1
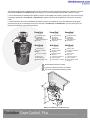
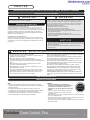
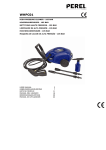
D A N G E R indicates a hazardous
situation which, if not avoided, will result in
death or serious injury.
WA R N I N G indicates a hazardous
situation which, if not avoided, could result
in death or serious injury.
C A U T I O N indicates a hazardous
situation which, if not avoided, could result
in minor or moderate injury.
N OT I C E
is used to address practices
not related to personal injury.
SAFETY
INSTRUCTIONS
(or equivalent) signs
indicate specific safetyrelated instructions or procedures.
PELIGRO indica una situación
peligrosa que, si no se evita, provocará
lesiones graves o incluso la muerte.
ADVERTENCIA indica una situación
riesgosa, la cual, si no se evita, puede
ocasionar lesiones graves o incluso
la muerte.
PRECAUCIÓN indica una situación
riesgosa, la cual, si no se evita, puede
provocar heridas leves o moderadas.
AV I S O
hace referencia a
prácticas que no presentan riesgos de
generar lesiones personales.
INSTRUCCIONES
PARA SU
SEGURIDAD
(o equivalentes) son
señales que designan
instrucciones o
procedimientos específicos de seguridad.
DA NGER
indique une situation
dangereuse qui, si elle n’est pas évitée,
entraînera la mort ou une blessure grave.
AVERTISSEMENT indique une
situation dangereuse qui, si elle n’est pas
évitée, pourrait entraîner la mort ou une
blessure grave.
EVOLUTION
COVER CONTROL® PLUS
COVE RE D ACT I VATI O N FO O D WAST E DI S P OS E R
MISE EN GARDE indique une
situation dangereuse qui, si elle n’est pas
évitée, pourrait entraîner une blessure
mineure ou modérée.
AV I S
est utilisé pour décrire
des pratiques qui ne sont pas liées à des
blessures.
DIRECTIVES DE
SÉCURITÉ
(ou l'équivalent) ces
panneaux indiquent des
directives ou des procédures concernant
spécifiquement la sécurité.
TRI TU RA D O R DE D ESP E RDIC I OS DE A L I ME N TOS
ACTI VA DO PO R TA P Ó N
BR OYEUR DE DÉ C H E TS À ACT I VATIO N CO U VE RTE
77084 Rev B
Evolution Cover Control Plus
®
Covered Activation Food Waste Disposer/Triturador de Desperdicios de Alimentos Activado por Tapón/Broyeur de Déchets À Activation Couverte
1
The Evolution Series® by InSinkErator® sets the standard in sound and grind performance. Featuring exclusive
patented SoundSeal® and MultiGrind® technologies, no food waste disposer grinds more with less noise.
La serie Evolution® de InSinkErator® define la norma en desempeño de sonido y trituración. Con las exclusivas
tecnologías patentadas SoundSeal® y MultiGrind®, ningún triturador de desperdicios tritura más con menos
ruido.
La série Evolution Series® d'InSinkErator® établit la norme en matière de son et de rendement de broyage.
Caractérisée par des technologies exclusives brevetées SoundSeal® et MultiGrind®, aucun autre broyeur ne
broie plus de déchets aussi silencieusement.
®
®
SoundSeal
Technology
6
5
®
SoundSeal
SoundSeal
Tecnología
Technologie
1
Anti-Vibration Mount
1
Anti-Vibration Mount
1
Anti-Vibration Mount®
2
Anti-Vibration
Tailpipe Mount™
2
Anti-Vibration
Tailpipe Mount™
2
Anti-Vibration
Tailpipe Mount™
3
Multi-Layer SoundLimiter™
Insulation
3
Aislamiento Multi-Layer
SoundLimiter™
3
Isolation Multi-Layer
SoundLimiter™
®
®
1
®
®
4
7
2
3
®
Multi Grind
Multi Grind
Multi Grind
Technology
Tecnología
Technologie
4
GrindShear Ring®
4
GrindShear Ring®
4
GrindShear Ring®
5
Magnetic CoverStart®
Switch
5
Interruptor magnético
CoverStart®
5
Interrupteur magnétique de
CoverStart®
6
Quick Lock® Sink Mount
6
Montaje del fregadero
Quick Lock®
6
Outil de montage
Quick Lock®
7
Stainless Steel
Grind Components
7
Componentes de trituración
de acero inoxidable
7
Composants de broyage
en acier inoxydable
8
3/4 HP Dura-Drive® Motor
8
Motor Dura-Drive® de 3/4 HP
8
Moteur robuste à 0,56 kW
Dura-Drive®
8
!
!
Read all warnings before proceeding.
!
Lire tous les avertissements avant de procéder.
Lea todas las advertencias antes de continuar.
"
10
Update
Image
97
/16
1
16
/4"
"
4"
53
/4"
Dimensions/Dimensiones/Dimensions
Evolution Cover Control Plus
®
Covered Activation Food Waste Disposer/Triturador de Desperdicios de Alimentos Activado por Tapón/Broyeur de Déchets À Activation Couverte
2
Includes/Incluye/Comprend
A
Disposer/Triturador/Broyeur
B
Stopper
Lower Mounting Ring
Anillo de montaje inferior
Anneau de montage inférieur
Anti-Vibration Mount®
Anti-Vibration Mount®
Anti-Vibration Mount®
Tapón
Bouchon
C
Sink Flange
Brida del fregadero
Collet d’évier
Dishwasher Inlet
Entrada del lavaplatos
Entrée du lave-vaisselle
D
Fiber Gasket
Junta de fibra
Joint de fibre
E
Backup Flange
Brida de soporte
Bride de retenue
Anti-Vibration
Tailpipe Mount™
Anti-Vibration
Tailpipe Mount™
Anti-Vibration
Tailpipe Mount™
F
Mounting Ring
Anillo de montaje
Anneau de montage
G1
1-1/2” Screws
Tornillos de 3,8 cm
Vis de 3,8 cm
G2
H
1-1/8” Screws
I
Failure to use the spring type
hose clamp provided voids
warranty./La garantía pierde validez
si no usa la abrazadera de manguera
tipo resorte incluida./Le fait de ne
pas utiliser la bride de serrage à
ressort annule la garantie.
or/
o/ou
J
Spring Type Hose Clamp
Abrazadera de manguera
tipo resorte/Bride de
serrage à ressort
K
Discharge Tube
Tornillos de 2,8 cm
Vis de 2,8 cm
Snap Ring
Anillo de cierre
Anneau élastique
Jam-Buster™ Wrench
Llave Jam-Buster™
Clé Jam-Buster™
Tubo de descarga
Tuyau de vidange
L
Discharge Tube
Tubo de descarga
Tuyau de vidange
Tools and Materials/Herramientas y materiales/Outils et pièces
Not Included/No incluidos/Non compris
Cable Connector
Plumbers putty
Conector para cable Masilla de plomería
Connecteur de câble Mastic de plomberie
Wire Nuts
Tuercas para cables
Serre-fils
Evolution Cover Control Plus
®
Covered Activation Food Waste Disposer/Triturador de Desperdicios de Alimentos Activado por Tapón/Broyeur de Déchets À Activation Couverte
3
Removal of old disposer/Extracción del triturador viejo/Retrait de l’ancien broyeur
WARNING/ADVERTENCIA/
AVERTISSEMENT
SHOCK HAZARD
Turn off electric power at fuse box or
circuit breaker.
PELIGRO DE DESCARGA ELÉCTRICA
Desconecte el suministro eléctrico
desde la caja de fusibles o del
interruptor de circuito.
DANGER D’ÉLECTROCUTION
Couper l’alimentation électrique au
boîtier de fusibles ou de disjoncteurs.
3
WARNING
ADVERTENCIA
AVERTISSEMENT
Falling Hazard
Peligro de caída
Danger de chute
If you are replacing an
existing disposer, continue
to Step 2. If there is no
existing disposer, disconnect
sink drain and skip to Step 9.
1
2
Si tiene que reemplazar un triturador
existente, continúe con el paso 2. Si no
existe un triturador, desconecte el
desagüe del fregadero y continúe con el
Paso 9.
En cas de remplacement d’un broyeur
existant, passer à l’étape 2. Dans le cas
contraire, déconnecter le drain de
l’évier et passer à l’étape 9.
4
Disconnect drain trap from waste
discharge tube. Disconnect dishwasher if
connected to the disposer./Desconecte la
trampa de desagüe del tubo de descarga
de desperdicios. Desconecte el lavaplatos
si está conectado al triturador./
Déconnecter le robinet de vidange du tube
de vidange. Déconnecter le lave-vaisselle
s’il est connecté au broyeur.
5
I
Support disposer, insert end of
Jam-Buster™ Wrench (I) into right side
of mounting lug, and turn. Disposer will fall
free./Apoye el triturador, inserte el
extremo de la Llave Jam-Buster™ (I) en
el lado derecho de uno de los salientes
de montaje y gire. El triturador se
liberará./Soutenir le broyeur, insérer
l’extrémité de la Clé Jam-Buster™ (I) dans
le côté droit de l’écrou de montage et
tourner. Le broyeur chutera librement
en place.
Flip disposer over and remove electrical
cover plate. Save cable connector if
applicable./Dé vuelta al triturador y retire
la placa de protección eléctrica. Guarde el
conector del cable si corresponde./
Renverser le broyeur et retirer la plaque
électrique. Conserver le connecteur de
câble s’il y a lieu.
Disconnect the disposer wires from the
electrical supply./Desconecte del
suministro eléctrico los cables del
triturador./Débrancher les fils du broyeur
de l’alimentation électrique.
Evolution Cover Control Plus
®
Covered Activation Food Waste Disposer/Triturador de Desperdicios de Alimentos Activado por Tapón/Broyeur de Déchets À Activation Couverte
4
If the new disposer mounting is the
same as the old one, you can go to
Step 14.
7
6
Note: For sinks thicker than 3/8”, you
will need to replace existing 1-1/2”
screws with 1-1/8” screws (G2). See
Step 13.
Si el montaje del triturador nuevo es el
mismo que el del viejo, puede ir al
Paso 14.
Nota: Para los fregaderos con espesor
mayor a 0.9 cm, deberá reemplazar los
tornillos existentes de 3.8 cm por
tornillos de 2.8 cm (G2). Consulte el
Paso 13.
Si le nouveau broyeur est similaire à
l’ancien broyeur, pas-ser à l’étape 14.
Using a flathead screwdriver, loosen the
3 screws on the mounting assembly./
Con un destornillador de punta plana, afloje
los 3 tornillos del conjunto de montaje./
Au moyen d’un tournevis à tête plate,
desserrer les trois vis du montage de base.
Using a flathead screwdriver, pry off the
snap ring./Con un destornillador de punta
plana, saque el anillo de cierre./Au moyen
d’un tournevis à tête plate, retirer l’anneau
élastique.
Remarque : Pour les éviers de plus de
0,9 cm d’épaisseur, il faut remplacer
les vis de 3,8 cm existantes par des vis
de 2,8 cm (G2). Voir l’étape 13.
8
Remove flange from sink. Remove old
plumber’s putty from sink with putty
knife./Retire la brida del fregadero. Retire
la masilla de plomería vieja del fregadero
con una espátula para masilla./Retirer le
collet de l’évier. Enlever le mastic de
plomberie usagé au moyen d’un couteau
à mastic.
Evolution Cover Control Plus
®
Covered Activation Food Waste Disposer/Triturador de Desperdicios de Alimentos Activado por Tapón/Broyeur de Déchets À Activation Couverte
5
Installation Instructions/Instrucciones de Instalación/Instructions d’Installation
9
11
10
C
D
C
E
C
G
I
F
Evenly apply 1/2” thick rope of plumber’s
putty around flange (C)./Aplique una tira
gruesa de masilla de plomería, de 1.3 cm,
en forma uniforme alrededor de la brida
(C)./Appliquer uniformément un cordon de
mastic de plomberie de 1,3 cm d’épaisseur
autour du collet (C).
Press flange (C) firmly into sink drain.
Remove excess putty./Presione la brida (C)
firmemente en el desagüe del fregadero.
Retire la masilla sobrante./Enfoncer le
collet (C) fermement dans le drain de
l’évier. Enlever l’excès de mastic.
< 3/8”
13
12
E
G1
Optional/
Opcional/
Facultatif
F
Insert fiber gasket (D), backup flange (E)
and mounting ring (F). Hold flange (C) in
place while inserting snap ring (I)./Inserte
la junta de fibra (D), la brida de soporte (E)
y el anillo de montaje (F). Sostenga la brida
(C) en su lugar mientras inserta el anillo de
cierre (I)./Insérer le joint fibreux (D), la
bride de retenue (E) et l’anneau de
montage (F). Tenir la bride (C) en place
pendant l’insertion du jonc de blocage (I).
14
Stop and read
Deténgase y lea
*
Arrêter et lire
1-1/2”
A
> 3/8”
H
E
G2
Place a weight such as the disposer on the
sink flange to hold it in place. Use a towel
to prevent scratching sink. Pull snap ring
(H) open and press firmly until it snaps into
place./Coloque un peso, por ejemplo el
triturador, sobre la brida del fregadero para
mantenerla en su lugar. Utilice una toalla
para evitar que se raye el fregadero.
Abra el anillo de cierre (H) y presione
firmemente hasta que se coloque en el
lugar./Placer un poids tel que le broyeur
sur le collet de l’évier pour le maintenir en
place. Utiliser une serviette pour éviter
d’égratigner l’évier. Ouvrir le jonc de
blocage (H) et appuyer fermement jusqu’à
ce qu’il s’enclenche.
F
1-1/8”
Tighten 1-1/2” screws (G1) evenly and firmly
against backup flange. Use shorter 1-1/8”
screws (G2) if sink is more than 3/8”thick./
Ajuste los tornillos de 3.8 cm (G1) en forma
uniforme y firme contra la brida de soporte.
Utilice tornillos más cortos de 2.8 cm (G2)
si el fregadero tiene más de 0.9 cm de
espesor./Serrer les vis de 3,8 cm (G1)
uniformément et fermement contre la bride
de retenue. Utiliser les vis plus courtes de
2,8 cm (G2) si l’épaisseur de l’évier dépasse 0,9 cm.
* NOTICE: DISHWASHER CONNECTION
ONLY. If you do not need to attach the
dishwasher, go to Step 16. Turn disposer (A)
onto side and insert screwdriver into
dishwasher inlet./* AVISO: SÓLO PARA
CONEXIÓN DEL LAVAPLATOS. Si no es
necesario conectar el lavaplatos, pase
al Paso 16. Voltee el triturador (A) sobre
un lado e introduzca el destornillador en
la entrada del lavaplatos./* AVIS :
CONNECTION DU LAVE-VAISSELLE
UNIQUEMENT. S’il n’est pas nécessaire
de connecter le lave-vaisselle, passer à
l’étape 16. Mettre le broyeur (A) sur le flanc
puis insérer un tournevis dans l’avaloir
du lave-vaisselle.
Evolution Cover Control Plus
®
Covered Activation Food Waste Disposer/Triturador de Desperdicios de Alimentos Activado por Tapón/Broyeur de Déchets À Activation Couverte
6
15
*
16
* NOTICE: DISHWASHER CONNECTION
ONLY. Knock out drain plug and remove
plug from inside of disposer./* AVISO:
SÓLO PARA LA CONEXIÓN DEL
LAVAPLATOS. Extraiga de un golpe la
tapa ciega de desagüe del interior del
triturador./* AVIS : CONNECTION DU
LAVE-VAISSELLE UNIQUEMENT. Faire
tomber le bouchon du drain et enlever le
bouchon qui se trouve à l’intérieur du
broyeur.
18
17
Turn disposer over and remove electrical
cover plate. Pull out wires. * NOTICE: DO
NOT REMOVE CARDBOARD SHIELD./
Dé vuelta el triturador y retire la placa
protectora eléctrica. Saque los cables. *
AVISO: NO RETIRE LA PROTECCIÓN DE
CARTÓN./Renverser le broyeur et enlever
la plaque électrique. Extraire les fils
électriques. * AVIS : NE PAS ENLEVER
L’ÉCRAN DE CARTON.
19
*
1
Insert cable connector (not included)
and run electrical cable through access
hole on bottom of disposer. Tighten cable
connector./Introduzca el conector del
cable (no incluido) y pase el cable eléctrico
a través del orificio de acceso en la parte
inferior del triturador. Ajuste el conector
del cable./Insérer le connecteur de câble
(non compris) et faire passer le câble
électrique par le trou d’accès qui se trouve
au bas du broyeur. Serrer le connecteur
de câble.
20
2
DO NOT cut or disconnect any wires.
NO corte ni desconecte ningún cable.
Ne couper ou débrancher AUCUN fil.
This disposer requires a switch (15 amp minimum
rating) with a marked “Off” position (wired to
disconnect all ungrounded supply conductors)
installed within sight of the disposer sink
opening, except if using an air switch or batch
feed accessory, or batch feed disposer./Este
triturador requiere un interruptor (capacidad
mínima de 15 amperios) con la posición “Off”
marcada (cableado para desconectar todos los
conductores de suministro no conectados a
tierra) e instalado no muy lejos de la abertura del
fregadero para el triturador, salvo si se utiliza un
interruptor de aire o un accesorio o un triturador
de carga por tandas./Ce broyeur nécessite un
commutateur (puissance nominale minimum de
15 ampères) avec une position marquée « Off »
(câblé de manière à débrancher tous les
conductions d’alimentation non mis à la terre)
installé en vue de l’ouverture d’évier du broyeur,
sauf si un commutateur de débit d’air ou un
accessoire d’alimentation par lot ou un broyeur
d’alimentation par lot sont utilisés.
* WARNING! Improper grounding can result in electric
shock hazard. Connect white wire from disposer to
neutral (white) wire from power source and black wire
from disposer to hot (black, red) wire from power source
with wire nuts (not included); ground wire to green
grounding screw. Unit must be grounded for safe and
proper installation./* ADVERTENCIA: La conexión
incorrecta a tierra puede representar un riesgo de
descarga eléctrica. Conecte el cable blanco del triturador
al cable neutro (blanco) de la fuente de energía, y el cable
negro del triturador al cable vivo (negro, rojo) de la fuente
de energía, use para ello tuercas para cable (no incluidas);
finalmente, una el cable de conexión a tierra con el
tornillo verde conectado a tierra. La unidad debe estar
conectada a tierra para una instalación segura y
adecuada./* AVERTISSEMENT : Une mise à la terre
inefficace peut entraîner un risque de choc électrique.
Raccordez le fil blanc du broyeur au fil neutre (blanc) de
la source d’alimentation et le fil noir du broyeur au fil sous
tension (noir ou rouge) de la source d’alimentation au
moyen de serre-fils (non inclus); mettez le fil à la terre au
moyen de la vis verte de mise à la terre. L’unité doit être
mise à la terre pour assurer une installation adéquate et
sûre.
Push wires into disposer (do not displace
cardboard shield) and replace electrical
cover plate./Coloque los cables dentro del
triturador (no desplace la protección de
cartón) y vuelva a colocar la placa
protectora eléctrica./Pousser les fils dans
le broyeur (ne pas déplacer l’écran de
carton) et replacer la plaque électrique.
Evolution Cover Control Plus
®
Covered Activation Food Waste Disposer/Triturador de Desperdicios de Alimentos Activado por Tapón/Broyeur de Déchets À Activation Couverte
7
21
J*
23
22
K
L
Place tube (K or L) into Anti-Vibration
Tailpipe Mount™. Use provided tubes for
best results. Secure with spring type hose
clamp (J). * NOTICE: Failure to use the
spring type hose clamp provided voids
warranty./Coloque el tubo (K o L) dentro del
Anti-Vibration Tailpipe Mount™. Fije con la
abrazadera de manguera tipo resorte (J).
* AVISO: La garantía pierde validez si no
usa la abrazadera de manguera tipo
esorte incluida./Placer le tuyau (K ou L)
dans le dispositif Anti-Vibration Tailpipe
Mount™. Utiliser les tuyaux fournis pour
obtenir de meilleurs resultats. Fixer avec la
bride de serrage à ressort (J). * AVIS : Le
fait de ne pas utiliser la bride de serrage à
ressort annule la garantie.
24
Hang disposer by aligning 3 mounting tabs
with slide-up ramps on mounting ring./
Sostenga el triturador y alinee las 3
lengüetas de montaje con las rampas
deslizables sobre el anillo de montaje./
Accrocher le broyeur en alignant les 3
onglets de montage avec les glissières de
l’anneau de montage.
25
Turn lower mounting ring until all 3
mounting tabs lock over the ridges on the
slide-up ramps./Gire el anillo de montaje
inferior hasta que las tres lengüetas de
montaje se fijen sobre los bordes de las
rampas de deslizamiento ascendente./
Tourner l'anneau de montage inférieur
jusqu'à ce que les 3 pattes de montage
s'enclenchent sur les arêtes des
inclinaisons de remontée.
26
K
B
Model Evolution 18005585700
05081500028
L
You may need to trim tube for proper fit.
Reconnect plumbing (and dishwasher
connection if used). Make sure AntiVibration Tailpipe Mount™ is straight./Es
posible que deba recortar el tubo para
una colocación adecuada. Reconecte la
plomería (y la conexión del lavaplatos, si
utiliza uno). Asegúrese de que el AntiVibration Tailpipe Mount™ esté derecho./
Le tuyau devra peut-être être coupé pour
s’ajuster correctement. Reconnecter la
plomberie (et le lave-vaisselle s’il y a lieu).
S’assurer que le dispositif Anti-Vibration
Tailpipe Mount™ est bien droit.
AMPS 8.1 HP 3/4
Volts 120 Hz 60 1PH
InSinkErator
Emerson Electric
Racine, WI 53406
Stopper orientation
Orientación del tapón
Orientation du bouchon
Model Evolution
05081500028
18005585700
Detach removable portion of spec label
and place on a visible location./Corte la
parte desmontable de la etiqueta de
especificaciones y colóquela en un lugar
visible./Détacher la partie détachable de
l’étiquette de spécifications et la placer
dans un endroit bien visible.
Insert stopper (B) into sink opening in the
fully sealed position and fill sink with water.
Remove stopper and check for leaks. For
more detail refer to operating instructions./
Introduzca el tapón (B) en la abertura del
fregadero en una posición que selle el
fregadero totalmente y llénelo de agua.
Retire el tapón y controle si hay fugas de
agua. Si desea conocer más detalles, consulte
las instrucciones de operación./Insérer le
bouchon (B) dans l'ouverture de l'évier en
position entièrement scellée et remplir l'évier
d'eau. Retirer le bouchon et s’assurer qu’il
n’y a pas de fuites. Pour de plus amples
renseignements, se reporter aux directives
d’utilisation.
Evolution Cover Control Plus
®
Covered Activation Food Waste Disposer/Triturador de Desperdicios de Alimentos Activado por Tapón/Broyeur de Déchets À Activation Couverte
8
OPERATING INSTRUCTIONS/INST RUCCIONES DE OPERACION/
MOD E D’ EM PLOI
ENGLISH
1. Place food waste into disposer grind chamber. Do not pack chamber
with waste. Run a strong flow of cold water and place stopper back in
sink opening.
2. Place stopper in the SEALED (down) position. (See Figure A).
3. Turn the stopper clockwise. The stopper will raise into the PARK
position, allowing water to flow into the disposer grind chamber.
(See Figure B).
Figure A
4. With stopper in PARK position, continue turning stopper clockwise
until disposer RUNS. (See Figure C).
5. After grinding, turn the stopper counter-clockwise into the PARK
position, allowing water to flow into the disposer grind chamber.
6. To return to the SEALED position, continue turning stopper
counter-clockwise until stopper drops down and seals the drain.
NOTE: Stopper must be in SEALED position to be removed.
Figure B
PARK
SEALED
Figure C
RUN
1
2
ESPAÑOL
1. Coloque los desperdicios de comida en la cámara de trituración del
triturador. Tenga cuidado de que la cámara no quede llena de residuos. Deje
circular un buen volumen de agua fría y coloque el tapón nuevamente en la
abertura del fregadero.
2. Coloque el tapón en posición SEALED (sellado) (hacia abajo). (Ver Figura A).
3. Gire el tapón en el sentido de las agujas del reloj. El tapón se levantará
hacia la posición PARK (detenido), para permitir que el agua circule
hacia la cámara de trituración del triturador. (Ver Figura B).
Figura A
4. Con el tapón en la posición PARK (detenido), siga girándolo en el
sentido de las agujas del reloj hasta que llegue a la posición RUN (en
funcionamiento). (Ver Figura C).
5. Después de la trituración, gire el tapón en el sentido contrario a las
agujas del reloj hacia la posición PARK (detenido), para permitir que el
agua circule hacia la cámara de trituración del triturador.
6. Para volver a la posición SEALED (sellado), siga girando el tapón en el
sentido contrario a las agujas del reloj hasta que caiga y selle el drenaje.
NOTA: El tapón debe estar en posición SEALED (sellado) para retirarlo.
Figura C
Figura B
SEALED
(sellado)
PARK
(detenido)
1
RUN
(en funcionamiento)
2
FRANÇAIS
1. Placer les déchets alimentaires dans la cuve de broyage du broyeur.
Ne pas la remplir de déchets. Faire couler un fort débit d’eau froide et
replacer le bouchon dans l’ouverture de l’évier.
2. Placer le bouchon en position SCELLÉE (vers le bas). (Se reporter à la
Figure A.)
3. Tourner le bouchon dans le sens horaire. Le bouchon se soulèvera en
position d'ARRÊT pour laisser l'eau s'écouler dans la cuve de broyage
du broyeur. (Se reporter à la Figure B.)
Figure A
4. Avec le bouchon en position ARRÊT, continuer de le tourner dans le
sens horaire jusqu'à ce que le broyeur se mette en MARCHE. (Se
reporter à la Figure C.)
5. Après le broyage, tourner le bouchon dans le sens antihoraire
jusqu'à la position d'ARRÊT pour laisser l'eau s'écouler dans la cuve
de bro-yage du broyeur.
6. Pour revenir à la position SCELLÉE, continuer à tourner le bouchon
dans le sens antihoraire jusqu'à ce qu'il s'enfonce et scelle le drain.
REMARQUE : le bouchon doit être en position SCELLÉE pour l'enlever.
Figure B
ARRÊT
SCELLÉE
Figure C
MARCHE
1
2
Evolution Cover Control Plus
®
Covered Activation Food Waste Disposer/Triturador de Desperdicios de Alimentos Activado por Tapón/Broyeur de Déchets À Activation Couverte
9
ENGLISH
INSTRUCTIONS PERTAINING TO RISK OF FIRE, ELECTRIC SHOCK, OR INJURY TO PERSONS
IMPORTANT SAFETY INSTRUCTIONS
WARNING
WARNING
Personal Injury: Do not position your head or body under disposer;
unit could fall during removal or installation.
GROUNDING INSTRUCTIONS
For all grounded, cord-connected disposers:
This disposer must be grounded to reduce the risk of electric shock in the
event of a malfunction or breakdown. Grounding provides a path of least
resistance for electric current. This disposer is equipped with a cord having an
equipment-grounding conductor and a grounding plug. The plug must be
plugged into an outlet that is properly installed and grounded in accordance
with all local codes and ordinances.
For permanently connected disposers:
This disposer must be connected to a grounded, metal, permanent wiring
system; or an equipment-grounding conductor must be run with the circuit
conductors and connected to the equipment-grounding terminal or lead on
the disposer.
WARNING
Improper connection of the equipment-grounding conductor can result in
a risk of electric shock. Check with a qualified electrician or serviceman if
you are in doubt as to whether the disposer is properly grounded. If the
plug provided with the disposer does not fit the outlet, do not modify the
plug or attempt to force the plug into the outlet – have a proper outlet
installed by a qualified electrician.
• This disposer must be properly grounded.
• Do not attach ground wire to gas supply line.
• Disconnect power before installing or servicing disposer.
• If three-prong grounded plug is used, plug must be inserted into threehole grounded receptacle.
• All wiring must comply with local electrical codes.
• Do not reconnect electrical current at main service panel until proper
grounds are installed.
NOTICE
• Do not use plumber’s putty on any other disposer connection other than sink
flange. Do not use thread sealants or pipe dope. These may harm disposer and
cause property damage.
• Do not operate disposer without Anti-Vibration Tailpipe Mount™ as water
leaks may result.
When using electric appliances, basic precautions are always to be followed, including:
• Read all instructions before using the appliance.
• To reduce the risk of injury, close supervision is required when an
appliance is used near children.
• Do not put fingers or hands into a waste disposer.
• Turn the power switch to the off position before attempting to
clear a jam, removing an object from the disposer or pressing reset
button.
• When attempting to loosen a jam in a waste disposer, use the
self-service Jam-Buster™ Wrench.
• When attempting to remove objects from a waste disposer, use
long-handled tongs or pliers.
• Do not put the following into a disposer: clam or oyster shells,
caustic drain cleaners or similar products, glass, china, or plastic,
large (whole) bones, metal (such as bottle caps, steel shot, tin
cans, or utensils), hot grease or other hot liquids.
• When not operating a disposer, leave the stopper in place to reduce the
risk of objects falling into the disposer.
• This product is designed to dispose of normal household food waste;
inserting materials other than food waste into disposer could cause
personal injury and/or property damage.
• To reduce the risk of injury and/or property damage, do not use the
sink containing the disposer for purposes other than food preparation
(such as baby bathing or washing hair).
• Do not dispose of the following in the disposer: paints, solvents,
household cleaners and chemicals, automotive fluids, plastic wrap.
• FIRE HAZARD: Do not store flammable items such as rags, paper
or aerosol cans near disposer. Do not store or use gasoline or other
flammable vapors and liquids in vicinity of disposer.
• LEAK HAZARD: Regularly inspect disposer and plumbing fittings for
leaks, which can cause property damage and could result in personal
injury.
SAVE THESE INSTRUCTIONS
OPERATING INSTRUCTIONS
DO...
DON’T...
• First turn on cold water and then turn on the disposer. Continue
running cold water for several seconds after grinding is completed to
flush the drain line.
• Grind hard materials such as small bones, fruit pits, and ice. A
scouring action is created by the particles inside the grind chamber.
• Grind peelings from citrus fruits to freshen up drain smells.
• Use a disposer cleaner, degreaser, or deodorizer as necessary to
relieve objectionable odors caused by grease build-up.
• DON’T POUR GREASE OR FAT DOWN YOUR
Stop and read
DISPOSER OR ANY DRAIN. IT CAN BUILD UP IN
Deténgase
y lea
PIPES AND CAUSE DRAIN BLOCKAGES. PUT
GREASE IN A JAR OR CAN AND DISPOSE IN THE
Arrêter et lire
TRASH.
• Don’t use hot water when grinding food waste. It is
OK to drain hot water into the disposer between
grinding periods.
• Don’t fill disposer with a lot of vegetable peels all at once. Instead, feed into
disposer in multiple batches.
• Don’t grind large amounts of egg shells or fibrous materials like corn husks,
artichokes, etc., to avoid possible drain blockage.
• Don’t turn off disposer until grinding is completed and only sound of motor
and water is heard.
Evolution Cover Control Plus
®
Covered Activation Food Waste Disposer/Triturador de Desperdicios de Alimentos Activado por Tapón/Broyeur de Déchets À Activation Couverte
10
USER-MAINTENANCE INSTRUCTIONS
CLEANING DISPOSER
Over time, food particles may accumulate in the grind chamber and baffle. An odor from the disposer is usually a sign of food buildup. To clean disposer:
1. Place stopper in sink opening and fill sink halfway with warm water.
2. Mix 1/4 cup baking soda with water. Turn disposer on to wash away loose particles.
3. Stopper may be cleaned by hand or in dishwasher.
Disposers may also be cleaned with Disposer Care®. This product is not sold by InSinkErator®, but is generally available in major home centers, hardware, and grocery
stores. For more information on Disposer Care®, contact Summit Brands at 1-888-476-6688 or www.summitbrands.com.
NOTE: Magnets in Stopper can attract shavings from steel wool pads, use tape to remove.
RELEASING DISPOSER JAM
If motor stops while disposer is operating, disposer may be jammed. To release jam:
1. Turn off disposer and water.
2. Insert one end of self-service Jam-Buster™ Wrench into center hole on bottom of disposer (see Figure D). Work Jam-Buster™ Wrench back and forth until it turns
one full revolution. Remove Jam-Buster™ Wrench.
3. Reach into disposer with tongs and remove object(s). Allow disposer motor to cool for 3 - 5 minutes, then lightly push red reset button on disposer bottom (see
Figure E). (If motor remains inoperative, check service panel for tripped circuit breakers or blown fuses.)
Figure D
Figure E
7 YEAR IN-HOME FULL SERVICE LIMITED WARRANTY
This limited warranty is provided by InSinkErator®, a business unit of Emerson Electric Co.,
(“InSinkErator” or “Manufacturer” or “we” or “our” or “us”) to the original consumer owner
of the InSinkErator product with which this limited warranty is provided (the “InSinkErator
Product”), and any subsequent owner of the residence in which the Product was originally
installed (“Customer” or “you” or “your”).
InSinkErator warrants to Customer that your InSinkErator Product will be free from defects in
materials and workmanship, subject to the exclusions described below, for a period of 7 years
(the “Warranty Period”), commencing on the later of: (a) the date your InSinkErator Product is
originally installed, (b) the date of purchase, or (c) the date of manufacture as identified by
your InSinkErator
Product serial number. You will be required to show written documentation supporting (a) or
(b). If you are unable to provide documentation supporting either (a) or (b), the Warranty
Period commencement date will be determined by Manufacturer, in its sole and absolute
discretion, based upon your InSinkErator Product serial number.
What is Covered
This limited warranty covers defects in materials or workmanship, subject to the exclusions
below, in InSinkErator Products used by a consumer Customer for residential use only, and
includes all replacement parts and labor costs. YOUR SOLE AND EXCLUSIVE REMEDY
UNDER THIS LIMITED WARRANTY SHALL BE LIMITED TO REPAIR OR REPLACEMENT OF
THE INSINKERATOR PRODUCT.
What is not Covered
This limited warranty does not extend to and expressly excludes:
• Losses or damages or the inability to operate your InSinkErator Product resulting from
conditions beyond the Manufacturer’s control including, without limitation, accident,
alteration, misuse, abuse, neglect, negligence (other than Manufacturer’s), failure to
install, maintain, assemble, or mount the InSinkErator Product in accordance with
Manufacturer’s instructions or local electrical and plumbing codes.
• Wear and tear expected to occur during the normal course of use, including without
limitation, cosmetic rust, scratches, dents or comparable and reasonably expected
losses or damages.
In addition to the above exclusions, this limited warranty does not apply to InSinkErator
Products installed in a commercial or industrial application.
No Other Express Warranty Applies
This limited warranty is the sole and exclusive warranty provided to the Customer
identified above. No other express warranty, written or verbal, applies. No employee, agent,
dealer, or other person is authorized to alter this limited warranty or make any other
warranty on behalf of Manufacturer. The terms of this limited warranty shall not be
modified by the Manufacturer, the original owner, or their respective successors or assigns.
What we will do to Correct Problems
If your InSinkErator Product does not operate in accordance with the documentation provided
to you, or you have questions concerning your InSinkErator Product or how to determine when
service is needed, please call the toll free InSinkErator AnswerLine™ at 1 (800) 558-5700, or
visit our website at www.insinkerator.com. You may also notify us at: InSinkErator Service Center,
4700 21st Street, Racine, Wisconsin 53406 USA. The following information must be provided as
part of your warranty claim: your name, address, phone number, your InSinkErator Product model
and serial number, and if necessary, upon request, written confirmation of either: (a) the date
shown on your installation receipt, or (b) the date shown on your purchase receipt.
Manufacturer or its authorized service representative will determine, in its sole and absolute
discretion, if your InSinkErator Product is covered under this limited warranty. You will be given
the contact information for your closest authorized InSinkErator Service Center. Please contact
your InSinkErator Service Center directly to receive in home warranty repair or replacement
service. Only an authorized InSinkErator service representative may provide warranty service.
InSinkErator is not responsible for warranty claims arising from work performed on your
InSinkErator Product by anyone other than an authorized InSinkErator service representative.
If a covered claim is made during the Warranty Period, Manufacturer will, through its authorized
service representative, either repair or replace your InSinkErator Product. Cost of replacement
parts or a new InSinkErator Product, and cost of labor for repair or installation of the
replacement InSinkErator Product are provided at no cost to you. Repair or replacement shall
be determined by Manufacturer or its authorized service representative in their sole discretion.
All repair and replacement services will be provided to you at your home. If Manufacturer
determines that your InSinkErator Product must be replaced rather than repaired, the limited
warranty on the replacement InSinkErator Product will be limited to the unexpired term
remaining in the original Warranty Period.
Limitation of Liability
TO THE EXTENT PERMITTED BY LAW, IN NO EVENT SHALL MANUFACTURER OR ITS
AUTHORIZED SERVICE REPRESENTATIVES BE LIABLE FOR ANY INCIDENTAL, SPECIAL,
INDIRECT, OR CONSEQUENTIAL DAMAGES, INCLUDING ANY ECONOMIC LOSS, WHETHER
RESULTING FROM NONPERFORMANCE, USE, MISUSE OR INABILITY TO USE THE
INSINKERATOR PRODUCT OR THE MANUFACTURER’S OR ITS AUTHORIZED SERVICE
REPRESENTATIVE’S NEGLIGENCE. MANUFACTURER SHALL NOT BE LIABLE FOR
DAMAGES CAUSED BY DELAY IN PERFORMANCE AND IN NO EVENT, REGARDLESS OF
THE FORM OF THE CLAIM OR CAUSE OF ACTION (WHETHER BASED IN CONTRACT,
INFRINGEMENT, NEGLIGENCE, STRICT LIABILITY, OTHER TORT OR OTHERWISE), SHALL
MANUFACTURER'S LIABILITY TO YOU EXCEED THE PRICE PAID BY THE ORIGINAL
OWNER FOR THE INSINKERATOR PRODUCT.
The term “consequential damages” shall include, but not be limited to, loss of anticipated
profits, business interruption, loss of use or revenue, cost of capital or loss or damage to
property or equipment.
Some states do not allow the exclusion or limitation of incidental or consequential damages,
so the above limitation may not apply to you. This limited warranty gives you specific legal
rights and you may also have other rights which vary from state to state.
Food waste disposers provide an environmentally responsible alternative to transporting food waste to landfills. And they can help reduce
greenhouse gas emissions. At capable wastewater treatment plants, food waste can be converted to biosolids and used as fertilizer. Capable plants
can also recycle food waste into renewable energy. (Check the plant in your area.)
For U.S. www.insinkerator.com/green
For Canada www.insinkerator.ca
InSinkErator® may make improvements and/or changes in the specifications at any time, in its sole discretion, without notice or obligation and further
reserves the right to change or discontinue models.
The mounting collar configuration is a trademark of Emerson Electric Co.
Evolution Cover Control Plus
®
Covered Activation Food Waste Disposer/Triturador de Desperdicios
de Alimentos Activado por Tapón/Broyeur de Déchets À Activation Couverte
The Emerson logo is a trademark and service mark of Emerson Electric Co.
Printed in the U.S.A. © 2013 InSinkErator, a business unit of Emerson Electric Co. All Rights Reserved.
11