1
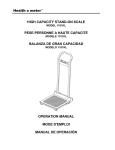
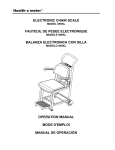
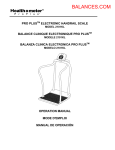
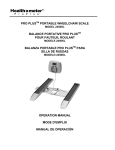
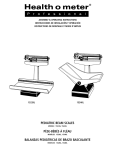
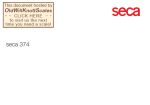
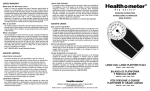
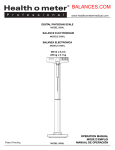
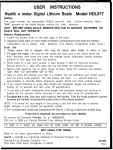
Health o meter P r o P l u sTM PRO PLUSTM NEONATAL PEDIATRIC SCALE MODEL 2200KL PESE-BEBE NEONATAL PRO PLUSTM MODELE 2200KL BALANZA PEDIATRICA NEONATAL PRO PLUSTM MODELO 2200KL OPERATION MANUAL MODE D'EMPLOI MANUAL DE OPERACIÓN PRO PLUSTM NEONATAL PEDIATRIC SCALE Thank you for your purchase of this product. Please read this manual carefully and keep it handy for ready reference. Merci d'avoir acheté ce produit. Veuillez lire attentivement ce manuel et le garder à portée de main pour pouvoir le consulter à tout moment Gracias por la adquisición de este producto. Lea por favor este manual cuidadosamente y manténgalo a su alcance para una pronta referencia. ENGLISH............................................................................................ 1 FRANÇAIS ......................................................................................... 11 ESPAÑOL .......................................................................................... 21 TABLE OF CONTENTS CAUTION AND WARNING.................................................................................................... 2 SPECIFICATIONS.................................................................................................................2 ASSEMBLY INSTRUCTIONS ............................................................................................... 3 SET UP.................................................................................................................................. 3 OPERATION INSTRUCTIONS.............................................................................................. 5 MAINTENANCE..................................................................................................................... 5 TROUBLESHOOTING........................................................................................................... 6 CALIBRATION PATH ............................................................................................................ 7 EXPLODED VIEW OF SCALE .............................................................................................. 8 PARTS LIST .......................................................................................................................... 9 WARRANTY .......................................................................................................................... 10 1 CAUTION AND WARNING • To prevent injury, never leave infant unattended while on the scale. • To prevent injury, do not transport the scale while the infant is in the weighing tray. • For accurate infant weighing the scale must be placed on a flat, stable surface. • For accurate weighing, verify proper operation according to the procedure described in this manual before each use. • Do not use in the presence of flammable materials. • Operating at other voltages and frequencies than specified could damage the equipment. • If the “LO BAT” indicator activates, for accurate weighing, connect the scale to an AC power source as soon as possible. SPECIFICATIONS GENERAL Health o meter’s Pro PlusTM Neonatal Pediatric Scale model 2200KL uses highly sophisticated microprocessor technology. Each precision instrument is designed to provide accurate, reliable and repeatable weight measurements and features that make the weighing process simple, fast and convenient. The actual weighing is performed by special motion sensing weighing-technology, to determine the weight of an active baby. The baby’s weight can be displayed in pounds/ounces or in kilograms. The weight is displayed until a reweighing is performed or until the scale zeros. The unit can be operated using its AC power adapter or by its rechargeable battery. SCALE SPECIFICATIONS Capacity and Resolution Power Requirements Environmental Physical Dimensions 0 - 12 Lb x 0.1 oz (0 - 6 Kg x 2 g) 12 - 30 Lb x 0.2 oz (6 - 15 Kg x 5 g) Adapter 120V AC - 60Hz 9V DC - 500mA Operating temperatures: 50°F to 95°F (10°C to 35°C) Storage temperatures: 30°F to 125°F (0°C to 50°C) Humidity: 85% Length: 22” (56 cm) Width: 16” (40.5 cm) Height: 7⅞” (20 cm) Weight: 20.2 Lb (9.2 Kg) 2 ASSEMBLY INSTRUCTIONS This 2200KL scale has been calibrated at the factory. It is shipped in two assembled parts, the weighing tray and the base assembly. Remove each assembly from its carton and unwrap packing material carefully to prevent scratching the unit’s parts. Figure 1. Assembly After Shipment 1. Place the base assembly on a steady surface. 2. Attach weighing tray to the base assembly. The scale may be operated by an AC power source adapter or its internal rechargeable battery. The scale will automatically switch to battery operation when an AC power source is absent. SET UP 1. 2. Plug the scale’s AC adapter into the back of the scale and into the power source. Press the ON/OFF button to turn the scale on. The display will show “start” and then ”0-00.0”. 3. When the self-test function is complete: • The digital display should read ”0-00.0”. • The CHARGE indicator should be illuminated on the display. • “LB” should be indicated on the right side of the display. (To change the default units of the scale to kilograms (Kg), please contact our Technical Support Center at 1.800.638.3722 or 1.708.598.9100). 4. Place a weight [not to exceed 15 Kg (30 Lb)] on the scale. The digital display should blink “ ----------- “ until the weight calculation is complete. 5. Press the LBS/KG button to select the weight mode, either in kilograms or pounds/ounces. 6. Press the REWEIGH button; the digital display should read again the weight of the item on the scale. 7. Remove the weight from the scale. The digital display should continue to read the weight of the item that was on the scale. 8. Press the ZERO button; the digital display should return to zero. 9. Disconnect the scale from the AC power source. The scale should automatically switch to its internal battery and the CHARGE indicator should turn off. NOTES: 1. If the set up procedure failed, go to the troubleshooting instructions. If the problem is not corrected, refer to qualified service personnel. 2. At the end of set up procedure, connect the scale to an AC power source for at least 8 hours for battery recharging. 3 SET UP Figure 2. Control Panel ITEM DESCRIPTION FUNCTION 1 ON/OFF button Turns scale ON and OFF. 2 REWEIGH button Allows repeated reweighing of infant. 3 ZERO button Zeros Digital Display prior to weighing. Enables the cancellation (tare) of weight of blankets or other accessories on the scale. 4 LBS/KG button Selects kilograms or pounds/ounces. 5 BAT indicator When ON, indicates scale battery requires recharging. Scale should be connected to an AC power source. 6 ZERO indicator When ON, indicates the scale is stable and ready for use. 7 Digital Display 6 Digit LCD Displays infant weight in kilograms or pounds/ounces as shown by the “LB” or “KG” indicator on the right side of the display. When REWEIGH button is depressed, display will blink “ ----------- ” until infant’s weight is determined. 8 CHARGE indicator Is ON when the scale is connected to AC power source and battery charging is in progress. 9 LB indicator When ON, indicates displaying weight in pounds/ounces. 10 KG indicator When ON, indicates displaying weight in kilograms. 4 OPERATION INSTRUCTIONS 1. 2. 3. 4. 5. Press the ON/OFF button to turn the scale on. Wait until ”0-00.0” appears on the digital display. Place a pad on the weighing tray. Make sure that the edges of the pad are on the tray and are not touching the surface on which the scale is positioned. Press the ZERO button to cancel the weight of a pad or other accessory that is on the weighing tray. Place the infant on the scale. The display will blink “ ----------- ” until the weight of the infant is determined. 6. Press the REWEIGH button to weigh the infant again (to achieve a more accurate result). 7. Remove the infant from the scale. The digital display should continue to read the infant’s weight until REWEIGH or ZERO button is pressed. NOTE: If the scale was not used for 2 minutes, the scale will turn off for power and batteries life saving. To restart the scale press the ON/OFF button. MAINTENANCE GENERAL This section provides instructions for maintenance, cleaning, troubleshooting and operator replaceable parts for the Pro PlusTM Neonatal Pediatric Scale Model 2200KL. Other maintenance operations than that described in this section should be performed by qualified service personnel. MAINTENANCE Before first use and after periods of non-use, check the scale for proper operation and function. If the scale does not operate correctly, refer to qualified service personnel. 1. 2. Check overall appearance of the total scale for any obvious damage, wear and tear. Inspect AC charger for cord cracking or fraying or for broken or bent prongs. CLEANING Proper care and cleaning is essential to ensure a long life of accurate and effective operation. Disconnect the scale from the AC power source. 1. Clean all external surfaces with a clean damp cloth or tissue. Mild soap and water solution may be used. Dry with a clean soft cloth. 2. Do not immerse the scale base into cleaning or other liquid solution. 3. Do not use Isopropyl Alcohol or other solutions to clean the display surface. 5 TROUBLESHOOTING Refer to the following instructions to check and correct any failure before contacting service personnel. SYMPTOM POSSIBLE CAUSE CORRECTIVE ACTION Scale does not turn on Dead Battery Connect scale to power source CHARGE indicator does not turn on 1. 2. Bad electricity socket Bad power supply 1. 2. Use a different socket Replace adapter Questionable weight or the scale does not zero 1. External object interfering with the weighing tray 1. Remove all objects/infant from the weighing tray 2. The weighing tray is not placed properly 2. Place the tray in its proper place 3. The display did not show ”0-00.0” before weighing 3. Remove infant, zero the scale and begin weighing process again 4. Scale is not placed on a stable surface 4. Place the scale on a stable surface and begin weighing process again 5. Scale is out of calibration 5. Check weight with known weight value The display shows “OL” The load on the scale exceeds the capacity Remove the excess weight and use the scale according to its limits The display shows “UL” The scale is in under-load condition Make sure the weighing tray is placed on the base The display shows “LO BAT” The rechargeable battery is low Recharge the battery according to instructions 6 CALIBRATION PATH The modes are accessible by holding certain keys pressed after power-up. The keys must be pressed and held for at least three seconds. 7 EXPLODED VIEW OF SCALE 8 PARTS LIST Key No. Part No. Description 1 2 3 4 5 6 7 8 9 10 11 12 13 14 15 16 17 18 19 20 21 22 23 24 25 26 27 28 29 30 31 32 33 34 35 36 2266401-0 3813701-0 WEIGHING TRAY ASSEMBLY SCALE COVER SCREW COVER MAIN BOARD BATTERY CABLE FACE PLATE PHIL. FLAT HEAD SCREW NC8*1/2 SUPPORT PLATE LOAD CELL SHIM FOR L.C. 2MM LOAD CELL BASE PAN PHIL. SCREW NC8*1/2” NUT NC 1/4" LOCK WASHER HEX. HEAD SCREW NC1/4”*3/4” HEX. HEAD SCREW NC1/4”*5/8” NUT M6 TRAY SUPPORT RUBBER SHOCK ABSORBER WEIGHING TRAY STAND HEX. SOCKET SET SCREW M6*12 ADAPTER UNIT 9VDC 120VAC ADAPTER UNIT-MAIN BOARD ASSEMBLY SCALE BASE HEX. SOCKET SCREW NC1/4”*5/8 RECHARGEABLE BATTERY 6V ROSETTE LEG HEAD SCREW M6*15 BATTERY COVER HANDLE ∅16*M3*7 PAN PHIL.SCREW M3*6 LOCK NUT M3 BATTERY HOLDER CLAMP CABLE TIE 10CM SQUARE COVER PLUG MODEL LABEL P.S.INLET LABEL 2138801-0 2032901-0 3513301-0 410709 3329101-0 2266301-0 2266501-0 410182 401149 3814001-0 3813101-0 Qty. 9 1 1 1 1 1 1 5 1 1 2 1 6 4 4 2 4 6 1 4 4 2 1 1 1 2 1 4 1 1 10 1 1 3 1 1 1 WARRANTY LIMITED WARRANTY What does the Warranty Cover? Pelstar LLC scales are warranted from date of purchase against defects of materials or in workmanship for a period of one (1) year. If product fails to function properly, return the product, freight prepaid and properly packed to Pelstar. See “To Get Warranty Service” below for instructions. If manufacturer determines that a defect of material or in workmanship exists, customers' sole remedy will be repair or replacement of scale at no charge. Replacement will be made with a new or remanufactured product or component. If the product is no longer available, replacement may be made with a similar product of equal or greater value. All parts including repaired and replaced parts are covered only for the original warranty period. Who is Covered? The original purchaser of the product must have proof of purchase to receive warranty service. Pelstar dealers or retail stores selling Pelstar products do not have the right to alter, or modify or any way change the terms and conditions of this warranty. What is Excluded? Your warranty does not cover normal wear of parts or damage resulting from any of the following: negligent use or misuse of the product, use on improper voltage or current, use contrary to the operating instruction, abuse including tampering, damage in transit, or unauthorized repair or alternations. Further, the warranty does not cover Acts of God, such as fire, flood, hurricanes and tornadoes. This warranty gives you specific legal rights, and you may also have other rights that vary from country to country, state to state, province to province or jurisdiction to jurisdiction. To get Warranty Service Make sure you keep your sales receipt or document showing proof of purchase. Call 1 (800) 815-6615 or 1 (708) 598-9100 to receive a return authorization number. Attach proof of purchase to your defective product along with your name, address, daytime telephone number and description of the problem. Carefully package the product and send with shipping and insurance prepaid to: Pelstar LLC Attention R/A#_____________ Repair Department 7400 W. 100th Place Bridgeview, IL 60455 If your scale is not covered by warranty, or has been damaged, an estimate of repair costs or replacement costs will be provided to you for approval prior to servicing or replacing. Pelstar LLC 7400 West 100th Place, Bridgeview IL 60455 • 1-800-815-6615 or 1-708-598-9100 www.healthometermedical.com Health o meter® is a registered trademark of Sunbeam Products Inc., Boca Raton, FL 33431 ProPlusTM is a registered trademark of Pelstar LLC 10 PESE-BEBE NEONATAL PRO PLUSTM TABLE DES MATIERES PRECAUTION ET PREVENTION ......................................................................................... 12 SPECIFICATIONS.................................................................................................................12 MODE D'ASSEMBLAGE ....................................................................................................... 13 INSTALLATION ..................................................................................................................... 13 MODE DE FONCTIONNEMENT ........................................................................................... 15 MAINTENANCE..................................................................................................................... 15 LOCALISATION DES PANNES ............................................................................................ 16 MODE DE CALIBRAGE ........................................................................................................ 17 SCHEMA DU PESE-BEBE EN PIECES DETACHEES......................................................... 18 LISTE DES PIECES .............................................................................................................. 19 GARANTIE ............................................................................................................................ 20 11 PRECAUTION ET PREVENTION • Pour prévenir toute blessure accidentelle, ne laissez jamais un nouveau-né sans surveillance sur le pèse-bébé. • Pour prévenir toute blessure accidentelle, ne transportez jamais le pèse-bébé avec l'enfant sur le plateau. • Pour obtenir une lecture du poids exacte, placez le pèse-bébé sur une surface plane et stable. • Pour obtenir une lecture du poids exacte, vérifiez le bon fonctionnement de la bascule en appliquant la procédure décrite dans le manuel avant chaque utilisation. • Ne pas utiliser en présence d'anesthésiques inflammables. • Le fonctionnement sous d'autres tensions et fréquences est susceptible d'endommager l'appareil. • Si l'indicateur « LO BAT » est actif, connectez dès que possible le pèse-bébé à une source AC pour obtenir une lecture du poids exact. SPECIFICATIONS GENERALITES Le pèse-bébé néonatal Health o meter’s Pro PlusTM modèle 2200KL utilise une technologie très sophistiquée parmi les technologies de microprocesseur disponibles aujourd'hui sur le marché. Chaque instrument de précision est conçu pour donner la mesure exacte, fiable et répétable du poids et présente des caractéristiques qui font de la pesée un processus simple, rapide et commode. La mesure réelle du poids s'effectue par l'application d'une technologie de pesée spéciale, sensible au mouvement de façon à déterminer le poids d'un bébé en éveil. Le poids du bébé peut être lu en livres/ onces ou en kilogrammes. Il reste affiché jusqu'à la pesée suivante ou jusqu'à la remise à zéro du pèse-bébé. L'appareil peut être utilisé avec son adaptateur électrique AC ou avec sa pile rechargeable. SPECIFICATIONS DU PESE-BEBE Capacité et Résolution Exigences électriques Environnement Dimensions 0 - 12 Lb x 0.1 oz (0 - 6 Kg x 2 g) 12 - 30 Lb x 0.2 oz (6 - 15 Kg x 5 g) Adaptateur 120V AC - 60Hz 9V DC - 500mA Températures de fonctionnement: 50°F to 95°F (10°C to 35°C) Températures de stockage: 30°F to 125°F (0°C to 50°C) Humidité: 85% Longueur: 22” (56 cm) Largeur: 16” (40.5 cm) Hauteur: 7⅞” (20 cm) Poids: 20.2 Lb (9.2 Kg) 12 MODE D'ASSEMBLAGE Le pèse-bébé 2200KL a été calibré en usine. Il est constitué de deux parties reliées l'une à l'autre, le plateau et le châssis. Retirez chaque partie de l'ensemble de son carton et déballez-la avec précaution pour éviter d'en rayer les divers côtés. Figure 1. Assemblage après envoi 1. Placez le châssis sur une surface ferme. 2. Fixez le plateau sur le châssis. Le pèse-bébé fonctionne avec un adaptateur électrique AC ou avec sa pile rechargeable interne. En l'absence d'une source électrique AC, le pèse-bébé se règlera automatiquement sur pile. INSTALLATION 1. 2. Branchez l'adaptateur AC de l'appareil au dos du pèse-bébé et à la source électrique. Appuyez sur l'interrupteur de Marche/ Arrêt (ON/OFF) pour allumer l'appareil. L'écran de visualisation affichera la mention « start » (démarrage) suivie de « 0-00.0 ». 3. Après accomplissement du test automatique: • L'écran numérique doit afficher « 0-00.0 ». • L'indicateur de CHARGE doit être éclairé sur l'écran. • A droite de l'écran doit alors apparaître la mention « LB » (Pour changer l'unité de poids programmée par défaut en unité de kilogrammes (Kg), veuillez contacter notre Centre d'Assistance Technique aux numéros 1.800.638.3722 ou 1.708.598.9100). 4. Placez un poids (ne dépassant pas 15 Kg (30 Lb) sur le pèse-bébé. L'écran numérique doit maintenant clignoter « ----------- » jusqu'à ce que le calcul du poids soit terminé. 5. Appuyez sur la touche LBS/KG pour sélectionner l'unité de poids de votre choix : kilogrammes ou livres/onces. 6. Appuyez sur l'interrupteur REWEIGH (repesée); l'écran numérique doit à présent lire à nouveau le poids de l'objet posé sur le plateau. 7. Retirez le poids du plateau. L'écran numérique doit encore afficher le poids de l'objet en question. 8. Appuyez sur la touche ZERO; l'écran numérique doit à présent indiquer zéro. 9. Déconnectez le pèse-bébé de la source électrique AC. L'appareil doit se régler automatiquement sur sa pile interne et l'indicateur de CHARGE doit s'éteindre. REMARQUES; 1. Si la procédure d'installation a échoué, consultez les instructions relatives à la localisation des pannes. Si le problème persiste, veuillez avoir recours au technicien compétent. 2. A la fin de la procédure d'installation, connectez le pèse-bébé à une source électrique AC pendant au moins 8 heures pour recharger la pile. 13 INSTALLATION Figure 2. Tableau de contrôle INDICATEUR DESCRIPTION 1 Interrupteur de Marche/ Arrêt (ON/OFF) 2 3 Touche de repesée (REWEIGH) Touche ZERO 4 Touche LBS/KG 5 Indicateur BAT 6 Indicateur ZERO 7 Ecran numérique LCD à 6 chiffres 8 Indicateur de CHARGE 9 Indicateur LB 10 Indicateur KG FONCTION Allume (ON) et éteint (OFF) la balance. Permet de répéter l'opération de pesée du nouveau-né. Remet l'écran numérique à zéro avant la pesée. Permet d'annuler le poids (tare) des couvertures ou autres accessoires posés sur le plateau. Sélectionne l'unité de poids: kilogrammes ou livres/onces. En position « ON », il indique que la pile du pèsebébé nécessite une recharge. L'appareil doit être connecté à une source électrique AC. En position « ON », il indique que le pèse-bébé est stable et prêt à l'emploi. Affiche le poids du bébé en kilogrammes ou livres/onces selon la sélection de l'indicateur « LB » ou « KG » sur le côté droit de l'écran. Quand la touche de repesée « REWEIGH » est appuyée, l'affichage « ----------- » clignotera jusqu'à détermination du poids du nouveau-né. En position « ON » quand le pèse-bébé est branché à une source électrique AC et que la recharge de la pile est en cours. En position « ON », il indique l'affichage du poids en livres/onces. En position « ON », il indique l'affichage du poids en kilogrammes. 14 MODE DE FONCTIONNEMENT 1. 2. 3. Appuyez sur l'interrupteur de Marche/ Arrêt (ON/OFF) pour allumer l'appareil. Attendez que la mention « 0-00.0 » apparaisse sur l'écran numérique. Placez une petite couverture sur le plateau. Vérifiez que les bords de la couverture sont bien sur le plateau et ne touchent pas la surface sur laquelle le pèse-bébé est posé. 4. Appuyez sur la touche ZERO pour annuler le poids de la couverture ou de tout autre accessoire sur le plateau. 5. Placez le bébé sur la bascule. L'affichage « ----------- » clignote jusqu'à détermination du poids du nouveau-né. 6. Appuyez sur la touche « REWEIGH » pour effectuer une repesée du bébé (dans le but d'obtenir une lecture plus exacte). 7. Relevez le bébé de la bascule. L'écran numérique doit continuer à afficher le poids du nouveau-né jusqu'à ce que l'une des touches « REWEIGH » OU « ZERO » soit appuyée. Remarque: Après 2 minutes d'inutilisation, le pèse-bébé s'éteindra automatiquement, économisant ainsi l'électricité et les piles. Pour le remettre en marche, il vous suffit d'appuyer sur la touche de Marche/Arrêt (ON/OFF). MAINTENANCE GENERALITES Cette partie donne les instructions de maintenance, nettoyage, localisation des pannes et pièces remplaçables par l'opérateur pour le pèse-bébé néonatal Pro PlusTM, Modèle 2200KL. Toute opération de maintenance autre que celle décrite dans cette partie devra être accomplie par un technicien qualifié. MAINTENANCE Avant la première utilisation et après les périodes de non utilisation, vérifiez le bon état de marche et le fonctionnement correct du pèse-bébé. Si le pèse-bébé ne fonctionne pas correctement, veuillez consulter un technicien compétent. 1. Vérifiez l'aspect général du pèse-bébé pour y déceler tout éventuel dommage ou usure. 2. Contrôlez le chargeur AC en observant la présence éventuelle de craquelures ou usure du câble ou encore de broches cassées ou tordues. NETTOYAGE Un entretien et un nettoyage appropriés sont essentiels à l'assurance de l'efficacité et de la haute précision à long terme de l'appareil. Déconnectez le pèse-bébé de la source électrique AC. 1. Nettoyez toutes les surfaces externes à l'aide d'un chiffon ou d'une lingette en papier humide et propre. Vous pouvez utiliser de l'eau et du savon doux. Séchez ensuite avec un chiffon doux et propre. 2. Ne trempez pas le châssis dans une solution de nettoyage ou n'importe quel autre liquide. 3. N'utilisez pas d'alcool isopropylique ou autres solutions pour nettoyer l'écran d'affichage. 15 LOCALISATION DES PANNES Reportez-vous aux instructions suivantes pour définir et éventuellement corriger une panne avant d'appeler un technicien qualifié. SYMPTOME CAUSE POSSIBLE ACTION CORRECTIVE Le pèse-bébé ne s'allume pas La pile est morte Branchez l'appareil sur secteur électrique L'indicateur de CHARGE ne s'allume pas 1. La prise électrique n'est pas bonne Mauvaise alimentation 1. Utilisez une autre prise 2. Changez l'adaptateur 1. Un corps étranger provoque une interférence avec le plateau 1. Retirez tout objet/ Relevez le nouveau-né du plateau 2. Le plateau n'est pas en place 2. Replacez le plateau correctement 3. L'écran n'a pas affiché la mention « 0-00.0 » avant la pesée 3. Relevez le bébé, remettez la bascule à zéro et recommencez la pesée 4. Le pèse-bébé n'est pas posé sur une surface stable 4. Placez l'appareil sur une surface stable et renouvelez le processus de la pesée 5. Le pèse-bébé n'est pas bien calibré 5. Vérifiez le poids avec un poids de valeur connue 2. Le poids affiché est contestable ou le pèse-bébé ne se remet pas à zéro L'écran affiche « OL » Le poids posé sur le pèsebébé dépasse la capacité de l'appareil Retirez l'excédent de poids et utilisez le pèse-bébé en tenant compte de ses limites L'écran affiche « UL » Le poids posé sur le pèsebébé est inférieur à la charge minimum Vérifiez que le plateau est bien placé sur le châssis L'écran affiche « LO BAT » La pile rechargeable est faible Rechargez la pile suivant les instructions 16 MODE DE CALIBRAGE L'accès aux modes de calibrage se fait en maintenant certaines touches appuyées après le mise sous tension, et ce pendant au moins trois secondes. 17 SCHEMA DU PESE-BEBE EN PIECES DETACHEES 18 LISTE DES PIECES Touche N° 1 2 3 4 5 6 7 8 9 10 11 12 13 14 15 16 17 18 19 Pièce N° 2266401-0 3813701-0 2138801-0 2032901-0 3513301-0 410709 3329101-0 20 21 22 23 24 25 26 27 28 29 30 31 32 33 34 35 36 2266301-0 2266501-0 410182 401149 3814001-0 3813101-0 Description PLATEAU DE PESEE COUVERCLE DU PESE-BEBE CACHE VIS TABLEAU DE CONTROLE CABLE DE LA PILE PLAQUE FRONTALE VIS PHIL. A TETE PLATE C8*1/2 PLAQUE DE SUPPORT CAPTEUR A JAUGE CALE POUR L.C. 2MM SUPPORT DU CAPTEUR A JAUGE VIS PAN PHIL. NC8*1/2” ECROU NC 1/4" RONDELLE DE BLOCAGE VIS A TETE HEX. NC1/4”*3/4” VIS A TETE HEX. NC1/4”*5/8” ECROU M6 SUPPORT DU PLATEAU AMORTISSEUR DE CHOCS EN CAOUTCHOUC MONTANT - REPOSE PLATEAU VIS DE PRESSION A TETE HEX. CREUSE M6*12 ADAPTATEUR 9VDC 120VAC ADAPTATEUR – MONTAGE DU TABLEAU DE CONTROLE CHASSIS DU PESE-BEBE VIS A TETE HEX. CREUSE NC1/4”*5/8 PILE RECHARGEABLE 6V VIS ROSETTE – LEG HEAD M6*15 COUVERCLE DE LA PILE POIGNEE ∅16*M3*7 VIS PAN PHIL. M3*6 ECROU DE BLOCAGE M3 AGRAFE DE MAINTIEN DE LA PILE ATTACHE DE CABLE 10CM CACHE CARRE FICHE SIGNALETIQUE DU MODELE ETIQUETTE ENTREE P.S. 19 Quantité 1 1 1 1 1 1 5 1 1 2 1 6 4 4 2 4 6 1 4 4 2 1 1 1 2 1 4 1 1 10 1 1 3 1 1 1 GARANTIE GARANTIE LIMITÉE Que couvre la garantie? A compter de la date d’achat, les pèse-personnes Pelstar LLC sont garantis contre les défauts de matériel ou de fabrication pour une période d’un (1) an. Renvoyez à Pelstar, port payé et bien emballé, le produit qui fonctionne mal. Voir « Pour Obtenir un Service de Garantie » ci-dessous pour des instructions. Si le fabricant constate un défaut de matériel ou de fabrication, le pèse-personne sera réparé ou changé sans aucun frais pour le client. Le remplacement se fera avec un produit ou composant neuf ou corrigé. Si le produit n’est plus disponible, le remplacement se fera par un appareil similaire d’une valeur égale ou supérieure. Les frais de toutes les pièces réparées ou changées sont couvertes seulement pour la période de garantie originale. Qui est couvert par la garantie? Le premier acheteur du produit doit avoir les pièces justificatives de l’achat lui donnant droit au service de garantie. Les concessionnaires ou les détaillants des produits Pelstar n’ont pas le droit de modifier ou de changer les termes et conditions de cette garantie. Ce que la garantie ne couvre pas? Votre garantie ne couvre pas une usure normale des pièces ou un dommage résultant des éléments suivants: négligence ou mauvais usage du produit, branchement sur un courant ou un voltage non approprié, usage non conforme au mode d’emploi, abus comprenant le fait de trifouiller l’appareil, le dommage occasionné pendant le transport, les réparations alternance sans autorisation. De plus, la garantie ne couvre pas les catastrophes naturelles comme l’incendie, l’inondation, l’ouragan et la tornade. Cette garantie vous donne des droits légitimes spécifiques. Le client peut également bénéficier de certains autres droits qui varient selon les pays, les états, les provinces ou les juridictions. Pour obtenir un service de garantie Assurez-vous d'avoir conservé votre reçu ou tout autre document prouvant votre achat. Appelez le 1 (800) 815 - 6615 ou le 1 (708) 598 – 9100 pour recevoir un numéro d'autorisation de renvoi. Joignez votre preuve d'achat au produit défectueux en indiquant vos nom, adresse, numéro de téléphone dans la journée, et en donnant une description du problème. Emballez soigneusement le produit et envoyez-le avec port et assurance payés d'avance à: Pelstar LLC Attention R/A#_____________ Repair Department 7400 W. 100th Place Bridgeview, IL 60455 Si votre pèse-bébé n'est pas couvert par la garantie, ou a été endommagé, une estimation des frais de réparation ou de remplacement sera soumise à votre approbation avant l'exécution de la réparation ou du remplacement. Pelstar LLC 7400 West 100th Place, Bridgeview IL 60455 • 1-800-815-6615 or 1-708-598-9100 www.healthometermedical.com Health o meter® est une marque déposée de of Sunbeam Products Inc., Boca Raton, FL 33431 ProPlusTM is est une marque déposée de of Pelstar LLC 20 BALANZA PEDIATRICA NEONATAL PRO PLUSTM ÍNDICE PRECAUCIÓN Y ADVERTENCIA ........................................................................................ 22 ESPECIFICACIONES............................................................................................................ 22 INSTRUCCIONES DE MONTAJE ......................................................................................... 23 CONFIGURACIÓN ................................................................................................................ 23 INSTRUCCIONES DE OPERACIÓN .................................................................................... 25 MANTENIMIENTO................................................................................................................. 25 SOLUCIÓN DE PROBLEMAS .............................................................................................. 26 TRAYECTORIA DE CALIBRACIÓN ..................................................................................... 27 VISTA DETALLADA DE LA BALANZA.................................................................................. 28 LISTA DE PIEZAS ................................................................................................................. 29 GARANTÍA ............................................................................................................................ 30 21 PRECAUCIÓN Y ADVERTENCIA • Para evitar lesiones, nunca deje al bebé solo mientras esté en la balanza. • Para evitar lesiones, no traslade la balanza mientras el bebé está en la bandeja de pesaje. • Para un pesaje exacto del bebé, la balanza debe ser colocada en una superficie plana, estable. • Para un pesaje exacto, verifique antes de cada uso la apropiada operación según los procedimientos descritos en este manual. • No use en presencia de materiales inflamables. • Operando en otros voltajes y frecuencias que los especificados puede hacer daño al equipo. • Si el indicador de “LO BAT” se activa, para un pesaje exacto, conecte la balanza a una fuente de energía CA, lo más pronto posible. ESPECIFICACIONES GENERAL La Balanza Pediátrica Neonatal Pro Plus™ de Health o meter, modelo 2200KL usa la tecnología de microprocesador altamente sofisticada disponible. Cada instrumento de precisión es proyectado para proveer medidas de peso exactas, confiables, repetibles y características que hacen el proceso de pesaje simple, rápido y conveniente. El pesaje propiamente dicho es realizado por medio de tecnología de pesaje especial que detecta movimiento, para determinar el peso de un bebé activo. El peso del bebé puede ser presentado en libras/onzas o en kilogramos. El peso es exhibido hasta que un nuevo pesaje sea realizado o hasta que la balanza vuelva a cero. La unidad puede ser operada usando su adaptador de energía CA o por medio de su batería recargable. ESPECIFICACIONES DE LA BALANZA Capacidad y Resolución Requerimientos de Energía Ambiental Dimensiones Físicas 0 - 12 Lb x 0.1 oz (0 - 6 Kg x 2 g) 12 - 30 Lb x 0.2 oz (6 - 15 Kg x 5 g) Adaptador120v AC - 60Hz 9V DC - 500mA Temperaturas de Operación: 50°F hasta 95°F (10°C hasta 35°C) Temperaturas de Almacenamiento: 30°F hasta 125°F (0°C hasta 50°C) Humedad: 85% Largo: 22” (56 cm) Ancho: 16” (40.5 cm) Altura: 7⅞” (20 cm) Peso: 20.2 Lb (9.2 Kg) 22 INSTRUCCIONES DE MONTAJE Esta balanza 2200KL ha sido calibrada en fabricá. Es enviada en dos partes montadas, la bandeja de pesaje y la base de montaje. Saque cada parte de su cartón y desempaquete el material cuidadosamente para evitar ralladuras en las partes de la unidad. Figura 1. Montaje Después del Envío 1. Coloque la base de montaje en una superficie estable. 2. Monte la bandeja de pesaje a la base de montaje. La balanza puede ser operada por un adaptador de fuente de energía CA o por su batería interna recargable. La balanza pasará automáticamente a ser operada por batería cuando la fuente de energía CA estuviera ausente. CONFIGURACIÓN 1. 2. Conecte el adaptador a la parte posterior de la balanza y al origen de energía. Presione el botón ON/OFF para activar la balanza. El display empezará a mostrar “start” y después ”0-00.0”. 3. Cuando la función de auto-prueba está completa: • El display digital debe mostrar ”0-00.0”. • El indicador CHARGE debe estar iluminado en el display. • “LB” debe estar indicado en el lado derecho del display. (Para cambiar las unidades predeterminadas de la balanza de kilogramos (Kg), por favor contacte nuestro Centro de Soporte Técnico en el 1.800.638.3722 o 1.708.598.9100) 4. Ponga un peso [no superior a 15 Kg (30 Lb)] en la balanza. El display digital deberá parpadear “ ----------- “ hasta que el cálculo del peso sea completado. 5. Presione el botón LBS/KG para seleccionar el modo de peso, o en kilogramos o en libras/onzas. 6. Presione el botón REWEIGH; el display digital deberá mostrar nuevamente el peso del ítem en la balanza. 7. Retire el peso de la balanza. El display digital deberá continuar mostrando el peso del ítem que estaba en la balanza. 8. Presione el botón ZERO; el display digital debe volver a cero. 9. Desconecte la balanza de la fuente de energía CA. La balanza debe automáticamente pasar a su batería interna y el indicador CHARGE debe apagarse. NOTA: 1. Si el procedimiento de configuración falla, diríjase a las instrucciones de solución de problemas. Si el problema no es corregido, refiérase al personal de servicio calificado. 2. Al término del procedimiento de configuración, conecte la balanza a una fuente de energía CA durante por lo menos 8 horas para recargar la batería. 23 CONFIGURACIÓN Figura 2. Panel de Control ÍTEM DESCRIPCIÓN FUNCIÓN 1 Botón ON/OFF Conecta y desconecta la balanza. 2 Botón REWEIGH Permite repetidos pesajes del bebé. 3 Botón ZERO Display Digital de Ceros antes del pesaje. Permite la cancelación (tara) del peso de mantas u otros accesorios en la balanza. 4 Botón LBS/KG Selecciona kilogramos o libras/onzas. 5 Indicador BAT Cuando ON, indica que la batería de la balanza requiere recarga. La balanza deberá ser conectada a una fuente de energía CA. 6 Indicador ZERO Cuando ON, indica que la balanza está estable y lista para ser usada. 7 Display Digital LCD de 6 Dígitos Exhibe el peso del bebé en kilogramos o libras/onzas, como se ve por el indicador “LB” o “KG” en el lado derecho del display. Cuando el botón REWEIGH es liberado, el display parpadeará “ ----------- ” hasta que el peso del bebé sea determinado. 8 Indicador CHARGE Es ON cuando la balanza está conectada a una fuente de energía CA y la recarga de la batería está en andamiento. 9 Indicador LB Cuando ON, indica la exhibición del peso en libras/onzas. 10 Indicador KG Cuando ON, indica la exhibición del peso en kilogramos. 24 INSTRUCCIONES DE OPERACIÓN 1. 2. 3. Presione el botón ON/OFF para activar la balanza. Espere hasta que aparezca “0-00.0” en el display digital. Coloque una almohadilla en la bandeja de pesaje. Asegúrese que las bordas de la almohadilla estén en la bandeja y no tocando la superficie donde la balanza está posicionada. 4. Presione el botón ZERO para cancelar el peso de la almohadilla u otro accesorio que esté en la bandeja de pesaje. 5. Coloque el bebé en la balanza. El display parpadeará “ ----------- ” hasta que el peso del bebé sea determinado. 6. Presione el botón REWEIGH para pesar al bebé otra vez (para alcanzar un resultado más exacto) 7. Retire el bebé de la balanza. El display digital deberá continuar mostrando el peso del bebé hasta que el botón REWEIGH o ZERO sea presionado. NOTA: Si la balanza no fue utilizada por 2 minutos, la balanza se apagará para ahorro de energía y vida de las baterías. Para reactivar la balanza, presione el botón ON/OFF. MANTENIMIENTO GENERAL Esta sección provee instrucciones para mantenimiento, limpieza, solución de problemas y piezas reemplazables del operador para la Balanza Pediátrica Neonatal Pro Plus(™) Modelo 2200KL. Otras operaciones de mantenimiento aparte de las descritas en esta sección deben ser realizadas por el personal de servicio calificado. MANTENIMIENTO Antes de usarla por primera vez y después de periodos sin usarla, confiera la balanza para una operación y función apropiadas. Si la balanza no operar correctamente, refiérase al personal de servicio calificado. 1. 2. Verifique el aspecto total de la balanza para saber si hay cualquier daño, desgaste obvios. Inspeccione el cargador de CA para verificar cordón con grietas o corroído o para dientes quebrados o acodados. LIMPIEZA Cuidado apropiado y limpieza son esenciales para asegurar una vida de operación larga, exacta y eficaz. Desconecte la balanza de la fuente de energía CA. 1. Limpie todas las superficies externas con un paño húmedo limpio o con tisú. Una solución suave de jabón y agua puede ser usada. Seque con un paño suave limpio. 2. No sumerja la base de la balanza en soluciones de limpieza u otro líquido. 3. No use Alcohol Isopropilo u otras soluciones para limpiar la superficie del display. 25 SOLUCIÓN DE PROBLEMAS Refiérase a las siguientes instrucciones para verificar y corregir cualquier falla antes de contactar el personal de servicio. SÍNTOMA POSIBLE CAUSA ACCIÓN CORRECTIVA La balanza no se prende Batería terminada Conecte la balanza a una fuente de energía Indicador CHARGE no se prende 1. Enchufe de electricidad malo Fuente mala de energía 1. Use un enchufe distinto 2. Cambie el adaptador 1. Objeto externo interfiriendo en la bandeja de pesaje 1. Remueva todos objetos/bebé de la bandeja de pesaje 2. La bandeja de pesaje no está bien colocada 2. Coloque la balanza en su lugar apropiado 3. El display no mostró “0-00.0” antes del pesaje 3. Remueva el bebé, vuelva la balanza a cero y empiece el proceso de pesaje nuevamente 4. La balanza no está colocada sobre una superficie estable 4. Coloque la balanza en una superficie estable y empiece el proceso de pesaje nuevamente 5. La balanza no está calibrada 5. Confiera el peso con un valor de peso sabido 2. Peso cuestionable o la balanza no vuelve a cero El display muestra “OL” La carga en la balanza excede su capacidad Remueva el peso excesivo y use la balanza según sus límites El display muestra “UL” La balanza está en condición de carga negativa Asegúrese que la bandeja de pesaje esté colocada sobre la base El display muestra “LO BAT” La batería recargable está baja Recargue la batería según las instrucciones 26 TRAYECTORIA DE CALIBRACIÓN Los modos son accesibles manteniéndose presionadas ciertas teclas después de la activación. Las teclas deben ser presionadas y mantenidas así por lo menos tres segundos. 27 VISTA DETALLADA DE LA BALANZA 28 LISTA DE PIEZAS Tecla No. Parte No. Descripción 1 2 3 4 5 6 7 8 9 10 11 12 13 14 15 16 17 18 19 20 21 22 23 2266401-0 3813701-0 ACOPLADURA PARA LA BANDEJA DE PESAJE TAPA DE LA BALANZA CUBIERTA DEL TORNILLO TABLERO PRINCIPAL CABLE DE LA BATERÍA PLACA TORNILLO PRINCIPAL PLANO PHIL. NC8*1/2 PLACA DE SOPORTE CÉLULA DE CARGA CALCE PARA L.C. 2MM CÉLULA DE CARGA DE LA BASE TORNILLO PAN PHIL. NC8*1/2” TUERCA NC 1/4" ARANDELA DE FRENO TUERCA HEXAGONAL NC1/4”*3/4” TUERCA HEXAGONAL NC1/4”*5/8” TUERCA M6 SOPORTE DE LA BANDEJA AMORTIGUADOR DE CAUCHO STAND DE LA BANDEJA DE PESAJE MANGUITO HEX.TORNILLO DE PRESIÓN M6*12 UNIDAD ADAPTADOR 9VDC 120VAC ACOPLADURA DE LA UNIDAD ADAPTADORA TABLERO PRINCIPAL BASE DE LA BALANZA MANGUITO ROSCADO HEX. NC1/4”*5/8 BATERÍA RECARGABLE 6V TORNILLO ROSETTE LEG HEAD M6*15 TAPA DE LA BATERÍA MANGO ∅16*M3*7 TAPÓN TORNILLO PHIL.M3*6 CONTRATUERCA M3 ABRAZADERA DEL SOSTENEDOR DE BATERÍA CABLE DE CONEXIÓN 10CM ENCHUFE CUADRADO DE LA TAPA ETIQUETA DEL MODELO ETIQUETA P.S.DE ENTRADA 24 25 26 27 28 29 30 31 32 33 34 35 36 2138801-0 2032901-0 3513301-0 410709 3329101-0 2266301-0 2266501-0 410182 401149 3814001-0 3813101-0 Cde. 29 1 1 1 1 1 1 5 1 1 2 1 6 4 4 2 4 6 1 4 4 2 1 1 1 2 1 4 1 1 10 1 1 3 1 1 1 GARANTÍA GARANTÍA LIMITADA ¿Qué Cubre la Garantía? Las balanzas de Pelstar LLC están garantizadas a partir de la fecha de compra contra defectos de fabricación y mano de obra por un periodo de un (1) año. Si el funcionamiento del producto no fuese adecuado, regrese el producto a Pelstar con fletes prepagados y en un embalaje adecuado. Vea ´Para obtener Servicio de Garantía´ debajo para de instrucciones. Si el fabricante determinase la existencia de un defecto de fabricación o mano de obra, el remedio único será la reparación o reemplazo de la balanza sin cargo alguno para el cliente. El replazo se realizará con un equipo o componente nuevo o remanufacturado. Si el producto se encontrase fuera de producción se le remplazará con un producto similar del mismo o mayor valor. Todas las partes, incluyendo las partes separadas o remplazadas, están cubiertas únicamente durante el periodo original de la garantía. ¿Quién Está Cubierto? El comprador original del producto debe poder comprobar la compra para hacer válida la garantía. Los distribuidores o minoristas de Pelstar no tienen derechos para alterar, modificar, o cambiar de ninguna manera los términos y condiciones de esta garantía. ¿Quién Está Excluido? La garantía no cubre el desgaste normal de las partes o daños como resultado de: Uso negligente o mal uso del equipo, uso de voltajes o corrientes inapropiadas, utilización contraria a las instrucciones de operación, abuso incluyendo modificaciones, daños en transporte, reparaciones o alteraciones no autorizadas. Más aún, la garantía no cubre sucesos naturales como fuego, inundaciones, huracanes o tornados. Esta garantía le dá a Ud. derechos legales específicos, puede tener además otros derechos que varían de país a país, estado a estado, provincia a provincia o jurisdicción a jurisdicción. Para obtener Servicio de Garantía Asegúrese de conservar su recibo de venta o un documento que demuestre prueba de la compra. Llame 1 (800) 815-6615 o 1 (708) 598-9100 para recibir un número de autorización para retorno. Adjunte prueba de la compra al producto con defecto junto con su nombre, dirección, número de teléfono de día y descripción del problema. Empaquete el producto cuidadosamente y envíelo con transporte y seguro pagados por adelantado a: Pelstar LLC Atención R/A#_____________ Departamento de Reparación 7400 W. 100th Place Bridgeview, IL 60455 Si su balanza no está cubierta por garantía, o ha sido dañificada, un presupuesto de los costos de reparación o reemplazo será proveído a usted para aprobación antes del mantenimiento o reemplazo. Pelstar LLC 7400 West 100th Place, Bridgeview IL 60455 • 1-800-815-6615 or 1-708-598-9100 www.healthometermedical.com Health o meter® es una marca registrada de Sunbeam Products Inc., Boca Raton, FL 33431 ProPlusTM es una marca registrada de Pelstar LLC 30