1
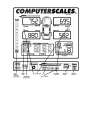
th 16892 146 St SE, Monroe, WA 98272 (360) 453-2030 Computerscales DX Model 72634 Operating Instructions (Also applies to models 72632, 72635, 72636) QUICK START INSTRUCTIONS: 1) Set up pads alongside car (they are interchangeable). 2) Connect cables marked RF, LR, etc. 3) Turn on; warm up 1-2 minutes. 4) Press ZERO (by ON button) if all 4 wheel weights are not at 0. 5) Put car on scales. All weights and % are computed automatically and displayed. (These can be easily changed to your preference. See full instructions below.) To Store in Memory hold the Mem Store button and push any Memory Recall #1 to 10. To Recall push & hold #1 to 10. AutoLevel™: At shop hold Base Line 2 seconds. At track put car on scales (make NO changes) and push Auto Level. Weights will change to those at the shop. AutoLevel™ may be turned off for normal weighing, then back on again. “Secret Mode”: Keep ‘prying eyes’ from seeing your setup. Press Tare button just above partial % display, Display will go to a temporary Zero. Press again to return to normal. Center of Gravity: Push Mode button. Enter numbers by using Memory buttons 1 to 9, 10 is 0. After each entry push Mem. Store Enter. Follow instructions on display. To change wheelbase push Zero to clear. Height computed is in inches above axle centerline. Push Mode to continue. Goal: Push Mode twice (only once from “Center of Gravity”). Enter numbers as above. After each entry push Mem. Store Enter. To change entry push Zero to clear. Store in Memory if you want to save it – same as above. Recall from Memory to compare with current weights. • When Low Battery light flashes plug in charger. Scale will run on charger. Full recharge takes 12-24 hours. • You can change weights with car on scales. No need to re-zero. Turn off, then back on again OK. • Keep scales and pads clean and dry. Do not drop! For other operations see full instructions below. OPERATING INSTRUCTIONS: 1) Set up scale pads next to the wheels. Pads are calibrated to within 5/100 of 1% and can be marked RF, LR, etc. or used interchangeably. 2) Set up control box in a convenient place, uncoil cables and plug into pads. Be sure the cables go to the correct location, RF, LR, etc. and route cables to avoid tripping. 3) Turn on box, warm up 1 minute and Zero as needed. When you push the ZERO button you are defining that as zero weight: the car MUST be off the pads. 4) Lift car and place pads under the wheels. The weight will be the same regardless of the location of the tire on the pad. It is a good idea to keep it near the center to minimize the possibility of the car rolling off the pad. Put the car in gear or block the wheels. Ramps or a platen setup fixture may also be used. 5) Shake each corner up & down to settle the chassis. Shock absorber friction can hold up a surprising amount of weight, changing your cross weight %. Total weight, left, and rear will be constant but cross can vary by 1% or more until settled. Memory: To store weights in memory put the car on the scales, hold the MemStore button down and press one of the Memory buttons – 1 thru 10. Weights will be stored there (even if the unit is then turned off). To recall a Memory simply press and hold any Memory button 1 thru 10. Zero: This defines the starting point for weight. If you use the scales without starting at 0 the weights & % will not be correct. The ZERO button by the ON switch will zero all 4 pads. (This is slightly different from the 1996 and earlier models.) To zero individual pads see next paragraph. To “Zero” individual pads only or with car still on scales: Lift the car off the pad to be zeroed. Push the “Zero this wheel only” button just above or below the individual wheel weight display – RF, LR, etc. No other pads will be zeroed. To Temporary Zero or “Tare”: Push this button and all 4 pads go to 0. However, the original zero is kept in memory. Push the button again to go back to normal zero. This will make it easier to add or subtract weight to the car. You can see exactly what you have done without adding. Mode: This takes you to the other functions such as Center of Gravity and Goal. Recharge Battery: When Low Battery light flashes plug charger in front of enclosure. Charging light should come on and will stay on as long as the charger is connected. Full recharge takes 12 to 24 hours. The scale can be used during this time. It is normally best to run off battery power to cycle the battery. This extends battery life. Recharge once a month during the off season. NOTE: This system has a “Universal Charging Circuit” which will let you charge the battery from almost any type charger – from 6 to 18 volts, 500ma or more, any polarity. You can also connect to an external battery. Indicator Lights (near ON button): Power: Indicates power is on to the circuit board. If this does not come on when ON is pushed battery is probably dead and the scale will not work. See Recharge Battery above. Low Batt: Indicates battery is nearly drained. When it first comes on you have approximately 45 minutes left. The scale can be operated with the charger plugged in if the battery is low. Charging: Indicates power is going into the battery. If the charger is plugged in and this light is not on the battery is not charging. Check the wall plug and the charger. * Calculate Center of Gravity – Mode 2 * This version is programmed to actually calculate the car’s center of gravity by weighing the car level and then reweighing it with the rear raised 10”. Proceed as follows: Set up as usual and put car on the scales. Push Mode to get into Center of Gravity: 1) Weigh car level. With car on scales simply push Memory Store Enter button to store this weight. An “OK” will appear at the end of line 2. 2) The third line asks you to reweigh the car with the rear scale pads raised 10” higher than the front ones. Use risers or blocks under the rear pads. DO NOT SHUT OFF THE SCALES DURING THIS CHANGE. ALSO BE CAREFUL THAT THE CAR DOES NOT ROLL OFF THE SCALE PADS. BLOCK THE WHEELS AS NECESSARY. When the car is settled at this point push Memory Store Enter again. An “OK” will appear on line 3. 3) Now the scale will ask you to enter the wheelbase of the car (in whole inches – no fractions). Use the memory buttons #1 to 9 and 10 for 0. When done push Memory Store Enter. The scale will automatically calculate the center of gravity and display the change in front weight. This number is the height above axle centerline. Push Mode twice to go back to normal weighing. NOTE: With some suspension systems built with anti-dive there is tendency for the suspension to reduce the increase in front weight when the rear is raised 10”. If the C/G number you get seems unrealistic it may be necessary to replace the shocks with strut rods to lock the suspension. * Goal – Mode 3 * This feature lets you enter the distribution %s and total weight and the computer will calculate the wheel weights. This is good for initial setups or for going to a track with different weight rules. Set up as usual and put car on the scales. Push Mode twice to get into Goal (once takes you to C/G): 1) Use the memory buttons #1 to 9 and 10 for 0 to enter the %. The computer will ask you for Left, Rear, & Cross, and Total Weight. Enter to the nearest 1/10% - ie. 56.7% and total in lbs. AFTER EACH ENTRY PUSH MEM. STORE ENTER JUST BELOW THE MEMORY NUMBERS. 2) The computer will display the calculated wheel weights and the % & total you entered. At this point you can save it in Memory to compare later. If you shut the scales off or go to another Mode the weights & % will be lost. * AutoLevel™ * This exclusive feature electronically compensates for the differences in ground level between your shop and the racetrack pits. 1) When you are done working on your car at the shop before you remove it from the scales push the Base Line button and hold for 2 seconds. A message “Baseline established” will come up. This baseline is stored in the memory. Now turn off the scales and remove the car. 2) When you get to the track find the most level spot that is convenient. Set up the scales, turn them on, and put the car on. BE SURE THE TIRE PRESSURES ARE THE SAME AS AT THE SHOP AND DO NOT MAKE ANY CHASSIS CHANGES OR ADD OR REMOVE WEIGHT. This is VERY important! If any changes are made AutoLevel™ will not work properly. 3) With the car exactly as it was back at the shop push the AutoLevel™ button. The first time you do this the computer will check the current weights, compare them to the baseline, and compute an electronic correction factor. All the weights and % will change to the same as back at the shop. Now you can work on the car as needed and any changes will be as if they had been done at the shop. A red flashing LED indicates that AutoLevel™ is turned on. 4) You may turn AutoLevel™ off at any time and the actual current weight readings will show. You can also turn AutoLevel™ back on again and get the same correction factor as before. This correction will remain until you establish a new baseline. 5) If you move to a new location the AutoLevel™ correction will no longer be correct. You can simply switch off AutoLevel™ and use the scales as normal OR you can repeat steps 1 & 2 above to establish a new baseline. NOTE: AutoLevel™ will not work below 250 lbs. or if the change between your shop and the track is too great. * Optional Printer & PC Download * 1) To print first push Printer ON/OFF. Then push Print. To line feed paper turn on, then push the “SEL” button on the printer. Then use the LF on printer to line feed. NEVER pull paper through the printer. This will damage the mechanism. Use common adding machine paper – not thermal. 2) For PC download information contact the factory. * Other Special Purpose Functions * Set Up % Display: You can select the partial % weights shown on the lower 4 line display. Hold the Set Up Hold button down. Line 1 will be highlighted. Use the ▲ & ▼ arrows to scroll thru the options. When you find the one you want on that line push the Enter button. CONTINUE TO HOLD THE SET UP HOLD BUTTON DOWN. After you push Enter for the first line the second line will be highlighted. Repeat as above. Do the same for the remaining lines. Release the Set Up Hold button. This will stay until you change it. You can select any combination of partial weights that suits your needs. You can even select blank lines if you don’t need all 4. 1/10th lb. Resolution: For special purposes you may want to display to closer than 1 lb units. This system can be set to display to 1/10 lb. (.1) between 4 and 200 lbs. You can still weigh up to the full capacity of the system (1500 lbs/wheel) but above 200 lbs. the display will go back to reading by 1 lb. This can be used to weigh gas cans during a pit stop more accurately. It works well for weighing racing go karts too. Push Memory #1 & 10 at the same time and hold for 3 seconds. Same procedure is used to go back. There is no problem leaving the system in this mode. ½ lb. Resolution: Same as above but push Memory #1 & 3 and hold for 3 seconds. Same procedure is used to go back. English / Metric Conversion: To convert from English (lbs.) to Metric (kgms.) and back use the Memory Buttons (#1 – 10). Push #1 & 5 together and hold for 3 seconds. The display will change slightly and the scale will beep to indicate change. Kgms. are displayed in ½ kgm. units.