1
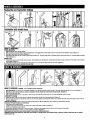
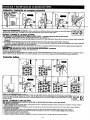
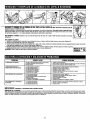
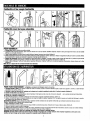
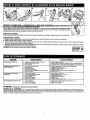
TO REMOVE BELT: Be sure belt is off motor shaft. Lift and remove brush roll. Dispose of old belt, (Diagram 2).
TO REPLACE BELT:
I. Slip brush roll through belt. Place belt i n area of brush roll without bristles, (~Cagram3).
2. Loop belt around motor shaft, (Diagram 4).
3. Insert brush roll into side holder # I and then #2. Follow direction of arrows on brush end caps. Rotate brush roll t o make sure belt is not twisted, (Diagram 5).
4. Replace nozzle guard. Match the front tabs to the slots on the nozzle base'first. Swing down to snap hooks. Press firmly on entire nozzle guard to fit into place. Replace all
screws, (Diagram 6).
IMPORTANT: Rotate brush roll by hand before starting cleaner. *
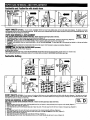
HOW TO CHECK FOR A CLOG: If there is suction at the end of the hose, a clog may be in the base of the unit. To clear clog: 1. Remove hose from
the nonle. Press latch on nozzle connector and pull up. Lift door on the nozzle and gently clear the blockage. (Diagram 7) or 2. Remove nonle
guard (See belUbrush roll removal section - Pg. 5) and gently clear the blockage. If there is no suction at the end of the hose, there is a clog in
hose. To clear clog: 1. Remove the hose from the nozzle. Press latch on nozzle connector and pull up. Lift door on nonle and gently clear the
blockage (Diagram 7) or 2. Check inside hose and gently clear the blockage.
I
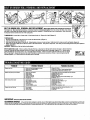
PROBLEM
I
Cleaner won't run
I
POSSIBLE REASON
I
1. Power cord not firmly plugged Into outlet.
2. Blown fuse or tripped breaker.
3. Needs Service.
Cleaner won't pick-upor low suction
Dust escaping from cleaner
-
Cleaner tools won't pick up
--
1. Paper bag is not opened.
2. Paper ba full.
3. Brush roa worn
4. Broken or wom'belt.
5. Nozzlehose clogged.
6. No paper bag.
1
I
POSSIBLE SOLUTION
1. Plug unit in firmly.
2. Check fuse or breaker.-Replacefuselreset breaker:
3. Take to service center or call 1-800-321-1134.
1. Insert finger into hole and push paper away from opening.
2. Replace aper ba Pg 4
3. Replace !rush r o i IP~:
5
4. Replace belt - Pg. 5
5. Remove nonlelhose guard to clear blockage - Pg. 5
6. Install bag - Pg. 4
2.
3.
4.
5.
6.
1. Paper bag full.
Bag not installed correctly.
Puncturehole iti oaoer baa.
Handle seal.
' '
No bag in cleaner.
Hose not installed correctly.
1. Replace paper bag - Pg. 4
2. Review paper bag installation- Pg. 4
3. Replace pa er bag.
4. Check handle assembly.
5. lnstall bag.
6. Review Hose Installation- Pg. 3
1. Hose clogged.
2$ Paper bag full.
3. No bag in cleaner.
1. Remove hose and tools; remove obstruction - Pg. 3
2. Replace paper baQ- Pg. 4
3. Install bag.
I
I
,
IMPORTANT: UNPLUG CLEANER BEFORE SERVICING
CUSTOMER SERVICE: In the event that further assistance is required, see your Yellow Pages for an authorized ~ o y ?Dealer.
~
costs of any transportatiqn to and from any
place of repair are to be paid by the owner. The service parts used in this unit are easily replaced and teadily available from an authorized Royal Dealer or retailer. Always ~dentifyyour cleaner by the model and Mfg. code when requesting information or ordering replacement parts. (The model number and Mfg. code appears on the lower back of the cleaner.)