1
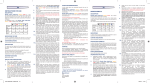
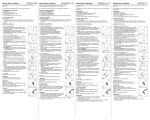
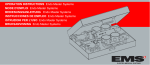
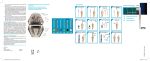
5.
GB
6.
INSTRUCTIONS FOR USE
DESCRIPTION
2 stage parallel design for optimum retention and adaptation.
LIGHT-POST® is a radiopaque translucent quartz fiber post.
The radio-opacity level of the LIGHT-POST® is respectively
about 1.8 and 2 mm Al (ISO 4049).
■ 1
■2
■3
Ø apical tip
0.65
0.85
0.85
Ø 1 St stage
1.00
1.20
1.40
Ø 2 St stage
1.40
1.80
2.10
■
■
Color coding
Red
Grey
■
Blue
INDICATIONS FOR USE
In case of insufficient residual tooth structure (<4 mm), the
post is needed to support and secure the coronal restoration.
CONTRAINDICATIONS
If coronal tooth structure is less than 1.5 mm.
PRECAUTIONS
The post must be cleaned with alcohol before insertion in
the canal. Avoid touching the posts with your fingers after
cleaning.
Shortening the post should be done outside of the mouth.
The use of rubber dam is recommended.
The crown must cover the preparation of at least 1.5 mm of
healthy dentin in order to get the ferrule effect.
ADVERSE REACTIONS
None known to date.
STEP-BY-STEP INSTRUCTIONS
1. Root canal preparation: remove gutta-percha to
2.
3.
4.
preplanned depth with a Gates-Glidden, Peeso reamer
or Largo. Radiographic verification is recommended.
Select the correct LIGHT-POST® post size. Determine
the post size according to the anatomical situation of
the tooth using the radiograph and the plastic calibrating card.
Determine the length of the coronal build-up, which will
account for 1/3 of the final post length. Remove the root
filling with the Torpan70 (rotation speed 1000-2000 rpm)
as deep as necessary for the post to be inserted to 2/3
of the root length. In case of curved canal, this calculated length is not suitable. At least 4 mm of root canal
filling should remain in the apical region. Complete the
preliminary preparation with the selected preshaping drill
(rotation speed 1000-2000 rpm).
Shape the canal with the Finishing Drill LIGHT-POST®
corresponding to the selected LIGHT-POST® size, (rotation speed 1000-2000 rpm).
NOT0800XX00-201301-07.indd 1-6
7.
8.
9.
Try in the post, to check that the post is properly seated
in the canal
For LIGHT-POST® position the colored O-ring as a cutting mark and then remove post. Shorten the post to its
final length with a diamond disc outside of the mouth.
Never use a crimping instrument, such as wire cutters,
as the pressure can destroy the structure of the post.
Remove the O-ring.
Clean the post with alcohol.
Apply etchant in the post space and to the exposed
dentin for 15 seconds*. Rinse for 10 seconds. Remove
the excess water with paper points but leave surface moist. Do not put the etchant in contact with the
gingiva.
Apply 2 coats* of the primer with a thin brush (e.g.
Composibrush RTD) in the post space. Remove excess
using paper points and gently air dry all surfaces.
Enamel and dentin surfaces should have a uniform,
glossy appearance. If not, repeat application. Light-cure
the primer* inside the post space for 10 to 20 seconds.
10. Apply a single coat of primer* to the post. Gently air dry
5 seconds and light-cure the post for 10 to 20 seconds
(if needed) outside the mouth.
11a. If using a dual cure resin cement for both cementation
and core build up such as Corecem™ (recommended
technique): Mix the cement and apply it in the post
space from bottom to the top using the root canal
tips. Seat the post immediately. Light-cure for 40 to
60 seconds. Continue applying the core build up using a
plastic Coreform™ matrix, or directly on the tooth.
11b. If using separate cement and a core build up resins : Mix
the cement* and apply it to the post and then in the post
space using a Lentulo spiral or a syringe tip. Seat the
post immediately. Remove excess cement with appropriate instruments. If using dual-cure cement, light-cure
for 40 to 60 seconds, applying gentle pressure on the
post with the tip of the curing light probe. Apply 2 coats
of bonding agent* to the exposed post(s), cement and
involved tooth structure. Remove excess and air-dry with
jet of air. Light-cure for 20 seconds (if needed).
11c. If using a self etching cement*, there is no need to etch
and prime the post space. Mix the cement and apply it in
the post space from bottom to the top using a root canal
tip. Seat the post immediately. Remove excess cement.
Light cure if needed. After etching, rinsing, drying,
apply 2 coats of bonding agent* to the exposed post(s),
cement and involved tooth structure. Remove excess
and air dry with jet of air. Light cure for 20 seconds (if
needed).
12. Directly model the build-up using a composite core
build-up material*. R.T.D. recommends that the coronal
end of the post be covered by core composite.
OTHER RECOMMENDATIONS
®
LIGHT-POST are single use devices. They must not be reused to avoid the risk of contamination.
LIGHT-POST® can be cleaned with alcohol. They can neither
be sterilised nor disinfected in thermodisinfector.
LIGHT-POST® can be sterilized individually in an autoclave
with the following settings**:
• Wrap individually in disposable sterilization pouches or
tubing that comply with the regulation standard in force in
the country of use (e.g EN ISO 11607-1),
• Autoclave: type B complying with regulation standard in
force (e.g EN 13060),
MANUFACTURER :
RTD
3 rue Louis Neel
38120 St Egrève - France
www.rtd.fr
[email protected]
• Sterilization temperature: 134°C - sterilization time:
18 minutes,
FR
• 1 cycle only.
A LIGHT-POST® re-access kit is available if needed. Contact
your RTD distributor.
PRESHAPING DRILL LIGHT-POST® and Finishing Drill LIGHTPOST®: these instruments are supplied non-sterile. Disinfect
and sterilize instruments before each use. Disinfect instruments with disinfecting or cleaning agents adapted for rotary
instruments*. Do not disinfect instruments in thermodisinfector. Inspect instruments visually before each use: change to
new drills when they are damaged, corroded or dull. The finishing drills may be used only to prepare root canal.
LIGHT-POST® drills must be sterilized individually in an autoclave with the following settings**:
MODE D’EMPLOI
DESCRIPTION
Forme à double rétention cylindrique et à deux étages
coniques de stabilisation, longueur 19 mm.
LIGHT-POST® est un tenon radio-opaque et translucide en
fibres de quartz.
Le niveau de radio-opacité des tenons LIGHT-POST® est de
1.8 à 2 mm Al (ISO 4049).
• Wrap individually in disposable sterilization pouches or
tubing that comply with the regulation standard in force in
the country of use (e.g EN ISO 11607-1),
• Autoclave: type B complying with regulation standard in
■ 1
■2
■3
Ø pointe
0.65
0.85
0.85
Ø intermédiaire
1.00
1.20
1.40
force (e.g EN 13060),
Ø tête
1.40
1.80
2.10
18 minutes.
Codage
couleur
■
■
• Sterilization temperature: 134°C - sterilization time:
Use a new drill after 12 -15 uses.
Rouge
Gris
■
Bleu
For profoundly flared or ovoid canals, the use of accessory
post, such as Fibercone™, is indicated for best results.
INDICATIONS
STORAGE
Le tenon sert de support à la restauration coronaire en cas de
substance dentaire résiduelle inférieure à 4 mm.
Store the sterilized components in a dry, dust-free place.
If the packaging’s integrity appears to be compromised,
before using again, place the component in a new pouch ad
re-sterilize according to the protocol defined before.
SAFETY AND LIABILITY
WARRANTY
RTD warrants this product will be free from defects in material
and manufacture. RTD makes no other warranties including
any implied warranty of merchantability or fitness for a particular purpose. User is responsible for determining the suitability
of the product for user’s application. If this product is defective within the warranty period, your exclusively remedy and
RTD’s sole obligation shall be repair or replacement of the RTD
product.
LIMITATION OF LIABILITY
Except where prohibited by law, RTD will not be liable for any
loss or damage arising from this product, whether direct, indirect, special, incidental or consequential, regardless of the
theory asserted, including warranty, contract, negligence
or strict liability. Selection of the correct drill and post is the
responsibility of the user.
For dental use only.
* Refer to the manufacturer’s instructions for use.
** Please refer to your autoclave manufacturer for specific
sterilization instructions if needed
CONTRE-INDICATIONS
Parois dentinaires inférieures à 1.5 mm au niveau coronaire.
PRECAUTIONS D’EMPLOI
Le tenon doit être nettoyé à l’alcool avant toute insertion dans
la bouche du patient. Ne pas toucher le tenon avec vos mains.
Le tenon doit être coupé à l’extérieur de la bouche du patient.
L’usage de la digue est recommandé.
Le recouvrement prothétique doit être d’au moins 1.5 mm
de structure dentaire saine pour obtenir l’effet de sertissage
désiré (Ferrule effect).
EFFETS SECONDAIRES
Aucun effet secondaire connu à ce jour.
PREPARATION PAS-A-PAS
1. Préparation canalaire : retirer la gutta-percha à la pro-
2.
3.
fondeur prévue avec un foret Gates-Glidden, alésoir
Peeso ou Largo. Une vérification radiographique est
recommandée.
Choisir le tenon LIGHT-POST® adapté à l’anatomie du
canal d’après l’analyse radiographique.
Déterminer la hauteur du faux-moignon : elle devra
être 1/3 de la longueur totale du tenon. Retirer l’obturation radiculaire avec le Torpan 70, (1000−2000 t.min−1).
Préformer le canal radiculaire avec le foret
PRESHAPING DRILL LIGHT-POST® correspondant,
(1000-2000 t.min-1), afin de permettre au tenon d’être
inséré sur 2/3 de la longueur radiculaire. Dans le cas de
canaux très courbés, il n’est pas toujours possible d’atteindre cette longueur. Il doit rester un minimum de 4 mm
d’obturation jusqu’à l’apex. Préparer le canal radiculaire
adapté au tenon choisi avec le foret FINISHING DRILL
LIGHT-POST® correspondant (1000-2000 t. min-1 ) .
4. Vérifier que le tenon est bien ajusté au canal ainsi
préparé.
5. Raccourcir le tenon à la longueur adéquate avec un
disque diamanté. Déplacer le codage couleur et l’utiliser comme repère de coupe. Ne pas utiliser de pinces,
car la pression exercée risque de détruire la structure du
tenon. Retirer le codage couleur.
6. Nettoyer le tenon à l’alcool.
7. Mordancer le canal et la partie coronaire pendant
15 secondes*. Rincer le canal pendant 10 secondes
et le sécher légèrement avec des pointes de papier.
Les parois canalaires doivent rester humides. Eviter
tout contact avec la gencive.
8. Appliquer 2 couches d’adhésif* sur la préparation à
l’aide de l’applicateur de type Composibrush RTD.
Retirer l’excès de produit avec des pointes de papier.
Sécher légèrement avec un jet d’air. La surface canalaire
doit avoir un aspect lisse et brillant. Si tel n’est pas le
cas, renouveler l’application. Photo-polymériser l’adhésif* dans le canal pendant 10 à 20 secondes.
9. Appliquer une seule couche d’adhésif* sur le tenon.
Sécher 5 secondes avec un jet d’air. Photo-polymériser
pendant 10 à 20 secondes (extra oral) si nécessaire.
10a. Cas d’une utilisation avec le même produit
comme ciment et composite de reconstitution
tel que le Corecem™ (technique recommandée).
Mélanger le ciment-composite et remplir le canal de bas
en haut à l’aide de l’embout « root canal tip ». Insérer
le tenon immédiatement. Photo-polymériser pendant
40-60 s. Continuer la préparation du faux-moignon
soit en appliquant directement soit en remplissant une
matrice plastique Coreform™.
11b. Cas d’une utilisation avec deux produits séparés :
un ciment et un composite pour faux-moignon.
Mélanger le ciment* et remplir le canal à l’aide d’un
Lentulo ou d’une seringue à injecter. Insérer le tenon
immédiatement. Enlever l’excès du ciment à l’aide
d’instruments appropriés. Photo-polymériser pendant
40-60 s dans le cas d’un ciment dual en maintenant
l’embout de la lampe contre le tenon. Appliquer deux
couches d’adhésif* sur la partie émergente du tenon et
les parois dentinaires. Enlever l’excès à l’aide d’un léger
jet d’air. Photo-polymériser pendant 20 s à nouveau si
nécessaire.
11c. Cas d’utilisation d’un ciment auto-mordançant. Il n’est
pas utile d’appliquer un mordançage et un adhésif dans
le canal. Mélanger le ciment et remplir le canal de bas
en haut à l’aide de l’embout « root canal tip ». Insérer
le tenon immédiatement. Enlever les excès de ciment.
Photo-polymériser si nécessaire. Après mordançage,
rinçage et séchage, appliquer 2 couches d’adhésif* sur
la partie émergente du tenon et les parois coronaires.
Enlever l’excès à l’aide d’un léger jet d’air. Photopolymériser si nécessaire.
12. Reconstituer le moignon avec un matériau composite*.
RTD recommande que la partie coronaire du tenon soit
recouverte par le composite.
AUTRES RECOMMANDATIONS
Les tenons LIGHT-POST® sont des dispositifs à usage unique.
Ils ne doivent pas être ré-utilisés pour éviter tout risque de
contamination.
Les tenons ne peuvent être ni stérilisés, ni purifiés au
désinfecteur thermique. Ils doivent être nettoyés préalablement
à l’alcool.
Les tenons LIGHT-POST® peuvent être stérilisés individuellement par autoclave selon les paramètres suivants** :
• Conditionner individuellement dans les sachets ou
gaines de stérilisation à usage unique conforme
à la réglementation nationale du pays (exemple
EN ISO 11607-1),
• Autoclave: type B conforme à la réglementation en
vigueur (exemple EN 13060),
• Température stérilisation : 134°C - Temps de stérilisation :
18 minutes,
• 1 cycle maximum.
Un kit de réaccès canalaire est disponible en cas de besoin.
Contacter votre distributeur.
Forets PRESHAPING DRILL LIGHT-POST® et Finishing
Drill LIGHT-POST® : les instruments sont livrés non stériles.
Stériliser avant chaque utilisation. Désinfecter les instruments
avec des solutions* de rinçage adaptées aux instruments
rotatifs. Ne pas désinfecter les instruments au désinfecteur
thermique. Contrôler visuellement les instruments avant
chaque utilisation : changer les instruments lorsqu’ils sont
endommagés, corrodés ou émoussés. Les forets de finition ne
devront être utilisés que pour préparer les canaux radiculaires.
Les forets doivent être stérilisés individuellement par autoclave
selon les paramètres suivants** :
• Conditionner individuellement dans les sachets ou gaines
de stérilisation à usage unique conforme à la réglementation nationale du pays (exemple EN ISO 11607-1),
• Autoclave: type B conforme à la réglementation en
vigueur (exemple EN 13060),
• Température stérilisation : 134°C - Temps de stérilisation :
18 minutes.
Changer de foret après 12 à 15 utilisations.
Pour des canaux très aplatis ou ovoïdes, l’utilisation des
tenons accessoires tels que le Fibercone™ est recommandée
pour un meilleur résultat.
STOCKAGE
Conserver les produits stérilisés dans un endroit sec, à l’abri
de la poussière.
Avant réutilisation, en cas de non conformité de l’intégrité de
l’emballage, re-conditionner et re-stériliser selon le protocole
défini.
SECURITE ET RESPONSABILITE
GARANTIE
RTD garantit ce produit contre tous défauts de matière et de
fabrication.
RTD n’offre aucune autre garantie, ni aucune garantie implicite ou de qualité marchande ou d’adéquation à un usage
particulier.
Il revient à l’utilisateur de s’assurer que les produits sont bien
destinés à l’usage recherché. Si ce produit s’avère défectueux
pendant la période de garantie, votre seul recours et la seule
06/06/13 16:54
A l’exception des lieux où la loi l’interdit, RTD ne sera tenu responsable d’aucune perte ou dommage découlant de ce produit, qu’ils soient directs, indirects, spécifiques, accidentels ou
consécutifs, quels que soient les arguments avancés, y compris la garantie, le contrat, la négligence ou la stricte responsabilité. L’utilisateur est seul responsable du choix de la taille
appropriée pour le foret et le tenon.
Produit à usage dentaire uniquement.
* Se reporter aux instructions du fabricant.
** Se reporter aux consignes spécifiques de stérilisation
fournies par le fabricant.
FABRICANT :
RTD
3 rue Louis Neel
38120 St Egrève - FRANCE
www.rtd.fr
[email protected]
SU / NO / DK
BRUKSANVISNING/BESKRIVNING
Parallell design för optimal retention och adaption.
COMPOSIPOST är ett röntgenkontrasterande kolfiberstift/kullfiberstift med 19mm längd/lengde.
LIGHT-POST
är ett röntgenkontrasterande translucent
kvartsfiberstift.
Graden av röntgenkontrast för COMPOSIPOST och LIGHTPOST är 1.5 respektive 1.25 mm Al (ISO 4049).
■ 1
■2
■3
Dimension
0.65
0.85
0.85
1:a del
1.00
1.20
1.40
2:a del
1.40
1.80
2.10
■
■
Färgkodning
Red
Grey
■
Blue
INDIKATIONER
I fall/tilfeller med otillräcklig/utilstrækkelig mängd kvarvarande/
gjenværende tandsubstans (<4mm) behövs stiftet för att stödja
och säkerställa den koronala restaurationen.
KONTRAINDIKATIONER
Otillräcklig/Utilstrækkelig mängd kvarvarande/gjenværende
tandsubstans (<1.5mm) kring/omkring preparationen.
REKOMMENDATIONER
Använd dualhärdande eller självhärdande/kemisk hærdende
primer/adhesive vid användning av icke-transluscenta stift.
VARNINGAR
Stiftet måste/skal vara väl rengjort i alkohol före cementering.
Undvik att vidröra/ta/røre på stiftet med fingrarna efter att
detta har rengjorts i alkohol. Oljan som finns på fingrarna kan
påverka bondingstyrkan. Använd handskar eller pincett.
Korrigering av stiftets längs skall göras utanför patientens mun.
Användning av kofferdam rekommenderas.
NOT0800XX00-201301-07.indd 7-12
Kronan behöver omsluta pelarpreparationen med minimum 1.5
mm ner över friskt dentin för att erhålla/beholde den omkramande önskade effekten.
ANDRA REKOMMENDATIONER
TILLVERKARE:
AVVIKANDE REAKTIONER
D.T.-stift är engångsartiklar. De får inte återanvändas på grund
av kontamineringsrisken.
D.T.-stift kan rengöras med alkohol. De kan vare sig steriliseras
eller desinficeras i en värmedesinfektor.
RTD
3 rue Louis Neel
Technoparc Espace Gavavière
38120 St Egrève - Frankrike
Inga kända.
STEGVISA INSTRUKTIONER
1. Preparera rotkanalen
2. Välj det mest lämpliga stiftet. Bestäm stiftets storlek i
förhållande till tandens anatomi. Använd röntgen vid
behov.
3. Bestäm höjden på den koronala pelaruppbyggnaden.
Denna bör utgöra ca 1/3 av hela stiftets längd. Ta bort
kvarvarande rotfyllning med Torpan 70 borr (rotationshastighet: 1000-2000 varv/min) så djupt att stiftet kan
placeras i kanalen till ca 2/3 av sin totala längd. Efter
preparationen skall minst 4 mm av rotfyllningen lämnats
kvar apikalt i kanalen. I fall/tilfeller med böjda rotkanaler
kan ovanstående riktlinjer inte tillämpas/følges helt.
4. Gör klart rotrymningen med rotrymmare i vald/utvalgt
storlek. (rotationshastighet: 1000-2000 varv/min).
5. Forma rotkanalen med valt slutborr för att anpassa/tilpasse den till det valda stiftet. (rotationshastighet: 10002000 varv/min).
6. Prova det valda stiftet i kanalpreparationen för att se att
det sitter ordentligt i kanalen.
7. Vid användning av LIGHT-POST skall den färgade o-ringen placeras som markering för senare avkapning av
stiftet. Korta stiftet till önskad längd genom kapning med
en diamanttrissa utanför patientens mun. Använd inte
avbitartång eller dylikt eftersom detta kan skada strukturen i stiftet. Ta bort o-ringen.
8. Rengör stiftet med alkohol.
9. Applicera etsgel både i rotkanalen och på det koronala dentinet under/i 15 sekunder*. Spola/Skyll bort
etsgelen under 10 sekunder. Ta bort överskottsvatten
med papperspoints, men lämna ytorna/overflatene fuktade. Undvik att etsgelen kommer i kontakt med gingival vävnad.
10. Applicera 2 skikt/lag* av primer med en tunn pensel (ex.
Composibrush RTD) i rotkanalen. Ta bort överskottsmaterial med papperspoints och luftblästra försiktigt alla
ytor. Emalj- och dentinytor skall nu ha en glänsande
yta. Om detta inte är fallet skall proceduren upprepas. Ljushärda primern* inne i rotkanalen under/i 10-20
sekunder.
11. Applicera ett skikt av primer på det valda stiftet och
luftblästra försiktigt under 5 sekunder. Ljushärda stiftet
under/i 10-20 sekunder (vid behov) utanför patientens
mun*.
12. Blanda cementet* och applicera detta i rotkanalen och
på stiftet. Använd en Lentulonål eller tunn kanyl. Placera
omedelbart stiftet i kanalen. Ta bort överskottsmaterial med lämpligt/egnet instrument. Om dualhärdande
cement används skall detta ljushärdas under/i 40-60
sekunder. Pressa försiktigt med ljusspetsen mot stiftet
under härdningen.
13. Applicera 2 skikt av adhesiv* på den synliga delen av
stiftet, cement och koronalt dentin. Ta bort överskottsmaterial och luftblästra försiktigt. Ljushärda under/i 20
sekunder.(vid behov)
14. Bygg direkt upp pelardelen med ett kompositmaterial
(core build-up material)*.
www.rtd.fr
[email protected]
LIGHT-POST®
D.T.-stift kan steriliseras enskilt i en autoklav med följande
inställningar**:
• Enskilt inslagna i engångssteriliseringsfickor eller -tuber
som uppfyller gällande regelstandarder i användningslandet (till exempel EN ISO 11607-1),
• Autoklav: typ B som uppfyller gällande regelstandard (till
exempel EN 13060),
• Steriliseringstemperatur:
134°C
-
steriliseringstid:
SUGGESTED POST SIZE FOR EACH TOOTH (GUIDELINES
ONLY) / SUGGESTION POUR LE CHOIX DU TENON / REKOMMENDERAD STORLEK/STØRRELSE PÅ STIFT FÖR VARJE
Tr a n s l u c e n t q u a r t z f i b e r
TAND (ENDAST VÄGLEDNING)
GB
INSTRUCTION FOR USE
FR
MODE D’EMPLOI
18 minuter,
• Endast 1 cykel.
A D.T.-åtkomstsats finns tillgänglig vid behov. Kontakta din
RTD-distributör.
D.T.-universalborr och D.T.-putsborr: dessa instrument levereras icke-sterila. Desinficera och sterilisera instrumenten före
användning. Desinficera instrumenten med desinficeringseller rengöringsmedel anpassade för roterande instrument*.
Desinficera inte instrumenten i värmedesinfektor. Inspektera
instrumenten visuellt före varje användning: byt till nya borrar
om de är skadade, korroderade eller slöa. Universalborren får
endast användas för att delvis ta bort rotkanalfyllningen och
putsborrar får bara användas för att förbereda rotkanalen.
D.T.-borrar kan steriliseras enskilt i en autoklav med följande
inställningar**:
• Enskilt inslagna i engångssteriliseringsfickor eller -tuber
som uppfyller gällande regelstandarder i användningslandet (till exempel EN ISO 11607-1),
• Autoklav: typ B som uppfyller gällande regelstandard (till
exempel EN 13060),
• Steriliseringstemperatur: 134°C - steriliseringstid:
18 minuter.
Byt till ny borr efter 12-15 användningar.
För koniska eller äggformade kanaler rekommenderas användning av stödstift, till exempel Fibercone™, för bästa resultat.
SE
NO BRUKSANVISNING
DK
LAGRING
Lagra de steriliserade komponenterna på en torr och dammfri plats.
Om förpackningen verkar skadad vid nästa användning ska
komponenten placeras i en ny ficka och steriliseras på nytt
enligt protokollet som tidigare definierades.
SÄKERHET OCH ANSVAR
- RTD tar inget ansvar och ger ingen kompensation för möjliga skador som uppstått till följd av:
- användning av instrument som inte tillhör systemet och
som kan nedsätta funktionen,
att instruktioner inte följts.
Användaren har ansvar att testa materialet för dess lämplighet för användning i annat syfte än det som uttryckligen anges
i användarinstruktionerna. Det är användarens ansvar att välja
rätt borr och stift.
Endast för dental användning.
* hänvisning till tillverkarens/ producentens bruksanvisning.
Rev.:2013-01
RESPONSABILITÉ
|
0459
-2005-
NOT0800XX00-201301
obligation de RTD sera le remplacement du produit RTD.
06/06/13 16:54