1
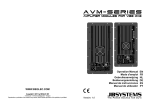
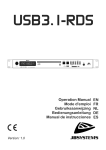
MPL-1 USB/SD CARD PLAYER Operation Manual Mode d'emploi Gebruiksaanwijzing Bedienungsanleitung Manual de instrucciones EN FR NL DE ES WWW.BEGLEC.COM Copyright © 2009 by BEGLEC NV ‘t Hofveld 2 ~ B1702 Groot-Bijgaarden ~ Belgium Reproduction or publication of the content in any manner, without express permission of the publisher, is prohibited. Version: 1.0 The Power Source for DJ’s EN - DISPOSAL OF THE DEVICE Dispose of the unit and used batteries in an environment friendly manner according to your country regulations. FR - DÉCLASSER L’APPAREIL Débarrassez-vous de l’appareil et des piles usagées de manière écologique Conformément aux dispositions légales de votre pays. NL - VERWIJDEREN VAN HET APPARAAT Verwijder het toestel en de gebruikte batterijen op een milieuvriendelijke manier conform de in uw land geldende voorschriften. DU - ENTSORGUNG DES GERÄTS Entsorgen Sie das Gerät und die Batterien auf umweltfreundliche Art und Weise gemäß den Vorschriften Ihres Landes. ES - DESHACERSE DEL APARATO Reciclar el aparato y pilas usadas de forma ecologica conforme a las disposiciones legales de su pais. PT - COMO DESFAZER-SE DA UNIDADE Tente reciclar a unidade e as pilhas usadas respeitando o ambiente e em conformidade com as normas vigentes no seu país. ENGLISH OPERATION MANUAL ENGLISH OPERATION MANUAL Always unplug the unit when it is not used for a longer time or before you start servicing. The electrical installation should be carried out by qualified personal only, according to the regulations for electrical and mechanical safety in your country. Check that the available voltage is not higher than the one stated in this manual. In the event of serious operating problems, stop using the appliance and contact your dealer immediately. Please use the original packing when the device is to be transported. Due to safety reasons it is prohibited to make unauthorized modifications to the unit. OPERATION MANUAL FEATURES This unit is radio-interference suppressed. This appliance meets the requirements of the current European and national guidelines. Conformity has been established and the relevant statements and documents have been deposited by the manufacturer. Compact audio player module for use with APL-15 amplifier module: Supports both SDHC-cards and USB-memories (USB-stick & small HD) Supports both MP3 and WMA files (+subfolder support) 11 Equalizer presets (normal, rock, pop, classic, bass, soft, …) Built-in FM-radio with up to 30 station presets Blue graphic LCD display (names, time, FM freq. and other info) Infrared remote with all functions included Plug & play for APL-15 amplifier modules: takes 2min to install! Can be used for all kinds of applications other than APL-15, special connection cable included. Power input: 12Vdc CLEANING THE APPLIANCE: Clean by wiping with a polished cloth slightly dipped with water. Avoid getting water inside the unit. Do not use volatile liquids such as benzene or thinner which will damage the unit. FUNCTIONS AND OPERATION BEFORE USE Before you start using this unit, please check if there’s no transportation damage. Should there be any, do not use the device and consult your dealer first. Important: This device left our factory in perfect condition and well packaged. It is absolutely necessary for the user to strictly follow the safety instructions and warnings in this user manual. Any damage caused by mishandling is not subject to warranty. The dealer will not accept responsibility for any resulting defects or problems caused by disregarding this user manual. Keep this booklet in a safe place for future consultation. If you sell the fixture, be sure to add this user manual. To protect the environment, please try to recycle the packing material as much as possible. Check the contents: Check that the carton contains the following items: User manual 1x MPL-1 Audio player module 1x MPL-1R IR remote control 1x Special connection cable (not needed when used with APL-15) SAFETY INSTRUCTIONS: This symbol means: indoor use only This symbol means: Read instructions To prevent fire or shock hazard, do not expose this appliance to rain or moisture. To avoid condensation to be formed inside, allow the unit to adapt to the surrounding temperatures when bringing it into a warm room after transport. Condense sometimes prevents the unit from working at full performance or may even cause damages. This unit is for indoor use only. Don’t place metal objects or spill liquid inside the unit. No objects filled with liquids, such as vases, shall be placed on this appliance. Electric shock or malfunction may result. If a foreign object enters the unit, immediately disconnect the mains power. No naked flame sources, such as lighted candles, should be placed on the appliance. Prevent use in dusty environments and clean the unit regularly. Keep the unit away from children. Inexperienced persons should not operate this device. Maximum save ambient temperature is 40°C. Don’t use this unit at higher ambient temperatures. JB SYSTEMS® 1/21 MPL-1 1. VOLUME buttons: (only on remote) The default volume level is fixed to “12”, with the VOL+/- buttons on the remote control you can adapt the output volume. 2. PLAY / PAUSE button: Radio operation: Press the PLAY/PAUSE button shortly to skip to the next radio station preset. Press the PLAY/PAUSE button for about 2seconds to store the current radio station to a preset: In the display a preset number starts flashing Use the SKIP buttons (3) to choose the desired preset to store the current radio station Press the PLAY/PAUSE button shortly to store the radio station to the selected preset Player operation: While playing a track: press the PLAY/PAUSE button to start / pause the current audio track. While browsing folders (6): press the PLAY/PAUSE button to enter the selected folder. 3. SKIP BACKWARD / FORWARD buttons: Radio operation: Press the SKIP buttons shortly to search manually for another radio station. Each time the button is pressed frequency changes in 0,1MHz steps. Press the SKIP buttons for about 2seconds to start auto-search for radio stations. Player operation: While playing a track: Press the SKIP buttons shortly to skip to the next/previous track. Keep one of the SKIP buttons pressed to search quickly inside the current track. While browsing folders: press the SKIP buttons shortly to skip to the next/previous folder. 4. MUTE button: (only on remote) Press the MUTE button to mute the audio output. Note that the current track continues playing. 5. REP / REPEAT button: used to select one of the 3 repeat modes of the audio player, the display shows which mode is currently selected: Repeat all: (standard mode) When all tracks on the memory device are played, playback starts again from the first track. Repeat 1+: The current track is played in an endless loop. Repeat F+: When all tracks in the folder are played, playback starts again from the first track. JB SYSTEMS® 2/21 MPL-1 ENGLISH OPERATION MANUAL 6. FOLDER button: Press this button to show the different folders (named 01\ ~ 02\ ~ 03\ ~ …). Use the SKIP buttons (3) to choose a folder and press the PLAY/PAUSE button (2) to select it. When the folder contains audio tracks, the names of the audio tracks will be shown. If the folder doesn’t contain any tracks, the display shows “No Song”. 7. EQ button: (only on remote) Radio operation: Press the EQ button shortly to toggle between mono and stereo mode. Note: In the APL-15 only Mono playback is possible, we suggest using the tuner always in mono mode to reduce noise. Press the EQ button for about 3seconds to start the full automatic search and store function: the complete FM-range is scanned, all available radio stations are automatically stored to the (max) 30 presets. Note: all previously stored station presets will be overwritten with new stations. Player operation: each time you press the EQ button, another equalizer preset is selected: normal, rock, pop, classic, jazz, blue, hall, bass, soft, country, opera. Just select the one you like most. 8. INPUT button: Press this button to select one of the 3 available options: USB-memory: if a USB memory device is inserted, the player will start playing the stored tracks. SD-card: if an SD or SDHC-card is inserted, the player will start playing the stored tracks. FM-radio: radio starts playing, make sure the antenna is in the right position. 9. LCD display: This graphic blue LCD-display shows a lot of information. The information shown depends on which input is selected. 10. USB-input: here you can connect all kinds of USB-memories (USB-sticks, USB-hard disks, …). As soon as the memory device is inserted, the display shows “Searching”, next the first track will be played. Some important notes: The USB-memory should be formatted in FAT16 or FAT32 (most USB-sticks and small hard disks are OK, however bigger hard disks are formatted in NTFS) Using a hard disk with external power supply is preferred, the USB-output on the MPL-1 is not always able to supply enough current to the external hard disk. 11. SD-card input: here you can connect MMC, SD and SDHC memory cards, formatted in FAT16 / FAT32. Insert the memory card until you hear a small click. As soon as the memory device is inserted, the display shows “Searching”, next the first track will be played. 12. IR-RECEIVER: accepts IR-signals from the MPL-1R remote control. 13. MOUNTING HOLES: used to fix the MPL-1 in the APL-15 amplifier module (see next chapter) 14. MULTI CONNECTOR: used to connect audio, antenna and power input of the MPL-1. See the picture for the pinning of the connector. ENGLISH OPERATION MANUAL D. Install the MPL-1 gently in the compartment and use the 4 screws (A) to fasten the audio player in the APL15. Done! SPECIFICATIONS Input voltage: Input current : USB voltage: USB current: Accepted audio files: FM Radio freq range: FM Radio tuning steps: Audio output: IR-Remote replacement battery: Dimensions: Weight: DC 8 to 18V 200 to 1000mA 5Vdc +/-0,2V 500mA WMA, MP3 (different sample rates) 87,5 to 108MHz 0,1MHz 750mV CR2025 3V battery (included) 110(W) x 44(H) x 65(D) mm 80grams Every information is subject to change without prior notice You can download the latest version of this user manual on our website: www.beglec.com INSTALLATION AND CONNECTIONS Apart from installing the MPL-1 inside the APL-15 amplifier module, you can use it also for all kinds of other applications. You can easily connect the supplied connection cable to the back of the MPL-1, the other end has connections for audio left & right, FM-antenna, power supply (8Vdc to 18Vdc). See the picture of the multi connector in the previous chapter for more information. Installing the MPL-1 inside the APL-15 amplifier module is quite easy, you only need a screwdriver: A. Turn the APL-15 amplifier module off and remove the power cable. Use a suitable screwdriver to loosen the 4 screws that hold the small cover plate on the APL-15 in place. B. Remove the metal cover plate and keep the 4 screws, you will still need these. Inside you will see a cable with special connector: tear the connector gently a few centimeters out of the APL-15 C. Connect it firmly to the back of the MPL-1 audio player module. JB SYSTEMS® 3/21 MPL-1 JB SYSTEMS® 4/21 MPL-1 FRANCAIS MODE D’EMPLOI FRANCAIS MODE D’EMPLOI INSTRUCTIONS DE SECURITE: MODE D’EMPLOI Ce symbole signifie: uniquement pour usage à l'intérieur. Ce symbole signifie : Lire le mode d’emploi. Nous vous remercions d’avoir acheté ce produit JB Systems®. Veuillez lire ce mode d’emploi très attentivement afin de pouvoir exploiter toutes les possibilités de cet appareil. EN VOUS INSCRIVANT POUR LA LETTRE D’INFORMATION VOUS SEREZ TOUJOURS TENU AU COURANT DES DERNIERES NOUVELLES CONCERNANT NOS PRODUITS: NOUVEAUTES, ACTIONS SPECIALES, JOURNEES PORTES OUVERTES, ETC. SURFEZ SUR: WWW.BEGLEC.COM CARACTERISTIQUES Cet appareil ne produit pas d’interférences radio. Il répond aux exigences nationales et européennes. La conformité a été établie et les déclarations et documents correspondants ont été déposés par le fabricant. Module lecteur audio compact à utiliser avec le module d'amplification APL-15 : supporte à la fois les cartes SDHC et les mémoires de type USB (clefs USB et les disques durs externes) supporte à la fois les fichiers MP3 et WMA (+ gestion des subfolders) 11 présélections d'égalisation (normal, rock, pop, classic, bass, soft, …). Radio FM intégrée avec 30 stations à présélectionner. Ecran graphique LCD bleu avec les noms, la durée, la fréquence FM, ainsi que d'autres infos. Télécommande à infrarouge apte à gérer toutes les fonctions existantes. Conception 'Plug & Play' pour les modules d'amplification APL-15 : l'installation ne vous prendra que deux minutes. Peut également être utilisé pour d’autres applications qu’avec l’APL-15, un câble de raccordement spécial est fourni avec l’appareil. Tension de service : 12 volts cc. AVANT L’UTILISATION Quelques instructions importantes: Avant d’utiliser cet appareil, assurez-vous de l’absence de dommages liés au transport. En cas de dommages, n’utilisez pas l’appareil et contactez le vendeur. Important: Cet appareil a quitté notre usine en parfaite condition et bien emballé. Il est primordial que l’utilisateur suive les instructions de sécurité et avertissements inclus dans ce manuel. La garantie ne s’applique pas en cas de dommage lié à une utilisation incorrecte. Le vendeur ne prend pas la responsabilité des défauts ou de tout problème résultant du fait de n’avoir pas tenu compte des mises en garde de ce manuel. Conservez ce manuel dans un endroit sûr pour toute consultation future. Si vous vendez l’appareil, assurez-vous d’y joindre ce manuel également. Afin de protéger l’environnement, merci de recycler les emballages autant que possible. Afin d’éviter tout risque d’incendie ou de décharge électrique, ne pas exposer cet appareil à la pluie ou l’humidité. Pour éviter la formation de condensation à l’intérieur de l’appareil, patientez quelques minutes pour laisser l’appareil s’adapter à la température ambiante lorsqu’il arrive dans une pièce chauffée après le transport. La condensation empêche l'appareil de fonctionner de manière optimale, et elle peut même causer des dommages. Cet appareil est destiné à une utilisation à l’intérieur uniquement. Ne pas insérer d’objet métallique ou renverser de liquide dans l’appareil. Aucun objet contenant un liquide, tels que des vases, ne peut être placé sur cet appareil. Cela risquerait de provoquer une décharge électrique ou un dysfonctionnement. Si un corps étranger est introduit dans l’appareil, déconnectez immédiatement de la source d’alimentation. Aucune source de flamme nue, telle que des bougies allumées, ne peut être placée sur l'appareil. Ne pas utiliser l'appareil dans un environnement poussiéreux et le nettoyer régulièrement. Ne pas laisser l'appareil à portée des enfants. Les personnes non expérimentées ne doivent pas utiliser cet appareil. La température ambiante maximale d’utilisation de l’appareil est de 45°C. Ne pas l’utiliser au-delà de cette température. Débranchez toujours l’appareil si vous ne l’utilisez pas de manière prolongée ou avant d’entreprendre des réparations. Les installations électriques ne peuvent être faites que par du personnel qualifié et conformément aux règlements de sécurité électrique et mécanique en vigueur dans votre pays. Assurez-vous que la tension d’alimentation de la source d’alimentation de la zone dans laquelle vous vous trouvez ne dépasse pas celle indiquée dans ce mode d’emploi. En cas de problèmes de fonctionnement sérieux, arrêtez toute utilisation de l’appareil et contactez votre revendeur immédiatement. Utilisez l’emballage d’origine si l’appareil doit être transporté. Pour des raisons de sécurité, il est interdit d’apporter une quelconque modification à l’appareil non spécifiquement autorisée par les parties responsables. NETTOYAGE: Nettoyez l’appareil à l’aide d’un chiffon doux, légèrement humide. Evitez d’introduire de l’eau à l’intérieur de l’appareil. N’utilisez pas de produits volatils tels que le benzène ou le 'thinner', qui peuvent endommager l’appareil. FONCTIONS ET FONCTIONNEMENT Vérifiez le contenu: Vérifiez si l'emballage contient bien les articles suivants : Mode d'emploi 1 x MPL-1, module lecteur audio. 1 x MPL-1R, télécommande IR. 1 x câble spécial de connexion (n’est pas utilisé avec l’APL-15). JB SYSTEMS® 5/21 MPL-1 JB SYSTEMS® 6/21 MPL-1 FRANCAIS MODE D’EMPLOI 1. Touches de VOLUME : Elles sont seulement présentes sur la télécommande ; le niveau de volume par 2. 3. 4. 5. 6. 7. défaut est fixé à la valeur 12 ; vous pouvez adapter le volume de sortie via les touches VOL+ et VOL- de la télécommande. Touche PLAY/PAUSE : En mode radio : Appuyez brièvement sur la touche PLAY/PAUSE pour passer à la station de radio présélectionnée suivante. Appuyez pendant environ 2 secondes sur la touche PLAY/PAUSE pour enregistrer la station de radio actuellement sélectionnée ; l'écran se met à afficher un numéro de présélection qui clignote ; utilisez les touches SKIP (3) pour choisir le numéro de présélection désiré afin d'enregistrer la station de radio actuelle ; Appuyez brièvement sur la touche PLAY/PAUSE pour enregistrer la station de radio actuelle vers le numéro de présélection choisi. En mode lecteur : Pendant la lecture d'un morceau : Appuyez sur la touche PLAY/PAUSE pour faire démarrer ou arrêter la piste audio en cours ; Pendant la navigation parmi les différents menus (6) : Appuyez sur la touche PLAY/PAUSE pour confirmer le dossier sélectionné. Touches SKIP BACKWARD / FORWARD (aller vers l'arrière / l'avant) : En mode radio : Appuyez brièvement sur les touches SKIP pour rechercher manuellement une autre station de radio ; chaque fois que l'on appuie sur la touche, la fréquence change par pas de 0,1 MHz ; Appuyez environ pendant 2 secondes sur les touches SKIP pour faire démarrer la recherche automatique des stations de radio. En mode lecteur : Pendant la lecture d'un morceau : Appuyez brièvement sur les touches SKIP pour passer à la piste audio suivante ou précédente ; Maintenez l'une des touches SKIP appuyée en continu pour faire une recherche rapide à l'intérieur même de la piste audio en cours. Pendant la navigation parmi les différents menus : appuyez brièvement sur les touches SKIP pour passer au dossier suivant ou précédent. Touche MUTE : Elle est seulement présente sur la télécommande ; appuyez brièvement sur la touche MUTE pour réduire la sortie audio au silence ; il est à noter que la piste audio en cours continue à être lue par le lecteur. Touches REP / PEPEAT : elles sont utilisées pour sélectionner l'un des 3 modes de répétition du lecteur audio ; l'écran montre quel est le mode en cours de sélection : Repeat all : c'est le mode de répétition par défaut : quand toutes les pistes audio présentes sur le support de mémoire ont été jouées, la lecture recommence à partir de la première piste audio. Repeat 1+ : ce mode lit et répète la piste audio en cours dans une boucle sans fin. Repeat F+ : quand toutes les pistes audio présentes dans le dossier (F = Folder) sélectionné ont été jouées, la lecture recommence à partir de la première piste audio présente dans ce dossier. Touche FOLDER (dossier) : Appuyez sur cette touche pour afficher les différents dossiers (nommés 01\ ~ 02\ ~ 03\ ~ …). Utilisez les touches SKIP (3) afin de choisir un dossier, puis appuyez sur la touche PLAY/PAUSE (2) pour le sélectionner ; si le dossier sélectionné contient des pistes audio, les noms de ces pistes audio seront affichés ; si le dossier sélectionné ne contient pas de pistes audio, l'écran affichera le message 'No Song'. Touche d'égalisation : Elle est seulement présente sur la télécommande. En mode radio : Appuyez brièvement sur la touche EQ pour passer du mode mono au mode stéréo et vice versa. Remarque : Avec l'APL-15, il n'est possible que de fonctionner en mode MONO ; nous vous suggérons donc de n'utiliser le tuner qu'en mode MONO afin de réduire les bruits parasites. Appuyez pendant environ 3 secondes sur la touche EQ pour mettre en route la fonction 100 % automatique de recherche et de stockage : la bande FM complète est alors scannée, et toutes les stations de radio disponibles sont automatiquement mémorisées vers les 30 numéros de JB SYSTEMS® 7/21 MPL-1 FRANCAIS MODE D’EMPLOI présélection (maximum). Remarque : toutes les stations de radio mémorisées auparavant seront "écrasées" par les nouvelles stations de radio. En mode lecteur : chaque fois que l'on appuie sur la touche EQ, une autre présélection d'égalisation est sélectionnée : normal, rock, pop, classic, jazz, blues, hall, bass, soft, country, opera. Il vous suffit de sélectionner celle que vous préférez. 8. Touche INPUT (entrée) : Appuyez sur cette touche pour sélectionner l'une des 3 entrées disponibles : Mémoire USB : si un support de mémoire USB est inséré dans le port adéquat, le lecteur commence à lire les pistes audio enregistrées sur ce support ; carte SD : si un support de mémoire SD ou SDHC est inséré dans le port adéquat, le lecteur commence à lire les pistes audio enregistrées sur ce support ; Radio FM : c'est la radio qui est lue ; dans ce cas, assurez-vous que l'antenne est dans une position adéquate. 9. Ecran LCD : Cet écran graphique LCD bleu est capable d'afficher un grand nombre d'informations : l'information affichée à l'écran dépendra donc de l'entrée sélectionnée. 10. Entrée USB : ce connecteur permet d'insérer toutes sortes de mémoires de type USB (clefs USB, disques durs USB, …). Dès que le support de mémoire est inséré à sa place, l'écran affiche le massage 'Searching', et ensuite, le lecteur commence à lire la première piste audio. QUELQUES REMARQUES IMPORTANTES : La mémoire USB devrait être au format FAT 16 ou FAT 32 (la plupart des clefs USB et des petits disques durs sont en ordre, mais cependant, les disques durs de taille supérieure sont au format NTFS) ; Si vous utilisez un disque dur, il faut préférer une alimentation extérieure ; en effet, la sortie USB du MPL-1 ne dispose pas toujours du courant suffisant pour alimenter un disque dur externe. 11. Entrée carte SD : ce connecteur permet d'insérer toutes sortes de cartes mémoires de type MMC, SD et SDHC au format FAT 16 et FAT 32. Insérez la carte mémoire jusqu'à ce que vous entendiez un petit clic. Dès que le support de mémoire est inséré à sa place, l'écran affiche le massage 'Searching', et ensuite, le lecteur commence à lire la première piste audio. 12. RECEPTEUR IR (INFRA ROUGE) : il accepte les signaux IR en provenance de la télécommande MPL-1R. 13. ORIFICES POUR LE MONTAGE : ils sont utilisés pour fixer le MPL-1 dans le module d'amplification APL-15 (prière de se reporter au chapitre suivant). 14. CONNECTEUR A BORNES MULTIPLES : elle est utilisée pour connecter les signaux audio, l'antenne et l'alimentation d'entrée du MPL-1 ; prière de se reporter à la figure ci-contre pour l'identification des différentes bornes. INSTALLATION ET CONNEXIONS A part l’installation du MPL-1 dans l’APL-15, vous pouvez l’utiliser pour plein d’autres applications. Le câble de connexion qui est fourni avec l’appareil peut être inséré dans le module MPL-1, vous disposez ainsi des fils pour raccorder la sortie audio gauche & droite, l’antenne FM et l’alimentation (8Vdc à 18Vdc). Voir l’image du connecteur dans le chapitre précédent pour plus d’informations sur la connectique. L'installation du MPL-1 à l'intérieur de l'APL15 est un véritable jeu d'enfant : il suffit de disposer d'un tournevis. A. Mettez le module APL-15 hors tension et retirez le câble d'alimentation de sa prise. Veuillez vous munir d'un tournevis approprié pour enlever les 4 vis qui maintiennent la petite plaque de métal en place sur l'APL-15. B. Enlever cette petite plaque de métal et gardez les 4 vis près de vous, vous allez en avoir besoin. A l'intérieur de la cavité JB SYSTEMS® 8/21 MPL-1 FRANCAIS MODE D’EMPLOI qui était masquée par la petite plaque, vous allez voir un connecteur spécial : avec précaution, tirez le connecteur de quelques centimètres en dehors de la cavité de l'APL-15. C. Connectez-le fermement à l'arrière du module lecteur audio MPL-1. D. Avec précaution, repoussez le lecteur audio MPL-1 en place, dans la cavité. Toujours avec précaution, fixez le MPL-1 au moyen des 4 vis qui servaient à maintenir la petite plaque en métal en place. NEDERLANDS HANDLEIDING GEBRUIKSAANWIJZING ® Hartelijk dank voor de aankoop van dit JB Systems product. Om ten volle te kunnen profiteren van alle mogelijkheden en voor uw eigen veiligheid is het aangeraden de aanwijzingen zeer zorgvuldig te lezen voor U het apparaat begint te gebruiken. Et voilà, c'est terminé ! CARACTERISTIQUES TECHNIQUES Tension d'entrée : de 8 à 18 V, CC Courant d'entrée : de 200 à 1000 mA Tension USB : 5 V CC, +/- 0,2 V Courant USB : 500 mA Fichiers audio supportés : WMA, MP3 (à différentes vitesses d'échantillonnage) Bande passante de la radio FM : de 87,5 à 108 MHz Pas de réglage de la radio FM : par pas de 0,1 MHz Sortie audio: 750mV Batterie de remplacement de la télécommande IR : Batterie CR 2025, 3V (incluse) Dimensions : 110 (L) x 44 (H) x 65 (P) mm Poids : 80 grammes Chacune de ces informations peut être modifiée sans avertissement préalable. Vous pouvez télécharger la dernière version de ce mode d’emploi de notre site Web: www.beglec.com DOOR U OP ONZE MAILINGLIJST IN TE SCHRIJVEN ONTVANGT U STEEDS DE LAATSTE INFORMATIE OVER ONZE PRODUKTEN: NIEUWIGHEDEN, SPECIALE ACTIES, OPENDEURDAGEN, ENZ. SURF NAAR: WWW.BEGLEC.COM KARAKTERISTIEKEN In dit apparaat is radio-interferentie onderdrukt. Dit product voldoet aan de gangbare Europese en nationale voorschriften. Het is vastgesteld dat het apparaat er zich aan houdt en de desbetreffende verklaringen en documenten zijn door de fabrikant afgegeven. Compacte audio player module voor de APL-15 versterkermodule: Werkt zowel met SDHC geheugenkaarten als met USB sticks en kleine Hard Discs Leest zowel MP3 als WMA files (+ondersteunt submappen) 11 Equalizer presets (normal, rock, pop, classic, bass, soft, …) Ingebouwde FM-radio met tot 30 presets Blauwe grafische LCD display (namen, tijd, FM frequentie en andere info) Infrarood afstandbediening voor alle functies Plug & play voor de APL-15 versterkermodules: het installeren duurt slechts 2 minuten! Kan ook voor allerlei andere toepassingen gebruikt worden dan in de APL-15. Er wordt een speciale aansluitkabel meegeleverd. Voedingsingang: 12Vdc EERSTE INGEBRUIKNAME Belangrijke instructies: Controleer voor het eerste gebruik van het apparaat of het tijdens het transport beschadigd werd. Mocht er schade zijn, gebruik het dan niet, maar raadpleeg eerst uw dealer. Belangrijk: Dit apparaat verliet de fabriek in uitstekende staat en goed verpakt. Het is erg belangrijk dat de gebruiker de veiligheidsaanwijzingen en raadgevingen in deze gebruiksaanwijzing uiterst nauwkeurig volgt. Elke schade veroorzaakt door verkeerd gebruik van het apparaat valt niet onder de garantie. De dealer aanvaardt geen verantwoordelijkheid voor mankementen en problemen die komen door het veronachtzamen van deze gebruiksaanwijzing. Bewaar deze brochure op een veilige plaats om hem in de toekomst nogmaals te kunnen raadplegen. Indien U ooit het apparaat verkoopt mag u niet vergeten om de gebruiksaanwijzing bij te voegen. Om het milieu te beschermen, probeer zoveel mogelijk het verpakkingsmateriaal te recycleren. Controleer de inhoud: Kijk na of de verpakking volgende onderdelen bevat: Gebruiksaanwijzing 1x MPL-1 Audio player module 1x MPL-1R IR afstandbediening 1x Speciale verbindingskabel (niet nodig wanneer het toestel gebruikt wordt in de APL-15) VEILIGHEIDSVOORSCHRIFTEN: Dit symbool betekent: het apparaat mag enkel binnenhuis worden gebruikt. Dit symbool betekent: Lees de handleiding! JB SYSTEMS® 9/21 MPL-1 JB SYSTEMS® 10/21 MPL-1 NEDERLANDS HANDLEIDING Stel dit apparaat niet bloot aan regen of vocht, dit om het risico op brand en elektrische schokken te voorkomen. Om de vorming van condensatie binnenin te voorkomen, laat het apparaat aan de omgevingstemperatuur wennen wanneer het, na het transport, naar een warm vertrek is overgebracht. Condensatie kan het toestel soms verhinderen perfect te functioneren. Het kan soms zelfs schade aan het apparaat toebrengen. Gebruik dit apparaat uitsluitend binnenshuis. Plaats geen stukken metaal en mors geen vocht binnen in het toestel om elektrische schokken of storing te vermijden. Objecten gevuld met water, zoals bvb. Vazen, mogen nooit op dit apparaat worden geplaatst. Indien er toch een vreemd voorwerp of water in het apparaat geraakt, moet U het direct van het lichtnet afkoppelen. Open vuur, zoals brandende kaarsen, mogen niet op het apparaat geplaatst worden. Zorg dat het toestel niet in een stoffige omgeving wordt gebruikt en maak het regelmatig schoon. Houd het apparaat uit de buurt van kinderen. Dit apparaat mag niet door onervaren personen bediend worden. De maximum veilige omgevingstemperatuur is 40°C. Gebruik het apparaat dus niet bij hogere temperaturen. Trek altijd de stekker uit wanneer het apparaat gedurende langere tijd niet wordt gebruikt of alvorens met de onderhoudsbeurt te beginnen. De elektrische installatie behoort uitsluitend uitgevoerd te worden door bevoegd personeel, volgens de in uw land geldende regels betreffende elektrische en mechanische veiligheid. Controleer dat de beschikbare spanning niet hoger is dan die aangegeven in deze handleiding. Ingeval van ernstige problemen met het bedienen van het toestel, stopt U onmiddellijk het gebruik ervan. Contacteer uw dealer voor een eventuele reparatie. Gebruik best de originele verpakking als het toestel vervoerd moet worden. Om veiligheidsredenen is het verboden om ongeautoriseerde modificaties aan het toestel aan te brengen. NEDERLANDS 3. 4. 5. 6. ONDERHOUD Reinig het toestel met een zacht, lichtjes bevochtigd doek. Vermijd water te morsen in het toestel. Gebruik nooit vluchtige producten zoals benzeen of thinner, dit kan het toestel beschadigen. 7. FUNCTIES EN WERKING 8. 9. 1. VOLUME toetsen: (alleen op de afstandbediening) Het standaard volumeniveau is ingesteld op “12”, met de VOL+/- toetsen op de afstandbediening kunt u het uitgangsvolume regelen. 2. PLAY / PAUSE toets: Werking met de radio: Druk even op de PLAY/PAUSE toets om over te gaan naar de volgende radio preset. Druk gedurende ongeveer 2 seconden op de PLAY/PAUSE toets om het radiostation dat u beluisterd op te slaan in een preset: Op de display begin teen preset nummer te flitsen Gebruik de SKIP toetsen (3) om de gewenste preset te kiezen waarin u het radiostation wilt opslaan. JB SYSTEMS® 11/21 MPL-1 10. HANDLEIDING Druk even op de PLAY/PAUSE toets om het radiostation op te slaan in de gekozen preset Werking met de speler: Terwijl een nummer speelt: druk op de PLAY/PAUSE toets om het huidige nummer te starten of in pauze modus te zetten. Terwijl u mappen doorloopt (6): druk op de PLAY/PAUSE om in de gekozen map te gaan. SKIP ACHTERWAARTS / VOORWAARTS toetsen: Werking met de radio: Druk even op de SKIP toetsen om manueel een ander radiostation te zoeken. Elke keer dat u op deze toets drukt verandert de frequentie in stappen van 0,1MHz. Druk gedurende ongeveer 2 seconden op de SKIP toetsen om het automatisch zoeken naar radiostations te starten. Werking met de speler: Terwijl een nummer speelt: Druk even op de SKIP om over te gaan naar het vorige/volgende nummer. Houd één van de SKIP toetsen ingedrukt om snel in een nummer te zoeken. Terwijl u mappen doorloopt: druk even op de SKIP toetsen om over te gaan naar de volgende/vorige map. MUTE toets: (alleen op de afstandbediening) Druk op de MUTE toets om de audio uitgang te onderbreken. Het nummer dat speelt blijft wel doorlopen zonder dat u het hoort. REP / REPEAT toets: wordt gebruikt om één van de 3 herhaalmodi van de audio speler te kiezen, op de display ziet u welke modus in gebruik is: Repeat all: (standaard modus) Wanneer alle nummers gespeeld zijn, dan zal de weergave opnieuw beginnen vanaf het eerste nummer. Repeat 1+: Het huidige nummer wordt voortdurend opnieuw gespeeld. Repeat F+: wanneer alle nummers in een map gespeeld zijn, dan begint de weergave opnieuw vanaf het eerste nummer in die map. FOLDER toets: druk op deze toets om de verschillende mappen weer te geven (naam 01\ ~ 02\ ~ 03\ ~ …). Gebruik de SKIP toetsen (3) om een map te kiezen en druk op de PLAY/PAUSE toets (2) om ze te bevestigen. Wanneer de map muzieknummers bevat, dan zullen de namen van deze muziekstukken getoond worden. Als de map geen muziek bevat, dan verschijnt er op de display “No Song”. EQ toets: (alleen op de afstandbediening) Werking met de radio: Druk even op de EQ toets om te kiezen tussen mono en stereo modus. Opmerking: In de APL-15 is alleen Mono weergave mogelijk, u zet dus best de tuner in mono modus zodat u minder storingen ontvangt Druk gedurende ongeveer 3 seconden op de EQ toets om de volautomatische “zoeken en opslaan” functie te starten: de volledige FM bandbreedte wordt gescand, alle beschikbare radiostations worden automatisch opgeslagen in (max) 30 presets. Opmerking: alle stations die eerder opgeslagen waren worden vervangen door de nieuwe radiostations. Werking met de speler: telkens u op de EQ toets drukt wordt ere en andere equalizer preset gekozen: normal, rock, pop, classic, jazz, blue, hall, bass, soft, country, opera. Kies gewoon diegene die u het leukst vindt. INPUT toets: druk op deze toets om één van de 3 beschikbare opties te kiezen: USB-memory: als er een USB apparaat aangesloten is zal de speller de opgeslagen nummer beginnen spelen. SD-card: al ser een SD of SDHC kaart in het toestel steekt zal de speller de opgeslagen nummer beginnen spelen. FM-radio: de radio begint te spleen, let er op dat de antenne in de juiste positie staat. LCD display: deze grafische blauwe LCD display toont heel wat informatie. De weergegeven informatie hangt af van de gekozen bron. USB-ingang: hier kunt u allerlei USB opslagmedia aansluiten (USB-sticks, USB-hard disks, …). Van zodra de opslagmedia aangesloten is zal er op de display “Searching” verschijnen, daarna zal het eerste nummer beginnen spelen. Enkele belangrijke opmerkingen: Het USB opslagmedium moet geformatteerd zijn in FAT16 of in FAT32 (de meeste USB-sticks en kleine harddisks zijn OK, grote harddisks zijn soms geformatteerd in NTFS) het is beter een harddisk te gebruiken die beschikt over een externe voeding, de USB uitgang van de MPL-1 is niet altijd geschikt om voldoende stroom naar de externe harddisk te voeren. JB SYSTEMS® 12/21 MPL-1 NEDERLANDS HANDLEIDING 11. SD-card ingang: hier kunt u MMC, SD en SDHC geheugenkaarten gebruiken, geformatteerd in FAT16 / FAT32. Steek de kaart in het toestel tot u een kleine ‘klik’ hoort. Van zodra de geheugenkaart in het toestel zit zal er op de display “Searching” verschijnen, daarna zal het eerste nummer gespeeld worden. 12. IR-ONTVANGER: ontvangt IR signalen van de MPL-1R afstandbediening. 13. BEVESTIGINGSGATEN: worden gebruikt om de MPL-1 in de APL-15 versterkermodule vast te maken (zie volgende hoofdstuk) 14. MULTICONNECTOR: wordt gebruikt om het audio signaal, de antenne en de stroomingang van de MPL-1aan te sluiten. Zie de afbeelding voor meer info over de verdeling van de pinnen van de connector. INSTALLATIE EN AANSLUITING De MPL-1 kan, naast het inbouwen in de APL-15 versterkermodule, ook voor allerlei andere toepassingen gebruikt worden. U kunt de meegeleverde aansluitkabel gebruiken, welke op de achterzijde van de MPL-1module wordt aangesloten, om de linker en rechter audiouitgang, de FM antenne, de voeding (8Vdc tot 18Vdc) aan te sluiten. Zie de afbeelding van de multiconnector in het vorige hoofdstuk voor meer info. Het installeren van de MPL-1 in de APL-15 versterkermodules is zeer eenvoudig, u heeft alleen een schroevendraaier nodig: A. Zet de APL15 uit en verwijder de stroomkabel. Verwijder de 4 schroeven van de afdekplaat (5). Gooi de schroeven niet weg !!! B. Verwijder de afdekplaat, hieronder vindt u een kleine kabel met een connector: haal deze kabel voorzichtig uit het compartiment. C. Sluit de connector voorzichtig aan op de ingang van de MPL-1 speler module. D. Installeer de MPL-1 voorzichtig in het compartiment en gebruik de 4 originele schroeven (A) om de audio speler in de APL15 vast te zetten. Klaar! EIGENSCHAPPEN Ingangsspanning : Ingangsstroom : USB spanning: USB stroom: Gelezen audio files: FM Radio frequentiebereik: FM Radio tuning stappen: Audio uitgang: IR afstandbediening batterij: Afmetingen: Gewicht: DC 8 tot 18V 200 tot 1000mA 5Vdc +/-0,2V 500mA WMA, MP3 (verschillende sample rates) 87,5 tot 108MHz 0,1MHz 750mV CR2025 3V battery (inbegrepen) 110(W) x 44(H) x 65(D) mm 80 gram 13/21 BEDIENUNGSANLEITUNG BEDIENUNGSANLEITUNG ® Vielen Dank, dass Sie sich für den Erwerb dieses JBSystems -Produkt entschieden haben. Bitte lesen Sie diese Bedienungsanleitung sorgfältig vor der Inbetriebnahme durch, zur vollen Ausschöpfung der Möglichkeiten, die dieses Gerät bietet, sowie zu Ihrer eigenen Sicherheit. EIGENSCHAFTEN Das Gerät ist funkentstört und erfüllt die Anforderungen der europäischen und nationalen Bestimmungen. Entsprechende Dokumentation liegt beim Hersteller vor. Kompaktes Audioplayermodul passend zum APL-15 Verstärkermodul: Eignet sich sowohl für SDHC-Karten als auch für USB-Memories (USB-Stick & kleine Festplatte) Unterstützt sowohl MP3- als auch WMA-Dateien (+Unterordner-Unterstützung) 11 Equalizer-Voreinstellungen (normal, Rock, Pop, Klassik, Bass, Soft, …) Eingebautes FM-Radio mit bis zu 30 voreingestellten Sendern Blaues Grafik-LCD-Display (Bezeichnungen, Zeit, FM-Freq. und sonstige Infos) Infrarot-Fernbedienung mit allen Funktionen versehen Plug & Play für APL-15 Verstärkermodule: die Einrichtung erfordert nur 2 Min.! Der MPL-1 kann nicht nur in Verbindung mit dem APL-15 Modul ,sonder auch in vielen anderen Anwendungen eigesetzt werden. Spezielles Anschlusskabel enthalten. Leistungseingang: 12 V dc (Gleichspannung) VOR DER ERSTBENUTZUNG Wichtige Hinweise: Vor der Erstbenutzung bitte das Gerät zuerst auf Transportschäden überprüfen. Sollte das Gerät einen Schaden aufweisen, Gerät bitte nicht benutzen, sondern setzen Sie sich unverzüglich mit Ihrem Händler in Verbindung. Wichtiger Hinweis: Das Gerät hat das Werk unbeschädigt und gut verpackt verlassen. Es ist wichtig, dass der Benutzer sich streng an die Sicherheitshinweise und Warnungen in der Bedienungsanleitung hält. Schäden durch unsachgemäße Handhabung sind von der Garantie ausgeschlossen. Der Händler übernimmt keine Verantwortung für Schäden, die durch Nichtbeachtung der Bedienungsanleitung hervorgerufen wurden. Die Bedienungsanleitung zum zukünftigen Nachschlagen bitte aufbewahren. Bei Verkauf oder sonstiger Weitergabe des Geräts bitte Bedienungsanleitung beifügen. Aus Umweltschutzgründen Verpackung bitte wieder verwenden oder richtig trennen. Überprüfen Sie den Inhalt: Folgende Teile müssen sich in der Geräteverpackung befinden: Bedienungsanleitung 1 x MPL-1 Audioplayermodul 1 x MPL-1R IR Fernbedienung 1 x Spezialverbindungskabel (nicht gebraucht, wenn mit APL-15 verwendet) SICHERHEITSHINWEISE Dieses Symbol bedeutet: Nur innerhalb von Räumen verwenden. Elke inlichting kan veranderen zonder waarschuwing vooraf U kan de laatste versie van deze handleiding downloaden via Onze website: www.beglec.com JB SYSTEMS® DEUTSCH Dieses Symbol bedeutet: Achtung! Bedienungsanleitung lesen! Zur Vermeidung von Stromschlag oder Feuer, Gerät bitte nicht Regen oder Feuchtigkeit aussetzen. Zur Vermeidung von Kondensation im Inneren des Geräts bitte nach dem Transport in eine warme Umgebung zum Temperaturausgleich einige Zeit ausgeschaltet stehen lassen. Kondensation kann zu Leistungsverlust des Geräts oder gar Beschädigung führen. Gerät nicht im Freien und in feuchten Räumen und Umgebungen verwenden. MPL-1 JB SYSTEMS® 14/21 MPL-1 DEUTSCH BEDIENUNGSANLEITUNG Keine Metallgegenstände oder Flüssigkeiten ins Innere des Geräts gelangen lassen. Keine mit Flüssigkeit gefüllten Gegenstände, z.B. Vasen, auf das Gerät stellen. Kurzschluss oder Fehlfunktion können die Folge sein. Falls es doch einmal vorkommen sollte, bitte sofort Netzstecker ziehen und vom Stromkreis trennen. Offene Brandquellen, wie z.B. brennende Kerzen, sollten nicht auf das Gerät gestellt werden. Nicht in staubiger Umgebung verwenden und regelmäßig reinigen. Für Kinder unerreichbar aufbewahren. Unerfahrene Personen sollen das Gerät nicht bedienen. Umgebungstemperatur darf 40ºC nicht überschreiten. Stets Netzstecker ziehen, wenn Gerät für längeren Zeitraum nicht genutzt oder es gewartet wird. Elektrische Anschlüsse nur durch qualifiziertes Fachpersonal überprüfen lassen. Sicherstellen, dass Netzspannung mit der in vorliegender Bedienungsanleitung angegebenen übereinstimmt. Bei Fehlfunktion Gerät nicht benutzen und sich mit dem Händler in Verbindung setzen. Bei Transport bitte Originalverpackung verwenden, um Schäden am Gerät zu vermeiden. Aus Sicherheitsgründen dürfen an dem Gerät keine unbefugten Veränderungen vorgenommen werden. WARTUNG DEUTSCH 3. 4. 5. Die Reinigung des Geräts erfolgt mit einem leicht mit Wasser angefeuchteten Tuch. Vermeiden Sie, dass Wasser in das Gerätinnere gelangt. Verwenden Sie keine brennbaren Flüssigkeiten wie Benzin oder Verdünner, die das Gerät beschädigen würden. FUNKTIONEN UND FUNKTIONSWEISE 6. 7. 1. LAUTSTÄRKE(Volume)-Knöpfe: (nur auf Fernbedienung) Der voreingestellte Lautstärkepegel ist auf “12” festgelegt. Mit den VOL+/- -Knöpfen auf der Fernbedienung können Sie die Ausgangslautstärke einstellen. 2. ABSPIEL- (PLAY) / PAUSE-Taste: Funktionsweise des Radios: Drücken Sie kurz die PLAY/PAUSE-Taste, um zum nächsten voreingestellten Radiosender zu wechseln. Halten Sie die PLAY/PAUSE-Taste ungefähr 2 Sekunden lang gedrückt, um den gerade eingestellten Radiosender auf einen Speicherplatz zu speichern: Auf dem Display blinkt eine Speichernummer Verwenden Sie die VORLAUF-RÜCKLAUF (SKIP) -Tasten (3), um den gewünschten Speicherplatz auszuwählen, auf dem der gerade eingestellte Radiosender gespeichert werden soll Drücken Sie kurz die PLAY/PAUSE-Taste, um den Radiosender auf dem ausgewählten Speicherplatz zu speichern Funktionsweise des Players: Beim Abspielen eines Track: drücken Sie die PLAY/PAUSE-Taste, um den gerade vorliegenden Track zu starten/zu unterbrechen (Pause). JB SYSTEMS® 15/21 MPL-1 8. 9. 10. BEDIENUNGSANLEITUNG Beim Durchlaufen von Ordnern (6): drücken Sie die PLAY/PAUSE-Taste, um in den gewählten Ordner zu gelangen. RÜCKLAUF/VORLAUF (SKIP)-Tasten: Funktionsweise des Radios: Drücken Sie die SKIP-Tasten kurz, um manuell einen anderen Radiosender zu suchen. Bei jedem Tastendruck ändert die Frequenz in 0,1MHz-Schritten. Halten Sie die SKIP-Tasten ungefähr 2 Sekunden lang gedrückt, um den automatischen Sendersuchlauf zu starten. Funktionsweise des Players: Beim Abspielen eines Track: Drücken Sie kurz die SKIP-Tasten, um zum folgenden/vorangehenden Track zu wechseln. Halten Sie eine der SKIP-Tasten gedrückt, um schnell innerhalb des gerade spielenden Tracks zu suchen. Beim Durchlaufen von Ordnern: Drücken Sie kurz die SKIP-Tasten, um zum folgenden/vorangehenden Ordner zu wechseln. STUMM- (MUTE) Taste: (nur auf Fernbedienung) Drücken Sie die MUTE-Taste, um den Audioausgang stumm zu schalten. Hinweis: Der gerade spielende Track spielt weiter. WIEDERHOLUNGS (REPEAT) Taste: zum Auswählen einer der 3 Wiederholungsmodi des Audioplayers. Auf dem Display wird der aktuell ausgewählte Modus angezeigt: Repeat all (Alles wiederholen): (Standardmodus) Wenn alle Tracks auf der Speichereinheit abgespielt wurden, startet die Wiedergabe erneut beim ersten Track. Repeat 1+: Der gerade spielende Track wird in einer Endlosschleife abgespielt. Repeat F+: Wenn alle Tracks im Ordner abgespielt wurden, startet die Wiedergabe erneut beim ersten Track. ORDNER-Taste: Drücken Sie diese Taste, um die verschiedenen Ordner anzuzeigen (mit den Bezeichnungen 01\ ~ 02\ ~ 03\ ~ …). Verwenden Sie die SKIP-Tasten (3), um einen Ordner auszuwählen und drücken Sie die PLAY/PAUSE-Taste (2), um die Auswahl zu bestätigen. Wenn der Ordner Audiotracks enthält, werden die Namen der Audiotracks angezeigt. Wenn der Ordner keine Tracks enthält, erscheint auf dem Display der Hinweis „No Song” (Kein Song). EQ-Taste: (nur auf Fernbedienung) Funktionsweise des Radios: Drücken Sie kurz die EQ-Taste um zwischen Mono- und Stereomodus hin- und herzuwechseln. Achtung: Im APL-15 ist nur eine Mono-Wiedergabe möglich, wir empfehlen den Tuner stets im Monomodus zu verwenden, um das Rauschen einzuschränken. Halten Sie die EQ-Taste ungefähr 3 Sekunden lang gedrückt, um die vollautomatische Suchund Speicherfunktion zu starten: die vollständige FM-Bereich wird abgetastet, alle verfügbaren Radiosender werden automatisch auf den (max.) 30 Speicherplätzen gespeichert. Achtung: alle vorher gespeicherten Sendereinstellungen werden mit neuen Sendern überschrieben. Funktionsweise des Players: jedes Mal, wenn Sie die EQ-Taste drücken, wird eine andere Equalizer-Voreinstellung ausgewählt: normal, Rock, Pop, Klassik, Jazz, Blues, Hall, Bass, Soft, Country, Oper. Wählen Sie einfach Ihre Lieblingseinstellung. INPUT-Taste: Drücken Sie diese Taste, um eine der 3 verfügbaren Optionen auszuwählen: USB-Memory: wenn eine USB-Speichereinheit eingeführt wird, beginnt der Player mit dem Abspielen der gespeicherten Tracks. SD-Karte: wenn eine SD oder SDHC-Karte eingeführt wird, beginnt der Player mit dem Abspielen der gespeicherten Tracks. FM-Radio: das Radio beginnt zu spielen. Achten Sie darauf, dass die Antenne in der richtigen Position steht. LCD-Display: Dieses blaue Grafik-LCD-Display zeigt viele Informationen an. Die gezeigte Information ist abhängig von dem ausgewählten Eingang (Input). USB-Eingang: hier können Sie alle Arten USB-Memories (USB-Sticks, USB-Festplatten, …) anschließen. Sobald die Speichereinheit eingeführt wurde, zeigt das Display „Searching” (Suche) an, anschließend wird der erste Track abgespielt. Einige wichtige Hinweise: Das USB-Memory muss auf FAT16 oder FAT32 formatiert sein (die meisten USB-Sticks und kleine Festplatten sind OK, größere Festplatten sind allerdings auf NTFS formatiert) Der Einsatz einer Festplatte mit externer Stromspeisung wird empfohlen, da der USB-Ausgang an dem MPL-1 nicht immer in der Lage ist, ausreichend Strom für die externe Festplatte zu liefern. JB SYSTEMS® 16/21 MPL-1 DEUTSCH BEDIENUNGSANLEITUNG 11. SD-Karten-Eingang: hier können Sie MMC, SD und SDHC Speicherkarten, die auf FAT16 / FAT32 formatiert sind, anschließen. Führen Sie die Speicherkarte ein, bis Sie ein kleines Klicken hören. Sobald die Speichereinheit eingeführt wurde, zeigt das Display „Searching” (Suche) an, anschließend wird der erste Track abgespielt. 12. IR-RECEIVER: nimmt IR-Signale von der MPL-1R Fernbedienung auf. 13. MONTAGELÖCHER: zur Befestigung des MPL-1 im APL-15 Verstärkermodul (siehe folgendes Kapitel) 14. MULTI-STECKER: zum Anschließen des Audio-, Antennen- und Netzeingangs des MPL-1. Siehe Abbildung für die Verdrahtung des Steckers. EINBAU UND ANSCHLUSS Der MPL-1 kann nicht nur in Verbindung mit dem APL-15 Modul ,sonder auch in vielen anderen Anwendungen eigesetzt werden. Sie können einfach das mitgelieferte Verbindungskabel mit dem Anschluss auf der Rückseite des MPL-1 verbinden, während am anderen Kabelende Anschlüsse für: Audio (links/rechts); FM-Antenne und Stromversorgung (8Vdc bis 18Vdc) zu finden sind. Für weitere Informationen betrachten Sie das Bild des Multi-Connector im vorherigen Kapitel Der Einbau des MPL-1 in das APL-15 Verstärkermodul ist ziemlich einfach, Sie benötigen nur einen Schraubendreher: A. Schalten Sie das APL-15 Verstärkermodul aus und entfernen Sie das Netzkabel. Benutzen Sie einen geeigneten Schraubendreher, um die 4 Schrauben, die die kleine Abdeckplatte auf dem APL-15 halten, zu lösen. B. Entfernen Sie die Metallabdeckplatte und bewahren Sie die 4 Schrauben auf, Sie werden sie noch brauchen. Im Inneren sehen Sie ein Kabel mit einem Sonderstecker: ziehen Sie den Stecker sanft einige Zentimeter aus dem APL-15 C. Schließen Sie ihn fest an die Rückseite des MPL-1 Audioplayermoduls an. D. Setzen Sie den MPL-1 Audioplayer vorsichtig an seinen Platz. Befestigen Sie den MPL-1 vorsichtig mit den 4 Schrauben, die Sie von der Metallabdeckung aufbewahrt haben. Fertig! TECHNISCHE DATEN Eingangsspannung: Eingangsstrom : USB-Spannung: USB-Strom: Kompatible Audiodateien: FM Radio Frequenzbereich: FM Radio Abstimmschritte (Tuning): Audio-Ausgang: Ersatzbatterie für IR-Fernbedienung: Abmessungen: Gewicht: 8 bis 18V Gleichspannung 200 bis 1000mA 5V Gleichstrom +/-0,2V 500mA WMA, MP3 (verschiedene Abtastgeschwindigkeiten) 87,5 bis 108MHz 0,1MHz 750mV CR2025 3V Batterie (inbegriffen) 110(B) x 44(H) x 65(T) mm 80 g Technische Änderungen können auch ohne Vorankündigung vorgenommen werden! Sie können sich die neueste Version dieses Benutzerhandbuches von unserer Website herunterladen: www.beglec.com ESPAÑOL MANUAL DE FUNCIONAMIENTO CARACTERÍSTICAS Esta unidad es a prueba de interferencias de radio. Este producto cumple con los requisitos de las directrices nacionales y europeas actuales. Se ha establecido la conformidad y las instrucciones y los documentos correspondientes han sido depositados por el fabricante. Módulo compacto reproductor de audio para usarse con el módulo amplificador APL-15: Compatible tanto con las tarjetas SDHC como con las memorias USB (memoria USB y HD pequeñas) Compatible con archivos MP3 y WMA (+ soporte de subcarpetas) 11 preajustes de ecualizador (normal, rock, pop, classic, bass, soft,…) Radio FM integrado hasta con 30 estaciones preestablecidas. Pantalla LCD con gráficos azules (nombres, hora, frecuencia FM y otro tipo de información) Mando infrarrojos con todas las funciones incluidas ¡Plug & play para los módulos amplificadores APL-15: tarda 2 min en instalarse! Puede ser utilizado para todo tipo de aplicaciones otras que para APL-15, cable de conexión especial incluido. Entrada de alimentación: 12 V CC ANTES DEL USO Antes de comenzar a utilizar esta unidad, compruebe que no existan daños ocasionados durante el transporte. Si observa algún daño, no utilice el dispositivo y consulte primero a su distribuidor. Importante: Este dispositivo ha salido de nuestras instalaciones en perfecto estado y bien embalado. Es absolutamente necesario que el usuario siga estrictamente las instrucciones de seguridad y advertencias que aparecen en este manual del usuario. Cualquier daño producido por un manejo inadecuado queda excluido de la garantía. El distribuidor no asumirá ninguna responsabilidad por cualquier defecto o problema que surja por no haber seguido las instrucciones de este manual de usuario. Guarde este manual en un lugar seguro para consultarlo en el futuro. Si vende este aparato más adelante, asegúrese de incluir este manual de usuario. Para proteger el medio ambiente, por favor intente reciclar el material de embalaje en la medida de lo posible. Compruebe el contenido: Compruebe que la caja contiene los siguientes elementos: Manual del usuario 1 x Módulo reproductor de audio MPL-1 1 x Mando a distancia IR MPL-1R 1 x Cable de conexión especial (no es necesario cuando se utiliza con APL-15) INSTRUCCIONES DE SEGURIDAD: Este símbolo indica: uso en interiores solamente Este símbolo indica: leer instrucciones Para evitar incendios o riesgos de descarga, no exponga la unidad a la lluvia o a la humedad. Para evitar que se forme condensación en el interior, deje que la unidad se adapte a la temperatura ambiente cuando la lleve a una habitación cálida después del transporte. A veces la condensación impide que la unidad funcione a pleno rendimiento y puede incluso provocar daños. Esta unidad sólo se puede usar en interiores. No coloque objetos metálicos ni derrame líquidos dentro de la unidad. No deberá colocar sobre la unidad objetos con líquidos, como por ejemplo jarrones. Se pueden producir descargas eléctricas o fallos de funcionamiento. Si algún objeto extraño entra en la unidad, desconecte inmediatamente el suministro eléctrico. JB SYSTEMS® JB SYSTEMS ® 17/21 MPL-1 MANUAL DE FUNCIONAMIENTO 18/21 MPL-1 ESPAÑOL MANUAL DE FUNCIONAMIENTO ESPAÑOL No coloque sobre el aparato fuentes de llamas, como por ejemplo velas encendidas. Evite el uso en ambientes con polvo y limpie la unidad regularmente. Mantenga la unidad lejos de los niños. Las personas sin experiencia no deben utilizar este aparato. La máxima temperatura ambiente para un funcionamiento seguro es de 40 °C. No utilice esta unidad a temperaturas ambiente superiores. Desenchufe siempre la unidad cuando no vaya a ser utilizada durante un largo periodo de tiempo o antes de comenzar el mantenimiento. La instalación eléctrica sólo debe ser llevada a cabo por personal cualificado, de acuerdo con las regulaciones de seguridad eléctrica y mecánica de su país. Compruebe que el voltaje disponible no supera el que se indica en este manual. En caso de que ocurran problemas de funcionamiento serios, deje de utilizar el aparato y póngase en contacto con su distribuidor inmediatamente. Utilice el embalaje original cuando tenga que transportar el dispositivo. Por razones de seguridad se prohíbe realizar modificaciones no autorizadas en la unidad. LIMPIEZA DEL APARATO: Limpie con un paño pulido ligeramente empapado con agua. No deje entrar agua en la unidad. No utilice líquidos volátiles como benceno o diluyente, puesto que dañarán la unidad. 4. 5. 6. FUNCIONES Y OPERACIÓN 7. 8. 1. Botones de VOLUMEN: (sólo en el mando) El nivel de volumen predeterminado está fijado en “12”, con los botones de VOL +/- en el mando a distancia puedes adaptar el volumen de salida. 2. Botón REPRODUCIR/PAUSA: Operación del aparato de radio: Pulse el botón REPRODUCIR/PAUSA brevemente para saltar a la siguiente emisora de radio preestablecida. Pulse el botón REPRODUCIR/PAUSA durante 2 segundos para guardar la emisora de radio actual en una preestablecida. En la pantalla el número preestablecido se ilumina de modo intermitente Use los botones OMITIR (3) para seleccionar la posición preestablecida deseada para guardar la emisora de radio actual Pulse el botón REPRODUCIR/PAUSA brevemente para guardar la estación de radio en la posición preestablecida que haya seleccionado Operación del reproductor: Al reproducir una pista: pulse el botón REPRODUCIR/PAUSA para iniciar/pausar la pista de audio actual. Al explorar en las carpetas (6): pulse el botón REPRODUCIR/PAUSA para ingresar en la carpeta seleccionada. 3. Botones OMITIR HACIA ATRÁS/HACIA DELANTE: Operación del aparato de radio: Pulse los botones OMITIR brevemente para buscar manualmente otra emisora de radio. Cada vez que pulse el botón la frecuencia cambia en incrementos de 0,1 MHz. JB SYSTEMS® 19/21 MPL-1 9. 10. 11. MANUAL DE FUNCIONAMIENTO Pulse los botones OMITIR durante 2 segundos para iniciar la búsqueda automática de las emisoras de radio. Operación del reproductor: Durante la reproducción de una pista: Pulse los botones OMITIR brevemente para saltar a la siguiente/anterior pista. Mantenga pulsado uno de los botones OMITIR para buscar rápidamente dentro de la pista actual. Al explorar en las carpetas: pulse los botones OMITIR brevemente para saltar a la siguiente/anterior pista. Botón MUTE (SILENCIAR): (solo en el mando) Pulse el botón MUTE (SILENCIAR) para silenciar la salida de audio. Tenga en cuenta que se sigue reproduciendo la pista actual. Botón REP / REPETIR: se usa para seleccionar uno de los 3 modos de repetición del reproductor de audio, la pantalla muestra el modo que se encuentra actualmente seleccionado: Repetir Todo: (modo estándar) Al reproducir todas las pistas en el dispositivo de memoria, la reproducción inicia nuevamente a partir de la primera pista. Repetir 1+: La pista actual se reproduce en un ciclo indefinido. Repetir F+: Al reproducir todas las pistas en la carpeta, la reproducción inicia nuevamente a partir de la primera pista. Botón CARPETA: Pulse este botón para mostrar las diferentes carpetas (nombradas 01/ ~ 02\ ~ 03\ ~ …). Use los botones OMITIR (3) para seleccionar una carpeta y pulse el botón REPRODUCIR/PAUSA (2) para seleccionarla. Cuando la carpeta contiene pistas de audio, se mostrarán los nombres de las pistas de audio. Si la carpeta no contiene ninguna pista, la pantalla muestra "No Song" (No canción). Botón EQ: (solo en el mando) Operación del aparato de radio: Pulse el botón EQ brevemente para cambiar entre el modo mono y el modo estéreo. Nota: En el APL-15 solamente es posible la reproducción Mono, sugerimos que use el sintonizador siempre en el modo mono para reducir el ruido. Pulse el botón EQ alrededor de 3 segundos para iniciar la búsqueda totalmente automática y guarde la función: se explora el rango FM por completo, todas las estaciones de radio disponibles se guardan automáticamente en las 30 (máx.) emisoras preestablecidas. Nota: todas las emisoras preestablecidas guardadas previamente serán sobrescritas con nuevas emisoras. Operación del reproductor: cada vez que pulse el botón EQ, se selecciona otro ecualizador preestablecido: normal, rock, pop, classic, jazz, blues, hall, bass, soft, country, opera. Solo seleccione el que más le guste. Botón INPUT (ENTRADA): Pulse este botón para seleccionar una de las 3 opciones disponibles: Memoria USB: si inserta un dispositivo de memoria USB, el reproductor empezará a reproducir las pistas guardadas. Tarjeta SD: si inserta una tarjeta SD o SDHC, el reproductor empezará a reproducir las pistas guardadas. Radio FM: se empieza a reproducir la radio, asegúrese de que la antena se encuentre en la posición correcta. Pantalla LCD: Esta pantalla LCD con gráficos azules muestra mucha información. La información mostrada depende de la entrada que haya sido seleccionada. Entrada USB: aquí puede conectar todo tipo de memorias USB (memorias USB, discos duros USB, …). Tan pronto como inserte el dispositivo de memoria, la pantalla muestra “Searching” (Buscando), enseguida se reproducirá la primera pista. Algunas notas importantes: La memoria USB debe estar formateada en FAT16 o FAT32 (la mayoría de las memorias USB y los discos duros pequeños son compatibles, sin embargo los discos duros más grandes están formateados en NTFS) Se prefiere el uso de un disco duro con suministro de alimentación externa, la salida USB en el MPL-1 no siempre es capaz de suministrar suficiente corriente al disco duro externo. Entrada de tarjeta SD: aquí puedes conectar las tarjetas de memoria MMC, SD y SDHC, formateadas en FAT16/FAT32. Inserte la tarjeta de memoria hasta que escuche un pequeño clic. Tan pronto como inserte el dispositivo de memoria, la pantalla muestra “Searching” (Buscando), enseguida se reproducirá la primera pista. JB SYSTEMS® 20/21 MPL-1 ESPAÑOL MANUAL DE FUNCIONAMIENTO 12. RECEPTOR IR: acepta las señales IR desde el mando a distancia MPL-1R. 13. ORIFICIOS DE INSTALACIÓN: se usa para fijar el MPL-1 en el módulo amplificador APL-15 (vea el siguiente capítulo) 14. MULTI CONECTOR: se usa para conectar la entrada de audio, antena y de alimentación del MPL-1. Vea la imagen para la patilla del conector. INSTALACIÓN Y CONEXIONES A parte de la instalación del MPL-1 dentro del modulo amplificador APL-15 , se puede utilizar también para otras aplicaciones. Usted puede conectar el cable de conexión suministrado a la parte posterior del MPL-1, el otro extremo tiene las conexiones de audio izquierdo y derecho, FM-antena, fuente de alimentación (8Vdc a 18Vdc). Ver la imagen del conector múltiple en el capítulo anterior para obtener más información. Instalar el MPL-1 dentro del módulo amplificador APL-15 es demasiado fácil, solamente requiere un destornillador. A. Apague el módulo amplificador APL-15 y quite el cable de alimentación. Use un desatornillador adecuado para aflojar los 4 tornillos que sujetan la placa de la cubierta pequeña en el APL-15 en su lugar. Extraiga la placa de la cubierta metálica y conserve los 4 tornillos, aún los va a necesitar. B. En el interior verá un cable con un conector especial: rasgue el conector suavemente unos cuantos centímetros fuera del APL-15. C. Conéctelo firmemente en la parte posterior del módulo reproductor de audio MPL-1. D. Coloque el reproductor de audio MPL-1 suavemente en su lugar. Apriete el MPL-1 suavemente con los 4 tornillos que tiene de la placa de la cubierta metálica. ¡Ya está! ESPECIFICACIONES Voltaje de entrada: CC 8 a 18 V Corriente de entrada: 200 a 1000 mA Voltaje USB: 5 Vcc +/-0,2 V Corriente USB: 500 mA Archivos de audio aceptados: WMA, MP3 (velocidad de muestreo diferente) Rango de frecuencia de radio FM: 87,5 a 108 MHz Incrementos de sintonización de radio FM: 0,1 MHz Salida de Audio: 750mV Batería de repuesto del mando IR: Batería de 3 V CR2025 (incluida) Dimensiones: 110 (An) x 44 (Al) x 65 (P) mm Peso: 80 gramos Toda la información está sujeta a cambios sin previo aviso Puede descargar la última versión de este manual de usuario en nuestro sitio web: www.beglec.com JB SYSTEMS® 21/21 MPL-1