1
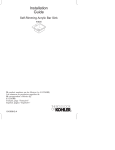
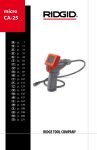
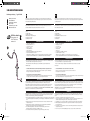
USB-INSPEKTIONSKAMERA
Bedienungsanleitung Typ: DT-2828
GB
USB Inspection Camera
Instruction Manual
FR
Camera D‘inspection USB
Mode d'emploi
ES
Cámara De Inspección - USB
Manual de instrucciones
DE
GB
Lesen Sie die vorliegende Anleitung sorgfältig, bevor Sie das Produkt benutzen. Bewahren Sie
diese Bedienungsanleitung zum späteren Nachschlagen gut auf. Geben Sie das Produkt nur mit
Gebrauchsanweisung an Dritte weiter.
Read the present operating instructions carefully before using the product. Keep these operating
instructions in a safe place for later reference. Pass on the product to third parties only together with the
operating instructions.
BESTIMMUNGSGEMÄSSE VERWENDUNG
Diese USB-Endoskop Kamera wurde entwickelt, um schwer zugängliche Objekte, welche ohne
technische Hilfsmittel nicht betrachtet werden können, zu erforschen.
INTENDED USE
This USB endoscope camera has been developed to allow examination of objects which cannot be
viewed without technical aids.
BESCHREIBUNG DER KOMPONENTEN
1.Linse
2.4x weiße LED‘s
3.Flexibler Schwanenhals
4.LED (AN/AUS) und Helligkeitsregler
5.Schnappschuss Taster
6.USB Daten Anschluss
REV Ritter GmbH
Frankenstraße 1-4
D-63776 Mömbris
www.rev.biz
SPEZIFIKATIONEN
•
•
•
•
•
•
•
•
640*480 farb- CMOS Sensor
Betrachtungswinkel: 40 – 50°
Sensor Größe: 1/6 Zoll
Fokus: 40 – 60mm
4x weiße LED Lichter
USB 2.0 Anschluss
Die Helligkeit der LEDs kann variabel eingestellt werden.
Keine Treiberinstallation erforderlich.
(Mit Ausnahme von Windows 7, hier ist eine optionale Freeware zur Verwendung erforderlich)
• Unterstützt von Windows ME, Windows 2000, Windows XP, Windows Vista und Windows 7
1
3
1
DESCRIPTION OF THE COMPONENTS
1.Lens
2.4x white LEDs
3.Flexible gooseneck
4.LED (ON/OFF) and brightness controller
5.Snapshot button
6.USB data port
2
SPECIFICATIONS
•
•
•
•
•
•
•
•
640*480 colour CMOS sensor
Viewing angle: 40 – 50°
Sensor size: 1/6“
Focus: 40 – 60 mm
4x white LEDs
USB 2.0 port
The brightness of the LEDs can be varied.
No driver installation necessary.
(With the exception of Windows 7; an optional freeware is necessary in this case)
• Supported by Windows ME, Windows 2000, Windows XP, Windows Vista and Windows 7
INBETRIEBNAHME
5
4
6
1.When the USB plug is inserted into the port, the computer signals that new hardware has been
detected and installs the necessary drivers automatically.
After a short time a message is displayed that the hardware has been installed successfully.
2.Bilddarstellung
2.Illustration
• Unter älteren Windows Versionen kann das Bild folgendermaßen dargestellt werden:
Öffnen Sie zunächst den Arbeitsplatz und anschließend den Ordner „Scanner und Kameras“.
Nun folgt ein Doppelklick auf „USB-Verbundgerät“.
• Under older Windows versions the mask can look as follows:
First open the Control panel and then the folder „Scanners and cameras“.
Now double-click on „USB device“.
0
• Vorgehensweise
bei Verwendung von Windows 7:
Um die Kamera nutzen zu können benötigen Sie eine optionale Software wie z.B. die Freeware
VLC-Player, welche kostenfrei aus dem Internet heruntergeladen werden kann.
• Procedure when using Windows 7:
In order to be able to use the camera, you need an optional software such as the freeware VLC Player
which can be downloaded free of charge from the Internet.
ENTSORGUNG
Gebrauchte Elektro- und Elektronikgeräte dürfen gemäß europäischer Vorgaben nicht mehr zum
unsortierten Abfall gegeben werden. Das Symbol der Abfalltonne auf Rädern weist auf die
Notwendigkeit der getrennten Sammlung hin. Helfen auch Sie mit beim Umweltschutz und sorgen
dafür, dieses Gerät, wenn Sie es nicht mehr nutzen, in die hierfür vorgesehenen Systeme der
Getrenntsammlung zu geben. RICHTLINIE 2012/19/EU DES EUROPÄISCHEN PARLAMENTS UND DES
RATES vom 04. Juli 2012 über Elektro- und Elektronik-Altgeräte.
REV 12.14
GARANTIE
ANL_DT-2828.indd 1
COMMISSIONING
1.Nach dem Einstecken des USB Steckers zeigt der Computer an, dass eine neue Hardware erkannt
wurde und installiert die benötigten Treiber automatisch.
Nach einiger Zeit erscheint die Meldung, dass die Hardware erfolgreich installiert wurde.
Dieses REV-Produkt durchläuft während der Fertigung mehrere, nach neuesten Techniken aufgebaute
Prüfstationen. Sollte dennoch ein Mangel auftreten, leistet REV im nachfolgenden Umfang Gewähr:
1. Die Dauer der Garantie beträgt 24 Monate ab dem Kaufdatum.
2. Das Gerät wird von REV entweder unentgeltlich nachgebessert oder ausgetauscht, wenn es innerhalb
der Gewährleistungspflicht nachweisbar wegen eines Fertigungs- oder Materialfehlers unbrauchbar
wird.
3. Die Haftung erstreckt sich nicht auf Transportschäden sowie auf Schäden, die durch fehlerhafte
Installation entstehen.
4. Wird innerhalb von 6 Monaten nach Nichtanerkennung des Haftungsfalles durch REV kein
Widerspruch eingelegt, verjährt das Recht auf Nachbesserung.
5. Im Gewährleistungsfall ist das Gerät zusammen mit dem Kaufbeleg und einer kurzen
Mangelbeschreibung an den Händler oder REV zu senden.
6. Ohne Garantienachweis erfolgt Nachbesserung ausschließlich gegen Berechnung.
WEEE-REFERENCE OF DISPOSAL
In accordance with European defaults used electrical and electronics devices may no more be given to
the unsorted waste. The symbol of the waste bin on wheels refers to the necessity of separate collection.
Please help with environmental protection and see to it that this device is given to the for this purpose
designated systems of waste sorting if you do not use it any longer.
GUIDELINE 2012/19/EU of the EUROPEAN PARLIAMENT AND the COUNCIL of July 04th 2012 about
electrical and electronics old devices.
WARRANTY
During manufacturing this REV product is passed through several quality testing stations which are set
up with newest technology. Should nevertheless a defect arise, REV offers a warranty to the following
extent:
1. The duration of the warranty is 24 months after the date of purchase.
2. The unit is either repaired or replaced by REV free of charge or if it can be shown that it has become
unusable during the warranty period due to a manufacturing or material defect.
3. The liability does not cover transport damages or damaged incurred through defective installation.
4. If REV repudiates the warranty claim and no objection is made within 6 months, the right to repair
becomes time-barred.
5. In a warranty case the unit must be sent to the dealer or REV together with the sales slip and a short
description of the defect.
6. If there is no proof for a warranty liability being in place, any repair carried out will be invoiced.
04.12.2014 13:36:20
USB-INSPEKTIONSKAMERA
Bedienungsanleitung Typ: DT-2828
GB
USB Inspection Camera
Instruction Manual
FR
Camera D‘inspection USB
Mode d'emploi
ES
Cámara De Inspección - USB
Manual de instrucciones
FR
ES
Veuillez lire attentivement le mode d’emploi avant d’utiliser le produit. Conservez précieusement
ce mode d’emploi en vue d’une consultation ultérieure. Ce produit ne doit être transmis à des tiers
qu‘accompagné du mode d‘emploi.
UTILISATION CONFORME A LA DESTINATION
Cette caméra d’inspection a été conçue pour étudier des objets difficilement accessibles ne pouvant
pas être observés sans accessoires techniques.
DESCRIPTION DES COMPOSANTS
1.Lentille
2.4x DEL blanches
3.Cols de cigne flexibles
4.DEL (Marche/arrêt) et régulateur de clarté
5.Touche de prise de vue
6.Connexion de données USB
REV Ritter GmbH
Frankenstraße 1-4
D-63776 Mömbris
www.rev.biz
SPECIFICATIONS
•
•
•
•
•
•
•
•
Capteur couleur CMOS 640*480
Angle d’observation : 40 – 50°
Dimension du capteur : 1/6 pouce
Focus : 40 – 60mm
4 lampes blanches LED
Branchement USB 2.0
La clarté des DEL est variable.
L‘installation d‘un pilote n‘est pas nécessaire.
(à l’exception de Windows 7, nécessitant un logiciel gratuit)
• Compatible Windows ME, Windows 2000, Windows XP, Windows Vista et Windows 7
1
3
1
2
MISE EN SERVICE
1.Après le branchement à la prise USB, l‘ordinateur détecte automatiquement la connexion d‘un
nouveau matériel et installe le pilote requis automatiquement.L’installation terminée, le message
apparaît que le matériel a été installé avec succès.
5
2.Représentation d’images
4
• L’image peut êtr représentée comme suit avec des versions de Windows plus anciennes.
Ouvrez tout d’abord le poste de travail et ensuite le dossier « Scanners et appareils photos ». Doublecliquez ensuite sur « périphériques USB connectés ».
6
0
• Procédure
à suivre pour Windwos 7:
Pour pouvoir utiliser l‘appareil photo, vous avez besoin d‘un logiciel optimal, tel que le programme
gratuit, le lecteur VLC qui peut être téléchargé ’ans frais sur Internet.
WEEE - INDICATION DES TRAITEMENTS DES DÉCHETS
Suite aux indications européennes, les déchets électriques et électroniques ne doivent plus être jeter
avec les déchets non tirés. Le symbole de la poubelle avec les roues indique l’importance du tri sélectif.
Participez vous aussi au respect de l’environnement et faites en sorte que, lorsque vous n’utiliserez plus
votre appareil, vous suiviez les indications du traitement des déchets.
Directive : 2012/19/EU DU PARLEMENT ET CONSEIL EUROPÉENS DU 04 juillet 2012 au sujet d’anciens
appareils électroniques et électriques.
ANL_DT-2828.indd 2
Lea atentamente este manual antes de utilizar el producto. Guarde este manual para futuras consultas.
En caso de proporcionar el producto a terceros, debe incluir el manual.
USO PREVISTO
Esta cámara endoscópica USB se ha desarrollado para investigar objetos prácticamente inaccesibles
que, sin ayuda técnica, no se podrían considerar.
DESCRIPCIÓN DE LOS COMPONENTES
1. Lente
2.4x LEDs blancos
3.Cuello de cisne flexible
4.LED (ENCENDIDO/APAGADO) y Regulador del brillo
5.Pulsador instantáneo
6.Conexión de datos USB
ESPECIFICACIONES
•
•
•
•
•
•
•
•
Sensor CMOS a color 640*480
Ángulo de visión 40 – 50°
Tamaño del sensor: 1/6 pulgadas
Foco: 40 – 60mm
4x LEDs blancos, luces
Conexión USB 2.0
La claridad de los LEDs pueden ajustarse de manera variable.
No se requiere la instalación del controlador.
(Con la excepción de Windows 7, en este caso se requiere un software gratuito para su uso)
• Funciona en Windows ME, Windows 2000, Windows XP, Windows Vista y Windows 7
PUESTA EN FUNCIONAMIENTO
1.Después de insertar el USB, el ordenador muestra que se ha reconocido un nuevo hardware e instala
automáticamente el controlador necesario. A continuación, aparece una notificación de que el
hardware se ha instalado correctamente.
2.Representación gráfica
• En versiones anteriores de Windows, la imagen puede aparecer de la siguiente manera:
A continuación diríjase a la carpeta Mi PC y abra la carpeta „Escáner y Cámaras“.
Haga doble clic en „Dispositivo compuesto USB“.
• Procedimiento en Windows 7:
Para usar la cámara, necesita un software opcional como por ejemplo con software gratuito VLCPlayer, que puede descargase gratuitamente de Internet.
WEEE-INDICACIONES PARA LA EVACUACIÓN
De acuerdo con las normas europeas los residuos de aparatos eléctricos y electrónicos ya no pueden
evacuarse junto con los residuos no clasificados. El símbolo del recipiente de basura con ruedas indica
la necesidad de una evacuación selectiva. Colabore usted también en la protección del medio ambiente
entregando este aparato a la recogida selectiva de residuos cuando no vaya a utilizarlo más. DIRECTIVA
2012/19/EU DEL PARLAMENTO Y CONSEJO EUROPEOS del 04 de julio de 2012 sobre residuos de
aparatos eléctricos y electrónicos.
04.12.2014 13:36:20