1
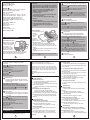
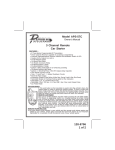
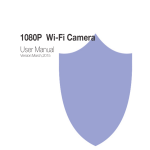
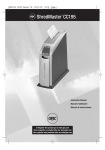
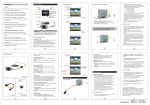
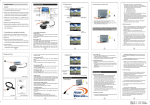
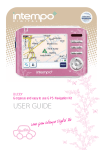
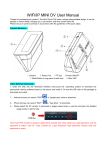
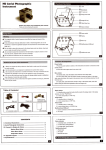
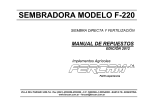
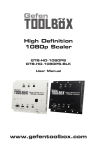
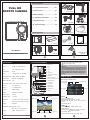
Table of contents
FULL HD
SPORTS CAMERA
I. Functional Illustrations....................03
II. Screen Icons....................................03
Helmet Mount
Long Shaft
Short Shaft
Handlebar Mount
Surf Board Mount
USB cable
AV cable
User Manual
III.Menu Settings..................................04
IV. Operation Instructions..................05
V. Playback on PC...............................08
VI. Troubleshooting.............................09
Packing Content
Camera
Battery
Dive Case
Case Clip
User Manual
Before use, please read this manual carefully!
Windsheild Mount
(Optional)
01
Specifications
02
I. Functional Illustrations
01 Battery cover
02 USB
Sensor:
5.0 M 1/2.5” CMOS Sensor
Lens:
f/2.8, 6-layers glass lens
Compression:
H.264
FOV:
170° @ 720P; 127° @ 1080P
03 TF1
04 HDMI
05 TF2
06 Microphone
07 Charging indicator light
08 White light
Recording modes: 1080P 30FPS , 720 60FPS
Photo modes:
8M / 5M / 3M Optional
Motion Detection:
Yes
09 Status indicator light
10 Posts for Car DVR Function
11 White light Button
12 Power Button
Time Lapse modes: 1 FPS 2FPS 6FPM 1FPM
Screen:
1.5” HD Screen
Storage:
2 x 32G Micro SD
Interface:
USB2.0 HDMI
Battery:
800mAh Li-Po Battery
Working Time:
2 hours
Charging Time:
2.5 hours
Waterproof:
30 meters / 90 feet (w/ dive case)
Size:
49mm x 42mmx 34mm (H x W x D)
Weight:
68 grams
Warning:
When you plug only TF2 for both sports camera
and car DVR function, please take the videos out
the TF card, before you use this camera as car
DVR, to protect your videos files. Avoiding the
loop record function to delete the footage you
record.
III.Menu Settings
External screen display menu
Video settings
Image settings
System settings
13 Menu Button
14 Photo Button
15 Replay Button
16 Video Button
Father options
Son options
17 Screen
II. Screen Icons
00 : 10:01
Photo
Photo size: 3M, 5M, 8M
Photo intervall: off, 3 Photos, 5 Photos
Auto shooting: off, 3 Sec., 5 Sec., 10 Sec., 30 Sec.,
50 Sec.
Time stamp: off, on
1 2 20.5GB 1080p
Video
Video size: 1080p, 1080pS, 720pH, 720p
Quality: H, M, L
Video section: 5 minutes, 10 minutes, 15 minutes,
20 minutes, 30 minutes
Time stamp: off, on
Time Lapse Rec: off, 1fps, 6fps, 2fpm, 1fpm
recording time
Timestamp
Video /Photo
battery display
Compatible system: Window 7, Vista ,
Mac OS X 10.4.11 and above
Output:
1 TF1 and TF2 for sports camera function.
2 TF2 for car DVR function.
HDMI , Real Time AV out
10:03
System time
image quality
Memory cards and remaining capacity
V 1.0
03
04
Loop recording: off, on
File Formal: Mpeg, MOV
Microphone: on, off
Power Button: Short press ON, Long press OFF
Warning:
System
Language: English, French, German, Spanish,
Italian, Dutch, Norwegian, Russian
Date: YYYY-MM-DD
Time: hh:mm
Auto Screen off: off, 30 Sec., 60 Sec., 120 Sec.
Auto Power off: off, 60 Sec., 120 Sec., 300 Sec.
Motion Detection: off, High, Medium, Low
Image Rotation: Regular, Rotation 180
Image Mirror: Regular, MirrorLight Frequency:
60Hz, 50Hz
Video System: NTSC, PAL
OSD: on, off
LED Indication: on, off
Format card
Default setting
Firmware update: Vx.xx
The sport camera is compatible with 2GB, 4GB,
8GB, 16GB and 32GB capacity micro SD, micro
SDHC and micro SDXC memory cards. While all
speed class ratings are compatible, Speed
Class4 or above recommended for high
definition video recording use.
to insert SD card:
1. Slide memory card into card slot with label
facing front of camera.
2. The card will click into place when fully
inserted.
to remove SD card:
1. Place fingernail against edge of memory card
and lightly press further into camera.
2. Card will spring out far enough to be
removed.
Short press
to turn camera on. Screen on when
camera started;
Long press
to turn camera off. Screen show off
image and go off when camera turned off.
Reminds:
Don’t try long press when you are recording video.
It may cause to lose the video you are shooting.
This button
is active in Car DVR Mode, while
other buttons become LOCK buttons in that Mode.
White Light Button:
Turn the white light ON/OFF
Press
to turn the white light ON/OFF when
camera is working.
Reminds:
This button
is active in *Car DVR Mode, it work
as LOCK button, to make the recording video section
locked, and also will turn white light ON/OFF.
2.Install Battery
Default Setting in Bolt
IV. Operation Instructions
1.Install Memory Card
Before using your sport
camera for the first time:
1. insert a micro SD™,
micro SDHC™ or
micro SDXC™ card
into the card slot with
label facing forward,
narrowest part of the card first. Speed Class 4 is
OK for high definition video recording, and Speed
Class 10 or higher cards are recommended.
05
ii) UP Button in Menu , Replay or Connect to
PC mode
Press
to take a photo or a serial photo as
setting in Menu.
* Taking single photo;
* Taking 3/5 photos
* Tacking photo every 3 / 5 / 10 / 30 / 50 Sec.
This button
works as UP button in:
Menu Mode
Replay Mode
Connect to PC Mode
Replay Button:
i) Long press to turn Replay function ON/OFF
ii) SECLET Button in Menu , Replay or Connect
to PC mode
Press
to call replay function.
First you can see TF1/TF2 selection options, and
then in next level you see Video/Photo selection
options. Use UP button
and Down button
to
select from options and files.
Record Button:
i) Start/stop video or time lapse video recording;
ii) DOWN Button in Menu , Replay or Connect to
PC mode
Press
to take a video or record the video when
you press
again.
*Record normal video with section time set in Menu:
5 / 10 / 15 / 20 / 30 minutes
*Record time lapse video
This button
works as DOWN button in:
Menu Mode
Replay Mode
Connect to PC Mode
V. Playback on PC
Playback on PC (MS Windows)
The videos can be easily watched on your PC.
08
2. Place battery into the
camera.
3. Charge
battery.
The
included
lithium-ion
battery comes
partially charged.
To charge, connect the included USB cable to
camera and connect the other end of the cable
to a power source such as a computer, 5 Volt wall
charger
or Mobile power bank. No damage will occur to the
camera
or battery if used prior to a full charge.
Warning: If the battery is idle for long, do take
it out.
M Menu Button:
i) Long press to turn Menu Mode ON/OFF;
ii) RETURN button in Menu, Replay mode
Long press M to call the Menu ON/OFF.
This button M works as RETURN button in Menu
Mode and Replay Mode, works as LOCK button in
Car DVR Mode (Optional)
RETURN button Short M press to go back one
level up in Menu or in Replay Mode.
Long press M to go directly to Photo/Video Mode.
When replaying videos or reviewing photos: Short
press M to call the *Fill operations* window, you
can choose to “Return, Delete this file, Delete all
files or LOCK/UNLOCK(clear protection of files);
Long press M to go directly to Photo/Video Mode.
Photo Button:
i) Take Photo/Photos
06
We recommend the free VLC- Player.
This can be downloaded on www.vlcplayer.org
Connect the camera to your PC by using the USBCable. Turn on the camera. Choose the card access
with the buttons "Photo and Video" and confirm with
the Play button. The PC will recognize the cam as a
hard drive.
The display will show "Connect to PC" for a short
time.
VI. Troubleshooting
Delete playback
1. Unable to Power on
a. Check if the battery is installed properly and
check the direction of the battery.
b. Check if the battery is fully charged; use it only
after it is fully charged.
c. Take out the battery, reinstall it and power the
device on.
2. Immediately off after powered on
a. Always use the fully charged battery.
b. Subject to working temperature, the device
may automatically power off in order to protect itself;
related information will occur before powering off.
c. The service life of the battery expires, please
replace it.
About Video/Photo
1. Unable to take videos/photos
a. Please check if the storage card is full; if yes,
delete the unwanted videos or photos.
b. Please check if <Auto shooting> is correct.
2. Video interruption
a. Check if a Micro SDHC card supporting this
device is used.
b. A Micro SDHC card must be used to ensure
normal video; Micro SDHC 1 0 is recommended.
c. Due to different memory card type, video may
interrupt.
09
07
3. Unclear photo
a. Please check if the lens has dirt (fingerprint). If
yes, mop the surface of the lens lightly with a piece
of dry soft cloth.
4. The Video jerks when playing at the PC
a.The USB- connection is too slow. Download the
file to the PC first.
b.The micro SD- Card is too slow. Try one of the
recommended micro SD- Cards.
c.The computer is too slow. Connect the camera
and your TV with the AV- Cable.
d.The data rate is too high for the computer.
Reduce data rate to "standard".
5. The video is turned 180°
a.Wrong settings, use setup configuration to turn
the picture
About Replay
1. Unable to replay
a. Please check if the storage card is installed
properly.
b. No file in the storage card, no replay.
c. The video or photo with file name changed
cannot be replayed.
d. After the folder is changed, no replay.
2. White dots appear on image
a. If the device works in a dark place, dust or
other particles may cause reflection.
b. The white dots are caused by rays and do not
indicate the failure of the device.
c. Check if the surface of the lens has dust.
About Display
1. Date and time not display in a correct way
a. Wrong settings, change Settings in the Setup
2. Display shows "error"
a. The memory card is not working correctly.
Format the memory card. Card is possibly damaged.
10