Transcript
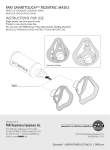
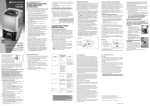
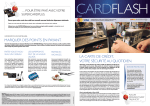
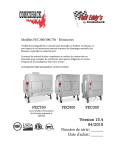
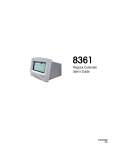
ENGLISH FRANÇAIS DEUTSCH ESPAÑOL User Guide
1
Dock and Charge
1. Plug the USB
2.To charge the mouse,
receiver into
a USB port.
2
dock it on to the
USB receiver.
For video tutorials visit the support
page at www.swiftpoint.net
Hold the Mouse
Hold the mouse as shown, with your thumb in the
thumb grip and your middle finger on the finger grip.
Rest your index finger on the grip surface of the left-click button.
3
Scrolling, Zooming
and Paging
Is the Pointer on the screen
moving too fast or too slow?
Use your index finger to roll the scroll wheel.
You can adjust the pointer speed in your computer settings.
To find out how to do this, and for other tips on using the
mouse, see our support page at www.swiftpoint.net.
You can scroll rapidly by lifting the mouse and
rolling the scroll wheel along the mousing surface.
This is called SlideScrollTM and is useful when you
want to scroll quickly through documents.
Need Help?
For help on using your product or technical queries
please visit the support page at www.swiftpoint.net
or email us at [email protected].
Swiftpoint™ Mouse
Thumb grip
Systems Requirements
Hardware: 1 x USB port
Operating Systems: Either Windows® 7 /
Windows Vista® / Windows® XP / Windows®
2000 / Mac OS® 10.4 or higher
Middle finger grip
Right-click button
Left-click button
Before first use perform a full charge.
Scroll wheel
The Battery LED will flash while charging and will
glow steadily when charging is complete. This may
take up to 90 minutes.
The first time you plug the USB receiver
into a Mac, a window may pop up saying
“keyboard cannot be identified…’. This
message can be safely ignored. Click the
red close button in the upper-left corner
of the window to "cancel".
USB receiver/charger
4
Recharging
When the mouse battery is low, the battery LED will flash every 5 seconds.
•
•
5
The first 30 seconds of charging will give you up
to one hour of use. During this RapidChargeTM
the battery LED will flash rapidly.
Set the ‘Up’ Direction
You may find that you hold the mouse at different
angles when using your laptop in different
environments. This may mean that the pointer
doesn’t move in the direction that you expect.
6
• Hold down the left-click button to zoom in and out.
• Hold down the right-click button to page up and
down.
SmartTouch™
The SmartTouchTM sensor ensures the mouse
pointer stops moving when your finger is not
detected on the finger grip.
7
1. Hold the mouse at a
comfortable angle.
2.Press and hold down both
Using the Parking Accessory
(optional)
The parking accessory allows you to use your laptop
on an angle. When the mouse is positioned on the
parking space, it will magnetically attach to the film
and not slide off.
When you type, it is best to move the mouse to
a position between your hands, but doing this
will also move the pointer
across your screen. When
SmartTouchTM is on, you can
move your mouse without
any pointer movement by
lifting your middle finger
and then moving the mouse
with your thumb.
To ensure that you are comfortable in any location,
you can easily change the angle that your mouse
regards as ‘up’. To do this:
To fully charge the mouse, leave it docked until
the battery LED glows steadily. This takes up to
90 minutes and gives 2-4 weeks of normal use.
While SlideScrolling:
Do not place
your thumb too
far forward
SmartTouchTM will be set to
off by default. To activate it:
mouse buttons.
3.After 2 seconds the mouse
pointer will position itself at
the bottom of the screen and
move up (as illustrated).
1.Press and hold down
both mouse buttons.
2.After 2 seconds, the
4.Release the buttons and move
The parking space also
helps position your
mouse between your
hands, so that you
can type without any
obstruction.
status LED will glow.
the mouse pointer in a straight
line upward until the pointer
moves in a small circle.
3.Release the buttons and
when the status LED turns
off, roll the scroll wheel.
The new up direction has now
been set.
The status LED will flash once indicating
SmartTouchTM is now on.
Fully charging the
mouse periodically will
prolong battery life.
If you have a laptop
with a highly reflective
palmrest, the parking
accessory will allow the
mouse to work more
efficiently.
Refer to the instructions on the parking accessory on
how to apply.
You can switch SmartTouchTM off again by
repeating the steps above.
Ergonomic Information
Repetitive use of computers and computer
peripherals such as mice and keyboards over
prolonged periods may result in physical
discomfort and/or injury to muscles, tendons
and nerves. Such outcomes may also be due
to an incorrect body posture, an unergonomic
work set-up, or poor work habits. If you
experience any pain, swelling, stiffness,
numbness or other discomfort of these in
your hands, wrists, arms, neck, shoulders,
back or other parts of your body while using
a computer, you should immediately contact a
qualified medical professional.
Warranty
Swiftpoint warrants this product to be free
from defects in material and workmanship
for a period of two (2) years from the date
of purchase. In the event that this product
is found to be defective in material and
workmanship, Swiftpoint shall, at its sole
election, either (1) repair or replace the
product, or (2) refund the purchase price,
provided that the product is returned to
Swiftpoint with a copy of the sales receipt
or invoice. Postage charges shall be to the
cost of the purchaser, unless applicable
law requires otherwise. Refer to the support
page at www.swiftpoint.net for product return
addresses.
This warranty does not cover accidental
damage, wear and tear, or use of the product
in a manner other than in accordance with the
instructions. UNDER NO CIRCUMSTANCES
SHALL SWIFTPOINT BE LIABLE FOR
ANY CONSEQUENTIAL, INDIRECT
OR INCIDENTAL LOSS OR DAMAGES
INCLUDING, BUT NOT LIMITED TO,
LOSS OF REVENUES, PROFITS, DATA, OR
RECORDS, EVEN IF SWIFTPOINT HAS BEEN
MADE AWARE OF THIS POSSIBILITY.
This warranty does not affect your statutory
rights.
Regulatory Information
FCC Declaration
This device complies with part 15 of the FCC
Rules. Operation is subject to the following
two conditions:
1.This device may not cause harmful
interference, and
2.This device must accept any interference
received, including interference that may
cause undesired operation.
Changes or modifications not expressly
approved by Swiftpoint Limited could void
the user's authority to operate the equipment.
Industries Canada Statement
This device complies with the requirements of
RSS 210 of Industry Canada.
(Cet appareil est conforme á la RSS 210
d’Industrie Canada).
CE Declaration of Conformity
Swiftpoint Limited hereby declares that
this device complies with the essential
requirements and other relevant provisions
of EU Directive 1999/5/EC and related
standards.
The technical documentation as required by
the Conformity assessment procedure is kept
at the following address:
Unit 5, 27 Tyne Street,
Christchurch, New Zealand
Internet: www.swiftpoint.net
Product Disposal
Please dispose of this product and
packaging in a responsible manner
and in accordance with any applicable
local or national disposal regulations,
including those governing the recovery and
recycling of waste electrical and electronic
equipment (WEEE).
Patent Information
Patents pending in the United States and
other countries.
Features and specifications of the product and this user guide are subject to change without notice.
Microsoft, Windows 7, Windows Vista and Windows XP are either registered trademarks or
trademarks of Microsoft Corporation in the United States and/or other countries. Mac OS is
either a registered trademark or trademark of Apple Corporation in the United States and/or other
countries. All trademarks and registered trademarks are the property of their respective owners.
User guide version v2010.1 © 2010 Swiftpoint Limited. All rights reserved.
ENGLISH FRANÇAIS DEUTSCH ESPAÑOL Guide d'utilisation
1
Charger la souris
1. Insérez le récepteur
USB dans un
port USB.
2.Pour charger la
2
souris, fixez-la au
récepteur USB.
Didacticiels vidéos disponibles sur
www.swiftpoint.net
Manipuler la souris
Prenez la souris en main comme indiqué sur la
photo, en plaçant votre pouce et votre majeur
aux emplacements dédiés. Posez votre index sur
le revêtement adhérent du bouton clic gauche.
3
Déplacer, zoomer et défiler
Faites tourner la molette à l'aide de votre index.
Vous pouvez effectuer un défilement rapide en
soulevant la souris et en faisant tourner la molette
sur le tapis de souris. Le « SlideScrolling » est
particulièrement utile lorsque vous souhaitez
parcourir rapidement des documents.
Le pointeur se déplace trop vite
ou trop lentement à l'écran?
Vous pouvez modifier la vitesse du pointeur à partir
des paramètres de votre ordinateur. Si vous voulez
savoir comment, et découvrir d'autres astuces pour
une utilisation optimale de votre souris, rendez-vous
sur l'aide en ligne sur le site www.swiftpoint.net.
Besoin d'aide ?
Vous avez besoin d'aide pour utiliser votre produit ou
vous avez des questions techniques ? Consultez l'aide
en ligne sur le site www.swiftpoint.net ou envoyeznous un e-mail à [email protected].
Souris SwiftpointTM
Emplacement pouce
(revêtement adhérent)
Emplacement majeur
(revêtement adhérent)
Bouton clic droit
Procédez à la charge complète de la souris
avant la première utilisation. Le témoin lumineux
Bouton clic gauche
de la batterie clignote pendant la charge. Une fois la
charge terminée, le témoin reste allumé en continu.
La charge peut durer jusqu'à 90 minutes.
Molette
Si vous utilisez un Mac, il est possible qu'une
fenêtre s'ouvre lorsque vous branchez le
récepteur USB pour la première fois, indiquant
que le clavier n'est pas reconnu. Vous pouvez
ignorer ce message sans risque. Cliquez sur le
bouton rouge (fermeture) situé dans le coin
supérieur gauche de la fenêtre pour « annuler ».
Récepteur/chargeur USB
4
Recharger la souris
Lorsque la batterie de la souris est faible, le témoin
lumineux de la batterie clignote, à intervalles de
5 secondes.
•
•
Les 30 premières secondes de charge vous
permettront d'utiliser la souris pendant une heure
maximum. Au cours du RapidChargeTM, le témoin
lumineux de la batterie clignote rapidement.
Pour effectuer la charge complète de la souris,
laissez-la connectée au récepteur USB jusqu'à ce que
le témoin lumineux s'allume en continu. La charge
complète peut prendre jusqu'à 90 minutes et assure
2 à 4 semaines d'autonomie en utilisation normale.
5
Modifier la direction
« verticale »
L'angle de la souris peut varier lorsque vous utilisez
votre ordinateur portable dans des environnements
différents. Il peut alors arriver que le pointeur ne
se déplace pas dans la direction souhaitée.
Pour remédier à ce problème et utiliser votre
souris dans toutes les positions, vous pouvez
facilement modifier l'angle de la souris. Pour cela :
1. Tenez la souris dans la position
la plusconfortable pour vous.
2.Maintenez les deux boutons
de la souris enfoncés pendant
2 secondes.
3.Le pointeur de la souris se
positionne alors en bas de
l'écran et se déplace vers le
haut (voir illustration).
4.Relâchez les boutons et
déplacez le pointeur de la
souris vers la haut selon un
axe vertical jusqu'à ce que le
pointeur crée un petit cercle.
Pour prolonger la durée de vie
de la batterie, il est recommandé
d'effectuer périodiquement la
charge complète de la souris.
La mise à jour de la direction
verticale est terminée.
Lorsque vous utilisez le SlideScrolling :
Veillez à ne pas
placer votre pouce
trop en avant.
• Maintenez le bouton clic gauche enfoncé pour
effectuer un zoom avant ou arrière.
• Maintenez le bouton clic droit enfoncé pour faire
défiler la page vers le haut ou vers le bas.
6
Activer et désactiver le
SmartTouchTM
Grâce au capteur SmartTouchTM, le pointeur
de la souris ne bouge pas quand votre doigt
n'est pas sur le revêtement adhérent.
Lorsque vous utilisez le clavier, il est préférable de
placer la souris entre vos deux mains. Cependant,
dans cette position, le pointeur bouge sur l'écran. Lorsque le SmartTouchTM est activé, pour déplacer
la souris mais pas le pointeur,
soulevez simplement votre
majeur et déplacez ensuite
la souris avec votre pouce.
7
Utiliser le tapis magnétique
(vendu séparément)
Grâce au tapis magnétique, vous pouvez utiliser
votre ordinateur portable dans toutes les
positions. Lorsque la souris est placée sur le tapis
magnétique, elle est aimantée et ne glisse pas.
Par défaut, le SmartTouchTM
est désactivé. Pour
activer le SmartTouch:
1. Maintenez les deux boutons
de la souris enfoncés
pendant 2 secondes.
2.Le témoin lumineux s'allume.
3.Relâchez les boutons. Une
fois le témoin lumineux
éteint, tournez la molette.
Le témoin lumineux clignote une fois pour
indiquer que le SmartTouchTM est activé.
Pour désactiver le SmartTouchTM,
répétez les étapes précédentes.
Le tapis magnétique
vous permet également
de positionner
facilement la souris
entre vos mains. Vous
pourrez ainsi utiliser le
clavier en toute liberté.
De plus, si le cadre
de votre ordinateur
portable est très
réfléchissant, le tapis
magnétique assurera
un fonctionnement
optimal de votre souris.
Référez-vous au guide d'utilisation du tapis
magnétique pour plus d'informations.
Configuration minimale requise
Matériel : 1 port USB 2
Système d'exploitation : Windows® 7 / Windows
Vista® / Windows® XP / Windows® 2000 /
Mac® OS 10.4 ou supérieur
Informations en matière d'ergonomie
L'utilisation répétée des ordinateurs et de leurs
périphériques, tels que les souris et claviers,
sur des périodes prolongées peut entraîner
une gêne physique et/ou des dommages
au niveau des muscles, des tendons et des
nerfs. Ces effets négatifs peuvent également
résulter d'une mauvaise posture, d'un manque
d'ergonomie dans la configuration de l'espace
de travail ou de mauvaises habitudes de travail.
Si vous ressentez ou constatez une douleur, un
gonflement, une raideur, un engourdissement
ou toute autre gêne au niveau des mains,
poignets, bras, nuque, épaules, dos ou de toute
autre partie de votre corps lors de l'utilisation
d'un ordinateur, prenez immédiatement
contact avec un médecin qualifié.
Informations légales
Déclaration FCC
Cet appareil est conforme à la partie 15 du
règlement FCC. Son fonctionnement est
soumis aux deux conditions suivantes.
1.Cet appareil ne doit causer aucune
interférence néfaste.
2.Cet appareil doit être à même d’accepter toutes
les interférences générées, y compris celles
pouvant causer un dysfonctionnement.
Tout changement ou toute modification
n'ayant pas été expressément approuvé(e)
par Swiftpoint Limited peut entraîner la
révocation de l'autorisation d'utilisation
de l'appareil accordée au client.
Garantie
Swiftpoint garantit le présent produit contre
tout défaut, tant au niveau du matériel que de la
fabrication, pour une période de deux (2) ans
à compter de la date d'achat. En cas de défaut
constaté, tant au niveau du matériel que de la
fabrication, Swiftpoint s'engage, à son entière
discrétion, à assurer soit (1) la réparation
ou le remplacement du produit, soit (2) son
remboursement au prix d'achat, sous réserve
que le produit lui soit renvoyé accompagné
d'une copie de la facture ou de la preuve
d'achat. Les frais de port restent à la charge
de l'acheteur, sauf dispositions contraires
prévues par la loi en vigueur. Consultez
l'aide en ligne sur le site www.swiftpoint.net
pour connaître l'adresse de retour produit.
La présente garantie ne couvre pas les
dommages accidentels, l'usure et les
dysfonctionnements liés à une utilisation
non conforme aux instructions fournies. LA
SOCIÉTÉ SWIFTPOINT NE PEUT EN AUCUN
CAS ÊTRE TENUE RESPONSABLE DES
DOMMAGES OU PERTES INDIRECTEMENT
LIÉS À L'UTILISATION DU PRÉSENT PRODUIT,
NOTAMMENT ET SANS CARACTÈRE
LIMITATIF, LA PERTE DE REVENUS, DE
PROFITS, DE DONNÉES OU D'ARCHIVES,
ET CE MÊME SI SWIFTPOINT A ÉTÉ
INFORMÉE DE CETTE ÉVENTUALITÉ.
La présente garantie n'affecte en rien
vos droits reconnus par la loi.
Déclaration de conformité CE
Swiftpoint Limited déclare par la présente
que l'appareil dont il est ici question est en
conformité avec les exigences essentielles et
autres stipulations de la directive européenne
1999/5/CE et des normes qui y sont rattachées.
Les documents techniques ayant servi à
la rédaction de la présente déclaration de
conformité sont disponibles à l'adresse :
Swiftpoint Limited,
Unit 5, 27 Tyne Street, Christchurch,
Nouvelle-Zélande
Site Web : www.swiftpoint.net
Déclaration Industrie Canada
Cet appareil est conforme à la norme
RSS-210 d'Industrie Canada.
(This device complies with the requirements
of RSS 210 of Industry Canada.)
Élimination
Veuillez jeter ce produit et son
emballage de manière responsable
et conformément à toutes les
dispositions en vigueur à l'échelle
locale et nationale en matière d'élimination,
y compris celles relatives à la récupération
et au recyclage des déchets d'équipements
électriques et électroniques (DEEE).
Informations relatives aux brevets
Brevets en attente aux États-Unis
et dans d'autres pays.
Les fonctions et caractéristiques du produit et le mode d'emploi peuvent être modifiés sans préavis.
Microsoft, Windows 7, Windows Vista et Windows XP sont des marques déposées ou des
marques de Microsoft Corporation aux États-Unis et/ou dans d'autres pays. Mac OS est une
marque déposée ou une marque d'Apple Corporation aux États-Unis et/ou dans d'autres pays.
Toutes les marques et marques déposées sont la propriété de leurs propriétaires respectifs.
Mode d'emploi version v2010.1 © 2010 Swiftpoint Limited. Tous droits réservés.