1
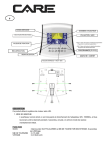
F
8
1
2
3
4
9
5
6
7
10
11
1. LCD
2. Bouton Recovery
3. Bouton Down
4. Bouton Enter & Reset
5. Bouton Start/Stop
6. Bouton Body Fat
7. Bouton Up
8. Compartiment des piles
9. Vis pour le compteur
10. Fil du compteur
11. Connection du hand grip
Les choses à savoir avant de commencer l’entraînement
A. Branchement
Branchez l'adaptateur à l'équipement. L'ordinateur émet un signal sonore et allume l'ordinateur au mode manuel.
B. Sélection de programme et réglage de valeur
1. Utilisez les touches UP et DOWN pour choisir le mode et pressez ensuite sur ENTER pour confirmer votre
mode d'exercice.
2. Au mode manuel, l'ordinateur emploiera les touches UP et DOWN pour régler votre TEMPS d'exercice,
DISTANCE, CALORIES, POULS.
3. Appuyez sur la touche START/STOP pour commencer l'exercice.
4. Quand vous atteignez la cible, l'ordinateur émet un signal sonore et puis s'arrête.
5. Si vous installez plus d'une cible et que vous voulez atteindre la prochaine cible, appuyez sur la touche
START/STOP pour continuer l'exercice.
Fonctions et caractéristiques :
1. Quick Start clés: Vous permet de démarrer l'ordinateur sans sélectionner un programme. TIME automatiquement
commence à compter à partir de zéro. Utilisez les touches HAUT et BAS pour ajuster la résistance
1. TEMPS : Montre votre temps d'entraînement écoulé en minutes et secondes. Votre ordinateur comptera
automatiquement de 0:00 à 99:59 par intervalles d'une seconde. Vous pouvez également programmer votre
ordinateur pour décompter à partir d'une valeur réglée en utilisant les touches UP et DOWN. Si vous continuez
l’exercice une fois que le temps a atteint 0:00, l'ordinateur commencera à biper et se remettra au temps réglé, vous
faisant savoir que votre séance d'entraînement est terminée.
2. DISTANCE : Montre la distance cumulée pendant chaque séance d'entraînement jusqu’au maximum de 99.9KM.
3. RPM : Votre cadence de pédalage.
5. VITESSE : Montre votre vitesse d'entraînement en KM par heure.
6. CALORIES : Votre ordinateur estimera les calories cumulatives brûlées à un moment donné pendant votre séance
d'entraînement.
7. POULS : Votre ordinateur indique votre pouls en battements par minute pendant votre séance d'entraînement.
10. RETOUR AU CALME : Pendant l'étape START, laissez les mains sur les poignées ou l'émetteur de poitrine
attaché et puis appuyez sur la touche “PULSE RECOVERY”, tous les affichages de fonction s'arrêteront excepté le
TEMPS. Le temps est compté de 00:60 - 00:59 - - à 00:00. Dès que 00:00 est atteint, l'ordinateur indique votre statut
de retour au calme de la fréquence cardiaque avec une note de F1.0 à F6.0.
1.0
veut dire PARFAIT
1.0<
<F<
<2.0 veut dire EXCELLENT
2.0≦
≦ F≦
≦ 2.9 veut dire BON
3.0≦
≦ F≦
≦ 3.9 veut dire MOYEN
4.0≦
≦ F≦
≦ 5.9 veut dire EN DESSOUS DE LA MOYENNE
6.0 veut dire FAIBLE
Note : Si aucun signal de pouls n’est capté, alors l'ordinateur indiquera “P” sur la fenêtre POULS. Si l'ordinateur
indique “ERR” sur la fenêtre de l’écran, veuillez pressez à nouveau sur la touche PULSE RECOVERY et
assurez-vous que vos mains restent bien sur les poignées ou que l'émetteur de poitrine est bien attaché.
11.TEMPERATURE: Affichage de la température actuelle
Fonctions des touches :
Il y a 6 touches et la description des fonctions est la suivante :
1. Touche START/STOP :
a. Fonction démarrage rapide : Vous permet de mettre en marche l'ordinateur sans choisir de programme.
Entraînement manuel seulement. Le temps commence automatiquement à compter à partir de zéro.
b. Pendant le mode d'exercice, appuyez sur cette touche pour ARRÊTER l'exercice.
c. Pendant le mode d'arrêt, appuyez sur cette touche pour COMMENCER l'exercice
2. Touche UP :
a. Faites tourner la molette pour augmenter la résistance pendant le mode d'exercice.
b. Pendant le mode réglage, faites tourner la molette pour augmenter les valeurs de temps, distance, calories, âge et
pour choisir le sexe et le programme.
3. Touche DOWN :
a. Appuyez sur cette touche pour diminuer la résistance pendant le mode d'exercice.
b. Pendant le mode réglage, appuyez sur cette touche pour diminuer les valeurs de temps, distance, calories, âge et
pour choisir le sexe et le programme.
4. Touche ENTER/RESET :
a. Pendant le mode réglage, appuyez sur cette touche pour confirmer la saisie des données.
b. Au mode arrêt, en tenant cette touche pendant plus de deux secondes, l'utilisateur peut remettre toutes les valeurs
à zéro ou à la valeur par défaut.
c. Pendant le réglage de l'horloge, appuyez sur cette touche pour accepter le réglage de l'heure et la minute.
5. Touche BODY FAT : Appuyez sur cette touche pour entrer votre TAILLE, POIDS, SEXE et ÂGE puis pour mesurer
votre taux de graisse dans le corps,
6. Touche PULSE RECOVERY : Appuyez sur cette touche pour activer la fonction de retour au calme de la
fréquence cardiaque.
Introduction & mode d’emploie des programmes :
Programme manuel : Manuel
P1 est un programme manuel. L'utilisateur peut commencer l'exercice en appuyant sur la touche START/STOP.
Le niveau de résistance par défaut est 5. Les utilisateurs peuvent s'exercer à tout niveau de résistance désiré
(en ajustant par les touches UP et DOWN pendant la séance d'entraînement) avec un certain temps ou un
certain nombre de calories ou une certaine distance.
Mode d’emploi :
1. Employez les touches UP et DOWN pour choisir le programme MANUEL (P1).
2. Appuyez sur la touche ENTER pour entrer dans le programme MANUEL.
3. Le TEMPS clignotera et vous pouvez appuyer sur les touches UP et DOWN pour régler votre TEMPS
d'exercice. Appuyez sur la touche ENTER pour confirmer votre TEMPS désiré.
4. La DISTANCE clignotera et vous pouvez appuyer sur les touches UP et DOWN pour régler votre DISTANCE
ciblée. Appuyez sur la touche ENTER pour confirmer votre DISTANCE désirée.
5. Les CALORIES clignoteront et vous pouvez appuyer sur les touches UP et DOWN pour régler vos
CALORIES ciblées. Appuyez sur la touche ENTER pour confirmer les CALORIES désirées.
6. Appuyez sur la touche START/STOP pour commencer l'exercice.
Programme préréglé : pas, colline, roulement, vallée, brûlage de graisse, rampe, montagne,
intervalles, aléatoires, plateau, Fartlek, programme de précipice
Les PROGRAMMES 2 à 13 sont des programmes préréglés. Les utilisateurs peuvent s'entraîner avec
différents niveaux dans différents intervalles comme les profils l’indiquent. Les utilisateurs peuvent s'entraîner
au niveau de résistance désiré (en ajustant avec les touches UP et DOWN pendant la séance d'entraînement)
avec une certaine période ou un nombre de calories ou une distance.
Mode d’emploi :
1. Employez les touches UP et DOWN pour choisir les programmes de P2 à P13.
2. Appuyez sur la touche ENTER pour entrer dans le programme.
3. Le TEMPS clignotera et vous pouvez appuyer sur les touches UP et DOWN pour régler votre TEMPS
d'exercice. Appuyez sur la touche ENTER pour confirmer votre TEMPS désiré.
4. La DISTANCE clignotera et vous pouvez appuyer sur les touches UP et DOWN pour régler votre DISTANCE
ciblée. Appuyez sur la touche ENTER pour confirmer votre DISTANCE désirée.
5. Les CALORIES clignoteront et vous pouvez appuyer sur les touches UP et DOWN pour régler vos
CALORIES ciblées. Appuyez sur la touche ENTER pour confirmer les CALORIES désirées.
6. Appuyez sur la touche START/STOP pour commencer l'exercice.
Programme de réglage utilisateur : Utilisateur 1, utilisateur 2
Les programmes 14 à 15 sont des programmes de réglage par l’utilisateur. Les utilisateurs sont libres de créer
les valeurs de TEMPS, DISTANCE, CALORIES et niveau de résistance dans 10 colonnes. Les valeurs et les
profils seront stockés dans la mémoire après réglage. Les utilisateurs peuvent également changer le
chargement continu dans chaque colonne avec les touches UP et DOWN, et ils ne changeront pas le niveau de
résistance stocké dans la mémoire.
Mode d’emploi :
1. Employez les touches UP et DOWN pour choisir les programmes de P14 à P15.
2. Appuyez sur la touche ENTER pour entrer dans le programme.
3. La colonne 1 clignotera, utilisez les touches UP et DOWN pour créer votre profil personnel d'exercice.
Appuyez sur la touche ENTER pour confirmer votre première colonne de profil d'exercice. Le niveau par défaut
est la charge 1.
4. La colonne 2 clignotera, utilisez les touches UP et DOWN pour créer votre profil personnel d'exercice.
Appuyez sur la touche ENTER pour confirmer votre deuxième colonne de profil d'exercice.
5. Suivez la description ci-dessus 5 et 6 pour finir vos profils personnels d'exercice. Appuyez sur la touche
ENTER pour confirmer votre profil désiré d'exercice
6. Le TEMPS clignotera et vous pouvez appuyer sur les touches UP et DOWN pour régler votre TEMPS
d'exercice. Appuyez sur la touche ENTER pour confirmer votre TEMPS désiré.
7. La DISTANCE clignotera et vous pouvez appuyer sur les touches UP et DOWN pour régler votre DISTANCE
ciblée. Appuyez sur la touche ENTER pour confirmer votre DISTANCE désirée.
8. Les CALORIES clignoteront et vous pouvez appuyer sur les touches UP et DOWN pour régler vos
CALORIES ciblées. Appuyez sur la touche ENTER pour confirmer les CALORIES désirées.
9. Appuyez sur la touche START/STOP pour commencer l'exercice.
Programme graisse : graisse
Le programme 16 est une conception de programme spéciale pour calculer le rapport de graisse du corps de
l'utilisateur et pour offrir un profil spécifique de chargement pour les utilisateurs. Il y a 3 types de corps divisés selon
le % calculé de graisse.
Type1 : % GRAISSE > 27
Type2 : 20 < % GRAISSE < 27
Type3 : % GRAISSE < 20
L'ordinateur donnera les résultats du test de POURCENTAGE DE GRAISSE, BMI et BMR.
Mode d’emploi :
1. Utilisez les touches UP et DOWN pour choisir le programme graisse (P16).
2. Appuyez sur la touche ENTER pour entrer dans votre programme d'entraînement.
3. La TAILLE clignotera et vous pouvez appuyer sur les touches UP et DOWN pour régler votre TAILLE.
Pressez sur la touche ENTER pour confirmer votre TAILLE. La TAILLE par défaut est 170cm.
4. Le POIDS clignotera et vous pouvez appuyer sur les touches UP et DOWN pour régler votre POIDS.
Pressez sur la touche ENTER pour confirmer votre POIDS. Le POIDS par défaut est 70kgs.
5. Le SEXE clignotera et vous pouvez appuyer sur les touches UP et DOWN pour choisir votre sexe. Le
numéro 1 signifie MASCULIN et le numéro 0 signifie FEMININ. Pressez sur la touche ENTER pour
confirmer votre sexe. Le sexe par défaut est 1 (HOMME).
6. L'ÂGE clignotera et vous pouvez appuyer sur les touches UP et DOWN pour régler votre ÂGE. Pressez
sur la touche ENTER pour confirmer votre ÂGE. L'ÂGE par défaut est 35.
7. Appuyez sur la touche START/STOP pour commencer la mesure de la graisse. Si la fenêtre indique E,
assurez-vous que vos mains sont bien sur les poignées ou que la ceinture de poitrine est bien en
contact avec votre corps. Appuyez à nouveau sur la touche START/STOP pour commencer la mesure
de graisse.
8. Après avoir fini votre mesure, l'ordinateur indiquera les valeurs de BMR, BMI et pourcentage de
graisse sur l’écran d'affichage. En outre, l'ordinateur indiquera votre propre profil d'exercice pour votre
type de corps.
9. Appuyez sur la touche START/STOP pour commencer l’exercice.
Guide :
1. Mode veille : L'ordinateur entre en mode veille quand il n'y a aucun signal et qu’aucune touche n’est
pressée après 4 minutes. Vous pouvez appuyer sur n'importe quelle touche pour réveiller l'ordinateur.
2. BMI (index de masse de corps) : Le BMI est une mesure de graisse du corps basée sur la taille et le poids
qui s'applique aux hommes et aux femmes adultes.
3. BMR (taux métabolique basique) : Votre BMR indique le nombre de calories dont votre corps a besoin pour
fonctionner. Ceci ne compte aucune activité, c’est simplement l'énergie requise pour maintenir un
battement de coeur, une respiration et une température corporelle normale. Il mesure le corps au repos, pas
en sommeil, à la température ambiante.
Message d'erreur :
E1 (ERREUR 1) :
État normal :
Pendant la séance d'entraînement, quand le moniteur n'a pas obtenu de signal de
compte du moteur depuis plus de 4 secondes et après les contrôles 3 fois de suite,
l’écran indique E1.
Energie en l'état :
Le moteur retourne à zéro automatiquement, quand le signal du moteur ne peut pas
être détecté pendant plus de 4 secondes alors le conducteur du moteur sera coupé
immédiatement et l’écran indiquera E1. Tous les autres nombres et fonctions sont
blancs, et les signaux sortants sont également coupés.
E2 (ERREUR 2) :
Quand le moniteur a lu les données de mémoire, si le code d'identification n'est pas
correct ou que la mémoire IC est endommagée le moniteur indique E2
immédiatement au démarrage.
E3 (ERREUR 3) :
Après 4 secondes en mode démarrage, l'ordinateur détecte si le moteur défectueux
n'a pas laissé un zéro, puis les barres d'affichage indiquent « E3 ».
Données techniques de l'adaptateur courant
1. Disponible pour l'entrée : 230V/50Hz ou 60Hz Rendement : 6V AC/0.5A
2. Disponible pour l'entrée : 110V/50Hz ou 60Hz Rendement : 6V AC/0.5A
Graphiques d’entraînement LCD
PROFILS DE PROGRAMME PREREGLES :
PROGRAMME 1
MANUEL
PROGRAMME 4
ROULEMENT
PROGRAMME 7
RAMPE
PROGRAMME 10
ALEATOIRE
PROGRAMME 2
PAS
COLLINE
PROGRAMME 5
VALLEE
PROGRAMME 8
MONTAGNE
PROGRAMME 11
PLATEAU
PROGRAMME 13
PRECIPICE
PROGRAMME REGLAGE PAR L’UTILISATEUR
PROGRAMME 14
UTILISATEUR 1
PROGRAMME 3
PROGRAMME 6
BRULAGE DE GRAISSE
PROGRAMME 9
INTERVALLES
PROGRAMME 12
FARTLEK
PROGRAMME 15
UTILISATEUR 2
PROGRAMMES TEST GRAISSE :
PROGRAMME 16
GRAISSE (MODE STOP)
GRAISSE (MODE START)
Un des six profiles suivants sera indiqué automatiquement après la mesure de votre graisse :
Durée entraînement: 40 minutes
Durée entraînement: 40 minutes
Durée entraînement: 20 minutes
Durée entraînement: 40 minutes
Durée entraînement: 40 minutes
Durée entraînement: 20 minutes
CONSEILS D’ENTRAINEMENT
Attention :
Avant de programmer votre entraînement, il est indispensable de tenir compte de votre âge,
particulièrement pour les personnes de plus de 35 ans, ainsi que de votre condition physique. Si vous avez
un mode de vie sédentaire sans activité physique régulière, il est primordial de consulter votre médecin
pour déterminer le niveau d’intensité de votre entraînement. Une fois déterminé, ne chercher pas à atteindre
votre maximum dès les premiers entraînements. Soyez patient vos performances augmenteront rapidement.
L’entraînement Cardio – Training :
Il permet de développé le système cardio – vasculaire (tonicité cœur / vaisseaux sanguin).
Lors d'un entraînement Cardio – Training , les muscles ont besoin d'un apport d'oxygène, de substances nutritives, et
d'éliminer leurs déchets. Notre cœur accélère son rythme, et véhicule vers l'organisme par l'intermédiaire du système
cardio-vasculaire une quantité plus importante d'oxygène.
Plus on effectue d'exercices de façon régulière et répétitive, plus le cœur se développe à la manière d'un muscle
ordinaire. Dans la vie courante, ceci se traduit par la faculté de supporter des efforts physiques plus importants, et
d'augmenter ses facultés intellectuelles.
Définition de votre Zone de travail :
La fréquence cardiaque maximale (FCM) = 220 – âge (180 – âge pour les personnes sédentaires).
La Zone d’échauffement et de retour au calme est égale à 55% de votre FCM.
La Zone de Perte de Graisse est comprise entre 55 / 65% de votre FCM.
La Zone Aérobie est comprise entre 65 / 85% de votre FCM.
La Zone Anaérobie, est comprise entre 85% de votre FCM et celle ci.
Les étapes d’un entraînement progressif :
1) Une phase d'échauffement :
Commencez chaque entraînement par un échauffement progressif (10-20 mn, plus au-delà de 50 ans) qui mettra
en éveil vos muscles et élèvera doucement votre rythme cardiaque. Elevez doucement vos pulsations à 55% de
votre FCM (Fréquence Cardiaque Maximale).
Tenez votre Fréquence Cardiaque à ce niveau pendant la durée de l’échauffement.
Si vous commencez trop rapidement votre entraînement, vous risquez d’augmenter les risques de blessures tendino
- musculaire.
2) Une phase de travail :
C’est la partie principale de l’entraînement.
Selon vos buts spécifiques, perte de poids, amélioration de la résistance cardio – vasculaire (travail aérobie),
développement de la résistance (travail anaérobie) il est possible de choisir la zone cible adéquate.
La Zone de Perte de Graisse, 55 - 65%
La fréquence cardiaque doit être basse et la durée d'exercice assez longue. Cette zone est conseillée pour les
personnes reprenant une activité physique depuis longtemps oubliée, recherchant à éliminer un surcroît
pondérale, ou exposées à des problèmes cardiaques. N’oubliez pas que pour ce type d’entraînement la durée de
l’exercice doit être d’au moins 30 minutes et la Fréquence Cardiaque (FC) comprise entre 55 et 65% de la FCM .
-
Elevez graduellement de 30 à 60 minutes par séance.
-
Exercez vous 3 ou 4 fois par semaine.
La Zone Aérobie, 65-85%
Cette zone est recommandée pour ceux qui ont une bonne condition physique et qui s’entraînent
régulièrement. En vous entraînant dans cette zone, vous augmenterez votre condition physique en évitant le
surmenage.
-
Durée : 20 à 30 minutes par séance
-
Fréquence : Au moins 3 ou 4 fois par semaine.
La Zone Anaérobie, 85%-FCM
Cette zone est seulement prévue pour des athlètes confirmés et n’est jamais recommandé sans approbation
ou surveillance médicale. Cette zone est uniquement destinée à des personnes très entraînées. Elle est utilisée
pour un entraînement en intervalle (ou pour des courtes courses de sprint) pour aider à améliorer ou mesurer les
niveaux d'endurance.
Le temps passé dans cette zone doit être bref sous peine d’accident.
3) Une phase de retour au calme :
Il s’agit de la réduction de l'effort (10 à 20 mn). Cela permet un retour au calme du système cardio-vasculaire (55%
de la FCM) et d’éviter ou de diminuer les douleurs musculaires tel que les crampes et les courbatures.
Les étirements doivent suivre la séance d'étirements pendant que les articulations sont encore chaudes. Cela détend
les muscles et aide à éviter les courbatures.
Etirez-vous lentement et doucement , il ne faut jamais vous étirer jusqu'à un point de douleur. Tenez chaque
étirement pendant 30 à 60 secondes en expirant.
a.
Contrôlez votre progrès
En s’améliorant votre système cardio-vasculaire aura au repos une FC (fréquence cardiaque) qui se réduira. Vous
mettrez plus longtemps pour atteindre votre zone cible et il sera plus facile pour vous de vous y maintenir. Les
séances vous paraîtront de plus en plus facile et vous serez plus résistant au quotidien .
Si au contraire votre FC au repos est plus haute qu’à l’habitude, il vous faudra vous reposer ou diminuer
l’intensité de l’entraînement.
Fréquence d’entraînement :
Ne vous laissez pas décourager par les premières séances, motivez vous en planifiant des plages d’entraînement
fixes. Bon courage !
Entraînement quotidien = environ 10 minutes par séance.
2 à 3 séances par semaine = environ 30 minutes par séance.
1 à 2 séances par semaine = environ 50 minutes par séance.
* Il s’agit de la phase de travail. Les durées indiquées ne tiennent pas compte des phases d’échauffement et de
retour au calme.
Tous matériels ou pièces défectueuses ne pourront être remplacés qu’après réception de ceux-ci retournés
aux frais de l’expéditeur. Aucun retour de marchandises ne pourra être accepté sans notre accord préalable
POUR COMMANDER DES PIECES DETACHEES
Dans un soucis d’efficacité munissez-vous des éléments suivants avant de contacter notre Service Après
Vente :
Le nom ou la référence du produit.
Le numéro de fabrication indiqué sur le châssis principal et sur le carton d’emballage.
Contacter du lundi au vendredi de 10H00 à 12H00 et de 14H00 à 17H00 (sauf jour fériés).
STRIALE Service Après Vente
18 / 22 rue Bernard – Z.I. les Vignes
93012 BOBIGNY Cedex
Tél. : 0820 821 167 - Fax : 00 33 1 48 43 51 03
E mail : [email protected]
GB
8
1
2
3
4
9
5
6
7
10
11
1. LCD
2. Recovery button
3. Down button
4. Enter & Reset Button
5. Start / Stop button
6. Body Fat Button
7. Up Button
8. Battery compartment
9. Screw for the counter
10. Over the counter
11. Connection of hand grip
The things you should know before exercising
A, Input Power
Plug in the adaptor to the equipment then the computer will produce a beep sound and turn on the computer at
the Manual mode.
B.Program select and setting value
1. Use the UP or DOWN keys to select program mode and then press ENTER to confirm your exercise mode.
2. At the Manual mode, the computer will use the UP or DOWN keys to set up your exercise TIME, DISTANCE,
CALORIES, PULSE.
3. Press the START/STOP key to start exercise.
4. When you reach the target, the computer will produce beep sounds and then stop.
5. If you set up more than one target and you would like to reach next target, press START/STOP key to keep on
exercise.
Functions and Features:
1. TIME: Shows your elapsed workout time in minutes and seconds. Your computer will automatically count up from
0:00 to 99:59 in one second intervals. You can also program your computer to count down from a set value by
using the UP and DOWN keys. If you continue exercising once the time has reached 0:00, the computer will
begin beeping, and reset itself to the original time set, letting you know your workout is done.
2. DISTANCE: Displays the accumulative distance traveled during each workout up to a maximum of 99.9KM/MILE.
3. RPM: Your pedal cadence.
4. SPEED: Displays your workout speed value in KM/MILE per hour.
5. CALORIES: Your computer will estimate the cumulative calories burned at any given time during your workout.
6. PULSE: Your computer displays your pulse rate in beats per minute during your workout.
7. TARGET HEART RATE (TARGET PULSE): The heart rate you should maintain is called your Target Hear Rate in
beats per minute.
8. PULSE RECOVERY: During the START stage, leave the hands holding on grips or leave the chest transmitter
attached and then press “PULSE RECOVERY” key, all function displays will stop except “TIME”. Time starts
counting from 00:60 - 00:59 - - to 00:00. As soon as 00:00 is reached, the computer will show your heart rate
recovery status with the grade F1.0 to F6.0.
1.0 means OUTSTANDING
1.0<
<F<
<2.0 means EXCELLENT
2.0 F 2.9 means GOOD
3.0 F 3.9 means FAIR
4.0 F 5.9 means BELOW AVERAGE
6.0 means POOR
Note: If no pulse signal input then the computer will show “P” on the PULSE window. If the computer shows “ERR”
on the message window, please re-press the PULSE RECOVERY key and please make sure your hands are
keeping well on the grips or the chest transmitter is attached well.
Key function:
There are 6 button keys and the function description as follows:
1. START/STOP key:
a. Quick Start function: Allows you to start the computer without selecting a program. Manual .workout only. Time
automatically begins to count up from zero
b. During the exercise mode, press the key to STOP exercise.
c. During the stop mode, press the key to START exercise.
2. UP key:
a. Turn the toggle wheel to increase the resistance during exercise mode.
b. During the setting mode, turn the toggle wheel to increase the value of Time, Distance, Calories, Age and
select Gender and Program.
3. DOWN key:
a. Press the key to decrease the resistance during exercise mode.
b. During the setting mode, press the key to decrease the value of Time, Distance, Calories, Age and select
Gender and Program.
4. ENTER key:
a. During the setting mode, press the key to accept the current data entry.
b. At the stop mode, by holding this key for over two seconds the user can reset all values to zero or default value.
c. During setting the Clock, press this key can accept the setting hour and setting minute.
5. BODY FAT key: Press the key to input your HEIGHT, WEKGHT, GENDER and AGE then to measure your body
fat ratio,
6. PULSE RECOVERY key: Press the key to activate heart rate recovery function.
Program Introduction & Operation:
Manual Program: Manual
P1 is a manual program. User can start exercise by pressing START/STOP key. The default resistance level is 5.
Users may exercise in any desirous of resistance level (Adjusting by UP/DOWN keys during the workout) with a
period of time or a number of calories or a certain distance.
Operations:
1. Use UP/DOWN keys to select the MANUAL (P1) program.
2. Press the ENTER key to enter MANUAL program.
3. The TIME will flash and you can press UP or DOWN keys to set your exercise TIME. Press ENTER key to
confirm your desired TIME.
4. The DISTANCE will flash and you can press UP or DOWN keys to set your target DISTANCE. Press ENTER
key to confirm your desired DISTANCE.
5. The CALORIES will flash and you can press UP or DOWN keys to set your exercise CALORIES. Press
ENTER key to confirm your desired CALORIES.
7. Press the START/STOP key to begin exercise.
Preset Program: Steps, Hill, Rolling, Valley, Fat Burn, Ramp, Mountain, Intervals, Random, Plateau, Fartlek,
Precipice Program
PROGRAM 2 to PROGRAM 13 is the preset programs. Users can exercise with different level of loading in different
intervals as the profiles show. Users may exercise in any desirous of resistance level (Adjusting by UP/DOWN keys
during the workout) with a period of time or a number of calories or a certain distance.
Operations:
1. Use UP/DOWN keys to select one of the above programs from P2 to P13.
2. Press the ENTER key to enter your workout program.
3. The TIME will flash and you can press UP or DOWN keys to setting your exercise TIME. Press ENTER key
to confirm your desired TIME.
4. The DISTANCE will flash and you can press UP or DOWN keys to setting your target DISTANCE. Press
ENTER key to confirm your desired DISTANCE.
5. The CALORIES will flash and you can press UP or DOWN keys to setting your exercise CALORIES. Press
ENTER key to confirm your desired CALORIES.
6. Press the START/STOP key to begin exercise.
User Setting Program: User 1, User 2
Program 14 to 15 is the user setting program. Users are free to create the values in the order of TIME, DISTANCE,
CALORIES and the resistance level in 10 columns. The values and profiles will be stored in the memory after setup.
Users may also change the ongoing loading in each column by UP/DOWN keys, and they will not change the
resistance level stored in the memory.
Operations:
1. Use UP/DOWN keys to select the USER program from P14 to P15.
2. Press the ENTER key to enter your workout program.
3. The column 1 will flash, and then use the UP/DOWN keys to create your personal exercise profile. Press
ENTER to confirm your first column of exercise profile. The default level is load 1.
4. The column 2 will flash, and then use the UP/DOWN keys to create your personal exercise profile. Press
ENTER to confirm your second column of exercise profile.
5. Follow the above description 5 and 6 to finish your personal exercise profiles. Press ENTER to confirm your
desired exercise profile.
6. The TIME will flash and you can press UP or DOWN keys to setting your exercise TIME. Press ENTER key
to confirm your desired TIME.
7. The DISTANCE will flash and you can press UP or DOWN keys to setting your target DISTANCE. Press
ENTER key to confirm your desired DISTANCE.
8. The CALORIES will flash and you can press UP or DOWN keys to setting your exercise CALORIES. Press
ENTER key to confirm your desired CALORIES.
9. Press the START/STOP key to begin exercise.
Body Fat Program: Body Fat
Program 16 is a special program design to calculate users’ body fat ratio and to offer a specific loading profile for
users. There are 3 body types divided according to the FAT% calculated.
Type1: BODY FAT% > 27
Type2: 27
BODY FAT%
20
Type3: BODY FAT % < 20
The computer will show the test results of FAT PERCENT, BMI and BMR.
Operations:
1. Use UP/DOWN keys to select the BODY FAT (P16) program.
2. Press the ENTER key to enter your workout program.
3. The HEIGHT will flash and you can press UP or DOWN keys to set your HEIGHT. Press ENTER key to
confirm your HEIGHT. The default HEIGHT is 170cm or 5’07” (5feet 7 inches).
4. The WEIGHT will flash and you can press UP or DOWN keys to set your WEIGHT. Press ENTER key to
confirm your WEIGHT. The default WEIGHT is 70kgs or 155lbs.
5. The GENDER will flash and you can press UP or DOWN keys to select your sex. Number 1 means man and
number 0 means female. Press ENTER key to confirm your Gender. The default sex is 1 (MAN).
6. The AGE will flash and you can press UP or DOWN keys to set your AGE. Press ENTER key to confirm your
AGE. The default AGE is 35.
7. Press the START/STOP key to begin body fat measurement. If the window show E on the window, please
make sure your hands are attached well on the grips or the chest belt is touch well on your body. Then press
the START/STOP key again to begin body fat measurement.
8. After finished your measurement, the computer will show the values of BMR, BMI and FAT PERCENT on
the LCD display. Furthermore, the computer will show your own exercise profile for your body type.
9. Press START/STOP key to begin exercise.
Operation guide:
1. Sleep Mode: The computer will enter the sleep mode when there is no signal input and no keys be pressed
after 4 minutes. You can press any key to wake up the computer.
2. BMI (Body Mass Index): BMI is a measure of body fat based on height and weight that applies to both adult
men and women.
3. BMR (Basal Metabolic Rate): Your Basal Metabolic Rate (BMR) shows the number of calories your body
needs to operate. This doesn’t account for any activity, it’s simply the energy needed to sustain a heartbeat,
breathing and normal body temperature. It measures the body at rest, not sleep, at room temperature.
Error Message:
E1 (ERROR 1):
Normal state:
During workout, when the monitor did not get the count signal from the gear motor more than 4
seconds and check under successive 3 times then the LCD will show E1.
Power on state: The gear motor will return to zero automatically, when the signal of motor cannot be detected
for more than 4 seconds then the gear motor’s driver will be cut off immediately and show the
E1 on the LCD display. All the other digital and function mark are blank, and the output signals
are cut off also.
E2 (ERROR 2): When the monitor read the memory data, if the I.D. code is not correct or the memory IC damages
then the monitor will show E2 immediately at power on.
E3 (ERROR 3): After 4 seconds by start mode, the computer detects the faulty motor did not leave the zero point
then the LCD bar displays “E3”.
Technical data of the current adapter
1. Available for Input: 230V/50Hz or 60Hz Output: 6V AC/0.5A
2. Available for Input: 110V/50Hz or 60Hz Output: 6V AC/0.5A
LCD Workout Graphics
PRESET PROGRAM PROFILES:
PROGRAM 1
MANUAL
PROGRAM 4
ROLLING
PROGRAM 7
RAMP
PROGRAM 10
RANDOM
PROGRAM 13
PRECIPICE
PROGRAM 2
STEPS
PROGRAM 5
VALLEY
PROGRAM 8
MOUNTAIN
PROGRAM 11
PLATEAU
PROGRAM 3
HILL
PROGRAM 6
FAT BURN
PROGRAM 9
INTERVALS
PROGRAM 12
FARTLEK
USER SETTING PROGRAM
PROGRAM 14
USER 1
PROGRAM 15
USER 2
BODY FAT TEST PROGRAMS:
PROGRAM 16
BODY FAT (STOP MODE)
BODY FAT (START MODE)
One of the Following Six Profiles Will Display Automatically after Measuring Your BODY FAT:
Workout Time: 40 minutes
Workout Time: 40 minutes
Workout Time: 40 minutes
Workout Time: 40 minutes
Workout time: 20 minutes
Workout time: 20 minutes
Cardio – Training:
Before programming your training, it is essential to take account of your age, particularly for people of
more than 35 years of age, as well as your physical condition. If you have a sedentary lifestyle
without regular physical activity, it is vital that you consult your doctor to determine the level of
intensity of your training. Once determined, do not attempt to achieve your maximum during the
first training sessions. Be patient; your performance will quickly improve.
This enables you to develop your cardiovascular system (fitness of the heart / blood vessels). During
Cardio-Training, the muscles need a supply of oxygen and nutritive substances. They also need to
liminate waste. Our heart increases its rhythm and sends a larger amount of oxygen to the body by
means of the cardiovascular system.
The more often you exercise regularly and repetitively, the more your heart will develop, just like any
other muscle. In daily life, this translates into the ability to bear greater physical effort and improve
your intellectual faculties.
Definition of your work Zone:
The Maximum Heart Rate (MHR) = 220 - age (180 – age for sedentary people).
The Warming Up Zone and Cooling Down Zone are equal to 55% of your MHR.
The Fat Loss Zone is between 55 / 65% of your MHR.
The Aerobic Zone is between 65 / 85% of your MHR.
The Anaerobic Zone is between 85% of your MHR and your MHR.
The progressive training stages:
1) A warming up phase:
Start each training session by warming up progressively (10-20 min, more if you are over 50)
which will put your muscles on standby and gently increase your heart rate. Gently increase your
pulse to 55% of your MHR (Maximum Heart Rate).
Keep your Heart Rate at this level for the duration of the warming up time. If you
begin your training too quickly, you are in danger of increasing the risk of tendon or muscle injury.
2) A work phase:
This is the main part of the training session. Depending on your specific goals and your initial physical condition,
weight loss, improvement of cardiovascular resistance (aerobic work), development of stamina (anaerobic work), it is
possible to choose the appropriate target zone.
The Fat Loss Zone, 55 – 65%
The heart rate must be low and the duration of the exercise quite long. This zone is advised for people resuming
physical activity after a long period of idleness, who
are trying to eliminate excess weight or are susceptible to cardiac problems. Do not forget that for this type of
training the duration of the exercise must be at least 30 minutes and the Heart Rate (HR) between 55 and 65% of the
MHR. - Gradually increase from 30 to 60 minutes per session.
-
Exercise 3 or 4 times a week.
The Aerobic Zone, 65-85%
This zone is recommended for those who are in good physical condition who train
regularly. By training in this zone, you will improve your physical condition but avoid overworking.
-
Duration: 20 to 30 minutes per session.
-
Frequency: At least 3 or 4 times a week.
The Anaerobic Zone, 85% - MHR
This zone is exclusively for experienced athletes and is never recommended
without medical approval and supervision. This zone is designed only for very fit people. It is used for interval
training (or for short sprints) to help you to improve or measure your level of stamina.
The time spent in this zone must be brief to avoid the risk of accident.
3) A cooling down phase:
This entails a reduction of exertion (10 to 20 min). It enables you to return your cardiovascular system to normal
(55% of your MHR) and prevent or reduce muscular pain such as cramp and stiffness. You must follow the training
with a session of stretching exercises while your joints
are still warm. This relaxes the muscles and helps to prevent stiffness. Stretch slowly and gently. You must never
stretch until you reach the pain threshold. Hold each stretch for 30 to 60 seconds while breathing out.
Check your progress
As it improves, your cardiovascular system will have an HR which will be lower when at rest. You will take longer to
reach your target zone and it will be easier for you to maintain it. Sessions will seem easier and easier and you will
have more stamina in your daily life.
If, on the other hand, your HR is higher than usual when at rest, you will have to rest or reduce the intensity of
your training.
Do not be discouraged by the initial sessions. Motivate yourself by scheduling specific training times. Work hard!
All defective materials or parts can only be exchanged once we have received them. Shipping is at the
sender’s expense. No returns of goods will be accepted without our prior approval.
To order spare parts
To guarantee an efficient service, make sure you have the following items before you
contact our After Sales Service:
The name or reference of the product.
The manufacturing number shown on the main chassis and on the packing box.
Contact us from Monday to Friday between 10h00 and 12h00 and 14h00 and
17h00 (except for public holidays).
STRIALE After Sales Service
18 / 22 rue Bernard – Z.I. les Vignes
93012 BOBIGNY
Fax: 00 33 1 48 43 51 03
Email: [email protected]