1
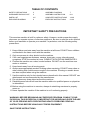
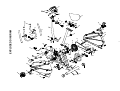
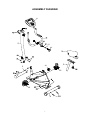
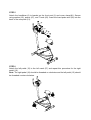
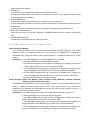
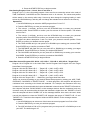
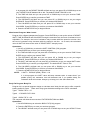
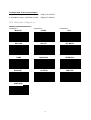
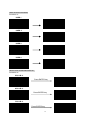
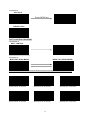
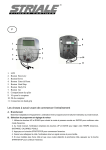
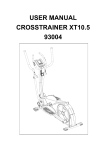
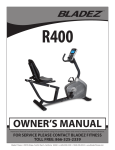
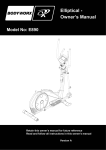
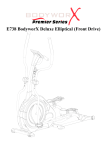
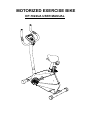
MOTORIZED EXERCISE BIKE
DP-7022UA USER MANUAL
TABLE OF CONTENTS
SAFETY PRECAUTIONS
HARDWARE PACKING LIST
PARTS LIST
EXPLODED DIAGRAM
2
3
4-5
6
ASSEMBLY DIAGRAM
ASSEMBLY INSTRUCTION
COMPUTER INSTRUCTIONS
EXERCISE INSTRUCTIONS
7
8-11
12-20
21-22
IMPORTANT SAFETY PRECAUTIONS
This exercise machine is built for optimum safety. However, certain precautions apply
whenever you operate a piece of exercise equipment. Be sure to read the entire manual
before you assemble or operate your machine. In particular, note the following safety
precautions:
1. Keep children and pets away from the machine at all times. DO NOT leave children
unattended in the same room with the machine.
2. Only one person at a time should use the machine.
3. If the user experiences dizziness, nausea, chest pain, or any other abnormal
symptoms, STOP the workout at once. CONSULT A PHYSICIAN IMMEDIATELY.
4. Position the machine on a clear, leveled surface. DO NOT use the machine near
water or outdoors.
5. Keep hands away from all moving parts.
6. Always wear appropriate workout clothing when exercising. DO NOT wear robes or
other clothing that could become caught in the machine. Running or aerobic shoes
are also required when using the machine.
7. Use the machine only for its intended use as described in this manual. DO NOT use
attachments not recommended by the manufacturer.
8. Do not place any sharp object around the machine.
9. Disabled person should not use the machine without a qualified person or physician
in attendance.
10. Before using the machine to exercise, always do stretching exercises to properly
warm up.
11. Never operate the machine if the machine is not functioning properly.
WARNING: BEFORE BEGINNING ANY EXERCISE PROGRAM, CONSULT YOUR
PHYSICIAN. THIS IS ESPECIALLY IMPORTANT FOR INDIVIDUALS OVER THE AGE
OF 35 OR PERSONS WITH PRE-EXISTING HEALTH PROBLEMS. READ ALL
INSTRUCTIONS BEFORE USING ANY FITNESS EQUIPMENT.
SAVE THESE INSTRUCTIONS.
2
HARDWARE PARTS LIST
#67
1PC
#62 I D8. 2* OD16. 8 1PC
3
PARTS LIST
PART NO.
1
2
3
4
5
6
7
8
9
10
11
12
13
14
15
16
17
18
19
20
21
22
23
24
25
26
27
28
29
30
31
32
33
34
35
36
37
38
39
40
41
42
43
DESCRIPTION
Main Frame
Front Post
Seat Post
Rear Stabilizer
Front Stabilizer
Handle Bar
Rear End Cap
Front Transportation Wheel
Seat Slider
Computer
Handle Pulse Sensor
End Cap of Handlebar Φ25.4
Foam Grip
Seat
Left Pedal
Right Pedal
Belt
Belt-driven Wheel
Flywheel
Quick Release Knob M16
Bushing for seat post
Protect Cover for Seat Post
Reed Switch
Left Chain Cover
Right Chain Cover
Protect Cover for Crank
Crank
Axle
B.B. Parts
Idle
Bearing
Magnetite Holder
Spring 1
Spring 2
Eye Bolt
U Plate
Powder
Screw M5*15
Philips Screw M4*20
WasherΦ6.2
Screw for Computer
Computer Upper Wire
Screw M4*15
4
Q’TY
1
1
1
1
1
1
2
2
1
1
2
2
2
1
1
1
1
1
1
1
1
1
1
1
1
2
2
1
1
1
2
1
1
1
2
2
1
4
2
4
4
1
4
PARTS LIST
PART NO.
44
45
46
47
48
49
50
51
52
53
54
55
56
57
58
59
60
61
62
63
64
65
66
67
68
69
70
71
72
73
74
75
76
77
78
79
80
81
82
83
DESCRIPTION
Allen Bolt M8*45
Nylon Nut M8
Allen Bolt M8*25
France Nut M10
Washer OD24.2*ID12.5*2.2T
Washer OD19*ID6.5*1.6T
Hex Bolt M6*15
Screw M6*25
Nut M6
Spring Clasp
Spring Washer
Protect Cover for Front Post
Horizontal Knob M8*33
Square End Cap □25*50
Computer Middle Wire
Q’TY
1
5
1
2
1
2
1
1
3
1
3
1
1
2
1
1
1
2
1
4
4
4
3
1
2
1
1
2
8
2
1
1
1
1
1
2
4
1
1
1
Computer Lower Wire
T Knob
Nylon Nut M6
Washer OD16.8*ID8.2
Carriage Bolt M8*70
Curve Washer OD22.2*ID8.2
Domed Nut M8
Allen Bolt M8*15
Bushing
Philips Screw M3*10L
Handle Pulse Wire
Sensor-Magnetite
Crank Cover
Magnetite
France Domed Nut
Motor
Adaptor
Reed Switch Wire
DC WIire
Carriage Bolt M8*29
Carriage Bolt M8*55
Philips Screw M4*25
Clamp
Allen Wrench S13-14-15
Allen Key S6
5
10
14
81
62
12
67
60
16
9
57
11
71
EXPLODED DIAGRAM
13
39
69
40
26
56
76
25
3
6
17
28
6
18
55
22 21
77
75
59
38 74
5
68
20
49
1
19
70
50
51
52
47
53
32
33
26
27
15
71
73
72
35
64
44
45
65
4
63
24
43
30
45
34
36 40 61
29
80
31
37
29
8
48
7
ASSEMBLY DIAGRAM
10
67
60
14
3
20
5
16
15
4
7
63
ASSEMBLY INSTRUCTION
STEP 1
Attach the front stabilizer (5) to the main frame (1), securing with 2 x carriage bolts (63), 2
x curve washers (64) and 2 x domed nuts (65). Now attach the rear stabilizer (4) to the
main frame (1), securing with 2 x carriage bolts (63), 2 x curve washers (64) and 2 x
domed nuts (65).
1
5
63
4
63
STEP 2
Take the front post (2) and connect the computer middle wire (58) with computer lower wire
(59). Insert front post (2) into main fame (1) and tighten with 3 x allen bolt (66), 1 x carriage
bolt (78) and 2 x carriage bolt (79).
58
59
1
8
STEP 3
(a) Attach the seat (14) to the seat slide (9), securing with 3 x curve washer (63) and 3 x
nylon nut (45).
(b) Pull the locking knob (20) out and insert the seat post (3) into the frame (1). Release
the locking knob (20) so that it springs into the hole of the seat post at your desired
location.
(c) Place the seat slider (9) on the seat post bracket (3) and secure using the seat post
knob (56).
a
9
54
54
45
c
3
20
56
STEP 4
Connect computer upper wire (42) with computer middle wire (59). Attach the computer
(10) on the front post (2), securing with 4 x screws (41).
10
42
59
41
9
STEP 5
Attach the handlebar (6) to bracket on the front post (2) and cover clamp(81). Secure
using washer (62), spacer (67), and T knob (60). Insert the hand pulse wire (69) into the
back of the computer (10).
81
STEP 6
Attach the left pedal (15) to the left crank (27) and repeat this procedure for the right
pedal (16).
Note: The right pedal (16) should be threaded on clockwise and the left pedal (15) should
be threaded counter-clockwise.
16
10
STEP 7
Connect adaptor (75) with Main frame(1)
CHECK ALL BOLTS AND NUT ARE TIGHTENED
BEFORE USING THE MACHINE
11
COMPUTER INSTRUCTIONS
The things you should know before exercise
A. Input Power
Plug in the adaptor to the equipment then the computer will produce a beep sound and turn on the
computer at the Manual mode.
B. Program select and setting value
1. Use the UP or DOWN keys to select program mode and then press ENTER to confirm your
exercise mode.
2. At the Manual mode, the computer will use the UP or DOWN keys to set up your exercise TIME,
DISTANCE, CALORIES.
3. Press the START/STOP key to start exercise.
4. When you reach the target, the computer will produce beep sounds and then stop.
5. If you set up more than one target and you would like to reach next target, press START/STOP
key to keep on exercise.
C. Clock Mode:
1.
After plug-in AC adaptor then the LCD will display at the Clock mode for user to input the
current hour by 24 hours and minute by 60 minutes. After setting up the clock then the
monitor will display the hour-minute and second bar on the screen. Two seconds display
one bar. Also display the current temperature on the screen. Press any key to quit the
CLOCK mode except the ENTER key.
2.
The computer will enter the clock mode when there is no signal input or no keys be pressed
after 4 minutes. You can press ENTER key to switch the clock and temperature at the clock
mode or press other keys to quit the clock mode except the ENTER key.
3.
By holding the ENTER and UP keys together for over two seconds, you can switch to the
CLOCK mode during the STOP mode.
4.
You can set up the CLOCK by holding ENTER key for over 2 seconds when switch to
CLOCK mode from STOP mode then you can set up TIME by UP or DOWN keys.
12
Functions and Features:
1. Quick Start key: Allows you to start the computer without selecting a program. TIME automatically
begins to count up from zero. Use the UP and DOWN keys to adjust the resistance.
2. TIME: Shows your elapsed workout time in minutes and seconds. Your computer will
automatically count up from 0:00 to 99:59 in one second intervals. You can also program your
computer to count down from a set value by using the UP and DOWN keys. If you continue
exercising once the time has reached 0:00, the computer will begin beeping, and reset itself to the
original time set, letting you know your workout is done.
3. DISTANCE: Displays the accumulative distance traveled during each workout up to a maximum of
99.9KM/MILE.
4. RPM: Your pedal cadence.
5. WATT: The amount of mechanical power the computer is receiving from your exercise.
6. SPEED: Displays your workout speed value in KM/MILE per hour.
7. CALORIES: Your computer will estimate the cumulative calories burned at any given time during
your workout.
8. PULSE: Your computer displays your pulse rate in beats per minute during your workout.
9. AGE: Your computer is age-programmable from 10 to 99 years. If you do not set an age, this
function will always default to age 35.
10. TARGET HEART RATE (TARGET PULSE): The heart rate you should maintain is called your
Target Hear Rate in beats per minute.
11. PULSE RECOVERY: During the START stage, leave the hands holding on grips or leave the
chest transmitter attached and then press “PULSE RECOVERY” key, all function displays will stop
except “TIME”. Time starts counting from 00:60 - 00:59 - - to 00:00. As soon as 00:00 is reached,
the computer will show your heart rate recovery status with the grade F1.0 to F6.0.
1.0
means OUTSTANDING
1.0<
<F<
<2.0 means EXCELLENT
2.0≦
≦F≦
≦2.9 means GOOD
3.0≦
≦F≦
≦3.9 means FAIR
4.0≦
≦F≦
≦5.9 means BELOW AVERAGE
6.0
means POOR
Note: If no pulse signal input then the computer will show “P” on the PULSE window. If the
computer shows “ERR” on the message window, please re-press the PULSE RECOVERY key and
please make sure your hands are keeping well on the grips or the chest transmitter is attached
well.
Key function:
There are 6 button keys and the function description as follows:
1. START/STOP key:
a. Quick Start key function: Allows you to start the computer without selecting a program. Manual
workout only. Time automatically begins to count up from zero
b. During the exercise mode, press the key to STOP exercise.
c. During the stop mode, press the key to START exercise.
2. UP key:
a. Press the key to increase the resistance during exercise mode.
b. During the setting mode, press the key to increase the value of Time, Distance, Calories, Age and
13
select Gender and Program.
3. DOWN key:
a. Press the key to decrease the resistance during exercise mode.
b. During the setting mode, press the key to decrease the value of Time, Distance, Calories, Age
and select Gender and Program.
4. ENTER/RESET key:
a. During the setting mode, press the key to accept the current data entry.
b. At the stop mode, by holding this key for over two seconds the user can reset all values to zero or
default value.
c. During setting the Clock, press this key can accept the setting hour and setting minute.
5. BODY FAT / MEASURE key:
Press the key to input your HEIGHT, WEKGHT, GENDER and AGE then to measure your body fat
ratio.
6. PULSE RECOVERY key:
Press the key to activate heart rate recovery function.
Program Introduction & Operation:
Manual Program: Manual
P1 is a manual program. User can start exercise by pressing START/STOP key. The default
resistance level is 5. Users may exercise in any desirous of resistance level (Adjusting by
UP/DOWN keys during the workout) with a period of time or a number of calories or a certain
distance.
Operations: 1. Use UP/DOWN keys to select the MANUAL (P1) program.
2. Press the ENTER key to enter MANUAL program.
3. The TIME will flash and you can press UP or DOWN keys to setting your exercise
TIME. Press ENTER key to confirm your desired TIME.
4. The DISTANCE will flash and you can press UP or DOWN keys to setting your
target DISTANCE. Press ENTER key to confirm your desired DISTANCE.
5. The CALORIES will flash and you can press UP or DOWN keys to setting your
exercise CALORIES. Press ENTER key to confirm your desired CALORIES.
6. Press the START/STOP key to begin exercise.
Preset Program: Steps, Hill, Rolling, Valley, Fat Burn, Ramp, Mountain, Intervals, Random,
Plateau, Fartlek, Precipice Program
PROGRAM 2 to PROGRAM 13 is the preset programs. Users can exercise with different level of
loading in different intervals as the profiles show. Users may exercise in any desirous of
resistance level (Adjusting by UP/DOWN keys during the workout) with a period of time or a
number of calories or a certain distance.
Operations: 1. Use UP/DOWN keys to select one of the above programs from P2 to P13.
2. Press the ENTER key to enter your workout program.
3. The TIME will flash and you can press UP or DOWN keys to setting your exercise
TIME. Press ENTER key to confirm your desired TIME.
4. The DISTANCE will flash and you can press UP or DOWN keys to setting your
target DISTANCE. Press ENTER key to confirm your desired DISTANCE.
5. The CALORIES will flash and you can press UP or DOWN keys to setting your
exercise CALORIES. Press ENTER key to confirm your desired CALORIES.
14
6. Press the START/STOP key to begin exercise.
User Setting Program: User 1, User 2, User 3 and User 4
Program 14 to 17 is the user setting program. Users are free to create the values in the order of
TIME, DISTANCE, CALORIES and the resistance level in 10 columns. The values and profiles
will be stored in the memory after setup. Users may also change the ongoing loading in each
column by UP/DOWN keys, and they will not change the resistance level stored in the memory.
Operations:
1. Use UP/DOWN keys to select the USER program from P14 to P17.
2. Press the ENTER key to enter your workout program.
3. The column 1 will flash, and then use the UP/DOWN keys to create your personal
exercise profile. Press ENTER to confirm your first column of exercise profile. The default
level is load 1.
4. The column 2 will flash, and then use the UP/DOWN keys to create your personal
exercise profile. Press ENTER to confirm your second column of exercise profile.
5. Follow the above description 5 and 6 to finish your personal exercise profiles. Press
ENTER to confirm your desired exercise profile.
6. The TIME will flash and you can press UP or DOWN keys to setting your exercise TIME.
Press ENTER key to confirm your desired TIME.
7. The DISTANCE will flash and you can press UP or DOWN keys to setting your target
DISTANCE. Press ENTER key to confirm your desired DISTANCE.
8. The CALORIES will flash and you can press UP or DOWN keys to setting your exercise
CALORIES. Press ENTER key to confirm your desired CALORIES.
9. Press the START/STOP key to begin exercise.
Heart Rate Control Program: 55% H.R.C., 65% H.R.C., 75% H.R.C., 85% H.R.C., Target H.R.C.
Program 18 to Program 22 is the Heart Rate Control Programs and Program 22 is the Target
Heart Rate Control program.
Program 18 is the 55% Max H.R.C. - - Target H.R. = (220 – AGE) x 55%
Program 19 is the 65% Max H.R.C. - - Target H.R. = (220 – AGE) x 65%
Program 20 is the 75% Max H.R.C. - - Target H.R. = (220 – AGE) x 75%
Program 21 is the 85% Max H.R.C. - - Target H.R. = (220 – AGE) x 85%
Program 22 is the Target H.R.C. - - Workout by your target heart rate value.
Users can exercise according to your desired Heart Rate program by setting your AGE, TIME,
DISTANCE, CALORIES or TARGET PULSE. In these programs, the computer will adjust the
resistance level according to the heart rate detected. For example, the resistance level may
increase every 20 seconds while the heart rate detected is lower than the TARGET H.R and then
the computer will show “SLOW DOWN” on the message window. Also the resistance level may
decrease every 20 seconds while the heart rate detected is higher than the TARGET H.R and
then the computer will show “HURRY UP” on the message window. As a result, the user’s heart
rate will be adjusted to close the TARGET H.R. between the range of TARGET H.R. +5 and
TARGET H.R. -5 and then the computer will show “KEEP GOING” on the message window.
Operations:
1. Use UP/DOWN keys to select one of the heart rate control program from P18 to P22.
2. Press the ENTER key to enter your workout program
3. The AGE will flash at P18 to P21 programs and you can press UP or DOWN keys to set
your AGE. The default age is 35.
15
4. At program 22, the TARGET PULSE will flash and you can press UP or DOWN keys to set
your TARGET PULSE between 80 to 180. The default TARGET PULSE is 120.
5. The TIME will flash and you can press UP or DOWN keys to set your exercise TIME.
Press ENTER key to confirm your desired TIME.
6. The DISTANCE will flash and you can press UP or DOWN keys to set your target
DISTANCE. Press ENTER key to confirm your desired DISTANCE.
7. The CALORIES will flash and you can press UP or DOWN keys to set your exercise
CALORIES. Press ENTER key to confirm your desired CALORIES.
8. Press the START/STOP key to begin exercise.
Watt Control Program: Watt Control
Program 23 is a Speed Independent Program. Press ENTER key to set up the values of TARGET
WATT, TIME, DISTANCE and CALORIES. During the exercise mode, the level of resistance is not
adjustable. For example, the level of resistance may increase while the speed is too slow. Also
the level of resistance may decrease while the speed is too fast. As a result, the calculated
value of WATT will close to the value of TARGET WATT setup by users.
Operations:
1. Use UP or DOWN key to select the WATT CONTROL (P23) program.
2. Press ENTER key to enter your workout program.
3. The TIME will flash and you can press UP or DOWN key to set your exercise TIME. Press
ENTER key to confirm your desired TIME.
4. The DISTANCE will flash and you can press UP or DOWN key to set your target
DISTANCE. Press ENTER key to confirm your desired DISTANCE.
5. The WATT will flash and you can press UP or DOWN key to set your target WATT value.
Press ENTER key to confirm your target WATT. The default WATT value is 100.
6. The CALORIES will flash and you can press UP or DOWN key to set your exercise
CALORIES. Press ENTER key to confirm your desired CALORIES.
7. Press the START/STOP key to begin exercise.
NOTE: 1. WATT = TORQUE (KGM) * RPM * 1.03
2. In this program, the WATT value will keep constant value. It means that if you
peddle quickly, the resistance level will decrease and if you peddle slowly, the
resistance level will increase. Always try to keep you in the same watt value.
Body Fat Program: Body Fat
Program 24 is a special program design to calculate users’ body fat ratio and to offer a specific
loading profile for users. There are 3 body types divided according to the FAT% calculated.
Type1: BODY FAT% > 27
Type2: 27 ≧ BODY FAT% ≧ 20
Type3: BODY FAT % < 20
The computer will show the test results of FAT PERCENT, BMI and BMR.
Operations:
1. Use UP/DOWN keys to select the BODY FAT (P24) program.
2. Press the ENTER key to enter your workout program.
3. The HEIGHT will flash and you can press UP or DOWN keys to set your HEIGHT. Press
16
ENTER key to confirm your HEIGHT. The default HEIGHT is 170cm or 5’07” (5feet 7
inches).
4. The WEIGHT will flash and you can press UP or DOWN keys to set your WEIGHT. Press
ENTER key to confirm your WEIGHT. The default WEIGHT is 70kgs or 155lbs.
5. The GENDER will flash and you can press UP or DOWN keys to select your sex. Number
1 means man and number 0 means female. Press ENTER key to confirm your Gender. The
default sex is 1 (MAN).
6. The AGE will flash and you can press UP or DOWN keys to set your AGE. Press ENTER
key to confirm your AGE. The default AGE is 35.
7. Press the START/STOP key to begin body fat measurement. If the window show E on the
window, please make sure your hands are attached well on the grips or the chest belt is
touch well on your body. Then press the START/STOP key again to begin body fat
measurement.
8. After finished your measurement, the computer will show the values of BMR, BMI and FAT
PERCENT on the LCD display. Furthermore, the computer will show your own exercise
profile for your body type.
9. Press START/STOP key to begin exercise.
Operation guide:
1.
Sleep Mode:
The computer will enter the sleep mode when there is no signal input and no keys be pressed
after 4 minutes. You can press any key to wake up the computer.
2. BMI (Body Mass Index): BMI is a measure of body fat based on height and weight that applies
to both adult men and women.
3. BMR (Basal Metabolic Rate): Your Basal Metabolic Rate (BMR) shows the number of calories
your body needs to operate. This doesn’t account for any activity, it’s simply the energy needed
to sustain a heartbeat, breathing and normal body temperature. It measures the body at rest,
not sleep, at room temperature.
Error Message:
E1 (ERROR 1):
Normal state: During workout, when the monitor did not get the count signal from the gear motor
more than 4 seconds and check under successive 3 times then the LCD will show
E1.
Power on state: The gear motor will return to zero automatically, when the signal of motor cannot
be detected for more than 4 seconds then the gear motor’s driver will be cut off
immediately and show the E1 on the LCD display. All the other digital and function
mark are blank, and the output signals are cut off also.
E2 (ERROR 2): When the monitor read the memory data, if the I.D. code is not correct or the memory
IC damages then the monitor will show E2 immediately at power on.
E3 (ERROR 3): After 4 seconds by start mode, the computer detects the faulty motor did not leave the
zero point then the LCD bar displays “E3”.
17
Technical data of the current adapter:
1. Available for Input: 230V/50Hz or 60Hz
2. Available for Input: 110V/50Hz or 60Hz
Output: 6V AC/0.5A
Output: 6V AC/0.5A
LCD Workout Graphics
PRESET PROGRAM PROFILES:
PROGRAM 1
MANUAL
PROGRAM 4
ROLLING
PROGRAM 7
RAMP
PROGRAM 10
RANDOM
PROGRAM 2
PROGRAM 3
STEPS
PROGRAM 5
HILL
PROGRAM 6
VALLEY
PROGRAM 8
FAT BURN
PROGRAM 9
MOUNTAIN
PROGRAM 11
INTERVALS
PROGRAM 12
PLATEAU
PROGRAM 13
PRECIPICE
18
FARTLEK
USER SETTING PROGRAM
PROGRAM 14
USER 1
PROGRAM 15
USER 2
PROGRAM 16
USER 3
PROGRAM 17
USER 4
HEART RATE PROGRAM PROFILES:
PROGRAM 18
55% H.R.C.
Press ENTER key
PROGRAM 19
65% H.R.C.
Press ENTER key
PROGRAM 20
75% H.R.C.
Press ENTER key
19
PROGRAM 21
85% H.R.C.
Press ENTER key
PROGRAM 22
TARGET H.R.C.
WATT CONTROL PROGRAM
PROGRAM 23
WATT CONTROL
BODY FAT TEST PROGRAMS:
PROGRAM 24
BODY FAT (STOP MODE)
BODY FAT (START MODE)
One of the Following Six Profiles Will Display Automatically after Measuring Your BODY FAT:
Workout Time: 40 minutes
Workout Time: 40 minutes
Workout time: 20 minutes
Workout Time: 40 minutes
Workout Time: 40 minutes
Workout time: 20 minutes
20
EXERCISE INSTRUCTIONS
Using your MOTORIZED EXERCISE BIKE will provide you with several benefits, it will
improve your physical fitness, tone muscle and in conjunction with a calorie controlled
diet help you lose weight.
1. The Warm Up Phase
This stage helps get the blood flowing around the body and the muscles working properly.
It will also reduce the risk of cramp and muscle injury. It is advisable to do a few
stretching exercises as shown below. Each stretch should be held for approximately 30
seconds, do not force or jerk your muscles into a stretch - if it hurts, STOP.
INNER THIGH
FORWARD
BENDS
CALF / ACHILLES
SIDE BENDS
OUTER THIGH
2. The Exercise Phase
This is the stage where you put the effort in. After regular use, the muscles in your legs
will become more flexible. Work to your but it is very important to maintain a steady
tempo throughout. The rate of work should be sufficient to raise your heart beat into the
target zone shown on the graph below.
21
This stage should last for a minimum of 12 minutes though most people start at
about 15-20 minutes
3. The Cool Down Phase
This stage is to let your Cardio-vascular System and muscles wind down. This is a repeat
of the warm up exercise e.g. reduce your tempo, continue for approximately 5 minutes.
The stretching exercises should now be repeated, again remembering not to force or jerk
your muscles into the stretch.
As you get fitter you may need to train longer and harder. It is advisable to train at least
three times a week, and if possible space your workouts evenly throughout the week.
MUSCLE TONING
To tone muscle while on your MOTORIZED EXERCISE BIKE you will need to have the
resistance set quite high. This will put more strain on our leg muscles and may mean you
cannot train for as long as you would like. If you are also trying to improve your fitness
you need to alter your training program. You should train as normal during the warm up
and cool down phases, but towards the end of the exercise phase you should increase
resistance making your legs work harder. You will have to reduce your speed to keep
your heart rate in the target zone.
WEIGHT LOSS
The important factor here is the amount of effort you put in. The harder and longer
you work the more calories you will burn. Effectively this is the same as if you were
training to improve your fitness, the difference is the goal.
22