1
GRADATEUR DMX 4 CANAUX
4 CHANNELS DMX DIMMER
SRC - 167
USER MANUAL
MODE D’EMPLOI
FRANÇAIS
ATTENTION
Afin de prévenir tous risques de choc électrique vous ne devez pas enlever le capot.
Aucune pièce utile à l’utilisateur à l’intérieur.
Confier la réparation à un personnel qualifié.
IMPORTANT
L'emploi de contrôles ou ajustements ou utilisations autres que celles indiquées peuvent provoquer une exposition aux radiations.
Merci d’avoir acheter le gradateur DMX 4 canaux SRC-167 de chez SONO PROLIGHTING. Pour une utilisation optimale de ce produit, veuillez lire
attentivement le mode d’emploi afin de vous familiarisez avec les opérations basics de ce gradateur.
Cet appareil permet de contrôler des jeux de lumière qui normalement ne pourraient pas être piloté par un contrôleur DMX. Nous avons remplacé les
switch d’adressage DMX par des boutons numériques facile d’utilisation à l’aide du LCD.
ATTENTION: Afin de prévenir ou de réduire les risques de chocs électriques ou de feu, n’exposez pas l’appareil à la moisissure ou à l’humidité.
N’utilisez que l’adaptateur secteur AC/DC conseillé par SONO PROLIGHTING. L’utilisation d’un autre adaptateur secteur mettra fin à la garantie.
NOTE: Il n’y a pas de pièces facilement remplaçables dans l’appareil. Toutes interventions techniques à l’intérieur de l’appareil doivent être effectuées
par un professionnel. Toute intervention non autorisée par SONO PROLIGHTING mettra fin à la garantie. En cas de panne, contactez votre revendeur.
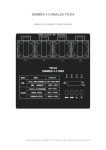
FONCTIONS ET REGLAGES PANNEAUx AVANT ET ARRIERE
1.
Bouton Mode : Ce bouton change le mode de fonctionnement : DMX ou
séquenceur.
2. Bouton Menu : Ce bouton active les différentes fonctions DMX et les
modes séquences.
3. Bouton Up : Ce bouton permet d’incrémenter la valeur affichée sur le
LCD.
4. Bouton Down : Ce bouton permet de diminuer la valeur affichée sur le
LCD.
5. Connecteur de sortie : Branchez sur ces prises les différents appareils à
piloter.
6. Indicateur vert : Indique l’état de fonctionnement du canal
correspondant.
7. Afficheur LCD : Indique les informations de toutes les fonctions en
cours.
8. Fusibles canal : Chaque canal est protégé par un fusible 10A. Ces
fusibles évitent d’abîmer les appareils pilotés en cas de mauvaises
manipulations ou mal fonctions. Toujours remplacer un fusible
défectueux par un fusible de même valeur.
9. Interrupteur On/Off
10. Cordon d’alimentation : Connectez ce cordon sur un prise secteur (
220V ).
11. Entrée DMX : Connectez sur cette prise un contrôleur.
12. Sortie DMX : Ce connecteur délivre le signal DMX et peut être relié à un
autre appareil DMX.
MODE DE FONCTIONNEMENT
Cet appareil à deuxmodes de fonctionnement. Il peut être utilisé comme un
séquenceur 4 canaux ou comme un gradateur DMX 1,2,3 ou 4 canaux. Merci
de lire les instructions de chaque mode avant d’utiliser l’appareil.
MODE SEQUENCE
Utilisez ce mode si vous prévoyez d’utiliser le SRC-167 comme un séquenceur 4 canaux. Cet appareil possède 16 programmes intégrés, Vous pouvez
sélectionner n’importe quel programme ou créer une séquence aléatoire des 16 programmes intégrés. Vous contrôlez la vitesse à laquelle la séquence
sera effectuée.
1. Connectez vos appareils de lumières sur n’importe quelle prise de sortie sur le SRC-167.
2. Utilisez le bouton mode pour sélectionner le mode séquence : Le mode séquence est indiqué sur l’afficheur par « PA » suivi d’un nombre de 01 à
16. “PA” est Programme Appliqué. Si “A” apparaît sur l’afficheur DMX et vous etes en mode DMX, “A” correspondra à l’adresse.
3. Sélection de la séquence : Une fois la fonction séquence sélectionnée, utilisez le bouton menu pour choisir la séquence souhaitée. La séquence
est représentée sur l’afficheur par la lettre “P » suivi de deux chiffres. Vous pouvez sélectionner n’importe quel programme parmi les 16 ( mais
vous ne pouvez en exécuter qu’un seul à la fois ).
4. Sélection de la vitesse de la séquence : A partir de ce point, vous pouvez choisir de modifier la vitesse de la séquence. Pendant la séquence,
appuyez sur la touche menu jusqu’à ce que “SP” ( suivi de deux chiffres ) soit affiché sur l’écran. Ensuite utilisez les touches up et down pour
choisir la vitesse ( 99 est la vitesse maximum ( 1/10s ). 01 est la vitesse la plus lente (un pas toutes les 30s ).
5. Intensité de la lumière : Utilisez le bouton menu pour afficher « d ». Utilisez les touches Up et Down pour changer l’intensité lumineuse. ( 00 étant
l’intensité la plus faible et 99 la plus forte ).
MODE DMX
Utilisez ce mode seulement si vous voulez utiliser le SRC-167 comme un
gradateur DMX. Cette fonction vous permet d’allumer et de contrôler
l’intensité lumineuse d’appareil non-DMX en utilisant un contrôleur DMX. Les
fonctions On, off, et gradateur peut être effectué à partir du SRC-167. Vous
pouvez aussi régler votre SRC-167 comme un gradateur 1,2 ou 4 canaux.
Fonctionnement DMX:
1.
2.
3.
4.
5.
6.
7.
Connectez un contrôleur DMX sur votre SRC-167 en utilisant un câble XLR 3 broches ( entrée DMX ).
Connectez vos appareils de lumières sur n’importe quelle prise de sortie sur le SRC-167.
Décidez si vous allez utiliser le SRC-167 comme un gradateur DMX 1,2 ou 4 canaux. Cette fonction vous permet de :
a. Controler les sorties en utilisant un canal DMXControl the output to all four outlets with one DMX channel.
b. Le groupes des canaux 1 et 2 ou le groupe des canaux 3 et 4. Le premier group est contrôlé par un canal DMX et le deuxième par un
deuxième canal DMX..
c. Le réglage d’origine est switcher DX 4 canaux, chaque canal est contrôlé par un canal DMX.
Pour changer le mode de fonctionnement canal, assurez-vous que vous etes en mode DMX. Utilisez le bouton menu pour afficher CH suivi de 2
chiffres. Ensuite utilisez les touches Up et Down pour changer le réglage 01, 02 ou 04. ( le réglage d’origine est 04 ).
Normalement le SRC-167 est activé par une adresse DMX. Pour changer ce réglage, assurez-vous que vous etes en mode DMX. Utilisez la
touche menu pour accéder au réglage des adresses, cela est représenté par un “A” suivi de 3 chiffres. Utilisez les touches Up et Down pour
sélectionner l’adresse DMX souhaitée.
Une fois avoir réglé l’adresse DMX, assurez-vous que le contrôleur pilote correctement le SRC-167.
Votre SRC-167 peut maintenant fonctionner comme un gradateur DMX, vous pouvez contrôler l’intensité de vos appareils de lumière à partir du
contrôleur DMX. 0 étant le niveau minimum et 99 le niveau maximum..
REMPLACEMENT DU FUSIBLE
Pour remplacer un fusible, utilisez un petit tournevis plat et dévissez le support fusible. Tirez sur le support et sortez le fusible défectueux. Remplacez le
par un nouveau. Replacez le support fusible et revissez-le.
ATTENTION: Débranchez le SRC-167 avant de changer le fusible
ALIMENTATION
Avant de brancher le SRC-167, assurez-vous que la tension secteur soit bien de 230-240V. Toute autre voltage pourrait endommager l’appareil.
CONDITIONS DE GARANTIE :
Les équipements SONO PROLIGHTING sont couverts par une garantie d’1 an pièces et main d’œuvre sauf pour les crossfaders (90 jours).
Les principes suivants s’appliquent à partir du moment où l’appareil quitte nos usines.
La facture de mise à la consommation fera foi de date de départ de la garantie, dans la mesure ou celle-ci n’excède pas 12 mois par rapport à la date
de fabrication.
Seules les compagnies agréées par SONO PROLIGHTING sont autorisées à opérer sur ces équipements.
La garantie devient nulle si l’intervenant appartient à un autre groupe.
Durant la période sous garantie, tout matériel défectueux doit nous être retourné dans son emballage d’origine sous colis pré-payé.
SONO PROLIGHTING vous retournera vos biens par colis pré-payé au cours de l’année de garantie. Au-delà, les frais d’expédition seront à la charge
du client.
Les potentiomètres ont une durée de vie limitée et ne sont pas garantis par le fabricant en cas d’utilisation très intensive.
Pour toute demande relative à ces services, adressez-vous à votre distributeur habituel, qui sera le plus apte à vous renseigner
ENGLISH
CAUTION
To prevent electric shock do not remove cover (or bottom) screws.
No user serviceable parts inside refer servicing to qualified
servicing personnel.
IMPORTANT
Use of controls or adjustments or performance of procedures other than those specified herein may result in hazardous radiation
exposure.
Thank you for purchasing the SRC-167 4 channel dimmer pack. To optimize the performance of this product, please read these operating instructions
carefully and familiarize yourself with the basic operations of this unit. SRC-167 is a four channel, DMX dimmer pack. This unit has been tested at the
factory before being shipped to you . There is no assembly required.
This unit allow you to control special effect lighting, that normally could not be controlled, by a DMX controller. With this revision to our popular SRC167, we have eliminated confusing dip switches and replace them with an easy to use digital switching device that incorporates the use of an easy to
read LCD display.
WARNING: To prevent or reduce the risk of electrical shock or fire, do not expose this unit to rain or moisture. Clearing memory often may cause damage to the
memory chip, be careful not to reinitialize your unit frequency often to avoid this risk. Only use the recommended AC/DC power adaptor.
CAUTION: There are no user serviceable parts inside this unit. Do not attempt any repairs yourself, doing so will void your manufactures warranty. In the unlikely
event your unit may require service, please contact your nearest our dealer.
FUNCTIONS AND CONTROLS FRONT PANEL, REAR PANEL
1.
Mode Button: This button will change the operate mode between DMX
and chaser.
2. Menu Button: This button will activate the different functions in DMX and
chase modes.
3. Up Button: This button will increase the displayed value in the LCD
display.
4. Down Button: This button will decrease the displayed value in the LCD
display.
5. Power Output: 3-prong grounded Edison output sockets. 8total output
sockets.
6. Green L.E.D. Indicators: These LEDs will indicate their relevant channel
activity.
7. LCD Display: This multifunction display will detail all chase and program
that pertains to the current operating mode of the pack.
8. Channel Fuses: Each of the four channels is protected by a 10A fuse.
These fuses prevent you from overloading and damaging your pack. Be
sure to always replace with the exact same type fuse.
9. Power Switch: This switch controls the units main power.
10. Power Cord: Plug this cord into a matching power supply for your area.
11. DMX Input: This connector accepts your DMX input signal.
12. DMX Output: This connector sends your DMX input signal through to the
next DMX device.
OPERATION MODE
The unit has two different operating modes. This unit can be used as a four
channel chaser or as a 1, 2, or 4 channel DMX dimmer pack. Please follow
the instructions blow to operate the unit in your desired mode.
CHASE MODE
Use this operating mode only if you are planning on using your SRC-167 as a four channel chaser. This device has 16 built in programs, you may select
any of these programs or set the pack to chase in a random sequence of all 16 built in programs for a more dramatic light show. You may control the
speed at which the programs will chase.
6. Connect your lighting effects to the any of the eight power sockets on the pack
7. Use the mode button to select chase mode: Chase mode is indicated by “PA” followed by numbers 01-16. “PA” is Programmed Applied. If “A”
appears in the LCD display you are in DMX mode, “A” stands for address.
8. Set you desired chase pattern: Once you have selected the chase function use the Menu button to select your desired chase. The chase pattern is
represented in the LCD display by “P” followed by two numbers. You may select any of the built in 16 programs to run at a single time.
9. Set you desired chase speed: At this point you may change the program chase speed. While in chase mode, tap on the MENU button until the
“SP” followed by two numbers is displayed in the LCD. Then use the UP and DOWN buttons to adjust the chase speed. A value of 99 will give you
the fastest chase speed (about 1/10th of a second). A value of 01 will give you the slowest chase speed (one step every 30 sec.).
10. You may now change the light intensity: Use the MENU button to select “d” in the LCD. Use the UP and DOWN arrow keys to change the light
output intensity. 00 will give the lowest output and 99 will give you full intensity.
DMX MODE
Use this operating mode only if you plan to use your pack as a DMX dimmer. This function will allow you to turn on and control the intensity of non-DMX
with the use of a DMX controller. On, off, and dimming functions can be performed through this pack. You may also set your dimmer pack to function as
a 1, 2, or 4 channel DMX dimmer pack, which means you can combine the output
functions.
DMX Operation:
8. Plug in a DMX controller to your dimmer pack via the 3-pin XLR cables.
9. Connect your lighting effect to any of the eight power sockets on the front of the pack.
10. Decide if you are going to use your dimmer pack as 1, 2, or 4 channels. This function allows you to:
a. Control the output to all four outlets with one DMX channel.
b. Group outlet channels one and two and group outlets channels three and four. The first group will be controlled by one DMX channel and the
second group will be controlled by another DMX channel. This gives the pack a DMX value of two.
c. The default setting is a four channel DMX switcher, each channel is controlled by one DMX channel.
11. To change the channel function mode be sure you are in DMX mode. Use the MENU button to select “CH” followed by two digits. Then use the UP
and DOWN arrow buttons to change the setting from 01, 02, or 04. Your dimmer pack is initially set as a four channel DMX switcher.
12. The dimmer pack is initially set to be activated by DMX address one. To change this setting be sure you are in DMX mode. Use the MENU button
to select the address settings, this will be indicated by an “A” in the first character of the LCD followed by three numbers. Use the UP and DOWN
arrow buttons to select your desired DMX address. Remember the DMX address tells your DMX controller what channel to activate the pack’s
functions.
13. Once you have set the pack’s DMX address be sure your controller’s address matches that of the pack’s.
14. Your pack will now operate as DMX dimmer, you may control the light output intensity through your DMX controller. 0 will give no output and 100
will give you full output.
FUSE REPLACEMENT
To replace the protective fuse, use a flat head screwdriver to unscrew the fuse holder. Pull out the old fuse and replace it with a new one. Insert the fuse
back into slot and tighten. Always replace with the exact same type fuse remove unless otherwise specified by an authorized our company service
technician.
CAUTION: Always disconnect the units main power before performing any type of service or fuse replacement!
POWER SUPPLY
Before plugging your unit in be sure the source voltage in your area matches the required voltage for your SRC-167. The unit is available in a 120V and
240V version. Because line voltage may vary from venue to venue, you should be sure to plug your power supply into a matching wall outlet before
attempting to operate you controller.
PRODUCT DESCRIPTION
The SRC-167 is 1, 2, or 4 channel DMX Dimmer Pack. This pack can serve as a stand alone chaser or a DMX dimmer pack. This pack is designed for
zero-crossing circuitry which protects against inductive loads, so it is safe for use with all lighting effects that include transformers such as pin spots.
Each channel comes with two 3-prong Edison sockets inputs for a total of eight. This unit features XLR female and male connection for DMX
compatibility. Each channel is equipped with a fuse for each channel, and a maximum output load of 10A per channel or 20A total. This revision of our
popular SRC-167 has a great new case design that makes it great for permanent or mobile applications.
WARRANTY CONDITIONS
SONO PROLIGHTING equipment is covered by a 1-year warranty on parts and labour except for Crossfaders (90 days).
The following rules apply from the day the equipment leaves the factory:
The date on the invoice is considered to be the date the warranty begins.
Only companies approved by SONO PROLIGHTING are allowed to work on the equipment. Warranty becomes void when other service technicians
open the equipment.
During warranty period, defective equipment must be sent by pre-paid mail in the original box.
SONO PROLIGHTING will return the goods by pre-paid mail during the first year of warranty; thereafter the mailing cost is to be paid by the recipient
Potentiometers have a limited lifetime and are not covered by the manufacturer for more than normal use.
For all service enquiries, refer to your local distributor, as he is best able to help you.