1
8
1
QUICK GUIDE EN
3
F
7
5
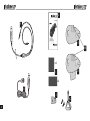
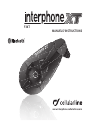
1 - MFB (multifunction button)
2 - UP button
3 - DOWN button
4 - + volume button
5 - – volume button
7 - Multifunction LED
7 - Multifunction LED
8 - Multifunction audio/data port
9 - Mounting guides for Bluetooth® module
10 - Charging/audio-in connector
ASSEMBLY OF THE SLIDE SUPPORT
WITH REMOVABLE CLIP
Take the support and note the best place
to fasten it to the side of the helmet. Insert
the rear part of the clip into the helmet and
attach the other part on the outside.
A - YELLOW
B - GREEN
B
*see the user manual
for complete instructions.
PHASE 1
PHASE 2
8
9
A
PHASE 3
Insert the screws and
tighten gently. Check
position and move the
support if necessary by sliding it along. Tighten the
screws with the screwdriver supplied.
(images A/B)
B
www.interphone.cellularline.com
A
PHASE 1
PHASE 2
PHASE 3
PHASE 4
10
met’s finish). Remove the
protective film from the
double sided tape, and
apply the support to the
helmet.
As the support cannot be
moved once it is attached
to the helmet, take great
care with its positioning
when applying.
(image C)
g
J
4
K
MOUNTING ON
OPEN FACE HELMET
MOUNTING ON
MODULAR AND
OPEN-FACE
HELMETs
A
A
M
d
x2
MOUNTING ON
MODULAR HELMET
E
x4
i
A
A
MOUNTING ON
FULL-FACE HELMET
C
A
B
PHASE 4
ASSEMBLY OF THE ADHESIVE SLIDE
SUPPORT
Take the adhesive support and look for the
best side and place to position it. Clean and
de-grease the part of the helmet where you
are going to stick the support (do not use
any detergents that could damage the hel-
WE RECOMMEND YOU CHECK FOR
SOFTWARE UPDATES ON THE WEBSITE
WWW.INTERPHONE.CELLULARLINE.COM
MOUNTING ON
FULL-FACE HELMET
B
A
6
2
4
B
L
F4XT
F3XT