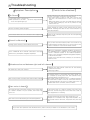
1
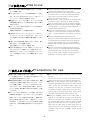
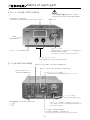
SRM-006tS
VACUUM TUBE OUTPUT DRIVER UNIT FOR EARSPEAKERS
取扱説明書
このたびはスタックスのSRM-006tSをお買い上げいただき、誠にありがとうございます。
本機の音質、性能をフルに発揮してお使いいただくため、また安全にご使用していただくためにこの説明書をよくお読
みの上、末永くご愛用くださいますようお願い申し上げます。お読みになったあとは保証書と共に必ず保存しておいて
ください。
User's Manual
Thank you very much for purchasing STAX SRM-006tS. Please read this manual carefully in order to
use the unit safely and to bring out its maximum performance for many years of listening pleasure.
Please be sure to keep this manual along with the warranty card after reading.
Safety information
This product contains high-voltage circuitry. Never attempt to disassemble or modify it to avoid danger.
!
安全に関する注意
この製品は高電圧を内蔵しています。危険ですから、絶対に分解した
り改造しないようにお願い致します。
R
○
1
ご使用方法/How to use
●リアパネルの各入力端子にお聴きになるソースの出力
●Connect the output cables from source equipment
to each input terminal on the rear panel.
●Insert the socket side of the supplied power cable
into the AC inlet ⑫ on the rear panel and then its
plug side into the wall socket. Push the “power”
switch ① to power on the unit.
●The pilot lamp ② blinks for about 50 seconds while
the vacuum tube is warming up. When the lamp
lights up continuously, the unit is ready to operate.
●Select the connected input signal using the “INPUT”
selector switch ③ on the front panel (“INPUT-1” is
selected when powered on).
●Plug in the earspeaker into one of the earspeaker
sockets ④ on the front panel, and turn the volume
knob ⑤ slowly clockwise to set optimal volume level.
●Turning independently the front part of the
double-structured knob adjusts the left channel level, and likewise the backside part of the knob adjusts the right channel level. The volume balance
between left and right channels can be adjusted in
this way.
●As other connection possibilities than described
above, a TV set or a portable apparatus equipped
with headphone jack can also be connected by
using a commercially available “stereo mini-plug →
RCA plug” conversion cable or connector.
コードを接続します。
●リアパネルのACインレット⑫に付属の電源コードを差し
込み、ACプラグをAC100Vのコンセントに差して「パ
ワースイッチ」①を押すと電源が入ります。
●真空管がウォームアップする間パイロットランプ②が約
20秒間前後点滅します。その後常時点灯しましたら動作
状態になります。
●フロントパネルの「INPUT」切換えスイッチ③で接続した
入力信号を切換えます。
(電源投入時は「INPUT-1」が選択されます)
●ご使用になるイヤースピーカーをフロントパネルの「イ
ヤースピーカーコンセント」④に差し込み、ボリュームツ
マミ⑤を徐々に右に回して最適な音量に調整してくださ
い。
●2重ツマミの手前を単独で回すと左チャンネルが、奥を
回すと右チャンネルが調整できます。
左右の音量のバランスはこれで調整します。
●上記以外の接続方法としては、市販の「ミニステレオプ
ラグ→RCAプラグ」の変換ケーブルや変換のコネクター
を使用すると、TVのヘッドフォン端子やミニステレオ
ジャックを装備しているポータブル機器と繋ぐことがで
きます。
2
使用上のご注意/Precautions for use
●There are high-voltage dangerous sections inside
the unit.
Do not remove the top cover or the bottom plate,
and avoid using the unit in humid or dusty places.
●Because of the vacuum tube used inside, this
driver unit generates heat. Do not cover the venting
holes on the top and bottom plates. When installing it in a rack etc., keep 5cm or more opening above the upper surface of the top cover. Also,
when a door is furnished in the front, keep it open
for better heat dissipation while using the unit.
●When the "POWER" switch on the front panel is
pushed on, red LED on the front panel blinks for
about 50 seconds (time needed for warming up
the vacuum tube heater), and then when the LED
lights up continuously, the unit is ready to operate.
Note that the LED starts to blink again and no
sound comes out for about 50 seconds if you
carelessly push off the "POWER" switch during
operation.
●本機の内部には高電圧の部分があり危険です。トップカ
バーや底板を外したり、水に濡れやすい場所やホコリの
多い場所での使用は避けてください。
●本機は真空管を使用しておりますので発熱します。通電
中は本体上下の通気孔を塞さがないでください。ラック
などに設置する場合、トップカバーの上面より5cm以上
あけて下さい。また、前面に扉がある場合、お使いに
なっている間は、扉は開けたままのほうが熱がこもり難
くなります。
●フロントパネルの「POWER」スイッチを投入すると約20
秒間前後(真空管のヒーターがウォームアップに要する
時間)フロントパネルの緑のLEDが点滅し、連続点灯に
変わると動作状態になります。ご使用中にうっかり
「POWER」スイッチをOFFにしてしまうと再度LEDが点滅
状態になり、再び20秒間位音が出ませんのでご注意くだ
さい。
-2-
3
各部の名称/Name of each part
【フロントパネル側/FRONT PANEL】
上下の通気孔は塞さがないでください。
Do not close a vent of top and bottom.
③入力切換スイッチ/表示LED/
INPUT SELECTOR SWITCH/LED: Input selection display
放熱孔/Vent
②LED
POWER DISPLAY
⑤ボリュームツマミ:
①パワースイッチ/POWER SWITCH
(音量調整
手前を回すとL-ch、奧側を回すとR-chの音量が調整できます)
VOLUME CONTROL KNOB :
(Front knob for L-channel, Rear knob for R-channel)
④イヤースピーカーコンセント
5-PIN CONNECTOR for PRO-series Earspeakers
【リアパネル側/RIA PANEL】
⑧INPUT[2]:RCA入力端子/RCA INPUT CONNECTORS
⑥INPUT[1]:RCA入力端子/RCA INPUT CONNECTORS
⑨INPUT[3]:XLR入力端子/
XLR INPUT CONNECTORS
⑦パラレル(スルー)アウト端子/
PARALLEL OUTPUT CONNECTORS: (Please refer to page 4)
シリアルナンバー貼付場所:
Serial number pasting space
⑩XLR極性表示/XLR PORARITY INDCATION
⑫ACインレット/AC INLET: (付属の電源コードを差し込みます)
(To connect AC power cord) (VOLTAGE: Depending on
your country’s voltage)
①:SHIELD
②:HOT
③:COLD
⑪アース端子/GROUND TERMINAL:
ハムが出る場合、他の機器のアース等に接続します
(To connect other equipment with cable when hum-noise is heard)
-3-
4
接続の例
現在お使いのシステムへSRM-600tSを追加する場合:プリアンプやプリメインアンプの「REC OUT」端子へ接
続して、本機でイヤースピーカーの音量調整を行ってください。
他のドライバーユニット等
1.XLR(バランス)接続でお使いになる時
XLR出力端子付きSACD/DVD-Audio Player etc.
PUS
XLRケーブルをご用意ください
PUS
2.RCA接続でお使いになる時
① RCA接続の場合は2種類のソース機器がお使いになれます。
② RCAに接続したソースをラウドスピーカーでもお聴きになるときは「INPUT-1」へ接続してください。
CD/MD/SACD/DVD-Audio Player etc.
ラウドスピーカーも併用する場合は
アンプの「AUX入力へ接続します。
TAPE Deck/DAT etc.
ラウドスピーカー
プリアンプ/プリメインアンプ
Pre-amp / Pre-main amplifier
Portable-Audio Player / PC-Audio, TV etc.
ヘッドフォン端子へ接続した際の音量調整の仕方は?
ステレオミニプラグ
ヘッドフォン用の端子のみでLINE出力がないポータブル・オーディオプレーヤー
やTV等の音量調整は、付属のヘッドフォンを使用する時の音量のボリューム位置
に固定します。次に、本機のボリュームで最適な音量になるように調整してくだ
さい。
市販のステレオミニプラグ→ RCAプラグ
変換コード又は変換アダプターをご用意
してください
パソコンのオーディオ端子・ポータブルオーディオプレーヤーやテレビのヘッドフォン端子などに接続する場合:
市販の「ミニ・ステレオプラグ→RCAプラグ」等の上図の様な変換ケーブルや変換のコネクターをご用意して下さい。
5
ブロックダイアグラム/Block diagram
L-ch
PARALLEL OUT
1
INPUT-1: RCA
2
Earspeaker connectors
6FQ7/6CG7
3
INPUT-2: RCA
1
INPUT-3: XLR
②
①
③
2
3
②
1
Input selector switch
4-gang volume controller
2
3
GND
R-ch
-4-
POWER SUPPLY
③
④
① ⑤
②
③
④
① ⑤
4
Connection examples
When adding the SRM-006tS to the existing system:
Connect the drive unit to the “REC OUT” terminal of a preamplifier or integrated amplifier, and adjust the volume level of your
earspeaker using the volume knob on the SRM-006tS front panel.
To use for recording, or connecting quantity
of DRIVER UNITS (SRM series).
1. When Using XLR (Balance) Connection
SACD/DVD-Audio Player etc.
with XLR
Use commercially available XLR cable.
PUS
PUS
2. When using RCA connection
①In RCA connection, two source equipments can be connected.
②When listening to the RCA connection also via a loudspeaker, the source equipment
have to be connected to the “INPUT-1”.
CD/MD/SACD/DVD-Audio Player etc.
When listening to the source connected to
RCA terminal also via the loudspeaker
TAPE Deck/DAT etc.
Loud speaker
Pre-amp / Pre-main amplifier
Portable-Audio Player / PC-Audio, TV etc.
RCA plug
Stereo mini plug.
How to adjust the volume level when connected to a headphone jack?
If a portable audio player or a TV set has only headphone output with volume
control and has no line output, adjust and fix the volume level using its supplied
headphone in the first place. Next, adjust the ear speaker level to an optimal
volume using the volume knob of the driver unit.
When connecting to the audio terminal of a personal computer or to the headphone jack of a portable audio
player or a TV set:
Use the commercially available “stereo mini-plug → RCA plug” conversion cable or connector as illustrated above.
● About usage and caution of “PARALLEL OUT”:
●パラレルアウト(PARALLEL OUT)
の使い方とご注意:
“PARALLEL OUT” terminal is a direct output connected to
“INPUT-1” as shown in the block diagram. It can be used
for connection to another driver unit or to the amplifier to
drive a loudspeaker.
この出力端子はブロック図の様に「INPUT-1」に接続されたソース
の信号がそのままの形で出力されます。増設したドライバーユニッ
トやラウドスピーカー用のアンプ等に接続する時にご利用できま
す。
Note:
When the preamplifier/integrated amplifier connected to
“PARALLEL OUT” is powered off, sound might be distorted
because of the lowered impedance. In this case, either power on the preamplifier/integrated amplifier or disconnect the
cable.
ご注意:パラレルアウト端子に接続されたプリアンプ/プリメイ
ンアンプの電源がOFFの場合、インピーダンスが下がって音が歪む
ことがあります。その場合は、アンプの電源を入れるか、ケーブル
を外してください。
-5-
6
Troubleshooting
【Points to be checked 】
【Symptom Description 】
【No Sound 】
Is the power switch ① pushed on ?
(When powered on, the LED ② as well as input indicator
③ on the front panel lights up.)
Check whether the AC cable is firmly inserted both into the
AC inlet of the driver unit and into the wall socket.
①The power switch is locked to “ON” with a click on the
first push, and released then to “OFF” on the second
push.
②When power switch ① is OFF, turn it ON. After 20 seconds
of tube heater warming-up, the unit is powered on and
sound comes out.
Are the connecting cables all right?
Check whether the cable is firmly inserted into the input
terminal. Exchange the cable in case of disconnection or
half-disconnection.
Is the selector switch set to the connected source equipment?
Check for the connected input and push the corresponding
selector switch.
【Sound is distorted] 】
①Try to lower the volume little by little. If the sound is no
longer distorted at lower volume, too much volume is the
cause of distortion. Listen with moderate volume.
Turning up the volume too much distorts the sound.
①When the preamplifier (integrated amplifier) connected to
the “PARALLEL OUT” is powered off, it is possible that the
sound is distorted because of the lowered impedance.
Power on the connected preamplifier (integrated amplifier),
or disconnect the cable.
②Power on the other driver unit connected, or turn down its
volume to zero.
Is the “PARALLEL OUT” terminal connected to the input
terminal of a preamplifier (integrated amplifier)?
【Unbalanced sound between right and left channel 】
Do cables etc. have poor contact?
①Replace the right-channel cable with the left-channel
cable and vice versa.
②Exchange cables.
Has not the position of double-axis volume knobs shifted?
The shifted position of the double-axis volume knobs can
be corrected by turning both front and backside knobs
counterclockwise to the leftmost to "0".
When raising volume slowly from zero, it sometimes happens
that sound does not start to come out at the same time from
left and right channels. This is the so-called “gang-error” of
a double-axis volume controller, and not a failure.
【Ham noise is heard 】
Are input terminals connected correctly? If the ground side
of a cable is floated or in poor contact, ham noise may
come out.
If the ground side of a cable is floated, ham noise may
come out. Connect the ground of the driver unit to that of
other equipments for checking.
Ham noise can be induced through connected equipments.
Through equipments with large-sized transformer, etc.
Example: If a microwave oven, large-sized amplifier, etc.
are located near the driver unit, keep them away from the
unit.
If you have other problems than described above, please consult your dealer or our distributor in your country.
-6-
6
サービスノート
【このような症状のときは】
【ここをチェックしてください】
パワースイッチ①がONになっていますか?
(電源がONの時はフロントパネルのLED②と入力切換えス
イッチ表示のLED③が点灯しています)
ACコードが本機のACインレットと壁のコンセントに確実に差
し込まれているか確認してください。
①電源スイッチは一度押し込んでカチッと音がしてロックさ
れて「ON」になり、もう一度押すと解除されて「OFF」にな
ります。
②パワースイッチ①がOFFの場合はONにしてください。
ヒーターが約20秒間前後ウォームアップした後メインの電源
が入り、音が出るようになります。
接続のケーブルに異常はありませんか。
入力端子に確実に差込まれているか確認し、断線又は断線気
味の場合はケーブルを交換してください。
セレクタースイッチは接続したソース機器を選択しています
か。
どの入力端子に接続されているのかを確認し、接続された入
力端子に対応したセレクタースイッチを押して選択してくだ
さい。
【音が出ない】
【音が歪む・音が割れる】
音が歪む場合音量の上げ過ぎが考えられますので適度な音量
でお聴きください。
音量を少しずつ下げてみてください。
音量を上げ過ぎると歪みます。
①パラレルアウト端子に接続されたプリアンプやプリメイン
アンプの電源がOFFの場合インピーダンスが下がって音が歪
むことがあります。アンプの電源を入れるか、ケーブルを外
してください。
②他のドライバーユニットの電源を入れるか、ボリュームを
ゼロにしてください。
パラレルアウト端子にプリアンプやプリメインアンプの入力
端子へ接続されていますか。
【左右で音が揃わない】
①ケーブルの左右を入れ替えてみてください。
②ケーブルを交換してみてください。
ケーブルなどに接触不良はありませんか。
2重軸のボリュームツマミがずれている場合、一番左に絞った
状態「目盛0」の位置で揃えることができます。
ゼロから序々に音量を上げてゆく時、稀に音の出始めが左右
で一時的に揃わないことが有ります。これは、ボリューム自身
の一時的な連動誤差で、故障ではありません。
二重軸のボリュームツマミの位置がずれていませんか?
【ハム音が出る】
入力端子は正しく接続されていますか。
ケーブルのアース側が浮いている、または接触不良があると
ハム音がでる場合があります。
ケーブルのアース側が浮いているとハム音がでる場合があり
ます。本体のアースと他の機器のアース等を接続してみてく
ださい。
機器同士でハムを誘発する場合があります。
大型トランスを使用した機器など。
例:電子レンジ、大型のアンプ等が付近にある場合、それぞ
れの距離を離してください。
その他故障と思われる症状が出ましたら、お買い求めになった販売店もしくは弊社サービス課 049 (258)2660 までお問合わせくだ
さい。お送りになる場合は症状を詳しく書いたメモを同封してください。また、弊社のホームページ(www.stax.co.jp)でもご相談
をお受けしています。
**電話・FAXによるお問い合わせについて**
・電話番号:049-258-2660
・FAX番号:049-258-2659
・受付時間:9:00-12:00, 12:50-17:00
・受付日:弊社休日および祝日を除く月曜~金曜
-7-
7
規 格/Specifications
●周波数特性
: DC ~ 80KHz/+0, -3dB
(SR-407 1台使用時)
●定格入力レベル
: 100mV/100V 出力時
●最大入力レベル
: 30V/ボリュ-ム最小時
●増幅度
: 60dB(1000 倍)
●高調波歪
: 0.01%以下/1KHz
100Vrms 出力(SR-407 1台使用時)
●入力インピーダンス : 50k Ω (RCA 入力)/100k Ω (XLR 入力)
●入力数
●最大出力電圧
●バイアス電圧
●電源電圧
●消費電力
●使用温度範囲
●外形寸法
: 3 (RCA × 2 系統, XLR × 1 系統)
: 300Vrms/1KHz
: DC580V × 2
: AC100V 固定,50/60Hz
: 49W
: 0 ~ 35℃(結露無きこと)
: 195(W)×103(H)×380(D) mm
(最大突起部分を含む)
●重量
: 3.4Kg
●使用真空管
: 6CG7/6FQ7×2
● XLR 極性
:①番:SHIELD、②番:HOT、③番:COLD
●パラレルアウト端子 :「INPUT-1」の RCA 入力端子へ接続さ
れたソースの信号がそのまま出力されます。
パラレル出力端子をご利用の際のご注意!
パラレルアウト端子に接続されたプリ・アンプやプリメイン・ア
ンプの電源がOFFの場合、そのアンプの入力インピーダンスが下
がりソースの音が歪むことがあります。この場合はアンプの電源
を入れるか、ケーブルを外してください。
弊社製のドライバーユニットを増設してご使用になっている場
合、お使いになっていないドライバーユニットのボリュームをゼ
ロに絞れば影響はございません。
*仕様および外観は改良のため予告なく変更することがあります。
●Frequency response: DC~80KHz +0, -3dB
(when used with one SR-407)
● Rated input level: 100mV (at 100V output)
● Maximum input level: 30V (at minimum volume)
● Gain: 60dB (x 1000)
● Harmonic distortion: 0.01% or less
(at 100Vrms/1kHz output with one SR-407)
● Input impedance: 50kΩ (RCA input)/100kΩ (XLR input)
● Input terminal: two RCA (one with bypassing output),
one XLR connector
● Maximum output voltage: 300Vrms (1kHz)
● Bias voltage: DC580V x 2 (PRO bias)
● Mains voltage: AC117V,220V,230V,240V, 50/60Hz
(depending on your country’s voltage)
● Power consumption: 49W
● Operating temperature: 0 to 35 degrees C
● Dimension: 195 (W) x103 (H) x380 (D) mm
(maximum protruding portion included)
● Weight: 3.4kg
● Vacuum tube: 6FQ7/6CG7 x 2
● XLR terminal polarity: ①-GND, ②-HOT, ③-COLD
(European system)
● “PARALLEL OUT” terminal: direct output from RCA input
“INPUT-1”
Note: When the preamplifier/integrated amplifier connected
to “PARALLEL OUT” is powered off, sound might be
distorted due to the lowered impedance. In this case, either
power on the preamplifier/integrated amplifier or disconnect
the cable. If another driver unit is connected to the
“PARALLEL OUT”, turn down its volume to minimum to
avoid lowering the impedance.
*Specifications and appearance are subject to change
without notice for improvement.
*日本国内用の製品は AC100V に調整されています。
*この製品を日本以外でご使用になった場合、製品の保証は無効
になります。
The warranty of this product is valid only in Japan.
Life of the vacuum tubes and their
replacement:
真空管の寿命と交換について
●SRM-006tSで使用されている6FQ7/6CG7は最新設備で製造され
た高い信頼性を誇る真空管ですが、性質上寿命があります。ご使用
中に、音の明瞭度にかげりが生じてきた場合は点検調整にお出しく
ださい。弊社で真空管の状態をチェックし、交換の必要がある場合
はご連絡させていただきます。
●SRM-006tSはDCアンプのため真空管を交換した場合、DCバラン
スなどの簡単な調整が必要です。真空管の交換は弊社までお申し出
ください。
付属品
ACコ-ド ・・・・・・・・・・・・・・・・・・・・・・・・・・・・・・・・
RCAピン・ケ-ブル・・・・・・・・・・・・・・・・・・・・
保証書・・・・・・・・・・・・・・・・・・・・・・・・・・・・・・・・・・・・・・
取扱説明書・・・・・・・・・・・・・・・・・・・・・・・・・・・・・・・・・
安全上のご注意・・・・・・・・・・・・・・・・・・・・・・・・・・・・
●The 6FQ7/6CG7 series vacuum tubes used in SRM-006tS
are manufactured using state-of-the-art equipment and
are known for their outstanding reliability. However, their
properties are such that they have a finite lifespan. If the
tonal quality begins to lose its clarity, the unit should be
submitted for inspection and adjustment. We will check the
condition off the vacuum tubes and let you know if they
need to be replaced.
●Since SRM-006tS is a DC amplifier, simple adjustment of
the DC balance, etc., will be needed when replacing the
vacuum tubes. Please ask your dealer or distributor (STAX)
to replace the tubes.
1
1
1
1
1
Accessories
AC cord ・・・・・・・・・・・・・・・・・・・・・・・・・・・・・・・・・・ 1
RCA Pin-Cable・・・・・・・・・・・・・・・・・・・・・・・・・・ 1
User's Manual・・・・・・・・・・・・・・・・・・・・・・・・・・・・ 1
Safety information ・・・・・・・・・・・・・・・・・・・・・・ 1
R
○
有限会社スタックス(STAX
LTD.)
●住所:〒354-0046 埼玉県入間郡三芳町竹間沢東7-1 TEL: 049-258-2660(代)FAX:049-258-2659
7-1 Chikumazawa-higashi, Iruma-gun, Saitama-Prefecture, Japan
Printed in Japan 10-10 1K MP C STAX