1
手動加締め・圧接工具 /
MANUAL CAULKING
AND INSULATION DISPLACEMENT TOOL
HT601-TM23/22P-88P
取扱説明書 / INSTRUCTION MANUAL
注意
安全に使用していただくために使用前に、必ずこの取扱説明書をお読みください。
また、いつでもすぐに読めるように、この取扱説明書を保管してください。
CAUTION :
Be sure to read this Instruction Manual carefully before using it to secure safety in operation.
In addition, save this Instruction Manual so that it is available whenever necessary for review.
ヒロセ電機株式会社
HIROSE ELECTRIC CO., LTD.
はじめに
このたびは,モジュラープラグTM23P-88P,TM22P-88P用手動工具HT601-TM23/
22P-88Pをご購入頂きまして誠にありがとうございます。
本工具は、TM23P-88PおよびTM22P-88Pコネクタの結線を行う工具です。
ご使用の前に必ず本書を良くお読み頂き十分理解の上、正しくお使い頂きますようお願い致します。
PREFACE
Thank you very much for your purchase of our Manual Tool, HT601-TM23/22P-88P for the modular plugs TM23P-88P and
TM22P-88P this time.
This tool is the tool to perform the connection of TM23P-88P and TM22P-88P connectors.
Be sure to read this Instruction Manual carefully before using it to secure safety in operation.
安全にご使用していただくために
本工具を実際にご使用されるオペレータの方および、保守、修理等をされる保全の方は、以
下の安全についての注意事項 を熟読されて、怪我などされないようにご使用ください。
なお、本取扱説明書および、警告表示の内容を十分に理解し、指示を守ってください。
( I )警告表示の説明
危険
警告
注意
取り扱いを誤った場合に、使用者が死亡または重傷を負う危険が切迫
して生じることが想定される場合。
取り扱いを誤った場合に、使用者が死亡または重傷を負う可能性が想
定される場合。
取り扱いを誤った場合に、使用者が傷害を負う危険が想定される場合
および物的損害のみの発生が想定される場合。
※ 損害の程度の分類は、以下を参考とする。
重
傷 :
傷
害 :
物的損害 :
失明、けが、やけど(高温・低温)、感電、骨折、中毒などで、後遺症が残るもの
および治療に入院・長期の通院を要するものを言う。
治療に入院や長期の通院を要さない、けが、やけど、感電などを指す。
家屋・家財および家畜・ペットにかかわる拡大損害を指す。
安全についての注意事項
注意
基本的注意事項
1. ご使用される前に本取扱説明書および、付属に入っている全ての説明書類を必ずお読みくださ
い。また、いつでもすぐに読めるように、この取扱説明書を大切に保存してください。
安全装置
1. 本工具には、安全カバー等の安全装置は取り付いていません。加締め・圧接作業に際しては、
摺動部およびハンドル部に指等挟まないよう安全に十分配慮してご使用ください。
用 途
1. この工具は、本来の用途および本取扱説明書に規定された使用方法以外には使用しないでくだ
い。用途以外の使用に対しては、当社は責任を負いません。
2. 工具には、改造等を加えないでください。改造によって起きた事故に対しては、当社は責任を
負いません。
保 守
1. 不慣れによる事故を防ぐため、修理、調整は工具を熟知した保全技術者が本取扱説明書の指示
範囲で行ってください。不適切な修理・調整および非純正部品による事故に対しては、当社は
責任を負いません。
2. 人身事故を防ぐため、修理調整・部品交換等の作業後は、ねじ・ナット等が緩んでいないこと
を確認してください。
3. 工具の使用期間中は、定期的に清掃を行ってください。
4. 事故を防ぐため、修理・調整した結果、正常に動かない場合は直ちに操作を中止し、当社に連
絡し、修理依頼してください。
-i-
FOR SAFE OPERATION
The operators of the tool and the maintenance personnel who are in charge of maintenance and repair work are required to read
the following SAFETY INSTRUCTIONS .
Fully understand and follow the descriptions given in this Instruction Manual and the warning symbols attached to the tool.
(I) Description of warning messages
DANGER
Misuse of the tool will expose the operator to immediate danger of major injury or
death.
Misuse of the tool may expose the operator to danger of major injury or death.
WARNING
CAUTION
Misuse of the tool may expose the operator to danger of injury and may cause
damage to property.
* Determine the degree of impairment referring to the below-stated classification.
Major injury
: Loss of eyesight, wounds, burns (hyperthermal and hypothermal burns), electric shocks, fracture of a bone,
poisoning, etc. requiring emergency treatment or extended medical care.
Injury (Minor injury) : Wounds, burns, electric shocks, etc. requiring medical treatment.
Damage to property
: Damage to the machinery and or the surrounding area.
SAFETY INSTRUCTIONS
CAUTION
Basic safety instructions
1. Be sure to read understand and follow all the instructions and other materials supplied with the unit as before using the
tool. Save this Instruction Manual and make it available for review whenever necessary.
Safe operation
1.
Such safety devices as the safety cover and the like are not attached to this tool. When performing caulking
and insulation displacement, use this tool while fully considering so that the fingers or the like are not
caught in the sliding section and the handle section.
Application
1.
This tool shall only be used for its originally intended purpose while following the instructions specified in this
Instruction Manual. Hirose assumes no responsibility for any misuse of the tool other than the intended use.
2.
Modifications to this tool is prohibited.
We assume no responsibility for accidents resulting from modifications.
Maintenance
1.
To prevent possible accidents caused by unfamiliarity with the operation of the tool, repair and adjustment of the tool
shall be conducted only by maintenance personnel who have a full knowledge of the tool. Any repair and adjustment
beyond the range covered by the instructions given in this Instruction Manual is prohibited. We assume no
responsibility for accidents caused by improper repair or adjustment or the use of non-genuine part(s).
2.
To protect against personal injury, check to be sure that screws and nuts are properly tightened after the completion of
repair/adjustment works or replacement of the parts.
3.
Periodically cleaning of the tool is recommended.
4.
In the event that your tool fails to perform normally after repair or adjusting immediately stop the work and contact us
for service so as to protect against personal injury.
- ii -
目
次
1. 型式 ..............................................................................................................................1
2. 仕様 ..............................................................................................................................1
3. 各部の名称 ..................................................................................................................2
4. 本治具の操作方法 ......................................................................................................3
5. 品質確認 ..................................................................................................................10
6. パンチ交換方法 ......................................................................................................11
CONTENTS
1. Model...............................................................................................................................1
2. Specifications..................................................................................................................1
3. CONFIGURATION ......................................................................................................2
4. OPERATING PROCEDURE OF THIS JIG..............................................................3
5. QUALITY CONFIRMATION .................................................................................10
6. PUNCH REPLACING PROCEDURE....................................................................11
1. 型式/Model
製品番号/Product No.
HRS.No.
HT601-TM23/22P-88P
CL902-2128-1
2. 仕様/Specifications
項目/Item
外形寸法/External dimensions
重量/Weight
適合プラグ/Applicable plug
仕様/Specification
長さ 222 ㎜ × 幅 62 ㎜ × 厚さ 41 ㎜/
Length 222 mm X width 62 mm X thickness 21.5 mm
1.0kg
TM23P-88P (CL222-2916-6)
TM22P-88P (CL333-2899-9)
TM23P-88P 適合ケーブル/TM23P-88P applicable cable specifications
シース/Sheath
十字介在/
Cross intervention
導体/Conductor
導体/Conductor
φ0.5 ㎜単線/
ø 0.5 mm solid wire
AWG#24 撚り線 /
AWG#24 stranded wire
絶縁体外径/
Insulator external
diameter
(φ0.95 ~ φ 1.05)
シース外径/
Sheath external
diameter
絶縁体/Insulator
(φ5.4
~ φ6.8)
TM22AP-88P 適合ケーブル仕様/TM22P-88P applicable cable specifications
シース/Sheath
導体/Conductor
φ0.5 ㎜単線/
ø 0.5 mm solid wire
AWG#24 撚り線 /
AWG#24 stranded wire
絶縁体外径/
Insulator external
diameter
(φ0.90 ~
導体/Conductor
シース外径/
Sheath external
diameter
絶縁体/Insulator
(φ5.4
φ1.00)
~ φ5.7)
注)シース外径・シース硬さ・十字介在の有無によりケーブルクランプ力の差が生じます。上記以外のケーブ
ルをご使用の際は、弊社営業または技術にご相談ください。
Note) Difference of the cable clamp force occurs by outer diameter of sheath, hardness of sheath and existence of cross
intervention. When using the cable other than the above cables, consult our sales dept. or engineering dept.
-1-
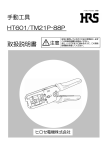
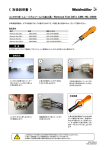
3. 各部の名称/CONFIGURATION
① ケーブル加締め工程部(TM22P-88Pを結線する場合には使用しません)
① Cable caulking process section (It is not used when connecting TM22P-88P.)
クリンパ
Crimper
アンビル
Anvil
ハンドル
Handle
② 圧接工程部
② Insulation displacement process section
TM23P-88P 用パンチ
(TM22P-88P を結線する際は専用の
パンチを取りつけてください。
⇒『6.パンチ交換方法』P11)
圧接パンチ
Insulation
displacement punch
Punch for TM23P-88P
(When connecting TM22P-88P, install the
exclusive punch.
⇒"6. PUNCH REPLACING
PROCEDURE", p.11)
ホルダー
Holder
HT601-TM23/22P-88P
-2-
工具品名表示
Tool name indication
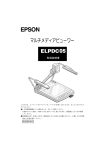
4. 本治具の操作方法/OPERATING PROCEDURE OF THIS JIG
TM23P-88P
ハーネスの詳細は技術指定書 ATAD-E2415『TM23P-88P結線手順書』をご参照下さい。
For the details of the harness, refer to "TM23P-88P CONNECTION PROCEDURE MANUAL" of the appointed engineering
manual ATAD-E2415”.
①
①
端末処理をしたケーブルをクランプ金具および
セパレーターに挿入します。端末寸法およびセパ
レーターへの挿入方向については結線手順書を
ご参照ください。
セパレーター/Separator
Insert the cable that the top end has been finished
into the clamp metal fittings and the separator For the
top end dimension and the inserting direction to the
separator, refer to the connection procedure manual.
クランプ金具/Clamp metal fittings
②
ケーブル加締め工程部を手前にして手動工具を
持ちます。
②
Put the cable caulking process section to the front
and hold the manual tool.
-3-
③ ①でクランプ金具とセパレーターを通したケー
ブルを手動工具の加締め工程部にセットします。
セパレーターがガイドに突き当たるまでケーブ
ルを差しこんでください。
③ Set the cable that has passed through the clamp metal
fittings and the separator at step ① to the caulking
process section of the manual tool. Insert the cable
until the separator comes in contact with the guide.
④
ハンドルを握り、クランプ金具を加締めてくだ
さい。
(注意)ハンドルにはラチェット機構がついてい
ますので、ラチェットが解除されるまで
ハンドルを握りこんでください。
④ Grasp the handle and caulk the clamp metal fittings.
(Caution) Ratchet mechanism is provided with the
handle and keep grasping until the
ratchet is released.
⑤
加締めハイトが 6.1 ± 0.1 であること、ならび
にクランプ金具に変形、著しいキズのないことを
確認して下さい。
6.0 ± 0.1
⑤ Check that the caulking height is 6.1±0.1 and that
there is no deformation and remarkable flaw on the
clamp metal fittings.
変形および著しいキズの無いこと /
There should be no deformation and
remarkable flaw.
-4-
⑥ ツイストペアー線をセパレーターの端面までほ
ぐします。整線は技術指定書のケーブル結線対比
表をご覧ください。
この面までほぐします
Unlace up to this plane.
⑥ Unlace the twist pair wire up to the end of the
separator.
To properly arrange the cable, refer to the cable
connection comparison table of the appointed
engineering manual.
⑦ 整線したケーブルにガイドプレートを挿入し、ガ
イドプレートの端面から 0.5mm 以内の位置でケ
ーブル先端を切りそろえます。
0.5mm 以下
0.5 mm or less
⑦ Insert the guide plate into the cable that has been
properly arranged, and cut and arrange the top end of
cable at the place of within 0.5 mm from the end of
the guide plate.
⑧ 整線されたケーブルをプラグに挿入します。芯線
がプラグの先端位置まで届く様真直ぐ挿入して
下さい。
⑧ Insert the cable that has been properly arranged into
the plug. Insert the cable straight so that the contact
wire can reach up to the top end position of the plug.
芯線がプラグ先端に突き当たるまで挿入すること。
Insert the cable up to the contact wire comes in contact with
the top end of the plug.
-5-
⑨
圧接工程部を手前にして手動工具を持ちます。
(HRS 表示、工具品名表示が手前になります。)
注) TM23P-88P 用のパンチが付いていることを
確認して下さい。
TM23P-88P 用パンチ
※『23』の表示が手前である
こと。
Punch for TM23P-88P
* Indication of "23" should be
⑨ Put the insulation displacement process section to the
front and hold the manual tool. (HRS indication and
the tool name indication come to the front.)
put to the front.)
工具品名表示
Note) Check that the punch for TM23P-88P is
provided.
Tool name indication
TM23P-88P 用パンチ形状/Punch for TM23P-88P
⑩
⑩
ケーブルを挿入したプラグを圧接工程部にセッ
トします。プラグの肩がホルダーに突き当たるま
で差しこんでください。
Set the plug to which the cable has been inserted to
the insulation displacement process section. Insert
the plug until the shoulder of the plug comes in
contact with the holder.
プラグの肩がホルダーに
突き当たるまで挿入する
こと
Insert the plug until the
shoulder of the plug comes
in contact with the holder.
ホルダー
Holder
-6-
⑪ ハンドルを握り、圧接を行なってください。
(注意) ハンドルにはラチェット機構がついています
ので、ラチェットが解除されるまでハンドルを
握りこんでください。
⑪ Grasp the handle and perform the insulation
displacement.
(Caution) Ratchet mechanism is provided with the
handle and keep grasping the handle until the
ratchet is released.
⑫ 結線完了です。
『5.品質確認』P10 に基づき品質の確認を行な
ってください。
⑫ Connection of the cable has been completed.
Perform the confirmation of quality in accordance
with "5. QUALITY CONFIRMATION", p.10.
-7-
TM22P-88P
ハーネスの詳細は技術指定書 ATAD-E2381『TM22P-88P結線手順書』をご参照下さい。
①
圧接工程部を手前にして手動工具を持ちま
す。(HRS 表示、工具品名表示が手前になり
ます。)
注) TM22P-88P 用のパンチが付いていること
を確認して下さい。(⇒「6.パンチ交換方法」
P11)
TM22P-88P 用パンチ
※『22』の表示が手前である
こと。
Punch for TM22P-88P
* Indication of "22" should be
① Put the insulation displacement process section to
the front and hold the manual tool. (HRS
indication and the tool name indication come to
the front.
Note) Check that the punch for TM22P-88P is
provided. ("6. PUNCH REPLACING
PROCEDURE", p.11)
put to the front.)
工具品名表示
Tool name indication
TM22P-88P 用パンチ形状/Punch for TM22P-88P
②
ケーブルを挿入したプラグを圧接工程部にセ
ットします。プラグの肩がホルダーに突き当
たるまで差しこんでください。
② Set the plug to which the cable has been inserted to
the insulation displacement process section. Insert
the plug until the shoulder of the plug comes in
contact with the holder.
ホルダー
Holder
プラグの肩がホルダーに突き当たる
まで挿入すること
Insert the plug until the shoulder of the
plug comes in contact with the holder.
-8-
⑪ ハンドルを握り、圧接を行なってください。
(注意) ハンドルにはラチェット機構がついてい
ますので、ラチェットが解除されるまでハン
ドルを握りこんでください。
⑪ Grasp the handle and perform the insulation
displacement.
(Caution) Ratchet mechanism is provided with the
handle and keep grasping the handle until the
ratchet is released.
⑫
結線完了です。
「5.品質確認」P10 に基づき品質の確認を行
なってください。
⑫ Connection of the cable has been completed.
Perform the confirmation of quality in accordance
with "5. QUALITY CONFIRMATION", p.10.
-9-
5. 品質確認/QUALITY CONFIRMATION
下記の規格に基づき品質確認を行なってください。
Perform the quality confirmation in accordance with the standard below.
① TM23P-88P
6.0 ± 0.1mm
A
A
・ ロックが掛かっていること。
・ 破断の無いこと。
・ Lock is applied.
・ There should be no flaw.
② TM22P-88P
6.0 ± 0.1mm
B
B
・ ロックが掛かっていること。
・ Lock is applied.
・ 破断の無いこと
・ There should be no fracture.
-10-
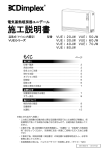
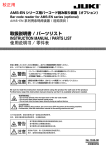
6. パンチ交換方法/PUNCH REPLACING PROCEDURE
TM23P-88P と TM22P-88P を打ち分ける際のパンチ交換手順です。
(工具納品時には TM23P-88P パンチが取りつけられています)
Punch replacing procedure, when separating TM23P-88P and TM22P-88P by punch, is given below.
(When the tool is delivered, punch for TM23P-88P is installed.)
① 六角レンチを用い、ボルトを緩めて TM23P-88P 用パ
ンチを取外します。
①
TM23P-88P 用パンチ
Punch for TM23P-88P
Loosen the bolt and remove the punch for TM23P-88P,
using the hexagonal wrench key.
② TM22P-88P 用パンチをパンチホルダーに押しつ
けながら取付けして下さい。(パンチの肩がパンチ
ホルダーと突き当たるようにして下さい。)
パンチホルダー
Punch holder
②
Pressing the punch for TM22P-88P to the punch holder,
install the punch. (Install so that the shoulder of the
punch comes in contact with the punch holder.)
TM23P-88P 用パンチ
Punch for TM23P-88P
パンチの肩がパンチホルダーに突き当たっていること
Shoulder of the punch should come in contact with the punch
holder.
TM22P-88P 用パンチが取り付いている状態から TM23P-88P 用パンチに交換する際も同様の手順で交換を行
なってください。
When replacing the punch with the punch for TM23P-88P from the state that the punch for TM22P-88P is installed, perform
the replacement with the same procedure.
-11-
取扱説明書番号
ATAD-P0043
発行年月
03 年 9 月
改定年月
版
数
08 年 1 月
2
版
Instruction Manual Number
ETAD-P0043
Date of issue
Sep. 2003
Date of revision
Jan. 2008
Edition number
Second edition
注意
(1) 本書の内容の一部または全部を無断転載することは固く御断りします。
(2) 本書の内容については、将来予告無しに変更する事があります。
(3) 本書の内容については、万全を期して作成いたしましたが、万一ご不審な点や誤り、記
載漏れなどお気付きの点がありましたらご連絡ください。
(4) 当社では、本製品の運用を理由とする損失、逸失利益等の請求につきましては(3)項
に関わらず責任を負いかねますのでご了承ください。
(5) 本製品がお客様により不適当に使用されたり、本書の内容に従わずに取り扱われたり、
または、ヒロセ電機株式会社以外の第三者により修理・変更されたこと等に起因して生
じた損害等につきましては、責任を負いかねますのでご了承ください。
(6)海外においては、本製品の保守・修理対応をしておりませんのでご承知ください。
CAUTION
(1) No part of this manual may be reproduced without the permission of Hirose Electric Co., Ltd.
(2) Description in this manual is subject to change without notice.
(3) This Instruction Manual has been prepared for clarify. Should you find any unclear portion, error, or omission,
please, for the safety of other, contact our Marketing Department.
(4) It should be understood that, notwithstanding the aforementioned item (3), we assume no liability to any claim for
loss or failure to earn profit resulting from the use of the machine.
(5) We assume no responsibility for any damage resulting from your improper use of the machine including your failure
to follow the instructions given in this Instruction Manual. This includes repair or modification conducted by any
third party other than Hirose Electric Co., Ltd.
(6) Please note that servicing of the machine is not available in any country other than Japan.
ヒロセ電機株式会社 2008
HIROSE ELECTRIC CO., LTD. 2008
ヒロセ電機株式会社
〒141-8587 東京都品川区大崎 5 丁目 5 番 23 号
本製品に関するお問い合わせは下記までご連絡下さい。
生産技術部 〒222-8566
横浜市港北区菊名 7 丁目 3 番 13 号
TEL:045(402)7725
FAX:045(402)7861
HIROSE ELECTRIC CO., LTD.
5-23, OSAKI 5-CHOME, SHINAGAWA-KU, TOKYO 141-8587, JAPAN
TELEX: J2468237 HRSELE
TELE FAX: 03-3493-2933
CABLE: BESELECONHIROSE TOKYO, PHONE: 03-3491-9741
Hirose Electric (U.S.A), Inc.
Hirose Electric GmbH
Hirose Electric UK Ltd.
2688 Westhills Court, Simi Valley, Calif. 93065-6235
Zeppelinstraze 42
73760 Ostfildern-Kemnat
Phone:
(805) 5227958
Tele-Fax:
(805) 5223217
Phone:
0711-4560021
Tele-Fax:
0711-4560729
Crownhill Business Centre, 22, Vincent Avenue,
Phone:
(0908) 260616
Crownhill Milton Keynes, MK80AB
Tele-Fax:
HIROSE KOREA Co., Ltd.
472-5, Mok Nae-Dong, Ansen-City Seoul
Hirose Electric Co., Ltd.,
Hong Kong Branch
2102 Emperor Group Center, 288 Hennessy Road, Wanchai
Phone:
Tele-Fax:
(0908) 563309
(02) 864-5075
(0345) 491-9886
Phone:
2803-5338
Tele-Fax:
2591-6560
08.01 Printed in Japan