1
A
A
B
C
Fig.1
図1
D
C
Fig.2
図2
Fig.1
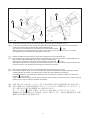
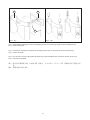
Fig.2 Remove the mounting plate (A) from the body (B) by unscrewing the two threaded pins (C).
Fix the mounting plate (A) to the wall with the screws and expansion plugs, taking care to pass the electrical supply wire and the earth wire through the special cableholder (D).
N.B.: take care to assemble in the correct direction in respect of the symbol
(Up).
Make electrical connection (black to black, white to white, green to ground) in the junction box; secure the mounting plate (A) to the junction box by thigtening the screws.
Fig.1
Fig.2
Séparer le plateau de montage (A) du corps (B) en dévissant les deux pivots filetés (C).
Fixer le plateau de montage (A) à la paroi par l’intermédiaire des vis et vis tamponnées, en faisant attention de faire passer le câble d’alimentation et de terre à travers le chaumard (D).
NB: respecter l’orientation correcte de montage indiquée par le symbole
(Up).
Effectuer les branchements électriques (noir au noir, blanc au blanc, vert sur courant à la Terre) à l’intérieur de la boîte de connexion; fixer le plateau de montage (A) à la boîte de connexion.
Fig.1
Fig.2
Quite el plato de fijación (A) del cuerpo (B) desatornillando las dos puntas de rosca (C).
Una el plato de fijación (A) al muro con los tornillos y las clavijas de expansión, teniendo cuidado de pasar el cable distribuidor de corriente y el cable de tierra a través del orificio especial para cable (D).
NOTA IMPORTANTE : tenga cuidado de realizar la unión de montaje en la dirección correcta con respecto al símbolo
(hacia arriba).
Haga conexión eléctrica (negro a negro, blanco a blanco, verde a tierra) en la caja de conexión; sujete el plato de fijación (A) en la caja de conexión apretando los tornillos.
図1
図2
本体(B)から2本のスレッドピン(C)をゆるめながら取り付け器具板(A)を外します。
ねじと拡張プラグで壁に電気供給ワイヤーとアースワイヤーを専用のケーブルホルダー (
D)に通しながら取り付け器具板(A)を取り付けます。
註 : シンボル (UP)に関し、必ず正しい方向に組み立てるようにして下さい。
接続箱の中で電気接続させて(黒は黒、白は白 緑はアース)、取り付け器具板(A)を接
続板にねじを締めながら固定します。
3