1
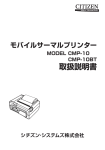
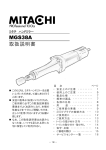
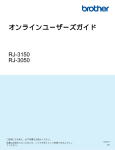
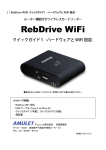
自動シートカッター
AUTO SHEET CUTTER
取扱説明書
日本語
ご使用の前に必ずこの取扱説明書をお読みください。
将来いつでも使用できるように大切に保管してください。
User's Manual
Be sure to read this User's Manual before using the cutter.
Keep this manual handy for future reference.
English
2
目次
目次 ・・・・・・・・・・・・・・・・・・・・・・・・・・・・・・・・・・・・・・・・・・・・・・・・・・・・・・・・・・・・・・・・・・・・・・・・3
はじめに ・・・・・・・・・・・・・・・・・・・・・・・・・・・・・・・・・・・・・・・・・・・・・・・・・・・・・・・・・・・・・・・・・・・・4
第1章
1.1
1.2
1.3
1.4
第2章
2.1
2.2
第3章
3.1
3.2
3.3
3.4
3.5
3.6
第4章
4.1
4.2
第5章
ご使用の前に ・・・・・・・・・・・・・・・・・・・・・・・・・・・・・・・・・・・・・・・・・・・ 6
安全にお使いいただくために ・・・・・・・・・・・・・・・・・・・・・・・・・・・・・・・・・・・・・・・・6
同梱品の確認 ・・・・・・・・・・・・・・・・・・・・・・・・・・・・・・・・・・・・・・・・・・・・・・・・・・・・・・7
自動シートカッター各部の名称 ・・・・・・・・・・・・・・・・・・・・・・・・・・・・・・・・・・・・・・7
自動シートカッターの特徴 ・・・・・・・・・・・・・・・・・・・・・・・・・・・・・・・・・・・・・・・・・・8
自動シートカッターのセット/取り外し ・・・・・・・・・・・・・・・・・・・ 9
自動シートカッターのセット ・・・・・・・・・・・・・・・・・・・・・・・・・・・・・・・・・・・・・・・9
自動シートカッターの取り外し ・・・・・・・・・・・・・・・・・・・・・・・・・・・・・・・・・・・・ 10
自動シートカッターの使い方 ・・・・・・・・・・・・・・・・・・・・・・・・・・・ 11
自動シートカッターに適したシートの種類 ・・・・・・・・・・・・・・・・・・・・・・・・・・ 11
操作パネルのカッター機能の設定 ・・・・・・・・・・・・・・・・・・・・・・・・・・・・・・・・・・ 13
カットモードの設定 ・・・・・・・・・・・・・・・・・・・・・・・・・・・・・・・・・・・・・・・・・・・・・・ 14
先端カットの設定 ・・・・・・・・・・・・・・・・・・・・・・・・・・・・・・・・・・・・・・・・・・・・・・・・ 15
カット位置補正の設定 ・・・・・・・・・・・・・・・・・・・・・・・・・・・・・・・・・・・・・・・・・・・・ 15
プリンターメッセージ ・・・・・・・・・・・・・・・・・・・・・・・・・・・・・・・・・・・・・・・・・・・・ 16
日常の清掃 ・・・・・・・・・・・・・・・・・・・・・・・・・・・・・・・・・・・・・・・・・・・ 17
カッター刃の清掃 ・・・・・・・・・・・・・・・・・・・・・・・・・・・・・・・・・・・・・・・・・・・・・・・・ 17
カッター外装の清掃 ・・・・・・・・・・・・・・・・・・・・・・・・・・・・・・・・・・・・・・・・・・・・・・ 18
主な仕様 ・・・・・・・・・・・・・・・・・・・・・・・・・・・・・・・・・・・・・・・・・・・・・ 19
3
はじめに
このたびは《自動シートカッター》をお買い上げいただきまことにありがとうございます。
本製品は、
プレート&シートプリンターPP550専用のシートロールカッターオプションです。
(PP500ではご使用いただけません)
本製品を使用すると、印刷時にシートロールを自動的にカットすることができます。
本書には《自動シートカッター》の機能と操作方法および使用上の注意について記載してあ
ります。各機能を十分にご理解いただき、
より効果的にご利用いただくために、
ご使用前にこの
取扱説明書をよくお読みください。また、
お読みいただきました後も大切に保管してください。
本取扱説明書中のシンボルマークとシグナル用語は、下記の意味を定義するものです。
取扱説明書の指示を必ずお守りください。
警告
取扱いをあやまった場合に、 死亡または重傷を負うおそれのある警
告事項が記載されています。安全にお使いいただくために、必ずこ
の警告事項をお守りください。
注意
取扱いをあやまった場合に、傷害を負うおそれや物的損害が発生す
るおそれのある注意事項が記載されています。安全にお使いいただ
くために、必ずこの注意事項をお守りください。
お願い 操作上必ず守っていただきたい重要事項や禁止事項が記載されてい
ます。機械の故障や損傷、および誤った操作を防ぐために、必ずお
読みください。
4
MEMO
操作上の指示、および補足説明が記載されています。お読みになり
ご活用ください。
参考
操作の参考となる項目(ページ等)が記載されています。お読みに
なることをおすすめします。
お客様へのお願い
・本書に記載されている一部または全部を無断転載することは、禁止されています。
・本装置の仕様や本書に記載されている内容は、将来予告なしに変更することがあります。
・本書の内容については万全を期していますが、万一不審な点や誤り、記載もれなどで、
お気づきの点がございましたらお近くの販売店までご連絡ください。
・本装置を運用した結果については、上記に関わらず責任を負いかねますのでご了承くだ
さい。
電波障害規制について
この装置は、
一般財団法人VCCI協会の基準に基づくクラスB情報技術装置です。
この装置は、
家庭環境で
使用することを目的としていますが、
この装置がラジオやテレビジョン受信機に近接して使用されると、
受
信障害を引き起こすことがあります。
取扱説明書に従って正しい取り扱いをしてください。
5
第1章 ご使用になる前に
1.1
安全にお使いいただくために
本カッターを安全にお使いいただくために、以下の注意事項を必ずお守りください。おもわ
ぬ火災や感電、あるいはケガなどのトラブルの原因となることがあります。
警 告
●アルコール、
シンナーなどの引火性溶剤の近くに、本カッターを設置しないでください。
●本カッターの近くで可燃性のスプレーなどは使用しないでください。
すぐに、
プリンターの電源スイッ
●万一、煙が出ている、異臭がする等の異常状態が発生した場合、
チをOFFにし、
コンセントから電源プラグを抜き、
お近くの販売店までご連絡ください。
●本カッターを分解・改造しないでください。
●本カッターの外装を清掃する時は、水に湿らせ固くしぼったガーゼを使用してください。アルコ
シンナー等の引火性溶剤は使用しないでください。引火性溶剤が製品内部の
ール、ベンジン、
電気部品などに接触すると、火災や感電、
故障の原因になります。
●接続コネクターは確実に奥まで差込んでください。濡れた手で接続コネクターに触れないでくだ
さい。
注 意
●不安定な場所や振動のある場所に設置しないでください。
●湿度やホコリの多い場所、高温や火気の近くには設置しないでください。
●じゅうたんやカーペットなどの上に設置しないでください。
まず、
プリンターの電源スイッチ
●万一、異物(金属片、水、液体等)が本カッターの内部に入った場合、
をOFFにしてください。電源プラグをコンセントから抜いてお近くの販売店までご連絡ください。
●動作中、シートを無理に引っ張らないでください。カット不良や故障の原因になります。
●本カッターでシート以外の物をカットしないでください。刃を損傷したり、電気部品のシ
ョートの原因になります。
●直射日光のあたる場所、湿気やホコリの多い場所でのご使用、保管はおやめください。ま
た、規定の温度、湿度にてのご使用、保管をお願いします。
使用環境(プリンターに準ずる) 温度:15〜32.5℃
湿度:10〜85% (ただし結露なきこと)
保管環境(プリンターに準ずる) 温度:5〜35℃
湿度:10〜90% (ただし結露なきこと)
●清掃は、プリンターの電源スイッチをOFFにし、本カッターをプリンターから取り外して行な
ってください。
●鋭利な刃物が装着されていますので、カッター刃や排出口に指などを入れないでください。
警告ラベル添付位置
6
1.2
同梱品の確認
以下のものが同梱されていることを確認してください。
自動シートカッター
1.3
取扱説明書
(本書)
自動シートカッター各部の名称
マグネット
カッター刃
搬送口
排出口
接続コネクター
接続レバー
7
1.4
自動シートカッターの特長
本カッターは、プリンターの排出口に簡単に装着が可能で、自動でラベルシートや連続ロー
ルシートを設定したサイズにカットすることができます。
今までは・・・
IN
PR
TE
R
カットする
TE
UT
R
C
R
R
TT E
R
E
T
E
R
U
T
T
E
C
T
T
T
CCUU
CU
●用紙サイズごとに
カットすることができます。
●自動でカットされます。
●印刷前に先端をカットし、
用紙の先端を整えることができます。
8
第2章 自動シートカッターのセット/取り外し
2.1
自動シートカッターのセット
ここでは、本カッターをプリンターにセットする手順について説明します。
(1)接続レバーを
RELEASE
の位置に切り替えます。
K
LOC
E
EAS
REL
注 意
本カッターのセットの際は、プリンターの電源スイッチがOFFになっていることを
確認してください。
お願い
本カッターのセットの際に、接続レバーを LOCK のまま行なうと装着がで
きません。また、レバーの破損の原因になりますのでご注意ください。
(2)接続コネクターをプリンター側のオプション差込口に合わせて、プリンターに確実に奥ま
でセットしてください。
9
(3)接続レバーを
LOCK
の位置に切り替え固定します。
K
LOC
E
EAS
REL
2.2
自動シートカッターの取り外し
ここでは、本カッターをプリンターから取り外す手順について説明します。
(1)接続レバーを
RELEASE
の位置に切り替えます。
CK
LO
REL
EAS
E
注 意
本カッターの取り外しの際は、プリンターの電源スイッチがOFFになっていることを
確認してください。
お願い
本カッターの取り外しの際に、接続レバーを LOCK
の破損の原因になりますのでご注意ください。
(2)プリンターから本カッターを引き出してください。
10
のまま行なうとレバー
第3章 自動シートカッターの使いかた
ここでは、本カッターの使用方法について説明します。
お願い
本カッターは厚さがカット仕様を越えるシートでも通紙できます。
ただし、シートをカットする場合、シートの厚みが仕様を越えてしまうとカッ
トできません。
カットする場合は、厚さが0.38mm以下のシートをお使いください。
3.1
自動シートカッターに適したシートの種類
本カッターでシートをカットする場合、仕様に合った下記のシートを選んでご使用ください。
( )内はプリンタードライバーの設定項目名です。
1. 連続ロール状シート(ロールシート(つや有り・つや無し))
φ140mm以下
幅40〜80mm
φ76mm以上
(3インチ紙管等)
MEMO
・つや有り … 金色および銀色の印刷用ポリエステルフィルムで表面に光沢のあるもの
・つや無し … 銀色の印刷用ポリエステルフィルムで表面に光沢のないもの
2. ダイカットシートロール(ダイカットラベル)
φ140mm以下
幅40〜80mm
ラベルシート
φ76mm以上
(3インチ紙管等)
4mm以上
MEMO
ダイカットシートロールには頭出しができない種類がありますので、詳細につ
いては、お近くの販売店にご相談ください。
11
3.
TOF ラベル
・TOF…ラベル用紙裏側にTOF (Top of form)マークが付いているもの
(TOFマークの例)
3mm 以上
TOFマーク
MEMO
TOFラベルには頭出しができない種類がありますので、詳細については、
お近くの販売店にご相談ください。
お願い
本カッターはシート専用です。それ以外はご使用にならないでください。
また、穴付きロール状シートなどはミシン目(ハーフカット)がありますので
ご使用にならないでください。
参考
12
プリンターの取扱説明書
「2.7 ロール状シートのセット」
「3.4 プリンタードライバーの使いかた」をご覧ください。
3.2
操作パネルのカッター機能の設定
プリンターの印刷準備と本カッターの接続が完了しましたら準備完了です。
本カッターの機能としてプリンターの操作パネルより3つの機能がご使用になれます。
1.
2.
3.
カットモード
先端カット
カット位置補正
参考
本書の
「3.3 カットモードの設定」「3.4 先端カットの設定」
「3.5 カット位置補正の設定」をご覧ください。
これらのモードのディスプレイ表示は、本カッターをプリンターに接続した場合のみ表示さ
れます。
・本カッターを接続した場合に表示されます。
シートのカット位置を−2.00mm〜+5.00mm
(0.25mm単位)
で
補正します。
シートの1枚ごと、
または最後の1枚印刷後にカットするかを切り替えます。
シートの先端が斜めになっている場合、
垂直にカットします。
参考
プリンターの取扱説明書
「2.1 操作パネルの名称と働き」をご覧ください。
13
3.3
カットモードの設定
印刷されたシートを1枚ごとにカットするか、
印刷の最後にカットするかを選択します。
(1)
キーを押します。
(2)
か、
キーを押し、メニュー項目を変更します。
を表示します。
(3)
キーを押し
か、
キーで選択項目を
変更します。
いずれかを
表示します。
(4)
キーを押し、設定します。
TT
C UR
ER
T
R
T
TTEE
U
T
ER
T
C
T
U
UT
C
C
CU
●カットモード/あり:
ER
1枚ごとにカットします。
●カットモード/なし:
最後の1枚でカットします。
お願い
シートをカットする場合、セットしたシートに合わせドライバー上の シート
の種類 を設定してください。
・ロールシート(つや有り)
・ロールシート(つや無し)
・ダイカットラベル
・TOFラベル
カットされたシートが本カッターの排出口をふさぐ位置まで積載しないでくだ
さい。
MEMO
ダイカットラベル または TOFラベル を選択した場合は、カットモードの
設定に関係なく最後の1枚でカットされます。1枚ごとのカットはできません。
また、プリンターのメニュー機能の設定によって、印刷品質を保つため、最後の
1枚でなくてもカットされる場合があります。
お願い
カットモード/あり でもシートの最後端から150mm以内にカット位置が
ある場合はカットされず、そのまま排出されますのでご注意ください。
14
3.4
先端カットの設定
シートの先端が斜めになっている場合、先端を垂直にカットします。
(1)
キーを押します。
(2)
か、
キーを押し、メニュー項目を変更します。
を表示します。
キーを押すと先端をカットします。
(3)
●シートの先端をカットします。
お願い
先端カット機能は、印刷前にロールシートの先端をまっすぐに整えるためのカ
ット機能です。ダイカットラベル、TOFラベルにこの機能を使うと、ラベルシ
ート(シール)をカットすることがありますのでご注意ください。
3.5
カット位置補正の設定
シートのカット位置を−2.00mm〜+5.00mm
(0.25mm単位)の範囲で補正できます。
(1)
キーを押します。
(2)
か、
キーを押し、メニュー項目を変更します。
を表示します。
(3)
キーを押し
か、
例:
(4)
キーで選択項目を
変更します。
、
キーを押し、設定します。
−2.00mm〜+5.00mm
位置補正
カット位置
15
3.6
プリンターメッセージ
本カッターを使用中に、プリンターのディスプレイにメッセージが表示された場合、以下
を参考に考えられる原因をチェックし、適切な処置を行なってください。
カッターユニットを外してください。
原因:パソコンからの送信データがプレートを指定した。
処置:本カッターはシートカットのみでプレートカットには対応しておりません。
プレートを印刷する場合はカッターを取り外します。
取り外しかたやカット可能なシート厚については、
本書「第2章 自動シートカッターのセット/取り外し」
「第5章 主な仕様」をご覧ください。
メディアが厚すぎてカットできません。
原因:セットされているシートが厚い。
処置:カット可能な厚みのシートをセットし直してください。
カット可能な厚みについては、
本書「第5章 主な仕様」をご覧ください。
カットできません。刃の清掃をしてください。
原因:カッター刃に
(ラベルの)糊が付着し、
シートをカットできなかった。
または、
セットされているシートの厚さがカット仕様を超えている。
処置:次の手順で操作します。
(1)
シートを引き抜きます。
(2)
シートを引き抜いた後、
カッター刃が糊で汚れている場合はカッター刃を清掃して
ください。
カッター刃の清掃については、
本書「4.1 カッター刃の清掃」をご覧ください。
または、
シートの厚さがカット仕様(0.38mm以下)
を超えている場合は、
シートを
変更してください。
16
第4章 日常の清掃
本カッターの性能を維持するために、外装やカッター刃を定期的に清掃してください。
注 意
●清掃は、プリンターの電源スイッチをOFFにして、本カッターをプリンターから
取り外して行なってください。
●カッター刃は、たいへん鋭利な刃物です。カッター刃や排出口には絶対、指など
を入れないでください。
4.1
カッター刃の清掃
本カッターでカットしていると、カッター刃に糊が付着し、うまくカットできなくなること
があります。常に良好な状態でカットできるようにするため、刃先に糊が付着したら清掃を
行なってください。
(目安として100カットごとに清掃)
お願い
カッター刃を清掃するときは、市販のシール(テープ)剥がし製品(刷毛タイプの
もの)と綿棒をご用意ください。シール剥がし製品はスプレータイプやペンタイプの
ものなどいろいろなものがありますが、必ず刷毛タイプのものをご使用ください。刷
毛タイプでないものを使用した場合、本製品の故障の原因になります。
注 意
スプレータイプのシール剥がし製品は、スプレー内の成分が製品内部に入ると、火
災・感電の原因になります。絶対に使用しないでください。
市販製品については、市販製品の取扱い上の注意をご確認の上、ご使用ください。
カッター刃の清掃のしかたは次のとおりです。
(1)プリンターの電源スイッチをOFFにし、本カッターをプリンターから取り外します。
参考
本書の
「第2章
自動シートカッターのセット/取り外し」をご覧ください。
(2)市販の「シール剥がし製品(刷毛タイプのもの)」と綿棒を用意します。
17
(3)カッター刃の刃先に付着している糊に、シール剥がし製品の刷毛部分を軽くあてます。
シール剥がし製品
カッター刃
付着した糊
(4)剥がれた糊を、綿棒を使って拭き取ります。
綿棒
注 意
カッター刃の汚れを拭き取るときは、綿棒を
使用してください。手を触れたり、紙や布な
どで拭き取ると、けがの原因になります。
お願い
本カッターの排出口付近にも糊が付着する場
合がありますので、同様に清掃してください。
(5)プリンターに本カッターをセットし、プリンターの電源スイッチをONにします。
4.2
カッター外装の清掃
カッターの外装が汚れたときは、プリンターの電源スイッチをOFFにし、水を含ませ固く
絞ったガーゼで拭いてください。
警 告
本カッターの外装を清掃するときは、水を含
ませ硬く絞ったガーゼで拭いてください。ア
ルコール、ベンジン、シンナー等の引火性
溶剤は使用しないでください。引火性溶剤
が製品内部の電気部品などに接触すると火
災や感電、故障の原因になります。
18
第5章 主な仕様
カット速度
0.8秒/カット
最大カット長さ
500mm
最大カット幅
80mm
最大カット厚
0.38mm以下(剥離紙含む) 剥離紙の厚みは、0.15mm以上のものを使
用してください。
(ただし、ニスカが推奨するもので、プラスチック板材以外のシート等に限る)
使用環境
使用環境(プリンターに準ずる) 温度:15〜32.5℃
湿度:10〜85%(ただし結露なきこと)
保管環境(プリンターに準ずる) 温度:5〜35℃
湿度:10〜90%(ただし結露なきこと)
インタフェース
プリンター接続用の専用コネクター
外形寸法
(W x D x H)
210mm x 115mm x 166mm
重量
1.7kg
19
20
Contents
Contents ……………………………………………………………………………………………… 21
Introduction …………………………………………………………………………………………… 22
Chapter 1 Before Using Auto Sheet Cutter …………………………………… 24
1.1 Important Safety Information …………………………………………………………………… 24
1.2 Details of Enclosed Items ……………………………………………………………………… 25
1.3 Names of Parts ………………………………………………………………………………… 25
1.4 Features of the Auto Sheet Cutter …………………………………………………………… 26
Chapter 2 Setting Up / Removing the Auto Sheet Cutter ……………………… 27
2.1 Setting Up the Auto Sheet Cutter ……………………………………………………………… 27
2.2 Removing the Auto Sheet Cutte ……………………………………………………………… 28
Chapter 3 Using the Auto Sheet Cutter ………………………………………… 29
3.1 Types of Sheets That Are Compatible with the Auto Sheet Cutter ………………………… 29
3.2 Cutter Mode Display on the Operation Panel ………………………………………………… 31
3.3 Setting the Cut Mode …………………………………………………………………………… 32
3.4 Setting tje Leading-Edge Cut ………………………………………………………………… 33
3.5 Setting the Cut Position Adjustment …………………………………………………………… 33
3.6 Printer Messages ………………………………………………………………………………… 34
Chapter 4 Daily Cleaning ………………………………………………………… 35
4.1 Cleaning the Cutter Blade ………………………………………………………………………35
4.2 Cleaning the Exterior of the Auto Sheet Cutter ………………………………………………36
Chapter 5 Specifications …………………………………………………………… 37
21
Introduction
Thank you for purchasing the Auto Sheet Cutter.
This product is the Sheet-Roll cutter option only for Plate & Sheet Printer.
Using this product, you can cut Sheet-Roll automatically when printing.
This user’s manual describes the Auto Sheet Cutter’s features, how to operate the cutter, and
cautions concerning its use.
In order to ensure that you fully understand the cutter’s features and are able to use it
effectively, read this manual carefully before you start using the cutter. Once you have finished
reading this manual, retain it for future reference.
The symbols used in this user’s manual are described below. Be sure to always follow the
instructions given in this user’s manual.
WARNING
Indicates situations where mishandling might result in serious injury or even death.
For your own safety, be sure to always observe these warnings.
Caution
Indicates situations where mishandling might result in personal injury or damage to
property. To protect yourself and your property, be sure to always observe these cautions.
Note
Indicates important information and restrictions concerning operation. Be sure to read this
information to prevent the unit from breaking down or being damaged, and to ensure it
is not operated incorrectly.
Memo
Indicates operation instructions and supplementary information. Be sure to read and apply
this information.
22
FCC Regulations
This device complies with Part 15 of the FCC Rules.Operation is subject to the following
two conditions: (1) This device may not cause harmful interference, and (2) this device
must accept any interference received, including interference that may cause undesired
operation.
Note: This equipment has been tested and found to comply with the limits for class B
digital device, pursuant to Part 15 of the FCC Rules. These limits are designed to provide
reasonable protection against harmful interference in a residential installation. This
equipment generates, uses and can radiate radio frequency energy and, if not installed
and used in accordance with the instructions, may cause harmful interference to radio
communications. However, there is no guarantee that interference will not occur in a
particular installation. If this equipment does cause harmful interference to radio or
television reception, which can be determined by turning the equipment off and on, the
user is encouraged to try to correct the interference by one or more of the following
measures:
Reorient or relocate the receiving antenna.
Increase the separation between the equipment and receiver.
Connect the equipment into an outlet on a circuit different from that to which the receiver
is connected.
Consult the dealer or an experienced radio/TV technician for help.
Do not make any changes or modifications to the equipment unless otherwise specified in
the manual. If such changes or modifications should be made, you could be required to
stop operation of theb equipment.
Legal Notice
Unauthorized transfer or duplication of all or any part of this document is prohibited.
The contents of this document is subject to change without notice.
Every effort has been made to ensure that the information contained in this guide is correct.
If any error or omission is found, contact your nearest dealer for details.
NISCA Corporation is not responsible for any damages, direct or indirect, arising from or
related to the use of this machine.
23
Chapter 1 Before Using the Auto Sheet Cutter
1.1 Important Safety Information
To ensure safe operation of the cutter, always observe the following warnings and cautions.
Failure to observe these cautions could result in fire, electric shock, personal injury, or other
accidents.
WARNING
Do not set this cutter up in the vicinity of alcohol, paint thinner, and other flammable chemicals.
Do not use flammable sprays in the vicinity of the cutter.
If the cutter should begin to smoke or emit an unusual odor, or if any other abnormality should
develop, turn off the printer power immediately, unplug the power cord, and then contact
your dealer.
Do not attempt to disassemble or modify this cutter.
Use only a damped cloth to clean the cutter. Never use alcohol, thinner, benzene or any other
flammable liquids which can cause a fire, serious electrical shock or damage on the cutter.
Plug in the connector as far as it will go. Do not touch the connector with wet hands.
Caution
Do not set up the cutter on an unstable surface or in a location that is subject to vibration.
Do not set up the cutter in a hot, humid or dusty location, nor in the vicinity of an open flame.
Do not set up the cutter on a rug or carpet.
If any foreign matter (such as metal filings, water, or other liquids) gets inside of the cutter,
turn off the printer power immediately, unplug the power cord, and then contact your dealer.
Do not pull on the sheet while the cutter is in operation. Doing so could result in poor
printing, and could even damage the cutter.
Do not use the cutter to cut anything other than sheets. Doing so could damage the blade,
and also could short the electrical components.
Do not use or store the cutter in a humid or dusty location, or in a location that is exposed to
direct sunlight. The cutter should only be used under conditions that are within the indicated
temperature and humidity ranges.
Operating environment (same as the printer) temperature: 15 32.5
(59~ 90.5 F)
humidity: 10 85
(with no condensation)
Storage environment (same as the printer)
temperature: 5 35 (41~ 95 F)
humidity: 10~ 90
(with no condensation)
Before cleaning, turn the power of the printer off and detach the auto sheet cutter from the
printer.
The cutting blade is extremely sharp. Never stick your fingers, etc., into the outlet or touch
the cutter blade.
Warning label Position
24
1.2 Details of Enclosed Items
Make sure that the following items were included with your cutter.
Auto sheet cutter
User's Manual
(this document)
1.3 Names of Parts
Magnet
Cutter blade
Transport
opening
Outlet opening
Connector
Connecting lever
25
1.4 Features of the Auto Sheet Cutter
This cutter can be easily mounted on the outlet opening of the printer, and can be used to
automatically cut labels and sheets in a preset size.
Without the cutter
IN
PR
TE
R
Cut by hand
TE
UT
R
C
R
R
TT E
R
E
T
E
U
TT TT E R
C
U
T
CC U
CU
The cutter can cut individual
sheets
The cutter can make just
the final cut
The cutter can cut the sharper
leading edge before printing
26
Chapter 2 Setting Up/Removing the Auto Sheet Cutter
2.1 Setting Up the Auto Sheet Cutter
This section describes how to set up the cutter.
1
Move the connection lever to the “RELEASE” position.
K
LOC
E
EAS
REL
Caution
Before installing this cutter, make sure that the printer is turned off.
Note
This cutter cannot be installed while the connection lever is in the “LOCK”
position. Note that attempting to install the cutter while the connection lever is
in the “LOCK” position can damage the lever.
2
Align the connector with the options opening on the printer and then mount
the cutter on the printer, pushing it in all the way.
27
3
Move the connection lever to the “LOCK” position so that the cutter is locked
K
LOC
E
EAS
REL
2.2 Removing the Auto Sheet Cutter
This section describes how to remove the cutter from the printer.
1
Move the connection lever to the “RELEASE” position.
K
LOC
ASE
RELE
Caution
Before installing this cutter, make sure that the printer is turned off.
Note
This cutter cannot be installed while the connection lever is in the “LOCK”
position. Note that attempting to install the cutter while the connection lever is
in the “LOCK” position can damage the lever.
2
28
Pull the cutter off of the printer.
Chapter 3 Using the Auto Sheet Cutter
This section describes how to use the cutter.
Note
The auto sheet cutter-unit can let the sheet whose thickness exceeds the cutter
specifications pass through the unit.
But if the cutter is in the sheet cutting mode, the cutter will not cut the sheet whose
thickness exceeds the cutter specifications.
When you cut the sheet, the thickness of the sheet shall be 0.38mm or less.
3.1 Types of Sheets That Are Compatible with the
Auto Sheet Cutter
When using this cutter to cut sheets, keep the specifications described below in mind
when selecting the sheet. The terms in parentheses refer to the printer driver settings.
1
Continuous roll sheet (roll sheet (glossy/dull))
Diameter: Up to 140mm
Width:40 to 80mm
Diameter: At least 76mm
(3-inch paper tube,etc.)
Memo
• Glossy: Silver- or gold-colored polyester film for printing with a glossy surface
• Dull: Silver-colored polyester film for printing with a dull surface
2
Die-cut sheet roll (Die-cut label)
Diameter: Up to 140mm
Width:40 to 80mm
Label sheet
Diameter: At least 76mm
(3-inch paper tube,etc.)
4mm
Memo
Some types of sheets do not permit initial positioning. Consult your dealer for details.
29
3
TOF Label
TOF…TOF (Top of from) is maked on the back of the label sheet.
(TOF mark example)
TOF mark width 3mm or more
TOF mark
Memo
Some types of TOF label sheet may not get the correct leading edge position.
Contact your nearest dealer for details.
Note
This cutter is designed to cut sheets. Do not use this cutter to cut any other material.
This cutter cannot be used to cut polyacrylate plates or rigid PVC plates. In addition,
perforated (half-cut) sheets, such as roll sheets with holes, also cannot be used with
this cutter.
Memo
Refer to section 2.8, "Loading a Roll Sheet" and section 3.4, "Printing Settings" both in
the Printer User's Manual.
30
3.2 Setting the Cutting Function
Once the printer has been prepared for printing and the cutter has been connected to the
printer, preparations are complete. The cutter can operate in one of three functions
selected through the operation panel on the printer.
1. Cut mode
2. Loading edge cut
3. Cut position adjustment
These modes are displayed only when the cutter is connected to the printer.
Memo
Refer to section 3.3, "Setting the Cut mode", section 3.4, "Setting the LeadingEdge Cut", and section 3.5, "Setting the Cut Position Adjustment".
Cancel
Online
Message
<<Menu>>
Cut Mode
Menu
Enter
Menu
Displayed when the cutter is connected
Menu
<<Menu>>
Cut POS ADJ
Enter
Menu
Cancel
Enter
Cancel
Select this item to adjust the sheet cutting position over a
range of –2.00mm to +5.00mm (in 0.25mm increments).
<<Menu>>
Cut Mode
Enter
Cancel
Menu
Enter
Cancel
Select this item to switch between cutting after each sheet, or
cutting only after printing the last sheet.
<<Menu>>
Lead Edge Cut
Cancel
Enter
Cancel
Select this item to make a perpendicular cut on a sheet with an
edge that is on a diagonal.
Memo
Refer to section 2.1, "Operation Panel Components and Their Fnctions", in the
Printer User's Manual.
31
3.3 Setting the Cut Mode
This mode is used to select whether to cut each printer sheet, or to cut only after the last sheet
has been printed.
1
2
Press the
Use the
<<Menu>>
Cut Mode
3
Press the
Menu
Menu
key.
key and the
key to change the menu item so that
is displayed.
Enter
key, and then press either the
Menu
key or the
key
so that one of the following screens is displayed.
Cut mode
On
4
Press the
Cut mode
Off
Enter
key to finalize the selection.
ER
TT
U
CR
E
T
R
EER
T
T
R
TE
U
TT T
C
U
UT
C
CU
C
Cut mode
on:
Each sheet is cut.
Cut mode off:
Cuts only after the last sheet.
Note
When cutting a sheet, set the "plate type" in the driver for the type of sheet loaded in the printer:
Glossy Roll Sheet
Dull Roll Sheet
Die-cut label
TOF label
When using the cutter, do not load so many sheets that the cutter outlet becomes blocked.
Memo
When "Label Sheet" (Die-cut label) or "TOF label" is selected, the sheet is cut only after the
last label is printed, regardless of the cutting mode.
It is not possible to cut between each label. And according to the printer menu function
settings, it may be cut the label even if it is not the last one to keep the print quality.
Note
If "Cut Mode/On" is set and the cutting position is located within 150mm of the trailing end
of the sheet, the media is output as is, without being cut.
32
3.4 Setting the Leading-Edge Cut
This function makes a perpendicular cut even if the leading edge of the sheet is angled.
1
2
Press the
Use the
<<Menu>>
Lead Edge Cut
3
Press the
Menu
Menu
key.
key and the
key to change the menu item so that
is displayed.
Enter
key to cut the leading edge.
Cuts the leading edge.
Note
Use the leading-edge cut mode with continuous roll sheets only.
If you use this function for die-cut label or TOF label, the sheet (seal) will be cut. Please pay an
attention that.
3.5 Setting the Cut Position Adjustment
This function adjusts the sheet cutting position over a range of -2.00mm to +5.00mm
(in 0.25mm increments).
1
2
Press the
Use the
<<Menu>>
Cut POS ADJ
3
Press the
Menu
Menu
key.
key and the
key to change the menu item so that
is displayed.
Enter
key, and then pass either the
Menu
key or the
key
so that one of the following screens is displayed.
Cut POS ADJ
-2.00
4
Press the
Cut POS ADJ
+5.00
Enter
key to finalize the selection.
From -2.00mm to +5.00mm
ADJUST
Cutting position
33
3.6 Printer Messages
If a message appears in the printer's display while you are using the cutter, check this list
of messages to determine why the message was generated, and then take the appropriate
action.
Remove Cutter
Unit.
Problem : It is set to print a plate by transmitted data from PC.
Solution : The cutter can be used to cut a sheet only, not a plate.
Remove the cutter before printing a plate.
Refer to Chapter 2, "Setting Up/Removing the Auto Sheet Cutter",
and Chapter 5, "Specifications".
Too think
media to cut.
Problem : The sheet that is loaded in the printer was found to be too thick to cut.
Solution : Load a sheet that can be cut for the thickness.
Refer to Chapter 5, "Specifications".
Unable to cut.
Clean cutter blade.
Problem : Could not cut a sheet because an adhesive adhered on the cutter.
Or the thickness of the sheet set on the printer exceeds the cutter specifications.
Or thickness of a sheet exceeds the cutter specifications.
Solution : Follow the procedure below to clean the cutter blade.
(1) Pull out a sheet.
(2) Clean the cutter blade after pull out a sheet in case an adhesive adheres to the cutter blade.
Refer to Chapter 4.1, "Cleaning the Cutter Blade".
Change a sheet in case the thickness of the sheet exceeds the cutter specifications (0.38mm
or below).
34
Chapter 4 Daily Cleaning
Regularly clean the exterior and the cutter blade to keep the performance. Always follow the
safety guidelines below when cleaning.
Caution
Before cleaning, turn the power of the printer off and detach the auto sheet cutter from the
printer.
The cutting blade is extremely sharp. Never stick your fingers, etc., into the outlet or touch
the cutter blade.
4.1 Cleaning the Cutter Blade
Adhesives of the label tapes are transferred and collected on the edge of the cuter blade
while using the auto sheet cutter. This may result in a failure in cutting. Regularly clean off the
adhesives on the cutter blade in case of need. (As a reference, the cleaning may be
necessary approximately every 100 cuttings).
Note
Prepare a ready-made remover for stickers/adhesive tapes and cotton swabs
when cleaning the cutter blade. Always use the remover in a stick-brush type while
there is a wide-variety of types for the remover, such as pen type, spray type, etc.
Use of a remover other than the stick-brush type may cause a damage on the
printer.
Caution
Never use especially the spray type remover since vapor of the remover may get
inside the auto sheet cutter and can cause a fire, electric shock, etc.
Follow the procedure below to clean the cutter blade.
1
Turn the power of the printer off and detach the auto sheet cutter from the
printer.
Memo
Refer to Chapter 2, "Setting Up/Removing the Auto Sheet Cutter".
2
Have a ready-made adhesive remover (stick-brush type) and cotton swabs
ready.
35
3
Gently apply the remover with the stick-brush to adhesives on the
edge of the cutter blade.
A ready-made adhesive remover
(stick-brush type)
Cutter blade
Adhesive stuck
on the blade
4
Use a cotton swab to wipe the adhesive off.
Cotton swab
Caution
Use a cotton swab to remove the
adhesives on the cutter blade. Do not
touch the blade with hand or try to remove
with paper or cloth to avoid injury.
Note
If there are adhesives at the outlet of the
auto sheet cutter, clean them in the same
way.
5
Set up the auto sheet cutter, then turn the power of the printer on.
4.2 Cleaning the Exterior of the Auto Sheet Cutter
Before cleaning, turn the power of the printer off.
Use a damped soft cloth to clean the exterior of the auto sheet cutter.
WARNING
Use only a damped cloth to clean the cutter.
Never use alcohol, thinner, benzene or any
other flammable liquids which can cause a
fire, serious electrical shock or damage on
the cutter.
36
Chapter 5 Specifications
Cutting speed
0.8 sec/cut
Maximum cutting length
500mm (19.69in.)
Maximum cutting width
80mm (3.15in.)
Maximum cutting
thickness
0.38mm (including any backing paper)
The thickness of a backing paper shall be 0.15mm or more.
(limited to label sheets that are not on plastic panels
and that are recommended by NISCA Corporation.)
Operating
environment
Operating environment Temperature : 15 32.5 (59 90.5 F)
Humidity : 10 80
(with no condensation)
Storage environment
Temperature : 5 35 (41 95 F)
Humidity : 10 90
(with no condensation)
Interface
Printer connector
Extermal dimensions
(W x D x H)
210 x 115 x 166mm (8.27 x 4.53 x 6.54in.)
Weight
1.7kg (37.48lb.)
37
38
39
PUB. 4Y5-8102-010
PRINTED IN JAPAN