1
2010 All Rights Reserved.
* 2 1 4 6 5 1 4 - 8 G *
安全上のご注意
● 警告表示の意味
機器を分解することで、感電などの障害が起こる可能性を
示します。
安全上の要点
使用上の注意
30
白 HIGH判定出力
灰 LOW判定出力
黄 エラー出力
11.7
10.9
18
15.4
6.1
ビニル絶縁丸形コード
φ5.2 11芯(導体断面積:0.09mm2
/絶縁体径:φ0.7mm)標準長さ 2m
最小曲げ半径:30mm
注.アナログ出力線(黒)
は二重シールド
構造で絶縁体径がφ2.3㎜となります
16.6
38.4
青 GND(0V)
桃 LD-OFF入力
タイミング入力/
紫 BANK0入力
(単位:mm)
橙 ゼロリセット入力
リセット入力/
赤 BANK1入力
6.
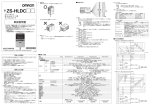
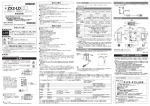
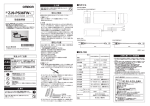
各部の名称とはたらき
2.
アンプユニットの設置について
35mm幅のDINレールに、
ワンタッチで着脱することができます。
■取り外し
③センサヘッド接続コネクタ側に押しつ
けます。
④コネクタ側を持ち上げます。
6.2
DC10
∼30V
緑 PASS判定出力
エンドプレート
①
③
電流/電圧出力
切替
100Ω
電流出力
4∼20mA
電圧出力
±5V
1∼5V
操作部
(※)
表示部
(※)
黒 アナログ出力
シールド アナログGND
電流出力:300Ω以下
電圧出力:10kΩ以上
(3) 出力コード
電源および同期センサや
外部装置と接続します。
(2) 連結部
(両側面に1箇所ずつ 計2箇所)
演算ユニットを接続します。
(1) センサヘッド接続コネクタ
PNPタイプ
センサヘッドを接続します。
茶 DC10∼30V
(※)
操作部と表示部
白 HIGH判定出力
④
(8) PASS LED
DC10
∼30V
緑 PASS判定出力
灰 LOW判定出力
3.
センサヘッドとの接続について
(7) HIGH LED
負荷
負荷
測定可能時に点灯します。測定不能時
(受光量過大または不足、測定範囲外、
電源投入時にセンサヘッド未接続)
は消灯します。
(9) LOW LED
(13) スマートチューニングボタン
(10) メインデジタル
(17) MENU表示灯
判定結果がLOWの
ときに点灯します。
測定値や機能の
名称を表示します。
(11) サブデジタル
黒 アナログ出力
負荷
シールド アナログGND
ゼロリセット設定時に点灯します。
(6) ENABLE LED
モードの切替えや設定内容
の確定に使用します。
リセット入力/
赤 BANK1入力
電圧出力
±5V
1∼5V
(5) ゼロリセットLED
(14) MENU/SETボタン
橙 ゼロリセット入力
電流/電圧出力
切替
100Ω
センサヘッドがレーザ光を
放出しているときに点灯します。
表示の切替えや測定条件
の設定に使用します。
タイミング入力/
紫 BANK0入力
電流出力
4∼20mA
(4) レーザ点灯LED
(12) カーソルボタン
桃 LD-OFF入力
■取り外し
センサ部のコネクタ外周リングを持って、
まっすぐに引っ張ります。
【重要】
・コネクタ内の端子には触れないでください。
・違う形式のセンサヘッドに交換した場合は、
アンプユニット内の設定データはすべてクリアされます。
負荷
青 GND(0V)
負荷
■取付け
アンプユニットの▲印をセンサヘッドのコネクタ矢印
の位置と合わせ、
ロックするまで差し込みます。
判定結果がPASSの
ときに点灯します。
判定結果がHIGHの
ときに点灯します。
黄 エラー出力
内部回路
製品が動作不能、誤動作、
または性能・機器への悪影響を防ぐため、以下のことを守ってください。
■設置場所について
次のような場所には設置しないでください
・周囲温度が定格の範囲を越える場所
・温度変化が急激な場所
・相対湿度が35∼85%RHの範囲を超える場所
・腐食性ガス、可燃性ガスがある場所
・塵埃、塩分、鉄粉がある場所
・振動や衝撃が直接加わる場所
・強い外乱光
(レーザ光、
アーク溶接光など)
があたる場所
・直射日光があたる場所や暖房器具のそば
・水、油、化学薬品の飛沫がある場所
・強磁界、強電界がある場所
■電源および配線について
・センサヘッドを接続し、
アンプユニットの入出力線を配線後に電源を供給してください。
・市販のスイッチングレギュレータをご使用の際は、FG端子を接地してください。
・電源ラインにサージがある場合、使用環境に応じてサージアブソーバを接続してご使用ください。
・複数のアンプユニットを接続して使用するときは、
すべてのアンプユニットのアナログGNDを相互に接続
してください。
・複数のアンプユニットを接続して使用するときは、電源を同時に投入してください。
・配線後は電源を投入する前に、電源の正誤、負荷短絡などの誤接続の有無、負荷電流の適否につ
いて確認を行ってください。誤配線などで故障するおそれがあります。
・アンプユニットのコード延長は全長で10m以内としてください。配線には同種のシールドコードをご使用く
ださい。センサヘッドのコード延長は別売の延長コード
(ZX2-XC□R)
をご使用ください。延長コードは複
数本を連結してお使いいただくことはできません。
・本センサは、以下の使用環境を前提にUL規格認証を取得しています。
・
「クラス2回路」で使用することを前提としています。米国、
カナダでのご使用の際は、
「クラス2電源」
をご使用ください。過電流保護の最大電流定格は、0.8A以下です。
・オープンタイプとして認証を取得しています。
エンクロージャー内に設置してください。
・ケーブル定格は30Vです。最終製品の内部配線用ケーブルとして使用してください。
茶 DC10∼30V
* MENUモードのアナログ出力の設定で選択できます。
注.
その他仕様、機能については、
マニュアル
(ZX2 ユーザーズ)
をご覧ください。
■取付け
①センサヘッド接続コネクタ側のツメをレ
ールにはめ込みます。
②フックがロックするまで押し込みます。
必要に応じてエンドプレートで固定し
②
てください。
【重要】
①、②の順序を逆にしないでください。逆
に取付けると取付強度が低下します。
9.6
・内部回路図
NPNタイプ
負荷
以下に示すような項目は安全を確保する上で必要なことですので必ず守ってください。
■設置環境について
・引火性、爆発性ガスの環境では使用しないでください。
・操作や保守の安全を確保するため、高電圧機器や動力機器から離して設置してください。
■電源および配線について
・定格電圧
(DC10∼30V リップル
(p-p)
10%含む)
を越えて使用しないでください。
・電源の逆接続および交流電源への接続はしないでください。
・オープンコレクタ出力は、負荷を短絡させないでください。
・高圧線、動力線と当製品の配線は別配線としてください。同一配線あるいは同一ダクトにすると誘導を
受け、誤動作あるいは破損の原因になることがあります。
・配線やコネクタを着脱するときは、必ず電源を切ってから行ってください。
■その他
・本体の分解、修理、改造、加圧変形、焼却などは絶対にしないでください。
・廃棄するときは、産業廃棄物として処理してください。
・万が一、異常を感じたときには、すぐに使用を中止し、電源を切った上で、当社支店・営業所までご相談ください。
ZX2-LD□□
DC10-30V (リプル(p-p)10%含む)
3000mW以下(電源電圧24V時 125mA以下) センサヘッド接続時 クラス2
最速 30μs
60us, 120us, 240us, 500us, 1ms, 2ms, 4ms, 8ms,
12ms, 20ms, 36ms, 66ms, 128ms, 250ms, 500ms
4∼20mA (最大負荷抵抗300Ω)
アナログ出力 *
±5VDCまたは1∼5VDC (出力インピーダンス100Ω)
NPNオープンコレクタ出力
判定出力
PNPオープンコレクタ出力
DC30V 50mA以下
(HIGH/PASS/LOW:3出力)
DC30V 50mA以下
残留電圧 負荷電流10mA以下:1V以下 残留電圧 負荷電流10mA以下:1V以下
エラー出力
負荷電流10mA超え:2V以下
負荷電流10mA超え:2V以下
外部入力
ON時:電源電圧短絡または
ON時:0V短絡または1.2V以下
(LD-OFF入力、ゼロリセット
電源電圧−1.2V以下
OFF時:開放
(漏れ電流0.1mA以下)
入力、タイミング入力、
OFF時:開放
(漏れ電流0.1mA以下)
リセット入力、バンク入力)
周囲温度
動作時:0∼50℃ 保存時:−15∼+70℃
(ただし、氷結、結露しないこと)
動作、保存時:35∼85%RH
(ただし、結露しないこと)
周囲湿度
AC1000V 50∼60Hz 1min.
耐電圧
10∼150Hz (複振幅0.7mm)
X,Y,Z各方向80min.
振動
(耐久)
(上下、左右、前後)
300m/s2 6方向各3回
衝撃(耐久)
IP40
保護構造
ケース:ポリブチレンテレフタレート、
カバー:ポリカーボネート
材質
ボタン:ポリアセタール
本体:約135g、梱包状態:約200g
質量
内部回路
破裂の恐れがあります。
AC電源では絶対に使用しないでください。
ZX2-LDA41
34.2
16.9
負荷
故障や発火の恐れがあります。
定格電圧を越えて使用しないでください。
ZX2-LDA11
負荷
注意
項目
適用センサヘッド
電源電圧
消費電力
測定周期
応答時間
負荷
● 警告表示
形式
負荷
注意
正しい取扱いをしなければ、この危険のために、時に軽傷・中程
度の傷害を負ったり、あるいは物的損害を受ける恐れがあります。
1.
定格/性能
電源(DC10-30V)
GND(OV)
HIGH判定出力
PASS判定出力
LOW判定出力
エラー出力
アナログ出力
アナログGND
LD-OFF入力
ゼロリセット入力
タイミング入力/BANK0入力
リセット入力/BANK1入力
72(※カバー開放時 84.6)
・アンプユニット 1台 ・取扱説明書
(本書)
1部
このたびは、本製品をお買い上げいただきまして、まことにありがとうございます。
ご使用に際しては、次の内容をお守りください。
・ 電気の知識を有する専門家がお取り扱いください。
・この取扱説明書をよくお読みになり、十分にご理解のうえ、正しくご使用ください。
・この取扱説明書はいつでも参照できるよう大切に保管してください。
© OMRON Corporation
茶
青
白
緑
灰
黄
黒
シ−ルド
桃
橙
紫
赤
パッケージ内容の確認
3.1
取扱説明書
【重要】
配線は正しく行ってください。破損の原因になります。
47.6
レーザ変位センサ CMOSタイプ アンプユニット
・外部入出力の各コードの機能は次のとおりです。
4.2
ZX2-LDA□□
5.
外形寸法図
36.8
形
4.
配線について
20.7
スマートセンサ
■ウォームアップについて
・電源投入後、10分以上経過してからご使用ください。
・電源投入直後は回路が安定していませんので、計測値が徐々に変化することがあります。
■保守点検について
・調整や着脱を行う場合は、必ず電源を切ってから作業をしてください。
・清掃には、
シンナー、
ベンジン、
アセトン、灯油類は使用しないでください。
電流出力:300Ω以下
電圧出力:10kΩ以上
測定時の補助的な情報や
機能の設定値を表示します。
使用条件に応じ、
センシング条件を
最適状態にするときに使用します。
MENUモード時に点灯します。
(16) LOWしきい値表示灯
サブデジタルにLOWしきい値を
表示しているときに点灯します。
(15) HIGHしきい値表示灯
サブデジタルにHIGHしきい値を
表示しているときに点灯します。
7.
基本設定
9.
故障かなと思ったら?
8.
エラーメッセージ
★:初期値 *
:バンク切替
:
メインデジタル
ここでは、
アンプユニットに表示されるエラー内容とその処置について記載します。
■一番簡単な設定方法
[シングルスマートチューニング]
:サブデジタル
表示
*しきい値、
スケーリングの初期値は形ZX2-LD50(L)の場合の値を記載しております。
また設定画面は、
ソフトウェア Ver1.2xxの場合を記載しております。
ボタン操作 デジタル表示
RUNモード
LOW
しきい値
HIGH
しきい値
アナログ
出力値
分解能
現在値
BANK
―
±5V、1∼5Vの場合
―
4∼20mAの場合
* メインデジタルは常に測定値を表示します。
* 上記の表示内容は一例であり、実際の表示は異なります。
* 押下中はワークを動かさないでください。
サブデジタルの表示切替中は出力が更新されません。
1秒押し
ボタン操作無効
(解除)
3秒長押し
ゼロリセット
解除
ゼロリセット
実行
3秒同時押し
3秒同時押し
*
・MENUモード
詳細メニューON時
タイミング
入力
1秒同時押し
押下終了
1秒押し
1秒同時押し
応答時間
LOW
しきい値
アナログ
出力設定
サブデジタル
メモリ
★
★
詳細メニュー
表示選択
★
Error-bright
設定
初期化
受光量飽和、計測異常
です。
処置
・ センサヘッドとワーク間距離を測定範
囲内に設置してください。
Error-channel ・相互干渉防止設定ONにし ・ アンプユニットを2台以上設置してい
ているにも関わらず、アンプ
る場合は、
いったん電源を切り、
アンプ
ユニットが1台しかありません。 ユニットおよび演算ユニットの接続が
正しいことを確認してください。
・隣接演算設定ONにしている
にも関わらず、アンプユニット ・ アンプユニットを1台で使用している場
が1台しかありません。
合は、
いったんアンプユニットを2台以
上連結して、相互干渉防止設定・隣接
Error-channel アンプユニット連結通信
演算設定をOFFにするか、設定データ
エラーです。
の初期化操作をしてください。
Error-dark
受光量不足、計測異常
です。
・ センサヘッドとワーク間距離を測定範
囲内に設置してください。
Error-head
センサヘッドが接続されて
いません。
またはセンサ通信エラー
です。
・ いったん電源を切り、
センサヘッドが
正しく接続されているか確認後、電源
を再投入してください。
Error-head
センサヘッドレーザが異常
です。
・それでもエラーが解決しない場合は、
センサヘッドが故障しています。センサ
ヘッドを交換してください。
Error-head
センサヘッド内蔵メモリが
異常です。
Error-head
※測定内容別
(高さ、段差・浮き・反り、2枚差し、厚み、位置決め、偏芯・面振
れ)
の基本設定については、
マニュアルをご覧ください。
MENUモード
(詳細メニューOFF)
・初回使用時
・MENUモード
詳細メニューOFF時
が表示されたらボタン 3秒間点滅表示し
を離して、
スマートチュ た場合、チューニ
ーニングを実行する。 ングできていませ
ん。設定を確認後、
再度実施してくだ
さい。
点滅
* スマートチューニングはMENUモードでも実行できます。
HIGH
しきい値
ボタンを1秒押して、サブデジタルに
と
押下中
RUNモード
スマート
チューニング
操作内容
選択メニュー説明
基準ワークをセットし、
センサヘッドとワーク
の距離が測定中心
距離になるように、
ア
ンプユニットのデジタ
ル表示値またはセン
サヘッドの表示灯を
見ながらセンサヘッド
の位置を調整し、取り
つけます。
エラー内容
Error-head
★
・ノイズの影響を受けている可能性が
ある場合は、電源を他の機器と独立
させる、
センサケーブルの配線を動力
線から離すなどのノイズ対策を行って
ください。
ここでは、
ハードに関する一時的なトラブルの対処方法を記載します。修理に出す前に、
まずご確
認ください。
現象
分類
動作 稼働中に再起動される
原因と対処法
・電源装置は正しく接続されていますか?
・演算ユニットは、
しっかりと接続されていますか?
入力信号を受付けない
・各コードは正しく配線されていますか?
・信号線が断線していませんか?
測定値が日や時刻によって ・温度特性の影響が考えられます。定期的に基準対象物
変動し、安定しない
でゼロリセットを実行し、補正するようにしてください。
レーザ光が投光されない
・LD off入力が短絡していませんか?
外部入力端子からのバンク ・外部入力端子設定が
に設定されていますか?
切替えが動作しない
・コードは正しく配線されていますか?
ボタン操作でバンクを切り ・外部入力端子の設定が
に設定されて
替えても、RUNモードで
いませんか?
BANK0に戻る
・ホールド機能が有効で、
トリガモードが
のとき、
表示 メインデジタルの表示が
タイミングは入力されていますか?
“-----”
の状態のままになる
・ホールド機能が有効で、
トリガの種類が
または
のとき、
セルフトリガレベルは適切な値が設定されていますか?
このような現象が発生する場合が
明らかに測定範囲外の領域 ・センサの特性上、
で、異常な距離が表示される あります。検出物体との測定距離を確認のうえ、
使用してください。
電源投入時メインデジタル ・センサヘッドのレーザが劣化しています。
に
と表示される センサヘッドを交換してください。
出力 外部へ判定を出力できない ・各コードは正しく接続されていますか?
・信号線が断線していませんか?
・リセット入力が短絡していませんか?
・HIGHしきい値がLOWしきい値より大きく設定され
ていますか?
アナログ出力レベルがおか ・アナログ出力設定は正しいですか?
しい
3秒長押し
★
★
(数値設定)
★
Error-head
(数値設定)
Error-head
OFF設定時
センサヘッドシステム異常
です。
ご承諾事項
ON設定時
Error-head
MENUモード
(詳細メニューON)
相互干渉
防止
バンク
切替設定
非連結時、
CH1として接続時
CH1として接続時
★
HIGH
しきい値
応答時間
LOW
しきい値
隣接演算
設定
ヒス幅
CH2以降として
接続時
非連結時、相互干渉防止ON
にてCH1として接続時
THICKの場合
★
★
★
★
★
CH2以降として接続時
スケーリング後
表示値1
スケーリング前
表示値2
微分機能
ONの場合
Error-memory アンプユニット設定
メモリエラーです。
★
★
★
Error-head
スケーリング後
表示値2
★
★
★
★
相互干渉防止ONにて
CH2以降として接続時
(数値設定)
(数値設定)
THICK以外の場合
(数値設定)
非連結時、
CH1として接続時
(数値設定)
(数値設定)
・ いったん電源を切り、結線が正しいか
確認後、電源を再投入してください。
・それでもエラーが解決しない場合は、
アンプユニットが故障しています。
アンプユニットを交換してください。
★
(数値設定)
(数値設定)
非連結時、
CH2以降として接続時
スケーリング前
表示値1
計測表示
スケーリング
厚み設定
(数値設定)
・ SETキーを3秒長押しにより設定内容
を初期化してください。
Error-memory
OFFの場合
・それでもエラーが解決しない場合は、
アンプユニットが故障しています。
アンプユニットを交換してください。
ホールド
設定
トリガモード
セルフトリガ
レベル
OFF以外の場合
TIMING以外の場合
アナログ
出力設定
非計測時
出力
オンディレイ
時間
クランプ値
オフディレイ
時間
ゼロリセット
メモリ
ゼロリセット時
表示
外部入力
端子設定
検出面選択
★
★
★
設定初期化
Error-short
判定出力が短絡して
います。
非連結時、
CH1として接続時
±5V、1∼5Vの場合
★
詳細メニュー
表示選択
サブデジタル
メモリ
★
★
★
★
★
★
★
★
★
★
Error-system アンプユニットシステム
エラーです。
(数値設定)
CH2以降として接続時
(数値設定)
TIMINGの場合
4∼20MAの場合
★
(数値設定)
・ いったん電源を切り、結線が正しいか
確認後、電源を再投入してください。
・それでもエラーが解決しない場合は、
アンプユニットが故障しています。
アンプユニットを交換してください。
★
(数値設定)
・ いったん電源を切り、HIGH/PASS/
LOW/エラーの出力線が短絡していな
いか確認後、電源を再投入してください。
Tuning-failed スマートチューニングに
失敗しました。
・ 応答時間を大きな値に設定変更して
から再度実施してください。
・ センサとワークの距離が測定範囲内
か確認後、再度実施してください。
OFFの場合
LD.down
センサヘッドのレーザが
劣化しています。
・ センサヘッドを交換してください。
リセット信号入力中や、演算中・ ・ 測定値が出力可能な状態となり次第、
ホールドサンプリング時間前
通常に測定値が表示されます。
などの原因により、測定値が
出力されない状態です。
当社商品は、一般工業製品向けの汎用品として設計製造されています。従いまして、次に
掲げる用途での使用を意図しておらず、
お客様が当社商品をこれらの用途に使用される際
には、当社は当社商品に対して一切保証をいたしません。
ただし、次に掲げる用途であって
も当社の意図した特別な商品用途の場合や特別の合意がある場合は除きます。
(a) 高い安全性が必要とされる用途
(例:原子力制御設備、燃焼設備、航空・宇宙設備、鉄
道設備、昇降設備、娯楽設備、医用機器、安全装置、
その他生命・身体に危険が及び
うる用途)
(b) 高い信頼性が必要な用途
(例:ガス・水道・電気等の供給システム、24時間連続運転
システム、決済システムほか権利・財産を取扱う用途など)
(c) 厳しい条件または環境での用途
(例:屋外に設置する設備、化学的汚染を被る設備、
電磁的妨害を被る設備、振動・衝撃を受ける設備など)
(d) カタログ等に記載のない条件や環境での用途
*(a)から(d)に記載されている他、本カタログ等記載の商品は自動車
(二輪車含む。以下同
じ)
向けではありません。自動車に搭載する用途には利用しないで下さい。自動車搭載
用商品については当社営業担当者にご相談ください。
*上記は適合用途の条件の一部です。当社のベスト、総合カタログ、データシート等最新版
のカタログ、
マニュアルに記載の保証・免責事項の内容をよく読んでご使用ください。
インダストリアルオートメーションビジネスカンパニー ●製品に関するお問い合わせ先
お客様相談室
0120-919-066
クイック
オムロン
携帯電話・PHS・IP電話などではご利用いただけませんので、下記の電話番号へおかけください。
電話
055-982-5015(通話料がかかります)
■営業時間:8:00∼21:00 ■営業日:365日
●FAXやWebページでもお問い合わせいただけます。
FAX
055-982-5051 / www.fa.omron.co.jp
●その他のお問い合わせ
納期・価格・サンプル・仕様書は貴社のお取引先、または貴社
担当オムロン販売員にご相談ください。
オムロン制御機器販売店やオムロン販売拠点は、Webページで
ご案内しています。
A v 2 0 1 4 年 7月
The following notice applies only to products that carry the CE mark:
Notice:
This is a class A product. In residential areas it may cause radio
interference, in which case the user may be required to take adequate
measures to reduce interference.
© OMRON Corporation 2010 All Rights Reserved.
PRECAUTIONS ON SAFETY
●Keys to Warning Symbols
Indicates a potentially hazardous situation which, if not
CAUTION avoided, may result in minor or moderate injury or in
property damage.
●Warning Symbols
CAUTION
Do not use it exceeding the rated voltage. There is a
possibility of failure and fire.
Do not connect amplifier units to AC power supply. Risk
of explosion.
Indicates prohibition when there is a risk of minor injury
from electrical shock or other source if the product is
disassembled.
PRECAUTIONS FOR SAFE USE
Please observe the following precautions for safe use of the products.
(1)Installation Environment
・Do not use the product in environments where it can be exposed to inflammable/explosive gas.
・To secure the safety of operation and maintenance, do not install the product close to high-voltage
devices and power devices.
(2)Power Supply and Wiring
・The supply voltage must be within the rated range (DC10 to 30V including ripple 10%(peak to peak)).
・Reverse connection of power supply is not allowed. Connection to AC power supplies also not allowed.
・Open-collector outputs should not be short-circuited.
・High-Voltage lines and power lines must be wired separately from this product. Wiring them together
or placing them in the same duct may cause induction, resulting in malfunction or damage.
・Always turn off the power of the unit before connecting or disconnecting cables.
(3)Other Rules
・Do not attempt to disassemble, deform by pressure, incinerate, repair, or modify this product.
・When disposing of the product, treat as industrial waste.
・If you notice an abnormal condition such as a strange odor, extreme heating of the unit, or smoke,
immediately stop using the product, turn off the power, and consult your dealer.
PRECAUTIONS FOR CORRECT USE
Please observe the following precautions to prevent failure to operate, malfunctions, or undesirable
effects on product performance.
(1)Do not install the product in locations subjected to the following conditions:
・Surrounding air temperature outside the rating
・Rapid temperature fluctuations
・Relative humidity outside the range of 35 to 85%
・Presence of corrosive or flammable gases
・Presence of dust, salt, or iron particles
・Direct vibration or shock
・Reflection of intense light (such as other laser beams, electric arc-welding machines, or ultra-violet light)
・Direct sunlight or near heaters
・Water, oil, or chemical fumes or spray, or mist atmospheres
・Strong magnetic or electric field
Checking the package contents
1.Specifications
Item
Applicable Sensor
Units
Power supply voltage
Power consumption
Measurement cycle
Response time
Analog output *1
Judgement outputs
HIGH/PASS/LOW:
3output
ERORR output
LD-OFF input
Zero reset input
Timming input
Reset input
Bank input
Surrounding air temperature
Ambient humidity
Dialectic strength
Vibration resistance
(destructive)
Shock resistance
(destructive)
Degree of protection
Materials
Weight (packed state)
ZX2-LDA11
Brown
Blue
White
Green
Gray
Yellow
Black
Shield
Pink
Orange
Purple
Red
ZX2-LDA41
10 to 30 VDC (including ripple 10%p-p) Class 2
3,000mW max. (Power supply voltage: 30V, Current consumption: 100mA max.)
(Senser connected)
min.30μs
60μs, 120μs, 240μs, 500μs, 1ms, 2ms, 4ms, 8ms,
12ms, 20ms, 36ms, 66ms,128ms, 250ms, 500ms
For current output:4 to 20 mA/F.S. maxmum load 300Ω
For voltage output:±5VDC or 1 to 5V output impedance 100Ω
NPN open-collector outputs,
PNP open-collector outputs,
30VDC, 50mA max. Resistive.
30VDC, 50mA max. Resistive.
Residual voltage:
Residual voltage:
1V max. at 10mA load current max. 1V max. at 10mA load current max.
2V max. at 10mA load current over 2V max. at 10mA load current over
ON: Short-circuited with 0V
terminal or 1.2V or less
OFF: Open
(leakage current: 0.1mA max.)
ON: Supply voltage Short-circuited
or within supply voltage -1.2V max.
OFF: Open
(leakage current: 0.1mA max.)
Operating: 0 to 50°C, Storage: -15 to 70°C (with no icing or condensation)
Operating and storage: 35% to 85% (with no condensation)
1,000 VAC, 50/60 Hz for 1 min
10 to 150 Hz, 0.7-mm double amplitude,
80 min each in X, Y, and Z directions
300 m/s2 3 times each in six directions
(up/down, left/right, forward/backward)
IP40
PBT (Case), PC (Cover), Polyacetal(Button)
Approx.200g (sensor head:Approx. 135g)
*1 Select the analog output style by menu mode.
*2 Please see the user's manual about other specifications and functions.
Amplifier Units can be easily mounted to 35-mm DIN Track.
■Removal
(3)Push the Amplifier Unit
(4)Up and pull out from the connector
end.
11.7
18
③
15.4
6.1
VINYL INSULATED ROUND
CORD 5.2 Dia. 11 CORES
(COMDUCTOR CROSS SECTIONAL AREA: 0.09mm2 /
INSULATION OUTSIDE DIAMETER:0.7mm Dia.)
STANDARD LENGTH:2m
16.6
38.4
(UNIT:mm)
White
Load
HIGH
judgement output
Load
Green
PASS judgement output
Gray
LOW judgement output
Load
Load
Operating Section(*)
DC10 to 30V
Display Section(*)
Yellow Error output
Blue
(1)Input Cable
(*) Operating and Display Section
Orange Zero reset input
Reset input /
Bank1 input
Red
(8)PASS indicator
Current output
4 to 20mA
100Ω
Voltage output
±5V
1 to 5V
Black
Shield
Linear output
Linear GND
Current output:300Ω or lower
Load
Voltage output:10kΩ or higher
The PASS indicator lights
when the judgement result
is PASS.
(7)HIGH indicator
The HIGH indicator
lights when the
judgement result
is HIGH.
PNP Amplifier Unit
Brown DC10 to 30V
HIGH
judgement output
Green
PASS judgement output
Gray
LOW judgement output
GND(0V)
Load Load Load Load
100Ω
(9)LOW indicator
The LOW indicator lights
when the judgement
result is LOW.
(10)Main display
Orange Zero reset input
Reset input /
Bank1 input
Red
The main display shows
measured values
and function names.
(11)Sub-display
Current output
4 to 20mA
Black
Linear output
Voltage output
±5V
1 to 5V
Shield
Linear GND
The Laser indicator lights while the Sensor Head is
emitting a laser beam.
(5)Zero Reset indicator
The Zero Reset indicator lights when the zero reset
function is enabled.
(6)ENABLE indicator
The ENABLE indicator lights when the Sensor is ready for
measurement. It goes off when measurement is not possible
(e.g. when the received light amount is excessive or insufficient,
when the measuring range is exceeded, or when the Sensor
Head is not connected when the power is turned ON).
(14)MENU/ SET button
LD-OFF input
Timing input /
Purple Bank0 input
Current / voltage
output
Switch
(4)Laser indicator
The Control Keys select
measurement conditions
and make other settings.
DC
10 to 30V
Pink
④
The input cable connects the Sensor Head.
(12)Corsor button
White
Blue
The output cable connects the sensor to the power
supply and external devices, such as sync sensors
or programmable controllers.
The connectors connect Calculation Units.
LD-OFF input
Timing input /
Purple Bank0 input
Pink
Current / voltage
output
Switch
(3)Output Cable
(2)Connector (two connectors, one on each side)
GND(0V)
Yellow Error output
②
10.9
6.Part Names and Functions
Brown DC10 to 30V
End plate(option)
①
(1) Power suplly(10 to 30 VDC)
(2) GND(0V)
(3) HIGH judgement output
(4) PASS judgement output
(5) LOW judgement output
(6) Error output
(7) Linear output
(8) Linear GND
(9) LD-OFF input
(10) Zero reset input
(11) Timing input/ Bank0 input
(12) Reset input/ Bank1 input
・I/O Circuit Diagrams
NPN Amplifier Unit
2.Installing the amplifier unit
CHECK!
Always hook the connector end of
the Amplifier Unit on the DIN
Track first. Mounting strength may
decrease if the output cable end
is hooked on the DIN Track first.
6.2
4.Wiring Input/Output Cables
ZX2-LD□□
■Installation
(1)Hook the connector end of the
Amplifier Unit on the DIN Track
(2)Press in at the bottom until the Unit
locks into place.
30
Check!
・Do not touch the terminals inside the connector.
・When connecting another type sensor head, the setting data in the amplifier unit is
cleared.
・The input/output cable has the following wires.
CHECK!
Wire the cable correctly. Incorrect wiring may damage the Smart Sensor.
・Amplifier units Sensor head ×1 ・Manual (this paper) ×1
Model
9.6
72 (When the cover opened: 84.6)
Manufacturer:
Omron Corporation,
Shiokoji Horikawa, Shimogyo-ku,
Kyoto 600-8530 JAPAN
Ayabe Factory
3-2 Narutani, Nakayama-cho,
Ayabe-shi, Kyoto 623-0105 JAPAN
34.2
3.1
TRACEABILITY INFORMATION:
Representative in EU:
Omron Europe B.V.
Wegalaan 67-69
2132 JD Hoofddorp,
The Netherlands
16.9
47.6
Thank you for selecting OMRON product. This sheet primarily describes
precautions required in installing and operating the product. Before operating
the product, read the sheet thoroughly to acquire sufficient knowledge of
the product. For your convenience, keep the sheet at your disposal.
Refer to the user’s manual for details.
■Disconnecting
To disconnect the Sensor Head, hold the Sensor Head's
connector ring and the Amplifier Unit connector, and then pull
them straight out.
4.2
INSTRUCTION SHEET
20.7
Laser Displacement Sensor CMOS type
Amplifier units For Model ZX2-LD□□
36.8
ZX2-LDA□□
5.Dimensions
■Connecting
Push the Sensor Head connector into the Amplifier Unit
connector until it locks.
Internal circuit
Model
3.Connecting the Sensor Head
Internal circuit
Smart Sensor
(2)Power Supply and Wiring
・When using a commercially available switching regulator, make sure that the FG terminal is grounded.
・If surge currents are present in the power lines, connect surge absorbers that suit the operating
environment.
・When using two ore more amplifier units, make sure that the linear GND line of the amplifier units are
connected to each other.
・When using two ore more amplifier units, turn the power on the amplifier units at the same time.
・Before turning ON the power after the product is connected, make sure that the power supply voltage is
correct, there are no incorrect connections (e.g. load short-circuit) and the load current is appropriate.
Incorrect wiring may result in break down of the product.
・The cables must be 10m or shorter in total length, for amplifier units. To extend the cable from the
sensor head, an optional extension cable (ZX2-XC□R) must be used. For extension of the cable of
amplifier units, shielded cables of the same type must be used.
・The sensor is certificated by the UL standard on the assumption of the following installation conditions.
・It is based on the assumption of usage in “Class 2 circuit” . Please use it with “Class 2 power
supply” in the United States or Canada. The current rating of overcurrent protection is 0.8A max.
・It is certificated as open type. The sensor shall be installed within an enclosure.
・Rating of the cable is 30V. Please use it as internal cable wiring only in the end products equipment.
(3)Warming Up
・After turning on the power supply, allow the Controller to stand for at least 10 minutes before use. The
circuits are unstable immediately after the power supply is turned on and attempting measurement may
result in inconsistent measurement values.
(4)Maintenance and inspection
・Always turn off the power of the unit before connecting or disconnecting cables.
・Do not use thinner, alcohol, benzene, acetone, or kerosene to clean the amplifier units.
Load
Current output:300Ω or lower
Voltage output:10kΩ or higher
The sub-display shows
additional information and
function settings for
measurements.
The MENU/ SET button selects
the operating mode and set
measurement conditions.
(13)Smart tuning button
When the measurement parameter is
set to the best condition, a smart button
is used.
(17)MENU indicator
The MENU indicator lights while the
amplifier unit is in the menu mode.
(16)LOW threshold indicator
The LOW indicator lights while the sub
display show the low threshold.
(15)HIGH threshold indicator
The HIGH indicator lights while the sub
display show High threshold.
7.
Function Transition Carts
:BANK
★:Default Value *
8.Error Messages and Countermeasures
:Main Display
■The easiest setting up
Single Smart Tuning
:Sub Display
*The case of ZX2-LD50(L) (Firmware Ver1.2xx)has been described.
operation
Display
Explanation of
operation
―
Place the work piece in
position and adjust the
Sensor Head position.
Refer to the Amplifier
Unit's display or Sensor
Head's indicators. And
adjust the Sensor Head
position so that the
upper and lower limits
of the height (H) to be
measured fall within the
measuring range.
RUN mode
LOW
Threshold
HIGH
Threshold
Analog
output
Present
value
Resolution
BANK
±5V or 1 to 5V;
―
4 to 20mA;
*The main display always shows the measured value.
*The numerals shown in the above diagram are an example only.
The actual display may be different.
*Do not move workpiece while pressing button.
The output is not updated while switching the sub-display.
RUN mode
Pressing
Setting the Key Lock/
Releasing the Key Lock
Smart Tuning
Press for about
3 seconds
Zero Reset
Release
Zero Reset
Perform
Timing input
Press for 1 second
*
When the detail menu
is selected on.
Separated
Press for about
3 seconds at the
same time
Press for about
1 seconds
Press for 1 second
at the same time
Response
Time
HIGH
Threshold
Sub-display
memory
Analog
output
Detail
Menu
★
★
(数値設定)
Error
prevention setting is ON or
2-sensor operation setting is
ON, but only one Amplifier
Unit connected
Error-channel Two-sensor operation
communications data error
When press the
When it is displayed
button for one second, if on sub display as
ITEM
No input signal received.
isplayed, separate from and flash for three
the button. The single
seconds, the single
smart tuning is executed. smart tuning is failed.
Please change the
setting parameter, and
execute it again.
If this does not solve the problem, use a
The received light intensity is
suitable workpiece.
insufficient or a distance
measurement error has occurred.
Error-head
The Sensor Head is
disconnected. The Amplifire
unit can not communicate
the sensor.
★
(数値設定)
Display
・ Change the mode for the CH1 Amplifier
Unit to RUN.
Error-dark
Error-head
★
turn OFF the power supply and check that
the Amplifier and Calculating Units are
connected correctly.
・ If only one Amplifier Unit is being used,
connect another Amplifier Unit temporarily
and turn OFF the two-sensor operation,
or initialize the settings data.
Error-head
Sensor Head laser error
Error-head
Sensor Head EEPROM
data error
Turn OFF the power supply, check the
connection for the Sensor Head, and then
turn ON the power supply again.
When there is a possibility of received the
influence of the noise,the power supply of
the sensor is divided with other equipment
or high-voltage lines and power lines must
be wired separately from this sensor.
If this does not solve the problem, the
Sensor Head is defective. Replace the
Sensor Head.
Problem
Operationg Device restarts during
operation.
The measured values fluctuate
and are not stable depending
on day and time.
The main display remains on
[-----].
Abnormal distance is displayed
when the object is clearly
outside meaurement range.
・ Turn OFF the power supply and check that
the Amplifier and Calculating Units are
connected correctly. Replace the Amplifier
Unit or the Calculating Unit if the above
countermeasures do not solve the
problem.
Initialization
★
Countermeasure
If this does not solve the problem, use a
The received light intensity is
suitable workpiece.
saturated or a distance
measurement error hasoccurred.
This section describes countermeasures for temporary hardware problems. Check the
malfunction in this section before sending the hardware for repair.
Error-channel When the mutual interference ・ If two Amplifier Units have been connected,
Error-head
LOW
Threshold
★
Display
Error-bright
*Please see the user's manual about other setting.
★
Press for about
3 seconds
Explanation of
selection menu
Flashing
*Smart tuning can be performed in menu mode.
MENU MODE (Detail Menu OFF)
When the detail
menu is selected
off.
This section outlines the error messages displayed on the main display and the
countermeasures for those messages.
9.Troubleshooting
Output
is displayed on the
main display when the power
is turned ON.
Judgements not output to
external device.
Strange linear output levels.
Probable cause and possible countermeasure
• Is the power supply device connected correctly?
• Are the Interface and Calculating Units connected
correctly?
• Are all cables connected correctly?
• Is the signal line disconnected?
This problem may be due to temperature
characteristics. Execute zero reset periodically using
the standard object to correct this problem.
• Has a timing input been made while hold is enabled
and the trigger type has been set to
?
• If the hold function is enabled and the trigger type is
[UP] or [DOWN], has the self-trigger level been set
to an appropriate Value.
• This problem may occur due to the characteristics of
the sensor. Make sure that the distance to the
sensing object is appropriate.
• This problem may be solved by selecting a fixed
measurement gain in the measurement sensitivity
setting.
The laser of the sensor head has deteriorated.
Replase the Sensor Head.
• Are all cables connected correctly?
• Is the signal line disconnected?
• Are reset inputs short-circuited?
• Is the switch on the bottom of the Amplifier Unit set
to the correct position?
• Has the correct selection (voltage/current) been
made in the monitor focus settings?
• Linear output levels can be fine-tuned.
select: OFF
Error-head
select: ON
MENU MODE (Detail Menu ON)
Mutual
interference
prevention
HIGH
Threshold
Response
Time
BANK
For unconnection
or CH1
For CH1
Error-head
LOW
Threshold
Hysteresis
width
When not connected or connected
as 1 channel unit
For CH2 or more
★
★
★
CH2 or more
★
Present value 1
before scaling
setting
Scaling
2-sensor operation
setting is THICK.
★
★
For unconnection,
or CH2 or more
Thickness
setting
mode
2-sensor
operation
Present value 1
after scaling
setting
Present value 2
before scaling
setting
Present value 2
after scaling
setting
★
★
When connected as a
2 channel or later unit
★
★
★
Error-head
★
Error-memory Amplifier unit EEPROM
2-sensor operation
setting is not THICK.
data error
Hold setting is OFF.
For unconnection
or CH1
Error-memory
Hold
setting
Self trigger
level
Trigger
mode
Hold setting is
not OFF.
★
Non
measurement
setting
Analog
output
Clamp
level
On delay
time
Off delay
time
Zero reset
display
value
Zero reset
memory
External
Input
Detail
Menu
Sub-display
memory
Detect
Initialization
For unconnection
or CH1
Trigger setting is
not TIMMING.
★
★
★
Analog output setting is
-5 to5V or 1 to 5V.
★
★
★
★
★
★
★
★
★
★
Error-short
Error-system Amplifier unit System error
Turn OFF the power supply, check the
wiring for the Amplifier unit, and then turn
ON the power supply again. If this does
not solve the problem, the amplifier unit
is defective. Replace the Amplifier unit.
Tuning-failed Smart tuning failed.
The response time setting is more large
value. If this does not solve the problem,
use a suitable workpiece.
LD.down
Sensor Head laser
deterioration failure
Replace the Sensor Head.
Measurements are not output by the
cause when the RESETsignal is
being input, and before the sampling
duration of holding the operations.
Measurements are displayed if entering the
state that measurements can be output.
CH2 or more
Trigger setting is
TIMMING.
★
Turn OFF the power supply, check the
wiring for the Amplifier unit, and then turn
ON the power supply again. If this does
not solve the problem, the amplifier unit is
defective. Replace the Amplifier unit.
One or all of the judgement Turn OFF the power supply, check that the
outputs are short-cuircuited. HIGH, PASS, and LOW output lines are
not short-circuited, then turn ON the
power supply again.
★
Analog output setting is
4 to20mA.
Omron Companies shall not be responsible for conformity with any standards,
codes or regulations which apply to the combination of the Product in the
Buyer’s application or use of the Product. At Buyer’s request, Omron will
provide applicable third party certification documents identifying ratings and
limitations of use which apply to the Product. This information by itself is not
sufficient for a complete determination of the suitability of the Product in
combination with the end product, machine, system, or other application or
use. Buyer shall be solely responsible for determining appropriateness of the
particular Product with respect to Buyer’s application, product or system.
Buyer shall take application responsibility in all cases.
Sensor Head System error
Error-head
Hold setting is ON.
★
★
Differentition
Suitability for Use
Hold setting is OFF.
NEVER USE THE PRODUCT FOR AN APPLICATION INVOLVING
SERIOUS RISK TO LIFE OR PROPERTY WITHOUT ENSURING THAT THE
SYSTEM AS A WHOLE HAS BEEN DESIGNED TO ADDRESS THE RISKS,
AND THAT THE OMRON PRODUCT(S) IS PROPERLY RATED AND
INSTALLED FOR THE INTENDED USE WITHIN THE OVERALL
EQUIPMENT OR SYSTEM.
See also Product catalog for Warranty and Limitation of Liability.
OMRON Corporation
Tokyo, JAPAN
Industrial Automation Company
Contact: www.ia.omron.com
Regional Headquarters
OMRON EUROPE B.V.
Sensor Business Unit
Carl-Benz-Str. 4, D-71154 Nufringen, Germany
Tel: (49) 7032-811-0/Fax: (49) 7032-811-199
OMRON ELECTRONICS LLC
2895 Greenspoint Parkway, Suite 200
Hoffman Estates, IL 60169 U.S.A.
Tel: (1) 847-843-7900/Fax: (1) 847-843-7787
OMRON ASIA PACIFIC PTE. LTD.
No. 438A Alexandra Road # 05-05/08 (Lobby 2),
Alexandra Technopark,
Singapore 119967
Tel: (65) 6835-3011/Fax: (65) 6835-2711
OMRON (CHINA) CO., LTD.
Room 2211, Bank of China Tower,
200 Yin Cheng Zhong Road,
PuDong New Area, Shanghai, 200120, China
Tel: (86) 21-5037-2222/Fax: (86) 21-5037-2200
D s Oct, 2014