1
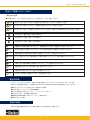
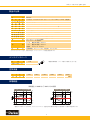
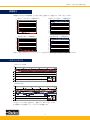
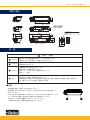
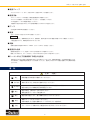
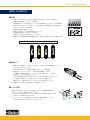
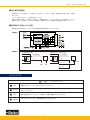
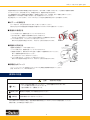
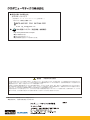
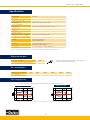
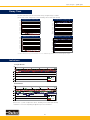
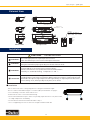
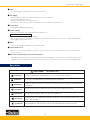
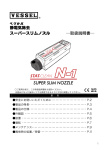
ǯȭȀȋȥȸȞȆǣǯǹఇࡸ˟ᅈ スポットイオナイザ取扱説明書 INDEX ■ 安全にお使いいただくために ・・・・・・・・・ P2 ■ 製品の特長・用途 ・・・・・・・・・・・・・・・ P2 ■ 製品の仕様 ・・・・・・・・・・・・・・・・・・・ P3-4 ■ 外観寸法図 ・・・・・・・・・・・・・・・・・・・ P5 ■ 設置・・・・・・・・・・・・・・・・・・・・・・・ P5 ■ 運転・・・・・・・・・・・・・・・・・・・・・・・ P6-8 ■ メンテナンス ・・・・・・・・・・・・・・・・・・ P8 ■ 異常時の処置 / 保管 ・・・・・・・・・・・・・・ P9-10 ǹȝȃȈǤǪȊǤǶ'50 安全にご使用いただくために 安全上のご注意 ● ご使用の前に、この「安全上のご注意」をよくお読みの上、正しくお使いください。 ! 危険 取り扱いを誤った場合,人が死亡または重症を負う危険が切迫して生じることが想定される場合。 ! 警告 取り扱いを誤った場合,人が死亡もしくは重傷を負う危険が生じることが想定される場合。 ! 注意 取り扱いを誤った場合,人が傷害を負う危険が生じることが想定される場合および物的損害のみの発生が想定される場合。 この記号は、「警告や注意」を促す内容です。 この記号は、行為を「禁止」する内容です。 この記号は、行為を「強制」する内容です。 禁止 防爆を要求する環境で使用しないでください。防爆構造ではありませんので爆発や火災のおそれがあります。 禁止 引火性の雰囲気の中で使用しないでください。コロナ放電は着火源となる爆発や火災のおそれがあります。 禁止 急激に温度変化する環境や結露する場所では使用しないでください。故障のおそれがあります。 水濡禁止 水、油、溶剤がかかるような場所や湿気の多い場所で使用しないでください。感電や故障のおそれがあります。 禁止 除電、除塵以外の目的に使用しないでください。 禁止 仕様に示された電源の規格以外で使用しないでください。火災、感電のおそれがあります。 禁止 本書を理解できるまでは、製品の設置、使用、保守をしないでください。 必ず守る 本書は簡単に参照できるように、製品のそばに保管してください。 注意 このシステムを運用した結果については、一切の責任を負いません。 製品の特長 スポットイオナイザ ESN-200 は、増幅された高圧電源によりプラスイオンおよびマイナスイオン化させ 供給された圧縮空気を利用し、帯電物に吹き付けることで帯電を中和させる交流放電式のイオナイザです。 ● 安定したイオンバランスを生み出す 高周波 AC 放電式 ● 28mm 幅コンパクトボディに制御回路搭載 ● ノズルは用途に合わせて ストレート ・ エルボ の 2 タイプ ● 2 色 LED により、正常運転と異常を表示 ● 複数台の配線を簡単にするデイジーチェーン接続に対応 ● RoHS 対応、CE 適合 製品の用途 帯電による強固な塵埃の吹き飛ばしや、塵埃付着防止のための除電などにご使用ください。 2 ǹȝȃȈǤǪȊǤǶ'50 製品の仕様 形 除 電 時 式 ESN-200 間 0.7 秒以下 ±1000V→±100V(ストレートノズル・0.3MPa、150mm)〔測定値〕 イ オ ン 発 生 方 式 高周波 AC 放電式 入 力 電 圧 DC24V ±5% リップル (P-P) 10% 以下 消 費 電 流 100mA 使 用 流 体 無給油ドライエア(0.1 ∼ 0.6MPa) 、N2(0.1 ∼ 0.6MPa) *1) 印 加 電 圧 AC5.0kV(p-p) イ オ ン バ ラ ン ス ±10V 以下 ( ストレートノズル・0.3MPa、150mm)〔測定値〕 オ ゾ ン 発 生 量 0.05ppm 以下(測定距離 50mm) 環 境 温 度 / 湿 度 5 ∼ 40℃/ 35 ∼ 65%RH(ただし結露なきこと) 保 存 温 度・湿 度 0 ∼ 60℃/ 35 ∼ 85%RH(ただし結露なきこと) 質 量 62g(ストレートノズル装着時) 61g(エルボノズル装着時) 材 質 ケース ノズル 電極針 品 取扱説明書、ストレートノズル(取付済)、エルボノズル 同 梱 難燃 ABS 樹脂 UL94 V-0 難燃 ABS 樹脂 UL94 V-0 ステンレス SUS304 *1) エアセービングユニットと合わせて使用する場合は、エアセービングユニットの使用圧力範囲に準じます。 メンテナンスパーツ 電 極 針 * 電極の交換の目安:1200時間(8時間 / 日、約 6 ヶ月) N-1H 電極針交換用ドライバ G-7DR 空気流量 入 力 圧 力 0.1MPa 0.2MPa 0.3MPa 0.4MPa 0.5MPa 0.6MPa 消 費 流 量 93ℓ/min 160ℓ/min 219ℓ/min 280ℓ/min 334ℓ/min 389ℓ/min 除電範囲 帯電電位 ±1000V から 100V までの時間 エルボノズル (0.3MPa) ストレートノズル (0.3MPa) 㻝㻡㻜 㻝㻡㻜 㻞㻚㻜㼟 㻝㻜㻜 㻜㻚㻢㼟 㻜㻚㻡㼟 㻜㻚㻥㼟 㻝㻜㻜 㻜 㻜㻚㻡㼟 㻝㻚㻜㼟 㻝㻜㻜 㻡㻜 㻟㻜㻜 㻠㻜㻜 㻜 㻝㻜㻜 㻝㻡㻜 㻢㻜㻜㻌㻔㼙㼙㻕 㻡㻜 㻟㻜㻜 㻠㻜㻜 㻝㻡㻜 㻢㻜㻜㻌㻔㼙㼙㻕 * 連続ブロー時のデータとなります。エアセービングユニットと組み合わせて使用する場合は、使用状況により異なる場合があります。 3 ǹȝȃȈǤǪȊǤǶ'50 除電能力 帯電電位 ±1000V からの減衰時間(エア圧力 0.3Mpa、温度 25.0℃、湿度 50.0% 、CPM:20pF、150mm) ࢫࢺ࣮ࣞࢺࣀࢬࣝ㸦э㹔㸧 ࢫࢺ࣮ࣞࢺࣀࢬࣝ㸦㸫э㹔㸧 㻜㻚㻜 㻝㻜㻜㻜㼂 㻜 㻥㻜㻜 㻙㻝㻜㻜 㻤㻜㻜 㻙㻞㻜㻜 㻣㻜㻜 㻙㻟㻜㻜 㻢㻜㻜 㻙㻠㻜㻜 㻡㻜㻜 㻙㻡㻜㻜 㻠㻜㻜 㻙㻢㻜㻜 㻟㻜㻜 㻙㻣㻜㻜 㻞㻜㻜 㻙㻤㻜㻜 㻝㻜㻜 㻜 㻝㻚㻜 㻝㻚㻡 㻞㻚㻜 㻞㻚㻡㼟 㻙㻥㻜㻜 㻜㻚㻜 㻜㻚㻡 㻝㻚㻜 㻝㻚㻡 㻞㻚㻜 㻙㻝㻜㻜㻜㼂 㻞㻚㻡㼟 ࢚ࣝ࣎ࣀࢬࣝ㸦э㹔㸧 ࢚ࣝ࣎ࣀࢬࣝ㸦㸫э㹔㸧 㻝㻜㻜㻜㼂 㻜 㻥㻜㻜 㻜㻚㻜 㻜㻚㻡 㻝㻚㻜 㻝㻚㻡 㻞㻚㻜 㻞㻚㻡㼟 㻙㻝㻜㻜 㻤㻜㻜 㻙㻞㻜㻜 㻣㻜㻜 㻙㻟㻜㻜 㻢㻜㻜 㻙㻠㻜㻜 㻡㻜㻜 㻙㻡㻜㻜 㻠㻜㻜 㻙㻢㻜㻜 㻟㻜㻜 㻙㻣㻜㻜 㻞㻜㻜 㻙㻤㻜㻜 㻝㻜㻜 㻜 㻜㻚㻡 㻙㻥㻜㻜 㻜㻚㻜 㻜㻚㻡 㻝㻚㻜 㻝㻚㻡 㻞㻚㻜 㻞㻚㻡㼟 㻙㻝㻜㻜㻜㼂 * 連続ブロー時のデータとなります。エアセービングユニットと組み合わせて使用する場合は、使用状況により異なる場合があります。 イオンバランス ࢫࢺ࣮ࣞࢺࣀࢬࣝ ࢚ࣝ࣎ࣀࢬࣝ (エア圧力 0.1, 0.2, 0.3Mpa、温度 25.0℃、湿度 50.0%、CPM:20pF、150mm) ※ご使用のエア圧や流量によって、イオンバランスが変動します。 4 ǹȝȃȈǤǪȊǤǶ'50 外観寸法図 0 㐺ᛂࢿࢪ㸸0 ධฟຊࢥࢿࢡࢱ ࢧࢺ࣮ࣃ࣮ࢶࠉ0/193 㐺ᛂ㟁⥺ࢧࢬ $:* 㹼 $:* 㹼 PP 9287 *1' $/0+9 &20 ,1 *1' ESN-200 エルボノズル ストレートノズル 設 置 ! 注意 - 設置 - 必ず守る 配管には、必ず耐圧性能のあるチューブをご使用ください。 耐圧のないホースは破裂・エア漏れの恐れがあります。 必ず守る 必ずアースコードを接地して、ご使用ください。 感電の恐れがあります。 必ず守る 設置環境は以下の条件をお守りください。 製品の劣化・故障の原因となります。 湿度 35 ∼ 65%RH (ただし結露氷結のないこと) 温度 5 ∼+40℃ 禁止 次の場所では使用しないでください。 製品の劣化・故障、事故の原因となります。 防爆を要求する環境、引火性の雰囲気、高温多湿、急激に温度変化する環境、結露する場所、水、 油、溶剤がかかるような場所、湿気の多い場所 ■ 設置 除電範囲を考慮して位置、高さを決めてください。 本体底面にねじ穴があります。M3のねじ(ねじ長さ 10mm+ 取付側の厚み)で 固定してください。 ※取り付けねじは本体表面から 10mm以上入らない長さのものを使用してください。 ※水、油のかかる場所、高温多湿、塵垢の多い場所を避けてください。 ※製品とワークの間に障害物が入らないようにしてください。 ※製品を固定する際、構造物の強度に注意してください。 5 ǹȝȃȈǤǪȊǤǶ'50 ■ 使用チューブ ボリウレタンチューブ(TP-6 外形䃥6mm× 内径䃥4mm)をご使用ください。 ■ 使用流体 コアレッシングフィルタを通過した無給油圧縮空気をご使用ください。 エアドライヤを使用して水分を取り除いてください。 (大気露点−15℃以下) エアの温度は 0 ∼ 40℃の範囲で供給してください。 ※放電針に油分が付着しますとコロナ放電の障害となりますのでご注意ください。 ■ アース 必ず電源の GROUND 側を接地してください。 ■ 電源 必ずノイズのない安定した DC24V を供給してください。 逆電圧厳禁 誤配線をしますと、故障の原因となります。配線後は、電源を投入する前に極性に間違いがないか確認してください。 ※高圧装置ですので、単独電源をおすすめいたします。 ■ 電線 配線に使用する電線は AWG28 ∼ AWG22(0.08 ∼ 0.3mm2)をお使いください。 ■ 使用前の点検 使用前に製品やチューブ、電源ハーネスなどに異常がないか確認してください。 破損、ねじのゆるみ、チューブはずれ、コネクタのゆるみなどがないか確かめてください。 ■ シーケンサなどで自動制御する場合の注意点 本製品はエアを通した状態で高圧電源をONにする仕様になっております。自動制御の場合、必ず電磁弁を開けてから または同時に、本製品の電源を投入するよう制御してください。電源を入れたままエア供給が途絶えますと故障の原因 となります。 運 転 ! 禁止 必ず守る 必ず守る 注意 - 運転 - 除電除塵以外の用途には使用しないでください。 異常が見られたときは直ちに使用を中止してください。 コアレッシングフィルタを通過した無給油ドライエアを供給してください。 製品の劣化および作業物の汚染の原因となります。 禁止 製品を改造、分解することはおやめください。 高電圧部品が入っており大変危険です。 禁止 製品を床に落としたり、強い衝撃を与えたりしないでください。 禁止 無理にチューブをひっぱらないでください。 本体が破損したり内部で電線やチューブが外れたりして危険です。 禁止 チューブやコードを傷つけたり高温のものに近づけたりしないでください。 6 ǹȝȃȈǤǪȊǤǶ'50 接続および使用方法 ■ 電源 ① 電源ハーネスのコネクタピン番号 2 に電源 DC24V 入力を、コネクタピン番号 1 に GROUND 側を接続してください。 (右図参照) 【分配配線】コネクタピン番号2と6、1と5が並列接続になっています。5 が GROUND、 6 が DC24V 出力になっていますので、そこから分配をすれば本製品を 4 台まで渡り接続 することができます。 (右下図参照) ② GROUND 側は必ず接地してください。 ③ 結線された電源コードに DC24V を供給してください。 ※本機には電源スイッチは付いておりません。 電源の入り切りは DC24V 側でおこなってください。 ④ 電源が入ると本機天面の表示部が青色に点灯し、先端ノズル内部でイオンが生成されます。 エアが供給されていないときは、電源をお切りください。 ESN-200 ESN-200 ESN-200 ESN-200 ■ 供給エア ※本機にはエアの開閉スイッチは付いていません。エアの入り切りは電磁弁やマニュアル バルブなどでおこなってください。 ① Φ6×Φ4mm のチューブを吸気口に接続してください。 (右図参照) ES N-2 00 ② 使用圧力は、レギュレータで 0.1 ∼ 0.6MPa の間で調節してください。 ※ご使用のエア圧や流量によって、イオンバランスが変動します。(P.4 参照) ③ 水分のないドライエアを供給してください。 ※水分が放電針に付着すると放電が正しくおこなわれず、除電できなくなります。 ④ エアを供給し電源を入れると先端ノズルよりイオンエアが放出されます。 帯電したワーク、塵埃の付いたワークに対してエアを吹き付けてください。 ⑤ 除電が完了しましたら、電源を切りエアを遮断してください。 ■ ノズル交換 標準ノズルのほかに、エルボノズルが付属しています。設置場所や対象物に 合わせて、付け替えて使用することができます。 ※ノズルはしっかり取り付けてください。締めすぎると破損する場合があります。 またゆるいと飛び出す恐れがあります。 ※エルボノズルはいったん締め込んで、戻しながら位置を調整してください。 ノズル方向は 90 度ごとに止まるようになっています。 エルボノズル 7 ストレートノズル ǹȝȃȈǤǪȊǤǶ'50 ■ 高圧異常警告機能 内蔵の高圧トランスが負荷オーバーを検出し、出力をシャットダウンした場合、本体表示部が赤色に点灯し、運転を 停止します。 アラームが点灯したときは、すぐ電源を切ってください。 放電針に異物が付着している場合には、清掃して、再度電源を入れ、アラームが点灯しないことを確認してください。 電源を入れたとき、再度アラームが点灯する場合は、事故防止のため必ず販売店に点検修理を依頼してください。 ■ 警報信号を外部出力する場合 警報信号を外部出力することでライト等の外部の報知装置を動作させることができます。 【回路図】 電極針 【接続例】 別電源を使用する場合 本機の DC アウトを使用する場合 4. 高圧異常警報出力 オープンコレクタ 4. 高圧異常警報出力 オープンコレクタ ランプや ランプや ブザー 3.COM 3.COM ブザー 限流抵抗 6.DC24V OUT - + 5.GROUND メンテナンス ! 禁止 必ず守る 禁止 水濡禁止 注意 - メンテナンス - 電極針以外のメンテナンスはおこなわないでください。 清掃時には必ず、電源の供給を止めて、システム内の残圧を排出してからメンテナンスを おこなってください 洗剤や溶剤で拭いたりしない。ひび割れ・感電や故障のおそれがあります。 水をかけないでください。感電や故障のおそれがあります。 8 ǹȝȃȈǤǪȊǤǶ'50 電極針の周囲の汚れや損耗は除電能力の低下を招きます。約 56 時間(8時間 / 日で約 7 日)ごとを目安に電極針の清掃を おこなってください。保守を怠りますと、除電能力の低下、製品寿命の低下を招きます。 また長期間使用しますと電極針の先端が磨耗し、除電能力が低下します。その場合、新しい電極と交換してください。 電極の交換は1200時間(8時間 / 日で約 6 ヶ月)を目安におこなってください。 能力の低下をチェックするために、イオンバランスとイオン出力を定期的に測定することのお勧めいたします。 ■ ボディーの清掃方法 カバーの汚れは、水を含ませた柔らかい布をよく絞ってから拭いてください。 洗剤などに含まれる界面活性剤が除電性能に影響するおそれがありますので使用しないでください。 ■ 電極針の清掃方法 ① ノズルを取り外す。電極針を囲っているノズルをはずします。 ② 汚れを取り除く。電極針の先端を綿棒で汚れをふき取ります。 汚れがひどい場合はアルコールを少し含ませた綿棒などで付着物を取り除きます。 ③ ノズルを取り付ける。ノズルはしっかり取り付けてください。 締めすぎると破損する場合があります。またゆるいと飛び出す恐れがあります。 ■ 電極針の交換方法 電極針は別売部品N−1Hをご使用ください。 ① ノズルを取り外す。電極針を囲っているノズルをはずします。 ② 電極針を交換する。専用工具 G-7DR(別売)を使用して電極針を取り外してください。 新しい電極針を確実に取り付けてください。 針で手をささないようよう気をつけてください。 ③ ノズルを取り付ける。ノズルはしっかり取り付けてください。 締めすぎると破損する場合があります。またゆるいと飛び出す恐れがあります。 ■ 除電能力のチェック チャージプレートモニターを使用してイオンバランスと帯電圧減衰時間の測定をしてください。 参考:IEC61340-5-1・2、ANSI EOS/ESD S3.1 異常時の処置 ! 禁止 電源を止める 分解禁止 注意 - 異常時の処置 - 次のような場合は使用しないでください。火災や感電のおそれがあります。 ・コードが痛んだり熱くなったりしている。 ・落下や衝撃によって損傷している。 異常時には電源とエアの供給を止めてください。 分解は絶対におこなわないでください。 不良や異常のままでの使用した場合、製品の故障や事故の原因となりますのですみやかに修理を依頼してください。 修理はお買い上げの販売店にご相談ください。 9 ǹȝȃȈǤǪȊǤǶ'50 保 管 ! 禁止 注意 - 保管 - 次のような場所には保管しないでください。故障のおそれがあります。 ・本体に著しい振動や衝撃が加わる場所 ・仕様に示された範囲を超える高温多湿な場所 ・結露する場所 ・急激な温度変化のある場所 ・可燃性の溶剤や粉塵等、引火や爆発のおそれのある場所 ・ホコリ・粉塵・煙が多い場所 ・水・油・薬品等がかかる場所 ・強電界・強磁界が発生する場所 10 11 ǯȭȀȋȥȸȞȆǣǯǹఇࡸ˟ᅈ ● 製品に関するお問合せ先 カスタマーサービス [ 受付時間:8:30 ∼ 12:00 / 12:45 ∼ 17:00(土日祝日除く)] 〒289-2505 千葉県旭市鎌数 10243 0479-64-2282 FAX 0479-64-2291 E-mail [email protected] ● Web 見積りシステム(商品価格・納期検索) http://www.parkerkuroda.com/pds/ ■ 型式の曖昧検索が可能 ■ 不完全な型式問合せをサポート ■ 型式検索結果と製品カタログを同時に入手可能 警告 お客様の責任範囲 ᮏᩥ᭩ෆ䛻グ㍕䛧䛯〇ရ䚸 䛒䜛䛔䛿㛵㐃䛧䛯≀ရ䜢䚸 ṇ䛧䛟㑅ᐃ䛧䛺䛛䛳䛯䜚䚸 䛔᪉䜢ㄗ䛳䛯䜚䛩䜜䜀䚸 Ṛஸᨾ䜔ᡃ䚸 䛭䛧䛶≀ᦆᐖ䜢ᘬ䛝㉳䛣䛩ྍ⬟ᛶ䛜䛒䜚䜎䛩䚹 ᮏᩥ᭩䚸 䛺䜙䜃䛻 㻼㼍㼞㼗㼑㼞㻙㻴㼍㼚㼚㼕㼒㼕㼚㻌㻯㼛㼞㼜㼛㼞㼍㼠㼕㼛㼚䚸 䛭䛧䛶ᙜ♫䛾Ꮚ♫䛺䜙䜃䛻ṇつ㈍ᴗ⪅䛜Ⓨ⾜䛧䛶䛔䜛䛭䛾䛾ሗ䛷䛿䚸 ᢏ⾡ⓗᑓ㛛▱㆑䜢᭷䛧䛶䛔䜛䛚ᐈᵝ䛜䛥䜙䛺䜛 ㄪᰝ䜢ᐇ䛷䛝䜛䜘䛖䛻䚸 ㈍䛧䛶䛔䜛〇ရ䜔䝅䝇䝔䝮䛻䛴䛔䛶䛾ሗ䜢ᥦ౪䛧䛶䛔䜎䛩䚹 䛚ᐈᵝ䛿䚸 ྛ⮬䛾ゎᯒ䜔ヨ㦂䛾⤖ᯝ䛻ᇶ䛵䛝䝅䝇䝔䝮䜔㒊ရ䜢᭱⤊ⓗ䛻㑅ᢥ䛧䚸 䛥䜙䛻䛿䛩䜉䛶䛾ᛶ⬟䚸 ⪏ஂᛶ䚸 ಖᏲ䚸 Ᏻᛶ䚸 䛭䛧䛶㆙࿌せ௳䛜‶䛯䛥䜜䛶䛔䜛䛛䛹䛖䛛䛻㛵䛧䛶䚸 ၏୍䛚ᐈᵝ⮬㌟䛻䛶㈐௵䜢㈇䛖䜒䛾䛸䛧䜎䛩䚹 䛚ᐈᵝ䛿䚸 䜰䝥䝸䜿䞊䝅䝵䞁䛾䛩䜉䛶䛾㠃䜢ゎᯒ䛧䚸 ヱᙜ䛩䜛ᴗ⏺ᇶ‽䛻ᚑ䛔䚸 ᭱᪂∧䛾〇ရ䜹䝍䝻䜾ෆ䛾ᙜヱ〇ရ䛻ሗ䚸 䛺 䜙䜃䛻 㻼㼍㼞㼗㼑㼞䚸 䛭䛧䛶ᙜ♫Ꮚ♫䜔ṇつ㈍ᴗ⪅䛜ᥦ౪䛩䜛䛭䛾䛾ཎᮦᩱ䛩䜉䛶䛻㛵䛩䜛ሗ䛻ᚑ䛳䛶䛟䛰䛥䛔䚹 䛚ᐈᵝ䛜ᥦ౪䛩䜛䝕䞊䝍䜔ᵝ䛻ᇶ䛵䛝䚸 㻼㼍㼞㼗㼑㼞䚸 䛺䜙䜃䛻ᙜ♫䛾Ꮚ♫䜔ṇつ㈍ᴗ⪅䛜㒊ရ䜔䝅䝇䝔䝮䛾䝷䜲䞁䝘䝑䝥䜢ᥦ౪䛩䜛㝈䜚䚸 䛚ᐈᵝ䛿ᙜヱ䝕䞊䝍䚸 䛺䜙䜃䛻 ᵝ䛜䛩䜉䛶䛾⏝㏵䚸 䛺䜙䜃䛻ᥦ౪䛩䜛㒊ရ䜔䝅䝇䝔䝮䜢⏝䛩䜛㝿䛻ྥ䛡䛶䚸 㐺ษ䛛䛴༑ศ䛷䛒䜛䛣䛸䛻㈐௵䜢ᣢ䛴䜒䛾䛸䛧䜎䛩䚹 䖃㻌䛣䛾䜹䝍䝻䜾䛾グ㍕ෆᐜ䛿 㻞㻜㻝㻡 ᖺ 㻣 ᭶⌧ᅾ䛾䜒䛾䛷䛩 䖃㻌〇ရᨵⰋ䛾Ⅽ䚸 ண࿌↓䛟ᵝኚ᭦䜢⾜䛖䛣䛸䛜䛒䜚䜎䛩 -741PGWOCVKEU.VF Spot ionizer / ESN-200 Instruction Manual INDEX Ŷ)RU<RXU6DIHW\ ・・・・・・・・・・・・・・・・・・ P12 Ŷ)HDWXUHV ・・・・・・・・・・・・・・・・・・・・・ P12 Ŷ6SHFLILFDWLRQV ・・・・・・・・・・・・・・・・・・・ P13-14 Ŷ([WHUQDO9LHZ ・・・・・・・・・・・・・・・・・・・ P15 Ŷ,QVWDOODWLRQ ・・・・・・・・・・・・・・・・・・・・ P15 Ŷ2SHUDWLRQ ・・・・・・・・・・・・・・・・・・・・・ P16-17 Ŷ,QVWUXFWLRQVIRUZLULQJ Ŷ0DLQWHQDQFH ・・・・・・・・・・・・・ ・・・・・・・・・・・・・・・・・・・ Ŷ7URXEOHVKRRWLQJ6WRUDJH ・・・・・・・・・・・・ 13 P18 P19-20 P20-21 5RQVKQPK\GT'50 For Your Safety Safety Instructions ● Read the Safety Instructions carefully before use. Observe the instructions indicated herein to ensure safety. ● If the equipment is used in a manner not specified by the manufacturer, the protection provided by the equipment may be impaired. ! WARNING Indicates a potentially hazardous situation which may arise due to improper handling or operation and could result in serious personal injury or death. ! CAUTION Indicates a potentially hazardous situation which may arise due to improper handling or operation and could result in personal injury or property-damage-only accidents. ! DANGER Indicates an impending hazardous situation which may arise due to improper handling or operation and could result in serious personal injury or death. This symbol indicates a WARNING or CAUTION. This symbol indicates a prohibited action. This symbol indicates a mandatory required action PROHIBITED Do not use ESN-200 in environments that require explosion-proofing. ESN-200 is not of explosion-proof construction, therefore explosion or fire may occur. PROHIBITED Do not use ESN-200 in flammable atmospheres. The corona discharge can act as an ignition source and cause an explosion or fire. PROHIBITED Do not use ESN-200 in environments subjected to sharp temperature fluctuations or dewing. This kind of environment can lead to breakdown. DO NOT WET Do not use ESN-200 in highly damp places or anywhere it may be exposed to water, oil, solvent or other liquids. Contact with moisture can result in electric shock or breakdown. PROHIBITED Do not use ESN-200 for any other purposes than static erasure or dust removal. PROHIBITED Do not use ESN-200 with power supplies of ratings not specified in the specifications. Inappropriate power supplies can result in fire and electric shock. PROHIBITED Do not install, use or service ESN-200 until having understood the information in this instruction manual. REMEMBER Keep this instruction manual in a safe handy place for future reference. CAUTION Vessel assumes no responsibility whatsoever for consequences arising from the use of this product. Features Spot Ionizer, ESN-200, is AC corona discharge type ionizer. Utilized amplified high voltage power to create plus and minus ion and supplied compressed air, ESN-200 neutralize static electricity and blow off dust efficiently. ● High frequency AC discharge system creates stable ion balance. ● Built-n control circuit board in 28mm width compact body. ● Selectable from straight and elbow style nozzle. ● Two color LED indicate normal or abnormal operation. ● Daisy-chain connection makes multiple Spot Ionizers usage easy. Applications ESN-200 is designed to blow away dust and remove static electricity to prevent dust accumulation. 14 5RQVKQPK\GT'50 Specifications Part Number ESN-200 Decay time ±1000V to ±100V, within 0.7sec, 3 Bar / 150mm Ion generation method High voltage AC corona discharge Input voltage DC24V ± 5% ripple (p-p) 10% max. Power consumption 100mA Applied fluid Clean air (1~6 bar), Nitrogen gas (1~6 bar) Applied voltage AC5.0kV(p-p) Ion balance Within±10V (3 bar / 150 mm) Ozone generation 0.05 ppm or less (Measured at 50 mm) Working temperature / humidity 5~40°C 35~65%RH (No dewing) Storage temperature / humidity 0~60°C 35~85%RH (No dewing) Weight 62g with Straight nozzle 61g with Elbow nozzle Material Casing and Nozzles: ABS (UL94-V-0) Electrode Needle: SUS304 Accessories Instruction Manual, Straight, Elbow Nozzle *1) *1) In case of the combination usage with Air Saver Unit, follow the operating pressure range of specified Air Saver Unit. Replacement part Electrode needle pole N-1H Electrode needle pole replacement tool G-7DR * Reference time to replace the electrode needles: 1,200 hours (8 hours/day, approximately 6 months) Air consumption Air pressure at the tool end Air consumption 1bar 2bar 3bar 4bar 5bar 6bar 93ℓ/min 160ℓ/min 219ℓ/min 280ℓ/min 334ℓ/min 389ℓ/min Discharging area The discharging area are based on the decay time from +/-1000 to +/-100V at 3 bar. Elbow nozzl (3 bar) Straight nozzle (3 bar) 150 150 2.0s 100 0.6s 0.5s 0.9s 100 0 0.5s 1.0s 100 50 300 400 0 100 150 600 (mm) 50 300 400 * This data is based on the usage of continuous blow. In case of combination usage with Air Saver Unit, the data might be changed. 15 150 600 (mm) 5RQVKQPK\GT'50 Decay Time The data shown above was measured with initially charged voltage of ±1000V. (Air Pressure: 3 bar Temperature: 25.0°C Humidity: 50.0% CPM: 20pF-150mm) Straight Nozzle (+1000 to 0㹔) Straight Nozzle (-1000 to 0㹔) 㻝㻜㻜㻜㼂 㻜 㻥㻜㻜 㻙㻝㻜㻜 㻤㻜㻜 㻙㻞㻜㻜 㻣㻜㻜 㻙㻟㻜㻜 㻢㻜㻜 㻙㻠㻜㻜 㻡㻜㻜 㻙㻡㻜㻜 㻠㻜㻜 㻙㻢㻜㻜 㻟㻜㻜 㻙㻣㻜㻜 㻞㻜㻜 㻙㻤㻜㻜 㻝㻜㻜 㻜 㻜㻚㻜 㻝㻚㻜 㻝㻚㻡 㻞㻚㻜 㻞㻚㻡㼟 㻙㻥㻜㻜 㻜㻚㻜 㻜㻚㻡 㻝㻚㻜 㻝㻚㻡 㻞㻚㻜 㻙㻝㻜㻜㻜㼂 㻞㻚㻡㼟 Elbow Nozzle (+1000 to 0㹔) Elbow Nozzle (-1000 to 0㹔) 㻝㻜㻜㻜㼂 㻜 㻥㻜㻜 㻜㻚㻜 㻜㻚㻡 㻝㻚㻜 㻝㻚㻡 㻞㻚㻜 㻙㻝㻜㻜 㻤㻜㻜 㻙㻞㻜㻜 㻣㻜㻜 㻙㻟㻜㻜 㻢㻜㻜 㻙㻠㻜㻜 㻡㻜㻜 㻙㻡㻜㻜 㻠㻜㻜 㻙㻢㻜㻜 㻟㻜㻜 㻙㻣㻜㻜 㻞㻜㻜 㻙㻤㻜㻜 㻝㻜㻜 㻜 㻜㻚㻡 㻙㻥㻜㻜 㻜㻚㻜 㻜㻚㻡 㻝㻚㻜 㻝㻚㻡 㻞㻚㻜 㻞㻚㻡㼟 㻙㻝㻜㻜㻜㼂 * This data is based on the usage of continuous blow. In case of combination usage with Air Saver Unit, the data might be changed. Ion balance Straight Nozzle 1 bar 2 bar 3 bar ElbowNozzle 1 bar 2 bar 3 bar (Air Pressure: 1,2,3 bar Temperature: 25.0°C Humidity: 50.0% CPM: 20pF-150mm) * Ion balance level varies depending on applied air pressure and volume. 16 㻞㻚㻡㼟 5RQVKQPK\GT'50 External View 0 6FUHZ㸸0 7XEH)LWWLQJ 7XEHGLD㸸PP &RQQHFWHU 6$723$576ࠉ0/193 :LUHVL]H $:* 㹼 $:* 㹼 PP 9287 *1' $/0+9 &20 ,1 *1' ESN-200 Elbow nozzle Straight nozzle Installation ! CAUTIONS FOR INSTALLATION REMEMBER Use a tube appropriate for required pressure resistance. Tube of insufficient pressure resistance will rupture and leak air. REMEMBER Ground ESN-200 before use. Using this unit without proper grounding runs the risk of electric shock. REMEMBER Use ESN-200 only in the environment specified as follows: Adverse environments cause product deterioration and breakdown. Humidity: 35 65%RH (No dewing) Temperature: 5 +40°C PROHIBITED Do not use ESN-200 in the following environments. Adverse environments cause product damage and breakdown as well as personal accidents.Where explosion-proofing is required, where found flammable atmospheres, high temperature and high humidity, or sharp temperature fluctuations, where dewing occurs, where possibly wet by water, oil or solvent ■ Installation Take account of the static erasing range before setting the installation height. The N-1 can be locked down using the screw holes (M3) on the bottom. See page 6. * Use a mounting screw that can be sunk at least 10 mm from the surface of the ESN-200 housing. * Do not install ESN-200 in a place where it is possibly exposed to water or oil, dust or dirt, or to high temperature or humidity. * Prevent obstructions between ESN-200 and the object. * Select a supporting structure of sufficient strength to hold the ESN-200. 17 5RQVKQPK\GT'50 ■ tube Uses a tube (OD6 mm x ID4 mm) of sufficient pressure resistance. ■ Air supply Remove all impurities with a mist separator (0.3μm). Remove all moisture with an air filter(dew-point below –15℃). Supply air at a temperature in the range of 0~40°C. Note: When oil is attached to the surface of Electrode needle, Corona discharge will not function. ■ Grounding Provide ESN-200 with proper grounding. ■ Power supply Make sure that ESN-200 can be supplied with stable 24V DC power. Note: Do not apply a reverse voltage. Wrong wiring connection may cause a breakdown. Make sure all the wires are connected according to their polarity before turning on the unit. Since this is a high-voltage equipment, please supply a separate power source. ■ Wire Please use wire AWG28 ~ AWG22 (0.08 ∼ 0.32mm2) for wiring. ■ Check before use Before use, check the unit, tube and power harness in order to make sure there is no damage, loose screws, disconnected hosing, loose connectors, etc. ■ Note for automated control of the sequencer ESN-200should provides power to the high voltage transformer while supplying air. For automatic control, please make a control to supply power after opening the solenoid valve or simultaneously.It may cause failure when the air is shut off while supplying power. Operation ! CAUTIONS IN OPERATION PROHIBITED Do not use ESN-200 for anything other than static erasure or dust removal. REMEMBER If you notice any abnormalities, stop using ESN-200 immediately. REMEMBER Supply clean dry air. Improper air quality can lead to ESN-200 deterioration and contamination of the object. PROHIBITED Do not remodel or disassemble ESN-200 as the unit contains high voltage parts. PROHIBITED Do not drop ESN-200 nor subject it to any shock / vibration. PROHIBITED Do not pull the tube. Inappropriate handling can damage ESN-200 and internally disconnect the power cable and tube. PROHIBITED Do not damage the tube or wiring. Keep the tube and wiring away from any heat source 18 5RQVKQPK\GT'50 Instructions for wiring ■ Power Source 1) Connect the 24V DC power to No.2 connection pin, and the grounding wire to the No.1 connection pin. Please refer to the figure at the right. * Connection pins No.2 and No.1 are connected in parallel with No.6 and No.5 respectively. For the multiple connection of ESN-200, power supply to next unit can be done by No.6 pin for DC24V and No.5 pin for the grounding. Up to four ESN-200’ s can be connected. Please refer to the figure at the below right. 2) Make sure to ground ESN-200 by the appropriate wiring. 3) Supply 24V DC power. * ESN-200 does not have a power switch. Switching on/off should be done by external equipment. 4) When ESN-200 is activated, the top part will glow in blue and ion will be generated. Note: Please turn off the power when air supply is stopped. ESN-200 ESN-200 ESN-200 ESN-200 ■ Air Control Air output has to be controlled at external equipment like a solenoid-controlled valve or a foot valve. Please connect the tube of Φ6×Φ4mm with the inlet. 1) Connect a tube (φ6 x φ4 mm) to the air inlet of ESN-200. ES N-2 00 2) Air pressure should be adjusted within the range between 0.1 and 0.6 MPa with an appropriate air regulator. * Ion balance fluctuates according to air pressure and volume in use. See page.5. 3) Supply dry clean air without moisture in the air. * Moisture interferes with corona discharge on the electrode needle. 4) Supply power and direct the ionized air toward the work piece. 5) When static elimination is completed, turn off the power and air supply. ■ Replacing nozzles ESN-200 can be adjusted suitable to its installation site and target object by changing its nozzles, as two types of nozzles (Straight and Elbow nozzle) are included in the package. * A nozzle should be attached firmly. * Tighten the corner nozzle once, and adjust your position while returning it. The direction of corner nozzle is to stop every 90 degrees. 19 Elbow nozzle Straight nozzle 5RQVKQPK\GT'50 ■ High Voltage Warning and Automatic Shut-off When the incorporated high-voltage transformer detects electrical overload, corona discharge stops and the LED light on the top turns red. Please switch off the unit as soon as the alarm has been activated. If the electrode needle is contaminated with dust or other substances, clean it and confirm whether or not the unit can be turned on properly. If the LED light still glows red after cleaning the needle, please contact the local distributor for repairing or maintenance service. Do not attempt to repair the unit on your own. ■ External Output of Warnings ESN-200 can be connected to warning device like patrol lamp through its external pin. 【Circuit diagram】 【Connection Example】 Maintenance ! CAUTIONS IN MAINTENANCE AND CHECKS DO NOT DISASSEMBLE Do not perform any maintenance on the ESN-200 except for maintenance and replacement of the electrode pole. REMEMBER Before cleaning the electrode needle, shut off power and air supply at the source and disconnect the tube. PROHIBITED Do not wipe the ionizer with detergent or solvent. Substances of the sort can cause cracking and result in electric shock or breakdown. DO NOT WET Do not wet the ESN-200. Exposure to moisture can result in electric shock or breakdown. 20 5RQVKQPK\GT'50 Dirt and wear in the electrode pole area can deteriorate the performance of this ionizer. Clean the electrode pole every 56 hours of use. If the electrode pole is not kept in an optimum condition, the performance will drop and product life might shorten as well. If the unit is used for a long period of time, the tip of its electrode pole may wear out and consequently static erasing efficiency will decrease. In such case, replace the electrode pole with a new one. It is recommended that the electrode pole be replaced every 1,200 hours of operation. Keep the unit in good working condition by measuring its ion balance and ion output regularly as a means for checking for a drop in capacity. ■ How to Clean the Casing Remove the dirt over the casing with dry, soft cloth. Never apply alcohol / thinner solvent / detergent. ■ How to Clean the Electrode Needle Power supply to ESN-200 should be shut off before cleaning the Electrode Needle. Cleaning Order: 1) Remove the nozzle. 2) Clean the tip of the needle with a cotton stick. If it is especially dirty, use a few drops of alcohol-wet cloth. 3) Place the nozzle back in place. Attach the nozzle firmly. If it is fastened too tightly, it may be damaged or break, but if it is fastened too lightly, thenozzle may come off while in use. ■ How to Replace the Electrode Needle Electrode needle must be replaced with the needle replacement tool (separately sold). Make sure to shut off power supply before the cleaning of Electrode needle. Replacement Order: * Remove the nozzle. * Release the screw with the driver. * Replace it with a new electrode needle and fasten it firmly. * Put the nozzle back in place. Make sure that the nozzle is mounted firmly. Otherwise, it might come off while in use. On the contrary, it may be broken or damaged if it is fastened too tightly. ■ Checking Ionizer’ s Performance Measure ion balance and decay time regularly by a charge plate monitor. Reference: IEC61340-5-1-2, EOS/ESD S3.1 Troubleshooting ! CAUTIONS IN TROUBLESHOOTING PROHIBITED Do not use ESN-200 in the following situations. It can result in fire or electric shock. * If the power cable is damaged or hot * If the ESN-200 has been damaged because of dropping or shock. SHUT POWER OFF Unplug power cable if ESN-200 has a defect. DO NOT DISASSEMBLE Do not disassemble the ESN-200. Using ESN-200 when in anything but proper working condition can cause product damage or personal accident. Therefore, request servicing promptly if such trouble occurs. For servicing, contact your local distributor. 21 5RQVKQPK\GT'50 Storage ! PROHIBITED CAUTIONS IN STORAGE Do not store the ESN-200 in the following places. Adverse environments can cause product breakdown. * Where it may be exposed to vibrations or shock * Where temperature and humidity are outside specified ranges * Where dewing occurs * Where temperature fluctuates sharply * Where there is the possibility of ignition or explosion of flammable solvents, dust, etc. * Where there is heavy dust or smoke * Where it may be wet by water, oil , chemicals, etc. * Where strong electric or magnetic fields are generated 22 23 © 2013 Parker Hannifin Corporation. All rights reserved. Kuroda Pnuematics LTD. Customer Service Phone FAX +81-479-64-2282 +81-479-64-2291 [email protected] www.parkerkuroda.com