1
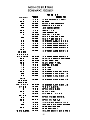
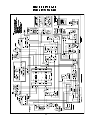
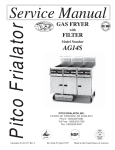
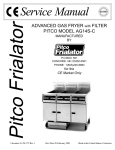
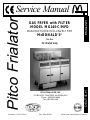
MANUFACTURED EXCLUSIVELY FOR
Literature # L20-162 Rev 1
McDONALD'S®
ENGLISH
GAS FRYER with FILTER
MODEL MG14S-C/MFD
for the
CE Market Only
PITCO FRIALATOR, INC.
P.O.BOX 501 CONCORD, NH 03302-0501
Phone: 1(603)225-6684
Fax: (603)225-8497
Date March 2001
DEUTSCH
Pitco Frialator
Service Manual
Made in the United States of America
FOR YOUR SAFETY:
Do not store gasoline or other flammable
vapors or liquids in the vicinity of this or
any other appliance.
TO THE PURCHASER
POST IN A PROMINENT LOCATION INSTRUCTIONS TO BE FOLLOWED IN THE
EVENT THAT AN OPERATOR SMELLS GAS.
OBTAIN THIS INFORMATION FROM YOUR
LOCAL GAS SUPPLIER.
WARNING:
IMPROPER INSTALLATION, ADJUSTMENT,
ALTERATION, SERVICE OR MAINTENANCE
CAN CAUSE PROPERTY DAMAGE, INJURY
OR DEATH. READ THE INSTALLATION, OPERATING AND MAINTENANCE MANUALS
THOROUGHLY BEFORE INSTALLING OR
SERVICING THIS EQUIPMENT.
WARNING
This appliance is equipped with a grounding plug.
This is for your protection against shock hazard in
the event of equipment malfunction. Always plug
the unit into a properly grounded receptacle. DO
NOT cut or remove the grounding prong.
WARNING
DO NOT use an open flame to check for gas leaks!
Keep all open flames away from the machine at
all times.
WARNING
Machines equipped with casters, a flexible power
cord, and a flexible gas hose. The hose must be
connected to a gas supply with a Quick-Disconnect device. This quick disconnect must comply
with all local and national codes. To limit the movement of the unit without depending on the connector or quick disconnect, a restraining device must
also be installed.
This attaches the rear of the machine to the wall.
When the fryer is in its operating location, lock the
casters and reattach the restraining device to the
rear of the machine.
WARNING
DO NOT supply the fryer with a gas that is not identified on the data plate, located on the inside of one
of the doors of the machine. If you need to convert
the machine to another type of fuel, contact your
dealer or Authorized Service Agency.
WARNING
There is an open flame inside the machine. The
unit may get hot enough to set nearby materials on
fire. Keep the area around the unit free from combustibles.
WARNING
Ensure that the machine can get enough air to keep
the flame burning correctly. If the flame is starved
of air it can give off a dangerous carbon monoxide
gas. Carbon Monoxide is a clear odorless gas that
can cause suffocation.
WARNING
Carbon Monoxide gas can build up if you obstruct
the flue. Blocking the flue will also cause the unit
to overheat. DO NOT obstruct the flow of combustion/ventilation or air opening around the machine. Ensure that you meet the minimum clearances specified in the installation instructions.
Adequate clearance around the unit is necessary
for servicing and proper burner operation.
WARNING
If the machine should shut down unexpectedly wait
5 minutes before attempting to restart it. This will
allow for any excess gas in the unit to dissipate.
WARNING
The power supply must be disconnected before
servicing or cleaning the unit.
WARNING
Shortening, when it is at cooking temperatures, is
very HOT and DANGEROUS! Use extreme caution when handling! Use the proper protective gear
such as insulated gloves, aprons, face shield and
sleeves when handling hot shortening. DO NOT
attempt to move any machine that has hot oil in it.
Allow the oil to cool to room temperature or drain
the oil into a suitable container before moving the
fryer.
Table of Contents
Heating System - Full Vat ........................................................................................ 3
Heating System - Split Vat ....................................................................................... 3
Hi - Limit System ..................................................................................................... 4
Filter System ............................................................................................................ 4
Chapter 2: COMPONENT TROUBLESHOOTING .......................................................... 4
Probe ....................................................................................................................... 4
Relays ...................................................................................................................... 4
Hi Limits .................................................................................................................. 4
Drain Valve & Return Valve Switches .................................................................... 5
Transformer ............................................................................................................. 5
Blower ..................................................................................................................... 5
Pressure Switch ....................................................................................................... 5
Gas Valve ................................................................................................................. 5
Chapter 3: TROUBLESHOOTING GUIDE .......................................................... 6
Fryers ....................................................................................................................... 6
Filters ....................................................................................................................... 7
Chapter 4: COMPONENT CHANGEOUT ........................................................................ 8
Probes ...................................................................................................................... 8
Hi Limits .................................................................................................................. 8
Computers ............................................................................................................... 8
Components mounted in the front panel .................................................................. 9
Filter Relays ............................................................................................................. 9
Control Relays .......................................................................................................... 9
Filter Pumps ............................................................................................................. 9
Circuit Breaker ........................................................................................................ 9
Gas Valves ................................................................................................................ 10
Burners and Spark Ignitors ....................................................................................... 10
Proximity Switches ................................................................................................... 10
Blowers .................................................................................................................... 11
Pressure Switches .................................................................................................... 11
Fry Vats .................................................................................................................... 12
Chapter 6: Parts Identification ............................................................................................... 31 - 45
Chapter 7: Schematics ........................................................................................................... 46 - 49
1
ENGLISH
Table of Contents ...................................................................................................... 1
Chapter 1: HOW DOES IT WORK? ......................................................................... 3
2
not see a flame sense signal it will "Lock Out".
Chapter 1: HOW DOES IT WORK?
Heating System - Split Vat:
•
•
Heating System - Full Vat:
•
•
•
•
•
•
•
•
•
•
Power to the machine is turned ON:
The computer is supplied with 24 VAC and, if the
Drain Valve Handle is closed, the Proximity Switch •
will supply 24 VAC to the DVI (Drain Valve Inter- •
lock) Input at the computer. The Ignition Control
Modules are also supplied with 24 VAC at the 24V
terminal.
The computer is turned ON Computer calls for heat and supplies 24 VDC to
the Heat Demand Relay which will energize supplying the Blower, the Pilot Solenoid on the Gas Valve
and the Pressure Switch with Power.
The Pressure Switch will energize the Check Blower
Relay which will stay energized.
When the Blower reaches its normal speed it will
cause the pressure switch to close supplying 24 VAC
to the second set of switch points on the Check
Blower Relay. Because the Check Blower Relay is
still energized the power will be supplied to the TH
terminal of each Ignition Control Module.
Both Ignition Control Modules supply power to the
Spark Ignitors. At the same time one of the Ignition
Control Modules supplies power to the Main Valve
Relay coil. The other Ignition Control Module supplies power to the switch points of the Main Valve
Relay.
The Main Valve Relay energizes allowing the second Ignition Control Module to supply power to the
Main Solenoid of the Gas Valve.
At this point the main burners will ignite. This will
also supply the computer with a heat feedback signal. (It is the lack of this Feedback signal that causes
the Computer to display "Ignition Failure".)
Each Ignition Control Module will spark for 10 seconds and then check for a flame sense signal from
the Flame Rod. If the Ignition Control Module does
•
•
•
•
3
Power to the machine is turned ON:
The computer is supplied with 24 VAC and, if the
Drain Valve Handle is closed, the Proximity Switch
will supply 24 VAC to the DVI (Drain Valve Interlock) Input at the computer. The Ignition Control
Modules are also supplied with 24 VAC at the 24
V terminal.
The computer is turned ON.
Computer calls for heat and supplies 24 VDC to
the Heat Demand Relay which will energize supplying the Blower Relay and the Pressure Switch with
power. When the Blower Relay energizes the Blower
will be supplied with power and will increase in speed
until the pressure switch closes.
Before the pressure Switch closes it will supply
power to the Check Blower Relay which will remain energized.
When the Pressure Switch comes up to speed it will
supply power to the second set of switch points on
the Check Blower Relay. Because the Check Blower
Relay is energized the Blower OK Relay coil will be
supplied with power causing it to energize. When
the Blower OK Relay energizes, one set of its Switch
points supplies voltage to the Left Hand Ignition
Control Module at the TH terminal and the other
set of switch points supplies the right hand Ignition
Control Module with power at the TH terminal. The
same power that is supplied to the TH terminals of
the Ignition Control Modules is also supplied to the
Hi Limit switches which, if closed, will supply power
to the Pilot Solenoid of the Gas Valve.
When an Ignition Control Module is supplied with
power at the TH terminal it will supply power to the
Ignitor, the Main Solenoid of the Gas Valve and the
Heat Feedback Input of the Computer. (It is the
lack of this Feedback signal that causes the Computer to display "Ignition Failure".)
The Ignition Control Module will continue to spark
for 10 seconds and then look for a flame sense signal from the Flame Rod. If the Ignition Control
Module does not see a flame sense signal it will "Lock
Out".
ENGLISH
The McDonald's Gas fryer will have certain reactions to
what is happening, knowing what these reactions are
and knowing what the machine is trying to do will enable
us to diagnose most of the problems likely to be encountered.
Hi - Limit System:
220
5470 Ω
375
712 Ω
240
4013 Ω
380
675 Ω
When the Hi Limit trips it causes the power to the Pilot 260
2991 Ω
385
640 Ω
Solenoid to stop and gas will cease to flow through the 280
2262 Ω
390
607 Ω
gas valve. This will cause a Lock Out condition and the 300
1734 Ω
395
576 Ω
computer will show "IGNITION" "FAILURE". The Hi 320
1347 Ω
400
547 Ω
Limit is an automatic reset type switch. In order to make 325
1267 Ω
the computer recognize that the Hi Limit has reset it must
be turned OFF. The reset switch must be pressed and If the probe returns an open circuit or 0 Ohms reading it
released in order to reset the Ignition Control Modules should be replaced. If the resistance varies more than
and the computer turned back ON again for further use 20 Ohms from the above chart when being checked
of the fryer.
between 325-375°F (162ºC - 190ºC) the probe will
give a false temperature reading on the computer and
should be replaced. However, it will continue to operate at a slightly higher or lower temperature. Allow the
oil to cool and check the probe resistance at a lower
temperature. As can be seen from the chart a greater
degree of offset can be allowed at a lower temperature.
Relays:
Filter System:
Opening the RED Return Valve Handle will cause the
Pump On Relay to be energized and the pump will begin to pump. Closing the Return Valve Handle will de energize the Relay and the Pump will stop pumping.
Chapter 2: COMPONENT
TROUBLESHOOTING:
The Heat Demand relays are 24VDC relays and will
energize when the correct voltage is supplied to the
coil. When energizing, the relay Switching Contacts
Probe:
will close, thus connecting the Common and Normally Open terminals. The Hi - Limit relay is a 24VAC
The resistance of the probe will change as the tempera- relay and may be checked in the same manner as the
ture changes. The resistance will decrease as the tem- above relay.
perature rises. The lower the temperature the greater
the resistance change will be per degree of temperature Hi Limits:
change, as the temperature approaches the working
range of the probe, the resistance change will become A Hi - Limit switch is a normally closed switch until
more linear.
the temperature at the probe reaches 435ºF ± 15°
If the probe is suspect, check its resistance and the oil/ (225ºC ± 15º). In order to test this switch it will be
air temperature at which it was taken. Compare these necessary to bypass the Heat Demand Relay. Follow
values on the chart below.
the Hi Limit testing procedure outlined in the Operating
TEMP
RESISTANCE
TEMP
Manual.
RESISTANCE
ºF
Ohms Ω
ºF
Ohms Ω
60
80
100
120
140
160
180
200
210
139055 Ω
84644 Ω
53146 Ω
34328 Ω
22755 Ω
15446 Ω
10716 Ω
7586 Ω
6427 Ω
330
335
340
345
350
355
360
365
370
1192 Ω
1123 Ω
1058 Ω
998 Ω
942 Ω
890 Ω
841 Ω
795 Ω
752 Ω
WARNING
Do NOT leave the machine during this test. This
test will cause the oil to heat past the normal operating temperature and can cause damage to the machine and its operator.
If the switch does not trip between the prescribed limits
it is defective and should be replaced. Once tripped, the
switch will not reset until the oil has cooled to approximately 400°F (204ºC). If the switch does not reset it is
4
defective.
Drain Valve & Return Valve Switches:
ENGLISH
This switch is a magnetically operated Reed switch. When
the Drain Valve handle is moved to the open position,
the Actuator will move away from the switch causing
the Reed switch to open. When the Drain Valve is closed
the Reed switch will close. This switch can also be
checked with an Ohm meter. The normal gap between
the Actuator and the Sensor switch on the Drain Valve
handle is 1/8" - 1/4" (3 - 6 mm).
Transformer:
Transformers are multiple input voltage, 24 volt output
voltage and can be checked by reading the input and
output voltages.
Blower:
Check the voltage between the wires going to the Blower.
If voltage is found and the Blower is NOT turning it is
defective.
Pressure Switch:
As the blower speed rises the amount of vacuum on the
suction side of the pressure switch rises past approximately 1.3" WC (0.325 kPa) the Presssure Switch will
close. When the vacuum falls below approximately 0.8"
WC (0.2 kPa) the Pressure Switch will open. With the
Blower running, check the IN and OUT voltage of the
Switch. If 24VAC can be found on one side but NOT
the other the Pressure Switch is defective.
Gas Valve:
The Knob should be in the ON position. Check for
24VAC between the terminals marked MV and MV/
PV and between PV and MV/PV. If voltage IS found
between both of these connections and the Gas Valve
does not open the Gas Valve is defective. If voltage is
NOT present at both of the coils on the Gas Valve,
troubleshoot and repair the machine until voltage IS
present at both coils, retest the Gas Valve as previously
described.
5
Chapter 3: TROUBLESHOOTING GUIDE
Fryers:
It is assumed that, before starting any troubleshooting, the power is turned on and the gas lines are connected
correctly.
PROBLEM
PROBABLE CAUSE
CORRECTIVE ACTION
Computer does not come on
nothing shows in either display
A. Main circuit breaker is turned off
B. Fryer fuse is blown
C. Transformer
A. Locate the correct circuit breaker and
turn OFF and back ON again.
B. Check and Replace as needed
C. Check Transformer
Computer heat light comes on
but burners do not heat
A
A. Allow the oil to cool, the Hi Limit will
reset when the temperature falls. Turn the
computer OFF and back ON again.
Press the reset switch.
Computer display shows "OFF"
and cannot be turned "ON"
A. Computer
If the oil is hot the Hi Limit may be
tripped
A. Switch circuit breaker OFF and ON
again to try to reset computer, if this
does not remedy the problem, replace
computer.
Heat Light ON, Computer shows A. Heat Demand Relay
"IGNITION" "FAILURE"
B. F2 Fuse may be blown
C. Blower
D. Pressure Switch
E. Gas Valve
F. Ignition Module (One or both)
G. Gas Valve Relay (Full Vat Only)
H. Tripped or defective Hi Limit
A.
B.
C.
D.
E.
F.
G.
H.
No Spark heard, blower IS
running
A. Heat Demand Relay
B. Ignition Control Module
C. Spark Ignitor
A. Check and replace where needed.
B. Check and replace where needed.
C. Check and replace where needed.
Spark sound can be heard,
Blower NOT running
A. F2 fuse blown
B. Blower
C. Heat Demand Relay
A. Check and replace where needed.
B. Check and replace where needed.
C. Check and replace where needed.
Spark sound can be heard,
Blower IS running but main
burners do not run
A.
B.
C.
D.
E.
A.
B.
C.
D.
E.
Burner comes ON for short
time, does not come back on
A. Flame Sensor
B. Ignition Control Module
C. Gas Valve
A. Check and replace where needed.
B. Check and replace where needed.
C. Check and replace where needed.
Computer controls left side of
split vat only
A. Wiring harnesses attached in wrong
order
A. Remove power to machine, power up
again.
Unplug both sides of computer, plug in
Ignition Control Module
Gas Valve Relay (Full Vat Only)
Bad Pressure Switch
Tripped or defective Hi limit
Gas Valve
6
Check Heat Demand Relay.
Check and replace as needed.
Check and replace as needed.
Check and replace as needed.
Check and replace as needed.
Check and replace as needed.
Check and replace as needed.
Allow the oil to cool, the Hi Limit will
reset when the temperature falls. Turn
the computer OFF and back ON again
to reset the computer. Press the reset
switch. Check and replace is needed.
Check and replace where needed.
Check and replace where needed.
Check and replace where needed.
Check and replace where needed.
Check and replace where needed.
PROBLEM
PROBABLE CAUSE
CORRECTIVE ACTION
Red Return Valve is open but no
pump sound can be heard
A. Red Return Valve NOT fully open
B. Filter Circuit Breaker may be tripped
C. Filter Motor Thermal Overload may
be tripped
D. Sensor switch may be loose or bad
A. Pull slightly on the Red handle to check
that it is fully open.
B. Locate the circuit breaker and reset.
C. Push Red reset button located on end of
filter motor.
D. Check that the switch is tight in its
mounting. If switch is bad replace it.
Drain valve is closed and the
computer has been reset but
still shows "DRAINING" or
"TURN OFF"
A. Green Drain Valve is NOT fully
Closed
B. Sensor switch may be loose or bad
A. Apply a little more pressure to the
Green Handle to check that it is
fully closed.
B. Check that the switch is tight in its
mounting. If switch is bad replace it.
Drain Valve is OPEN, the oil
is draining slowly or not at all.
A. Green Drain Valve is NOT fully open
B. Drain is plugged with debris
A. Apply a little more pressure to the
Green Handle to check that it is fully
closed.
B. Use the Clean Out Rod from inside the
Fry Vat to clear the Drain Valve. If this
NOT clear the blockage, CLOSE the
Green Drain Valve and follow these
instructions for clearing the main drain
line.
CAUTION:
Some HOT oil may still come out when
the cap is removed.
Remove the two screw from the end
cap (Do NOT lose these.) Use the
Clean Out Rod to clear the main drain
tube. Install the end cap along with its
gasket and two screws. Do not
overtighten these screws.
7
ENGLISH
Filters:
Chapter 4: COMPONENT CHANGEOUT:
Computers:
It is assumed that for all (except ehere noted) of these
component changeout instructions the fryer has been
shut down and disconnected from the power and gas
supplies, cooled and drained of oil.
CAUTION
Take care not to drop any of the components
from the front panel as this will damage them.
1. Remove the two screws from the upper mount of
the front panel.
2. Unplug the wiring connector at the rear of the
computer.
Probes:
1. Unplug the wiring connector.
2. Unscrew the small nut on the probe seal.
3. Slide the probe from the seal.
NOTE: On split vat machinesyou will find 2 wiring
connectors to unplug.
Install in the reverse order using the new ferrule supplied with the new probe.
Hi Limits:
Install in the reveres order.
1. Unplug the wiring connector.
2. Unscrew the Hi Limit from the front of the fry NOTE: When installing computers in a split vat mavat.
chine, the Right side harness must be plugged in before the left side harness or the computer will NOT
operate in Split Vat mode. If the computer is in Full
Vat mode on a Split Vat mmachine, remove the electrical power from the machine. When the power is
returned to the fryer the computer will reset itself in
Split Vat mode.
Install in the reveres order.
8
Components mounted in the front panel:
To access all of the components mounted in the front
panel follow the instructions below:
1. Remove the computer as described in the above
instructions.
The components within the front panel area can
now be accessed.
Filter Pumps:
Filter Relays:
1. From the front of the machine, loosen and remove
the fittings at the end of each of the flex lines.
2. Remove the 2 bolts, and the front of the Pump/
Motor assembly will drop. The assembly can be
removed from the machine by lifting the rear
slightly and pushing back. The front of the mount
can be lowered until the assembly can be removed
from the machine.
These relays are always wired in the following manner -
Control Relays:
Install in the reverse order.
Circuit Breaker:
1. Remove the 2 mounting
screws on either side of
the door magnet catch. Remove the door magnet
catch.
2. Remove the 2 mounting
screws from the top and
bottom of the cover.
3.
Depress the 4 catches that
Control relays are always wired in the following manhold the circuit breaker in
ner the cover.
9
1. Unscrew the fitting for the gas supply tubing on
the bottom of the burner.
2. Unplug the wire to the spark ignitor.
3. Remove the 2 screws that hold the spark ignitor
and burner in place.
Install of the reverse order.
Gas Valves:
1. Unscrew the fittings to the gas outlet tubes at the
top of the gas valve.
The burner and spark ignitor may be removed together. Install in the reverse order.
Proximity Switches:
1. The actuator can be removed by removing the 2
mounting screws.
2. The sensor may be removed by disconnecting the
wiring harness and by removing the 2 mounting
screws.
2. Unscrew the pipe union, located behind the gas
valve.
Install in the reverse order.
3. Unplug the 3 wires that plug into the gas valve.
Install in the reverse order.
Burners and Spark Ignitors:
NOTE: If the ignitor is to be removed without the
burner start the proceedure at step 2.
10
Pressure Switches:
1. Unplug the wiring connector.
2. Remove the 3 screws from the mounting flange.
1. Unscrew the plastic fitting from the air connection on the pressure switch.
2. Unplug the 2 wires from the switch.
ENGLISH
Blowers:
3. Remove the 2 screws from the mounting bracket.
Install in the reverse order.
3. Using a flat screwdriver, break the seal at the
motor flange.
4. The motor can now be lowered out of the machine.
NOTE: The new blower will be shipped with the
blower housing attached. Remove the motor from the
blower housing in the above manner. Clean the sealant from the new motor and the old housing (still attached to the machine). Apply a small amount of high
temperature silicone sealant to the motor mounting
flange.
Install the motor in the reverse order of removal.
11
Fry Vats:
Full Vatss1. Remove ALL of the computer/controllers from
the machine.
2. Remove the burners and ignitors from the vat to
be removed.
3. Disconnect the drain valve switch wires.
4. Disconnect the return valve switch wires.
5. Disconnect the blower wires.
6. Remove the drain line from the left and right ends
of the drain valve tee.
7. Remove the 3 screws from the front of each unit. 10. Remove all of the screws holding the front of the
vat
13. Remove the complete splash back assembly.
8. Remove all of the nuts and washers holding the
splash deck in place.
14. Remove the lower rear back cover.
15. Unscrew the compression fitting at the rear of the
tank.
16 Remove the air tube from the air box (the blower
is mounted to this box).
9. Remove the front deck from the machine.
12
ENGLISH
17. Grasp the vat by the middle tube and remove it
from the rear of the cabinet.
Split vatsSplit vats should be removed and installed as pairs
in the same manner as Full vats. There are 3 sets of
clamps that hold the two Split Vats together:
1. On the rear of the vat.
2. On the bottom of the vat accessed by first removing the blower.
3. On the bottom of the vat at the front.
NOTE: To disconnect the filter return piping (as in
step # 15) unscrew the union connecting the return
piping to the vats.
Install in the reverse order.
13
Should you have any questions about or problems with your equipment, please contact
the Dealer or Parts and Service representative covering you area. Pitco Frialator may be
contacted directly at:
Country Code (603)225-6684
Country Code (603)225-8497 Fax
14
ELEKTRISCHE FRITTEUSE mit FILTER
MODEL MG14S-C/MFD
EXKLUSIV FÜR MCDONALD’S HERGESTELLT
Broschüre # L20-162 Rev 1
McDONALD'S®
Nur für den
CE Markt
PITCO FRIALATOR, INC.
P.O.BOX 501 CONCORD, NH 03302-0501
Tel: 1(603)225-6684
Fax: (603)225-8497
Uberarbeit März 2001
15
In den USA hergestellt
DEUTSCH
Pitco Frialator
Service Anleitung
FÜR IHRE SICHERHEIT:
Kein Benzin oder sonstige entzündbare Flüssigkeiten
oder Gase in der Nähe dieses oder jeglichen Gerätes
der Anlage aufbewahren!
WARNUNG:
Das Gerät muß mit ausreichender Luft versorgt werden,
damit die Flamme korrekt brennen kann. Sollte keine
ausreichende Luft vorhanden sein, kann gefährliches
Kohlenmonoxyd entstehen. Kohlenmonoxyd ist ein
farbloses und geruchloses Gas, welches zum Tod durch
erstickung führen kann.
WARNUNG
Dieses Gerät verfügt über einen Stecker mit Erdung.
Dies dient zum Schutz gegen Stromschläge falls eine
Fehlfunktion des Gerätes vorliegt. Das Gerät immer
an eine geerdete Steckdose anschließen. Den
Erdungsleiter NICHT entfernen.
WARNUNG:
Kohlenmonoxyd kann sich anhäufen, falls der Abzug
nicht völlig offen ist. In solch einem Fall wird das Gerät
auch überhitzen. Die Ventilation und Zuluft zum Gerät
NICHT beschränken. Die in der Installations-Anleitung
angegebenen Mindest-Abstände mössen eingehalten
werden. Ausreichende Abstände um das Gerät sind
Notwendig für Wartung und korrekte Brennerfunktion.
WARNUNG:
Falsche Installation, Einstellung, Abänderung,
Wartung oder Pflege kann Sachschaden, Verletzung
oder Tod zur Folge haben. Vor dem Einbau und
jeglicher Wartung dieses Gerätes sind die
Aufstellungs-, Betriebs- und Wartungsanleitungen
gründlich durchzulesen.
WARNUNG:
Sollte sich das Gerät auf unerwartete Weise abschalten,
warten Sie 5 Minuten vor erneutem Zünden. Dadurch
kann sich jegliches im Gerät befindlich Restgas
verflüchtigen.
WARNUNG:
Diese Gerät ist mit einem geerdeten Netzstecker
versehen. Dieser dient zu Ihrem Schutz gegen Schlag
im Falle einer Gerätefehlfunktion. Das Gerät ist
grundsätzlich an eine vorschriftsmäßig geerdete
Netzsteckdose anzuschließen. Der Erdpol am Stecker
DARF NICHT entfernt werden.
WARNUNG:
Die Stromversorgung muß vor Wartung bzw. Reinigung
getrennt werden.
WARNUNG:
Die Pitco Frialator Friteuse ist mit einer Schnellkupplung
für den Gasanschluß und einer Sicherheitshalterung
ausgerüstet, um umkippen des Gerätes und
überschwappen von heißem Fett zu vermeiden. Diese
Sicherheitshalterung verbindet die Rückseite des Gerätes
mit der Wand. Befindet sich die Friteuse am Betriebsort
arretieren Sie die Rollen und befestigen Sie die
Sicherheitshalterung an der Rückseite des Gerätes.
WARNUNG:
NICHT mit offenen Flammen auf Gasundichtheit
prüfen! Offene Flammen niemals in die Nähe des
Gerätes bringen.
WARNUNG:
Geräte mit Rollen und einem flexiblen Netzkabel
müssen über eine Schnellkupplung an die Gasversorgung
angeschlossen werden. Diese Schnellkupplung muß allen
örtlichen und nationalen Vorschriften entsprechen. Um
den Standort des Gerätes zu beschränken und die Rohrbzw. Kabelverbindungen nicht zu gefährden, muß eine
Sicherheitshalterung (Riemen bzw. Kette) angebracht
werden.
WARNUNG:
Die Friteuse nur mit einem Gastypen versorgen, welcher
auf dem Typenschild, an der Innenseite der Tür,
angegeben ist.Muß das Gerät auf einen anderen Gastypen
umgestellt werden, nehmen Sie bitte mit Ihrem Händler
oder authorisiertem Service Center Kontakt auf.
WARNUNG:
Auf Betriebstemperatur erhiztes Fett ist sehr HEISS und
GEFÄHRLICH! Gehen Sie äußerst vorsichtig vor!
Verwenden Sie entsprechende Schutzkleidung wie z.B.
isolierte Handschuhe, Schürzen, Gesichtsmasken und
Armschützer, wenn Sie mit dem heißen Fett umgehen. Den
Standort einer Fritteuse mit heißem Fett nicht verändern.
Lassen Sie vor der Standortänderung zuerst das Fett auf
Raumtemperatur abkühlen oder lassen Sie das Fett in einen
geeigneten Behälter ab.
WARNUNG:
Im Gerät befindet sich eine offenen Flamme. Das Gerät
kann ausreichend Hitze entwickeln, um Gegenstände in
unmittelbarer Nähe zu entzünden. Halten Sie brennbare
Materialien vom Gerät fern.
16
Inhaltsverzeichnis
DEUTSCH
Inhaltsverzeichnis .................................................................................................................. 17
Kapitel 1: FUNKTIONSWEISE ........................................................................................... 19
Heizsystem Einzelkessel ........................................................................................... 19
Heizsystem unterteilter Kessel .................................................................................. 19
Oberes Begrenzungssystem (Überhitzungsschutz) ................................................... 20
Filtersystem .............................................................................................................. 20
Kapitel 2: PRÜFUNG DER EINZELTEILE ......................................................................... 20
Fühler ....................................................................................................................... 20
Relais ........................................................................................................................ 20
Überhitzungsschutz .................................................................................................. 21
Ablassventil- & Füllventil-Schalter ........................................................................... 21
Transformator .......................................................................................................... 21
Gebläse..................................................................................................................... 21
Druckschalter ........................................................................................................... 21
Gasventil .................................................................................................................. 21
Kapitel 3: ANLEITUNG ZUR FEHLERSUCHE ................................................................. 22
Friteusen ................................................................................................................... 22
Filter ......................................................................................................................... 23
Kapitel 4: AUSTAUSCHEN DER EINZELTEILE ............................................................... 24
Fühler ....................................................................................................................... 24
Überhitzungsschutz .................................................................................................. 24
Computer ................................................................................................................. 24
Teile in der Bedienkonsole ....................................................................................... 25
Filter-Relais .............................................................................................................. 25
Steuer-Relais ............................................................................................................ 25
Filter-Pumpen .......................................................................................................... 25
Sicherung ................................................................................................................. 25
Gasventile ................................................................................................................. 26
Brenner und Zündelemente ...................................................................................... 26
Näherungsschalter .................................................................................................... 26 - 27
Gebläse..................................................................................................................... 27
Druckschalter ........................................................................................................... 27
Fritierkessel .............................................................................................................. 28
Kapitel 6: AUSTAUSCHEN DER EINZELTEILE ............................................................... 31 - 45
Kapitel 7: SCHALTPLÄNE .................................................................................................. 46 - 49
17
18
Kapitel 1: FUNKTIONSWEISE
Die Komponenten der McDonald’s Gas-Fritteusen
funktionieren in einer bestimmten Reihenfolge.
Verständnis im Ablauf des Fritteusen-Betriebs und
der Funktion der Komponenten ist eine
Vorraussetzung für eine schnellere und genauere
Fehlerdiagnose.
•
Heizsystem unterteilte Kessel:
•
•
Spannung zum Gerät ist eingeschaltet:
•
Der Computer wird mit 24VAC versorgt. Ist das •
Ablassventil geschlossen versorgt der dort
angebrachte Berührungsschalter den DVI-Eingang
(drain
valve
interlock
=
Ablassventilüberwachung) am Computer mit
24VAC. Die Zündsteuermodule werden ebenfalls
mit 24VAC am 24V-Anschluß versorgt.
Spannung zum Gerät ist eingeschaltet:
Der Computer wird mit 24VAC versorgt. Ist das
Ablassventil geschlossen versorgt der dort
angebrachte Berührungsschalter den DVI-Eingang
(drain
valve
interlock
=
Ablassventilüberwachung) am Computer mit
24VAC. Die Zündsteuermodule werden ebenfalls
mit 24VAC am 24V-Anschluß versorgt.
•
•
Der Computer wird eingeschaltet.
Der Computer fordert das Aufheizen und versorgt
das Heizungs-Schaltrelais mit 24VDC, welches
schaltet und das Gebläse, den Elektromagnet am
Gasventil und den Druckschalter mit Strom
versorgt.
Der Druckschalter aktiviert das GebläsePrüfrelais, welches aktiviert bleibt.
Sobald das Gebläse die normale
Betriebsgeschwindigkeit erreicht, schließt der
Druckschalter und versorgt somit die sekundären
Kontakte am Gebläse-Prüfrelais mit 24VAC.Da
das Gebläse-Prüfrelais immer noch aktiviert ist,
werden die TH-Anschlüsse der beiden
Zündsteuermodule mit Spannung versorgt.
Beide Zündsteuermodule versorgen die
Zündelemente mit Strom. Gleichzeitig versorgt
eines der Zündsteuermodule die HauptventilRelaisspule mit Strom. Das andere
Zündsteuermodul versorgt die Kontakte des
Hauptventil-Relais mit Strom.
Das Hauptventil-Relais wird aktiviert, wodurch
das zweite Zündsteuermodul in die Lage versetzt
wird, Strom an den Elektromagneten des
Gasventils zu leiten.
In diesem Moment zünden die Hauptbrenner. Ein
Wärmefeedbacksignal wird außerdem an den
•
•
Der Computer wird eingeschaltet.
Der Computer fordert das Aufheizen und versorgt
das Heizungs-Schaltrelais mit 24VDC, welches
schaltet und das Gebläserelais und den
Druckschalter mit Strom versorgt. Aktivierung
des Gebläserelais versorgt das Gebläse mit
Strom, welches die Geschwindigkeit erhöht bis
der Druckschalter schließt.
Befor der Druckschalter schließt, wird dieses
Strom an das Gebläseprüfrelais leiten, welches
aktiviert bleibt.
Wenn das Gebläse die Betriebsgeschwindigkeit
erreicht, schließt der Druckschalter und die
sekundären Kontakte des Gebläse-Prüfrelais
werden mit 24VAC versorgt. Da das GebläsePüfrelais noch aktiviert ist, wird der Strom an
die TH Anschlußklemmen der beiden Zündmodule
geleitet. Da das Gebläse-Prüfrelais aktiviert ist,
wird das Gebläse-Bestätigungsrelais mit Strom
versorgt und somit aktiviert. Bei Aktivierung des
Gebläse-Bestätingungsrelais führt ein
Kontaktpaar Spannung an den TH Anschluß des
linken Zündsteuermoduls, das andere Kontaktpaar
führt Spannung an den TH Anschluß des rechten
Zündsteuermoduls. Diese Spannung der TH
Anschlüsse wird auch an die Überhiztungsschalter
geführt, welche im geschlossenen Zustand
•
•
•
•
•
•
19
•
DEUTSCH
Heizsystem Einzelkessel:
Computer geleitet (bei Ausfall dieses
Rückkopplungssignals wird der Computer die
Meldung “Zündungsfehler” anzeigen).
Jedes Zündsteuermodul wird für 10 Sekunden
Funken erzeugen und dann kontrollieren, ob ein
Signal vom Flammensensor abgegeben wird.
Erhält das Zündsteuermodul dieses Signal nicht,
wird das System verriegelt.
•
•
Spannung an den Elektromagenten des Gasventils
führen.
Der Zünder, der Elektromagnet des Gasventils
und Wärmefeedback-Anschluß am Computer
werden mit Strom versorgt, wenn an die THAnschlußklemmen eines Zündmoduls Spannung
angelegt wird. (bei Ausfall dieses
Rückkopplungssignals wird der Computer die
Meldung “Zündungsfehler” anzeigen).
Jedes Zündsteuermodul wird für 10 Sekunden
Funken erzeugen und dann kontrollieren, ob ein
Signal vom Flammensensor abgegeben wird.
Erhält das Zündsteuermodul dieses Signal nicht,
wird das System verriegelt.
Überhitzungsschutz:
Steht der Fühler im Verdacht defekt zu sein, sollen
der Widerstand und die Fett- bzw. Luft-Temperatur
gemessen werden. Diese Werte können mit der
folgenden Tabelle verglichen werden:
TEMP. WIDERSTAND
TEMP. WIDERSTAND
ºF
Ohm Ω
ºF
Ohm Ω
60
80
100
120
140
160
180
200
210
220
240
260
280
300
320
325
139055 Ω
84644 Ω
53146 Ω
34328 Ω
22755 Ω
15446 Ω
10716 Ω
7586 Ω
6427 Ω
5470 Ω
4013 Ω
2991 Ω
2262 Ω
1734 Ω
1347 Ω
1267 Ω
330
335
340
345
350
355
360
365
370
375
380
385
390
395
400
1192 Ω
1123 Ω
1058 Ω
998 Ω
942 Ω
890 Ω
841 Ω
795 Ω
752 Ω
712 Ω
675 Ω
640 Ω
607 Ω
576 Ω
547 Ω
Schaltet sich der Überhitzungsschutz ein, wird der
Strom zum Elektromagneten des Gasventils
unterbrochen und das Gasventil schließt sich. Das
System wird dadurch verriegelt und der Computer
zeigt
“ZÜND-FEHLER”
an.
Dieser
Überhitzungschutz wird automatisch zurückgesetzt.
Der Computer muß jedoch ausgeschaltet werden,
damit das Rücksetzen dieses Schalters erkannt wird.
Um die Zündsteuermodule zurückzusetzen, muß der Wird am Fühler ein offener Stromkreis bzw. ein
Rücksetzschalter betätigt und der Computer danach Kurzschluß (0 Ohm) gemessen, soll dieser
ausgetauscht werden. Weichen die Messwerte bei
wieder eingeschaltet werden.
Temperaturen zwischen 162°C - 190°C (325 - 375°F)
um mehr als 20 Ohm ab, werden falsche
Filtersystem:
Temperaturwerte an den Computer übermittelt. Der
Durch Öffnen des roten Füllventils wird das Pumpen- Fühler sollte auch in diesem Fall ausgetauscht
Relais aktiviert, wodurch die Pumpe in Betrieb werden. Trotzdem funktioniert der Fühler bei etwas
gesetzt wird. Schließen des Füllventils de-aktiviert höheren bzw. niedrigeren Temperaturen. Der
Widerstand des Fühlers soll nach abkühlen des Fetts
das Relais und schaltet somit die Pumpe ab.
nochmals gemessen und mit der Tabelle verglichen
werden. Wie aus der Tabelle hervorgeht sind bei
Kapitel 2: PRÜFUNG DER EINZELTEILE
niedrigeren Temperaturen größere Abweichungen
akzeptabel.
Fühler:
Heizungs-Schaltrelais:
Der Widerstand des Fühlers ist temperaturabhängig. Die Heizungs-Schaltrelais sind 24VAC ElektronikDer Widerstand verringert sich mit zunehmender Relais und schalten sobald die korrekte Spannung an
Temperatur. Je niedriger die Temperatur, um so höher der Spule anliegt. Bei Aktivierung schließen sich die
werden die Unterschiede des Widerstands pro Schalt-Kontakte, worauf der Strom durch die
Temperaturgrad-Änderung. Mit erreichen der Elemente fließt. Das Überhitzungsrelais ist ein
Betriebstemperatur werden die Unterschiede des 24VAC Relais und kann wie das obige Relais geprüft
werden.
Widerstandes linear.
20
Überhitzungsschutz:
Gebläse:
Der Überhitzungsschalter ist ein im Normalzustand
geschlossener Schalter bis die Temperatur an der
Sonde 225°C ± 15°C (435°F ± 15°F) erreicht. Um
diesen Schalter zu prüfen, muß das Heizrelais
überbrückt werden. Die entsprechenden Hinweise
für diese Prüfung Befinden sich in der
Bedienungsanleitung.
Prüfen Sie die Spannung zwischen den
Anschlußkabeln des Gebläses. Wird eine Spannung
gemessen und das Gebläse läuft nicht, ist dieses
defekt.
Druckschalter:
Mit steigender Geschwindigkeit des Gebläses, steigt
das Vacuum an der Saugseite des Druckschalters. Bei
einem Vacuum von 0,325kPa (1,3" WC) schließt der
Schalter. Fällt das Vacuum unter ca. 0,2 kPa (0,8"
WC) öffnet sich der Druckschalter. Die Eingangsund Ausgangs-Spannung bei laufendem Gebläse
messen. Werden 24VAC an einer, jedoch nicht der
anderen Seite gemessen, ist der Druckschalter defekt.
VORSICHT
Während diesem Test muß sich die Fritteuse
unter ständiger Beobachtung befinden. In
diesem Verfahren wird das Fett über die
normale Betriebstemperatur hinaus erhitzt und
kann deshalb bei Unachtsamkeit Schäden am
Gerät oder Verletzungen verursachen.
Schaltet sich dieser Überhitzungsschutz innerhalb der
angegebenen Grenzwerte nicht ein, ist dieser Schalter
defekt und muß ausgetauscht werden. Schaltet sich
der Überhitzungschutz ein, kann dieser erst
zurückgesetzt werden wenn das Fett auf ca. 204ºC
(400ºF) abgekühlt ist. Lässt sich dieser
Überhitzungsschutz nach dem abkühlen des Fetts nicht
zurücksetzen, liegt ein Defekt des Schalters vor.
Gasventil:
Ablassventil- & Füllventil-Schalter:
Der Knopf sollte sich in der ON-Position befinden.
Prüfen Sie auf 24VAC zwischen den Anschlüssen MV
und MV/PV als auch zwischen PV und MV/PV. Wird
Spannung zwischen beiden Kontaktpaaren gemessen
und das Gasventil öffnet nicht, ist dieses defekt. Sollte
keine Spannung an beiden Spulen des Gasventils
anliegen, müssen entsprechende Reperaturen
durchgeführt werden. Prüfen Sie danach das Gasventil
nochmals wie oben beschrieben.
Transformator:
Die Transformatoren sind für mehrere EingangsSpannungen und 24 Volt Ausgangs-Spannung
ausgelegt. Diese können durch Ablesen bzw. Messen
der Eingangs- und Ausgangs-Spannung geprüft
werden.
21
DEUTSCH
Diese Schalter sind magnetische Reedschalter. Wenn
das Ventil geöffnet wird bewegt sich der Auslöser
und öffnet den Schalter, wenn das Ventil geschlossen
wird schließt der Auslöser den Schalter. Diese Die Ablenkplatte sollte wie Abgebildet mit zwei
Schalter kann auch mit einem Ohm-Meter gerpüft selbstbohrenden Schrauben installiert werden.
werden. Der normale Abstand zwischen dem
Schaltmagneten und dem Auslöser am Ventil beträgt
3-6mm (1/8" bis ¼”).
Kapitel 3: ANLEITUNG ZUR FEHLERSUCHE
Friteusen:
Es wird vorrausgesetzt, daß vor jeglicher Fehlersuche der Strom eingeschaltet wird und die Gasleitungen
angeschlossen sind.
PROBLEM
MÖGLICHE URSACHE
VORGEHENSWEISE
Computer schaltet sich nicht ein
(ON) Displays leuchten nicht
auf
A. Hauptsicherung ist ausgeschaltet
B. Sicherung der Friteuse ist
durchgebrannt
C. Transformator
A.
B.
C.
Die Heizungsleuchten am
Computer leuchten auf, das
Gerät heizt jedoch nicht
A
Ist das Fett heiß wurde eventuell
der Überhitzungsschutz aktiviert
A.
Das Fett abkülen lassen damit sich der
Überhitzungschalter zurücksetzt. Den
Computer Aus- und dann wieder EinSchalten. Den Rücksetzschalter betätigen.
Im Displays wird "OFF"
angezeigt; der Computer läßt
sich nicht eingeschalten
A.
Computer
A.
Den Netzschalter aus- und dann wieder
einschalten, damit sich der Computer
zurücksetz. Wird das Problem nicht behoben
muß der Computer ausgetauscht werden.
Die Heizungsleuchten auf; der
Computer zeigt "ZUENDUNG"
"FEHLER" an
A.
B.
C.
D.
E.
F.
G.
H.
Heizrelais
Sicherung F2 eventuell durchgebrannt
Gebläse
Druckschalter
Gasventil
Zündmodul (eines oder beide)
Gasventil-Relais (nur bei Einzelkessel)
Überhitzungsschutz wurde aktiviert
oder ist defekt
A.
B.
C.
D.
E.
F.
G.
H.
Heizrelais prüfen.
Prüfen & austauschen falls defekt.
Prüfen & austauschen falls defekt.
Prüfen & austauschen falls defekt.
Prüfen & austauschen falls defekt.
Prüfen & austauschen falls defekt.
Prüfen & austauschen falls defekt.
Das Fett abkülen lassen damit sich der
Überhitzungschalter zurücksetzt. Den
Computer Aus- und dann wieder EinSchalten. Den Rücksetzschalter betätigen.
Funken sind nicht zu hören; das
Gebläse läuft
A. Heizrelais
B. Zündsteuermodul
C. Zünder
A. Prüfen & austauschen falls defekt.
B. Prüfen & austauschen falls defekt.
C. Prüfen & austauschen falls defekt.
Funken sind hörbar; Gebläse
läuft nicht
A.
B.
C.
Sicherung F2 durchgebrannt
Gebläse
Heizrelais
A. Prüfen & austauschen falls defekt.
B. Prüfen & austauschen falls defekt.
C. Prüfen & austauschen falls defekt.
Funken sind hörbar; Gebläse
läuft, die Brenner zünden jedoch
nicht
A.
B.
C.
D.
E.
Zündsteuermodul
Gasventil-Relais (nur bei Einzelkessel)
Druckschalter defekt
Überhitzungsschutz wurde aktiviert
Gasventil
A.
B.
C.
D.
E.
Der Brenner erslischt nach kurzer
Zeit; keine erneute Zündung
A. Flammensensor
B. Zündsteuermodul
C. Gasventil
A. Prüfen & austauschen falls defekt.
B. Prüfen & austauschen falls defekt.
C. Prüfen & austauschen falls defekt.
Computer steuert nur die linke
Seite einer unterteilten Friteuse
A.
A.
Kabelbaum in falscher Reihenfolge
angeschlossen
22
Hauptsicherungen Aus- und dann wieder
Ein-Schalten.
Prüfen, falls nötig austauschen.
Transformator prüfen.
Prüfen & austauschen falls defekt.
Prüfen & austauschen falls defekt.
Prüfen & austauschen falls defekt.
Prüfen & austauschen falls defekt.
Prüfen & austauschen falls defekt.
Strom zum Gerät abschalten, dann
wieder einschalten. Beide Kabelverbindungen
zum Computer trennen, danach zuerst die
rechte Seite, dann die linke Seite anschließen.
Filter:
PROBLEM
MÖGLICHE URSACHE
VORGEHENSWEISE
Das rote Ventil ist offen, die
Pumpe macht jedoch keine
Geräusche.
A. Füllventil ist nicht voll geöffnet
B. Sicherung für Filter kann
durchgebrannt sein
C. Überlastschutz des Filtermotors wurde
aktiviert
D. Näherungsschalter ist locker oder
defekt
A. Etwas am roten Griff des FüllventilsVentils ziehen, um eine völlige Öffnung
zu versuchern.
B. Die Sicherung zurücksetzen.
C. Den roten Rücksetz-Knopf am Ende des
Filter-Motors betätigen.
D. Abstand und Montage des Schalters
prüfen. Falls defekt austauschen.
Ablassventil ist geschlossen,
A. Das grüne Ablassventil ist nicht
der Computer wurde
völlig geschlossen
zurückgesetzt, das Display zeigt B. Näherungsschalter ist locker oder
jedoch immer noch "DRAINING"
aktiviert
oder "TURN OFF" an.
A. Etwas mehr Kraft am grünen Griff
aufwanden, um eine völlige Schließung
zu versichern.
B. Montage des Schalters prüfen. Falls
defekt austauschen.
Ablassventil ist offen, das Fett
läuft nur langsam oder
überhaupt nicht ab.
A. Etwas mehr Kraft am grünen Griff
aufwenden, um ein völliges Schließen
zu versichern.
B. Ablassventil-Öffnung mit der
Reinigungsstange reinigen. Wird die
Verstopfung nicht bereinigt, das grüne
Ablaßventil schließen und folgende
Schritte zur Reinigung des
Hauptablaßrohrs ausführen.
A. Das grüne Ablassventil ist nicht
völlig geöffnet
B. Abfluss ist verstopft
DEUTSCH
VORSICHT:
Heißes Fett kann immer noch
entweichen, wenn der Deckel entfernt
wird. Die beiden Schrauben der
Reinigungs-Abdeckung entfernen und
die Abdeckung abnehmen (Schrauben
nicht verlieren). Das Hauptablassrohr
mit der Reiningungsstange reinigen.
Die Abdeckung mit der Dichtung
wieder anbringen und mit den beiden
Schrauben befestigen. Die Schrauben
nicht zu fest anziehen.
23
Kapitel 4: AUSTAUSCHEN DER
EINZELTEILE:
Einbau erfolgt in umgekehrter Reihenfolge.
Computers:
Es wird vorrausgesetzt daß bei allen beschriebenen
VORSICHT
Vorgängen (außer falls anders Vermerkt) zum
Austauschen der Einzelteile die Friteuse ausgeschaltet Keine Teile der Bedienkonsole fallen lassen, da
und abgekühlt ist, das Fett abgelassen wurde, das diese leicht beschädigt werden können.
Gerät vom Stromnetz und den Gasleitungen getrennt
1. Die beiden Schrauben von der oberen Halterung
wurde.
der Bedienkonsole entfernen.
2. Kabelverbindung hinter dem Computer trennen.
Fühler:
1. Den Kabelstecker abziehen.
2. Die kleine Mutter an der Fühlerdichtung
abschrauben.
3. Den Fühler aus der Dichtung schieben.
HINWEIS: Bei Geräten mit unterteilten Kesseln
sind zwei Kabelverbindungen vorhanden.
Einbau erfolgt in umgekehrter Reihenfolge unter
Verwendung der neuen Mutter.
Einbau erfolgt in umgekehrter Reihenfolge.
HINWEIS: Bei Einbau eines Computers in eine
Friteuse mit unterteilten Kesseln, muß zuerst die
rechte Kabelverbindung, dann die linke
Kabelverbindung hergestellt werden. Wird dies
nicht beachtet, funktioniert der Computer nicht
im Betriebsmodus für unterteilte Kessel. Sollte sich
der Computer im Betriebsmodus für Einzelkessel
befinden, stellen Sie den Strom ab. Sobald der
Strom eingeschaltet wird, schaltet der Computer
auf den Betriebsmodus für unterteilte Kessel.
Überhitzungsschutz:
1. Den Kabelstecker abziehen.
2. Den Überhitzungsschutz von der vorderen Seite
des Kessels abschrauben.
24
Teile in der Bedienkonsole:
Zum Zugriff, auf alle in der Bedienkonsole
eingebauten Teile, diesen Anweisungen folgen:
1. Den Computer wie vorhergehend beschreiben
aentfernen. Alle Teile in der Bedienkonsole sind
nun zugänglich.
Filter-Relais:
Filter-Pumpen:
1. An der vorderen Seite des Grätes die Anschlüsse
an den Enden der flexiblen Schläuche entfernen.
2. Die beiden Schrauben entfernen, damit die Motor/Pumpen-Kombination nach unten fällt. Diese
Kombination kann, durch leichtes Anheben des
hinteren Endes aus dem Gerät entfernt werden.
Das vordere Teil der Halterung kann gesenkt
werden bis die Kombination zum herrausnehmen
durch die Öffnung passt.
Diese Relais werden immer wie folgt
angeschlossen:
Steuerrelais:
1. Die beiden Schrauben auf den Seiten des
Türmagneten entfernen.
Den Magneten entfernen.
2. Die beiden oberen und
unteren Schrauben der
Abdeckung entfernen.
3. Die vier Zungen, welche
den Sicherungs-Automaten
in der Abdeckung halten,
eindrücken.
Diese Relais werden immer wie folgt
angeschlossen:
25
DEUTSCH
Der Einbau erfolgt in umgekehrter Reihenfolge.
Sicherungs-Automat:
1. Die Rohrverbindung der Gasleitung unter dem
Brenner trennen.
2. Das Kabel zum Zünder abziehen.
3. Die beiden Schrauben, welche den Zünder und
den Brenner befestigen, entfernen.
Der Einbau erfolgt in umgekehrter Reihenfolge.
Gasventile:
1. Die Anschlüsse zu den Gasrohren auf dem Ventil
trennen.
Der Brenner und der Zünder können zusammen
herrausgenommen werden.
Der Einbau erfolgt in umgekehrter Reihenfolge.
Näherungsschalter:
1. Durch entfernen der beiden Schrauben kann der
Auslöser entfernt werden.
2. Durch trennen der Kabelverbindung und
entfernen der beiden Schrauben kann der Sensor
entfernt werden.
2. Die Rohrverbindung hinter dem Gasventil
trennen.
3. Die drei Kabel am Gasventil abziehen.
Einbau erfolgt in umgekehrter Reihenfolge.
Der Einbau erfolgt in umgekehrter Reihenfolge.
Brenner und Zünder:
HINWEIS: Sollter der Zünder ohne den Brenner
entfernt werden, mit Schritt 2 anfangen.
26
Gebläse:
Druckschalter:
1. Die Kabelverbindung trennen.
2. Die drei Schrauben vom Flansch entfernen.
1. Schrauben Sie die Kunststoffverbindung von der
Vacuumverbindung des Schalters ab.
2. Ziehen Sie die beiden Kabel vom Schalter ab.
3. Entfernene Sie die beiden Schrauben von der
Halterung.
Einbau erfolgt in umgekehrter Reihenfolge.
3. Mit einem flachen Schraubendreher die Dichtung
am Motorflansch aufbrechen.
4. Der Motor kann nun aus dem Gerät gesenkt
werden.
DEUTSCH
HINWEIS: Neue Gebläse werden mit Gehäuse
geliefert. Entfernen Sie den Motor von diesem
Gehäuse auf die gleiche Art und Weise. Entfernen
Sie Dichtungsreste am neuen Motor und am alten
Gehäuse (welches sich am Gerät befindet). Tragen
Sie ein wenig temperaturbeständige SilikonDichtmasse auf den Flansch des Motors auf. Bauen
Sie nun den Motor in umgekehrter Reihenfolge wieder
ein.
27
Fritierkessel:
9. Entfernen Sie die vordere Abdeckung vom Gerät.
Einzelkessel
1. Entferenn Sie ALLE Computer/Steuerelemente
von dem Gerät.
2. Entfernen Sie die Brenner und Zündelemente von
dem entsprechenden Kessel.
3. Trennen Sie die Kabelverbindungen des
Ablassventils.
4. Trennen Sie die Kabelverbindungen des
Füllventils.
5. Trennen Sie die Kabel zum Gebläse.
6. Entfernen Sie die Abflußleitung auf der linken 10.Entfernen Sie alle Schrauben, welche die vordere
Seite des Kessels befestigen.
und rechten Seite des T-Stücks.
7. Entfernen Sie die drei Schrauben an der vorderen
Seite des Gerätes.
11. Entfernen Sie die Halterungen im hinteren
Spritzschutz.
12. Entfernen Sie die obere Abdeckung hinten.
13. Entfernen Sie den gesamten hinteren Spritzschutz.
8. Entfernen Sie alle Muttern und Unterlegscheiben,
welche den Spritzschutz befestigen.
14. Entferen Sie die untere Abdeckung hinten.
15. Trennen Sie die Quetsch-Rohrverbindung am
hinteren Ende des Kessels.
28
16 Entfernen Sie das Lüftungsrohr vom
Lüftungskasten (das Gebläse ist an diesem Kasten
montiert).
17. Halten Sie den Kessel am mittleren Rohr und
entnehmen Sie diesen von hinten aus der Friteuse.
Unterteilte Kessel
Unterteilte Kessel sollten zusammen und auf die
gleiche Art und Weise wie Einzelkessel aus- bzw.
eingebaut werden. Unterteilte Kessel sind über 3
Halterungen miteinander verbunden:
1. Auf der Rückseite der Kessel.
2. Am Boden der Kessel, nach entfernen des
Gebläses zugänglich.
3. Am Boden der Kesselfront.
HINWEIS: Trenne Sie die Rohrverbindung
zwischen den Füll-Leitungen und den Kesseln,
um die Filter-Rückleitung zu entfernen (wie in
Schritt 15).
Einbau erfolgt in umgekehrter Reihenfolge.
29
30
ENGLISH
PARTS SECTION
31
MG14 FRYER FRONT
PARTS LISTS
I.D. #
PART #
PART DESCRIPTION
1 ...................................................... PP10752 ........................................ 10-32 X 1/2” SCREW
2 ...................................................... A1830901 ...................................... MAGNET STRIKER PLATE
A1835001 ...................................... MAGNET STRIKER PLATE COVER
3 ...................................................... A3802901 ...................................... TOP RIGHT & LEFT DOOR HINGE
4 ...................................................... B3801301-C .................................. DOOR HINGE PIN
5 ...................................................... A3802903 ...................................... BOTTOM RIGHT & LEFT DOOR HINGE
6 ...................................................... B2302301-C .................................. LEFT DOOR ASSEMBLY
7 ...................................................... B2302302-C .................................. RIGHT DOOR ASSEMBLY
8 ...................................................... B3626801-C .................................. FRONT PANEL BEZLE ASSEMBLY
9 ...................................................... P0092300 ...................................... 10-24 HEX NUT
10 .................................................... P0080601 ...................................... #10 FLAT WASHER
11 .................................................... PP11372 ........................................ 3600 McDONALDS COMPUTER FULL
& SPLIT VAT
12 .................................................... B362601-C .................................... CONTROLLER MOUNTING BEZLE
13 .................................................... PP11068 ........................................ HEAT DEMAND RELAY
P5046688 ...................................... MAIN GAS VALVE RELAY
14 .................................................... A5059102 ...................................... TERMINAL STRIP COVER
15 .................................................... P5045282 ...................................... WIRE TERMINAL STRIP
16 .................................................... PP11058 ........................................ FILTER PUMP RELAY
17 .................................................... PP10429 ........................................ TRANSFORMER CE
PP10210 ........................................ TRANSFORMER DOMESTIC
18 .................................................... PP11225 ........................................ SPARK IGNITION MODULE DOMESTIC
PP11145 ........................................ SPARK IGNITION MODULE CE
32
33
MG14 FRYER CABINET
PARTS LISTS
I.D. #
PART #
PART DESCRIPTION
1 ...................................................... B4101601-C .................................. SINGLE FRYER BACK SPLASH
B4101001-C .................................. DUAL FRYER BACK SPLASH
B4101101-C .................................. TRIPLE FRYER BACK SPLASH
B4101201-C .................................. QUAD FRYER BACK SPLASH
B4101701-C .................................. QUINT FRYER BACK SPLASH
2 ...................................................... PP10752 ........................................ 10-32 X 1/2” SCREW
3 ...................................................... A1623901 ...................................... REAR CABINET ACCESS PLATE (STEEL)
A1623902 ...................................... REAR CABINET ACCESS PLATE (SS)
4 ...................................................... A1623501+A1623502 .................. SINGLE FRYER CABINET BACK
(1st #galvinized, 2nd # stainless) A1623601+A1623502 .................. DUAL FRYER CABINET BACK
A1623701+A1623702 .................. TRIPLE FRYER CABINET BACK
A1623801+A1623802 .................. TRIPLE FRYER CABINET BACK TOP
USE DUAL TWICE ....................... QUAD FRYER CABINET BACK
USE DUAL & TRIPLE .................. QUINT FRYER CABINET BACK
5 ...................................................... P0020600 ...................................... 1/4” X 5/8” BOLT
6 ...................................................... PP10815 ........................................ 9” LOCKING CASTER
6 ...................................................... PP10814 ........................................ 9” NON-LOCKING CASTER
7 ...................................................... P0093300 ...................................... 1/4” X 20 NUT
8 ...................................................... B3622401-C .................................. SINGLE FRONT PANEL TOP DECK
B3627001-C .................................. DUAL FRONT PANEL TOP DECK
B3627201-C .................................. TRIPLE FRONT PANEL TOP DECK
B3627401-C .................................. QUAD FRONT PANEL TOP DECK
B3628201-C .................................. QUINT FRONT PANEL TOP DECK
9 ...................................................... P0080650 ...................................... 1/4” FLAT WASHER
10 .................................................... P0093300 ...................................... 1/4” X 20 NUT
11 .................................................... A1838101 ...................................... SINGLE CABINET BOTTOM PLATE
A1834501 ...................................... CABINET BOTTOM PLATE LEFT HAND
(Non-filter)
A1839301 ...................................... DUAL CABINET BOTTOM PLATE
(Non filter)
A1839303 ...................................... TRIPLE CABINET BOTTOM
(Filter)
A1839401 ...................................... TRIPLE CABINET BOTTOM RIGHT H.
A1839501 ...................................... PUMP BOTTOM COVER
34
35
MG14 FRYER FILTER
PARTS LISTS
I.D. #
PART #
PART DESCRIPTION
1 ...................................................... B4003203-C .................................. OIL RETURN HANDLE FULL & RH SPLIT
B4003204-C .................................. OIL RETURN HANDLE LH SPLIT
2 ...................................................... P0079500 ...................................... 10-24 X 1/2” SCREW
3 ...................................................... A7004401 ...................................... DRAIN LINE CLEAN OUT COVER
4 ...................................................... PP11182 ........................................ CLEAN OUT COVER GASKET
5 ...................................................... PP10568 ........................................ 10-24 WING NUT
6 ...................................................... B6643101-C .................................. FILTER DRAIN LINE END CAP
7 ...................................................... PP11181 ........................................ DRAIN LINE END CAP GASKET
8 ...................................................... PP10696 ........................................ 10-24 X 1/2” SCREW
9 ...................................................... PP11241 ........................................ FLEX TUBING WITH FITTINGS 18”
10 .................................................... B6638601-C .................................. PUMP & MOTOR ASSEMBLY 115VAC
(Including tubing & heat tape) B6638602-C .................................. PUMP & MOTOR ASSEMBLY 240VAC
(Including tubing & heat tape) B6638603-C .................................. PUMP & MOTOR ASSEMBLY 220VAC
(Pump & motor only)
PP10101 ........................................ PUMP & MOTOR ASSEMBLY 115-230VAC
PP10416 ........................................ MOTOR ONLY 115-230VAC
(Pump & motor only)
PP10171 ........................................ PUMP AND MOTOR ASSEMBLY
PP10417 ........................................ PUMP ONLY
11 .................................................... PP11242 ........................................ FLEX TUBING WITH FITTINGS 20”
12 .................................................... P0020600 ...................................... 1/4-20 X 5/8 BOLT
13 .................................................... P0080650 ...................................... 1/4 FLAT WASHER
14 .................................................... B6652601-C .................................. FILTER RETURN RECEPTICLE ASSY.
15 .................................................... PP10039 ........................................ HEAT TAPE 165 WATT 110VAC 79”
PP10080 ........................................ HEAT TAPE 165 WATT 240VAC 79”
PP10194 ........................................ HEAT TAPE 96 WATT 110VAC 48”
PP10598 ........................................ HEAT TAPE 96 WATT 240VAC 48”
36
37
MG14 FRYER FILTER DRAWER
PARTS LISTS
I.D. #
PART #
PART DESCRIPTION
1 ...................................................... B6640901-C .................................. PAPER RETAINING RACK
2 ...................................................... B6647701-C .................................. OIL DRAIN CATCH TOWER
3 ...................................................... PP10409 ........................................ FILTER COUPLING “O” RING
4 ...................................................... B6661601 ...................................... FILTER PICK-UP ASSEMBLY
5 ...................................................... P0020900 ...................................... 1/4-20 HEX HEAD SCREW
P6071020 ...................................... 1/4” NYLON BUSHING
P0080650 ...................................... 1/4” FLAT WASHER
P0093300 ...................................... 1/4-20 NUT
6 ...................................................... PP10177 ........................................ VINYL PROTECTIVE COVER
P0093300 ...................................... 1/4-20 NUT
P0080650 ...................................... 1/4” FLAT WASHER
P0020900 ...................................... 1/4-20 HEX HEAD SCREW
7 ...................................................... B6640701-C .................................. FILTER DRAWER HANDLE
8 ...................................................... B6640601-C .................................. FILTER DRAWER WELDMENT
9 ...................................................... PP11152 ........................................ ROLLER WHEEL KIT
10 .................................................... B6656801-C .................................. FILTER DRAWER EXTENSION RAIL (RH)
B6656802-C .................................. FILTER DRAWER EXTENSION RAIL (LH)
11 .................................................... A7008302 ...................................... PAPER SUPPORT RACK
12 .................................................... B6661501-C .................................. FILTER PAN
13 .................................................... P0007300 ...................................... 8-32 X 1/4” SCREW
14 .................................................... PP10900 ........................................ FLAT WASHER
15 .................................................... B6641001-C .................................. FRONT FILTER PAN COVER W/HANDLE
A7001102 ...................................... FRONT FILTER PAN COVER NO HANDLE
16 .................................................... P6071516 ...................................... FILTER PAN COVER HANDLE
17 .................................................... A7013502 ...................................... REAR FILTER PAN COVER
18 .................................................... B6640801 ...................................... FILTER DRAWER CARRIAGE ASSY
(INCLUDES PARTS 5-9)
19 .................................................... B6645701 ...................................... FILTER PAN ASSY (INCLUDES PARTS 1-17)
38
39
MG14 FRYER DRAIN VALVE HANDLE
PARTS ASSEMBLY
I.D. #
PART #
PART DESCRIPTION
1 ...................................................... PP11302 ........................................ VINYL DRAIN VALVE HANDLE COVER
2 ...................................................... PP10263 ........................................ DRAIN PROXIMITY SWITCH ACTUATOR
3 ...................................................... B4002902-C .................................. DRAIN VALVE HANDLE FULL, RH SPLIT
B4002901-C .................................. DRAIN VALVE HANDLE LH SPLIT VAT
4 ...................................................... PP10266 ........................................ 4-40 X 1/4” SCREW
5 ...................................................... PP10647 ........................................ 1/2-13 NUT
6 ...................................................... PP11059 ........................................ PLUNGER ASSEMBLY
7 ...................................................... A4015801 ...................................... DRAIN HANDLE RELEASE LEVER
8 ...................................................... PP11303 ........................................ RELEASE LEVER VINYL COVER
9 ...................................................... B4003001-C .................................. FULL VAT HANDLE ASSEMBLY
(Complete drain valve handle assy) B4003003-C .................................. LH SPLIT VAT HANDLE ASSEMBLY
B4003005-C .................................. RH SPLIT VAT HANDLE ASSEMBLY
40
41
MG14 GAS & BURNER SYSTEM
PARTS LISTS
I.D. #
PART #
PART DESCRIPTION
1 ...................................................... B3317701-C .................................. FULL VAT BURNER BOX ASSY.
B3321101-C .................................. FULL VAT BURNER BOX INSUL. KIT
2 ...................................................... A8027301 ...................................... (CE) IGNITOR MOUNTING BRACKET
A8022301 ...................................... LEFT (DOMESTIC) IGNITOR MNTNG BRKT
A8022303 ...................................... RIGHT (DOMESTIC) IGNITOR MNTNG BRKT
3 ...................................................... B8022301-C .................................. BURNER (DOMESTIC)
B8027001-C .................................. BURNER (CE GERMANY)(CE LP)
4 ...................................................... PP11131 ........................................ IGNITOR (DOMESTIC)
PP11193 ........................................ IGNITOR (CE)
5 ...................................................... PP11064 ........................................ HI LIMIT SWITCH
6 ...................................................... PP11193 ........................................ FLAME SENSOR (CE)
7 ...................................................... B3316801-C .................................. TEMPERATURE PROBE ASSY.
8 ...................................................... CALL SERVICE AGENT FOR # ... BURNER ORIFICE
9 ...................................................... PP11140 ........................................ GAS VALVE (NAT) DOMESTIC
PP11142 ........................................ GAS VALVE (NAT) CE
PP11141 ........................................ GAS VALVE (PROP) DOMESTIC
PP10958 ........................................ GAS VALVE (PROP) CE
10 .................................................... B3314801-C .................................. SPLIT VAT BURNER BOX ASSY. LH
B3314802-C .................................. SPLIT VAT BURNER BOX ASSY. RH
B3321201-C .................................. SPLIT VAT BURNER BOX INSUL. KIT
11 .................................................... B8021602-C .................................. COMBUSTION TUBE (FULL & SPLIT
VAT)
12 .................................................... B3316601-C .................................. SPLIT VAT
13 .................................................... B3316501-C .................................. FULL VAT
42
43
MG14 FRYER ACCESSORIES
PARTS LISTS
I.D. #
PART #
PART DESCRIPTION
1 ...................................................... PP11332 ........................................ FRYER COVER HANDLE
2 ...................................................... P0082400 ...................................... WASHER
3 ...................................................... PP10693 ........................................ SCREW
4 ...................................................... A1103302 ...................................... BASKET HANGER (W/CAPPING PIECE)
A1103202 ...................................... BASKET HANGER (W/O CAPPING PIECE)
5 ...................................................... B5002701-C .................................. DUAL CAPPING PIECE
B5002702-C .................................. TRIPLE CAPPING PIECE
B5002703-C .................................. QUAD CAPPING PIECE
B5002704-C .................................. QUINT CAPPING PIECE
6 ...................................................... A1907004 ...................................... CHANNEL STRIP INTERIOR OF A SPLIT
7 ...................................................... A1907504 ...................................... CHANNEL STRIP (SPLIT TO SPLIT TANK)
A1906804 ...................................... CHANNEL STRIP (SPLIT TO FULL, FULL
TO FULL TANK)
8 ...................................................... P6073148 ...................................... TUBE RACK (FULL VAT)
B4510401-C .................................. TUBE RACK (SPLIT VAT)
9 ...................................................... B2100904-C .................................. COVER ASSEMBLY (FULL VAT)
B2100903-C .................................. COVER ASSEMBLY (SPLIT VAT)
44
45
46
47
48
49
Bei jeglichen Fragen oder Problemen bezüglich Ihrer Geräte wenden Sie sich
bitte an den für Ihren Bereich zuständigen Händler oder Kundendienst. Für
Direktkontakt mit Pitco Frialator in den USA wählen Sie:
Tel: +(603) 225-6684
Fax: +(603) 225-8496