1
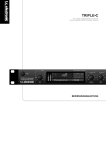
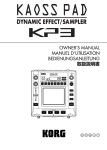
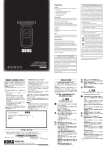
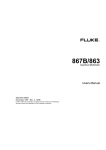
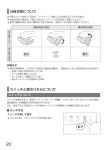
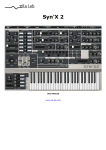
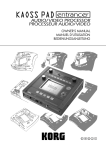
1 Precautions Location Using the unit in the following locations can result in a malfunction. • In direct sunlight • Locations of extreme temperature or humidity • Excessively dusty or dirty locations • Locations of excessive vibration • Close to magnetic fields Power supply Please connect the designated AC adapter to an AC outlet of the correct voltage. Do not connect it to an AC outlet of voltage other than that for which your unit is intended. Interference with other electrical devices Radios and televisions placed nearby may experience reception interference. Operate this unit at a suitable distance from radios and televisions. Handling To avoid breakage, do not apply excessive force to the switches or controls. Care If the exterior becomes dirty, wipe it with a clean, dry cloth. Do not use liquid cleaners such as benzene or thinner, or cleaning compounds or flammable polishes. Keep this manual After reading this manual, please keep it for later reference. Keeping foreign matter out of your equipment Never set any container with liquid in it near this equipment. If liquid gets into the equipment, it could cause a breakdown, fire, or electrical shock. Be careful not to let metal objects get into the equipment. If something does slip into the equipment, unplug the AC adapter from the wall outlet. Then contact your nearest Korg dealer or the store where the equipment was purchased. THE FCC REGULATION WARNING (for USA) This equipment has been tested and found to comply with the limits for a Class B digital device, pursuant to Part 15 of the FCC Rules. These limits are designed to provide reasonable protection against harmful interference in a residential installation. This equipment generates, uses, and can radiate radio frequency energy and, if not installed and used in accordance with the instructions, may cause harmful interference to radio communications. However, there is no guarantee that interference will not occur in a particular installation. If this equipment does cause harmful interference to radio or television reception, which can be determined by turning the equipment off and on, the user is encouraged to try to correct the interference by one or more of the following measures: Reorient or relocate the receiving antenna. Increase the separation between the equipment and receiver. Connect the equipment into an outlet on a circuit different from that to which the receiver is connected. Consult the dealer or an experienced radio/TV technician for help. Unauthorized changes or modification to this system can void the user’s authority to operate this equipment. Notice regarding disposal (EU only) When this “crossed-out wheeled bin” symbol is displayed on the product, owner’s manual, battery, or battery package, it signifies that when you wish to dispose of this product, manual, package or battery you must do so in an approved manner. Do not discard this product, manual, package or battery along with ordinary household waste. Disposing in the correct manner will prevent harm to human health and potential damage to the environment. Since the correct method of disposal will depend on the applicable laws and regulations in your locality, please contact your local administrative body for details. If the battery contains heavy metals in excess of the regulated amount, a chemical symbol is displayed below the “crossedout wheeled bin” symbol on the battery or battery package. * All product names and company names are the trademarks or registered trademarks of their respective owners. 3 Introduction Thank you for purchasing the Korg KAOSS PAD QUAD dynamic effect processor. To enjoy the KAOSS PAD QUAD to the fullest potential, please read this manual carefully and use the KAOSS PAD QUAD only as directed. Main features Create custom KAOSS effects combinations You can combine up to four different effects to create your custom KAOSS effect combinations, with literally hundreds of possibilities. Since switching is as easy as hitting a button and touching the touch pad, you can also swap effects as often as desired as the song progresses. Total control and smooth playability Simply touch, tap or rub your finger across the surface of the touch pad, and you will be in total control of the effects. Flexible Looping In addition to the normal Looper function, the KAOSS PAD QUAD features a Reverse Looper, and a Loop Slicer that slices recorded samples and then loops them automatically between manually adjusted points. You can switch the type of the Looper during playback. These newly-designed Looper effects increase the variety of performance possibilities. 4 New Vinyl Break effect The Vinyl Break effect simulates how a turntable platter slows down gradually before stopping. The effect also simulates Scratch play on a turntable. These turntable effects can be useful for DJ performances. Tap Tempo and Auto BPM The KAOSS PAD QUAD’s Auto BPM circuit derives tempo information from any audio source and can sync effects to play in time. You can also tap the Tap button along with the beat to sync with the music’s BPM. Freeze function Pressing the FREEZE button while touching the pad will memorize your position on the pad, allowing you to remove your finger and keep the effect(s) playing. Since each effect module features its own FREEZE button, the looper can play a phrase repeatedly using the same “frozen” effect, while you control other effects via the touch pad. Creative freedom is all yours. Turning an effect on or off, or changing the effect within one of the four banks, will call up the effect with the “frozen” position on the pad. Getting ready Connections AC AC ADAPTER MIXER, DJ MIXER CD PLAYER Connecting your monitor amp or mixer to the output jacks Connect the KAOSS PAD QUAD’s LINE OUT jacks to your mixer or powered monitors (amplified speakers). If you’re using headphones, connect them to the PHONES jack. TIP The KAOSS PAD QUAD’s sound will still be out- put from the LINE OUT jacks even if headphones are connected. Connecting your mic or audio source to the input jacks If you’re using a mic, connect it to the MIC jack. If you want to connect a sampler or other audio source device, connect its output jacks to the KAOSS PAD QUAD’s LINE IN jacks. Always connect devices to your KAOSS PAD QUAD with the power turned off. Careless operation can damage your speaker system or cause other issues. Connecting the KAOSS PAD QUAD to send/return jacks You can use the KAOSS PAD QUAD as an external effect unit by connecting it to the send and return jacks of a mixer. For this connection, set the CONNECTION switch to SEND. DIRECT: Both input and effect sounds will be output from the KAOSS PAD QUAD. When you are not touching the touch pad, the input sound will be output as is. “Controlling the effect depth (p.7)” SEND: Only the effect sound (not the input sound) will be output from the KAOSS PAD QUAD. TIP For more information on the send and return jacks, refer to the owner’s manual for the device that you are connecting. TIP When you are using the KAOSS PAD QUAD as an external effects unit, the return level may be lower than expected. In such cases, adjust the input level on the KAOSS PAD QUAD. “Adjusting the volume (p.6)” If you are not using a mic, turn the MIC VOLUME knob all the way down. 5 Operation will not be applied. Using the power switch Adjusting the volume 1. Connect the KAOSS PAD QUAD to your other equipment as shown in the diagrams on the preceding pages, and connect the AC adapter to an electrical outlet. 1. Use the INPUT VOLUME knob to adjust the input level. Adjust the level as high as possible without making the peak indicator light up red when audio is input from the connected equipment. If you are using the mic jack, adjust the MIC VOLUME knob as appropriate for the sensitivity of the mic, so that the sound is not distorted. 2. If you are listening through headphones, use the PHONES VOLUME knob to adjust the headphone level. TIP The PHONES VOLUME knob does not affect the Never use any AC adapter other than the one that’s included. 2. Press the Power button to turn the KAOSS PAD QUAD on. The display will light up. To turn the KAOSS PAD QUAD off, press and hold down the Power button until the display indicators turn off. The settings will not be retained after the power is turned off. TIP The initial factory setting is “Ena” for the Auto Power Off function. level at the LINE OUT jack. Auto Power Off The KAOSS PAD QUAD features an Auto Power Off function, which turns the unit off automatically if the unit is left unused for approximately four hours. TIP If any sound is being input, this function will not kick in. Disabling the Auto Power Off function Follow the steps below to disable the Auto Power Off function. 1. Turn the KAOSS PAD QUAD on while pressing and holding down the 1DELAY button. The unit will indicate the current settings on the display. 2. Rotate the BPM knob to select “dis” on the display. 3. Press the TAP button to store this setting. The unit will automatically restart. 4. To enable the Auto Power Off function, turn the KAOSS PAD QUAD on while pressing and holding down the 1DELAY button. Rotate the BPM knob to select “Ena” on the display, then press the TAP button. TIP If you turn the unit off without pressing the TAP 6 button in the steps above, the changes to the setting Selecting an effect The KAOSS PAD QUAD features four effect modules (1–4). You can assign a different effect to each of these four models. Touching the touch pad will cause all selected effects to be applied to the sound. You can also continue applying the effects by pressing the FREEZE button. “Freeze (p.7)” TIP Effects are applied in ascending order of the effect modules (1 to 4). 1. Select an effect by pressing the corresponding Effect Type button. The selected Effect Type button indicator will light up. 2. To turn the effect off, press the illuminated Effect Type button. The Effect Type button indicator will go dark and the corresponding effect turns off. 3. To switch to a different effect for an effect module, press the corresponding Effect Type button. A different effect will be selected for that effect module. TIP Some combinations of certain effects may dis- tort the sound. Controlling the effect depth Use the FX DEPTH knob to adjust the depth of the effect. Rotating the knob all the way to the left will turn the effect off. Rotating the knob all the way to the right will maximize the effect depth. INPUT the sound of the “frozen” effect modules. However, the sound of “non-frozen” effect modules will change. 2. Press the FREEZE button again to cancel the Freeze function. TIP If you press the FREEZE button again immedi- ately after you cancel the Freeze function, the same touch pad position information will be recalled. OUTPUT During performance, if you rotate the FX DEPTH knob all the way to the left or release your fingers from the touch pad, the effect sound will continue until its delay or reverb sound decays and dissipates. Touch pad LED The touch pad LED lights up in different patterns depending on the selected effects, the Freeze or BPM setting, and operation of the touch pad. Adjusting the brightness of the touch pad LED Using the touch pad You can control the sound by using your finger to rub or tap the touch pad. TIP Affix the included protective sheet to the touch pad before using it. Touch pad care Never press the touch pad with excessive force, or place heavy objects on it. It may crack or break if handled roughly. Press the touch pad only with your finger, since rubbing or pressing the touch pad with a sharp object will scratch it. To clean the touch pad, wipe it lightly with a soft dry cloth. Do not use solvents such as thinner, since this may cause deformation. Freeze If you press the FREEZE button, the KAOSS PAD QUAD will remember the current touch pad position at the time you press the button, and will continue to apply the same effects. You can use the Freeze function for each effect module. Even if you switch the effects inside the effect modules, the unit remembers the touch pad position. 1. While your finger is on the touch pad, press the FREEZE button. The effect sound being used at that point will be retained. TIP Touching the touch pad will not change 1. While pressing and holding down the LPF button, turn on the power to the KAOSS PAD QUAD. The touch pad LED will light up, and the brightness value will appear on the display. The higher the value, the brighter the LED. 2. Rotate the BPM knob to adjust the brightness. 3. Press the TAP button to store the setting. The unit automatically restarts. TIP If you turn the unit off without pressing the TAP button as described in the step above, changes to the setting will not be applied. TIP The initial factory setting is maximum brightness. Specifying the BPM What is BPM? BPM (Beats Per Minute) is the tempo of the song expressed as the number of beats (quarter notes) that occur in one minute. A higher BPM value means a faster tempo. TIP When you turn on the KAOSS PAD QUAD, the BPM will be set to 120.0. Manually setting the BPM Use the BPM knob to adjust the BPM value. TIP The Auto BPM is automatically turned off. 7 Using Tap Tempo to set the BPM If you’re not certain of the BPM value of a song, you can set the BPM by pressing the TAP button in rhythm with the beat of the song. Press the TAP button three or more times in rhythm with the beat of the song. The KAOSS PAD QUAD will detect the interval at which you press the button, the corresponding BPM value will appear in the display, and that BPM value will be set. Auto BPM detection The KAOSS PAD QUAD can set the BPM value automatically by detecting the beat of the song. If the song’s BPM changes, the KAOSS PAD QUAD’s BPM value will change in sync. 1. Press and hold down the TAP button to turn on Auto BPM detection. The AUTO indicator will light up. The BPM of the incoming audio source will be detected automatically. If the KAOSS PAD QUAD is unable to detect the BPM Press the TAP button several times in time with the beat of the song; the KAOSS PAD QUAD will automatically detect the BPM using the beat you manually tapped as a guideline. Because of the way that the Auto BPM function operates, it may erroneously detect a value that is 1/2 or 2/3 of the correct BPM value, or small deviations may arise. In such cases, you can use the TAP button to make compensations. If you press the TAP button while Auto BPM detection is active, the value you specify by tapping will become the center value of the BPM range. TIP It’s not possible to detect the BPM value from music that does not have a clear sense of beat. The detectable BPM range is from 80 to 160. Turning off Auto BPM Press and hold down the TAP button until the AUTO indicator goes dark. The Auto BPM function will turn off, and the unit will use the BPM value obtained at the point you turned off the function. 8 Effects guide 1. Looper category LOOPER The Looper samples (records) a phrase and plays it back repeatedly. You can add some variety to a song by looping a phrase while changing the length of the phrase by rubbing the touch pad up and down with your finger. TIP When your finger touches the touch pad, re- cording will start. As soon as a phrase is recorded, the phrase will play repeatedly. REV LOOPER (REVERSE LOOPER) As you touch the touch pad with your finger, a phrase will play in reverse. You can play a phrase repeatedly while changing the length of the phrase by rubbing the touch pad up and down with your finger. TIP The Looper always records the input audio, and starts looping as soon as you touch the touch pad. LOOP SLICER A sampled phrase of one measure can be sliced into parts of various length. You can assign these parts onto the x axis of the touch pad, then play the desired parts repeatedly. TIP The Looper always records the input audio, and starts looping as soon as you touch the touch pad. GRAIN SHIFTER The looper samples a sound for a short period of time on a certain cycle, and plays it repeatedly. This effect is useful for sounds that change their tone frequently. VINYL BREAK This effect simulates the sound heard when a turntable is stopped. Rubbing the touch pad will simulate the scratch technique. 2. Mod category 4. Delay/Rev category DIST (DISTORTION) 1DELAY This effect distorts the input sound. Distortion will add an edginess to the sound. This effect delays the input sound and plays just one delay sound. DECIMATOR DELAY This effect reduces the sampling frequency or data bit length, creating a gritty and rough cheap sampler sound. This is a standard stereo delay effect. DUCKING COMP This compressor effect responds to the bass range of the input sound. It emphasizes offbeats, creating a well-framed sound. TIP The effect may be subtle under certain circum- stances. FLANGER This effect adds a substantial swell and rolling pitch. It is very effective with sounds that contain a lot of harmonics. TAPE ECHO This effect simulates a tape echo, which reproduces distortion or tonal changes on magnetic tapes. REVERB This effect simulates the ambient reverberation of a hall. DELAY REVERB This effect combines the DELAY and REVERB effects. First the DELAY effect is applied, followed by the REVERB effect. PHASER This effect offsets the phase of the sound, creating a swell. 3. Filter category LPF This filter cuts the treble and boosts the bass. HPF This filter cuts the bass and boosts the treble. BPF+ This filter emphasizes a certain band based on the current touch pad position. JET This filter creates an effect of the high swishing whine of a jet plane. PITCH SHIFTER This filter changes the pitch of the input sound. 9 Specifications Main controllers Touch pad, EFFECT TYPE button, FX DEPTH knob Connectors LINE OUT L/R (RCA jacks), LINE IN L/R (RCA jacks), MIC IN (unbalanced 6.3 mm phone jack), HEADPHONES (6.3 mm stereo phone jack) Power supply DC9V Dimensions and weight 185 (W) x 213 (D) x 44 (H) mm, 754g 7.28” x 8.39” x 1.73”, 1.66 lbs. Operating temperature 0–+40 ˚C (non-condensing) Included items AC adapter, protective sheet for touch pad * Specifications and appearance are subject to change without notice for improvement. Parts of the KAOSS PAD QUAD 11 12 13 1 2 3 6 4 7 8 9 5 10 10 1. Effect type button 2. FREEZE button 3. Peak indicator 4. INPUT VOLUME knob 5. FX DEPTH knob 6. Display 7. BPM knob 8. AUTO indicator 9. TAP button 10.Touch pad 11.MIC VOLUME knob 12.Power button 13.PHONES VOLUME knob Précautions Emplacement L’utilisation de cet instrument dans les endroits suivants peut en entraîner le mauvais fonctionnement. • En plein soleil • Endroits très chauds ou très humides • Endroits sales ou fort poussiéreux • Endroits soumis à de fortes vibrations • A proximité de champs magnétiques Alimentation Branchez l’adaptateur secteur mentionné à une prise secteur de tension appropriée. Evitez de brancher l’adaptateur à une prise de courant dont la tension ne correspond pas à celle pour laquelle l’appareil est conçu. Interférences avec d’autres appareils électriques Les postes de radio et de télévision situés à proximité peuvent par conséquent souffrir d’interférences à la réception. Veuillez dès lors faire fonctionner cet appareil à une distance raisonnable de postes de radio et de télévision. Maniement Pour éviter de les endommager, manipulez les commandes et les boutons de cet instrument avec soin. Note concernant les dispositions (Seulement EU) Quand un symbole avec une poubelle barrée d’une croix apparait sur le produit, le mode d’emploi, les piles ou le pack de piles, cela signifie que ce produit, manuel ou piles doit être déposé chez un représentant compétent, et non pas dans une poubelle ou toute autre déchetterie conventionnelle. Disposer de cette manière, de prévenir les dommages pour la santé humaine et les dommages potentiels pour l'environnement. La bonne méthode d'élimination dépendra des lois et règlements applicables dans votre localité, s’il vous plaît, contactez votre organisme administratif pour plus de détails. Si la pile contient des métaux lourds au-delà du seuil réglementé, un symbole chimique est affiché en dessous du symbole de la poubelle barrée d’une croix sur la pile ou le pack de piles. * Tous les noms de produits et de sociétés sont des marques commerciales ou déposées de leur détenteur respectif. Entretien Lorsque l’instrument se salit, nettoyez-le avec un chiffon propre et sec. Ne vous servez pas d’agents de nettoyage liquides tels que du benzène ou du diluant, voire des produits inflammables. Conservez ce manuel Après avoir lu ce manuel, veuillez le conserver soigneusement pour toute référence ultérieure. Evitez toute intrusion d’objets ou de liquide Ne placez jamais de récipient contenant du liquide près de l’instrument. Si le liquide se renverse ou coule, il risque de provoquer des dommages, un courtcircuit ou une électrocution. Veillez à ne pas laisser tomber des objets métalliques dans le boîtier (trombones, par ex.). Si cela se produit, débranchez l’alimentation de la prise de courant et contactez votre revendeur korg le plus proche ou la surface où vous avez acheté l’instrument. 11 Introduction Nous vous remercions d’avoir choisi le processeur d’effets dynamique Korg KAOSS PAD QUAD. Afin de pouvoir exploiter au mieux toutes les fonctions du KAOSS PAD QUAD, veuillez lire attentivement ce manuel et utiliser l’instrument de la manière préconisée. Caractéristiques principales Création de combinaisons personnelles d’effets KAOSS Vous pouvez assembler jusqu’à quatre effets différents pour créer des ensembles d’effets KAOSS très personnels. Les possibilités de combinaisons se comptent par centaines. Le changement d’effet se faisant d’une simple pression sur un bouton et du pad tactile, vous pouvez changer d’effet autant de fois que vous le voulez au cours d’un morceau. Contrôle total et plaisir de jeu inégalé Touchez, tapez ou frottez du doigt la surface du pad tactile pour contrôler parfaitement les effets. Boucles flexibles à souhait En plus de la fonction “Looper” traditionnelle, le KAOSS PAD QUAD propose les fonctions “Reverse Looper” et “Loop Slicer”. Cette dernière “tranche” les échantillons puis les met automatiquement en boucle entre deux points choisis manuellement. De plus, vous pouvez changer de type de fonction “Loop” en cours de reproduction. Ces nouvelles fonctions de boucle étendent encore les possibilités de jeu. 12 Nouvel effet ‘Vinyl Break’ L’effet “Vinyl Break” simule la façon dont une platine vinyle ralentit progressivement avant de s’arrêter. Cet effet simule aussi l’effet Scratch sur un vinyle. Ces effets de platine vinyle sont principalement destinés aux DJ. ‘Tap Tempo’ et ‘Auto BPM’ Le circuit “Auto BPM” du KAOSS PAD QUAD détecte les informations de tempo de n’importe quelle source audio et peut synchroniser les effets avec ce tempo. Vous pouvez aussi régler la valeur BPM en tapant sur le bouton Tap selon le rythme de la musique. Fonction ‘Freeze’ En appuyant sur le bouton FREEZE tout en touchant le pad, vous mémorisez la position sur le pad, ce qui vous permet de relâcher le pad tout en conservant l’effet. Comme chaque module dispose de son propre bouton FREEZE, vous pouvez “geler” un module à la fois pour produire son effet en boucle tandis que vous continuez à piloter les autres modules avec le pad tactile. Votre liberté artistique a toute latitude. Quand vous changez d’effet sur un module que vous avez “gelé”, le son du nouvel effet adopte automatiquement le réglage correspondant à la position “gelée” sur le pad. Préparations Connexions SECTEUR ADAPTATEUR SECTEUR MÉLANGEUR, MÉLANGEUR DJ LECTEUR CD Connexion d’enceintes actives ou d’une console de mixage aux sorties Branchez les prises LINE OUT du KAOSS PAD QUAD aux entrées de votre console de mixage ou de vos enceintes actives. Si vous utilisez un casque, branchez-le à la prise PHONES. ASTUCE: Le son du KAOSS PAD QUAD est toujours envoyé aux prises LINE OUT même quand vous branchez un casque. Connexion d’un micro ou d’un dispositif audio aux entrées Si vous utilisez un micro, branchez-le à la prise MIC. Vous pouvez brancher les sorties d’un échantillonneur ou d’une autre source audio aux prises LINE IN du KAOSS PAD QUAD. Coupez toujours l’alimentation avant de brancher des périphériques au KAOSS PAD QUAD. Un mauvais maniement risque d’endommager vos enceintes ou d’entraîner d’autres problèmes. Si vous n’utilisez pas de micro, réglez la commande MIC VOLUME au minimum. Connexion du KAOSS PAD QUAD à des départ/retour Vous pouvez utiliser le KAOSS PAD QUAD comme processeur d’effet externe et le brancher aux prises de départ et de retour d’une console de mixage. Pour cette connexion, réglez le commutateur CONNECTION sur “SEND”. DIRECT: Le signal d’entrée et le signal d’effet sont transmis par le KAOSS PAD QUAD. Si vous ne touchez pas le pad tactile, le signal d’entrée est retransmis tel quel. “Réglage de l’intensité de l’effet (p.15)” SEND: Seul le signal d’effet (et non le signal d’entrée) est transmis par le KAOSS PAD QUAD. ASTUCE Pour en savoir plus sur les prises de départ et de retour, voyez le mode d’emploi du dispositif branché. ASTUCE Quand vous utilisez le KAOSS PAD QUAD comme processeur d’effet externe, le niveau de retour peut être trop faible. Dans ce cas, réglez le niveau d’entrée sur le KAOSS PAD QUAD. “Réglage du volume(p.14)” 13 Fonctionnement ASTUCE Si vous coupez l’alimentation sans appuyer sur le bouton TAP ci-dessus, le changement de réglage n’est pas appliqué. ASTUCE A la sortie d’usine, la fonction “Auto Power Interrupteur d’alimentation 1. Branchez le KAOSS PAD QUAD à votre matériel en vous référant aux illustrations des pages précédentes puis branchez l’adaptateur secteur à une prise de courant. N’utilisez jamais d’autre adaptateur secteur que l’adaptateur fourni. 2. Appuyez sur l’interrupteur d’alimentation pour mettre le KAOSS PAD QUAD sous tension. L’écran s’allume. Pour mettre le KAOSS PAD QUAD hors tension, maintenez l’interrupteur d’alimentation enfoncé jusqu’à ce que l’écran s’éteigne. Les réglages ne sont pas conservés après la mise hors tension. Mise hors tension automatique Le KAOSS PAD QUAD dispose d’une fonction “Auto Power Off” qui met automatiquement l’appareil hors tension s’il reste inutilisé durant environ quatre heures. ASTUCE Si un signal d’entrée arrive, l’instrument n’est pas mis hors tension. Désactivation de la fonction ‘Auto Power Off’ 14 Effectuez les opérations suivantes pour désactiver la fonction “Auto Power Off”. 1. Mettez le KAOSS PAD QUAD sous tension tout en maintenant le bouton 1DELAY enfoncé. L’écran affiche le réglage en vigueur à l’écran. 2. Tournez la commande BPM pour sélectionner “dis” à l’écran. 3. Appuyez sur le bouton TAP pour sauvegarder ce réglage. L’instrument redémarre automatiquement. 4. Pour activer la fonction “Auto Power Off”, mettez le KAOSS PAD QUAD hors tension tout en maintenant le bouton 1DELAY enfoncé. Tournez la commande BPM pour sélectionner “Ena” à l’écran puis appuyez sur le bouton TAP. Off” est réglée sur “Ena”. Réglage du volume 1. Utilisez la commande INPUT VOLUME pour régler le niveau d’entrée. Choisissez un niveau aussi élevé que possible tout en évitant que le témoin PEAK ne s’allume en rouge quand il reçoit des signaux audio. Si vous utilisez un micro, réglez la commande MIC VOLUME en fonction de la sensibilité du micro afin d’éviter une distorsion du signal audio. 2. Si vous écoutez au casque, réglez le volume du casque avec la commande PHONES VOLUME. ASTUCE La commande PHONES VOLUME n’influen- ce pas le niveau de sortie de la prise LINE OUT. Sélection d’un effet Le KAOSS PAD QUAD dispose de quatre modules d’effet (1~4). Vous pouvez assigner un effet différent à chacun de ces modules. En touchant le pad tactile, vous appliquez tous les effets sélectionnés au son. Vous pouvez aussi maintenir (“geler”) les effets en appuyant sur le bouton FREEZE. “Freeze (p.15)” ASTUCE Les effets sont appliqués dans l’ordre des modules (1~4). 1. Choisissez un type d’effet en appuyant sur le bouton de type d’effet correspondant. Le témoin du bouton de type d’effet sélectionné s’allume. 2. Pour couper l’effet, appuyez sur le bouton de type d’effet allumé. Le témoin du bouton de type d’effet s’éteint et l’effet correspondant est coupé. 3. Pour changer l’effet d’un module, appuyez sur le bouton de type d’effet voulu. Le module en question utilise alors le nouvel effet. ASTUCE Certaines combinaisons de certains effets peuvent entraîner de la distorsion. Réglage de l’intensité de l’effet Utilisez la commande FX DEPTH pour régler l’intensité de l’effet. Tournez la commande à bout de course vers la gauche pour couper le signal d’effet. Inversement, tournez la commande à fond vers la droite pour obtenir l’intensité d’effet maximale. INPUT OUTPUT Si vous tournez la commande FX DEPTH à fond vers la gauche durant le jeu ou si vous relâchez le pad tactile, le signal d’effet reste audible jusqu’à la disparition naturelle du delay ou de la réverbération. Pad tactile Vous pouvez contrôler le son en glissant ou en tapant du doigt sur le pad tactile. ASTUCE: Avant d’utiliser le pad tactile, apposez le film protecteur sur le pad. Précautions liées au pad tactile N’exercez jamais de force excessive sur le pad tactile et évitez d’y déposer des objets lourds. Il risque de se fêler ou de se casser en cas de maniement brutal. Jouez uniquement avec le doigt sur le pad tactile: si vous le frottez ou appuyez dessus avec un objet acéré, vous risquez de le griffer. Nettoyez le pad tactile en le frottant délicatement avec un chiffon sec et doux. N’utilisez pas de solvants comme de la térébenthine car cela peut entraîner des déformations. 1. Appuyez sur le bouton FREEZE quand votre doigt est sur le pad. Les réglages d’effet correspondant à cette position sont mémorisés. ASTUCE Les modules pour lesquels le bouton FREE- ZE est activé ne changent pas leurs réglages d’effet quand vous touchez le pad. Cependant, l’effet des modules non “gelés” change. 2. Appuyez de nouveau sur le bouton FREEZE pour couper la fonction “Freeze”. ASTUCE Si vous appuyez de nouveau sur le bouton FREEZE immédiatement après avoir coupé la fonction “Freeze”, les réglages d’effet correspondant à la position mémorisée au préalable sont à nouveau chargés. Diode du pad tactile La diode du pad tactile s’allume selon différents motifs en fonction des effets sélectionnés, des réglages “Freeze” ou “BPM” et de l’utilisation faite du pad. Réglage de la luminosité de la diode du pad tactile 1. Maintenez le bouton LPF enfoncé et mettez le KAOSS PAD QUAD sous tension. La diode du pad tactile s’allume et la valeur de luminosité s’affiche à l’écran. Plus la valeur est élevée, plus la diode est lumineuse. 2. Réglez la luminosité avec la commande BPM. 3. Appuyez sur le bouton TAP pour mémoriser le réglage. L’instrument redémarre automatiquement. ASTUCE Si vous coupez l’alimentation sans appuyer sur le bouton TAP ci-dessus, le changement de réglage n’est pas mémorisé. ASTUCE A la sortie d’usine, la luminosité a son réglage maximum. Freeze Si vous appuyez sur le bouton FREEZE, le KAOSS PAD QUAD mémorise la position sur le pad tactile au moment où vous appuyez sur le bouton et continue à appliquer les effets même si vous relâchez le pad. Vous pouvez utiliser la fonction “Freeze” pour chaque module d’effet. La position mémorisée sur le pad s’applique même quand vous changez d’effet au sein d’un module. Réglage du BPM Qu’est-ce que le BPM ? BPM (Beats Per Minute) est le tempo du morceau exprimé sous la forme du nombre de temps (noires) par minute. Plus la valeur du BPM est élevée, plus le tempo est rapide. ASTUCE Quand vous mettez le KAOSS PAD QUAD soustension, le BPM est réglé sur 120,0. 15 Réglage manuel du BPM Utilisez la commande BPM pour régler la valeur BPM. ASTUCE La fonction “Auto BPM” est alors automati- quement désactivée. Régler la valeur BPM avec ‘Tap Tempo’ Si vous ne connaissez pas la valeur BPM d’un morceau, vous pouvez la déterminer en appuyant sur le bouton TAP selon la pulsation du morceau. Appuyez au moins trois fois sur le bouton TAP en suivant la pulsation du morceau. Le KAOSS PAD QUAD détecte la vitesse à laquelle vous appuyez sur le bouton. Il affiche la valeur BPM correspondante à l’écran et l’adopte. Fonction AUTO BPM Le KAOSS PAD QUAD peut régler automatiquement la valeur du BPM en identifiant le temps du morceau. Si le BPM du morceau change, le BPM du KAOSS PAD QUAD changera de manière synchronisée. 1. Maintenez le bouton TAP enfoncé pour activer la fonction “Auto BPM”. Le témoin AUTO s’allume. La valeur BPM du signal d’entrée audio est automatiquement détectée. Si le KAOSS PAD QUAD n’arrive pas à détecter le BPM Appuyez plusieurs fois sur la touche TAP en suivant le temps du morceau. Le KAOSS PAD QUAD détectera automatiquement le BPM en utilisant les battements de votre doigt. Les modalités de fonctionnement d’AUTO BPM rendent possible la détection par erreur d’une valeur représentant 1/2 ou 1/3 de celle du BPM correct, ou bien de légères déviations peuvent survenir. Dans ce cas, vous pouvez utiliser la touche TAP pour effectuer des corrections. Si vous appuyez sur la touche TAP alors que AUTO BPM est activé, la valeur spécifiée en tapant manuellement deviendra la valeur centrale d’une gamme de valeurs de BPM. ASTUCE Il n’est pas possible de détecter la valeur de BPM d’un morceau dont les temps ne sont pas prononcés. La gamme de BPM identifiables est comprise entre 80 et 160. 16 Désactivation de la fonction ‘Auto BPM’ Maintenez le bouton TAP enfoncé jusqu’à ce que le témoin AUTO s’éteigne. La fonction “Auto BPM” est désactivée et l’instrument utilise la valeur BPM en vigueur lorsque vous avez désactivé la fonction. Guide des effets 1. Catégorie ‘Looper’ LOOPER Le “Looper” échantillonne (enregistre) des phrases et les reproduit en boucle. Vous pouvez modifier la longueur des phrases durant la reproduction en glissant le doigt sur le pad vers le haut ou vers le bas. ASTUCE L’enregistrement démarre quand votre doigt touche le pad. Dès qu’une phrase est enregistrée, elle est reproduite en boucle. 2. Catégorie ‘Mod’ DIST (DISTORTION) Cet effet ajoute de la distorsion au signal d’entrée et rend le son plus rugueux. DECIMATOR Cet effet réduit la fréquence d’échantillonnage ou le débit en bits et recrée l’effet “lo-fi” d’un vieil échantillonneur. DUCKING COMP Ce compresseur est déclenché par les basses fréquences du signal d’entrée. Il souligne les temps pairs et produit un son bien cadré. ASTUCE L’effet obtenu peut être à peine perceptible REV LOOPER (REVERSE LOOPER) selon les circonstances. Quand vous touchez le pad du doigt, une phrase est reproduite à l’envers. Vous pouvez reproduire une phrase en boucle et en modifier la longueur en glissant le doigt sur le pad vers le haut ou vers le bas. ASTUCE Le Looper enregistre les signaux audio en- FLANGER trant en continu et les met en boucle dès que vous touchez le pad tactile. LOOP SLICER Une phrase échantillonnée d’une mesure peut être “tranchée” en sections de longueurs différentes. Vous pouvez assigner ces sections à l’axe X du pad et les reproduire en boucle. ASTUCE Le Looper enregistre les signaux audio en- trant en continu et les met en boucle dès que vous touchez le pad tactile. GRAIN SHIFTER Le Looper enregistre un bref signal audio selon un certain cycle et le reproduit en boucle. Cet effet est particulièrement destiné aux sons dont le timbre change fréquemment. VINYL BREAK Cet effet simule le son obtenu lors de l’arrêt d’une platine vinyle. Frottez le pad tactile pour simuler l’effet scratch sur vinyle. Cet effet gonfle considérablement le son et plus particulièrement son timbre. Il donne très bien avec des sons contenant beaucoup d’harmoniques. PHASER Cet effet déphase du son, rendant ce dernier plus vaste. 3. Catégorie ‘Filter’ LPF Ce filtre coupe l’aigu et accentue le grave. HPF Ce filtre coupe le grave et accentue l’aigu. BPF+ Ce filtre accentue une certaine bande dépendant de la position du doigt sur le pad tactile. JET Ce filtre simule le son produit par un avion à réaction. PITCH SHIFTER Cet effet change la hauteur du signal d’entrée. 17 4. Catégorie ‘Delay/Rev’ 1DELAY Cet effet retarde le signal d’entrée et ne produit pas de répétitions. DELAY Cet effet est un delay stéréo standard. TAPE ECHO Cet effet simule un écho à bande qui reproduit la distorsion ou les changements de timbre des bandes magnétiques. REVERB Cet effet simule la réverbération d’une salle. DELAY REVERB Cet effet combine les effets DELAY et REVERB. Il applique d’abord l’effet DELAY puis l’effet REVERB. 18 Fiche technique Contrôleurs principaux Pad tactile, Bouton de type d’effet, Commande FX DEPTH Prises LINE OUT (prises stéréo RCA/cinch), LINE IN (prises stéréo RCA/cinch), MIC IN (mini-jack asymétrique de 6,3mm), HEADPHONES (minijack stéréo de 6,3mm) Alimentation DC9V Dimensions et poids 185 (W) x 213 (D) x 44 (H) mm, 754g Température de fonctionnement Accessoires fournis 0~+40˚C (sans condensation) Adaptateur secteur, Film protecteur du pad tactile * Les caractéristiques et l’aspect du produit sont susceptibles d’être modifiés sans avis préalable en vue d’une amélioration. Description du KAOSS PAD QUAD 11 12 13 1 2 3 6 4 7 8 9 5 1. Bouton de type d’effet 2. Bouton FREEZE 3. Témoins PEAK 4. Commande INPUT VOLUME 5. Commande FX DEPTH 6. Ecran 7. Commande BPM 8. Témoin AUTO 9. Bouton TAP 10.Pad tactile 11.commande MIC VOLUME 12.Interrupteur d’alimentation 13.commande PHONES VOLUME 10 19 Vorsichtsmaßnahmen Aufstellungsort Vermeiden Sie das Aufstellen des Geräts an Orten, an denen • es direkter Sonneneinstrahlung ausgesetzt ist; • hohe Feuchtigkeit oder Extremtemperaturen auftreten können; • Staub oder Schmutz in großen Mengen vorhanden sind; • das Gerät Erschütterungen ausgesetzt sein kann. • in der Nähe eines Magnetfeldes. Stromversorgung Schließen Sie das optionale Netzteil nur an eine geeignete Steckdose an. Verbinden Sie es niemals mit einer Steckdose einer anderen Spannung. Störeinflüsse auf andere Elektrogeräte Dieser kann bei in der Nähe aufgestellten Rund-funkempfängern oder Fernsehgeräten Empfangsstörungen hervorrufen. Betreiben Sie solche Geräte nur in einem geeigneten Abstand von diesem Erzeugnis. Bedienung Vermeiden Sie bei der Bedienung von Schaltern und Reglern unangemessenen Kraftaufwand. Reinigung Bei auftretender Verschmutzung können Sie das Gehäuse mit einem trockenen, sauberen Tuch abwischen. Verwenden Sie keinerlei Flüssigreiniger wie beispielsweise Reinigungsbenzin, Verdünnungs- oder Spülmittel. Verwenden Sie niemals brennbare Reiniger. Bedienungsanleitung Bewahren Sie diese Bedienungsanleitung gut auf, falls Sie sie später noch einmal benötigen. Flüssigkeiten und Fremdkörper Stellen Sie niemals Behältnisse mit Flüssigkeiten in der Nähe des Geräts auf. Wenn Flüssigkeit in das Gerät gelangt, können Beschädigung des Geräts, Feuer oder ein elek-trischer Schlag die Folge sein. Beachten Sie, daß keinerlei Fremdkörper in das Gerät gelangen. Sollte ein Fremdkörper in das Gerät gelangt sein, so trennen Sie es sofort vom Netz. Wenden Sie sich dann an Ihren KORG-Fachhändler. 20 Hinweis zur Entsorgung (Nur EU) Wenn Sie das Symbol mit der „durchgekreuzten Mülltonne“ auf Ihrem Produkt, der dazugehörigen Bedienungsanleitung, der Batterie oder dem Batteriefach sehen, müssen Sie das Produkt in der vorgeschriebenen Art und Weise entsorgen. Dies bedeutet, dass dieses Produkt mit elektrischen und elektronischen Komponenten nicht mit dem normalen Hausmüll entsorgt werden darf. Für Produkte dieser Art existiert ein separates, gesetzlich festgelegtes Entsorgungssystem. Gebrauchte elektrische und elektronische Geräte müssen separat entsorgt werden, um ein umweltgerechtes Recycling sicherzustellen. Diese Produkte müssen bei benannten Sammelstellen abgegeben werden. Die Entsorgung ist für den Endverbraucher kostenfrei! Bitte erkundigen sie sich bei ihrer zuständigen Behörde, wo sie diese Produkte zur fachgerechten Entsorgung abgeben können. Falls ihr Produkt mit Batterien oder Akkumulatoren ausgerüstet ist, müssen sie diese vor Abgabe des Produktes entfernen und separat entsorgen (siehe oben). Die Abgabe dieses Produktes bei einer zuständigen Stelle hilft ihnen, dass das Produkt umweltgerecht entsorgt wird. Damit leisten sie persönlich einen nicht unerheblichen Beitrag zum Schutz der Umwelt und der menschlichen Gesundheit vor möglichen negativen Effekten durch unsachgemäße Entsorgung von Müll. Batterien oder Akkus, die Schadstoffe enthalten, sind auch mit dem Symbol einer durchgekreuzten Mülltonne gekennzeichnet. In der Nähe zum Mülltonnensymbol befindet sich die chemische Bezeichnung des Schadstoffes. Cd oder NiCd steht für Cadmium, Pb für Blei und Hg für Quecksilber. * Alle Produkt- und Firmennamen sind Warenzeichen oder eingetragene Warenzeichen der betreffenden Eigentümer. Vorweg Vielen Dank für Ihre Entscheidung zu einem dynamischen Effektprozessors Korg KAOSS PAD QUAD. Um alle Funktionen des KAOSS PAD QUAD kennen zu lernen und über Jahre hinaus Freude daran zu haben, müssen Sie sich diese Bedienungsanleitung vollständig durchlesen. Hauptfunktionen Erstellung eigener KAOSS-Effektkombinationen Es lassen sich bis zu vier verschiedene Effekte zu KAOSS-Effektkombinationen konfigurieren, woraus sich Hunderte von Möglichkeiten ergeben. Da die Umschaltung auf Tastendruck und Berühren des Pads erfolgen kann, lassen sich innerhalb eines Songs auch unterschiedliche Effektkombinationen verwenden. Umfassende Kontrolle—ein wahrer Kreativitätsschub ‘Tap Tempo’ und ‘Auto BPM’ Die „Auto BPM“-Schaltung des KAOSS PAD QUAD kann Tempo-Impulse von Audiomaterial ermitteln und die Effekte zu dem berechneten Tempowert synchronisieren. Andererseits können Sie den BPM-Wert sehr bequem einstellen, indem Sie den TAP-Taster im Rhythmus der Musik drücken. ‘Freeze’-Funktion Durch Drücken des FREEZE-Tasters, während Sie das Pad berühren, können Sie die aktuell verwendeten Einstellungen „einfrieren“, d.h. halten, selbst wenn Sie das Pad freigeben. Da für jedes Effektmodul ein separater FREEZE-Taster zur Verfügung steht, brauchen nicht unbedingt alle Effekteinstellungen gleichzeitig gehalten zu werden. So können Sie also ausgesprochen kreativ arbeiten. Und wenn Sie ein Effektmodul zuerst „einfrieren“ und danach einen anderen Effekttyp wählen, wird auch dafür sofort der Sound der „eingefrorenen“ Pad-Position verwendet. Berühren Sie das Pad, tappen Sie darauf oder reiben Sie darüber, um die Effekte auf eine überaus flexible Art zu beeinflussen. Flexible Loops Außer einer herkömmlichen „Looper“-Funktion bietet das KAOSS PAD QUAD einen „Reverse Looper“ und einen „Loop Slicer“. Letzterer kann das gewählte Sample in Stücke schneiden und zwischen den von Hand gewählten Positionen Schleifen abspielen. Selbst während der Looper-Wiedergabe kann eine andere dieser Schleifenfunktionen gewählt werden. Dank der neu hinzugekommenen Funktionen lässt es sich viel kreativer mit Loops arbeiten. Neuer ‘Vinyl Break’-Effekt Der „Vinyl Break“-Effekt simuliert den Effekt, der beim Anhalten eines Plattentellers auftritt und sogar das „Scratchen“ mit einem Plattenteller. Diese Effekte eignen sich natürlich in erster Linie für DJs. 21 Vorbereitungen Anschlüsse Steckdose Netzteil Mischpult, DJ-Mixer CD-Player Anschließen eines Verstärkers, Mischpults usw. an die Ausgänge Verbinden des KAOSS PAD QUAD mit den SEND/RETURN-Buchsen Verbinden Sie die LINE OUT-Buchsen des KAOSS PAD QUAD mit den Eingängen eines Mischpults oder mit Ihren Aktivboxen (d.h. Boxen mit internem Verstärker). An die Kopfhörerbuchse des PHONES kann ein optionaler Kopfhörer angeschlossen werden. TIPP Beim Anschließen eines Kopfhörers an das Wenn Sie das KAOSS PAD QUAD an die SEND/ RETURN-Buchsen eines Mischpults anschließen, können Sie es als „allgemeinen“ Effekt verwenden. In dem Fall müssen Sie den CONNECTION-Schalter auf „SEND“ stellen. DIRECT: Das KAOSS PAD QUAD gibt sowohl das Direkt- als auch das Effektsignal aus. Solange Sie das Pad nicht berühren, wird das Eingangssignal unverändert ausgegeben. „Beeinflussung des Effektanteils (p.24)” SEND: Das KAOSS PAD QUAD gibt nur das Effektsignal aus—also nicht das Direktsignal. TIPP Weitere Hinweise zur Send/Return-Verbindung KAOSS PAD QUAD werden die LINE OUT-Buchsen nicht stummgeschaltet. Anschließen eines Mikrofons oder einer Audioquelle an die Eingänge Wenn Sie ein Mikrofon verwenden möchten, müssen Sie es an die MIC-Buchse anschließen. Ein Sampler bzw. ein anderes Audiogerät muss mit den LINE IN-Buchsen des KAOSS PAD QUAD verbunden werden. Sie alle Geräte aus, bevor Sie sie mit dem KAOSS PAD QUAD verbinden. Andernfalls könnten Sie die Lautsprecher beschädigen oder Betriebsstörungen verursachen. 22 Solange Sie kein Mikrofon verwenden, sollten Sie den MIC VOLUME-Regler auf den Mindestwert stellen. mit dem Mischpult entnehmen Sie bitte dessen Bedienungsanleitung. TIPP Wenn Sie das KAOSS PAD QUAD als Send/Return-Effektprozessor nutzen, ist sein Ausgangspegel eventuell niedriger als erwartet. Das können Sie aber lösen, indem Sie den Eingangspegel des KAOSS PAD QUAD erhöhen. „Einstellen der Lautstärke (p.23)” Bedienung TIPP Wenn Sie das Gerät ausschalten, ohne vorher den TAP-Taster zu drücken, wird die neue Einstellung nicht gespeichert. TIPP Die Werksvorgabe für „Auto Power Off“ lautet Verwendung des Netzschalters 1. Schließen Sie das KAOSS PAD QUAD wie auf den vorangehenden Seiten gezeigt an und verbinden Sie sein Netzteil mit einer Steckdose. Es darf ausschließlich das beiliegende Netzteil gebraucht werden. 2. Drücken Sie den Netzschalter, um das KAOSS PAD QUAD einzuschalten. Das Display leuchtet. Um das KAOSS PAD QUAD einzuschalten, müssen Sie den Netztaster so lange gedrückt halten, bis die Display-Anzeigen erlöschen. Beim Ausschalten werden alle vorgenommenen Einstellungen wieder gelöscht. Ausschaltautomatik Das KAOSS PAD QUAD enthält eine „Auto Power Off“-Funktion, die dafür sorgt, dass es sich automatisch ausschaltet, wenn Sie es mehr als vier Stunden nicht verwenden. TIPP Diese Automatik funktioniert jedoch nicht, wenn das Gerät weiterhin Audiosignale empfängt. Deaktivieren der ‘Auto Power Off’-Funktion Zum Deaktivieren der „Auto Power Off“-Funktion gehen Sie bitte folgendermaßen vor. 1. Halten Sie den 1DELAY-Taster gedrückt, während Sie das KAOSS PAD QUAD einschalten. Das Display zeigt jetzt die aktuell verwendeten Einstellungen an. 2. Wählen Sie mit dem BPM-Regler „dis“ im Display. 3. Drücken Sie den TAP-Taster, um diese Einstellung zu speichern. Das Gerät wird automatisch neugestartet. 4. Um die „Auto Power Off“-Funktion zu aktivieren, müssen Sie den 1DELAY-Taster gedrückt halten, während Sie das KAOSS PAD QUAD einschalten. Wählen Sie mit dem BPM-Regler „Ena“ im Display und drücken Sie anschließend den TAP-Taster. „Ena“. Einstellen der Lautstärke 1. Stellen Sie mit dem INPUT VOLUME-Regler den Eingangspegel ein. Stellen Sie den Pegel so hoch wie möglich ein. Allerdings darf die PEAK-Diode selbst bei Signalspitzen niemals leuchten. Wenn Sie mit einem Mikrofonsignal arbeiten, müssen Sie den MIC VOLUME-Regler so einstellen, dass der Pegel hoch genug ist, jedoch ohne Übersteuerung zu bewirken. 2. Wenn Sie einen Kopfhörer anschließen, können Sie den Hörpegel mit dem PHONES VOLUME-Regler einstellen. TIPP Die Lautstärke der an LINE OUT anliegenden Si- gnale wird vom PHONES VOLUME-Regler nicht beeinflusst. Anwahl eines Effekts Das KAOSS PAD QUAD enthält vier Effektmodule (1–4). Diesen Modulen können unterschiedliche Effekte zugeordnet werden. Wenn Sie das Pad berühren, wird das Eingangssignal von allen gewählten Effekten bearbeitet. Wenn Sie den FREEZE-Taster aktivieren, wird das Eingangssignal selbst nach Freigabe des Pads noch mit den Effekten bearbeitet. „Freeze (p.24)” TIPP Die Effektreihenfolge entspricht der Reihenfolge der Effektmodule (1–4). 1. Um einen Effekt zu wählen, brauchen Sie nur den Taster des gewünschten Typs im Tastenfeld eines Moduls zu drücken. Der Taster des gewählten Effekttyps leuchtet. 2. Um einen Effekt wieder auszuschalten, müssen Sie den leuchtenden Effekttyptaster erneut drücken. Die Tasterdiode erlischt und der Effekt wird deaktiviert. 23 3. Um einem Modul einen anderen Effekttyp zuzuordnen, drücken Sie einfach den Taster des gewünschten Typs. Das betreffende Modul verwendet dann den neu gewählten Effekttyp. TIPP Bestimmte Effektkombinationen können zu Über- steuerung führen. Beeinflussung des Effektanteils Mit dem FX DEPTH-Regler kann der Effektanteil eingestellt werden. Wenn Sie den Regler ganz nach links drehen, werden die Effekte nicht angesprochen. Drehen Sie den Regler ganz nach rechts, um mit dem maximalen Effektanteil zu arbeiten. INPUT OUTPUT Wenn Sie den FX DEPTH-Regler während der Bearbeitung ganz nach links drehen oder das Pad freigeben, klingen Hall- und Delay-Effekte trotzdem natürlich aus. Verwendung des berührungsempfindlichen Pads Alle Fingerbewegungen auf dem berührungsempfindlichen Pad beeinflussen die Tonausgabe. TIPP Vor der ersten Verwendung sollten Sie den beiliegenden Schutzfilm auf dem Pad anbringen. Pflege des berührungsempfindlichen Pads Drücken Sie niemals mit Gewalt auf das Pad und stellen Sie keine schweren Gegenstände darauf. Bei einer all zu forschen Handhabung wird es beschädigt. Bedienen Sie das Pad nur mit den Fingern, weil andere Gegenstände es verkratzen könnten. Verwenden Sie zum Reinigen des Pads ein weiches trockenes Tuch. Benutzen Sie niemals Lösungsmittel wie Verdünner, weil das zu Verformungen führt. Freeze 24 Wenn Sie den FREEZE-Taster drücken, werden die Effekteinstellungen der aktuellen Fingerposition auf dem Pad gepuffert. Das KAOSS PAD QUAD verwendet die entsprechenden Einstellungen dann selbst, wenn Sie das Pad wieder freigeben. Jedes Effektmodul ist mit einem separaten FREEZE-Taster ausgestattet. Die gepufferte Pad-Position wird selbst beibehalten, wenn Sie für jenes Modul einen anderen Effekttyp wählen. 1. Berühren Sie das Pad und drücken Sie den FREEZE-Taster. Die über die Pad-Position gewählten Effekteinstellungen werden beibehalten. TIPP Module, deren FREEZE-Taster aktiv ist, ändern ihre Effekteinstellungen nicht mehr, wenn Sie auf dem Pad „rühren“. Nur die nicht „eingefrorenen“ Module werden von der Pad-Bedienung beeinflusst. 2. Drücken Sie den FREEZE-Taster erneut, um die „Freeze“-Funktion zu deaktivieren. TIPP Sie können den FREEZE-Taster nach Deaktivie- ren dieser Funktion erneut drücken, um wieder die zuvor gepufferten Effekteinstellungen zu verwenden. Diode des berührungsempfindlichen Pads Das Leuchtmuster der Pad-Diode richtet sich nach den gewählten Effekten, der „Freeze“- und „BPM“-Einstellung sowie der aktuellen Verwendung des Pads. Ändern der Helligkeit der Pad-Diode 1. Halten Sie den LPF-Taster gedrückt, während Sie das KAOSS PAD QUAD wieder einschalten. Die Pad-Diode leuchtet und der aktuelle Helligkeitswert erscheint im Display. Je größer der Wert, desto heller leuchtet die Diode. 2. Wählen Sie mit dem BPM-Regler die gewünschte Helligkeit. 3. Drücken Sie den TAP-Taster, um die Einstellung zu speichern. Das Gerät wird automatisch neugestartet. TIPP Wenn Sie das Gerät ausschalten, ohne vorher den TAP-Taster zu drücken, wird die neue Einstellung nicht gespeichert. TIPP Ab Werk wird der maximale Helligkeitswert verwendet. Festlegen der Taktzahl (BPM) Was bedeutet BPM? Die Taktzahl (BPM, Beats per Minute) drückt das Tempo eines Stücks als Anzahl der Taktschläge (Viertelnoten) pro Minute aus. Je höher der BPM-Wert, desto schneller das Tempo. TIPP Beim Einschalten des KAOSS PAD QUAD ist die Taktzahl auf 120,0 eingestellt. Manuelle Einstellung des BPM-Werts Mit dem BPM-Regler kann der gewünschte BPM-Wert eingestellt werden. TIPP Die „Auto BPM“-Funktion wird dann automatisch deaktiviert. Einstellen des BPM-Werts mit ‘Tap Tempo’ Taktzahlwerts ist, oder es können kleine Abweichungen auftreten. In solchen Fällen können Sie die Taste TAP verwenden, um Korrekturen vorzunehmen Wenn Sie die Taste TAP drükken, während die automatisch Taktzahl-Erkennung aktiv ist, wird der durch Antrommeln festgelegte Wert der Mittenwert des Taktzahlbereichs. TIPP Es ist nicht möglich, den Taktzahl- Wert von Musik zu ermitteln, die keinen deutlichen Takt aufweist. Der Taktzahl-Erkennungsbereich beträgt 80 bis 160. Deaktivieren von ‘Auto BPM’ Halten Sie den TAP-Taster so lange gedrückt, bis die AUTO-Diode erlischt. Die „Auto BPM“Funktion wird deaktiviert und als Tempo wird weiterhin der zuletzt ermittelte BPM-Wert verwendet. Wenn Sie den BPM-Wert eines Titels nicht genau kennen, können Sie ihn einstellen, indem Sie den TAP TEMPO-Taster im Takt des Titels drücken. Drücken Sie den TAP TEMPO-Taster mindestens drei Mal im Takt des Songs. Das KAOSS PAD QUAD ermittelt den entsprechenden BPMWert, zeigt ihn im Display an und stellt ihn ein. Automatische Taktzahl-Erkennung Der KAOSS PAD QUAD kann den Taktzahlwert automatischdurch Erkennung des Takts des Stücks einstellen. Wenn die Taktzahl sich ändert, ändert sich der Taktzahlwert des KAOSS PAD QUAD synchron damit. 1. Halten Sie den TAP-Taster gedrückt, um die „Auto BPM“-Funktion zu aktivieren. Die AUTODiode leuchtet. Jetzt wird der BPM-Wert der eingehenden Audiosignale automatisch ermittelt. Wenn der KAOSS PAD QUAD nicht die Taktzahl ermitteln kann Drücken Sie die TAP-Taste mehrmals entsprechend dem Takt des Stücks; der KAOSS PAD QUAD ermittelt automatisch die Taktzahl mit dem manuell eingetrommelten Takt als Richtlinie. Aufgrund der Weise, wie die automatische Taktzahl-Funktion arbeitet, kann fälschlich ein Wert ermittelt werden, der 1/2 oder 2/3 des korrekten 25 Die Effekte 1. ‘Looper’-Kategorie LOOPER Der „Looper“ zeichnet Phrasen auf (d.h. er „sampelt“ sie) und spielt sie wiederholt ab. Die Länge der Phrasen kann man bei laufender Wiedergabe ändern, indem man mit einem Finger auf- oder abwärts über das Pad reibt. TIPP Die Aufnahme beginnt, sobald Sie das Pad mit einem Finger berühren. Wenn Sie das Pad wieder freigeben, hält die Aufnahme an – und die Phrase wird wiederholt abgespielt. REV LOOPER (REVERSE LOOPER) Wenn Sie das Pad mit einem Finger berühren, wird eine Phrase rückwärts abgespielt. Die Länge der rückwärts abgespielten Phrase kann man bei laufender Wiedergabe ändern, indem man mit einem Finger auf- oder abwärts über das Pad reibt. TIPP Der Looper nimmt die eingehenden Audiosignale fortwährend auf und spielt eine Schleife ab, sobald Sie das Pad berühren. LOOP SLICER Eine gesampelte Phrase kann in unterschiedlich große Stücke zerteilt werden. Diese Bruchteile können der X-Achse des Pads zugeordnet und danach in einer Schleife abgespielt werden. TIPP Der Looper nimmt die eingehenden Audiosignale fortwährend auf und spielt eine Schleife ab, sobald Sie das Pad berühren. GRAIN SHIFTER Der Looper sampelt ein kurzes Audiosignal (z.B. einen Zyklus) und spielt es danach in einer Schleife ab. Dieser Effekt eignet sich besonders für Klänge mit häufigen Klangfarbenänderungen. VINYL BREAK Dieser Effekt simuliert den Klangeindruck eines anhaltenden Plattentellers. Reiben Sie über das Pad, wenn Sie „scratchen“ möchten. 26 2. ‘Mod’-Kategorie DIST (DISTORTION) Dieser Effekt verzerrt das Eingangssignal. Das führt zu einer rauen, kratzbürstigen Wiedergabe. DECIMATOR Dieser Effekt reduziert die Sampling-Frequenz oder Wortbreite (Anzahl der Bits) und simuliert so den „LoFi“-Klang eines alten oder billigen Samplers. DUCKING COMP Dieser Kompressor wird von den Bassfrequenzen des eingehenden Audiosignals ausgelöst. Hierdurch werden die geradzahligen Taktschläge und Schlagunterteilungen hervorgehoben. TIPP Bei bestimmtem Audiomaterial ist dieser Effekt kaum hörbar. FLANGER Versieht das Eingangssignal mit einem Schwelleffekt, der vor allem die Klangfarbe beeinflusst. Daher eignet er sich besonders für obertonreiche Signale. PHASER Dieser Effekt erzeugt einen periodischen Phasenversatz, der ebenfalls an- und abschwillt. 3. ‘Filter’-Kategorie LPF Dieses Filter unterdrückt die Höhen und hebt den Bass hervor. HPF Dieses Filter unterdrückt den Bass und hebt die Höhen hervor. BPF+ Dieses Filter hebt ein relativ schmales Frequenzband hervor, das man über die Fingerposition auf dem Pad wählen kann. JET Dieses Filter simuliert den hochfrequenten „Wuusch“ eines Düsenjägers. PITCH SHIFTER Dieser Effekt ändert die Tonhöhe des eingehenden Signals. 4. ‘Delay/Rev’-Kategorie 1DELAY Dieser Effekt verzögert das Eingangssignal, erzeugt aber keine Wiederholungen. DELAY Hierbei handelt es sich um ein herkömmliches Stereo-Delay. TAPE ECHO Dieser Effekt simuliert ein bandbasiertes Echogerät, das nicht nur Wiederholungen, sondern auch leichte Unsauberkeiten erzeugt. REVERB Dieser Effekt simuliert die Akustik eines Konzertsaals. DELAY REVERB Dies ist eine Kombination des DELAY-Effekts mit REVERB. Der DELAY-Effekt bearbeitet das Signal zuerst. Sein Ausgangssignal geht dann zum REVERB-Effekt. 27 Technische Daten Wichtigste Bedienelemente Berührungsempfindliches Pad, Effekttypwahltaster, FX DEPTH-Regler Anschlüsse LINE OUT (RCA/Cinch, stereo), LINE IN (RCA/ Cinch, stereo), MIC IN (unsymmetrische 6,3mmKlinkenbuchse), HEADPHONES (6,3mmStereoklinkenbuchse) Stromversorgung DC9V Abmessungen und Gewicht 185 (B) x 213 (T) x 44 (H) mm, 754g Betriebstemperatur 0–+40˚C (ohne Kondensbildung) Lieferumfang Netzteil, Schutzfilm für das berührungsempfindliche Pad * Änderungen der technischen Daten und des Designs ohne vorherige Ankündigung vorbehalten. Bedienelemente des KAOSS PAD QUAD 11 12 13 1 2 3 6 4 7 8 9 5 10 28 1. Effekttypwahltaster 2. FREEZE-Taster 3. PEAK-Diode 4. INPUT VOLUME-Regler 5. FX DEPTH-Regler 6. Display 7. BPM-Regler 8. AUTO-Diode 9. TAP-Taster 10.Berührungsempfindliches Pad 11.MIC VOLUME-Regler 12.Netzschalters 13.PHONES VOLUME-Regler 安全上のご注意 ご使用になる前に必ずお読みください ここに記載した注意事項は、製品を安全に正しくご使用いただき、 あなたや他の方々への危害や損害を未然に防ぐためのものです。 注意事項は誤った取り扱いで生じる危害や損害の大きさ、または切 迫の程度によって、内容を「警告」、 「注意」の 2 つに分けています。 これらは、あなたや他の方々の安全や機器の保全に関わる重要な内 容ですので、よく理解した上で必ずお守りください。 火災・感電・人身障害の危険を防止するには ・温度が極端に高い場所(直射日光の当たる場所、暖房機器の 近く、発熱する機器の上など)で使用や保管はしない。 ・振動の多い場所で使用や保管はしない。 ・ホコリの多い場所で使用や保管はしない。 ・風呂場、シャワー室で使用や保管はしない。 ・雨天時の野外のように、湿気の多い場所や水滴のかかる場所 で、使用や保管はしない。 ・本製品の上に、花瓶のような液体が入ったものを置かない。 ・本製品に液体をこぼさない。 ・濡れた手で本製品を使用しない。 注意 図記号の例 記号は、注意(危険、警告を含む)を示しています。 記号の中には、具体的な注意内容が描かれています。左 の図は「一般的な注意、警告、危険」を表しています。 記号は、禁止(してはいけないこと)を示していま す。記号の中には、具体的な注意内容が描かれることが あります。左の図は「分解禁止」を表しています。 記号は、強制(必ず行うこと)を示しています。記 号の中には、具体的な注意内容が描かれることがありま す。左の図は「電源プラグをコンセントから抜くこと」 を表しています。 以下の指示を守ってください 警告 この注意事項を無視した取り扱いをすると、死亡や重傷を負う可能性があります ・AC アダプターのプラグは、必ず AC100V の電源コンセン トに差し込む。 ・AC アダプターのプラグにほこりが付着している場合は、ほ こりを拭き取る。 感電やショートの恐れがあります。 ・本製品はコンセントの近くに設置し、AC アダプターのプラ グへ容易に手が届くようにする。 ・次のような場合には、直ちに電源を切って AC アダプターの プラグをコンセントから抜く。 ○AC アダプターが破損したとき ○異物が内部に入ったとき ○製品に異常や故障が生じたとき 修理が必要なときは、コルグ・サービス・センターへ依頼し てください。 ・本製品を分解したり改造したりしない。 ・修理、部品の交換などで、取扱説明書に書かれてること以外 は絶対にしない。 ・AC アダプターのコードを無理に曲げたり、発熱する機器に 近づけない。また、AC アダプターのコードの上に重いもの をのせない。 コードが破損し、感電や火災の原因になります。 ・大音量や不快な程度の音量で長時間使用しない。 大音量で長時間使用すると、難聴になる可能性があります。 万一、聴力低下や耳鳴りを感じたら、専門の医師に相談して ください。 ・本製品に異物(燃えやすいもの、硬貨、針金など)を入れない。 この注意事項を無視した取り扱いをすると、傷害を負う可能性または物理的損害が発 生する可能性があります ・正常な通気が妨げられない所に設置して使用する。 ・ラジオ、テレビ、電子機器などから十分に離して使用する。 ラジオやテレビ等に接近して使用すると、本製品が雑音を受 けて誤動作する場合があります。また、ラジオ、テレビ等に 雑音が入ることがあります。 ・外装のお手入れは、乾いた柔らかい布を使って軽く拭く。 ・AC アダプターをコンセントから抜き差しするときは、必ず プラグを持つ。 ・長時間使用しないときは、AC アダプターをコンセントから 抜く。 ・付属の AC アダプターは、他の電気機器で使用しない。 付属の AC アダプターは本製品専用です。他の機器では使用 できません。 ・他の電気機器の電源コードと一緒にタコ足配線をしない。 本製品の定格消費電力に合ったコンセントに接続してくださ い。 ・スイッチやツマミなどに必要以上の力を加えない。 故障の原因になります。 ・外装のお手入れに、ベンジンやシンナー系の液体、コンパウ ンド質、強燃性のポリッシャーは使用しない。 ・不安定な場所に置かない。 本製品が落下してお客様がけがをしたり、本製品が破損する 恐れがあります。 ・本製品の上に乗ったり、重いものをのせたりしない。 本製品が落下または損傷してお客様がけがをしたり、本製品 が破損する恐れがあります。 データについて 操作ミス等により万一異常な動作をしたときに、メモリー内容が消 えてしまうことがあります。大切なデータは、あらかじめ他のメディ ア等へセーブしておいてください。データの消失による損害につい ては、当社は一切の責任を負いかねますのでご了承ください。 著作権について 著作権者から許諾を得ていない著作物を、個人、家庭内、またはそ の他のこれに準ずる限られた範囲以外で使用した場合、著作権侵害 となり、損害賠償を含む補償を負う場合があります。そのような著 作物を録音したものはもちろん、著作物に手を加えて作られたもの にも、著作権者の権利が含まれていますので、これら成果物の転載、 配信などは、著作権侵害となります。著作権侵害によって発生した 損害賠償などは、当社は一切の責任を負いかねます。使用者自身の 権利について不明確なときは、法律の専門家に相談してください。 *すべての製品名および会社名は、各社の商標または登録商標です。 29 はじめに このたびは、コルグ・ダイナミック・エフェク ト・プロセッサー KAOSS PAD QUAD をお 買い上げいただきまして、まことにありがとう ございます。 本機を末永くご愛用いただくためにも、この取 扱説明書をよくお読みになって正しい方法で ご使用ください。 おもな特長 4 つのエフェクトを組み合わせて作り出す自 分だけの KAOSS エフェクト 4 つのエフェクトを組み合わせ、オリジナルの KAOSS エフェクトを作り出すことが可能で す。組み合わせは 1295 通りあり、曲の展開に 合わせて、エフェクトを入れ替えることもでき ます。 演奏するようにエフェクトをコントロール カラフルに点滅するタッチ・パッドをなぞるだ けで、簡単にエフェクトをコントロールするこ とができます。 ループを自由自在にあやつる逆再生 / ワープ が可能な新設計ルーパー・エフェクト 順再生をするルーパーのほか、逆再生をするリ バース・ルーパー、録音したフレーズを細かく 切り出し、好きな位置をループ再生することが できるループ・スライサーも搭載しています。 また、それぞれのルーパー・タイプは再生中に 切り替えることが可能です。新設計のループ・ エフェクトで、演奏表現の幅が広がります。 30 ターンテーブルをシミュレートする新設計 “VINYL BREAK”エフェクト ターンテーブルを止めたときの、徐々に再生ス ピードが遅くなる効果や、ターンテーブルの スクラッチ奏法をシミュレートした“VINYL BREAK”を搭載しており、ターンテーブル特有 の効果を DJ プレイに取り入れることができ ます。 音 楽 と エ フ ェ ク ト を シ ン ク さ せ る Tap Tempo と Auto BPM 機能 オ ー ト BPM エ ン ジ ン に よ り、正 確 な BPM を自動検出が可能です。また、曲に合わせて Tap ボタンを叩いて BPM をあわせることも できます。 4 つのエフェクトをより多彩にコントロール できるフリーズ機能 タッチ・パッドに触れながら FREEZE ボタン を押すことで、今のエフェクトの音色をキープ することができます。エフェクト・モジュー ルごとに FREEZE ボタンが設けられている ため、ルーパーをフリーズ機能でキープしてフ レーズを再生しつつ、他のエフェクトをタッ チ・パッドでコントロールするなどの操作がで き、演奏の自由度をより一層高めます。 演奏の準備 接続 AC AC ADAPTER MIXER, DJ MIXER CD PLAYER モニター・アンプやミキサーなどの機器を出力 端子に接続する KAOSS PAD QUAD の LINE OUT 端 子 を ミキサーやパワード・モニター(アンプ内蔵ス ピーカー)と接続します。 ヘッドホンを使う場合は、PHONES 端子に ヘッドホンのプラグを差し込んでください。 TIP ヘッドホンを接続しても、本機の音は LINE OUT 端子から出力されます。 マイクやオーディオ機器などを入力端子に接 続する マ イ ク を 使 用 し て 音 声 を 入 力 す る 場 合 は、 MIC 端子へマイクを接続します。 サンプラーなどのオーディオ機器から音声を 入力する場合は、LINE IN 端子と外部機器の 出力端子を接続します。 各接 続は、必ず電源を切った状態で行ってくださ マイクを使用しないときは、MIC VOLUME ノブを 絞っておいてください。 センド / リターン端子に接続して使用する 本機をミキサーなどのセンド / リターン端子 に接続して、外部エフェクターとして使用す ることができます。本機を外部エフェクター として、接続する場合には CONNECTION ス イッチを SEND に設定します。 DIRECT:入力音 / エフェクト音の両方が本 機から出力されます。タッチ・パッドに触れ ていないときには、入力音がそのまま出力され ます。「エフェクトのかかり具合を調節する (→ p.33)」 SEND:エフェクト音のみが本機から出力さ れ、入力音は出力されません。 TIP センド / リターン端子については接続する機材の 取扱説明書を参照してください。 い。不注意な操作を行うと、スピーカー・システムなど TIP 本機を外部エフェクトとして使用したときに、リ を破損したり、誤動作を起こしたりする原因となります ターン・レベルが下がることがあります。その場合は、 ので、十分に注意してください。 本機の入力レベルを調節し直してください。「音量を 調節する(→ p.32)」 31 操作方法 電源を入れる 1. 接続例を参考にして、使用する機材を接続 し、AC アダプターをコンセントに差し込み ます。 必ず付属の AC アダプターを使用してください。 2. 電源スイッチを押します。ディスプレイの 表示が点灯します。 電源を切るときは、ディスプレイの表示が消灯 するまで、電源スイッチを押し続けます。 電源を切る前の状態は、保持されません。 オート・パワー・オフ KAOSS PAD QUAD にはオート・パワー・ オフ機能がついています。オート・パワー・オ フ機能は、操作をしない状態が約 4 時間続く と、自動的に電源が切れる機能です。 TIP 入力音がある場合にはオート・パワー・オフ機能 は作動しません。 オート・パワー・オフ機能を無効にする オート・パワー・オフ機能は、無効にすること ができます。 1. 1DELAY ボタンを押しながら電源を入れ ます。 電源を入れると、ディスプレイに現在の設定が 表示されます。 2. BPM ノブを回して、ディスプレイに“dis” を表示します。 3. TAP ボタンを押して、設定を保存します。 保存すると、自動的に再起動します。 4. オート・パワー・オフ機能を有効にする場 合には、無効にする場合と同様に 1DELAY ボ タンを押しながら電源を入れ、BPM ノブを 回して、ディスプレイに“Ena”を表示させてか ら、TAP ボタンを押します。 TIP TAP ボタンを押さないで、電源を切った場合は、 変更した設定は有効になりません。 32 TIP 工場出荷時は "Ena" に設定されています。 音量を調節する 1. INPUT VOLUME ノブで入力レベルを調 節します。 接続した機材から音声を入力し、ピーク・イン ジケーターが赤く点灯しないレベルで最大に 調整してください。 マイク入力端子を使用するときは、マイクの感 度に合わせて、音声がひずまないように MIC VOLUME ノブを調整します。 2. ヘッドホンを使用するときは、PHONES VOLUME ノブで音量を調節します。 TIP LINE OUT 端子の音量は PHONES VOLUME ノブで調節することはできません。 エフェクトを選ぶ KAOSS PAD QUAD は 1 から 4 のエフェク ト・モジュールがあります。各エフェクト・モ ジュールにそれぞれ 1 つずつエフェクト・タ イプを選ぶことができます。 タ ッ チ・パ ッ ド に 触 れ る と 選 ん だ す べ て の エ フ ェ ク ト の 効 果 が か か り ま す。 ま た、 FREEZE ボタンを押してエフェクトの効果 を か け 続 け る こ と も で き ま す。「 フ リ ー ズ (→ p.33)」 TIP 1 から 4 のエフェクト・モジュールの順に効果 がかかります。 1. エフェクトはエフェクト・タイプ・ボタン を押して選択します。選択したエフェクト・タ イプ・ボタンが点灯します。 2. エフェクトをオフにする場合は、点灯して いるエフェクト・タイプ・ボタンを押します。 押したエフェクト・タイプ・ボタンが消灯し、 エフェクトがオフになります。 3. 他のエフェクトに切り替えるときは、変更 したいエフェクト・タイプ・ボタンを押します。 同じエフェクト・モジュール内で選択していた エフェクトから、変更したエフェクトに切り替 わります。 TIP エフェクトの組み合わせによっては、音がひずむ ことがあります。 エフェクトのかかり具合を調 節する FX DEPTH ノブを左に回しきるとエフェク トがかからない音になります。右に回しきる ともっともエフェクトがかかった音になりま す。 INPUT OUTPUT また、演奏中に FX DEPTH ノブを左に回しきっ たり、タッチ・パッドから手を離した場合も、 ディレイ音、リバーブ音の残響音が減衰しきる までの間、エフェクト音が出力され続けます。 タッチ・パッドを操作する タッチ・パッドを指でこすったり、タッピング (軽く叩く)したりして、音色を操作します。 TIP 付属の保護シートをタッチ・パッドに貼ってご使 用ください。 タッチ・パッドの取り扱いについて タッチ・パッドは強く押したり、重いものを乗せたり 絶対にしないでください。乱暴に扱うとタッチ・パッ ドにヒビが入ったり、割れたりすることがあります。 また、表面をとがったものでこすったり、押したりする とキズがつきますので、必ず指先で操作してください。 お手入れは、必ず乾いた柔らかい布で軽く拭いてくだ さい。シンナーなどの有機溶剤は変形の恐れがあり ますので、使用しないでください。 フリーズ FREEZE ボタンを押したときのタッチ・パッ ドの位置情報を記憶し、エフェクトの音色を保 持することができます。 フリーズはエフェクト・モジュールごとに行 え、フリーズ中にエフェクト・タイプを変更し ても、タッチ・パッドの位置情報を記憶してい ます。 1. タッチ・パッドに触れた状態で、FREEZE ボタンを押します。 FREEZE ボタンを押したときの、エフェクト の音色が保持されます。 TIP フリーズしたエフェクト・モジュールは、タッチ・ パッドを触っても効果が変わりません。その他のエ フェクト・モジュールの音色は変化します。 2. 再度 FREEZE ボタンを押すと、フリーズが 解除します。 TIP 解除した直後に、再度 FREEZE ボタンを押すと、 再び同じ位置情報を呼び出すことができます。 タッチ・パッド LED タッチ・パッド LED は、選択しているエフェ クトやフリーズ、BPM の設定、タッチ・パッ ドの操作などにより、点灯するパターンが変化 します。 タッチ・パッド LED の明るさを調整する 1. LPF ボタンを押しながら電源を入れます。 電源を入れると、タッチ・パッド LED が点灯 し、ディスプレイに明るさの度合いが数字で表 示されます。数字が大きいほど明るくなりま す。 2. BPM ノブを回して、設定したい明るさを選 択します。 3. TAP ボタンを押して、設定を保存します。 保存すると、自動的に再起動します。 TIP TAP ボタンを押さないで、電源を切った場合は、 変更した設定は有効になりません。 TIP 工場出荷時は最大の明るさに設定されています。 BPM を設定する BPM とは? BPM(Beats Per Minute)は曲のテンポの速 さを 1 分間の拍数(4 分音符の個数)で表して います。BPM の数字が大きいほど速いテンポ の曲になります。 TIP 電源を入れたときは、BPM 値が 120 に設定さ れます。 BPM マニュアル設定 BPM ノブで、BPM 値を設定します。 TIP オート BPM は自動的にオフになります。 33 タップ・テンポ機能 BPM 値のわからない曲などで、曲のビートに 合わせてボタンを押し、BPM 値を設定するこ とができます。 曲のビートに合わせて、TAP ボタンを 3 回 以上押します。ボタンを押したビートを検出 し、BPM 値がディスプレイに表示され、その BPM 値が設定されます。 オート BPM 設定 曲のビートを自動検出し、BPM 値を設定する ことができます。BPM が変化すると、値も同 期して変化します。 1. TAP ボタンを押し続けると、AUTO ラン プが点灯し、オート BPM がオンになります。 入力中の音声の BPM 値が自動検出されます。 BPM が検出できないとき TAP ボタンを数回曲のビートに合わせて押す と、そのビートをガイドとして BPM を自動検 出します。 オート BPM の特性上、正しい BPM 値の 1/2 や 2/3 といった値や、細かな揺れが起こってし まうため、TAP ボタンを使って補助を行うこ とができます。オート BPM 検出中に、TAP ボタンを押した間隔により、BPM のレンジの 中央値を決定します。 TIP ビート感がはっきりしない音楽の場合は、BPM 値を検出できません。検出可能な BPM は 80 〜 160 です。 オート BPM をオフにする TAP ボタンを AUTO ランプが消えるまで押 し続けます。オート BPM 機能がオフになり、 オフになった時点の BPM 値に設定されます。 34 エフェクト・ガイド 1.Looper カテゴリ Looper フレーズを録音し、そのフレーズを繰り返し再 生します。タッチ・パッドを上下の動きでフ レーズの長さを変化させながら再生すること で、曲の展開に変化を与えることができます。 TIP タッチ・パッドに触れると同時に録音を開始し、 フレーズの長さ分の録音が終わり次第、繰り返しフ レーズを再生します。 Rev Looper (Reverse Looper) タッチ・パッドに触れるとフレーズを逆再生し ます。タッチ・パッドを上下の動きでフレーズ の長さを変化させながら再生することができ ます。 TIP 常にフレーズを録音し続け、タッチ・パッドに触 れると同時に再生を開始します。 Loop Slicer 1 小節分のフレーズをさまざまな長さに切り 分けた状態でタッチ・パッドの横軸に割り当 て、切り分けたフレーズの好きな部分を繰り返 し再生することができます。 TIP 常にフレーズを録音し続け、タッチ・パッドに触 れると同時に再生を開始します。 Grain Shifter ある周期の短い時間で音をサンプリングし、 ループ再生します。音色が常に変化する音に 有効です。 Vinyl Break ターン・テーブルを停止させるときの音をシ ミュレートするエフェクトです。また、タッチ・ パッドをこすることで、スクラッチ操作をシ ミュレートします。 2.Mod カテゴリ 4.Delay/Rev カテゴリ Dist (Distortion) 1Delay 入力音に対して、ひずみを発生させます。ひず みが発生することで、角のあるサウンドを得る ことができます。 入力音を遅らせて、1 度だけ再生するディレ イ・エフェクトです。 Decimator スタンダードなステレオ・ディレイ ・ エフェク トです。 サンプリング周波数やデータのビット長を低 下させて、チープなサンプラーのようなザラザ ラしたサウンドを作り出します。 Ducking Comp 入力音の低音成分に反応するコンプレッサー・ エフェクトです。ウラ拍(オフ・ビート)を強調 し、メリハリのあるサウンドを作り出します。 TIP 条件によっては効果がわかりにくいことがあり ます。 Flanger 激しいうねりと音程の移動感を与えます。倍 音を多く含んだ音にかけると効果的です。 Phaser Delay Tape Echo テープ・エコーをシミュレートしたエフェクト です。磁気テープによる歪みや音色変化を再 現しています。 Reverb ホールの残響などのアンビエンスをシミュ レートしたエフェクトです。 Delay Reverb Delay、Reverb の両方の効果を与えるエ フ ェ ク ト で す。Delay の 効 果 を か け た 後、 Reverb の効果をかけます。 音の位相を動かすことによって、うねりのある サウンドを作り出します。 3.Filter カテゴリ LPF 高音を削り、低音を強調します。 HPF 低音を削り、高音を強調します。 BPF+ タッチしているタッチ・パッドの位置にあわせ て、ある帯域を強調します。 Jet ジェット機が風を切るときのような効果を与 えます。 Pitch Shifter 入力音のピッチ(音高)を変えるエフェクトで す。 35 仕様 おもなコントローラー タッチ・パッド 、エフェクト・タイプ・ボタン、 FX DEPTH ノブ 接続端子 LINE OUT L/R(ピン・ジャック)、LINE IN L/ R(ピン・ジャック)、MIC IN(6.3mm フォーン・ ジ ャ ッ ク、不 平 衡 )、HEADPHONES(6.3mm ステレオ・フォーン・ジャック) 電源 DC9V 寸法・質量 185(W) × 213(D) × 44(H)mm、754g 使用温度条件 0 ~ +40℃(結露させないこと) 付属品 AC アダプター、タッチ・パッド保護シート ※ 製品の外観および仕様は、予告無く変更することがあります。 各部の名称 11 12 13 1. エフェクト・タイプ・ボタン 2. FREEZE ボタン 3. ピーク・インジケーター 4. INPUT VOLUME ノブ 1 2 3 6 4 7 8 9 5 10 36 5. FX DEPTH ノブ 6. ディスプレイ 7. BPM ノブ 8. AUTO インジケーター 9. TAP ボタン 10.タッチ・パッド 11.MIC VOLUME ノブ 12.電源スイッチ 13.PHONES VOLUME ノブ 37 Effect Type List FX Category LOOPER MOD FILTER DELAY/REVERB FX Name Assign X Assign Y LOOPER REV LOOPER LOOP SLICER GRAIN SHIFTER VINYL BREAK DIST DECIMATOR DUCKING COMP FLANGER PHASER LPF HPF BPF+ JET PITCH SHIFTER 1 DELAY DELAY TAPE ECHO REVERB DELAY REVERB Slice Position LFO Sync Note Stop Speed Tone Sample Rate Ratio LFO Speed LFO Speed Cutoff frequency Cutoff frequency Cutoff frequency Delay time Pitch Delay time Delay time Delay time Reverb time Delay/Reverb time Looper beat Looper beat Looper beat Duration Scratch Gain Bit Depth Threshold Feedback Resonance Resonance Resonance Resonance Feedback Mix Balance Pan Delay Depth Delay Depth Reverb Depth Delay/Reverb Depth BPM Sync o o o o x x x x x x x x x x x o o o x o SIGNAL PATH INPUT 38 LOOPER MOD FILTER DELAY/REV OUTPUT 保証規定(必ずお読みください) 本保証書は、保証期間中に本製品を保証するもので、付属品類 (ヘッドホンなど)は保証の対象になりません。保証期間内に本 製品が故障した場合は、保証規定によって無償修理いたします。 1. 本保証書の有効期間はお買い上げ日より 1 ケ年です。 2. 次の修理等は保証期間内であっても有償となります。 ・消耗部品(電池、スピーカー、真空管、フェーダーなど) の交換。 ・お取扱い方法が不適当のために生じた故障。 ・天災(火災、浸水等)によって生じた故障。 ・故障の原因が本製品以外の他の機器にある場合。 ・不当な改造、調整、部品交換などにより生じた故障または 損傷。 ・保証書にお買い上げ日、販売店名が未記入の場合、または 字句が書き替えられている場合。 ・本保証書の提示がない場合。 尚、当社が修理した部分が再度故障した場合は、保証期間外 であっても、修理した日より 3 ケ月以内に限り無償修理いた します。 3. 本保証書は日本国内においてのみ有効です。 This warranty is valid only in Japan. 4. お客様が保証期間中に移転された場合でも、保証は引き続き お使いいただけます。詳しくは、サービス・センターまでお 問い合わせください。 5. 修理、運送費用が製品の価格より高くなることがありますの で、あらかじめサービス・センターへご相談ください。発送 にかかる費用は、お客様の負担とさせていただきます。 6. 修理中の代替品、商品の貸し出し等は、いかなる場合におい ても一切行っておりません。 本製品の故障、または使用上生じたお客様の直接、間接の損害 につきましては、弊社は一切の責任を負いかねますのでご了承 ください。 本保証書は、保証規定により無償修理をお約束するためのもの で、これよりお客様の法律上の権利を制限するものではありま せん。 ■お願い 1. 保証書に販売年月日等の記入がない場合は無効となります。 記入できないときは、お買い上げ年月日を証明できる領収書 等と一緒に保管してください。 2. 保証書は再発行致しませんので、紛失しないように大切に保 管してください。 アフターサービス ■ 保証書 本製品には、保証書が添付されています。 お買い求めの際に、販売店が所定事項を記入いたしますので、 「お買い上げ日」 、 「販売店」等の記入をご確認ください。記入 がないものは無効となります。 なお、保証書は再発行致しませんので、紛失しないように大 切に保管してください。 ■ 保証期間 お買い上げいただいた日より一年間です。 ■ 保証期間中の修理 保証規定に基づいて修理いたします。詳しくは保証書をご覧 ください。 本製品と共に保証書を必ずご持参の上、修理を依頼してくだ さい。 ■ 保証期間経過後の修理 修理することによって性能が維持できる場合は、お客様のご 要望により、有料で修理させていただきます。ただし、補修 用性能部品(電子回路などのように機能維持のために必要な 部品)の入手が困難な場合は、修理をお受けすることができ ませんのでご了承ください。また、外装部品(パネルなど) の修理、交換は、類似の代替品を使用することもありますので、 あらかじめサービス・センターへお問い合わせください。 ■ 修理を依頼される前に 故障かな?とお思いになったら、まず取扱説明書をよくお読 みのうえ、もう一度ご確認ください。 それでも異常があるときは、サービス・センターへお問い合 わせください。 ■ 修理時のお願い 修理に出す際は、輸送時の損傷等を防ぐため、ご購入された ときの箱と梱包材をご使用ください。 ■ ご質問、ご相談について 修理についてのご質問、ご相談は、サービス・センターへお 問い合わせください。 商品のお取り扱いについてのご質問、ご相談は、お客様相談 窓口へお問い合わせください。 WARNING! この英文は日本国内で購入された外国人のお客様のための注意事項です 保証書 This Product is only suitable for sale in Japan. Properly qualified service is not available for this product if purchased elsewhere. Any unauthorised modification or removal of original serial number will disqualify this product from warranty protection. コルグ KAOSS PAD QUAD 本保証書は、上記の保証規定により無償修理をお約束するものです。 お買い上げ日 販売店名 年 月 日 お客様相談窓口 TEL 03(5355)5056 ●サービス・センター : 〒 168-0073 東京都杉並区下高井戸 1-15-12 TEL 03(5355)3537 FAX 03(5355)4470 IMPORTANT NOTICE TO CONSUMERS This product has been manufactured according to strict specifications and voltage requirements that are applicable in the country in which it is intended that this product should be used. If you have purchased this product via the internet, through mail order, and/or via a telephone sale, you must verify that this product is intended to be used in the country in which you reside. WARNING: Use of this product in any country other than that for which it is intended could be dangerous and could invalidate the manufacturer’s or distributor’s warranty. Please also retain your receipt as proof of purchase otherwise your product may be disqualified from the manufacturer’s or distributor’s warranty. REMARQUE IMPORTANTE POUR LES CLIENTS Ce produit a été fabriqué suivant des spécifications sévères et des besoins en tension applicables dans le pays où ce produit doit être utilisé. Si vous avez acheté ce produit via l’internet, par vente par correspondance ou/et vente par téléphone, vous devez vérifier que ce produit est bien utilisable dans le pays où vous résidez. ATTENTION: L’utilisation de ce produit dans un pays autre que celui pour lequel il a été conçu peut être dangereuse et annulera la garantie du fabricant ou du distributeur. Conservez bien votre récépissé qui est la preuve de votre achat, faute de quoi votre produit ne risque de ne plus être couvert par la garantie du fabricant ou du distributeur. WICHTIGER HINWEIS FÜR KUNDEN Dieses Produkt wurde unter strenger Beachtung von Spezifikationen und Spannungsanforderungen hergestellt, die im Bestimmungsland gelten. Wenn Sie dieses Produkt über das Internet, per Postversand und/oder mit telefonischer Bestellung gekauft haben, müssen Sie bestätigen, dass dieses Produkt für Ihr Wohngebiet ausgelegt ist. WARNUNG: Verwendung dieses Produkts in einem anderen Land als dem, für das es bestimmt ist, verwendet wird, kann gefährlich sein und die Garantie des Herstellers oder Importeurs hinfällig lassen werden. Bitte bewahren Sie diese Quittung als Kaufbeleg auf, da andernfalls das Produkt von der Garantie des Herstellers oder Importeurs ausgeschlossen werden kann. 4015-2 Yanokuchi, Inagi-city, Tokyo 206-0812 Japan 1 2010 KORG INC.