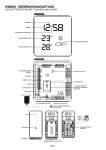
1
CONRAD IM INTERNET http://www.conrad.com
BEDIENUNGSANLEITUNG OPERATING INSTRUCTIONS
MODE D’EMPLOI
GEBRUIKSAANWIJZING
Version
100 %
Recyclingpapier.
Chlorfrei
gebleicht.
Impressum
100 %
recycling
paper.
Bleached
without
chlorine.
Imprint
Diese Bedienungsanleitung ist eine Publikation der Conrad Electronic GmBH.
Alle Rechte einschließlich Übersetzung vorbehalten. Reproduktionen jeder Art, z. B.
Fotokopie, Mikroverfilmung, oder die Erfassung in elektronischen Datenverarbeitungsanlagen, bedürfen der schriftlichen Genehmigung des Herausgebers.
Nachdruck, auch auszugsweise, verboten.
Diese Bedienungsanleitung entspricht dem technischen Stand bei Drucklegung.
Änderung in Technik und Ausstattung vorbehalten.
© Copyright 2005 by Conrad Electronic GmbH. Printed in Germany.
These operating instructions are published by Conrad Electronic GmBH, Klaus-Conrad-Straße 1, 92240 Hirschau/Germany.
No reproduction (including translation) is permitted in whole or part e.g. photocopy,
microfilming or storage in electronic data processing equipment, without the express
written consent of the publisher.
The operating instructions reflect the current technical specifications at time of print.
We reserve the right to change the technical or physical specifications.
© Copyright 2005 by Conrad Electronic GmbH. Printed in Germany.
Note de l´éditeur
100%
papier
recyclé.
Blanchi
sans
chlore.
Cette notice est une publication de la société Conrad Electronic GmBH, Klaus-ConradStraße 1, 92240 Hirschau/Allemagne.
Tous droits réservés, y compris traduction. Toute reproduction, quel que soit le type,
par exemple photocopies, microfilms ou saisie dans des traitements de texte electronique est soumise à une autorisation préalable écrite de l`éditeur.
Impression, même partielle, interdite.
Cette notice est conforme à la règlementation en vigueur lors de l´impression.
Données techniques et conditionnement soumis à modifications sans aucun préalable.
© Copyright 2005 par Conrad Electronic GmbH. Imprimé en Allemagne.
Impressum
100 %
Recyclingpapier.
Chloorvrij
gebleekt.
Deze gebruiksaanwijzing is een publicatie van Conrad Electronic Ned BV.
Alle rechten, inclusief de vertaling, voorbehouden. Reprodukties van welke aard dan
ook, fotokopie, microfilm of opgeslagen in een geautomatiseerd gegevensbestand,
alleen met schriftelijke toestemming van de uitgever.
Nadruk, ook in uittreksel, verboden.
Deze gebruiksaanwijzing voldoet aan de technische eisen bij het ter perse gaan. Wijzigingen in techniek en uitrusting voorbehouden.
© Copyright 2005 by Conrad Electronic Ned BV. Printed in Germany. *01-05/AH
01/05
Funk-Tisch-Wecker
Sandra
Seite 3 - 18
Table Radio Alarm Clock
Sandra
Page 19 - 34
Réveil Sandra à signal
radio
Page 35 - 50
Radiografische tafelwekker Sandra
Best.-Nr. / Item-No. / No de commande:
Page 51 - 66
64 04 71
Diese Bedienungsanleitung gehört zu diesem Produkt. Sie ent-
hält wichtige Hinweise zur Inbetriebnahme und Handhabung.
Achten Sie hierauf, auch wenn Sie dieses Produkt an Dritte weitergeben.
Heben Sie deshalb diese Bedienungsanleitung zum Nachlesen auf!
Eine Auflistung der Inhalte finden Sie in dem Inhaltsverzeichnis mit
Angabe der entsprechenden Seitenzahlen auf Seite 4.
These
Operating Instructions accompany this product. They
contain important information on setting up and using your Voltage Detector. You should refer to these instructions, even if you
are buying this product for someone else.
Please retain these Operating Instructions for future use!
A list of the contents can be found in the Table of contents, with the
corresponding page number, on page 20.
Le présent mode d'emploi fait partie intégrante du produit. Il
comporte des directives importantes pour la mise en service et
la manipulation de l'appareil. Tenir compte de ces remarques,
même en cas de transfert du produit à un tiers.
Conserver ce mode d'emploi afin de pouvoir le consulter à tout
moment.
La table des matières avec indication des pages correspondantes se
trouve à la page 36
Deze gebruiksaanwijzing hoort bij dit product. Zij bevat belangrijke informatie over de inbedrijfstelling en het gebruik. Let
hierop, ook wanneer u dit product aan derden overhandigt.
Bewaar daarom deze gebruiksaanwijzing om in voorkomende
gevallen te kunnen raadplegen.
In de inhoudsopgave op pagina 52 vindt u een lijst met inhoudspunten met vermelding van het bijbehorende .
2
67
Verwijdering van lege batterijen/accu´s!
U bent als eindverbruiker volgens de KCA-voorschriften wettelijk verplicht alle lege batterijen en
accu’s in te leveren; verwijdering via het huisvuil is
niet toegestaan! Op batterijen/accu´s die schadelijke
stoffen bevatten, vindt u speciale symbolen. Deze
mogen niet via het huisvuil worden verwijderd. De
aanduidingen voor zware metalen zijn: Cd = cadmium, Hg = kwik, Pb = lood. Lege batterijen en niet
meer oplaadbare accu´s kunt u gratis inleveren bij de
verzamelplaatsen van uw gemeente, onze filialen of
andere verkooppunten van batterijen en accu´s.
Zo voldoet u aan de wettelijke verplichtingen voor afvalscheiding en draagt u bij aan de bescherming van het milieu!
Einführung
Sehr geehrte Kundin, sehr geehrter Kunde, wir bedanken uns für den
Kauf des "Funk-Tisch-Wecker Sandra".
Mit diesem Gerät haben Sie ein Produkt erworben, welches nach
dem heutigen Stand der Technik gebaut wurde.
Dieses Produkt erfüllt die Anforderungen der geltenden europäischen
und nationalen Richtlinien.
Um diesen Zustand zu erhalten und einen gefahrlosen Betrieb sicherzustellen müssen Sie als Anwender diese Bedienungsanleitung
beachten!
Bei Fragen wenden Sie sich an unsere Technische Beratung
Deutschland:
Tel.-Nr.:
Fax-Nr.:
e-mail:
Mo. - Fr.
0180/5 31 21 11
09604/40 88 48
[email protected]
8.00 bis 18.00 Uhr
Österreich:
Tel.-Nr.:
Fax-Nr.:
e-mail:
Mo. - Do.
0 72 42/20 30 60
0 72 42/20 30 66
[email protected]
8.00 bis 17.00 Uhr,
Fr. 8.00 bis 14.00 Uhr
Schweiz:
Tel.-Nr.:
Fax-Nr.:
e-mail:
Mo. - Fr.
0848/80 12 88
0848/80 12 89
[email protected]
8.00 bis 12.00 Uhr,
13.00 bis 17.00 Uhr
Conformiteitsverklaring
Hierbij verklaren wij, Conrad Electronic, Klaus-Conrad-Straße 1,
92240 Hirschau, dat dit product in overeenstemming is met de fundamentele eisen en andere relevante voorschriften van de richtlijn
1999/5/EG.
☞
De bij dit product behorende verklaring van
conformiteit kunt u vinden op www.conrad.de.
Technische gegevens
Bedrijfsspanning:......................1,5VDC
Batterij:.....................................1xmignon (AA)
Bedrijfstemperatuurbereik: .......0°C tot 50°C
Relatieve luchtvochtigheid: .......< 90 % (niet condenserend)
66
3
Inhaltsverzeichnis
Einführung ......................................................................................3
☞
Inhaltsverzeichnis ...........................................................................4
Bestimmungsgemäße Verwendung .................................................5
Wanneer u vooraf de weergave van de tijd in het 12uurs formaat het geselecteerd, wordt de alarmtijd nu
ook in het 12-uurs formaat weergegeven. Let op de
weergave „AM“ voor voormiddag en „PM“ voor
namiddag, zodat het alarm in het juiste dagdeel
afgaat.
Sicherheitshinweise ........................................................................5
Produktbeschreibung ......................................................................6
Anzeige- und Bedienelemente.........................................................7
Displayverlichting
Druk op de toets SNOOZE/LIGHT om de displayverlichting in te schakelen. De verlichting gaat na korte tijd automatisch uit.
DCF Empfang..................................................................................8
Einlegen und Wechseln der Batterie ................................................9
Bedienung ....................................................................................10
Starten und automatisches Einstellen .......................................10
Manuelles Einstellen des Kalenders und der Uhrzeit .................11
Einstellen der Sprache für den Wochentag................................12
Uhranzeige im 12- oder 24-Stundenformat ..............................13
Zeitzonenfunktion.....................................................................13
Alarm 1 einstellen ....................................................................14
Alarm 2 einstellen ....................................................................15
Alarmfunktionen und SNOOZE (Weckwiederholung) benutzen...16
Anzeigebeleuchtung .................................................................17
Onderhoud, reiniging en verzorging
Het apparaat mag uitsluitend worden gerepareerd/geopend door een technicus die op de hoogte
is van de risico’s resp. toepasselijke voorschriften.
Het apparaat is nagenoeg onderhoudsvrij en mag absoluut niet worden geopend. Als u het apparaat opent, vervalt de aanspraak op
garantie.
De buitenkant van het apparaat dient slechts met een zachte, iets
vochtige doek of droge borstel te worden gereinigd. Gebruik in geen
geval agressieve schoonmaakmiddelen of chemische oplossingen,
aangezien hierdoor de behuizing kan worden aangetast of de functies kunnen worden beperkt.
Wartung, Reinigung und Pflege .....................................................17
Entsorgung ...................................................................................17
Konformitätserklärung ..................................................................18
Verwijdering
Technische Daten .........................................................................18
Verwijder het onbruikbaar geworden apparaat volgens de geldende
wettelijke voorschriften.
4
65
Alarmfunctie en SNOOZE (sluimerfunctie) gebruiken
1
1
• Druk op de toets SET
resp. SET
om de alarmfunctie
voor alarm 1 resp. alarm 2 in- of uit te schakelen. Wanneer de
alarmfunctie is ingeschakeld, verschijnt op de display het betreffende alarmsymbool 1 resp. 1
• Zodra de actuele tijd de ingestelde alarmtijd bereikt, volgt een
reeks pieptonen.
1
1
• Druk op de toets SET
of SET
om het alarm te beëindigen. De volgende dag gaat de wekker opnieuw af op de ingestelde tijd.
• Wanneer tijdens het alarm de toets SNOOZE/LIGHT wordt ingedrukt, wordt deze gedurende de vooraf ingestelde SNOOZE-tijd
onderbroken. Standaard is deze tijd ingesteld op 4 minuten. De
SNOOZE-tijd kan tussen 1 minuut en 59 minuten worden ingesteld, zie hoofdstuk „Alarm 1 instellen“ resp. „Alarm 2 instellen“.
Wanneer het apparaat in de SNOOZE-functie staat, knippert op de
display het symbool „ZZ“.
• Het alarm wordt automatisch beëindigd wanneer niet binnen 4
minuten de toets SET 1 of SET 1 , resp. SNOOZE/LIGHT
wordt ingedrukt.
Het alarmsignaal voor alarm 1 is een zogenoemd „crescendo“ alarm,
d.w.z. de pieptoon neemt in intensiteit toe.
Het alarmsignaal voor alarm 2 is een continu alarm.
64
Bestimmungsgemäße Verwendung
Das Produkt dient als Tischwecker mit Uhrzeit- (DCF-genau) und
Kalenderanzeige. Es verfügt über eine Alarmfunktion mit zwei voneinander unabhängig einstellbaren Alarmzeiten. Das Gerät ist nur für
den Betrieb in trockenen Innenräumen geeignet. Zur Spannungsversorgung des Produktes darf nur eine 1,5V Mignonbatterie benutzt
werden. Eine andere Verwendung als zuvor beschrieben führt zur
Beschädigung dieses Produktes, darüber hinaus ist dies mit Gefahren verbunden.
Sicherheitshinweise
Lesen Sie bitte vor Inbetriebnahme die komplette
Anleitung durch, sie enthält wichtige Hinweise
zum korrekten Betrieb. Bei Schäden, die durch
Nichtbeachten dieser Bedienungsanleitung verursacht werden, erlischt der Garantieanspruch! Für
Folgeschäden übernehmen wir keine Haftung!
Bei Sach- oder Personenschäden, die durch
unsachgemäße Handhabung oder Nichtbeachten
der Sicherheitshinweise verursacht werden, übernehmen wir keine Haftung! In solchen Fällen
erlischt jeder Garantieanspruch.
• Aus Sicherheits- und Zulassungsgründen (CE) ist das eigenmächtige Umbauen und/oder Verändern des Gerätes nicht gestattet.
• Das Gerät darf keinen extremen Temperaturen (<0°C / >+50°C),
starken Vibrationen, starken mechanischen Beanspruchungen, keiner direkten intensiven Sonneneinstrahlung und hoher Feuchtigkeit
ausgesetzt werden. Ansonsten kann das Gerät beschädigt werden.
5
• Dieses Gerät ist kein Spielzeug und gehört nicht in Kinderhände.
Kinder können die Gefahren, die im falschen Umgang mit elektrischen Geräten auftreten können nicht einschätzen.
• Beim Aufstellen des Gerätes ist auf einen stabilen Untergrund und
sicheren Stand des Gerätes zu achten. Das Gerät muss sicher stehen, durch ein Herunterfallen könnten Personen verletzt oder das
Gerät bzw. der Boden beschädigt werden.
• Lassen Sie Verpackungsmaterial nicht achtlos liegen. Plastikfolien/-tüten, Styroporteile, etc. könnten für Kinder zu einem gefährlichen Spielzeug werden.
den de instelmodus zelfstandig en keert het terug naar de normale
weergavemodus.
Alarm 2 instellen
• Druk op en houd de toets SET 2 (ca. 3
seconden) ingedrukt, totdat de uurwaarde
voor alarm 2 begint te knipperen. Druk
op de toets + of de toets – om de uurwaarde in te stellen.
AM
PM
D
M
AM
PM
1
2
S
AL2
2
Produktbeschreibung
• DCF (Funk) gesteuerte Uhr- und Datumseinstellung
• Großes LC-Display
• Displayanzeige mit Stunden, Minuten, Sekunden, Monat, Datum,
Wochentag
• Zeitzonenfunktion (-9 Stunden bis +9 Stunden)
• Sommerzeitindikator
• Zwei Alarmzeiten mit programmierbarer Snoozedauer
• Alarm 1 mit Crescendo Alarmton (ansteigender Alarmton) und
Alarm 2 mit kontinuierlichem Alarmton
• Anzeige der Uhrzeit im 12- oder 24-Stundenformat
• Anzeige des Wochentages in 5 Sprachen wählbar
• Batterie-Entladeanzeige
• Hintergrundbeleuchtung
• Druk op de toets SET
, deminuutwaarde voor alarm 2 begint te knipperen.
Druk op de toets + of de toets – om de
minuutwaarde in te stellen.
AM
PM
D
M
AM
PM
AL2
1
2
S
2
• Druk op de toets SET
, deSNOOZEtijd (sluimerfunctie) begint te knipperen.
Druk op de toets + of de toets – om de
gewenste SNOOZE-tijd (1 minuut tot 59
minuten) in te stellen.
AM
PM
D
M
AM
PM
AL2
1
2
S
SNOOZE-tijd = Wanneer tijdens het alarm de toets SNOOZE/LIGHT
wordt ingedrukt, gaat het alarm 2 na de hier ingestelde tijd opnieuw af.
2
• Druk op de toets SET
om de instelling voor de alarmtijd 2 af
te sluiten en tegelijkertijd de alarmfunctie te activeren. Wanneer
er geen toets wordt ingedrukt, verlaat het apparaat na 30 seconden de instelmodus zelfstandig en keert het terug naar de normale weergavemodus.
6
63
• Druk op en houd de toets + (ca. 3 seconden) vast, terwijl het
apparaat in de weergave van de tijdzonetijd staat. Op de display
gaat het symbool F uit.
Anzeige- und Bedienelemente
RADIO CONTROLLED
• Laat de toets + los, het apparaat geeft nu weer de lokale tijd aan.
Alarm 1 instellen
• Druk op en houd de toets SET 1 (ca. 3
seconden) vast, totdat de uurwaarde voor
alarm 1 begint te knipperen. Druk op de
toets + of de toets – om de uurwaarde in
te stellen.
• Druk op de toets SET 1 , deminuutwaarde voor alarm 1 begint te knipperen.
Druk op de toets + of de toets – om de
minuutwaarde in te stellen.
• Druk op de toets SET 1 , deSNOOZEtijd (sluimerfunctie) begint te knipperen.
Druk op de toets + of de toets – om de
gewenste SNOOZE-tijd (1 minuut tot 59
minuten) in te stellen.
D
D
M
AM
PM
AL1
1
2
1
SET
SET
1
2
S
MODE
Anzeige
AM
PM
D
M
AM
PM
AL1
1
2
Bedeutung
ZZ
SNOOZE Funktion aktiv
D
Datum
M
Monat
F
Zeitzonen Indikator
PM
AM
AM
PM
D
Anzeige
DCF Signal
Bedeutung
S
S
Sommerzeit Indikator
PM (im 12 Stundenformat)
1
Alarm 1
AM (im 12 Stundenformat)
2
Alarm 2
DCF-Signal schwach
M
AM
PM
AL1
1
2
S
SNOOZE-tijd = Wanneer tijdens het alarm de toets SNOOZE/LIGHT
wordt ingedrukt, gaat het alarm 1 na de hier ingestelde tijd opnieuw af.
• Druk op de toets SET 1 om de instelling voor de alarmtijd 1 af
te sluiten en tegelijkertijd de alarmfunctie te activeren. Wanneer
er geen toets wordt ingedrukt, verlaat het apparaat na 30 secon-
62
M
AL1
2
AM
PM
Tastenfunktionen:
MODE Taste
• Anzeige der Alarmzeit 1 oder der Alarmzeit 2
• Manuelle Zeiteinstellung
• Einstellen der Zeitzone
+ Taste
• Erhöhen des Stunden-, Minuten-, des Jahres-, Monats- und
Datumswertes während der Einstellphase
• Umschalten der Uhrzeitanzeige zwischen dem 12- und 24-Stundenformat
7
• Umschalten zwischen der Ortszeit und der Zeitzonenzeit (zweite
einstellbare Uhrzeit)
- Taste
• Verringern des Stunden-, Minuten-, des Jahres-, Monats- und
Datumswertes während der Einstellphase
• Auswahl der Sprache für die Anzeige des Wochentages
1
SET Taste
• Einstellen des Alarm 1
• Ein-/Ausschalten des Alarm 1
2
SET Taste
• Einstellen des Alarm 2
• Ein-/Ausschalten des Alarm 2
SNOOZE/LIGHT Taste
• Einschalten der Displayhintergrundbeleuchtung
• Einschalten der SNOOZE-Funktion (Weckwiederholung) während
des Alarms
DCF Empfang
Das Gerät arbeitet nach dem DCF Prinzip. Das DCF77-Zeit-Signal
(77,5kHz) wird von einem Sender in Mainflingen nahe Frankfurt gesendet (Reichweite ca. 1500km). Der "Funk-Tisch-Wecker Sandra" ist mit
einer elektronischen Schaltung ausgestattet, die das DCF Signal empfängt und auswertet. Die Uhr synchronisiert somit automatisch auf die
aktuelle Uhrzeit. Ein manuelles Einstellen, z.B. bei der Umstellung von
Sommer- auf Winterzeit, ist nicht nötig. Das Gerät führt stündlich automatisch die Synchronisation auf das DCF Signal durch.
8
Spaans (SP). Laat de toets – los zodra de gewenste taal verschijnt.
De weekdag wordt nu in de ingestelde taal weergegeven. Het
apparaat keert na het loslaten van de toets – weer terug naar de
normale modus.
Tijdweergave in 12- of 24-uurs formaat
Met de toets + kan tussen de tijdweergave in 12-uurs of 24-uurs formaat worden geschakeld. In de 12-uurs weergave verschijnen op de
display de letters „AM“ voor voormiddag en „PM“ voor namiddag.
Tijdzonefunctie
Het apparaat kan een tweede tijd aangeven die afwijkt van de lokale
tijd. Deze tijd kan bijvoorbeeld op de actuele tijd van een ander land
worden ingesteld.
• Druk op en houd de toets + (ca. 3 seconden) vast terwijl het apparaat in de normale modus (tijd en datum worden weergegeven)
staat. Op de display verschijnt naast het zendmastsymbool het
symbool F .
• Laat de toets + los, het apparaat geeft nu de tijdzonetijd aan.
• Druk op en houd de toets MODE (ca. 3 seconden) vast, totdat de
uurwaarde begint te knipperen.
• Druk op de toets + of de toets – om de van de lokale tijd (DCF-tijd)
afwijkende uurwaarde van de tijdzonetijd in te stellen. Het apparaat staat een maximale afwijking van +/- 9 uur m.b.t. de actuele
lokale tijd toe.
• Druk op de toets MODE; de tijdzone is ingesteld. Wanneer er geen
toets wordt ingedrukt, verlaat het apparaat na 30 seconden zelfstandig de instelmodus.
61
• Druk op de toets MODE, de maandwaarde begint te knipperen. Druk op de
toets + of de toets – om de maand in te
stellen.
• Druk op de toets MODE, de datum
begint te knipperen. Druk op de toets +
of de toets – om de datum in te stellen.
De juiste weekdag wordt door het apparaat op basis van de ingestelde datum
zelf bepaald.
☞
AM
PM
D
M
AM
PM
AL1
1
2
S
AM
PM
D
M
AM
PM
AL1
1
2
S
• Druk op de toets MODE om de instelling af te sluiten. Wanneer
geen toets wordt ingedrukt, verlaat het apparaat na 30 seconden
de instelmodus zelfstandig en keert het terug naar de normale
weergavemodus.
☞
Voor een snelle instelling van de betreffende knipperende waarde houdt u de toets + resp. de toets –
ingedrukt in plaats van deze alleen even aan te
raken. De in te stellen waarde stijgt resp. daalt nu
snel.
Taal instellen voor de weekdag
De afkorting voor de weekdag kan in 5 verschillende talen worden
weergegeven.
• Druk op en houd de toets – (ca. 3 seconden) ingedrukt terwijl het
apparaat in de normale modus (tijd en datum worden weergegeven) staat. Op de display wordt in plaats van de weekdag nu de
taal van de weekdag weergegeven. De weergave doorloopt alle
beschikbare talen Engels (EN), Duits (GE), Italiaans (IT), Frans (FR),
60
Beachten Sie bitte folgende Hinweise, um dem
Gerät einen korrekten Empfang des DCF-Funksignals zu ermöglichen. Der Funksignalempfang des
Gerätes kann durch Störquellen, wie z.B. Computer, Handys, Funktelefone, TV Geräte, starke Motoren usw. beeinträchtigt werden. Platzieren Sie das
Gerät in einiger Entfernung (1,5 bis 2m) zu solchen
Störquellen. Ebenfalls kann der Empfang durch
Stahlbetonwände und andere funkwellendämpfende Materialien beeinflusst werden. Erfahrungsgemäß ist der Empfang in der Nähe von Fenstern
und Nachts (weniger Störquellen) am Besten. Der
Empfang ist von der Lage des Gerätes zum DCFSender abhängig, experimentieren Sie, falls Sie
keinen Empfang haben, etwas mit dem Aufstellort.
Einlegen und Wechseln der Batterie
Batterien gehören nicht in Kinderhände. Achten
Sie beim Einlegen der Batterie auf die richtige
Polung. Lassen Sie die Batterie nicht offen herumliegen, es besteht die Gefahr, dass diese von Kindern oder Haustieren verschluckt wird. Suchen Sie
im Falle eines Verschluckens sofort einen Arzt auf.
Ausgelaufene oder beschädigte Batterien können
bei Berührung mit der Haut Verätzungen verursachen, benutzen Sie entsprechende Schutzhandschuhe. Die Batterie darf nicht kurzgeschlossen,
geöffnet oder ins Feuer geworfen werden. Sie darf
außerdem nicht aufgeladen werden. Es besteht
Explosionsgefahr.
9
Ein Batteriewechsel ist nötig, wenn die Anzeige stark an Kontrast
verliert. Das Batteriefach befindet sich auf der Rückseite des Gerätes. Öffnen Sie das Batteriefach und legen Sie eine neue 1,5V Alkaline-Mignonbatterie (AA) polungsrichtig ein. Die korrekte Polung (Plus
und Minus) ist anhand der Aufschrift im Batteriefach zu erkennen.
Schließen Sie den Batteriefachdeckel. Nach dem Einlegen der Batterie leuchten kurz alle Displayzeichen auf. Danach meldet sich das
Gerät mit der Displayanzeige "0:00" Uhr und "1D 1M WE", die
Alarmzeit für den Alarm1 ist auf 7:00Uhr voreingestellt.
☞
Benutzen Sie eine Alkaline-Mignon-Batterie, um eine
möglichst lange Betriebsdauer zu erreichen. Um eine
Beschädigung des Gerätes durch eine auslaufende
Batterie zu vermeiden, entfernen Sie die Batterie,
wenn Sie das Gerät für längere Zeit nicht benutzen.
Bedienung
Starten und automatisches Einstellen
Nach dem Einlegen der Batterien beginnt das Gerät mit dem Empfangsversuch für das DCF Signal. In der Anzeige erscheint pulsierend das Symbol
für den DCF-Empfang. In der Regel dauert die
Synchronisation auf das DCF-Signal zwischen 3-5 Minuten (je nach
Empfangslage). Ist die Synchronisation erfolgreich abgeschlossen,
erscheint das Symbol
nicht mehr pulsierend und die aktuelle
Uhrzeit und das Datum werden angezeigt.
Sollte die Synchronisation auf das DCF-Empfang nicht innerhalb von
5 Minuten erfolgt sein, bricht das Gerät den Synchronisationsversuch
ab. Das Symbol
wird dann nicht angezeigt.
10
Probeer door het apparaat te draaien of een andere plaats te kiezen
een betere ontvangst te krijgen. Start de synchronisatie opnieuw
door de batterij uit het apparaat te verwijderen en te wachten totdat
de display uitgaat. Plaats de batterij terug. Het apparaat start een
nieuwe DCF-synchronisatiepoging.
Wanneer desondanks geen DCF-signaal wordt ontvangen, kunt u de
tijd zoals hieronder beschreven handmatig instellen. Het product
werkt dan als een gewone kwartsklok. Het apparaat probeert zich nu
automatisch elk uur met het DCF-signaal te synchroniseren. Wanneer de synchronisatiepoging succesvol is, wordt de handmatig
ingestelde tijd door de DCF-nauwkeurige tijd vervangen.
Handmatig instellen van kalender en tijd
• Druk op en houd de toets MODE (ca. 3
seconden) vast, totdat de uurwaarde
begint te knipperen. Druk op de toets +
of de toets – om de uurwaarde in te stellen.
• Druk op de toets MODE, de min-uutwaarde begint te knipperen. Druk op de
toets + of de toets – om de minuutwaarde in te stellen.
AM
PM
D
M
AM
PM
AL1
2
AM
PM
D
M
1
AM
PM
AL1
• Druk op de toets MODE, het jaar-tal
begint te knipperen. Druk op de toets +
of de toets – om het jaar in te stellen.
1
S
2
S
AM
PM
D
M
AM
PM
AL1
1
2
S
59
U dient de batterij te vervangen als het contrast van de display verslechtert. Het batterijvak bevindt zich aan de achterkant van het apparaat. Open het batterijvak en plaats een nieuwe 1,5 V alkalinemignonbatterij (AA) volgens de juiste poolrichting in het vak. De juiste
poolrichting (plus en min) kunt u in het batterijvak aflezen. Sluit het
deksel van het batterijvak. Na het plaatsen van de batterij branden
even alle displaytekens. Daarna verschijnt op de display „0:00“ uur
en „1D 1M WE“, de alarmtijd voor alarm 1 is standaard op 7:00 uur
ingesteld.
☞
Gebruik voor een zo lang mogelijke gebruiksduur een
alkalinebatterij van het type mignon. Verwijder de batterij als u het apparaat gedurende langere tijd niet
gebruikt om te voorkomen dat het door een lekkende
batterij beschadigd raakt.
Bediening
Starten en automatisch instellen
Na het plaatsen van de batterijen gaat het apparaat op zoek naar het
DCF-signaal. Op het display verschijnt pulserend het symbool
voor de DCF-ontvangst. Normaal gesproken duurt de
synchronisatie met het DCF-signaal tussen 3-5 minuten (afhankelijk
van de ontvangst). Wanneer de synchronisatie met succes is afgesloten, verschijnt het symbool
niet meer pulserend en de actuele
tijd en de actuele datum worden weergegeven.
Wanneer de synchronisatie met het DCF-signaal niet binnen 5 minuten is uitgevoerd, breekt het apparaat de synchronisatiepoging af.
Het symbool
wordt dan niet weergegeven.
58
Versuchen Sie durch Drehen des Gerätes oder einen Wechsel der
Aufstellortes einen besseren Empfang zu erzielen. Starten Sie die
Synchronisation nochmals, indem Sie die Batterie des Gerätes entnehmen und warten, bis die Displayanzeige erlischt. Setzen Sie die
Batterie wieder ein. Das Gerät beginnt mit einem neuen DCF-Synchronisationsversuch.
Sollte trotzdem kein DCF-Signal empfangen werden, stellen Sie die
Uhrzeit wie nachfolgend beschrieben manuell ein. Das Produkt
arbeitet dann wie eine normale Quarz-Uhr. Das Gerät versucht jetzt
automatisch jede Stunde sich auf das DCF-Signal zu synchronisieren. Ist der Synchronisationsversuch erfolgreich, wird die manuell
eingestellte Uhrzeit durch die DCF genaue Uhrzeit ersetzt.
Manuelles Einstellen des Kalenders und der Uhrzeit
• Drücken und halten Sie die Taste MODE
AM
(ca. 3 Sekunden), bis der Stundenwert
PM
zu blinken beginnt. Drücken Sie die
Taste + oder die Taste – um den Stundenwert einzustellen.
D
• Drücken Sie die Taste MODE, der Minutenwert beginnt zu blinken. Drücken Sie
die Taste + oder die Taste –, um den
Minutenwert einzustellen.
M
AM
PM
AL1
2
AM
PM
D
M
1
AM
PM
AL1
• Drücken Sie die Taste MODE, die Jahreszahl beginnt zu blinken. Drücken Sie
die Taste + oder die Taste –, um das
Jahr einzustellen.
1
S
2
S
AM
PM
D
M
AM
PM
AL1
1
2
S
11
• Drücken Sie die Taste MODE, der Monatswert beginnt zu blinken. Drücken
Sie die Taste + oder die Taste –, um den
Monat einzustellen.
• Drücken Sie die Taste MODE, das
Datum beginnt zu blinken. Drücken Sie
die Taste + oder die Taste –, um das
Datum einzustellen. Der richtige
Wochentag wird vom Gerät aufgrund des
eingestellten Datums selbst ermittelt.
van zomer- naar wintertijd, is niet nodig. Het apparaat voert elk uur
automatisch de synchronisatie met het DCF-signaal uit.
AM
PM
D
M
AM
PM
AL1
☞
1
2
S
AM
PM
D
M
AM
PM
AL1
1
2
S
• Drücken Sie die Taste MODE, um die Einstellung abzuschließen.
Wird keine Taste gedrückt, verlässt das Gerät nach 30 Sekunden
den Einstellmodus selbständig und kehrt in den normalen Anzeigemodus zurück.
☞
Um eine beschleunigte Einstellung der jeweils
blinkenden Werte zu erzielen, halten Sie Taste +
bzw. die Taste – gedrückt, statt sie nur kurz anzutippen. Der einzustellende Wert läuft dann schnell
nach oben bzw. nach unten.
Einstellen der Sprache für den Wochentag
Das Wochentagskürzel kann in 5 verschiedenen Sprachen dargestellt werden.
• Drücken und halten Sie die Taste – (ca. 3 Sekunden) während
sich das Gerät im Normalmodus (Uhrzeit und Datum wird angezeigt) befindet. Im Display wird statt des Wochentages jetzt die
Sprache des Wochentages angezeigt. Die Anzeige durchläuft alle
verfügbaren Sprachen Englisch (EN), Deutsch (GE), Italienisch (IT),
12
Neem de volgende instructies in acht om een goede ontvangst van het DCF-signaal mogelijk te
maken. De ontvangst van het DCF-signaal kan
door storingsbronnen zoals bijv. computers,
gsm’s, draadloze telefoons, tv-toestellen, sterke
motoren enz. worden beïnvloed. Zet het apparaat
niet in de buurt van dergelijke storingsbronnen,
maar op een afstand van 1,5 tot 2m. De ontvangst
kan eveneens worden beïnvloed door muren van
gewapend beton en andere storende materialen.
Uit ervaring blijkt dat de ontvangst het beste is in
de buurt van ramen en met name ´s nachts (minder storingsbronnen). De ontvangst is afhankelijk
van de positie van het apparaat ten opzichte van
de DCF-zender. Zet de klok als u geen ontvangst
heeft steeds op een andere plaats of in een andere
richting, totdat de ontvangst goed is.
Plaatsen en vervangen van de batterij
Houd batterijen buiten bereik van kinderen. Let bij
het plaatsen van de batterij op de juiste poolrichting. Laat batterijen niet achteloos liggen; zij kunnen eventueel door kinderen of huisdieren worden
ingeslikt. Raadpleeg bij inslikken onmiddellijk een
arts. Lekkende of beschadigde batterijen kunnen
bij huidcontact bijtende wonden veroorzaken.
Draag in dit geval beschermende handschoenen.
Zorg dat de batterij niet wordt kortgesloten, geopend of in vuur worden geworpen. De batterij mag
niet worden opgeladen. Er bestaat explosiegevaar.
57
• In de tijdweergave wisselen tussen 12- en 24-uurs formaat
• Wisselen tussen de lokale tijd en de tijdzonetijd (tweede instelbare tijd)
- toets
• Verlagen van uren-, minuten-, jaar-, maand- en datumwaarde tijdens de instelfase
• Selectie van de taal voor de weergave van de weekdag
1
SET toets
• Instellen van alarm 1
• In-/uitschakelen van alarm 1
1
SET toets
• Instellen van alarm 2
• In-/uitschakelen van alarm 2
SNOOZE/LIGHT toets
• Inschakelen van de achtergrondverlichting van de display
• Inschakelen van de SNOOZE-functie (sluimerfunctie) tijdens het
alarm
DCF-ontvangst
Het apparaat werkt volgens het DCF-principe. Het DCF77-tijdsignaal
(77,5kHz) wordt door een zender in Mainflingen in de buurt van Frankfurt uitgezonden (bereik ca. 1.500 km). De „radiografische tafelwekker
Sandra“ is voorzien van een elektronische schakeling die het DCFsignaal ontvangt en verwerkt. De klok wordt zo automatisch op de
actuele tijd ingesteld. Handmatig instellen, bijv. bij het overschakelen
56
Französisch (FR), Spanisch (SP). Lassen Sie die Taste – los,
sobald die gewünschte Sprache erscheint. Der Wochentag wird
jetzt in der eingestellten Sprache dargestellt. Das Gerät ist nach
dem Loslassen der Taste – wieder im Normalmodus.
Uhranzeige im 12- oder 24-Stundenformat
Mit der Taste + kann zwischen der Anzeige der Uhrzeit im 12- oder
24-Stundenformat umgeschaltet werden. Im 12 Stundenformat
erfolgt im Display die Anzeige "AM" für vormittags und "PM" für
nachmittags.
Zeitzonenfunktion
Das Gerät kann eine zur Ortszeit abweichende zweite Uhrzeit anzeigen. Diese Uhrzeit kann z.B. auf die aktuelle Uhrzeit eines anderen
Landes eingestellt werden.
• Drücken und halten Sie die Taste + (ca. 3 Sekunden) während
sich das Gerät im Normalmodus (Uhrzeit und Datum wird angezeigt) befindet. Im Display erscheint neben dem Funkturmsymbol
das Symbol F .
• Lassen Sie die Taste + los, das Gerät zeigt jetzt die Zeitzonenzeit
an.
• Drücken und halten Sie die Taste MODE (ca. 3 Sekunden) bis der
Stundenwert zu blinken beginnt.
• Drücken Sie die Taste + oder die Taste – um den von der Ortszeit
(DCF-Zeit) abweichenden Stundenwert der Zeitzonenzeit einzustellen. Das Gerät erlaubt eine maximale Abweichung von +/- 9
Stunden zu der aktuellen Ortszeit.
• Drücken Sie die Taste MODE die Zeitzone ist eingestellt. Wird keine Taste gedrückt, verlässt das Gerät nach 30 Sekunden den Einstellmodus selbständig.
13
• Drücken und halten Sie die Taste + (ca. 3 Sekunden) während
sich das Gerät in der Anzeige der Zeitzonenzeit befindet. Im Display erlischt das Symbol F .
Weergave- en bedieningselementen
RADIO CONTROLLED
• Lassen Sie die Taste + los, das Gerät zeigt jetzt wieder die Ortszeit an.
D
M
1
2
AL1
Alarm 1 einstellen
• Drücken und halten Sie die Taste SET 1
(ca. 3 Sekunden), bis der Stundenwert für
den Alarm 1 zu blinken beginnt. Drücken
Sie die Taste + oder die Taste –, um den
Stundenwert einzustellen.
2
1
SET
SET
AM
PM
D
M
AM
PM
AL1
1
2
S
MODE
1
• Drücken Sie die Taste SET
, der
Minutenwert für den Alarm 1 beginnt zu
blinken. Drücken Sie die Taste + oder die
Taste –, um den Minutenwert einzustellen.
Weergave
Anzeige
AM
PM
D
M
AM
PM
AL1
D
1
2
F
S
PM
AM
1
• Drücken Sie die Taste SET
, die
SNOOZE-Zeit
(Weckwiederholung)
beginnt zu blinken. Drücken Sie die
Taste + oder die Taste –, um die
gewünschte SNOOZE-Zeit (1 Minute bis
59 Minuten) einzustellen.
AM
PM
D
M
AM
PM
AL1
1
2
S
SNOOZE-Zeit = Wird während der Alarmton erklingt die Taste
SNOOZE/LIGHT gedrückt, so erfolgt der Alarm 1
erneut nach der hier eingestellten Zeitspanne.
1
• Drücken Sie die Taste SET
, um die Einstellung für die Alarmzeit 1 abzuschließen und gleichzeitig die Alarmfunktion zu aktivie-
14
Weergave
Betekenis
Betekenis
Bedeutung
Bedeutung
Anzeige
DCF-signaal
SNOOZE-functie
actief
ZZ
SNOOZE Funktion
aktiv
DCF Signal
Datum
Maand
Monat
Datum
M
Tijdzone-indicator
Zomertijdindicator
Sommerzeit Indikator
Zeitzonen Indikator
S
1
Alarm
PM (in
formaat)
Alarm 11
(im12-uurs
12 Stundenformat)
2
AM
(in
12-uurs
formaat)
Alarm
AM (im 12 Stundenformat)
Alarm 22
DCF-signaal
zwak
DCF-Signal schwach
Toetsfuncties:
MODE toets
• Weergave van alarmtijd 1 of alarmtijd 2
• Handmatige tijdinstelling
• Instellen van de tijdzone
+ toets
• Verhogen van uren-, minuten-, jaar-, maand- en datumwaarde tijdens de instelfase
55
• Het apparaat is geen speelgoed. Houd het buiten bereik van kinderen. Kinderen kunnen niet inschatten welke gevaren aan een
verkeerd gebruik van elektrische apparatuur zijn verbonden.
• Plaats het apparaat altijd op een stabiele en veilige ondergrond.
Het apparaat moet stevig staan; als de wekker omlaag valt, kunnen personen gewond en het apparaat of vloer beschadigd raken.
• Laat verpakkingsmateriaal niet achteloos slingeren. Plasticfolie,
plastic zakken, stukken piepschuim etc. kunnen voor kinderen
gevaarlijk speelgoed zijn.
Productomschrijving
• DCF (radiografisch) gestuurde klok- en datuminstelling
• Groot LC-display
• Display met weergave van uren, minuten, seconden, maand,
datum, weekdag
• Tijdzonefunctie (-9 uur tot +9 uur)
• Zomertijdindicator
• Twee alarmtijden met programmeerbare snoozeduur
• Alarm 1 met crescendo alarmsignaal (alarm neemt in intensiteit
toe) en alarm 2 met continu alarmsignaal
• Tijdweergave in 12- of 24-uurs formaat
• Weergave van weekdag kan in 5 talen worden weergegeven
• Batterij-ontladingsindicator
• Achtergrondverlichting
ren. Wird keine Taste gedrückt, verlässt das Gerät nach 30
Sekunden den Einstellmodus selbständig und kehrt in den normalen Anzeigemodus zurück.
Alarm 2 einstellen
• Drücken und halten Sie die Taste SET 2
(ca. 3 Sekunden), bis der Stundenwert für
den Alarm 2 zu blinken beginnt. Drücken
Sie die Taste + oder die Taste –, um den
Stundenwert einzustellen.
AM
PM
D
M
AM
PM
1
2
S
AL2
2
• Drücken Sie die Taste SET
, der
Minutenwert für den Alarm 2 beginnt zu
blinken. Drücken Sie die Taste + oder die
Taste –, um den Minutenwert einzustellen.
AM
PM
D
M
AM
PM
AL2
1
2
S
2
• Drücken Sie die Taste SET
, die
SNOOZE-Zeit
(Weckwiederholung)
beginnt zu blinken. Drücken Sie die
Taste + oder die Taste –, um die
gewünschte SNOOZE-Zeit (1 Minute bis
59 Minuten) einzustellen.
AM
PM
D
M
AM
PM
AL2
1
2
S
SNOOZE-Zeit = Wird während der Alarmton erklingt die Taste
SNOOZE/LIGHT gedrückt, so erfolgt der Alarm 2
erneut nach der hier eingestellten Zeitspanne.
2
• Drücken Sie die Taste SET
, um die Einstellung für die Alarmzeit 2 abzuschließen und gleichzeitig die Alarmfunktion zu aktivieren. Wird keine Taste gedrückt, verlässt das Gerät nach 30
54
15
Sekunden den Einstellmodus selbständig und kehrt in den normalen Anzeigemodus zurück.
Alarmfunktionen und SNOOZE (Weckwiederholung) benutzen
1
2
• Drücken Sie die Taste SET
bzw. SET
, um die Alarmfunktion für den Alarm 1 bzw. für den Alarm 2 ein- oder auszuschalten. Ist die Alarmfunktion eingeschaltet, erscheint im Display
das jeweilige Alarmsymbol 1 bzw. 2 .
• Sobald die aktuelle Uhrzeit die eingestellte Alarmzeit erreicht
erfolgt eine Reihe von Pieptönen.
1
Het product dient als tafelwekker met tijd- (DCF-nauwkeurig) en
kalenderweergave. Het apparaat beschikt over een alarmfunctie met
twee van elkaar onafhankelijk instelbare alarmtijden. De wekker is
uitsluitend geschikt voor gebruik in droge ruimten binnenshuis. Voor
de spanningsverzorging van het product mag alleen een 1,5V
mignonbatterij worden gebruikt. Een andere toepassing dan hierboven beschreven, kan leiden tot beschadiging van het product en
brengt risico´s met zich mee.
2
• Drücken Sie die Taste SET
oder SET
, um den Alarm zu
beenden. Der Alarm erfolgt am nächsten Tag zur eingestellten Zeit
erneut.
• Wird während der Alarmton erklingt die Taste SNOOZE/LIGHT
gedrückt, so wird dieser für die zuvor eingegebene SNOOZE-Zeit
unterbrochen. In der Grundeinstellung des Gerätes sind dies 4
Minuten. Die SNOOZE-Zeit kann zwischen 1 Minute und 59 Minuten eingestellt werden, siehe Kapitel "Alarm 1 einstellen" bzw.
"Alarm 2 einstellen". Während sich das Gerät in der SNOOZEFunktion befindet , blinkt im Display das Symbol "ZZ".
• Der Alarm wird automatisch beendet, wenn innerhalb von 4 Minuten nicht die Taste SET 1 oder SET 2 , bzw. SNOOZE/LIGHT
gedrückt wird.
Der Alarmton für den Alarm 1 ist ein sogenannter "Crescendo"
Alarm, d.h. ein ansteigender Piepton.
Der Alarmton für den Alarm 2 ist ein kontinuierlicher Piepton.
16
Voorgeschreven gebruik
Veiligheidsinstructies
Lees voor ingebruikneming de volledige gebruiksaanwijzing door; deze bevat belangrijke instructies voor het juiste gebruik. Bij schade veroorzaakt
door het niet opvolgen van de gebruiksaanwijzing,
vervalt het recht op garantie! Voor vervolgschade
die hieruit ontstaat, zijn wij niet aansprakelijk!
Wij kunnen niet aansprakelijk worden gesteld voor
materiële schade of persoonlijk letsel als gevolg
van ondeskundig gebruik of het negeren van de
veiligheidsvoorschriften! In dergelijke gevallen
vervalt elke aanspraak op garantie.
• Om veiligheids- en keuringsredenen (CE) is het eigenmachtig
ombouwen en/of veranderen van het apparaat niet toegestaan.
• Het apparaat mag niet worden blootgesteld aan extreme temperaturen (<0°C / >+50°C), sterke trillingen, sterke mechanische
belastingen, direct intensief zonlicht en een hoge vochtigheid. Hierdoor kan het apparaat worden beschadigd.
53
Inhoudsopgave
Inleiding........................................................................................51
☞
Inhoudsopgave..............................................................................52
Voorgeschreven gebruik................................................................53
Veiligheidsinstructies ....................................................................54
Productomschrijving .....................................................................55
Weergave- en bedieningselementen .............................................56
Haben Sie zuvor die Anzeige der Uhrzeit im 12-Stundenformat gewählt, wird auch die Alarmzeit im 12Stundenformat dargestellt. Achten Sie auf die Anzeige
"AM" für vormittags und "PM" für nachmittags, damit
der Alarm zur richtigen Tageshälfte erfolgt.
Anzeigebeleuchtung
Drücken Sie die Taste SNOOZE/LIGHT, um die Displaybeleuchtung
einzuschalten. Die Beleuchtung erlischt automatisch nach kurzer
Zeit.
DCF-ontvangst..............................................................................57
Plaatsen en vervangen van de batterij ...........................................58
Bediening .....................................................................................58
Starten en automatisch instellen...............................................59
Handmatig instellen van kalender en tijd ..................................60
Taal instellen voor de weekdag ................................................61
Tijdweergave in 12- of 24-uurs formaat ...................................61
Tijdzonefunctie.........................................................................62
Alarm 1 instellen ......................................................................63
Alarm 2 instellen ......................................................................64
Alarmfunctie en SNOOZE (sluimerfunctie) gebruiken.................16
Displayverlichting .....................................................................65
Wartung, Reinigung und Pflege
Eine Reparatur oder ein Öffnen des Gerätes darf
nur durch eine Fachkraft erfolgen, die mit den
damit verbundenen Gefahren bzw. einschlägigen
Vorschriften vertraut ist.
Das Produkt ist wartungsfrei, öffnen Sie es deshalb niemals. Durch
ein Öffnen des Produkts erlischt der Garantieanspruch.
Äußerlich sollte das Gerät nur mit einem weichen, leicht feuchten
Tuch oder trockenen Pinsel gereinigt werden. Verwenden Sie auf
keinen Fall aggressive Reinigungsmittel oder chemische Lösungen,
da dadurch das Gehäuse angegriffen oder die Funktion beeinträchtigt werden könnte.
Onderhoud, reiniging en verzorging...............................................65
Verwijdering..................................................................................65
Entsorgung
Conformiteitsverklaring .................................................................66
Entsorgen Sie das unbrauchbar gewordene Gerät gemäß den geltenden gesetzlichen Vorschriften.
Technische gegevens ...................................................................66
52
17
Entsorgung von gebrauchten Batterien/Akkus!
Sie als Endverbraucher sind gesetzlich (Batterieverordnung) zur Rückgabe aller gebrauchten Batterien
und Akkus verpflichtet; eine Entsorgung über den
Hausmüll ist untersagt! Schadstoffhaltige Batterien/Akkus sind mit Symbolen gekennzeichnet, die auf
das Verbot der Entsorgung über den Hausmüll hinweisen. Die Bezeichnungen für das ausschlaggebende
Schwermetall sind: Cd = Cadmium, Hg = Quecksilber, Pb = Blei. Ihre verbrauchten Batterien/Akkus
können Sie unentgeltlich bei den Sammelstellen Ihrer
Gemeinde unseren Filialen oder überall dort abgeben,
wo Batterien/Akkus verkauft werden!
Sie erfüllen damit die gesetzlichen Verpflichtungen und leisten
Ihren Beitrag zum Umweltschutz!
Konformitätserklärung
Hiermit erklären wir, Conrad Electronic, Klaus-Conrad-Straße 1,
92240 Hirschau, dass sich dieses Produkt in Übereinstimmung mit
den grundlegenden und den anderen relevanten Vorschriften der
Richtlinie 1999/5/EG befindet.
☞
Inleiding
Geachte klant, hartelijk dank voor de aanschaf van de „radiografische tafelwekker Sandra“.
Met dit product heeft u een apparaat gekocht dat volgens de huidige
stand van de techniek is ontwikkeld.
Dit product voldoet aan de voorwaarden van de geldende Europese
en nationale richtlijnen.
Volg de instructies van de gebruiksaanwijzing op om deze status van
het apparaat te handhaven en een veilige werking te garanderen!
Bij vragen kunt u zich wenden aan onze Technische
helpdesk:
Nederland:
Tel.
053-428 54 80
Fax
053-428 00 28
e-mail:
[email protected]
Ma. t/m do. van 8:30 tot 20:00 uur
Vr.
van 8:30 tot 18:00 uur
Die Konformitätserklärung zu diesem Produkt finden Sie unter www.conrad.com.
Technische Daten
Betriebsspannung:
1,5VDC
Batterie:
1xMignon (AA)
Arbeitstemperaturbereich: 0°C bis 50°C
Relative Luftfeuchtigkeit:
< 90 % (nicht kondensierend)
18
51
Elimination des piles et accumulateurs usagés !
Le consommateur final est légalement tenu (ordonnance relative à l´élimination des piles usagées)
de rapporter toutes les piles et accumulateurs usés; il
est interdit de les jeter dans les ordures ménagères ! Les piles et accumulateurs qui contiennent
des substances toxiques sont caractérisés par des
symboles qui indiquent l’interdiction de les jeter dans
les ordures ménagères. Les désignations pour le
métal lourd décisif sont : Cd = cadmium, Hg = mercure, Pb = plomb. Vous pouvez rapporter gratuitement vos piles et accumulateurs usagés aux centres
de récupération de votre commune, à nos succursales ou à tous les points de vente de piles et d’accumulateurs.
Vous respectez ainsi les obligations légales et contribuez à la
protection de l’environnement !
Introduction
Sehr geehrte Kundin, sehr geehrter Kunde, wir bedanken uns für den
Kauf des „Funk-Tisch-Wecker Sandra“.
With this appliance, you have purchased a product whose design
complies with state-of-the-art technology.
This product meets the requirements of all applicable European and
national guidelines.
To maintain this status and to ensure risk-free operation, you, as the
user must comply with these operating instructions!
Pour toutes questions, adressez vous à notre service conseil
technique
France:
Tél.
0892 897 777
Fax
0892 896 002
e-mail:
[email protected]
du lundi au vendredi de 8h00 à 18h00
le samedi de 8h00 à 12h00
Suisse:
Tél.
0848/80 12 88
Fax
0848/80 12 89
e-mail:
[email protected]
du lundi au vendredi de 8h00 à 12h00,
13h00 à 17h00
Déclaration de conformité
Conrad Electronic, Klaus-Conrad-Strasse 1, 92240 Hirschau, déclare
que le produit est en conformité avec les exigences fondamentales et
autres prescriptions concernées de la directive 1999/5/CE.
☞
Vous trouverez la déclaration de conformité du
produit à l’adresse www.conrad.com.
Caractéristiques techniques
Tension de service :..................1,5 Vcc
Pile : ........................................1xmignon (AA)
Plage de températures de service :
0°C à 50°C
Humidité relative de l’air : .........< 90 % (sans condensation)
50
19
Table of Contents
Introduction ..................................................................................19
☞
Table of Contents..........................................................................20
Intended Use.................................................................................21
Safety Instructions ........................................................................21
Product Description.......................................................................22
Display and Control Elements........................................................23
Si vous avez choisi préalablement l´affichage de l´heure en format 12 heures, l´heure d´alarme sera également représentée dans ce format. Respectez l´affichage « AM » pour le matin et « PM » pour l´après-midi
afin que l´alarme ait lieu à l´heure de la journée désirée.
Eclairage de l´affichage
Appuyez sur la touche SNOOZE/LIGHT pour mettre l’éclairage de
l´affichage en marche. L´éclairage s´éteint automatiquement après
un court instant.
DCF Reception ..............................................................................24
Inserting and Replacing the Battery...............................................25
Operation......................................................................................26
Starting and Automatic Setting .................................................26
Manual Setting of Calendar and Time .......................................27
Setting the Language for the Day of the Week ..........................28
Maintenance, nettoyage et entretien
Toute réparation ou ouverture de l’appareil doivent
uniquement être effectuées par un technicien qualifié connaissant parfaitement les risques potentiels encourus et les prescriptions spécifiques en
vigueur.
Clock Display in the 12/24-Hour Format ...................................29
Time Zone Function..................................................................29
Setting Alarm 1 ........................................................................30
Setting Alarm 2 ........................................................................30
Using Alarm Functions and SNOOZE (Alarm Repetition).............31
Display Illumination ..................................................................33
Le produit ne nécessite aucun entretien, par conséquent, ne jamais
l´ouvrir. L’ouverture du produit a pour effet d’annuler la garantie.
L’extérieur de l’appareil doit uniquement être nettoyé avec un chiffon
doux, légèrement humide ou un pinceau sec. N’utiliser en aucun cas
des nettoyants agressifs ou des solutions chimiques car ces produits
attaquent le boîtier ou peuvent nuire au bon fonctionnement de l’appareil.
Maintenance, Cleaning and Service Instructions............................33
Disposal........................................................................................33
Elimination des éléments usés
Declaration of Conformity..............................................................34
Si l’appareil est devenu inutilisable, il conviendra alors de procéder à
son élimination, conformément aux prescriptions légales en vigueur.
Technical Data..............................................................................34
20
49
Utilisation des fonctions d’alarmes et SNOOZE (répétition
d’alarme)
1
1
• Appuyez sur la touche SET
ou SET
, pour activer ou
désactiver la fonction d’alarme 1 ou 2. Si la fonction d’alarme
est activée, le symbole d’alarme correspondant 1 ou 1
apparaît.
• Dès que l’heure actuelle atteint l’heure définie pour l’alarme, une
suite de bips retentit.
1
Intended Use
The product is used as a table alarm clock with time (DCF-exact) and
calendar display It is provided with an alarm function offering two
alarm times which can be set separately. The product is approved
only for the operation in dry rooms. Only a 1.5V mignon battery may
be used for the power supply. Use other than that described above
will lead to damage to the product and also involves additional risks.
1
• Appuyez sur la touche SET
ou SET
pour arrêter l’alarme. L´alarme sonne de nouveau le lendemain à l´heure d´alarme
réglée.
• Si vous appuyez sur la touche SNOOZE/LIGHT pendant l’alarme,
l’alarme est interrompue jusqu’à l’heure SNOOZE définie. Dans le
réglage par défaut de l’appareil, cet intervalle est de 4 minutes.
L’heure SNOOZE peut être réglée entre 1 minute et 59 minutes,
voir le chapitre „Réglage de l’alarme 1“ ou „Réglage de l’alarme
2“. Alors que l’appareil se trouve dans la fonction SNOOZE, le
symbole „ZZ“ clignote.
• L’alarme s’arrête automatiquement, lorsque vous n’appuyez par
sur la touche SET 1 ou SET 1 ou SNOOZE/LIGHT pendant 4
minutes.
L’alarme 1 est une alarme en „crescendo“, la tonalité augmente progressivement.
L’alarme 2 a une tonalité continue.
Safety Instructions
Please read through the operating instructions
completely before setting up the system; they
include important information necessary for the
correct operation. The warranty will lapse in case
of damage caused by failure to comply with these
operating instructions! We shall not be held liable
for any consequential damage or loss!
We shall not accept any liability for damage to
property or personal injury caused by incorrect
handling or non-compliance with the safety
instructions! In such cases the guarantee will
lapse.
• For safety and licensing reasons (CE), unauthorised conversion
and/or modification of the device is not permitted.
• The device may not be exposed to extreme temperatures (<0°C /
>+50°C), strong vibration, heavy mechanical loads, direct sunlight
and high degrees of humidity. This could damage the device.
48
21
• This product is not a toy and has no place in the hands of children.
Children cannot estimate the risks which can arise through incorrect handling of electrical appliances.
• Make sure that the device is set up on a secure and stable surface. The clock must be set up in a stable position. If it falls down,
persons could be injured or the appliance or the floor could be
damaged.
• Do not leave packaging material lying around carelessly. In the
hands of children, plastic foil and/or bags and polystyrene parts
etc. can turn into dangerous toys.
Product Description
• DCF (radio) controlled time and date settings
• Large LC display
• Display indicating the hours, minutes, seconds, month, date, day
of the week
• Time zone function (-9 hours up to + 9 hours)
• Summer time indicator
• Two alarm times with programmable snooze period
• Alarm 1 with crescendo audio signal (increasing audio signal) and
alarm 2 with constant audio signal
• Display of the time in the 12- or 24-hour format
• Indication of the day of the week selectable in 5 languages
• Battery discharge indication
• Background illumination
Réglage de l’alarme 2
• Appuyez et maintenez enfoncée pendant
env. 3 secondes la touche SET 2 jusqu´à ce que l´heure de l’alarme 2 commence à clignoter. Appuyez sur la
touche + ou la touche – pour régler
l’heure.
• Appuyez sur la touche SET 2 , les
minutes pour l’alarme 2 commencent à
clignoter. Appuyez sur la touche + ou la
touche – pour régler les minutes.
AM
PM
D
M
AM
PM
1
2
S
AL2
AM
PM
D
M
AM
PM
AL2
1
2
S
2
• Appuyez sur la touche SET
, l’heure
SNOOZE (répétition de l’alarme) commence à clignoter. Appuyez sur la
touche + ou la touche –, pour régler
l’heure SNOOZE (1 minute à 59
minutes).
AM
PM
D
M
AM
PM
AL2
1
2
S
Heure SNOOZE = Si vous appuyez sur la touche SNOOZE/LIGHT
pendant l’alarme, l’alarme 2 retentit à nouveau
après l’intervalle défini.
2
• Appuyez sur la touche SET
, pour quitter le réglage de l’alarme 2 et activer la fonction d’alarme. Si aucune touche n’est
actionnée, l’appareil quitte seul le mode de réglage au bout de 30
secondes et revient au mode d’affichage normal.
22
47
• Appuyez et maintenez enfoncée la touche + (env. 3 secondes)
pendant que l’appareil est en mode d’affichage de l’heure du
fuseau. Le symbole F disparaît !
Display and Control Elements
RADIO CONTROLLED
• Relâchez la touche +, l’appareil affiche à nouveau l’heure locale.
Réglage de l’alarme 1
• Appuyez et maintenez enfoncée (3
secondes) la touche SET 1 jusqu´à ce
que l´heure de l’alarme 1 commence à
clignoter. Appuyez sur la touche + ou la
touche – pour régler l’heure.
D
M
1
2
AL1
AM
PM
D
2
M
AM
PM
AL1
1
SET
SET
1
2
S
MODE
• Appuyez sur la touche SET 1 , les
minutes pour l’alarme 1 commencent à
clignoter. Appuyez sur la touche + ou la
touche – pour régler les minutes.
AM
PM
Display
Anzeige
D
M
AM
PM
AL1
1
2
S
D
• Appuyez sur la touche SET 1 , l’heure
SNOOZE (répétition de l’alarme) commence à clignoter. Appuyez sur la
touche + ou la touche –, pour régler
l’heure SNOOZE (1 minute à 59
minutes).
F
AM
PM
D
PM
AM
M
AM
PM
AL1
1
2
Meaning
Bedeutung
DCF
DCFsignal
Signal
Date
Datum
Summer
time
indicator
Zeitzonen
Indikator
PM (in
(imthe
12 12-hour
Stundenformat)
PM
format)
AM
format)
AM (in
(imthe
1212-hour
Stundenformat)
DCF
signal weak
DCF-Signal
schwach
Display
Anzeige
ZZ
M
S
1
2
Meaning
Bedeutung
SNOOZE
active
SNOOZEfunction
Funktion
aktiv
Month
Monat
Summer
timeIndikator
indicator
Sommerzeit
Alarm
Alarm 11
Alarm
Alarm 22
S
Heure SNOOZE = Si vous appuyez sur la touche SNOOZE/LIGHT
pendant l’alarme, l’alarme 1 retentit à nouveau
après l’intervalle défini.
Key functions:
MODE key
• display of alarm time 1 or alarm time 2
• manual time setting
• setting the time zone
1
• Appuyez sur la touche SET
, pour quitter le réglage de l’alarme 1 et activer la fonction d’alarme. Si aucune touche n’est
actionnée, l’appareil quitte seul le mode de réglage au bout de 30
secondes et revient au mode d’affichage normal.
46
+ key
• increasing the hour, minute, year, month and date values during
the setting phase
• switching the time display from the 12- to the 24-hour format
23
• switching between the local time and the time zone time (second
time which can be set)
- key
• decreasing the hour, minute, year, month and date values during
the setting phase
• selecting the language for the indication of the day of the week
1
SET key
• setting alarm 1
• switching alarm 1 on/off
1
SET key
• setting alarm 2
• switching alarm 2 on/off
SNOOZE/LIGHT key
• switching on the display background illumination
• switching on the SNOOZE function (alarm repetition) during the
alarm
DCF reception
The device operates according to the DCF principle. The DCF77 time
signal (77.5kHz) is sent by a transmitter in Mainflingen near Frankfurt
on the Main (range of about 1.500km). The Table Radio Alarm Clock
Sandra is provided with an electronic system which receives and evaluates the DCF signal. Thus, the clock synchronises automatically the
current time. Therefore, a manual setting, e.g. the change from winter
to summer time, is not required. The device performs the synchronisation to the DCF signal once per hour.
24
français (FR), espagnol (SP). Relâchez la touche -, dès que la langue
souhaitée apparaît. Le jour de la semaine s’affiche désormais dans la
langue choisie. L’appareil repasse en mode normal après relâchement de la touche.
Affichage de l´heure en format 12 ou 24 heures
La touche 12/24 permet de commuter entre l´affichage de l´heure en
format 12 et en format 24 heures. En format 12 heures, « AM »
s´affiche en plus sur l´écran pour le matin et « PM » pour l´aprèsmidi.
Fonction fuseau horaire
L’appareil peut afficher une deuxième heure, différente de l’heure
locale. Cette heure peut être calée sur l’heure d’un autre pays.
• Appuyez et maintenez enfoncée la touche + (env. 3 secondes)
pendant que l’appareil est en mode normal (la date et l’heure sont
affichées). Le symbole s’affiche à l’écran, à côté du symbole F
de la tour radio.
• Relâchez la touche +, l’appareil affiche l’heure du fuseau horaire.
• Appuyez et maintenez enfoncée pendant env. 3 secondes la
touche MODE jusqu´à ce que l´heure commence à clignoter.
• Appuyez sur la touche + ou la touche – pour régler l’heure du
fuseau horaire différant de l’heure locale (heure DCF). L’appareil
permet un écart maximal de +/- 9 heures avec l’heure locale
actuelle.
• Appuyez sur la touche MODE, le fuseau horaire est réglé. Si vous
n’appuyez sur aucune touche, l’appareil quitte le mode de réglage
au bout de 30 secondes.
45
• Appuyez sur la touche MODE, le mois
commence à clignoter. Appuyez sur la
touche + ou la touche – pour régler le
mois.
• Appuyez sur la touche MODE, la date
commence à clignoter. Appuyez sur la
touche + ou la touche – pour régler la
date. L’appareil détermine seul le jour de
la semaine sur la base de la date.
☞
AM
PM
D
M
AM
PM
AL1
1
2
S
AM
PM
D
M
AM
PM
AL1
1
2
S
• Appuyez sur la touche MODE pour terminer le réglage. Si aucune
touche n’est actionnée, l’appareil quitte seul le mode de réglage
au bout de 30 secondes et revient au mode d’affichage normal.
☞
Pour obtenir un réglage rapide des valeurs qui clignotent, maintenez enfoncée la touche + ou la
touche –, au lieu d’appuyer brièvement dessus. La
valeur à régler défile alors rapidement vers le haut
ou le bas.
Réglage de la langue pour le jour de la semaine
Le sigle du jour de la semaine peut être affiché en 5 langues au
choix.
• Appuyez et maintenez enfoncée la touche – (env. 3 secondes)
pendant que l’appareil est en mode normal (la date et l’heure sont
affichées). L’écran indique maintenant la langue du jour de la
semaine, au lieu du jour de la semaine. L’écran fait défiler toutes
les langues d’affichage anglais (EN), allemand (GE), italien (IT),
44
Please observe the following information to ensure
a correct reception of the DCF radio signal. The
radio signal reception of the device can be
impaired by sources of interference, such as computers, mobile phones, TV sets, strong motors, etc.
Place the device in a considerable distance (1.5 to
2m) from such sources of interference. The reception can also be negatively influenced by reinforced steel walls and other radio attenuation
materials, Experience has shown that the reception is the best in the vicinity of windows and during the night (less sources of interference). The
reception of the device depends on its position to
the DCF transmitter; therefore, look for a more
suitable location if the device does not receive the
signals.
Inserting and Replacing the Battery
Keep batteries away from children. Observe the
correct polarity when inserting the battery. Do not
leave the battery lying around in the open; there is
the risk of being swallowed by children or domestic animals. If swallowed, consult a doctor immediately. Leaking or damaged batteries may cause
cause burning if they come into contact the with
skin. For this reason you should use suitable protective gloves. You may not short-circuit the battery or throw it into the fire. Moreover, it is not permitted to recharge it. Danger of explosion.
25
It is necessary to replace the battery if the display contrast becomes
considerably weak. The battery compartment is located on the rear
side of the clock. Open the battery compartment and insert a new
1.5V alkaline mignon battery (AA) paying attention to the polarity. The
correct polarity (plus and minus) can be recognised by the sign in the
battery compartment. Close the battery compartment lid again. After
inserting the battery all the display signs are flashing briefly. Afterwards, the device responds with the display „0:00“ o’clock and „1D
1M WE“; the alarm time for alarm 1 is set to 7 o’clock.
☞
Use an alkaline battery to ensure the longest possible
service life. In order to prevent damage to the device
by a leaking battery, remove the battery if you do not
use the device for a longer period of time.
Operation
Starting and Automatic Setting
After inserting the battery, the device starts to test the reception of
the DCF signal. The display shows the pulsating symbol
for the
DCF reception. Normally, the
synchronisation to the DCF signal takes between 3 to 5 minutes
(depending on the reception location). If the synchronisation has
been successfully completed, the display shows the symbol
not
pulsating any longer and the current
time and date will be indicated.
If the synchronisation to the DCF reception is not successfully completed after 5 minutes, the devices will cancel the synchronisation
attempt. The symbol
willnot be indicated then.
26
Essayez d´obtenir une meilleure réception en tournant l´appareil ou
en changeant l´emplacement. Redémarrez la synchronisation en retirant la pile de l’appareil et attendez que l’affichage s’éteigne. Réinstallez la pile. L´appareil commence à effectuer une nouvelle opération de synchronisation DCF.
Si aucun signal DCF n’est toujours reçu, réglez l’heure manuellement
comme décrit ci-dessous. Le produit fonctionne ensuite comme une
horloge à quartz normale. L´appareil cherche maintenant automatiquement toutes les heures à se synchroniser sur le signal DCF. Si
l’essai de synchronisation réussit, l’heure réglée manuellement est
remplacée par l’heure exacte DCF.
Réglage manuel du calendrier et de l´heure
• Appuyez puis maintenez enfoncée pendant env. 3 secondes la touche MODE
jusqu´à ce que l´heure commence à clignoter. Appuyez sur la touche + ou la
touche – pour régler l’heure.
• Appuyez sur la touche MODE, les
minutes commencent à clignoter.
Appuyez sur la touche + ou la touche –
pour régler les minutes.
AM
PM
D
M
AM
PM
AL1
2
AM
PM
D
M
1
AM
PM
AL1
• Appuyez sur la touche MODE, l’année
commence à clignoter. Appuyez sur la
touche + ou la touche – pour régler l’année.
1
S
2
S
AM
PM
D
M
AM
PM
AL1
1
2
S
43
Un remplacement de la pile est nécessaire lorsque l’affichage perd
sensiblement de sa netteté. Le logement de la pile se trouve au dos
de l´appareil. Ouvrez le logement de la pile et insérez-y une pile
mignon alcaline neuve (AA) de 1,5 V en respectant la polarité. La
polarité correcte (plus et moins) est indiquée par l´inscription correspondante dans le logement des piles. Refermez le couvercle du logement de la pile. Après avoir inséré la pile, tous les symboles d’affichage s’allument brièvement. Puis, l’appareil indique „0:00“ et „1D
1M WE“, l’horaire de l’alarme 1 est préréglé sur 7:00.
☞
Utilisez une pile mignon alcaline afin d’atteindre une
durée de fonctionnement maximale. En cas d´inutilisation prolongée de l´appareil, retirez la pile afin d´éviter
que la pile ne fuie et endommage ainsi l´appareil.
Commande
Démarrage et réglage automatique
Après l’installation de la pile, l´appareil commence à essayer de
recevoir le signal DCF. Le symbole
de réception du signal DCF
apparaît en clignotant dans l´affichage. En général, la synchronisation sur le signal DCF dure entre 3 et 5 minutes (selon la situation de
réception).
Quand la synchronisation est correctement terminée, le symbole
ne clignote plus, l´heure et la date actuelles s´affichent.
Si la synchronisation sur la réception DCF ne se fait pas dans les 5
minutes, l’appareil interrompt l’essai de synchronisation. Le symbole
ne s’affiche plus.
42
Try to achieve a better reception by turning the devices or by changing the location. Start the synchronisation process anew by removing
the battery out of the clock and waiting till the display goes out. Insert
the battery again. The device starts a new synchronisation attempt.
If nevertheless a DCF signal cannot be received, set the time manually as described below. Then, the product operates like a normal
quartz clock. Now, the device tries to synchronise itself to the DCF
signal once per hour. If the synchronisation is successful, the manually set time will be replaced by the DCF-exact time.
Manual Setting of Calendar and Time
• Press the MODE key and keep it pressed
(ca. 3 seconds) till the hour value starts
to flash. Press the + key or the – key to
set the hour.
AM
PM
D
M
AM
PM
AL1
• Press the MODE key, the minute value
starts to flash. Press the + key or the –
key to set the minutes.
2
AM
PM
D
M
AM
PM
AL1
• Press the MODE key, the year value
starts to flash. Press the + key or the –
key to set the year.
1
S
1
2
S
AM
PM
D
M
AM
PM
AL1
1
2
S
27
• Press the MODE key, the monthvalue
starts to flash. Press the + key or the –
key to set the month.
passage de l´heure d´été à l´heure d´hiver. L´appareil effectue automatiquement une fois par heure la synchronisation sur le signal DCF.
AM
PM
D
M
AM
PM
AL1
• Press the MODE key, the date starts to
flash. Press the + key or the – key to set
the date. Based on the date setting, the
correct day of the week will be determined by the device automatically.
☞
1
2
S
AM
PM
D
M
AM
PM
AL1
1
2
S
• Press the MODE key to finish the setting. If no key is activated, the
device exits the setting mode automatically after 30 seconds and
returns to the normal display mode.
☞
To achieve an accelerated setting of the individually flashing values keep the „+“ key or the „-“
key pressed instead of pressing it only briefly.
Then, the value to be set runs quickly upwards or
downwards.
Setting the Language for the Day of the Week
The abbreviation of the day of the week can be displayed in 5 different languages.
• Press the „-“ key and keep it pressed (ca. 3 seconds) while the
device is in the normal mode (time and date indication). Now, the
language of the day of the week is displayed instead of the day of
the week itself. The display runs through all languages provided:
English (EN), German (DE), Italian (IT), French (FR) and Spanish
(SP). Release the „-“ key as soon as the language desired appears.
28
Respectez les consignes suivantes afin d´assurer
une bonne réception du signal radiopiloté DCF. Des
sources de parasites telles qu´ordinateurs, téléphones mobiles, radiotéléphones, téléviseurs,
moteurs puissants etc peuvent nuire à la réception
du signal DCF de l´appareil. Placez l´appareil à une
certaine distance (1,5m à 2m) par rapport aux
sources de parasites. La réception peut également
être influencée par des murs en béton armé et
autres matériaux entravant le passage des ondes
radio. L´expérience montre que la réception est la
meilleure la nuit et à proximité de fenêtres
(sources parasites réduites) . La réception dépend
de la position de l´appareil par rapport à l´émetteur
DCF ; en cas de non-réception du signal, faites
des essais avec le lieu d´installation de l´appareil.
Mise en place/remplacement de la pile
Les piles ne doivent pas être laissées à la portée
des enfants ! Respecter la polarité lors de la mise
en place de la pile. Ne pas laisser la pile à la portée
de tous, les enfants ou les animaux domestiques
risqueraient de les avaler. Dans ce cas, consulter
immédiatement un médecin ! En cas de contact
avec la peau, les piles qui fuient ou qui sont
endommagées peuvent occasionner des brûlures
par acide ; veuillez utiliser des gants de protection
correspondants. Ne pas court-circuiter, ouvrir ou
jeter la pile dans le feu. Ne pas la recharger. Danger d’explosion.
41
• Commutation de l’affichage de l’heure entre les formats 12 et 24
heures
• Commutation entre l’heure locale et l’heure d’un fuseau (deuxième heure réglable séparément)
Touche • Réduction de la valeur des heures, minutes, année, mois et date
pendant la phase de réglage
• Sélection de la langue d’affichage du jour de la semaine
1
Touche SET
• Réglage de l’alarme 1
• Marche/Arrêt de l’alarme 1
2
Touche SET
• Réglage de l’alarme 2
• Marche/Arrêt de l’alarme 2
Touche SNOOZE/LIGHT
• Activation du rétro-éclairage
• Activation de la fonction SNOOZE (répétition de l’alarme) pendant
l’alarme
Réception DCF
L´appareil fonctionne d´après le principe DCF. Le signal horaire DCF (77,5
kHz) est envoyé centralement par un émetteur situé à Mainflingen, près
de Francfort (portée d´environ 1500 km). Le réveil Sandra à signal radio
est équipé d´un circuit électronique qui reçoit et évalue le signal DCF.
Ainsi, l´horloge se synchronise automatiquement sur l´heure actuelle. Il
n´est pas utile de procéder à un réglage manuel permettant, par ex., le
40
Now, the day of the week will be indicated in the language set. The
device is again in the normal mode, if the „-“ key is released.
Clock Display in the 12/24-Hour Format
You can select between the time display in 12 or 24 hours by activating the „+“ key. In the 12-hour format, the acronym „AM“ will be
displayed for times before 12:00 o’clock and „PM“ after 12.00
o’clock.
Time Zone Function
The device can display a second time value which deviates from the
local time. This time value can for example be set to the current time
of another country.
• Press the + key and keep it pressed (ca. 3 seconds), while the
device is in the normal mode (time and date indication). The symbol will be shown beside the radio tower symbol. F .
• Release the „+“ key; the device displays the time zone now.
• Press the MODE key and keep it pressed (ca. 3 seconds) till the
hour value starts to flash.
• Press the + key or the – key to set the hour value of the time zone
deviating from the local time (DCF time). The device allows a maximum deviation of +/- 9 hours from the current local time.
• Press the MODE key to finish the setting. If no key is activated, the
device exits the setting mode automatically after 30 seconds.
• Press the + key and keep it pressed (ca. 3 seconds), while the
device is in the time zone indication mode. The symbol F goes
out in the display .
• Release the „+“ key; now the device displays again the local time.
29
Eléments d’affichage et de commande
Setting Alarm 1
• Press the SET 1 key and keep it pressed
(ca. 3 seconds) till the hour value for
the alarm 1 will start to flash. Press the +
key or the – key to set the hour.
AM
PM
D
M
RADIO CONTROLLED
1
AM
PM
2
AL1
S
D
• Press the SET 1 key; the minute value
for alarm 1 starts to flash. Press the + key
or the – key to set the minutes.
M
1
2
AL1
AM
PM
2
D
M
1
SET
SET
1
AM
PM
2
AL1
S
MODE
• Press the SET 1 key; the SNOOZE
time (alarm repetition) starts to flash.
Press the + key or the – key to set the
SNOOZE time desired (from 1 minute to
59 minutes).
AM
PM
D
M
1
AM
PM
2
AL1
S
Ecran
Anzeige
D
SNOOZE time = If the SNOOZE/LIGHT key is pressed during the
alarm signal, alarm 1 will become active again after
the period of time set here.
F
PM
AM
Signification
Bedeutung
Signal
DCF
DCF Signal
Date
Datum
Indicateur
Zeitzonenfuseaux
Indikatorhoraires
PM (format
(im 12 Stundenformat)
PM
12 heures)
AM
12 heures)
AM (format
(im 12 Stundenformat)
Signal
DCF faible
DCF-Signal
schwach
Ecran
Anzeige
ZZ
M
S
1
2
Signification
Bedeutung
Fonction
activée
SNOOZESNOOZE
Funktion
aktiv
Mois
Monat
Indicateur
heure
d’été
Sommerzeit
Indikator
Alarme
Alarm 11
Alarme
Alarm 22
1
• Press the SET
key both to finish the setting for the alarm time
1 and to activate the alarm function simultaneously. If no key is
activated, the device exits the setting mode automatically after 30
seconds and returns to the normal display mode.
Setting Alarm 2
• Press the SET 1 key and keep itpressed
(ca. 3 seconds) till the hour value for
the alarm 2 will start to flash. Press the +
key or the – key to set the hour.
30
Fonctions des touches :
Touche MODE
• Affichage de l’horaire de l’alarme 1 ou de l’horaire de l’alarme 2
• Réglage manuel de l’heure
• Réglage du fuseau horaire
AM
PM
D
M
AM
PM
AL2
1
2
S
Touche +
• Augmentation de la valeur des heures, minutes, année, mois et
date pendant la phase de réglage
39
• Ne pas exposer l’appareil aux rayons directs du soleil, à des températures extrêmes (<0°C / >+50°C), de fortes vibrations, à une
humidité élevée ou de fortes sollicitations mécaniques. Cela pourrait endommager l’appareil.
• Cet appareil n´est pas un jouet, il ne doit pas être laissé à la portée
des enfants. Ceux-ci ne sont pas en mesure d´estimer les risques
susceptibles d´apparaître lors d´une manipulation erronée des
appareils électriques.
• Pour installer l´appareil, veillez à un support stable et à une position sûre de l´appareil. Celui-ci doit sera stabilisé sans risque de
blesser quelqu´un ou d´endommager l´appareil ou le sol.
• Ne laissez pas le matériel d’emballage sans surveillance. Les
films et sachets plastique, le polystyrène, etc. peuvent constituer
des jouets dangereux pour les enfants.
Description du produit
• Réglage par commande DCF (radio) de l´heure et de la date
• Grand afficheur à cristaux liquides
• Affichage des heures, minutes, secondes, jour de la semaine,
date et mois
• Fonction fuseau horaire (-9 heures à +9 heures)
• Indicateur d’heure d’été
• Deux horaires d’alarme avec intervalle de répétition programmable
• Alarme 1 avec sonnerie à tonalité en crescendo et alarme 2 avec
sonnerie à tonalité continue
• Affichage de l´heure en format 12 ou 24 heures
• Affichage du jour de la semaine en 5 langues au choix
• Affichage de l’état de la pile
• Rétroéclairage
38
2
• Press the SET
key; the minute value
for alarm 2 starts to flash. Press the + key
or the – key to set the minutes.
AM
PM
D
M
AM
PM
AL2
1
2
S
2
• Press the SET
key; the SNOOZE
time (alarm repetition) starts to flash.
Press the + key or the – key to set the
SNOOZE time desired (from 1 minute to
59 minutes).
AM
PM
D
M
AM
PM
AL2
1
2
S
SNOOZE time = If the SNOOZE/LIGHT key is pressed during the
alarm signal, alarm 2 will be active again after the
period of time set here.
2
• Press the SET
key both to finish the setting for the alarm
time 2 and to activate the alarm function simultaneously. If no key
is activated, the device exits the setting mode automatically after
30 seconds and returns to the normal display mode.
Using Alarm Functions and SNOOZE (Alarm Repetition)
2
2
• Press the SET
key or SET
, to switch the alarm function
for alarm 1 or alarm 2 on or off. If the alarm function is switched
on, the corresponding alarm signal 1 or 1 appears in the
display.
• As soon as the current time of the alarm time set is reached, a
number of beep tones are output.
1
2
• Press the SET
key or SET
to stop the alarm signal. The
alarm will sound the next day again at the time set.
31
• If the SNOOZE/LIGHT key is pressed during the alarm signal, it
will be interrupted for a SNOOZE period of time entered before. In
the basic setting of the device these are 4 minutes. The SNOOZE
time can be set from 1 minute to 59 minutes. For this purpose,
see chapters „Setting Alarm 1“ or „Setting Alarm 2“. When the
SNOOZE function of the device is active, the „ZZ“ symbol flashes
in the display.
1
• The alarm will be stopped automatically, if the SET
key or
SET 1 or SNOOZE/LIGHT is not pressed within 4 minutes.
The alarm sound for alarm 1 is an audio signal known as „crescendo“ alarm; that is an increasing beep.
The alarm sound for alarm 2 is a continuous beep.
Utilisation conforme
Ce produit est un réveil de poche avec affichage de l’heure (précision
DCF) et de la date. Il dispose d’une fonction d’alarme avec deux
heures d’alarme réglables séparément. L´appareil est conçu uniquement pour être utilisé dans des locaux d´intérieur secs. L’alimentation électrique de l’appareil est assurée exclusivement par une pile
mignon 1,5V. Toute utilisation autre que celle décrite précédemment
peut détériorer le produit, de plus elle entraîne l’apparition de dangers.
Consignes de sécurité
Avant de mettre en service le produit, lire intégralement le mode d’emploi ; il contient des indications importantes pour son bon fonctionnement.
Tout dommage résultant d’un non-respect des
présentes instructions a pour effet d’annuler la
garantie ! Nous déclinons toute responsabilité
pour les dommages consécutifs !
De même, nous n’assumons aucune responsabilité
en cas de dommages matériels ou corporels résultant d’une utilisation non conforme aux spécifications de l’appareil ou d’un non-respect des présentes consignes ! Dans ces cas, tout droit à la
garantie est annulé.
• Pour des raisons de sécurité et d’homologation (CE), toute transformation ou modification à titre individuel de l’appareil sont interdites.
32
37
Table des matières
Introduction ..................................................................................35
☞
Table des matières .......................................................................36
Utilisation conforme ......................................................................37
Consignes de sécurité...................................................................37
Description du produit...................................................................38
Eléments d’affichage et de commande..........................................39
Réception DCF ..............................................................................40
If you have selected the time indication in the 12-hour
format before, the alarm time is also shown in the 12hour format. Pay attention to the „AM“ indication for
times before 12:00 o’clock and „PM“ for times after
12.00 o’clock so that the alarm signal is output at the
correct part of the day.
Display Illumination
Press the SNOOZE/LIGHT key to switch on the display illumination.
The illumination will go out automatically after a short period of time.
Mise en place/remplacement de la pile .........................................41
Commande ...................................................................................42
Démarrage et réglage automatique ..........................................42
Réglage manuel du calendrier et de l´heure ..............................43
Réglage de la langue pour le jour de la semaine .......................44
Affichage de l´heure en format 12 ou 24 heures .......................45
Fonction fuseau horaire ............................................................45
Réglage de l’alarme 1 .............................................................46
Réglage de l’alarme 2 .............................................................47
Utilisation des fonctions d’alarmes et SNOOZE
(répétition d’alarme) .................................................................48
Eclairage de l´affichage ............................................................49
Maintenance, Cleaning and Service
Instructions
Only a specialist who is familiar with the risks and
relevant regulations may carry out repairs or open
the appliance.
The device is maintenance-free. For this reason, you should never
open it. If you do open the product, the guarantee will lapse.
The outside of the device should be cleaned with a soft, slightly
damp cloth or dry brush. Do not use aggressive cleaning agents or
chemical solutions which could damage the housing or impair operation.
Maintenance, nettoyage et entretien .............................................49
Elimination des éléments usés ......................................................49
Disposal
Déclaration de conformité .............................................................50
Once the product becomes unusable, dispose of it in accordance
with the relevant statutory regulations.
Caractéristiques techniques ..........................................................50
36
33
Disposal of flat batteries/accumulators!
You, as the end user, are legally obliged (Battery
Ordinance) to return all used batteries and accumulators. Disposal in the household waste is prohibited! Batteries/accumulators containing hazardous
substances are marked by the symbols alongside.
These symbols also indicate that it is prohibited to
dispose of these batteries in the household waste.
The heavy metals concerned are: Cd = cadmium, Hg
= mercury, Pb = lead. You can return flat
batteries/accumulators free of charge to the collection points in your community, our branches or anywhere else where batteries or accumulators are sold.
You thus fulfil the legal requirements and make your contribution to the protection of the environment!
Introduction
Chère Cliente, cher Client, nous vous remercions d’avoir acheté le
réveil Sandra à signal radio.
Avec cet appareil, vous avez acquis un produit à la pointe du développement technique et bénéficiant d’une grande sécurité de fonctionnement.
Ce produit répond aux exigences des directives européennes et
nationales en vigueur.
Afin de maintenir le produit dans son état actuel et pour un fonctionnement sans risques, les utilisateurs sont tenus de suivre les instructions contenues dans le présent mode d’emploi !
Pour toutes questions, adressez vous à notre
service conseil technique
France:
Tél.
0 892 897 777
Fax
0 892 896 002
du lundi au vendredi de 8h00 à 18h00
le samedi de 8h00 à 12h00
Suisse:
Tél.
0848/80 12 88
Fax
0848/80 12 89
e-mail:
[email protected]
du lundi au vendredi de 8h00 à
12h00,13h00 à 17h00
Declaration of Conformity
We, Conrad Electronic, Klaus-Conrad-Str. 1, 92240 Hirschau, hereby
declare that this product adheres to the fundamental and the other
relevant regulations of the directive 1999/5/EG.
☞
You can find the Declaration of Conformity for this
product under www.conrad.com
Technical Data
Operating voltage:.....................1.5VDC
Battery:.....................................1xmignon (AA)
Operating temperature range: ...0°C to 50°C
Relative air humidity: ................<90% (non-condensing)
34
35