1
4. Installation and assembly
Assembly and connection
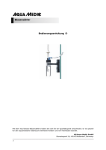
The wall bracket (optional accessory) or alternative
storage room is to be fixed horizontally on the wall.
Open the control unit by undoing the four cruciform
head screws on the face side and fasten its rear wall
at the predrilled points of the wall bracket (below the
storage space for the compressor) using the four cruciform head screws included in the supply. Subsequently, the housing cover should be tightened to
maximum torque of 1Nm. Caution: pay attention that
the unit is de-energised (see safety information p. 2)
Place the compressor on the storage space of the wall
bracket into the recesses provided for that purpose.
Please pay attention that the pilot lamp must face to
the front and that the device's electrical connection
must be located on the right hand side of the device.
The compressor's mains plug must be connected with
the earthed connector on the control unit.
Before the elbow for connecting the compressed air
line to the compressor is connected with the device,
the metal sleeve included in the supply must be pushed into the long leg of the elbow. Afterwards, the
elbow is mounted on the compressor's connection
and is fastened on the device using the spring terminal. Cut a 20 cm section off of the supplied air hose
and use it to connect the elbow connection using the
supplied clamping ring.
Open the quick-action coupling by turning the end cap by 120° to the left and push in the long end of the
elbow up to the stop. Close the end cap by turning it to the right.
The transparent hose of the compressed air sensor must be connected with the control unit on the third socket
from the left. To do so, undo the black cap nut and remove the clamping ring inside, then push the cap nut
and the clamping ring onto the transparent hose, afterwards push on the hose. Finally, screw on black cap
nut hand-tight.
To connect the compressed air line from the tank, the grey aeration hose in the cable conduit must be shortened to the adequate length and fastened on the compressor without bends by means of the quick-action
coupling. Caution: lay the aeration hose loosely, without tension.
The connecting cable from the valve block must be plugged into the appropriate socket on the control unit
and fastened by means of the screw connection.
112