1
-
Laser measurement device
Art.Nr. 0630-00
Important: Please read these operating instructions carefully prior to using the device
and keep them for information purposes.
a)
b)
c)
d)
e)
f)
g)
h)
i)
j)
k)
l)
m)
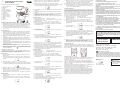
Laser beam outlet
LCD display
Recall
Measurement button
Pythagorean function
Metres / Feet switching button
On / Off / Clear
Measurement level
Area calculation
Volume calculation
Spirit level
+ button
- button
3. Press the “+” button (l) in order to add another measurement. Press
the “-“ button (m), in order to subtract an additional measurement.
4. Repeat steps 1 and 2 in order to carry out the next measurement.
5. The result of the second measurement will be displayed to you in the top
row. The sum of the results will be displayed to you in the bottom row.
11.
12.
13.
a
b
d
i
h
g
k
l
c
m
j
e
f
Measurement bases
1) The laser measurement device measures distances using a laser beam
2) The device can measure through glass or colourless liquids, although the
laser target point can be projected through.
3) Measurements can be carried out within a range of 0.30 – 50 m
4) Measurements may only be carried out within a temperature range of 0°C to 40°C
Measurement procedure
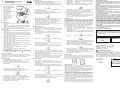
1. Switch the measurement device on by pressing the “On/Off” button (g).
2. Press the “Measure” button (d). The laser aiming point will be activated.
Aim at your target and press the “Measure” button (d) again. The result
will be shown in the display (b) in metres.
3. In order to display the result in millimetres, press the “Metres/Feet” button (f).
4. In order to display the result in inches, press the “Metres/Feet” button (f)
again.
5. In order to display the result in feet, press the “Metres/Feet" button (f)
again.
6. In order to display the result in metres again, press the “Metres/Feet” but
ton (f) again.
7. In order to delete the current measurement value, press the "On/Off/Clear"
(g) button.
8. The laser beam will switch off automatically after 30 seconds, if no entry is made.
9. The Laser measurement device will switch off automatically after 5 minu
tes, if no entry is made.
10. Measurements can be carried out both from the beginning of the housing
and from the end of the housing. By pressing the
(h) button, the
reference points can be switched.
Selecting the measurement method
The laser measurement device offers you the possibility to added and subtract
partial sections, as well as carrying out area and space calculations. A
Pythagorean function is also integrated.
Basic measurement:
1. Prior to starting the measurement, press the “Measure” button (d). The
laser beam will be activated.
2. Aim at your target and press the “Measure” button (d) again, in order to
carry out the measurement. The result will be shown to you in the display (b) .
6.
7.
8.
9.
In order to add or subtract additional measurements, start again with step 3.
You can add and/or subtract any number of measurements.
Press the “Recall” button (c), in order to display the previous measurements.
With the “+” and “-“ buttons (l + m), you can have the last 10 measurement
results displayed sequentially.
By pressing the “Measure” button (d), you exit the recall mode.
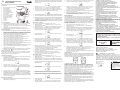
Area calculation:
1.
Before starting the measurement, press the
button (i).
2.
The flashing
symbol indicates that the first measurement can be
carried out.
3.
Press the “Measure” button (d). The laser beam is activated.
4. Aim at your target and press the “Measure” button (d) again, in order to carry out
the length measurement. The result will be shown to you in the display (b).
Press the “Recall” button (c), in order to display the previous measurements.
With the “+” and “-“ buttons (l + m), you can have the last 10 volume
measurement results displayed sequentially.
By pressing the “Measure” button (d), you exit the recall mode.
You can add and/or subtract any number of volume areas. After calcula
ting the first volume area, press the “+” or “-“ (l + m) button or start again
with step 3.
Pythagorean function:
The Pythagorean function enables an indirect length measurement. This is for
the purpose of measuring distances, which cannot be measured directly, as an
obstacle would obstruct the beam or no target surface is available as a reflector.
Correct results are only achieved if the laser beam and the sought distan
ce form an exact right angle (Pythagorean theorem). Ensure that the reference
point of the measurement (e.g. housing end of the laser measurement device)
for both measurements is in exactly the same place.
1. Prior to starting the measurement, press the
button (j).
2. The flashing
symbol indicates that the first measurement can be
carried out.
3. Press the “Measure” button (d). The laser beam is activated.
4. Aim at your target and press the “Measure” button (d) again, in order to
carry out the width measurement. The result will be shown to you in
the display (b).
Safety instructions:
Never look directly into the laser beam. The beam can damage your eyes perma
nently. Do not aim the laser beam at persons or reflective surfaces.
Keep the work area clean and tidy. Avoid subjecting the device to blows and
impact forces.
Never expose the laser distance measurer to damp and rain.
Keep the laser distance measurer in a dry, safe place.
If you do not intend to use the laser distance measurer for some time,
remove the batteries to avoid battery leakage.
Check the laser distance measurer and all individual parts for damage
before use. Only use the device if all parts are in a proper and correct condition.
Only qualified personnel are permitted to conduct repairs.
Only use the laser distance measurer for the measuring activities indicted in the
operating instructions.
Only use parts and accessories that are explicitly recommended for use with
the laser distance measurer.
Any manipulation intended to increase the laser performance is forbidden.
No liability can be assumed for any damage that results from the non-obser
vance of these safety instructions.
The laser pointer contains no service parts. This is why we ask you not to
open the casing as this results in expiry of the guarantee.
Keep well away from the reach of children.
5. The flashing
symbol indicates that the second measurement
can be carried out.
5.
The flashing
be carried out.
symbol indicates that the second measurement can
6.
6.
7.
Aim at your target and press the “Measure” button (d) again, in order to
carry out the width measurement.
The result of the second measurement will be displayed to you in the top
row. The surface area will be displayed to you in the second row.
7.
8.
8.
Press the “Recall” button (c), in order to display the previous measurements.
With the “+” and “-“ (l+m) buttons (l + m), you can have the last 10 area
measurement results displayed sequentially.
9.
By pressing the “Measure” button (d), you exit the recall mode.
10. You can add and/or subtract any number of surface areas. After calcula
ting the first surface area, press the “+” or “-“ (l+m) button or start again with
step 3.
Volume calculation:
1.
Prior to starting the measurement, press the
button (j).
2.
The flashing
symbol indicates that the first measurement can be carried out.
3.
Press the “Measure” button (d). The laser beam is activated.
4. Aim at your target and press the “Measure” button (d) again, in order to carry out
the width measurement. The result will be shown to you in the display (b).
5.
The flashing
carried out.
symbol indicates that the second measurement can be
9.
Aim at your target again and press the “Measure” button (d) again, in
order to carry out the hypotenuse (diagonal) measurement. Do not remove the
laser measurement device from its position.
The measurement result of the second measurement will be displayed to
you in the top row. The determined indirect length will be displayed to you
in the second row.
Press the “Recall” button (c), in order to display the previous measure
ments. With the “+” and “-“ buttons (l + m), you can have the last 10
Pythagorean measurement results displayed sequentially.
By pressing the “Measure” button (d), you exit the recall mode.
Battery change:
When the battery performance becomes too weak, the "Low Battery" message
will appear in the display (b). In order to change the battery, open the battery
compartment on the back of the device. Discharged batteries must be
properly disposed of.
Results obtained by using the laser distance measurer
must always be checked. kwb cannot assume liability
for measurement errors and consequential damage
resulting from the same.
Laser beam,
do not look into
beam!
STATEMENT OF CONFORMANCE
We, kwb-Karl W. Burmeister GmbH & Co. KG, ake sole responsibility in declaring that the ultra-sonic distance measurer referred to in
this declaration complies with the following standards: EN 608251:1994 + A2 : 2001+ A1: 2002, EN 61010-1:2001, EN 500811/1992, EN 50082-1/1997 and the provisions of the directive EW
89/336 EEC.
kwb Karl W. Burmeister
GmbH & Co.KG
28816 Stuhr · Germany
Error messages:
The following error messages can appear in the display (b):
6.
7.
5. Repeat steps 1 and 2 in order to carry out additional measurements.
6. Press the “Recall” button (c), in order to display the previous measure
ments. With the “+” and “-“ buttons (l + m), you can sequentially have the
last 10 measurement results displayed.
7. By pressing the “Measure” button (d), you will exit the recall mode.
Multiple measurement:
1. Prior to starting the measurement, press the “Measure” button (d). The
laser beam will be activated.
2. Aim at your target and press the “Measure” button (d) again, in order to
carry out the measurement. The result will be shown to you in the display (b).
8.
9.
10.
Aim at your target and press the “Measure” button (d) again, in order to
carry out the height measurement.
The result of the second measurement will be displayed to you in the top row.
The surface area will be displayed to you in the second row.
The flashing symbol
indicates that the third measurement can be
carried out.
Aim at your target and press the “Measure” button (d) again, in order to
carry out the depth measurement.
The measurement result of the third measurement will be displayed to
you in the top row. The surface area will be displayed to you in the
second row.
Conditions too bright - The surroundings are too bright. Darken the room
somewhat
Target too dark - The surface of your target is not reflecting the light sufficiently
Brighten the target surface e.g. with a white sheet of paper
Target out of range - The measurement range of 0.30 - 50 m has been undercut
or exceeded
Temperature too high - The temperature is above 40°C. The device can only
be used in a temperature range of 0 – 40°C
Temperature too low - The temperature is below 0°C. The device can only be
used in a temperature range of 0 – 40°C
Low Battery - The battery performance is too weak. Change the battery.
Strong vibration - The laser measurement device has been moved too much
during the measurement. Keep the device as still as possible during measurement
Wrong input - The hypotenuse (diagonal), which you have measured in the
Pythagorean mode, is shorter than the previous, measured length. In this
function, always measure the longer side first
DIN EN 60825-1/A2:2001
Technical specifications:
Wave length: 650nm
Power supply: 2 x 1,5V AAA
Maximum energy output: 1mW
Measuring range: 0,30 – 50m
Accuracy: +/-3mm/m
kwb Produktentwicklung
3. Repeat steps 1 and 2 in order to carry out the next measurement.
4. The result of the first measurement will be shown to you in the top row.
The result of the second measurement will be shown to you in the bottom row.
Laser class 2 pursuant to
Caution!
Electrical devices
that are no longer
usable do not belong in
household waste. Please
take these to the collection
centre,which is responsible for you.