1
KCA-BT100
Bluetooth HANDS FREE BOX 3 page 2-21
INSTRUCTION MANUAL
BOÎTIER MAINS-LIBRES Bluetooth 3 page 22-41
MODE D’EMPLOI
Bluetooth HANDS FREE BOX 3 Seite 42-61
BEDIENUNGSANLEITUNG
Bluetooth HANDSGREE KIT 3 biz. 62-81
GEBRUIKSAANWIJZING
KIT VIVAVOCE CON TECNOLOGIA Bluetooth 3 pagina. 82-101
ISTRUZIONI PER L’USO
CAJA DE MANOS LIBRES Bluetooth 3 página 102-121
MANUAL DE INSTRUCCIONES
CAIXA DE MÃOS-LIVRES Bluetooth 3 página 122-141
MANUAL DE INSTRUÇÕES
© B64-3480-00/01 (EW)
B64-3480-00_01_E.indb 1
06.10.4 6:15:39 PM
Contents
Safety Precautions
Notes
3
4
Setting up the Bluetooth Function 5
Before Use
Registering Your Cell-Phone
Downloading the Phone Book
5
5
5
General Features
6
Answering a Phone Call
Switching to the Private Mode
Clearing the Disconnection Message
Adjusting the Voice Volume during a Call
Disconnecting a Call
Switching between Display Modes
Dialing Method
7
Selecting the Dialing Mode
Making a Call by Entering a Phone Number
Dialing by Using the Quick Dialing Function
Registering to the Preset Dial Number List
Dialing by Using the Phone Book
Dialing by Using the Outgoing Call List
Dialing by Using the Incoming Call List
Hands-Free Unit Control
Hands-Free Control screen
Remote Controller
Key Operation
When Called
When Dialing
Quick Dialing
Calling by Phone Book
Redialing
Setting up the Hands-Free Phone
Selecting a Hands-Free Phone
Deleting the Hands-Free Phone
7
7
7
8
8
8
9
12
12
13
13
14
14
14
15
16
16
17
17
Accessories/
Installation Procedure
18
Connection
19
Installation
20
Troubleshooting Guide
21
Specifications
21
2 |
6
6
6
6
6
6
Remote Control
9
Functions of the buttons
9
Menu System
10
Menu System
Selecting the Cell-Phone You Wish to
Connect
Deleting a Registered Cell-Phone
Displaying the Cell-Phone Status
Setting the Time Interval for Automatic
Answer
Setting up the Voice Output Speakers
Setting the Beep of the Incoming Call
10
10
10
10
11
11
11
The Bluetooth word mark and logos are owned
by the Bluetooth SIG, Inc. and any use of such
marks by Kenwood Corporation is under license.
Other trademarks and trade names are those of
their respective owners.
English
B64-3480-00_01_E.indb 2
06.10.4 6:15:40 PM
Safety Precautions
2WARNING
Italiano
To prevent injury or fire, take the following
precautions:
Español
• To prevent a short circuit, never put or leave any
metallic objects (such as coins or metal tools) inside
the unit.
• Mounting and wiring this product requires skills and
experience. For safety’s sake, leave the mounting
and wiring work to professionals.
Português
Con la presente Kenwood dichiara che questo KCA-BT100 è conforme ai requisiti
essenziali ed alle altre disposizioni pertinenti stabilite dalla direttiva 1999/5/CE.
Por medio de la presente Kenwood declara que el KCA-BT100 cumple con los
requisitos esenciales y cualesquiera otras disposiciones aplicables o exigibles de
la Directiva 1999/5/CE.
Kenwood declara que este KCA-BT100 está conforme com os requisitos
essenciais e outras disposições da Directiva 1999/5/CE.
Polska
Kenwood niniejszym oświadcza, że KCA-BT100 spełnia zasadnicze wymogi oraz
inne istotne postanowienia dyrektywy 1999/5/EC.
2CAUTION
Český
To prevent damage to the machine, take
the following precautions:
Magyar
• Do not install the unit in a spot exposed to direct
sunlight or excessive heat or humidity. Also avoid
places with too much dust or the possibility of
water splashing.
Kenwood timto prohlasuje, ze KCA-BT100 je ve shode se zakladnimi pozadavky
a s dalsimi prislusnymi ustanoveni Narizeni vlady c. 426/2000 Sb.
Alulírott, Kenwood, kijelenti, hogy a jelen KCA-BT100 megfelel az 1999/5/EC
irányelvben meghatározott alapvető követelményeknek és egyéb vonatkozó
előírásoknak.
Svenska
Härmed intygar Kenwood att denna KCA-BT100 stär l överensstämelse med de
väsentliga egenskapskrav och övriga relevanta bestämmelser som framgår av
direktiv 1999/5/EG.
Suomi
Declaration of Conformity with regard to
the R&TTE Directive 1999/5/EC
Manufacturer:
Kenwood Corporation
2967-3 Ishikawa-machi, Hachioji-shi, Tokyo, 192-8525 Japan
EU Representative's:
Kenwood Electronics Europe BV
Amsterdamseweg 37, 1422 AC UITHOORN, The Netherlands
Kenwood vakuuttaa täten että KCA-BT100 tyyppinen laite on direktiivin
1999/5/EY oleellisten vaatimusten ja sitä koskevien direktiivin muiden ehtojen
mukainen.
Slovensko
S tem Kenwood izjavlja, da je ta KCA-BT100 v skladu z osnovnimi zahtevami in
ostalimi ustreznimi predpisi Direktive 1999/5/EC.
Slovensky
Spoločnosť Kenwood týmto vyhlasuje, že KCA-BT100 spĺňa zákldné požiadavky
a ďalšie prislušné ustanovenia Direktĺvy 1999/5/EC.
Dansk
Undertegnede Kenwood erklærer harved, at følgende udstyr KCA-BT100
overholder de væsentlige krav og øvrige relevante krav i direktiv 1999/5/EF.
English
Hereby, Kenwood declares that this unit KCA-BT100 is in compliance with the
essential requirements and other relevant provisions of Directive 1999/5/EC.
Français
Par la présente Kenwood déclare que l’appareil KCA-BT100 est conforme aux
exigences essentielles et aux autres dispositions pertinentes de la directive
1999/5/CE.
Par la présente, Kenwood déclare que ce KCA-BT100 est conforme aux
exigences essentielles et aux autres dispositions de la directive 1999/5/CE qui
lui sont applicables.
Deutsch
Hiermit erklärt Kenwood, dass sich dieser KCA-BT100 in Übereinstimmung mit
den grundlegenden Anforderungen und den anderen relevanten Vorschriften
der Richtlinie 1999/5/EG befindet. (BMWi)
Hiermit erklärt Kenwood die Übereinstimmung des Gerätes KCA-BT100 mit den
grundlegenden Anforderungen und den anderen relevanten Festlegungen der
Richitlinie 1999/5/EG. (Wien)
Nederlands
Hierbij verklaart Kenwood dat het toestel KCA-BT100 in overeenstemming is
met de essentiële eisen en de andere relevante bepalingen van richtlijn 1999/5/
EG.
Bij deze verklaat Kenwood dat deze KCA-BT100 voldoet aan de essentiële eisen
en aan de overige relevante bepalingen van Richtlijn 1999/5/EC.
Ελληνικά
ΜΕ ΤΗΝ ΠΑΡΟΥΣΑ Kenwood ΔΗΛΩΝΕΙ ΟΤΙ KCA-BT100 ΣΥΜΜΟΡΦΩΝΕΤΑΙ ΠΡΟΣ
ΤΙΣ ΟΥΣΙΩΔΕΙΣ ΑΠΑΙΤΗΣΕΙΣ ΚΑΙ ΤΙΣ ΛΟΙΠΕΣ ΣΧΕΤΙΚΕΣ ΔΙΑΤΑΞΕΙΣ ΤΗΣ ΟΔΗΓΙΑΣ
1999/5/EK.
Eesti
Sellega kinnitab Kenwood, et see KCA-BT100 vastab direktiivi 1999/5/EC
põhilistele nõudmistele ja muudele asjakohastele määrustele.
Latviešu
Ar šo, Kenwood, apstiprina, ka KCA-BT100 atbilst Direktīvas 1999/5/EK
galvenajām prasībām un citiem tās nosacījumiem.
Lietuviškai
Šiuo, Kenwood, pareiškia, kad šis KCA-BT100 atitinka pagrindinius Direktyvos
1999/5/EB reikalavimus ir kitas svarbias nuostatas.
Malti
Hawnhekk, Kenwood, jiddikjara li dan KCA-BT100 jikkonforma mal-ħtiġijiet
essenzjali u ma provvedimenti oħrajn relevanti li hemm fid-Dirrettiva 1999/5/
EC.
Українська
Компанія Kenwood заявляє, що цей виріб KCA-BT100 відповідає ключовим
вимогам та іншим пов’язаним положенням Директиви 1999/5/EC.
English |
B64-3480-00_01_E.indb 3
3
06.10.4 6:15:42 PM
Notes
• If you experience problems during installation,
consult your Kenwood dealer.
• When you purchase optional accessories, check with
your Kenwood dealer to make sure that they work
with your model and in your area.
• The illustrations of the display and the panel
appearing in this manual are examples used to
explain more clearly how the controls are used.
Therefore, what appears on the display in the
illustrations may differ from what appears on the
display on the actual equipment, and some of the
illustrations on the display may be inapplicable.
Kenwood Receivers available for this unit
The receiver units that can be used with KCA-BT100
are as follows: (As of September 2006)
Audio receiver
DPX501U*, DPX701U, KDC-W5534U*,
KDC-W6534U*, KDC-W7534U, KDV-5234*
Monitor receiver
DDX6029
For details on the compatible receivers to be released
in the future, access the following URL:
http://www.kenwood.com/bt/bt100/
• *: Set the display character conversion function switch to
"2". For more details, see <Display Character Conversion
Function> (page 18).
About the Remote Controller
The audio receiver requires a remote controller with
numeric buttons to enter phone numbers directly.
To make a call using the remote controller, the [ ]
button must be provided on the remote controller.
For more details, access the following URL:
http://www.kenwood.com/bt/bt100/
• You cannot use a remote controller depending on the type
of your control unit.
4 |
About the Cell-Phone
This unit conforms to the following Bluetooth
specifications:
Version
Bluetooth Standard Ver. 1.2
Profile
HFP (Hands Free Profile)
OPP (Object Push Profile)
For the cell-phones verified for compatibility, access
the following URL:
http://www.kenwood.com/bt/bt100/
• The units supporting the Bluetooth function have been
certified for conformity with the Bluetooth Standard
following the procedure prescribed by Bluetooth
SIG. However, it may be impossible for such units to
communicate with your cell-phone depending on its type.
• HFP is a profile used to make a hands-free call.
• OPP is a profile used to transfer data such as a phone book
between units.
This product is not installed by the manufacturer
of vehicles on the production line, nor by the
professional importer of vehicles into an EU Member
State.
Information on Disposal of Old Electrical
and Electronic Equipment (applicable for
EU countries that have adopted separate
waste collection systems)
Products with the symbol (crossed-out
wheeled bin) cannot be disposed as
household waste.
Old electrical and electronic equipment
should be recycled at a facility capable
of handling these items and their waste
byproducts. Contact your local authority
for details in locating a recycle facility
nearest to you. Proper recycling and waste
disposal will help conserve resources whilst
preventing detrimental effects on our
health and the environment.
English
B64-3480-00_01_E.indb 4
06.10.4 6:15:42 PM
Setting up the Bluetooth Function
Before Use
Downloading the Phone Book
• You need to register your cell-phone before using
it with this unit. For more details, see <Registering
Your Cell-Phone> (page 5).
• If you have registered two or more cell-phones, you
need to select one of them. For more details, see
<Selecting the Cell-Phone You Wish to Connect>
(page 10) or <Selecting a Hands-Free Phone> (page
17).
• To use the Phone Book, it must be downloaded to
this unit in advance. For details, see <Downloading
the Phone Book> (page 5).
• You can set up the voice output speaker. For more
details, see <Setting up the Voice Output Speakers>
(page 11) or <Setting up the Hands-Free Phone>
(page 16).
Download the phone book data from the cellphone to this unit so that you can use the Phone
Book of this unit.
Registering Your Cell-Phone
To make your cell-phone usable with this unit, you
need to register it (pairing). You can register up to
five cell-phones to this unit.
1 Turn on the control unit.
2 Start cell-phone registration on the cell-phone
By operating the cell-phone, carry out hands-free
phone registration (pairing). Select "KCA-BT100"
from the list of connected units.
3 Enter a path key
Enter "1234" as a path key.
Check that registration is complete on the cellphone.
4 By operating the cell-phone, start hands-free
connection.
• For how to operate the cell-phone, refer to the
Instruction Manual that comes with your cell-phone.
• You can register up to five cell-phones. Registering the
sixth cell-phone will delete the cell-phone registered
most previously.
• You cannot register a cell-phone when another cellphone is in the hands-free connection status. End the
hands-free connection, and then register a new cellphone.
• If two or more "KCA-BT100" are displayed in the list of
connected units, another "KCA-BT100" is probably used
nearby. Move your car, and then check that only one
"KCA-BT100" is displayed.
1 By operating the cell-phone, end the hands-free
connection.
2 By operating the cell-phone, send the phone
book data to this unit
By operating the cell-phone, download the phone
book data to this unit.
During downloading:
"Downloading", "DOWNLOAD", or "Now
Downloading…" is displayed.
After completion of downloading (for Audio
receiver):
"Complete", "Completed", or "COMPLETE" is
displayed.
3 By operating the cell-phone, start the handsfree connection.
To clear the downloading completion message
(for Audio receiver):
Press any button.
• For how to operate the cell-phone, refer to the
Instruction Manual that comes with your cell-phone.
• Up to 300 phone numbers can be registered for each
registered cell-phone.
• Up to 32 digits can be registered for each phone number
along with up to 40 characters representing a name.
• Depending on the type of your cell-phone, the following
restrictions are placed:
- The phone book data cannot be downloaded
normally.
- Characters in the Phone Book are garbled.
- The phone book data cannot be downloaded normally
if it contains images. It may take several hours to a full
day to download the phone book depending on the
total image size.
• To cancel downloading of the phone book data, operate
the cell-phone.
English |
B64-3480-00_01_E.indb 5
5
06.10.4 6:15:43 PM
General Features (For Audio receiver)
Answering a Phone Call
When "CALL" or "Call" is displayed, "(Calling party
name)" or "(Phone number)" is also displayed.
Press the [AUDIO] button or one of [1] – [6]
buttons.
Rejecting an Incoming Call
Press the [ATT] button for at least 1 second.
• You can set up the unit so that the incoming call is
received after lapse of a predetermined time. For more
details, see <Setting the Time Interval for Automatic
Answer> (page 11).
• Inserting a disc such as a CD will disconnect your call.
• Setting the cell-phone in the private mode can disable
the hands-free function.
• When a call without caller ID arrives, "No Name No
Number", "No Number", or "NO-NMBER" is displayed.
• The name of the calling party is displayed if it has already
been registered in the Phone Book.
Switching to the Private Mode
You can switch between the private mode (talking
directly on the cell-phone) and the hands-free
mode.
Press the Control knob ([38]).
Talk modes are switched as follows:
Display
Talk mode
"Private"/ "PRIVATE"/ "PV TALK"
Private talk
"Handsfree"/ – / "HF TALK"
Hands-free talk
• Depending on the type of your cell-phone, switching
to the private talk mode may select the source that was
used before commencing the hands-free connection.
If this happens, the source cannot be switched back to
the hands-free talk mode by operating this unit. Operate
your cell-phone to return to the hands-free talk mode.
Clearing the Disconnection Message
You can clear the message displayed after
disconnection of the cell-phone.
Press the [ATT] button for at least 1 second.
"Disconnect" or "DISCONCT" disappears.
• It may take some time before the disconnected cellphone is reconnected.
6 |
Adjusting the Voice Volume during a
Call
You can adjust the voice volume during a call.
Turn the [VOL] knob.
• The volume adjusted during the current call will be
effective for the next and subsequent calls.
• Increasing the volume excessively is more likely to
produce echo. If echo is produced, turn down the
volume as low as possible. Echo increases in proportion
to the volume.
Disconnecting a Call
Press the [SRC] button.
• You can also press the [ATT] button for at least 1 second
to end a call.
Switching between Display Modes
You can switch between the Phone Book and the
Call List.
Press the [DISP]/ [AUTO]/ [TI] button.
If the [DISP] button is not provided, press the
[AUTO] or [TI] button.
For the Audio receiver with Multi-function Key System:
Press the [AUTO]/ [TI] button.
Pressing this button toggles between the name list
and the phone number list.
Scrolling the Display
You can scroll through the list of phone numbers
or names. For the operation method, refer to <Text/
Title Scroll> in the Instruction Manual that comes
with the control unit.
• With the control unit on which only the name of the
calling party is displayed when receiving a call or quick
dialing, you can switch to the phone number display
mode by performing the above operation.
• Depending on the type of your control unit, the
following restrictions are placed.
- Up to 19 characters can be displayed.
- The # letter cannot be displayed, or "|" (all segments
are lit) is displayed for #.
- You cannot switch between display modes.
English
B64-3480-00_01_E.indb 6
06.10.4 6:15:44 PM
Dialing Method (For Audio receiver)
Selecting the Dialing Mode
You can dial in five different ways.
1 Enter the dialing method selection mode
Press the [ATT] button for at least 1 second.
"DIAL" or "N-DIAL" is displayed.
2 Select a dialing method
Press the Control knob ([38]).
Pressing this knob toggles between the following
dialing methods:
For the Audio receiver with Multi-function Key System:
1 Press the [NEXT] button.
Select the key function section.
2 Press the [1] ("DIAL") – [4] ("IN-C") button.
Display
Multi key Dialing method
"DIAL"/
[1] ("DIAL") Dial by entering a phone number.
"N-DIAL"
(page 7)
Dial by using the quick dialing function.
(page 7)
"INITIAL"/ [2]
Dial by searching for the initial in the
"PH-BOOK1" ("PHBK")* Phone Book (page 8)
"PH.BOOK"/ [2]
Dial by searching the Phone Book in the
"PH-BOOK2" ("PHBK")* alphabetical order. (page 8)
"OUT"/
[3] ("OUT-C") Dial by using the outgoing call list.
"OUT-CALL"
(page 8)
"IN"/
[4] ("IN-C") Dial by using the incoming call list.
"IN-CALL"
(page 9)
3 Exit the dialing method selection mode
Press the [ATT] button for at least 1 second.
2 Enter a phone number
Press the number ([1] – [0]), #([FM]), *([AM]), or
+([¢]) button on the remote controller.
3 Make a call
Press the [DIRECT] button on the remote
controller.
"CALL" or "Call" is displayed.
To erase the entered phone number digit by
digit:
Press the [4] button on the remote controller.
• You can input max 32 digits.
• Depending on the type of your control unit, "|" (all
segments are lit) is displayed for #.
Dialing by Using the Quick Dialing
Function
You can dial by calling the phone number
registered to the preset dial number list. For how to
preset a phone number, refer to <Registering to the
Preset Dial Number List> (page 8).
1 Enter the number dialing mode
Select the "DIAL" or "N-DIAL" display.
Refer to <Selecting the Dialing Mode> (page 7).
2 Select the button corresponding to the preset
• To use the Phone Book, it must have been downloaded
from the cell-phone. For more details, see <Downloading
the Phone Book> (page 5).
• The outgoing call list and the incoming call list are the
lists of calls originated from and received at this unit.
They are not the ones stored in the cell-phone memory.
• * With the Multi-function Key System, pressing the [2]
("PHBK") button switches between the Phone Book
search methods.
dial number
Press the [1] – [3] button.
"Preset #" or "PRESET #" is displayed.
For the Audio receiver with Multi-function Key System:
1 Press the [NEXT] button.
Select the key function section.
2 Press the [1] ("1") – [3] ("3") button.
"DIAL #" is displayed.
3 Make a call
Function of remote controller
Making a Call by Entering a Phone
Number
You can make a call by entering a phone number.
1 Enter the number dial mode
Press the Control knob ([38]) for at least 1
second.
"CALL" or "Call" is displayed.
• If the desired number is not registered to the preset dial
number list, "No Name No Number", "No Number", or
"NO-NUMBER" is displayed.
Select the "DIAL" or "N-DIAL" display.
Refer to <Selecting the Dialing Mode> (page 7).
English |
B64-3480-00_01_E.indb 7
7
06.10.4 6:15:44 PM
Dialing Method (For Audio receiver)
Registering to the Preset Dial Number
List
You can register up to 3 phone numbers for quick
dialing.
1 Enter the phone number you wish to register
Enter the phone number with reference to the
following:
- <Making a Call by Entering a Phone Number>
(page 7)
- <Dialing by Using the Phone Book> (page 8)
- <Dialing by Using the Outgoing Call List> (page
8)
- <Dialing by Using the Incoming Call List> (page 9)
2 Select the button you wish to register
Press the [1] – [3] button for at least 2 seconds.
For the Audio receiver with Multi-function Key System:
1 Press the [NEXT] button.
Select the key function section.
2 Press the [1] ("1"/ "MEM.1") – [3] ("3"/
"MEM.3") button for at least 2 seconds.
"Memory" or "MEMORY" display blinks 1 time.
2 Select the initial to be searched for
Push the Control knob towards [4], [¢],
[FM] or [AM].
Move the cursor to the initial to be searched for.
Knob
Operation
[4]/ [¢] Move to the next character.
[FM]/ [AM]
Move to the next row.
3 Determine the selected initial
Press the Control knob ([38]) for at least 1
second.
4 Select the name
Push the Control knob towards [FM], [AM],
[4] or [¢].
Select the name.
Knob
Operation
[FM]/ [AM]
Change the name.
[4]/ [¢] Change the initial.
5 Make a call
Press the Control knob ([38]) for at least 1
second.
"CALL" or "Call" is displayed.
3 Exit the dialing method selection mode
Press the [ATT] button for at least 1 second.
Dialing by Using the Phone Book
You can dial by using the downloaded Phone Book.
1 Enter the Phone Book mode
Select the "INITIAL", "PH-BOOK1", "PH.BOOK", or "PHBOOK2" display.
Refer to <Selecting the Dialing Mode> (page 7).
If you have selected, "PH.BOOK" or "PH-BOOK2",
proceed to step 4.
For the Audio receiver with Multi-function Key System:
Press the [2] ("PHBK") button.
Pressing this button toggles between the
following search methods:
Display
Search method
"INITIAL"/
Search by the initial.
"PH-BOOK1"
"PH.BOOK"/ Search in the alphabetical order.
"PH-BOOK2" Proceed to step 4.
8 |
• To use the Phone Book, it must have been downloaded
from the cell-phone. For details, see <Downloading the
Phone Book> (page 5).
• Initials including no corresponding name will not be
displayed.
• On the control unit that displays three rows, the name in
the middle row is the selected one.
• During search, a non-accent character such as "u" is
searched for instead of an accent character such as "ü".
• Characters that the control unit cannot display are
searched for in the order in which they were registered
to the Phone Book.
Dialing by Using the Outgoing Call
List
You can dial by using the outgoing call list. Up
to ten phone numbers of the originated calls are
recorded in the outgoing call list.
1 Enter the outgoing call list mode
Select the "OUT" or "OUT-CALL" display.
Refer to <Selecting the Dialing Mode> (page 7).
English
B64-3480-00_01_E.indb 8
06.10.4 6:15:45 PM
Remote Control (For Audio receiver)
2 Select a name or phone number
Functions of the buttons
Push the Control knob towards [FM] or [AM].
3 Make a call
Press the Control knob ([38]) for at least 1
second.
"CALL" or "Call" is displayed.
[SRC] button*
During a call: End the call.
[VOL] buttons*
During a call: Adjusts the voice volume.
[
• The outgoing call list is the list of calls originated from
this unit. It is not the one stored in the cell-phone
memory.
• On the control unit that displays three rows, the phone
number in the middle row is the selected one.
• Depending on the type of your control unit, "0" is
displayed for the tenth call in the outgoing call list.
] button
Enters the dialing method selection mode.
When a call comes in: Answers the call.
[38] button*
During a call:
Switches between the private talk mode and the
hands-free talk mode.
In dialing method selection mode:
Selects a dialing method.
Dialing by Using the Incoming Call
List
[¢] button*
Number dial input: Inputs "+".
You can dial by using the incoming call list. Up to
ten phone numbers of the received calls are stored
recorded in the incoming call list.
[4] button*
Number dial input:
Clears the entered phone number.
1 Enter the incoming call list mode
[FM] button*
Number dial input: Inputs "#".
Select the "IN" or "IN-CALL" display.
Refer to <Selecting the Dialing Mode> (page 7).
2 Select a name or phone number
Push the Control knob towards [FM] or [AM].
3 Make a call
Press the Control knob ([38]) for at least 1
second.
"CALL" or "Call" is displayed.
• The incoming call list is the list of calls received at this
unit. It is not the one stored in the cell-phone memory.
• On the control unit that displays three rows, the phone
number in the middle row is the selected one.
• Depending on the type of your control unit, "0" is
displayed for the tenth call in the incoming call list.
[AM] button*
Number dial input: Inputs "*".
[0] – [9] buttons*
Number dial input: Inputs a digit.
[DIRECT] button*
Makes a call.
Remote Control Mode selector switch
Switch to "AUD" when dialing.
• * If your remote controller has a mode selection switch, set
it to "AUD".
• Remote controllers with the [
] button and/or numeric
buttons are available optionally. Purchase a remote
controller with a desired function.
English |
B64-3480-00_01_E.indb 9
9
06.10.4 6:15:46 PM
Menu System (For Audio receiver)
Menu System
Set up various functions. The Menu system basic
operation method is explained here. The reference
for the Menu items and their setting content is after
this operation explanation.
1 Enter Menu mode
Press the [MENU] button for at least 1 second.
"MENU" is displayed.
2 Select the menu item
Push the Control knob towards [FM] or [AM].
3 Set the menu item
Push the Control knob towards [4] or [¢].
4 Exit Menu mode
Press the [MENU] button.
• Three menu items appear on the display. The menu item
displayed at the center is the one you can adjust.
In Standby mode
Deleting a Registered Cell-Phone
You can delete a registered cell-phone.
1 Select the phone deletion mode
Push the Control knob towards [FM] or [AM].
Select the "Phone Delete" or "PHN-DEL" display.
2 Enter the phone deletion mode
Press the Control knob ([38]) for at least 1
second.
"(name)" is displayed.
3 Select the cell-phone you wish to delete
Push the Control knob towards [FM] or [AM].
4 Delete the selected cell-phone
Press the Control knob ([38]) for at least 1
second.
"Delete" or "DELETE" is displayed.
5 Exit the phone deletion mode
Press the [MENU] button.
In Standby mode
Selecting the Cell-Phone You Wish to
Connect
When two ore more cell-phones have already been
registered, you need to select the cell-phone you
wish to use.
1 Select the phone selection mode
Push the Control knob towards [FM] or [AM].
Select the "Phone Selection" or "PHN-SEL" display.
2 Enter the selected phone selection mode
Press the Control knob ([38]) for at least 1
second.
"(name)" is displayed.
3 Select the cell-phone you wish to connect
Push the Control knob towards [FM] or [AM].
4 Set up the cell-phone you wish to connect
Push the Control knob towards [4] or [¢].
"✱(name)" or "-(name)" is displayed.
"✱" (dark color) or "✱": The selected cell-phone is
busy.
"✱" (light color) or "_": The selected cell-phone is
on standby.
• When a registered cell-phone is deleted, its Phone Book,
list of outgoing calls, and list of incoming calls are also
deleted.
Displaying the Cell-Phone Status
You can display the connection status, signal
strength, and battery level.
1 Select the status display item
Push the Control knob towards [FM] or [AM].
Select the "P-STATUS" display.
2 Enter the status display mode
Press the Control knob ([38]) for at least 1
second.
3 Select the item you wish to display
Push the Control knob towards [FM] or [AM].
4 Exit the status display mode
Press the [MENU] button.
5 Exit the phone selection mode
Press the [MENU] button.
10 |
English
B64-3480-00_01_E.indb 10
06.10.4 6:15:46 PM
1 Select the status display item
Push the Control knob towards [FM] or [AM].
Select the "Phone Status" display.
2 Display the statuses
Push the Control knob towards [4] or [¢].
All statuses are indicated with icons.
3 Exit Menu mode
Press the [MENU] button.
Setting the Time Interval for
Automatic Answer
This function automatically answers (responds
to) a call after lapse of the preset time interval for
automatic answer.
Display
Setting
"Auto Answer: OFF"/ Does not answer the phone call automatically.
"ANS OFF"
"Auto Answer: 0s"/ Automatically answers the phone call at once.
"ANS 0"
"Auto Answer: 8s"/
"ANS 8"
Automatically answers the phone call after lapse
of 8 seconds (original setting).
…
Bluetooth connection status
Display
Icon
Information
"BT-CON Y"
Connected
In Standby mode
…
If your control unit supports a graphic display
function:
"Auto Answer: 99s"/ Automatically answers the phone call after lapse
"ANS 99"
of 99 seconds.
Battery level of cell-phone
Display
Icon
Information
"BAT FULL"
Full
• If the time set in the cell-phone is shorter than that set in
the unit, the former will be used.
…
"BAT MID"
…
Disconnected
"BT-CON N"
"BAT LOW"
Nearly dead
"BAT - - -"
Cannot get information.
…
"SGNL MID"
…
Signal strength of cell-phone
Display
Icon
Information
"SGNL MAX"
Maximum
"SGNL LOW"
Minimum
"NO SGNAL"
Outside the service range
"SGNL - - -"
Cannot get information.
In Standby mode
Setting up the Voice Output Speakers
You can specify the voice output speakers.
Display
"SP Select: Front"/
"SPK FRT"
"SP Select: F-R"/
"SPK F-R"
"SP Select: F-L"/
"SPK F-L"
Setting
Outputs voice from the front-left and front-right
speakers.
Outputs voice from the front-right speaker.
Outputs voice from the front-left speaker.
• Select the speaker which is further from the microphone
in order to prevent howling or echos.
In Standby mode
• Since the number of steps of the control unit is different
from that of the cell-phone, the statuses displayed on
the control unit may discord from those displayed on
the cell-phone.
Setting the Beep of the Incoming Call
You can output a beep from the speaker when a call
comes in.
Display
Setting
"Call Beep: ON"/ "C-BP ON" Beep is heard.
"Call Beep: OFF"/ "C-BP OFF" Beep is canceled.
English |
B64-3480-00_01_E.indb 11
11
06.10.4 6:15:47 PM
Hands-Free Unit Control (For Monitor receiver)
Hands-Free Unit control
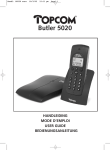
Hands-Free Control screen
Or when a call
comes in …
TEL
Hands-Free Control screen
9
8
Hands
10
AUTO
Free
K E N WO O D
1
2
11
0123456789
P1
1
2
3
4
5
6
7
8
9
*
0
#
15
P2
3
12
P3
6
4
5
S e t Up
+
13
Clear
14
7
Return
Control screen
DV D V I D E O
13:50
8 Displays the signal strength.*
The more the number of bar segments, the
stronger the signal.
9 Displays the present Auto Answering status
AUTO
When Auto Answering is on:
When Auto Answering is off:
p Displays the battery drain of the cell-phone.*
The more the number of bar segments, the higher
the battery level.
q Starts the call.
w Ends the call.
Clears the phone number being entered.
e Clears the entered phone number.
r Returns to the previous screen.
t Displays the calling and called phone numbers.
If you have registered a phone number in the
Phone Book, the destination person name is
displayed.
y Displays the status of connection with the cellphone.
White: The cell-phone is connected.
Orange: The cell-phone is not connected, or it is
outside the service range.
16
TEL
IN
REP
Next
Title 1
Chap
KENWOOD
3
TIME
SCRL
T0:05:20
1 Displays the Search for Phone Book screen.
(See the <Calling by Phone Book>, page 15)
2 Displays the Out Going Calls screen.
(See the <Redialing>, page 16)
3 Displays the Incoming Calls screen.
(See the <Redialing>, page 16)
4 Switches between the private and hands-free
modes (only when a call in progress).
5 Displays the Hands-Free Set Up screen.
(See the <Setting up the Hands-Free Phone>, page
16)
6 Enter three phone numbers for quick dialing.
(See the <Quick Dialing>, page 14)
7 Enters a phone number.
(See the <When Dialing>, page 14)
12 |
• While your car is moving, some functions are
disabled for safety’s sake. The buttons associated
with the disabled functions become ineffective if
pressed.
• When the Hands-Free Control screen appears, the
name of the connected cell-phone is displayed for 5
seconds.
• * Since the number of steps of the control unit is
different from that of the cell-phone, the statuses
displayed on the control unit may discord from
those displayed on the cell-phone. No status
is displayed if information about it cannot be
obtained.
• Setting the cell-phone in the private mode can
disable the hands-free function.
English
B64-3480-00_01_E.indb 12
06.10.4 6:15:50 PM
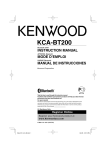
Remote Controller
Key Operation
17
18
19
24
20
25
21
26
SRC
22
27
28
23
u [SRC] key
During a call: Ends the call.
i [*] key (When f is set to "AUD")
Number dial input: Inputs "+".
o [FM+] key (When f is set to "AUD")
Number dial input: Inputs "#".
; [AM-] key (When f is set to "AUD")
Number dial input: Inputs "*".
a [4] key (When f is set to "AUD")
Number dial input:
Clears the entered phone number.
s [0] – [9] key (When f is set to "AUD")
Number dial input: Inputs a phone number digit.
d [DIRECT] key (When f is set to "AUD")
Make a call.
f Remote Control Mode selector switch
Switch to "AUD" when dialing.
g [5]/ [∞] key
During a call: Adjusts the voice volume.
h [
] key
Displays the Hands-Free Control screen.
When a call comes in: Answers the call.
j [u]/ [d] key
During a call: Adjusts the voice volume.
k [SRC] key
During a call: Ends the call.
• The voice volume level adjusted during a call will be
effective for the next and subsequent calls.
• Increasing the volume excessively is more likely
to produce echo. If echo is produced, turn down
the volume as low as possible. Echo increases in
proportion to the volume.
English |
B64-3480-00_01_E.indb 13
13
06.10.4 6:15:52 PM
Hands-Free Unit Control (For Monitor receiver)
When Called
Quick Dialing
When you receive a call, you can use the hands-free
phone.
You can register up to 3 phone numbers for quick
dialing.
1
To register a phone number:
Responds to a call
1
When a call arrives, the Hands-Free Control screen
appears automatically.
2
2
End the call
Display a phone number you wish to register
See the <Calling by Phone Book> (page 15),
<Redialing> (page 16) and <When Dialing> (page
14).
Register the phone number
P1
—
P3
Continue to touch more than 2 seconds.
The previous screen reappears.
To call a phone number from memory:
1
When Dialing
Recall the phone number
Make a call by entering a phone number.
P1
1
+
9
—
0
2
—
P3
Enter a phone number
,
*
2
,
,
Make a call
#
Make a call
You can start talking when the destination
responds.
• Only the phone numbers can be registered for
Quick Dialing. Therefore, the destination subscriber
name and others are not displayed during dialing.
• To clear your incorrect entry, touch Clear .
3
End the call
The previous screen reappears.
• You can input max 32 digits.
14 |
English
B64-3480-00_01_E.indb 14
06.10.4 6:15:54 PM
Calling by Phone Book
3
Select a destination you wish to call
You can call a person using his/her phone number
that you have registered in the Phone Book.
1
Name
Display the Phone Book screen
4
Confirm the destination
OK
The Initial Input screen appears.
The Hands-Free Control screen appears again. The
selected destination data is displayed.
Initial Input screen
AUTO
Phone Book L i s t
5
Make a call
2
1
1
a
b
c
d
e
f
h
i
j
k
l
m
n
o
p
q
r
s
t
u
v
w
x
y
z
g
1 Scrolls the character array display.
2 Displays the Phone Book beginning with the
name whose first character you have touched.
3 Returns to the Hands-Free Control screen.
2
You can start talking when the destination
responds.
3
Return
Select the initial character of a person name
in memory
a
The Phone Book List screen appears.
Phone Book List screen
AUTO
1234567890
2
1
End the call
The previous screen reappears.
• To use the Phone Book, it must have been
downloaded from the cell-phone. For more details,
see <Downloading the Phone Book> (page 5).
• Up to 16 characters can be displayed for each name
in the Phone Book.
• Initials including no corresponding name will not be
displayed.
• During search, a non-accent character such as "u" is
searched for instead of an accent character such as
"ü".
etc.
Phone Book L i s t
6
Name
Name
1
Name
Name
3
4
OK
Return
1 Scrolls the list.
2 Enters the destination name.
3 Enters the destination data and returns to the
Hands-Free Control screen.
4 Returns to the Hands-Free Control screen.
English |
B64-3480-00_01_E.indb 15
15
06.10.4 6:15:56 PM
Hands-Free Unit Control (For Monitor receiver)
Redialing
5
End the call
You can redial, one of the last 10 phone numbers
that you have called or received.
1
Display the Search for Out Going Calls or
Incoming Calls screen
The previous screen reappears.
Out Going Calls
• The Out Going Calls list screen or Incoming Calls list
screen shows the list of the calls originated from or
received at this unit. They are not the ones stored in
the cell-phone memory.
or
Incoming Calls
The Out Going Calls or Incoming Calls list screen
appears.
Out Going Calls or Incoming Calls screen
Incoming Calls
2
Setting up the Hands-Free Phone
AUTO
The Hands-Free system can be set as follows.
Kenwood
1234567890
Kenwood
1234567890
Kenwood
1234567890
3
DISP
1
OK
1
Kenwood
1234567890
Return
1 Scrolls the list.
2 Enters the destination name.
3 Change to record of redial list.
4 Enters the destination data and returns to the
Hands-Free Control screen.
5 Returns to the Hands-Free Control screen.
2
Select a destination you wish to call
3
Confirm the destination
OK
The Hands-Free Control screen appears again. The
selected destination data is displayed.
4
Make a call
You can start talking when the destination
responds.
16 |
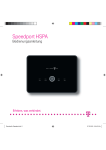
S e t Up
4
Kenwood
1234567890
5
Hands-Free Set Up screen
Hands Free Set Up
Au t o A n s w e r i n g
1
8
P h o n e Vo i c e
2
F-Right
Beep
On
4 S
Se
e ll e
ec
c tt
5
AUTO
1
2
3
D
Seelleetcet
6
Return
1 Sets an automatic response time after call
termination. ( "8")
"Off": This function can not use.
"0-99": Sets to calling ring time (second).
2 Sets a ringing tone output position.
( "F-Right")
"F-Left":
Outputs the tone from the front
left-hand side speaker.
"F-Right": Outputs the tone from the front
right-hand side speaker.
"Front All": Outputs the tone from the both
front speakers.
3 Set the beep of the incoming call. ( "On")
"On":
Beep is heard.
"Off": Beep is canceled.
4 Display the Phone Select screen.
5 Display the Phone Delete screen.
6 Returns to the Hands-Free Control screen.
English
B64-3480-00_01_E.indb 16
06.10.4 6:15:58 PM
Deleting the Hands-Free Phone
• Either the time interval for automatic answer set on
this unit or the time interval set on the cell-phone,
whichever is shorter, takes effect.
• Select the speaker which is further from the
microphone in order to prevent howling or echos.
You can cancel a registration of Hands-Free phone.
1
S e t Up
2
Selecting a Hands-Free Phone
You can choose the Hands-Free phone from the list.
1
Display the Hands-Free Set Up screen
Display the Phone Delete list
D
Seelleetcet
Display the Hands-Free Set Up screen
Phone Delete screen
S e t Up
Phone Delete
1
AUTO
Kenwood 1
2
Kenwood 2
Display the Phone Select list
Kenwood 3
S
Se
e ll e
ec
c tt
Kenwood 4
Kenwood 5
Return
2
Phone Select screen
Phone Select
1
1 Selects the cell-phone to be deleted from the
list.
2 Returns to the Hands-Free Set Up screen.
AUTO
Kenwood 1
Kenwood 2
3
Kenwood 3
Select a Hands-Free phone you wish to delete
Kenwood 4
Kenwood 5
Return
1 Selects the cell-phone to be used as a handsfree phone.
2 Returns to the Hands-Free Set Up screen.
3
2
Kenwood 3
• The Phone Book, outgoing call list, and incoming
call list are deleted together with the deleted
Hands-Free phone.
Select a Hands-Free phone you wish to use
Kenwood 1
English |
B64-3480-00_01_E.indb 17
17
06.10.4 6:15:59 PM
Accessories/ Installation Procedure
For Good Reception
To assure good reception, note the following:
Accessories
1
3 m ..........1
2
..........2
3
..........1
Installation Procedure
1. To prevent a short circuit, remove the key from the
ignition and disconnect the - battery.
2. Set the display character conversion function
switch.
3. Make the proper input and output wire
connections for each unit.
4. Install the unit in your car.
5. Reconnect the - battery.
6. Press the reset button on the control unit.
• Insulate unconnected wires with vinyl tape or other similar
material. To prevent a short circuit, do not remove the caps
on the ends of the unconnected wires or the terminals.
• After the unit is installed, check whether the brake lamps,
blinkers, wipers, etc. on the car are working properly.
18 |
• Communicate with the cell-phone within the line-of-sight
distance of 10 m. The communication range becomes
shorter depending on the surrounding environment. The
communication range also becomes shorter when there
is an obstacle between this unit and the cell-phone. The
above maximum communication range (10 m) is not always
assured.
• Keep this unit away from other electric components
(AV components) as far as possible. If they are near, call
connection can fail, TV or radio noise can be generated, or
poor reception can occur.
• A broadcast station or walkie-talkie located nearby can
interfere with communication due to too strong signal.
Display Character Conversion Function
If the control unit cannot display accent characters
such as "ü" and "ä", set the display character
conversion function switch to "2" to convert them to
"U" and "A".
When one of the following control units is connected,
set the switch to "2". (As of September 2006)
KDV-5234, KDC-W6534U, KDC-W5534U, DPX501U
1 2
Conversion Table
Conversion character
A:
À, à, Á, á, Ã, ã, Ä, ä, Â, â, Å, å
C:
Ç, ç
D:
Ð, ð
E:
È, è, É, é, Ê, ê, Ë, ë
I:
Ì, ì, Í, í, Î, î, Ï, ï
N:
Ñ, ñ
O:
Ò, ò, Ó, ó, Ô, ô, Õ, õ, Ö, ö, Ø, ø
S:
ß
U:
Ù, ù, Ú, ú, Û, û, Ü, ü
X:
×
Y:
Ý, ý, ÿ
English
B64-3480-00_01_E.indb 18
06.10.4 6:16:01 PM
Connection
Accessory 1 (3 m)
Hands-Free Box
Control Unit
TO HEAD UNIT
Disc changer input
MIC
TO 5L I/F
1
2
(1.5 m)
Display character conversion switch
For the operation method refer
to <Display Character Conversion
Function> (page 18).
Connection cable (Provided with the
disc changer)
Disc Changer
Connector for external device
Items sold separetely such as a disc changer and KCAiP500 can be connected here. For the connectable
units, refer to the Instruction Manual that comes with
your control unit.
If You Want to Connect KCA-S220A
Connect the Hands-Free Box to the terminal labelled TO CHANGER 2.
Control Unit
KCA-S220A
TO HEAD UNIT
TO CHANGER 1
Hands-Free Box
TO CHANGER 2
TO HEAD UNIT
TO 5L I/F
Disc Changer
• Please keep the total extension of the control cable from the control unit to the disc changer to 13 m or less. Control cable
lengths in excess of 13 m will cease to function properly.
English |
B64-3480-00_01_E.indb 19
19
06.10.4 6:16:02 PM
Installation
Installation the Hands-Free Box
• Determine the installation position after making sure that
the unit can communicate with the cell-phone.
• Please do not install the unit near the dashboard, the rear
tray, or other important components. Doing so could lead
to injury or accident should the unit come off due to a
shock and strike a person or an important component.
Tapping screws should be used for mounting. (Attachment
with velcro strips, although easy, can come off with a
shock.)
Installation the Microphone Unit
1 Check the installation position of the microphone
(accessory 1).
2 Remove oil and other dirt from the installation
surface.
3 Install the microphone.
4 Wire the microphone cable up to the hands-free
box with it secured at several positions using tape
or the like.
Securing to audio board
Accessory 2 (Ø4 × 16 mm)
Antenna part
Fix a cable with a commercial
item of tape.
Securing to pile carpet
Antenna part
Accessory 3
Peel the release coated paper of double-face adhesive tape
to fix on the place shown in the left-hand example.
• Do not stick the velcro tape over the serial number.
• If the installation place is stepped, cut the velcro tape into
two pieces and stick them at two positions as shown.
20 |
Adjust the direction of the microphone to the driver.
English
B64-3480-00_01_E.indb 20
06.10.4 6:16:03 PM
Troubleshooting Guide
What might seem to be a malfunction in your unit
may just be the result of slight misoperation or
miswiring. Before calling service, first check the
following table for possible problems.
?
The hands-free talk volume is low.
✔ The hands-free talk volume is set at a low level.
☞ The hands-free talk volume can be adjusted
independently. Adjust it during hands-free talk.
?
No sound is heard from the rear speakers.
✔ You are talking in the hand-free talk mode.
☞ No sound is heard from the rear speakers in the
hands-free talk mode.
?
?
?
No beep is heard at reception of an incoming call.
✔ No beep is heard depending on the type of your
cell-phone.
☞ Selecting "Call Beep: ON" or "C-BP ON" (page 11),
or "Beep On" (page 16) allows you to hear the
beep.
Characters in a name are missing.
✔ The control unit cannot display accent characters.
☞ Set the display character conversion function
switch to "2" (page 18).
The name of the cell-phone is not displayed.
✔ When registering a cell-phone, the address may be
displayed instead of the name of the cell-phone.
☞ Turn off the power of the control unit and on
again. The name of the connected cell-phone
will be displayed.
The messages shown below display your
systems condition.
No Number/ NO-NMBER/ Incoming No Number :
• The calling party does not notify a caller ID.
• There is no phone number data.
No Data/ NO DATA :
• There is no outgoing call list.
• There is no incoming call list.
No Entry/ NO ENTRY :
The cell-phone has not been registered (pairing).
Disconnect/ DISCONCT/ Non Connection/ Disconnected :
The unit cannot communicate with the cell-phone.
Connect/ CONNECT :
The unit can communicate with the cell-phone.
HF Error 07/ HF ERR07:
The memory cannot be accessed.
\ Turn off the power and on again. If this message still
appears, press the reset button on the control unit.
HF Error 68/ HF ERR68:
The unit cannot communicate with the cell-phone.
\ Turn off the power and on again. If this message still
appears, press the reset button on the control unit.
Specifications
Specifications subject to change without notice.
Bluetooth section
Technology
: Bluetooth 1.2 Certified
Frequency
: 2.402 – 2.480 GHz
Output Power
: +4dBm (MAX), 0dBm (AVE) Power Class 2
General
Operating voltage (11 – 16V allowable)
: 14.4 V
Current consumption
: 0.2 A
Dimension (W × H × D)
: 95 × 30 × 105 mm
Weight
: 0.35 kg
English |
B64-3480-00_01_E.indb 21
21
06.10.4 6:16:04 PM
Table des matières
Précautions de sécurité
23
Remarques
24
Configuration de la fonction
Bluetooth
25
Avant utilisation
Enregistrement de votre téléphone
portable
Téléchargement du répertoire
téléphonique
25
25
32
33
33
34
34
34
35
36
36
37
37
Accessoires/ Procédure
d'installation
38
Connexion
39
Installation
40
Guide de dépannage
41
Caractéristiques techniques
41
22 |
26
Répondre à un appel téléphonique
26
Passer en mode privé
26
Effacement du message de déconnexion 26
Ajustez le volume sonore pendant
un appel
26
Mettre fin à un appel
26
Passage d'un mode d'affichage à un autre 26
25
Commande de l'appareil mains
libres
32
Ecran de commande mains libres
Télécommande
Opération des touche
Lors d'un appel entrant
Pendant la numérotation
Numérotation rapide
Appeler à partir du répertoire
téléphonique
Refaire un numéro
Configuration du téléphone mains libres
Sélection d'un téléphone mains libres
Effacement du téléphone mains libres
Caractéristiques générales
Méthode de numérotation
27
Sélection du mode de numérotation
Effectuer un appel en composant un
numéro de téléphone
Numérotation en utilisant la fonction de
numérotation rapide
Enregistrement de la liste de numéros
composés préréglés
Numérotez en utilisant le répertoire
téléphonique
Numérotation en utilisant la liste
des appels sortants
Numérotation en utilisant la liste
des appels entrants
Télécommande
27
27
27
28
28
28
29
29
Fonctions des touches
29
Système de menu
30
Système de menu
30
Sélection du téléphone portable que vous
souhaitez connecter
30
Effacer l'enregistrement d'un téléphone
portable
30
Affichage de l'état du téléphone portable 30
Réglage de la temporisation pour
la réponse automatique
31
Configuration des haut-parleurs
de sortie vocale
31
Réglage du bip des appels entrants
31
La marque et logos Bluetooth appartiennent
à Bluetooth SIG, Inc. et toute utilisation de ces
marques par Kenwood Corporation est sous
licence. Les autres marques et appellations
commerciales appartiennent à leurs
propriétaires respectifs.
Français
B64-3480-00_01_E.indb 22
06.10.4 6:16:04 PM
Précautions de sécurité
2AVERTISSEMENT
Pour éviter toute blessure ou incendie,
veuillez prendre les précautions suivantes :
• Pour éviter un court-circuit, ne laissez jamais d’objets
métalliques (comme une pièce de monnaie ou un
outil en métal) à l’intérieur de l’appareil.
• Le montage et le câblage de ce produit nécessitent
des compétences et de l'expérience. Pour des raisons
de sécurité, laissez un professionnel effectuer le travail
de montage et de câblage.
Bij deze verklaat Kenwood dat deze KCA-BT100 voldoet aan de essentiële eisen
en aan de overige relevante bepalingen van Richtlijn 1999/5/EC.
Italiano
Con la presente Kenwood dichiara che questo KCA-BT100 è conforme ai requisiti
essenziali ed alle altre disposizioni pertinenti stabilite dalla direttiva 1999/5/CE.
Español
Por medio de la presente Kenwood declara que el KCA-BT100 cumple con los
requisitos esenciales y cualesquiera otras disposiciones aplicables o exigibles de
la Directiva 1999/5/CE.
Português
Kenwood declara que este KCA-BT100 está conforme com os requisitos
essenciais e outras disposições da Directiva 1999/5/CE.
Polska
2ATTENTION
Kenwood niniejszym oświadcza, że KCA-BT100 spełnia zasadnicze wymogi oraz
inne istotne postanowienia dyrektywy 1999/5/EC.
Pour éviter tout dommage à l’appareil,
veuillez prendre les précautions suivantes :
Český
• N’installez pas l’appareil dans un endroit exposé
directement à la lumière du soleil, à une chaleur
excessive ou à l’humidité. Evitez également
les endroits trop poussiéreux ou exposés aux
éclaboussures.
Magyar
Kenwood timto prohlasuje, ze KCA-BT100 je ve shode se zakladnimi pozadavky
a s dalsimi prislusnymi ustanoveni Narizeni vlady c. 426/2000 Sb.
Alulírott, Kenwood, kijelenti, hogy a jelen KCA-BT100 megfelel az 1999/5/EC
irányelvben meghatározott alapvető követelményeknek és egyéb vonatkozó
előírásoknak.
Svenska
Härmed intygar Kenwood att denna KCA-BT100 stär l överensstämelse med de
väsentliga egenskapskrav och övriga relevanta bestämmelser som framgår av
direktiv 1999/5/EG.
Suomi
Déclaration de conformité se rapportant à
la directive R&TTE 1999/5/EC
Fabricant :
Kenwood Corporation
2967-3 Ishikawa-machi, Hachioji-shi, Tokyo, 192-8525 Japon
Représentants dans l'UE :
Kenwood Electronics Europe BV
Amsterdamseweg 37, 1422 AC UITHOORN, Pays-Bas
Kenwood vakuuttaa täten että KCA-BT100 tyyppinen laite on direktiivin
1999/5/EY oleellisten vaatimusten ja sitä koskevien direktiivin muiden ehtojen
mukainen.
Slovensko
S tem Kenwood izjavlja, da je ta KCA-BT100 v skladu z osnovnimi zahtevami in
ostalimi ustreznimi predpisi Direktive 1999/5/EC.
Slovensky
Spoločnosť Kenwood týmto vyhlasuje, že KCA-BT100 spĺňa zákldné požiadavky
a ďalšie prislušné ustanovenia Direktĺvy 1999/5/EC.
Dansk
Undertegnede Kenwood erklærer harved, at følgende udstyr KCA-BT100
overholder de væsentlige krav og øvrige relevante krav i direktiv 1999/5/EF.
Ελληνικά
English
Hereby, Kenwood declares that this unit KCA-BT100 is in compliance with the
essential requirements and other relevant provisions of Directive 1999/5/EC.
Français
Par la présente Kenwood déclare que l’appareil KCA-BT100 est conforme aux
exigences essentielles et aux autres dispositions pertinentes de la directive
1999/5/CE.
Par la présente, Kenwood déclare que ce KCA-BT100 est conforme aux
exigences essentielles et aux autres dispositions de la directive 1999/5/CE qui
lui sont applicables.
Deutsch
Hiermit erklärt Kenwood, dass sich dieser KCA-BT100 in Übereinstimmung mit
den grundlegenden Anforderungen und den anderen relevanten Vorschriften
der Richtlinie 1999/5/EG befindet. (BMWi)
Hiermit erklärt Kenwood die Übereinstimmung des Gerätes KCA-BT100 mit den
grundlegenden Anforderungen und den anderen relevanten Festlegungen der
Richitlinie 1999/5/EG. (Wien)
Nederlands
Hierbij verklaart Kenwood dat het toestel KCA-BT100 in overeenstemming is
met de essentiële eisen en de andere relevante bepalingen van richtlijn 1999/5/
EG.
ΜΕ ΤΗΝ ΠΑΡΟΥΣΑ Kenwood ΔΗΛΩΝΕΙ ΟΤΙ KCA-BT100 ΣΥΜΜΟΡΦΩΝΕΤΑΙ ΠΡΟΣ
ΤΙΣ ΟΥΣΙΩΔΕΙΣ ΑΠΑΙΤΗΣΕΙΣ ΚΑΙ ΤΙΣ ΛΟΙΠΕΣ ΣΧΕΤΙΚΕΣ ΔΙΑΤΑΞΕΙΣ ΤΗΣ ΟΔΗΓΙΑΣ
1999/5/EK.
Eesti
Sellega kinnitab Kenwood, et see KCA-BT100 vastab direktiivi 1999/5/EC
põhilistele nõudmistele ja muudele asjakohastele määrustele.
Latviešu
Ar šo, Kenwood, apstiprina, ka KCA-BT100 atbilst Direktīvas 1999/5/EK
galvenajām prasībām un citiem tās nosacījumiem.
Lietuviškai
Šiuo, Kenwood, pareiškia, kad šis KCA-BT100 atitinka pagrindinius Direktyvos
1999/5/EB reikalavimus ir kitas svarbias nuostatas.
Malti
Hawnhekk, Kenwood, jiddikjara li dan KCA-BT100 jikkonforma mal-ħtiġijiet
essenzjali u ma provvedimenti oħrajn relevanti li hemm fid-Dirrettiva 1999/5/
EC.
Українська
Компанія Kenwood заявляє, що цей виріб KCA-BT100 відповідає ключовим
вимогам та іншим пов’язаним положенням Директиви 1999/5/EC.
Français |
B64-3480-00_01_E.indb 23
23
06.10.4 6:16:05 PM
Remarques
• Si vous rencontrez des problèmes pendant
l’installation, consultez votre distributeur Kenwood.
• Lorsque vous achetez des accessoires en option,
vérifiez auprès de votre distributeur Kenwood que ces
accessoires fonctionnent avec votre modèle et dans
votre région.
• Les illustrations de l’affichage et du panneau
apparaissant dans ce manuel sont des exemples
utilisés pour expliquer avec plus de clarté comment
les commandes sont utilisées. Il est donc possible que
les illustrations de l’affichage puissent être différentes
de ce qui est réellement affiché sur l’appareil et
que certaines illustrations affichées ne sont pas
applicables.
Récepteurs Kenwood disponibles pour cet
appareil
Les appareils de réception qui peuvent être utilisés
avec le modèle KCA-BT100 sont les suivants : (en
septembre 2006)
Récepteur audio
DPX501U*, DPX701U, KDC-W5534U*,
KDC-W6534U*, KDC-W7534U, KDV-5234*
Récepteur avec moniteur
DDX6029
Pour obtenir des détails sur les récepteurs
compatibles à venir, accédez à l'URL suivante :
http://www.kenwood.com/bt/bt100/
• *: Réglez le bouton de fonction de conversion d'affichage
de caractères sur "2". Pour plus de détails, voir <Fonction
de conversion d'affichage de caractères> (page 38).
A propos de la télécommande
Le récepteur audio nécessite une télécommande avec
des touches numériques pour composer les numéros
de téléphone directement.
Pour effectuer un appel en utilisant la télécommande,
la télécommande doit inclure le bouton [ ]. Pour
plus de détails, accéder à l'URL suivante :
http://www.kenwood.com/bt/bt100/
• Suivant le type d'appareil de commande, vous ne pouvez
pas utiliser de télécommande.
24 |
À propos du téléphone portable
Cette unité est conforme aux spécifications de
Bluetooth suivantes :
Version
Bluetooth Standard Ver. 1.2
Profil
HFP (profil mains libres)
OPP (profil d'envoi de fichiers)
Pour les téléphones portables dont la compatibilité
est vérifiée, accédez à l'URL suivante :
http://www.kenwood.com/bt/bt100/
• Les appareils comprenant la fonction Bluetooth sont
certifiés conformes à la norme Bluetooth d'après la
procédure prescrite par Bluetooth SIG. Cependant, il est
possible que ces appareils ne puissent pas communiquer
avec certains types de téléphones portables.
• HFP est un profil utilisé pour effectuer des appels en mains
libres.
• OPP est un profil utilisé pour transférer des données telles
qu'un répertoire téléphonique entre appareils.
Ce produit n’est pas installé par le constructeur d’un
véhicule sur le site de production, ni par l’importateur
professionnel d’un véhicule dans un Etat membre de
l’UE.
Information sur l’élimination des anciens
équipements électriques et électroniques
(applicable dans les pays de l’Union
Européenne qui ont adopté des systèmes
de collecte sélective)
Les produits sur lesquels le pictogramme
(poubelle barrée) est apposé ne peuvent
pas être éliminés comme ordures
ménagères.
Les anciens équipements électriques et
électroniques doivent être recyclés sur
des sites capables de traiter ces produits
et leurs déchets. Contactez vos autorités
locales pour connaître le site de recyclage
le plus proche. Un recyclage adapté
et l’élimination des déchets aideront à
conserver les ressources et à nous préserver
des leurs effets nocifs sur notre santé et sur
l’environnement.
Français
B64-3480-00_01_E.indb 24
06.10.4 6:16:06 PM
Configuration de la fonction Bluetooth
Avant utilisation
• Vous devez enregistrer votre téléphone portable
avant de l'utiliser avec cet appareil. Pour plus de
détails, voir <Enregistrement de votre téléphone
portable> (page 25).
• Si vous avez enregistré plusieurs téléphones
portables, vous devez en choisir un. Pour plus de
détails, voir <Sélection du téléphone portable que
vous souhaitez connecter> (page 30) ou <Sélection
d'un téléphone mains libres> (page 37).
• Pour utiliser le répertoire téléphonique, il est
nécessaire de l'avoir téléchargé auparavant sur cet
appareil. Pour plus de détails, voir <Téléchargement
du répertoire téléphonique> (page 25).
• Vous pouvez installer la sortie haut-parleur. Pour plus
de détails, voir <Configuration des haut-parleurs
de sortie vocale > (page 31) ou <Configuration du
téléphone mains libres> (page 36).
Téléchargement du répertoire
téléphonique
Téléchargez les données du répertoire téléphonique
du téléphone portable vers cet appareil de manière
pour pouvoir utiliser le répertoire téléphonique dans
cet appareil.
1 En faisant fonctionner le téléphone portable,
terminez la connexion mains libres.
2 En faisant fonctionner le téléphone
portable, envoyez les données du répertoire
téléphonique vers cet appareil
En faisant fonctionner le téléphone portable,
téléchargez les données du répertoire téléphonique
vers cet appareil.
Pendant le téléchargement :
"Downloading", "DOWNLOAD", ou "Now
Downloading…" s'affiche.
Après le téléchargement complet (pour le
récepteur audio) :
Enregistrement de votre téléphone
portable
3 En faisant fonctionner le téléphone portable,
Pour que votre téléphone portable puisse être utilisé
avec cet appareil, vous devez l'enregistrer (pairage).
Vous pouvez enregistrer jusqu'à cinq téléphones
portables sur cet appareil.
démarrez la connexion mains libres.
Pour effacer le message de fin de
téléchargement (pour le récepteur audio) :
Appuyez sur n’importe quelle touche.
1 Activez l'appareil de commande.
2 Commencez l'enregistrement sur le téléphone
portable
En faisant fonctionner le téléphone portable, effectuez
l'enregistrement du téléphone mains libres (pairage).
Sélectionnez "KCA-BT100" à partir de la liste des
appareils connectés.
3 Entrez la touche d'un chemin d'accès
Entrez "1234" comme touche d'un chemin d'accès.
Vérifiez que l'enregistrement est bien effectué sur le
téléphone portable.
4 En faisant fonctionner le téléphone portable,
démarrez la connexion mains libres.
• Pour faire fonctionner le téléphone portable, veuillez vous
reporter au manuel d'instructions qui accompagne votre
téléphone portable.
• Vous pouvez enregistrer jusqu'à cinq téléphones portables.
L'enregistrement du sixième téléphone portable effacera le
téléphone portable enregistré en tout premier.
• Vous ne pouvez pas enregistrer un téléphone portable
lorsqu'un autre téléphone portable est en statut de
connexion mains libres. Fermez la connexion main libres, et
enregistrez ensuite un nouveau téléphone portable.
• Si plusieurs "KCA-BT100" s'affichent dans la liste des unités
connectées, un autre "KCA-BT100" est probablement utilisé
à proximité. Déplacez votre véhicule, et vérifiez ensuite
qu'un seul "KCA-BT100" s'affiche.
"Complete", "Completed", ou "COMPLETE" s'affiche.
• Pour faire fonctionner le téléphone portable, veuillez vous
reporter au manuel d'instruction qui accompagne votre
téléphone portable.
• Chaque téléphone portable enregistré peut mettre en
mémoire jusqu'à 300 numéros de téléphone.
• Pour chaque numéro de téléphone il est possible
d'enregistrer jusqu'à 32 chiffres et jusqu'à 40 caractères
pour un nom.
• Selon le type de votre téléphone portable, les restrictions
suivantes sont possibles :
- Les données du répertoire téléphonique ne peuvent pas
être téléchargées normalement.
- Les caractères du répertoire téléphonique sont altérés.
- Les données du répertoire téléphonique ne peuvent
pas être téléchargées normalement si elles contiennent
des images. Cela peut prendre de nombreuses heures
voire un jour entier pour télécharger le répertoire
téléphonique, en fonction de la taille totale des images.
• Pour annuler le téléchargement des données du répertoire
téléphonique, faites fonctionner le téléphone portable.
Français |
B64-3480-00_01_E.indb 25
25
06.10.4 6:16:07 PM
Caractéristiques générales (pour récepteur audio)
Répondre à un appel téléphonique
Quand "CALL" ou "Call" s'affiche, le "(nom de ligne
appelante)" ou le "(numéro de téléphone)" s'affiche
également.
Appuyez sur la touche [AUDIO] ou sur une des
touches de [1] à [6] .
Rejeter un appel entrant
Appuyez sur la touche [ATT] pendant au moins
1 seconde.
• Vous pouvez configurer l'appareil pour que l'appel entrant
soit reçu après un laps de temps prédéterminé. Pour
plus de détails, voir <Réglage de la temporisation pour la
réponse automatique> (page 31).
• Insérer un disque tel qu'un CD aura pour conséquence de
couper votre appel.
• Régler le téléphone portable en mode privé peut
désactiver la fonction mains libres.
• Quand un appel sans le nom de l'identifiant est reçu,
"No Name No Number", "No Number", ou "NO-NUMBER"
s'affiche.
• Le nom de l'appelant s'affiche s'il a déjà été enregistré dans
le répertoire téléphonique.
Passer en mode privé
Vous pouvez passer du mode privé (parler directement
au téléphone portable) au mode mains libres.
Appuyez sur la touche de commande ([38]).
Les modes de conversation sont branchés comme
suit :
Affichage
"Private"/ "PRIVATE"/ "PV TALK"
"Handsfree"/ – / "HF TALK"
Mode de conversation
Conversation privée
Conversation mains libres
Ajustez le volume sonore pendant un
appel
Vous pouvez ajuster le volume sonore pendant un
appel.
Tournez le bouton [VOL].
• Le volume ajusté durant un appel en cours deviendra
effectif à partir de l'appel suivant.
• Un volume excessif risque de créer un écho. Si un écho
survient, baissez le volume le plus bas possible. L'écho
augmente proportionnellement au volume.
Mettre fin à un appel
Appuyez sur la touche [SRC].
• Vous pouvez aussi appuyer sur la touche [ATT] au moins 1
seconde pour mettre un terme à un appel.
Passage d'un mode d'affichage à un
autre
Vous pouvez passer du répertoire téléphonique à la
liste d'appels.
Appuyez sur la touche [DISP]/ [AUTO]/ [TI].
Si la touche [DISP] n'est pas disponible, appuyez sur la
touche [AUTO] ou [TI].
Pour le récepteur audio avec système de touche multifonction :
Appuyez sur la touche [AUTO]/ [TI].
Appuyez sur cette touche pour passer de la liste de
noms à la liste de numéros de téléphone.
Faire dérouler l'affichage
• Selon le type de votre téléphone portable, se brancher en
mode de conversation privée peut sélectionner la source
utilisée avant la connexion mains libres. Si cela arrive, la
source ne peut pas revenir au mode de conversation mains
libres avec cet appareil. Utilisez votre téléphone portable
pour revenir au mode de conversation mains libres.
Effacement du message de déconnexion
Vous pouvez effacer le message affiché après une
déconnexion du téléphone portable.
Appuyez sur la touche [ATT] pendant au moins
1 seconde.
"Disconnect" ou "DISCONCT" disparaît.
• Le téléphone portable déconnecté peut mettre du temps à
se reconnecter.
26 |
Vous pouvez faire dérouler la liste de noms ou de
numéros téléphoniques. Pour la méthode d'exécution,
se reporter à <Déroulement du texte/titre> dans
le manuel d'instruction qui accompagne l'unité de
commande.
• Avec l'appareil de commande sur lequel seul le nom de
l'appelant est affiché quand un appel ou un bref signal
d'appel est reçu, vous pouvez passer au mode d'affichage
du numéro de téléphone en exécutant l'opération cidessus.
• Selon le type de votre appareil de commande, les
restrictions suivantes sont apportées.
- Jusqu'à 19 caractères peuvent s'afficher.
- La lettre # ne peut pas être affichée, ou "|" (tous les
segments sont éclairés) s'affiche pour #.
- Vous ne pouvez pas passer d'un mode d'affichage à
l'autre.
Français
B64-3480-00_01_E.indb 26
06.10.4 6:16:07 PM
Méthode de numérotation (pour le récepteur audio)
Sélection du mode de numérotation
1 Entrez dans le mode de numérotation
Sélectionnez l'affichage "DIAL" ou "N-DIAL" .
Reportez vous à <Sélection du mode de
numérotation> (page 27).
Vous pouvez composer un numéro de cinq manières
différentes.
1 Entrez le mode de sélection de la méthode de
numérotation
Appuyez sur la touche [ATT] pendant au moins
1 seconde.
"DIAL" ou "N-DIAL" s'affiche.
2 Sélectionnez une méthode de numérotation
Appuyez sur la touche de commande ([38]).
Appuyez sur cette touche pour basculer entre les
méthodes de numérotation suivantes :
Pour le récepteur audio avec système de touche multifonction :
1 Appuyez sur la touche [NEXT].
Sélectionnez la section de fonction touche.
2 Appuyez sur la touche [1] ("DIAL") – [4] ("INC").
Affichage Touche multi- Méthode de numérotation
fonction
"DIAL"/
[1] ("DIAL")
Numéroter en composant le numéro
"N-DIAL"
de téléphone. (page 27)
Numéroter en utilisant la fonction de
composition rapide. (page 27)
"INITIAL"/ [2] ("PHBK")* Numéroter en cherchant la première
"PH-BOOK1"
lettre dans le répertoire téléphonique
(page 28)
"PH.BOOK"/ [2] ("PHBK")* Numéroter en cherchant le
"PH-BOOK2"
répertoire téléphonique dans l'ordre
alphabétique. (page 28)
"OUT"/
[3] ("OUT-C") Numéroter en utilisant la liste des
"OUT-CALL"
appels sortants. (page 28)
"IN"/
[4] ("IN-C")
Numéroter en utilisant la liste des
"IN-CALL"
appels entrants. (page 29)
3 Sortez du mode de sélection de la méthode de
numérotation
Appuyez sur la touche [ATT] pendant au moins
1 seconde.
• Pour utiliser le répertoire téléphonique, celui-ci doit avoir
été téléchargé à partir du téléphone portable. Pour plus de
détails, voir <Téléchargement du répertoire téléphonique>
(page 25).
• Les listes d'appels entrants et sortants sont les listes des
appels émis et reçus par cet appareil. Il ne s'agit pas de
ceux stockés dans la mémoire du téléphone portable.
• * Avec le système de touche multi-fonction, en appuyant
sur la touche [2] ("PHBK") vous passez aux méthodes de
recherche du répertoire téléphonique.
Fonction de la télécommande
Effectuer un appel en composant un
numéro de téléphone
Vous pouvez effectuer un appel en composant un
numéro de téléphone.
B64-3480-00_01_E.indb 27
2 Entrez un numéro de téléphone
3
Appuyez sur la touche numéro ([1] à
[0]), #([FM]), *([AM]), ou +([¢]) sur la
télécommande.
Effectuez un appel
Appuyez sur la touche [DIRECT] sur la
télécommande.
"CALL" ou "Call" s'affiche.
Pour effacer le numéro de téléphone entré ligne
par ligne :
Appuyez sur la touche [4] de la
télécommande.
• Vous pouvez entrer 32 chiffres au maximum.
• Selon le type de votre appareil de commande, "|" (tous les
segments sont éclairés) s'affiche pour #.
Numérotation en utilisant la fonction
de numérotation rapide
Vous pouvez numéroter en appelant le numéro de
téléphone enregistré sur la liste préréglée des numéros
composés. Pour prérégler un numéro de téléphone,
veuillez vous reporter à <Enregistrement sur la liste
préréglée des numéros composés> (page 28).
1 Entrez le mode de numérotation
Sélectionnez l'affichage "DIAL" ou "N-DIAL" .
Reportez vous à <Sélection du mode de
numérotation> (page 27).
2 Sélectionnez la touche correspondant au
numéro préréglé composé
Appuyez sur une touche de [1] à [3].
"Preset #" ou "PRESET #" s'affiche.
Pour le récepteur audio avec système de touche multifonction :
1 Appuyez sur la touche [NEXT].
Sélectionnez la section de fonction touche.
2 Appuyez sur la touche [1] ("1") – [3] ("3").
"DIAL #" s'affiche.
3 Effectuez un appel
Appuyez sur le bouton de commande ([38])
pendant au moins 1 seconde.
"CALL" ou "Call" s'affiche.
• Si le numéro désiré n'est pas enregistré sur la liste des
numéros composés préréglés, "No Name No Number", "No
Number", ou "NO-NUMBER" apparaît.
Français |
27
06.10.4 6:16:08 PM
Méthode de numérotation (pour le récepteur audio)
Enregistrement sur la liste préréglée
des numéros composés
2 Sélectionnez la première lettre à rechercher
Poussez le boutton de commande vers [4],
[¢], [FM] ou [AM].
Vous pouvez enregistrer jusqu'à 3 numéros de
téléphone pour une numérotation rapide.
Déplacez le curseur vers la première lettre à rechercher.
Bouton
Opération
[4]/ [¢] Déplacer vers le caractère suivant.
[FM]/ [AM]
Déplacer vers la rangée suivante.
1 Entrez le numéro de téléphone que vous
souhaitez enregistrer
Entrez le numéro de téléphone en référence à ce qui
suit :
- <Effectuer un appel en composant un numéro de
téléphone> (page 27)
- <Numérotation en utilisant le répertoire
téléphonique> (page 28)
- <Numérotation en utilisant la liste des appels
sortants> (page 28)
- <Numérotation en utilisant la liste des appels
entrants> (page 29)
2 Sélectionnez la touche que vous souhaitez
enregistrer
Appuyez sur une touche de [1] à [3] pendant au
moins 2 secondes.
Pour le récepteur audio avec système de touche multifonction :
1 Appuyez sur la touche [NEXT].
3 Déterminez la première lettre sélectionnée
4
Appuyez sur le bouton de commande ([38])
pendant au moins 1 seconde.
Sélectionnez le nom
Poussez le bouton de commande vers [FM],
[AM], [4] ou [¢].
Sélectionnez le nom.
Bouton
Opération
[FM]/ [AM]
Changez le nom.
[4]/ [¢] Changez la première lettre.
5 Effectuez un appel
Appuyez sur le bouton de commande ([38])
pendant au moins 1 seconde.
"CALL" ou "Call" s'affiche.
Sélectionnez la section de fonction touche.
2 Appuyez sur la touche [1] ("1"/ "MEM.1") – [3]
("3"/ "MEM.3") pendant au moins 2 secondes.
L'affichage "Memory" ou "Memory" clignote une fois.
3 Sortez du mode de sélection de la méthode de
numérotation
Appuyez sur la touche [ATT] pendant au moins
1 seconde.
Numérotation en utilisant le répertoire
téléphonique
Vous pouvez numéroter en utilisant le répertoire
téléphonique téléchargé.
• Pour utiliser le répertoire téléphonique, celui-ci doit avoir
été téléchargé à partir du téléphone portable. Pour plus de
détails, voir <Téléchargement du répertoire téléphonique>
(page 25).
• Les premières lettres qui ne correspondent pas au nom ne
seront pas affichées.
• Sur l'appareil de commande qui affiche trois rangées, le
nom qui apparaît dans la rangée du milieu est celui qui est
sélectionné.
• Pendant la recherche, un caractère non accentué tel que
"u" est recherché plutôt qu'un caractère accentué tel que
"ü".
• Les caractères que l'appareil de commande ne peut pas
afficher sont recherchés dans l'ordre dans lequel ils ont été
enregistrés dans le répertoire téléphonique.
1 Entrez en mode de répertoire téléphonique
Sélectionnez l'affichage "INITIAL", "PH-BOOK1", "PH.
BOOK ", ou "PH-BOOK2".
Reportez vous à <Sélection du mode de
numérotation> (page 27).
Si vous avez sélectionné "PH.BOOK" ou "PH-BOOK2",
passez à l'étape 4.
Pour le récepteur audio avec système de touche multifonction :
Appuyez sur la touche [2] ("PHBK").
Appuyer sur cette touche permet de faire basculer
les méthodes de recherche suivantes :
Affichage
"INITIAL"/
"PH-BOOK1"
"PH.BOOK"/
"PH-BOOK2"
28 |
Méthode de recherche
Recherche par la première lettre.
Numérotation en utilisant la liste des
appels sortants
Vous pouvez numéroter en utilisant la liste des appels
sortants. Jusqu'à dix numéros de téléphone provenant
des appels sont enregistrés dans la liste des appels
sortants.
1 Entrez dans le mode de liste des appels
sortants
Sélectionnez l'affichage "OUT" ou "OUT-CALL" .
Reportez vous à <Sélection du mode de
numérotation> (page 27).
Recherche par ordre alphabétique.
Passez à l'étape 4.
Français
B64-3480-00_01_E.indb 28
06.10.4 6:16:09 PM
Télécommande (pour récepteur audio)
2 Sélectionnez un nom ou un numéro de
3
téléphone
Poussez le bouton de commande sur [FM] ou
[AM].
Effectuez un appel
Appuyez sur le bouton de commande ([38])
pendant au moins 1 seconde.
"CALL" ou "Call" s'affiche.
• La liste des appels sortants est la liste des appels en
provenance de cette unité. Il ne s'agit pas de celle stockée
dans la mémoire du téléphone portable.
• Sur l'appareil de commande qui affiche trois rangées, le
numéro de téléphone qui apparaît dans la rangée du
milieu est celui qui est sélectionné.
• Selon le type de votre appareil de commande, "0" s'affiche
pour le dixième appel dans la liste des appels sortants.
Fonctions des touches
Touche [SRC]*
Pendant un appel : met fin à l'appel.
Touche [VOL]*
Pendant un appel : ajuste le volume sonore.
Touche [
]
Entre dans le mode de sélection de la méthode de
numérotation.
Lorsqu'un appel survient : Répond à l'appel.
Touche [38]*
Pendant un appel :
Bacule entre le mode de conversation privée et le
mode de conversation mains libres.
Mode de sélection de la méthode de numérotation :
Sélectionne une méthode de numérotation.
Touche [¢]*
Entrée de numérotation : Entre "+".
Touche [4]*
Numérotation en utilisant la liste des
appels entrants
Vous pouvez numéroter en utilisant la liste des appels
entrants. Jusqu'à dix numéros de téléphone provenant
des appels reçus sont enregistrés dans la liste des
appels entrants.
1 Entrez dans le mode de liste des appels
entrants
Sélectionnez l'affichage "IN" ou "IN-CALL".
Reportez vous à <Sélection du mode de
numérotation> (page 27).
2 Sélectionnez un nom ou un numéro de
3
téléphone
Poussez le bouton de commande sur [FM] ou
[AM].
Effectuez un appel
Appuyez sur le bouton de commande ([38])
pendant au moins 1 seconde.
Entrée de numérotation :
Efface le numéro de téléphone entré.
Touche [FM]*
Entrée de numérotation : Entre "#".
Touche [AM]*
Entrée de numérotation : Entre "*".
Touche [0] à [9]*
Entrée de numérotation : Entrent un chiffre.
Touche [DIRECT]*
Effectue un appel.
Contact de sélection de mode de télécommande
Contact avec "AUD" durant la numérotation.
• * Si votre télécommande possède un interrupteur de
sélection de mode, réglez-le sur "AUD".
• Les télécommandes avec la touche [
] et/ou les
touches numériques sont disponibles en option. Achetez
une télécommande ayant une fonction spécifique.
"CALL" ou "Call" s'affiche.
• La liste des appels entrants est la liste des appels reçus
par cet appareil. Il ne s'agit pas de celle stockée dans la
mémoire du téléphone portable.
• Sur l'appareil de commande qui affiche trois rangées, le
numéro de téléphone qui apparaît dans la rangée du
milieu est celui qui est sélectionné.
• Selon le type de votre appareil de commande, "0" est
affiché pour le dixième appel dans la liste des appels
entrants.
Français |
B64-3480-00_01_E.indb 29
29
06.10.4 6:16:10 PM
Système de menu (pour le récepteur audio)
Système de menu
Configuration de nombreuses fonctions. La méthode
de base d’utilisation du système du menu est expliquée
ici. Les références pour les éléments du menu et
leur réglage se trouvent après l’explication de cette
opération.
1 Entrez dans le mode menu
Appuyez sur la touche [MENU] pendant au
moins 1 seconde.
"MENU" est affiché.
2 Sélectionnez l'élément du menu
3
4
Poussez le bouton de commande sur [FM] ou
[AM].
Réglez l'élément du menu
Poussez le bouton de commande sur [4] ou
[¢].
Sortez du mode menu
Appuyez sur la touche [MENU].
• Trois éléments de menu apparaissent à l'affichage.
L'élément du menu affiché au centre est celui que vous
pouvez régler.
"✱" (couleur claire) ou "_": le téléphone portable
sélectionné est en veille.
5 Sortez du mode de sélection de téléphone
Appuyez sur la touche [MENU].
En mode de veille
Effacer l'enregistrement d'un téléphone
portable
Vous pouvez effacer l'enregistrement d'un téléphone
portable.
1 Sélectionnez le mode d'effacement de
téléphone
Poussez le bouton de commande sur [FM] ou
[AM].
Sélectionnez l'affichage "Phone Delete" ou "PHN-DEL" .
2 Entrez dans le mode d'effacement de
téléphone
Appuyez sur le bouton de commande ([38])
pendant au moins 1 seconde.
"(nom)" s'affiche.
3 Sélectionnez le téléphone portable que vous
En mode de veille
Sélection du téléphone portable que
vous souhaitez connecter
Lorsque plusieurs téléphones portables ont déjà
été enregistrés, il est nécessaire de sélectionner le
téléphone portable que vous souhaitez utiliser.
4
"Delete" ou "DELETE" s'affiche.
5 Sortez du mode d'effacement de téléphone
Appuyez sur la touche [MENU].
1 Sélectionnez le mode de sélection de
téléphone
Poussez le bouton de commande sur [FM] ou
[AM].
• Quand un téléphone portable enregistré est effacé, son
répertoire téléphonique, sa liste des appels sortants et sa
liste des appels entrants sont aussi effacés.
Sélectionnez l'affichage "Phone Selection" ou "PHNSEL" .
2 Entrez dans le mode de sélection du
téléphone choisi
Appuyez sur le bouton de commande ([38])
pendant au moins 1 seconde.
"(nom)" s'affiche.
3 Sélectionnez le téléphone portable que vous
4
souhaitez connecter
Poussez le bouton de commande sur [FM] ou
[AM].
Configurez le téléphone portable que vous
souhaitez connecter
Poussez le bouton de commande sur [4] ou
[¢].
"✱(nom)" ou "-(nom)" s'affiche.
"✱" (couleur foncée) ou "✱": le téléphone portable
sélectionné est occupé.
30 |
souhaitez effacer
Poussez le bouton de commande sur [FM] ou
[AM].
Effacez le téléphone portable sélectionné
Appuyez sur le bouton de commande ([38])
pendant au moins 1 seconde.
Affichage de l'état du téléphone
portable
Vous pouvez afficher l'état de connexion, la force du
signal, et le niveau de la batterie.
1 Sélectionnez l'élément d'affichage de l'état
Poussez le bouton de commande sur [FM] ou
[AM].
Sélectionnez l'affichage "P-STATUS" .
2 Entrez dans le mode d'affichage de l'état
3
Appuyez sur le bouton de commande ([38])
pendant au moins 1 seconde.
Sélectionnez l'élément que vous souhaitez
afficher
Poussez le bouton de commande sur [FM] ou
[AM].
Français
B64-3480-00_01_E.indb 30
06.10.4 6:16:10 PM
Sélectionnez l'affichage "Phone Status"
2 Affichage des états
Poussez le bouton de commande sur [4] ou
[¢].
Tous les états sont indiqués par des icônes.
3 Sortez du mode Menu
Appuyez sur la touche [MENU].
Etat de connexion Bluetooth
Affichage
Icône
Information
"BT-CON Y"
Connecté
"BT-CON N"
Cette fonction répond automatiquement à un appel
après une période de temps préréglée pour réponse
automatique.
Affichage
"Auto Answer: OFF"/
"ANS OFF"
"Auto Answer: 0s"/
"ANS 0"
Réglage
Ne répond pas aux appels téléphoniques
automatiquement.
Répond aux appels téléphoniques
automatiquement immédiatement.
"Auto Answer: 8s"/
"ANS 8"
Répond aux appels téléphoniques
automatiquement après une période de 8
secondes (réglage d'origine).
"Auto Answer: 99s"/ Répond aux appels téléphoniques
"ANS 99"
automatiquement après une période de 99
secondes.
• Si le réglage du temps du téléphone portable est plus
court que le réglage de l'unité, c'est le premier qui sera
utilisé.
…
…
En mode de veille
Configuration des haut-parleurs de
sortie vocale
Vous pouvez régler les haut-parleurs de sortie vocale.
"BAT LOW"
Presque déchargée
"BAT - - -"
Ne peut pas obtenir
d'information.
…
…
Force du signal du téléphone portable
Affichage
Icône
Information
"SGNL MAX"
Maximum
"SGNL MID"
Réglage de la temporisation pour la
réponse automatique
Déconnecté
Niveau de batterie du téléphone portable
Affichage
Icône
Information
"BAT FULL"
Pleine
"BAT MID"
En mode de veille
…
Appuyez sur la touche [MENU].
Si votre appareil de commande comprend la
fonction d'affichage graphique :
1 Sélectionnez l'élément d'affichage de l'état
Poussez le bouton de commande sur [FM] ou
[AM].
…
4 Sortez du mode d'affichage de l'état
Affichage
"SP Select: Front"/
"SPK FRT"
"SP Select: F-R"/
"SPK F-R"
"SP Select: F-L"/
"SPK F-L"
Réglage
Le son sort des haut-parleurs avant-gauche et
avant-droit.
Le son sort du haut-parleur avant-droit.
Le son sort du haut-parleur avant-gauche.
• Sélectionnez le haut-parleur le plus éloigné du microphone
pour éviter les ronronnements acoustiques ou échos.
"SGNL LOW"
Minimum
"NO SGNAL"
Hors de portée du service
Réglage du bip des appels entrants
"SGNL - - -"
Ne peut pas obtenir
l'information.
Vous pouvez émettre un bip à partir du haut-parleur
lorsqu'un appel survient.
• Comme le nombre d'étapes de l'appareil de commande est
différent de celui du téléphone portable, les états affichés
sur l'appareil de commande peuvent varier de ceux affichés
sur le téléphone portable.
En mode de veille
Affichage
Réglage
"Call Beep: ON"/ "C-BP ON" On entend un bip.
"Call Beep: OFF"/ "C-BP OFF" Le bip est annulé.
Français |
B64-3480-00_01_E.indb 31
31
06.10.4 6:16:11 PM
Commande de l'appareil mains libres (pour le récepteur avec moniteur)
Commande de l'appareil mains libres
Ecran de commande mains libres
Ou lorsqu'un
appel survient ...
TEL
Ecran de commande mains libres
9
8
Hands
10
AUTO
Free
K E N WO O D
1
2
11
0123456789
P1
15
1
2
3
4
5
6
12
7
8
9
Clear
*
0
#
P2
3
P3
6
4
5
S e t Up
+
13
14
7
Return
Ecran de contrôle
DV D V I D E O
13:50
16
TEL
IN
REP
Next
Title 1
Chap
KENWOOD
3
TIME
SCRL
T0:05:20
1 Affiche l'écran de recherche du répertoire
téléphonique.
(Voir <Appeler à partir du répertoire
téléphonique>, page 35)
2 Affiche l'écran des appels sortants.
(Voir <Refaire un numéro>, page 36)
3 Affiche l'écran des appels entrants.
(Voir <Refaire un numéro>, page 36)
4 Contact entre les modes privé et mains libres
(seulement quand un appel est en cours).
5 Affiche l'écran de réglage de la fonction mains
libres.
(Voir <Configuration du téléphone mains libres>,
page 36)
32 |
6 Entrez trois numéros de téléphone pour une
numérotation rapide.
(Voir <Numérotation rapide>, page 34)
7 Entre un numéro de téléphone.
(Voir <Pendant la numérotation>, page 34)
8 Affiche la force du signal.*
Plus le nombre des segments de barres est élevé,
plus le signal est fort.
9 Affiche l'état actuel du répondeur automatique
Lorsque le répondeur automatique est en marche
AUTO
:
Lorsque le répondeur automatique est débranché
:
p Affiche le niveau de la batterie du téléphone
portable.*
Plus le nombre des segments de barres est élevé,
plus le niveau de la batterie est élevé.
q Effectue l'appel.
w Met fin à l'appel.
Efface le numéro de téléphone qui est composé.
e Efface le numéro de téléphone composé.
r Revient à l'écran précédent.
t Affiche les numéros de téléphone appelés et reçus.
Si vous avez enregistré le numéro de téléphone
dans le répertoire téléphonique, le nom du
correspondant appelé s'affiche.
y Affiche l'état de la connexion avec le téléphone
portable.
Blanc : Le téléphone portable est connecté.
Orange : Le téléphone portable n'est pas connecté,
ou il se trouve hors de portée du service.
• Pour des raisons de sécurité, certaines fonctions
sont désactivées lorsque votre véhicule est en
mouvement. Les touches associées aux fonctions
désactivées deviennent inefficaces si on les presse.
• Lorsque l'écran de commande mains libres apparaît,
le nom du téléphone portable connecté s'affiche
pendant 5 secondes.
• * Comme le nombre d'étapes de l'appareil de
commande est différent de celui du téléphone
portable, les états affichés sur l'appareil de
commande peuvent varier de ceux affichés sur le
téléphone portable. Aucun état ne s'affiche si les
informations sont inaccessibles.
• Régler le téléphone portable en mode privé peut
désactiver la fonction mains libres.
Français
B64-3480-00_01_E.indb 32
06.10.4 6:16:13 PM
Télécommande
Opération des touches
17
18
19
24
20
25
21
26
SRC
22
27
28
23
u Touche [SRC]
Pendant un appel : Met fin à l'appel.
i Touche [*] (Quand f est réglé sur "AUD")
Entrée de numérotation : Entre "+".
o Touche [FM+] (Quand f est réglé sur "AUD")
Entrée de numérotation : Entre "#".
; Touche [AM-] (Quand f est réglé sur "AUD")
Entrée de numérotation : Entre "*".
a Touche [4] (Quand f est réglé sur "AUD")
Entrée de numérotation :
Efface le numéro de téléphone composé.
s Touches [0] à [9] (Quand f est réglé sur "AUD")
Entrée de numérotation : Entre un chiffre du
numéro de téléphone.
d Touche [DIRECT] (Quand f est réglé sur "AUD")
Effectuer un appel.
f Sélecteur de la télécommande
Basculer avec "AUD" durant la numérotation.
g Touche [5]/ [∞]
Pendant un appel : Ajuste le volume sonore.
h Touche [
]
Affiche l'écran de commande mains libres.
Lorsqu'un appel survient : Répond à l'appel.
j Touche [u]/ [d]
Pendant un appel : Ajuste le volume sonore.
k Touche [SRC]
Pendant un appel : Met fin à l'appel.
• Le niveau de volume sonore ajusté pendant un
appel prendra effet à partir de l'appel suivant.
• Augmenter le volume excessivement produira
vraisemblablement un écho. Si un écho survient,
baissez le volume le plus possible. L'écho augmente
proportionnellement au volume.
Français |
B64-3480-00_01_E.indb 33
33
06.10.4 6:16:15 PM
Commande de l'appareil mains libres (pour le récepteur avec moniteur)
Lors d'un appel entrant
Numérotation rapide
Quand vous recevez un appel, vous pouvez utiliser le
téléphone mains libres.
Vous pouvez enregistrer jusqu'à 3 numéros de
téléphone pour une numérotation rapide.
1
Pour enregistrer un numéro de téléphone :
Répondre à un appel
1
Voir <Appels à partir du répertoire téléphonique>
(page 35), <Refaire un numéro> (page 36) et <Pendant
la numérotation> (page 34).
Quand vous recevez un appel, l'écran de commande
mains libres apparaît automatiquement.
2
Mettre fin à l'appel
Afficher un numéro de téléphone que vous
souhaitez enregistrer
2
Enregistrer le numéro de téléphone
P1
L'écran précédent réapparaît.
—
P3
Continuez à appuyer pendant plus de 2 secondes.
Pendant la numérotation
Pour appeler un numéro de téléphone à partir de
la mémoire :
Effectuer un appel en composant un numéro de
téléphone.
1
1
Rappeler le numéro de téléphone
Composer un numéro de téléphone
P1
+
2
9
—
0
,
*
—
P3
,
,
#
2
Effectuer un appel
Effectuer un appel
Vous pouvez commencer la conversation lorsque le
correspondant vous répond.
• Seuls les numéros de téléphone peuvent être
enregistrés pour la numérotation rapide. Ainsi, le
nom du correspondant et les autres ne sont pas
affichés pendant la numérotation.
• Pour effacer une numérotation erronée, appuyez
sur Clear .
3
Mettre fin à l'appel
L'écran précédent réapparaît.
• Vous pouvez entrer 32 chiffres au maximum.
34 |
Français
B64-3480-00_01_E.indb 34
06.10.4 6:16:16 PM
Appeler à partir du répertoire
téléphonique
3
Vous pouvez appeler quelqu'un en utilisant son
numéro de téléphone qui est enregistré dans le
répertoire téléphonique.
1
Sélectionner le destinataire que vous
souhaitez appeler
Name
Afficher l'écran du répertoire téléphonique
4
Confirmer le destinataire
OK
L'écran des entrées initiales apparaît.
L'écran de commande mains libres apparaît à nouveau.
Les données du destinataire sélectionné sont affichées.
Ecran des entrées initiales
5
AUTO
Phone Book L i s t
Effectuer un appel
2
1
1
a
b
c
d
e
f
h
i
j
k
l
m
n
o
p
q
r
s
t
u
v
w
x
y
z
g
Vous pouvez commencer la conversation lorsque le
correspondant vous répond.
3
Return
6
Mettre fin à l'appel
1 Faites défiler l'affichage du tableau des caractères.
2 Affichez le répertoire téléphonique en commençant
par le nom dont vous avez introduit la première
lettre.
3 Revient à l'écran de commande mains libres.
2
Sélectionner dans la mémoire le caractère de
début correspondant à un nom de personne
a
etc.
La liste du répertoire téléphonique apparaît.
Ecran de la liste du répertoire téléphonique
Phone Book L i s t
AUTO
1234567890
2
1
Name
L'écran précédent réapparaît.
• Pour utiliser le répertoire téléphonique, celui-ci doit
avoir été téléchargé à partir du téléphone portable.
Pour plus de détails, voir <Téléchargement du
répertoire téléphonique> (page 25).
• Jusqu'à 16 caractères peuvent être affichés pour
chaque nom dans le répertoire téléphonique.
• Les premières lettres qui ne correspondent pas au
nom ne seront pas affichées.
• Pendant la recherche, un caractère non accentué
tel que "u" est recherché plutôt qu'un caractère
accentué tel que "ü".
Name
1
Name
Name
3
4
OK
Return
1 Faites défiler la liste.
2 Entrez la nom du destinataire.
3 Entrez les données du destinataire et revenez à
l'écran de commande mains libres.
4 Revenez à l'écran de commande mains libres.
Français |
B64-3480-00_01_E.indb 35
35
06.10.4 6:16:18 PM
Commande de l'appareil mains libres (pour le récepteur avec moniteur)
Refaire un numéro
5
Mettre fin à l'appel
Vous pouvez recomposer un des 10 derniers numéros
de téléphone que vous avez appelés ou reçus.
1
Afficher l'écran de recherche des appels
sortants ou des appels entrants
L'écran précédent réapparaît.
Appels sortants
ou
• L'écran de liste des appels sortants ou celui de
liste des appels entrants montre la liste des appels
provenant ou reçus par cet appareil. Il ne s'agit pas
de ceux stockées dans la mémoire du téléphone
portable.
Appels entrants
L'écran de la liste des appels sortants ou des appels
entrants apparaît.
Ecran des appels sortants ou des appels entrants
Incoming Calls
2
Configuration du téléphone mains
libres
AUTO
Kenwood
1234567890
Le système mains libres peut être réglé comme suit.
Kenwood
1234567890
Kenwood
1234567890
3
DISP
4
1
Kenwood
1234567890
OK
1
Kenwood
1234567890
Return
S e t Up
5
Ecran de configuration mains libres
1 Faites défiler la liste.
2 Entrez le nom du destinataire.
3 Changez pour enregistrer une liste de rappels.
4 Entrez les données du destinataire et revenez à
l'écran de commande mains libres.
5 Revenez à l'écran de commande mains libres.
2
Hands Free Set Up
Au t o A n s w e r i n g
1
8
P h o n e Vo i c e
2
F-Right
Beep
On
4 S
Se
e ll e
ec
c tt
Sélectionner le destinataire que vous
souhaitez appeler
5
AUTO
1
2
3
D
Seelleetcet
6
Return
1 Règle le temps de réponse automatique après la fin
3
Confirmer le destinataire
OK
L'écran de commande mains libres apparaît à nouveau.
Les données du destinataire sélectionné sont affichées.
4
Effectuer un appel
Vous pouvez commencer la conversation lorsque le
correspondant vous répond.
36 |
d'un appel. ( "8")
"Off":
Cette fonction ne marche pas.
"0-99": Réglez un temps de sonnerie d'appel (en
secondes).
2 Réglez une position de sortie de tonalité d'appel.
( "F-Right")
"F-Left":
La tonalité sort du haut-parleur avant
gauche.
"F-Right":
La tonalité sort du haut-parleur avant
droit.
"Front All": La tonalité sort des deux hautparleurs frontaux.
3 Réglez le bip de l'appel entrant. ( "On")
"On":
Le bip est émis.
"Off":
Le bip est annulé.
4 Affichez l'écran de sélection du téléphone.
5 Affichez l'écran d'effacement du téléphone.
6 Revenez à l'écran de commande mains libres.
Français
B64-3480-00_01_E.indb 36
06.10.4 6:16:19 PM
Effacement du téléphone mains libres
• Du délai de réponse automatique réglé sur cet
appareil ou du temporisateur réglé sur le téléphone
portable, celui qui est le plus court prend effet.
• Sélectionnez le haut-parleur le plus éloigné du
microphone pour éviter les ronronnements
acoustiques ou échos.
Vous pouvez annuler l'enregistrement du téléphone
mains libres.
1
S e t Up
2
Sélection d'un téléphone mains libres
Afficher l'écran de configuration mains libres
Afficher la liste d'effacement de téléphone
Vous pouvez choisir le téléphone mains libres à partir
de la liste.
1
D
Seelleetcet
Afficher l'écran de configuration mains libres
Ecran d'effacement de téléphone
Phone Delete
1
S e t Up
AUTO
Kenwood 1
Kenwood 2
2
Afficher la liste de sélection de téléphone
Kenwood 3
Kenwood 4
S
Se
e ll e
ec
c tt
Kenwood 5
Ecran de sélection de téléphone
Phone Select
1
Return
2
1 Sélectionnez le téléphone portable à effacer de la
liste.
AUTO
2 Revenez à l'écran de configuration mains libres.
Kenwood 1
3
Kenwood 2
Kenwood 3
Sélectionner un téléphone mains libres que
vous souhaitez effacer
Kenwood 4
Kenwood 5
Return
2
Kenwood 3
1 Sélectionnez le téléphone portable à utiliser
comme téléphone mains libres.
2 Revenez à l'écran de configuration mains libres.
3
Sélectionner le téléphone mains libres que
vous souhaitez utiliser
• Le répertoire téléphonique, la liste des appels
sortants, et la liste des appels entrants sont effacés
en même temps que le téléphone mains libres
effacé.
Kenwood 1
Français |
B64-3480-00_01_E.indb 37
37
06.10.4 6:16:21 PM
Accessoires/ Procédure d'installation
Pour une bonne réception
Pour assurer une bonne réception, prenez note de ce
qui suit :
Accessoires
1
3 m ..........1
2
..........2
3
..........1
Procédure d’installation
1. Pour éviter les courts-circuits, retirez la clef de
contact et déconnectez la borne - de la batterie.
2. Réglez l'interrupteur de la fonction de conversion
d'affichage des caractères.
3. Effectuez correctement la connexion des câbles de
sortie et d'entrée de chaque appareil.
4. Installez l’appareil dans votre véhicule.
5. Reconnectez la borne - de la batterie.
6. Appuyez sur la touche de réinitialisation sur l'unité
de commande.
• Isolez les câbles non-connectés avec un ruban de vinyle ou
d'un autre matériau similaire. Pour éviter les courts-circuits,
ne retirez pas non plus les capuchons à l’extrémité des
câbles non-connectés ou des prises.
• Après avoir installé l’appareil, vérifiez si les lampes de
frein, les indicateurs, les clignotants, etc. de la voiture
fonctionnent correctement.
38 |
• Communiquer avec le téléphone portable dans un rayon
de 10 m. La portée de communication devient plus
courte selon l'environnement ambiant. La portée de
communication se réduit aussi quand il existe un obstacle
entre cet appareil et le téléphone portable. La portée
de communication maximum ci-dessus (10 m) n'est pas
toujours assurée.
• Gardez cet appareil à l'écart d'autres composants
électriques (composants audio-vidéo) aussi loin que
possible. S'ils sont à proximité, la connexion d'appel peut
échouer, le bruit TV ou de la radio peut être produit, ou une
mauvaise réception peut survenir.
• Une station de diffusion ou un talkie-walkie situé à
proximité peut interférer avec les communications (signal
trop fort).
Affichage de la fonction de conversion de
caractères
Si l'appareil de commande ne peut pas afficher
les caractères accentués tels que "ü" et "ä", réglez
l'affichage de la fonction de conversion de caractères
sur "2" pour les convertir en "U" et "A".
Lorsqu'un des appareils de commande suivants est
connecté, réglez l'interrupteur sur "2". (En septembre
2006)
KDV-5234, KDC-W6534U, KDC-W5534U, DPX501U
1 2
Tableau de conversion
Conversion des caractères
A:
À, à, Á, á, Ã, ã, Ä, ä, Â, â, Å, å
C:
Ç, ç
D:
Ð, ð
E:
È, è, É, é, Ê, ê, Ë, ë
I:
Ì, ì, Í, í, Î, î, Ï, ï
N:
Ñ, ñ
O:
Ò, ò, Ó, ó, Ô, ô, Õ, õ, Ö, ö, Ø, ø
S:
ß
U:
Ù, ù, Ú, ú, Û, û, Ü, ü
X:
×
Y:
Ý, ý, ÿ
Français
B64-3480-00_01_E.indb 38
06.10.4 6:16:22 PM
Connexion
Accessoire 1 (3 m)
Boîtier mains libres
Unité de commande
TO HEAD UNIT
Entrée de changeur de
disque
MIC
TO 5L I/F
1
2
(1,5 m)
Affichage de l'interrupteur de
conversion de caractères
Pour la méthode d'exploitation se
reporter sur <Affichage de la fonction
de conversion de caractères> (page 38).
Câble de connexion (fourni avec le
changeur de disque)
Changeur de disque
Prise du dispositif externe
Les éléments vendus séparément tels qu'un changeur de
disque et KCA-iP500 peuvent y être raccordés. Pour les appareils
raccordables, reportez-vous au manuel d'instruction qui
accompagne votre appareil de commande.
Si vous voulez raccorder le KCA-S220A
Raccordez le boîtier mains libres au terminal portant la mention TO CHANGER 2.
Appareil de commande
KCA-S220A
TO HEAD UNIT
TO CHANGER 1
Boîtier mains libres
TO CHANGER 2
TO HEAD UNIT
TO 5L I/F
Changeur de disque
• Veuillez conserver à une longueur de 13 m ou moins l'extension du câble de commande de l'appareil de commande vers le
changeur de disque. Les câbles de commande dépassant une longueur de 13 m cesseront de fonctionner correctement.
Français |
B64-3480-00_01_E.indb 39
39
06.10.4 6:16:23 PM
Installation
Installation du boîtier mains libres
Installation de l'unité du microphone
1 Vérifiez de l'emplacement de l'installation du
• Déterminez l'emplacement d'installation après vous être
assuré que l'appareil communique bien avec le téléphone
portable.
• Veuillez ne pas installer l'appareil près du tableau de bord,
de la plage arrière, ou d'autres composants importants.
Ceci peut engendrer des blessures ou accidents si l'appareil
s'arrête à cause d'un choc et frappe une personne ou un
composant important. Des vis autotaraudeuses doivent être
utilisées pour l'installation. (Une fixation avec des bandes
velcro, bien que facile à installer, peut se détacher suite à
une choc.)
microphone (accessoire 1).
2 Retirez la graisse et autres saletés de la surface
d'installation.
3 Installez le microphone.
4 Reliez le câble du microphone au boîtier mains
libres en le fixant en plusieurs points à l'aide
d'adhésifs ou autres.
Fixation à l'appareil audio
Accessoire2 (Ø4 × 16 mm)
Partie de l'antenne
Fixez un câble avec un élément
adhésif courant.
Fixation sur la moquette
Partie de l'antenne
Accessoire 3
Détachez la pellicule papier du ruban adhésif double-face
pour fixer à l'endroit indiqué dans l'exemple de gauche.
Ajustez l'orientation du microphone vers le chauffeur.
• Ne collez pas la bande velcro sur le numéro de série.
• Si on risque de marcher sur l'emplacement de l'installation,
coupez la bande velcro en deux et collez les morceaux aux
deux endroits indiqués.
40 |
Français
B64-3480-00_01_E.indb 40
06.10.4 6:16:24 PM
Guide de dépannage
Ce qui semblerait être un dysfonctionnement de votre
appareil n'est peut-être que le résultat d'une mauvaise
manipulation ou d'un câblage erroné. Avant d’appeler
un centre de service, vérifiez d’abord dans le tableau
suivant les problèmes possibles.
?
Le volume de la conversation est bas.
✔ Le volume de la conversation mains libres est réglé
sur un niveau bas.
☞ Le volume de la conversation mains libres peut
être ajusté indépendamment. Ajustez-le pendant
la conversation mains libres.
?
Aucun son ne sort des haut-parleurs arrière.
✔ Vous parlez en mode de conversation mains libres.
☞ Aucun son ne sort des haut-parleurs arrières en
mode de conversation mains libres.
?
On n'entend aucun bip à l'arrivée d'un appel
entrant.
✔ On entend le bip selon le type de votre téléphone
portable.
☞ Sélectionner "Call Beep: ON" ou "C-BP ON"
(page 31), ou "Beep On" (page 36) vous permet
d'entendre le bip.
?
Des caractères d'un nom manquent.
✔ L'unité de commande ne peut pas afficher les
caractères accentués.
☞ Réglez le bouton de fonction de conversion
d'affichage de caractères sur "2" (page 38).
?
Le nom du téléphone portable ne s'affiche pas.
✔ Lors de l'enregistrement d'un téléphone portable,
il se peut que l'adresse s'affiche au lieu du nom du
téléphone portable.
☞ Désactivez et activez à nouveau l'alimentation
de l'unité de commande. Le nom du téléphone
portable connecté s'affichera.
Les messages ci-dessous indiquent l’état
de votre système.
No Number/ NO-NMBER/ Incoming No Number :
• L'appelant ne précise pas d'identification.
• Il n'y a pas de données de numéros de téléphone.
No Data/ NO DATA :
• Il n'y a pas de liste des appels sortants.
• Il n'y a pas de liste des appels entrants.
No Entry/ NO ENTRY :
Le téléphone portable n'a pas été enregistré (pairage).
Disconnect/ DISCONCT/ Non Connection/ Disconnected :
L'appareil ne peut pas communiquer avec le téléphone
portable.
Connect/ CONNECT :
L'appareil peut communiquer avec le téléphone portable.
HF Error 07/ HF ERR07:
On ne peut pas ouvrir la mémoire.
\ Désactivez et activez à nouveau l'alimentation. Si ce
message continue d'apparaître, appuyez sur la touche
de réinitialisation de l'appareil de commande.
HF Error 68/ HF ERR68:
L'appareil ne peut pas communiquer avec le téléphone
portable.
\ Désactivez et activez à nouveau l'alimentation. Si ce
message continue d'apparaître, appuyez sur la touche
de réinitialisation de l'appareil de commande.
Caractéristiques techniques
Les spécifications sont sujettes à changements sans notification.
Section Bluetooth
Technologie
: Certifiée Bluetooth 1.2
Fréquence
: 2,402 – 2,480 GHz
Puissance de sortie
: +4dBm (MAX), 0dBm (AVE) Classe d'énergie 2
Généralités
Tension de fonctionnement (entre 11 et 16V)
: 14,4 V
Consommation de courant
: 0,2 A
Dimensions (W × H × D)
: 95 × 30 × 105 mm
Poids
: 0,35 kg
Français |
B64-3480-00_01_E.indb 41
41
06.10.4 6:16:25 PM
Inhalt
Sicherheitshinweise
Hinweise
43
44
Einrichten der Bluetooth-Funktion 45
Vorbereitungen
Anmelden Ihres Mobiltelefons
Übertragen des Telefonbuchs
Steuerung der
Freisprecheinrichtung
Steuerbildschirm der
Freisprecheinrichtung
Fernsteuerung
Tastenbedienung
Bei eingehendem Anruf
Beim Wählen
Kurzwahl
Anrufen über das Telefonbuch
Wahlwiederholung
Einrichten des Telefons mit
Freisprecheinrichtung
Auswählen eines Telefons mit
Freisprecheinrichtung
Löschen des Telefons für die
Freisprecheinrichtung
45
45
45
52
52
53
53
54
54
54
55
56
56
57
57
Allgemeine Funktionen
46
Annehmen eines Anrufs
Umschalten in den privaten Modus
Löschen der Verbindungsende-Nachricht
Anpassen der Sprachlautstärke während
eines Anrufs
Trennen eines Gesprächs
Umschalten zwischen den Anzeigemodi
Wählmethode
46
46
46
46
46
46
47
Auswählen des Wählmodus
Machen Sie einen Anruf durch
Eingabe einer Telefonnummer
Wählen über die Kurzwahlfunktion
Eintragen der Kurzwahlnummernliste
Wählen über das Telefonbuch
Wählen über die Wahlwiederholungsliste
Wählen über die Anruferliste
Fernsteuerung
47
47
47
48
48
48
49
49
Funktionen der Tasten
49
Menü-Steuerung
50
Menü-Steuerung
Wählen Sie das zu verbindende
Mobiltelefon
Löschen eines angemeldeten
Mobiltelefons
Anzeigen des Mobiltelefon-Status
Einstellen des Zeitintervalls für die
automatische Antwort
Einstellen der Lautsprecher für die
Sprachausgabe
Einstellen des Tonsignals für eingehende
Anrufe
50
50
50
50
51
51
51
Zubehör/Hinweise zum Einbau 58
Verbindung
59
Einbau
60
Fehlersuche
61
Technische Daten
61
42 |
Die Wortmarke Bluetooth und die Logos
sind Eigentum von Bluetooth SIG, Inc. und
jede Verwendung dieser Marken durch die
Kenwood Corporation erfolgt unter Lizenz.
Andere Warenzeichen und Handelsmarken sind
Eigentum der jeweiligen Inhaber.
Deutsch
B64-3480-00_01_E.indb 42
06.10.4 6:16:26 PM
Sicherheitshinweise
2WARNUNG
Zur Vermeidung von Bränden und
Verletzungen beachten Sie bitte die
folgenden Hinweise:
• Stellen Sie sicher, dass keine Metallgegenstände
(Münzen, Werkzeuge usw.) ins Innere des Geräts
gelangen und Kurzschlüsse verursachen.
• Die Montage sowie die Verkabelung dieses Gerätes
macht besondere Fähigkeiten und Erfahrung
erforderlich. Überlassen Sie die Arbeiten zur
Montage und Verkabelung ausgewiesenem
Fachpersonal.
Bij deze verklaat Kenwood dat deze KCA-BT100 voldoet aan de essentiële eisen
en aan de overige relevante bepalingen van Richtlijn 1999/5/EC.
Italiano
Con la presente Kenwood dichiara che questo KCA-BT100 è conforme ai requisiti
essenziali ed alle altre disposizioni pertinenti stabilite dalla direttiva 1999/5/CE.
Español
Por medio de la presente Kenwood declara que el KCA-BT100 cumple con los
requisitos esenciales y cualesquiera otras disposiciones aplicables o exigibles de
la Directiva 1999/5/CE.
Português
Kenwood declara que este KCA-BT100 está conforme com os requisitos
essenciais e outras disposições da Directiva 1999/5/CE.
Polska
Kenwood niniejszym oświadcza, że KCA-BT100 spełnia zasadnicze wymogi oraz
inne istotne postanowienia dyrektywy 1999/5/EC.
Český
2ACHTUNG
Kenwood timto prohlasuje, ze KCA-BT100 je ve shode se zakladnimi pozadavky
a s dalsimi prislusnymi ustanoveni Narizeni vlady c. 426/2000 Sb.
Bitte beachten Sie folgende
Vorsichtsmaßnahmen, damit Ihr Gerät stets
einwandfrei funktioniert:
Magyar
• Stellen Sie das Gerät nicht an Orten auf, an denen
es direktem Sonnenlicht, übermäßiger Hitze oder
Feuchtigkeit ausgesetzt ist. Schützen Sie beides
darüber hinaus vor Staub und Spritzwasser.
Svenska
Alulírott, Kenwood, kijelenti, hogy a jelen KCA-BT100 megfelel az 1999/5/EC
irányelvben meghatározott alapvető követelményeknek és egyéb vonatkozó
előírásoknak.
Härmed intygar Kenwood att denna KCA-BT100 stär l överensstämelse med de
väsentliga egenskapskrav och övriga relevanta bestämmelser som framgår av
direktiv 1999/5/EG.
Suomi
Konformitätserklärung in Bezug auf die
R&TTE-Vorschrift 1999/5/EG
Hersteller:
Kenwood Corporation
2967-3 Ishikawa-machi, Hachioji-shi, Tokyo, 192-8525 Japan
EU-Vertreter:
Kenwood Electronics Europe BV
Amsterdamseweg 37, 1422 AC UITHOORN, Niederlande
Kenwood vakuuttaa täten että KCA-BT100 tyyppinen laite on direktiivin
1999/5/EY oleellisten vaatimusten ja sitä koskevien direktiivin muiden ehtojen
mukainen.
Slovensko
S tem Kenwood izjavlja, da je ta KCA-BT100 v skladu z osnovnimi zahtevami in
ostalimi ustreznimi predpisi Direktive 1999/5/EC.
Slovensky
Spoločnosť Kenwood týmto vyhlasuje, že KCA-BT100 spĺňa zákldné požiadavky
a ďalšie prislušné ustanovenia Direktĺvy 1999/5/EC.
Dansk
Undertegnede Kenwood erklærer harved, at følgende udstyr KCA-BT100
overholder de væsentlige krav og øvrige relevante krav i direktiv 1999/5/EF.
Ελληνικά
English
Hereby, Kenwood declares that this unit KCA-BT100 is in compliance with the
essential requirements and other relevant provisions of Directive 1999/5/EC.
Français
Par la présente Kenwood déclare que l’appareil KCA-BT100 est conforme aux
exigences essentielles et aux autres dispositions pertinentes de la directive
1999/5/CE.
Par la présente, Kenwood déclare que ce KCA-BT100 est conforme aux
exigences essentielles et aux autres dispositions de la directive 1999/5/CE qui
lui sont applicables.
Deutsch
Hiermit erklärt Kenwood, dass sich dieser KCA-BT100 in Übereinstimmung mit
den grundlegenden Anforderungen und den anderen relevanten Vorschriften
der Richtlinie 1999/5/EG befindet. (BMWi)
Hiermit erklärt Kenwood die Übereinstimmung des Gerätes KCA-BT100 mit den
grundlegenden Anforderungen und den anderen relevanten Festlegungen der
Richitlinie 1999/5/EG. (Wien)
Nederlands
Hierbij verklaart Kenwood dat het toestel KCA-BT100 in overeenstemming is
met de essentiële eisen en de andere relevante bepalingen van richtlijn 1999/5/
EG.
B64-3480-00_01_E.indb 43
ΜΕ ΤΗΝ ΠΑΡΟΥΣΑ Kenwood ΔΗΛΩΝΕΙ ΟΤΙ KCA-BT100 ΣΥΜΜΟΡΦΩΝΕΤΑΙ ΠΡΟΣ
ΤΙΣ ΟΥΣΙΩΔΕΙΣ ΑΠΑΙΤΗΣΕΙΣ ΚΑΙ ΤΙΣ ΛΟΙΠΕΣ ΣΧΕΤΙΚΕΣ ΔΙΑΤΑΞΕΙΣ ΤΗΣ ΟΔΗΓΙΑΣ
1999/5/EK.
Eesti
Sellega kinnitab Kenwood, et see KCA-BT100 vastab direktiivi 1999/5/EC
põhilistele nõudmistele ja muudele asjakohastele määrustele.
Latviešu
Ar šo, Kenwood, apstiprina, ka KCA-BT100 atbilst Direktīvas 1999/5/EK
galvenajām prasībām un citiem tās nosacījumiem.
Lietuviškai
Šiuo, Kenwood, pareiškia, kad šis KCA-BT100 atitinka pagrindinius Direktyvos
1999/5/EB reikalavimus ir kitas svarbias nuostatas.
Malti
Hawnhekk, Kenwood, jiddikjara li dan KCA-BT100 jikkonforma mal-ħtiġijiet
essenzjali u ma provvedimenti oħrajn relevanti li hemm fid-Dirrettiva 1999/5/
EC.
Українська
Компанія Kenwood заявляє, що цей виріб KCA-BT100 відповідає ключовим
вимогам та іншим пов’язаним положенням Директиви 1999/5/EC.
Deutsch |
43
06.10.4 6:16:27 PM
Hinweise
• Sollten Sie Probleme bei der Installation des Geräts
haben, lassen Sie sich bitte von Ihrem KenwoodFachhändler beraten.
• Lassen Sie sich beim Kauf von optionalem
Zubehör von Ihrem Kenwood-Händler beraten um
sicherzustellen, dass das Zubehör von Ihrem Modell
und in Ihrem Bereich unterstützt wird.
• Die in dieser Bedienungsanleitung dargestellten
Abbildungen des Displays und der Frontblende
dienen lediglich der Veranschaulichung der
vielseitigen Einstellmöglichkeiten Ihres Geräts. Daher
kann die Darstellung auf den Abbildungen von
der tatsächlichen Anzeige auf dem Gerätedisplay
abweichen und manche Symbole auf dem Display
sind eventuell nicht zutreffend.
Für dieses Gerät erhältliche KenwoodReceiver
Mit dem KCA-BT100 können folgende Receiver
verwendet werden: (Stand September 2006)
Audio-Receiver
DPX501U*, DPX701U, KDC-W5534U*,
KDC-W6534U*, KDC-W7534U, KDV-5234*
Monitor-Receiver
DDX6029
Details zu neu erscheinenden kompatiblen Receivern
finden Sie unter der folgenden URL:
http://www.kenwood.com/bt/bt100/
• *: Bringen Sie den Schalter für die Display-ZeichenKonvertierungsfunktion in Stellung "2". Weitere
Einzelheiten finden Sie unter <Display-ZeichenKonvertierungsfunktion> (Seite 58).
Die Fernbedienung
Der Audio-Receiver benötigt eine Fernbedienung
mit Zifferntasten zur direkten Eingabe von
Telefonnummern.
Um einen Anruf über die Fernbedienung zu
machen, muss auf der Fernbedienung die Taste [ ]
vorhanden sein. Weitere Einzelheiten finden Sie unter
der folgenden URL:
http://www.kenwood.com/bt/bt100/
• Je nach Typ Ihres Steuergeräts können Sie eventuell keine
Fernbedienung verwenden.
Über das Mobiltelefon
Dieses Gerät entspricht den folgenden BluetoothSpezifikationen:
Version
Bluetooth Standard Ver. 1.2
Profil
HFP (Hands Free Profile)
OPP (Object Push Profile)
44 |
Angaben zu Mobiltelefonen mit überprüfter
Kompatibilität finden Sie unter der folgenden URL:
http://www.kenwood.com/bt/bt100/
• Die Geräte mit Bluetooth-Unterstützung wurden gemäß
den Vorschriften der Bluetooth SIG auf Konformität mit
dem Bluetooth-Standard zertifiziert. Je nach dem Typ Ihres
Mobiltelefons kann es trotzdem sein, dass diese Geräte
nicht mit diesem kommunizieren können.
• HFP ist ein Profil, das für Anrufe über
Freisprecheinrichtungen verwendet wird.
• OPP ist ein Profil, das zur Übertragung von Daten wie z. B.
Telefonbüchern zwischen Geräten verwendet wird.
Dieses Produkt wird weder vom Hersteller eines
Fahrzeugs während der Produktion noch von einem
professionellen Importeur eines Fahrzeugs in einen
EU-Mitgliedsstaat eingebaut.
Entsorgung von gebrauchten elektrischen
und elektronischen Geräten (anzuwenden
in den Ländern der Europäischen Union und
anderen europäischen Ländern mit einem
separaten Sammelsystem für solche Geräte)
Das Symbol (durchgestrichene Mülltonne)
auf dem Produkt oder seiner Verpackung
weist darauf hin, dass dieses Produkt
nicht als normaler Haushaltsabfall
behandelt werden darf, sondern an einer
Annahmestelle für das Recycling von
elektrischen und elektronischen Geräten
abgegeben werden muss. Durch Ihren
Beitrag zur korrekten Entsorgung dieses
Produktes schützen Sie die Umwelt und
die Gesundheit Ihrer Mitmenschen.
Unsachgemässe oder falsche Entsorgung
gefährden Umwelt und Gesundheit.
Weitere Informationen über das Recycling
dieses Produktes erhalten Sie von Ihrer
Gemeinde oder den kommunalen
Entsorgungsbetrieben.
Hinweis zur Entsorgung der Batterien :
Verbrauchte Batterien dürfen nach der
Batterieverordnung nicht mehr mit dem
Hausmüll entsorgt werden. Kenwood
beteiligt sich daher am „Gemeinsamen
Rücknahmesystem Batterien“ (GRS
Batterien).
Werfen Sie verbrauchte Batterien
unentgeltlich in die beim Handel
aufgestellten Sammelbehälter. Auch
bei Ihrem Fachhändler finden Sie
einen Sammelbehälter für verbrauchte
Batterien.
Auch Batterien, die in Geräten fest
eingebaut sind, unterliegen diesen
gesetzlichen Vorschriften.
Deutsch
B64-3480-00_01_E.indb 44
06.10.4 6:16:27 PM
Einrichten der Bluetooth-Funktion
Vorbereitungen
• Bevor Sie Ihr Mobiltelefon mit diesem Gerät
verwenden, müssen Sie es anmelden. Weitere
Einzelheiten finden Sie unter <Anmelden Ihres
Mobiltelefons> (Seite 45).
• Wenn Sie zwei oder mehr Mobiltelefone
angemeldet haben, müssen Sie eines auswählen.
Weitere Einzelheiten finden Sie unter <Wählen
Sie das zu verbindende Mobiltelefon> (Seite
50) oder <Auswählen eines Telefons mit
Freisprecheinrichtung> (Seite 57).
• Um das Telefonbuch zu verwenden, muss dies zuvor
in das Gerät übertragen werden. Einzelheiten finden
Sie unter <Übertragen des Telefonbuchs> (Seite 45).
• Sie können den Lautsprecher für die Sprachausgabe
einrichten. Weitere Einzelheiten finden Sie
unter <Einrichten der Lautsprecher für die
Sprachausgabe> (Seite 51) oder <Einrichten des
Telefons mit Freisprecheinrichtung> (Seite 56).
Anmelden Ihres Mobiltelefons
Damit Sie Ihr Mobiltelefon zusammen mit diesem
Gerät verwenden können, müssen Sie es anmelden
(pairing). Sie können bis zu fünf Mobiltelefone an
diesem Gerät anmelden.
1 Schalten Sie das Steuergerät ein.
2 Starten Sie die Mobiltelefon-Anmeldung auf
dem Mobiltelefon
Verwenden Sie die Bedienelemente des
Mobiltelefons, um die Anmeldung (pairing) für die
Freisprecheinrichtung durchzuführen. Wählen Sie in
der Liste der verbundenen Geräte den Eintrag "KCABT100".
3 Geben Sie einen Path Key ein
Geben Sie "1234" als Path Key ein.
Überprüfen Sie, ob die Anmeldung auf dem
Mobiltelefon abgeschlossen ist.
4 Verwenden Sie die Bedienelemente des
Mobiltelefons, um die Verbindung zur
Freisprecheinrichtung zu starten.
• Informationen zum Bedienen des Mobiltelefons finden Sie
in der Bedienungsanleitung des Mobiltelefons.
• Sie können bis zu 5 Mobiltelefone anmelden. Bei
Anmeldung des sechsten Mobiltelefons wird das zuletzt
angemeldete Mobiltelefon gelöscht.
• Sie können kein Mobiltelefon anmelden, während
ein anderes Mobiltelefon eine Verbindung zur
Freisprecheinrichtung aufgebaut hat. Beenden Sie die
Verbindung zur Freisprecheinrichtung und melden Sie
dann das neue Mobiltelefon an.
• Wenn in der Liste der verbundenen Geräte der Eintrag
"KCA-BT100" mehr als einmal erscheint, ist offenbar in
unmittelbarer Nähe ein weiteres "KCA-BT100" in Gebrauch.
Fahren Sie Ihren Wagen ein Stück weiter und achten Sie
darauf, dass der Eintrag "KCA-BT100" nur einmal erscheint.
Übertragen des Telefonbuchs
Übertragen Sie die Daten des Telefonbuchs aus dem
Mobiltelefon in das Gerät, damit Sie das Telefonbuch
im Gerät verwenden können.
1 Verwenden Sie die Bedienelemente des
Mobiltelefons, um die Verbindung zur
Freisprecheinrichtung zu beenden.
2 Verwenden Sie die Bedienelemente des
Mobiltelefons, um die Telefonbuchdaten an
das Gerät zu senden
Verwenden Sie die Bedienelemente des Mobiltelefons,
um die Telefonbuchdaten an das Gerät zu übertragen.
Während der Übertragung:
erscheint die Anzeige "Downloading", "DOWNLOAD"
oder "Now Downloading…".
Nach dem Abschluss der Übertragung
(Audio-Receiver):
erscheint die Anzeige "Complete", "Completed" oder
"COMPLETE".
3 Verwenden Sie die Bedienelemente des
Mobiltelefons, um die Verbindung zur
Freisprecheinrichtung zu starten.
So löschen Sie die Meldung über den Abschluss
der Übertragung (Audio-Receiver):
Drücken Sie eine beliebige Taste.
• Informationen zum Bedienen des Mobiltelefons finden Sie
in der Bedienungsanleitung des Mobiltelefons.
• Für jedes angemeldete Mobiltelefon können bis zu 300
Telefonnummern gespeichert werden.
• Für jede Telefonnummer können bis zu 32 Ziffern und bis
zu 40 Zeichen für den Namen gespeichert werden.
• Je nach Typ Ihres Mobiltelefons gelten eventuell folgende
Einschränkungen:
- Die Telefonbuchdaten können nicht normal übertragen
werden.
- Zeichen im Telefonbuch erscheinen verstümmelt.
- Die Telefonbuchdaten können nicht normal übertragen
werden, wenn es Bilder enthält. Es kann je nach
Gesamtgröße der Bilder mehrere Stunden bis zu einem
Tag dauern, das Telefonbuch zu übertragen.
• Verwenden Sie die Bedienelemente des Mobiltelefons, um
die Übertragung der Telefonbuchdaten abzubrechen.
Deutsch |
B64-3480-00_01_E.indb 45
45
06.10.4 6:16:28 PM
Allgemeine Funktionen (Audio-Receiver)
Annehmen eines Anrufs
Wenn in der Anzeige "CALL" oder "Call" erscheint, wird
auch "(Name des Anrufers)" oder "(Telefonnummer)"
angezeigt.
Drücken Sie die [AUDIO]-Taste oder eine der
Tasten [1] – [6].
Abweisen eines eingehenden Anrufs
Drücken Sie die [ATT]-Taste für mindestens 1
Sekunde.
• Sie können das Gerät so einstellen, dass der eingehende
Anruf nach Ablauf einer vorbestimmten Zeit angenommen
wird. Weitere Einzelheiten finden Sie unter <Einstellen des
Zeitintervalls für die automatische Antwort> (Seite 51).
• Durch Einlegen einer Disc, z. B. einer CD, wird das Gespräch
getrennt.
• Durch Einstellen des Mobiltelefons auf den privaten Modus
kann die Freisprechfunktion deaktiviert werden.
• Wenn ein Anruf ohne Anschlusskennung eingeht, erscheint
die Anzeige "No Name No Number", "No Number" oder
"NO-NMBER".
• Der Name des Anrufers wird angezeigt, wenn er bereits im
Telefonbuch eingetragen ist.
Umschalten in den privaten Modus
Sie können zwischen dem privaten Modus (direktes
Sprechen in das Mobiltelefon) und dem FreisprechModus umschalten.
Drücken Sie den Steuerknopf ([38]).
Die Gesprächsmodi werden wie folgt umgeschaltet:
Anzeige
Gesprächsmodus
"Private"/ "PRIVATE"/ "PV TALK"
Privates Gespräch
"Handsfree"/ – / "HF TALK"
Gespräch über die
Freisprecheinrichtung
• Je nach dem Typ Ihres Mobiltelefons kann durch
Umschalten in den privaten Gesprächsmodus die
Quelle ausgewählt werden, die vor dem Beginn der
Freisprechverbindung verwendet wurde. In diesem
Fall kann die Quelle über dieses Gerät nicht zurück auf
den Freisprech-Gesprächsmodus geschaltet werden.
Verwenden Sie die Bedienelemente Ihres Mobiltelefons, um
in den Freisprech-Gesprächsmodus zurück zu gelangen.
Löschen der Verbindungsende-Nachricht
Sie können die Nachricht löschen, die nach Ende der
Verbindung mit dem Mobiltelefon angezeigt wird.
Drücken Sie die [ATT]-Taste für mindestens 1
Sekunde.
Die Meldung "Disconnect" oder "DISCONCT"
verschwindet.
46 |
• Es kann eine Weile dauern, bis die Verbindung zum
getrennten Mobiltelefon neu aufgebaut wird.
Anpassen der Sprachlautstärke
während eines Anrufs
Sie können die Sprachlautstärke während eines
Anrufs anpassen.
Drehen Sie den [VOL]-Knopf.
• Die beim aktuellen Anruf vorgenommene Anpassung der
Lautstärke bleibt bei folgenden Anrufen erhalten.
• Durch zu hohe Einstellung der Lautstärke kommt es
häufiger zu Echoeffekten. Falls ein Echo auftritt, stellen
Sie die Lautstärke so niedrig wie möglich ein. Echoeffekte
verstärken sich proportional zur eingestellten Lautstärke.
Trennen eines Gesprächs
Drücken Sie die [SRC]-Taste.
• Sie können auch die [ATT]-Taste mindestens 1 Sekunde
gedrückt halten, um ein Gespräch zu beenden.
Umschalten zwischen den Anzeigemodi
Sie können zwischen Telefonbuch und Anruferliste
umschalten.
Drücken Sie die [DISP]/ [AUTO]/ [TI]-Taste.
Wenn keine [DISP]-Taste vorhanden ist, drücken Sie die
[AUTO]- oder [TI]-Taste.
Audio-Receiver mit Multi-Funktions-Key-System:
Drücken Sie die [AUTO]/ [TI]-Taste.
Mit dieser Taste schalten Sie zwischen der Namensliste
und der Telefonnummernliste um.
Bildlauf im Display
Sie können einen Bildlauf durch die Liste der
Telefonnummern oder Namen durchführen. Hinweise
zur Bedienung finden Sie unter <Text-/Titeldurchlauf>
in der Bedienungsanleitung des Steuergeräts.
• Wenn auf dem Steuergerät bei Eingang eines Anrufs oder
bei der Kurzwahl nur der Name des Anrufers angezeigt
wird, können Sie mit der oben beschriebenen Methode zur
Anzeige der Telefonnummer umschalten.
• Je nach Typ Ihres Steuergeräts gelten eventuell folgende
Einschränkungen:
- Bis zu 19 Zeichen können angezeigt werden.
- Das Zeichen # kann nicht angezeigt werden, oder "|"
(alle Segmente leuchten) wird anstelle von # angezeigt.
- Sie können nicht zwischen Anzeigemodi umschalten.
Deutsch
B64-3480-00_01_E.indb 46
06.10.4 6:16:29 PM
Wählmethode (Audio-Receiver)
Auswählen des Wählmodus
Es stehen fünf Wählmethoden zur Auswahl.
1 Rufen Sie den Auswahlmodus für die
Wählmethode auf
Drücken Sie die [ATT]-Taste für mindestens 1
Sekunde.
Die Anzeige "DIAL" oder "N-DIAL" erscheint.
2 Wählen Sie eine Wählmethode
Drücken Sie den Steuerknopf ([38]).
Durch Drücken dieser Taste erfolgt eine Umschaltung
zwischen den folgenden Wählmethoden:
Audio-Receiver mit Multi-Funktions-Key-System:
1 Drücken Sie die [NEXT]-Taste.
Wählen Sie den Abschnitt für die Tastenfunktion.
2 Drücken Sie die Taste [1] ("DIAL") – [4] ("INC").
Anzeige
Multi-Taste Wählmethode
"DIAL"/
[1] ("DIAL") Wählen durch Eingabe einer
"N-DIAL"
Telefonnummer. (Seite 47)
Wählen über die Kurzwahlfunktion.
(Seite 47)
"INITIAL"/ [2]
Wählen durch Suchen des
"PH-BOOK1" ("PHBK")* Anfangsbuchstabens im Telefonbuch.
(Seite 48)
"PH.BOOK"/ [2]
Wählen durch Durchsuchen des
"PH-BOOK2" ("PHBK")* Telefonbuchs in alphabetischer
Reihenfolge. (Seite 48)
"OUT"/
[3] ("OUT-C") Wählen unter Verwendung der
"OUT-CALL"
Wahlwiederholungsliste. (Seite 48)
"IN"/
[4] ("IN-C") Wählen unter Verwendung der
"IN-CALL"
Anruferliste. (Seite 49)
3 Verlassen Sie den Auswahlmodus für die
Wählmethode
Drücken Sie die [ATT]-Taste für mindestens 1
Sekunde.
• Damit Sie das Telefonbuch verwenden können,
müssen Sie es zuvor aus dem Mobiltelefon übertragen.
Weitere Einzelheiten finden Sie unter <Übertragen des
Telefonbuchs> (Seite 45).
• Die Wahlwiederholungsliste und die Anruferliste enthalten
die ausgehenden und eingehenden Anrufe auf diesem
Gerät. Es handelt sich nicht um die auf dem Mobiltelefon
gespeicherten Einträge.
• * Mit dem Multi-Funktions-Key-System schalten Sie mit
der Taste [2] ("PHBK") zwischen den Suchmethoden im
Telefonbuch um.
Funktion der Fernbedienung
Machen Sie einen Anruf durch
Eingabe einer Telefonnummer
1 Rufen Sie den Nummernwählmodus auf
Wählen Sie die Anzeige "DIAL" oder "N-DIAL".
Siehe <Auswählen des Wählmodus> (Seite 47).
2 Geben Sie eine Telefonnummer ein
Drücken Sie die Tasten ([1] – [0]), #([FM]),
*([AM]) oder +([¢]) auf der Fernbedienung.
3 Machen Sie einen Anruf
Drücken Sie die [DIRECT]-Taste auf der
Fernbedienung.
Die Anzeige "CALL" oder "Call" erscheint.
So löschen Sie die eingegebene Telefonnummer
ziffernweise:
Drücken Sie die [4]-Taste auf der
Fernbedienung.
• Sie können maximal 32 Ziffern eingeben.
• Je nach Typ Ihrer Fernbedienung wird "|" (alle Segmente
leuchten) anstelle des Zeichens # angezeigt.
Wählen über die Kurzwahlfunktion
Sie können den Anruf über die in der
Kurzwahlnummernliste eingetragenen
Rufnummern tätigen. Einzelheiten zum Einrichten
von Kurzwahlen finden Sie unter <Eintragen der
Kurzwahlnummernliste> (Seite 48).
1 Rufen Sie den Nummernwählmodus auf
Wählen Sie die Anzeige "DIAL" oder "N-DIAL".
Siehe <Auswählen des Wählmodus> (Seite 47).
2 Drücken Sie die Taste für die voreingestellte
Kurzwahlnummer
Drücken Sie die Taste [1] – [3].
Die Anzeige "Preset #" oder "PRESET #" erscheint.
Audio-Receiver mit Multi-Funktions-Key-System:
1 Drücken Sie die [NEXT]-Taste.
Wählen Sie den Abschnitt Tastenfunktion.
2 Drücken Sie die Taste [1] ("1") – [3] ("3").
Die Anzeige "DIAL #" erscheint.
3 Machen Sie einen Anruf
Drücken Sie den Steuerknopf ([38]) für
mindestens 1 Sekunde.
Die Anzeige "CALL" oder "Call" erscheint.
• Wenn die gewünschte Nummer nicht in der
Kurzwahlnummernliste eingetragen ist, erscheint die
Anzeige "No Name No Number", "No Number" oder "NONUMBER".
Sie können Anrufe durch Eingabe einer
Telefonnummer machen.
Deutsch |
B64-3480-00_01_E.indb 47
47
06.10.4 6:16:30 PM
Wählmethode (Audio-Receiver)
Eintragen der Kurzwahlnummernliste
Sie können bis zu 3 Telefonnummern als Kurzwahlen
eintragen.
1 Geben Sie die gewünschte Telefonnummer ein
Geben Sie die Telefonnummer auf eine der folgenden
Methoden ein:
- <Machen Sie einen Anruf durch Eingabe einer
Telefonnummer> (Seite 47)
- <Wählen über das Telefonbuch> (Seite 48)
- <Wählen über die Wahlwiederholungsliste> (Seite 48)
- <Wählen über die Anruferliste> (Seite 49)
2 Wählen Sie die Taste für die Kurzwahl
Drücken Sie die Taste [1] – [3] für mindestens 2
Sekunden.
Audio-Receiver mit Multi-Funktions-Key-System:
1 Drücken Sie die [NEXT]-Taste.
Wählen Sie den Abschnitt für die Tastenfunktion.
2 Drücken Sie die Taste [1] ("1"/ "MEM.1") – [3]
("3"/ "MEM.3") für mindestens 2 Sekunden.
Die Anzeige "Memory" oder "MEMORY" blinkt einmal.
3 Verlassen Sie den Auswahlmodus für die
Wählmethode
Drücken Sie die [ATT]-Taste für mindestens 1
Sekunde.
Wählen über das Telefonbuch
Sie können unter Verwendung des übertragenen
Telefonbuchs wählen.
1 Rufen Sie den Telefonbuchmodus auf
Wählen Sie die Anzeige "INITIAL", "PH-BOOK1", "PH.
BOOK" oder "PH-BOOK2".
Siehe <Auswählen des Wählmodus> (Seite 47).
Wenn Sie die Anzeige "PH.BOOK" oder "PH-BOOK2"
gewählt haben, fahren Sie fort mit Schritt 4.
Audio-Receiver mit Multi-Funktions-Key-System:
Drücken Sie die Taste [2] ("PHBK").
Durch Drücken dieser Taste erfolgt eine
Umschaltung zwischen den folgenden
Suchmethoden:
Anzeige
"INITIAL"/
"PH-BOOK1"
"PH.BOOK"/
"PH-BOOK2"
Suchmethode
Suchen über den Anfangsbuchstaben.
Suchen in alphabetischer Reihenfolge.
Weiter mit Schritt 4.
2 Wählen Sie den zu suchenden
Anfangsbuchstaben
Schieben Sie den Steuerknopf auf [4], [¢],
[FM] oder [AM].
Bewegen Sie den Cursor auf den zu suchenden
Anfangsbuchstaben.
Knopf
Funktion
[4]/ [¢] Weiter zum nächsten Zeichen.
[FM]/ [AM]
Weiter zur nächsten Zeile.
3 Legen Sie den gewählten Anfangsbuchstaben
fest
Drücken Sie den Steuerknopf ([38]) für
mindestens 1 Sekunde.
4 Wählen Sie den Namen
Schieben Sie den Steuerknopf auf [FM], [AM],
[4] oder [¢].
Wählen Sie den Namen.
Knopf
Funktion
[FM]/ [AM]
Ändern des Namens.
[4]/ [¢] Ändern des Anfangsbuchstabens.
5 Machen Sie einen Anruf
Drücken Sie den Steuerknopf ([38]) für
mindestens 1 Sekunde.
Die Anzeige "CALL" oder "Call" erscheint.
• Damit Sie das Telefonbuch verwenden können, müssen Sie
es zuvor aus dem Mobiltelefon übertragen. Einzelheiten
finden Sie unter <Übertragen des Telefonbuchs> (Seite 45).
• Anfangsbuchstaben ohne passenden Namen werden nicht
angezeigt.
• Beim Steuergerät mit dreizeiliger Anzeige ist der Name in
der mittleren Zeile der jeweils gewählte.
• Während des Suchvorgangs wird nach Zeichen ohne
Umlaut anstelle von Zeichen mit Umlaut gesucht, z. B. nach
"u" anstelle von "ü".
• Zeichen, die vom Steuergerät nicht dargestellt werden
können, werden in der Reihenfolge gesucht, in der sie im
Telefonbuch eingetragen wurden.
Wählen über die
Wahlwiederholungsliste
Sie können unter Verwendung der
Wahlwiederholungsliste wählen. Die Telefonnummern
für bis zu zehn ausgehende Anrufe werden in der
Wahlwiederholungsliste gespeichert.
1 Rufen Sie den Wahlwiederholungslistenmodus
auf
Wählen Sie die Anzeige "OUT" oder "OUT-CALL".
Siehe <Auswählen des Wählmodus> (Seite 47).
48 |
Deutsch
B64-3480-00_01_E.indb 48
06.10.4 6:16:30 PM
Fernsteuerung (Audio-Receiver)
2 Wählen Sie einen Namen oder eine
Telefonnummer
Schieben Sie den Steuerknopf auf [FM] oder
[AM].
3 Machen Sie einen Anruf
Drücken Sie den Steuerknopf ([38]) für
mindestens 1 Sekunde.
Die Anzeige "CALL" oder "Call" erscheint.
• Die Wahlwiederholungsliste ist die Liste der von diesem
Gerät getätigten Anrufe. Es handelt sich nicht um die auf
dem Mobiltelefon gespeicherten Einträge.
• Beim Steuergerät mit dreizeiliger Anzeige ist die
Telefonnummer in der mittleren Zeile die jeweils gewählte.
• Je nach Typ Ihres Steuergeräts wird für den 10. Eintrag in
der Wahlwiederholungsliste eventuell "0" angezeigt.
Funktionen der Tasten
[SRC]-Taste*
Während eines Anrufs: Gespräch beenden.
[VOL]-Tasten*
Während eines Anrufs: Sprachlautstärke anpassen.
[
]-Taste
Zum Aufrufen des Auswahlmodus für die
Wählmethode.
Bei einem eingehenden Anruf: Anruf
entgegennehmen.
[38]-Taste*
Während eines Anrufs:
Umschalten zwischen dem Modus privates Gespräch
und dem Modus Freisprechen.
Im Auswahlmodus für die Wählmethode:
Auswahl einer Wählmethode.
[¢]-Taste*
Wählen über die Anruferliste
Sie können unter Verwendung der Anruferliste
wählen. Die Telefonnummern für bis zu zehn
eingehende Anrufe werden in der Anruferliste
gespeichert.
1 Rufen Sie den Anruferlistenmodus auf
Wählen Sie die Anzeige "IN" oder "IN-CALL".
Siehe <Auswählen des Wählmodus> (Seite 47).
2 Wählen Sie einen Namen oder eine
Telefonnummer
Schieben Sie den Steuerknopf auf [FM] oder
[AM].
3 Machen Sie einen Anruf
Drücken Sie den Steuerknopf ([38]) für
mindestens 1 Sekunde.
Nummerneingabe zur Wahl: Eingabe von "+".
[4]-Taste*
Nummerneingabe zur Wahl:
Löscht die eingegebene Telefonnummer.
[FM]-Taste*
Nummerneingabe zur Wahl: Eingabe von "#".
[AM]-Taste*
Nummerneingabe zur Wahl: Eingabe von "*".
Tasten [0] – [9]*
Nummerneingabe zur Wahl: Eingabe einer Ziffer.
[DIRECT]-Taste*
Tätigen eines Anrufs.
Moduswahlschalter an der Fernbedienung
Umschalten zu "AUD" während des Wahlvorgangs.
Die Anzeige "CALL" oder "Call" erscheint.
• Die Anruferliste ist die Liste der auf diesem Gerät
eingegangenen Anrufe. Es handelt sich nicht um die auf
dem Mobiltelefon gespeicherten Einträge.
• Beim Steuergerät mit dreizeiliger Anzeige ist die
Telefonnummer in der mittleren Zeile die jeweils gewählte.
• Je nach Typ Ihres Steuergeräts wird für den 10. Eintrag in
der Anruferliste eventuell "0" angezeigt.
• * Wenn Ihre Fernbedienung über einen Moduswahlschalter
verfügt, stellen Sie diesen auf "AUD".
• Fernbedienungen mit der Taste [
] und/oder
Zifferntasten sind optional erhältlich. Kaufen Sie eine
Fernbedienung mit der gewünschten Funktionsweise.
Deutsch |
B64-3480-00_01_E.indb 49
49
06.10.4 6:16:31 PM
Menü-Steuerung (Audio-Receiver)
Menü-Steuerung
Einrichten verschiedener Funktionen. Die
Hauptfunktionen des Menüsystems werden in
diesem Abschnitt beschrieben. Nach dieser Erklärung
finden Sie Hinweise zu den Grundeinstellungen und
Einstellmöglichkeiten der Menüpunkte.
1 Rufen Sie den Menümodus auf
Drücken Sie die [MENU]-Taste für mindestens 1
Sekunde.
"MENU" wird angezeigt.
2 Wählen Sie den Menüpunkt
Schieben Sie den Steuerknopf auf [FM] oder
[AM].
3 Stellen Sie den Menüpunkt ein
Schieben Sie den Steuerknopf auf [4] oder
[¢].
4 Beenden Sie den Menümodus
Drücken Sie die [MENU]-Taste.
• Drei Menüpunkte werden auf dem Display angezeigt. Der
in der Mitte angezeigte Menüpunkt ist derjenige, den Sie
anpassen können.
Im Standby-Modus
Wählen Sie das zu verbindende
Mobiltelefon
Wenn bereits zwei oder mehr Mobiltelefone
angemeldet sind, müssen Sie das zu verwendende
Mobiltelefon wählen.
1 Wählen Sie den Telefonauswahlmodus
"✱" (helle Farbe) oder "_": Das gewählte Mobiltelefon
befindet sich im Standby-Modus.
5 Beenden Sie den Telefonauswahlmodus
Drücken Sie die [MENU]-Taste.
im Standby-Modus
Löschen eines angemeldeten
Mobiltelefons
Sie können angemeldete Mobiltelefone löschen.
1 Wählen Sie den Telefonlöschmodus
Schieben Sie den Steuerknopf auf [FM] oder
[AM].
Wählen Sie die Anzeige "Phone Delete" oder "PHNDEL".
2 Rufen Sie den Telefonlöschmodus auf
Drücken Sie den Steuerknopf ([38]) für
mindestens 1 Sekunde.
"(name)" wird angezeigt.
3 Wählen Sie das zu löschende Mobiltelefon
Schieben Sie den Steuerknopf auf [FM] oder
[AM].
4 Löschen Sie das gewählte Mobiltelefon
Drücken Sie den Steuerknopf ([38]) für
mindestens 1 Sekunde.
"Delete" oder "DELETE" wird angezeigt.
5 Beenden Sie den Telefonlöschmodus
Drücken Sie die [MENU]-Taste.
• Beim Löschen eine angemeldeten Mobiltelefons werden
das zugehörige Telefonbuch sowie die Anrufer- und die
Wahlwiederholungsliste ebenfalls gelöscht.
Schieben Sie den Steuerknopf auf [FM] oder
[AM].
Wählen Sie die Anzeige "Phone Selection" oder "PHNSEL".
2 Rufen Sie den Telefonauswahlmodus auf
Drücken Sie den Steuerknopf ([38]) für
mindestens 1 Sekunde.
"(name)" wird angezeigt.
3 Wählen Sie das zu verbindende Mobiltelefon
Schieben Sie den Steuerknopf auf [FM] oder
[AM].
4 Richten Sie das zu verbindende Mobiltelefon
ein
Schieben Sie den Steuerknopf auf [4] oder
[¢].
"✱(name)" oder "-(name)" wird angezeigt.
"✱" (dunkle Farbe) oder "✱": Das gewählte
Mobiltelefon ist besetzt.
50 |
Anzeigen des Mobiltelefon-Status
Sie können Verbindungsstatus, Signalstärke und
Batterieladezustand anzeigen lassen.
1 Wählen Sie das anzuzeigende Statuselement
Schieben Sie den Steuerknopf auf [FM] oder
[AM].
Wählen Sie die Anzeige "P-STATUS".
2 Rufen Sie den Statusanzeigemodus auf
Drücken Sie den Steuerknopf ([38]) für
mindestens 1 Sekunde.
3 Wählen Sie das anzuzeigende Element
Schieben Sie den Steuerknopf auf [FM] oder
[AM].
4 Beenden Sie den Statusanzeigemodus
Drücken Sie die [MENU]-Taste.
Deutsch
B64-3480-00_01_E.indb 50
06.10.4 6:16:32 PM
Schieben Sie den Steuerknopf auf [FM] oder
[AM].
Wählen Sie die Anzeige "Phone Status".
2 Anzeigen der Statusinformationen
Schieben Sie den Steuerknopf auf [4] oder
[¢].
Alle Statuselemente werden durch Symbole angezeigt.
3 Beenden Sie den Menümodus
Drücken Sie die [MENU]-Taste.
Bluetooth-Verbindungsstatus
Anzeige
Symbol
Informationen
"BT-CON Y"
Verbunden
Einstellen des Zeitintervalls für die
automatische Antwort
Diese Funktion beantwortet eingehende Anrufe nach
einer voreingestellten Wartezeit automatisch.
Anzeige
Einstellung
"Auto Answer: OFF"/ Anrufe werden nicht automatisch beantwortet.
"ANS OFF"
"Auto Answer: 0s"/ Anrufe werden sofort automatisch beantwortet.
"ANS 0"
…
1 Wählen Sie das anzuzeigende Statuselement
im Standby-Modus
"Auto Answer: 8s"/
"ANS 8"
Anrufe werden nach einer Wartezeit von
8 Sekunden automatisch beantwortet
(Werkseinstellung).
…
Wenn Ihr Steuergerät über eine grafische
Anzeigefunktion verfügt:
"Auto Answer: 99s"/ Anrufe werden nach einer Wartezeit von 99
"ANS 99"
Sekunden automatisch beantwortet.
"BT-CON N"
Nicht verbunden
…
"BAT MID"
…
Batterieladezustand des Mobiltelefons
Anzeige
Symbol
Informationen
"BAT FULL"
Voll
"BAT LOW"
Fast leer
"BAT - - -"
Informationen nicht verfügbar.
im Standby-Modus
Einstellen der Lautsprecher für die
Sprachausgabe
Sie können die Lautsprecher für die Sprachausgabe
einstellen.
Anzeige
"SP Select: Front"/
"SPK FRT"
"SP Select: F-R"/
"SPK F-R"
"SP Select: F-L"/
"SPK F-L"
Einstellung
Sprachausgabe erfolgt auf den Lautsprechern
vorne links und rechts.
Sprachausgabe erfolgt auf dem Lautsprecher
vorne rechts.
Sprachausgabe erfolgt auf dem Lautsprecher
vorne links.
…
"SGNL MID"
…
Signalstärke des Mobiltelefons
Anzeige
Symbol
Informationen
"SGNL MAX"
Maximum
• Wenn die auf dem Mobiltelefon eingestellte Wartezeit
kürzer ist als die auf dem Gerät eingestellte, wird die erstere
verwendet.
"SGNL LOW"
Minimum
"NO SGNAL"
Kein Signal
"SGNL - - -"
Informationen nicht verfügbar.
• Wählen Sie den weiter vom Mikrofon entfernten
Lautsprecher, um Rückkopplungen oder Echo zu
vermeiden.
im Standby-Modus
• Da sich die Anzahl der Schritte von Steuergerät und
Mobiltelefon unterscheiden, können sich auch die auf dem
Steuergerät angezeigten Statusinformationen von den auf
dem Mobiltelefon angezeigten unterscheiden.
Einstellen des Tonsignals für
eingehende Anrufe
Sie können bei eingehenden Anrufen ein Tonsignal
über den Lautsprecher ausgeben.
Anzeige
Einstellung
"Call Beep: ON"/ "C-BP ON" Der Tastenton ertönt.
"Call Beep: OFF"/ "C-BP OFF" Der Tastenton ertönt nicht.
Deutsch |
B64-3480-00_01_E.indb 51
51
06.10.4 6:16:32 PM
Steuerung der Freisprecheinrichtung (Monitor-Receiver)
Steuerung der Freisprecheinrichtung
Steuerbildschirm der
Freisprecheinrichtung
Bei einem
eingehenden
Anruf...
TEL
Steuerbildschirm der Freisprecheinrichtung
9
8
Hands
10
AUTO
Free
K E N WO O D
1
2
11
0123456789
P1
15
1
2
3
4
5
6
12
7
8
9
Clear
*
0
#
P2
3
P3
6
4
5
S e t Up
+
13
14
7
Return
Steuerbildschirm
DV D V I D E O
13:50
16
TEL
IN
REP
Next
Title 1
Chap
KENWOOD
TIME
3
SCRL
T0:05:20
1 Zeigt die Anzeige Telefonbuchsuche an.
(Siehe <Anrufen über das Telefonbuch>, Seite 55)
2 Zeigt die Anzeige Wahlwiederholung an.
(Siehe <Wahlwiederholung>, Seite 56)
3 Zeigt die Anzeige Anruferliste an.
(Siehe <Wahlwiederholung>, Seite 56)
4 Schaltet um zwischen den Modi privates Gespräch
und Freisprecheinrichtung (nur bei laufendem
Gespräch).
5 Zeigt die Anzeige Freisprecheinrichtung einrichten
an.
(Siehe <Einrichten des Telefons mit
Freisprecheinrichtung>, Seite 56)
6 Eingabe von drei Telefonnummern für die
Kurzwahl.
(Siehe <Kurzwahl>, Seite 54)
52 |
7 Gibt eine Telefonnummer ein.
(Siehe <Beim Wählen>, Seite 54)
8 Zeigt die Signalstärke an.*
Je mehr Segmente im Balken erscheinen, desto
stärker ist das Signal.
9 Zeigt den aktuellen Status für automatische
Antwort an
AUTO
Automatische Antwort ist eingeschaltet:
Automatische Antwort ist ausgeschaltet:
p Zeigt den Ladezustand der Batterie des
Mobiltelefons an.*
Je mehr Segmente im Balken erscheinen, desto
besser ist der Ladezustand.
q Beginnt einen Anruf.
w Beendet den Anruf.
Löscht die gerade eingegebene Telefonnummer.
e Löscht die eingegebene Telefonnummer.
r Kehrt zum vorherigen Bildschirm zurück.
t Zeigt die Anruferliste und die
Wahlwiederholungsliste an.
Wenn Sie eine Telefonnummer im Telefonbuch
eingetragen haben, wird der zur jeweiligen
Nummer gehörende Name angezeigt.
y Zeigt den Status der Verbindung zum Mobiltelefon
an.
Weiß: Das Mobiltelefon ist verbunden.
Orange: Das Mobiltelefon ist nicht verbunden oder
befindet sich außer Reichweite.
• Wenn sich Ihr Fahrzeug bewegt, sind einige
Funktionen aus Sicherheitsgründen deaktiviert.
Die mit den deaktivierten Funktionen verknüpften
Tasten sind dann ohne Funktion.
• Wenn der Steuerbildschirm der
Freisprecheinrichtung erscheint, wird der Name
des verbundenen Mobiltelefons 5 Sekunden lang
angezeigt.
• * Da sich die Anzahl der Schritte von Steuergerät
und Mobiltelefon unterscheiden, können sich
auch die auf dem Steuergerät angezeigten
Statusinformationen von den auf dem Mobiltelefon
angezeigten unterscheiden. Wenn eine bestimmte
Statusinformation nicht verfügbar ist, wird keine
Information dazu angezeigt.
• Durch Einstellen des Mobiltelefons auf den privaten
Modus kann die Freisprechfunktion deaktiviert
werden.
Deutsch
B64-3480-00_01_E.indb 52
06.10.4 6:16:34 PM
• Durch zu hohe Einstellung der Lautstärke kommt
es häufiger zu Echoeffekten. Falls ein Echo auftritt,
stellen Sie die Lautstärke so niedrig wie möglich
ein. Echoeffekte verstärken sich proportional zur
eingestellten Lautstärke.
Fernsteuerung
17
18
19
24
20
25
Tastenbedienung
21
26
22
23
u [SRC]-Taste
Während eines Anrufs: Beendet den Anruf.
i [*]-Taste (Wenn f auf "AUD" eingestellt ist)
Nummerneingabe zur Wahl: Eingabe von "+".
o [FM+]-Taste (Wenn f auf "AUD" eingestellt ist)
Nummerneingabe zur Wahl: Eingabe von "#".
; [AM-]-Taste (Wenn f auf "AUD" eingestellt ist)
Nummerneingabe zur Wahl: Eingabe von "*".
a [4]-Taste (Wenn f auf "AUD" eingestellt ist)
Nummerneingabe zur Wahl:
Löscht die eingegebene Telefonnummer.
s Tasten [0] – [9] (Wenn f auf "AUD" eingestellt ist)
Nummerneingabe zur Wahl: Eingabe der Ziffer
einer Telefonnummer.
d [DIRECT]-Taste (Wenn f auf "AUD" eingestellt ist)
Machen Sie einen Anruf.
f Moduswahlschalter an der Fernbedienung
Umschalten zu "AUD" während des Wahlvorgangs.
g [5]/ [∞]-Taste
Während eines Anrufs: Anpassen der
Sprachlautstärke.
h [
]-Taste
Zeigt den Steuerbildschirm für die
Freisprecheinrichtung an.
Bei einem eingehenden Anruf: Anruf
entgegennehmen.
SRC
27
28
j [u]/ [d]-Taste
Während eines Anrufs: Sprachlautstärke anpassen.
k [SRC]-Taste
Während eines Anrufs: Beendet den Anruf.
• Die beim aktuellen Anruf vorgenommene
Anpassung der Lautstärke bleibt bei folgenden
Anrufen erhalten.
Deutsch |
B64-3480-00_01_E.indb 53
53
06.10.4 6:16:36 PM
Steuerung der Freisprecheinrichtung (Monitor-Receiver)
Bei eingehendem Anruf
Kurzwahl
Wenn Sie einen Anruf erhalten, können Sie die
Freisprecheinrichtung verwenden.
Sie können bis zu 3 Telefonnummern als Kurzwahlen
eintragen.
1
So tragen Sie eine Telefonnummer ein:
Nimmt einen Anruf an
1
Siehe <Anrufen über das Telefonbuch> (Seite 55),
<Wahlwiederholung> (Seite 56) und <Beim Wählen>
(Seite 54).
Bei einem eingehenden Anruf erscheint der
Steuerbildschirm für die Freisprecheinrichtung
automatisch.
2
2
Beendet den Anruf
Zeigen Sie eine Telefonnummer an, die Sie
eintragen wollen
Tragen Sie die Telefonnummer ein
P1
—
P3
Mehr als 2 Sekunden gedrückt halten.
Der vorherige Bildschirm erscheint wieder.
Anrufen einer Telefonnummer aus dem Speicher:
1
Beim Wählen
Machen Sie einen Anruf durch Eingabe einer
Telefonnummer.
1
P1
—
P3
Geben Sie eine Telefonnummer ein
2
+
9
—
0
2
Wiederaufrufen der Telefonnummer
,
*
Machen Sie einen Anruf
,
,
#
Machen Sie einen Anruf
Sie können zu sprechen beginnen, wenn die
angerufene Person antwortet.
• Für die Kurzwahl können nur Telefonnummern
eingetragen werden. Daher werden während des
Wählvorgangs Name und andere Angaben zur
angerufenen Person nicht angezeigt.
• Zum Löschen falscher Eingaben drücken Sie
Clear .
3
Beendet den Anruf
Der vorherige Bildschirm erscheint wieder.
• Sie können maximal 32 Ziffern eingeben.
54 |
Deutsch
B64-3480-00_01_E.indb 54
06.10.4 6:16:38 PM
Anrufen über das Telefonbuch
3
Sie können Personen über die im Telefonbuch
eingetragene Telefonnummer anrufen.
1
Wählen Sie eine anzurufende Person
Name
Rufen Sie die Anzeige Telefonbuch auf
4
Bestätigen Sie die Auswahl
OK
Der Eingabestartbildschirm erscheint.
Der Steuerbildschirm für die Freisprecheinrichtung
erscheint erneut. Die Daten der anzurufenden Person
werden angezeigt.
Eingabestartbildschirm
AUTO
Phone Book L i s t
5
2
a
1
1
b
c
d
e
f
g
h
i
j
k
l
m
n
o
p
q
r
s
t
u
v
w
x
y
z
Machen Sie einen Anruf
3
Return
1 Führt einen Bildlauf der Zeichenanzeige durch.
2 Zeigt das Telefonbuch beginnend mit dem Namen,
Sie können zu sprechen beginnen, wenn die
angerufene Person antwortet.
6
Beendet den Anruf
dessen ersten Buchstaben Sie berührt haben.
3 Kehrt zum Steuerbildschirm für die
Freisprecheinrichtung zurück.
2
Wählen Sie den Anfangsbuchstaben einer
gespeicherten Person
a
• Damit Sie das Telefonbuch verwenden können,
müssen Sie es zuvor aus dem Mobiltelefon
übertragen. Weitere Einzelheiten finden Sie unter
<Übertragen des Telefonbuchs> (Seite 45).
• Für jeden Namen im Telefonbuch können bis zu 16
Zeichen angezeigt werden.
• Anfangsbuchstaben ohne passenden Namen
werden nicht angezeigt.
• Während des Suchvorgangs wird nach Zeichen
ohne Umlaut anstelle von Zeichen mit Umlaut
gesucht, z. B. nach "u" anstelle von "ü".
usw.
Der Bildschirm mit der Telefonbuchliste erscheint.
Telefonbuchlisten-Bildschirm
Phone Book L i s t
AUTO
1234567890
2
1
Name
Name
1
Name
Name
3
4
Der vorherige Bildschirm erscheint wieder.
OK
Return
1 Führt einen Bildlauf in der Liste durch.
2 Gibt den anzurufenden Namen ein.
3 Gibt die Daten des Anzurufenden ein und kehrt
zum Steuerbildschirm der Freisprecheinrichtung
zurück.
4 Kehrt zum Steuerbildschirm für die
Freisprecheinrichtung zurück.
Deutsch |
B64-3480-00_01_E.indb 55
55
06.10.4 6:16:39 PM
Steuerung der Freisprecheinrichtung (Monitor-Receiver)
Sie können zu sprechen beginnen, wenn die
angerufene Person antwortet.
Wahlwiederholung
Sie können eine der letzten 10 Telefonnummern
erneut wählen, die Sie angerufen haben oder von der
Sie einen Anruf erhalten haben.
1
Rufen Sie die Anzeige für die Suche in der
Wahlwiederholungsliste bzw. der Anruferliste
auf
5
Beendet den Anruf
Der vorherige Bildschirm erscheint wieder.
Ausgehende Anrufe
oder
Eingehende Anrufe
Die Anzeige für die Suche in der
Wahlwiederholungsliste bzw. der Anruferliste erscheint.
Anzeige Ausgehende Anrufe oder Eingehende
Anrufe
Incoming Calls
2
Einrichten des Telefons mit
Freisprecheinrichtung
AUTO
Kenwood
1234567890
Kenwood
1234567890
Kenwood
1234567890
3
DISP
Kenwood
1234567890
OK
1
Kenwood
1234567890
Return
Wahlwiederholungsliste.
4 Gibt die Daten des Anzurufenden ein und kehrt
zum Steuerbildschirm der Freisprecheinrichtung
zurück.
5 Kehrt zum Steuerbildschirm für die
Freisprecheinrichtung zurück.
3
Wählen Sie eine anzurufende Person
Bestätigen Sie die Auswahl
OK
Der Steuerbildschirm für die Freisprecheinrichtung
erscheint erneut. Die Daten der anzurufenden Person
werden angezeigt.
4
Machen Sie einen Anruf
56 |
Die Freisprecheinrichtung kann wie folgt eingerichtet
werden.
4
1
1 Führt einen Bildlauf in der Liste durch.
2 Gibt den anzurufenden Namen ein.
3 Wählen Sie einen Eintrag in der
2
• Der Bildschirm mit der Wahlwiederholungsliste oder
der Anruferliste zeigt die Liste der Anrufe, die von
diesem Gerät geführt oder empfangen wurden. Es
handelt sich nicht um die auf dem Mobiltelefon
gespeicherten Einträge.
5
S e t Up
Anzeige Freisprecheinrichtung einrichten
Hands Free Set Up
Au t o A n s w e r i n g
1
8
P h o n e Vo i c e
2
F-Right
Beep
On
4 S
Se
e ll e
ec
c tt
5
AUTO
1
2
3
D
Seelleetcet
6
Return
1 Stellt eine automatische Antwortzeit nach der
Beendigung eines Anrufs ein. ( "8")
"Off":
Diese Funktion kann nicht verwendet
werden.
"0-99": Stellt die Dauer des Anrufsignals (in
Sekunden) ein.
2 Stellt eine Ausgabeposition für das Anrufsignal ein.
( "F-Right")
"F-Left":
Gibt das Tonsignal über den
Lautsprecher vorne links aus.
"F-Right":
Gibt das Tonsignal über den
Lautsprecher vorne rechts aus.
"Front All": Gibt das Tonsignal über beide vordere
Lautsprecher aus.
3 Stellt das Tonsignal für eingehende Anrufe ein.
( "On")
"On":
Der Tastenton ertönt.
Deutsch
B64-3480-00_01_E.indb 56
06.10.4 6:16:41 PM
"Off":
Löschen des Telefons für die
Freisprecheinrichtung
Der Tastenton ertönt nicht.
4 Wählen Sie die Anzeige Telefonauswahl.
5 Wählen Sie die Anzeige Telefon löschen.
6 Kehrt zum Steuerbildschirm für die
Sie können die Anmeldung eines Telefons für die
Freisprecheinrichtung abbrechen.
Freisprecheinrichtung zurück.
1
• Entweder das für dieses Gerät eingestellte
Zeitintervall für die automatische Antwort oder das
für das Mobiltelefon eingestellte Zeitintervall ist
wirksam, je nachdem, welches kürzer ist.
• Wählen Sie den weiter vom Mikrofon entfernten
Lautsprecher, um Rückkopplungen oder Echo zu
vermeiden.
Rufen Sie die Anzeige Freisprecheinrichtung
einrichten auf
S e t Up
2
Rufen Sie die Liste Telefon löschen auf
D
Seelleetcet
Auswählen eines Telefons mit
Freisprecheinrichtung
Anzeige Telefon löschen
Sie können das Telefon für die Freisprecheinrichtung
in der Liste wählen.
1
Phone Delete
1
AUTO
Kenwood 1
Rufen Sie die Anzeige Freisprecheinrichtung
einrichten auf
Kenwood 2
Kenwood 3
Kenwood 4
S e t Up
2
Kenwood 5
Return
2
1 Wählt das Mobiltelefon, das aus der Liste gelöscht
Rufen Sie die Liste Telefonauswahl auf
werden soll.
2 Kehrt zur Anzeige Freisprecheinrichtung einrichten
S
Se
e ll e
ec
c tt
zurück.
3
Anzeige Telefonauswahl
Phone Select
1
Wählen Sie ein Telefon der
Freisprecheinrichtung zum Löschen aus
AUTO
Kenwood 3
Kenwood 1
Kenwood 2
Kenwood 3
Kenwood 4
Kenwood 5
Return
2
1 Wählt das Mobiltelefon, das zusammen mit der
• Zusammen mit dem Telefon der
Freisprecheinrichtung werden auch das zugehörige
Telefonbuch und die Wahlwiederholungs- und
Anruferliste gelöscht.
Freisprecheinrichtung verwendet wird.
2 Kehrt zur Anzeige Freisprecheinrichtung einrichten
zurück.
3
Wählen Sie ein Telefon für die
Freisprecheinrichtung aus
Kenwood 1
Deutsch |
B64-3480-00_01_E.indb 57
57
06.10.4 6:16:42 PM
Zubehör/Hinweise zum Einbau
Guter Empfang
Um einen guten Empfang sicherzustellen, sollten Sie
folgendes beachten:
Zubehör
1
3 m ..........1
2
..........2
3
..........1
Hinweise zum Einbau
1. Um Kurzschlüsse zu vermeiden, entfernen Sie den
Zündschlüssel und den --Pol der Batterie.
2. Stellen Sie den Funktionsschalter für die
Konvertierung der angezeigten Zeichen korrekt ein.
3. Schließen Sie die Eingangs- und Ausgangskabel
jedes Gerätes richtig an.
4. Bauen Sie das Autoradio in Ihrem Fahrzeug ein.
5. Schließen Sie den --Pol der Batterie wieder an.
6. Drücken Sie die Reset-Taste am Steuergerät.
• Isolieren Sie nicht angeschlossene Kabel mit Vinylband
oder ähnlichem Material. Um Kurzschlüsse zu vermeiden,
entfernen Sie die Kappen an den Enden der nicht
angeschlossenen Kabel oder Klemmen nicht.
• Überprüfen Sie nach der Installation des Geräts, ob
Bremsleuchten, Blinker, Scheibenwischer usw. des
Fahrzeugs korrekt funktionieren.
58 |
• Halten Sie zum Mobiltelefon einen Maximalabstand von 10
m ein. Die Reichweite kann in bestimmten Umgebungen
weiter abnehmen. Die Reichweite wird ebenfalls kürzer,
wenn sich zwischen dem Gerät und dem Mobiltelefon
Hindernisse befinden. Die oben genannte maximale
Reichweite (10 m) kann nicht immer garantiert werden.
• Halten Sie dieses Gerät so weit wie möglich entfernt von
anderen elektrischen Komponenten (AV-Komponenten). In
deren Nähe kann es zu Verbindungsabbrüchen sowie zu TVoder Radiostörungen oder schlechtem Empfang kommen.
• In der Nähe befindliche Sendestationen oder
Funksprechgeräte können durch zu starke Signale die
Kommunikation stören.
Display-Zeichen-Konvertierungsfunktion
Wenn das Steuergerät bestimmte Zeichen mit
Umlauten, z. B. "ü" und "ä", nicht anzeigen kann,
bringen Sie den Schalter für die Display-ZeichenKonvertierungsfunktion in Stellung "2", um diese
Zeichen zu "U" bzw. "A" zu konvertieren.
Bei Verbindung mit einem der folgenden Steuergeräte
bringen Sie den Schalter in Stellung "2". (Stand
September 2006)
KDV-5234, KDC-W6534U, KDC-W5534U, DPX501U
1 2
Konvertierungstabelle
Konvertiertes Zeichen
A:
À, à, Á, á, Ã, ã, Ä, ä, Â, â, Å, å
C:
Ç, ç
D:
Ð, ð
E:
È, è, É, é, Ê, ê, Ë, ë
I:
Ì, ì, Í, í, Î, î, Ï, ï
N:
Ñ, ñ
O:
Ò, ò, Ó, ó, Ô, ô, Õ, õ, Ö, ö, Ø, ø
S:
ß
U:
Ù, ù, Ú, ú, Û, û, Ü, ü
X:
×
Y:
Ý, ý, ÿ
Deutsch
B64-3480-00_01_E.indb 58
06.10.4 6:16:43 PM
Verbindung
Zubehör 1 (3 m)
Freisprecheinrichtung
Steuergerät
TO HEAD UNIT
MIC
Eingang für CD-Wechsler
TO 5L I/F
1
2
(1,5 m)
Verbindungskabel (mit dem CDWechsler geliefert)
Display-ZeichenKonvertierungsschalter
Hinweise zum Betrieb finden
Sie unter <Display-ZeichenKonvertierungsfunktion> (Seite 58).
CD-Wechsler
Anschluss für externes Gerät
Getrennt erhältliche Geräte wie z. B. CD-Wechsler und KCAiP500 können hier angeschlossen werden. Eine Liste der
anschließbaren Geräte finden Sie in der Ihrem Steuergerät
beiliegenden Bedienungsanleitung.
Wenn Sie ein KCA-S220A anschließen möchten
Verbinden Sie die Freisprecheinrichtung mit dem Anschluss mit der Bezeichnung "TO CHANGER 2".
Steuergerät
KCA-S220A
TO HEAD UNIT
TO CHANGER 1
Freisprecheinrichtung
TO CHANGER 2
TO HEAD UNIT
TO 5L I/F
CD-Wechsler
• Achten Sie darauf, dass die Gesamtlänge des Steuerkabels zwischen Steuergerät und CD-Wechsler 13 m nicht übersteigt. Bei
Steuerkabeln mit einer Länge von mehr als 13 m kann es zu Fehlfunktionen kommen.
Deutsch |
B64-3480-00_01_E.indb 59
59
06.10.4 6:16:44 PM
Einbau
Einbau der Freisprecheinrichtung
• Legen Sie die Einbauposition fest, nachdem Sie
sichergestellt haben, dass das Gerät mit dem Mobiltelefon
kommunizieren kann.
• Bitte installieren Sie das Gerät nicht in der Nähe von
Armaturenbrett, hinterer Ablage oder anderen wichtigen
Komponenten. Andernfalls kann es zu Verletzungen
oder Unfällen kommen, wenn das Gerät sich bei einer
Erschütterung löst und eine Person oder eine wichtige
Komponente trifft. Zur Montage sollten Blechschrauben
verwendet werden.
(Eine Befestigung mit Klettstreifen ist zwar einfach zu
bewerkstelligen, kann sich aber bei Erschütterungen lösen.)
Einbau der Mikrofoneinheit
1 Überprüfen Sie die Einbauposition des Mikrofons
(Zubehör 1).
2 Entfernen Sie Öl und andere Verschmutzungen von
der Einbauoberfläche.
3 Bauen Sie das Mikrofon ein.
4 Verkabeln Sie das Mikrofon mit der
Freisprecheinrichtung und befestigen Sie das
Kabel an mehreren Stellen mit Klebeband oder
ähnlichem.
Befestigung am Audioteil
Zubehör 2 (Ø4 × 16 mm)
Antennenteil
Befestigen Sie Kabel mit
handelsüblichem Klebeband.
Befestigung am Teppichflor
Antennenteil
Zubehör 3
Lösen Sie das Schutzpapier des mitgelieferten
doppelseitigen Klebebands zur Befestigung an der im
linken Beispiel gezeigten Stelle.
Richten Sie das Mikrofon zum Fahrer hin aus.
• Kleben Sie das Klettband nicht über die Seriennummer.
• Wenn die Einbaustelle nicht eben ist, schneiden Sie das
Klettband in zwei Teile und kleben Sie diese wie gezeigt an
zwei Stellen.
60 |
Deutsch
B64-3480-00_01_E.indb 60
06.10.4 6:16:45 PM
Fehlersuche
Was zunächst wie eine Fehlfunktion des Geräts
erscheint, kann einfach nur auf eine falsche
Bedienung oder Verkabelung zurückzuführen sein.
Sehen Sie sich deshalb bitte zuerst die nachfolgende
Übersicht an, bevor Sie Ihr Gerät zur Reparatur geben.
Die unten aufgeführten Meldungen
zeigen den Zustand Ihres Systems an.
?
Die Lautstärke beim Freisprechen ist gering.
✔ Die Lautstärke für das Freisprechen ist niedrig
eingestellt.
☞ Die Lautstärke für das Freisprechen kann
getrennt eingestellt werden. Nehmen Sie die
Anpassung während des Gebrauchs vor.
No Data/ NO DATA :
• Es ist keine Wahlwiederholungsliste vorhanden.
• Es ist keine Anruferliste vorhanden.
?
Die hinteren Lautsprecher bleiben stumm.
✔ Sie sprechen im Freisprechmodus.
☞ Im Freisprechmodus werden die hinteren
Lautsprecher stumm geschaltet.
Disconnect/ DISCONCT/ Non Connection/ Disconnected :
Das Gerät kann nicht mit dem Mobiltelefon
kommunizieren.
?
Bei eingehenden Anrufen ertönt kein Tonsignal.
✔ Das Tonsignal hängt vom Typ Ihres Mobiltelefons ab.
☞ Wählen Sie "Call Beep: ON", "C-BP ON" (Seite 51)
oder "Beep On" (Seite 56), um das Tonsignal zu
hören.
?
?
In einem Namen fehlen Zeichen.
✔ Das Steuergerät kann keine Zeichen mit Umlauten
oder Akzenten darstellen.
☞ Bringen Sie den Schalter für die Display-ZeichenKonvertierungsfunktion in Stellung "2" (Seite 58).
Der Name des Mobiltelefons wird nicht angezeigt.
✔ Bei der Anmeldung eines Mobiltelefons kann es sein,
dass statt des Namens die Adresse des Mobiltelefons
angezeigt wird.
☞ Schalten Sie das Steuergerät aus und wieder ein.
Der Name des verbundenen Mobiltelefons wird
angezeigt.
No Number/ NO-NMBER/ Incoming No Number :
• Der Anrufer sendet keine Anruferkennung.
• Es sind keine Telefonnummerdaten vorhanden.
No Entry/ NO ENTRY :
Das Mobiltelefon wurde nicht angemeldet (pairing).
Connect/ CONNECT :
Das Gerät kann mit dem Mobiltelefon kommunizieren.
HF Error 07/ HF ERR07:
Kein Speicherzugriff möglich.
\ Schalten Sie das Gerät aus und wieder ein. Wenn die
Meldung weiterhin erscheint, drücken Sie die ResetTaste auf dem Steuergerät.
HF Error 68/ HF ERR68:
Das Gerät kann nicht mit dem Mobiltelefon
kommunizieren.
\ Schalten Sie das Gerät aus und wieder ein. Wenn die
Meldung weiterhin erscheint, drücken Sie die ResetTaste auf dem Steuergerät.
Technische Daten
Die technischen Daten können ohne Vorankündigung geändert werden.
Bluetooth-Abschnitt
Technologie
: Bluetooth 1,2 Zertifiziert
Frequenz
: 2,402 – 2,480 GHz
Ausgangsleistung
: +4dBm (MAX), 0dBm (Mittel) Power Klass 2
Allgemeines
Betriebsspannung (11-16 V zulässig)
: 14,4 V
Stromverbrauch
: 0,2 A
Abmessungen (B × H × T)
: 95 × 30 × 105 mm
Gewicht
: 0,35 kg
Deutsch |
B64-3480-00_01_E.indb 61
61
06.10.4 6:16:46 PM
Inhoud
Veiligheidsvoorschriften
Opmerkingen
63
64
De Bluetooth-functie instellen 65
Voor gebruik
Uw mobiele telefoon registreren
De telefoonlijst downloaden
65
65
65
Algemene functies
66
Een telefonisch gesprek beantwoorden
Overschakelen naar de privé-modus
Het bericht dat de verbinding wordt
verbroken verwijderen
Het spraakvolume aanpassen tijdens een
gesprek
Een gesprek beëindigen
Overschakelen tussen displaymodi
Kiesmethode
Besturing van handsfree eenheid 72
Scherm voor besturing van handsfree
eenheid
Afstandsbediening
Werking van de toetsen
Bij binnenkomende gesprekken
Tijdens het kiezen
Snelkiezen
Bellen via de telefoonlijst
Opnieuw kiezen
De handsfree telefoon instellen
Een handsfree telefoon selecteren
De handsfree telefoon verwijderen
72
73
73
74
74
74
75
76
76
77
77
Toebehoren/
Installatieprocedure
78
Verbinding
79
Installatie
80
Oplossen van problemen
81
Technische gegevens
81
62 |
66
66
66
66
66
66
67
De kiesmodus selecteren
Een gesprek voeren door een
telefoonnummer in te voeren
Kiezen met behulp van de functie voor
snelkiezen
Nummers opnemen in de lijst met vooraf
ingestelde nummers
Kiezen met behulp van de telefoonlijst
Kiezen met behulp van de lijst met
uitgaande gesprekken
Kiezen met behulp van de lijst met
binnenkomende gesprekken
67
67
67
68
68
68
69
Afstandsbediening
69
Functies van de toetsen
69
Menusysteem
70
Menusysteem
Selecteer de mobiele telefoon die u wilt
aansluiten
Een geregistreerde mobiele telefoon
verwijderen
De status van de mobiele telefoon
weergeven
Het tijdsinterval voor automatische
beantwoording instellen
De luidsprekers voor spraakuitvoer
instellen
Het geluidssignaal voor binnenkomende
gesprekken instellen
70
70
70
70
71
71
71
Het Bluetooth-woordmerk en de Bluetoothlogo's zijn het eigendom van Bluetooth SIG,
Inc. en elk gebruik van dergelijke merken
door Kenwood Corporation vindt plaats
onder licentie. Andere handelsmerken en
handelsnamen zijn het eigendom van hun
respectievelijke houders.
Nederlands
B64-3480-00_01_E.indb 62
06.10.4 6:16:46 PM
Veiligheidsvoorschriften
2WAARSCHUWING
Voorkom persoonlijk letsel en/of
brand en neem derhalve de volgende
voorzorgsmaatregelen:
• Voorkom kortsluiting en steek derhalve
nooit metalen voorwerpen (zoals munten en
gereedschap) in het toestel.
• De bevestiging en bedrading van dit product vereist
vakbekwaamheid en ervaring. Laat de bevestiging
en bedrading om veiligheidsredenen door vaklui
uitvoeren.
Bij deze verklaat Kenwood dat deze KCA-BT100 voldoet aan de essentiële eisen
en aan de overige relevante bepalingen van Richtlijn 1999/5/EC.
Italiano
Con la presente Kenwood dichiara che questo KCA-BT100 è conforme ai requisiti
essenziali ed alle altre disposizioni pertinenti stabilite dalla direttiva 1999/5/CE.
Español
Por medio de la presente Kenwood declara que el KCA-BT100 cumple con los
requisitos esenciales y cualesquiera otras disposiciones aplicables o exigibles de
la Directiva 1999/5/CE.
Português
Kenwood declara que este KCA-BT100 está conforme com os requisitos
essenciais e outras disposições da Directiva 1999/5/CE.
Polska
Kenwood niniejszym oświadcza, że KCA-BT100 spełnia zasadnicze wymogi oraz
inne istotne postanowienia dyrektywy 1999/5/EC.
2LET OP
Český
Voorkom beschadiging van het
toestel en neem derhalve de volgende
voorzorgsmaatregelen:
Magyar
• Installeer het toestel niet op plaatsen die aan direct
zonlicht, hitte of extreme vochtigheid blootstaan.
Vermijd ook plaatsen waar het zeer stoffig is of waar
gevaar bestaat voor waterspatten.
Svenska
Kenwood timto prohlasuje, ze KCA-BT100 je ve shode se zakladnimi pozadavky
a s dalsimi prislusnymi ustanoveni Narizeni vlady c. 426/2000 Sb.
Alulírott, Kenwood, kijelenti, hogy a jelen KCA-BT100 megfelel az 1999/5/EC
irányelvben meghatározott alapvető követelményeknek és egyéb vonatkozó
előírásoknak.
Härmed intygar Kenwood att denna KCA-BT100 stär l överensstämelse med de
väsentliga egenskapskrav och övriga relevanta bestämmelser som framgår av
direktiv 1999/5/EG.
Suomi
Conformiteitsverklaring met betrekking
tot de R&TTE-richtlijn van de Europese
Unie (1999/5/EC)
Fabrikant:
Kenwood Corporation
2967-3 Ishikawa-machi, Hachioji-shi, Tokio, 192-8525 Japan
EU-vertegenwoordiger:
Kenwood Electronics Europe BV
Amsterdamseweg 37, 1422 AC UITHOORN, Nederland
Kenwood vakuuttaa täten että KCA-BT100 tyyppinen laite on direktiivin
1999/5/EY oleellisten vaatimusten ja sitä koskevien direktiivin muiden ehtojen
mukainen.
Slovensko
S tem Kenwood izjavlja, da je ta KCA-BT100 v skladu z osnovnimi zahtevami in
ostalimi ustreznimi predpisi Direktive 1999/5/EC.
Slovensky
Spoločnosť Kenwood týmto vyhlasuje, že KCA-BT100 spĺňa zákldné požiadavky
a ďalšie prislušné ustanovenia Direktĺvy 1999/5/EC.
Dansk
Undertegnede Kenwood erklærer harved, at følgende udstyr KCA-BT100
overholder de væsentlige krav og øvrige relevante krav i direktiv 1999/5/EF.
Ελληνικά
English
Hereby, Kenwood declares that this unit KCA-BT100 is in compliance with the
essential requirements and other relevant provisions of Directive 1999/5/EC.
Français
Par la présente Kenwood déclare que l’appareil KCA-BT100 est conforme aux
exigences essentielles et aux autres dispositions pertinentes de la directive
1999/5/CE.
Par la présente, Kenwood déclare que ce KCA-BT100 est conforme aux
exigences essentielles et aux autres dispositions de la directive 1999/5/CE qui
lui sont applicables.
Deutsch
Hiermit erklärt Kenwood, dass sich dieser KCA-BT100 in Übereinstimmung mit
den grundlegenden Anforderungen und den anderen relevanten Vorschriften
der Richtlinie 1999/5/EG befindet. (BMWi)
Hiermit erklärt Kenwood die Übereinstimmung des Gerätes KCA-BT100 mit den
grundlegenden Anforderungen und den anderen relevanten Festlegungen der
Richitlinie 1999/5/EG. (Wien)
Nederlands
ΜΕ ΤΗΝ ΠΑΡΟΥΣΑ Kenwood ΔΗΛΩΝΕΙ ΟΤΙ KCA-BT100 ΣΥΜΜΟΡΦΩΝΕΤΑΙ ΠΡΟΣ
ΤΙΣ ΟΥΣΙΩΔΕΙΣ ΑΠΑΙΤΗΣΕΙΣ ΚΑΙ ΤΙΣ ΛΟΙΠΕΣ ΣΧΕΤΙΚΕΣ ΔΙΑΤΑΞΕΙΣ ΤΗΣ ΟΔΗΓΙΑΣ
1999/5/EK.
Eesti
Sellega kinnitab Kenwood, et see KCA-BT100 vastab direktiivi 1999/5/EC
põhilistele nõudmistele ja muudele asjakohastele määrustele.
Latviešu
Ar šo, Kenwood, apstiprina, ka KCA-BT100 atbilst Direktīvas 1999/5/EK
galvenajām prasībām un citiem tās nosacījumiem.
Lietuviškai
Šiuo, Kenwood, pareiškia, kad šis KCA-BT100 atitinka pagrindinius Direktyvos
1999/5/EB reikalavimus ir kitas svarbias nuostatas.
Malti
Hawnhekk, Kenwood, jiddikjara li dan KCA-BT100 jikkonforma mal-ħtiġijiet
essenzjali u ma provvedimenti oħrajn relevanti li hemm fid-Dirrettiva 1999/5/
EC.
Українська
Компанія Kenwood заявляє, що цей виріб KCA-BT100 відповідає ключовим
вимогам та іншим пов’язаним положенням Директиви 1999/5/EC.
Hierbij verklaart Kenwood dat het toestel KCA-BT100 in overeenstemming is
met de essentiële eisen en de andere relevante bepalingen van richtlijn 1999/5/
EG.
Nederlands |
B64-3480-00_01_E.indb 63
63
06.10.4 6:16:48 PM
Opmerkingen
• Raadpleeg uw Kenwood-dealer indien u problemen
of vragen hebt tijdens de installatie.
• Vraag bij aankoop van optionele accessoires aan
uw Kenwood-dealer of deze functioneren met uw
model en in uw gebied.
• De afbeeldingen van de display en het
voorpaneel in deze gebruiksaanwijzing zijn slechts
voorbeelden en zijn bedoeld om het gebruik
van de bedieningselementen te verduidelijken.
Daardoor kan de inhoud van het display in de
afbeeldingen afwijken van die van het display van
de daadwerkelijke apparatuur en zijn sommige
afbeeldingen op het display mogelijk niet van
toepassing.
Beschikbare ontvangers van Kenwood voor
dit toestel
De volgende ontvangers kunnen worden gebruikt
met de KCA-BT100: (Peildatum: september 2006)
Audio-ontvanger
DPX501U*, DPX701U, KDC-W5534U*,
KDC-W6534U*, KDC-W7534U, KDV-5234*
Beeldontvanger
DDX6029
Voor nadere details over compatibele ontvangers die
in de toekomst beschikbaar komen, raadpleegt u de
volgende URL:
http://www.kenwood.com/bt/bt100/
• *: Stel de functieschakelaar voor schermtekenconversie in
op "2". Raadpleeg voor meer informatie de sectie <Functie
voor schermtekenconversie> (pagina 78).
Informatie over de afstandsbediening
Voor de audio-ontvanger is een afstandsbediening
met cijfertoetsen vereist voor het rechtstreeks
invoeren van telefoonnummers.
U kunt alleen een gesprek uitvoeren met de
afstandsbediening als de toets [ ] beschikbaar is
op de afstandsbediening. Breng voor meer informatie
een bezoek aan de volgende URL:
http://www.kenwood.com/bt/bt100/
• Afhankelijk van uw bedieningseenheid kunt u al dan niet
gebruikmaken van een afstandsbediening.
64 |
Informatie over de mobiele telefoon
Dit toestel voldoet aan de volgende Bluetoothspecificaties:
Versie
Bluetooth-standaardversie 1.2
Profiel
HFP (Hands Free Profile)
OPP (Object Push Profile)
U kunt op de volgende URL nagaan welke mobiele
telefoons zijn gecontroleerd op compatibiliteit:
http://www.kenwood.com/bt/bt100/
• De apparaten die de Bluetooth-functionaliteit
ondersteunen, zijn gecertificeerd voor conformiteit met
de Bluetooth-norm volgens de procedure die wordt
voorgeschreven door Bluetooth SIG Inc. Afhankelijk van het
gebruikte type bestaat echter de kans dat deze apparaten
niet kunnen communiceren met uw mobiele telefoon.
• HFP is een profiel dat wordt gebruikt voor handsfree bellen.
• OPP is een profiel dat wordt gebruikt voor het overdragen
van gegevens, bijvoorbeeld de inhoud van een telefoonlijst,
tussen apparaten.
Dit product wordt niet geïnstalleerd door de fabrikant
van een voertuig op de productielijn, noch door
de professionele invoerder van een voertuig in EUlidstaten.
Informatie over het weggooien van
elektrische en elektronische apparatuur
(particulieren)
Dit symbool geeft aan dat gebruikte
elektrische en elektronische producten niet
bij het normale huishoudelijke afval mogen.
Lever deze producten in bij de aangewezen
inzamelingspunten, waar ze gratis worden
geaccepteerd en op de juiste manier worden
verwerkt, teruggewonnen en hergebruikt.
Voor inleveradressen zie www.nvmp.nl,
www.ictmilieu.nl, www.stibat.nl. Wanneer
u dit product op de juiste manier als afval
inlevert, spaart u waardevolle hulpbronnen
en voorkomt u potentiële negatieve gevolgen
voor de volksgezondheid en het milieu, die
anders kunnen ontstaan door een onjuiste
verwerking van afval.
Batterij niet
weggooien, maar
inleveren als KCA.
Nederlands
B64-3480-00_01_E.indb 64
06.10.4 6:16:48 PM
De Bluetooth-functie instellen
Voor gebruik
• U moet uw mobiele telefoon registreren voordat u
deze gaat gebruiken met dit toestel. Raadpleeg voor
meer informatie de sectie <Uw mobiele telefoon
registreren> (pagina 65).
• Als u twee of meer mobiele telefoons hebt
geregistreerd, moet u een van deze mobiele
telefoons selecteren. Raadpleeg voor meer
informatie de sectie <Selecteer de mobiele telefoon
die u wilt aansluiten> (pagina 70) of <Een handsfree
telefoon selecteren> (pagina 77).
• Als u de telefoonlijst wilt gebruiken, moet u deze
eerst downloaden naar dit toestel. Raadpleeg
voor meer informatie de sectie <De telefoonlijst
downloaden> (pagina 65).
• U kunt de luidspreker voor spraakuitvoer instellen.
Raadpleeg voor meer informatie de sectie <De
luidsprekers voor spraakuitvoer instellen> (pagina
71) of <De handsfree telefoon instellen> (pagina
76).
Uw mobiele telefoon registreren
Als u de mobiele telefoon wilt gebruiken met dit
toestel, moet u de telefoon registreren (koppelen). U
kunt maximaal vijf mobiele telefoons registreren voor
dit toestel.
1 Zet de bedieningseenheid aan.
2 Start de registratie van de mobiele telefoon
op de mobiele telefoon.
Voer een registratie (koppeling) voor een handsfree
telefoon uit met behulp van de mobiele telefoon.
Selecteer "KCA-BT100" uit de lijst met aangesloten
toestellen.
3 Voer een padsleutel in.
Voer "1234" in als padsleutel.
Controleer of de registratie is voltooid op de mobiele
telefoon.
4 Breng de handsfree verbinding tot stand met
behulp van de mobiele telefoon.
• Raadpleeg de bedieningshandleiding bij de mobiele
telefoon voor nadere bedieningsinstructies.
• U kunt maximaal vijf mobiele telefoons registreren. Als
u een zesde mobiele telefoon registreert, wordt de als
voorlaatste geregistreerde mobiele telefoon verwijderd.
• U kunt een mobiele telefoon niet registreren als op een
andere mobiele telefoon een handsfree verbinding actief is.
Beëindig de handsfree verbinding en registreer vervolgens
een nieuwe mobiele telefoon.
• Als de aanduiding "KCA-BT100" tweemaal of vaker wordt
weergegeven in de lijst met aangesloten toestellen, wordt
waarschijnlijk een andere "KCA-BT100" gebruikt in de buurt.
Verplaats uw auto en controleer of er nog maar één "KCABT100" wordt weergegeven.
De telefoonlijst downloaden
Download de gegevens in de telefoonlijst vanuit
de mobiele telefoon naar dit toestel zodat u de
telefoonlijst van dit toestel kunt gebruiken.
1 Verbreek de handsfree verbinding met behulp
van de mobiele telefoon.
2 Verstuur de gegevens uit de telefoonlijst
naar dit toestel met behulp van de mobiele
telefoon.
Download de gegevens uit de telefoonlijst naar dit
toestel met behulp van de mobiele telefoon.
Tijdens het downloaden wordt:
"Downloading", "DOWNLOAD" of "Now
Downloading…" weergegeven.
Na voltooiing van het downloadproces (voor
audio-ontvanger) wordt:
"Complete", "Completed" of "COMPLETE" weergegeven.
3 Breng de handsfree verbinding tot stand met
behulp van de mobiele telefoon.
U kunt als volgt het voltooiingsbericht voor de
download verwijderen (voor audio-ontvanger):
Druk op een willekeurige toets.
• Raadpleeg de bedieningshandleiding bij de mobiele
telefoon voor nadere bedieningsinstructies.
• Voor elke geregistreerde mobiele telefoon kunnen tot 300
telefoonnummers worden geregistreerd.
• Voor elk telefoonnummer kunnen 32 cijfers worden
geregistreerd plus maximaal 40 tekens voor het weergeven
van de naam.
• Afhankelijk van het type mobiele telefoon dat u gebruikt,
gelden de volgende beperkingen:
- De gegevens uit de telefoonlijst kunnen niet op de
normale wijze worden gedownload.
- De tekens in de telefoonlijst zijn door elkaar gegooid.
- De gegevens in de telefoonlijst kunnen niet normaal
worden gedownload als de telefoonlijst afbeeldingen
bevat. Het kan verschillende uren duren voordat de
telefoonlijst is gedownload, afhankelijk van de totale
afbeeldingsgrootte.
• Annuleer het downloaden van de gegevens in de
telefoonlijst met behulp van de mobiele telefoon.
Nederlands |
B64-3480-00_01_E.indb 65
65
06.10.4 6:16:49 PM
Algemene functies (voor audio-ontvanger)
Een telefonisch gesprek
beantwoorden
Als "CALL" of "Call" wordt weergegeven, worden tevens
de "(naam van de beller)" of het "(telefoonnummer)"
weergegeven.
Druk op de toets [AUDIO] of op een van de
toetsen [1] – [6].
Een binnenkomend gesprek weigeren
Houd de toets [ATT] ten minste 1 seconde
ingedrukt.
• U kunt het toestel zo instellen dat het binnenkomende
gesprek wordt aangenomen nadat een bepaalde
hoeveelheid tijd is verstreken. Raadpleeg voor meer
informatie de sectie <Het tijdsinterval voor automatische
beantwoording instellen> (pagina 71).
• Als u een schijf plaatst, bijvoorbeeld een cd, wordt de
verbinding verbroken.
• Als u de mobiele telefoon in de privé-modus zet, kan de
handsfree functie worden uitgeschakeld.
• Als een gesprek zonder beller-id binnenkomt, wordt
"No Name No Number", "No Number" of "NO-NMBER"
weergegeven.
• De naam van de beller wordt weergegeven als deze al is
geregistreerd in de telefoonlijst.
Overschakelen naar de privé-modus
U kunt overschakelen tussen de privé-modus
(rechtstreeks via de mobiele telefoon praten) en de
handsfree modus.
Druk op de regelknop ([38]).
Er wordt als volgt overgeschakeld tussen
gespreksmodi:
Display
Gespreksmodus
"Private"/ "PRIVATE"/ "PV TALK"
Privé-gesprek
"Handsfree"/ – / "HF TALK"
Handsfree gesprek
• Afhankelijk van het type mobiele telefoon dat u gebruikt,
kan bij overschakeling op de privé-modus de bron worden
geselecteerd die werd gebruikt voordat de handsfree
verbinding tot stand werd gebracht. Als dit gebeurt, kan
de bron niet worden teruggeschakeld naar de handsfree
modus met dit toestel. Ga terug naar de handsfree modus
met behulp van uw mobiele telefoon.
Het bericht dat de verbinding wordt
verbroken verwijderen
U kunt het bericht dat wordt weergegeven nadat de
verbinding van de mobiele telefoon is verbroken ook
verwijderen.
Houd de toets [ATT] ten minste 1 seconde
ingedrukt.
"Disconnect" of "DISCONCT" wordt weergegeven.
66 |
• Het kan enige tijd duren voordat de verbinding van de
mobiele telefoon weer is hersteld.
Het spraakvolume aanpassen tijdens
een gesprek
U kunt het spraakvolume aanpassen tijdens een
gesprek.
Draai aan de knop [VOL].
• Het tijdens het huidige gesprek aangepaste volume blijft
ongewijzigd tijdens de daaropvolgende oproepen.
• Als u het volume te veel verhoogt, neemt de kans op echo
toe. Als er sprake is van echo, stelt u het volume in op een
zo laag mogelijke waarde. Echo neemt proportioneel toe
ten opzichte van het volume.
Een gesprek beëindigen
Druk op de toets [SRC].
• U kunt ook de toets [ATT] ten minste één 1 seconde
ingedrukt houden om een gesprek te beëindigen.
Overschakelen tussen displaymodi
U kunt overschakelen tussen de telefoonlijst en de
gesprekkenlijst.
Druk op de toets [DISP]/ [AUTO]/ [TI].
Als de toets [DISP] niet beschikbaar is, drukt u op de
toets [AUTO] of [TI].
Voor de audio-ontvanger met multitoetssysteem:
Druk op de toets [AUTO]/ [TI].
Hiermee schakelt u over tussen de namenlijst en de
lijst met telefoonnummers.
Door het display schuiven
U kunt de lijst met telefoonnummers of namen
doorbladeren. Hoe u daarbij te werk gaat, kunt
u nalezen in <Laten rollen van tekst/titel> in de
instructiehandleiding die bij de besturingseenheid
wordt geleverd.
• Met de besturingseenheid, waarop alleen de naam van de
beller wordt weergegeven bij een binnenkomend gesprek
of bij snelkiezen, kunt u overschakelen naar de modus voor
weergave van het telefoonnummer door de bovenstaande
actie uit te voeren.
• Afhankelijk van het type besturingseenheid dat u gebruikt,
gelden de volgende beperkingen:
- Er kunnen maximaal 19 tekens worden weergegeven.
- Het teken # kan niet worden weergegeven, of "|" (alle
segmenten zijn verlicht) wordt weergegeven in de plaats
van #.
- U kunt niet overschakelen tussen displaymodi.
Nederlands
B64-3480-00_01_E.indb 66
06.10.4 6:16:49 PM
Kiesmethode (voor audio-ontvanger)
De kiesmodus selecteren
U kunt op vijf verschillende manieren kiezen.
1 Activeer de modus voor selectie van de
kiesmethode
Houd de toets [ATT] ten minste 1 seconde
ingedrukt.
"DIAL" of "N-DIAL" wordt weergegeven.
2 Selecteer een kiesmethode
Druk op de regelknop ([38]).
Door op deze knop te drukken, kunt u overschakelen
tussen de volgende kiesmethoden:
Voor de audio-ontvanger met multitoetssysteem:
1 Druk op de toets [NEXT].
Selecteer de sectie voor de toetsfunctie.
2 Druk op de toets [1] ("DIAL") – [4] ("IN-C").
Display
Multitoets Kiesmethode
"DIAL"/
[1] ("DIAL") Kies door een telefoonnummer in te
"N-DIAL"
voeren. (pagina 67)
Kies met behulp van de functie voor
snelkiezen. (pagina 67)
"INITIAL"/ [2]
Kies door naar de gewenste initiaal te
"PH-BOOK1" ("PHBK")* zoeken in de telefoonlijst (pagina 68)
"PH.BOOK"/ [2]
Kies door de telefoonlijst te doorzoeken
"PH-BOOK2" ("PHBK")* in alfabetische volgorde. (pagina 68)
"OUT"/
[3] ("OUT-C") Kies met behulp van de lijst met
"OUT-CALL"
uitgaande gesprekken. (pagina 68)
"IN"/
[4] ("IN-C") Kies met behulp van de lijst met
"IN-CALL"
binnenkomende gesprekken. (pagina 69)
3 Deactiveer de modus voor selectie van de
kiesmethode
Houd de toets [ATT] ten minste 1 seconde
ingedrukt.
• U kunt de telefoonlijst alleen gebruiken als u deze hebt
gedownload vanuit de mobiele telefoon. Raadpleeg voor
meer informatie de sectie <De telefoonlijst downloaden>
(pagina 65).
• De lijst met uitgaande gesprekken en de lijst met
binnenkomende gesprekken zijn de lijsten met gesprekken
die zijn uitgegaan van of binnengekomen bij deze eenheid.
Het gaat hierbij niet om de gesprekken die zijn opgeslagen
in het geheugen van de mobiele telefoon.
• * Met het multitoetssysteem kunt u overschakelen tussen
de methoden voor het doorzoeken van de telefoonlijst
door op de toets [2] ("PHBK") te drukken.
1 Activeer de modus voor het kiezen van een
nummer
Selecteer het display "DIAL" of "N-DIAL".
Raadpleeg <De kiesmodus selecteren> (pagina 67).
2 Voer een telefoonnummer in
Druk op het nummer ([1] – [0]), op de
toets #([FM]), *([AM]) of +([¢]) van de
afstandsbediening.
3 Voer een gesprek
Druk op de toets [DIRECT] op de
afstandsbediening.
"CALL" of "Call" wordt weergegeven.
U kunt als volgt het ingevoerde
telefoonnummer cijfer voor cijfer wissen:
Druk op de toets [4] op de
afstandsbediening.
• U kunt maximaal 32 cijfers invoeren.
• Afhankelijk van het type besturingseenheid, wordt mogelijk
"|" (alle segmenten zijn verlicht) weergegeven in plaats van
#.
Kiezen met behulp van de functie
voor snelkiezen
U kunt kiezen door een telefoonnummer te bellen
dat is vastgelegd in de lijst met vooraf ingestelde
nummers. Raadpleeg voor meer informatie over het
vooraf vastleggen van een telefoonnummer de sectie
<Nummers opnemen in de lijst met vooraf ingestelde
nummers> (pagina 68) .
1 Activeer de modus voor het kiezen van een
nummer
Selecteer het display "DIAL" of "N-DIAL".
Raadpleeg <De kiesmodus selecteren> (pagina 67).
2 Selecteer de toets waaronder het vooraf
ingestelde nummer ligt opgeslagen
Druk op de toets [1] – [3].
"Preset #" of "PRESET #" wordt weergegeven.
Voor de audio-ontvanger met multitoetssysteem:
1 Druk op de toets [NEXT].
Selecteer de sectie voor de toetsfunctie.
2 Druk op de toets [1] ("1") – [3] ("3").
"DIAL #" wordt weergegeven.
3 Voer een gesprek
Functie van afstandsbediening
Een gesprek voeren door een
telefoonnummer in te voeren
U kunt een gesprek voeren door een telefoonnummer
in te voeren.
Houd de regelknop ([38]) ten minste 1
seconde ingedrukt.
"CALL" of "Call" wordt weergegeven.
• Als het gewenste nummer niet voorkomt in de lijst met
vooraf ingestelde nummers, wordt "No Name No Number",
"No Number" of "NO-NUMBER" weergegeven.
Nederlands |
B64-3480-00_01_E.indb 67
67
06.10.4 6:16:50 PM
Kiesmethode (voor audio-ontvanger)
Nummers opnemen in de lijst met
vooraf ingestelde nummers
U kunt maximaal 3 telefoonnummers vastleggen voor
snelkiezen.
1 Voer het telefoonnummer in dat u wilt
vastleggen
Houd bij het invoeren van het telefoonnummer
rekening met het volgende:
- <Een gesprek voeren door een telefoonnummer in te
voeren> (pagina 67)
- <Kiezen met behulp van de telefoonlijst> (pagina 68)
- <Kiezen met behulp van de lijst met uitgaande
gesprekken> (pagina 68)
- <Kiezen met behulp van de lijst met binnenkomende
gesprekken> (pagina 69)
2 Selecteer de toets waaronder u het nummer
wilt vastleggen
Houd de toets [1] – [3] ten minste 2 seconde
ingedrukt.
Voor de audio-ontvanger met multitoetssysteem:
1 Druk op de toets [NEXT].
2 Selecteer de initiaal waarop u wilt zoeken
Zet de regelknop op [4], [¢], [FM] of [AM].
Verplaats de cursor naar de initiaal waarop u wilt
zoeken.
Knop
Werking
[4]/ [¢] Naar het volgende teken gaan.
[FM]/ [AM]
Naar de volgende rij gaan.
3 Bepaal de geselecteerde initiaal
Houd de regelknop ([38]) ten minste 1
seconde ingedrukt.
4 Selecteer de naam
Zet de regelknop op [FM], [AM], [4] of [¢].
Selecteer de naam.
Knop
Werking
[FM]/ [AM]
De naam wijzigen.
[4]/ [¢] De initiaal wijzigen.
5 Voer een gesprek
Houd de regelknop ([38]) ten minste 1
seconde ingedrukt.
"CALL" of "Call" wordt weergegeven.
Selecteer de sectie voor de toetsfunctie.
2 Houd de toets [1] ("1"/ "MEM.1") – [3] ("3"/
"MEM.3") ten minste 2 seconde ingedrukt.
"Memory" of "MEMORY" knippert eenmaal.
3 Deactiveer de modus voor selectie van de
kiesmethode
Houd de toets [ATT] ten minste 1 seconde
ingedrukt.
Kiezen met behulp van de
telefoonlijst
U kunt kiezen met behulp van de gedownloade
telefoonlijst.
1 Activeer de telefoonlijstmodus
Selecteer het display "INITIAL", "PH-BOOK1", "PH.BOOK"
of "PH-BOOK2".
Raadpleeg <De kiesmodus selecteren> (pagina 67).
Als u "PH.BOOK" of "PH-BOOK2" hebt geselecteerd,
gaat u verder met stap 4.
Voor de audio-ontvanger met multitoetssysteem:
Druk op de toets [2] ("PHBK").
Door op deze toets te drukken, kunt u
overschakelen tussen de volgende zoekmethoden:
Display
"INITIAL"/
"PH-BOOK1"
"PH.BOOK"/
"PH-BOOK2"
68 |
Zoekmethode
Zoeken op initiaal.
Zoeken in alfabetische volgorde.
Ga verder naar stap 4.
• U kunt de telefoonlijst alleen gebruiken als u deze hebt
gedownload vanuit de mobiele telefoon. Raadpleeg voor
meer informatie de sectie <De telefoonlijst downloaden>
(pagina 65).
• Initialen zonder bijbehorende naam worden niet
weergegeven.
• Op de besturingseenheid met drie displayrijen, is de naam
in de middelste rij de geselecteerde naam.
• Tijdens de zoekbewerking wordt gezocht naar tekens
zonder accent, bijvoorbeeld "u", in plaats van naar tekens
met accent, zoals "ü".
• Naar tekens die niet kunnen worden weergegeven op de
besturingseenheid wordt gezocht in de volgorde waarin zij
zijn vastgelegd in de telefoonlijst.
Kiezen met behulp van de lijst met
uitgaande gesprekken
U kunt ook kiezen met behulp van de lijst met
uitgaande gesprekken. Er kunnen maximaal tien
telefoonnummers van uitgaande gesprekken worden
vastgelegd in de lijst met uitgaande gesprekken.
1 Activeer de modus voor de lijst met uitgaande
gesprekken
Selecteer het display "OUT" of "OUT-CALL".
Raadpleeg <De kiesmodus selecteren> (pagina 67).
2 Selecteer een naam of telefoonnummer
Druk de regelknop naar [FM] of [AM].
Nederlands
B64-3480-00_01_E.indb 68
06.10.4 6:16:51 PM
Afstandsbediening (voor audio-ontvanger)
3 Voer een gesprek
Houd de regelknop ([38]) ten minste 1
seconde ingedrukt.
"CALL" of "Call" wordt weergegeven.
Functies van de toetsen
Toets [SRC]*
Tijdens een gesprek: Het gesprek wordt beëindigd.
Toetsen [VOL]*
• De lijst met uitgaande gesprekken is de lijst met
gesprekken die zijn gevoerd vanaf deze eenheid. Het gaat
hierbij niet om de gesprekken die zijn opgeslagen in het
geheugen van de mobiele telefoon.
• Op de besturingseenheid met drie displayrijen is het
telefoonnummer in de middelste rij het geselecteerde
nummer.
• Afhankelijk van het type besturingseenheid dat u gebruikt,
wordt al dan niet "0" weergegeven voor het tiende gesprek
in de lijst met uitgaande gesprekken.
Kiezen met behulp van de lijst met
binnenkomende gesprekken
U kunt ook kiezen met behulp van de lijst met
binnenkomende gesprekken. Er kunnen maximaal
tien telefoonnummers van binnenkomende
gesprekken worden vastgelegd in de lijst met
binnenkomende gesprekken.
1 Activeer de modus voor de lijst met
binnenkomende gesprekken
Selecteer het display "IN" of "IN-CALL".
Raadpleeg <De kiesmodus selecteren> (pagina 67).
2 Selecteer een naam of telefoonnummer
Druk de regelknop naar [FM] of [AM].
3 Voer een gesprek
Houd de regelknop ([38]) ten minste 1
seconde ingedrukt.
"CALL" of "Call" wordt weergegeven.
Tijdens een gesprek: Het spraakvolume wordt
aangepast.
Toets [
]
De modus voor selectie van de kiesmethode wordt
geactiveerd.
Bij een binnenkomend gesprek: Het gesprek wordt
aangenomen.
Toets [38]*
Tijdens een gesprek:
Er wordt overgeschakeld tussen de privé-modus en de
handsfree modus.
In de modus voor selectie van de kiesmethode:
Er wordt een kiesmethode geselecteerd.
Toets [¢]*
Invoer van kiesnummer: Er wordt een "+" ingevoerd.
Toets [4]*
Invoer van kiesnummer:
Het ingevoerde telefoonnummer wordt gewist.
Toets [FM]*
Invoer van kiesnummer: Er wordt een "#" ingevoerd.
Toets [AM]*
Invoer van kiesnummer: Er wordt een "*" ingevoerd.
Cijfertoetsen [0] – [9]*
Invoer van kiesnummer: Er wordt een cijfer ingevoerd.
Toets [DIRECT]*
Er wordt een verbinding tot stand gebracht.
Schakelaar voor modusselectie op
afstandsbediening
Schakel op naar "AUD" tijdens het kiezen.
• De lijst met binnenkomende gesprekken is de lijst met
gesprekken die zijn ontvangen op deze eenheid. Het gaat
hierbij niet om de gesprekken die zijn opgeslagen in het
geheugen van de mobiele telefoon.
• Op de besturingseenheid met drie displayrijen is het
telefoonnummer in de middelste rij het geselecteerde
nummer.
• Afhankelijk van het type besturingseenheid dat u gebruikt,
wordt al dan niet "0" weergegeven voor het tiende gesprek
in de lijst met binnenkomende gesprekken.
• * Als de afstandsbediening een schakelaar voor
modusselectie bevat, stelt u deze in op "AUD".
• Afstandsbedieningen met de toets [
] en/of
numerieke toetsen zijn optioneel beschikbaar. Schaf een
afstandsbediening met de gewenste functies aan.
Nederlands |
B64-3480-00_01_E.indb 69
69
06.10.4 6:16:51 PM
Menusysteem (voor audio-ontvanger)
Menusysteem
Voor het instellen van verschillende functies.
Hieronder wordt de basisbediening van het
menusysteem uitgelegd. Na deze uitleg volgt een
beschrijving van alle beschikbare functies en de
daarbij behorende instellingen.
1 Activeer de menumodus
Houd de toets [MENU] ten minste 1 seconde
ingedrukt.
"MENU" wordt getoond.
2 Selecteer het menu-item
Druk de regelknop naar [FM] of [AM].
3 Stel het menu-item in
Druk de regelknop naar [4] of [¢].
In stand-by
Een geregistreerde mobiele telefoon
verwijderen
U kunt een geregistreerde mobiele telefoon
verwijderen.
1 Selecteer de modus voor het verwijderen van
telefoons
Druk de regelknop naar [FM] of [AM].
Selecteer het display "Phone Delete" of "PHN-DEL".
2 Activeer de modus voor het verwijderen van
telefoons
Houd de regelknop ([38]) ten minste 1
seconde ingedrukt.
"(naam)" wordt weergegeven.
4 Deactiveer de menumodus
3 Selecteer de mobiele telefoon die u wilt
Druk op de toets [MENU].
verwijderen
Druk de regelknop naar [FM] of [AM].
• Drie menu-items verschijnen op het display. Het menuitem dat in het midden wordt weergegeven, is het item dat
u kunt aanpassen.
4 Verwijder de geselecteerde mobiele telefoon
Houd de regelknop ([38]) ten minste 1
seconde ingedrukt.
"Delete" of "DELETE" wordt weergegeven.
5 Deactiveer de modus voor het verwijderen
In stand-by
Selecteer de mobiele telefoon die u
wilt aansluiten
Als er al twee of meer mobiele telefoons zijn
geregistreerd, moet u de mobiele telefoon selecteren
die u wilt gebruiken.
van telefoons
Druk op de toets [MENU].
• Als een geregistreerde mobiele telefoon wordt verwijderd,
worden tevens de telefoonlijst, de lijst met uitgaande
gesprekken en de lijst met binnenkomende gesprekken
voor deze mobiele telefoon verwijderd.
1 Selecteer de modus voor telefoonselectie
Druk de regelknop naar [FM] of [AM].
Selecteer het display "Phone Selection" of "PHN-SEL".
2 Activeer de geselecteerde modus voor
telefoonselectie
Houd de regelknop ([38]) ten minste 1
seconde ingedrukt.
"(naam)" wordt weergegeven.
3 Selecteer de mobiele telefoon die u wilt
aansluiten
Druk de regelknop naar [FM] of [AM].
4 Stel de mobiele telefoon in die u wilt
aansluiten
Druk de regelknop naar [4] of [¢].
"✱(naam)" of "-(naam)" wordt weergegeven.
"✱" (donkere kleur) of "✱": De geselecteerde mobiele
telefoon is bezet.
"✱" (lichte kleur) of "_": De geselecteerde mobiele
telefoon staat op stand-by.
De status van de mobiele telefoon
weergeven
U kunt de verbindingsstatus, de signaalsterkte en het
batterijniveau weergeven.
1 Selecteer het item voor statusweergave
Druk de regelknop naar [FM] of [AM].
Selecteer het display "P-STATUS".
2 Activeer de modus voor statusweergave
Houd de regelknop ([38]) ten minste 1
seconde ingedrukt.
3 Selecteer het item dat u wilt weergeven
Druk de regelknop naar [FM] of [AM].
4 Deactiveer de modus voor statusweergave
Druk op de toets [MENU].
5 Deactiveer de modus voor telefoonselectie
Druk op de toets [MENU].
70 |
Nederlands
B64-3480-00_01_E.indb 70
06.10.4 6:16:52 PM
1 Selecteer het item voor statusweergave
Druk de regelknop naar [FM] of [AM].
Selecteer het display "Phone Status".
2 Geef de statussen weer
Druk de regelknop naar [4] of [¢].
Alle statussen worden aangeduid met pictogrammen.
3 Deactiveer de menumodus
Druk op de toets [MENU].
Bluetooth-verbindingsstatus
Display
Pictogram
Informatie
"BT-CON Y"
Verbinding actief
In stand-by
Het tijdsinterval voor automatische
beantwoording instellen
Met deze functie wordt een gesprek automatisch
beantwoord (aangenomen) nadat het vooraf
ingestelde tijdsinterval voor automatische
beantwoording is verstreken.
Display
"Auto Answer: OFF"/
"ANS OFF"
"Auto Answer: 0s"/
"ANS 0"
"Auto Answer: 8s"/
"ANS 8"
Geen verbinding
Het telefoongesprek wordt automatisch
beantwoord nadat 8 seconden zijn verstreken
(oorspronkelijke instelling).
…
"BT-CON N"
Instelling
Het gesprek wordt niet automatisch
beantwoord.
Het telefoongesprek wordt direct automatisch
beantwoord.
…
Als de besturingseenheid een grafische
weergavefunctie ondersteunt:
"Auto Answer: 99s"/ Het telefoongesprek wordt automatisch
"ANS 99"
beantwoord nadat 99 seconden zijn verstreken.
• Als in de mobiele telefoon een kortere tijd is ingesteld dan
in de besturingseenheid, wordt de tijd van de mobiele
telefoon gebruikt.
…
"BAT MID"
…
Batterijniveau van mobiele telefoon
Display
Pictogram
Informatie
"BAT FULL"
Vol
"BAT LOW"
Bijna leeg
In stand-by
"BAT - - -"
Geen informatie beschikbaar.
De luidsprekers voor spraakuitvoer
instellen
…
"SGNL MID"
…
Signaalsterkte van mobiele telefoon
Display
Pictogram
Informatie
"SGNL MAX"
Maximaal
"SGNL LOW"
Minimaal
"NO SGNAL"
Buiten het ontvangstbereik
"SGNL - - -"
Geen informatie beschikbaar.
• Aangezien het aantal stappen van de besturingseenheid
afwijkt van dat van de mobiele telefoon, komen
de statussen die worden weergegeven op de
besturingseenheid mogelijk niet overeen met de statussen
op de mobiele telefoon.
U kunt de luidsprekers voor spraakuitvoer instellen.
Display
"SP Select: Front"/
"SPK FRT"
"SP Select: F-R"/
"SPK F-R"
"SP Select: F-L"/
"SPK F-L"
Instelling
De spraak wordt uitgevoerd via de luidsprekers
linksvoor en rechtsvoor.
De spraak wordt uitgevoerd via de luidspreker
rechtsvoor.
De spraak wordt uitgevoerd via de luidspreker
linksvoor.
• Selecteer de luidspreker die verder af staat van de
microfoon om gejank of echo te voorkomen.
In stand-by
Het geluidssignaal voor
binnenkomende gesprekken instellen
U kunt een geluidssignaal laten klinken via de
luidspreker als een gesprek binnenkomt.
Display
Instelling
"Call Beep: ON"/ "C-BP ON" Het geluidssignaal wordt weergegeven.
"Call Beep: OFF"/ "C-BP OFF" Het geluidssignaal is uitgeschakeld.
Nederlands |
B64-3480-00_01_E.indb 71
71
06.10.4 6:16:53 PM
Besturing van handsfree eenheid (voor beeldontvanger)
Besturing van handsfree eenheid
6 Hiermee voert u drie telefoonnummers voor
snelkiezen in.
(Zie de sectie <Snelkiezen>, pagina 74)
7 Hiermee voert u een telefoonnummer in.
(Zie de sectie <Tijdens het kiezen>, pagina 74)
8 Hiermee wordt de signaalsterkte weergegeven.*
Hoe meer balksegmenten zichtbaar zijn, des te
sterker het signaal.
9 Hiermee wordt de huidige status voor
automatische beantwoording weergegeven.
Als automatische beantwoording is ingeschakeld:
Scherm voor besturing van
handsfree eenheid
Of bij een
binnenkomend
gesprek…
TEL
AUTO
Als automatische beantwoording is uitgeschakeld:
Scherm voor besturing van handsfree eenheid
9
8
Hands
10
AUTO
Free
K E N WO O D
1
2
11
0123456789
P1
15
1
2
3
4
5
6
12
7
8
9
Clear
*
0
#
P2
3
P3
6
4
5
S e t Up
+
13
14
7
Return
Besturingsscherm
DV D V I D E O
13:50
16
TEL
IN
Next
REP
Title 1
Chap
KENWOOD
3
TIME
SCRL
T0:05:20
1 Hiermee wordt het scherm voor het doorzoeken
van de telefoonlijst weergegeven.
(Zie de sectie <Bellen via de telefoonlijst>, pagina
75)
2 Hiermee wordt het scherm met uitgaande
gesprekken weergegeven.
(Zie de sectie <Opnieuw kiezen>, pagina 76)
3 Hiermee wordt het scherm met binnenkomende
gesprekken weergegeven.
(Zie de sectie <Opnieuw kiezen>, pagina 76)
4 Hiermee wordt overgeschakeld tussen de modi
privé en handsfree (alleen tijdens een gesprek).
5 Hiermee wordt het scherm voor het instellen van
de handsfree modus weergegeven.
(Zie de sectie <De handsfree telefoon instellen>,
pagina 76)
72 |
p Hiermee wordt de batterijstatus van de mobiele
telefoon weergegeven.*
Hoe meer balksegmenten zichtbaar zijn, des te
voller de batterij nog is.
q Hiermee wordt het gesprek gestart.
w Hiermee wordt het gesprek beëindigd.
Hiermee wordt het ingevoerde telefoonnummer
gewist.
e Hiermee wordt het ingevoerde telefoonnummer
gewist.
r Hiermee gaat u terug naar het vorige scherm.
t Hiermee worden de nummers van beller en
gebelde weergegeven.
Als u een telefoonnummer hebt vastgelegd in de
telefoonlijst, wordt de naam van de desbetreffende
persoon weergegeven.
y Hiermee wordt de status van de verbinding met de
mobiele telefoon weergegeven.
Wit: De mobiele telefoon is aangesloten.
Oranje: De mobiele telefoon is niet aangesloten of
bevindt zich buiten het ontvangstbereik.
• Sommige functies zijn om veiligheidsredenen
uitgeschakeld terwijl uw auto rijdt. De toetsen
voor de uitgeschakelde functies werken niet als zij
worden ingedrukt.
• Als het scherm voor handsfree besturing wordt
weergegeven, wordt de naam van de aangesloten
mobiele telefoon 5 seconden lang weergegeven.
• * Aangezien het aantal stappen van de
besturingseenheid afwijkt van dat van de mobiele
telefoon, komen de statussen die worden
weergegeven op de besturingseenheid mogelijk
niet overeen met de statussen op de mobiele
Nederlands
B64-3480-00_01_E.indb 72
06.10.4 6:16:55 PM
telefoon. Er wordt geen status weergegeven als
geen informatie beschikbaar is voor deze status.
• Als u de mobiele telefoon in de privé-modus zet, kan
de handsfree functie worden uitgeschakeld.
g Toets [5]/ [∞]
Het spraakvolume aanpassen tijdens een gesprek.
h Toets [
]
Hiermee wordt het scherm voor handsfree
besturing weergegeven.
Bij een binnenkomend gesprek: Het gesprek wordt
aangenomen.
Afstandsbediening
17
18
19
24
20
• Het tijdens een gesprek aangepaste volume blijft
ongewijzigd tijdens de daaropvolgende gesprekken.
• Als u het volume te veel verhoogt, neemt de kans
op echo toe. Als er sprake is van echo, stelt u het
volume in op een zo laag mogelijke waarde. Echo
neemt proportioneel toe ten opzichte van het
volume.
25
21
26
22
Werking van de toetsen
23
u Toets [SRC]
Tijdens een gesprek: Het gesprek wordt beëindigd.
i Toets [*] (als f is ingesteld op "AUD")
Invoer van kiesnummer:
Er wordt een "+" ingevoerd.
o Toets [FM+] (als f is ingesteld op "AUD")
Invoer van kiesnummer:
Er wordt een "#" ingevoerd.
; Toets [AM-] (als f is ingesteld op "AUD")
Invoer van kiesnummer:
Er wordt een "*" ingevoerd.
a Toets [4] (als f is ingesteld op "AUD")
Invoer van kiesnummer:
Hiermee wordt het ingevoerde telefoonnummer
gewist.
s Cijfertoetsen [0] – [9] (als f is ingesteld op
"AUD")
Invoer van kiesnummer: Hiermee wordt een cijfer
van een telefoonnummer ingevoerd.
d Toets [DIRECT] (als f is ingesteld op "AUD")
Hiermee voert u een gesprek.
f Schakelaar voor modusselectie op
afstandsbediening
Schakel op naar "AUD" tijdens het kiezen.
SRC
27
28
j Toets [u]/ [d]
Tijdens een gesprek: Het spraakvolume wordt
aangepast.
k Toets [SRC]
Tijdens een gesprek: Het gesprek wordt beëindigd.
Nederlands |
B64-3480-00_01_E.indb 73
73
06.10.4 6:16:57 PM
Besturing van handsfree eenheid (voor beeldontvanger)
Bij binnenkomende gesprekken
Snelkiezen
Als een gesprek binnenkomt, kun u de handsfree
telefoon gebruiken.
U kunt maximaal 3 telefoonnummers vastleggen voor
snelkiezen.
1
Een gesprek aannemen
U kunt als volgt een telefoonnummer
vastleggen:
1
Als een gesprek binnenkomt, wordt automatisch het
scherm voor besturing van de handsfree eenheid
weergegeven.
2
Een gesprek beëindigen
Geef een telefoonnummer weer dat u wilt
vastleggen
Zie de sectie <Bellen via de telefoonlijst> (pagina
75), <Opnieuw kiezen> (pagina 76) en <Tijdens het
kiezen> (pagina 74).
2
Leg het telefoonnummer vast
P1
Het vorige scherm wordt opnieuw weergegeven.
—
P3
Houd deze meer dan 2 seconden ingedrukt.
Tijdens het kiezen
U kunt als volgt een telefoonnummer bellen
vanuit het geheugen:
Begin een gesprek door een telefoonnummer in te
voeren.
1
1
Voer een telefoonnummer in
+
2
9
—
0
,
*
Haal het telefoonnummer op
P1
,
,
#
2
—
P3
Voer een gesprek
Voer een gesprek
U kunt beginnen met praten zodra de gebelde
antwoordt.
• Alleen de telefoonnummers kunnen worden
vastgelegd voor snelkiezen. Daarom worden de
naam van de gebelde en andere gebruikers niet
weergegeven tijdens het kiezen.
• U kunt onjuiste invoer wissen door Clear aan
te raken.
3
Een gesprek beëindigen
Het vorige scherm wordt opnieuw weergegeven.
• U kunt maximaal 32 cijfers invoeren.
74 |
Nederlands
B64-3480-00_01_E.indb 74
06.10.4 6:16:58 PM
Bellen via de telefoonlijst
3
U kunt iemand bellen via zijn of haar telefoonnummer
dat u hebt vastgelegd in de telefoonlijst.
1
Selecteer een bestemming die u wilt bellen
Name
Geef het scherm met de telefoonlijst weer
4
Bevestig de bestemming
OK
Het scherm voor initiële invoer wordt weergegeven.
Het scherm voor handsfree besturing wordt opnieuw
weergegeven. De gegevens over de geselecteerde
bestemming worden weergegeven.
Scherm voor initiële invoer
AUTO
Phone Book L i s t
5
2
a
1
1
b
c
d
e
f
g
h
i
j
k
l
m
n
o
p
q
r
s
t
u
v
w
x
y
z
Voer een gesprek
3
Return
1 Hiermee wordt door de lijst met tekens gebladerd.
2 Hiermee wordt de naam in de telefoonlijst
U kunt beginnen met praten zodra de gebelde
antwoordt.
6
Een gesprek beëindigen
weergegeven waarvan de eerste letter
overeenkomt met het teken dat u hebt aangeraakt.
3 Hiermee wordt teruggegaan naar het scherm voor
handsfree besturing.
Het vorige scherm wordt opnieuw weergegeven.
2
Selecteer het eerste teken van de naam van
een persoon in het geheugen
a
enz.
Het scherm met de telefoonlijst wordt weergegeven.
Scherm met telefoonlijst
Phone Book L i s t
AUTO
1234567890
2
1
Name
• U kunt de telefoonlijst alleen gebruiken als u deze
hebt gedownload vanuit de mobiele telefoon.
Raadpleeg voor meer informatie de sectie <De
telefoonlijst downloaden> (pagina 65).
• Er kunnen maximaal 16 tekens worden
weergegeven voor elke naam in de telefoonlijst.
• Initialen zonder bijbehorende naam worden niet
weergegeven.
• Tijdens de zoekbewerking wordt gezocht naar
tekens zonder accent, bijvoorbeeld "u", in plaats van
naar tekens met accent, zoals "ü".
Name
1
Name
Name
3
4
OK
Return
1 Hiermee wordt de lijst doorgebladerd.
2 Hiermee wordt de naam van de gebelde ingevoerd.
3 Hiermee worden de bestemmingsgegevens
ingevoerd en wordt vervolgens teruggegaan naar
het scherm voor handsfree besturing.
4 Hiermee wordt teruggegaan naar het scherm voor
handsfree besturing.
Nederlands |
B64-3480-00_01_E.indb 75
75
06.10.4 6:17:00 PM
Besturing van handsfree eenheid (voor beeldontvanger)
U kunt beginnen met praten zodra de gebelde
antwoordt.
Opnieuw kiezen
U kunt een van de laatste 10 telefoonnummers voor
binnenkomende of uitgaande gesprekken opnieuw
kiezen.
1
5
Geef het scherm voor het zoeken van
uitgaande of binnenkomende gesprekken
weer
Een gesprek beëindigen
Het vorige scherm wordt opnieuw weergegeven.
Uitgaande gesprekken
of
binnenkomende gesprekken
Het scherm voor uitgaande of binnenkomende
gesprekken wordt weergegeven.
Scherm voor uitgaande of binnenkomende
gesprekken
Incoming Calls
2
• Het scherm met uitgaande gesprekken of het
scherm met binnenkomende gesprekken bevat
de lijst met gesprekken die zijn gestart vanaf of
ontvangen op deze eenheid. Het gaat hierbij niet
om de gesprekken die zijn opgeslagen in het
geheugen van de mobiele telefoon.
AUTO
De handsfree telefoon instellen
Kenwood
1234567890
Kenwood
1234567890
Kenwood
1234567890
3
DISP
Het handsfree systeem kan als volgt worden
ingesteld.
4
1
Kenwood
1234567890
OK
1
Kenwood
1234567890
Return
5
1 Hiermee wordt de lijst doorgebladerd.
2 Hiermee wordt de naam van de gebelde ingevoerd.
3 Hiermee schakelt u over naar de herkieslijst.
4 Hiermee worden de bestemmingsgegevens
ingevoerd en wordt vervolgens teruggegaan naar
het scherm voor handsfree besturing.
5 Hiermee wordt teruggegaan naar het scherm voor
handsfree besturing.
S e t Up
Scherm voor instellen van handsfree telefoon
Hands Free Set Up
Au t o A n s w e r i n g
1
8
P h o n e Vo i c e
2
F-Right
Beep
On
4 S
Se
e ll e
ec
c tt
5
AUTO
1
2
3
D
Seelleetcet
6
2
Return
Selecteer een bestemming die u wilt bellen
1 Hiermee wordt een automatische
3
Bevestig de bestemming
OK
Het scherm voor handsfree besturing wordt opnieuw
weergegeven. De gegevens over de geselecteerde
bestemming worden weergegeven.
4
Voer een gesprek
76 |
beantwoordingstijd na beëindiging van een
gesprek ingesteld. ( "8")
"Off":
Deze functie kan niet worden gebruikt.
"0-99": Hiermee wordt ingesteld hoe lang
het geluidssignaal voor een gesprek
maximaal klinkt (in seconden).
2 Hiermee wordt de uitvoerpositie voor de beltoon
ingesteld. ( "F-Right")
"F-Left":
De beltoon klinkt vanuit de
luidspreker linksvoor.
"F-Right":
De beltoon klinkt vanuit de
luidspreker rechtsvoor.
"Front All": De beltoon klinkt vanuit beide
voorste luidsprekers.
3 Hiermee wordt het geluidssignaal voor
binnenkomende gesprekken ingesteld. ( "On")
Nederlands
B64-3480-00_01_E.indb 76
06.10.4 6:17:01 PM
De handsfree telefoon verwijderen
"On":
Het geluidssignaal wordt weergegeven.
"Off":
Het geluidssignaal is uitgeschakeld.
4 Hiermee wordt het scherm voor telefoonselectie
weergegeven.
5 Hiermee wordt het scherm voor het verwijderen
van een telefoon weergegeven.
6 Hiermee wordt teruggegaan naar het scherm voor
handsfree besturing.
U kunt het vastleggen van een handsfree telefoon
ook weer ongedaan maken.
1
Geef het scherm voor het instellen van de
handsfree modus weer
S e t Up
• Het tijdsinterval voor automatische beantwoording
dat is ingesteld op deze eenheid of het tijdsinterval
dat is ingesteld op de mobiele telefoon wordt van
kracht (het kortste interval krijgt de voorrang).
• Selecteer de luidspreker die verder af staat van de
microfoon om gejank of echo te voorkomen.
2
Geef het scherm voor het verwijderen van
een telefoon weer
D
Seelleetcet
Scherm voor verwijderen van telefoon
Een handsfree telefoon selecteren
AUTO
Phone Delete
1
U kunt de handsfree telefoon kiezen uit de lijst.
Kenwood 1
1
Het scherm voor het instellen van de
handsfree modus weergeven
Kenwood 2
Kenwood 3
Kenwood 4
S e t Up
2
Kenwood 5
2
1 Hiermee wordt de mobiele telefoon geselecteerd
Het scherm voor telefoonselectie weergeven
die u wilt verwijderen uit de lijst.
2 Hiermee wordt teruggegaan naar het scherm voor
S
Se
e ll e
ec
c tt
het instellen van de handsfree telefoon.
3
Scherm voor telefoonselectie
Phone Select
1
Return
Selecteer een handsfree telefoon die u wilt
verwijderen
AUTO
Kenwood 3
Kenwood 1
Kenwood 2
Kenwood 3
Kenwood 4
Kenwood 5
Return
1 Hiermee wordt de mobiele telefoon geselecteerd
2
• Samen met de bijbehorende handsfree telefoon
worden de telefoonlijst, de lijst met uitgaande
gesprekken en de lijst met binnenkomende
gesprekken verwijderd.
die u wilt gebruiken als handsfree telefoon.
2 Hiermee wordt teruggegaan naar het scherm voor
het instellen van de handsfree telefoon.
3
Selecteer een handsfree telefoon die u wilt
gebruiken
Kenwood 1
Nederlands |
B64-3480-00_01_E.indb 77
77
06.10.4 6:17:03 PM
Toebehoren/Installatieprocedure
Voor een goede ontvangst
Houd voor een goede ontvangst rekening met het
volgende:
Toebehoren
1
3 m ..........1
2
..........2
3
• Communiceer met de mobiele telefoon terwijl deze
zich op een afstand van maximaal 10 m bevindt. Het
communicatiebereik kan korter worden, afhankelijk van de
omgevingssituatie. Het communicatiebereik wordt tevens
korter als er zich een obstakel tussen deze eenheid en de
mobiele telefoon bevindt. Het bovengenoemde maximale
communicatiebereik (10 m) is niet altijd verzekerd.
• Houd deze eenheid zo veel mogelijk uit de buurt van
andere elektrische onderdelen (AV-componenten). Als zij te
dichtbij staan, kan de verbinding mislukken, kan de televisie
of radio last hebben van ruis of kan de ontvangst slecht zijn.
• Een zendstation of walkietalkie in de buurt kan de
communicatie verstoren ten gevolge van een te krachtig
signaal.
..........1
Installatieprocedure
1. Verwijder de sleutel uit het contactslot en koppel
de - accu los om kortsluiting te voorkomen.
2. Stel de functieschakelaar voor
schermtekenconversie in.
3. Maak voor elke eenheid de juiste invoer- en
uitvoerkabelaansluitingen.
4. Installeer het toestel in de auto.
5. Sluit de - accu opnieuw aan.
6. Druk op de reset-knop van de besturingseenheid.
• Isoleer niet-aangesloten kabels met isolatieband of ander
geschikt materiaal. Laat de afdekkapjes op de uiteinden van
de niet-aangesloten kabels of op de connectoren zitten om
kortsluiting te voorkomen.
• Controleer, nadat u het apparaat hebt geïnstalleerd, of de
remlichten, knipperlichten, ruitenwissers, enz. goed werken.
78 |
Functie voor schermtekenconversie
Als de besturingseenheid geen tekens met
accenten, zoals "ü" en "ä" kan weergeven, stelt u de
functieschakelaar voor schermtekenconversie in op
"2" om deze tekens om te zetten naar respectievelijk
"U" en "A".
Als een van de volgende besturingseenheden
is aangesloten, stelt u de schakelaar in op "2".
(Peildatum: september 2006)
KDV-5234, KDC-W6534U, KDC-W5534U, DPX501U
1 2
Conversietabel
Conversieteken
A:
À, à, Á, á, Ã, ã, Ä, ä, Â, â, Å, å
C:
Ç, ç
D:
Ð, ð
E:
È, è, É, é, Ê, ê, Ë, ë
I:
Ì, ì, Í, í, Î, î, Ï, ï
N:
Ñ, ñ
O:
Ò, ò, Ó, ó, Ô, ô, Õ, õ, Ö, ö, Ø, ø
S:
ß
U:
Ù, ù, Ú, ú, Û, û, Ü, ü
X:
×
Y:
Ý, ý, ÿ
Nederlands
B64-3480-00_01_E.indb 78
06.10.4 6:17:04 PM
Verbinding
Toebehoren 1 (3 m)
Handsfree kit
Besturingseenheid
TO HEAD UNIT
Ingang voor diskwisselaar
MIC
TO 5L I/F
1
2
(1,5 m)
Schakelaar voor
schermtekenconversie
Raadpleeg voor meer informatie over
de werking de sectie <Functie voor
schermtekenconversie> (pagina 78).
Verbindingskabel (meegeleverd met
diskwisselaar)
Diskwisselaar
Aansluiting voor extern apparaat
Apart bijgeleverde items, zoals een diskwisselaar of de KCAiP500, kunnen hier worden aangesloten. Raadpleeg voor de
aansluitbare eenheden de instructiehandleiding die met uw
besturingseenheid is meegeleverd.
Als u de KCA-S220A wilt aansluiten
Sluit de handsfree kit aan op de connector met het opschrift TO CHANGER 2.
Besturingseenheid
KCA-S220A
TO HEAD UNIT
TO CHANGER 1
Handsfree kit
TO CHANGER 2
TO HEAD UNIT
TO 5L I/F
Diskwisselaar
• Zorg ervoor dat de totale lengte van de kabel tussen de besturingseenheid en de diskwisselaar 13 m of minder bedraagt. Als
de besturingskabel langer is dan 13 m, werkt de verbinding niet goed meer.
Nederlands |
B64-3480-00_01_E.indb 79
79
06.10.4 6:17:05 PM
Installatie
Installatie van de handsfree kit
• Bepaal de installatiepositie nadat u hebt gecontroleerd of
de eenheid kan communiceren met de mobiele telefoon.
• Installeer de eenheid niet in de buurt van het dashboard,
de achterste lade of andere belangrijke onderdelen. Als u
dit wel doet, kan er letsel of schade ontstaan als de eenheid
door een schok losschiet en een persoon of belangrijk
onderdeel raakt. Gebruik tapschroeven voor de montage.
(Montage met klittenband is weliswaar gemakkelijk, maar
kan er wel toe leiden dat de eenheid losschiet bij een
schok.)
Installatie van de microfooneenheid
1 Controleer de installatiepositie van de microfoon
(toebehoren 1).
2 Verwijder olie en ander vuil van het
installatieoppervlak.
3 Installeer de microfoon.
4 Leid de microfoonkabel tot aan de handsfree kit
en zet de kabel op verschillende plaatsen vast met
tape of vergelijkbaar materiaal.
Bevestigen op audiokaart
Toebehoren 2 (Ø4 × 16 mm)
Antennegedeelte
Bevestig de kabel met in de
handel verkrijgbare tape.
Bevestigen aan hoogpolig tapijt
Antennegedeelte
Toebehoren 3
Verwijder de beschermlaag van de aan twee kanten
klevende tape voor bevestiging op de plek die wordt
aangegeven in het voorbeeld links.
Verplaats de microfoon in de richting van de chauffeur.
• Zorg ervoor dat het serienummer niet wordt bedekt door
het klittenband.
• Als de installatielocatie niet via een rechte lijn bereikbaar is,
knipt u het klittenband in twee stukken en brengt u deze
op twee posities aan, zoals weergegeven.
80 |
Nederlands
B64-3480-00_01_E.indb 80
06.10.4 6:17:06 PM
Oplossen van problemen
Wat een storing aan uw eenheid lijkt te zijn, kan
simpelweg het gevolg zijn van verkeerde bediening
of bedrading. Controleer voordat u uw handelaar
raadpleegt eerst de volgende lijst voor een mogelijke
oplossing van uw probleem.
?
Het gespreksvolume bij handsfree bellen is laag.
✔ Het gespreksvolume bij handsfree bellen is ingesteld
op een laag niveau.
☞ Het gespreksvolume bij handsfree bellen kan
afzonderlijk worden aangepast. Pas het aan
tijdens handsfree bellen.
?
Er komt geen geluid uit de achterste luidsprekers.
✔ U gebruikt de handsfree gespreksmodus.
☞ Er komt geen geluid uit de achterste luidsprekers
in de handsfree gespreksmodus.
?
Er klinkt geen pieptoon bij binnenkomst van een
gesprek.
✔ Of er een pieptoon te horen is, hangt af van uw type
mobiele telefoon.
☞ Als u "Call Beep: ON" of "C-BP ON" (pagina 71),
of "Beep On" (pagina 76) selecteert, wordt de
pieptoon wel weergegeven.
?
?
Tekens in een naam ontbreken.
✔ Op de besturingseenheid kunnen geen accenttekens
worden weergegeven.
☞ Stel de functieschakelaar voor
schermtekenconversie in op "2" (pagina 78).
De naam van de mobiele telefoon wordt niet
weergegeven.
✔ Bij de registratie van een mobiele telefoon wordt
mogelijk het adres weergegeven in plaats van de
naam van de mobiele telefoon.
☞ Zet de besturingseenheid uit en weer aan. De
naam van de aangesloten mobiele telefoon
wordt nu weergegeven.
De onderstaande berichten geven de
toestand van uw systeem weer.
No Number/ NO-NMBER/ Incoming No Number :
• De beller heeft geen beller-id.
• Er zijn geen gegevens over het telefoonnummer
beschikbaar.
No Data/ NO DATA :
• Er is geen lijst met uitgaande gesprekken.
• Er is geen lijst met binnenkomende gesprekken.
No Entry/ NO ENTRY :
De mobiele telefoon is niet geregistreerd (gekoppeld).
Disconnect/ DISCONCT/ Non Connection/ Disconnected :
De eenheid kan niet communiceren met de mobiele
telefoon.
Connect/ CONNECT :
De eenheid kan wel communiceren met de mobiele
telefoon.
HF Error 07/ HF ERR07:
Het is niet mogelijk toegang tot het geheugen te krijgen.
\ Schakel de stroom uit en weer in. Als dit bericht nog
steeds wordt weergegeven, drukt u op de reset-knop
op de besturingseenheid.
HF Error 68/ HF ERR68:
De eenheid kan niet communiceren met de mobiele
telefoon.
\ Schakel de stroom uit en weer in. Als dit bericht nog
steeds wordt weergegeven, drukt u op de reset-knop
op de besturingseenheid.
Technische gegevens
Technische gegevens zijn zonder voorafgaande kennisgeving wijzigbaar.
Bluetooth-gedeelte
Technologie
: Gecertificeerd voor Bluetooth 1,2
Frequentie
: 2,402 – 2,480 GHz
Uitgangsvermogen
: +4dBm (MAX), 0dBm (AVE) klasse 2 vermogen
Algemeen
Bedrijfsspanning (11 – 16V toelaatbaar)
: 14,4 V
Stroomverbruik
: 0,2 A
Afmetingen (B × H × D)
: 95 × 30 × 105 mm
Gewicht
: 0,35 kg
Nederlands |
B64-3480-00_01_E.indb 81
81
06.10.4 6:17:07 PM
Sommario
Precauzioni di sicurezza
83
Note
84
Impostazione della funzione
Bluetooth
85
Operazioni preliminari
Registrazione del telefono cellulare
Scaricamento della rubrica telefonica
85
85
85
Controllo dell'unità vivavoce
92
Schermata di controllo vivavoce
Telecomando
Funzionamento dei tasti
Ricezione di una chiamata
Composizione
Selezione rapida
Composizione dalla rubrica
Ricomposizione
Configurazione del telefono vivavoce
Selezione di un telefono vivavoce
Cancellazione del telefono vivavoce
92
93
93
94
94
94
95
96
96
97
97
Accessori/ Procedimento per
l’installazione
98
Collegamento
99
Installazione
100
Guida alla soluzione
di problemi
101
Specifiche
101
82 |
Caratteristiche generali
86
Risposta ad una chiamata
86
Passaggio alla modalità privata
86
Cancellazione del messaggio di
disconnessione
86
Regolazione del volume della voce
durante una chiamata
86
Interruzione di una chiamata
86
Selezione delle modalità di visualizzazione 86
Metodo di composizione
87
Selezione della modalità di composizione
Composizione mediante inserimento
diretto di un numero di telefono
Composizione mediante la funzione di
selezione rapida
Registrazione nell'elenco di numeri
preimpostati
Composizione di un numero di telefono
dalla rubrica
Composizione di un numero di telefono
dall'elenco delle chiamate in uscita
Composizione di un numero di telefono
dall'elenco delle chiamate in entrata
87
87
87
88
88
88
89
Telecomando
89
Funzioni dei tasti
89
Sistema a menu
90
Sistema a menu
Selezione del telefono cellulare
da collegare
Cancellazione di un telefono cellulare
registrato
Visualizzazione dello stato del telefono
cellulare
Impostazione dell'intervallo di tempo per
la risposta automatica
Impostazione degli altoparlanti per
l'uscita vocale
Impostazione di un segnale acustico per
le chiamate in entrata
90
90
90
90
91
91
91
Il marchio e i loghi Bluetooth sono di proprietà
di Bluetooth SIG, Inc. L'uso di tali marchi da parte
di Kenwood Corporation è soggetto a licenza.
Gli altri marchi e nomi commerciali sono di
proprietà dei rispettivi proprietari.
Italiano
B64-3480-00_01_E.indb 82
06.10.4 6:17:07 PM
Precauzioni di sicurezza
2AVVERTENZA
Italiano
Per evitare lesioni e/o incendi, osservate le
seguenti precauzioni:
Español
• Per evitare cortocircuiti, non inserire mai oggetti
di metallo (come monete o strumenti di metallo)
all’interno dell’apparecchio.
• Il montaggio e il cablaggio di questo prodotto
richiedono conoscenze specifiche ed esperienza.
Per motivi di sicurezza, affidare il montaggio e il
cablaggio a dei professionisti.
Con la presente Kenwood dichiara che questo KCA-BT100 è conforme ai requisiti
essenziali ed alle altre disposizioni pertinenti stabilite dalla direttiva 1999/5/CE.
Por medio de la presente Kenwood declara que el KCA-BT100 cumple con los
requisitos esenciales y cualesquiera otras disposiciones aplicables o exigibles de
la Directiva 1999/5/CE.
Português
Kenwood declara que este KCA-BT100 está conforme com os requisitos
essenciais e outras disposições da Directiva 1999/5/CE.
Polska
Kenwood niniejszym oświadcza, że KCA-BT100 spełnia zasadnicze wymogi oraz
inne istotne postanowienia dyrektywy 1999/5/EC.
Český
2ATTENZIONE
Kenwood timto prohlasuje, ze KCA-BT100 je ve shode se zakladnimi pozadavky
a s dalsimi prislusnymi ustanoveni Narizeni vlady c. 426/2000 Sb.
Per evitare danni all’apparecchio, osservare
le seguenti precauzioni:
Magyar
• Non installare l’apparecchio in un luogo esposto a
luce solare diretta, o a calore o umidità eccessivi.
Evitare anche i luoghi molto polverosi o soggetti a
schizzi d’acqua.
Svenska
Alulírott, Kenwood, kijelenti, hogy a jelen KCA-BT100 megfelel az 1999/5/EC
irányelvben meghatározott alapvető követelményeknek és egyéb vonatkozó
előírásoknak.
Härmed intygar Kenwood att denna KCA-BT100 stär l överensstämelse med de
väsentliga egenskapskrav och övriga relevanta bestämmelser som framgår av
direktiv 1999/5/EG.
Suomi
Dichiarazione di conformità relativa alla
direttiva R&TTE 1999/5/CE
Produttore:
Kenwood Corporation
2967-3 Ishikawa-machi, Hachioji-shi, Tokyo, 192-8525 Japan
Rappresentante UE:
Kenwood Electronics Europe BV
Amsterdamseweg 37, 1422 AC UITHOORN, The Netherlands
Kenwood vakuuttaa täten että KCA-BT100 tyyppinen laite on direktiivin
1999/5/EY oleellisten vaatimusten ja sitä koskevien direktiivin muiden ehtojen
mukainen.
Slovensko
S tem Kenwood izjavlja, da je ta KCA-BT100 v skladu z osnovnimi zahtevami in
ostalimi ustreznimi predpisi Direktive 1999/5/EC.
Slovensky
Spoločnosť Kenwood týmto vyhlasuje, že KCA-BT100 spĺňa zákldné požiadavky
a ďalšie prislušné ustanovenia Direktĺvy 1999/5/EC.
Dansk
Undertegnede Kenwood erklærer harved, at følgende udstyr KCA-BT100
overholder de væsentlige krav og øvrige relevante krav i direktiv 1999/5/EF.
Ελληνικά
English
Hereby, Kenwood declares that this unit KCA-BT100 is in compliance with the
essential requirements and other relevant provisions of Directive 1999/5/EC.
Français
Par la présente Kenwood déclare que l’appareil KCA-BT100 est conforme aux
exigences essentielles et aux autres dispositions pertinentes de la directive
1999/5/CE.
Par la présente, Kenwood déclare que ce KCA-BT100 est conforme aux
exigences essentielles et aux autres dispositions de la directive 1999/5/CE qui
lui sont applicables.
Deutsch
Hiermit erklärt Kenwood, dass sich dieser KCA-BT100 in Übereinstimmung mit
den grundlegenden Anforderungen und den anderen relevanten Vorschriften
der Richtlinie 1999/5/EG befindet. (BMWi)
Hiermit erklärt Kenwood die Übereinstimmung des Gerätes KCA-BT100 mit den
grundlegenden Anforderungen und den anderen relevanten Festlegungen der
Richitlinie 1999/5/EG. (Wien)
Nederlands
ΜΕ ΤΗΝ ΠΑΡΟΥΣΑ Kenwood ΔΗΛΩΝΕΙ ΟΤΙ KCA-BT100 ΣΥΜΜΟΡΦΩΝΕΤΑΙ ΠΡΟΣ
ΤΙΣ ΟΥΣΙΩΔΕΙΣ ΑΠΑΙΤΗΣΕΙΣ ΚΑΙ ΤΙΣ ΛΟΙΠΕΣ ΣΧΕΤΙΚΕΣ ΔΙΑΤΑΞΕΙΣ ΤΗΣ ΟΔΗΓΙΑΣ
1999/5/EK.
Eesti
Sellega kinnitab Kenwood, et see KCA-BT100 vastab direktiivi 1999/5/EC
põhilistele nõudmistele ja muudele asjakohastele määrustele.
Latviešu
Ar šo, Kenwood, apstiprina, ka KCA-BT100 atbilst Direktīvas 1999/5/EK
galvenajām prasībām un citiem tās nosacījumiem.
Lietuviškai
Šiuo, Kenwood, pareiškia, kad šis KCA-BT100 atitinka pagrindinius Direktyvos
1999/5/EB reikalavimus ir kitas svarbias nuostatas.
Malti
Hawnhekk, Kenwood, jiddikjara li dan KCA-BT100 jikkonforma mal-ħtiġijiet
essenzjali u ma provvedimenti oħrajn relevanti li hemm fid-Dirrettiva 1999/5/
EC.
Українська
Компанія Kenwood заявляє, що цей виріб KCA-BT100 відповідає ключовим
вимогам та іншим пов’язаним положенням Директиви 1999/5/EC.
Hierbij verklaart Kenwood dat het toestel KCA-BT100 in overeenstemming is
met de essentiële eisen en de andere relevante bepalingen van richtlijn 1999/5/
EG.
Bij deze verklaat Kenwood dat deze KCA-BT100 voldoet aan de essentiële eisen
en aan de overige relevante bepalingen van Richtlijn 1999/5/EC.
Italiano |
B64-3480-00_01_E.indb 83
83
06.10.4 6:17:08 PM
Note
• In caso di difficoltà durante l’installazione, rivolgersi
al rivenditore Kenwood più vicino.
• Prima di acquistare accessori opzionali, verificare con
il rivenditore Kenwood che tali accessori siano adatti
al modello posseduto e alla regione di utilizzo.
• Le illustrazioni contenute in questo manuale e
raffiguranti il display ed il pannello sono degli
esempi usati per spiegare l'utilizzo dei comandi.
Pertanto, le schermate del display presentate nelle
illustrazioni potrebbero essere diverse da quanto
visualizzato sul display dell'apparecchio, e alcune
delle illustrazioni sul display potrebbero non essere
applicabili.
Ricevitori Kenwood disponibili per questa
unità
I ricevitori utilizzabili con KCA-BT100 sono: (al
settembre 2006)
Ricevitori audio
DPX501U*, DPX701U, KDC-W5534U*,
KDC-W6534U*, KDC-W7534U, KDV-5234*
Ricevitori monitor
DDX6029
Per dettagli sui ricevitori compatibili che verranno
distribuiti in futuro, visitare il sito Internet:
http://www.kenwood.com/bt/bt100/
• *: Impostare l'interruttore della funzione di conversione dei
caratteri visualizzati su "2". Per ulteriori dettagli, vedere
<Funzione di conversione dei caratteri visualizzati>
(pagina 98).
Telecomando
Il ricevitore audio necessita di un telecomando con
tasti numerici per inserire direttamente i numeri di
telefono.
Per effettuare una chiamata con il telecomando, è
necessario che sul telecomando sia presente il tasto
[ ]. Per ulteriori dettagli, visitare il sito Internet:
http://www.kenwood.com/bt/bt100/
• Con alcuni tipi di unità di controllo potrebbe non essere
possibile usare un telecomando.
Telefono cellulare
Questa unità è conforme alle seguenti specifiche
Bluetooth:
Versione
Bluetooth Standard Ver. 1.2
Profilo
HFP (Hands Free Profile)
OPP (Object Push Profile)
Per i telefoni cellulari compatibili, visitare il sito
Internet:
http://www.kenwood.com/bt/bt100/
• La conformità allo Standard Bluetooth delle unità con
tecnologia Bluetooth è stata certificata secondo la
procedura prescritta da Bluetooth SIG. Tuttavia, queste unità
potrebbero non essere in grado di comunicare con alcuni
tipi di telefoni cellulari.
• HFP è un profilo usato per effettuare chiamate in vivavoce.
• OPP è un profilo usato per trasferire dati (come ad esempio
la rubrica telefonica) tra le unità.
Questo prodotto non è installato dal produttore di un
veicolo della linea di produzione, né dall’importatore
professionale di un veicolo negli stati membri della
UE.
Informazioni sullo smaltimento delle
vecchie apparecchiature elettriche ed
elettroniche (valido per i paesi europei
che hanno adottato sistemi di raccolta
separata)
I prodotti recanti il simbolo di un
contenitore di spazzatura su ruote barrato
non possono essere smaltiti insieme ai
normali rifiuti di casa.
I vecchi prodotti elettrici ed elettronici
devono essere riciclati presso una apposita
struttura in grado di trattare questi
prodotti e di smaltirne i loro componenti.
Per conoscere dove e come recapitare
tali prodotti nel luogo a voi più vicino,
contattare l’apposito ufficio comunale. Un
appropriato riciclo e smaltimento aiuta a
conservare la natura e a prevenire effetti
nocivi alla salute e all’ambiente.
LA DICHIARAZIONE DI CONFORMITA’ “CE”
DI QUESTO PRODOTTO E’ DEPOSITATA
PRESSO:
KENWOOD ELECTRONICS EUROPE B.V.
AMSTERDAMSEWEG 37
1422 AC UITHOORN
THE NETHERLANDS
84 |
Italiano
B64-3480-00_01_E.indb 84
06.10.4 6:17:09 PM
Impostazione della funzione Bluetooth
Operazioni preliminari
Scaricamento della rubrica telefonica
• Prima di poter usare il proprio telefono cellulare
con questa unità è necessario registrarlo. Per
ulteriori dettagli, vedere <Registrazione del telefono
cellulare> (pagina 85).
• Se sono stati registrati due o più telefoni cellulari, è
necessario selezionarne uno. Per ulteriori dettagli,
vedere <Selezione del telefono cellulare da
collegare> (pagina 90) o <Selezione di un telefono
vivavoce> (pagina 97).
• Per usare la rubrica, è necessario prima scaricarla
su questa unità. Per ulteriori dettagli, vedere
<Scaricamento della rubrica telefonica> (pagina 85).
• È possibile impostare l'altoparlante dell'uscita
vocale. Per ulteriori dettagli, vedere <Impostazione
degli altoparlanti per l'uscita vocale> (pagina 91) o
<Configurazione del telefono vivavoce> (pagina 96).
Scaricare su questa unità i dati della rubrica telefonica
del telefono cellulare in modo da poter usare la
rubrica.
1 Dal telefono cellulare, terminare la connessione
vivavoce.
2 Dal telefono cellulare, inviare i dati della
rubrica telefonica a questa unità
Dal telefono cellulare, scaricare i dati della rubrica
telefonica su questa unità.
Durante il download:
Viene visualizzato "Downloading", "DOWNLOAD", o
"Now Downloading…".
Al termine del download (per il ricevitore
audio):
Viene visualizzato "Complete", "Completed", o
"COMPLETE".
Registrazione del telefono cellulare
Prima di poter usare un telefono cellulare con questa
unità è necessario registrarlo (pairing). È possibile
registrare fino a cinque telefoni cellulari per questa
unità.
1 Accendere l'unità di controllo.
2 Avviare la registrazione del telefono cellulare
sul telefono cellulare
Sul telefono cellulare, eseguire la registrazione del
telefono vivavoce (pairing). Selezionare "KCA-BT100"
dall'elenco di unità collegate.
3 Inserire un codice
Inserire "1234" come codice.
Verificare sul telefono cellulare che la registrazione sia
stata completata.
4 Dal telefono cellulare, avviare la connessione
vivavoce.
• Per informazioni sull'uso del telefono cellulare, fare
riferimento al manuale del telefono cellulare.
• È possibile registrare fino a cinque telefoni cellulari. Se
si registra un sesto telefono cellulare, si cancella il primo
telefono cellulare registrato.
• Non è possibile registrare un telefono cellulare mentre un
altro cellulare si trova in modalità di connessione vivavoce.
Terminare la connessione vivavoce, quindi registrare il
nuovo telefono cellulare.
• Se nell'elenco dei dispositivi collegati è presente più di
un "KCA-BT100", è probabile che nelle vicinanze sia in uso
un altro "KCA-BT100". Spostare l'auto e controllare che sia
visualizzato un solo "KCA-BT100".
3 Dal telefono cellulare, avviare la connessione
vivavoce.
Per cancellare il messaggio di completamento
del download (per i ricevitori audio):
premere un tasto qualsiasi.
• Per informazioni sull'uso del telefono cellulare, fare
riferimento al manuale del telefono cellulare.
• È possibile registrare fino a 300 numeri di telefono per
ogni telefono cellulare registrato.
• È possibile registrare fino a 32 cifre per ogni numero di
telefono e ogni nome può contenere fino a 40 caratteri.
• Per alcuni tipi di telefoni cellulari potrebbero essere
presenti le seguenti limitazioni:
- Potrebbe non essere possibile scaricare normalmente i
dati della rubrica telefonica.
- I caratteri nella rubrica telefonica potrebbero apparire
distorti.
- Potrebbe non essere possibile scaricare normalmente
la rubrica telefonica se quest'ultima contiene immagini.
Potrebbero essere necessarie più ore o anche un
giorno intero per scaricare la rubrica, a seconda delle
dimensioni totali delle immagini.
• Per annullare lo scaricamento dei dati della rubrica
telefonica, usare il telefono cellulare.
Italiano |
B64-3480-00_01_E.indb 85
85
06.10.4 6:17:10 PM
Caratteristiche generali (per il ricevitore audio)
Risposta ad una chiamata
Quando sono visualizzati "CALL" o "Call", sono indicati
anche "(Calling party name)" o "(Phone number)".
Premere il tasto [AUDIO] o uno dei tasti [1] – [6].
Rifiuto di una chiamata in entrata
Premere il tasto [ATT] per almeno 1 secondo.
• È possibile impostare l'unità in modo che le chiamate in
entrata vengano accettate automaticamente dopo un
periodo di tempo predeterminato. Per ulteriori dettagli,
vedere <Impostazione dell'intervallo di tempo per la
risposta automatica> (pagina 91).
• Se si inserisce un disco, come ad esempio un CD, si
termina la chiamata in corso.
• L'impostazione della modalità privata sul telefono cellulare
potrebbe provocare la disattivazione della funzione
vivavoce.
• Quando è in arrivo una chiamata senza ID del chiamante,
vengono visualizzati "No Name No Number", "No Number",
o "NO-NMBER".
• Il nome del chiamante viene visualizzato se il numero è
presente nella rubrica telefonica.
Regolazione del volume della voce
durante una chiamata
È possibile regolare il volume della voce durante una
chiamata.
Girare la manopola [VOL].
• La regolazione sarà effettiva a partire dalla chiamata
successiva e per tutte le chiamate successive.
• Se si aumenta eccessivamente il volume si rischia di
produrre eco. In caso di eco, abbassare il volume il più
possibile. L'eco aumenta in proporzione al volume.
Interruzione di una chiamata
Premere il tasto [SRC].
• È possibile terminare una chiamata anche premendo il
tasto [ATT] per più di 1 secondo.
Selezione delle modalità di
visualizzazione
Passaggio alla modalità privata
È possibile passare dalla modalità privata (per parlare
direttamente al telefono) alla modalità vivavoce e
viceversa.
Premere la manopola di controllo ([38]).
Per selezionare la modalità:
Display
Modalità
"Private"/ "PRIVATE"/ "PV TALK"
Modalità privata
"Handsfree"/ – / "HF TALK"
Modalità vivavoce
È possibile passare dalla rubrica all'elenco delle
chiamate e viceversa.
Premere il tasto [DISP]/ [AUTO]/ [TI].
Se il tasto [DISP] non è disponibile, premere il tasto
[AUTO] o [TI].
Per il ricevitore audio con il sistema di tasti multifunzione:
Premere il tasto [AUTO]/ [TI].
Premendo questo tasto si passa dall'elenco dei nomi
all'elenco dei numeri di telefono e viceversa.
Scorrimento del display
• Su alcuni telefoni cellulari, il passaggio alla modalità
privata potrebbe provocare la selezione della fonte usata
prima dell'avvio della connessione vivavoce. In questo
caso, non è possibile riportare la fonte alla modalità
vivavoce da questa unità. Per ritornare alla modalità
vivavoce è necessario selezionarla sul telefono cellulare.
Cancellazione del messaggio di
disconnessione
È possibile cancellare il messaggio visualizzato dopo
la disconnessione del telefono cellulare.
Premere il tasto [ATT] per almeno 1 secondo.
"Disconnect" o "DISCONCT" scompare.
• Potrebbero essere necessari alcuni istanti per riconnettere
un telefono cellulare scollegato.
86 |
È possibile scorrere l'elenco di numeri di telefono o
nomi. Per informazioni, fare riferimento alla sezione
<Scorrimento del testo/titolo> del manuale fornito
con l'unità di controllo.
• Con l'unità di controllo su cui viene visualizzato solo il
nome del chiamante quando si riceve una chiamata o
per la selezione rapida, è possibile passare alla modalità
di visualizzazione del numero di telefono eseguendo
l'operazione indicata sopra.
• Per alcuni tipi di unità di controllo potrebbero essere
presenti le seguenti limitazioni.
- Potrebbero essere visualizzati fino a 19 caratteri.
- La lettera # potrebbe non essere visualizzata, o al suo
posto potrebbe essere visualizzato "|" (tutti i segmenti
sono illuminati).
- Potrebbe non essere possibile selezionare la modalità di
visualizzazione.
Italiano
B64-3480-00_01_E.indb 86
06.10.4 6:17:10 PM
Metodo di composizione (per il ricevitore audio)
Selezione della modalità di composizione
Per comporre un numero sono disponibili cinque
modi diversi.
1 Accedere alla modalità di selezione del
metodo di composizione
Premere il tasto [ATT] per almeno 1 secondo.
Vengono visualizzati "DIAL" o "N-DIAL".
2 Selezionare un metodo di composizione
Premere la manopola di controllo ([38]).
Premendo questa manopola è possibile selezionare i
seguenti metodi di composizione:
Per il ricevitore audio con il sistema di tasti multifunzione:
1 Premere il tasto [NEXT].
Selezionare la sezione dei tasti funzione.
2 Premere i tasti [1] ("DIAL") – [4] ("IN-C").
Display
Tasto
Metodo di composizione
multifunzione
"DIAL"/
[1] ("DIAL")
Per comporre un numero inserendo il
"N-DIAL"
numero di telefono. (pagina 87)
Per comporre un numero usando la
funzione di selezione rapida. (pagina 87)
"INITIAL"/ [2] ("PHBK")* Per comporre un numero selezionando
"PH-BOOK1"
l'iniziale nella rubrica (pagina 88)
"PH.BOOK"/ [2] ("PHBK")* Per comporre un numero eseguendo una
"PH-BOOK2"
ricerca nella rubrica in ordine alfabetico.
(pagina 88)
"OUT"/
[3] ("OUT-C") Per comporre un numero usando
"OUT-CALL"
l'elenco delle chiamate in uscita.
(pagina 88)
"IN"/
[4] ("IN-C")
Per comporre un numero usando
"IN-CALL"
l'elenco delle chiamate in entrata.
(pagina 89)
3 Uscire dalla modalità di selezione del metodo
di composizione
Premere il tasto [ATT] per almeno 1 secondo.
• Per usare la rubrica è necessario prima scaricarla
dal telefono cellulare. Per ulteriori dettagli, vedere
<Scaricamento della rubrica telefonica> (pagina 85).
• L'elenco delle chiamate in uscita e l'elenco delle chiamate
in entrata sono costituiti dalle chiamate effettuate e
ricevute da questa unità. Non sono quelli memorizzati
nella memoria del telefono cellulare.
• * Con il sistema di tasti multifunzione, premendo il tasto
[2] ("PHBK") si selezionano i metodi di ricerca della
rubrica.
1 Accedere alla modalità di composizione del
numero
Selezionare "DIAL" o "N-DIAL".
Vedere la sezione <Selezione della modalità di
composizione> (pagina 87).
2 Inserire un numero di telefono
Premere un numero ([1] – [0]), #([FM]), *([AM]),
o il tasto +([¢]) sul telecomando.
3 Effettuare una chiamata
Premere il tasto [DIRECT] sul telecomando.
Viene visualizzato "CALL" o "Call".
Per cancellare il numero di telefono cifra per
cifra:
Premere il tasto [4] sul telecomando.
• È possibile inserire al massimo 32 cifre.
• Su alcune unità di controllo al posto di # viene visualizzato
"|" (tutti i segmenti sono illuminati).
Composizione mediante la funzione
di selezione rapida
È possibile comporre un numero richiamandolo
dall'elenco di numeri preimpostati. Per informazioni
su come preimpostare un numero di telefono, vedere
<Registrazione nell'elenco di numeri preimpostati>
(pagina 88).
1 Accedere alla modalità di composizione del
numero
Selezionare "DIAL" o "N-DIAL".
Vedere la sezione <Selezione della modalità di
composizione> (pagina 87).
2 Selezionare il tasto corrispondente al numero
preimpostato
Premere il tasto [1] – [3].
Viene visualizzato "Preset #" o "PRESET #".
Per il ricevitore audio con il sistema di tasti multifunzione:
1 Premere il tasto [NEXT].
Selezionare la sezione dei tasti funzione.
2 Premere i tasti [1] ("1") – [3] ("3").
Viene visualizzato "DIAL #".
3 Effettuare una chiamata
Premere la manopola di controllo ([38]) per
almeno 1 secondo.
Viene visualizzato "CALL" o "Call".
Funzionamento del telecomando
Composizione mediante inserimento
diretto di un numero di telefono
• Se il numero desiderato non è registrato nell'elenco dei
numeri preimpostati, viene visualizzato "No Name No
Number", "No Number", o "NO-NUMBER".
È possibile effettuare una chiamata inserendo un
numero di telefono.
Italiano |
B64-3480-00_01_E.indb 87
87
06.10.4 6:17:11 PM
Metodo di composizione (per il ricevitore audio)
Registrazione nell'elenco di numeri
preimpostati
È possibile registrare fino a 3 numeri di telefono per la
selezione rapida.
1 Inserire il numero di telefono da registrare
Inserire il numero di telefono con i seguenti metodi:
- <Composizione mediante inserimento diretto di un
numero di telefono> (pagina 87)
- <Composizione di un numero di telefono dalla
rubrica> (pagina 88)
- <Composizione di un numero di telefono dall'elenco
delle chiamate in uscita> (pagina 88)
- <Composizione di un numero di telefono dall'elenco
delle chiamate in entrata> (pagina 89)
2 Selezionare il tasto da registrare
Premere il tasto [1] – [3] per almeno 2 secondi.
Per il ricevitore audio con il sistema di tasti multifunzione:
1 Premere il tasto [NEXT].
Selezionare la sezione dei tasti funzione.
2 Premere il tasto [1] ("1"/ "MEM.1") – [3] ("3"/
"MEM.3") per almeno 2 secondi.
"Memory" o "MEMORY" lampeggia una volta.
3 Uscire dalla modalità di selezione del metodo
di composizione
Premere il tasto [ATT] per almeno 1 secondo.
Composizione di un numero di
telefono dalla rubrica
È possibile comporre un numero di telefono
selezionandolo dalla rubrica scaricata dal telefono
cellulare.
1 Accedere alla modalità rubrica
Selezionare "INITIAL", "PH-BOOK1", "PH.BOOK", o "PHBOOK2".
Vedere la sezione <Selezione della modalità di
composizione> (pagina 87).
Se è stato selezionato "PH.BOOK" o "PH-BOOK2",
passare al punto 4.
Per il ricevitore audio con il sistema di tasti multifunzione:
Premere il tasto [2] ("PHBK").
Questo tasto consente di selezionare i seguenti
metodi di ricerca:
Display
"INITIAL"/
"PH-BOOK1"
"PH.BOOK"/
"PH-BOOK2"
88 |
Metodo di ricerca
Ricerca in base all'iniziale.
Ricerca in ordine alfabetico.
Passare al punto 4.
2 Selezionare l'iniziale da ricercare
Spingere la manopola di controllo verso [4],
[¢], [FM] o [AM].
Posizionare il cursore sull'iniziale da ricercare.
Manopola
Azione
[4]/ [¢] Passa al carattere successivo.
[FM]/ [AM]
Passa alla riga successiva.
3 Confermare l'iniziale selezionata
Premere la manopola di controllo ([38]) per
almeno 1 secondo.
4 Selezionare il nome
Spingere la manopola di controllo verso [FM],
[AM], [4] o [¢].
Selezionare il nome.
Manopola
Azione
[FM]/ [AM]
Cambia il nome.
[4]/ [¢] Cambia l'iniziale.
5 Effettuare una chiamata
Premere la manopola di controllo ([38]) per
almeno 1 secondo.
Viene visualizzato "CALL" o "Call".
• Per usare la rubrica è necessario prima scaricarla
dal telefono cellulare. Per ulteriori dettagli, vedere
<Scaricamento della rubrica telefonica> (pagina 85).
• Le iniziali a cui non corrispondono nomi non vengono
visualizzate.
• Sull'unità di controllo che ha tre righe, il nome posto nella
riga centrale è quello selezionato.
• Durante la ricerca, al posto dei caratteri accentati vengono
ricercati i corrispondenti caratteri non accentati (ad
esempio, per "è" si ricerca"e").
• La ricerca dei caratteri che l'unità di controllo non
riconosce viene effettuata nell'ordine in cui i caratteri sono
registrati nella rubrica.
Composizione di un numero di
telefono dall'elenco delle chiamate in
uscita
È possibile comporre un numero usando l'elenco delle
chiamate in uscita. Nell'elenco delle chiamate in uscita
vengono registrati fino a dieci numeri di telefono
relativi alle chiamate effettuate.
1 Accedere alla modalità dell'elenco delle
chiamate in uscita
Selezionare "OUT" o "OUT-CALL".
Vedere la sezione <Selezione della modalità di
composizione> (pagina 87).
Italiano
B64-3480-00_01_E.indb 88
06.10.4 6:17:12 PM
Telecomando (per il ricevitore audio)
2 Selezionare un nome o un numero di telefono
Spingere la manopola di controllo verso [FM]
o [AM].
3 Effettuare una chiamata
Funzioni dei tasti
Tasto [SRC]*
Durante una chiamata: termina la chiamata.
Premere la manopola di controllo ([38]) per
almeno 1 secondo.
Tasti [VOL]*
Viene visualizzato "CALL" o "Call".
Tasto [
• L'elenco delle chiamate in uscita è l'elenco delle chiamate
effettuate da questa unità. Non è quello memorizzato nella
memoria del telefono cellulare.
• Sull'unità di controllo che ha tre righe, il numero di
telefono posto nella riga centrale è quello selezionato.
• Su alcune unità di controllo viene visualizzato "0" per la
decima chiamata nell'elenco delle chiamate in uscita.
Composizione di un numero di
telefono dall'elenco delle chiamate in
entrata
È possibile comporre un numero usando l'elenco
delle chiamate in entrata. Nell'elenco delle chiamate
in entrata vengono registrati fino a dieci numeri di
telefono relativi alle chiamate ricevute.
1 Accedere alla modalità dell'elenco delle
chiamate in entrata
Selezionare "IN" o "IN-CALL".
Vedere la sezione <Selezione della modalità di
composizione> (pagina 87).
2 Selezionare un nome o un numero di telefono
Spingere la manopola di controllo verso [FM]
o [AM].
3 Effettuare una chiamata
Premere la manopola di controllo ([38]) per
almeno 1 secondo.
Viene visualizzato "CALL" o "Call".
• L'elenco delle chiamate in entrata è l'elenco delle chiamate
ricevute da questa unità. Non è quello memorizzato nella
memoria del telefono cellulare.
• Sull'unità di controllo che ha tre righe, il numero di
telefono posto nella riga centrale è quello selezionato.
• Su alcune unità di controllo viene visualizzato "0" per la
decima chiamata nell'elenco delle chiamate in entrata.
Durante una chiamata: regola il volume della voce.
]
Per accedere alla modalità di selezione del metodo di
composizione.
Quando è in arrivo una chiamata: risponde alla
chiamata.
Tasto [38]*
Durante una chiamata:
passa dalla modalità privata alla modalità vivavoce e
viceversa.
Nella modalità di selezione del metodo di
composizione:
seleziona un metodo di composizione.
Tasto [¢]*
Durante l'inserimento di un numero: inserisce "+".
Tasto [4]*
Durante l'inserimento di un numero:
cancella il numero di telefono inserito.
Tasto [FM]*
Durante l'inserimento di un numero: inserisce "#".
Tasto [AM]*
Durante l'inserimento di un numero: inserisce "*".
Tasti [0] – [9]*
Durante l'inserimento di un numero: inserisce una cifra.
Tasto [DIRECT]*
Effettua una chiamata.
Selettore della modalità telecomando
Seleziona "AUD" durante la composizione.
• * Se il telecomando dispone del selettore, posizionarlo su
"AUD".
• I telecomandi con il tasto [
] e/o i tasti numerici sono
disponibili su richiesta. Acquistare il telecomando con la
funzione desiderata.
Italiano |
B64-3480-00_01_E.indb 89
89
06.10.4 6:17:12 PM
Sistema a menu (per il ricevitore audio)
Sistema a menu
Imposta varie funzioni. Di seguito viene spiegato il
metodo operativo principale del sistema a menu. Le
voci del menu e le relative funzioni sono spiegate
dopo questa sezione.
1 Accedere alla modalità Menu
Premere il tasto [MENU] per almeno 1 secondo.
"MENU" appare sul display.
2 Selezionare la voce di menu
Spingere la manopola di controllo verso [FM]
o [AM].
3 Impostare la voce di menu
Spingere la manopola di controllo verso [4]
o [¢].
Nel modo di attesa
Cancellazione di un telefono cellulare
registrato
È possibile cancellare i telefoni cellulari registrati.
1 Selezionare la modalità di cancellazione
telefono
Spingere la manopola di controllo verso [FM]
o [AM].
Selezionare "Phone Delete" o "PHN-DEL".
2 Accedere alla modalità di cancellazione
telefono
Premere la manopola di controllo ([38]) per
almeno 1 secondo.
Viene visualizzato "(nome)".
4 Uscire dalla modalità Menu
3 Selezionare il telefono cellulare da cancellare
Premere il tasto [MENU].
Spingere la manopola di controllo verso [FM]
o [AM].
• Tre voci di menu appaiono sul display. La voce di menu al
centro è quella regolabile.
4 Cancellare il telefono cellulare selezionato
Premere la manopola di controllo ([38]) per
almeno 1 secondo.
Viene visualizzato "Delete" o "DELETE".
Nel modo di attesa
5 Uscire dalla modalità di cancellazione telefono
Selezione del telefono cellulare da
collegare
Premere il tasto [MENU].
Se sono stati registrati due o più telefoni cellulari, è
necessario selezionare quello da usare.
1 Selezionare la modalità di selezione telefono
Spingere la manopola di controllo verso [FM]
o [AM].
Selezionare "Phone Selection" o "PHN-SEL".
• Quando viene cancellato un telefono cellulare registrato,
vengono cancellati anche la relativa rubrica e gli elenchi
delle chiamate in entrata e in uscita corrispondenti.
2 Accedere alla modalità di selezione del
telefono selezionato
Premere la manopola di controllo ([38]) per
almeno 1 secondo.
Viene visualizzato "(nome)".
3 Selezionare il telefono cellulare da collegare
Spingere la manopola di controllo verso [FM]
o [AM].
4 Impostare il telefono cellulare da collegare
Spingere la manopola di controllo verso [4]
o [¢].
Viene visualizzato "✱(nome)" o "-(nome)".
"✱" (colore scuro) o "✱": il telefono cellulare selezionato
è occupato.
"✱" (colore chiaro) o "_": il telefono cellulare è spento.
5 Uscire dalla modalità di selezione telefono
Premere il tasto [MENU].
90 |
Visualizzazione dello stato del
telefono cellulare
È possibile visualizzare lo stato di connessione, la
forza del segnale e il livello della batteria.
1 Selezionare la voce di visualizzazione dello
stato
Spingere la manopola di controllo verso [FM]
o [AM].
Selezionare "P-STATUS".
2 Accedere alla modalità di visualizzazione dello
stato
Premere la manopola di controllo ([38]) per
almeno 1 secondo.
3 Selezionare la voce da visualizzare
Spingere la manopola di controllo verso [FM]
o [AM].
4 Uscire dalla modalità di visualizzazione dello
stato
Premere il tasto [MENU].
Italiano
B64-3480-00_01_E.indb 90
06.10.4 6:17:13 PM
stato
Spingere la manopola di controllo verso [FM]
o [AM].
Selezionare "Phone Status".
2 Visualizzare gli stati
Spingere la manopola di controllo verso [4]
o [¢].
Tutti gli stati sono indicati con icone.
3 Uscire dalla modalità Menu
Premere il tasto [MENU].
Stato di connessione Bluetooth
Display
Icona
Informazione
"BT-CON Y"
Connesso
"BT-CON N"
…
…
"BAT LOW"
Quasi scarica
"BAT - - -"
Informazione non disponibile.
Display
"Auto Answer: OFF"/
"ANS OFF"
"Auto Answer: 0s"/
"ANS 0"
Impostazione
Non risponde automaticamente alle chiamate.
Risponde automaticamente alle chiamate
subito.
"Auto Answer: 8s"/
"ANS 8"
Risponde automaticamente alle chiamate dopo
8 secondi (impostazione originale).
"Auto Answer: 99s"/ Risponde automaticamente alle chiamate dopo
"ANS 99"
99 secondi.
• Se il tempo impostato nel telefono cellulare è inferiore a
quello impostato nell'unità, viene usato quello del telefono
cellulare.
Nel modo di attesa
Impostazione degli altoparlanti per
l'uscita vocale
È possibile specificare gli altoparlanti per l'uscita
vocale.
Display
"SP Select: Front"/
"SPK FRT"
"SP Select: F-R"/
"SPK F-R"
"SP Select: F-L"/
"SPK F-L"
Impostazione
La voce viene emessa dagli altoparlanti
anteriore-sinistro e anteriore-destro.
La voce viene emessa dall'altoparlante anteriore
destro.
La voce viene emessa dall'altoparlante anteriore
sinistro.
…
…
Intensità di segnale del telefono cellulare
Display
Icona
Informazione
"SGNL MAX"
Massima
"SGNL MID"
Con questa funzione l'unità risponde
automaticamente alle chiamate dopo il periodo di
tempo impostato per la risposta automatica.
Non connesso
Livello della batteria del telefono cellulare
Display
Icona
Informazione
"BAT FULL"
Carica
"BAT MID"
Impostazione dell'intervallo di tempo
per la risposta automatica
…
1 Selezionare la voce di visualizzazione dello
Nel modo di attesa
…
Se l'unità di controllo supporta una funzione di
display grafico:
• Selezionare l'altoparlante più lontano dal microfono per
prevenire distorsioni o echi.
"SGNL LOW"
Minima
"NO SGNAL"
Nessuna copertura
Nel modo di attesa
"SGNL - - -"
Informazione non disponibile.
Impostazione di un segnale acustico
per le chiamate in entrata
• Poiché il numero di passi dell'unità di controllo è diverso
da quello del telefono cellulare, gli stati visualizzati
sull'unità di controllo potrebbero non corrispondere a
quelli visualizzati sul telefono cellulare.
È possibile fare in modo che l'altoparlante emetta un
segnale acustico quando è in arrivo una chiamata.
Display
Impostazione
"Call Beep: ON"/ "C-BP ON" Viene emesso un segnale acustico.
"Call Beep: OFF"/ "C-BP OFF" Non viene emesso nessun segnale
acustico.
Italiano |
B64-3480-00_01_E.indb 91
91
06.10.4 6:17:14 PM
Controllo dell'unità vivavoce (per il ricevitore monitor)
Controllo dell'unità vivavoce
7 Per digitare i numeri di telefono.
(Vedere <Composizione>, pagina 94)
8 Mostra l'intensità del segnale.*
Maggiore è il numero di barre, più forte è il segnale.
9 Mostra lo stato di risposta automatica impostato
AUTO
Quando la risposta automatica è attiva:
Quando la risposta automatica non è attiva:
Schermata di controllo vivavoce
O quando è
in arrivo una
chiamata…
TEL
Schermata di controllo vivavoce
9
8
Hands
10
AUTO
Free
K E N WO O D
1
2
11
0123456789
P1
1
2
3
4
5
6
7
8
9
*
0
#
15
P2
3
12
P3
6
4
5
S e t Up
+
13
Clear
14
7
Return
Schermata di controllo
DV D V I D E O
13:50
16
TEL
IN
REP
Next
Title 1
Chap
KENWOOD
3
TIME
SCRL
T0:05:20
1 Mostra la schermata di ricerca della rubrica.
(Vedere <Composizione dalla rubrica>, pagina 95)
2 Mostra la schermata delle chiamate in uscita.
(Vedere <Ricomposizione>, pagina 96)
3 Mostra la schermata delle chiamate in entrata.
(Vedere <Ricomposizione>, pagina 96)
4 Passa dalla modalità privata alla modalità vivavoce
e viceversa (soltanto durante le chiamate).
5 Mostra la schermata di configurazione del vivavoce.
(Vedere <Configurazione del telefono vivavoce>,
pagina 96)
6 È possibile registrare tre numeri di telefono per la
selezione rapida.
(Vedere <Selezione rapida>, pagina 94)
92 |
p Mostra la carica della batteria del telefono
cellulare.*
Maggiore è il numero di barre, maggiore è il livello
di carica della batteria.
q Avvia la chiamata.
w Termina la chiamata.
Cancella il numero di telefono che si sta inserendo.
e Cancella il numero di telefono inserito.
r Ritorna alla schermata precedente.
t Mostra il numero di telefono della chiamata in
corso e di quelle effettuate.
Se il numero di telefono è registrato nella rubrica,
viene visualizzato il nome della persona.
y Mostra lo stato di connessione con il telefono
cellulare.
Bianco: il telefono cellulare è connesso.
Arancione: il telefono cellulare non è connesso, o
non ha copertura.
• Quando la vettura è in movimento, alcune funzioni
sono disattivate per motivi di sicurezza. I tasti relativi
alle funzioni disattivate sono inattivi.
• Quando viene visualizzata la schermata di controllo
vivavoce, il nome del telefono cellulare collegato
viene visualizzato per 5 secondi.
• * Poiché il numero di passi dell'unità di controllo è
diverso da quello del telefono cellulare, gli stati
visualizzati sull'unità di controllo potrebbero non
corrispondere a quelli visualizzati sul telefono
cellulare. Lo stato non può essere visualizzato se
non è possibile ottenere le relative informazioni.
• L'impostazione della modalità privata sul telefono
cellulare potrebbe provocare la disattivazione della
funzione vivavoce.
Italiano
B64-3480-00_01_E.indb 92
06.10.4 6:17:16 PM
Telecomando
Funzionamento dei tasti
17
18
19
24
20
25
21
26
SRC
22
27
28
23
u Tasto [SRC]
Durante una chiamata: termina la chiamata.
i Tasto [*] (quando f è impostato su "AUD")
Durante l'inserimento di un numero: inserisce "+".
o Tasto [FM+] (quando f è impostato su "AUD")
Durante l'inserimento di un numero: inserisce "#".
; Tasto [AM-] (quando f è impostato su "AUD")
Durante l'inserimento di un numero: inserisce "*".
a Tasto [4] (quando f è impostato su "AUD")
Durante l'inserimento di un numero:
cancella il numero di telefono inserito.
s Tasti [0] – [9] (quando f è impostato su "AUD")
Durante l'inserimento di un numero: inserisce una
cifra del numero di telefono.
d Tasto [DIRECT] (quando f è impostato su "AUD")
Effettua una chiamata.
f Selettore della modalità telecomando
Seleziona "AUD" durante la composizione.
g Tasto [5]/ [∞]
Durante una chiamata: regola il volume della voce.
h Tasto [
]
Mostra la schermata di controllo del vivavoce.
Quando è in arrivo una chiamata: risponde alla
chiamata.
j Tasti [u]/ [d]
Durante una chiamata: regola il volume della voce.
k Tasto [SRC]
Durante una chiamata: termina la chiamata.
• Il volume della voce regolato durante una chiamata
sarà effettivo a partire dalla chiamata successiva e
per tutte le chiamate successive.
• Se si aumenta eccessivamente il volume si rischia
di produrre eco. In caso di eco, abbassare il volume
il più possibile. L'eco aumenta in proporzione al
volume.
Italiano |
B64-3480-00_01_E.indb 93
93
06.10.4 6:17:17 PM
Controllo dell'unità vivavoce (per il ricevitore monitor)
Ricezione di una chiamata
Selezione rapida
Quando si riceve una chiamata è possibile usare il
telefono vivavoce.
È possibile registrare fino a 3 numeri di telefono per la
selezione rapida.
1
Per registrare un numero di telefono:
Rispondere ad una chiamata
1
Vedere <Composizione dalla rubrica> (pagina 95),
<Ricomposizione> (page 96) e <Composizione>
(pagina 94).
Quando arriva una chiamata, la schermata di controllo
del vivavoce appare automaticamente.
2
Terminare la chiamata
Visualizzare il numero di telefono da
registrare
2
Registrare il numero di telefono
P1
Si riapre la schermata precedente.
—
P3
Tenere premuto il tasto per più di 2 secondi.
Composizione
Per chiamare un numero di telefono dalla
memoria:
Effettuare una chiamata inserendo un numero di
telefono.
1
1
Inserire un numero di telefono
+
2
9
—
0
,
*
P1
,
,
Richiamare il numero di telefono
#
2
—
P3
Effettuare una chiamata
Effettuare una chiamata
È possibile iniziare a parlare quando risponde l'utente
chiamato.
• Per la selezione rapida è possibile selezionare solo
numeri di telefono. Quindi il nome dell'abbonato
chiamato e i relativi dati non vengono visualizzati
durante la composizione.
• Per cancellare un numero sbagliato, premere
Clear .
3
Terminare la chiamata
Si riapre la schermata precedente.
• È possibile inserire al massimo 32 cifre.
94 |
Italiano
B64-3480-00_01_E.indb 94
06.10.4 6:17:19 PM
Composizione dalla rubrica
3
È possibile effettuare chiamate usando i numeri di
telefono registrati nella rubrica.
1
Selezionare il destinatario
Name
Visualizzare la schermata della rubrica
telefonica
4
Confermare il destinatario
OK
Si apre la schermata di inserimento iniziale.
Si apre di nuovo la schermata di controllo del vivavoce.
Vengono visualizzati i dati del destinatario selezionato.
Schermata di inserimento iniziale
5
AUTO
Phone Book L i s t
Effettuare una chiamata
2
1
1
a
b
c
d
h
i
j
o
p
q
v
w
x
e
f
g
k
l
m
n
r
s
t
u
y
z
È possibile iniziare a parlare quando risponde l'utente
chiamato.
3
Return
6
Terminare la chiamata
1 Scorre tra i caratteri.
2 Visualizza la rubrica, iniziando dal nome che
contiene il primo carattere selezionato.
3 Ritorna alla schermata di controllo vivavoce.
Si riapre la schermata precedente.
2
Selezionare il primo carattere del nome del
contatto in memoria
a
ecc.
Si apre la schermata dell'elenco della rubrica.
Schermata dell'elenco della rubrica
Phone Book L i s t
AUTO
1234567890
2
1
• Per usare la rubrica è necessario prima scaricarla
dal telefono cellulare. Per ulteriori dettagli, vedere
<Scaricamento della rubrica telefonica> (pagina 85).
• Possono essere visualizzati fino a 16 caratteri per
ogni contatto della rubrica.
• Le iniziali a cui non corrispondono nomi non
vengono visualizzate.
• Durante la ricerca, al posto dei caratteri accentati
vengono ricercati i corrispondenti caratteri non
accentati (ad esempio, per "è" si ricerca"e").
Name
Name
1
Name
Name
3
4
OK
Return
1 Scorre l'elenco.
2 Inserisce il nome del destinatario.
3 Inserisce i dati del destinatario e ritorna alla
schermata di controllo del vivavoce.
4 Ritorna alla schermata di controllo vivavoce.
Italiano |
B64-3480-00_01_E.indb 95
95
06.10.4 6:17:21 PM
Controllo dell'unità vivavoce (per il ricevitore monitor)
Ricomposizione
5
Terminare la chiamata
È possibile richiamare uno degli ultimi 10 numeri
di telefono chiamati o dai quali sono state ricevute
chiamate.
1
Visualizzare la schermata di ricerca delle
chiamate in uscita o in entrata
Si riapre la schermata precedente.
Chiamate in uscita
• La schermata dell'elenco delle chiamate in uscita
o delle chiamate in entrata mostra la lista delle
chiamate effettuate e ricevute da questa unità. Non
sono gli elenchi memorizzati nella memoria del
telefono cellulare.
o
Chiamate in entrata
Si apre la schermata delle chiamate in uscita o in
entrata.
Schermata delle chiamate in uscita o in entrata
Configurazione del telefono vivavoce
Incoming Calls
2
AUTO
Il sistema vivavoce può essere configurato come
indicato di seguito.
Kenwood
1234567890
Kenwood
1234567890
Kenwood
1234567890
3
DISP
4
1
Kenwood
1234567890
OK
1
Kenwood
1234567890
Return
5
1 Scorre l'elenco.
2 Indica i destinatari.
3 Passa all'elenco di ricomposizione.
4 Per inserire i dati del destinatario e ritornare alla
schermata di controllo del vivavoce.
5 Ritorna alla schermata di controllo vivavoce.
S e t Up
Schermata di configurazione del vivavoce
Hands Free Set Up
Au t o A n s w e r i n g
1
8
P h o n e Vo i c e
2
F-Right
Beep
On
4 S
Se
e ll e
ec
c tt
5
AUTO
1
2
3
D
Seelleetcet
6
2
Return
Selezionare il destinatario
1 Imposta un tempo per la risposta automatica al
3
Confermare il destinatario
OK
Si apre di nuovo la schermata di controllo del vivavoce.
Vengono visualizzati i dati del destinatario selezionato.
4
Effettuare una chiamata
È possibile iniziare a parlare quando risponde l'utente
chiamato.
96 |
termine della chiamata. ( "8")
"Off":
Questa funzione non può essere usata.
"0-99": Per impostare il tempo prima della
risposta automatica (secondi).
2 Imposta gli altoparlanti di uscita della suoneria.
( "F-Right")
"F-Left":
altoparlante anteriore sinistro.
"F-Right":
altoparlante anteriore destro.
"Front All": altoparlanti anteriori.
3 Imposta il segnale acustico per la chiamata in
entrata. ( "On")
"On":
si sente un segnale acustico.
"Off":
non viene emesso nessun segnale
acustico.
4 Apre la schermata di selezione telefono.
5 Apre la schermata di cancellazione telefono.
6 Ritorna alla schermata di controllo vivavoce.
Italiano
B64-3480-00_01_E.indb 96
06.10.4 6:17:22 PM
Cancellazione del telefono vivavoce
• Viene applicato il tempo per la risposta automatica
più breve tra quello impostato su questa unità e
quello impostato sul telefono cellulare.
• Selezionare l'altoparlante più lontano dal microfono
per prevenire distorsioni o echi.
Selezione di un
telefono vivavoce
È possibile cancellare i telefoni vivavoce registrati.
1
Visualizzare la schermata di configurazione
del vivavoce
S e t Up
2
Visualizzare l'elenco di cancellazione telefono
È possibile selezionare il telefono vivavoce dall'elenco.
1
D
Seelleetcet
Visualizzare la schermata di configurazione
del vivavoce
Schermata di cancellazione telefono
AUTO
Phone Delete
1
S e t Up
Kenwood 1
Kenwood 2
2
Visualizzare l'elenco di selezione telefono
Kenwood 3
Kenwood 4
S
Se
e ll e
ec
c tt
Kenwood 5
Schermata di selezione telefono
Phone Select
1
Return
2
1 Seleziona dall'elenco il telefono cellulare da
cancellare.
AUTO
2 Ritorna alla schermata di configurazione del
vivavoce.
Kenwood 1
Kenwood 2
3
Kenwood 3
Selezionare il telefono vivavoce da cancellare
Kenwood 4
Kenwood 5
Return
2
Kenwood 3
1 Seleziona il telefono cellulare da usare come
vivavoce.
2 Ritorna alla schermata di configurazione del
vivavoce.
3
• La rubrica, l'elenco delle chiamate in uscita e
l'elenco delle chiamate in entrata vengono
cancellati insieme al telefono vivavoce.
Selezionare il telefono vivavoce da usare
Kenwood 1
Italiano |
B64-3480-00_01_E.indb 97
97
06.10.4 6:17:24 PM
Accessori/ Procedimento per l’installazione
Per una buona ricezione
Per garantire una buona ricezione, osservare quanto
segue:
Accessori
1
3 m ..........1
2
..........2
3
..........1
Procedimento per l’installazione
1. Per prevenire un cortocircuito, togliere la chiave di
accensione e scollegare il polo - della batteria.
2. Impostare l'interruttore della funzione di
conversione dei caratteri visualizzati.
3. Eseguire correttamente i collegamenti dei cavi di
ingresso ed uscita per ogni unità.
4. Installare l’apparecchio sull’automobile.
5. Ricollegare il polo - della batteria.
6. Premere il tasto di ripristino sul telecomando.
• Isolare i cavi non collegati con del nastro isolante in vinile
o un altro materiale simile. Per prevenire un cortocircuito,
non rimuovere i cappucci posti alle estremità dei cavi o dei
terminali non collegati.
• Al termine dell'installazione, verificare che le luci dei freni,
gli indicatori di direzione, i tergicristalli, ecc. funzionino
correttamente.
98 |
• Comunicare con il telefono cellulare entro una distanza
visiva di 10 m. La portata potrebbe essere inferiore in alcuni
ambienti. La portata è inferiore quando vi sono ostacoli tra
l'unità e il telefono cellulare. La portata massima (10 m) non
è sempre garantita.
• Tenere l'unità il più possibile lontano da componenti
elettrici (componenti AV). In caso contrario la connessione
può cadere, possono essere generati disturbi TV o radio,
oppure si potrebbe avere una scarsa ricezione.
• La presenza di una stazione di trasmissione o di un
walkie-talkie nelle vicinanze possono interferire con la
comunicazione a causa del forte segnale.
Funzione di conversione dei caratteri
visualizzati
Se l'unità di controllo non mostra i caratteri accentati
come "è" e "à", posizionare l'interruttore della funzione
di conversione dei caratteri su "2" per convertirli in "E"
e "A".
Quando è collegata una delle seguenti unità di
controllo, impostare l'interruttore su "2". (al settembre
2006)
KDV-5234, KDC-W6534U, KDC-W5534U, DPX501U
1 2
Tabella di conversione
Conversione dei caratteri
A:
À, à, Á, á, Ã, ã, Ä, ä, Â, â, Å, å
C:
Ç, ç
D:
Ð, ð
E:
È, è, É, é, Ê, ê, Ë, ë
I:
Ì, ì, Í, í, Î, î, Ï, ï
N:
Ñ, ñ
O:
Ò, ò, Ó, ó, Ô, ô, Õ, õ, Ö, ö, Ø, ø
S:
ß
U:
Ù, ù, Ú, ú, Û, û, Ü, ü
X:
×
Y:
Ý, ý, ÿ
Italiano
B64-3480-00_01_E.indb 98
06.10.4 6:17:25 PM
Collegamento
Accessorio 1 (3 m)
Kit vivavoce
Unità di controllo
TO HEAD UNIT
Ingresso commutatore
disco
MIC
TO 5L I/F
1
2
(1,5 m)
Interruttore di conversione dei
caratteri visualizzati
Per il funzionamento vedere <Funzione
di conversione dei caratteri visualizzati>
(pagina 98).
Cavo di collegamento (fornito con il
caricatore)
Caricatore
Connettore per dispositivo esterno
Qui è possibile collegare i dispositivi venduti
separatamente, come il caricatore e KCA-iP500. Per le
unità collegabili, fare riferimento al manuale fornito con
l'unità di controllo.
Per collegare KCA-S220A
Collegare il kit vivavoce al terminale TO CHANGER 2.
Unità di controllo
KCA-S220A
TO HEAD UNIT
TO CHANGER 1
Kit vivavoce
TO HEAD UNIT
TO CHANGER 2
TO 5L I/F
Caricatore
• La lunghezza totale del cavo dall'unità di controllo al caricatore non deve essere superiore a 13 m. I cavi di controllo di
lunghezza superiore a 13 m non funzionano correttamente.
Italiano |
B64-3480-00_01_E.indb 99
99
06.10.4 6:17:26 PM
Installazione
Installazione del kit vivavoce
• Procedere con l'installazione soltanto dopo aver accertato
che l'unità possa comunicare con il telefono cellulare.
• Non installare l'unità vicino al cruscotto, alla cappelliera o
ad altri componenti importanti. Nel caso l'unità dovesse
staccarsi a causa di un urto, potrebbe colpire un passeggero
o un componente importante e provocare lesioni o danni.
Per il montaggio usare viti filettate. (Anche se consentono
un fissaggio semplice, non usare strisce di velcro:
potrebbero staccarsi in caso di urto.)
Installazione dell'unità microfono
1 Controllare la posizione in cui eseguire
l'installazione del microfono (accessorio 1).
2 Rimuovere eventuali tracce di olio e sporco dalla
superficie di installazione.
3 Installare il microfono.
4 Collegare il cavo del microfono al kit vivavoce
fissandolo in diversi punti con del nastro adesivo.
Fissaggio con viti
Accessorio 2 (Ø4 × 16 mm)
Parte antenna
Fissare il cavo con comune
nastro adesivo.
Fissaggio con velcro
Parte antenna
Accessorio 3
Rimuovere la protezione di carta del nastro biadesivo e
fissarlo nel punto indicato.
Orientare il microfono verso il conducente.
• Non incollare il velcro sopra il numero di serie.
• Se il punto in cui viene eseguita l'installazione non è in
piano, tagliare il velcro in due pezzi e incollare i due pezzi
nei punti indicati.
100 |
Italiano
B64-3480-00_01_E.indb 100
06.10.4 6:17:27 PM
Guida alla soluzione di problemi
A volte i problemi possono essere soltanto la
conseguenza di un piccolo malfunzionamento o di
un collegamento errato dei cavi. Prima di rivolgersi ad
un centro di assistenza, si prega di eseguire i controlli
indicati nella tabella sottostante.
I messaggi mostrati di seguito indicano le
condizioni del sistema.
?
Il volume in modalità vivavoce è basso.
✔ Il volume del vivavoce è impostato su un livello
troppo basso.
☞ È possibile regolare il volume del vivavoce
separatamente. Regolarlo durante la modalità
vivavoce.
No Data/ NO DATA :
• L'elenco delle chiamate in uscita è vuoto.
• L'elenco delle chiamate in entrata è vuoto.
Non si sente nessun suono dagli altoparlanti
posteriori.
✔ È attiva la modalità vivavoce.
☞ Non si sente nessun suono dagli altoparlanti
posteriori in modalità vivavoce.
Disconnect/ DISCONCT/ Non Connection/ Disconnected :
L'unità non può comunicare con il telefono cellulare.
?
?
Non si sente nessun segnale acustico quando è in
arrivo una chiamata.
✔ Questa funzione potrebbe non essere disponibile su
alcuni telefoni cellulari.
☞ Selezionare "Call Beep: ON" o "C-BP ON" (pagina
91), oppure "Beep On" (pagina 96) per sentire il
segnale acustico.
?
Mancano dei caratteri nei nomi.
✔ L'unità di controllo non accetta i caratteri accentati.
☞ Impostare l'interruttore della funzione di
conversione dei caratteri visualizzati su "2"
(pagina 98).
?
Il nome del telefono cellulare non viene
visualizzato.
✔ Quando si registra un telefono cellulare, al posto
del nome del telefono cellulare potrebbe essere
visualizzato l'indirizzo.
☞ Spegnere l'unità di controllo e riprovare. Verrà
visualizzato il nome del telefono cellulare
collegato.
No Number/ NO-NMBER/ Incoming No Number :
• Il chiamante ha l'ID nascosto.
• Non vi sono dati sul numero di telefono.
No Entry/ NO ENTRY :
Il telefono cellulare non è stato registrato (pairing).
Connect/ CONNECT :
L'unità può comunicare con il telefono cellulare.
HF Error 07/ HF ERR07:
Non è possibile accedere alla memoria.
\ Spegnere l'apparecchio e riprovare. Se viene ancora
visualizzato questo messaggio, premere il tasto di
ripristino sull'unità di controllo.
HF Error 68/ HF ERR68:
L'unità non può comunicare con il telefono cellulare.
\ Spegnere l'apparecchio e riprovare. Se viene ancora
visualizzato questo messaggio, premere il tasto di
ripristino sull'unità di controllo.
Specifiche
Le specifiche sono soggette a cambiamenti senza preavviso.
Sezione Bluetooth
Tecnologia
: Certificato Bluetooth 1,2
Frequenza
: 2,402 – 2,480 GHz
Potrenza di uscita
: +4dBm (MAX), 0dBm (AVE) Classe 2
Generale
Tensione di alimentazione (11 – 16 V ammesso)
: 14,4 V
Consumo di corrente
: 0,2 A
Dimensioni (L × A × P)
: 95 × 30 × 105 mm
Peso
: 0,35 kg
Italiano |
B64-3480-00_01_E.indb 101
101
06.10.4 6:17:28 PM
Índice
Precauciones de seguridad
Notas
103
104
Configuración de la función
Bluetooth
105
Antes de usar
Registro del teléfono móvil
Descarga de la agenda
105
105
105
Control de la unidad manos
libres
112
Pantalla de control manos libres
Mando a distancia
Funcionamiento de teclas
Al llamar
Al marcar
Marcación rápida
Llamada usando la agenda
Remarcación
Configuración del teléfono manos libres
Selección de un teléfono manos libres
Eliminación del teléfono manos libres
112
113
113
114
114
114
115
116
116
117
117
Accesorios/ Procedimiento de
instalación
118
Conexión
119
Instalación
120
Guía Sobre Localización De
Averías
121
Especificaciones
121
102 |
Características generales
106
Respuesta a una llamada
Cambio al modo privado
Borrado del mensaje de desconexión
Ajuste del volumen de voz durante una
llamada
Desconexión de una llamada
Cambio entre modos de visualización
Método de marcación
106
106
106
106
106
106
107
Selección del modo de marcación
107
Cómo realizar una llamada introduciendo un
número de teléfono
107
Marcación usando la función de marcación
rápida
107
Registro de la lista de números de marcación
preajustada
108
Marcación usando la agenda
108
Marcación usando la lista de llamadas
salientes
108
Marcación usando la lista de llamadas
entrantes
109
Mando a distancia
109
Funciones de los botones
109
Sistema de menús
110
Sistema de menús
Selección del teléfono móvil que desea
conectar
Eliminación de un teléfono móvil
registrado
Visualización del estado del teléfono
móvil
Ajuste del intervalo de tiempo para
respuesta automática
Configuración de los altavoces de salida
de voz
Ajuste del pitido de la llamada entrante
110
110
110
110
111
111
111
La marca denominativa y los logos de Bluetooth
son propiedad de Bluetooth SIG, Inc. y cualquier
uso de dichas marcas por Kenwood Corporation
está sujeto a los términos de licencia. El resto
de marcas comerciales y nombres comerciales
corresponden a sus respectivos propietarios.
Español
B64-3480-00_01_E.indb 102
06.10.4 6:17:28 PM
Precauciones de seguridad
2 ADVERTENCIA
Para evitar riesgo de lesiones y/o fuego,
observe las siguientes precauciones:
• Para evitar cortocircuitos, nunca coloque ni deje
objetos metálicos (por ejemplo, monedas o
herramientas metálicas) dentro de la unidad.
• La instalación y cableado de este producto requiere
habilidad y experiencia. Por motivos de seguridad,
deje la labor de instalación y montaje en manos de
profesionales.
Bij deze verklaat Kenwood dat deze KCA-BT100 voldoet aan de essentiële eisen
en aan de overige relevante bepalingen van Richtlijn 1999/5/EC.
Italiano
Con la presente Kenwood dichiara che questo KCA-BT100 è conforme ai requisiti
essenziali ed alle altre disposizioni pertinenti stabilite dalla direttiva 1999/5/CE.
Español
Por medio de la presente Kenwood declara que el KCA-BT100 cumple con los
requisitos esenciales y cualesquiera otras disposiciones aplicables o exigibles de
la Directiva 1999/5/CE.
Português
Kenwood declara que este KCA-BT100 está conforme com os requisitos
essenciais e outras disposições da Directiva 1999/5/CE.
Polska
2 PRECAUCIÓN
Para evitar daños en la unidad, tome las
siguientes precauciones:
• No instale la unidad en un sitio expuesto a la luz
directa del sol, o excesivamente húmedo o caluroso.
Además deberá evitar sitios con mucho polvo o la
posibilidad de que se derrame agua sobre la unidad.
Kenwood niniejszym oświadcza, że KCA-BT100 spełnia zasadnicze wymogi oraz
inne istotne postanowienia dyrektywy 1999/5/EC.
Český
Kenwood timto prohlasuje, ze KCA-BT100 je ve shode se zakladnimi pozadavky
a s dalsimi prislusnymi ustanoveni Narizeni vlady c. 426/2000 Sb.
Magyar
Alulírott, Kenwood, kijelenti, hogy a jelen KCA-BT100 megfelel az 1999/5/EC
irányelvben meghatározott alapvető követelményeknek és egyéb vonatkozó
előírásoknak.
Svenska
Härmed intygar Kenwood att denna KCA-BT100 stär l överensstämelse med de
väsentliga egenskapskrav och övriga relevanta bestämmelser som framgår av
direktiv 1999/5/EG.
Suomi
Declaración de conformidad con respecto a
la Directiva R&TTE 1999/5/CE
Fabricante:
Kenwood Corporation
2967-3 Ishikawa-machi, Hachioji-shi, Tokyo, 192-8525 Japón
Representante en la UE:
Kenwood Electronics Europe BV
Amsterdamseweg 37, 1422 AC UITHOORN, Países Bajos
Kenwood vakuuttaa täten että KCA-BT100 tyyppinen laite on direktiivin
1999/5/EY oleellisten vaatimusten ja sitä koskevien direktiivin muiden ehtojen
mukainen.
Slovensko
S tem Kenwood izjavlja, da je ta KCA-BT100 v skladu z osnovnimi zahtevami in
ostalimi ustreznimi predpisi Direktive 1999/5/EC.
Slovensky
Spoločnosť Kenwood týmto vyhlasuje, že KCA-BT100 spĺňa zákldné požiadavky
a ďalšie prislušné ustanovenia Direktĺvy 1999/5/EC.
Dansk
Undertegnede Kenwood erklærer harved, at følgende udstyr KCA-BT100
overholder de væsentlige krav og øvrige relevante krav i direktiv 1999/5/EF.
Ελληνικά
English
Hereby, Kenwood declares that this unit KCA-BT100 is in compliance with the
essential requirements and other relevant provisions of Directive 1999/5/EC.
Français
Par la présente Kenwood déclare que l’appareil KCA-BT100 est conforme aux
exigences essentielles et aux autres dispositions pertinentes de la directive
1999/5/CE.
Par la présente, Kenwood déclare que ce KCA-BT100 est conforme aux
exigences essentielles et aux autres dispositions de la directive 1999/5/CE qui
lui sont applicables.
Deutsch
Hiermit erklärt Kenwood, dass sich dieser KCA-BT100 in Übereinstimmung mit
den grundlegenden Anforderungen und den anderen relevanten Vorschriften
der Richtlinie 1999/5/EG befindet. (BMWi)
Hiermit erklärt Kenwood die Übereinstimmung des Gerätes KCA-BT100 mit den
grundlegenden Anforderungen und den anderen relevanten Festlegungen der
Richitlinie 1999/5/EG. (Wien)
Nederlands
Hierbij verklaart Kenwood dat het toestel KCA-BT100 in overeenstemming is
met de essentiële eisen en de andere relevante bepalingen van richtlijn 1999/5/
EG.
ΜΕ ΤΗΝ ΠΑΡΟΥΣΑ Kenwood ΔΗΛΩΝΕΙ ΟΤΙ KCA-BT100 ΣΥΜΜΟΡΦΩΝΕΤΑΙ ΠΡΟΣ
ΤΙΣ ΟΥΣΙΩΔΕΙΣ ΑΠΑΙΤΗΣΕΙΣ ΚΑΙ ΤΙΣ ΛΟΙΠΕΣ ΣΧΕΤΙΚΕΣ ΔΙΑΤΑΞΕΙΣ ΤΗΣ ΟΔΗΓΙΑΣ
1999/5/EK.
Eesti
Sellega kinnitab Kenwood, et see KCA-BT100 vastab direktiivi 1999/5/EC
põhilistele nõudmistele ja muudele asjakohastele määrustele.
Latviešu
Ar šo, Kenwood, apstiprina, ka KCA-BT100 atbilst Direktīvas 1999/5/EK
galvenajām prasībām un citiem tās nosacījumiem.
Lietuviškai
Šiuo, Kenwood, pareiškia, kad šis KCA-BT100 atitinka pagrindinius Direktyvos
1999/5/EB reikalavimus ir kitas svarbias nuostatas.
Malti
Hawnhekk, Kenwood, jiddikjara li dan KCA-BT100 jikkonforma mal-ħtiġijiet
essenzjali u ma provvedimenti oħrajn relevanti li hemm fid-Dirrettiva 1999/5/
EC.
Українська
Компанія Kenwood заявляє, що цей виріб KCA-BT100 відповідає ключовим
вимогам та іншим пов’язаним положенням Директиви 1999/5/EC.
Español |
B64-3480-00_01_E.indb 103
103
06.10.4 6:17:29 PM
Notas
• Si tiene problemas durante la instalación, consulte
con su distribuidor Kenwood.
• Cuando compre accesorios opcionales, verifique
antes con su distribuidor Kenwood que dichos
accesorios funcionan con su modelo en su zona.
• Las ilustraciones de la pantalla y el panel que
aparecen en este manual son ejemplos utilizados
para explicar mejor cómo se utilizan los mandos.
Por lo tanto, las ilustraciones de la pantalla que
aparecen pueden ser distintas a las que aparecen
realmente en la pantalla del equipo, y algunas de las
ilustraciones de la pantalla puede que representen
algo imposible durante el funcionamiento actual.
Receptores Kenwood disponibles para esta
unidad
A continuación se muestran las unidades de
recepción que se pueden utilizar con KCA-BT100: (A
fecha de septiembre de 2006)
Receptor de audio
DPX501U*, DPX701U, KDC-W5534U*,
KDC-W6534U*, KDC-W7534U, KDV-5234*
Receptor de monitor
DDX6029
Para obtener detalles sobre los receptores
compatibles que se lanzarán en el futuro, acceda a la
siguiente URL:
http://www.kenwood.com/bt/bt100/
• *: Ajuste el interruptor de función de visualización de
conversión de caracteres en "2". Para obtener más detalles,
consulte <Función de visualización de conversión de
caracteres> (página 118).
Acerca del mando a distancia
El receptor de audio requiere un mando a distancia
con botones numéricos para introducir los números
de teléfono directamente.
Para realizar una llamada con el mando a distancia, el
botón [ ] debe figurar en el mando. Para obtener
más detalles, acceda a la siguiente URL:
http://www.kenwood.com/bt/bt100/
• Tal vez no pueda utilizar un mando a distancia en función
del tipo de unidad de control que tenga.
104 |
Acerca del teléfono móvil
Esta unidad cumple con las siguientes
especificaciones de Bluetooth:
Versión
Bluetooth Standard Ver. 1.2
Perfil
HFP (Perfil de manos libres)
OPP (Perfil de introducción de objetos)
Para verificar la compatibilidad de los teléfonos
móviles, acceda a la siguiente URL:
http://www.kenwood.com/bt/bt100/
• Las unidades que admiten la función Bluetooth han
certificado su conformidad con el estándar Bluetooth
siguiendo el procedimiento descrito por Bluetooth SIG. Sin
embargo, puede que resulte imposible que dichas unidades
se comuniquen con el teléfono móvil en función del tipo.
• HFP es un perfil utilizado para realizar una llamada de
manos libres.
• OPP es un perfil utilizado para transferir datos, como una
agenda, entre unidades.
Este producto no ha sido instalado en la línea
de producción por el fabricante de un vehículo,
ni tampoco por el importador profesional de un
vehículo dentro del estado miembro de la UE.
Información acerca de la eliminación de
equipos eléctricos y electrónicos al final
de la vida útil (aplicable a los países de
la Unión Europea que hayan adoptado
sistemas independientes de recogida de
residuos)
Los productos con el símbolo de un
contenedor con ruedas tachado no podrán
ser desechados como residuos domésticos.
Los equipos eléctricos y electrónicos
al final de la vida útil, deberán ser
reciclados en instalaciones que puedan
dar el tratamiento adecuado a estos
productos y a sus subproductos residuales
correspondientes. Póngase en contacto
con su administración local para obtener
información sobre el punto de recogida
más cercano. Un tratamiento correcto del
reciclaje y la eliminación de residuos ayuda
a conservar los recursos y evita al mismo
tiempo efectos perjudiciales en la salud y el
medio ambiente.
Español
B64-3480-00_01_E.indb 104
06.10.4 6:17:30 PM
Configuración de la función Bluetooth
Antes de usar
Descarga de la agenda
• Debe registrar el teléfono móvil antes de utilizarlo
con esta unidad. Para obtener más detalles, consulte
<Registro del teléfono móvil> (página 105).
• Si ha registrado dos o más teléfonos móviles, debe
seleccionar uno de ellos. Para obtener más detalles,
consulte <Selección del teléfono móvil que desea
conectar> (página 110) o <Selección de un teléfono
manos libres> (página 117).
• Para utilizar la agenda, debe descargarse con
antelación en esta unidad. Para obtener detalles,
consulte <Descarga de la agenda> (página 105).
• Puede configurar el altavoz de salida de voz. Para
obtener más detalles, consulte <Configuración
de los altavoces de salida de voz> (página 111) o
<Configuración del teléfono manos libres> (página
116).
Descargue los datos de la agenda desde el teléfono
móvil a esta unidad para poder utilizar la agenda en
la misma.
1 Utilizando el teléfono móvil, finalice la conexión
manos libres.
2 Utilizando el teléfono móvil, envíe los datos
de la agenda a esta unidad
Utilizando el teléfono móvil, descargue los datos de la
agenda en esta unidad.
Durante la descarga:
Se muestra "Downloading", "DOWNLOAD" o "Now
Downloading…".
Tras finalizar la descarga (para receptor de
audio):
Se muestra "Complete", "Completed" o "COMPLETE".
3 Utilizando el teléfono móvil, inicie la conexión
Registro del teléfono móvil
Para poder utilizar el teléfono móvil con esta unidad,
necesita registrarlo (emparejado). Puede registrar un
máximo de cinco teléfonos móviles en esta unidad.
1 Encienda la unidad de control.
2 Inicie el registro del teléfono móvil en el
teléfono móvil
Utilizando el teléfono móvil, realice el registro del
teléfono manos libres (emparejado). Seleccione "KCABT100" en la lista de unidades conectadas.
3 Introduzca una clave de ruta
Introduzca "1234" como clave de ruta.
Compruebe que el registro ha finalizado en el teléfono
móvil.
4 Utilizando el teléfono móvil, inicie la conexión
manos libres.
• Para obtener información sobre cómo utilizar el teléfono
móvil, consulte el manual de instrucciones que se
incluye con el teléfono.
• Puede registrar un máximo de cinco teléfonos móviles.
El registro del sexto teléfono móvil eliminará el teléfono
registrado con mayor anterioridad.
• No puede registrar un teléfono móvil cuando otro
teléfono tiene el estado de conexión manos libres.
Finalice la conexión manos libres y registre un nuevo
teléfono móvil.
• Si se muestran dos o más "KCA-BT100" en la lista de
unidades conectadas, probablemente se esté utilizando
otro "KCA-BT100" en las cercanías. Mueva el vehículo
y compruebe que sólo se muestra un modelo "KCABT100".
manos libres.
Para borrar el mensaje de finalización de
descarga (para receptor de audio):
Pulse cualquier botón.
• Para obtener información sobre cómo utilizar el teléfono
móvil, consulte el manual de instrucciones que se
incluye con el teléfono.
• Se puede registrar un máximo de 300 números de
teléfono para cada teléfono móvil registrado.
• Se puede registrar un máximo de 32 dígitos para
cada número de teléfono junto con un máximo de 40
caracteres para indicar un nombre.
• En función del tipo de teléfono móvil, se aplican las
siguientes restricciones:
- Los datos de la agenda no se pueden descargar
normalmente.
- Los caracteres de la agenda son incomprensibles.
- Los datos de la agenda no se pueden descargar
normalmente si contienen imágenes. Puede que tarde
entre varias horas y un día entero en descargar la
agenda en función del tamaño total de las imágenes.
• Para cancelar la descarga de los datos de la agenda,
utilice el teléfono móvil.
Español |
B64-3480-00_01_E.indb 105
105
06.10.4 6:17:31 PM
Características generales (para receptor de audio)
Respuesta a una llamada
Cuando se muestra "CALL" o "Call", también se muestra
"(nombre del interlocutor)" o "(número de teléfono)".
Pulse el botón [AUDIO] o uno de los botones
[1] – [6].
Rechazo de una llamada entrante
Pulse el botón [ATT] durante al menos 1
segundo.
• Puede configurar la unidad para que la llamada entrante
se reciba transcurrido un tiempo predeterminado. Para
obtener más detalles, consulte <Ajuste del intervalo de
tiempo para respuesta automática> (página 11).
• Si se inserta un disco, como un CD, se desconectará la
llamada.
• Si se ajusta el teléfono móvil en el modo privado, puede
que se desactive la función manos libres.
• Cuando se recibe una llamada sin identificación, se
muestra "No Name No Number", "No Number" o "NONMBER".
• El nombre del interlocutor se muestra si ya se ha
registrado en la agenda.
Cambio al modo privado
Puede alternar entre el modo privado (hablar
directamente por el teléfono móvil) y el modo manos
libres.
Presione el mando de control ([38]).
Los modos de conversación se alternan del siguiente
modo:
Visualización
Modo de conversación
"Private"/ "PRIVATE"/ "PV TALK"
Conversación privada
"Handsfree"/ – / "HF TALK"
Conversación manos libres
• En función del tipo de teléfono móvil, es posible que
alternar al modo de conversación privada seleccione
la fuente que se utilizó antes de comenzar la conexión
manos libres. Si esto ocurre, la fuente no puede volver
al modo de conversación manos libres utilizando esta
unidad. Utilice el teléfono móvil para volver al modo de
conversación manos libres.
Borrado del mensaje de desconexión
Puede borrar el mensaje mostrado tras la desconexión
del teléfono móvil.
Pulse el botón [ATT] durante al menos 1
segundo.
"Disconnect" o "DISCONCT" desaparece.
Ajuste del volumen de voz durante
una llamada
Puede ajustar el volumen de voz durante una llamada.
Gire el mando [VOL].
• El volumen ajustado durante la llamada actual entrará en
vigor para la siguiente y posteriores llamadas.
• Un aumento excesivo del volumen puede producir
eco. Si se produce eco, baje el volumen tanto como
sea posible. El eco aumenta de forma proporcional al
volumen.
Desconexión de una llamada
Pulse el botón [SRC].
• También puede pulsar el botón [ATT] durante al menos
1 segundo para finalizar la llamada.
Cambio entre modos de visualización
Puede alternar entre la agenda y la lista de llamadas.
Pulse el botón [DISP]/ [AUTO]/ [TI].
Si no figura el botón [DISP], pulse el botón [AUTO] o
[TI].
Para el receptor de audio con sistema de botones
multifunción:
Pulse el botón [AUTO]/ [TI].
Al pulsar este botón se alterna entre la lista de
nombres y la lista de números de teléfono.
Despliegue de la visualización
Puede desplazarse por la lista de números de teléfono
o nombres. Para obtener información sobre el método
de funcionamiento, consulte <Despliegue de texto/
título> en el manual de instrucciones que se incluye
con la unidad de control.
• Con la unidad de control en la que sólo se muestra
el nombre del interlocutor al recibir una llamada o
con la marcación rápida, puede alternar al modo de
visualización de número de teléfono realizando la
operación anterior.
• En función del tipo de unidad de control, se aplican las
siguientes restricciones.
- Se puede visualizar un máximo de 19 caracteres.
- No se puede visualizar la letra # o bien "|" (todos los
segmentos están encendidos) se muestra para #.
- No puede alternar entre los modos de visualización.
• La reconexión del teléfono móvil desconectado puede
llevar algún tiempo.
106 |
Español
B64-3480-00_01_E.indb 106
06.10.4 6:17:31 PM
Método de marcación (para receptor de audio)
Selección del modo de marcación
Puede realizar la marcación de cinco formas
diferentes.
1 Acceda al modo de selección del método de
marcación
Pulse el botón [ATT] durante al menos 1
segundo.
Se muestra "DIAL" o "N-DIAL".
2 Seleccione un método de marcación
Presione el mando de control ([38]).
Al pulsar este mando se alterna entre los siguientes
métodos de marcación:
Para el receptor de audio con sistema de botones
multifunción:
1 Pulse el botón [NEXT].
Seleccione la sección de función de botón.
2 Pulse el botón [1] ("DIAL") – [4] ("IN-C").
Visualización Botón
Método de marcación
multifunción
"DIAL"/
[1] ("DIAL")
Marcar introduciendo un número
"N-DIAL"
de teléfono (página 107).
Marcar usando la función de
marcación rápida (página 107).
"INITIAL"/
[2] ("PHBK")* Marcar buscando la inicial en la
"PH-BOOK1"
agenda (página 108).
"PH.BOOK"/ [2] ("PHBK")* Marcar buscando en la agenda en
"PH-BOOK2"
orden alfabético (página 108).
"OUT"/
[3] ("OUT-C") Marcar usando la lista de llamadas
"OUT-CALL"
salientes (página 108).
"IN"/
[4] ("IN-C")
Marcar usando la lista de llamadas
"IN-CALL"
entrantes (página 109).
3 Salga del modo de selección del método de
marcación
Pulse el botón [ATT] durante al menos 1
segundo.
• Para utilizar la agenda, se debe haber descargado desde
el teléfono móvil. Para obtener más detalles, consulte
<Descarga de la agenda> (página 105).
• La lista de llamadas salientes y la lista de llamadas
entrantes son las listas de llamadas procedentes de esta
unidad y recibidas en la misma. No son las almacenadas
en la memoria del teléfono móvil.
• * Con el sistema de teclas multifunción, al pulsar el
botón [2] ("PHBK") se alterna entre los métodos de
búsqueda de la agenda.
Función del mando a distancia
Cómo realizar una llamada
introduciendo un número de teléfono
Puede realizar una llamada introduciendo un número
de teléfono.
1 Acceda al modo de marcación de números
Seleccione la visualización "DIAL" o "N-DIAL".
Consulte <Selección del modo de marcación> (página
7).
2 Introduzca un número de teléfono
Pulse el número ([1] – [0]), el botón #([FM]),
*([AM]) o +([¢]) en el mando a distancia.
3 Realice una llamada
Pulse el botón [DIRECT] en el mando a
distancia.
Se muestra "CALL" o "Call".
Para borrar el número de teléfono introducido
dígito por dígito:
Pulse el botón [4] en el mando a distancia.
• Puede introducir un máximo de 32 dígitos.
• En función del tipo de unidad de control, "|" (todos los
segmentos están encendidos) se muestra para #.
Marcación usando la función de
marcación rápida
Puede marcar llamando al número de teléfono
registrado en la lista de números de marcación
preajustada. Para obtener información sobre cómo
preajustar un número de teléfono, consulte <Registro
de la lista de números de marcación preajustada>
(página 108).
1 Acceda al modo de marcación de números
Seleccione la visualización "DIAL" o "N-DIAL".
Consulte <Selección del modo de marcación> (página
107).
2 Seleccione el botón correspondiente al
número de marcación preajustada
Pulse el botón [1] – [3].
Se muestra "Preset #" o "PRESET #".
Para el receptor de audio con sistema de botones
multifunción:
1 Pulse el botón [NEXT].
Seleccione la sección de función de botón.
2 Pulse el botón [1] ("1") – [3] ("3").
Se muestra "DIAL #".
3 Realice una llamada
Presione el mando de control ([38]) durante al
menos 1 segundo.
Se muestra "CALL" o "Call".
• Si el número deseado no está registrado en la lista de
números de marcación preajustada, se muestra "No
Name No Number", "No Number" o "NO-NUMBER".
Español |
B64-3480-00_01_E.indb 107
107
06.10.4 6:17:32 PM
Método de marcación (para receptor de audio)
Registro de la lista de números de
marcación preajustada
Puede registrar un máximo de 3 números de teléfono
para la marcación rápida.
1 Introduzca el número de teléfono que desea
registrar
Introduzca el número de teléfono en relación con lo
siguiente:
- <Cómo realizar una llamada introduciendo un
número de teléfono> (página 107)
- <Marcación usando la agenda> (página 108)
- <Marcación usando la lista de llamadas salientes>
(página 108)
- <Marcación usando la lista de llamadas entrantes>
(página 109)
2 Seleccione el botón que desea registrar
Pulse el botón [1] – [3] durante al menos 2
segundos.
Para el receptor de audio con sistema de botones
multifunción:
1 Pulse el botón [NEXT].
Seleccione la sección de función de botón.
2 Pulse el botón [1] ("1"/ "MEM.1") – [3] ("3"/
"MEM.3") durante al menos 2 segundos.
La visualización de "Memory" o "MEMORY" parpadea
una vez.
3 Salga del modo de selección del método de
marcación
Pulse el botón [ATT] durante al menos 1
segundo.
Marcación usando la agenda
Puede marcar usando la agenda descargada.
2 Seleccione la inicial para realizar la búsqueda
Presione el mando de control hacia [4], [¢],
[FM] o [AM].
Mueva el cursor hasta la inicial de búsqueda.
Mando
Operación
[4]/ [¢] Desplazarse al siguiente carácter.
[FM]/ [AM]
Desplazarse a la siguiente fila.
3 Determine la inicial seleccionada
Presione el mando de control ([38]) durante al
menos 1 segundo.
4 Seleccione el nombre
Presione el mando de control hacia [FM], [AM],
[4] o [¢].
Seleccione el nombre.
Mando
Operación
[FM]/ [AM]
Cambiar el nombre.
[4]/ [¢] Cambiar la inicial.
5 Realice una llamada
Presione el mando de control ([38]) durante al
menos 1 segundo.
Se muestra "CALL" o "Call".
• Para utilizar la agenda, se debe haber descargado
desde el teléfono móvil. Para obtener detalles, consulte
<Descarga de la agenda> (página 105).
• Las iniciales que no correspondan a ningún nombre no
se mostrarán.
• En la unidad de control que muestra tres filas, el nombre
de la fila central es el seleccionado.
• Durante la búsqueda, se busca un carácter sin acento,
como por ejemplo "u", en lugar de buscar un carácter
acentuado, como "ü".
• Los caracteres que la unidad de control no puede
mostrar se buscan en el orden en que se registraron en
la agenda.
1 Acceda al modo de agenda
Seleccione la visualización "INITIAL", "PH-BOOK1", "PH.
BOOK" o "PH-BOOK2".
Consulte <Selección del modo de marcación> (página
107).
Si ha seleccionado "PH.BOOK" o "PH-BOOK2", continúe
con el paso 4.
Para el receptor de audio con sistema de botones
multifunción:
Pulse el botón [2] ("PHBK").
Al pulsar este botón se alterna entre los siguientes
métodos de búsqueda:
Visualización
"INITIAL"/
"PH-BOOK1"
"PH.BOOK"/
"PH-BOOK2"
108 |
Método de búsqueda
Buscar por la inicial.
Buscar en orden alfabético.
Continuar con el paso 4.
Marcación usando la lista de llamadas
salientes
Puede marcar usando la lista de llamadas salientes. En
la lista de llamadas salientes se registra un máximo de
diez números de teléfono de las llamadas realizadas.
1 Acceda al modo de lista de llamadas salientes
Seleccione la visualización "OUT" o "OUT-CALL".
Consulte <Selección del modo de marcación> (página
107).
2 Seleccione un nombre o número de teléfono
Presione el mando de control hacia [FM] o [AM].
Español
B64-3480-00_01_E.indb 108
06.10.4 6:17:33 PM
Mando a distancia (para receptor de audio)
3 Realice una llamada
Presione el mando de control ([38]) durante al
menos 1 segundo.
Se muestra "CALL" o "Call".
Funciones de los botones
Botón [SRC]*
Durante una llamada: Finaliza la llamada.
Botones [VOL]*
• La lista de llamadas salientes es la lista de llamadas
procedentes de esta unidad. No es la almacenada en la
memoria del teléfono móvil.
• En la unidad de control que muestra tres filas, el número
de teléfono de la fila central es el seleccionado.
• En función del tipo de unidad de control, se muestra "0"
para la décima llamada en la lista de llamadas salientes.
Marcación usando la lista de llamadas
entrantes
Durante una llamada: Ajusta el volumen de la voz.
Botón [
]
Accede al modo de selección del método de
marcación.
Cuando se recibe una llamada: Responde la llamada.
Botón [38]*
Durante una llamada:
Alterna entre el modo de conversación privada y el
modo de conversación manos libres.
En el modo de selección del método de marcación:
Selecciona un método de marcación.
Botón [¢]*
Puede marcar usando la lista de llamadas entrantes.
En la lista de llamadas entrantes se almacena un
máximo de diez números de teléfono de las llamadas
recibidas.
Botón [4]*
1 Acceda al modo de lista de llamadas entrantes
Botón [FM]*
Seleccione la visualización "IN" o "IN-CALL".
Consulte <Selección del modo de marcación> (página
107).
2 Seleccione un nombre o número de teléfono
Presione el mando de control hacia [FM] o [AM].
3 Realice una llamada
Presione el mando de control ([38]) durante al
menos 1 segundo.
Se muestra "CALL" o "Call".
• La lista de llamadas entrantes es la lista de llamadas
recibidas en esta unidad. No es la almacenada en la
memoria del teléfono móvil.
• En la unidad de control que muestra tres filas, el número
de teléfono de la fila central es el seleccionado.
• En función del tipo de unidad de control, se muestra "0"
para la décima llamada en la lista de llamadas entrantes.
Entrada de marcación de números: Introduce "+".
Entrada de marcación de números:
Borra el número de teléfono introducido.
Entrada de marcación de números: Introduce "#".
Botón [AM]*
Entrada de marcación de números: Introduce "*".
Botones [0] – [9]*
Entrada de marcación de números: Introduce un
dígito.
Botón [DIRECT]*
Realiza una llamada.
Interruptor de selección del modo de mando a
distancia
Cambie a "AUD" al marcar.
• * Si el mando a distancia dispone de un interruptor de
selección de modo, ajústelo en "AUD".
• Los mandos a distancia con el botón [
] y/o botones
numéricos están disponibles de forma opcional. Adquiera
un mando a distancia con la función deseada.
Español |
B64-3480-00_01_E.indb 109
109
06.10.4 6:17:33 PM
Sistema de menús (para receptor de audio)
Sistema de menús
Configure diversas funciones. Aquí se explica el
método de funcionamiento básico del sistema de
menús. La referencia a los elementos de menús y el
contenido de sus ajustes se encuentra a continuación
de esta explicación de funcionamiento.
1 Acceda al modo de menús
Pulse el botón [MENU] durante al menos 1
segundo.
Se visualiza "MENU".
2 Seleccione el elemento del menú
Presione el mando de control hacia [FM] o [AM].
3 Ajuste el elemento del menú
Presione el mando de control hacia [4] o
[¢].
4 Salga del modo de menús
Pulse el botón [MENU].
5 Salga del modo de selección de teléfonos
Pulse el botón [MENU].
En modo de espera
Eliminación de un teléfono móvil
registrado
Puede eliminar un teléfono móvil registrado.
1 Seleccione el modo de eliminación de
teléfonos
Presione el mando de control hacia [FM] o [AM].
Seleccione la visualización "Phone Delete" o "PHN-DEL".
2 Acceda al modo de eliminación de teléfonos
Presione el mando de control ([38]) durante al
menos 1 segundo.
Se muestra "(nombre)".
3 Seleccione el teléfono móvil que desea
eliminar
Presione el mando de control hacia [FM] o [AM].
• Aparecerán tres elementos del menú en la pantalla. El
elemento del menú mostrado en el centro es el que
puede ajustar.
4 Elimine el teléfono móvil seleccionado
Presione el mando de control ([38]) durante al
menos 1 segundo.
Se muestra "Delete" o "DELETE".
En modo de espera
5 Salga del modo de eliminación de teléfonos
Selección del teléfono móvil que
desea conectar
Pulse el botón [MENU].
Cuando ya se han registrado dos o más teléfonos
móviles, tiene que seleccionar el teléfono que desea
usar.
• Cuando se elimina un teléfono móvil registrado, también
se eliminan su agenda, lista de llamadas salientes y lista
de llamadas entrantes.
1 Seleccione el modo de selección de teléfonos
Presione el mando de control hacia [FM] o [AM].
Seleccione la visualización "Phone Selection" o "PHNSEL".
2 Acceda al modo de selección de teléfonos
seleccionado
Presione el mando de control ([38]) durante al
menos 1 segundo.
Se muestra "(nombre)".
3 Seleccione el teléfono móvil que desea
conectar
Presione el mando de control hacia [FM] o [AM].
4 Configure el teléfono móvil que desea
conectar
Presione el mando de control hacia [4] o
[¢].
Se muestra "✱(nombre)" o"'-(nombre)".
"✱" (color oscuro) o "✱": El teléfono móvil seleccionado
está ocupado.
"✱" (color claro) o "_": El teléfono móvil seleccionado
está en espera.
110 |
Visualización del estado del teléfono
móvil
Puede visualizar el estado de conexión, la fuerza de la
señal y el nivel de la batería.
1 Seleccione el elemento de visualización de
estado
Presione el mando de control hacia [FM] o [AM].
Seleccione la visualización "P-STATUS".
2 Acceda al modo de visualización de estado
Presione el mando de control ([38]) durante al
menos 1 segundo.
3 Seleccione el elemento que desea visualizar
Presione el mando de control hacia [FM] o [AM].
4 Salga del modo de visualización de estado
Pulse el botón [MENU].
Español
B64-3480-00_01_E.indb 110
06.10.4 6:17:34 PM
Si la unidad de control admite una función de
visualización de gráficos:
1 Seleccione el elemento de visualización de
estado
Presione el mando de control hacia [FM] o [AM].
Seleccione la visualización "Phone Status".
2 Visualice los estados
Presione el mando de control hacia [4] o
[¢].
Todos los estados se indican con iconos.
3 Salga del modo de menús
Desconectado
…
…
Nivel de la batería del teléfono móvil
Visualización
Icono
Información
"BAT FULL"
Cargada
"BAT MID"
"BAT LOW"
Casi sin carga
"BAT - - -"
No se puede obtener
información.
Visualización
"Auto Answer: OFF"/
"ANS OFF"
"Auto Answer: 0s"/
"ANS 0"
Preajuste
No responde la llamada telefónica
automáticamente.
Responde la llamada telefónica
automáticamente de inmediato.
"Auto Answer: 8s"/
"ANS 8"
Responde la llamada telefónica
automáticamente transcurridos 8 segundos
(ajuste original).
"Auto Answer: 99s"/ Responde la llamada telefónica
"ANS 99"
automáticamente transcurridos 99 segundos.
• Si el ajuste de tiempo en el teléfono móvil es más breve
que el de la unidad, se utilizará el primero.
En modo de espera
Configuración de los altavoces de
salida de voz
Puede especificar los altavoces de salida de voz.
Visualización
"SP Select: Front"/
"SPK FRT"
"SP Select: F-R"/
"SPK F-R"
"SP Select: F-L"/
"SPK F-L"
Preajuste
Proporciona salida de voz de los altavoces
delanteros izquierdo y derecho.
Proporciona salida de voz del altavoz delantero
derecho.
Proporciona salida de voz del altavoz delantero
izquierdo.
…
…
Fuerza de la señal del teléfono móvil
Visualización
Icono
Información
"SGNL MAX"
Máxima
"SGNL MID"
Esta función contesta automáticamente (responde)
una llamada una vez transcurrido el intervalo de
tiempo preajustado para respuesta automática.
…
Estado de conexión Bluetooth
Visualización
Icono
Información
"BT-CON Y"
Conectado
"BT-CON N"
Ajuste del intervalo de tiempo para
respuesta automática
…
Pulse el botón [MENU].
En modo de espera
"SGNL LOW"
Mínima
"NO SGNAL"
Fuera del intervalo de servicio
"SGNL - - -"
No se puede obtener
información.
• Debido a que el número de pasos de la unidad de
control es distinto al del teléfono móvil, los estados
mostrados en la unidad de control pueden variar de los
mostrados en el teléfono.
• Seleccione el altavoz que está más lejos del micrófono
para evitar pitidos o ecos.
En modo de espera
Ajuste del pitido de la llamada
entrante
Puede proporcionar salida para un pitido desde el
altavoz cuando se recibe una llamada.
Visualización
Preajuste
"Call Beep: ON"/ "C-BP ON" Se escucha un pitido.
"Call Beep: OFF"/ "C-BP OFF" Se cancela el pitido.
Español |
B64-3480-00_01_E.indb 111
111
06.10.4 6:17:35 PM
Control de la unidad manos libres (para receptor de monitor)
Control de la unidad manos libres
7 Introduce un número de teléfono.
(Consulte <Al marcar>, página 114)
8 Muestra la fuerza de la señal.*
Cuanto mayor sea el número de segmentos de
barra, más fuerte será la señal.
9 Muestra el estado actual de respuesta automática.
AUTO
Si la respuesta automática está activada:
Si la respuesta automática está desactivada:
Pantalla de control manos libres
O cuando se
recibe una
llamada...
TEL
Pantalla de control manos libres
9
8
Hands
10
AUTO
Free
K E N WO O D
1
11
0123456789
P1
2
15
1
2
3
4
5
6
12
7
8
9
Clear
*
0
#
P2
3
P3
6
4
5
S e t Up
+
13
14
7
Return
Pantalla de control
DV D V I D E O
13:50
16
TEL
IN
Next
REP
Title 1
Chap
KENWOOD
3
TIME
SCRL
T0:05:20
1 Muestra la pantalla de búsqueda de agenda.
(Consulte <Llamada usando la agenda>, página
115)
2 Muestra la pantalla de llamadas salientes.
(Consulte <Remarcación>, página 116)
3 Muestra la pantalla de llamadas entrantes.
(Consulte <Remarcación>, página 116)
4 Alterna entre los modos privado y manos libres
(sólo cuando hay una llamada en curso).
5 Muestra la pantalla de configuración de manos
libres.
(Consulte <Configuración del teléfono manos
libres>, página 116)
6 Introduzca tres números de teléfono para la
marcación rápida.
(Consulte <Marcación rápida>, página 114)
112 |
p Muestra la purga de la batería del teléfono móvil.*
Cuanto mayor sea el número de segmentos de
barra, más alto será el nivel de la batería.
q Inicia la llamada.
w Finaliza la llamada.
Borra el número de teléfono que se está
introduciendo.
e Borra el número de teléfono introducido.
r Vuelve a la pantalla anterior.
t Muestra los números de teléfono de envío y
recepción de llamadas.
Si ha registrado un número de teléfono en la
agenda, se muestra el nombre de la persona de
destino.
y Muestra el estado de conexión con el teléfono
móvil.
Blanco: El teléfono móvil está conectado.
Naranja: El teléfono móvil no está conectado o está
fuera del intervalo de servicio.
• Cuando el vehículo está en movimiento, algunas
funciones se desactivan por motivos de seguridad.
Los botones asociados con las funciones
desactivadas no están operativos si se presionan.
• Cuando aparece la pantalla de control manos libres,
el nombre del teléfono móvil conectado se muestra
durante 5 segundos.
• * Debido a que el número de pasos de la unidad de
control es distinto al del teléfono móvil, los estados
mostrados en la unidad de control pueden variar
de los mostrados en el teléfono. No se muestra
ningún estado si no se puede obtener información
sobre el mismo.
• Si se ajusta el teléfono móvil en el modo privado,
puede que se desactive la función manos libres.
Español
B64-3480-00_01_E.indb 112
06.10.4 6:17:37 PM
Mando a distancia
Funcionamiento de teclas
17
18
19
24
20
25
21
26
SRC
22
27
28
23
u Tecla [SRC]
Durante una llamada: Finaliza la llamada.
i Tecla [*] (Cuando f se ajusta en "AUD")
Entrada de marcación de números: Introduce "+".
o Tecla [FM+] (Cuando f se ajusta en "AUD")
Entrada de marcación de números: Introduce "#".
; Tecla [AM-] (Cuando f se ajusta en "AUD")
Entrada de marcación de números: Introduce "*".
a Tecla [4] (Cuando f se ajusta en "AUD")
Entrada de marcación de números:
Borra el número de teléfono introducido.
s Tecla [0] – [9] (Cuando f se ajusta en "AUD")
Entrada de marcación de números: Introduce un
dígito del número de teléfono.
d Tecla [DIRECT] (Cuando f se ajusta en "AUD")
Realice una llamada.
f Interruptor de selección del modo de mando a
distancia
Cambie a "AUD" al marcar.
g Tecla [5]/ [∞]
Durante una llamada: Ajusta el volumen de la voz.
h Tecla [
]
Muestra la pantalla de control manos libres.
Cuando se recibe una llamada: Responde la
llamada.
• El nivel de volumen de voz ajustado durante
una llamada entrará en vigor para la siguiente y
posteriores llamadas.
• Un aumento excesivo del volumen puede producir
eco. Si se produce eco, baje el volumen tanto como
sea posible. El eco aumenta de forma proporcional al
volumen.
B64-3480-00_01_E.indb 113
j Tecla [u]/ [d]
Durante una llamada: Ajusta el volumen de la voz.
k Tecla [SRC]
Durante una llamada: Finaliza la llamada.
Español |
113
06.10.4 6:17:38 PM
Control de la unidad manos libres (para receptor de monitor)
Al llamar
Marcación rápida
Cuando recibe una llamada, puede utilizar el teléfono
manos libres.
Puede registrar un máximo de 3 números de teléfono
para la marcación rápida.
1
Para registrar un número de teléfono:
Responde a una llamada
1
Consulte <Llamada usando la agenda> (página 115),
<Remarcación> (página 116) y <Al marcar> (página
114).
Cuando se recibe una llamada, la pantalla de control
manos libres aparece automáticamente.
2
Finalice la llamada
Visualice un número de teléfono que desee
registrar
2
Registre el número de teléfono
P1
Vuelve a aparecer la pantalla anterior.
—
P3
Continúe tocando durante más de 2 segundos.
Al marcar
Para marcar un número de teléfono desde la
memoria:
Realice una llamada introduciendo un número de
teléfono.
1
1
Introduzca un número de teléfono
+
2
9
—
0
,
*
,
,
#
Recupere el número de teléfono
P1
2
—
P3
Realice una llamada
Realice una llamada
Puede comenzar a hablar cuando el interlocutor
responda.
• Sólo los números de teléfono se pueden registrar
para la marcación rápida. Por tanto, el nombre y
otros datos del abonado de destino no se muestran
durante la marcación.
• Para borrar la entrada incorrecta, toque Clear .
3
Finalice la llamada
Vuelve a aparecer la pantalla anterior.
• Puede introducir un máximo de 32 dígitos.
114 |
Español
B64-3480-00_01_E.indb 114
06.10.4 6:17:40 PM
Llamada usando la agenda
3
Puede llamar a alguien usando el número de teléfono
que usted haya registrado en la agenda.
1
Seleccione un destino al que desee llamar
Name
Visualice la pantalla de agenda
4
Confirme el destino
OK
Se muestra la pantalla de entrada inicial.
La pantalla de control manos libres aparece de nuevo.
Se muestran los datos de destino seleccionados.
Pantalla de entrada inicial
AUTO
Phone Book L i s t
5
Realice una llamada
2
a
1
1
b
c
d
e
f
g
h
i
j
k
l
m
n
o
p
q
r
s
t
u
v
w
x
y
z
Puede comenzar a hablar cuando el interlocutor
responda.
3
Return
1 Despliega la visualización de matriz de caracteres.
2 Muestra la agenda comenzando por el nombre
6
Finalice la llamada
cuyo primer carácter ha tocado.
3 Vuelve a la pantalla de control manos libres.
2
Seleccione el carácter inicial del nombre de
una persona en la memoria
a
• Para utilizar la agenda, se debe haber descargado
desde el teléfono móvil. Para obtener más detalles,
consulte <Descarga de la agenda> (página 105).
• Se puede visualizar un máximo de 16 caracteres
para cada nombre en la agenda.
• Las iniciales que no correspondan a ningún nombre
no se mostrarán.
• Durante la búsqueda, se busca un carácter sin
acento, como por ejemplo "u", en lugar de buscar un
carácter acentuado, como "ü".
etc.
Se muestra la pantalla de lista de agenda.
Pantalla de lista de agenda
Phone Book L i s t
AUTO
1234567890
2
1
Vuelve a aparecer la pantalla anterior.
Name
Name
1
Name
Name
3
4
OK
Return
1 Despliega la lista.
2 Introduce el nombre de destino.
3 Introduce los datos de destino y vuelve a la pantalla
de control manos libres.
4 Vuelve a la pantalla de control manos libres.
Español |
B64-3480-00_01_E.indb 115
115
06.10.4 6:17:42 PM
Control de la unidad manos libres (para receptor de monitor)
Remarcación
5
Finalice la llamada
Puede remarcar uno de los 10 últimos números de
teléfono a los que ha llamado o de los que ha recibido
llamadas.
1
Visualice la pantalla de búsqueda de llamadas
salientes o entrantes
Llamadas salientes
Vuelve a aparecer la pantalla anterior.
• La pantalla de lista de llamadas salientes o la
pantalla de lista de llamadas entrantes muestra la
lista de las llamadas procedentes de esta unidad o
recibidas en la misma. No son las almacenadas en la
memoria del teléfono móvil.
o bien
Llamadas entrantes
Se muestra la pantalla de lista de llamadas salientes o
entrantes.
Pantalla de llamadas salientes o entrantes
Incoming Calls
2
Configuración del teléfono manos
libres
AUTO
Kenwood
1234567890
El sistema manos libres se puede ajustar de la
siguiente forma.
Kenwood
1234567890
Kenwood
1234567890
3
DISP
4
1
Kenwood
1234567890
OK
1
Kenwood
1234567890
Return
5
S e t Up
Pantalla de configuración de manos libres
1 Despliega la lista.
2 Introduce el nombre de destino.
3 Cambio para el registro de la lista de remarcación.
4 Introduce los datos de destino y vuelve a la pantalla
de control manos libres.
5 Vuelve a la pantalla de control manos libres.
Hands Free Set Up
Au t o A n s w e r i n g
1
8
P h o n e Vo i c e
2
F-Right
Beep
On
4 S
Se
e ll e
ec
c tt
2
Seleccione un destino al que desee llamar
5
AUTO
1
2
3
D
Seelleetcet
6
Return
1 Ajusta un tiempo de respuesta automática tras la
3
Confirme el destino
OK
La pantalla de control manos libres aparece de nuevo.
Se muestran los datos de destino seleccionados.
4
Realice una llamada
Puede comenzar a hablar cuando el interlocutor
responda.
116 |
finalización de la llamada. ( "8")
"Off":
No se puede utilizar esta función.
"0-99": Se ajusta al tiempo de timbre de llamada
(segundo).
2 Ajusta una posición de salida de tono de timbre.
( "F-Right")
"F-Left":
Proporciona salida del tono desde el
altavoz delantero izquierdo.
"F-Right":
Proporciona salida del tono desde el
altavoz delantero derecho.
"Front All": Proporciona salida del tono desde
ambos altavoces delanteros.
3 Ajuste el pitido de la llamada entrante. ( "On")
"On":
Se escucha un pitido.
"Off":
Se cancela el pitido.
4 Visualice la pantalla de selección de teléfono.
5 Visualice la pantalla de eliminación de teléfono.
6 Vuelve a la pantalla de control manos libres.
Español
B64-3480-00_01_E.indb 116
06.10.4 6:17:43 PM
Eliminación del teléfono manos libres
Puede cancelar un registro del teléfono manos libres.
• Entra en vigor el intervalo de tiempo para la
respuesta automática ajustado en esta unidad o
bien el intervalo de tiempo ajustado en el teléfono
móvil, el que sea más breve.
• Seleccione el altavoz que está más lejos del
micrófono para evitar pitidos o ecos.
1
Visualice la pantalla de configuración de
manos libres
S e t Up
Selección de un teléfono manos libres
2
Visualice la lista de eliminación de teléfono
Puede elegir el teléfono manos libres de la lista.
1
D
Seelleetcet
Visualice la pantalla de configuración de
manos libres
Pantalla de eliminación de teléfono
Phone Delete
1
S e t Up
AUTO
Kenwood 1
Kenwood 2
2
Visualice la lista de selección de teléfono
Kenwood 3
Kenwood 4
S
Se
e ll e
ec
c tt
Kenwood 5
Pantalla de selección de teléfono
Phone Select
1
Return
2
1 Selecciona un teléfono móvil para su eliminación
de la lista.
AUTO
2 Vuelve a la pantalla de configuración de manos
Kenwood 1
libres.
Kenwood 2
3
Kenwood 3
Kenwood 4
Kenwood 5
Return
Seleccione el teléfono manos libres que desee
eliminar
2
Kenwood 3
1 Selecciona el teléfono móvil que se va a utilizar
como teléfono manos libres.
2 Vuelve a la pantalla de configuración de manos
libres.
3
• La agenda, la lista de llamadas salientes y la lista de
llamadas entrantes se eliminan junto con el teléfono
manos libres eliminado.
Seleccione el teléfono manos libres que desee
utilizar
Kenwood 1
Español |
B64-3480-00_01_E.indb 117
117
06.10.4 6:17:45 PM
Accesorios/ Procedimiento de instalación
Recepción correcta
Para garantizar una recepción correcta, tenga en
cuenta lo siguiente:
Accesorios
1
3 m ..........1
2
..........2
3
..........1
Procedimiento de instalación
1. Para evitar cortocircuitos, retire la llave del
encendido y desconecte el terminal - de la
batería.
2. Ajuste el interruptor de función de visualización de
conversión de caracteres.
3. Realice las conexiones de los cables de entrada y
salida adecuadas para cada unidad.
4. Instale la unidad en su automóvil.
5. Vuelva a conectar el terminal - de la batería.
6. Pulse el botón de reposición en la unidad de
control.
• Enrolle los cables no conectados con una cinta de vinilo u
otro material similar para que queden aislados. Para evitar
cortocircuitos, no retire las tapas de los extremos de los
cables o terminales no conectados.
• Después de instalar la unidad, compruebe que las lámparas
de freno, las luces intermitentes, el limpiaparabrisas, etc.
funcionen satisfactoriamente.
118 |
• Realice la comunicación con el teléfono móvil dentro de
una distancia de línea de visión de 10 m. El intervalo de
comunicación puede acortarse en función del entorno
de la zona. El intervalo de comunicación también puede
acortarse cuando hay un obstáculo entre esta unidad y
el teléfono móvil. El intervalo de comunicación máximo
mencionado anteriormente (10 m) no siempre está
garantizado.
• Mantenga esta unidad tan alejada de otros componentes
eléctricos (componentes AV) como sea posible. Si hay
componentes cercanos de este tipo, la conexión de llamada
puede fallar, se puede generar ruido de TV o radio o bien
producirse una recepción defectuosa.
• Una emisora o un walkie-talkie situado en los alrededores
puede interferir en la comunicación debido a una señal
demasiado fuerte.
Función de visualización de conversión de
caracteres
Si la unidad de control no puede visualizar caracteres
acentuados como por ejemplo "ü" y "ä", ajuste el
interruptor de función de visualización de conversión
de caracteres en "2" para convertirlos en "U" y "A".
Al conectar una de las siguientes unidades de control,
ajuste el interruptor en "2". (A fecha de septiembre de
2006)
KDV-5234, KDC-W6534U, KDC-W5534U, DPX501U
1 2
Tabla de conversión
Carácter de conversión
A:
À, à, Á, á, Ã, ã, Ä, ä, Â, â, Å, å
C:
Ç, ç
D:
Ð, ð
E:
È, è, É, é, Ê, ê, Ë, ë
I:
Ì, ì, Í, í, Î, î, Ï, ï
N:
Ñ, ñ
O:
Ò, ò, Ó, ó, Ô, ô, Õ, õ, Ö, ö, Ø, ø
S:
ß
U:
Ù, ù, Ú, ú, Û, û, Ü, ü
X:
×
Y:
Ý, ý, ÿ
Español
B64-3480-00_01_E.indb 118
06.10.4 6:17:46 PM
Conexión
Accesorio 1 (3 m)
Caja de manos libres
Unidad de control
TO HEAD UNIT
Entrada de cambiador de
discos
MIC
TO 5L I/F
1
2
(1,5 m)
Interruptor de visualización de conversión de
caracteres
Para obtener información sobre el método de
funcionamiento, consulte <Función de visualización
de conversión de caracteres> (página 118).
Cable de conexión (suministrado con
el cambiador de discos)
Cambiador de discos
Conector para dispositivo externo
Los artículos que se venden por separado, como un cambiador
de discos y KCA-iP500, se pueden conectar aquí. Para obtener
información sobre las unidades conectables, consulte el manual de
instrucciones que se incluye con la unidad de control.
Si desea conectar KCA-S220A
Conecte la caja de manos libres al terminal con la etiqueta TO CHANGER 2.
Unidad de control
KCA-S220A
TO HEAD UNIT
TO CHANGER 1
Caja de manos libres
TO CHANGER 2
TO HEAD UNIT
TO 5L I/F
Cambiador de discos
• Evite que la extensión total del cable de control desde la unidad de control al cambiador de discos supere 13 m. Los cables de
control con una extensión superior a 13 m dejarán de funcionar correctamente.
Español |
B64-3480-00_01_E.indb 119
119
06.10.4 6:17:47 PM
Instalación
Instalación de la caja de manos libres
• Determine la posición de instalación tras asegurarse de que
la unidad se comunica con el teléfono móvil.
• No instale la unidad cerca del tablero de mandos, la
bandeja trasera u otros componentes importantes. Si lo
hace podría provocar lesiones o accidentes en caso de que
la unidad se suelte debido a un impacto y golpee a una
persona o un componente importante. Se deben utilizar
tornillos autorroscables para el montaje. (La fijación con
tiras de velcro, aunque sea más sencilla, puede soltarse a
causa de un impacto.)
Instalación de la unidad de micrófono
1 Compruebe la posición de instalación del
micrófono (accesorio 1).
2 Elimine el aceite y los restos de suciedad de la
superficie de instalación.
3 Instale el micrófono.
4 Conecte el cable del micrófono a la caja de manos
libres asegurando el mismo en varias posiciones
con cinta adhesiva o similar.
Fijación del módulo de audio
Accesorio 2 (Ø4 × 16 mm)
Parte de la antena
Fije un cable con una cinta
adhesiva de uso comercial.
Fijación a la moqueta
Parte de la antena
Accesorio 3
Retire el papel revestido antiadherente de la cinta adhesiva
de doble cara para fijarla en el lugar mostrado en el
ejemplo de la izquierda.
Ajuste la dirección del micrófono hacia el conductor.
• No pegue la cinta de velcro sobre el número de serie.
• Si el lugar de instalación está inclinado, corte la cinta de
velcro en dos partes y péguelas en las dos posiciones como
se muestra.
120 |
Español
B64-3480-00_01_E.indb 120
06.10.4 6:17:48 PM
Guía Sobre Localización De Averías
Lo que podría parecer un funcionamiento incorrecto
en la unidad puede ser simplemente el resultado
de un pequeño fallo de uso o de cableado. Antes
de acudir al servicio, verifique primero el siguiente
cuadro sobre los problemas que se podrían presentar.
?
?
El volumen de conversación manos libres es bajo.
✔ El volumen de conversación manos libres se ajusta a
un nivel bajo.
☞ El volumen de conversación manos libres se
puede ajustar de forma independiente. Ajústelo
durante la conversación manos libres.
No se oye ningún sonido de los altavoces traseros.
✔ Está hablando en el modo de conversación manos
libres.
☞ No se oye ningún sonido de los altavoces
traseros en el modo de conversación manos
libres.
?
No se oye ningún pitido al recibir una llamada
entrante.
✔ No se oye ningún pitido en función del tipo de
teléfono móvil.
☞ La selección de "Call Beep: ON" o "C-BP ON"
(página 111), o "Beep On" (página 116) le
permite oír el pitido.
?
Faltan caracteres en un nombre.
✔ La unidad de control no puede mostrar caracteres
acentuados.
☞ Ajuste el interruptor de función de visualización
de conversión de caracteres en "2" (página 118).
?
No se muestra el nombre del teléfono móvil.
✔ Al registrar un teléfono móvil, puede que se muestre
la dirección en vez de el nombre del teléfono móvil.
☞ Apague la alimentación de la unidad de control
y vuelva a encenderla. Aparecerá el nombre del
teléfono móvil conectado.
Los mensajes mostrados a continuación
presentan las condiciones de su sistema.
No Number/ NO-NMBER/ Incoming No Number :
• El interlocutor no notifica una identificación de
llamada.
• No hay datos del número de teléfono.
No Data/ NO DATA :
• No hay lista de llamadas salientes.
• No hay lista de llamadas entrantes.
No Entry/ NO ENTRY :
El teléfono móvil no se ha registrado (emparejado).
Disconnect/ DISCONCT/ Non Connection/ Disconnected :
La unidad no se puede comunicar con el teléfono
móvil.
Connect/ CONNECT :
La unidad se puede comunicar con el teléfono móvil.
HF Error 07/ HF ERR07:
No se puede acceder a la memoria.
\ Apague la alimentación y vuelva a encenderla. Si
el mensaje sigue apareciendo, pulse el botón de
reposición en la unidad de control.
HF Error 68/ HF ERR68:
La unidad no se puede comunicar con el teléfono
móvil.
\ Apague la alimentación y vuelva a encenderla. Si
el mensaje sigue apareciendo, pulse el botón de
reposición en la unidad de control.
Especificaciones
Las especificaciones se encuentran sujetas a cambios sin previo aviso.
Sección de Bluetooth
Tecnología
: Bluetooth 1,2 certificada
Frecuencia
: 2,402 – 2,480 GHz
Potencia de salida
: +4 dBm (MAX), 0d Bm (AVE) Alimentación de
Clase 2
General
Voltaje de funcionamiento (11 – 16 V admisibles)
: 14,4 V
Consumo
: 0,2 A
Dimensiones (An × A × P)
: 95 × 30 × 105 mm
Peso
: 0,35 kg
Español |
B64-3480-00_01_E.indb 121
121
06.10.4 6:17:49 PM
Índice
Precauções de Segurança
Notas
123
124
Configurar a função Bluetooth 125
Antes de utilizar
Registar o telemóvel
Transferir a lista telefónica
Controlo da unidade
mãos-livres
Ecrã do controlo mãos-livres
Controlo remoto
Funcionamento das teclas
Quando receber uma chamada
Ao marcar
Marcação rápida
Telefonar utilizando a lista telefónica
Remarcação
Configurar o telefone mãos-livres
Seleccionar um telefone mãos-livres
Apagar o telefone mãos-livres
125
125
125
132
132
133
133
134
134
134
135
136
136
137
137
Acessórios/ Procedimentos
para instalação
138
Ligação
139
Instalação
140
Guia de resolução de
problemas
141
Especificações
141
122 |
Características gerais
Atender uma chamada telefónica
Comutar para o modo privado
Apagar a mensagem de despedida
Ajustar o volume de voz durante uma
chamada
Desligar uma chamada
Comutar entre modos do mostrador
Método de marcação
126
126
126
126
126
126
126
127
Seleccionar o modo de marcação
127
Efectuar uma chamada introduzindo um
número de telefone
127
Marcar com a função de marcação
rápida
127
Registar na lista de números
predefinidos
128
Marcar utilizando a lista telefónica
128
Marcar utilizando a lista de chamadas
efectuadas
128
Marcar utilizando a lista de chamadas
recebidas
129
Controlo remoto
129
Funções dos botões
129
Sistema de menu
130
Sistema de menu
Seleccionar o telemóvel que pretende
ligar
Apagar um telemóvel registado
Visualizar o estado do telemóvel
Definir o intervalo de tempo para
atendimento automático
Configurar os altifalantes de saída
de voz
Definir o bip da chamada a receber
130
130
130
130
131
131
131
A marca da palavra e o logótipo Bluetooth
são propriedade da Bluetooth SIG, Inc. e
qualquer utilização de tais marcas pela
Kenwood Corporation está licenciada. Outras
marcas registadas e nomes de marcas são dos
respectivos proprietários.
Português
B64-3480-00_01_E.indb 122
06.10.4 6:17:49 PM
Precauções de Segurança
2ADVERTÊNCIA
As seguintes precauções devem ser
tomadas para evitar ferimentos ou
incêndio:
• Para prevenir curto-circuitos, nunca se deve colocar
ou deixar objectos metálicos (p.ex., moedas ou
ferramentas de metal) dentro do aparelho.
• A instalação e ligação deste aparelho requer
conhecimentos e experiência. Para sua segurança,
deixe o trabalho de montagem e ligação ser feito
por profissionais.
Bij deze verklaat Kenwood dat deze KCA-BT100 voldoet aan de essentiële eisen
en aan de overige relevante bepalingen van Richtlijn 1999/5/EC.
Italiano
Con la presente Kenwood dichiara che questo KCA-BT100 è conforme ai requisiti
essenziali ed alle altre disposizioni pertinenti stabilite dalla direttiva 1999/5/CE.
Español
Por medio de la presente Kenwood declara que el KCA-BT100 cumple con los
requisitos esenciales y cualesquiera otras disposiciones aplicables o exigibles de
la Directiva 1999/5/CE.
Português
Kenwood declara que este KCA-BT100 está conforme com os requisitos
essenciais e outras disposições da Directiva 1999/5/CE.
Polska
Kenwood niniejszym oświadcza, że KCA-BT100 spełnia zasadnicze wymogi oraz
inne istotne postanowienia dyrektywy 1999/5/EC.
2CUIDADO
Český
As seguintes precauções devem
ser tomadas para evitar danificar o
equipamento:
Magyar
• Não instalar o aparelho num local exposto à luz
solar directa ou calor e humidade excessivos.
Evitar também locais com poeira em demasia ou a
possibilidade de pingos de água.
Svenska
Kenwood timto prohlasuje, ze KCA-BT100 je ve shode se zakladnimi pozadavky
a s dalsimi prislusnymi ustanoveni Narizeni vlady c. 426/2000 Sb.
Alulírott, Kenwood, kijelenti, hogy a jelen KCA-BT100 megfelel az 1999/5/EC
irányelvben meghatározott alapvető követelményeknek és egyéb vonatkozó
előírásoknak.
Härmed intygar Kenwood att denna KCA-BT100 stär l överensstämelse med de
väsentliga egenskapskrav och övriga relevanta bestämmelser som framgår av
direktiv 1999/5/EG.
Suomi
Declaração de conformidade relativa à
Directiva R&TTE 1999/5/CE
Fabricante:
KENWOOD CORPORATION
2967-3 Ishikawa-machi, Hachioji-shi, Tóquio, 192-8525 Japão
Representante na UE:
Kenwood Electronics Europe BV
Amsterdamseweg 37, 1422 AC UITHOORN, Holanda
Kenwood vakuuttaa täten että KCA-BT100 tyyppinen laite on direktiivin
1999/5/EY oleellisten vaatimusten ja sitä koskevien direktiivin muiden ehtojen
mukainen.
Slovensko
S tem Kenwood izjavlja, da je ta KCA-BT100 v skladu z osnovnimi zahtevami in
ostalimi ustreznimi predpisi Direktive 1999/5/EC.
Slovensky
Spoločnosť Kenwood týmto vyhlasuje, že KCA-BT100 spĺňa zákldné požiadavky
a ďalšie prislušné ustanovenia Direktĺvy 1999/5/EC.
Dansk
Undertegnede Kenwood erklærer harved, at følgende udstyr KCA-BT100
overholder de væsentlige krav og øvrige relevante krav i direktiv 1999/5/EF.
Ελληνικά
English
Hereby, Kenwood declares that this unit KCA-BT100 is in compliance with the
essential requirements and other relevant provisions of Directive 1999/5/EC.
Français
Par la présente Kenwood déclare que l’appareil KCA-BT100 est conforme aux
exigences essentielles et aux autres dispositions pertinentes de la directive
1999/5/CE.
Par la présente, Kenwood déclare que ce KCA-BT100 est conforme aux
exigences essentielles et aux autres dispositions de la directive 1999/5/CE qui
lui sont applicables.
Deutsch
Hiermit erklärt Kenwood, dass sich dieser KCA-BT100 in Übereinstimmung mit
den grundlegenden Anforderungen und den anderen relevanten Vorschriften
der Richtlinie 1999/5/EG befindet. (BMWi)
Hiermit erklärt Kenwood die Übereinstimmung des Gerätes KCA-BT100 mit den
grundlegenden Anforderungen und den anderen relevanten Festlegungen der
Richitlinie 1999/5/EG. (Wien)
Nederlands
Hierbij verklaart Kenwood dat het toestel KCA-BT100 in overeenstemming is
met de essentiële eisen en de andere relevante bepalingen van richtlijn 1999/5/
EG.
ΜΕ ΤΗΝ ΠΑΡΟΥΣΑ Kenwood ΔΗΛΩΝΕΙ ΟΤΙ KCA-BT100 ΣΥΜΜΟΡΦΩΝΕΤΑΙ ΠΡΟΣ
ΤΙΣ ΟΥΣΙΩΔΕΙΣ ΑΠΑΙΤΗΣΕΙΣ ΚΑΙ ΤΙΣ ΛΟΙΠΕΣ ΣΧΕΤΙΚΕΣ ΔΙΑΤΑΞΕΙΣ ΤΗΣ ΟΔΗΓΙΑΣ
1999/5/EK.
Eesti
Sellega kinnitab Kenwood, et see KCA-BT100 vastab direktiivi 1999/5/EC
põhilistele nõudmistele ja muudele asjakohastele määrustele.
Latviešu
Ar šo, Kenwood, apstiprina, ka KCA-BT100 atbilst Direktīvas 1999/5/EK
galvenajām prasībām un citiem tās nosacījumiem.
Lietuviškai
Šiuo, Kenwood, pareiškia, kad šis KCA-BT100 atitinka pagrindinius Direktyvos
1999/5/EB reikalavimus ir kitas svarbias nuostatas.
Malti
Hawnhekk, Kenwood, jiddikjara li dan KCA-BT100 jikkonforma mal-ħtiġijiet
essenzjali u ma provvedimenti oħrajn relevanti li hemm fid-Dirrettiva 1999/5/
EC.
Українська
Компанія Kenwood заявляє, що цей виріб KCA-BT100 відповідає ключовим
вимогам та іншим пов’язаним положенням Директиви 1999/5/EC.
Português |
B64-3480-00_01_E.indb 123
123
06.10.4 6:17:50 PM
Notas
• Se aparecerem problemas durante a instalação,
consulte o seu revendedor Kenwood.
• Quando adquirir acessórios opcionais, verifique com
o seu revendedor Kenwood se estes funcionam com
o seu modelo e na sua área.
• As ilustrações do mostrador e o painel apresentados
neste manual são exemplos usados para explicar
mais claramente como são usados os controlos.
Portanto, o que aparece nas ilustrações poderá
diferir do que aparece no equipamento real, e
algumas ilustrações poderão representar algo
impossível na operação real.
Receptores Kenwood disponíveis para esta
unidade
As unidades de receptor que podem ser utilizadas
com KCA-BT100 são as seguintes: (Dados de
Setembro de 2006)
Receptor de áudio
DPX501U*, DPX701U, KDC-W5534U*,
KDC-W6534U*, KDC-W7534U, KDV-5234*
Receptor do monitor
DDX6029
Para mais informações sobre os receptores
compatíveis que serão comercializados no futuro,
aceda ao seguinte URL:
http://www.kenwood.com/bt/bt100/
• *: Defina o interruptor da função de conversão do carácter
de visualização para "2".
Para mais informações, consulte <Função de conversão
do carácter de visualização> (página 138).
Sobre o controlo remoto
O receptor de áudio necessita de um controlo remoto
com botões numéricos para introduzir directamente
os números de telefone.
Para efectuar uma chamada com o controlo remoto, é
necessário que este disponha de um botão [ ]. Para
mais informações, aceda ao seguinte URL:
http://www.kenwood.com/bt/bt100/
Sobre o telemóvel
Esta unidade está em conformidade com as seguintes
especificações Bluetooth:
Versão
Bluetooth padrão Ver. 1.2
Perfil
HFP (Perfil mãos-livres)
OPP (Perfil premir objecto)
Para os telemóveis verificados para compatibilidade,
aceda ao seguinte URL:
http://www.kenwood.com/bt/bt100/
• As unidades que suportam a função Bluetooth foram
certificadas para conformidade com a norma Bluetooth
em cumprimento do procedimento determinado pela
Bluetooth SIG. Contudo, poderá não ser possível que tais
unidades comuniquem com o seu telemóvel dependendo
do tipo.
• HFP é um perfil utilizado para efectuar uma chamada com
as mãos livres.
• OPP é um perfil utilizado para transferir dados, tais como
uma lista telefónica entre unidades.
Este produto não é instalado pelo fabricante de um
veículo na linha de produção, nem pelo importador
profissional de um veículo para um Estado Membro
da UE.
Informação sobre a forma de deitar fora
Equipamento Eléctrico ou Electrónico
Velho (aplicável nos países da UE que
adoptaram sistemas de recolha de lixos
separados)
Produtos com o símbolo (caixote do lixo
com um X) não podem ser deitados fora
junto com o lixo doméstico.
Equipamentos eléctricos ou electrónicos
velhos deverão ser reciclados num local
capaz de o fazer bem assim como os seus
subprodutos. Contacte as autoridades locais
para se informar de um local de reciclagem
próximo de si. Reciclagem e tratamento de
lixo correctos ajudam a poupar recursos
e previnem efeitos prejudiciais na nossa
saúde e no ambiente.
• Não pode utilizar um controlo remoto consoante o tipo da
unidade de controlo.
124 |
Português
B64-3480-00_01_E.indb 124
06.10.4 6:17:51 PM
Configurar a função Bluetooth
Antes de utilizar
Transferir a lista telefónica
• É necessário registar o telemóvel antes de o utilizar
com esta unidade. Para mais informações, consulte
<Registar o telemóvel> (página 125).
• Se registou dois ou mais telemóveis, é necessário
seleccionar um deles. Para mais informações,
consulte <Seleccionar o telemóvel que pretende
ligar> (página 130) ou <Seleccionar um telefone
mãos-livres> (página 137).
• Para utilizar a lista telefónica, é necessário transferila previamente para esta unidade. Para mais
informações, consulte <Transferir a lista telefónica>
(página 125).
• Pode configurar o altifalante de saída de voz.
Para mais informações, consulte <Configurar
os altifalantes de saída de voz> (página 131) ou
<Configurar o telefone mãos-livres> (página 136).
Transfira os dados da lista telefónica do telemóvel
para esta unidade de forma a poder utilizar a lista
telefónica desta unidade.
1 Ao funcionar com o telemóvel, termina a
ligação mãos-livres.
2 Ao funcionar com o telemóvel, envia os dados
da lista telefónica para esta unidade
Ao funcionar com o telemóvel, transfere os dados da
lista telefónica para esta unidade.
Durante a transferência:
É apresentado "Downloading", "DOWNLOAD" ou "Now
Downloading…".
Depois de concluir a transferência (para
receptor de áudio):
É apresentado "Complete", "Completed" ou
"COMPLETE".
Registar o telemóvel
Para poder utilizar o telemóvel com esta unidade, é
necessário registá-lo (emparelhamento). Pode registar
até cinco telemóveis a esta unidade.
1 Ligue a unidade de controlo.
2 Inicie o registo do telemóvel no telemóvel
Utilizando o telemóvel, efectue o registo do telemóvel
mãos-livres (emparelhamento). Seleccione "KCABT100" da lista de unidades ligadas.
3 Introduza um código de atalho
Introduza "1234" como um código de atalho.
Verifique se o registo está concluído no telemóvel.
4 Utilizando o telemóvel, inicie a ligação mãoslivres.
• Para informações sobre como utilizar o telemóvel,
consulte o Manual de instruções fornecido com o
mesmo.
• Pode registar até cinco telemóveis. Ao registar o
sexto telemóvel, apagará o telemóvel registado mais
recentemente.
• Não pode registar um telemóvel quando outro
telemóvel está ligado como mãos-livres. Termine a
ligação mãos-livres e, em seguida, registe o novo
telemóvel.
• Se forem apresentadas duas ou mais "KCA-BT100" na lista
de unidades ligadas, é provável que exista outra "KCABT100" na proximidade. Desloque o automóvel e, em
seguida, verifique se só é apresentada uma "KCA-BT100".
3 Ao funcionar com o telemóvel, inicia a ligação
mãos-livres.
Para apagar a mensagem de conclusão da
transferência (para receptor de áudio):
Pressione qualquer botão.
• Para instruções sobre como funcionar com o telemóvel,
consulte o Manual de instruções fornecido com o
mesmo.
• É possível registar até 300 números telefónicos para cada
telemóvel registado.
• É possível registar até 32 dígitos para cada número de
telefone juntamente com um máximo de 40 caracteres
que representam um nome.
• Consoante o tipo de telemóvel, são estabelecidas as
seguintes restrições:
- Os dados da lista telefónica não podem ser
transferidos normalmente.
- Os caracteres na lista telefónica são incompreensíveis.
- Os dados da lista telefónica não podem ser
transferidos normalmente se incluírem imagens.
Poderá demorar entre várias horas até um dia inteiro
para transferir a lista telefónica consoante o tamanho
total da imagem.
• Para cancelar a transferência dos dados da lista
telefónica, utilize o telemóvel.
Português |
B64-3480-00_01_E.indb 125
125
06.10.4 6:17:51 PM
Características gerais (Para receptor de áudio)
Atender uma chamada telefónica
Quando é apresentado "CALL" ou "Call", é também
apresentado "(nome da pessoa a telefonar)" ou
"(número de telefone)".
Pressione o botão [AUDIO] ou um dos botões
[1] – [6].
Rejeitar uma chamada
Pressione o botão [ATT] durante pelo menos 1
segundo.
• Pode configurar a unidade de forma que a chamada
é recebida após o decorrer de um período de tempo
predeterminado. Para mais informações, consulte
<Definir o intervalo de tempo para atendimento
automático> (página 131).
• Ao introduzir um disco como, por exemplo, um CD,
desligará a chamada.
• Definir o telemóvel no modo privado pode desactivar a
função mãos-livres.
• Quando receber uma chamada sem identificação, é
apresentado "No Name No Number", "No Number" ou
"NO-NMBER".
• O nome da pessoa que está a telefonar é apresentado se
já estiver registado na lista telefónica.
• Pode demorar algum tempo para que o telemóvel
desligado se ligue novamente.
Ajustar o volume de voz durante uma
chamada
Pode ajustar o volume de voz durante uma chamada.
Rode o botão [VOL].
• O ajuste do volume efectuado durante a chamada actual
será válido para a chamada seguinte e subsequentes.
• Um aumento excessivo do volume pode produzir eco.
Se for produzido eco, diminua o volume o mais possível.
O eco aumenta proporcionalmente ao volume.
Desligar uma chamada
Pressione o botão [SRC].
• Pode também pressionar o botão [ATT] durante pelo
menos 1 segundo para terminar uma chamada.
Comutar entre modos do mostrador
Comutar para o modo privado
Pode comutar entre o modo privado (falar
directamente ao telemóvel) e o modo mãos-livres.
Pressione o botão Controlo ([38]).
Os modos de conversação são comutados da seguinte
forma:
Indicação
Modo de conversação
"Private"/ "PRIVATE"/ "PV TALK"
Conversação privada
"Handsfree"/ – / "HF TALK"
Conversação mãos-livres
Pode comutar entre a Lista telefónica e a Lista de
chamadas.
Pressione o botão [DISP]/ [AUTO]/ [TI].
Se não dispuser do botão [DISP], pressione o botão
[AUTO] ou [TI].
Para o receptor de áudio com sistema de botões multifunções:
Pressione o botão [AUTO]/ [TI].
Ao pressionar este botão, alterna entre a lista de
nomes e a lista dos números de telefone.
Percorrer o mostrador
• Consoante o tipo de telemóvel, comutar para o modo
de conversação privada poderá seleccionar a fonte que
foi utilizada antes de iniciar a ligação mãos-livres. Caso
isto aconteça, a fonte não pode ser comutada de volta
para o modo de conversação mãos-livres ao utilizar esta
unidade. Utilize o telemóvel para voltar ao modo de
conversação mãos-livres.
Apagar a mensagem de despedida
Pode apagar a mensagem apresentada depois de
desligar o telemóvel.
Pressione o botão [ATT] durante pelo menos 1
segundo.
"Disconnect" ou "DISCONCT" desaparece.
126 |
Pode percorrer a lista de números de telefone
ou nomes. Para informações sobre o método de
funcionamento, consulte <Correr texto/título> no
Manual de instruções fornecido com a unidade de
controlo.
• Com a unidade de controlo em que só é apresentado
o nome da pessoa que está a telefonar, pode comutar
para o modo de apresentação do número de telefone
efectuando o procedimento anterior.
• Consoante o tipo de unidade de controlo, são
estabelecidas as seguintes restrições.
- Podem ser apresentados até 19 caracteres.
- A letra # não pode ser apresentada ou é apresentado
"|" (todos os segmentos são acesos) para #.
- Não é possível comutar entre os modos do mostrador.
Português
B64-3480-00_01_E.indb 126
06.10.4 6:17:52 PM
Método de marcação (Para receptor de áudio)
Seleccionar o modo de marcação
Pode marcar de cinco formas diferentes.
1 Aceda ao modo de selecção do método de
marcação
Pressione o botão [ATT] durante pelo menos 1
segundo.
É apresentado "DIAL" ou "N-DIAL.
2 Seleccione um método de marcação
Pressione o botão Controlo ([38]).
Ao pressionar este botão, alterna entre os seguintes
métodos de marcação:
Para o receptor de áudio com sistema de botões multifunções:
1 Pressione o botão [NEXT].
Seleccione a secção de função da botão.
2 Pressione o botão [1] ("DIAL") – [4] ("IN-C").
Indicação Multi-botões Método de marcação
"DIAL"/
[1] ("DIAL") Marcar introduzindo um número de
"N-DIAL"
telefone. (página 127)
Marcar com a função de marcação
rápida. (página 127)
"INITIAL"/ [2] ("PHBK")* Marcar procurando pela inicial na lista
"PH-BOOK1"
telefónica (página 128)
"PH.BOOK"/ [2] ("PHBK")* Marcar procurando na lista telefónica
"PH-BOOK2"
por ordem alfabética. (página 128)
"OUT"/
[3] ("OUT-C") Marcar utilizando a lista de chamadas
"OUT-CALL"
efectuadas. (página 128)
"IN"/
[4] ("IN-C") Marcar utilizando a lista de chamadas
"IN-CALL"
recebidas. (página 129)
3 Saia do método de selecção do modo de
marcação
Pressione o botão [ATT] durante pelo menos 1
segundo.
• Para utilizar a lista telefónica, é necessário que tenha
sido transferida do telemóvel. Para mais informações,
consulte <Transferir a lista telefónica> (página 125).
• A lista de chamadas efectuadas e a lista de chamadas
recebidas são as listas de chamadas realizadas e
recebidas nesta unidade. Não são as listas guardadas na
memória do telemóvel.
• * Com o sistema de botão multi-funções, ao pressionar
o botão [2] ("PHBK") comuta entre os métodos de
procura da lista telefónica.
Funcionamento do controlo remoto
Efectuar uma chamada introduzindo
um número de telefone
Pode efectuar uma chamada introduzindo um
número de telefone.
1 Aceda ao modo de marcação do número
Seleccione "DIAL" ou "N-DIAL".
Consulte <Seleccionar o modo de marcação> (página
127).
2 Introduza o número de telefone
Pressione o número ([1] – [0]), ou o botão
#([FM]), *([AM]), +([¢]) no controlo remoto.
3 Efectue uma chamada
Pressione o botão [DIRECT] no controlo remoto.
É apresentado "CALL" ou "Call".
Para apagar o número de telefone introduzido
dígito a dígito:
Pressione o botão [4] no controlo remoto.
• Pode introduzir no máx. 32 dígitos.
• Consoante o tipo da unidade de controlo, é apresentado
"|" (todos os segmentos são acesos) para #.
Marcar com a função de marcação
rápida
Pode marcar chamando o número de telefone
registado na lista predefinida de números. Para
informações sobre como predefinir um número de
telefone, consulte <Registar na lista de números
predefinidos> (página 128).
1 Aceda ao modo de marcação do número
Seleccione "DIAL" ou "N-DIAL".
Consulte <Seleccionar o modo de marcação> (página
127).
2 Seleccione o botão correspondente ao
número de marcação predefinido
Pressione o botão [1] – [3].
É apresentado "Preset #" ou "PRESET #".
Para o receptor de áudio com sistema de botões multifunções:
1 Pressione o botão [NEXT].
Seleccione a secção de função da botão.
2 Pressione o botão [1] ("1") – [3] ("3").
É apresentado "DIAL #".
3 Efectue uma chamada
Pressione o botão Controlo ([38]) durante pelo
menos 1 segundo.
É apresentado "CALL" ou "Call".
• Se o número pretendido não estiver registado na lista
de números predefinidos, é apresentado "No Name No
Number", "No Number" ou "NO-NUMBER".
Português |
B64-3480-00_01_E.indb 127
127
06.10.4 6:17:53 PM
Método de marcação (Para receptor de áudio)
Registar na lista de números
predefinidos
Pode registar até 3 números de telefone para
marcação rápida.
1 Introduza o número que pretende registar
Introduza o número com referência ao seguinte:
- <Efectuar uma chamada introduzindo um número de
telefone> (página 127)
- <Marcar utilizando a lista telefónica> (página 128)
- <Marcar utilizando a lista de chamadas efectuadas>
(página 128)
- <Marcar utilizando a lista de chamadas recebidas>
(página 129)
2 Seleccione o botão que pretende registar
Pressione o botão [1] – [3] durante pelo menos
2 segundos.
Para o receptor de áudio com sistema de botões multifunções:
1 Pressione o botão [NEXT].
Seleccione a secção de função da botão.
2 Pressione o botão [1] ("1"/ "MEM.1") – [3] ("3"/
"MEM.3") durante pelo menos 2 segundos.
2 Seleccione a inicial a procurar
Pressione o botão Controlo para [4], [¢],
[FM] ou [AM].
Desloque o cursor para a inicial a procurar.
Botão
Operação
[4]/ [¢] Desloca para o carácter seguinte.
[FM]/ [AM]
Desloca para a fila seguinte.
3 Determine a inicial seleccionada
Pressione o botão Controlo ([38]) durante pelo
menos 1 segundo.
4 Seleccione o nome
Pressione o botão Controlo para [FM], [AM],
[4] ou [¢].
Seleccione o nome.
Botão
Operação
[FM]/ [AM]
Muda o nome.
[4]/ [¢] Muda a inicial.
5 Efectue uma chamada
Pressione o botão Controlo ([38]) durante pelo
menos 1 segundo.
É apresentado "CALL" ou "Call".
A mensagem "Memory" ou "MEMORY" pisca 1 vez.
3 Saia do método de selecção do modo de
marcação
Pressione o botão [ATT] durante pelo menos 1
segundo.
Marcar utilizando a lista telefónica
Pode marcar utilizando a lista telefónica transferida.
1 Aceda ao modo de lista telefónica
Seleccione a mensagem "INITIAL", "PH-BOOK1", "PH.
BOOK" ou "PH-BOOK2".
Consulte <Seleccionar o modo de marcação> (página
127).
Se seleccionou "PH.BOOK" ou "PH-BOOK2", passe para
o passo 4.
Para o receptor de áudio com sistema de botões multifunções:
Pressione o botão [2] ("PHBK").
Ao pressionar este botão, alterna entre os seguintes
métodos de procura:
Indicação
"INITIAL"/
"PH-BOOK1"
"PH.BOOK"/
"PH-BOOK2"
128 |
Método de procura
Procurar pela inicial.
Procurar por ordem alfabética.
Passe para o passo 4.
• Para utilizar a lista telefónica, é necessário que tenha
sido transferida do telemóvel. Para mais informações,
consulte <Transferir a lista telefónica> (página 125).
• As iniciais que não incluam um nome correspondente
não serão apresentadas.
• Na unidade de controlo que apresenta três filas, o nome
na fila do meio é o que foi seleccionado.
• Durante a procura, é procurado um carácter sem acento
como "u" em vez de um carácter com acento como "ü".
• Os caracteres que a unidade de controlo não pode
apresentar são procurados pela ordem pela qual foram
registados na lista telefónica.
Marcar utilizando a lista de chamadas
efectuadas
Pode marcar utilizando a lista de chamadas
efectuadas. São registados até dez números de
telefone das chamadas efectuadas na lista de
chamadas efectuadas.
1 Aceda ao modo de lista de chamadas
efectuadas
Seleccione a mensagem "OUT" ou "OUT-CALL".
Consulte <Seleccionar o modo de marcação> (página
127).
Português
B64-3480-00_01_E.indb 128
06.10.4 6:17:53 PM
Controlo remoto (Para receptor de áudio)
2 Seleccione um nome ou número de telefone
Pressione o botão Controlo para [FM] ou [AM].
3 Efectue uma chamada
Pressione o botão Controlo ([38]) durante pelo
menos 1 segundo.
É apresentado "CALL" ou "Call".
Funções dos botões
Botão [SRC]*
Durante uma chamada: termina a chamada.
Botões [VOL]*
Durante uma chamada: ajustam o volume de voz.
Botão [
• A lista de chamadas efectuadas é a lista de chamadas
realizadas a partir desta unidade. Não é a lista guardada
na memória do telemóvel.
• Na unidade de controlo que apresenta três filas,
o número de telefone na fila do meio é o que foi
seleccionado.
• Consoante o tipo de unidade de controlo, é apresentado
"0" para a décima chamada na lista de chamadas
efectuadas.
]
Acede ao modo de selecção do método de
marcação.
Quando recebe uma chamada: atende a chamada.
Botão [38]*
Durante uma chamada:
comuta entre o modo de conversação privado e o
modo de conversação mãos-livres.
No modo de selecção do método de marcação:
Selecciona um método de marcação.
Botão [¢]*
Introdução da marcação do número: introduz "+".
Marcar utilizando a lista de chamadas
recebidas
Pode marcar utilizando a lista de chamadas recebidas.
São guardados até dez números de telefone das
chamadas recebidas na lista de chamadas recebidas.
1 Aceda ao modo de lista de chamadas
recebidas
Seleccione a mensagem "IN" ou "IN-CALL".
Consulte <Seleccionar o modo de marcação> (página
127).
2 Seleccione um nome ou número de telefone
Pressione o botão Controlo para [FM] ou [AM].
3 Efectue uma chamada
Pressione o botão Controlo ([38]) durante pelo
menos 1 segundo.
Botão [4]*
Introdução da marcação do número:
apaga o número de telefone introduzido.
Botão [FM]*
Introdução da marcação do número: introduz "#".
Botão [AM]*
Introdução da marcação do número: introduz "*".
Botões [0] – [9]*
Introdução da marcação do número: introduz um
dígito.
Botão [DIRECT]*
Efectua uma chamada.
Interruptor selector do modo do controlo
remoto
Comuta para "AUD" durante a marcação.
É apresentado "CALL" ou "Call".
• A lista de chamadas recebidas é a lista de chamadas
recebidas nesta unidade. Não é a lista guardada na
memória do telemóvel.
• Na unidade de controlo que apresenta três filas,
o número de telefone na fila do meio é o que foi
seleccionado.
• Consoante o tipo de unidade de controlo, é apresentado
"0" para a décima chamada na lista de chamadas
recebidas.
• * Se o controlo remoto dispuser de um interruptor
selector, defina-o para "AUD".
• Os controlos remotos com o botão [
] e/ou botões
numéricos estão disponíveis como opção. Adquira um
controlo remoto com a função pretendida.
Português |
B64-3480-00_01_E.indb 129
129
06.10.4 6:17:54 PM
Sistema de menu (Para receptor de áudio)
Sistema de menu
Configure diversas funções. O método de operação
básica do sistema de menu é explicado aqui. A
referência para os elementos de menu e o conteúdo
das suas regulações encontra-se depois da explicação
desta operação.
1 Aceda o modo de menu
Pressione o botão [MENU] durante pelo menos
1 segundo.
É apresentado "MENU".
2 Seleccione o item do menu
Pressione o botão Controlo para [FM] ou [AM].
3 Defina o item do menu
Pressione o botão Controlo para [4] ou [¢].
4 Saia do modo de menu
Pressione o botão [MENU].
Em modo Espera
Apagar um telemóvel registado
Pode apagar um telemóvel registado.
1 Seleccione o modo de eliminação de telefone
Pressione o botão Controlo para [FM] ou [AM].
Seleccione a mensagem "Phone Delete" ou "PHN-DEL".
2 Aceda ao modo de eliminação de telefone
Pressione o botão Controlo ([38]) durante pelo
menos 1 segundo.
É apresentado "(nome)".
3 Seleccione o telemóvel que pretende apagar
Pressione o botão Controlo para [FM] ou [AM].
4 Apague o telemóvel seleccionado
Pressione o botão Controlo ([38]) durante pelo
menos 1 segundo.
É apresentado "Delete" ou "DELETE".
5 Saia do modo de eliminação de telefone
• Aparecem três itens do menu no ecrã. O item do menu
apresentado ao centro é aquele que pode ajustar.
Em modo Espera
Pressione o botão [MENU].
• Quando um telemóvel registado é apagado, as
respectivas lista telefónica, lista de chamadas efectuadas
e lista de chamadas recebidas são também apagadas.
Seleccionar o telemóvel que pretende
ligar
Quando tiver registado dois ou mais telemóveis, é
necessário seleccionar qual o telemóvel que pretende
utilizar.
1 Seleccione o modo de selecção de telefone
Pressione o botão Controlo para [FM] ou [AM].
Seleccione a mensagem "Phone Selection" ou "PHNSEL".
2 Aceda ao modo de selecção de telefone
seleccionado
Pressione o botão Controlo ([38]) durante pelo
menos 1 segundo.
É apresentado "(nome)".
3 Seleccione o telemóvel que pretende ligar
Pressione o botão Controlo para [FM] ou [AM].
Visualizar o estado do telemóvel
Pode visualizar o estado de ligação, força da rede e
nível da bateria.
1 Seleccione o item de visualização do estado
Pressione o botão Controlo para [FM] ou [AM].
Seleccione a mensagem "P-STATUS".
2 Aceda ao modo de visualização do estado
Pressione o botão Controlo ([38]) durante pelo
menos 1 segundo.
3 Seleccione o item que pretende visualizar
Pressione o botão Controlo para [FM] ou [AM].
4 Saia do modo de visualização do estado
Pressione o botão [MENU].
4 Configure o telemóvel que pretende ligar
Pressione o botão Controlo para [4] ou [¢].
É apresentado "✱(nome)" ou "-(nome)".
"✱" (cor escura) ou "✱": o telemóvel seleccionado está
ocupado.
"✱" (cor clara) or "_": o telemóvel seleccionado está
em espera.
5 Saia do modo de selecção de telefone
Pressione o botão [MENU].
130 |
Português
B64-3480-00_01_E.indb 130
06.10.4 6:17:55 PM
1 Seleccione o item de visualização do estado
Pressione o botão Controlo para [FM] ou [AM].
Seleccione a mensagem "Phone Status".
2 Visualize os estados
Pressione o botão Controlo para [4] ou [¢].
Todos os estados são indicados com ícones.
3 Saia do modo de menu
Pressione o botão [MENU].
Definir o intervalo de tempo para
atendimento automático
Esta função atende automaticamente (responde a)
uma chamada após decorrer um intervalo de tempo
predefinido para atendimento automático.
Indicação
"Auto Answer: OFF"/
"ANS OFF"
"Auto Answer: 0s"/
"ANS 0"
Ajuste
Não atende o telemóvel automaticamente.
Atende automaticamente o telemóvel de
imediato.
"Auto Answer: 8s"/
"ANS 8"
Atende automaticamente o telemóvel após 8
segundos (definição original).
…
Estado de ligação Bluetooth
Indicação
Ícone
Informação
"BT-CON Y"
Ligado
Em modo Espera
…
Se a unidade de controlo suportar uma função
de visualização gráfica:
"BT-CON N"
Desligado
…
"BAT MID"
Em modo Espera
Configurar os altifalantes de saída de
voz
"BAT LOW"
Fraca
"BAT - - -"
Não é possível obter informação.
…
…
Força da rede do telemóvel
Indicação
Ícone
Informação
"SGNL MAX"
Máximo
"SGNL MID"
• Se o período de tempo definido no telemóvel for inferior
ao definido na unidade, será utilizado o primeiro.
…
Nível de bateria do telemóvel
Indicação
Ícone
Informação
"BAT FULL"
Cheia
"Auto Answer: 99s"/ Atende automaticamente o telemóvel após 99
"ANS 99"
segundos.
"SGNL LOW"
Mínimo
"NO SGNAL"
Fora do alcance do serviço
"SGNL - - -"
Não é possível obter informação.
Pode especificar os altifalantes de saída de voz.
Indicação
"SP Select: Front"/
"SPK FRT"
"SP Select: F-R"/
"SPK F-R"
"SP Select: F-L"/
"SPK F-L"
Ajuste
Transmite voz dos altifalantes dianteiros direito
e esquerdo.
Transmite voz do altifalante dianteiro direito.
Transmite voz do altifalante dianteiro esquerdo.
• Seleccione o altifalante que está mais longe do
microfone de forma a evitar ruídos ou ecos.
Em modo Espera
Definir o bip da chamada a receber
• Dado que o número de passos da unidade de controlo
difere daquele do telemóvel, os estados apresentados na
unidade de controlo podem não corresponder àqueles
apresentados no telemóvel.
Pode transmitir um bip do altifalante quando receber
uma chamada.
Indicação
Ajuste
"Call Beep: ON"/ "C-BP ON" É ouvido um bip.
"Call Beep: OFF"/ "C-BP OFF" O bip é cancelado.
Português |
B64-3480-00_01_E.indb 131
131
06.10.4 6:17:55 PM
Controlo da unidade mãos-livres (Para receptor de monitor)
Controlo da unidade mãos-livres
7 Introduza um número de telefone.
(Consulte <Ao marcar>, página 134)
8 Apresenta a força da rede.*
Quanto maior for o número de segmentos de
barra, maior é o sinal da rede.
9 Apresenta o estado actual de atendimento
automático
Quando o atendimento automático está activado:
Ecrã do controlo mãos-livres
Ou quando
recebe uma
chamada …
AUTO
TEL
p
Ecrã do controlo mãos-livres
9
8
Hands
10
AUTO
Free
K E N WO O D
1
2
11
0123456789
P1
1
2
3
4
5
6
7
8
9
*
0
#
15
P2
3
q
w
12
P3
6
4
5
S e t Up
+
13
Clear
14
7
Return
e
r
t
Ecrã do controlo
DV D V I D E O
13:50
16
TEL
IN
Next
REP
Title 1
Chap
KENWOOD
3
TIME
SCRL
T0:05:20
1 Apresenta o ecrã de procura da lista telefónica.
(Consulte <Telefonar utilizando a lista telefónica>,
página 135)
2 Apresenta o ecrã de chamadas efectuadas.
(Consulte <Remarcação>, página 136)
3 Apresenta o ecrã de chamadas recebidas.
(Consulte <Remarcação>, página 136)
4 Comuta entre os modos privado e mãos-livres
(apenas quando tiver uma chamada em curso).
5 Apresenta o ecrã de configuração de mãos-livres.
(Consulte <Configurar o telefone mãos-livres>,
página 136)
6 Introduza três números de telefone para marcação
rápida.
(Consulte <Marcação rápida>, página 134)
132 |
y
Quando o atendimento automático está
desactivado:
Apresenta a capacidade da bateria do telemóvel.*
Quanto maior for o número de segmentos de
barra, maior é o nível de bateria.
Inicia a chamada.
Termina a chamada.
Apaga o número de telefone a ser introduzido.
Apaga o número de telefone introduzido.
Volta ao ecrã anterior.
Apresenta os números de telefone das chamadas
recebidas e efectuadas.
Se registou o número de telefone na lista
telefónica, é apresentado o nome do destinatário.
Apresenta o estado da ligação ao telemóvel.
Branco: O telemóvel está ligado.
Laranja: O telemóvel não está ligado ou encontrase fora do alcance do serviço.
• Enquanto o automóvel está a deslocar-se, algumas
funções são desactivadas por motivos de segurança.
Os botões associados às funções desactivadas não
têm qualquer acção quando premidos.
• Quando o ecrã de controlo mãos-livres aparece, o
nome do telemóvel ligado é apresentado durante 5
segundos.
• * Dado que o número de passos da unidade de
controlo difere daquele do telemóvel, os estados
apresentados na unidade de controlo podem não
corresponder àqueles apresentados no telemóvel.
Não é apresentado nenhum estado se não for
possível obter informação acerca disso.
• Definir o telemóvel no modo privado pode
desactivar a função mãos-livres.
Português
B64-3480-00_01_E.indb 132
06.10.4 6:17:58 PM
• Um aumento excessivo do volume pode
produzir eco. Se for produzido eco, diminua
o volume o máximo possível. O eco aumenta
proporcionalmente ao volume.
Controlo remoto
17
18
19
24
Funcionamento das teclas
20
25
21
26
22
23
SRC
u Tecla [SRC]
Durante uma chamada: termina a chamada.
i Tecla [*] (Quando f está definido para "AUD")
Introdução da marcação do número: introduz "+".
o Tecla [FM+] (Quando f está definido para "AUD")
Introdução da marcação do número: introduz "#".
; Tecla [AM-] (Quando f está definido para "AUD")
Introdução da marcação do número: introduz "*".
a Tecla [4] (Quando f está definido para "AUD")
Introdução da marcação do número:
apaga o número de telefone introduzido.
s Tecla [0] – [9] (Quando f está definido para
"AUD")
Introdução da marcação do número: introduz um
dígito do número de telefone.
d Tecla [DIRECT] (Quando f está definido para
"AUD")
Efectue uma chamada.
f Interruptor selector do modo do controlo
remoto
Comuta para "AUD" durante a marcação.
g Tecla [5]/ [∞]
Durante uma chamada: ajusta o volume de voz.
h Tecla [
]
Apresenta o ecrã do controlo mãos-livres.
Quando recebe uma chamada: atende a chamada.
27
28
j Tecla [u]/ [d]
Durante uma chamada: ajustam o volume de voz.
k Tecla [SRC]
Durante uma chamada: termina a chamada.
• O nível do volume de voz ajustado durante uma
chamada será válido para a chamada seguinte e
subsequentes.
Português |
B64-3480-00_01_E.indb 133
133
06.10.4 6:17:59 PM
Controlo da unidade mãos-livres (Para receptor de monitor)
Quando receber uma chamada
Marcação rápida
Quando receber uma chamada, pode utilizar o
telefone mãos-livres.
Pode registar até 3 números de telefone para
marcação rápida.
1
Para registar um número de telefone:
Atenda uma chamada
1
Consulte <Telefonar utilizando a lista telefónica>
(página 135), <Remarcação> (página 136) e <Ao
marcar> (página 134).
Quando recebe uma chamada, aparece
automaticamente o ecrã do controlo de mãos-livres.
2
Termine a chamada
Visualize o número de telefone que pretende
registar
2
Registe o número de telefone
P1
O ecrã anterior aparece novamente.
—
P3
Continue a tocar durante mais de 2 segundos.
Ao marcar
Para marcar um número de telefone a partir da
memória:
Efectue uma chamada introduzindo um número de
telefone.
1
1
Introduza um número de telefone
+
2
9
—
0
,
*
,
,
#
Chame o número de telefone
P1
2
—
P3
Efectue uma chamada
Efectue uma chamada
Pode começar a conversação quando o destinatário
atender.
• Só podem ser registados números de telefone para
marcação rápida. Consequentemente, o nome
do destinatário e de outros não são visualizados
durante a marcação.
• Para apagar uma introdução incorrecta, toque em
Clear .
3
Termine a chamada
O ecrã anterior aparece novamente.
• Pode introduzir no máx. 32 dígitos.
134 |
Português
B64-3480-00_01_E.indb 134
06.10.4 6:18:01 PM
Telefonar utilizando a lista telefónica
3
Pode telefonar a um pessoa através do respectivo
número de telefone que registou na lista telefónica.
1
Seleccione um destinatário a quem pretenda
telefonar
Name
Visualize o ecrã da lista telefónica
4
Confirme o destinatário
OK
Aparece o ecrã da introdução inicial.
Ecrã da introdução inicial
O ecrã do controlo de mãos-livres aparece novamente.
Os dados do destinatário seleccionado são
apresentados.
AUTO
Phone Book L i s t
2
1
1
a
b
c
d
e
f
g
h
i
j
k
l
m
n
t
u
o
p
q
r
s
v
w
x
y
z
5
Efectue uma chamada
3
Return
1 Percorre a visualização da lista de caracteres.
2 Apresenta a lista telefónica começando pelo nome
cuja inicial é o primeiro carácter em que tocou.
Pode começar a conversação quando o destinatário
atender.
6
Termine a chamada
3 Volta ao ecrã do controlo de mãos-livres.
2
Seleccione o carácter inicial do nome de uma
pessoa na memória
a
etc.
Aparece o ecrã da lista telefónica.
Ecrã da lista telefónica
Phone Book L i s t
AUTO
1234567890
2
1
Name
Name
1
O ecrã anterior aparece novamente.
Name
Name
3
4
OK
• Para utilizar a lista telefónica, é necessário que
tenha sido transferida do telemóvel. Para mais
informações, consulte <Transferir a lista telefónica>
(página 125).
• É possível visualizar até 16 caracteres para cada
nome na lista telefónica.
• As iniciais que não incluam um nome
correspondente não serão apresentadas.
• Durante a procura, é procurado um carácter sem
acento como "u" em vez de um carácter com
acento como "ü".
Return
1 Percorre a lista.
2 Introduz o nome do destinatário.
3 Introduz os dados do destinatário e volta ao ecrã do
controlo de mãos-livres.
4 Volta ao ecrã do controlo de mãos-livres.
Português |
B64-3480-00_01_E.indb 135
135
06.10.4 6:18:03 PM
Controlo da unidade mãos-livres (Para receptor de monitor)
Remarcação
5
Termine a chamada
Pode remarcar um dos últimos 10 números que
marcou ou dos quais recebeu uma chamada.
1
Visualize o ecrã de procura de chamadas
efectuadas ou de chamadas recebidas
O ecrã anterior aparece novamente.
Chamadas efectuadas
ou
• O ecrã da lista de chamadas efectuadas ou o ecrã
da lista de chamadas recebidas mostra a lista de
chamadas efectuadas ou recebidas nesta unidade.
Não são as listas guardadas na memória do
telemóvel.
Chamadas recebidas
Aparece o ecrã da lista de chamadas efectuadas ou
chamadas recebidas.
Ecrã de chamadas efectuadas ou chamadas
recebidas
Configurar o telefone mãos-livres
Incoming Calls
2
AUTO
O sistema de mãos-livres pode ser definido da
seguinte forma.
Kenwood
1234567890
Kenwood
1234567890
Kenwood
1234567890
3
DISP
4
1
Kenwood
1234567890
OK
1
Kenwood
1234567890
Return
5
1 Percorre a lista.
2 Introduz o nome do destinatário.
3 Muda para registo da lista de remarcação.
4 Introduz os dados do destinatário e volta ao ecrã do
controlo de mãos-livres.
5 Volta ao ecrã do controlo de mãos-livres.
S e t Up
Ecrã de configuração mãos-livres
Hands Free Set Up
Au t o A n s w e r i n g
1
8
P h o n e Vo i c e
2
F-Right
Beep
On
4 S
Se
e ll e
ec
c tt
5
AUTO
1
2
3
D
Seelleetcet
6
2
3
Seleccione um destinatário a quem pretenda
telefonar
Confirme o destinatário
OK
O ecrã do controlo de mãos-livres aparece novamente.
Os dados do destinatário seleccionado são
apresentados.
4
Efectue uma chamada
Pode começar a conversação quando o destinatário
atender.
136 |
Return
1 Define um tempo de resposta automática após o
fim da chamada. ( "8")
"Off":
Esta função não pode ser utilizada.
"0-99": Define o tempo do toque de chamada
(segundo).
2 Define uma posição de saída do tom de toque.
( "F-Right")
"F-Left":
Transmite o tom do altifalante
dianteiro esquerdo.
"F-Right":
Transmite o tom do altifalante
dianteiro direito.
"Front All": Transmite o tom de ambos os
altifalantes dianteiros.
3 Define o bip da chamada a receber. ( "On")
"On":
É ouvido um bip.
"Off":
O bip é cancelado.
4 Visualiza o ecrã de selecção do telefone.
5 Visualiza o ecrã de eliminação do telefone.
6 Volta ao ecrã do controlo de mãos-livres.
Português
B64-3480-00_01_E.indb 136
06.10.4 6:18:04 PM
Apagar o telefone mãos-livres
• É válido o intervalo de tempo para o atendimento
automático definido nesta unidade ou o intervalo
de tempo definido no telemóvel, qualquer que seja
o mais curto.
• Seleccione o altifalante que está mais longe do
microfone de forma a evitar ruídos ou ecos.
Pode cancelar um registo do telefone mãos-livres.
1
Visualiza o ecrã de configuração mãos-livres
S e t Up
2
Visualiza a lista de eliminação de telefone
Seleccionar um telefone mãos-livres
D
Seelleetcet
Pode escolher o telefone mãos-livres a partir da lista.
1
Ecrã de eliminação de telefone
Visualiza o ecrã de configuração mãos-livres
Phone Delete
1
S e t Up
AUTO
Kenwood 1
Kenwood 2
2
Visualiza a lista de selecção do telefone
Kenwood 3
Kenwood 4
S
Se
e ll e
ec
c tt
Kenwood 5
Ecrã de selecção do telefone
Phone Select
1
Return
2
1 Selecciona o telemóvel a ser apagado da lista.
2 Volta ao ecrã de configuração mãos-livres.
AUTO
3
Kenwood 1
Kenwood 2
Seleccione um telefone mãos-livres que
pretende apagar
Kenwood 3
Kenwood 3
Kenwood 4
Kenwood 5
1 Seleccione o telemóvel a ser utilizado como
telefone mãos-livres.
2 Volta ao ecrã de configuração mãos-livres.
3
Return
2
• A lista telefónica, lista de chamadas efectuadas
e a lista de chamadas recebidas são apagadas
juntamente com o telefone mãos-livres.
Seleccione um telefone mãos-livres que
pretende utilizar
Kenwood 1
Português |
B64-3480-00_01_E.indb 137
137
06.10.4 6:18:06 PM
Acessórios/ Procedimentos para instalação
Para uma boa recepção
Para garantir uma boa recepção, tenha atenção ao
seguinte:
Acessórios
1
3 m ..........1
2
..........2
3
..........1
Procedimentos para instalação
1. Para evitar curto-circuitos, remova a chave da
ignição e desligue o terminal - da bateria.
2. Defina o interruptor de função de conversão do
carácter de visualização.
3. Faça as ligações adequadas dos fios de entrada e
saída para cada unidade.
4. Instale o aparelho no seu carro.
5. Volte a ligar o terminal - da bateria.
6. Pressione o botão reiniciar na unidade de controlo.
• Efectue a comunicação com o telemóvel dentro de uma
distância de linha de visão de 10 m. A amplitude de
comunicação torna-se mais reduzida consoante o ambiente
circundante. A amplitude de comunicação também se
torna mais reduzida quando existe um obstáculo entre
esta unidade e o telemóvel. A amplitude máxima de
comunicação anterior (10 m) nem sempre é garantida.
• Mantenha esta unidade o mais afastada possível de outros
componentes eléctricos (componentes AV). Se estiverem
perto, a ligação das chamadas pode falhar, pode ser
produzido ruído de televisão ou rádio ou pode ocorrer
recepção fraca.
• Uma estação de transmissão ou walkie-talkie localizado nas
proximidades pode interferir com a comunicação devido a
um sinal demasiado forte.
Função de conversão do carácter de
visualização
Se a unidade de controlo não puder apresentar
caracteres com acento como, por exemplo, "ü" e
"ä", defina o interruptor da função de conversão do
carácter de visualização para "2" para os converter
para "U" e "A".
Quando uma das seguintes unidades de controlo
está ligada, defina o interruptor para "2". (Dados de
Setembro de 2006)
KDV-5234, KDC-W6534U, KDC-W5534U, DPX501U
1 2
• Isole os cabos não ligados com fita isolante ou outro
material similar. Para evitar curto-circuitos, não remova
as capas dos finais dos cabos não conectados ou dos
terminais.
• Depois de instalar o aparelho, verifique se as lâmpadas
de stop, os pisca-piscas, os limpa pára-brisas, etc. do carro
estão a funcionar correctamente.
138 |
Tabela de conversão
Carácter de conversão
A:
À, à, Á, á, Ã, ã, Ä, ä, Â, â, Å, å
C:
Ç, ç
D:
Ð, ð
E:
È, è, É, é, Ê, ê, Ë, ë
I:
Ì, ì, Í, í, Î, î, Ï, ï
N:
Ñ, ñ
O:
Ò, ò, Ó, ó, Ô, ô, Õ, õ, Ö, ö, Ø, ø
S:
ß
U:
Ù, ù, Ú, ú, Û, û, Ü, ü
X:
×
Y:
Ý, ý, ÿ
Português
B64-3480-00_01_E.indb 138
06.10.4 6:18:07 PM
Ligação
Acessório 1 (3 m)
Caixa de mãos-livres
Unidade de controlo
TO HEAD UNIT
Entrada do comutador
de disco
MIC
TO 5L I/F
1
2
(1,5 m)
Interruptor de conversão do
carácter de visualização
Para o método de funcionamento,
consulte <Função de conversão do
carácter de visualização> (página 138).
Cabo de ligação (fornecido com o
comutador de disco)
Comutador de disco
Conector para dispositivo externo
Itens vendidos separadamente como, por exemplo, um
comutador de disco e KCA-iP500 podem ser ligados aqui.
Para as unidades que pode ligar, consulte o Manual de
instruções fornecido com a unidade de controlo.
Se pretender ligar KCA-S220A
Ligue a caixa de mãos-livres ao terminal com a indicação TO CHANGER 2.
Unidade de controlo
KCA-S220A
TO HEAD UNIT
TO CHANGER 1
Caixa de mãos-livres
TO CHANGER 2
TO HEAD UNIT
TO 5L I/F
Comutador de disco
• Mantenha a extensão total do cabo de controlo desde a unidade de controlo até ao comutador de disco em 13 m ou inferior.
Comprimentos do cabo de controlo superiores a 13 m deixarão de funcionar correctamente.
Português |
B64-3480-00_01_E.indb 139
139
06.10.4 6:18:08 PM
Instalação
Instalação da caixa de mãos-livres
• Determine a posição de instalação depois de se certificar de
que a unidade pode comunicar com o telemóvel.
• Não instale a unidade perto do painel de instrumentos, da
pala da bagageira ou de outros componentes importantes.
Se tal ocorrer, pode provocar ferimentos ou acidentes
caso a unidade se solte devido a um impacto e atinja
uma pessoa ou um componente importante. Devem ser
utilizados parafusos auto-roscantes para a montagem. (A
fixação com fitas de velcro, apesar de fácil, pode soltar-se
com um embate.)
Instalação da unidade do microfone
1 Verifique a posição de instalação do microfone
(acessório 1).
2 Remova óleo e outras sujidades da superfície de
instalação.
3 Instale o microfone.
4 Ligue o cabo do microfone à caixa de mãoslivres fixa em várias posições com fita adesiva ou
equivalente.
Fixar à placa de áudio
Acessório 2 (Ø4 × 16 mm)
Peça da antena
Fixe um cabo com fita adesiva.
Fixar à carpete
Peça da antena
Acessório 3
Retire o papel da fita adesiva dupla para fixar no local
indicado no exemplo à esquerda.
Ajuste a direcção do microfone para o condutor.
• Não cole a fita de velcro por cima do número de série.
• Se o local da instalação for inclinado, corte a fita de velcro
em dois e cole-os em duas posições conforme indicado.
140 |
Português
B64-3480-00_01_E.indb 140
06.10.4 6:18:09 PM
Guia de resolução de problemas
O que poderá parecer uma avaria da unidade
poderá apenas ser o resultado de um ligeiro mau
funcionamento ou má ligação. Antes de solicitar
assistência, verifique primeiro na seguinte tabela os
possíveis problemas.
?
?
O volume de conversação de mãos-livres está
baixo.
✔ O volume de conversação de mãos-livres está
definido para um nível baixo.
☞ O volume de conversação de mãos-livres pode
ser ajustado de forma independente. Ajuste-o
durante a conversação de mãos-livres.
Não se ouve som dos altifalantes traseiros.
✔ Está a falar no modo de mãos-livres.
☞ Não é ouvido qualquer som nas colunas traseiras
no modo de conversação de mãos-livres.
?
Não se ouve um bip ao receber uma chamada.
✔ Não se ouve um bip consoante o tipo de telemóvel.
☞ Seleccionar "Call Beep: ON" ou "C-BP ON" (página
131), ou "Beep On" (página 136) permite-lhe
ouvir o bip.
?
Faltam caracteres num nome.
✔ A unidade de controlo não pode apresentar
caracteres com acentos.
☞ Defina o interruptor da função de conversão do
carácter de visualização para "2" (página 138).
?
O nome do telemóvel não é apresentado.
✔ Ao registar um telemóvel, pode ser apresentada a
morada em vez do nome do telemóvel.
☞ Desligue e ligue novamente a alimentação da
unidade de controlo. Será apresentado o nome
do telemóvel ligado.
A mensagem mostrada a seguir apresenta
a condição do seu sistema.
No Number/ NO-NMBER/ Incoming No Number :
• A pessoa que está a telefonar não apresenta
identificação.
• Não existem dados do número de telefone.
No Data/ NO DATA :
• Não existe lista de chamadas efectuadas.
• Não existe lista de chamadas recebidas.
No Entry/ NO ENTRY :
O telemóvel não foi registado (emparelhamento).
Disconnect/ DISCONCT/ Non Connection/ Disconnected :
A unidade não consegue comunicar com o telemóvel.
Connect/ CONNECT :
A unidade consegue comunicar com o telemóvel.
HF Error 07/ HF ERR07:
Não é possível aceder à memória.
\ Desligue e ligue novamente a alimentação. Se esta
mensagem continuar a aparecer, pressione o botão
reiniciar na unidade de controlo.
HF Error 68/ HF ERR68:
A unidade não consegue comunicar com o telemóvel.
\ Desligue e ligue novamente a alimentação. Se esta
mensagem continuar a aparecer, pressione o botão
reiniciar na unidade de controlo.
Especificações
As especificações podem ser alteradas sem prévia notificação.
Secção de Bluetooth
Tecnologia
: Bluetooth 1,2 Certified
Frequência
: 2,402 – 2,480 GHz
Alimentação de saída
: +4dBm (MÁX), 0dBm (MÉD) Classe de
alimentação 2
Geral
Voltagem de operação (11 – 16V permitido)
: 14,4 V
Consumo de energia
: 0,2 A
Dimensões (L × A × P)
: 95 × 30 × 105 mm
Peso
: 0,35 kg
Português |
B64-3480-00_01_E.indb 141
141
06.10.4 6:18:10 PM
B64-3480-00_01_E.indb 142
06.10.4 6:18:10 PM
B64-3480-00_01_E.indb 143
06.10.4 6:18:10 PM
B64-3480-00_01_E.indb 144
06.10.4 6:18:10 PM
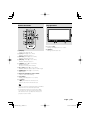
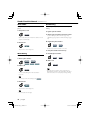
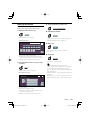
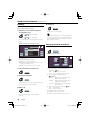
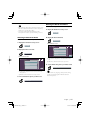


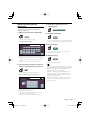
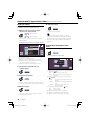


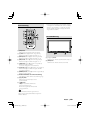
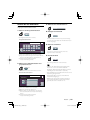
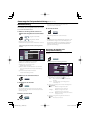
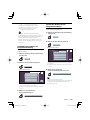


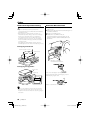

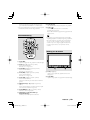
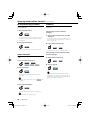
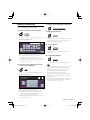
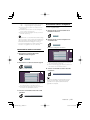
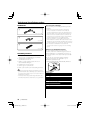


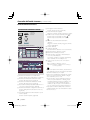
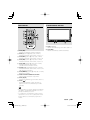

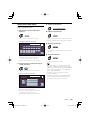
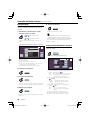
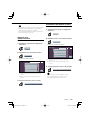
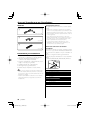
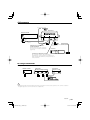
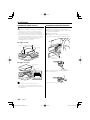


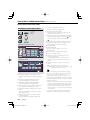

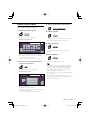
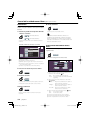


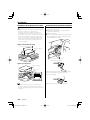


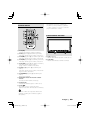
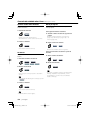
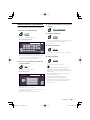
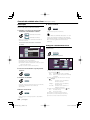
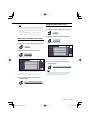
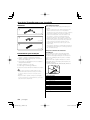


![- [::] Kenwood ASC](http://vs1.manualzilla.com/store/data/006754055_1-2875af1c3780f91f86ae6cadbcafce89-150x150.png)


![KCA-BT200 - [::] Kenwood ASC](http://vs1.manualzilla.com/store/data/006752619_1-caafe1ac50a55c4b3d037d0d04359ae9-150x150.png)


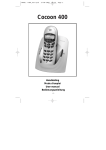
![KCA-BT300 - [::] Kenwood ASC](http://vs1.manualzilla.com/store/data/006728037_1-9b378982cb2be3137434f78b86e789ba-150x150.png)