1
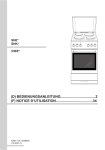
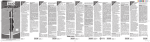
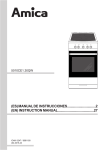
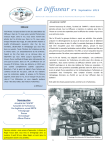
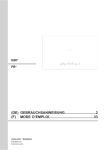
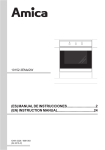
OFC 1111 ELECTROHERD ELECTRIC COOKER (DE) BEDIENUNGSANLEITUNG 2 (EN) INSTRUCTION MANUAL 25 IOAK-3148 / 8057709 (11.2014./1) SEHR GEEHRTER KUNDE, Der Elektroherd verbindet außergewöhnliche Bedienungsfreundlichkeit mit perfekter Kochwirkung. Wenn Sie sich mit dieser Bedienungsanleitung vertraut gemacht haben, wird die Bedienung des Geräts kein Problem sein. Bevor der Elektroherd das Herstellerwerk verlassen konnte, wurde er eingehend auf Sicherheit und Funktionstüchtigkeit überprüft. Vor Inbetriebnahme lesen Sie bitte die Bedienungsanleitung aufmerksam durch. Durch Befolgung der darin enthaltenen Hinweise vermeiden Sie Bedienungsfehler. Diese Bedienungsanleitung ist so aufzubewahren, dass sie im Bedarfsfall jederzeit griffbereit ist. Befolgen Sie ihre Hinweise sorgfältig, um mögliche Unfälle zu vermeiden. Achtung! Gerät nur bedienen, wenn Sie sich mit dem Inhalt dieser Bedienungsanleitung vertraut gemacht haben. Das Gerät ist nur zur Verwendung im privaten Haushalt bestimmt. Der Hersteller behält sich das Recht vor, solche Änderungen vorzunehmen, die keinen Einfluss auf die Funktionsweise des Geräts haben. 2 INHALTSVERZEICHNIS Sicherheitshinweise............................................................................................................ 4 Bedienelemente .................................................................................................................. 9 Ihr Herd stellt sich vor...................................................................................................... 10 Installation...........................................................................................................................11 Bedienung.......................................................................................................................... 14 Backen und Braten – Praktische Hinweise..................................................................... 17 Allgemeine Pflegehinweise.............................................................................................. 19 Wenn’s mal ein Problem gibt............................................................................................ 23 Technische Daten.............................................................................................................. 24 3 SICHERHEITSHINWEISE Achtung. Das Gerät und seine zugänglichen Teile werden während der Benutzung heiß. Seien Sie beim Berühren sehr vorsichtig. Kinder unter 8 Jahren sollten sich nicht in der Nähe des Geräts aufhalten. Das Gerät darf von Kindern nur unter Aufsicht benutzt werden. Das Gerät darf von Kindern (ab einem Alter von 8 Jahren) sowie von Personen, die nicht im vollen Besitz ihrer körperlichen, sensorischen oder geistigen Fähigkeiten sind nur unter Aufsicht und gebrauchsanweisungsgemäß benutzt werden. Kinder dürfen nicht mit dem Gerät spielen. Kinder dürfen Reinigungsarbeiten nur unter Aufsicht durchführen. Kinder dürfen das Gerät nur unter Aufsicht bedienen. Achtung! Erhitzen Sie Fett oder Öl niemals unbeaufsichtigt (Brandgefahr!). Versuchen Sie Flammen niemals mit Wasser zulöschen. Schalten Sie das Gerät aus und ersticken Sie die Flammen z.B. mit einem Topfdeckel oder einer nichtentflammbaren Decke. Achtung! Verwenden Sie die Kochfläche nicht als Ablagefläche (Brandgefahr!). 4 SICHERHEITSHINWEISE Starke Erhitzung des Geräts während des Betriebs. Seien Sie vorsichtig und vermeiden Sie das Berühren der heißen Innenteile des Geräts. Zugängliche Teile können bei Benutzung heiß werden. Kinder fern halten. Achtung. Verwenden Sie zur Reinigung der Kochfläche keine aggressiven Putzmittel oder scharfen Metallgegenstände, die die Oberfläche beschädigen könnten (Entstehung von Sprüngen oder Brüchen). Achtung.Um Stromschläge zu vermeiden, muss man sich vor dem Wechsel die Glühlampe vergewissern, dass das Gerät abgeschaltet ist. Es wird empfohlen die Abdeckung vor dem Öffnen von jeglicher Verschmutzung zu reinigen. Es wird empfohlen die Oberfläche der Kochplatte vor dem Zudecken abkühlen zu lassen. Zur Reinigung des Geräts keine Dampfreiniger verwenden. 5 SICHERHEITSHINWEISE Lassen Sie Kinder nicht unbeaufsichtigt an den Herd! Gefahr von Verbrennungen bei direktem Kontakt mit dem eingeschalteten Herd! Achten Sie darauf, dass elektrische Anschlussleitungen von mechanischen Küchengeräten, z.B. Mixer, keine heißen Herdteile berühren. Bewahren Sie in der Schublade keine leicht entzündlichen Stoffe auf, da diese sich während des Betriebs des Backofens entzünden können. Beim Braten den Herd nicht ohne Aufsicht lassen! Öle und Fette können sich infolge von Überhitzung entzünden. Bei Betriebsstörungen darf der Herd erst nach der Beseitigung des Schadens durch eine Fachkraft in Betrieb genommen werden. Keine Gegenstände, die schwerer als 15 kg sind, auf der geöffneten Backofentür abstellen. Verboten ist die Durchführung von Umbau- und Instandsetzungsarbeiten am Herd durch unqualifizierte Personen. Es wird empfohlen die Abdeckung vor dem Öffnen von jeglicher Verschmutzung zu reinigen. Es wird empfohlen die Oberfläche der Kochplatte vor dem Zudecken abkühlen zu lassen. Das Gerät ist ausschließlich zum Kochen im haushaltsüblichen Rahmen ausgelegt. Ein anderweitiger Gebrauch jeder Art (z.B. zur Raumbeheizung) ist nicht bestimmungsgemäß und kann gefährlich sein. 6 UNSERE ENERGIESPARTIPPS Wer Energie verantwortlich verbraucht, der schont nicht nur die Haushaltskasse, sondern handelt auch umweltbewusst. Seien Sie dabei! Sparen Sie Elektroenergie! Folgendes können Nachwärme des Backofens nutzen. Bei Garzeiten von mehr als 40 Minuten den Backofen unbedingt 10 Minuten vor dem Ende der Garzeit ausschalten. Das richtige Kochgeschirr benutzen. Töpfe mit flachem und dickem Boden sparen bis zu 1/3 an Strom. Deckel nicht vergessen, sonst ist der Stromverbrauch 4-mal so hoch! Backofentür gut geschlossen halten. Durch Verschmutzungen an den Türdichtungen geht Wärme verloren. Deshalb: Am besten sofort beseitigen! Sie tun: Wichtig!Bei Betrieb mit Zeitschaltuhr entsprechend kürzere Garzeiten einstellen. Herd nicht direkt neben Kühl- oder Gefrieranlagen einbauen. Deren Stromverbrauch steigt dadurch unnötig. Kochgeschirr auf die Kochfläche abstimmen. Das Kochgeschirr sollte nie kleiner als die Kochfläche sein. Kochflächen und Topfböden stets sauber halten. Verschmutzungen stören die Wärmeübertragung – sind sie erst einmal stark eingebrannt, ist die Reinigung oft nur noch mit umweltbelastenden Mitteln möglich. Unnötiges „Topfgucken” vermeiden. Auch die Backofentür nicht unnötig oft öffnen. Rechtzeitig herunterschalten und Restwärme nutzen. Bei langen Garzeiten 5-10 Minuten vor Ende der Garzeit ausschalten. Sie sparen bis zu 20% an Strom. Backofen nur bei größeren Mengen einsetzen. Fleisch mit einem Gewicht bis zu 1 kg lässt sich sparsamer im Topf auf dem Herd garen. 7 AUSPACKEN AuSSerbetriebnahme Für den Transport haben wir das Gerät durch die Verpackung gegen Beschädigung gesichert. Nach dem Auspacken entsorgen Sie bitte umweltfreundlich die Verpac- Nach Beendigung der Benutzung des Geräts darf es nicht zusammen mit dem gewöhnlichen Hausmüll entsorgt werden, sondern ist an eine Sammel- und Recyclingstelle für Elektro- und elektronische Geräte abzugeben. Darüber werden Sie durch ein Symbol auf dem Gerät, auf der Bedienungsanleitung oder der Verpackung informiert. Achtung! Die Verpackungsmaterialien (Polyäthylenbeutel, Polystyrolstücke etc.) sind beim Auspacken von Kindern fern zu halten. Die bei der Herstellung dieses Geräts eingesetzten Materialien sind ihrer Kennzeichnung entsprechend zur Wiederverwendung geeignet. Dank der Wiederverwendung, der Verwertung von Wertstoffen oder anderer Formen der Verwertung von gebrauchten Geräten leisten Sie einen wesentlichen Beitrag zum Umweltschutz. kungsteile. Alle Verpackungsmaterialien sind umweltverträglich, hundertprozentig wieder zu verwerten und wurden mit einem entsprechenden Symbol gekennzeichnet. Über die zuständige Recyclingstelle für die gebrauchten Geräte werden Sie von Ihrer Gemeindeverwaltung informiert. 8 BEDIENELEMENTE 10 9 6 7 2, 3 4, 5 1 8 1 Backofen-Temperaturwähler/ Backraumschalter 2, 3, 4, 5 Schalter für Kochplatte 6 Kontrollleuchte rot (Heizunganzeige) 7 Kontrollleuchte gelb (Betriebsanzeige) 8 Türgriff 9 Kochmulde 10 Abdeckplatte 9 IHR HERD STELLT SICH VOR Ausstattung des Herdes Backblech* Grillrost (Gitterrost) Bratblech* *vorhanden nur bei einigen Modellen 10 INSTALLATION Montage der Sicherung gegen Umkippen des Kochherdes Der richtige Einbauort Der Küchenraum sollte trocken und luftig sein und eine gute Belüftung haben; die Aufstellung des Gerätes sollte einen freien Zugang zu allen Steuerelementen sicherstellen. Die Sicherung wird montiert, um das Umkippen des Kochherdes zu verhindern. Dank der Sicherung, mit der gegen Umkippen des Kochherdes geschützt wird, sollte das Kind nicht im Stande sein, z.B. auf die Backofentür zu klettern und dadurch den Kochherd zum Umkippen zu bringen. Der Herd entspricht der Wärmeschutzklasse Y, d.h. er darf nur auf einer Seite neben höheren Küchenmöbeln oder Wänden eingebaut werden. Die Einbaumöbel müssen Beläge haben und die verwendeten Kleber müssen hitzebeständig sein (100°C). Ist das nicht der Fall, so kann dies eine Verformung der Belagfläche oder deren Ablösung verursachen. Falls Sie die thermische Widerstandsfähigkeit Ihrer Küchenmöbel nicht kennen, sind zwischen den Möbeln und dem Herd ca. 2 cm Abstand zu belassen. Kochherd Wand Y Abzughauben sind gemäß den Anweisungen aus den ihnen beigefügten Bedienungsanleitungen einzubauen. X1 X2 Fußboden Der Herd ist auf einer harten und ebenen Bodenfläche (nicht auf einem Untersatz) aufzustellen. Kochherd Breite 500 mm, Höhe 850 mm X1=Y+30 mm X2=Y+65 mm Y=25 mm Vor Beginn der Nutzung, ist der Herd in der Ebene auszujustieren, was besonders wichtig für die gleichmäßige Verteilung von Fett in den Bratpfannen ist. Dazu sind die Regelfüße vorgesehen; sie sind zugänglich, wenn man die Schublade herauszieht. Regelbereich +/- 5 mm. Kochherd Breite 500 mm, Höhe 900 mm X1=Y+30 mm X2=Y+65 mm Y=70 mm X - Abstand von der Befestigung an der Wand Y - Abstand vom Fußboden 11 INSTALLATION Achtung! Der Anschluss an das Stromnetz darf nur durch eine autorisierte Elektrofachkraft erfolgen, die beim örtlichen Energieversorgungsunternehmen zugelassen ist. Nicht autorisierte Personen dürfen keine willkürlichen Veränderungen oder Änderungen an der Elektroinstallation vornehmen. 2 1 Hinweise für die Elektrofachkraft Das Gerät ist für den Anschluss an Dreh- und Wechselstrom (400V 3N~50Hz) ausgelegt. Die Nennspannung der Heizelemente beträgt 230 V. Die Anpassung des Gerätes für den Einphasenstrom (230 V) ist durch entsprechende Überbrückung auf der Anschlussleiste gemäß dem nachfolgenden Schaltplan möglich. Als Netzanschlussleitung ist ein entsprechend ausgelegter Leitungstyp unter Berücksichtigung der Anschlussart und Nennleistung des Herdes zu wählen. Die Anschlussleitung ist in der Entlastungseinrichtung zu befestigen. Achtung! Es ist zu beachten, dass der Schutzleiter an die Klemme der mit gekennzeichneten Anschlussleiste angeschlossen werden muss. Die Elektroinstallation des Herdes sollte mit einem Notschalter ausgestattet sein, der im Notfall das ganze Gerät vom Netz abschaltet. Der Abstand zwischen den Arbeitskontakten des Notschalters muss mind. 3 mm betragen. Anschlussdose öffnen: Zum Entriegeln Schraubendreher ansetzen (1) und geringfügig nach unten bewegen (2). Vor Anschluss des Herdes an das Stromnetz sind die Informationen auf Typenschild und Schaltplan durchzulesen. 12 INSTALLATION Anschluss-Schaltplan Schema möglicher Anschlüsse Achtung! Spannung der Heizelemente 230V. Achtung! Im Falle jedes der Anschlüsse ist der Schutzleiter vom Netz mit der Klemme PE verbunden werden. Empfohlene Art der Anschlussleitung 1. Bei 230V Netz Einphasenanschluss mit Be triebsnull. Brücken verbinden die Klemmen 1-2-3 sowie Klemmen 4-5 Schutzleiter auf 1/N~ 4 2 5 L1 Bei 400/230 Netz Zweiphasenanschluss mit Betriebsnull. Brücken verbinden Klemmen 2-3 sowie 4-5. Schutzleiter auf 2/N~ Bei 400/230V Netz Dreiphasenanschluss mit Betriebsnull. Brücken verbinden 4-5. Phasen reihenfolge nach 1-2-3. Null auf 4-5, Schut zleiter auf 3/N~ PE 3 4 N L2 L1 3. 3 L2=S L3=T N=neutrale Leitung 13 PE 4 2 L3 5 1 L2 L1 L1=R H05VV-F4G2,5 5 2 1 H05VV-F3G4 N 1 2. 3 N PE PE=Schutzleiter H05VV-F5G1,5 BEDIENUNG Vor der ersten Inbetriebnahme des Gerätes vorhandene Verpackungsteile vom Kochfeld und vom Backofen entfernen, Schublade entleeren, Backofen-Innenraum und Kochfeld von Konservierungsmitteln reinigen, Ausstattungselemente des Backofens herausnehmen und mit warmem Wasser und etwas Spülmittel reinigen, Raumbelüftung einschalten oder Fenster öffnen, Backofen bei 250°C, etwa 30 min. eingeschaltet lassen, Verschmutzungen entfernen und genau reinigen, Kochplatten etwa 4 min. ohne Kochgeschirr eingeschaltet lassen. Wichtig! Backofen-Innenraum nur mit warmem Wasser und etwas Spülmittel reinigen. 14 BEDIENUNG Schalter für Kochplatten Sobald eine Kochplatte oder auch der Backraum eingeschaltet wird, leuchtet die Betriebsanzeige auf. Die Kochplatten werden mit dem zugehörenden 7-Takt-Schalter geregelt. Dieser bietet neben den Schaltstufen noch jeweils eine Zwischenstufe, die mit einem kleinen Punkt gekennz e ichnet ist. Diese Zwischenstufen werden gewählt, wenn die Temperatur der nächstkleineren Stufe zu niedrig und die der nächstgrößeren Stufe zu hoch wäre. Damit ist es möglich, die jeweilige Temperatur der Menge und der Art des Kochgutes feinstu fig anzupassen. Die mit einem roten Punkt gekennzeichneten Blitz-Kochplatten haben einen Überhitzungs schutz, damit die Platten bei Leerlauf oder Verwendung von falschen Geschirr vor zu hohen Temperaturen geschützt werden. Achtung! Die Abdeckplatte darf erst heruntergeklappt werden, wenn alle Kochplatten vollständig abgekühlt sind. Beispiele für Reglereinstellungen l MIN. Warmhalten 1 Dünsten von Gemüsen,Schonendes Kochen l Kochen von Suppen, mehreren Speisen 2 Schwaches Braten l Anbraten von Fleisch, Fisch 3 MAX. Schnelles Erwärmen, Schnellkochen, Braten 0 3 Aus 1 0 2 15 BEDIENUNG Unterhitze Ist der Schalter in diese Position gedreht, erfolgt das Vorheizen nur bei eingeschalteter Unterhitze. Anzuwenden z.B. beim Nachbacken von unten Oberhitze Ist der Schalter in diese Position gedreht, erfolgt das Vorheizen nur bei eingeschalteter Oberhitze. Wenden Sie sie an z.B. beim Nachbacken von oben. Funktion und Bedienung des Backofens Backofen mit natürlicher Konvektion Das Backen kann mit Oberhitze, Unterhitze und Grillhitze (sofern vorhanden) erfolgen. Die Betriebsteuerung dieses Backofens erfolgt über einen Drehschalter, der den mit dem Temperaturregler integrierten Betriebswahlschalter bedient. Ein- und Ausschalten des Backofens 100 Zum Einschalten des Backofens ist folgendes zu tun: die erforderlichen Betriebsbedingungen des Backofens, Temperatur und Heizoption festlegen, den Drehschalter in die gewünschte Stellung bringen, indem Sie ihn „nach rechts” drehen. Das Einschalten des Backofens wird über zwei Kontrollleuchten signalisiert, gelb und rot. Die gelbe Kontrollleuchte signalisiert den Backofenbetrieb. Erlischt die rote Kontrollleuchte, so ist die eingestellte Backofentemperatur erreicht. Falls das Kochrezept empfiehlt, die Speise in den vorgewärmten Backofen zu stellen, sollte dies nicht vor dem ersten Erlöschen der roten Kontrollleuchte erfolgen. Während des Backens wird die rote Kontrollleuchte zeitweise sich ein- und ausschalten (Thermostatfunktion des Backofens). Die gelbe Kontrollleuchte kann auch in der Drehschalterstellung „Backofenbeleuchtung” leuchten. Backofen ausschalten – um den Backofen auszuschalten, den Drehschalter in Position „0” bringen, indem Sie den Drehschalter „nach links” drehen. Die Kontrollleuchte sollte erlöschen. 0 25 200 0 15 Einstellungsmöglichkeiten des Drehschalters Unabhängige Backofen-Beleuchtung Durch das Drehen des Reglers auf diese Stellung wird der BackofenInnenraum beleuchtet. . Unter- und Oberhitze 100-250 Der Thermostat ermöglicht Tempera0 C tureinstellung im Bereich von 100°C bis 250°C. Zum Backen verwenden. 16 BACKEN und BRATEN - praktische hinweise Gebäck ● Zum Backen verwenden Sie am besten die mitgelieferten Bleche. ● Es können auch handelsübliche Formen und Bleche verwendet werden, die im Backofen auf den Gitterrost zu stellen sind. Zum Backen eignen sich am besten schwarz lackierte Bleche, die sich durch gute Wärmeübertragung auszeichnen und die Backzeit verkürzen. ● Bei herkömmlicher Erhitzung (Ober- und Unterhitze) sollten keine hellen und blanken Backformen verwendet werden, da ansonsten der Teig möglicherweise von unten nicht ausreichend gar wird. ● Vor Entnahme des Gebäcks aus dem Backofen sollte mit einem Holzstäbchen überprüft werden, ob der Teig richtig durchbacken ist (ist das Holzstäbchen frei von Teigspuren, so ist das Gebäck gar). ● Es empfiehlt sich, den Ofen auszustellen und das Gebäck noch ca. 5 min im Ofen durchgaren zu lassen. ● Nähere Backhinweise finden Sie in der Tabelle, diese können jedoch abhängig von eigenen Erfahrungen und Gewohnheiten geändert werden. ● Falls die Angaben aus den Kochbüchern stark von den in dieser Bedienungsanleitung enthaltenen Werten abweichen, berücksichtigen Sie bitte die Bedienungsanleitung. Braten von Fleisch ● Im Backofen sollte nur Fleisch mit einem Gewicht von über 1 kg zubereitet werden, kleinere Portionen empfiehlt es sich auf den Gasherdbrennern zu garen. ● Zum Braten empfiehlt sich die Verwendung von feuerfestem Geschirr, das auch hitzebeständige Griffe haben sollte. ● Beim Braten auf dem Gitter- oder Grillrost empfiehlt es sich ein Blech mit etwas Wasser in die untere Einschubleiste einzuschieben. ● Mindestens einmal, nach der Hälfte der Garzeit, sollte der Braten gewendet werden; den Braten während der Garzeit ab und zu mit der entstehenden Soße oder mit heißem, gesalzenem Wasser begießen, dabei kein kaltes Wasser verwenden. 17 BACKEN und BRATEN - praktische hinweise Backofen mit natürlicher Konvektion Art Gebäck Backofenfunktionen Temperatur Einschubhöhe Garzeit [min] 160 - 200 2-3 30 - 50 160 - 180 2 20 - 40* 220 - 240 3 10 - 15 210 - 220 2 45 - 60 225 - 250 2 120 - 150 160 - 230 2 90 - 120 160 - 180 2 45 - 60 190 - 210 2 40 - 50 * Kleingebäck Achtung! Die Angaben in den Tabellen sollten nur als Anhaltspunkte verstanden werden, die je nach eigenen Erfahrungen und Gewohnheiten geändert werden können. 18 ALLGEMEINE PFLEGEHINWEISE Backofen Die Pflege und ständige Reinhaltung des Herdes sowie dessen richtige Wartung haben einen wesentlichen Einfluss auf die Verlängerung der einwandfreien Funktionstüchtigkeit des Gerätes. Den Backofen nach jedem Gebrauch reinigen. Bei der Reinigung die BackofenBeleuchtung einschalten, um dadurch eine bessere Sicht im Arbeitsbereich zu bekommen. Vor der Reinigung Herd ausschalten. Dabei nicht vergessen sicherzustellen, dass sich alle Schalter in Position „”/„0” befinden. Lassen Sie den Herd vollständig auskühlen, bevor Sie mit der Reinigung beginnen. Den Backofen-Innenraum nur mit warmem Wasser und etwas Spülmittel reinigen. Kochplatten Reinigen Sie die Kochplatten immer nur mit einem trockenen Tuch oder mit einem handelsüblichen Pflegemittel. Sie können auch in regelmäßigen Abständen einen Tropfen Öl auftragen. Auf keinen Fall dürfen die Kochplatten abgeschmirgelt werden. Feuchtigkeit (von Topfdeckeln oder Ab deckplatten, übergelaufenen Kochgut) verkürzt die Lebensdauer der wertvollen Platten. Rückstände von salz halt ig en Flüssigkeiten dringen in die Poren ein und machen sie bald durch stetige Ro stabblätterung unbrauchbar. 19 ALLGEMEINE PFLEGEHINWEISE Auswechseln der BackofenBeleuchtung Technische Kontrollüberprüfungen Außer der Sauberhaltung des Herdes ist auf folgendes zu achten: Funktionsprüfungen für Steuerelemente und Baugruppen des Geräts durchführen. Nach Ablauf der Garantiezeit mindestens alle zwei Jahre eine technische Kontrollüberprüfung des Geräts in einer Kundendienst-Servicewerkstatt durchführen lassen. Festgestellte Betriebsstörungen beheben. Eine regelmäßige Wartung der Baugruppen gemäß den Wartungsintervallen durchführen. Achtung! Sämtliche Reparaturen und Regulierungen sind durch eine zuständige KundendienstServicewerkstatt oder einen authorisierten Installateur vorzunehmen. Um Stromstöße zu vermeiden, vor dem Wechsel den Herd ausschalten. Alle Drehschalter in der Schalterblende auf „” / „0” drehen und die Stromzufuhr abschalten, Die Abdeckung herausdrehen und reinigen, dann genau trocken wischen. Die Glühlampe aus der Fassung drehen, gegebenenfalls durch eine neue ersetzen – Backofen-Glühlampe hitzefest (300°C) mit folgenden Parametern: – Spannung 230 V – Leistung 25 W – Fassung E14. Backofen-Glühlampe Die Glühlampe genau in die Keramikfassung drehen. Abdeckung einschrauben. 20 ALLGEMEINE PFLEGEHINWEISE Herausnahme der inneren Scheibe 1. Mit Hilfe eines flachen Schraubendrehers die obere Türleiste herausheben, indem sie fein an den Seiten angehoben wird (Abb. B). 2. Die obere Türleiste herausnehmen. (Abb.B, C) Backofentür aushängen Zum Reinigen und für einen besseren Zugang zum Backofen-Innenraum lässt sich die Backofentür aushängen. Backofentür öffnen, die Klappbügel an den Scharnieren an beiden Seiten nach oben drücken (Abb. A). Tür leicht zudrücken, anheben und nach vorne herausziehen. Das Einsetzen der Backofentür erfolgt in umgekehrter Reihenfolge. Beim Einsetzen sicherstellen, dass die Aussparung des Scharniers richtig zu dem Haken des Scharnierhalters passt. Danach sind die beiden Klappbügel unbedingt wieder nach unten zu legen. Ist das nicht der Fall, können Scharniere beim Schließen der Backofentür beschädigt werden. B A Klappbügel nach oben drücken C 21 ALLGEMEINE PFLEGEHINWEISE 3. Innere Scheibe aus den Befestigungen (im unteren Bereich der Tür) nehmen. Zeichnung D und D1. 4. Die Scheibe mit warmem Wasser und einer kleinen Menge Reinigungsmittel abwaschen. Zwecks erneuter Montage der Scheibe sind oben genannte Handlungen in umgekehrter Reihenfolge auszuführen. Der glatte Teil der Scheibe muss sich im oberen Teil befinden. Hinweis! Die obere Leiste sollte nicht gleichzeitig an beiden Seiten der Tür eingedrückt werden. Zur korrekten Montage der oberen Türleiste sollte zuerst das linke Ende an die Tür gelegt und anschließend das rechte Ende eingedrückt werden, bis es „einrastet”. Anschließend die Leiste an der linken Seite eindrücken, bis sie „einrastet”. D1 1 2 2 1 Herausnahme der inneren Scheibe. 2 scheibe. D 3 2 1 3 2 1 Herausnahme der inneren Scheibe. 3 scheibe. 22 WENN´S MAL EIN PROBLEM GIBT In jedem Notfall: Baugruppen des Gerätes ausschalten Stromzufuhr des Geräts abschalten Reparatur anmelden Einige kleine Störungen können vom Benutzer gemäß den in der nachfolgenden Tabelle angegebenen Anweisungen selbst behoben werden: Bevor Sie sich an den Kundendienst oder an die Kundendienst-Servicewerkstatt wenden, lesen Sie bitte die in der Tabelle dargestellten Probleme durch. PROBLEM URSACHE MASSNAHMEN 1. Das Gerät funktioniert Stromausfall nicht. Sicherungen im Haus prüfen, durchgebrannte Sicherungen ersetzen 2. Backofen-Beleuchtung Glühlampe gelockert oder Glühlampe zudrehen oder ist ausgefallen beschädigt durchgebrannte BackofenBeleuchtung auswechseln (siehe Kapitel Allgemeine Pflegehinweise) 23 TECHNISCHE DATEN Nennspannung 230/400V ~ 50 Hz Nennleistung max. 7,5 kW Ausmaße des Geräts (HxBxT) 85 x 50 x 60 cm Das Gerät entspricht den EU-BestimmungenEU-Norm EN 60335-1, EN 60335-2-6 Übereinstimmungserklärung des Herstellers Hiermit erklärt der Hersteller, dass das Gerät grundsätzlich den folgenden EU Richtlinien entspricht: Niederspannungsrichtlinie 2006/95/EG, Elektromagnetische Verträglichkeit 2004/108/EG, ErP Richtlinie 2009/125/EG,. Dem Gerät wurde deshalb das Zeichen zugewiesen und es erhielt die Konformitätserklärung vorgesehen für die Marktaufsichtsbehörde. 24 DEAR CUSTOMER, The cooker is exceptionally easy to use and extremely efficient. After reading the instruction manual, operating the cooker will be easy. Before being packaged and leaving the manufacturer, the cooker was thoroughly checked with regard to safety and functionality. Before using the appliance, please read the instruction manual carefully. By following these instructions carefully you will be able to avoid any problems in using the appliance. It is important to keep the instruction manual and store it in a safe place so that it can be consulted at any time. It is necessary to follow the instructions in the manual carefully in order to avoid possible accidents. Caution! Do not use the cooker until you have read this instruction manual. The cooker is intended for household use only. The manufacturer reserves the right to introduce changes which do not affect the operation of the appliance. 25 Table of Contents Safety instructions............................................................................................................ 27 Description of the appliance............................................................................................ 32 Installation.......................................................................................................................... 34 Operation............................................................................................................................ 37 Baking in the oven – practical hints................................................................................ 40 Cleaning and maintenance............................................................................................... 42 Technical data.................................................................................................................... 47 26 SAFETY INSTRUCTIONS Warning: The appliance and its accessible parts become hot during use. Care should be taken to avoid touching heating elements. Children less than 8 years of age shall be kept away unless continuously supervised. This appliance can be used by children aged from 8 years and above and persons with reduced physical, sensory or mental capabilities or lack of experience and knowledge if they have been given supervision or instruction concerning use of the appliance in a safe way and understand the hazards involved. Children shall not play with the appliance. Cleaning and user maintenance shall not be made by children without supervision. Warning: Unattended cooking on a hob with fat or oil can be dangerous and may result in fire. NEVER try to extinguish a fire with water, but switch off the appliance and then cover flame e.g. with a lid or a fire blanket. Warning: Danger of fire: do not store items on the cooking surfaces. 27 SAFETY INSTRUCTIONS During use the appliance becomes hot. Care should be taken to avoid touching heating elements inside the oven. Accessible parts may become hot during use. Young children should be kept away. Warning: Do not use harsh abrasive cleaners or sharp metal scrapers to clean the oven door glass since they can scratch the surface, which may result in shattering of the glass. Warning: Ensure that the appliance is switched off before replacing the lamp to avoid the possibillity of electric shock. Before opening the cover, cleaning it of any dirt is recommended. The cooker hob surface should be cooled down before closing the cover. You should not use steam cleaning devices to clean the appliance. 28 SAFETY INSTRUCTIONS Always keep children away from the cooker. While in operation direct contact with the cooker may cause burns! Ensure that small items of household equipment, including connection leads, do not touch the hot oven or the hob as the insulation material of this equipment is usually not resistant to high temperatures. Do not leave the cooker unattended when frying. Oils and fats may catch fire due to overheating or boiling over. Do not put pans weighing over 15 kg on the opened door of the oven and pans over 25 kg on the hob. Do not use harsh cleaning agents or sharp metal objects to clean the door as they can scratch the surface, which could then result in the glass cracking. Do not use the cooker in the event of a technical fault. Any faults must be fixed by an appropriately qualified and authorised person. In the event of any incident caused by a technical fault, disconnect the power and report the fault to the service centre to be repaired. The rules and provisions contained in this instruction manual should be strictly observed. Do not allow anybody who is not familiar with the contents of this instruction manual to operate the cooker. The appliance has been designed only for cooking. Any other use (for example for heating) does not comply with its operating profile and may cause danger. 29 HOW TO SAVE ENERGY Using energy in a responsible way not only saves money but also helps the environment. So let’s save energy! And this is how you can do it: Make use of residual heat from the oven. If the cooking time is greater than 40 minutes switch off the oven 10 minutes before the end time. Important! When using the timer, set appropriately shorter cooking times according to the dish being prepared. Use proper pans for cooking. Pans with thick, flat bases can save up to 1/3 on electric energy. Remember to cover pans if possible otherwise you will use four times as much energy! Match the size of the saucepan to the surface of the heating plates. A saucepan should never be smaller than a heating plate. Ensure heating plates and pan bases are clean. Soils can prevent heat transfer – and repeatedly burnt–on spillages can often only be removed by products which cause damage to the environment. Do not uncover the pan too often (a watched pot never boils!). Do not open the oven door unnecessarily often. Switch off the oven in good time and make use of residual heat. For long cooking times, switch off heating zones 5 to 10 minutes before finishing cooking. This saves up to 20% on energy. Only use the oven when cooking larger dishes. Meat of up to 1 kg can be prepared more economically in a pan on the cooker hob. Only grill with the ultrafan after closing the oven door. Make sure the oven door is properly closed. Heat can leak through spillages on the door seals. Clean up any spillages immediately. Do not install the cooker in the direct vicinity of refrigerators/freezers. Otherwise energy consumption increases unnecessarily. 30 UNPACKING During transportation, protective packaging was used to protect the appliance against any damage. After unpacking, please dispose of all elements of packaging in a way that will not cause damage to the environment. All materials used for packaging the appliance are environmentally friendly; they are 100% recyclable and are marked with the appropriate symbol. Disposal of the appliance Old appliances should not simply be disposed of with normal household waste, but should be delivered to a collection and recycling centre for electric and electronic equipment. A symbol shown on the product, the instruction manual or the packaging shows that it is suitable for recycling. Materials used inside the appliance are recyclable and are labelled with information concerning this. By recycling materials or other parts from used devices you are making a significant contribution to the protection of our environment. Caution! During unpacking, the packaging materials (polythene bags, polystyrene pieces, etc.) should be kept out of reach of children. Information on appropriate disposal centres for used devices can be provided by your local authority. 31 DESCRIPTION OF THE APPLIANCE 10 9 6 7 2, 3 4, 5 1 8 1 Temperature control knob / Oven function selection knob 2, 3, 4, 5 Heating plate control knobs 6 Temperatureregulatorsignal light red 7 Cooker operation signal light yellow 8 Oven door handle 9 Heating plate 10 Cover 32 SPECIFICATIONS OF THE APPLIANCE Cooker fittings: Grill grate (drying rack) Baking tray* Roasting tray* *optional 33 INSTALLATION Mounting the overturning prevention bracket. Installing the cooker The kitchen should be dry and airy and have effective ventilation according to the existing technical provisions. The bracket is mounted to prevent overturning of the cooker. When the overturning prevention bracket is installed, a child who climbs on the oven door will not overturn the appliance. The room should be equipped with a ventilation system that pipes away exhaust fumes created during combustion. This system should consist of a ventilation grid or hood. Hoods should be installed according to the manufacturer’s instructions. The cooker should be placed so as to ensure free access to all control elements. Cooker Coating or veneer used on fitted furniture must be applied with a heat resistant adhesive (100°C). This prevents surface deformation or detachment of the coating. If you are unsure of your furniture’s heat resistance, you should leave approximately 2 cm of free space around the cooker. The wall behind the cooker should be resistant to high temperatures. During operation, its back side can warm up to around 50°C above the ambient temperature. Wall Y X1 X2 Floor Cooker width W 500 mm, height 850 mm X1=Y+30 mm X2=Y+65 mm Y=25 mm The cooker should stand on a hard, even floor (do not put it on a base). Cooker width W 500 mm, height 900 mm X1=Y+30 mm X2=Y+65 mm Y=70 mm Before you start using the cooker it should be leveled, which is particularly important for fat distribution in a frying pan. To this purpose, adjustable feet are accessible after removal of the drawer. The adjustment range is +/- 5 mm. X - distance to wall mounting Y - distance from the floor 34 INSTALLATION Electrical connection Warning! All electrical work should be carried out by a suitably qualified and authorised electrician. No alterations or wilful changes in the electricity supply should be carried out. 2 Fitting guidelines The cooker is manufactured to work with three–phase alternating current (400V 3N~50Hz). The voltage rating of the cooker heating elements is 230V. Adapting the cooker to operate with one-phase current is possible by apropriate bridging in the connection box according to the connection diagram below. The connection diagram is also found on the cover of the connection box. Remember that the connection wire should match the connection type and the power rating of the cooker. The connection cable must be secured in a strain–relief clamp. Warning! Remember to connect the safety circuit to the connection box terminal marked with . The electricity supply for the cooker must have a safety switch which enables the power to be cut off in case of emergency. The distance between the working contacts of the safety switch must be at least 3 mm. Before connecting the cooker to the power supply it is important to read the information on the data plate and the connection diagram. 35 1 INSTALLATION Connection diagram Caution! Voltage of heating elements 230V Caution! In the event of any connection the safety wire must be connected to the PE terminal 1 2 3 For 230 V earthed one–phase connection, bridges connect 1–2–3 terminals and 4–5 terminals, safety wire to . Recommended type of connection lead 3 4 2 5 L1 For 400/230 V earthed two–phase connection, bridges connect 2–3 terminals and 4–5 terminals, the safety wire to . PE 3 4 5 2 1 N L2 L1 For 400/230V earthed three–phase connection, bridges connect 4–5 terminals, phases in succession 1,2 and 3, earth to 4–5, the safety wire to . 3 36 H05VV-F4G2,5 PE 4 2 L3 5 1 L2 L1 L1=R, L2=S, L3=T, N=earth terminal, PE= safety wire terminal H05VV-F3G4 N 1 H05VV-F5G1,5 N PE OPERATION Before first use Remove packaging, empty the drawer, clean the interior of the oven and the hob. Take out and wash the oven fittings with warm water and a little washing–up liquid. Switch on the ventillation in the room or open a window. Heat the oven (to a temperature of 250°C, for approx. 30 min.), remove any stains and wash carefully; the heating plates of the hob should be heated for around 4 min. without a pan. 37 OPERATION How to use the heating plate The level of heat can be adjusted gradually by turning the appropriate knob to the right or left. Switching on the plate results in a yellow signal light on the control panel turning on. An appropriately selected pan saves energy. A pan should have a thick, flat base with a diameter equal to the plate diameter, as in that case heat is transferred most efficiently. 0 Switch off ● MIN. Warming up 1 Stewing vegetables, slow cooking ● Cooking soups, larger dishes 2 Slow frying ● Grilling meat, fish 3 MAX. Fast heating up, fast cooking, frying Caution! Ensure the plate is clean – a soiled zone does not transfer all of the heat. Protect the plate against corrosion. Switch off the plate before a pan is removed. Do not leave pans with prepared dishes based on fats and oils unattended on the switched – on plate; hot fat can spontaneously catch fire. 38 OPERATION Bottom heater on When the knob is set to this position, the oven is heated using only the bottom heater. Use for, e.g. final baking from the bottom. Oven functions and operation. Natural convection oven (conventional) The oven can be heated up using the bottom and top heaters, and the grill (if any). The oven is controlled by one knob handling, serving as a work type switch integrated with a temperature regulator. Top heater on When the knob is set to this position, the oven is heated using only the top heater, e.g. use for, final baking from above. Oven on and off 100 In order to switch on the oven you need to: set required working conditions of the oven, its temperature and a mode of heating, set the knob to the required position, turning it right. Switching on the oven is indicated by two signal lights, yellow and red, turning on. The yellow light turned on means the oven is working. If the red light goes out, it means the oven has reached the set temperature. If a recipe recommends placing dishes in a warmed-up oven, this should be not done before the red light goes out for the first time. When baking, the red light will temporarily come on and go out (to maintain the temperature inside the oven). The yellow signal light may also turn on at the knob position of “oven chamber lighting”. Switching off the oven – in order to switch off the oven, set the knob to the “0” knob position, turning it left. The signal light should go out. 25 0 200 0 15 Possible knob positions Separate oven lighting By setting the knob to this position, the lighting inside the oven is switched on. Use, for example, when washing the oven chamber. Bottom and top heaters on The thermostat enables the user to set 100-250 0 the temperature within a range from C 100°C to 250°C. Use for baking. 39 BAKING IN THE OVEN – PRACTICAL HINTS Baking we recommend using the baking trays which were provided with your cooker; it is also possible to bake in cake tins and trays bought elsewhere which should be put on the drying rack; for baking it is better to use black trays which conduct heat better and shorten the baking time; shapes and trays with bright or shiny surfaces are not recommended when using the conventional heating method (top and bottom heaters), use of such tins can result in undercooking the base of cakes; before the cake is taken out of the oven, check if it is ready using a wooden stick (if the cake is ready the stick should come out dry and clean after being inserted into the cake); after switching off the oven it is advisable to leave the cake inside for about 5 min.; the baking parameters given in Table are approximate and can be corrected based on your own experience and cooking preferences; if information given in recipe books is significantly different from the values included in this instruction manual, please apply the instructions from the manual. Roasting meat cook meat weighing over 1 kg in the oven, but smaller pieces should be cooked on the gas burners. use heatproof ovenware for roasting, with handles that are also resistant to high temperatures; when roasting on the drying rack or the grate we recommend that you place a baking tray with a small amount of water on the lowest level of the oven; it is advisable to turn the meat over at least once during the roasting time and during roasting you should also baste the meat with its juices or with hot salty water – do not pour cold water over the meat. 40 BAKING IN THE OVEN – PRACTICAL HINTS Natural convection oven (conventional) Type of dish Oven functions Temperature Level Time 160 - 200 2-3 30 - 50 160 - 180 2 20 - 40* 220 - 240 3 10 - 15 210 - 220 2 45 - 60 225 - 250 2 120 - 150 160 - 230 2 90 - 120 160 - 180 2 45 - 60 190 - 210 2 40 - 50 in minutes * Baking smaller items Caution! The figures given in Tables are approximate and can be adapted based on your own experience and cooking preferences. 41 CLEANING AND MAINTENANCE By ensuring proper cleaning and maintenance of your cooker you can have a significant influence on the continuing fault-free operation of your appliance. Oven The oven should be cleaned after every use. When cleaning the oven the lighting should be switched on to enable you to see the surfaces better. Before you start cleaning, the cooker must be switched off and you should ensure that all knobs are set to the “”/“0” position. Do not start cleaning until the cooker has completely cooled. The oven chamber should only be washed with warm water and a small amount of washing-up liquid. Electric hob From time to time a lukewarm heating plate should be covered with a thin layer of an available lubricating agent,. It is recommended to use engine oil applied for sewing machines or bicycles. Do not apply edible oil, because its salt contents may damage the plates. Dried up spillage on the surface or rim of the plates should be removed with a dry pad or brush. Do not use abrasives, because they may cause the forming of rust on the plates. By no means rub the plates with abrasive paper. Take care not to let salt drop on the plates. It dissolves in water poducing ugly rust spots. Use only dry pots and do not put wet lids on the plates. The enamel parts of the cooker can be wiped with a gentle rinsing solution and dried with a soft cloth. Spillage can be wiped during cooking with a dry cloth, to prevent building up of hard to clean burnt deposits. Chrome plated parts (e.g. rings around heating plates can be easily polished with a soft cloth). 42 CLEANING AND MAINTENANCE Replacement of the oven light bulb Regular inspections In order to avoid the possibility of an electric shock ensure that the appliance is switched off before replacing the bulb. Besides keeping the cooker clean, you should: carry out periodic inspections of the control elements and cooking units of the cooker. After the guarantee has expired you should have a technical inspection of the cooker carried out at a service centre at least once every two years, fix any operational faults, carry out periodical maintenance of the cooking units of the cooker. Set all control knobs to the position “”/“0” and disconnect the mains plug, unscrew and wash the lamp cover and then wipe it dry. unscrew the light bulb from the socket, replace the bulb with a new one – a high temperature bulb (300°C) with the following parameters: - voltage 230 V - power 25 W - thread E14. Caution! All repairs and regulatory activities should be carried out by the appropriate service centre or by an appropriately authorised fitter. Oven light bulb Screw the bulb in, making sure it is properly inserted into the ceramic socket. Screw in the lamp cover. 43 CLEANING AND MAINTENANCE Removing the inner panel 1. Using a flat screwdriver unhook the upper door slat, prying it gently on the sides (fig. B). 2. Pull the upper door slat loose. (fig. B, C) Door removal In order to obtain easier access to the oven chamber for cleaning, it is possible to remove the door. To do this, tilt the safety catch part of the hinge upwards (fig. A). Close the door lightly, lift and pull it out towards you. In order to fit the door back on to the cooker, do the inverse. When fitting, ensure that the notch of the hinge is correctly placed on the protrusion of the hinge holder. After the door is fitted to the oven, the safety catch should be carefully lowered down again. If the safety catch is not set it may cause damage to the hinge when closing the door. B A Tilting the hinge safety catches C 44 CLEANING AND MAINTENANCE D1 3. Pull the inner glass panel from its seat (in the lower section of the door). fig. D, D1. 4. Clean the panel with warm water with some cleaning agent added. Carry out the same in reverse order to reassemble the inner glass panel. Its smooth surface shall be pointed upwards. Important! Do not force the upper strip in on both sides of the door at the same time. In order to correctly fit the top door strip, first put the left end of the strip on the door and then press the right end in until you hear a “click”. Then press the left end in until you hear a “click”. 1 2 2 D 1 Removal of the internal glass panel. 2 glass panel. 3 2 1 3 2 1 Removal of the internal glass panel. 3 glass panel. 45 OPERATION IN CASE OF EMERGENCY In the event of an emergency, you should: switch off all working units of the cooker disconnect the mains plug call the service centre some minor faults can be fixed by referring to the instructions given in the table below. Before calling the customer support centre or the service centre check the following points that are presented in the table. PROBLEM REASON ACTION 1. The appliance does not work. Break in power supply. Check the household fuse box; if there is a blown fuse replace it with a new one. 2. The oven lighting does not work. The bulb is loose or damaged. Tighten up or replace the blown bulb (see ‘Cleaning and Maintenance’). 46 TECHNICAL DATA Voltage rating Power rating Cooker dimensions H/W/D 230/400V~50 Hz max. 7,5 kW 50/85/60 cm Safety certificate Complies with EU regulations EN 60335-1, EN 60335-2-6 standards Certificate of compliance CE The Manufacturer hereby declares that this product complies with the general requirements pursuant to the following European Directives: l The Low Voltage Directive 73/23/EEC, l Electromagnetic Compatibility Directive 89/336/EEC, ErP Directive 2009/125/EC, and therefore the product has been marked with the symbol and the Declaration of Conformity has been issued to the manufacturer and is available to the competent authorities regulating the market. 47 www.imtron.eu www.ok-online.com IMTRON GmbH Wankelstrasse 5 D-85046 Ingolstadt