1
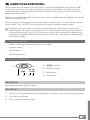
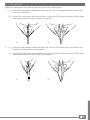
DE
EN
IT
ES
PL
NL
Index
DE…………………………………………………………………………………………… 3
EN…………………………………………………………………………………………… 9
IT …………………………………………………………………………………………… 15
ES…………………………………………………………………………………………… 21
PL…………………………………………………………………………………………… 27
NL…………………………………………………………………………………………… 33
b BEDIENUNGSANLEITUNG
Wir gratulieren Ihnen zum Kauf des TrekStor i.Gear agent Bluetooth® Keyboard for iPad®
und sind sicher, dass Sie viel Freude mit diesem Produkt haben werden. Bitte lesen Sie die
folgenden Abschnitte aufmerksam durch, damit Sie die Funktionen dieses Produkts und
seine Bedienung kennenlernen.
Aktuelle Produktinformationen können Sie der TrekStor Website www.trekstor.de entnehmen.
Haben Sie Fragen zur Bedienung oder den Funktionen von diesem Produkt? Auf der TrekStor
Website unter "Service" + "FAQ" finden Sie Antworten auf die häufigsten Fragen.
i Selbstverständlich steht Ihnen auch unser Support bei allen Fragen rund um dieses Gerät gerne
zur Verfügung. Am besten ist es, wenn Sie uns über das Support-Formular auf unserer Website
www.trekstor.de unter “Service” + “Support” kontaktieren oder unseren Support anrufen. Je
ausführlicher die Beschreibung Ihres Anliegens ist, desto schneller und zielgerichteter können
wir Ihnen helfen!
1)Lieferumfang
•
TrekStor i.Gear agent Bluetooth® Keyboard for iPad®
•
4 Gummifüße
•
USB 2.0-Kabel
•
Bedienungsanleitung
2) LEDs und Knöpfe
A) w-Schieber
B)Bluetooth®-Verbindungs-Knopf
C) Batterie-LED
A
B
C D
D) Status-LED
Batterie-LED
Die Batterie-LED leuchtet, wenn der Akku des i.Gear agent geladen wird.
Status-LED
1) Leuchtet nach dem Einschalten des i.Gear agent für ca. 3 Sekunden, danach erlischt sie
wieder, um Energie zu sparen.
2) Blinkt während des Bluetooth® Verbindungsvorgangs.
3) Blinkt, wenn der Ladestand der Batterie niedrig ist.
3 DE
3) Aufstellen des iPad® in ihrem i.Gear agent
Ihr i.Gear agent verfügt über eine Halterung, die ein Aufstellen des iPad® in zwei
verschiedenen Winkeln ermöglicht.
1) Vorbereiten der Halterung zur steilen iPad® Aufstellung
a)Heben Sie den Aufsteller an.
b)Platzieren Sie den Aufsteller in der dafür vorgesehenen Halterung.
c)Schieben Sie die Halterung mit leichtem Druck nach hinten, bis der Aufsteller einrastet.
a)
b)
2) Vorbereiten der Halterung zur steilen iPad® Aufstellung
a)
b)
a)Heben Sie den Aufsteller an.
c)
c)
b)Platzieren Sie den Aufsteller in der dafür vorgesehenen Halterung.
a) Schieben Sie die Halterung mit
b) leichtem Druck nach hinten,
c) bis der Aufsteller einrastet.
c)
a)
b)
c)
a)
b)
c)
3) Zusammenklappen der Halterung zum Transport
a) Lösen Sie den Aufsteller vorsichtig
aus der Halterung undc)heben Sie ihn an.
b)
b) Klappen Sie den Aufsteller wie dargestellt zusammen und haken Sie ihn in der hinteren Halterung ein.
c) Üben Sie leichten Druck auf den Aufsteller aus, um ihn zu fixieren.
a)
b)
c)
a)
b)
c)
a)
b)
c)
DE 4
4) Verbinden des i.Gear agent mit Ihrem iPad®
iHinweis: Diesen Schritt müssen Sie nur ausführen, wenn Sie den i.Gear agent zum ersten Mal
mit Ihrem iPad® verbinden.
a) Schalten Sie das iPad® ein und wählen Sie "Einstellungen" + "Allgemein" + "Bluetooth®"
b) Schieben Sie den Power-Schalter am i.Gear agent auf "On" und drücken Sie den
Bluetooth®-Verbindungs-Knopf.
c) Sobald die Statusleuchte blinkt, ist das Gerät bereit, sich mit Ihrem iPad® zu verbinden.
Das iPad® zeigt nun "Keyboard for iPad®" als verfügbares Gerät an.
d) Wählen Sie "Bluetooth® Keyboard" aus den verfügbaren Geräten aus. Ihnen wird nun ein
Passwort auf dem iPad® angezeigt.
e) Geben Sie das angezeigte Passwort über die Tatstatur des i.Gear agent ein und bestätigen
Sie die Eingabe mit der "Return" Taste. Jetzt wird die Verbindung zwischen Ihrem iPad® und
dem i.Gear agent hergestellt.
5 DE
5)iPad®-Funktionstasten
Der i.Gear agent ist mit speziellen Tasten ausgestattet, mit denen Sie unterschiedliche
Funktionen auf Ihrem iPad® steuern können:
Die Home-Taste ruft die Startseite des iPad® auf
Bildschirmtastatur auf dem iPad® anzeigen oder ausblenden
Die Search-Taste öffnet die iPad® Such-Seite
Gibt Ihre Bildersammlung wieder
Wechsel zwischen den Sprachen
Verdunkelt den Bildschirm und hellt ihn bei erneutem Druck wieder auf
Alles auswählen – wählt alle Elemente aus
Kopieren – kopiert ausgewählte Elemente
Einfügen – fügt ausgewählte Elemente ein
Ausschneiden – schneidet ausgewählte Elemente aus
Schaltet zum vorherigen Titel auf der aktuellen Wiedergabeliste um
Play/Pause – startet oder pausiert die Wiedergabe der aktuellen Titelliste
Schaltet zum nächsten Titel auf der aktuellen Wiedergabeliste um
Schaltet die Lautstärke des iPad® auf stumm
Verringert die Lautstärke Ihres iPad®
Erhöht die Lautstärke des iPad®
Sperrt den Bildschirm5)Batterie
6)Batterie
i Im Standby-Modus bleibt die Batterie der Tastatur für mehrere Tage aufgeladen.
i
Schalten Sie den i.Gear agent ab, wenn Sie ihn nicht benötigen. Auf diese Weise verlängern Sie
die Lebensdauer des Akkus.
Der i.Gear agent wechselt automatisch in den Standby-Modus, wenn die Tastatur längere
Zeit nicht verwendet wurde. Drücken Sie eine Taste und warten Sie 1 bis 2 Sekunden bis die
Tastatur reaktiviert wurde.
DE 6
7) Teilen der Geräte
Stellen Sie den i.Gear agent hochkant quer auf eine rutschfeste Unterlage.
1) a)Halten Sie den i.Gear agent mit beiden Händen fest und platzieren Sie die Daumen in Höhe des Anschlusses für das Ladekabel.
b) Sichern Sie den i.Gear agent und das iPad® mit den Daumen und drücken Sie das
iPad® vorsichtig aus der Tastatur.
a)
b)
a)
b)
2) a)Halten Sie den i.Gear agent mit beiden Händen fest und platzieren Sie die Daumen am Ausschnitt für die Tastatur.
b)Sichern Sie den i.Gear agent und das iPad® mit den Daumen und drücken Sie das iPad® vorsichtig aus der Tastatur.
a)
a)
b)
b)
7 DE
Sicherheits- und Verwendungshinweise:
d
e
j
m
h
g
Technische Arbeiten an dem Produkt dürfen nur von entsprechend qualifizierten Personen durchgeführt
werden. Das Produkt darf weder geöffnet werden noch dürfen Änderungen daran vorgenommen werden.
Die Komponenten können nicht vom Nutzer gewartet werden.
Setzen Sie das Gerät niemals Feuchtigkeit, Kondenswasser und Nässe aus.
Schützen Sie das Gerät vor extrem hohen und niedrigen Temperaturen und Temperaturschwankungen.
Betreiben Sie es nur bei einer Umgebungstemperatur innerhalb des Bereichs von 10º C und 40º C.
Stellen Sie das Gerät nicht in der Nähe einer Wärmequelle auf und schützen Sie es vor direkter
Sonneneinstrahlung.
Achten Sie bei der Verwendung und Lagerung des Geräts auf eine möglichst staubfreie Umgebung.
Die Reinigung der Oberfläche des Geräts darf niemals mit Lösungsmitteln, Farbverdünnern, Reinigungsmitteln
oder anderen chemischen Produkten erfolgen, nutzen Sie stattdessen ein weiches, trockenes Tuch bzw. einen
weichen Pinsel.
Hinweise:
p
a
Sollten Sie das Gerät einer elektrostatischen Entladung aussetzen, können Funktionen des Geräts gestört
werden. Schalten Sie das Gerät aus bzw. wieder ein.
Beachten Sie bitte, dass bei einem Ausbau des Akkus Ihr Gerät eventuell zerstört wird. Sie sollten den Akku nur
ausbauen, wenn Ihr Gerät ausgedient hat und zur Entsorgung geben werden soll.
Der Hersteller behält sich das Recht vor, das Produkt ständig weiter zu entwickeln. Diese Änderungen können
ohne direkte Beschreibung in dieser Bedienungsanleitung vorgenommen werden. Informationen in dieser
Bedienungsanleitung müssen somit nicht den Stand der technischen Ausführung widerspiegeln.
Der Hersteller garantiert nur die Eignung für die eigentliche Bestimmung dieses Produktes. Weiter ist der Hersteller
nicht für Beschädigungen oder Verlust von Daten und deren Folgeschäden verantwortlich.
Copyright © 2011 TrekStor GmbH. Alle Rechte vorbehalten. Bei weiteren erwähnten Produkt- oder Firmenbezeichnungen
handelt es sich möglicherweise um Warenzeichen oder Markennamen der jeweiligen Inhaber.
Mac OS and iPad® is a registered trademark of Apple Inc. in the United States and/or other countries.
Bluetooth is a registered trademark of Bluetooth® SIG, Inc.
DE 8
bQuick guide
Thank you for buying the TrekStor i.Gear agent Bluetooth® Keyboard for iPad®. We are confident
that this product will be the source of much enjoyment. Please read the following instructions
carefully so that you can become acquainted with the functions of this product and its use.
Current product information as well a detailed user manual can be found at the TrekStor
Website www.trekstor.de.
Have you got questions about the operation or the functions of this product? On the TrekStor
website you can find answers to the most frequently asked questions under "Service" + "FAQ".
i You can also get quick assistance by contacting our support. If you want to contact our
support, it is best to visit our website, www.trekstor.de, and fill out the support form that can
be found under “Service” + “Support”. You can of course also contact us directly by e-mail or
telephone. The more detailed your support request is, the quicker and better we will be able
to help you!
1) Package contents
•
TrekStor i.Gear agent Bluetooth® Keyboard for iPad®
•
4 rubber feet
•
USB 2.0 cable
•
Operating instructions
2) Lights and buttons
A) w switch
B) Bluetooth® Button
C) Charging light
A
B
C D
D) Status Light
Charging light
Charging light: turns on when charging
Status light
1) Lights briefly when you turn on the Keyboard. Then turns of to save battery.
2) Flashes when pairing
3) Flashes when battery is low2)Positioning
9 EN
3) Placing the iPad® into your i.Gear agent
Your i.Gear agent has a retainer, which enables the placement of the iPad® in two different
angels.
1) Preparing the retainer for placing the iPad® at a steep angle
a)Lift the hinge
b)Place the hinge into its place on the keyboard
c)Slide the retainer backwards with light pressure until the hinge snaps in
a)
b)
2) Preparing the retainer for placing the iPad® at a flat angle
a)
b)
a)Lift the hinge
c)
c)
b)Place the hinge into its place on the keyboard
a)
b)
c)
c)Slide the retainer backwards with light pressure until the hinge snaps in
a)
b)
c)
a)
b)
c)
3) Folding the retainer for transporting
a)
b)
a) Loosen the hinge carefully off the retainer and lift it
b) Fold the hinge as pictured and hook it into the retainer
c) Press the hinge with light pressure in order to fix it
c)
a)
b)
c)
a)
b)
c)
a)
b)
c)
EN 10
4) Pair your i.Gear agent to your iPad®
iNote: This step is only needed when you pair your TrekStor i.Gear agent to your iPad® for
the first time.
a) Turn on your iPad® and select "Settings" + "General" + "Bluetooth®".
b) On the Keyboard: Slide the power Button "On" and press the Bluetooth® button.
c) The status light will flash on i.Gear agent and the iPad® will display "Bluetooth® Keyboard"
as an available device.
d) Select "Keyboard for iPad®" on the iPad®; the iPad® will display a code
e) Type the code on the TrekStor i.Gear agent and press enter. The TrekStor i.Gear agent will
now be paired to the iPad®.
11 EN
5) Special function keys
The i.Gear agent has been designed with special function keys to give you more control
of your iPad®
Home button – brings you to the iPad® home screen
Keyboard hide/show – allows to show or hide the iPad® onscreen keyboard
Search – brings up the iPad® search screen
Slideshow – shows your picture selection
Language – changing the language
Black screen – makes the iPad® screen go dark and come back when press again
Select All – selects all elements
Copy – copies selected elements
Paste – pastes selected elements
Cut – cuts out selected elements
Previous track – skips to previous track on current playlist
Play/Pause – starts or pauses the current playlist
Next Track – slips to next track on current playlist
Mute – mutes audio on iPad®
Volume down – decreases the volume on your iPad®
Volume up – increases volume on iPad®
Screen lock
6)Battery
i The i.Gear agent´s longlife battery can stay for a couple of days in standby.
i When not in use, turn off the i.Gear agent to lengthen battery life.
The i.Gear agent will go into standby mode if left on and not being used; Press a key and wait
a second or two to bring it out of the sleep mode.
EN 12
7)Separating
Place the i.Gear agent vertically on a non-slip surface.
1) a)Using two hands, place one hand on each side of the i.Gear agent with thumbs just above the 30-Pin Charging Port.
b) Secure the i.Gear agent with one thumb and the iPad® with your other thumb. Apply slight downward pressure to iPad® and separate.
a)
b)
a) two hands, place one hand on eachb)side of the i.Gear agent with thumbs just 2) a)Using
above the side with keyboard cutout.
b) Secure the i.Gear agent with one thumb and the iPad® with your other thumb. Apply slight downward pressure to iPad® and separate.
a)
b)
a)
b)
13 EN
Instructions for safety and use:
d
e
j
m
h
g
Only qualified persons may perform technical work on the product. The product may not be opened or
changed. The components cannot be serviced by the user.
Never expose the device to moisture, condensation and liquids.
Protect the device from extremely high and low temperatures and temperature fluctuations. Use the device
within an ambient temperature of 10ºC to 40ºC.
Never place the device close to a source of heat, and protect it from direct sunlight.
Make sure that the surroundings are as dust-free as possible when you use and store the device.
Never clean the surface of the device with solvents, paint thinners, cleansers or other chemical products.
Instead, use a soft, dry cloth or soft brush.
Notes:
p
a
If this device is exposed to electrostatic discharge, the functionality of it could be affected. Please restart
your device.
Please keep in mind, that through a battery detaching your device will eventually get broken. You should
remove the battery only, if your device is disused and shall be forwarded to the disposal.
The manufacturer retains the right to continually improve the product. These changes may be made without being
directly described in these operating instructions. For this reason, the information provided in these operating
instructions may not reflect the current state of the art.
The manufacturer only guarantees suitability for the product’s intended purpose. In addition, the manufacturer is
not responsible for damages or loss of data and subsequent consequences.
Copyright © 2011 TrekStor GmbH. All rights reserved. Other cited product or company names may be trademarks
or brand names of the respective owner.
Mac OS and iPad® is a registered trademark of Apple Inc. in the United States and/or other countries.
Bluetooth is a registered trademark of Bluetooth® SIG, Inc.
EN 14
bGuida rapida
Congratulazioni per l’acquisto di TrekStor i.Gear agent Bluetooth® Keyboard for iPad® e siamo
sicuri che vi divertirete a usare questo prodotto. Si prega di leggere attentamente le seguenti
sezioni in modo da conoscere le funzioni di questo prodotto ed il suo uso.
Sul sito web di TrekStor www.trekstor.de troverete informazioni aggiornate sul prodotto e un
manuale di istruzioni.
Avete domande sull’uso o le funzioni di questo prodotto? Nel sito web TrekStor in "Assistenza" +
"FAQ" trovate le risposte alle domande più frequenti.
i Naturalmente anche il nostro supporto è a vostra disposizione per tutte le domande relative
a questo dispositivo. È meglio se ci contattate tramite il modulo di supporto sul nostro sito
www.trekstor.de nella sezione “Servizio” + “Supporto” o chiamate il nostro supporto. Più dettagliata
è la descrizione della vostra richiesta, più veloce e più mirato può essere il nostro aiuto!
1) Contenuto della confezione
•
TrekStor i.Gear agent Bluetooth® Keyboard for iPad®
•
4 piedini in gomma
•
Cavo USB 2.0
•
Istruzioni per l'uso
2) Spie e pulsanti
A)Levetta w
B) Pulsante Bluetooth®
C) Spia ricarica batteria
A
B
C D
D) Spia di stat
Spia di ricarica
Spia di ricarica: si accende mentre la batteria si sta caricando.
Stato della spia
1) Si accende brevemente quando si accende la tastiera. Poi si spegne per risparmiare
energia.
2) Lampeggia durante l’accoppiamento Bluetooth®.
3) Lampeggia quando la batteria è bassa.
15 IT
3) Posizionamento dell’iPad nel vostro i.Gear agent
Il vostro i.Gear agent ha un blocco, che permette il posizionamento dell’iPad® in due
angolazioni differenti.
1) Preparazione del blocco per posizionare l’iPad® ad un angolazione verticale
a)Sollevare la cerniera
b)Infilare la cerniera nelle due tacche sulla tastiera
c)Far slittare il blocco all’indietro, con una leggera pressione, finchè la cerniera
fa uno scatto
a)
b)
c)
2) Preparazione del blocco per posizionare l’iPad® ad una angolazione più aperta
a) Sollevare la cerniera
a)
b)Infilare la cerniera davanti alle tacche sulla tastiera
a)
b)
c)
c)Far slittare il blocco all’indietro, con una leggera pressione, finchè la cerniera
fa uno scatto
b)
c)
a)
b)
c)
a)
b)
c)
3) Piegare il blocco per il trasporto
a)
b)
a)Sfilare con cautela la cerniera dal blocco e sollevarla
c)
b)Ripiegare la cerniera come mostrato in figura e agganciarla nel blocco
c)Spingere la cerniera con una leggera pressione per bloccarla
a)
b)
c)
a)
b)
c)
a)
b)
c)
IT 16
4) Collegare l'i.Gear agent al vostro iPad® tramite Bluetooth®
iNota: ‚accoppiamento va eseguito solo la prima volta che l’i.Gear agent viene collegata
all’iPad®.
a) Accendere iPad® e selezionare: "Impostazioni" + "Generale" + "Bluetooth®"
b) Sull'i.Gear agent spostare l’interruttore di accensione su "ON" e premere il pulsante
Bluetooth®.
c) La spia di stato lampeggia e viene mostrata la tastiera come dispositivo disponibile.
d) Selezionare "Keyboard for iPad®" tra i dispositivi. Sull’iPad® viene visualizzata una password.
e) Digitare la password visualizzata sulla tastiera. Ora l’accoppiamento tra tastiera e iPad®
è eseguito.
17 IT
5) Tasti Funzione iPad®
L'i.Gear agent è stata progettata con tasti funzione speciali per avere un maggiore
controllo sul vostro iPad®:
Pulsante Home – vi riporta alla schermata iniziale dell’iPad®
Mostra/Nasconde la tastiera virtuale sullo schermo dell’iPad®
Pulsante Search – vi manda alla schermata di ricerca dell’iPad®
Diapositive – visualizza le immagini selezionate
Cambiare la lingua
Spegne lo schermo e torna dov’era quando viene ripremuto
Seleziona tutti gli elementi
Copia gli elementi selezionati
Incolla gli elementi selezionati
Taglia gli elementi selezionati
Precedente – rimanda al brano precedente nella corrente playlist
Play/ Pause – avvia/mette in pausa l’attuale playlist
Prossimo – va al prossimo brano nella corrente playlist
Mute – azzera istantaneamente il volume sull’iPad®
Diminuisce il volume
Aumenta il volume
Blocca lo schermo
6)Batteria
i La batteria a lunga durata dell'i.Gear agent può rimanere per diversi giorni in standby.
i Quando non viene usato, spegnete l'i.Gear agent, per risparmiare e prolungare la vita della
batteria.
L'i.Gear agent va automaticamente in modalità Standby, quando rimane acceso e non
utilizzato. Premere un tasto qualunque e dopo un secondo esce dalla modalità Sleep.
IT 18
7) Separazione della tasiera
Posizionare l'i.Gear agent in verticale su una superficie non sdrucciolevole.
1) a) Usando due mani, mettere una mano su ogni lato dell'i.Gear agent con il pollice appena sopra i 30 contatti di ricarica.
b) Tenere fermi l'i.Gear agent con un pollice e l’iPad® con l’altro. Applicare una
leggera pressione verso il basso e separarli.
a)
b)
a)
b)
2) a) Usando due mani,
mettere una mano su ogni lato dell'i.Gear agent
con il pollice appena sopra sul lato con il taglio della tastiera.
b) Tenere fermi l'i.Gear agent con un pollice e l’iPad® con l’altro. Applicare una
leggera pressione verso il basso e separarli.
a)
b)
a)
b)
19 IT
Indicazioni di sicurezza ed istruzioni per l’uso:
d
e
j
m
h
g
Le eventuali operazioni sul presente prodotto possono essere eseguite solamente da personale qualificato. Il prodotto
non deve essere aperto né modificato. I componenti non possono essere riparati da parte dell’utente.
Non esporre mai l’apparecchio a umidità, condensa e liquidi.
Proteggere l’apparecchio da temperature particolarmente elevate o basse e dalle variazioni di temperatura.
Utilizzare l’apparecchio solo a una temperatura ambiente compresa tra 10º C e 40º C.
Non posizionare l’apparecchio in prossimità di fonti di calore e proteggerlo dalla luce diretta del sole.
Utilizzare e conservare l’apparecchio in un ambiente il più possibile libero da polveri.
Per la pulizia della superficie dell’apparecchio non utilizzare mai solventi, diluenti, detergenti o altri prodotti
chimici, bensì un panno morbido e asciutto o un pennello morbido.
Nota:
p
a
Se questo dispositivo è esposto a scariche elettrostatiche, le sue funzionalità potrebbero essere compromesse.
Si prega di riavviare il dispositivo
Please keep in mind, that through a battery detaching your device will eventually get broken. You should
remove the battery only, if your device is disused and shall be forwarded to the disposal.
Il produttore si riserva il diritto di effettuare ulteriori operazioni di miglioramento del prodotto in modo costante.
Tali modifiche possono essere apportate senza fornirne una descrizione diretta all’interno delle presenti istruzioni
per l’uso. Le informazioni contenute nelle presenti istruzioni per l’uso non corrispondono necessariamente allo
stato della versione tecnica.
Il produttore garantisce esclusivamente l’idoneità all’uso previsto. Il produttore non è tenuto a rispondere di eventuali
danni o perdite di dati, né di danni secondari da essi derivanti.
Copyright © 2011 TrekStor GmbH. Tutti i diritti riservati. Per quanto riguarda eventuali riferimenti a prodotti o aziende,
si tratta di marchi di fabbrica o di nomi dei marchi dei rispettivi proprietari.
Mac OS and iPad® is a registered trademark of Apple Inc. in the United States and/or other countries.
Bluetooth is a registered trademark of Bluetooth® SIG, Inc.
IT 20
bGuía rápida
Le felicitamos por la compra del TrekStor i.Gear agent Bluetooth® Keyboard agent y estamos
convencidos de que estará contento con este producto. Por favor, lea detenidamente los
siguientes capítulos para que se familiarizarse con las funciones del producto y su manejo.
Encontrará información actual y un detallado manual de usuario en la página web de TrekStor
www.trekstor.de.
En caso de que tenga preguntas sobre el producto o su funcionamiento, encontrará
respuestas a las preguntas más frecuentes en la página web de TrekStor en el apartado
"Servicio" + "FAQ".
i Lo mejor sería ponerse en contacto con nosotros a través de una llamada telefónica o formulario
de soporte en nuestro sitio web www.trekstor.de en “Service” + ”Support”. ¡Cuanto más detallada sea
la descripción de su solicitud, más rápida y precisa será la forma en que le podremos ayudar!
1) Contenido de la caja
•
TrekStor i.Gear agent Bluetooth® Keyboard for iPad®
•
4 pies de goma
•
Cable USB 2.0
•
Manual de instrucciones
2) Luces y botones
A)Interruptor w
B)Bluetooth®
C) La luz de carga
A
B
C D
D) La luz del estado
La luz de carga
La luz de carga: se enciende al cargar el i.Gear agent Bluetooth® Keyboard.
La luz del estado
1) Se ilumina brevemente al encender el teclado y, a continuación, se apaga para
ahorrar energía
2) Parpadea cuando la bateria está baja
3) Parpadea cuando el i.Gear agent Bluetooth® Keyboard se conecta con el iPad®
21 ES
3) Instalación del iPad® en su i.Gear agent
Su i.Gear agent dispone de un soporte para colocar su iPad® en dos ángulos diferentes.
1) Preparación del soporte para colocar su iPad® en la posición vertical
a)Levante el soporte.
b) Coloque el soporte en la ranura prevista para ello.
c) Empuje ligeramente el soporte hacia atrás hasta que entre en la ranura.
a)
b)
c)
2) Preparación del soporte para colocar su iPad® en la posición inclinada
a) Levante el soporte.
b)
c)
a)
b)Coloque el soporte en la ranura prevista para ello.
a) Empuje ligeramente el soporte
b) hacia atrás hasta que entre
c) en la ranura.
c)
a)
b)
c)
a)
b)
c)
3) Plegar el soporte para transportar
a)
b)
a)Saque el soporte de la ranura y levántelo.
c)
b)Doble el soporte tal como se muestra en el dibujo y engánchelo en la ranura trasera.
c)Presione ligeramente el soporte para fijarlo.
a)
b)
c)
a)
b)
c)
a)
b)
c)
ES 22
4) Conecte el TrekStor i.Gear agent a su iPad®
iNota: este paso sólo es necesario al conectar el i.Gear agent con su iPad® por primera vez.
a) Encienda su iPad® y seleccione "Configuración" + "General" + "Bluetooth®".
b) Desplace el botón de encendido/apagado del i.Gear agent en la posición de encendido
y pulse el botón Bluetooth®.
c) El indicador luminoso del estado del i.Gear agent va a parpadear y el iPad® mostrará
"Keyboard for iPad®" como un dispositivo disponible.
d) Seleccione "Keyboard for iPad®" en el iPad®; el iPad® mostrará el código.
e) Introduzca el código en el i.Gear agent y pulse intro. El i.Gear agent se conectará al iPad®.
23 ES
5) Botones de funciones especiales
El i.Gear agent ha sido diseñado con unos botones de funciones que le permiten más control
sobre su iPad®:
El botón Home permite accederle a la pantalla de inicio de su iPad®
Mostrar/ocultar el teclado en la pantalla del iPad®
El botón Search abre la pantalla de búsqueda
Slideshow – presentación de sus imágenes
Cambiar la lengua
Apaga la pantalla del iPad® e ilumínala al pulsar el botón de nuevo
Select All – seleccionar todos los elementos
Copy – copiar elementos seleccionados
Paste – pegar elementos seleccionados
Cut – cortar elementos seleccionados
Salta a la pista anterior en la lista de reproducción actual
Play/Pause – inicia o detiene la lista de reproducción actual
Salta a la siguiente pista en la lista de reproducción actual
Apaga el sonido del iPad®
Baja el volumen de su Pad®
Sube el volumen de su iPad®
Bloquea la pantalla
6)Batería
i La batería del i.Gear agent puede estar varios días en el modo de standby.
i Apague el i.Gear agent cuando no está en el uso para prolongar la duración de la batería.
El i.Gear agent entrará en el modo de suspensión si lo deja encendido sin usar durante
mucho tiempo. Pulse un botón y espere de uno a dos segundos para que salga del modo
de suspensión.
ES 24
7)Desconección
Coloque el i.Gear agent verticalmente en una superficie no deslizante.
1) a) Coja el i.Gear agent firmemente con ambas manos, con los pulgares justo por encima del puerto de carga.
b) Sujete el i.Gear agent con un pulgar y el iPad® con el otro. Empuje ligeramente el iPad® para desconectarlo del teclado.
a)
b)
2) a) Cojaa)el i.Gear agent firmemente con ambas
b) manos, con los pulgares a la altura
del teclado.
b) Sujete el i.Gear agent con un pulgar y el iPad® con el otro. Empuje ligeramente el
iPad® para desconectarlo del teclado.
a)
b)
a)
b)
25 ES
Indicaciones de uso y de seguridad:
d
e
j
m
h
g
Sólo personas cualificadas pueden realizar trabajos técnicos con el producto. El producto no debe de estar abierto
ni se deben realizar modificaciones en él. El usuario no puede realizar el mantenimiento de los componentes.
No exponga el aparato a la humedad, agua de condensación ni lo moje.
Proteja el aparato de temperaturas extremas y cambios bruscos de temperatura. Utilícelo únicamente en un
intervalo de temperaturas de ambiente de entre 10 ºC y 40 ºC.
No aproxime el aparato a fuentes de calor y protéjalo de la luz solar directa.
Utilice y guarde el aparato en un ambiente lo más libre de polvo posible.
Nunca limpie la superficie del aparato con disolventes, diluyentes, detergentes u otros productos químicos.
Utilice en su lugar un paño suave y seco o un pincel suave.
Nota:
p
a
Una descarga electrostática puede afectar al funcionamiento del dispositivo. Apague el dispositivo y vuelva
a encenderlo.
Please keep in mind, that through a battery detaching your device will eventually get broken. You should
remove the battery only, if your device is disused and shall be forwarded to the disposal.
El fabricante reserva el derecho de continuar desarrollando el producto. Los consecutivos cambios en el producto
pueden realizarse sin que aparezcan descritos directamente en este manual. Por lo tanto, la información contenida
en el presente manual de usuario puede no coincidir con el estado técnico de la última versión.
El fabricante garantiza el producto únicamente para el uso previsto. Asimismo, el fabricante no se responsabiliza de
daños o pérdidas de datos, ni de daños resultantes de estos.
Copyright © 2011 TrekStor GmbH. Todos los derechos reservados. Los nombres de otros productos y empresas aquí
citados son probablemente productos y marcas registradas de sus respectivos propietarios.
Mac OS and iPad® is a registered trademark of Apple Inc. in the United States and/or other countries.
Bluetooth is a registered trademark of Bluetooth® SIG, Inc.
ES 26
bKrótka instrukcja obsługi
Gratulujemy zakupu TrekStor i.Gear agent Bluetooth® Keyboard for iPad® i jestesmy pewni,
ze sprawi on Panstwu wiele radosci. Prosze uwaznie przeczytac ponizsze rozdzialy, aby
zapoznac sie z dzialaniem tego produktu i jego obsluga.
Aktualne informacje o produkcie, jak tez i wyczerpujaca instrukcje obslugi znajda Panstwo
na portalu TrekStor www.trekstor.de.
Czy sa pytania odnosnie obslugi lub dzialania tego produktu? Na portalu TrekStor, w zakladce
„Service” + „FAQ” znajduja sie odpowiedzi na najczesciej zadawane pytania.
i Oczywiscie nasz dzial obslugi klienta jest do dyspozycji Panstwa i chetnie odpowie na pytania
dotyczace urzadzenia. Najlepiej jesli sie Panstwo skontaktujecie korzystajac z formularza na
naszej stronie www.trekstor.de w zakladce „Service” + „Support” albo polaczycie sie telefonicznie
z dzialem obslugi klienta. Im bardziej jest wyczerpujacy opis powstalej sytuacji tym szybciej
i skuteczniej mozemy pomóc!
1) Zakres dostawy:
•
TrekStor i.Gear agent Bluetooth® Keyboard for iPad®
•
4 gumowe podstawki,
•
Przewód USB 2.0
•
Instrukcja obsługi
2) Kontrolki i przyciski
A)Suwak w
B)
C)
Kontrolka baterii
D)
Kontrolka status
A
B
C D
Przycisk Bluetooth®
Kontrolka ładowania
Kontrolka ładowania: świeci gdy bateria i.Gear agent jest ładowana.
Kontrolki statusu
1) Miga powoli, gdy i.Gear agent rozpoczyna oszczędzanie energii.
2) Miga, gdy agent jest i.Gear agent łączy się z iPadem®.
3) Miga, gdy poziom naładowania akumulatora jest niski.
27 PL
3) Ustawianie pozycji iPad’a® na twoim i.Gear agent
i.Gear agent jest wyposażony w uchwyt, który umożliwia ustawienie iPad’a® w dwóch różnych
pozycjach.
1) Przygotowanie uchwytu do pozycji kąta ostrego
a)Podnieść klapkę
b)Umieścić klapkę w przygotowanych zaczepach
c)Przesuń uchwyt z lekkim naciskiem do tyłu, do momentu kliknięcia
a)
b)
2)Przygotowanie uchwytu do pozycji kąta prostego
a)
b)
a)Podnieść klapkę
c)
c)
b)Umieścić klapkę w przygotowanych zaczepach
a) Przesuń uchwyt z lekkim naciskiem
b)
c)
do tyłu, do momentuc)kliknięcia
a)
b)
c)
a)
b)
c)
3) Składanie uchwytu do transportu
a) Zwolnij ostrożnie zaczep uchwytu
b)
a)
i pociągnij do góry
c)
b)Ściśnij lekko uchwyt jak na obrazku
c)Wywieraj lekki nacisk na uchwyt w celu umieszczenia go na przewidzianym miejscu
a)
b)
c)
a)
b)
c)
a)
b)
c)
PL 28
4) Połącz TrekStor i.Gear agent ze swoim iPad®em
iUwaga: Należy to zrobić tylko wtedy, gdy i.Gear agent łączy się po raz pierwszy z iPad®em.
a) Włącz iPad® i wybierz „Ustawienia” + „General” + „Bluetooth®”.
b) Przesuń przełącznik zasilania i.Gear agent na środek klawiatury na pozycję „On” i naciśnij
przycisk Bluetooth®.
c) Lampka stanu agenta i.Gear agent miga i iPad® pokazuje „Keyboard for iPad®” jako
dostępne urządzenie.
d) Wybierz „Keyboard for iPad®” z dostępnych urządzeń.
e) Wprowadź wyświetlane hasło dla i.Gear agent. Teraz iPad® i.Gear agent jest powiązany.
29 PL
5) Klawisze funkcyjne
i.Gear agent wyposażone są w specjalne przyciski pozwalające na sterowanie wieloma
funkcjami iPada®:
Przycisk HOME – strona główna iPad®
Pokazuje lub ukrywa klawiaturę ekranową iPada
Przycisk Szukaj otwiera stronę wyszukiwania iPad®
Slideshow
Zmiana języka
Ekran ciemnieje i rozjaśnia się po naciśnięciu
Select All
Copy
Paste
Cut
Przełącza do poprzedniego utworu bieżącej listy odtwarzania
Play/Pause – uruchamia lub zatrzymuje odtwarzanie bieżącej listy tytułów
Przejście do następnego utworu bieżącej listy odtwarzania
Wycisza iPad®
Zmniejsza głośność iPada
Zwiększa głośność iPada
Blokada ekranu
6)Akumulator
i W trybie gotowości, naładowany akumulator klawiatury może zostać aktywny przez kilka dni.
i Włącz i.Gear agent, jeśli nie jest on potrzebny. W ten sposób można przedłużyć żywotność
baterii.
Klawiatura i.Gear agent automatycznie przechodzi w tryb uśpienia, gdy przez dłuższy czas nie
jest używany. Naciśnij przycisk i poczekaj 1 do 2 sekund, aby go ponownie uaktywnić.
PL 30
7)Odłączanie
Ustaw i.Gear agent pionowo na powierzchnię antypoślizgową.
1) a)Trzymaj i.Gear agent obiema rękami i umieść kciuk na wysokości połączenia
kabla ładowania.
b) Zabezpiecz i.Gear agent kciukiem wyciśnij iPad® ostrożnie z klawiatury.
a)
a)
b)
b)
2) a) Trzymaj i.Gear agent obiema rękami i umieść kciuk na wycięciu klawiatury.
b)Zabezpiecz i.Gear agent kciukiem wyciśnij iPad® ostrożnie z klawiatury.
a)
a)
b)
b)
31 PL
Wskazówki dotyczące bezpieczeństwa i eksploatacji:
d
e
j
m
h
g
Do wykonywania napraw i modyfikacji produktu uprawnione są tylko odpowiednio wykwalifikowane osoby.
Produktu nie wolno otwierać ani modyfikować. Podzespoły urządzenia nie mogą być konserwowane przez
użytkownika.
Urządzenie należy zawsze chronić przed wilgocią, skroplinami i wodą.
Urządzenie należy chronić przed ekstremalnie wysokimi lub niskimi temperaturami oraz przed wahaniami
temperatury. Podczas eksploatacji temperatura otoczenia musi wynosić od 10ºC do 40ºC.
Nie ustawiać urządzenia w pobliżu źródła ciepła i chronić je przed słońcem.
Podczas eksploatacji i składowania urządzenia otoczenie powinno być możliwie wolne od kurzu.
Do czyszczenia powierzchni urządzenia nie należy nigdy używać rozpuszczalników, rozcieńczalników, środków
czyszczących ani innych substancji chemicznych, a jedynie miękkiej, suchej ściereczki lub miękkiego pędzla.
Wskazówki:
p
a
Przy wystawieniu urządzenia na wyładowania elektrostatyczne, funkcje urządzenia mogą być zakłócone.
Wyłączyć zasilanie i włączyć ponownie.
Please keep in mind, that through a battery detaching your device will eventually get broken. You should
remove the battery only, if your device is disused and shall be forwarded to the disposal.
Producent zastrzega sobie prawo do ciągłego rozwoju produktu. Zmiany te mogą być wprowadzone bez uwzględnienia
ich w niniejszej instrukcji obsługi. Informacje zawarte w instrukcji obsługi nie muszą więc oddawać stanu technicznego
wersji urządzenia.
Producent gwarantuje jedynie, że produkt nadaje się do stosowania zgodnie z przeznaczeniem. Ponadto producent
nie odpowiada za uszkodzenia lub utratę danych oraz za ich skutki.
Copyright © 2011 TrekStor GmbH. Wszystkie prawa zastrzeżone. Inne wymienione tu nazwy produktów i firm mogą
być znakami towarowymi lub markami ich właścicieli.
Mac OS and iPad® is a registered trademark of Apple Inc. in the United States and/or other countries.
Bluetooth is a registered trademark of Bluetooth® SIG, Inc.
PL 32
bGebruiksaanwijzing
We feliciteren met uw aankoop van de TrekStor i.Gear agent Bluetooth® Keyboard for iPad®
en we zijn er zeker van dat u met dit product veel plezier zult hebben. We raden u aan de
volgende pagina's aandachtig door te lezen voor een omschrijving van de functies en het
gebruik van het product.
Bezoek voor actuele informatie over het product of een uitgebreidere handleiding de TrekStor
website www.trekstor.de.
Heeft u vragen over het gebruik of de bedieningen van dit product? Op de TrekStor website
kunt u onder "Service" + "FAQ" een antwoord op de meest gestelde vragen vinden.
i Natuurlijk staat tevens onze assistentie ter beschikking om vragen over het apparaat te
beantwoorden. We raden u in dit geval aan om via het support-formulier op onze website
www.trekstor.de onder “Service” + “Support” contact met ons op te nemen of ons telefonisch te
contacteren. Hoe gedetailleerder omschrijving van de kwestie is, hoe sneller en doeltreffender
wij u kunnen helpen!
1)Leveringsomvang
•
TrekStor i.Gear agent Bluetooth® Keyboard for iPad®
•
4 rubber voeten
•
USB 2.0-kabel
•
Gebruiksaanwijzing
2) Lichten en knoppen
A) w-regelaar
B) Bluetooth® knop
C)Batterijlamp
A
B
C D
D)Statuslamp
Batterijlamp
Batterijlamp gaat aan tijdens opladen.
Statuslamp
1) Licht kort op bij aanzetten toetsenbord en gaat vervolgens weer uit om batterij te sparen.
2) Flitst tijdens verbinden
3) Flitst als batterijspanning laag is
33 NL
3) Het plaatsen van de iPad in uw i.Gear agent
Uw i.Gear agent heeft een houder die het mogelijk maakt om de de iPad® in twee
verschillende posities te plaatsen.
1) Opstellen van de houder in een stijle hoek
a)Til het scharnierende deel op
b)Plaats dit deel als afgebeeld in de juiste positie van het toetsenbord
c)Druk het scharnierende deel met lichte druk in positie tot deze klikt
a)
b)
2) Opstellen van de houder in een hangende hoek
a)
b)
a)Til het scharnierende deel op
c)
c)
b)Plaats dit deel als afgebeeld in de juiste positie van het toetsenbord
a)
b)
c)
c)Druk het scharnierende deel met lichte druk in positie tot deze klikt
a)
b)
c)
a)
b)
c)
3) Inklappen van de houder voor vervoer
a)
b)
c)
a)Trek het scharnierende deel voorzichtig uit zijn vergrendeling en til het op
b)Vouw dit deel in als afgebeeld in de uitsparing
c)Druk het met lichte druk zodat deze zich vergrendeld in de uitsparing
a)
b)
c)
a)
b)
c)
a)
b)
c)
NL 34
4) Verbinden van de i.Gear agent met uw iPad®
iOpmerking: Deze stap is enkel nodig bij de eerste maal in gebruik nemen van uw i.Gear agent.
a) Zet de iPad® aan en selecteer "Settings/instellingen" + "General/Algemeen" + "Bluetooth"
b) Op het toetsenbord de aan/uit schakelaar schuiven in de aan positie en de Bluetooth®-knop
indrukken.
c) Het status lampje zal flitsen op de i.Gear agent en op de iPad® zal worden aangegeven
dat het "Keyboard for iPad®" beschikbaar is
d) Selecteer op de iPad® het “Keyboard for iPad®”, deze zal vervolgens een code weergeven
e) Voer deze code in op de i.Gear agent. De apparaten zijn nu verbonden
35 NL
5) Speciale functietoetsen
De i.Gear agent is uitgerust met special functietoetsen om meer controle te geven over uw iPad®.
Home button – roept het home scherm aan
Toetsenbord op iPad® wel of niet laten zien
Zoekknop – roept het zoekscherm aan
Slideshow – toont geselecteerde afbeeldingen
Wijzigen van de taal
Scherm stand-by, gaat weer aan bij indrukken
Select All – selecteert alle items in de lijst
Copy – kopieert alle geselecteerde items
Paste – plakt alle items van het plakbord
Cut – knipt alle geselecteerde items
Vorige nummer uit huidige afspeellijst
Afspelen en pauzeren afspeellijst
Volgende nummer uit afspeellijst
Mute
Volume zachter
Volume harder
Schermbeveiliging
6)Batterij
i De i.Gear agent ´s duurzame batterij houdt in stand-by dagen vol.
i Wanneer de i.Gear agent niet in gebruik is deze uitschakelen. Dit verlengt de levensduur
van de batterij.
De i.Gear agent zal in ruststand gaan als deze niet wordt gebruikt. Door een toets in te
drukken zal deze daar weer uitkomen, duurt 1 to 2 seconden.
NL 36
7)Loskoppelen
Plaats de i.Gear agent verticaal op een stevige anti slip ondergrond.
1) a) Gebruik beide handen, beide aan een zijde van de i.Gear agent met de duimen net boven het laadsnoer.
b) Houdt de i.Gear agent met de ene duim vast en de iPad® met de andere. Oefen lichte neerwaardse druk uit op de iPad® en koppel los.
a)
b)
2) a) Gebruik
a) beide handen, beide aan een zijdeb)van de i.Gear agent met de duimen aan de kant van de oetsenbord uitsparing.
b) Houdt de i.Gear agent met de ene duim vast en de iPad® met de andere. Oefen lichte neerwaardse druk uit op de iPad® en koppel los.
a)
b)
a)
b)
37 NL
Indicações de utilização e segurança:
d
e
j
m
h
g
Laat reparaties aan het apparaat uitsluitend door gekwalificeerd personeel verrichten. Maak het apparaat
nooit open en probeer het nooit te wijzigen. De componenten van het apparaat kunnen niet door de gebruiker
gerepareerd worden.
Plaats het apparaat nooit in vochtige ruimtes met condens en/of water.
Bescherm het apparaat tegen extreem hoge en lage temperaturen en temperatuurschommelingen. Gebruik
het apparaat uitsluitend bij een omgevingstemperatuur van minimaal 10° C en maximaal 40° C.
Plaats het apparaat nooit in de nabijheid van warmtebronnen en bescherm het tegen direct zonlicht
Plaats het apparaat voor gebruik en opslag in een zoveel mogelijk stofvrije omgeving.
Reinig het apparaat nooit met oplosmiddelen, verdunners, reinigingsmiddelen en andere chemische producten.
Maak uitsluitend gebruik van een zachte en droge doek of een zachte kwast.
Richtsnoer:
p
a
Wanneer het apparaat elektrostatisch ontladen is kan dit effect hebben op het functioneren ervan. U dient het
apparaat opnieuw op te starten.
Please keep in mind, that through a battery detaching your device will eventually get broken. You should
remove the battery only, if your device is disused and shall be forwarded to the disposal.
De fabrikant behoudt zich het recht voor het product verder te ontwikkelen. Deze wijzigingen kunnen zonder
directe omschrijving in deze handleiding worden doorgevoerd. De technische uitvoering van het apparaat kan
dus van de informatie in deze handleiding afwijken.
De fabrikant garandeert de kwaliteit uitsluitend voor het doel waarvoor het apparaat bestemd is. De fabrikant
acht zich niet verantwoordelijk voor daardoor veroorzaakte schade of gegevensverlies en gevolgschade.
Copyright © 2011 TrekStor GmbH. Alle rechten voorbehouden. De genoemde product- of bedrijfsnamen zijn
mogelijkerwijs merken of handelsnamen die eigendom zijn van de desbetreffende eigenaren.
Mac OS and iPad® is a registered trademark of Apple Inc. in the United States and/or other countries.
Bluetooth is a registered trademark of Bluetooth® SIG, Inc.
NL 38
Akku-Entsorgung
Informationspflicht gemäß Batterieverordnung (BattV)
Batterien und Akkus gehören nicht in den Hausmüll. Der Verbraucher ist dazu verpflichtet,
nicht mehr verwendete Batterien und Akkus ordnungsgemäß zurückzugeben. Lassen Sie
diese bitte nur über den Fachhandel oder durch Batteriesammelstellen entsorgen. Hier
leisten Sie einen konkreten Beitrag zum Umweltschutz.
Seit 1998 verpflichtet die Deutsche Batterieverordnung alle Bürgerinnen und Bürger,
verbrauchte Batterien und Akkus ausschließlichüber den Handel oder speziell dafür
eingerichtete Sammelstellen zu entsorgen (gesetzliche Rückgabepflicht).
Handel und Hersteller sind verpflichtet, diese Batterien und Akkus unentgeltlich
zurückzunehmen und ordnungsgemäß zu verwerten oder als Sondermüll zu beseitigen
(gesetzliche Rücknahmepflicht).
Der verbaute Lithium-Ionen Akku dieser Tastatur ist mit dem nebenstehenden Zeichen,
bestehend aus einer durchgestrichenen Mülltonne und der Art des verwendeten Akkus
gekennzeichnet.
Akku ausbauen
Sie Ihr ausgedientes Gerät zur Entsorgung geben, muss der Akku aus dem Gerät
aBevor
entfernt werden.
Battery disposal
Reporting requirement according to the Battery Directive (BattV)
Batteries are not part of the domestic waste. The consumer is obliged to return no longer
used batteries properly. Please dispose of them by a specialized trade or a battery collection
point. Hereby you make an important contribution to environmental protection.
Since 1998 the German Battery Directive compels all citizens to dispose of used batteries
exclusively through the trader or specially equipped departments (legal return obligation).
Trade and manufacturers are committed to take back batteries for free and to exploit it
properly or to remove it as special waste (legal take-back obligation).
The built-in Lithium-Ion battery of this keyboard is marked with the adjoining symbol,
consisting of a crossed out bin and the used battery type.
Remove battery
aBefore you return a disused device for disposal, the battery has to be removed from the device.
E C D E C L A R AT I O N O F C O N F O R M I T Y
As manufacturer and importer respectively:
TrekStor GmbH
Kastanienallee 8 - 10
D-64653 Lorsch, Germany
■ ■ ■ ■ ■ ■ ■ ■ ■ ■ ■ ■ ■ ■ ■ ■ ■ ■ ■ ■ ■ ■ ■ ■ ■ ■ ■ ■ ■ ■ ■ ■ ■ ■ ■ ■ ■ ■ ■ ■ ■ ■ ■ ■ ■ ■ ■ ■ ■ ■ ■ ■ ■ ■ ■ ■ ■ ■ ■ ■ ■ ■ ■ ■ ■ ■ ■ ■ ■ ■ ■ ■ ■ ■ ■ ■ ■ ■ ■ ■ ■ ■ ■ ■ ■ ■ ■ ■ ■ ■ ■ ■ ■ ■ ■ ■ ■ ■ ■ ■ ■ ■ ■ ■ ■ ■ ■ ■ ■ ■ ■ ■ ■ ■ ■ ■ ■ ■ ■ ■ ■ ■ ■ ■ ■ ■ ■ ■ ■ ■ ■ ■ ■ ■ ■ ■ ■ ■ ■ ■ ■ ■ ■ ■ ■ ■ ■ ■ ■ ■ ■ ■ ■ ■ ■ ■ ■ ■ ■ ■ ■ ■ ■ ■ ■ ■ ■ ■ ■ ■ ■ ■ ■ ■ ■ ■
herewith declares that the products
Product:
i.Gear agent
■ ■ ■ ■ ■ ■ ■ ■ ■ ■ ■ ■ ■ ■ ■ ■ ■ ■ ■ ■ ■ ■ ■ ■ ■ ■ ■ ■ ■ ■ ■ ■ ■ ■ ■ ■ ■ ■ ■ ■ ■ ■ ■ ■ ■ ■ ■ ■ ■ ■ ■ ■ ■ ■ ■ ■ ■ ■ ■ ■ ■ ■ ■ ■ ■ ■ ■ ■ ■ ■ ■ ■ ■ ■ ■ ■ ■ ■ ■ ■ ■ ■ ■ ■ ■ ■ ■ ■ ■ ■ ■ ■ ■ ■ ■ ■ ■ ■ ■ ■ ■ ■ ■ ■ ■ ■ ■ ■ ■ ■ ■ ■ ■ ■ ■ ■ ■ ■ ■ ■ ■ ■ ■ ■ ■ ■ ■ ■ ■ ■ ■ ■ ■ ■ ■ ■ ■ ■ ■ ■ ■ ■ ■ ■ ■ ■ ■ ■ ■ ■ ■ ■ ■ ■ ■ ■ ■ ■ ■ ■ ■ ■ ■ ■ ■ ■ ■ ■ ■ ■ ■ ■ ■ ■ ■ ■
Type:
Bluetooth® Keyboard
■ ■ ■ ■ ■ ■ ■ ■ ■ ■ ■ ■ ■ ■ ■ ■ ■ ■ ■ ■ ■ ■ ■ ■ ■ ■ ■ ■ ■ ■ ■ ■ ■ ■ ■ ■ ■ ■ ■ ■ ■ ■ ■ ■ ■ ■ ■ ■ ■ ■ ■ ■ ■ ■ ■ ■ ■ ■ ■ ■ ■ ■ ■ ■ ■ ■ ■ ■ ■ ■ ■ ■ ■ ■ ■ ■ ■ ■ ■ ■ ■ ■ ■ ■ ■ ■ ■ ■ ■ ■ ■ ■ ■ ■ ■ ■ ■ ■ ■ ■ ■ ■ ■ ■ ■ ■ ■ ■ ■ ■ ■ ■ ■ ■ ■ ■ ■ ■ ■ ■ ■ ■ ■ ■ ■ ■ ■ ■ ■ ■ ■ ■ ■ ■ ■ ■ ■ ■ ■ ■ ■ ■ ■ ■ ■ ■ ■ ■ ■ ■ ■ ■ ■ ■ ■ ■ ■ ■ ■ ■ ■ ■ ■ ■ ■ ■ ■ ■ ■ ■ ■ ■ ■ ■ ■ ■
comply with the following directive(s):
1999/5/EC
Radio Equipment and Telecommunications Terminal Equipment
■
■ ■ ■ ■ ■ ■ ■ ■ ■ ■ ■ ■ ■ ■ ■ ■ ■ ■ ■ ■ ■ ■ ■ ■ ■ ■ ■ ■ ■ ■ ■ ■ ■ ■ ■ ■ ■ ■ ■ ■ ■ ■ ■ ■ ■ ■ ■ ■ ■ ■ ■ ■ ■ ■ ■ ■ ■ ■ ■ ■ ■ ■ ■ ■ ■ ■ ■ ■ ■ ■ ■ ■ ■ ■ ■ ■ ■ ■ ■ ■ ■ ■ ■ ■ ■ ■ ■ ■ ■ ■ ■ ■ ■ ■ ■ ■ ■ ■ ■ ■ ■ ■ ■ ■ ■ ■ ■ ■ ■ ■ ■ ■ ■ ■ ■ ■ ■ ■ ■ ■ ■ ■ ■ ■ ■ ■ ■ ■ ■ ■ ■ ■ ■ ■ ■ ■ ■ ■ ■ ■ ■ ■ ■ ■ ■ ■ ■ ■ ■ ■ ■ ■ ■ ■ ■ ■ ■ ■ ■ ■ ■ ■ ■ ■ ■ ■ ■ ■ ■ ■ ■ ■ ■ ■ ■ ■
The following norms were consulted to assess conformity:
■
■
■
■
EN 300 328 V1.7.1 (2006-10)
Electromagnetic compatibility and Radio spectrum Matters (ERM); Data transmission equipment
operating in the 2,4 GHz ISM band and using wide band modulation techniques
EN 301 489-1 V1.8.1 (2008-04)
EMC and ERM: EMC standard for radio equipment and services; Part 1: Common technical requirements
EN 301 489-17 V2.1.1 (2009-05)
Electromagnetic compatibility and Radio spectrum Matters (ERM); ElectroMagnetic Compatibility (EMC)
standard for radio equipment; Part 17: Specific conditions for 2,4 GHz wideband transmission systems.
EN 60950-1:2006 + A11:2009 + A1:2010
Information technology equipment – Safety – Part 1: General requirements
■ ■ ■ ■ ■ ■ ■ ■ ■ ■ ■ ■ ■ ■ ■ ■ ■ ■ ■ ■ ■ ■ ■ ■ ■ ■ ■ ■ ■ ■ ■ ■ ■ ■ ■ ■ ■ ■ ■ ■ ■ ■ ■ ■ ■ ■ ■ ■ ■ ■ ■ ■ ■ ■ ■ ■ ■ ■ ■ ■ ■ ■ ■ ■ ■ ■ ■ ■ ■ ■ ■ ■ ■ ■ ■ ■ ■ ■ ■ ■ ■ ■ ■ ■ ■ ■ ■ ■ ■ ■ ■ ■ ■ ■ ■ ■ ■ ■ ■ ■ ■ ■ ■ ■ ■ ■ ■ ■ ■ ■ ■ ■ ■ ■ ■ ■ ■ ■ ■ ■ ■ ■ ■ ■ ■ ■ ■ ■ ■ ■ ■ ■ ■ ■ ■ ■ ■ ■ ■ ■ ■ ■ ■ ■ ■ ■ ■ ■ ■ ■ ■ ■ ■ ■ ■ ■ ■ ■ ■ ■ ■ ■ ■ ■ ■ ■ ■ ■ ■ ■ ■ ■ ■ ■ ■ ■
The CE symbol confirms that this product conforms with the above mentioned norms and regulations.
■ ■ ■ ■ ■ ■ ■ ■ ■ ■ ■ ■ ■ ■ ■ ■ ■ ■ ■ ■ ■ ■ ■ ■ ■ ■ ■ ■ ■ ■ ■ ■ ■ ■ ■ ■ ■ ■ ■ ■ ■ ■ ■ ■ ■ ■ ■ ■ ■ ■ ■ ■ ■ ■ ■ ■ ■ ■ ■ ■ ■ ■ ■ ■ ■ ■ ■ ■ ■ ■ ■ ■ ■ ■ ■ ■ ■ ■ ■ ■ ■ ■ ■ ■ ■ ■ ■ ■ ■ ■ ■ ■ ■ ■ ■ ■ ■ ■ ■ ■ ■ ■ ■ ■ ■ ■ ■ ■ ■ ■ ■ ■ ■ ■ ■ ■ ■ ■ ■ ■ ■ ■ ■ ■ ■ ■ ■ ■ ■ ■ ■ ■ ■ ■ ■ ■ ■ ■ ■ ■ ■ ■ ■ ■ ■ ■ ■ ■ ■ ■ ■ ■ ■ ■ ■ ■ ■ ■ ■ ■ ■ ■ ■ ■ ■ ■ ■ ■ ■ ■ ■ ■ ■ ■ ■ ■
The manufacturer also declares the conformity of the product according to the following directives:
■
2001/95/EC
General Product Safety
■
2002/95/EC
RoHS: Hazardous substances in electrical and electronic equipment
Lorsch,
25.03.2011
Aaron Taylor, CTO
Supportinformationen
Sollten Sie Fragen zu Ihrem TrekStor Produkt haben, gehen Sie bitte wie folgt vor:
• Überprüfen Sie anhand der Produkteigenschaften und der Funktionen Ihres
Gerätes (auf der Verpackung ersichtlich), ob Sie die richtigen Einstellungen
vorgenommen haben.
• Lesen Sie aufmerksam die gesamte Bedienungsanleitung.
• Informieren Sie sich auf unserer Website www.trekstor.de über aktuelle
Informationen zu Ihrem Produkt (z. B. neu verfügbare Firmware-Updates).
Wenn Sie weitergehende Fragen zu Ihrem Produkt haben, beachten Sie bitte
die folgenden TrekStor Supportoptionen:
FAQ
Der FAQ-Bereich unserer Website bietet Ihnen vielfältige
Problemlösungshinweise. Hier erhalten Sie Antworten zu
den am häufigsten gestellten Fragen zu unseren Produkten.
E-Mail
Füllen Sie das Supportformular auf unserer Website aus
oder senden Sie eine E-Mail an [email protected]. Telefonsupport
Von Deutschland aus wählen Sie bitte 01805-TREKSTOR*,
01805-87357867*. Die Nummer der Supporthotline für
andere Länder finden Sie auf unserer Website unter "SERVICE".
* 14 Cent/Min. aus dem deutschen Festnetz der DTAG,
max. 42 Cent/Min. aus Mobilfunknetzen.
Support information
If you have any questions regarding your TrekStor product, please proceed as follows:
• Check the features as well as the functions of your device (apparent on the packaging),
in order to use the correct settings.
• Read the manual carefully.
• Inform yourself on our website www.trekstor.de/en about the up-to-date information
concerning your product (e. g. available most recent firmware releases).
In the case you have further questions regarding your product, please note the
following TrekStor support options:
FAQ
The FAQ area of our website offers you a wide range of problem
solving hints. Here you can obtain answers to the most frequently
asked questions concerning our products.
E-Mail
Please fill in the support form on our website or send an E-Mail to
[email protected]. You can find mailing addresses for other
countries when you click "SERVICE" at the menu bar on our website.
Phone support
Please find the number of the support hotline for your country on
our website under "SERVICE" as well. TrekStor GmbH
Kastanienallee 8-10
D-64653 Lorsch, Germany
www.trekstor.de
BA-IGAGENT-DE-NL-V2.10-110426