1
Connecting the Air Sampling Pipe
WIRING
The input and output ports are designed to accept standard 25mm (1 inch) pipe
OD. The input ports are tapered to provide fast, easy, push-fit connection of the
sampling pipe to the unit. Perform the following procedure to connect the air sampling pipe to the unit.
1.Square off and de-burr the end of the sampling air pipe. Ensure that the pipe is
free from any particles that might interfere with the pipe connection.
2.Remove the input plug from the input port being used (either the top or bottom of the unit).
3.
Insert the sampling air pipe into the input port, ensuring a snug fit.
DO NOT glue these pipes.
WARNING
Before working on the FAAST system, notify all required authorities that the system
will be temporarily out of service. Make sure all power is removed from the system
before opening the unit. All wiring must be in accordance with local codes.
Power Cables
Use the power ratings of the unit to determine the required wire sizes for each
connection. Use the power ratings of the connected products to determine proper
wire size.
Conduit Usage
If electrical conduit is used for system wiring, terminate the conduits at the cable entry
ports on the top or bottom of the unit, using the appropriate conduit connectors.
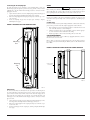
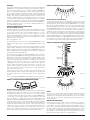
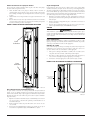
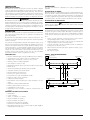
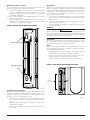
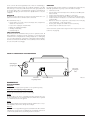
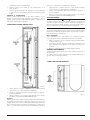
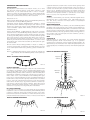
FIGURE 2. MOUNTING SLOTS FOR MOUNTING STUDS
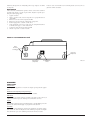
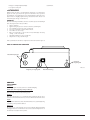
1.Run all wiring, both power and alarm, through the conduit and into the left
side of the unit enclosure, as shown in Figure 3.
2.Attach the appropriate wires to the supplied Euro connector. Follow appropriate local codes and electrical standards for all cabling.
3.Plug the appropriate connector into the mating connector on the unit.
CABLING REQUIREMENTS
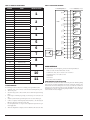
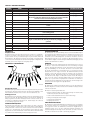
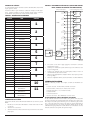
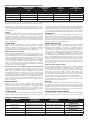
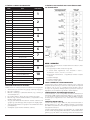
The FAAST system provides a series of Euro style pluggable terminals, located behind the left side door of the unit.
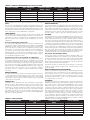
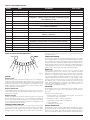
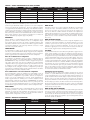
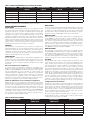
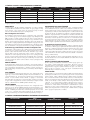
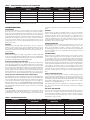
Refer to Table 1 for the proper electrical connections to the unit. Refer to Table 2
for a typical connection for monitoring the FAAST system at a Fire Alarm Control
Panel (FACP).
Mounting
Slot
FIGURE 3. POWER AND ALARM CONNECTION CONNECTOR BLOCK
Mounting
Slot
Power and Alarm
Connections
ASP-16
ASP-17
Exhaust Pipe
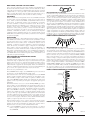
The device should always be exhausted into the space that it is monitoring. There
are some circumstances when it may be necessary to connect a pipe to the exhaust
port to divert the exhaust away from the location of the unit. The output ports are
tapered the same as the input ports, to provide fast, easy, push-fit connection of an
exhaust pipe to the unit. Perform the following procedure to connect the exhaust
pipe to the unit.
1.Square off and de-burr the end of the exhaust pipe. Ensure that the pipe is free
from any particles that might interfere with the pipe connection.
2.Remove the exhaust plug from the output port being used (either the top or
bottom of the unit).
3.Insert the exhaust pipe into the output port, ensuring a snug fit. DO NOT glue
these pipes.
SS-400-015 3I56-3836-005