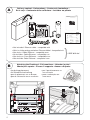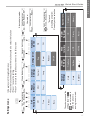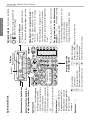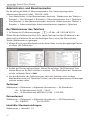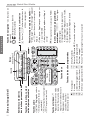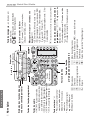
1
E NG LI S H D E UTSCH F R A N ÇA I S I TA L I A N O E S PA Ñ O L PORTUG U Ê S Quick Start Guide VoIP Business Phone A Delivery content - Lieferumfang - Contenu de l‘emballage En la caja - Contenuto della confezione - Incluídos no pacote 320 320 } • Not included: Ethernet cable - compatible with • Nicht im Lieferumfang enthalten: Ethernet-Kabel - kompatibel mit • Non inclus: Câble Ethernet - compatible avec • No incluidos: Cable Ethernet - compatible con • Non inclusos: Cavo Eth}ernet - compatibile con • Não incluído: Cabo Ethernet - compatível com B IEEE 802.3af Attaching the Footstand - Fuß montieren - Attacher le pied Montaje el soporte - Fissare il supporto - Anexar o Suporte • for desktop placement • für Schreibtischaufstellung • pour le placement sur un bureau • para la colocación en un escritorio • per il posizionamento su una scrivania • para a colocação em uma mesa 1 2 139.5 39.5 A XXXYY88888899999 0004132A0044 N14647 2 1. Bar code System: Code 128 2. Material: white ART paper 3. Black printing / SIZE: 139.5(W)X39.5(H)mm 4. Tolerence: ±0.2mm 6. Print content: A. Serial Number (5 digits) DDMMYY day, month, year (only last two digits) Product of factory abbreviation - provided by snom (2 digits) B • for wall mounting • für die Wandbefestigung • pour l'installation sur le mur • para el montaje en pared • per il montaggio a parete • para montagem na parede 1 13 139.5 13 9.5 9.5 139.5 AA A XX XXXY XX XYY88 XY Y88888 Y88 888899 899999 899 XXXY 888 999 Y88888 999 899999 39 39.5 39 .5 .5 39.5 N146 N146 N146 47 47 47 N146 47 BB B 0000000 444 111 333 222 AAA 00000 44444 000 413 2A0 044 1. 1.Bar 1. Barcod Bar codeeeSys cod 2. 2.Ma 2. System Sys 1. Ma Ma tem:::Co tem Bar teri terial: teri al:wh al: cod Code Co wh wh 3. 3.Bla de128 3. de e ite 2. Sys Bla Bla iteAR ite 128 128 Ma AR AR ck ckteri ck tem prin prin prin TTT:pap paper pap al: Co 4. 4.Tol 4. ting ting ting wh//ite 3. de TolBla Tol er 128 er /SIZ ere ereck ere SIZ SIZ AR nce nce nce E: E: E: prin T139 6. 6.Prin 6. :::±0. 139 139 pap.5(W ±0. ±0. 4. Prin Prin ting .5(W Tol 2m 2mm 2m er )X3 tttcon ere conten con m E: .5(W SIZ )X39.5 tent::t:t:±0. /m ten 9.5(H) 9.5 6. Prin nce 139.5(W)X3 (H)mm (H) mm t A. con A. ten 2mm A. )X39.5 mm t: (H)mm A. XXXYY88888899999 N14647 Se Serial Se rialNu rial Numb Nu mber mb DD DD DD er(5 er Se MM MM MM (5dig (5 rial digits) dig YY YY YY Nu its) its) day day day mb,,,er Pro Pro Pro DD mo mo mo duc duc duc MM (5 nth nth nth dig tttof YY of of ,,,yea yearrr(on yea its) fac fac fac day Co CoPro Co tory tory tory , mo unt untry unt (onlyly (on duc ry of ry lylas abb abb abb nth B. B.Bar B. of lasttttwo las t of 7. 7.atta 7. Barcod Bar rev , iati rev rev Ori Ori Ori attach atta yea fac twodig two iation iati Count of code: cod gin gin ch ont ch ron(on tory on digits) dig e:MA e: ---ISO ontoB. ISO ISO ---pro ry of Origin MACCCAdd ly vid MA its) its) abb316 pro pro oothe las 7. atta ont the bac the 316 rev6-1 vided vid ted Addres Add bac two iati ed 6-1on cod 6-1 gin - ISO316 ch ont Barbac res res ksid ksid ksid by bydig by e: alp alphaalp ssssam sno sno sno its) sameee eeof sam hapro333vid o the bac eMA of of Cthe m m(2 m 3166-1 -hathe Add (2dig (2 (3ed as asma (3 as pho pho pho digits) dig dig dig dig mainb resne ma kside the by alpha- (3 its) its) its) its) its) inboar snesam inb oar oar of the ne 3 (3 dig snom (2 dig e d d d as ma lab labelel lab phone el its) its) inboar d label 0004132A0044 2 3 com compan com panyyy pan compan sno snomm sno mtech y technolo tech mo model mo del del nology nolo gyAG snom tech gy AG AG model pro produc sno snomm nology pro sno ducttt duc m370 370 370 AG produc snom 370 filen filen LAB LAB filen LAB EL ELTYP ame ame t EL ame TYPEEE TYP revi revision revi sion sion filename LAB EL crea crea type type crea type TYP E _lab _label_s _lab ted ted ted 555 revision el_s el_s nom nom370 nom 370_rev crea type last lastsav _rev5.pd 200 2007-1 last _rev 200 _label_s 370 ted 5 7-10-0 5.pdfff 7-1 saved sav pre prepar pre 0-0999 nom370 5.pd 0-0 ed ed pared par edby ed last sav _rev5.pd by by sno snom sno 200 200200 7-10-0 200 prepar mtec m ed 9-1 9-1 9-1 f techni tec che checke che 1-0 1-0 9 1-0 ed hnical hni ckedddby cke cal dat cal snom by by by 2009-1 444 datash asheet ash techni dat 1-04 eet(P-D cked by app appche app (P-D (P-D cal dat eet rove rove rove IN_ IN_A4) IN_ dddby asheet A4) Ver A4) by by Versio (P-DIN_ Ver sio 1.2. sio stat statapp stat 1.2.1.1. us us roved by us A4) Ver nnn1.2. 1. /// ///Nov Nov200 Nov sion 1.2. /// 200999 status 200 1. /// Nov 200 9 PS PSNo. PS No. No. PS No. 4.12 4.12 4.12 . .. 4.12 . ERP ERPNo. ERP No. No. ERP No. 000 000 000 014 01438 014 38 38 000014 Mar Martin Mar tinTau tin 38 Taube Tau be be Martin Taube sca scalele sca le 1:1 1:1scale 1:1 1:1 tota totalll tota pag pag pag es esl es tota 111 pages 1 1 pag pageee pag page 111 1 2 4 C 1. Detaching the Footstand - Fuß abmontieren - Démonter le pied Desmontar el soporte - Smantellare il supporto - Destacandar o Suporte 2. 3 D Wall Mounting - Wandmontage - Fixation murale Montaje en pared - Montaggio a parete - Montagem na parede Not included in delivery: icht im Lieferumfang enthalten: N Non inclus: No incluidos: Non inclusos: Não incluído: 4x ø max 8 mm (0.315") Distance to wall Abstand zur Wand Distance au mur Distanza dalla parete Distancia a la pared Distância à parede E 4 ø max 4,5 mm (0.177") ∼ 5 mm (0.197") Adjusting the display - Den Displaywinkel einstellen - Ajuster l'ecran Ajustar el visualizador - Aggiustare il display - Ajustar um display F Connecting - Anschließen - Connecter Conectar - Collegare - AA A 3 1 XXX XXXYY8 XXX YY8888 YY8 888889 889999 889 XXXYY8888 999 999 888889 999 9999 13 139.5 13 9.5 9.5 139.5 39 39.5 39 .5 .5 39.5 N146 N146 N146 47 47 47 N146 47 0000000 444 111 333 222 AAA 00000 44444 000 413 2A0 044 BB B 1. 1.Bar 1. Barcod Bar codeeeSys cod 2. 2.Ma 2. System Sys 1. Ma Ma tem:::Cod tem Bar teri terial: teri al:whi al: cod Codeee Cod whi whi 3. 3.Bla 3. e Sys 2. Bla Bla 128 128 te 128 teAR te Ma AR AR ck ckteri ck tem prin prin prin TTT:pap paper pap al: Cod 4. 4.Tole 4. ting ting ting whi///te 3. Tole Tole er er e 128 Bla SIZ SIZ SIZ ren ren ren AR ckce: E: E: E: ce: ce: prin T139 6. 6.Prin 6. 139 139 pap.5(W ±0. ±0. ±0. 4. Prin Prin ting .5(W Tole 2m 2mm 2m er )X3 tttcon conten con m E: .5(W SIZ )X39.5 ten ce:t:t:t:±0. /m 9.5(H) 9.5 6. Prin renten 139.5(W)X3 (H)mm (H) mm t A. con A. ten 2mm A. )X39.5 mm t: (H)mm A. Ser Serial Ser ialNum ial Number Num ber(5 ber DD DD DD Ser MM MM MM (5dig (5 ial digits) dig YY YY YY Num its) its) day day day Pro Pro Pro ber DD ,,,mo mo mo duc duc duc MM (5 nth nth nth dig tttof YY of of ,,,yea yearrr(on yea its) fac fac fac day Cou Cou Cou Pro tory tory tory , mo (onlyly (on ntry ntry ntry ducof lylast abb abb abb nth B. B.Bar B. of lasttwo last t of 7. 7.atta 7. Barcod Bar rev , iatio rev rev Ori Ori Ori attach atta yea fac twodig two iatio iatio Countryof code: cod gin gin gin ch ont ch rnnn(on toryISO digits) dig e:MA e: ontoB. ISO ---pro MACCCAdd ly vide MA its) its) abb316 pro oothe pro of Origin---ISO last 7. atta ont the bac the 316 316 reviatio videdtwo vide Addres Add bac 6-1alp codksid 6-1 ddby ch ont Barbac resssssam res ksid bydig by e: eMA nalpha- ISO 6-1 alp sno sno sno its) sam eeof sam hao the backsid pro333vide of of Cthe m m(2 m 3166-1 -haeeeas the Add (2dig (2 (3dig asma (3 as pho pho pho ddig digits) dig dig mainbo resne ma kside the by alpha- (3 its) its) its) its) its) inboard snesam inbo of the ne ardlabe 3 (3 dig snom (2 dig labelll labe phone e as mainboard its) its) ard labe l 2 com compan com panyyy pan compan snom snomtech snom y technolo tech mod modelel mod nology nolo el gyAG snom tech gy AG AG model prod prod snom snom370 nology prod snom uct uct uct 370 370 AG product snom 370 filen filen LAB LAB filen LAB EL ELTYP ame ame EL ame TYPEEE TYP revi revision revi sion sion filename LAB EL crea crea type type crea type TYP E _lab _label_s _lab ted ted ted 555 revision el_s el_s nom nom370 nom 370_rev last lastcrea _rev5.pd 200 200type last _rev 200 _label_s 370 ted 5 7-10 7-10 5.pdfff 7-10 save save save prep prep prep -09 -09 nom370 5.pd -09 ddd ared aredby ared last save _rev5.pd by by sno snom sno 200 200200 7-10-09 200 prepared mtech m 9-11 9-11 9-11 f d technica tech che checke che -04 -04 -04 ckedddby cke nica nica lll data snom by by by 2009-11 datashe she she technica data -04 et et(P-D et cked by app appche app (P-DIN_A (P-D rove rove rove l data IN_A4) IN_A dddby by by sheet 4) Ver 4) Version (P-DIN_A Ver sion1.2. sion roved stat statapp stat 1.2. 1.2. us us us by 1.1. 1. /// 4) Ver ///Nov Nov200 Nov sion 1.2. /// 200999 status 200 1. /// Nov 200 9 If no PoE available Wenn PoE nicht verfügbar S'il n'y a pas de PoE Si no se dispone de PoE Se non disponibile PoE Se não disponível PoE PS PSNo. PS No. No. PS No. 4.12 4.12 4.12 . .. 4.12. ERP ERPNo. ERP No. No. ERP No. 000 000 000 014 01438 014 38 38 000014 Mar Martin Mar tinTau tin 38 Taube Tau be be Martin Taube sca scalele sca le 1:1 1:1scale 1:1 1:1 tota totalll tota pag pag pag es esl es tota 111 pages 1 pag pageee pag page 111 1 Optional - Opzionale Optionel - Opcional 5 Quick Start Guide ENGLISH .................................................................................................. 7 DEUTSCH ................................................................................................. 15 FRANÇAIS ................................................................................................ 23 ITALIANO .................................................................................................. 31 ESPAÑOL ................................................................................................. 39 PORTUGUÊS ........................................................................................... 47 APPENDIX ANHANG ANNEXE APENDICE ANEXO GNU General Public License ................................................................... 55 Symbols used in this guide Symboles utilisés dans ce manuel Símbolos usados en este manual In dieser Anleitung benutzte Symbole Symboli utilizzati in questa manuale Símbolos utilizados neste manual p q Press / Drücken / Appuyez / Premere / Pulse / Pressione: >: [Reg] 6 Next step Passez à l'étape suivante Siguiente paso Text in square brackets Text in eckigen Klammern Text en crochets Testo tra parentesi quadre Texto entre corchetes Texto entre colchetes Nächster Schritt Passo successivo Próxima etapa Press Appuyez Pulse Drücken Premere Pressione Quick Start Guide E N G L I S H ENGLISH This quick start guide describes the installation, setup, and operation of the snom 320. For further information please refer to the manual on our web page, http://wiki.snom.com/Snom320. Copyright, Trademarks, GPL, Legal Disclaimers © 2010 snom technology Aktiengesellschaft All Rights Reserved. snom, the names of snom products, and snom logos are trademarks owned by snom technology AG. All other product names and names of enterprises are the property of their respective owners. snom technology AG reserves the right to revise and change this document at any time, without being obliged to announce such revisions or changes beforehand or after the fact. Texts, images, and illustrations and their arrangement in this document are subject to the protection of copyrights and other legal rights worldwide. Their use, reproduction, and transmittal to third parties without express written permission may result in legal proceedings in the criminal courts as well as civil courts. Although due care has been taken in the compilation and presentation of the information in this document, the data upon which it is based may have changed in the meantime. snom therefore disclaims all warranties and liability for the accurateness, completeness, and currentness of the information published, except in the case of intention or gross negligence on the part of snom or where liability arises due to binding legal provisions. Our firmware includes some source code that may be used and modified by anyone and everyone under the GNU Public License (GPL) (see Appendix on page ), provided they, in turn, make it available to everyone else with the same licensing agreement. Please go to http://www.snom. com/en/support/download/gpl-quellcode/ for the original GPL license and the source code of components licensed under GPL and used in snom products. Important Information Please read the instructions on safety and disposal and on how to set up and use the device before using it and also give them to other users to read or inform those users of their contents. Save this manual and do not give the device to third parties without it. Safety Instructions Follow the instructions in this manual and other applicable documentation of the device. • If the phone is not supplied with power via an Ethernet cable, use only the power adapter included in the package or one expressly recommended by snom technology. Other power supplies may damage or destroy the phone, affect its behavior, or induce noise. 7 E N G L I S H E N G L I S H snom 320 Quick Start Guide • A void placing the cables where people may trip over them or where they may be exposed to mechanical pressure as this may damage them. • This device is for indoor use only! Do not install outdoors - NOT FOR OUTDOOR USE! • Do not install the device in rooms with high humidity (for example, in bathrooms, laundry rooms, damp basements). Do not immerse the device in water and do not spill or pour liquids of any kind onto or into the device. • Do not install the device in surroundings at risk for explosions (paint shops, for example). Do not use the device if you smell gas or other potentially explosive fumes. • Do not use the device during thunderstorms. Lightning striking the power grid may cause electric shocks. SELV (Safety Extra Low Voltage) Compliance Safety status of Input/Output connections comply with SELV requirements. Warning: To avoid electric shock, do not connect safety extra-low voltage (SELV) circuits to telephone-network voltage (TNV) circuits. LAN ports contain SELV circuits, and PSTN ports contain TNV circuits. Some LAN and PSTN ports both use RJ-45 (8P8C) connectors. Use caution when connecting cables. Standards conformance This device is CE and FCC-certified and meets European and US health, safety, and environmental standards. • • • • • • • Unauthorized opening, changing, or modifying the device will cause the warranty to lapse and may also result in the lapse of the CE and FCC certifications. In case of malfunction contact authorized service personnel, your seller, or snom. Safety: IEC 60950-1:2001, CB Test Certificate: DE 2-013297 Certifications: FCC Class B, CE Mark Power consumption: 2.1 – 2.4 watts Power: 5 V DC 1 x LAN, 1 x PC: RJ45 (Ethernet) Ethernet: 2 x IEEE 802.3 10/100 Mbps switch Power over Ethernet: IEEE 802.3af, Class 1 Disposal of the device This device is subject to European Directive 2002/96/EC and may not be disposed of with general household garbage. If you do not know where you may dispose of the device at the end of its lifespan, contact your municipality, your local waste management provider, or your seller. Cleaning To clean the device, use an anti-static cloth. Please avoid cleaning liquids as they might damage the surface or internal electronics of the device. 8 Quick Start Guide E N G L I S H Initializing and registering the phone Please note: You will need the registration information received from your Internet service provider or your network administrator - normally the phone or extension number, the password, and the registrar. After you have set up the phone and connected it to the network as shown on pages 2 - 5, the phone begins to initialize. Normally the initialization is completely automatic, using DHCP. If your network does not support DHCP, you must obtain the IP address, netmask, IP gateway, and DNS server from your Internet service provider or your network administrator and enter them manually when you are asked to do so on the display. Watch the display and, when asked to, make selections with and save with . 1. Language. The default is English. Other languages are available if the phone/ network is connected to the Internet during initialization, so that they can be provided from the snom server automatically (firmware 7 and higher). 2. 3. 4. 5. Dial tone Time zone Enter the account number. Save with P. Enter the registrar. Save with P . The display now shows the idle screen: Date: Account = identity (NR: not registered) Context-sensitive function symbols Time Press key to activate/ open/execute the function above it Context-sensitive function keys Entering numerals, letters, and special characters Press any key on the alphanumeric keypad. Text field To the left of : Current input mode To the right of : Press to change to input mode > > > Press to clear text field Press to delete character to the left of the cursor Input modes: : Numerals : Small letters : Capital letters To move cursor to the left or to the right, press: Editing the directory: Current input mode: Press abc > ABC > 123 > abc abc - small letters ABC - capital letters Delete character to the left of the cursor: to change: 123 - numerals Entering special characters and symbols in input modes small or capital letters: Press "1" key one or more times quickly, with a pause after each character. Examples: 1x = "." 2x = "+" 3x = "@" 4x = "1" 5x = ":" 6x = "," 9 E N G L I S H 10 (hash key) Pound key Star key • Switching between upper & lower case when pressed briefly while in editing mode • Locking and unlocking the keyboard when pressed for a few seconds Audio control keys • Adjust ringer volume of incoming call or loudspeaker volume when in call Turn microphone on/off • • Turn speakerphone on/off • Turn headset on/off Context-sensitive function keys (programmable) Context-sensitive functions At a glance Display idle screen Redial last call Directory Freely programmable Start/end conference Hold/unhold call Freely programmable function keys . with LEDs: Default mapping: line. Line LED: • Blinking fast: Incoming call. Press key to accept call. • Steady light: In call • Blinking slowly: Call on hold Record call (if supported by PBX) MWI, missed calls • Red LED: Message waiting - press to listen to message (if supported by PBX) • Yellow LED, steady light: Missed call press to turn LED off • Yellow LED, blinking fast: Incoming call Confirming actions & input, saving Cancelling actions & input Cancel & OK keys Navigation key - idle screen functions: : Select identity for outgoing call : Settings menu Settings menu IP address, MAC address, firmware version Freely programmable Transfer current call Turn DND (do not disturb) on/off Dedicated programmable function keys Alphanumeric keypad Identity E N G L I S H Quick Start Guide Off Reset The submenus and the settings shaded darkgray are not available when the phone is running in user mode. P HTTPS Reset HTTP DialTone Head xxxxx> Priority Server TimeZone Hand Speaker ID Web Interface Other Settings VLAN Settings Volume Settings DHCP Lang On Headset Device Reg Busy Fkeys Time Contrast Configuration Reboot CWI Off General Settings Always Phone Behavior • Use to scroll through submenus • Press the function key underneath the function symbol to select the function • Press P to save the setting • Press to return to the previous screen or to the idle screen Call Forwarding Settings menu Memory Network System Info * Asterisk preceding an option: Currently active selection User mode: Administrator mode: Quick Start Guide E N G L I S H 11 E N G L I S H E N G L I S H Quick Start Guide Administrator/user mode The factory setting is administrator mode. The default administrator password is 0000 (4 x zero). • Switch from administrator mode to user mode: Web interface > Advanced > Qos/ Security > Security > Administrator Mode: Off > Save. • Switch from user mode to administrator mode: Web interface > Advanced > Administrator Login > enter administrator password > Save. The phone's web interface 1. Look up the phone's IP address: > IP adr. Example: 192.168.10.115. 2. Open a web browser on your PC. Enter http:// and the IP address in the address bar and press ENTER. The "welcome" screen opens. 3. Click on an item in the menu on the left side of the screen to open that window. 4. If a window contains several pages, click on the tab at the top to open the page. The font weight of the characters on the tab of the visible page is bold. 5. Any changes you make will not take effect until you click on "Save". Changes will be lost if you open another page of the web interface without first clicking on "Save" . Clock/time format Web interface > Preferences > General Information > 24 Hour Clock: On: 24-hour format, 00:01 to 24:00 Off: 12-hour AM/PM format, 0:01 AM to 12:00 PM Date format Web interface > Preferences > General Information > US date format: On: 3/8/2010 Off: 8.3.2010 Configuring & modifying identity Web interface > Identity 1-12 > 12 Quick Start Guide E N G L I S H Using the phone Select outgoing identity From the idle screen, press pq to select one of the configured identities. Making calls • Enter the number on the alphanumeric keypad and pick up the handset or • pick up the handset, enter the number, P or • , enter the number, P Accepting calls • With the handset: Pick up the handset • With a headset: Press P or blinking line key • With the speakerphone: Press Putting calls on hold Press or the line key of the call. The LED starts to blink slowly. Press to resume the call. With more than one call on hold: Press line key of a call to resume it. Conference (3 parties) 1. Your phone number: 154. Put first caller (Jane Doe) on hold. 2. Call second party (158). With second party on the line: 3. Press to start conference. In conference: 4. Press hold. to stop conference and put both parties on 5. Resume conference: Press line key of one of the calls on hold > then . Call transfer Attended transfer Put the call on hold. Dial the number that you wish to transfer the call to. If the third party wishes to accept the call > press > press P. Blind transfer When the incoming call is ringing or with the call on the line: Press phone number the call is to be transferred to > press P. > dial the Call forwarding 1. Turn call forwarding on. a. All incoming calls: Call forwarding > [Always] > Always target: enter target phone number > P. 13 E N G L I S H E N G L I S H Quick Start Guide b. When busy: Call forwarding > [Busy] > Busy target: enter target phone number > P. c. When call is not picked up: Call forwarding > [Time] > Timeout target: enter target phone number > P > Call Fwd time: enter number of seconds after which call will be forwarded > P. . d. Call forwarding is on: 2. Turn call forwarding off: Call forwarding > [Off]. Call lists 1. From the idle screen, press [CHist] to open. 2. Select list with function key: [Missed], [Received], [Dialed] calls. 3. Scroll through list: . Dial selected number: P. Directory • Open: Press . Scroll: . Dial number of selected entry: P. • <New Item>: Press > . • Editing entries: See "Entering numerals, letters, and special characters" on page 9. Trouble shooting Reboot > Configuration > [Reboot] > Reboot? > P Hard reboot Disconnect power, wait for a few seconds, reconnect. Never disconnect the power during a firmware update! Reset to factory values All customized settings will be lost! > Configuration > [Reset] > enter administrator password > P. The default administrator password is 0000 (4 x zero). 14 DEUTSCH Quick Start Guide Diese Kurzanleitung beschreibt die Installation, Einrichtung und den Betrieb des snom 320. Weitere Informationen finden Sie auf unserer Webseite, http://wiki.snom.com/Snom320. Copyright, Markenrechte, GNU Lizenz, Haftung © 2010 snom technology Aktiengesellschaft Alle Rechte reserviert. snom sowie die Namen der snom-Produkte und die snom logos sind gesetzlich geschützte Marken der snom technology AG. Alle anderen Produkt- und Firmennamen sind Marken der jeweiligen Inhaber. snom technology AG behält sich jederzeit das Recht auf Überarbeitung und Änderung dieses Dokumentes vor, ohne verpflichtet zu sein, die vorgenommenen Änderungen anzukündigen oder mitzuteilen. Texte, Bilder, Grafiken und deren Anordnung in diesem Dokument unterliegen weltweit dem Schutz des Urheberrechts und anderen Schutzgesetzen. Ihre Verwendung, Reproduktion oder Weitergabe ohne ausdrückliche schriftliche Zustimmung der snom technology AG können sowohl straf- als auch zivilrechtlich verfolgt werden. Trotz der angewandten Sorgfalt bei der Zusammenstellung und Präsentation der Informationen in diesem Dokument können sich Daten zwischenzeitlich geändert haben. Daher übernimmt snom keine Gewähr für die Richtigkeit, Vollständigkeit oder Aktualität der zur Verfügung gestellten Informationen. Jegliche Haftung für Schäden ist ausgeschlossen, sofern diese nicht auf Vorsatz oder grober Fahrlässigkeit auf seiten von snom beruhen oder sofern keine Haftung aufgrund zwingender gesetzlicher Bestimmungen eintritt. Unsere Firmware enthält teilweise Quellcodes, die unter der GNU Public License (GPL) von jedermann genutzt und modifiziert werden dürfen, solange sie wiederum mit denselben Lizenzbedingen zur allgemeinen Nutzung veröffentlicht werden. Die Quellcodes der von snom genutzten und der GPL unterliegenden Komponenten können Sie auf der Supportseite unserer Webseite auf www.snom.com, den Wortlaut der GPL auf http://www.snom.com/de/support/ download/gpl-quellcode/ herunterladen. Wichtige Hinweise Lesen Sie bitte vor Inbetriebnahme die Sicherheitshinweise und die Bedienungsanleitung. Lassen Sie sie auch von den Mitbenutzern des Gerätes lesen oder informieren Sie sie über deren Inhalt. Bewahren Sie diese Bedienungsanleitung auf und geben Sie das Telefon nur mit der Bedienungsanleitung an Dritte weiter.. Sicherheit efolgen Sie die Anweisungen in dieser Bedienungsanleitung und in der sonstigen B Dokumentation des Geräts. • F alls die Stromversorgung nicht über das Ethernetkabel erfolgt, verwenden Sie nur das mitgelieferte Netzteil. Die Verwendung anderer Netzteile könnte das Telefon beschädigen oder gar zerstören. • Vermeiden Sie es, die Netz- und Stromkabel so zu verlegen, dass sie durch mechanischen Druck beschädigt werden oder dass Personen darüber stolpern könnten. 15 D E U T S C H snom 320 Quick Start Guide D E U T S C H • D ieses Gerät ist nur für den Gebrauch in Innenräumen bestimmt - NICHT FÜR DEN AUSSENBEREICH! • Stellen Sie das Telefon nicht in Räumen mit hoher Luftfeuchtigkeit wie z.B. Badezimmern, Waschküchen, feuchten Kellerräumen auf. Tauchen Sie das Telefon nicht in Wasser und gießen Sie keine Flüssigkeiten auf oder in das Gerät. • Stellen Sie das Telefon nicht in explosionsgefährdeten Umgebungen (z.B. Lackiereien) auf. Benutzen Sie das Telefon nicht, wenn Sie Gas oder andere möglicherweise explosionsgefährliche Dämpfe riechen. • Telefonieren Sie nicht während eines Gewitters (Stromschlaggefahr bei Blitzeinschlag ins Netz). SELV (Safety Extra Low Voltage) Einhaltung Die Eingangs-/Ausgangsverbindungen halten die SELV-Richtlinien für Kleinspannungsgeräte ein. Warnung: Um elektrische Schläge zu vermeiden, verbinden Sie keine SELV-Geräte mit Geräten, die Telefon-/Netzwerk-Spannung (TNV) führen. Nur an LAN-Ports anschließen! Normkonformität Dieses Gerät ist CE- und FCC-geprüft und entspricht den geltenden europäischen und US-amerikanischen Richtlinien. • • • • • Die eigenmächtige Öffnung des Geräts sowie Änderungen und Modifizierungen am Gerät führen zum Erlöschen der Gewährleistungspflicht und können darüberhinaus zum Erlöschen der Zulassungen führen. Wenden Sie sich bei Betriebsstörungen oder Defekten an authorisiertes Servicepersonal, an Ihren Verkäufer oder an snom. Sicherheit: IEC 60950-1:2001, CB Test-Zertifikat: DE 2-013297 Zertifikate: FCC Class B, CE Mark Stromspeisung: Über Netzwerk (PoE, IEEE 802.3af, Klasse 1) oder Netzteil 5 V DC Leistungsaufnahme: 2,1 – 2,4 Watt 1 x LAN, 1 x PC: RJ45 (Ethernet) ¡ Ethernet: 2 x IEEE 802.3 10/100 Mbps switch Entsorgung des Produkts Dieses Gerät unterliegt der europäischen Richtlinie 2002/96/EG und darf nicht im Hausmüll entsorgt werden. Wenn Sie nicht wissen, wo Sie Ihr Altgerät entsorgen können, wenden Sie sich bitte an Ihre Kommune, Ihren örtlichen Müllentsorger oder Ihren Fachhändler. Reinigung Benutzen Sie ein antistatisches Tuch. Benutzen Sie kein Wasser und keine Reinigungsflüssigkeiten, da sie die Oberfläche und die Elektronik des Gerätes beschädigen könnten. 16 Quick Start Guide Initialisierung und Registrierung des Telefons Beachten Sie bitte: Sie benötigen die von Ihrem Netzwerkadministrator oder Ihrem VoIP-Provider erhaltenen Zugangsdaten für die Registrierung und Nutzung Ihres Accounts (Kontos), normalerweise Telefonnummer, Passwort und Registrar. Sobald Sie das Telefon - wie auf den Seiten 2-5 gezeigt - an das Netzwerk angeschlossen haben, beginnt es mit der Initialisierung und Registrierung. Die Initialisierung erfolgt normalerweise automatisch über DHCP. Falls Ihr Netzwork DHCP nicht unterstützt, benötigen Sie außerdem die IP-Addresse, den IP-Gateway und den DNS Server, die Sie ebenfalls von Ihrem Netzwerkadministrator oder VoIP-Provider erhalten, um sie manuell einzugeben, wenn Sie auf dem Display dazu aufgefordert werden. Treffen Sie bei Aufforderung auf dem Display Ihre Auswahl mit . Speichern Sie mit P. 1. Sprache. Die Einstellung ab Werk ist Englisch. Andere Sprachen stehen zur Verfügung, wenn Ihr Telefon/Netzwerk bei der Initialisierung mit dem Internet verbunden ist, so dass sie automatisch vom snom-Server heruntergeladen werden können (Firmware 7 und höher). 2. Rufton 3. Zeitzone 4. Geben Sie den Account/die Telefonnummer ein > P 5. Geben Sie den Registrar ein > P. Bei erfolgreicher Anmeldung sehen Sie jetzt den Ruhebildschirm: Datum: Account = Identität (NR: nicht registriert) Kontextsensitive Funktionssymbole Zeit Funktionstaste drücken zum Aktivieren/Ausführen/ Öffnen der Funktion Kontextsensitive Funktionstasten Zahlen, Buchstaben und Sonderzeichen eingeben Nehmen Sie den Hörer ab oder drücken Sie eine beliebige alfanumerische Taste. Textfeld Links vom Pfeil : Jetziger Eingabemodus Rechts vom Pfeil : Taste drücken zum Ändern des Eingabemodus > > > Eingabemodi: : Ziffern : Kleinbuchstaben : Großbuchstaben Taste drücken zum Löschen des gesamten Textes Den Cursor nach links Das Zeichen links vom bzw. nach rechts bewegen: Cursor löschen Telefonbucheinträge editieren: Jetziger Eingabemodus. Ändern mit abc > ABC > 123 > abc abc - Kleinbuchstaben ABC - Großbuchstaben Zeichen links vom Cursor löschen: : 123 - Ziffern Eingabe von Sonderzeichen in den Eingabemodi Klein- u. Großbuchstaben: Taste "1" schnell drücken, mit einer Pause nach jedem Zeichen. Beispiele: 1x = "." 2x = "+" 3x = "@" 4x = "1" 5x = ":" 6x = "," 17 D E U T S C H 18 Rautetaste Sternchentaste • Kurz gedrückt: Bei der Texteingabe zwischen Groß-u. Kleinbuchstaben wechseln • Einige Sekunden gedrückt: Tastatur verriegeln/ entriegeln Frei programmierbare Funktionstasten mit LEDs: . Standardeinstellung: Leitung. Leitungs-LED: • Schnell blinkend: Eingehender Anruf. Zur Annahme Taste drücken. • Leuchtend: Im Gespräch • Langsam blinkend: Gehaltener Anruf Aufzeichnung (falls v. Tel-Anlage unterstützt) • LED leuchtet gelb: Verpasster Anruf drücken zum Ausschalten der LED • LED gelb & schnell blinkend: Eingehender Anruf unterstützt) Neue Nachricht + verpasste Anrufe • Rote LED: Neue Nachricht - zum Abhören drücken (falls von Tel.-Anlage Aktionen & Eing. bestätigen, speichern Beenden- & OK-Tasten Aktionen & Eingaben beenden/löschen Navigationstaste - Funktionen bei Ruhebildschirm: : Identität für ausgehende Anrufe : Menü Einstellungen Menü Einstellungen IP-Adresse, MAC-Adresse, Firmware-Version Frei programmierbar Anruf weiterleiten "Nicht stören"-Funktion an/aus Vorprogrammierte Funktionstasten Alphanumerische Tastatur Erneut wählen Telefonbuch Frei programmierbar Konferenz starten/beenden Anruf auf Halten setzen Audiotasten • Lautstärkeregelung der Klingel bei läutendem Anruf bzw. des Lautsprechers, wenn im Gespräch • Mikrofon ein-/ausschalten • Gehäuselautsprecher ein/ aus • Headset ein-/ausschalten Kontextsensitive Funktionstasten (programmierbar) Kontextsensitive Funktionen Identität Display Ruhebildschirm D E U T S C H Auf einen Blick Quick Start Guide Aus Reset Die Untermenüs und die Einstellungen in dunkelgrau sind im Benutzermodus nicht verfügbar P HTTPS Reset Priorität HTTP Töne (Wählton) Kopfhörer xxxxx> ID Server Zeitzone Hörer VLAN Einstellungen Webinterface Andere Einstellungen Lautsprecher Benutzermodus: Speicher Netzwerk System Info * Vorangestelltes Sternchen: Zur Zeit aktive Auswahl Lautstärke DHCP Sprache An Kopfhörer Reg Besetzt F-Tasten Zeit Kontrast Neustart Anklopfen Aus Allgem. Konfiguration Einstellungen Immer Telefonverhalten Administratormodus: • Mit die Untermenüs durchblättern • Drücken Sie auf die Funktionstaste unter dem Funktionssymbol, um die Funktion aufzurufen • Drücken Sie auf P, um die Einstellung zu speichern • Drücken Sie auf , um zum vorherigen Bildschirm oder zum Ruhebildschirm zurückzukehren Umleitung bei Menü Einstellungen Quick Start Guide D E U T S C H 19 Quick Start Guide Administrator- und Benutzermodus D E U T S C H Die Einstellung ab Werk ist Administratormodus. Das werkseitig eingestellte Administrator-Kennwort lautet: 0000 (4 x Null). • Vom Administrator- in den Benutzermodus wechseln: Webbrowser des Telefons > Erweitert > Qos Sicherheit > Sicherheit > Administratormodus: Aus > Speichern • Vom Benutzer- in den Administratormodus wechseln: Webbrowser des Telefons > Erweitert > Administratorlogin: Administratorkennwort eingeben > Speichern Der Webbrowser des Telefons 1. Im Display die IP-Adresse anzeigen: > IP Adr, z.B. 192.168.10.115. ffnen Sie den Webbrowser Ihres PCs, tippen Sie http://und die IP-Adresse in die Ö Adresszeile und drücken Sie auf die Bestätigen-Taste, um auf die Startseite des Telefon-Webbrowsers zu gelangen. 2. Klicken Sie auf einen Menüpunkt auf der linken Seite, um das dazugehörige Fenster zu öffnen, z.B. Präferenzen. 3. Enthält das Fenster mehrere Seiten, klicken Sie auf einen Tab (“Karteireiter”) am oberen Rand, um die Seite sichtbar zu machen. Der Schriftschnitt der Textzeichen auf der sichtbaren Seite ist fett. 4. Vor dem Schließen des Telefonbrowsers oder dem Anklicken eines anderen Menüpunktes immer auf "Speichern" klicken, wenn die vorgenommenen Änderungen wirksam werden sollen. Zeitformat Webbrowser > Präferenzen > Allgemeine Informationen > 24-Stundenuhr: An: 24-Stundenformat, 00:01 - 24:00 Aus: 12-Stundenformat AM/PM, 0:01 AM - 12:00 PM Datumsformat Webbrowser > Präferenzen > Allgemeine Informationen > US Datumsformat: An: 3/8/2010 Aus: 8.3.2010 Identitäts-/Kontoeinstellungen Webbrowser > Identität 1-12 20 Quick Start Guide Die Bedienung des Telefons Identität für ausgehende Anrufe wählen Vom Ruhebildschirm mit p q eine der konfigurierten Identitäten auswählen. Anrufen D E U T S C H • Nummer auf der alphanumerischen Tastatur eingeben und Hörer abheben oder • Hörer abheben, Nummer eingeben, P oder • , Nummer eingeben, P. Anrufe annehmen • Mit dem Hörer: Hörer abheben • Mit einem Headset: P oder blinkende Leitungstaste drücken • Mit dem Gehäuselautsprecher/-mikrofon: drücken. Anruf auf Halten setzen oder die Leitungstaste des Anrufs drücken. Die LED blinkt jetzt langsam. Erneut drücken, um den Anruf wieder aufzunehmen. Wenn mehr als ein Anruf gehalten wird: Die Leitungstaste eines Anrufes drücken, um das Gespräch wieder aufzunehmen. Konferenz (3-er) 1. Ihre Telefonnummer: 154. Setzen Sie den ersten Anrufer (Jane Doe) auf Halten. 2. Rufen Sie den zweiten Teilnehmer (158) an. Mit dem zweiten Teilnehmer in der Leitung: 3. Konferenz starten: drücken. Während der Konferenz: 4. Mit die Konferenz stoppen und beide Teilnehmer auf Halten setzen: 5. Konferenz erneut starten: Leitungstaste eines Teilnehmers drücken, dann . Weiterleitung Mit Ankündigung Anruf auf Halten setzen. Telefonnummer wählen, an die weitergeleitet werden soll. Will der Teilnehmer den Anruf entgegennehmen: > P drücken. Ohne Ankündigung Wenn ein eingehender Anruf läutet oder mit einem Anruf in der Leitung: > Telefonnummer, an die weitergeleitet wird, wählen > P drücken. drücken 21 Quick Start Guide Rufumleitung 1. Rufumleitung einschalten. a. Alle eingehenden Anrufe: Umleitung > [Immer] > Ziel Immer: Telefonnummer eingeben > P. D E U T S C H b. Bei Besetzt: eingeben > P. Umleitung > [Besetzt] > Ziel Besetzt: Telefonnummer c. Wenn der Anruf nicht angenommen wird: Umleitung > [Zeit] > Ziel bei Timeout: Telefonnummer eingeben > Umleitung Zeit: Anzahl der Sekunden eingeben, nach deren Verstreichen umgeleitet wird > P. d. Umleitungshinweis auf dem Ruhebildschirm: 2. Rufumleitung ausschalten: Umleitung > [Aus] Anruflisten 1. Vom Ruhebildschirm öffnen: [Listen]. 2. Anrufliste mit Funktionstaste auswählen: [Verpasst], [Angen.], [Gewählt] 3. Listeneintrag suchen: . Nummer des markierten Eintrags wählen: P. Telefonbuch • Öffnen: . Scrollen: . Nummer des markierten Eintrags wählen: P. • <Neuer Eintrag>: > • Einträge bearbeiten: Siehe "Zahlen, Buchstaben und Sonderzeichen eingeben" auf Seite 17. Fehlerbehebung Neustart (Reboot): > Konfiguration > [Neustart] > "Neustart?" > P Harter Neustart: Netzstecker ziehen. Telefon nach ein paar Sekunden wieder anschließen. Nie während eines Firmware-Updates die Stromzufuhr unterbrechen! Werte zurücksetzen: > Konfiguration > [Reset] > AdministratorKennwort eingeben > P. Das werkseitig eingestellte Kennwort ist 0000 (4x Null). Alle persönlichen Einstellungen werden gelöscht! 22 Quick Start Guide FRANÇAIS Ce manuel abrégé décrit l'installation, l'initialisation et la mise en service du snom 320. Consultez notre site web pour des informations complémentaires: http://wiki.snom.com/Snom320. Copyright, Marques Déposées, GPL, Non Responsabilitée © 2010 snom technology Aktiengesellschaft Tous droits réservés. snom, les noms des produits snom et les logos snom sont des marques déposées par snom technology AG. Tous les autres noms de produits et noms d'entreprises sont les propriétés de leurs détenteurs respectifs. snom technology AG se réserve le droit de modifier et de changer ce document à n'importe quel moment, sans devoir annoncer de telles modifications ou changements avant ou après leur mise en place. Les textes, images et illustrations ainsi que leur mise en page dans ce document sont protégés par les copyrights et autres dispositions légales internationales. Leur utilisation, leur reproduction et leur transmission à des parties tierces sans accord express écrit peut induire des poursuites devant les cours criminelles et civiles. Bien que le plus grand soin ait été apporté à la compilation et à la présentation des informations contenues dans ce document, les données sur lesquelles elles sont basées peuvent entretemps avoir été modifiées. snom doit donc décliner toute garantie et toute responsabilité quand à l'exactitude et à l'exhaustivité des informations publiées excepté en cas de négligence flagrante de la part de snom ainsi que des les cas ou la responsabilité de snom est engagée de par la loi. Notre firmware inclus des éléments de code source qui peuvent être utilisés et modifié par quiconque selon les termes des licences GPL (cf. page 110), à condition qu'à leurs tours ils les rendent disponibles selon les mêmes termes. Veuillez vous rendre sur http://www.snom.com/de/ support/download/gpl-quellcode/ pour consulter la licence GPL originelle et le code source des composants couverts par la licence GPL qui sont utilisé dans les produits snom. Informations importantes Veuillez lire les informations concernant la sécurité et la mise au rebut de l'appareil ainsi que celles concernant son installation et son utilisation avant d'utiliser l'appareil. Communiquez également ces informations aux autres utilisateurs ou faites-les leur lire. Conservez ce manuel et ne cédez pas l'appareil à une tierce partie sans y joindre le manuel. Sécurité uivez les instructions présentes dans ce manuel et dans les autres documents S concernant l'appareil. • Evitez de placer le câble d'alimentation de l'appareil dans un endroit ou il est possible de trébucher dessus. Evitez également de le placer là ou il pourrait être exposé à un écrasement car il pourrait en être endommagé. Si le cordon d'alimentation ou la fiche sont endommagés, débranchez l'appareil et contactez du personnel d'entretien qualifié. • Cet appareil est destiné à une utilisation en intérieur uniquement! Ne l'installez pas au dehors! 23 F R A N Ç A I S snom 320 Quick Start Guide • N 'installez pas l'appareil dans des pièces très humides (par exemple, dans une salle de bain, une buanderie ou un sous-sol humide). N'immergez pas l'appareil dans l'eau et ne versez pas de liquides d'aucune sorte sur ou dans l'appareil. • N'installez pas l'appareil dans un lieu présentant un risque d'explosion (un magasin de peinture par exemple). N'utilisez pas l'appareil si vous sentez une odeur de gaz ou d'autres émanations potentiellement explosives. • N'utilisez pas l'appareil durant les orages, le choc d'un éclair sur les circuits électriques peut provoquer une électrocution. Conforme à T.B.T.S (Très Basse Tension de Sécurité) Le niveau de sécurité des connexions d'entré/sortie est conforme aux recommandations T.B.T.S (SELV). F R A N Ç A I S Avertissement : Pour éviter les électrocutions, ne connectez pas les circuits de SELV / TBTS aux circuits sous tension du réseau téléphonique (TNV). Ne connectez le câble NET/Ethernet qu'à un port LAN! Conformité au standards Cet appareil est certifié CE et FCC et répond aux standards environnementaux, de sécurité et de santé européens et américains. L'ouverture, la modification ou le remplacement sans autorisation de l'appareil annule la garantie et peut également annuler les certifications CE et FCC. En cas de mauvais fonctionnement, veuillez contacter le personnel d'entretien agrée, votre revendeur ou bien snom. • Sécurité: IEC 60950-1:2001, Certificat CB Test: DE 2-013297 • Certificat: FCC Class B, CE Mark • Consommation d´énergie: 2,1 – 2,4 Watts • Alimentation: Par transformation 5 V DC ou PoE (Power over Ethernet) IEEE 802.3af, Classe 1 • 1 x LAN, 1 x PC: RJ45 (Ethernet) • Ethernet: 2 x IEEE 802.3 10/100 Mbps switch Mise au Rébut du Produit Cet appareil est soumis à la Directive 2002/96/CE et ne peut être mis au rebut avec les déchets ménagers normaux. Si vous ne savez pas ou mettre au rebut oú faire recycler l'appareil lorsqu'il arrive au terme de son existence, contactez votre municipalité, la société locale en charge de la gestion des déchets ou votre vendeur. Nettoyage Utilisez un tissu antistatique. N'utilisez pas de l'eau ou un produit de nettoyage liquide ou solide. Ils peuvent endommager l'éléctronique ou les sufaces de l'appareil. 24 Quick Start Guide Initialisation et enrégistration Renseignement: Vous devez également disposer des données pour la registration et l'utilisation de votre compte que vous avez reçu de votre administrateur réseau ou de votre fournisseur de VoIP, normalement la numéro de téléphone, le mot de passe et le régistraire. Une fois que l'appareil est connecté avec le réseau comme indiqué sur les pages 2-5, il commence à s'initialiser et se registrer. L'initialisation est normalement fait automatiquement via DHCP. Si votre réseau ne supporte pas le protocole DHCP, vous devez également saisir l'adresse IP, la passerelle IP et le serveur DNS manuellement. Demandez-les de votre administrateur réseau ou de votre fournisseur de VoIP et suivez les instruction qui s'affichent à l'ecran. Sélectionnez une option avec et sauvegardez chaque sélection avec P. 1. Langue. Le paramètre par défaut est Anglais. D'autres langues sont disponibles si votre téléphone est connecté à l'internet lors de l'initialisation. Dans ce cas ils sont téléchargés à partir du serveur snom (Firmware 7 et supérieur). 2. Tonalité 3. Fuseau horaire 4. Saisissez votre numéro de téléphone/compte + appuyez sur P 5. Saisissez votre registraire + P . Si l'enregistrement a réussi l'écran d'attente s'affiche: Date: Compte = Identité (NR: pas enregistrée) Symboles de fonction contextuelles L‘heure Appuyez sur la touche de fonction pour activer la fonction Touches de fonction contextuelles Saisie de lettres, chiffres et caractères spéciaux Appuyez sur l'une quelconque des touches alphanumeriques. Champs de saisie À gauche de la flêche: Mode de saisie actuelle À droite de la flêche: Appuyez sur la touche pour changer la mode de saisie à: > > > Modes de saisie: : Chiffres : Lettres minuscules : Lettres majuscules Appuyez pour supprimer toutes les saisies Déplacer le curseur vers la Supprimer la lettre à la gauche ou vers la droite: gauche du curseur Modifier l'annuaire: Mode de saisie actuel. Appuyez sur pour le changer: abc > ABC > 123 > abc Supprimer la lettre à la gauche du curseur: abc - Lettres minuscules ABC - Lettres majuscules 123 - Chiffres Saisie de caractères spéciaux en mode de saisie lettres: Appuyez rapidement plusieurs fois sur la touche "1", avec une petite pause après chaque caractère. Examples: 1x = "." 2x = "+" 3x = "@" 4x = "1" 5x = ":" 6x = "," 25 F R A N Ç A I S 26 Écran en état inactif Touches de fonction programmable . Défaut: Ligne. avec diodes: LED de la ligne: • Clignotement rapide: Appel entrant. Accepter l'appel: Appuyez sur la touche. • Allumé: Appel en cours • Clignotement lent: Appel en attente Enregistrement (si soutenu par le PABX) • Diode jaune: Appel manqué -appuyez sur pour l'éteindre • Diode jaune clignote rapidement: Appel entrant PABX) Nouvel message + appels manqués • Diode rouge: Nouvel message - appuyer sur pour l'écouter (si soutenu par le Annuler / Confirmer des actions & xxxxxxxxxxxxxxxxxxxxentrées, sauvegarder Touches annulation & confirmation Touche de navigation - ses fonctions en état inactif: : Sélectionner une identité : Menu Paramètres Menu Paramètres Adresse IP, Adresse MAC, version du micrologiciel Librement programmable Transférer un appel Fonction "Ne pas déranger" (mettre en marche/arrêt) Touches de fonction programmées Touche dièse Clavier alphanumérique Recomposer Annuaire Librement programmable Conference: Démarr./fermer Mettre un appel en attente Touche asterisque • Appuyé brièvement en mode de saisie: Passer entre mode majuscule et mode minuscule • Appuyé pour quelques secondes: Verrouiller/ déverrouiller le clavier Touches audio • Réglage du volume • Microphone (mise en marche/arrêt) • Haut-parleur (marche/arrêt) • Casque (marche/arrêt) Touches de fonction, contextuelles et personnalisables Symboles contextuelles des fonctions personnalisables Identité F R A N Ç A I S D'un seul coup d'oeil Quick Start Guide Les sous-menus et les paramètres en gris foncé ne sont pas disponibles en mode utilisateur Occupé Langue Contraste Réglage géneral 3 P HTTPS HTTP Tonalité Casque xxxxx> Serveur Fuseau Combiné Haut-parleur Interface Web Autres réglages DHCP En mode utilisateur: En mode administrateur: Reseau Mémoire ID Priorité Redémarrage Info Systeme * Astérisque antéposé: Sélection active en cours Parametres VLAN Tous les paramètres personnalisés seront écrasés Marche Reset3 Redémmarrage Arrêt Casque Reg Configuration Contrôle du volume LED présentation: Appel en attente 2 Temps: Apres un délai de réponse Fkeys Temps2 1 LED Présentation1 Arrêt Toujours Personnalisation • Scroller les sous-menus avec • Appuyez sur la touche de fonction au-dessous le symbole pour activer la fonction • Appuyez sur P pour sauvegarder le paramètre • Appuyez sur pour retourner a l'écran préalable ou à l'écran d'attente Renvoi d'appel Menu Paramètres Quick Start Guide F R A N Ç A I S 27 Quick Start Guide Mode administrateur/mode utilisateur La réglage par défaut est le mode administrateur. Le mot de passe administrateur par défaut est: 0000 (4 x zéro). • Passer de mode administrateur en mode utilisateur: Interface web du téléphone > Avancés > Qos/Security > Securité > Mode Administrateur: Off > Sauvegarder • Passer de mode utilisateur en mode administrateur: Interface web du téléphone > Avancés > Login Administrateur: Saisissez le mot de passe administrateur dans le champs de saisie > Sauvegarder. L'interface Web du téléphone F R A N Ç A I S 1. Obtenir l'adresse IP: , p.ex. 192.168.10.115. 2. Ouvrez le navigateur web de votre PC et saisissez http:// suivi de l'adresse IP dans la barre d'adresse. Appuyez sur la touche d'entrée pour ouvrir la page d'accueil de l'interface Web du téléphone. 3. Cliquez sur un élément au menu à gauche pour ouvrir la page correspondante. 4. Certaines pages contiennent plusieurs documents. Pour rendre visible un document, cliquez sur 'onglet correspondant. Les lettres de l'onglet actif sont affichées en caractères gras. 5. Appuyez toujours sur la touche "Sauvegarder" avant de cliquer sur un menu different ou de refermer l'interface Web si vous désirez appliquer les modifications que vous avez effectuées. Format de l'heure Interface Web > Préférences > Informations générals > Horloge 24 Heures On: Format 24 heures, 00:01 - 24:00 Off: Format 12 heures AM/PM, 0:01 AM - 12:00 PM Format de la date Interface Web > Préférences > Informations générals > Format date U.S. (mm/dd): On: 3/8/2010 Off: 8.3.2010 Paramètres d'identité/compte Interface Web > Identité 1-12 28 Quick Start Guide Utilizer le téléphone Sélectionner un identité pour l'appel sortant en course de l'écran en état inactif: qp Passer des appels • Saisissez le numéro sur le clavier alphanumérique et décrochez le combiné ou • Saisissez le combiné, saisissez le numéro et appuyez sur P ou • , saisissez le numéro, P. Accepter des appels • Avec le combiné: Décrochez le combiné • Avec un casque: Appuyez sur P ou la touche clignotante de la ligne • Avec le haut-parleur/microphone du boîtier: Appuyez sur F R A N Ç A I S Placer un appel en attente Appuyez sur ou la touche de la ligne. La diode commence à clignoter lentement. Reprendre l'appel: ou. S'il y'a plusieurs appels en attente: Appuyez sur appuyez sur la touche de la ligne d'un d'eux pour le reprendre. Conference à trois 1. Example: Votre numéro de téléphone est le 154. Mettez le premier appel (Jane Doe) en attente. 2. Appelez la deuxième partie (158). L'écran avec le deuxième appel en ligne: 3. Commencer la conférénce: Appuyez sur avec la conférénce en cours: . L'écran 4. Arrêter la conférénce et mettre les deux parties en attente: . 5. Recommencer la conférénce: Appuyez sur la touche de ligne d'un des appels en attente > . Transfert d'un appel Transfert attendu Mettre l'appel en attente > Composez le numéro de la tierce partie. Annoncez l'appel. > Si la tierce partie veux l'accepter: Appuyez sur > P. Sans l'annoncer á la tierce partie Quand un appel sonne ou avec l'appel en ligne: Appuyez sur numéro de la tierce partie > appuyez sur P. > composez le 29 Quick Start Guide Renvoi d'appel 1. Activer le renvoi d'appel. a. Tous les appels entrants: composez le numéro > P. Renvoi d'appel > [Touj] ours > Always target: b. Sur occupation: Renvoi d'appel > [Occupé ] > Numéro occupé: composez le numéro > P. c. Après un délai de réponse: Renvoi d'appel > [Tempo] > 5 Cible Timeout: composez le numéro > P > Temporisation (attente en secondes avant de transferer l'appel): saisissez le nombre de secondes > P. d. L'écran inactif quand le renvoi d'appel est activé: F R A N Ç A I S 2. Désactiver le renvoi d'appel: Renvoi d'appel > [ARRÊT]. Listes des appels 1. Ouvrir les listes de l'écran inactif: [Appel]. 2. Appuyez sur la touche de fonction au-dessous [perdu] (appels manqués), [recu], [appelé]) pour ouvrir la liste. 3. Scroller dans la liste: . Composer le numéro de l'entrée choisie: P Annuaire du téléphone • O uvrir: Appuyez sur . Faire défiler: . Composer le numéro de l'entrée choisie: P • <Nouvelle Entrée>: Appuyez sur > • Modifier les entrées: Cf. "Saisie de lettres, chiffres et caractères spéciaux", page 25. Dépannage Redémarrage (Reboot) > Config > [Redéma]rrage > "Reboot?" > P Redémarrage à froid Retirez la prise de courant. Rebranchez l'alimentation après quelques secondes. Ne coupez pas l'alimentation pendant une mise à jour du firmware ! Réinitilasation aux valeurs d'usine > Config > [Reset] > Saisissez le mot de passe administrateur > P. Mot de passe administrateur par défaut: 0000 (4 x zéro) Tous les paramètres personnalisés seront écrasés! 30 Quick Start Guide ITALIANO Questa è la guida rapida per l'installazione, l'impostazione e il funzionamento dello snom 320. Per ulteriori informazioni consultare la nostra pagina web: http://wiki.snom.com/Snom320. Copyright, Marchi registrati, GPL, Declinazione di responsabilita © 2010 snom technology Aktiengesellschaft Tutti i diritti riservati. snom, i nomi dei prodotti snom, ed i loghi snom sono marchi registrati di proprietà di snom technology AG. Tutti gli altri nomi di prodotti e di imprese sono proprietà dei rispettivi proprietari. snom technology AG si riserva il diritto di rivedere e modificare il presente documento in qualsiasi momento senza alcun obbligo di notifica precedente o posteriore a tali cambiamenti. Testi, immagini ed illustrazioni ed il loro ordine in questo documento sono soggetti a protezione del diritto d’autore ed altri diritti legali a livello mondiale. Il loro utilizzo, riproduzione e trasmissione a terzi senza il permesso scritto potrebbe dar luogo ad azioni legali, in sede penale e civile. Sebbene sia stata prestata la massima attenzione nella stesura e presentazione delle informazioni in questo documento, i dati su cui si basa potrebbero già aver subito variazioni. snom pertanto declina ogni responsabilità riguardo a tutte le garanzie di affidabilità, accuratezza, completezza ed attualità delle informazioni pubblicate, tranne nel caso di grossolana negligenza da parte di snom o laddove per legge è ritenuta responsabile. Il nostro firmware include codice sorgente utilizzabile e modificabile da chiunque. La licenza pubblica GNU (GPL) (cfr. pag. 92), consente di rendere disponibile il software con lo stesso accordo di licenza. Visitate http://www.snom.com/de/support/download/gpl-quellcode/ per la licenza GPL originale e per i codici di sorgente di componenti sotto licenza GPL ed utilizzati in prodotti snom. Informazioni importanti Pregasi leggere con attenzione le istruzioni inerenti la sicurezza, lo smaltimento e l‘installazione del dispositivo prima del suo impiego. Tali informazioni vanno condivise con gli altri utenti. È altresì necessario conservare questo manuale, consegnandolo insieme al dispositivo qualora esso venga dato a terzi. Sicurezza Seguite le istruzioni in questo manuale e tutta la documentazione relativa al dispositivo. • U tilizzate solo l’adattatore del dispositivo. Altri adattatori di corrente potrebbero danneggiare, anche irreversibilmente, il dispositivo soggetto a pressione meccanica ed il cavo. Se il cavo o la spina si danneggiano, scollegare il dispositivo e contattare il personale di assistenza qualificato. • Non posizionare il cavo di corrente del telefono dove può essere calpestato. Non posizionare il cavo di corrente del telefono dove può essere soggetto a pressione meccanica perchè potrebbe danneggiare il cavo. Se il cavo o la spina si 31 I T A L I A N O snom 320 Quick Start Guide danneggiano, scollegare il telefono e contattare il personale di assistenza qualificato. • Q uesto apparecchio si può impiegare solo al chiuso! Non installare all'aperto! • Non installare il dispositivo in ambienti con alta umidità (ad es., in bagno, lavanderia, seminterrati umidi). Non immergere il dispositivo in acqua e non versarvi liquidi sopra • Non installare il dispositivo nei pressi di locali a rischio esplosione (colorifici, ad es.). Non utilizzare il dispositivo se sentite odore di gas o di altra esalazione potenzialmente esplosiva. • Non utilizzare il dispositivo durante i temporali. Qualora un fulmine colpisca la rete elettrica, è passibile di scossa. Conforme al circuito SELV (bassissima tensione di sicurezza) Il nivello di scurezza dei circuiti in ingresso / uscita è conforme alle raccomandazioni SELV. Attenzione: Per evitare scosse elettriche non collegare i circuiti SELV a quelli della rete telefonica (TNV). Le porte LAN hanno circuiti SELV, le porte PSTN hanno circuiti TNV. Conformità Il dispositivo è certificato CE e FCC e risponde agli standard europei e statunitensi di salute, sicurezza ed ambientali. I T A L I A N O Eventuali modifiche, cambiamenti e l’apertura non autorizzata del dispositivo invalidano la garanzia e potrebbero eventualmente annullare le certificazioni CE e FC. In caso di malfunzionamento contattare il personale di assistenza autorizzato, il rivenditore, o snom. • Sicurezza: IEC 60950-1:2001, Certificato Test CB: DE 2-013297 • Certificazioni: FCC Class B, Marchio CE • Consumo di potenza: 2,1 – 2,4 Watt • Potenza: 5 V DC o PoE (Power over Ethernet`) IEEE 802.3af, Class 1 • 1 x LAN, 1 x PC: RJ45 (Ethernet) • Ethernet: 2 interruttori IEEE 802.3 da 10/100 Mbps Smaltimento del dispositivo Questo dispositivo è soggetto alla Direttiva Europea 2002/96/EC e non può essere smaltito con i rifiuti domestici. Se non sapete come smaltire l’apparecchio una volta inutilizzabile, contattate il comune, la nettezza urbana locale, o il vostro rivenditore. Pulizia Utilizzare un panno antistatico. Evitare acqua e altri liquidi o detergenti solidi che potrebbero danneggiare la superficie o l’elettronica interna. 32 Quick Start Guide Iniziallizzazione e registrazione Si prega di notare: Le informazioni dell’account fornite dal vostro amministratore di rete o un account VoIP presso un provider VoIP che supporti lo standard VoIP SIP, normalemente il utente (di solito corresponde al numero di telefono), il password e il registrar. Collegare il dispositivo alla rete (vedi pagina 2-5). Il telefono avvia il processo di inizializzazione e registeration. L'inizializzazione e la registrazione avviene normalmente tramite DHCP. Se il vostro sistema telefonico IP non supporta l’avvio automatico, richiesta l'indirizzo IP, gateway IP e server DNS dal tuo amministratore di rete o provider VoIP il manuale per l’avvio del telefono. Selezionare un'opzione con e salvare ogni selezione con P. 1. Lingua. La lingua di default è l'inglese. Se il telefono/rete sono collegati a internet durante la procedura di inizializzazione, sono disponibili altre lingue che possono essere fornite automaticamente dal server snom (firmware 7 e superiori). 2. Segnali di linee libera 3. Fuso orario 4. Digitare il tuo numero di conto/telefono + premere P 5. Digitare il registrar + P . Se la registrazione è riuscita, il display visualizza la schermata inattivo: Data: I T A L I A N O Account = Identità (NR: non registrati) Simboli delle funzioni disponibile in base al contesto Hora Premere il tasto funzione sotto il simbolo per attivare la funzione Tasti funzione per il contesto Inserire lettere, numeri e caratteri speciali Premere un tasto qualsiasi alfanumerico. Modalità d‘inserimento: : Numeri : Lettere minuscole : Lettere maiuscole Text box A sinistra della fleccia: Modalità d‘inserimento corrente A destra della fleccia: Premere il tasto per cambiare la modalità à: > > > Premere per eliminare tutte le inserimenti Spostare il cursore Cancellare il carattere a a sinistra | a destra: sinistra del cursore Modificare il rubrica: Modalità d‘inserimento corrente. Premere per cambiare: abc > ABC > 123 > abc Cancellare il carattere a sinistra del cursore: abc - Lettere minuscoleABC - Lettere maiuscole 123 - Numeri Inserire caratteri speciali - modalità lettere minuscole o maiuscole): Premere rapidamente il tasto "1" più volte, con una piccola pausa dopo ogni lettera. Esempi: 1x = "." 2x = "+" 3x = "@" 4x = "1" 5x = ":" 6x = "," 33 34 Tasto asterisco • Premuto brevemente in modalità inserimento: Passare dalla modalità lettere minuscole e maiuscole • Premuto per alcuni secondi: Bloccare/ sbloccare la tastiera Tasti audio Moficicare il volume • della suoneria (chiam. in arrivo) o del vivavoce (chiamata en corso) • Microfono on/off Vivavoce on/off • • Cuffia on/off Tasti funzione per il contesto, programmabili Tasto attesa Liberamente programmabili Iniziare/terminare conferenza Richiamo Rubrica • Lampeggia rapidamente: Chiamata in arrivo • Brillare senza lampeggia: Telefonata in corso • Lampeggia lentamente: Chiamata attesa Tasti funzioni con LED, liberamente programmabili: . Impostazione di fabbrica: Linea. Il LED: Registrare una chiamata (se support.dal PBX) Nuovi messaggi + chiam. perse • LED rosso: Nuovo mess. - premere per ascoltarla (se supportato dal PBX) • LED giallo: Chiamata perse. Spegnere il LED: Premere . • LED giallo, lampeggia velocamente: Chiamata in arrivo Annullare / Confirmare azioni & inserimenti, salvare Tasti annulla & OK Tasto navigazione - funzioni in stato inattivo: : Selezionare identità : Menu Impostazioni Menu Impostazioni Indirizzo IP, indirizzo MAC, versione firmware Liberamente programmabili Trasferimento Funzione "non disturbare" on/off Tasti funzioni dedicati/ preprogrammato Tasto cancelletto Clavier alphanumérique Identità Display stato inattivo I T A L I A N O Simboli delle funzioni disponibile in base al contesto In sintesi Quick Start Guide I sottomenu e l'impostazioni en grigio scuro non sono disponibile in modalità utente Occupado Lingua Contrasto Impostazioni generali P Tono ch(iam) Cu(ffie) xxxxx> Fuso o(rario) Cornetta Altoparlanti Altre impostazioni DHCP Riavvia Resetta3 Reg Configurazione Impostazioni volume Chiamata in: Notificazione MWI (acceso-spento) 2 Tempo: Dopo Timeout (senzo riposto) Tasti funzione Tempo2 1 Chiamata in 1 Spento Sempre Impostazioni Telefon Modalità utente: ID Priority Resettare Server HTTP HTTPS Memoria Rete Info Sistema *Asterisco anteposto: Selezione attualmente attivo Impostazioni VLAN Tutte le impostazioni modificate andranno perse! Interfaccia Web 3 Acceso Spento Cuffie Modalità amministratore: • Aprire il menu/sottomenu con • Premere il tasto funzione sotto il simbolo per attivare la funzione • Premere P per salvare l'impostazione • Premere per tournare alla scherma precedente o allo schermo inattivo Trasferisci Chiamata Menu Impostazioni Quick Start Guide I T A L I A N O 35 Quick Start Guide Modalità utente/Modalità amministratore L'impostazione di fabbrica è la modalità di amministratore. La password di default per l'amministratore è: 0000 (4 x zero). Cambiare la modalità: • Tra modalità amministratore a modalità utente: Interfaccia web > Avanzate > QoS/ Security > Sicurezza > Mod. amministratore: Off > Salva • Tra modalità utente a modalità amministratore: Interfaccia web > Avanzate > Login amministratore: Digitare la password di amministratore > Salva. L'interfaccia Web del telefono 1. Trovare l'indirizzo IP: , per esempio 192.168.10.115. 2. Aprire il browser web del vostro PC e digitare http:// seguito dall'indirizzo IP nella barra degli indirizzi. Premere Invio per apprire l'interfaccia Web del telefono. 3. Cliccare su una voce del menu per aprire la pagina relativa. I T A L I A N O ` 4. Alcune pagine contengono svariati documenti. Per rendere visibile un documento, cliccare sulla sua scheda. Il carattere è in grassetto per la scheda attiva. 5. Ricordare di premere sempre "Salva" prima di cliccare su un'altra voce del menu o di chiudere l'interfaccia web se volete che le modifiche vengano applicate. Formato ora Interfaccia Web > Preferenze > Informazioni generali > 24 Hour clock: On: Formato 24 ore, 00:01 - 24:00 Off: Formato 12 ore AM/PM, 0:01 AM - 12:00 PM Formato della data Interfaccia Web > Preferenze > Informazioni generali > US date format (mm/dd): On: 3/8/2010 Off: 8.3.2010 Impostazioni identità/Account Interfaccia Web > Identità 1-12 Usare il telefono Selezionare un’identità per la chiamata in uscita in corso dallo display inattivo: qp 36 Quick Start Guide Chiamare • Digitare il numero e sganciare la cornetta o • Sganciare la cornetta, digitare il numero e premere P o • , digitare il numero, P. Accettare le chiamate • Usando la cornetta: Sganciare la cornetta • Usando una cuffia: Premere P o il tasto linea lampeggiante • Usando il vivavoce: Premere Mettere le telefonate in corso in attesa Premere . Il LED lampeggia lentamente. Riprendere . Con più chiamate in attesa: la chiamata: Premere Premere il tasto della linea per riprendere uno da cui. Conferenza a tre 1. Il tuo numero di telefono: 154. Mettere le prima chiamata (Jane Doe) in attesa. 2. Chiamare il secondo partecipante (158). Con la seconda chiamata sulla linea: 3. Avviare la conferenza: I T A L I A N O . Conferenza in corso: 4. Fermare la conferenza e mettere i partecipanti in attesa: . 5. Avviare la conferenza di nuovo: Premere il tasto della linea di uno da cui e . Trasferimento Annunciato Mettere le chiamata in attesa > Digitare il numero della terza persona. Annunciate la chiamata > Se il terzo desidera accettare la chiamata: Premere > P. Trasferimento diretto (senza annunciare la chiamata): Con la chiamata sulla linea: Premere , digitare il numero della terza persona > premere P. Inoltro di chiamate 1. Attivare l'inoltro di chiamate a. Tutte le chiamate in arrivo: interno: digitare il numero > P. Trasferisci Chiamata > [Sempr]e > Sempre b. Se occupato: Trasferisci Chiamata > [Occupa]to > Interno occupato: digitare il numero > P . c. Dopo timeout (senza risposta): Trasferisci Chiamata > [Temp] > Timeout target: digitare il numero > P > Ora trasferimento: digitare il 37 Quick Start Guide numero di secondi precedenti all'inoltro > P. d. Display inattivo con trasferimento automatico attivato: 2. Disattivare: Trasferisci Chiamata > [Spen]to > P. Gli elenchi chiamate 1. Per aprire in stato di inattività: Premere [Reg.ch.] 2. Selezionare un elenco (Lista chiamate: Perse, Entranti (in ingresso), (in) Uscenti) con il tasto funzione 3. Scorrere l'elenco: . Chiamare il numero della registrazione selezionata: P Elenco del telefono • Per aprire: Premere . Scorrere: . Chiamare il numero selezionata: P • Nuovo indirizzo <Nuovo inserimento>: Premere > • Modificare indirizzi: Vedi "Inserire lettere, numeri e caratteri speciali", pagina Seite 33. Risoluzione dei problemi I T A L I A N O Riavvio (Reboot) Configurazione > [Riavvia] > "Riavviare?" > P Riavvio forzato Staccare il telefono dalla presa di corrente. Ricollegare il telefono alla corrente dopo alcuni secundi. Non staccare dalla corrente quando il telefono si sta riavviando ! Reimpostare i valori di fabbrica Configurazione > [Resetta] > digitare il password amministratore > P Tutte le impostazioni modificate andranno perse! 38 ESPAÑOL Quick Start Guide Esta es la Guía de Inicio Rápido para la instalación, configuración y uso del snom 320. Para más información, consulte el manual en nuestra página web http://wiki.snom.com/Snom320. Propriedad intelectual, Marcas registradas, GPL, Responsabilidad © 2010 snom technology Aktiengesellschaft Todos los derechos reservados. snom, los nombres de los productos snom, y los logos de snom son marcas comerciales propiedad de snom technology AG. Los demás nombres de producto y empresas son propiedad de sus respectivos propietarios. snom technology AG se reserva el derecho de revisar y modificar este documento en cualquier momento, sin obligación de notificar estas revisiones o modificaciones por adelantado o con posterioridad a sz realización. Los textos, imagines e ilustraciones, y su presentación en este documento, están sujetos a la protección de copyright y otros derechos legales internacionales. Su uso, reproducción y transmisión a terceros sin permiso expreso por escrito puede dar lugar al inicio de procedimientos legales en los tribunales penales y civiles. Aunque se han tomado todas las precauciones posibles en la compilación y presentación de la información de este documento, los datos en los que se basa pueden haber cambiado con el tiempo. snom, por lo tanto, renuncia a cualquier garantía y responsabilidad respecto a la precisión, exhaustividad y vigencia actual de la información publicada, excepto en el caso de intencionalidad o negligencia grave por parte de snom cuando se deriven responsabilidades de acuerdo con las disposiciones legales vinculantes. Nuestro firmware incluye código fuente que puede ser usado y modificado por cualquier persona bajo la licencia pública GNU (GPL) (vease la página 55), siempre que, a su vez, lo ponga a disposición de cualquier otra persona que tenga el mismo acuerdo de licencia. Acceda a http://www. snom.com/de/support/download/gpl-quellcode/ para obtener la licencia GPL original y el código fuente de los componentes con licencia en virtud de la GPL y utilizados en productos snom. Información importante Lea las instrucciones sobre seguridad y reciclaje del teléfono, y sobre cómo configurar y utilizar el teléfono antes de usarlo, y ofrézcalas igualmente a otros usuarios para que las lean o se informen de su contenido. Conserve este manual y no entregue el teléfono a terceros sin el mismo. Seguridad Siga las instrucciones de este manual y cualquier otra documentación aplicable del dispositivo. • S i la alimentación del teléfono no se realiza mediante/por Ethernet, use exclusivamente el adaptador de alimentación entregado con el teléfono o uno recomendado de forma expresa par snom. Otros adaptadores pueden dañar o incluso destruir el teléfono, afectar a su funcionamiento o provocar ruidos. • Evite poner los cables de modo que otras personas puedan tropezar con el mismo. No coloque los cables de forma que pueda verse sometido a presiones mecánicas, ya que eso podría dañar los cables. Si el cable de alimentación o el enchufe están 39 E S P A Ñ O L snom 320 Quick Start Guide dañados, desconecte el teléfono y contacte con personal de servicio cualificado. • Este dispositivo es solamente para uso en interiores. • No instale el teléfono en lugares con humedad elevada (por ejemplo, en baños, lavaderos, o sótanos húmedos). No sumerja el teléfono en agua ni derrame o vierta líquidos de ningún tipo sobre el teléfono. • No instale el teléfono cerca de lugares con riesgo de explosión (talleres de pintura, por ejemplo). No use el teléfono si huele a gas o a otros vapores que puedan ser explosivos. • No use el teléfono durante una tormenta; los rayos que impacten en la red eléctrica pueden descargas eléctricas. Cumplimiento de los requisitos SELV (Tensión Extra-Baja de Seguridad) Las condiciones de seguridad de las conexiones de entrada/salida cumplen con los requisitos SELV. Atención: Para evitar descargas eléctricas, no conecte circuitos de seguridad de tensión extra-baja (SELV) a circuitos de tensión de red telefónica (TNV). Los puertos LAN contienen circuitos SELV, los puertos PSTN contienen circuitos TNV. Algunos puertos LAN y PSTN utilizan conectores RJ-45 (8P8C). Tome precausiones cuando conecte los cables.. Cumplimiento con la normativa Este teléfono tiene certificación CE y FCC, y cumple con los estándares de salud, seguridad y medioambientales europeos y de Estados Unidos. La apertura, cambio, o modificación no autorizadas del teléfono provocarán que la garantía se cancele, y también pueden resultar en la cancelación de las certificaciones CE y FCC. En caso de avería, contacte con personal de servicio autorizado, su vendedor, o snom. E S P A Ñ O L • Seguridad: IEC 60950-1:2001, Certificado de comprobación CB: DE 2-013297 • Certificados: FCC Class B, Indicación CE • Consumo eléctrico: 2,1 – 2,4 W • 1 x LAN, 1 x PC: RJ45 (Ethernet) • A limentación: 5 V DC o PoE (Power over Ethernet) IEEE 802.3af, Clase 1 • Ethernet: 2 xIEEE 802.3 conmutador 10/100 Mbps Eliminación Este teléfono está sujeto a la Directriz Europea 2002/96/EC, y no se puede desechar con los residuos domésticos generales. Si no sabe dónde reciclar el dispositivo cuando deje de funcionar, contacte con las autoridades municipales, con su proveedor de gestión de residuos local o con su vendedor. Limpieza Use una paño antiestático. No utilice agua ni productos de limpieza, ya que podrían dañar la superficie o los componentes electrónicos del aparato. 40 Quick Start Guide Inizialización y registro Importante: La información de registro que le haya proporcionada su proveedor de internet o su administrador de red, normalemente, el número de teléfono, la extensión, la contraseña y el registro. Cuando haya configurado el teléfono y lo haya conectado la red como se indica en las páginas 2-5, el teléfono empezará a inicializar. Normalmente la inicialización es totalmente automática y se realiza a través del protocolo DHCP. Si su red no admite DHCP, debe obtener la dirección IP, la máscara de red, el IP de la puerta de enlace y el servidor DNS de su proveedor de internet o su administrador de red e introducirlos manualmente cuando se le solicite en la pantalla. Cuando se le indique, seleccione una opción con y guarde los cambios con P. 1. Idioma. El idioma por defecto es inglés. Tiene otros idiomas disponibles si el teléfono/red está conectado a internet durante la inicialización, de modo que se los puede proporcionar el servidor snom automáticamente (firmware 7 y superior). 2. Tono de marcado 3. Huso horario 4. Introduzca la cuenta/el número de teléfono y pulse P 5. Introduzca el registro (Registrar) y pulse P. Si el registro se realizó correctamente, la pantalla mostrará: Fecha: Cuenta = identidad (NR: no registrado) Símbolos de las funciones disponibles en este contexto particular La hora Pulse la tecla de función para activar la función Teclas de función Introducir letras, números y caracteres especiales Pulse cualquier tecla. Campo te texto A la izquierda de la flecha: Modo de entrada actual A la derecha de la flecha: Pulse la tecla para cambiar el modo de entrada à: > > > E S P A Ñ O L Modo de entrada: : Números : Minúsculas : Mayúsculas Pulse para eliminar el entrada de texto completo Mover el cursor a la Eliminar el carácter a la izquierda | a la derecha: izquierda del cursor Editar el directorio: Modo de entrada actual. Le cambiar: : abc > ABC > 123 > abc Pulse Eliminar el carácter a la izquierda del cursor: abc - Minúsculss ABC - Mayúsculas 123 - Números Introducir caracteres especiales y símbolos en modo letras: Pulse la tecla "1" una o varias veces rápidamente, con una breve pausa después de cada letra. Ejemplos: 1x = "." 2x = "+" 3x = "@" 4x = "1" 5x = ":" 6x = "," 41 42 Tecla asterisco • Pulsado brevemente en modo de edición: Alternar entre minúsculas y mayúsculas • Pulsado durante varios segundos: Bloquear/ desbloquear el teclado • Encendido/apagado: Micrófono Altavoz Auriculares Teclas de audio • Ajuste de volumen del timbre (llam. entrante) o del alta-voz (llamada en curso). Pantalla estado inactivo Confirmar acciones & Teclas de función con LEDs, libramente programables: . configuración predeterminada de fábrica: Línea. LED: • Parpadeo rápido: Llamada entrante • Luz fija: Llamada en curso • Parpadeo lento: Llamada en espera Grabar una llamada (si es comp. con la PBX) • LED rojo: Mensaje nuovo - pulse para apagarlo (si es compatible con la PBX) • LED ámbar, luz fija: Llamada perdida. Apadado el LED: Pulse . • LED ámbar, parpadeo lento: Llamada entrante Mensajes nuevos + llamad. perdidas Cancelar / entradas, guardar Teclas Cancelar & Confirmación Tecla de navegación - las funciones en estado inactivo: : Selección del identidad : Menu Ajustar Menú Ajustes Dirección IP, dirección MAC, versión de firmware Libramente programmable Transferencia Función "no molestar" encendido/apagado Teclas funciones preprogramada/programable Tecla almohadilla Teclado alfanuméricas Rellamada Directorio telefónico Libramente programmable Conferencia Espera Teclas de función, programables Identidad E S P A Ñ O L Símbolos de las funciones disponibles en este contexto particular De un vistazo Quick Start Guide Teclas de función Hora2 Los submenús e los ajustes en gris oscuro no son accesibles en modo de usuario Ocupado 1 Altavoz Manos Auricular Control de volumen Prioridad Reajuste HTTP HTTPS Tonos del ti ID Servidor Ajustes VLAN Huso orario xxxxx> P (tonos de marcado) En modo usuario: En modo administrador: Memoria Red Información del sistema * Asterisco antepuesto: Opción activa en ese momento Interfaz Web Toda la configuración se borrará Otras Configuraciones DHCP 3 Encendido Reajuste3 Idioma Reinicio Apagado Reg Contraste Menú general Configuration Manos libres CWI: Activar/desactivar la llamada en espera 2 Hora: Desvío tras tiempo excedido CWI1 Apagado Siempre Comportamiento del teléfono Desvío hacia • Desplazar en los menús con • Pulse la tecla de función debajo del símbolo para activar el función • PulseP para guardar la selección • Volver a la pantalla de inactividad con Menu Ajustes Quick Start Guide E S P A Ñ O L 43 Quick Start Guide Modo usuario/modo administradore La configuración por defecto de fábrica es el modo de administrador. La contraseña del administrador es 0000 (4 x cero). Cambiar el modo: • Del modo de adminstradore a modo de usuario: Interfaz web del teléfono > Avanzado > Qos/Security > Seguridad > Modo Administrador: apagado > Salvar. • Del modo de usuario a modo de administradore: Interfaz web del teléfono > Avanzado > Administrador Acceso: introducir la contraseña de administrador en la caja de texto > Salvar. La interfaz web del telefono 1. Obtenga la dirección IP del teléfono: , por ejemplo 192.168.10.115. 2. Abra el navegador de su PC y teclee http:// seguido de la dirección IP en la barra de direcciones. Pulse Enter para abrir la interfaz web del teléfono. 3. Haga clic en un elemento del menú de la izquierda para abrir la página. 4. Si una ventana contiene diversas páginas, haga clic en la pestaña de la parte superior de la página para abrirla. La fuente de los caracteres de la pestaña activa está en negrita. E S P A Ñ O L 5. Los cambios que realice no tendrán efecto hasta que haga clic en "Salvar". Se perderán todos los cambios si abre otra página de la interfaz web o o si cierra la interfaz web sin haber pulsado antes "Salvar". Formato de hora Interfaz Web > Preferencias > Información General > 24 Hour clock: Encendido: Formato 24 horas, 00:01 - 24:00 Apagado: Formato 12 horas AM/PM, 0:01 AM - 12:00 PM Formato de fecha Interfaz Web > Preferencias > Información General > US date format (mm/dd) Encendido: 3/8/2010 Apagado: 8.3.2010 Configuración y mocificación de la identidad/Cuenta Interfaz Web > Identidad 1-12 44 Quick Start Guide Uso del teléfono Selección de identidad para la llamada saliente desde la pantalla inactiva: qp Realizar llamadas • Introduzca el número y descuelgue el auricular, o • Descuelgue el auricular, introduzca el número y pulse P o • , introduzca el número, P. Aceptar llamadas • Con el auricular: Descuelgue el auricular • Con un auriculares (Headset) : Pulse P o la tecla de línea que parpadee • Con el altavoz: Pulse Poner la llamada en curso en espera Pulse o la tecla de línea. El LED empezará a parpadear lentamente. Vuelva a pulsar para retomar la llamada. Con más de una llamada en espera: Pulse la tecla de línea de una llamada para la retomar. Conferencia a tres 1. Su número de teléfono: 154. Ponga la primera llamada (Jane Doe) en espera. 2. Llame al segundo participante (158). Con la segunda llamada en línea: 3. Pulse curso: para iniciar la conferencia. Conferencia en E S P A Ñ O L 4. Pulse para parar la conferencia y poner a los participantes en espera. 5. Retomar la conferencia: Pulse la tecla delínea de una llamada > pulse . Transferencia de llamadas Transferencia asistida Ponga la llamada en espera > Marque el número al que desea transferir la llamada y pulse P > Si el destinatario desea aceptar la llamada, pulse > pulse P. Transferencia directa (sin anunciar la llamada) Con la llamada en la línea: Pulse la llamada > pulse P. > marque el número al que se desea transferir Desvío de llamadas 1. Activar el desvío de llamadas. 45 Quick Start Guide a. Todas las llamadas entrantes: Desvío hacia > [Siempre] > Destino siempre: introducir el número al que desviar la llamada > P. b. Cuando la línea este ocupada: Desvío hacia > [Ocupado] > Destino ocupado: introducir el número al que desviar la llamada > P . c. Si no responde a la llamada: Desvío hacia > [Hora] > Destino ausente: introducir el número al que desviar la llamada > P > Tiempo de desvío: introducir el número de segundos tras los que se debe desviar la llamada > P. d. Pantalla inactiva con desvío de llamadas activado: 2. Desactivar: Desvío hacia > [Apagado] > P. Listas de llamadas 1. Para abrir: Pulse [Listas]. 2. Seleccionar una lista ([Perdidas], [Recibidas], [Marcadas)] con la tecla de función 3. Seleccionar un número de teléfono de la lista: > marcar el número con P Directorio telefónico • Para abrir: Pulse . Desplazar: > marcar el número seleccionado con P • Crear una <Nueva entrada>: Pulse > • Crear/modificare las entradas: Consulte la página Seite 41, "Introducir letras, números y caracteres especiales". Solución de problemas Reinicio (Reboot) Configuración > Reinicio > P > "Reiniciar?" > P E S P A Ñ O L Reinicio físico Desconecte el cable de alimentación del teléfono. Vuelva a conectar la alimentación pasados unos segundos. No desconecte el cable de alimentación mientras se está actualizando el Firmware! Restablecer valores de fábrica Configuración > Reajuste > introducir la contraseña de administrador > P Toda la configuración se borrará ! 46 snom 320 Quick Start Guide PORTUGUÊS Este manual de iníciação rápida descreve a instalação, configuração e operação de snom 320. Para mais informações, consulte o manual disponível na nossa página na rede: http://wiki.snom.com/Snom320. Copyright, Marcas Comerciais, GPL, Reclamações Legais © 2010 snom technology Aktiengesellschaft Todos os direitos reservados. snom, os nomes dos produtos snom, e logotipos snom são marcas pertencentes à snom tecnologia AG. Todos os outros nomes de produtos e nomes de empresas são propriedade dos seus respectivos proprietários. snom tecnologia AG reserva o direito de rever e alterar este documento a qualquer momento, sem ser obrigado a anunciar tais revisões ou alterações antes ou depois do facto. Textos, imagens, ilustrações e sua disposição neste documento estão sujeitos à proteção de direitos autorais e outros direitos legais a nível mundial. A sua utilização, reprodução e transmissão a terceiros, sem expressa autorização por escrito pode resultar em processos judiciais nos tribunais penais, bem como nos tribunais civís. Embora já se tenham tomado os devidos cuidados na elaboração e apresentação das informações contidas neste documento, os dados em que se baseiam podem mudar sem aviso, pelo que, snom rejeita todas as garantias e responsabilidades pela não exactidão, integridade e atualização das informações publicadas, salvo em caso de ou negligência grosseira por parte da snom ou quando a responsabilidade surge devido à sua ligação a disposições legais. Nosso firmware inclui fonte de código que pode ser usado e modificado por todo e qualquer um mediante Licença Pública GNU (GPL) (ver Anexo na página), desde que, por sua vez, o torne disponível para todos os outros, sob o mesmo acordo de licenciamento. Por favor, aceda a http:// www.snom.com/en/support/download/gpl-quellcode/ para obter a licença GPL original e a fonte de código para componentes licenciados sob GPL e usado em produtos snom. Informações Importantes Por favor, leia as instruções de segurança e de eliminação, bem como as de configuração e utilização do aparelho, antes de usá-lo e recomende a outros utilizadores que as leiam ou informe-os do conteúdo. Guarde este manual e não transfira o dispositivo a terceiros sem incluí-lo. Instruções de Segurança Siga as instruções deste manual e outra documentação aplicável ao dispositivo. • S e o telefone não é fornecido com a corrente através de um cabo Ethernet, use apenas o adaptador de alimentação incluído na embalagem ou outro expressamente recomendado pela snom tecnologia. Outras fontes de alimentação podem danificar ou destruir o telefone, afectar o seu comportamento, ou provocar ruído. • Evite colocar os cabos onde as pessoas, podem tropeçar ou onde podem ficar 47 P O R T U G U Ê S snom 320 Quick Start Guide expostas a pressão mecânica, pois pode danificá-los. • E ste dispositivo é apenas para uso doméstico! Não instale ao ar livre - NÃO SE DESTINA A UTILIZAÇÃO AO AR LIVRE! • Não instale o aparelho em ambientes com elevada humidade (por exemplo, em banheiros, lavanderias, cave húmida). Não mergulhe o aparelho em água e não o derrame nem permita o contacto com líquidos seja de qualquer tipo. • Não instale o aparelho em ambientes com risco de explosões (lojas de tintas, por exemplo). Não utilize o dispositivo se sentir cheiro de gás ou outros químicos potencialmente explosivos. • Não utilize o dispositivo durante trovoadas. Raios que atingem a rede eléctrica podem causar choque eléctrico. Conformidade SELV (Tensão Extra Baixa de Segurança) A segurança das ligações de Entrada/Saída cumpre com os requisitos SELV. Atenção: Para evitar choque eléctrico, não ligue a Segurança Extra a Baixa Tensão (SELV) aos circuitos de tensão da rede telefónica (TNV). As entradas LAN contêm circuitos SELV e as POTS contêm circuitos TNV. Algumas entradas LAN e POTS usam ligações RJ-45 (8P8C). Tenha cuidado ao ligar os cabos. Padrões de Conformidade Este dispositivo possui a certificação CE e FCC e cumpre as normas europeias e dos E.U.A relativos à saúde, segurança e meio ambiente. A abertura não autorizada o ou modificação do aparelho não autorizada fará com que a garantia seja anulada e pode também resultar na extinção das certificações CE e FCC. Em caso de mau funcionamento contacte o pessoal autorizado, o vendedor, ou a snom. • Segurança: IEC 60950-1:2001, CB Teste Certificação: DE 2-013297 • Certificados: FCC Classe B, CE Marca • Consumo de energia: 2,8 – 2,4 Watt • Tensão: 5 V DC ou PoE (Power over Ethernet) IEEE 802.3af, Classe 1 • Ethernet: 2 x IEEE 802.3 da 10/100 Mbps • 1 x LAN, 1 x PC: RJ45 (Ethernet) Eliminação do dispositivo P O R T U G U Ê S Este dispositivo está sujeito à directiva europeia 2002/96/CE e não pode ser eliminado como lixo doméstico. Se não tem conhecimento do local de eliminação do dispositivo no final do ciclo de vida útil, contacte o gestor de resíduos local do seu município ou o vendedor do dispositivo. Limpeza Para limpar o aparelho, use um pano anti-estático. Por favor, evite líquidos de limpeza, já que podem danificar a superfície ou a parte eletrónica no interior do dispositivo. 48 snom 320 Quick Start Guide Iniciando e Registrando o Telefone Por favor note: Terá a informação de registo que recebeu do seu fornecedor de serviços de Internet ou o administrador de rede :normalmente o número de telefone ou de extensão, a senha e do registro. Depois de definir o telefone e ligá-lo à rede, conforme indicado nas páginas 2 - 5, o telefone começa a funcionar. Normalmente, a iniciação é completamente automática, utilizando o DHCP. Se a rede não suporta DHCP, deve obter o endereço IP, netmask, gateway IP e servidor DNS do seu provedor de serviços de Internet ou o administrador da rede e inseri-los manualmente, quando for solicitado a fazê-lo na tela. Assista a exibição e, quando solicitado, faça as e salve-as . 1. Lingua. A língua padrão é o Inglês. Outras línguas estão disponíveis se o telefone/ rede está ligado à Internet durante a iniciação, para que possam ser fornecidos a partir do servidor snom automaticamente (firmware 7 e superior). 2. Tom de chamada 3. Hora local 4. Digite o número da conta. Salve com 5. Entre na secção. Salvar com . Se bem-sucedido o visor apresentará a tela principal: Data: Conta = identidade (NR: não registrado) Símbolos de funções disponíveis neste contexto particular Hora Pressione a tecla para activar a função Teclas de funcão Digitar números, letras e caracteres especiais Pressione qualquer tecla para entrar no modo de entrada. Caixa te texto À esquerda da seta: Modo de entrada activo À direita da seta: Pressione a tecla para alterar o modo de entrada à: > > > Modo de entrada: : Números : Minúsculas : Maiúsculas Pressione para apagar todo el texto Apagar o caractere à Move o cursor para a esquerda do cursor esquerda | para a direita: Editar o directório: Modo de entrada activo. Alterá-lo: : abc > ABC > 123 > abc Pressione a abc - Minúsculss ABC - Maiúsculas Apagar o caractere à esquerda do cursor: 123 - Números Introduz os caracteres especiais e símbolos no modo de entrada: Pressione a tecla "1" uma ou mais vezes, rapidamente, com uma pausa depois de cada caracter. Exemplos: 1x = "." 2x = "+" 3x = "@" 4x = "1" 5x = ":" 6x = "," 49 P O R T U G U Ê S P O R T U G U Ê S 50 Tecla asterisco • Pressionada momentaneamente no modo de edição: Mudar entre minúsculas y maiúsculas • Pressionado por alguns segundos: Bloqueia/ desbloqueia o teclado Teclas de audio • Ajustar volume da campainha (chamada recivida) ou o altifalante (em chamada) • Microfone (ligar/desligar) • Altofalante (ligar/desligar) Auricular (ligar/desligar) • estado inactivo Exposição - • Piscando lentamente: Chamada em espera Teclas de função com LEDs, livramente programáveis: . Configuração de fábrica: Linha. LED: • Piscando rápidamente: Chamada recibida • Luz fixa: Em chamada Gração de uma chamada (se suportado pelo PBX) • LED vermelho: Mensaje nuovo - pulse para apagarlo (se suportado pelo PBX) • LED âmbar, luz fixa: Chamada perdida. Desligue LED: Pressione . • LED âmbar, piscando rapidamente: Chamada recebida Mensagem em espera + chamadas não atendidas Cancelar / Confirmar ações, seleções e entrada, salvar Teclas Cancelar & CEnter : Menú de configurações Tecla de navegação - as funções em estado inactivo: : Seleçao de uma identidade Menú de configurações Endereço IP, endereço MAC, versão do firmware Livremente programáveis Transferência Função "não perturbe" (ligar/desligar) Teclas de função pré-programados/programáveis Tecla cerquilha Teclado alfanumérico Identidade Remarcação Directório Livremente programáveis Conferência Espera Teclas de função, programável Símbolos das funções disponíveis neste contexto particular Num ápice Quick Start Guide Os submenus e as definições em cinza escuro não estão acessíveis no modo usuário Ocupado Sempre Viva-Voz Cabega Mão Ajuste de volumen xxxxx> P de discagem Tom HTTPS HTTP Servidor Em modo de usuário: Em modo de administrador: Reset Prioridade ID Memória Network Info sistema * Asterisk antecedendo uma opção: Neste momento selecção activa Config. VLAN Todas as configurações perder-se-ão Fuso orário 3 Web Interface DHCP Reinicio Outros Ajustes I.C.E: Indicação de chamada em espera 2 Hora: Se a chamada não for atendida Lidado Reset3 Idioma Fkeys Hora2 Desligado Reg Contraste I.C.E.1 Off (desligado) Headset Sistema Ajustes Comportamento teléfono • Percorrer o menu com • Pressione a tecla de função abaixo do símbolo para activar a função • Pressione a P para salvar a configuração • Para voltar ao ecrã anterior ou o ecrã inactivo com Evento Redirecionado 1 Menu de Configurações Quick Start Guide P O R T U G U Ê S 51 Quick Start Guide Modo usuário/modo administrador A configuração padrão é o modo administrador. A senha de administrador padrão é 0000 (4 x zero). Mudar do modo administrador para o modo utilizador e vice-versa: • Do modo administrador para o modo utilizador: Interface web do telefono > Avançado > Qos Security > Segurança > Modo de Administrador: Desligado > Salvar. • Do modo utilizador para o modo administrador: Interface web do telefono > Avançado > Login do Administrador: digite a senha do administrador > Salvar. A interface web do telefono 1. Obter o endereço IP do telefone: , por exemplo 192.168.10.115. 2. Abre um navegador web em seu PC. Digite http:// seguido pelo endereço IP na barra de endereços e pressione ENTER para abrir a interface web do seu telefone. 3. Clique em um item no menu do lado esquerdo da tela para abrir a janela. 4. Se uma janela contém várias páginas, clique na aba no topo para abrir a página. O peso da fonte dos caracteres no guia da página visível está em negrito. 5. Quaisquer alterações feitas não terão efeito até que você clique em "Salvar". As alterações perderão se abrir uma outra página da interface web sem clicar antes em "Salvar". Formato da hora Interface Web > Preferências > Informação Geral > 24 Hour clock: Ligado: Formato de 24 horas, 00:01 - 24:00 Desligado: Formato de 12 horas AM/PM, 0:01 A - 12:00 P P O R T U G U Ê S Formato da data Interface Web > Preferências > Informação Geral > US date format (mm/dd): Ligado: 3/8/2010 Desligado: 8.3.2010 Configuração da identidade/conta Interface Web > Identidad 1-12 52 Quick Start Guide Utilizar o telefone Selecione uma identidade para as chamadas efectuadas a partir da ecrã inativo: qp Fazer chamadas • Digite o número através do teclado alfanumérico e pegue no auscultador ou • digite o número e pressione P ou • > digite o número > P. Aceitar chamadas • Com o auscultador: Levantar o auscultador • Com o auricular: Pressione a P ou a tecla de linha e aceite a chamada • Com o altifalante: Pressione a Colocar chamadas en curso em espera Pressione a ou a tecla de linha da chamada. O LED começa a piscar lentamente. Pressione a novamente para retomar a chamada. Com mais de uma chamada em espera: Pressione a tecla de linha e aceite a chamada para retomar a chamada. Conferência de tres 1. O seu número de telefone: 154. Coloque a primeira chamada (Jane Doe) em espera. 2. Ligue para o segundo participante (158). Com a segunda chamada na linha: 3. Iniciar a conferência: . Conferência en curso: 4. Pressione a para suspender a conferência e colocar os participantes em espera. 5. Iniciar a conferência de nuovo: Pressione a tecla de linha de uma das chamadas e a . Transferir chamadas manualmente Transferência anunciado Colocar a chamada em espera > disque o número que deseja transferir a chamada > se o terceiro quer aceitar o chamada: Pressione a . Transferência cega (sem anúncio) Com a chamada em linha: Pressione chamada vai ser transferida > P. > disque o número de telefone que a 53 P O R T U G U Ê S Quick Start Guide Encaminhar chamadas 1. Activar el encaminhamento de llamadas. a. Todas as chamadas recebidas: Evento Redirecionado > [Sempre] > Redirecionar sempre para: digite o número de telefono > P. b. Se tiver ocupado: Evento Redirecionado > [Ocupado] > Ocup. redirecionar para: digite o número de telefono > P. c. Se a chamada não for atendida: Evento Redirecionado > [Hora] > Timeout target: digite o número de telefono > P > Hora de redirecionamento: digite o número de segundos seguintes que o convite deverá ser enviado > P. d. Ecrã inactivo com desvio de chamadas activado: 2. Desactivar: Evento Redirecionado > [Off] > P. Listas de chamadas (histórico de chamadas) 1. Para abrir: Pressione [Listas]. 2. Selecionar uma lista - [Perdida(s)], [R]ecibida(s), [Discada(s)]: Pressione o tecla de função 3. Percorra a lista com . Telefonar para o número destacado com: P. Directório 1. Para abrir: Pressione destacado com: P. . Localizar uma entrada: . Telefonar para o número 2. <Novo item>: Pressione > 3. Alterar/corrigir entradas: Ver página Seite 49, "Digitar números, letras e caracteres especiais". Solução de problemas Reiniciar (Reboot) Sistema > Reinicio > P > "Reiniciar?" > P Reinicio bruscamente P O R T U G U Ê S Desligue o cabo de alimentação > aguarde alguns segundos > reconecte. Não corte a energia durante uma atualização de firmware ! Restaurar as configurações da fábrica Sistema > Reset > digite a senha do administrador > P Todas as configurações perder-se-ão ! 54 APPENDIX COPYRIGHT NOTICE AND WARRANTY DISCLAIMER I. Das Produkt enthält Software, die unter der GNU General Public License, Version 2, frei genutzt werden darf. This Product contains Software applicable to GNU General Public License, Version 2 which can be used freely. II. Im Verhältnis zu den Lizenzgebern der Software gilt der folgende Haftungsausschluss: Towards the licensor of this Software the following liability is disclaimed: This program is distributed in the hope that it will be useful, but WITHOUT ANY WARRANTY; without even the implied warranty of MERCHANTABILITY or FITNESS FOR A PARTICULAR PURPOSE. See the GNU General Public License for more details. III. Der Lizenztext der GPL lautet wie folgt: The GNU General Public License is as follows: GNU GENERAL PUBLIC LICENSE Version 2, June 1991 Copyright (C) 1989, 1991 Free Software Foundation, Inc. 59 Temple Place, Suite 330 Boston, MA 02111-1307, USA Everyone is permitted to copy and distribute verbatim copies of this license document, but changing it is not allowed. Preamble The licenses for most software are designed to take away your freedom to share and change it. By contrast, the GNU General Public License is intended to guarantee your freedom to share and change free software--to make sure the software is free for all its users. This General Public License applies to most of the Free Software Foundation‘s software and to any other program whose authors commit to using it. (Some other Free Software Foundation software is covered by the GNU Library General Public License instead.) You can apply it to your programs, too. When we speak of free software, we are referring to freedom, not price. Our General Public Licenses are designed to make sure that you have the freedom to distribute copies of free software (and charge for this service if you wish), that you receive source code or can get it if you want it, that you can change the software or use pieces of it in new free programs; and that you know you can do these things. To protect your rights, we need to make restrictions that forbid anyone to deny you these rights or to ask you to surrender the rights. These restrictions translate to certain responsibilities for you if you distribute copies of the software, or if you modify it. For example, if you distribute copies of such a program, whether gratis or for a fee, you must give the recipients all the rights that you have. You must make sure that they, too, receive or can get the source code. And you must show them these terms so they know their rights. We protect your rights with two steps: (1) copyright the software, and (2) offer you this license which gives you legal permission to copy, distribute and/or modify the software. Also, for each author‘s protection and ours, we want to make certain that everyone understands that there is no warranty for this free software. If the software is modified by someone else and passed on, we want its recipients to know that what they have is not the original, so that any problems introduced by others will not reflect on the original authors‘ reputations. Finally, any free program is threatened constantly by software patents. We wish to avoid the danger that redistributors of a free program will individually obtain patent licenses, in effect making the program proprietary. To prevent this, we have made it clear that any patent must be licensed for everyone‘s free use or not licensed at all. The precise terms and conditions for copying, distribution and modification follow. GNU GENERAL PUBLIC LICENSE TERMS AND CONDITIONS FOR COPYING, DISTRIBUTION AND MODIFICATION 0. This License applies to any program or other work which contains a notice placed by the copyright holder saying it may be distributed 55 A P P APPENDIX under the terms of this General Public License. The „Program“, below, refers to any such program or work, and a „work based on the Program“ means either the Program or any derivative work under copyright law: that is to say, a work containing the Program or a portion of it, either verbatim or with modifications and/or translated into another language. (Hereinafter, translation is included without limitation in the term „modification“.) Each licensee is addressed as „you“. Activities other than copying, distribution and modification are not covered by this License; they are outside its scope. The act of running the Program is not restricted, and the output from the Program is covered only if its contents constitute a work based on the Program (independent of having been made by running the Program). Whether that is true depends on what the Program does. 1.You may copy and distribute verbatim copies of the Program‘s source code as you receive it, in any medium, provided that you conspicuously and appropriately publish on each copy an appropriate copyright notice and disclaimer of warranty; keep intact all the notices that refer to this License and to the absence of any warranty; and give any other recipients of the Program a copy of this License along with the Program. You may charge a fee for the physical act of transferring a copy, and you may at your option offer warranty protection in exchange for a fee. 2. You may modify your copy or copies of the Program or any portion of it, thus forming a work based on the Program, and copy and distribute such modifications or work under the terms of Section 1 above, provided that you also meet all of these conditions: a)You must cause the modified files to carry prominent notices stating that you changed the files and the date of any change. A P P b)You must cause any work that you distribute or publish, that in whole or in part contains or is derived from the Program or any part thereof, to be licensed as a whole at no charge to all third parties under the terms of this License. c)If the modified program normally reads commands interactively when run, you must 56 cause it, when started running for such interactive use in the most ordinary way, to print or display an announcement including an appropriate copyright notice and a notice that there is no warranty (or else, saying that you provide a warranty) and that users may redistribute the program under these conditions, and telling the user how to view a copy of this License. (Exception: if the Program itself is interactive but does not normally print such an announcement, your work based on the Program is not required to print an announcement.) These requirements apply to the modified work as a whole. If identifiable sections of that work are not derived from the Program, and can be reasonably considered independent and separate works in themselves, then this License, and its terms, do not apply to those sections when you distribute them as separate works. But when you distribute the same sections as part of a whole which is a work based on the Program, the distribution of the whole must be on the terms of this License, whose permissions for other licensees extend to the entire whole, and thus to each and every part regardless of who wrote it. Thus, it is not the intent of this section to claim rights or contest your rights to work written entirely by you; rather, the intent is to exercise the right to control the distribution of derivative or collective works based on the Program. In addition, mere aggregation of another work not based on the Program with the Program (or with a work based on the Program) on a volume of a storage or distribution medium does not bring the other work under the scope of this License. 3. You may copy and distribute the Program (or a work based on it, under Section 2) in object code or executable form under the terms of Sections 1 and 2 above provided that you also do one of the following: a) Accompany it with the complete corresponding machine-readable source code, which must be distributed under the terms of Sections 1 and 2 above on a medium customarily used for software interchange; or, b)Accompany it with a written offer, valid for at least three years, to give any third party, for a charge no more than your cost of APPENDIX physically performing source distribution, a complete machine-readable copy of the corresponding source code, to be distributed under the terms of Sections 1 and 2 above on a medium customarily used for software interchange; or, c)Accompany it with the information you received as to the offer to distribute corresponding source code. (This alternative is allowed only for noncommercial distribution and only if you received the program in object code or executable form with such an offer, in accord with Subsection b above.) The source code for a work means the preferred form of the work for making modifications to it. For an executable work, complete source code means all the source code for all modules it contains, plus any associated interface definition files, plus the scripts used to control compilation and installation of the executable. However, as a special exception, the source code distributed need not include anything that is normally distributed (in either source or binary form) with the major components (compiler, kernel, and so on) of the operating system on which the executable runs, unless that component itself accompanies the executable. If distribution of executable or object code is made by offering access to copy from a designated place, then offering equivalent access to copy the source code from the same place counts as distribution of the source code, even though third parties are not compelled to copy the source along with the object code. 4.You may not copy, modify, sublicense, or distribute the Program except as expressly provided under this License. Any attempt otherwise to copy, modify, sublicense or distribute the Program is void, and will automatically terminate your rights under this License. However, parties who have received copies, or rights, from you under this License will not have their licenses terminated so long as such parties remain in full compliance. 5.You are not required to accept this License, since you have not signed it. However, nothing else grants you permission to modify or distribute the Program or its derivative works. These actions are prohibited by law if you do not accept this License. Therefore, by modifying or distributing the Program (or any work based on the Program), you indicate your acceptance of this License to do so, and all its terms and conditions for copying, distributing or modifying the Program or works based on it. 6.Each time you redistribute the Program (or any work based on the Program), the recipient automatically receives a license from the original licensor to copy, distribute or modify the Program subject to these terms and conditions. You may not impose any further restrictions on the recipients‘ exercise of the rights granted herein. You are not responsible for enforcing compliance by third parties to this License. 7. If, as a consequence of a court judgment or allegation of patent infringement or for any other reason (not limited to patent issues), conditions are imposed on you (whether by court order, agreement or otherwise) that contradict the conditions of this License, they do not excuse you from the conditions of this License. If you cannot distribute so as to satisfy simultaneously your obligations under this License and any other pertinent obligations, then as a consequence you may not distribute the Program at all. For example, if a patent license would not permit royalty-free redistribution of the Program by all those who receive copies directly or indirectly through you, then the only way you could satisfy both it and this License would be to refrain entirely from distribution of the Program. If any portion of this section is held invalid or unenforceable under any particular circumstance, the balance of the section is intended to apply and the section as a whole is intended to apply in other circumstances. It is not the purpose of this section to induce you to infringe any patents or other property right claims or to contest validity of any such claims; this section has the sole purpose of protecting the integrity of the free software distribution system, which is implemented by public license practices. Many people have made generous contributions to the wide range of software distributed through that system in reliance on consistent application of that system; it is up to the author/donor to decide if he or she is willing to distribute software through any other system and a licensee cannot impose that choice. This section is intended to make thoroughly clear what is believed to be a consequence of 57 A P P the rest of this License. 8.If the distribution and/or use of the Program is restricted in certain countries either by patents or by copyrighted interfaces, the original copyright holder who places the Program under this License may add an explicit geographical distribution limitation excluding those countries, so that distribution is permitted only in or among countries not thus excluded. In such case, this License incorporates the limitation as if written in the body of this License. 9.The Free Software Foundation may publish revised and/or new versions of the General Public License from time to time. Such new versions will be similar in spirit to the present version, but may differ in detail to address new problems or concerns. Each version is given a distinguishing version number. If the Program specifies a version number of this License which applies to it and „any later version“, you have the option of following the terms and conditions either of that version or of any later version published by the Free Software Foundation. If the Program does not specify a version number of this License, you may choose any version ever published by the Free Software Foundation. 10. If you wish to incorporate parts of the Program into other free programs whose distribution conditions are different, write to the author to ask for permission. For software which is copyrighted by the Free Software Foundation, write to the Free Software Foundation; we sometimes make exceptions for this. Our decision will be guided by the two goals of preserving the free status of all derivatives of our free software and of promoting the sharing and reuse of software generally. NO WARRANTY A P P 11. BECAUSE THE PROGRAM IS LICENSED FREE OF CHARGE, THERE IS NO WARRANTY FOR THE PROGRAM, TO THE EXTENT PERMITTED BY APPLICABLE LAW. EXCEPT WHEN OTHERWISE STATED IN WRITING THE COPYRIGHT HOLDERS AND/OR OTHER PARTIES PROVIDE THE PROGRAM „AS IS“ WITHOUT WARRANTY OF ANY KIND, EITHER EXPRESSED OR IMPLIED, INCLUDING, BUT NOT LIMITED TO, THE IMPLIED WARRANTIES OF MERCHANTABILITY AND FITNESS FOR A 58 APPENDIX PARTICULAR PURPOSE. THE ENTIRE RISK AS TO THE QUALITY AND PERFORMANCE OF THE PROGRAM IS WITH YOU. SHOULD THE PROGRAM PROVE DEFECTIVE, YOU ASSUME THE COST OF ALL NECESSARY SERVICING, REPAIR OR CORRECTION. 12. IN NO EVENT UNLESS REQUIRED BY APPLICABLE LAW OR AGREED TO IN WRITING WILL ANY COPYRIGHT HOLDER, OR ANY OTHER PARTY WHO MAY MODIFY AND/OR REDISTRIBUTE THE PROGRAM AS PERMITTED ABOVE, BE LIABLE TO YOU FOR DAMAGES, INCLUDING ANY GENERAL, SPECIAL, INCIDENTAL OR CONSEQUENTIAL DAMAGES ARISING OUT OF THE USE OR INABILITY TO USE THE PROGRAM (INCLUDING BUT NOT LIMITED TO LOSS OF DATA OR DATA BEING RENDERED INACCURATE OR LOSSES SUSTAINED BY YOU OR THIRD PARTIES OR A FAILURE OF THE PROGRAM TO OPERATE WITH ANY OTHER PROGRAMS), EVEN IF SUCH HOLDER OR OTHER PARTY HAS BEEN ADVISED OF THE POSSIBILITY OF SUCH DAMAGES. END OF TERMS AND CONDITIONS How to Apply These Terms to Your New Programs If you develop a new program, and you want it to be of the greatest possible use to the public, the best way to achieve this is to make it free software which everyone can redistribute and change under these terms. To do so, attach the following notices to the program. It is safest to attach them to the start of each source file to most effectively convey the exclusion of warranty; and each file should have at least the „copyright“ line and a pointer to where the full notice is found. <one line to give the program‘s name and a brief idea of what it does> Copyright (C) <year> <name of author> This program is free software; you can APPENDIX redistribute it and/or modify it under the terms of the GNU General Public License as published by the Free Software Foundation; either version 2 of the License, or (at your option) any later version. This program is distributed in the hope that it will be useful, but WITHOUT ANY WARRANTY; without even the implied warranty of MERCHANTABILITY or FITNESS FOR A PARTICULAR PURPOSE. See the GNU General Public License for more details. You should have received a copy of the GNU General Public License along with this program; if not, write to the Free Software Foundation, Inc., 59 Temple Place, Suite 330, Boston, MA 02111-1307 USA IV. Den vollständigen korrespondierenden Sourcecode der Software schickt Ihnen die snom technology AG auf Nachfrage gerne auf einem üblichen Datenträger gegen Erstattung der Herstellungskosten in Höhe von EUR 5,- zu. Der vollständige korrespondierende Sourcecode kann auch über unsere Website unter http://www. snom.com/gpl_.html?&L=0 herunter geladen werden. If requested by you, the complete corresponding source code of the Software can be sent by snom technology AG on a standard data storage medium against the reimbursement of the manufacturing costs of EUR 5.- per unit. The complete corresponding source code of the Software can also be downloaded from our web site http://www.snom.com/gpl_.html?&L=0. V.. Weitere Informationen finden Sie auch unter http://www.snom.com. A P P For further information see http://www.snom.com. 59 snom technology AG Charlottenstr. 68 10117 Berlin Germany Tel. +49 30 39 83 3-0 Fax +49 30 39 83 31 11 [email protected]; [email protected] snom France SARL snom technology, Inc. 100 Cummings Center, Suite 125-G Beverly, MA 01915 Tel. 978-998-7882 Fax 978-998-7883 [email protected] snom technology SRL Via A. Lusardi 10 20122 Milano Tel +39 02 00611212 Fax +39 02 93661864 [email protected] [email protected] 6 Parc des fontenelles 78870 Bailly Tel. +33 1 80 87 62 87 Fax +33 1 80 87 62 88 [email protected] [email protected] Your specialist retailer - Ihr Fachhändler Votre distributeur - Su distribuidor - Il tuo rivenditore: © 2010 snom technology AG v1.01