1
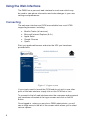
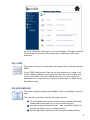
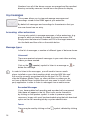
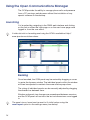
VoIP PABX User Guide PABX User Guide Release 3.2- January 2010 This document and certain software on the system disk of the device is Copyright © 2005-2010 IP Cortex Ltd. The above software is licenced under terms which can be found in the Software Licence section of the documentation. Use of the device is subject to the terms therein. If you do not accept those terms then you may return the device unused in its original packaging for a full refund of the purchase price. Important Safety Notice Depending on the power arrangements, it is possible that your VoIP system phone will not work during power outages. Your system administrator will be able to give you further information about arrangements for access to telephone service during power failures. It is not safe to assume that your VoIP phone will be available to make emergency calls at all times and you should therefore familiarise yourself with other means of making emergency telephone calls (e.g. fixed exchange lines and mobile phones) should this be required. EMERGENCY CALLS: the VoIP phone system should not be used as the sole or primary means of summoning assistance in the event of an emergency as power interruptions or other system failure modes could cause it to become unavailable without warning. Trademarks VoIPCortex and ipcortex are Trademarks of IP Cortex Ltd. All other Trademarks reproduced in this document are the property of their respective owners and used for identification purposes only. Contents Document Conventions 6 Getting Started 7 Making Phone Calls Using a Phone Handset 7 Using the Web Interface 8 Connecting 8 my calls 9 my phonebook 9 my messages 10 Accessing other extensions 10 Message types 10 my details 11 Name 11 E-mail Address 11 Send Email Voicemail Alerts? 11 Attach Voicemail to Alerts? 11 Personal phonebook 11 my phone 12 Current home extension 12 Phone line and button mappings 12 change password Using the Open Communications Manager 13 14 Launching 14 Resizing 14 Changing Settings and Status Settings 15 Status 15 Using IM Clients with the PABX Setting up an IM Client XMPP Server settings Phone Usage 16 16 16 17 snom300 17 snom320 and snom360 18 Polycom (all phones) 19 Aastra 9112i 20 Aastra 9133i 21 Aastra 480i 22 Aastra 53i 22 Aastra 55i 23 Aastra 57i 24 Yealink (all phones) 25 Eyebeam 26 Voicemail 15 28 Accessing Voicemail 28 Configuring Voicemail 28 Retrieving Voicemail 29 Short Code Features 31 Document Conventions Throughout the document, normal text like this indicates procedures required to correctly configure your device. Critical instructions and helpful configuration tips are highlighted in italics throughout the text. Critical instructions are formatted like this and preceded by an exclamation mark in a circle. Failing to comply with a critical instruction may cause anomalous behaviour, damage to the PABX or other components, or even result in safety issues. Configuration tips are formatted like this and highlight necessary steps that need to be performed in certain circumstances. Always take note of these tips as they contain information which can prevent common configuration problems. Getting Started We assume for the purposes of this user level manual that your phone system administrator or installation engineer has setup your VoIP PABX and phones. If you are also a phone system administrator then you should consult the ipcortex “VoIP PABX Installation & Administration Guide” for details of how to administer the whole system. As a user, you will normally have been provided with either a physical phone, or a PC based soft-phone which works in conjunction with your PC or PDA and suitable audio hardware. You should also have been given a username, password and URL to access your own personal user area of the PABX. If you do not have this information then you will need to obtain them if you wish to make any changes to user level settings, or access advanced integration features such as TAPI PC integration. If you have been provided with a physical phone, then you do not need the above username and password information to make phone calls. Making Phone Calls Using a Phone Handset Phone operation does vary between manufacturers and models but basic usage is reasonably intuitive, being quite similar to the way that traditional analogue handsets operate. The key difference is that most digital handsets have the concept of pressing a “dial” key after the whole number has been entered (in a similar way to a mobile phone) before the call attempt will be made. Picking up the handset, dialling the full extension, local, or national number and pressing the button marked “OK”, , or “Dial” is usually sufficient to make an outbound call. For more information about how to make and receive calls on your particular phone, please see the phone specific instructions later in this manual. Using the Web Interface The PABX has a personal web interface for each user which may be used to view phone information and make changes to your user settings and preferences. Connecting The web user interface and OCM are available from most HTML supporting browsers, including: • • • • • Mozilla Firefox (all versions) Microsoft Internet Explorer (6.0+) Apple Safari Google Chrome Opera Start your preferred browser and enter the URL you have been provided with: Figure 1: Logon screen If you simply need to launch the OCM and do not wish to use other parts of the web interface, simply click on the OCM link or icon. To proceed to the full web interface enter the username and password you have been allocated at the logon screen and click on the OK button. Once logged in, unless you are also a PABX administrator, you will see a single menu to the left of the screen which allows you to select various options: As a first step after initial logon, you should select "Change password" from the menu, and set your password to something of your own choosing. my calls This menu allows you to view the most recent calls made through the PABX. If your PABX administrator has set call cost patterns for some or all of the number prefixes in your recent list then the cost of these calls will also be shown in the list. Where the cost of a call is shown as unknown, this simply means a call cost pattern has not been set by the administrator. my phonebook This menu displays the whole phonebook that is available to you as a user. This consists of entries from the following sources: All of the extensions on the system whose entries have been configured to be visible to you (not ex-directory etc). 2 Your personal phonebook entries - see “my details” below for information about how to configure these. 3 System phonebook entries set by the system administrator. 1 Numbers from all of the above sources are merged and the resultant directory sorted by name as it would be on the phone for display. my messages This screen allows you to view and manage messages and recordings stored on the PABX against your extension: By default all messages and recordings for the extension that you own are shown here on entry. Accessing other extensions You may also switch to manage messages of other extensions (e.g. groups to which you belong) provided you know the access PIN. Simply enter the extension number and PIN of the target extension into the fields and then click on the switch button. Message types In the list of messages, a number of different types of data are shown. Voicemail These are received voicemail messages in your main inbox and any folders you have created. Click on the (speaker) symbol to listen to a message or delete the message. to In order to listen to the messages, you will need to have an audio player installed on your client machine which can play WAV files and this must be correctly associated with the file type. On PCs this will often be Windows Media Player, on other platforms or where you do not have a Media Player installed then you may need to install a third party application in order to listen to messages from a web browser. Recorded Messages If you have enabled call recording and recorded calls are present then these will appear in the list. Short calls can be listened to by clicking on the speaker symbol. In order to preserve system resources, longer calls must be downloaded using the bulk download option on the call recording tab by a system administrator. Faxes These may be read by clicking on the on 10 . symbol, deleted by clicking my details This is the main area where general details and preferences may be changed: Name Your full name as it appears in the directory and on calls to other users E-mail Address The address to which notifications will be delivered for this login. The e-mail address given here is the one to which voicemail notifications from ordinary extensions and/or faxes from any soft fax extensions will be sent. If this is entered incorrectly then you will never receive these notifications and information may be lost. Send Email Voicemail Alerts? If set, and an e-mail address is entered above then an e-mail will be sent to the address whenever a Voicemail is received at your extension. Attach Voicemail to Alerts? If set then the above notification will have a copy of the message attached as a WAV file. This may be listened to on a suitably equipped PC or PDA. Notifications with attached messages will generate large e-mails. Please ensure that your mail system and collection arrangements can cope with the volume and size of messages before enabling this option. Remember to disable it if you are going to be away from your e-mail for a while. Personal phonebook Enter names and numbers into empty fields in this area to add new entries into your personal phonebook. Use for phone buttons - if this is set to yes for an entry then the system will attempt to place that entry onto a spare short dial button on your phone. See my phone below for details of how to determine which entries have actually been placed onto phone buttons. 11 my phone Details about your own extension and physical phone may be viewed and changed from this page. A number of links are present, which reveal further information about the extension or phone. For security and confidentiality reasons these do not open out when the page is initially displayed. The information can however be seen and changed by clicking on the text. This area is also where TAPI settings for desktop PC dialling and call integration may be viewed and configured but this is dealt with in more detail in the next chapter of this user guide. Current home extension Shows the extension number of the main extension owned by you as a user. Show/Change my PIN number - Clicking on this text displays the PIN used to log in to voicemail for the extension. When the PIN is displayed, entering a new value into the box and clicking will change the PIN to this new number. Show SIP registration login(s) and password - Clicking on this text displays the SIP registration information for each line on the phone. You do not normally require this information for a hardware phone which has been set by your administrator to be auto configured by the PABX as the configuration will be pushed to the phone by the system. If you are using a soft phone or other user configured device to communicate with the PABX, then this is the information you need to give it in order to place and receive calls. Show TAPI settings - Clicking on this text reveals information required to set up your local PC for TAPI integration if this is enabled on your PABX. See the separate TAPI manual for details of how to use this feature. Phone line and button mappings Many phones have the ability to present more than one extension number and have a set of buttons with corresponding indicator lights to show which “line” is ringing or selected for outgoing calls. Short dial numbers may also be allocated onto some of these buttons on certain kinds of phone. The exact details, number of buttons allocated to extensions and allocated to short dials varies by phone type and system configuration. 12 This section shows exactly how the extensions and/or short dial buttons have been configured on your phone. This information can be used to fill out an insert card, or otherwise note which buttons and indicators correspond to which line or function on your phone. change password Enter the old password, and new password in the two fields for confirmation, and then click on the button. If you subsequently forget your password then this can be retrieved by using the lost password link on the Logon page (provided your e-mail address is correct). If this is not possible then your system administrator will need to reset your password for you. 13 Using the Open Communications Manager The OCM provides the ability to manage phone calls and presence from a PC running a web-browser without the installation of any special software on the desktop. Launching It is launched by navigating to the PABX web interface and clicking on the link on either the login page or on the user home page once logged in, from the user menu. A video tutorial on launching and using the OCM is available at �http:// www.ipcortex.co.uk/ocm-demo Resizing Once launched, the OCM panel may be resized by dragging a corner to resize the browser window. The individual panels within the window will then be adjusted to maintain the same relative proportions. The sizing of individual panels can be manually adjusted by dragging the diveider bar between them. Window and panel size changes are remembered between sessions and the OCM panel will resize to the last set dimensions once logged in. The panel size or layout can be reset to it’s initial values using the reset layout option on the settings menu (see below). 14 Changing Settings and Status The two icons on the top left of the OCM Window are used to access menu items from which settings and user status can be changed. Clicking on one of these icons reveals its menu: Settings auto-answer As a default (disabled) when a new call is initiated from the OCM, the users phone will ring and then when answered will attempt to connect to the requested destination. When auto-answer is enabled from this menu, the phone will automatically go off hook (usually on its speaker phone) and complete the requested dial operation. crm auto popup If your system administrator has configured a CRM popup URL onto your PABX then an icon appears next to active call in the phone display and can be used to launch a web page based on the phone number of the other party. When crm auto popup is enabled, this will happen automatically whenever a call is established. The auto popup occurs only when a call is answered, not when it starts ringing. If your browser is set to block pop ups then you should make sure that this is disabled for the PBX domain. Status Next to the settings icon is the status icon. Clicking on the icon and selecting a status other than online flags to other users that you may not be available to take calls by changing the icon used to represent your user in the contacts panel. A textual message may optionally be entered which can be seen by other OCM users when they hover over your icon. The status is also visible and changeable via an XMPP IM client. 15 Using IM Clients with the PABX Some models of PABX unit contain a full XMPP server which can be used to exchange instant messages and presence information with other users of the PABX using a suitable IM client. The PABX may then be used as a unified communication appliance with full synchronisation of presence between phone, OCM and IM client devices. Setting up an IM Client In order to access the PABX, there must be IP network connectivity between the PC that is running the IM client and your PABX. This is normally the case if they are on the same LAN, but may require a VPN or specific firewall or router settings if you are on a different or remote network. This should be verified with your system administrator. The PABX should interoperate with any standard XMPP client, the following setup instructions are therefore general and do not apply to any specific client software. In order to use IM, you must have a user account name and password on the PABX. This will be supplied by your system administrator or installer. XMPP Server settings An XMPP IM client should present at least the following setup fields to allow you to connect to your account on the PABX. User-ID (sometimes called Jabber ID): enter username@pabxdomain-name for this field in your client. username is your PABX web username, and pabx-domain-name is the domain name as supplied by your system administrator (normally used to access the PABX web-UI from a browser). Password: enter your PABX web-UI password. On some (typically remote) installations your PABX domain name may not resolve to an IP address and you may instead have been told to access the PABX by IP address instead. In these circumstances you should still enter the domain name after the @ sign in the UserID but need to go to the Advanced or Connection settings of your IM client and enter enter the PABX IP address and port number 5222 as the connection address in order to connect. Do not enter an IP Address after the @ sign in the User-ID, this will not allow the client to authenticate with the PABX. 16 Phone Usage The following sections give information about how to perform certain common operations on selected popular handsets. If the information about a specific feature or phone is not shown here, please consult the manufacturers documentation. snom300 Placing a Call There are 3 ways to place a call: 1 2 3 Completely Handsfree - Dial the number and press . Handsfree Dialling - Dial the number and pick up the handset. Handset dialling - Pick up, dial the number and press . In handsfree mode, the handset may be picked-up at any time. Answering a Call 1 2 3 Handsfree - Press . Handset - Pick up the handset. Headset - If the phone is configured for a headset, press Answering multiple calls Place the current call on hold by pressing the current line-button (solidly lit L1 or L2 button). The phone will start ringing. Press answer this call. to Switch between calls by pressing the line button of the caller you wish to speak to. If there are 3 or more calls, put the current call on hold, and use the left/right buttons on the silver keypad to select the desired line, then press Press “X” to hang-up the current call rather than replacing the handset, or you may inadvertently cause a call transfer. Transferring a Call Unattended: Press “transfer”, dial the destination number, and press . You are no-longer part of the call. Attended: Place the received call on hold by pressing the line button for that call. Dial the destination number, and press “OK”. Speak with the callee when answered. If only 2 lines are active, simply hang-up. If more callers are present, you need to choose the line to transfer; Press “Transfer” use left/right arrows to display line to transfer, then press . 17 Setting up a 3-way Conference This facility is not available without customisation of the phone. Picking up Voicemail If voicemail is waiting (Message light flashes), press without dialling a number to connect to the voicemail system. Alternatively dial whatever short-code has been configured on your PABX. snom320 and snom360 These phones are very similar, differing only in size of display and ability to accept the 42-key extension keypads. Placing a Call There are 3 ways to place a call: 1 2 3 Completely Handsfree - Dial the number and press . Handsfree Dialling - Dial the number and pick up the handset. Handset dialling - Pick up, dial the number and press . In handsfree mode, the handset may be picked-up at any time. Answering a Call 1 2 3 Handsfree - Press . Handset - Pick up the handset. Headset - If the phone is configured for a headset, press Answering multiple calls Place the current call on hold by pressing “Hold” or the current linebutton (solidly lit line button). The phone will start ringing. Press to answer the new call. Switch between calls by pressing the line button of the caller you wish to speak to. If there are more calls than spare line-buttons, put the current call on hold, and use the left/right buttons on the silver keypad to select the desired line, then press . Press “X” to hang-up the current call rather than replacing the handset, or you may inadvertently cause a call transfer. Transferring a Call Unattended: Press “transfer”, dial the destination number, and press . You are no-longer part of the call. Attended: Place the received call on hold by pressing “Hold” or the line button for that call. Dial the destination number, and press . 18 Speak with the callee when answered. If only 2 lines are active, simply hang-up. If more callers are present, you need to choose the line to transfer; Press “Transfer” use left/right arrows to display line to transfer, then press . Setting up a 3-way Conference Setting up a conference is as simple as having the 2 parties you wish on the phone (one on hold) and pressing the “Conference” button. Picking up Voicemail If voicemail is waiting (Message light flashes) press the “Message” button to be connected to the voicemail system. Alternatively dial the short-code that has been configured on your PABX. Polycom (all phones) Polycom phones all have a consistent set of basic functions with similar or identical usage across all models. The following instructions therefore apply to all phones supporting the feature. Placing a Call There are 3 ways to place a call: 1 2 3 Completely Handsfree - Dial the number and press Send or the Dial key where present. Handsfree Dialling - Dial the number and pick up the handset. Handset dialling - Pick up, dial the number and press Send or the Dial key where present. In handsfree mode, the handset may be picked-up at any time. Answering a Call 1 2 Headset/Handsfree - Press the “speaker/headset” button. Handset - Pick up the handset. Answering multiple calls If a line light is flashing for the new call, it can be pressed to answer the call, otherwise select Answer from the screen menu. Press a line button to switch to a call which arrived on a button, otherwise press Hold to place the current call on hold, use the up/down buttons to select a call, and then choose Resume from the screen menu. Transferring a Call Unattended: Press Trnsfer, enter the destination number and press Send or the Dial key where present. Press Trnsfer again. 19 Attended: Press Trnsfer, enter the destination number and press Send or the Dial key where present. Speak to the callee when answered. Press Trnsfer when ready to transfer the call. Setting up a 3-way Conference Call the first party as normal. To add the 3rd party, press Confrnc, enter the destination number and press Send or the Dial key where present. Speak to the callee when answered, and press Confrnc when ready to complete the 3-way conference. Picking up Voicemail Press the Messages button on the handset, or on smaller phone models, press Msgs on the LCD screen. Use the up/down arrows to select the mailbox to connect to and press Connect. On smaller phones when no voicemail is waiting, the Msgs button is unavailable - In this case it is necessary to dial the short-code that has been configured on your PABX Aastra 9112i Placing a Call There are 3 ways to place a call: 1 2 3 Completely Handsfree - Dial the number and press “Dial”. Handsfree Dialling - Dial the number and pick up the handset. Handset dialling - Pick up, dial the number and press “Dial”. In handsfree mode, the handset may be picked-up at any time. Answering a Call 1 2 Headset/Handsfree - Press the “speaker/headset” button. Handset - Pick up the handset. Answering multiple calls Press the “Swap” key to switch between the two available lines. This phone only has 2 lines available. Transferring a Call Unattended: Press “Xfer”, enter the destination number and press “Dial”. Press “Xfer” again. Attended: Press “Xfer”, enter the destination number and press “Dial”. Speak to the callee when answered. Press “Xfer” when ready to transfer the call. 20 Setting up a 3-way Conference Call the first party as normal. To add the 3rd party, press “Conf”, enter the destination number and press “Dial”. Speak to the callee when answered, and press “Conf” when ready to complete the 3-way conference. Picking up Voicemail Dial the short-code that has been configured on your PABX Aastra 9133i Placing a Call There are 3 ways to place a call: 1 2 3 Completely Handsfree - Dial the number and press “Dial”. Handsfree Dialling - Dial the number and pick up the handset. Handset dialling - Pick up, dial the number and press “Dial”. In handsfree mode, the handset may be picked-up at any time. Answering a Call 1 2 Headset/Handsfree - Press the “speaker/headset” button. Handset - Pick up the handset. Answering multiple calls Press “L1”, “L2” or “L3” to select the desired line, which will flash rapidly for a ringing call, or flash slowly for a call on hold. Transferring a Call Unattended: Press “Xfer”, enter the destination number and press “Dial”. Press “Xfer” again. Attended: Press “Xfer”, enter the destination number and press “Dial”. Speak to the callee when answered. Press “Xfer” when ready to transfer the call. Setting up a 3-way Conference Call the first party as normal. To add the 3rd party, press “Conf”, enter the destination number and press “Dial”. Speak to the callee when answered, and press “Conf” when ready to complete the 3-way conference. Picking up Voicemail Dial the short-code that has been configured on your PABX 21 Aastra 480i Placing a Call There are 3 ways to place a call: 1 2 3 Completely Handsfree - Dial the number and press “Dial”. Handsfree Dialling - Dial the number and pick up the handset. Handset dialling - Pick up, dial the number and press “Dial”. In handsfree mode, the handset may be picked-up at any time. Answering a Call 1 2 Headset/Handsfree - Press the “speaker/headset” button. Handset - Pick up the handset. Answering multiple calls If a line light is flashing for the new call, it can be pressed to answer the call, otherwise select “Answer” from the screen menu. Press a line button to switch to a call which arrived on a button, otherwise press “Hold” to place the current call on hold, use the left/right buttons to select a call, and then choose “Pickup” from the screen menu. Transferring a Call Unattended: Press “Xfer”, enter the destination number and press “Dial”. Press “Xfer” again. Attended: Press “Xfer”, enter the destination number and press “Dial”. Speak to the callee when answered. Press “Xfer” when ready to transfer the call. Setting up a 3-way Conference Call the first party as normal. To add the 3rd party, press “Conf”, enter the destination number and press “Dial”. Speak to the callee when answered, and press “Conf” when ready to complete the 3-way conference. Picking up Voicemail If voicemail is waiting, select “Services -> Voicemail” from the phone, and then select the line which has voicemail waiting. Alternatively, dial the short-code that has been configured on your PABX. Aastra 53i Placing a Call There are 3 ways to place a call: 22 1 2 3 Completely Handsfree - Dial the number and press “Dial”. Handsfree Dialling - Dial the number and pick up the handset. Handset dialling - Pick up, dial the number and press “Dial”. In handsfree mode, the handset may be picked-up at any time. Answering a Call 1 2 Headset/Handsfree - Press the “speaker/headset” button. Handset - Pick up the handset. Answering multiple calls Press “L1”, “L2” or “L3” to select the desired line, which will flash rapidly for a ringing call, or flash slowly for a call on hold. Transferring a Call Unattended: Press “Xfer”, enter the destination number and press “Dial”. Press “Xfer” again. Attended: Press “Xfer”, enter the destination number and press “Dial”. Speak to the callee when answered. Press “Xfer” when ready to transfer the call. Setting up a 3-way Conference Call the first party as normal. To add the 3rd party, press “Conf”, enter the destination number and press “Dial”. Speak to the callee when answered, and press “Conf” when ready to complete the 3-way conference. Picking up Voicemail Press the VMAIL shortcut key, or dial the short-code that has been configured on your PABX Aastra 55i Placing a Call There are 3 ways to place a call: 1 2 3 Completely Handsfree - Dial the number and press “Dial”. Handsfree Dialling - Dial the number and pick up the handset. Handset dialling - Pick up, dial the number and press “Dial”. In handsfree mode, the handset may be picked-up at any time. Answering a Call 1 2 Headset/Handsfree - Press the “speaker/headset” button. Handset - Pick up the handset. 23 Answering multiple calls If a line light is flashing for the new call, it can be pressed to answer the call, otherwise select “Answer” from the screen menu. Press a line button to switch to a call which arrived on a button, otherwise press “Hold” to place the current call on hold, use the left/right buttons to select a call, and then choose “Pickup” from the screen menu. Transferring a Call Unattended: Press “Xfer”, enter the destination number and press “Dial”. Press “Xfer” again. Attended: Press “Xfer”, enter the destination number and press “Dial”. Speak to the callee when answered. Press “Xfer” when ready to transfer the call. Setting up a 3-way Conference Call the first party as normal. To add the 3rd party, press “Conf”, enter the destination number and press “Dial”. Speak to the callee when answered, and press “Conf” when ready to complete the 3-way conference. Picking up Voicemail Press the VMAIL shortcut key, or dial the short-code that has been configured on your PABX Aastra 57i Placing a Call There are 3 ways to place a call: 1 2 3 Completely Handsfree - Dial the number and press “Dial”. Handsfree Dialling - Dial the number and pick up the handset. Handset dialling - Pick up, dial the number and press “Dial”. In handsfree mode, the handset may be picked-up at any time. Answering a Call 1 2 Headset/Handsfree - Press the “speaker/headset” button. Handset - Pick up the handset. Answering multiple calls If a line light is flashing for the new call, it can be pressed to answer the call, otherwise select “Answer” from the screen menu. Press a line button to switch to a call which arrived on a button, otherwise press “Hold” to place the current call on hold, use the left/right buttons to select a call, and then choose “Pickup” from the screen menu. 24 Transferring a Call Unattended: Press “Xfer”, enter the destination number and press “Dial”. Press “Xfer” again. Attended: Press “Xfer”, enter the destination number and press “Dial”. Speak to the callee when answered. Press “Xfer” when ready to transfer the call. Setting up a 3-way Conference Call the first party as normal. To add the 3rd party, press “Conf”, enter the destination number and press “Dial”. Speak to the callee when answered, and press “Conf” when ready to complete the 3-way conference. Picking up Voicemail Press the VMAIL shortcut key, or dial the short-code that has been configured on your PABX Yealink (all phones) Yealink phones all have a consistent set of basic functions with similar usage across all models. There are variations depending on which buttons are available on each model – where a button is not physically present, the phone shows it in the LCD display. The following instructions therefore apply to all phones supporting the feature. Placing a Call There are 3 ways to place a call: 1 2 3 Completely Handsfree - Dial the number and press Send or the OK key. Handsfree Dialling - Dial the number and pick up the handset. Handset dialling - Pick up, dial the number and press Send or the OK key. In handsfree mode, the handset may be picked up at any time. Answering a Call 1 2 Headset/Handsfree - Press the “speaker” button. Handset - Pick up the handset. 25 Answering multiple calls If a line light is flashing for the new call, it can be pressed to answer the call, otherwise select the Down button to select the new call and then press Answer from the screen menu. Press a line button to switch to a call which arrived on a button, otherwise press Hold to place the current call on hold, use the up/down buttons to select a call, and then choose Resume from the screen menu. Transferring a Call Unattended: Press Transfer, enter the destination number and press Transfer again. Attended: Press Transfer, enter the destination number and press Send or the OK key where present. Speak to the callee when answered. Press Transfer or hangup when ready to transfer the call. Setting up a 3-way Conference Call the first party as normal. To add the 3rd party, press Conference, enter the destination number and press Send or the OK key where present. Speak to the callee when answered, and press Conference when ready to complete the 3-way conference. Picking up Voicemail Press the Message button on the handset. The phone will connect to one of the accounts on which you have a message waiting. If no messages are waiting, or you want messages from a specific extension, it is necessary to dial the short-code that has been configured on your PABX. Eyebeam Placing a Call Dial the number by clicking the keypad, or by typing the number at the keyboard. Press ENTER or click the green Dial button. Answering a Call Click on the green button to answer a call. If the window is minimised, or hidden, a popup appears which can be clicked to answer or reject the call without restoring the window. Answering multiple calls If a second or subsequent call arrives, a popup appears which can be clicked to answer or reject the call. The current call is put on hold in order to answer the new call. 26 Switch between calls by pressing the line button of the caller you wish to speak to. Each call can be disconnected independently by hanging up the caller you are speaking to. Transferring a Call Unattended: Click “XFER”, dial the destination number, and press “XFER”. You are no-longer part of the call. Attended: Place the received call on hold by clicking the “HOLD” button. Dial the destination number as normal. Speak with the callee when answered. Click “XFER” and then click on the line button to join this caller to. Setting up an n-way Conference Dial a call as normal, and place it on hold. Dial any further parties, or receive additional calls as shown above. Once all parties are present, click the “CONF” button to join everyone into a conference. The voice quality of the conference will vary based on the power of your PC CPU, and the number of parties joined. If the Eyebeam user disconnects the call, all parties are disconnected. To break the conference without disconnecting, click “CONF” Picking up Voicemail If voicemail is waiting, an envelope symbol appears on the phone display. Dial whatever short-code has been configured on your PABX to pick-up voicemail. 27 Voicemail Your PABX system is equipped with a voicemail system and there is a one voicemail box per extension number by default. When a call is made to your extension and it is either not answered within a period of time determined by your system administrator, or busy because you are on another call then the call will be answered by the voicemail system. The caller will be prompted to leave a message which you can retrieve either via your phone, the PABX web interface, or e-mail. Accessing Voicemail Your system manger should have informed you of your initial voicemail PIN which will be required to access your voicemail account. If you do not have this, you may obtain it from the my phone area of your PABX logon (See Using the Web Interface). Your voicemail PIN should be changed to a secure code that you can remember. This can be done from the web interface, or using a phone keypad. To access voicemail simply dial your internal voicemail number from your internal extension phone. The default number to access your own voicemail is 8500, but your administrator may have set this to something different on your system. This voicemail interface “knows” your voicemail box based on the extension you are calling from, and will tell you the extension number when you call, and then ask for your password, or PIN. There is a second interface to voicemail which does not decide on the mailbox from the calling phone, but instead prompts you for your extension number. This is accessed using 8501 by default, but again, may be something else on your system. This is useful when you wish to check your voicemail whilst at another desk. With either interface, you should enter your PIN number, followed by the hash (#) key to gain access to your account. On entry, you will be told how many messages you have and given a range of options. Configuring Voicemail Voicemail options are set from within the mailbox options sub-menu. 28 To enter this menu, log in to your mailbox as above, then select: 0 Mailbox options Within this menu, the following are available: 1 Record unavailable message - This is the message which is used when you do not answer a call. 2 Record busy message - This is the message which is used when you cannot answer a call because you are busy with another caller, or have set Do Not Disturb on your phone. 3 Record name - The name is used as part of the default greeting if either an unavailable message or busy message have not been recorded. 4 Record or delete temporary greeting - once set this greeting overrides any existing unavailable or busy messages for the user until deleted. 5 Change password * Return to main menu If no messages are recorded, the greeting is “The person at extension XXX is busy/unavailable” If a name has been recorded, then the greeting is “name is busy/ unavailable” If a busy message is recorded, then it will override the busy message in both of the above examples. If an unavailable message is recorded, then it will override the unavailable message in the above example. If a temporary greeting is recorded, it overrides all of the above messages until it is removed. Retrieving Voicemail Voicemail has the concept of both new and old messages. New messages have not yet been heard, and old messages are ones which have previously been heard but have not been deleted. In addition, you may create a number of sub-folders and save messages to these for future replay. From the main menu, the following options are used to retrieve and manage messages: 29 1 New/Old messages - If you have messages then this prompt will take you to the first message. 2 Change folders - messages can be saved to alternate folders (see option 9 below). This option allows those folders to be accessed. * Return to main menu # Return to main menu Once a message has been listened to, the following additional options are available: 4 Previous message 5 Repeat message 6 Next message - move to next available message 7 Delete message 8 Forward message to someone else 9 Save message to a specific folder * Help - repeat options # Exit 3 Advanced - gives access to the following advanced options: 1 Reply - send a reply, if sender was a local extension. 3 Envelope - play time, date and sender information about the message, followed by the message. * Return to main menu - leave the advanced menu During message playback: 4 , 6 , 7 , 8 , 9 continue to work as above. Additionally, the following are available: 30 * 0 Rewind # Fast Forward Pause / Unpause Short Code Features Built-in short codes on the PABX are: *0<ext> Connect directly to voicemail for <ext>, doesn’t ring the phone. **1 Hot desk. Bring my extension here feature. **2 Hot desk. Release this phone. **40 Voicemail access shortcode **47 Toggle extension opt-out on current phone and line **47xxx Toggle extension opt-out of extension xxx on current phone. **470 Clear all extension opt-outs on current phone **47* Read back current opt-out status of line **5 Set a call forward (fork or deflect) **6 Remove a call forward (fork or deflect) **8 Enable night mode (requires admin pass code) **9 Disable night mode (requires admin pass code) *8 Pickup a ringing phone in your call group. *8xxx Directed pickup - pickup ringing extension number. *9xxx Call Barge - listen in on extension. Requesting phone must have access level All numbers (Super phone) #01#xx Record IVR menu message. #02#xx Play back IVR menu message. 31 Index A auto-answer OCM calls 15 B browser 8 busy message 29 button mappings 13 C call barge * code 31 change password 13 configuration tips definition 6 critical instructions definition 6 crm auto pop-up 15 D delete message (voicemail) 30 E e-mail address 11 extension opt-out * code 31 F folders 30 forward to voicemail 31 H home extension 12 hot desk 31 32 I IM setting up a client 16 using IM clients 16 J Jabber.See IM L licence software 2 login 8 Logon.See login M main menu (voicemail) 29 menu user 9 N new messages (voicemail) 30 next message (voicemail) 30 night mode 31 O OCM 14 old messages (voicemail) 30 Open Communication Manager 8 Open Communications Manager 14 Open Communications Manager (OCM) 14 P password 9 changing 9 password (voicemail) 29 phone 12,13,28,29 phonebook 9,10,11 personal 11 phone line 13 pickup directed 31 PIN number 12,28 33 Polycom 19 pop-up CRM page - from OCM 15 presence IM 16 OCM 14 S short codes 31 **1 31 **2 31 **5 31 **6 31 **8 31 **9 31 *8 31 SIP registration 12 supported browsers 8 T TAPI 28 Configuration 28 Introduction 28 U unavailable message 29 V video tutorial OCM 14 voicemail 28 accessing 28 access short code 31 advanced options 30 alerts 11 configuring 28 delete message 30 folders 30 main menu 29 new messages 30 next message 30 old messages 30 34 password 29 retreiving 29 voicemail alerts 11 W Web Interface 9 X XMPP.See IM 35 The Mansion, Bletchley Park Milton Keynes MK3 6EB, UK Tel: 01908 276650 Fax: 01908 276699 http://www.ipcortex.co.uk/