1
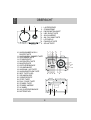
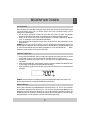
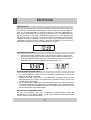
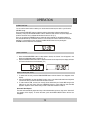
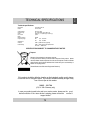
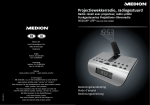
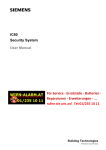
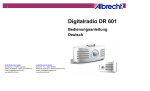
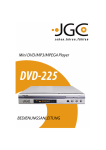
Design Radiowecker
UR 210 USB
BEDIENUNGSANLEITUNG
USER MANUAL
DEUTSCH
SICHERHEITSHINWEISE
WICHTIGE SICHERHEITSHINWEISE
Zum sicheren Gebrauch Ihres Gerätes
sollten sie die folgenden Hinweise
beachten:
Aufstellen und Gebrauch
! Verwenden Sie das Gerät nicht in
Umgebungen mit extremer Hitze oder
Kälte oder in staubiger oder feuchter
Umgebung.
! Stellen Sie das Gerät nur auf einer
flachen, ebenen Unterlage auf.
! Stellen Sie sicher, dass ausreichende
Luftzirkulation vorhanden ist. Decken Sie
die Lüftungsöffnungen nicht ab, stellen
Sie das Gerät nicht auf einen weichen
Untergrund.
Kondensation
! In warmer, feuchter Umgebung kann im
Gerät Kondensation entstehen.
! Bei Kondensation im Gerät wird die
Funktion stark beeinträchtigt.
! Die Kondensation kann verdunsten, wenn
das Gerät für 1 bis 2 Stunden in einer
warmen, trockenen Umgebung platziert
wird.
Sollte ein Problem auftreten, ziehen Sie
den Netzstecker und setzen Sie sich mit
dem Kundendienst in Verbindung.
Belüftung
Dieses Gerät verfügt über
Stromversorgung
Belüftungsöffnungen, welche nicht abgedeckt
! Prüfen Sie vor Gerbrauch des Gerätes, ob werden dürfen.
die vorhandene Stromversorgung mit der
auf d em G er ät a ng e ge b e ne n Wichtige Sicherheitshinweise
übereinstimmt.
! Setzen Sie das Gerät niemals
Flüssigkeiten aus, stellen Sie keine
Sichere Verwendung
Flüssigkeitsbehälter, z.B. Vasen auf das
Gerät.
! Fassen Sie die Netzzuleitung beim
Aus– oder Einstecken immer nur am ! Der Netzstecker dient dazu, das Gerät
Stecker an, niemals am Kabel ziehen.
vom Netz zu trennen und sollte immer frei
Ziehen am Kabel kann die Zuleitung
zugänglich sein.
beschädigen.
! Verwenden Sie das Gerät nicht im Freien.
! Trennen Sie das Gerät von der ! Die Luftzirkulation des Gerätes sollte nicht
Netzsteckdose, wenn das Gerät für
durch Gegenstände behindert werden.
längere Zeit nicht verwendet wird.
! Stellen Sie keine Kerzen auf das Gerät.
! Um das Gerät komplett vom Netz zu ! Beachten Sie die Umweltbestimmungen
trennen, ziehen Sie bitte den
bei der Entsorgung von Batterien.
Netz-Stecker.
! Verwenden Sie das Gerät nur in normaler
! Verwenden Sie das Gerät nur in
Umgebungstemperatur.
aufrechter Position.
! Öffnen Sie niemals das Gerät. Es besteht
die Gefahr eines elektrischen Schlages.
2
WARNUNG
Zur Vermeidung von Feuer oder elektrischen Schlages,
das Gerät niemals Regen oder Feuchtigkeit aussetzen
Erklärung der Warnsymbole
Das Blitzsymbol im Dreieck soll den Benutzer auf
das Vorhandensein von gefährlichen Stromspannung innerhalb des Gerätes hinweisen.
Das Ausrufezeichen im Dreieck soll den Benutzer
auf wichtige Bedienungs– und Wartungsangaben
in der Bedienungsanleitung hinweisen.
Warnung: Um einen elektrischen Schlag zu vermeiden,
öffnen Sie niemals die Gehäuseabdeckung. Lassen Sie das
Gerät nur von Ihrem Service Center reparieren.
ESD Hinweis:
Bei Fehlfunktion des Gerätes durch elektrostatische Entladungen kann ein Reset
durchgeführt werden. Dazu muss eventuell die Stromversorgung kurz unterbrochen werden.
REINIGUNG UND WARTUNG
REINIGUNG DES GEHÄUSES
Staub auf dem Gehäuse kann mit einem weichen, trockenen Tuch entfernt werden.
Verwenden Sie niemals Wachs oder Poliermittel, Reinigungsmittel oder Scheuermittel zur
Reinigung des Gehäuses.
ACHTUNG:
Es darf bei der Reinigung keine Flüssigkeit in das Gehäuse gelangen!
3
DEUTSCH
SICHERHEITSHINWEISE
DEUTSCH
ÜBERSICHT
2
1
3
1.
2.
3.
4.
5.
6.
7.
8.
9.
LAUTSPRECHER
STABANTENNE
RADIOEINSTELLKNOPF
USB / RADIO TASTE
AUX IN ANZEIGE
AM / FM / BAND TASTE
LCD DISPLAY
FM MODUS TASTE
SCHLAFTASTE
6
4
10. ALARM SUMMER HOCH /
RUNTER TASTE
11. ALARM MUSIK / SUMMER TASTE
12. SCHLUMMERTASTE
13. STUNDENTASTE
14. UHR EINSTELLTASTE
15. MINUTENTASTE
16. KOPFHÖRERBUCHSE
17. VOLUMENKNOPF
18. ALARM AN / AUS TASTE
19. ALARM EINSTELLEN TASTE
20. NEXT TASTE (USB)
21. USB ANSCHLUSS
22. VORHERIGTASTE
23. STOPP TASTE
24. PLAY / PAUSE TASTE
25. STANDBY TASTE
26. STANDBY ANZEIGE
27. AC KABEL
28. AUX IN STECKERBUCHSE
29. BATTERIEFACH
5
8
7
9
10
11
12
13
14
15
16
25 23 21
26 24 22 20
29
17
18
27
28
4
19
UHR EINSTELEN
Wenn das Radio zum ersten Mal an das Netz angeschlossen wird, leuchtet die rote Standby-Anzeige
auf und das Display zeigt „12:00“ (12 Stunden Version) oder „0:00“ (24 Stunden Version). Das ist
abhängig vom Vertriebsgebiet.
1. Um die Uhrzeit einzustellen, drücken Sie die CLOCK SET Taste und halten Sie gedrückt,
drücken wiederholt die HOUR Taste, um das Display auf die richtige Stunde einzustellen.
2. Halten Sie die CLOCK SET Taste weiterhin gedrückt und drücken wiederholt die MINUTE
Taste, um das Display auf die richtige Minute einzustellen.
3. Wenn das Display die richtige Zeit anzeigt, lassen Sie die Taste los. Die Uhreinstellung ist jetzt
abgeschlossen.
HINWEIS: Die Uhr kann sowohl im Standby- als auch im Betriebsmodus eingestellt werden. Das
Display zeigt die richtige Zeit, wenn immer das Radio im Standby Modus ( Standby-Anzeige ist AN)
ist, oder wenn die USB oder AUX IN Funktion ausgewählt ist. Um die Uhr während des
Radiobetriebes zu sehen, drücken Sie die CLOCK SET Taste.
WECKZEIT EINSTELLEN
1. Drücken Sie die ALARM SET Taste und halten diese gedrückt. Das Display wechselt von Uhrzeit
zur Weckzeit und zeigt „7:00“. Die „Alarmglocke“ erscheint und blinkt im Display auf (F1).
2. Drücken Sie wiederholt die HOUR Taste, um das Display auf die gewünschte Weck-Stunde
einzustellen.
3. Halten Sie die ALARM SET Taste weiterhin gedrückt und drücken wiederholt die MINUTE Taste,
um das Display auf die gewünschte Weck-Minute einzustellen.
4. Wenn das Display die gewünschte Weckzeit zeigt, lassen Sie alle Tasten los und die Weckzeit ist
eingestellt.
HINWEIS: Um die Weckzeit zu kontrollieren, können Sie jederzeit die ALARM Taste drücken. Das
Display zeigt die Weckzeit, solange die ALARM Taste gedrückt wird.
MEMORY BACKUP
Dieses Radio beinhaltet eine batteriebetriebene Speichersicherung, die die Uhr bei temporären
Stromausfällen weiterlaufen lässt. Setzen Sie 2 x 1.5V UM-3, AA oder gleichwertige Batterien in das
Batteriefach auf der Rückseite des Gehäuses ein. Für ein reibungsloses Funktionieren erneuern Sie
die Batterien alle 9 bis 12 Monate. Verwenden Sie niemals alte und neue Batterien oder unterschiedliche Batterietypen, wie z.B. alkalische und Karbon-Zink Batterien gleichzeitig.
5
DEUTSCH
BEDIENFUNKTIONEN
DEUTSCH
BEDIENUNG
ALARM FUNKTION
Sie können die Alarmfunktion dafür verwenden, Sie entweder mit einem elektronischen Summton, mit
dem Radio oder mit Ihren USB MP3 Lieblingssongs zu wecken. Drücken Sie zuerst die ALARM SET
Taste, um die Weckzeit-Einstellung zu überprüfen. Stellen Sie die Weckzeit gegebenenfalls ein.
Dann drücken Sie die ALARM ON / OFF Taste, um die Alarmfunktion on / off zu stellen. Das Display
zeigt die Alarmglocke um anzuzeigen, daß die Alarmfunktion AN ist (F.2). Dann können Sie die
Standby Taste drücken, um das Radio auf Standby zu schalten. Zur festgelegten Weckzeit wird der
festgelegte Weckmodus eingeschaltet. Er läuft eine Stunde lang und wird dann automatisch
ausgeschaltet. Um den Alarm früher zu beenden, drücken Sie die ALARM ON / OFF Taste einmal
oder drücken die Standby Taste, um in den Standby Modus umzuschalten.
F2
MIT SUMMTON AUFWACHEN
1.
2.
Drücken Sie die MUSIC / BUZZER Taste, um mit dem Summton geweckt zu werden, bis das
Buzzer-Symbol auf dem Display erscheint. Es zeigt an, daß der Summton ausgewählt ist (F.3).
Drücken Sie die BUZZER HIGH/LOW Taste, um die Lautstärke des Summtons einzustellen.
Das Display zeigt “HI”, wenn der lautere Summton gewählt wurde. (F. 4)
HI
MIT MUSIK AUFWACHEN (USB / RADIO)
1. Um vom Radio geweckt zu werden, drücken Sie die MUSIC / BUZZER Taste, bis das BuzzerSymbol auf dem Display verschwindet.
2. Drücken Sie die USB / RADIO Taste, um die Radiofunktion auszuwählen. Stellen Sie Ihren
bevorzugten Sender ein und stellen die Lautstärke auf das gewünschte Level ein, das Sie hören
möchten, wenn der Alarm beginnt.
3. Um vom USB geweckt zu werden, stecken Sie Ihre Speichereinheit mit Ihren MP3 Lieblingssongs
in den USB Anschluß auf dem Frontpanel, drücken die USB / RADIO Taste, um USB auszuwählen
und beginnen mit der MP3 Wiedergabe. Stellen Sie die Lautstärke auf das gewünschte Level ein,
das Sie hören möchten, wenn der Alarm beginnt.
AUTOMATISCHE ALARMWIEDERHOLUNG
Der Alarm wird automatisch jeden Tag zur eingestellten Weckzeit wiederholt, solange das
Alarmglocken-Icon auf dem Display erscheint. Um den Alarm aufzuheben, drücken Sie die ALARM
ON / OFF Taste, bis das Symbol verschwindet.
6
SCHLUMMERFUNKTION
Wenn Sie während des Alarms die SNOOZE Taste drücken, wird der Alarm kurzfristig für 5 Minuten
unterbrochen. Das Display zeigt „SNOOZE“. Dieser Vorgang ist innerhalb der einstündigen Alarmdauer wiederholbar (F.5).
HINWEIS: Wenn der Alarm im Betriebsmodus einsetzt und Wecken mit Musik (USB oder Radio)
ausgewählt ist, gibt es keine Schlummerfunktion.
RADIO HÖREN
Wenn Sie das Radio zum ersten Mal einschalten und die STANDBY Taste drücken, geht es
automatisch in den Radio FM Modus und das Display zeigt „TUNER“ (F.6).
1. Wenn Sie im normalen Betriebsmodus die USB / RADIO Taste drücken, schaltet das Gerät
zwischen USB und RADIO Funktion hin und her.
2. Wenn der Radiomodus gewählt ist, drücken Sie die AM / FM BAND Taste, um zwischen AM und
FM Empfang zu wählen.
3. Stellen Sie Ihren bevorzugten Sender ein, indem Sie langsam die TUNING Kontrolle oben auf
Ihrem Gerät drehen. Das Digitale Frequenz Display bewegt sich im Frequenzbereich hoch und
runter, während Sie drehen. Wenn Sie einen FM Stereo Sender einstellen, wird das „Stereo“
Symbol dargestellt (F.7).
4. Um FM Mono Empfang einzustellen, drücken Sie die FM MODE Taste, das „Stereo“ Symbol
verschwindet vom Display; das ist bei schlechtem FM Empfang hilfreich
HINWEIS: Während FM Stereo Empfang wird der empfangene L/R Stereo Sound automatisch auf
einen Single Kanal verbunden, der dem Einzellautsprecher Design dieses Radios entspricht
7
DEUTSCH
BEDIENFUNKTIONEN
DEUTSCH
BEDIENFUNKTIONEN
USB HÖREN (MP3 WIEDERGABE)
1. Wenn das Radio läuft, drücken Sie die USB / RADIO Taste, um die USB Funktion auszuwählen.
Das Display zeigt „USB NO DATA“ (F.8).
2. Verbinden Sie Ihr Speichermedium, auf dem sich Ihre MP3 Lieblingssongs befinden, mittels des
USB Ports auf dem Frontpanel. Das „NO DATA“ Symbol erlischt.
3. Drücken Sie die PLAY / PAUSE Taste. Das Gerät beginnt mit der Wiedergabe des ersten
gefundenen MP3 Tracks und das Display zeigt das USB Wiedergabesymbol (F.9).
4. Um die Wiedergabe zu unterbrechen, drücken Sie PLAY / PAUSE und das Playback Symbol
verschwindet.
5. Um mit der Wiedergabe fortzufahren, drücken Sie die PLAY / PAUSE Taste erneut.
6. Um die Wiedergabe zu stoppen, drücken Sie die STOP Taste.
7. Während der Wiedergabe drücken Sie die NEXT oder PREVIOUS Taste, um auf einen anderen
MP3 Track auf Ihrer Speichereinheit vor- oder zurückzuspringen. Die Wiedergabe beginnt am
Anfang des ausgewählten Tracks
HINWEIS: Für den Fall, daß Ihre Speichereinheit mit MP3 Songs geladen ist, das Display aber „NO
DATA“ anzeigt, wäre es möglich, daß Ihre USB Speichereinheit nicht mit diesem Radio kompatibel ist.
Um diese Songs auf Ihrer Speichereinheit zu hören, verwenden Sie bitte ein Line-In Kabel (nicht
mitgeliefert). Stecken Sie ein Ende in die AUX IN Buchse (auf der Rückseite des Radios) und das
andere Ende des Kabels an den Ausgang Ihres Kopfhöreranschlusses oder Ihrer USB Speichereinheit.
Das Radio wird automatisch auf den Ausgang Ihrer Speichereinheit umgeschaltet.
SCHLAFFUNKTION
Diese Funktion erlaubt es Ihnen, das Radio so zu programmieren, daß es sich nach einer bestimmten
Zeit selbst abschaltet.
1. Um die Schlaffunktion zu aktivieren, drücken Sie die SLEEP Taste. Das Display zeigt „90“ und
„SLEEP“ erscheint und blinkt.
2. Drücken Sie wiederholt die SLEEP Taste, die Zeit ändert sich fortlaufend mit jedem Drücken: XXX
3. Wenn Ihre gewünschte Schlafzeit im Display erscheint lassen Sie die Taste los. Das „SLEEP“ im
Display stabilisiert sich nach 2 Sekunden und die Schlaffunktion ist AN. Wenn die Schlafzeit auf
Null zählt, schaltet das Gerät ab.
4. Um die Schlaffunktion abzustellen, drücken Sie die SLEEP Taste, bis „SLEEP“ im Display
verschwindet.
Hinweis: Wenn die Schlaffunktion wie oben beschrieben eingestellt worden ist, schaltet sich das
Radio nach der gewünschten Zeit automatisch aus,
8
DISPLAY DIMMER
Die Helligkeit des Displays wird automatisch der Raumbeleuchtung angepaßt. Sie wird reduziert,
wenn die Raumbeleuchtung ausgeschaltet ist, um Sie nicht im Schlaf zu stören. Das Display wird
automatisch bei Tageslicht oder wenn die Raumbeleuchtung eingeschaltet ist heller, um besser sichtbar zu sein
AUX INPUT
Auf der Rückseite des Gerätes befindet sich eine 3,5 mm Stereo AUX IN Buchse. Analoge Audio
Sound Signale können von anderen Quellen durch diese Buchse in das Radio eingegeben werden.
Wenn ein 3,5 mm Stecker in diese Buchse eingesteckt wird, wird automatisch die AUX IN Funktion
ausgewählt. Die AUX IN LED Anzeige auf dem Frontpanel leuchtet und das Display zeigt die Uhr,
aber die Funktion auf dem Display bleibt unverändert. Audio wird auf das AUX INPUT Signal umgeschaltet und Sie können den Lautstärkeregler auf das von Ihnen gewünschte Sound Output Level
einstellen. Um in den normalen Radio- oder USB Betrieb fortzufahren, ziehen Sie den Stecker aus
der Eingangsbuchse.
Hinweis: Der L/R Audio Input von anderen Quellen wird automatisch auf einen Single Kanal verbunden, der dem Einzellautsprecher Design dieses Radios entspricht.
KOPFHÖRER ANSCHLUSS
Der Kopfhöreranschluss befindet sich rechts unten auf der Frontseite. Verbinden Sie ein Kopfhörerset (nicht enthalten) mit diesem Anschluß und Sie können für sich alleine Musik hören, ohne andere
zu stören. Wenn Kopfhörer verwendet werden, wird der Lautsprecher automatisch ausgeschaltet.
HINWEIS: Über den Kopfhöreranschluss des Gerätes ist nur Mono hörbar, das Stereo Signal wird in
Mono konvertiert und der Output über den L/R Kanal der Kopfhörer ausgegeben.
WICHTIG: Wenn Sie Kopfhörer verwenden, stellen Sie den Lautstärkeregler immer zuerst auf ein
niedriges Level, bevor Sie die Kopfhörer aufsetzen. Dann setzen Sie die Kopfhörer auf und erhöhen
die Lautstärke langsam auf ein angenehmes Level.
9
DEUTSCH
BEDIENFUNKTIONEN
DEUTSCH
TECHNISCHE DATEN
Technische Daten:
Beschreibung:
Modell:
Stromversorgung:
Gangreserve
Größe
Line in Buchse
Radio
Receiving bands
Frequenzbereich
USB Anschluss
Interface
Flash Speicher
Uhrenradio
UR 210 USB
230V~ 50Hz
2 x 1,5 V Mignon (UM-3, AA)
220mm (L) x 112,5mm (W)x 135mm (H)
3,5mm
AM/FM
AM
522 - 1629 kHz
FM
87,5 - 108 MHz
USB1.1 (USB HUB not supported)
USB 1.1 Flash USB 2.0 High-Speed Flash
FAT16/32 32MB-2GB
TECHNISCHE ÄNDERUNGEN JEDERZEIT OHNE ANKÜNDIGUNG VORBEHALTEN
Hinweise zum Umweltschutz
Entsorgen Sie die Verpackung sortenrein.
Dieses Produkt darf am Ende seiner Lebensdauer nicht über den normalen
Haushaltsabfall entsorgt werden, sondern muss an einem Sammelpunkt für
das Recycling von elektrischen und elektronischen Geräten abgegeben
werden. Das Symbol auf dem Produkt, in der Gebrauchsanleitung oder auf
der Verpackung weist darauf hin. Die Werkstoffe sind gemäß ihrer Kennzeichnung wieder verwertbar. Mit der Wiederverwendung, der stofflichen
Verwertung oder anderen Formen der Verwertung von Altgeräten, leisten
Sie einen wichtigen Beitrag zum Schutze unserer Umwelt. Bitte fragen Sie
bei Ihrer Gemeindeverwaltung nach der zuständigen Entsorgungsstelle.
Für den Fall, dass trotz unserer hohen Qualitätskontrollen
Ihr Gerät einen Defekt aufweisen sollte, wenden Sie sich bitte an
unsere Servicehotline. Diese erreichen Sie Montag bis Freitag
in der Zeit von 10-18 Uhr unter:
0180 5 - 22 17 84
(€ 0,14/Min. aus dem deutschen Festnetz)
Falls das defekte Produkt in unser Servicecenter eingeschickt werden muß, so
verwenden Sie bitte den beigefügten Retourenaufkleber. Sollte dieser
Retourenaufkleber fehlen, wenden Sie sich bitte an unsere Servicehotline.
10
WARNINGS
To reduce the risk of fire or electric shock, do
not expose this appliance to rain or moisture
EXPLANATION OF GRAPHIC SYMBOLS
ESD Remark:
In case of malfunction due to electrostatic discharge just reset the product (reconnect of
power source may be required) to resume normal operation
CARE AND MAINTENANCE
CARE OF THE CABINET
If the cabinet becomes dusty wipe it with a soft dry dust cloth. Do not use any wax,polish
sprays, or abrasive cleaners on the cabinet.
CAUTION:
Never allow any water or other liquids to get inside the unit while cleaning.
11
ENGLISH
SAFETY PRECAUTIONS
ENGLISH
SAFETY PRECAUTIONS
PRECAUTIONS FOR USE
To ensure safe, appropriate use of this Condensation
appliance, please follow the advice below:
! Water droplets or condensation may form
inside the CD player if it is left in a warm,
damp atmosphere.
! The product may not operate correctly if
Location
condensation forms inside it.
! Do not use the product in extremely hot, cold, ! Leave the product in a warm, dry room for 1 to
dusty or damp conditions.
2 hours to allow the condensation to
! Place the product on a smooth, flat surface.
evaporate.
! Ensure that air is free to circulate through the
product. Do not use it in a poorly ventilated In the event of a problem, unplug the power
place, cover it with a cloth or place it on cord and contact a qualified repair technician.
carpet.
Warning:
Power supply
This appliance has ventilation holes, which should
! Before using the product, check that its rated never be obstructed.
voltage is suitable for your mains supply.
Liquid warning:
Never allow liquids to splash or drip onto the
product. Never place a liquid-filled container
Safety precautions
! When you plug in or unplug the power cord, (e.g. vase, jar, etc.) above it.
always hold the plug rather than the cable.
Pulling the cord could damage it and create a ! The apparatus shall not be exposed to
dripping or splashing and that no objects filled
hazard.
with liquids, such as vases, shall be placed on
! Always unplug the product from the mains if
apparatus
you do not intend to use it for an extended
!
The mains plug is used as the disconnect
period.
device and it shall remain readily operable.
! The ON/OFF button does not disconnect the
To be completely disconnect the power input,
product from the mains power supply. To
the mains plug of apparatus shall be
disconnect the product from the power supply,
disconnected from the mains.
you must unplug the power cord.
! This product should only be used in a ! The apparatus will be use in open area
! The ventilation should not be impedde by
horizontal position.
covering the ventilation openings with items
! Never open the device.
such as newspaper, table-cloths, curtains etc.
! No naked flame sources such as lighted
candles should be placed on the apparatus.
! Attention should be drawn to the
environmental aspects of battory disposal.
! The use of apparatus in moderate climates.
12
ENGLISH
OVERVIEW
2
1
3
1.
2.
3.
4.
5.
6.
7.
8.
9.
SPEAKER
ROD ANTENNA
RADIO TUNING KNOB
USB/RADIO BUTTON
AUX IN INDICATOR
AM/FM /BAND BUTTON
LCD DISPLAY
FM MODE BUTTON
SLEEP BUTTON
6
4
5
10. ALARM BUZZER HIGH/
LOW BUTTON
11. ALARM MUSIC/BUZZER BUTTON
12. SNOOZE BUTTON
13. HOUR BUTTON
14. CLOCK SET BUTTON
15. MINUTE BUTTON
16. HEADPHONE JACK
17. VOLUME KNOB
18. ALARM ON/OFF BUTTON
19. ALARM SET BUTTON
20. NEXT BUTTON (USB)
21. USB PORT
22. PREVIOUS BUTTON (USB)
23. STOP BUTTON (USB)
24. PLAY/PAUSE BUTTON (USB)
25. STANDBY BUTTON
26. STANDBY INDICATOR
27. AC CORD
28. AUX IN SOCKET
29. BATTERY DOOR
8
7
9
10
11
12
13
14
15
16
25 23 21
26 24 22 20
29
17
18
27
28
13
19
ENGLISH
OPERATION
SETTING THE CLOCK
When the radio is connected to the AC outlet for the first time, the red standby indicator will come on
and the display will show “12:00” (12-Hour Version) or “0:00” (24-Hour Version). This is subject to
market.
1. To set the clock time, depress and hold the CLOCK SET button and repeatedly press the HOUR
button to adjust the display to the correct hour.
2. Continue to depress and hold the CLOCK SET button and repeatedly press the MINUTE button
to adjust the display to the correct minute.
3. When the display shows the correct time, release all the buttons, the clock setting is now completed.
Note: The clock can be set in either Standby or Operation mode. The display will show the correct
time whenever the radio is in Standby mode (Standby indicator is ON) or when the USB or AUX IN
function is selected. To see the clock in Radio operation, press the CLOCK SET button.
SETTING THE WAKE-UP TIMER
1. Depress and hold the ALARM SET button. The display will change from clock time to wake-up
time and show “7:00”. The “alarm bell” icon will appear and flash in the display. (F1)
2. Repeatedly press the HOUR button to adjust the display to the desired wake-up hour.
3. Continue to depress and hold the ALARM SET button and repeatedly press the MINUTE button
to adjust the display to the desired wake-up minute.
4. When the display shows the desired wake-up time, release all the buttons and the wake-up time
is set.
Note: To check the wake-up time, just press the ALARM button at any time, the display will show the
wake-up time as long as the ALARM SET button is depressed.
MEMORY BACKUP
This radio incorporates a battery back up circuit that will keep the clock running in the event of
temporary power interruption.
Insert 2 x 1.5V UM-3, AA or equivalent batteries into the battery compartment located at the back of
the cabinet. For best results, replace with fresh batteries every 9 to12 months. Do not mix old and
new batteries or different types of batteries such as alkaline and carbon-zinc batteries together.
14
ENGLISH
OPERATION
ALARM FUNCTION
You can use the alarm function to wake you to an electronic buzzer tone, the radio or your favourite
USB MP3 songs.
First press the ALARM SET button to check the wake-up time setting. Adjust the wake-up time if
necessary. Then press the ALARM ON/OFF button to select the alarm function on/off, the display will
show the “alarm bell” icon to indicate that the alarm function is ON. (F. 2)
Then you can press the STANDBY button to switch the radio to Standby. At the selected wake-up
time, the desired wake-up mode will be turned on. It will continue for one hour and then shut off automatically. To stop the alarm sooner, press the ALARM ON/OFF button once or pressing the
STANDBY button to switch the unit to Standby.
F2
WAKE TO BUZZER
1. Press the MUSIC/BUZZER button to select wake to buzzer, the “buzzer” icon will appear in the
display to indicate that buzzer is selected. (F. 3)
2. Press the BUZZER HIGH/LOW button to select the buzzer sound output level, the display will show
“HI” if the louder buzzer sound is selected. (F. 4)
HI
WAKE TO MUSIC (USB / RADIO)
1. To select wake to radio, press the MUSIC/BUZZER button until the “buzzer” icon disappears in the
display.
2. Press the USB/RADIO to select the Radio function, tune to your desired radio station and adjust the
volume to the level you want to hear when the alarm comes on.
3. To select wake to USB, connect your memory device loaded with your favorite MP3 songs to the
USB port on the front panel, press the USB/RADIO button to select USB and start the MP3
playback. Adjust the volume to the level you want to hear when the alarm comes on.
Automatic Alarm Repeat
The alarm will automatically repeat each day at the selected wake-up time as long as the “alarm bell”
icon appears in the display. To cancel the alarm, press the ALARM ON/OFF button until the icon
disappears.
15
ENGLISH
OPERATION
SNOOZE FUNCTION
During alarm, press the SNOOZE button will temporary switch off the alarm for 5 minutes. The display
will show “SNOOZE”. This is repeatable in the one hour alarm duration. (F. 5)
Note: If the alarm arrives in operation mode, and alarm to music (USB or Radio) is selected, there will
be no Snooze function.
LISTENING TO RADIO
When the radio is connected to the power for the first time, press the STANDBY button, it will
automatically enter into the Radio FM mode and the display will show “TUNER”. (F. 6)
1. In normal operation mode, press the USB/RADIO button will toggle the unit between USB and
RADIO function.
2. When radio mode is selected, press the AM/FM BAND button to select AM or FM reception.
3. Tune to your desired station by slowly rotating the TUNING control on the top. The digital
frequency display will move up and down the band as you rotate. If you tune to an FM stereo
station the “stereo” icon will be displayed. (F. 7)
4. To select FM mono reception, press the FM MODE button, the “stereo” icon will disappear from
the display; this is helpful for poor FM signal reception.
Note: During FM stereo reception, the received L/R stereo sound will be automatically combined to
one single channel to suit the single speaker design of this radio.
16
LISTENING TO THE USB (MP3 Playback)
1. When the radio is on, press the USB/RADIO button to select USB function, the display will show
“USB NO DATA”. (F. 8)
2. Connect your memory device loaded with your favourite MP3 songs via the USB port located on the
front panel. The “NO DATA” icon will go off.
3. Press the PLAY/PAUSE button, it will begin to playback from the first MP3 track found in the device
and the display will show the USB playback icon. (F. 9)
4. To interrupt playback, press PLAY/PAUSE, the playback icon in the display will flash.
5. To resume playback, press the PLAY/PAUSE button again.
6. To stop playback, press the STOP button.
7. During playback, press the NEXT or the PREVIOUS button to skip forward or back to other MP3
tracks in the memory device. Playback will start at the beginning of the selected track.
Note: In case that your memory device is loaded with MP3 songs but the display keeps on showing
‘NO DATA”, the format of your USB device might not be compatible with this radio. To listen to the
songs in the device, please use the line-in cable (not supplied), insert one end to the AUX IN socket (at
the back of the radio) and the other end to the line out or the headphone jack of your USB device, the
radio will be automatically switched to the output of your device.
SLEEP FUNCTION
This function allows you to program the radio to switch off itself after a set period of time.
1. To activate the sleep function, press the SLEEP button, the display will show “90” and the “SLEEP”
will appear and flash.
2. Repeatedly press the SLEEP button, the time will change in sequence on every press:
3. When your desired sleep time appears in the display, release the button, the “SLEEP” in the display will become stable in 2 seconds and the sleep function is ON. When the sleep time counts to
zero, the unit will go off.
4. To put the sleep function off, press the SLEEP button until “SLEEP” in the display goes off.
Note: If the sleep time is in standby, the radio will be switched ON automatically after the sleep function is on.
17
ENGLISH
OPERATION
ENGLISH
OPERATION
DISPLAY DIMMER
The brightness of the display is automatically adjusted for the room light conditions. It will be reduced
when the room lighting is turned off so as not to interfere with your sleep. The display will brighten
automatically in the daylight or when the room lights are turned on again for better visibility.
AUX INPUT
There is a 3.5mm stereo Aux input socket located at the back of the unit; analogue audio sound signals from other sources can be input to the radio through this socket.
When a 3.5mm jack is inserted to this input socket, the AUX IN function will be automatically selected.
The AUX-IN LED indicator on the front panel will be illuminated and the display will show the clock but
the function on the display will remain unchanged. The audio will be switched to the aux input signal
and you can adjust the volume control for your desired sound output level.
To resume back to normal Radio or USB operation, disconnect the jack from the input socket.
Note: The L/R audio input from other sources will be automatically combined to one single channel to
suit the single speaker design of this radio.
HEADPHONE JACK
The headphone jack is located on the right bottom front. Connect a set of headphones (not included)
to this jack for private listening. When headphones are in use, the speaker will be automatically cut
off.
Note: Only mono sound is available from the headphone jack, the stereo audio is converted to mono
and output to the L/R channel of the headphone inserted.
IMPORTANT: When using headphones always set the volume control to a low level before you put
the headphones on, then put the headphones on and gradually increase the volume to a comfortable
listening level.
18
Technical specifications
Description:
Model:
Clock radio with CD
UR 210 USB
Volatge Rating:
Clock back up
Scale
Line in Jack
Radio
Receiving bands
Frequency range
AC 230V / 50Hz
2x 1,5Volt battery type (UM-3, AA)
220mm (L) x 112,5mm (W)x 135mm (H)
3,5mm
USB Section
Interface
Flash Memory
AM/FM
AM
522 - 1629 kHz
FM
87,5 - 108 MHz
USB1.1 (USB HUB not supported)
USB 1.1 Flash USB 2.0 High-Speed Flash
FAT16/32 32MB-2GB
SPECIFICATIONS SUBJECT TO CHANGE WITHOUT NOTICE
Disposal
Dispose of the packaging in the proper manner.
If at any time in the future you should need to dispose of this product please
note that Waste electrical products should not be disposed of with household
waste. Please recycle where facilities exist. Check with your Local Authority or
retailer for recycling advice.
(Waste Electrical and Electronic Equipment Directive)
If this product should be defective, despite our high standard quality control, please
contact the service & support hotline. The hotline is available Monday through Friday
from 10am to 6pm at this number:
0180 5 - 22 17 84
(€ 0,14 / Min. Germany only)
In case your product needs to be sent to our service centre, please use the provided return sticker. If the return sticker is missing, please contact the service &
support hotline.
19
ENGLISH
TECHNICAL SPECIFICATIONS