1
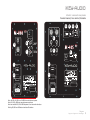
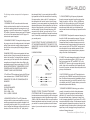
The following numbers correspond to the diagrams on
page 4.
Connections
1. POWERING ON: All Connections should be made,
all fader controls should be set at their minimum levels,
and all other equipment should be powered on prior to
powering on your iKEY audio monitors. The power ON/
OFF switch is located on the rear panel a red LED located
on the front of the speaker behind the iKEY logo will illuminate when power is applied.
2. CHANGING VOLTAGE: To change the voltage, remove
the power cord, and slide voltage selector to the desired
setting. Please note when making voltage changes the
fuses will have to be replaced (See changing fuses section below).
CHANGING FUSES: Under normal operation the fuses
should not blow. A blown fuse usually indicates an overload or fault condition. To change the fuse, remove the
power cord pry off the fuse block with a small flathead
screwdriver and change the blown fuses. Refer to the
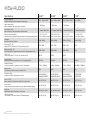
specifications page for fuse current ratings. IF A FUSE
BLOWS UPON POWER UP THIS INDICATES A FAULT
CONDITION AND THE MONITOR SHOULD BE RETURNED TO IKEY AUDIO FOR REPAIR.
the subwoofer. Next, if you are using the internal 80Hz
high-pass filter built into the subwoofer for the existing
full-range monitors, hook up the 1/4” output jacks on
the subwoofer to the line level inputs of your full range
speakers. If you are using passive (non-powered) monitor
speakers that require an external amplifier, hook the two
outputs of the subwoofer up to the inputs of the stereo
monitor amplifier. Typically this would also be an XLR
connector, but if need be, you could use the 1/4” connections providing the amplifier will accept them at amp
input. Connect the power amplifier to the speakers as
you normally would.
DO NOT ATTEMPT TO HOOK THE SPEAKER OUTPUT
OF THE MONITOR AMPLIFIER TO THE INPUT OF THE
SUBWOOFER, YOU RUN THE RISK OF DAMAGING THE
EQUIPMENT.
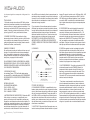
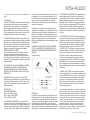
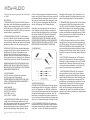
5. WIRING DIAGRAM
4. SUBWOOFER HOOK-UP: The iKEY Subwoofer
includes a built-in crossover and amplifier, so you only
need the appropriate hookup cables to integrate it into
your existing monitor system. First, you need to connect
a pair of cables from the stereo monitor outputs of your
console or DJ mixer to the XLR or 1/4” input jacks on
8. CROSSOVER: This adjusts the crossover frequency for
the built-in 24dB/ octave variable crossover. The crossover frequency can be adjusted from 40 Hz to 180 Hz.
Frequencies below the crossover frequency are sent to
the subwoofer, and frequencies above the crossover frequency are sent to the LEFT and RIGHT outputs, which
are connected to the main satellite speakers. Set the
crossover frequency to the lowest frequency response
rating of the main / satellite speakers.
9. PHASE: This switch changes the polarity of the signal
going to the subwoofer amplifier by 180°. It has no effect on the signal at the LEFT and RIGHT OUT or the
MASTER OUT. There is no right or wrong setting for this
switch. Listen to the overall blend of the subwoofer with
the rest of the system, and select the switch position that
gives you the best sound.
10. AUTO POWER: If set to the AUTO position the subwoofer will go into STANDBY mode (mute) if Idle for more
than 45 minutes it resumes working immediately after an
input signal is received. If set to the ON position it will be
on constantly, and the OFF position allows you to use the
subwoofers power switch Manually.
3. The XLR and TRS are balanced inputs, the RCA input
is an unbalanced input. CONNECTIONS FROM THE
SUBWOOFER TO SATELLITE SPEAKERS MUST BE
BALANCED.
AUDIO INPUT
10K OHMS BALANCED
PIN2 + TIP = HIGH
PIN 3 + RING = LOW
PIN 1 + SLEEVE = GROUND
7. HF ADJUSTMENT: High Frequency Adjustment is
through a rear panel mounted 4-position rotary switch.
Range of control is +1dB, flat, -1dB, or -2dB Shelving
above 2 kHz. Factory setting for your iKEY Audio powered Monitor is flat (switch is the 0dB position). Room
acoustics may dictate which type of adjustment you
need to make to retain a flat frequency response from the
monitor.
System Control / Speaker Placement
6. SYSTEM VOLUME: The input sensitivity is adjusted
(counterclockwise reduces sensitivity) with the rear panel
mounted system gain control. Adjustment range is from
-30dB to +6dB, which should suffice for most conditions.
Normally adjustments would only be made if you’re using
your monitor in a surround system and need to balance
levels or if your monitor send is too hot and not adjustable.
* SPEAKER PLACEMENT: Positioning your monitors
correctly in the studio is critical to their performance.
Typically, they should be placed so that the listening
position is fully “covered” with all monitors resting on
the same horizontal plane. A great way to test a monitor for its imaging capability is to play back a CD or DVD
recorded acoustically in stereo . We recommend acoustic
music because it represents the spectrum of sound. You
can adjust the angle of each monitor by listening for dead
spots. keep in mind, changing the angle or position of a
monitor will change the sound.
Connections and System Control
7