1
ENGLISH
LAN8900EKYN ENG indesign.indd 1
2010-03-24 ¿ÀÈÄ 10:44:23
Table of contents
General information. . . . . . . . . . . . . . . . . . . . . . .7-10
Safety notes . . . . . . . . . . . . . . . . . . . . . . . . . . . . . . . . . . . . . . . . . . . . . . . . . . . . . 7-8
Types of Playable Discs . . . . . . . . . . . . . . . . . . . . . . . . . . . . . . . . . . . . . . . . . . . . . . 9
Precautions of handling discs and player . . . . . . . . . . . . . . . . . . . . . . . . . . . . . . . 9
NOTES ON COPYRIGHTS . . . . . . . . . . . . . . . . . . . . . . . . . . . . . . . . . . . . . . . . . . 10
Disposal of your old appliance . . . . . . . . . . . . . . . . . . . . . . . . . . . . . . . . . . . . . . . 10
Name of each component . . . . . . . . . . . . . . . . 11-13
Control Panel . . . . . . . . . . . . . . . . . . . . . . . . . . . . . . . . . . . . . . . . . . . . . . . . . . . 11-12
Steering wheel remote control . . . . . . . . . . . . . . . . . . . . . . . . . . . . . . . . . . . . . . . 13
Basic operation . . . . . . . . . . . . . . . . . . . . . . . . .14-15
Start-up screen . . . . . . . . . . . . . . . . . . . . . . . . . . . . . . . . . . . . . . . . . . . . . . . . . . .
Turning the unit on/ Turning the unit off . . . . . . . . . . . . . . . . . . . . . . . . . . . . . . .
Inserting a disc/ Ejecting a disc . . . . . . . . . . . . . . . . . . . . . . . . . . . . . . . . . . . . . .
Adjusting the volume . . . . . . . . . . . . . . . . . . . . . . . . . . . . . . . . . . . . . . . . . . . . . .
Selecting a source on the control panel . . . . . . . . . . . . . . . . . . . . . . . . . . . . . . .
Selecting a source on the screen . . . . . . . . . . . . . . . . . . . . . . . . . . . . . . . . . . . . .
Rear view camera (optional) . . . . . . . . . . . . . . . . . . . . . . . . . . . . . . . . . . . . . . . . .
14
14
14
14
15
15
15
Setup . . . . . . . . . . . . . . . . . . . . . . . . . . . . . . . . .16-19
General operations of SETUP menu . . . . . . . . . . . . . . . . . . . . . . . . . . . . . . . . 16-19
Bluetooth . . . . . . . . . . . . . . . . . . . . . . . . . . . . . . . . . . . . . . . . . . . . . . . . . . . . . . 16
System . . . . . . . . . . . . . . . . . . . . . . . . . . . . . . . . . . . . . . . . . . . . . . . . . . . . . . 16-17
Traffic/ Navigation . . . . . . . . . . . . . . . . . . . . . . . . . . . . . . . . . . . . . . . . . . . . . . . 18
Audio . . . . . . . . . . . . . . . . . . . . . . . . . . . . . . . . . . . . . . . . . . . . . . . . . . . . . . .18-19
Display . . . . . . . . . . . . . . . . . . . . . . . . . . . . . . . . . . . . . . . . . . . . . . . . . . . . . . . . 19
2
LAN8900EKYN ENG indesign.indd 2
2010-03-25 ¿ÀÀü 10:00:14
Table of contents
Getting started with navigation . . . . . . . . . . . . 20-21
What is GPS?. . . . . . . . . . . . . . . . . . . . . . . . . . . . . . . . . . . . . . . . . . . . . . . . . . . . . 20
About satellite signals . . . . . . . . . . . . . . . . . . . . . . . . . . . . . . . . . . . . . . . . . . . . . . 20
Acquiring satellite signals . . . . . . . . . . . . . . . . . . . . . . . . . . . . . . . . . . . . . . . . . . . 20
Initial navigation screen. . . . . . . . . . . . . . . . . . . . . . . . . . . . . . . . . . . . . . . . . . . . . 20
Indicators of the map screen . . . . . . . . . . . . . . . . . . . . . . . . . . . . . . . . . . . . . 20-21
How to view a map screen. . . . . . . . . . . . . . . . . . . . . . . . . . . . . . . . . . . . . . 20-21
Changing the scale of a map . . . . . . . . . . . . . . . . . . . . . . . . . . . . . . . . . . . . . . 21
Destination input menu. . . . . . . . . . . . . . . . . . . . 22-32
Navigation menu overview/ Adjusting the navigation volume . . . . . . . . . . . . . . 22
General operations of destination menu . . . . . . . . . . . . . . . . . . . . . . . . . . . . . . . 22
Address Search . . . . . . . . . . . . . . . . . . . . . . . . . . . . . . . . . . . . . . . . . . . . . . . . . . . 23
Last Destinations . . . . . . . . . . . . . . . . . . . . . . . . . . . . . . . . . . . . . . . . . . . . . . . . . . 24
Address Book . . . . . . . . . . . . . . . . . . . . . . . . . . . . . . . . . . . . . . . . . . . . . . . . . . . . 24
POI (Point of Interest) . . . . . . . . . . . . . . . . . . . . . . . . . . . . . . . . . . . . . . . . . . . . . . 24
Near Position . . . . . . . . . . . . . . . . . . . . . . . . . . . . . . . . . . . . . . . . . . . . . . . . . . . 25
Near Destination. . . . . . . . . . . . . . . . . . . . . . . . . . . . . . . . . . . . . . . . . . . . . . . . . 26
In City/ Name. . . . . . . . . . . . . . . . . . . . . . . . . . . . . . . . . . . . . . . . . . . . . . . . . . . 26
Kia service . . . . . . . . . . . . . . . . . . . . . . . . . . . . . . . . . . . . . . . . . . . . . . . . . . . . . 26
Phone Number. . . . . . . . . . . . . . . . . . . . . . . . . . . . . . . . . . . . . . . . . . . . . . . . . . 26
GPS Input . . . . . . . . . . . . . . . . . . . . . . . . . . . . . . . . . . . . . . . . . . . . . . . . . . . . . . . 27
Parking . . . . . . . . . . . . . . . . . . . . . . . . . . . . . . . . . . . . . . . . . . . . . . . . . . . . . . . . . . 28
Continue Guidance/ Stop Guidance . . . . . . . . . . . . . . . . . . . . . . . . . . . . . . . . . . . . . 28
Using Map . . . . . . . . . . . . . . . . . . . . . . . . . . . . . . . . . . . . . . . . . . . . . . . . . . . . . . . 28
Tour Planner. . . . . . . . . . . . . . . . . . . . . . . . . . . . . . . . . . . . . . . . . . . . . . . . . . .29-30
Store Destination . . . . . . . . . . . . . . . . . . . . . . . . . . . . . . . . . . . . . . . . . . . . . . . . . . 31
Store Position. . . . . . . . . . . . . . . . . . . . . . . . . . . . . . . . . . . . . . . . . . . . . . . . . . . . . 31
Home 1/ Work2/ 3~12. . . . . . . . . . . . . . . . . . . . . . . . . . . . . . . . . . . . . . . . . . . . . . 32
3
LAN8900EKYN ENG indesign.indd 3
2010-03-25 ¿ÀÀü 10:00:14
Table of contents
Using the map menu . . . . . . . . . . . . . . . . . . .33-38
Map menu overview. . . . . . . . . . . . . . . . . . . . . . . . . . . . . . . . . . . . . . . . . . . . . . . . 33
General operations of map menu . . . . . . . . . . . . . . . . . . . . . . . . . . . . . . . . . . . . 33
POI Category . . . . . . . . . . . . . . . . . . . . . . . . . . . . . . . . . . . . . . . . . . . . . . . . . . . . . 34
2D/ 3D . . . . . . . . . . . . . . . . . . . . . . . . . . . . . . . . . . . . . . . . . . . . . . . . . . . . . . . . . . 34
Split Screen/ Full Screen . . . . . . . . . . . . . . . . . . . . . . . . . . . . . . . . . . . . . . . . . . . 35
Store Position. . . . . . . . . . . . . . . . . . . . . . . . . . . . . . . . . . . . . . . . . . . . . . . . . . . . . 35
Tour Planner. . . . . . . . . . . . . . . . . . . . . . . . . . . . . . . . . . . . . . . . . . . . . . . . . . . . . . 35
Route Options . . . . . . . . . . . . . . . . . . . . . . . . . . . . . . . . . . . . . . . . . . . . . . . . . . . . 36
Browser. . . . . . . . . . . . . . . . . . . . . . . . . . . . . . . . . . . . . . . . . . . . . . . . . . . . . . . . . . 37
Detour . . . . . . . . . . . . . . . . . . . . . . . . . . . . . . . . . . . . . . . . . . . . . . . . . . . . . . . . . . 37
Info Nearby. . . . . . . . . . . . . . . . . . . . . . . . . . . . . . . . . . . . . . . . . . . . . . . . . . . . . . . 38
Info On Route . . . . . . . . . . . . . . . . . . . . . . . . . . . . . . . . . . . . . . . . . . . . . . . . . . . . 38
Bluetooth wireless technology. . . . . . . . . . . . .39-45
Understanding Bluetooth wireless technology. . . . . . . . . . . . . . . . . . . . . . . . . . . 39
Connecting your unit and bluetooth phone . . . . . . . . . . . . . . . . . . . . . . . . . .39-40
Disconnecting/Connecting again the bluetooth phone . . . . . . . . . . . . . . . . . . . 41
Deleting a connected phone. . . . . . . . . . . . . . . . . . . . . . . . . . . . . . . . . . . . . . . . . 41
Changing the passkey . . . . . . . . . . . . . . . . . . . . . . . . . . . . . . . . . . . . . . . . . . . . . . 41
Making a call by entering phone number . . . . . . . . . . . . . . . . . . . . . . . . . . . . . . 42
Switching the sound path during a call . . . . . . . . . . . . . . . . . . . . . . . . . . . . . . . . 42
Switching the microphone on/off . . . . . . . . . . . . . . . . . . . . . . . . . . . . . . . . . . . . . 42
Answering calls . . . . . . . . . . . . . . . . . . . . . . . . . . . . . . . . . . . . . . . . . . . . . . . . . . . 42
Using your Phone Book. . . . . . . . . . . . . . . . . . . . . . . . . . . . . . . . . . . . . . . . . . . . . 43
Using your Calling list . . . . . . . . . . . . . . . . . . . . . . . . . . . . . . . . . . . . . . . . . . . . . . 44
Making a call with speed dial numbers . . . . . . . . . . . . . . . . . . . . . . . . . . . . . . . . 45
4
LAN8900EKYN ENG indesign.indd 4
2010-03-25 ¿ÀÀü 10:00:14
Table of contents
CD/MP3/WMA/USB/iPod operation . . . . . . .46-51
Playing an audio CD and MP3/ WMA/ USB/ iPod files . . . . . . . . . . . . . . . .46-48
Skip to the next track/file . . . . . . . . . . . . . . . . . . . . . . . . . . . . . . . . . . . . . . . . . 46
Skip to the previous track/file . . . . . . . . . . . . . . . . . . . . . . . . . . . . . . . . . . . . . 46
Return to the beginning of the current track/file . . . . . . . . . . . . . . . . . . . . . . 46
Search. . . . . . . . . . . . . . . . . . . . . . . . . . . . . . . . . . . . . . . . . . . . . . . . . . . . . . . . . 46
Intro scan . . . . . . . . . . . . . . . . . . . . . . . . . . . . . . . . . . . . . . . . . . . . . . . . . . . . . . 47
Repeat . . . . . . . . . . . . . . . . . . . . . . . . . . . . . . . . . . . . . . . . . . . . . . . . . . . . . . . . 47
RANDOM . . . . . . . . . . . . . . . . . . . . . . . . . . . . . . . . . . . . . . . . . . . . . . . . . . . . . 48
Playing files by classifying into folder/ Album/ Artist . . . . . . . . . . . . . . . . . . . 48
Locating a folder/file using the list. . . . . . . . . . . . . . . . . . . . . . . . . . . . . . . . . . . . 49
Searching music . . . . . . . . . . . . . . . . . . . . . . . . . . . . . . . . . . . . . . . . . . . . . . . . . . 49
Setting audio book play speed . . . . . . . . . . . . . . . . . . . . . . . . . . . . . . . . . . . . . . . 50
USB device requirement/ Compatible USB devices. . . . . . . . . . . . . . . . . . . . . . 50
MP3/WMA file requirement . . . . . . . . . . . . . . . . . . . . . . . . . . . . . . . . . . . . . . . . . 51
iPod device requirement . . . . . . . . . . . . . . . . . . . . . . . . . . . . . . . . . . . . . . . . . . . . 51
Radio operation . . . . . . . . . . . . . . . . . . . . . . . .52-54
Listening to the radio stations . . . . . . . . . . . . . . . . . . . . . . . . . . . . . . . . . . . . . . . 52
Storing and recalling stations . . . . . . . . . . . . . . . . . . . . . . . . . . . . . . . . . . . . . . . . 52
AS (Auto search memory) . . . . . . . . . . . . . . . . . . . . . . . . . . . . . . . . . . . . . . . . . . 53
To scan broadcast frequencies . . . . . . . . . . . . . . . . . . . . . . . . . . . . . . . . . . . . . . . 53
TA (Traffic announcement) . . . . . . . . . . . . . . . . . . . . . . . . . . . . . . . . . . . . . . . . . 53
NEWS. . . . . . . . . . . . . . . . . . . . . . . . . . . . . . . . . . . . . . . . . . . . . . . . . . . . . . . . . . . 54
REGION Auto/Off . . . . . . . . . . . . . . . . . . . . . . . . . . . . . . . . . . . . . . . . . . . . . . . . . 54
Auxiliary device operation . . . . . . . . . . . . . . . . . . . 55
Using an AUX source . . . . . . . . . . . . . . . . . . . . . . . . . . . . . . . . . . . . . . . . . . . . . . 55
5
LAN8900EKYN ENG indesign.indd 5
2010-03-25 ¿ÀÀü 10:00:14
Table of contents
Voice recognition system . . . . . . . . . . . . . . . 56-60
Voice recognition . . . . . . . . . . . . . . . . . . . . . . . . . . . . . . . . . . . . . . . . . . . . . . . . . . 56
Giving voice commands . . . . . . . . . . . . . . . . . . . . . . . . . . . . . . . . . . . . . . . . . . . . 56
How to say numbers . . . . . . . . . . . . . . . . . . . . . . . . . . . . . . . . . . . . . . . . . . . . . . . 56
Voice command examples . . . . . . . . . . . . . . . . . . . . . . . . . . . . . . . . . . . . . . . 57-58
Help command . . . . . . . . . . . . . . . . . . . . . . . . . . . . . . . . . . . . . . . . . . . . . . . . . . . 58
Voice commands . . . . . . . . . . . . . . . . . . . . . . . . . . . . . . . . . . . . . . . . . . . . . . .59-60
Troubleshooting . . . . . . . . . . . . . . . . . . . . . . . . 61-62
Specifications. . . . . . . . . . . . . . . . . . . . . . . . . . . . . 63
Index. . . . . . . . . . . . . . . . . . . . . . . . . . . . . . . . . . . . 64
Symbols for the display of traffic problems . . . . . 65
6
LAN8900EKYN ENG indesign.indd 6
2010-03-25 ¿ÀÀü 10:00:14
General information
Safety notes
CAUTION
RISK OF ELECTRIC SHOCK
DO NOT OPEN
CAUTION : TO REDUCE THE RISK OF
ELECTRIC SHOCK DO NOT REMOVE THE
COVER(OR BACK) NO USER SERVICEABLE PARTS INSIDE. REFER SERVICING TO
QUALIFIED SERVICE PERSONNEL.
The lightning flash with the arrowhead
symbol, within an equilateral triangle
is intended to alert the user about the
presence of uninsulated dangerous
voltage within the product’s enclosure
that may be of sufficient magnitude to
constitute a risk of electric shock.
The exclamation point within an equilateral triangle is intended to alert the user
to the presence of important operating
and maintenance (servicing) instructions in the literature accompanying the
appliance.
Always operate the vehicle in a safe
manner. Do not become distracted by
the vehicle while driving, and always be
fully aware of all driving conditions. Do
not change settings, or any functions.
Pull over in a safe and legal manner
before attempting such operations.
To promote safety, certain functions are
disabled unless the hand break is on.
Do not use for many hours at extremely
low or high temperature.
(-10°C to 60°C)
To reduce the risk of electric shock, do
not remove the cover or back of this
product. There are no user-serviceable
parts inside. Refer servicing to qualified
service personnel.
To reduce the risk of fire or electric
shock, do not expose this product to
dripping or splashing water, rain, or
moisture.
The temperature of unit’s outside can
be extremely high, please use the unit
after proper installation in your vehicle.
While driving, keep the sound volume at
a proper level.
Do not drop it and avoid heavy impacts
at anytime.
7
LAN8900EKYN ENG indesign.indd 7
2010-03-25 ¿ÀÀü 10:00:14
General information
CAUTION :
The driver must not watch the monitor while driving. If the driver watches
the monitor while driving, it may lead to
carelessness and cause an accident.
This unit is for vehicles with a 12-volt
battery and negative grounding. Before
installing it in a recreational vehicle, lorry
or bus, check the battery voltage. To
avoid shorts in the electrical system, be
sure to disconnect the E battery cable
before beginning the installation.
This product uses a Laser System.
To ensure proper use of this product,
please read this owner’s manual carefully and retain it for future reference.
Should the unit require maintenance,
contact an authorized service center.
Performing controls, adjustments, or
carrying out procedures other than
those specified herein may result in
hazardous radiation exposure.
To prevent direct exposure to laser
beam, do not try to open the enclosure.
Visible laser radiation when open. DO
NOT STARE INTO BEAM.
CAUTION :
CLASS 1M VISIBLE AND INVISIBLE
LASER RADIATION WHEN OPEN DO
NOT VIEW DIRECTLY WITH OPTICAL
INSTRUMENTS.
CAUTION :
• Do not keep the navigation system
running with the engine stopped.
Doing so may discharge the vehicle
battery. When you use the navigation
system, always keep the engine running.
• When the driver wants to operate the
navigation system, first park the vehicle
in a safe location and set the parking brake. Operating the system while
driving can distract the driver and may
result in a serious accident.
• Do not disassemble or modify this
system. If you do, it may result in accidents, fire or electrical shock.
• Some country may have laws limiting
the use of video screens while driving.
Use the system only where it is legal
to do so.
• Don't use your phone when you are
driving. You must stop at a safe place
to use your phone.
• When driving your vehicle, be sure
to keep the volume of the unit low
enough to allow you to hear sounds
coming from the outside.
8
LAN8900EKYN ENG indesign.indd 8
2010-03-25 ¿ÀÀü 10:00:14
General information
Types of Playable Discs
Precautions of handling discs and player
This unit plays CD-R or CD-RW containing audio titles, MP3 or WMA files.
• Depending on the conditions of the
recording equipment or the CD-R/RW
disc itself, some CD-R/RW discs cannot be played on the unit.
• Do not attach any seal or label to
either side (the labeled side or the
recorded side) of a disc.
• Do not use irregularly shaped CDs (e.g.,
heart-shaped or octagonal). It may
result in malfunctions.
• A defective or soiled disc
inserted into the unit can
cause sound to drop during
playback.
• Handle the disc by holding
its innerouter edges.
• Do not touch the surface of
the unlabeled side of the
disc.
• Clean the disc before playback. Wipe
the disc from the
center outward with
a cleaning cloth.
• Never use solvents
such as benzine or
alcohol to clean the
disc.
Do not stick paper or tape etc.
on the surface.
Do not expose the disc to direct sunlight or excessive heat.
8 cm
This unit cannot play 8cm
disc (use 12cm disc only).
9
LAN8900EKYN ENG indesign.indd 9
2010-03-25 ¿ÀÀü 10:00:14
General information
NOTES ON COPYRIGHTS
It is forbidden by law to copy, broadcast,
show, broadcast via cable, play in public,
or rent copyrighted material without
permission.
This product features the copy protection function developed by Macrovision.
Copy protection signals are recorded on
some discs. When playing the pictures
of these discs on a unit, picture noise
will appear. This product incorporates
copyright protection technology that
is protected by method claims of certain U.S. patents and other intellectual
property rights owned by Macrovision
Corporation and other rights owners. Use of this copyright protection
technology must be authorized by
Macrovision Corporation, and is intended for home and other limited viewing
uses only unless otherwise authorized
by Macrovision Corporation. Reverse
engineering or disassembly is prohibited.
Disposal of your old
appliance
1. When this crossed-out wheeled bin
symbol is attached to a product, it
means the product is covered by the
European Directive 2002/96/EC.
2. All electrical and electronic products
should be disposed of separately
from the municipal waste stream
via designated collection facilities
appointed by the government or the
local authorities.
3. The correct disposal of your old appliance will help prevent potential negative consequences for the environment and human health.
4. For more detailed information about
disposal of your old appliance, please
contact your city office, waste disposal service or the shop where you
purchased the product.
iPod is a trademark of Apple Inc., registered in the U.S. and other countries.
“Made for iPod” means that an electronic accessory has been designed to
connect specifically to iPod and has
been certified by the developer to meet
Apple performance standards.
“The Bluetooth word mark and logos are
owned by the Bluetooth SIG, Inc. and
any use of such marks by LG Electronics
is under license. Other trademarks and
trade names are those of their respective owners.”
10
LAN8900EKYN ENG indesign.indd 10
2010-03-25 ¿ÀÀü 10:00:15
Name of each component
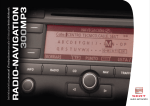
Control Panel
1 2
7
8 9
3
10
4
RADIO
MAP
11
5
MEDIA
NAV
12
13
6
14
1. Display on/off (
)
Press to switch between the display
on and off.
2. Eject (Z)
Press to eject a disc from the unit.
4. RADIO
Selects the FM/AM band.
5. MEDIA
Selects a source: CD, USB, iPod,
AUX
6.
/
• Press this button.
- Automatic tuning: RADIO
- Track up/down: USB CD iPod
• Press and hold this button.
- Search (FF/REW): USB CD
iPod
7. Disc slot
3. Left rotary ( / )
- Press: Power on/off
- Turn: Volume control
11
LAN8900EKYN ENG indesign.indd 11
2010-03-25 ¿ÀÀü 10:00:15
Name of each component
8. PHONE ( )
Use to enable Bluetooth Hands-Free
Phone.
13 SETUP ( )
• Press to access system settings.
(Page 16)
9. Repeat voice guidance ( )
Press to repeat the voice guidance.
10. Right rotary (
)
Rotate it clockwise/counterclockwise.
• Searches the previous or next radio
frequency.
- Manual tuning
• Skips a track/file up/down in all list
screen.
• ZOOM IN/ ZOOM OUT
- Rotate to change the map scale
on the map screen.
• Press and hold to check the device
ID, the software version, the navigation version, and the map version.
11. MAP
Press to display the current location
map screen.
14. Info ( )
Press to view the destination, route,
and traffic information when the
route guidance is active.
• Destination: Shows the information of current vehicle
position and destination.
• Route: Shows the route information from the current
vehicle position to the
destination.
• Traffic: Shows the traffic information.
- Traffic Info On Route: The list of
traffic information found on the
recommended route from the
current vehicle position to the
destination is displayed.
- Traffic Info Nearby: The list of
traffic information around the
current vehicle position is displayed.
12. NAV
Press to enter a destination menu.
Various methods for entering a destination are available.
12
LAN8900EKYN ENG indesign.indd 12
2010-03-25 ¿ÀÀü 10:00:15
Name of each component
Steering wheel remote control
7
1
6
2
3
5
4
4.
1.
Press this button briefly to reject a
call during a call.
Mutes the volume.
2. Volume ( / )
Increases or decreases the volume
level.
3.
Enables Bluetooth Hands-Free
Phone.
• Press this button briefly to take a
call when there is an incoming call.
• Press this button briefly to make a
call from last calls.
• Press this button lengthy to switch
the sound path during a call.
(Hands free y phone)
5.
• Press this button to start the voice
recognition mode.
• Press the button one more to cancel voice commands while the voice
recognition is active.
6. U / u
• Press this button.
- Automatic tuning: RADIO
- Track up/down: USB CD iPod
• Press and hold this button.
- Manual tuning: RADIO
- Search (FF/REW): USB CD
iPod
7.
Selects a source.
FM t AM t CD t USB t iPod
t AUX t FM...
13
LAN8900EKYN ENG indesign.indd 13
2010-03-25 ¿ÀÀü 10:00:15
Basic operation
Start-up screen
Turning the unit on
The unit starts when the ignition switch
is placed in the ACC or ON position.
Press
on the control panel in power
off status.
✽ Note
When you insert the disc in the disc slot,
the unit is turned on automatically.
Turning the unit off
- Then the radio mode is displayed
on the screen.
✽ Note
• The unit memorizes the last mode
that is played lastly. The last mode
is saved in the memory even if the
ignition switch is placed in the OFF
position. When the ignition switch is
placed in the ACC or ON position, the
mode is automatically recalled.
• It may take long time (about 20 seconds) for the unit to be rebooted.
Press
on the control panel in power
on status.
Inserting a disc
Insert a disc in the disc slot and playback starts automatically.
Ejecting a disc
Press Z on the control panel.
The disc is ejected from the loading slot.
✽ Note
If the ejected disc is not removed in
approximately 10 seconds, the disc is
automatically inserted again into the
loading slot.
Adjusting the volume
Rotate the volume knob (
control panel.
) on the
✽ Note
When you turn the unit off, the current
volume level is automatically memorized. Whenever you turn the unit back
on, it operates at the memorized
volume level.
If you turn the unit off/on below volume
level 5, the volume level is changed
into 5. If you turn the unit off/on above
volume level 25, the volume level is
changed into 25.
14
LAN8900EKYN ENG indesign.indd 14
2010-03-25 ¿ÀÀü 10:00:15
Basic operation
Selecting a source on the control panel
Selecting a source on the
screen
Press MEDIA repeatedly to select a
source.
The mode switches as follows.
CD t USB t iPod t AUX t CD...
You can select the source on the screen
to make it operate according to your
particular needs.
✽ Note
If a source is not connected to the unit,
the source is not recognized.
1. Touch the source icon in the left upward position when playing a source.
Rear view camera (optional)
With a rear view camera, automatic
switching to video from a rear view
camera is possible when the gearshift is
moved to REVERSE (R) position.
Rear view mode also allows you to check
what is behind you while driving.
When the unit is booted completely, the
guide line is displayed on the screen.
2. Touch the desired source.
✽ Note
If a source is not connected to the unit,
the source is not recognized.
✽ Note
• The rear view camera function is to
use this product as an aid to keep an
eye on trailers, or backing into a tight
parking spot. Do not use this function
for entertainment purposes.
• The object in rear view may appear
closer or more distant than in reality.
• Please note that the edges of the rear
view camera images may differ slightly
according to whether full screen images are displayed when backing.
15
LAN8900EKYN ENG indesign.indd 15
2010-03-25 ¿ÀÀü 10:00:16
Setup
General operations of SETUP
menu
Bluetooth
System
There are four kinds of screen menus.
There are five kinds of screen menus.
View Bluetooth Device List
This allows you to view the paired Bluetooth device list.
Language
This allows you to change the language
used in the system.
The navigation system can be customized to make it easier for you to use:
Bluetooth, System, Traffic, Navigation,
Audio, Display
1. Turn the unit on.
2. Press
on the control panel.
Search for Bluetooth Devices
This allows you to search for Bluetooth
devices. (Page 39)
3. Touch the desired option.
4. Touch the desired settings then
touch [OK] to confirm your selection.
✽ Note
Touch
to return to the previous
screen. Press MAP to return to the current location map screen.
External Device Authorization
This allows you to use when you connect
your unit and bluetooth phone by using
your bluetooth phone settings. (Page
40)
Touch the language button you want.
Use or to scroll up or down if necessary.
Change Passkey
You can change the passkey. (Page 41)
16
LAN8900EKYN ENG indesign.indd 16
2010-03-25 ¿ÀÀü 10:00:16
Setup
Clock
This allows you to set the time format and
the summer time.
Units
This allows you to set the unit of distance
displayed on your navigation system.
Factory Settings
This allows you to initialize various settings to the default settings.
• Time format: Change the time format
between the “12h” and
“24h”.
• Summer time: Set the summer time
between the “On” and
“Off”.
The unit sets the
clock automatically by
detecting the summer
time whether it is the
summer time season
or not. Even though the
summer time is set to
“On”, the unit sets the
clock to normal time
(not +1 hour) when
it’s not summer time
season.
Change the unit between the “km” and
“mls”.
- All: Initializes all the settings to the
default settings.
- Phone: Initializes all the settings related with phone.
- Navigation: Initializes all the settings
related with navigation.
- Audio/Media/Radio: Initializes all the
settings related
with Audio/
Media/ Radio.
Navigation Demo
This is a demonstration function. After a
route is set, a simulation of route guidance to a destination is automatically
displayed.
• Navigation Demo
- Off: Demo mode is set off.
- 1x: Sets the demo drive only once.
- Loop: Repeat demo drive
• Speed: Sets the speed of demo drive.
17
LAN8900EKYN ENG indesign.indd 17
2010-03-25 ¿ÀÀü 10:00:16
Setup
Traffic
Navigation
Audio
There are three kinds of screen menus.
There are four kinds of screen menus.
There are five kinds of screen menus.
TMC
Change the TMC (Traffic Message
Channel) to “Off”, “Auto” or “On”.
- Auto: When the TMC event is found
on current route, the navigation system searches the detour
route automatically without any
announcement.
- Off: Cancels the TMC function.
- On: When the TMC event is found on
current route, the navigation system displays the pop-up screen of
the event information.
Automatic TMC Station
When the TMC event is found on current route, the strongest TMC station is
received automatically.
Motorway Junction View
This displays the motorway junction on
the map screen.
Enhanced Lane Guidance
This displays the enhanced lane on the
map screen.
Plan Different Routes
This displays the plan different routes
on the map screen.
Speed Alert
This displays the speed alert on the
map screen.
Favourite TMC Station
The unit receives the TMC station that
the user set. This is activated when you
cancel the [Automatic TMC Station].
SDVC (Speed Dependent Volume Control)
When the speed of your vehicle is more
than 40km/h, the volume level outputs
higher than original volume level.
You can set the SDVC to Off, Low, Mid
(Middle), or High.
- Off: Outputs the original volume
level regardless of the speed of your
vehicle.
- Low, Mid, High: This outputs automatically the volume level according to the
speed of your vehicle.
Navigation Volume
You can set or cancel the voice announcement for navigation. Even
though the setting is “Off”, when starting
new route guidance, it is set to “On”
automatically.
Touchscreen Click
You can set the touchscreen sound to
On/Off.
18
LAN8900EKYN ENG indesign.indd 18
2010-03-25 ¿ÀÀü 10:00:16
Setup
Sound (Default : Center)
Balance/
Fader
Bass/Middle/
Treble
- Balance: Touch b or B to adjust the
sound the left and right speakers.
- Fader: Touch v or V to adjust the
sound of the front and rear speakers.
- Bass, Mid, Treble: Touch b or B to
adjust the Bass, Middle or Treble.
Power Bass
You can set the Power Bass to Off, Low,
Mid (Middle), or High.
- Off: Outputs the original sound.
- Low, Mid, High: Set the Low, Mid
(Middle), or High to boost the lowpitched sound.
Display
There are two kinds of screen menus.
✽ Note
Touch [Center] to return to the default
settings.
Map Mode
To improve the visibility of the map
screen between day and night, you can
change the combination of the colours
of the map.
- Auto: The map screen is displayed by
autolight signal or illumination
signal.
Illumination
On
Illumination
Off
Autolight Off
(Day)
Map: Day
Map: Day
Autolight On
(Night)
Map: Night
Map: Night
Autolight is
not detected
Map: Night
Map: Day
- Day: The map screen is always
displayed with bright colours.
- Night: The map screen is always
displayed with dark colours.
Brightness
You can set the brightness of the
screen.
Set the display brightness to Low, Mid
(Middle), or High.
19
LAN8900EKYN ENG indesign.indd 19
2010-03-25 ¿ÀÀü 10:00:16
Getting started with navigation
What is GPS?
About satellite signals
Indicators of the map screen
The Global Positioning System (GPS)
is a satellite-based navigation system
made up of a network of 24 satellites
placed into orbit by the U.S. Department of Defense.
GPS was originally intended for military applications, but in the 1980s, the
government made the system available
for civilian use.
GPS works in any weather conditions,
anywhere in the world, 24 hours a day.
There are no subscription fees or setup
charges to use GPS.
Your unit must acquire satellite signals
to operate. If you are indoors, near tall
buildings or trees, or in a parking garage, the unit cannot acquire satellites.
How to view a map screen
GPS
GPS
GPS
The navigation system displays various
information on the screen.
Acquiring satellite signals
Before the unit can find your current
location and navigate a route, you must
do the following steps:
1. Go outside to an area free from tall
obstructions.
2. Turn on the unit.
Acquiring satellite signals can take a
few minutes.
GPS
•
Initial navigation screen
After the ignition switch is placed in the
ACC or ON position, when you enter
a navigation mode for the first time,
the caution screen is displayed on the
screen. Read the caution carefully and
then touch [Agree].
/
Indicates the direction of the map.
Touch to switch the orientation of the
map.
•
Indicates the current vehicle location
and the direction of travel.
•
Touch [Menu] to access the map
menu.
20
LAN8900EKYN ENG indesign.indd 20
2010-03-25 ¿ÀÀü 10:00:17
Getting started with navigation
Changing the scale of a map
•
Indicates the scale of the map.
1. Touch
on the map screen.
•
Indicates the arriving time, distance
and remaining time to the destination.
•
Appears on the upper right corner of
the screen when a route is set.
Indicates the distance to the next
guide point and the turning direction
at that guide point.
•
Indicates the speed limit on the road
that you’re driving now.
2. Touch [+] to view the map in detail.
Touch [-] to view the map a wider
area.
50 m n100 m n 200 m n 300 m n
500 m n 750 m n 1 km n 2 km n 5
km n 10 km n 20 km n 50 km n 100
km n 200 km n 500 km
3. If you want to set the auto zoom,
touch
.
21
LAN8900EKYN ENG indesign.indd 21
2010-03-25 ¿ÀÀü 10:00:17
Destination input menu
Navigation menu overview
Navigation menu
Navigation
Address
Last Destinations
Addresse
POI
Parking
Continue Guidance/
Stop Guidance
Advanced
GPS Input
Using Map
Tour Planner
Store Destination
Store Position
Favourites
Home 1
Work 2
3~12
Adjusting the navigation
volume
If you want to adjust the navigation volume, rotate the volume knob ( ) on the
control panel during the voice guidance
or rotate it during the voice guidance
on the control panel.
after pressing
General operations of destination menu
1. Turn the unit on.
2. Press NAV on the control. The navigation menu appears on the screen.
3. Touch [Navigation], [Advanced] or
[Favourites] to select the desired option.
[Advanced] menu
[Favourites] menu
4. Touch the preferred setting method.
• Address: Finds a destination by
setting an address. (Page 23)
• Last Destinations: Sets a destination to a location that you have
lastly set. (Page 24)
• Address Book: Sets a destination
to a location stored in the address
book. (Page 24)
• POI: Searches for a destination
from various categories of businesses or locations. (Page 24-26)
• Parking: Sets a parking as your
destination. (Page 28)
• Continue/Stop Guidance: Sets the
guidance to On/Off. (Page 28)
• GPS Input: Sets a latitude and
a longitude as your destination.
(Page 27)
• Using Map: Searches for a destination by scrolling the map. (Page 28)
• Tour Planner: Adds new destination
or way point. (Page 29-30)
• Store Destination: Stores your destination in the address book. (Page 31)
• Store Position: Stores your position
in the address book. (Page 31)
• Home 1/ Work2/ 3~12: You can
set a home location, work location
or etc you want for the place you
return to most often. (Page 32)
22
LAN8900EKYN ENG indesign.indd 22
2010-03-25 ¿ÀÀü 10:00:17
Destination input menu
Address Search
You can find the destination by searching the address.
5. Set the part characters of street
name and then touch [OK].
Refer to the “Route Options” on the
page 36.
9. Touch [Start].
1. Press [NAV] > Touch [Address].
2. Set the preferred country.
If the country has already been set,
follow the step 3.
3. Set the preferred city name and
then touch [OK].
6. Touch the street in the list.
7. Touch the house number and then
touch [OK].
• If you want to store your destination
in the address book, touch [Store].
And input the name of your destination then touch [OK].
• If you want to view the map of your
destination, touch [Show Map] then
[Start].
10. Touch the preferred route, then
touch [Start]. Refer to the Note
regarding route criteria on the page
36.
4. Touch the city in the list.
8. Set the route options and then
touch [OK].
Drive in accordance with the screen
and voice information.
23
LAN8900EKYN ENG indesign.indd 23
2010-03-25 ¿ÀÀü 10:00:18
Destination input menu
Last Destinations
Address Book
POI (Point of Interest)
You can find the destination to a location that you have lastly set as the destination. Up to 50 last destinations are
automatically stored. If the number of
last destinations exceed 50, the oldest
one is replaced by the new one.
You can find the destination to a location stored in the Address Book. To
utilize this function more effectively,
destinations that you often travel to
should be stored in advance.
First of all, store in the Address Book by
searching the address. Refer to the Address Search on the page 23.
You can find a destination from various
categories of businesses or locations.
1. Press [NAV] > Touch [Last Destinations].
2. Touch the preferred last destination
from the list.
3. Touch the preferred route, then
touch [Start].
Drive in accordance with the screen
and voice information.
1. Press [NAV] > Touch [POI].
2. Touch one of the main category.
1. Press [NAV] > Touch [Address
Book].
2. Touch the preferred destination from
the list.
3. Touch the preferred route, then
touch [Start].
Drive in accordance with the screen
and voice information.
• Near Position: Sets a POI located
near the current vehicle position.
(Page 25)
• Near Destination: Sets a POI
located near the selected destination. (Page 26)
• In City: Sets a POI located in the
city. (Page 26)
• Name: Sets a POI by the name of
the facility. (Page 26)
• Kia Service: Sets a facility of the
Kia service. (Page 26)
• Phone Number: If you know the
telephone number of the facility,
use this to find the entering the
number. (Page 26)
24
LAN8900EKYN ENG indesign.indd 24
2010-03-25 ¿ÀÀü 10:00:18
Destination input menu
Near Position
1. Press [NAV] > Touch [POI] > [Near
Position].
5. Touch [OK] after confirming the
location of the displayed POI.
8. Touch [Start].
2. Touch one of the subcategory.
(For example: Emergency)
If you want to call on the telephone,
touch [ ]. It is available only when
the bluetooth is active.
3. Touch one of the subcategory in next
level. (For example: Hospital)
Drive in accordance with the screen
and voice information.
6. Touch [Start].
7. Touch the preferred route.
4. Touch the preferred POI.
25
LAN8900EKYN ENG indesign.indd 25
2010-03-25 ¿ÀÀü 10:00:18
Destination input menu
Near Destination
Name
Phone Number
1. Press [NAV] > Touch [POI] > [Near
Destination].
1. Press [NAV] > Touch [POI] > [Name].
1. Press [NAV] > Touch [POI] > [Phone
Number].
2. Set the preferred country.
2. Follow steps 2-8 on the page 25
(Near Position).
3. Input the part characters of the facility name and then touch [OK].
2. Input the phone number and then
touch [OK].
In City
1. Press [NAV] > Touch [POI] > [In City].
2. Set the part characters of city name
and then touch [OK].
4. Follow steps 4-8 on the page 25
(Near Position).
3. Touch the preferred phone number
from the list.
4. Touch [OK] after confirming the
location of the displayed POI.
Kia service
1. Press [NAV] > Touch [POI] > [Kia service].
3. Touch the city in the list.
2. Follow steps 4-8 on the page 25
(Near Position).
If you want to call on the telephone,
touch [ ]. It is available only when
the bluetooth is active.
5. Follow steps 6-8 on the page 25
(Near Position).
4. Follow steps 2-8 on the page 25
(Near Position).
26
LAN8900EKYN ENG indesign.indd 26
2010-03-25 ¿ÀÀü 10:00:19
Destination input menu
GPS Input
You can find the destination by inputting
the coordinates of latitude and longitude.
4. Input the coordinates of latitude by
touching the minutes. (For example:
58’)
6. Touch [OK].
1. Press [NAV] > Touch [Advanced] >
[GPS input].
7. Input the coordinates of longitude.
Refer to the steps 2-6.
(For example: 8°, 42’, 31’’)
2. Touch [Latitude].
8. When the settings are completed,
touch [Start].
3. Input the coordinates of latitude by
touching the degree. (For example:
49°)
5. Input the coordinates of latitude by
touching the seconds. (For example:
29’’)
9. Follow steps 7-8 on the page 25
(Near Position).
✽ Note
If you make a mistake while touching,
to erase one digit at a time.
touch
27
LAN8900EKYN ENG indesign.indd 27
2010-03-25 ¿ÀÀü 10:00:19
Destination input menu
Parking
Using Map
You can find the destination by searching the parking facility.
This allows you search for a destination
by scrolling the map.
1. Press [NAV] > Touch [Parking].
1. Press [NAV] > Touch [Advanced] >
[Using Map].
4. Touch the preferred route, then
touch [Start].
2. Touch a preferred facility.
2. Scroll the map, place the cross
pointer over the preferred location.
Drive in accordance with the screen
and voice information.
3. Follow steps 4-8 on the page 25
(Near Position).
3. Touch [Start].
Continue Guidance/ Stop Guidance
If you no longer need to travel to your
destination or if you want to change your
destination, press [NAV] > touch [Stop
Guidance]. If you continue to travel to
your destination again, touch [Continue
Guidance].
28
LAN8900EKYN ENG indesign.indd 28
2010-03-25 ¿ÀÀü 10:00:20
Destination input menu
Tour Planner
The tour planner allows you to travel
through the searched routes by setting
a destination or way point.
You can set a total of 4 destination or
way point.
- New Tour: Sets a tour.
- Load Tour: Displays the tourist.
- Show Tour: Displays tourist set lastly.
Setting a tour
1. Press [NAV] > Touch [Advanced] >
[Tour Planner].
4. Set a destination by using the navigation menu.
(Refer to the page 22.)
The destination you set is displayed.
If you need an additional way point, set
it by touching [Add Tourpoint] again.
5. Touch [Add Tourpoint].
7. Touch [Start].
If you would like to save the
searched routes, touch [Yes]. Otherwise, touch [No].
2. Touch [New Tour].
3. Touch [Yes].
6. Set a way point by using the [Navigation], [Advanced], and [Favourites]
menu.
(Refer to the page 22.)
8. Input a name, then touch [OK].
The searched routes are stored in
the [Load Tour] automatically.
9. Drive in accordance with the screen
and voice information.
29
LAN8900EKYN ENG indesign.indd 29
2010-03-25 ¿ÀÀü 10:00:20
Destination input menu
Editing/deleting a destination or way
point
You can modify or delete the destination
or way point already set.
1. Press [NAV] > Touch [Advanced] >
[Tour Planner] > [Load Tour].
2. Touch the desired tourist.
[Tour List Sort]: Changes the order of
the destination and
way point already set.
(Follow Steps 5-6)
[Tour Point Delete]: Deletes the way
point. (Follow
Steps 7-9)
[Tour List Delete]: Deletes the tourist.
(Follow Steps 10-11)
8. Touch the desired way point.
5. Touch [Tour List Sort] and then
touch [OK] after changing the order.
9. Follow steps 7-9 on the page 29
(Setting a tour).
10. Touch [Tour List Delete] to delete
the tourist you set.
3. Touch [Edit Tour List].
4. Touch the desired options.
6. Follow steps 7-9 on the page 29
(Setting a tour).
11. Touch the desired tourist.
7. Touch [Tour Point Delete] to delete
the way point.
30
LAN8900EKYN ENG indesign.indd 30
2010-03-25 ¿ÀÀü 10:00:20
Destination input menu
Store Destination
Store Position
Destinations that you often visit can be
stored in the Address Book. The stored
destinations can be easily retrieved to
set them as a destination or way point.
This is available only when the destinations have been set already.
The current vehicle position can be
stored in the Address Book.
1. Press [NAV] > Touch [Advanced] >
[Store Destination].
1. Press [NAV] > Touch [Advanced] >
[Store Position].
2. Input the name of the current position then touch [OK].
2. Input the name of the destination
then touch [OK].
The current vehicle position is stored
in the Address Book automatically.
(Page 24)
The destination is stored in the Address Book automatically. (Page 24)
31
LAN8900EKYN ENG indesign.indd 31
2010-03-25 ¿ÀÀü 10:00:21
Destination input menu
Home 1/ Work2/ 3~12
If your home location, work location and
favourite locations are already stored
in the Address Book, it can be easily
retrieved to set the route to your home
location, work location and favourite
locations.
Storing your home
4. If you want to set the location to your
home, touch [1 Home].
Finding your home
1. Press [NAV] > Touch [Favourites].
2. Touch [Home 1].
5. Touch [OK].
1. Press [NAV] > Touch [Address
Book].
3. Touch the preferred route, then
touch [Start].
2. Touch
after confirming the preferred location.
3. Touch [Favourites].
✽ Note
• The procedure to store your work location
and favourite locations is same as the
one for storing your home.
• New information placed in the same
storage position overwrites the old data.
• If you want to delete the location
stored in the Address Book, touch
[Delete].
• If you want to store the current location
in [Favourites] menu, press [NAV] >
touch [Favourites] > touch and hold
the preferred number > Input a name,
then touch [OK].
Drive in accordance with the screen
and voice information.
✽ Note
The procedure to find your work location
and favourite locations is same as the
one for finding your home.
32
LAN8900EKYN ENG indesign.indd 32
2010-03-25 ¿ÀÀü 10:00:21
Using the map menu
Map menu overview
General operations of map
menu
1. Turn the unit on.
2. Press MAP. The map screen appears.
[Route] menu
3. Touch [Menu].
[Traffic] menu
4. Touch [View], [Route] or [Traffic] to
select the desired option.
5. Touch the preferred setting method.
For details, refer to the page 34-38.
[View] menu
33
LAN8900EKYN ENG indesign.indd 33
2010-03-25 ¿ÀÀü 10:00:21
Using the map menu
POI Category
3. Touch [OK].
2D/ 3D
Some landmarks in the surrounding
area can be displayed as icons on the
screen.
This allows you to display or hide the
landmark icons by type.
1. Press [MAP] > Touch [Menu] >
[View] > [POI Category].
The activated landmark icons are
displayed on the map.
The map view can be changed between
2D and 3D.
- 2D: Displays the map in a 2-dimensional environment similar to a
road map.
- 3D: Displays the view from an elevated
perspective. It is easy to recognize
an image of the route because it
provides a panoramic view over a
long distance.
1. Press [MAP] > Touch [Menu] >
[View] > [2D/3D].
2. Touch the desired icons.
The icon display settings toggle on
and off each time you touch the
icon. The indicator of the selected
icon illuminates.
2. Touch [2D/3D] again to switch to
the 2D screen.
34
LAN8900EKYN ENG indesign.indd 34
2010-03-25 ¿ÀÀü 10:00:22
Using the map menu
Split Screen/ Full Screen
Store Position
Tour Planner
The map view can be changed between
split screen and full screen.
The current vehicle position can be
stored in the Address Book.
The tour planner allows you to travel
through the searched routes by setting
a destination or way point.
1. Press [MAP] > Touch [Menu] >
[View] > [Split Screen].
1. Press [MAP] > Touch [Menu] >
[Route] > [Store position].
1. Press [MAP] > Touch [Menu] >
[Route] > [Tour Planner].
2. Input the name of the current position then touch [OK].
2. Refer to “Tour Planner” on the pages
29-30.
Split screen
2. To switch to the full screen mode,
touch [Menu] > [View] > [Full
Screen].
The current vehicle position is stored
in the Address Book automatically.
(Page 24)
Full Screen
35
LAN8900EKYN ENG indesign.indd 35
2010-03-25 ¿ÀÀü 10:00:22
Using the map menu
Route Options
You can modify the route conditions or
confirm the route information. Set the
appropriate route condition according to
your purpose.
1. Press [MAP] > Touch [Menu] >
[Route] > [Route Options].
table with real time traffic information, however this route may
not be valid in terms of driving
conditions such as sudden acceleration.
- Eco Route might have more
driving time and distance to
save fuel consumption.
• TMC:
- Auto (
2. Touch the preferred setting item.
• Route: If you don’t set the [Plan
Different Routes] in the
setup menu, set the route
option to Fast ( ), Short
( ) or Eco ( ).
✽ Note
• Fast Route: Calculates a route with
the shortest travel time.
• Short Route: Calculates a route
with the shortest distance.
• Eco (Economical) Route:
- To save fuel consumption, this
route considers to reduce the
number of frequent stop&go route
at the intersection and turning
point based on fuel consumption
- Off (
- On (
): When the TMC event is
found on current route,
the navigation system
searches the detour
route automatically
without any announcement.
): Cancels the TMC function.
): When the TMC event is
found on current route,
the navigation system
displays the pop-up
screen of the event
information.
✽ Note
A pay TMC is not supported.
)
• Toll Road (
- Use: Includes the use of toll
roads.
- Avoid: Enables the avoid of toll
roads.
• Tunnel (
)
- Use: Includes the use of tunnel.
- Avoid: Enables the avoid of tunnel.
• Main Road (
)
- Use: Includes the use of main
road.
- Avoid: Enables the avoid of main
road.
• Ferry (
)
- Use: Includes the use of ferries.
- Avoid: Enables the avoid of ferries.
3. Press [OK].
When the current location map
screen or route setting screen is
displayed, the system recalculates a
route with the set conditions.
✽ Note
• Always stop the vehicle in a safe
local before modifying the route
conditions.
• Modifying the route conditions while
driving may cause an accident.
36
LAN8900EKYN ENG indesign.indd 36
2010-03-25 ¿ÀÀü 10:00:22
Using the map menu
Browser
Detour
You can view an enlarged screen of
route section when the route guidance
is active.
If you want to make a detour due to
traffic conditions, you can use the detour function to calculate an alternative
route from the vehicle location to the
destination.
1. Press [MAP] > Touch [Menu] >
[Route] > [Browser].
4. Touch the preferred route, then
touch [Start].
1. Press [MAP] > Touch [Menu] >
[Route] > [Detour].
2. Touch [Shorter] or [Longer] to set
a route which take a detour as the
distance you select.
Drive in accordance with the screen
and voice information.
2. Touch [Previous] or [Next] to view
the route sections.
✽ Note
If you don’t need to take a detour
when you are navigating a route , touch
[Menu] > [Route] > [Detour] > [Delete].
3. Touch [Section] to view the enlarged
screen of route section.
.
4. Touch [Route] to return to the previous screen.
- Blue: Original route
- Red: Detour route
3. Touch [Start].
5. Touch
to return to the current
vehicle map screen.
37
LAN8900EKYN ENG indesign.indd 37
2010-03-25 ¿ÀÀü 10:00:22
Using the map menu
Info Nearby
The list of traffic information around the
current vehicle position is displayed.
to return to the previous
5. Touch
screen. Press MAP to return to the
current location map screen.
1. Press [MAP] > Touch [Menu] > [Traffic] > [Info Nearby].
Info On Route
2. Touch the desired option to check
the detailed information.
3. Touch [Show Map] after checking it.
The list of traffic information found on
the recommended route from the current vehicle position to the destination is
displayed.
A detour route to avoid the event is
searched from the current vehicle position to the destination. Also, you can
check the detailed information about
the displayed events.
1. Press [MAP] > Touch [Menu] > [Traffic] > [Info On Route].
3. If you need to take a detour, touch
[Detour].
✽ Note
Touch [Show Map], if you want to
view the position about the event
to
found on the route. Touch
return to the previous screen. Press
MAP to return to the current location
map screen.
4. Touch the preferred route.
2. Touch the desired option to check
the detailed information.
4. Touch [Zoom+] to view the map in
detail. Touch [Zoom-] to view the
map a wider area.
5. Touch [Start].
Drive in accordance with the screen
and voice information.
38
LAN8900EKYN ENG indesign.indd 38
2010-03-25 ¿ÀÀü 10:00:23
Bluetooth wireless technology
Understanding Bluetooth
wireless technology
Bluetooth wireless technology establishes a wireless link between two devices,
such as your phone and the unit.
The first time you use two devices
together you must connect them by
establishing a relationship using a PIN
code. After the initial connecting, the
two devices can connect automatically
each time you turn them on.
✽ Note
• There may be restrictions on using
Bluetooth technology in some locations.
• Due to the variety of Bluetooth phones
and their firmware version, your device
may respond differently when performing over Bluetooth.
• As difference in functional operation by model is mainly resulted from
feature of a hands-free phone, consult
manufacturer of a phone if you have
any question.
• You can check the Bluetooth phone
compatibility list on the web-site
(http://www.navigation.com/kia).
Connecting your unit and
bluetooth phone
4. Touch a bluetooth phone you desire
from the “Bluetooth Devices” screen.
To connect using the unit settings (1)
1. Press
on the control panel.
2. Touch [Bluetooth].
3. Touch [Search for Bluetooth Devices].
If you want to cancel, touch [Cancel].
5. Input the passkey (Default: 0000)
showed on the screen in your phone
when the pop-up screen is displayed
on the screen.
When it is successfully connected,
the Bluetooth main screen appears
on the screen.
When it is not connected, the connection failure message appears on
the screen.
39
LAN8900EKYN ENG indesign.indd 39
2010-03-25 ¿ÀÀü 10:00:23
Bluetooth wireless technology
To connect using the unit
settings (2)
To connect using the phone
settings
1. Press
Your phone’s Bluetooth feature may be
set to off by default. To use the Bluetooth feature, Bluetooth must be turned
on in your phone. Refer to your phone’s
user guide.
on the control panel.
2. Press [Search for Bluetooth Devices].
5. Input the passkey (Default: 0000)
showed on the screen in your phone
when the pop-up screen is displayed
on the screen.
When it is successfully connected,
the [Bluetooth] screen appears on
the screen.
1. Enable the phone’s Bluetooth component. This might be in a menu
called Settings, Bluetooth, Connections, or Hands-free.
2. Press [ ] > Touch [Bluetooth] > [External Device Authorization].
3. Follow steps 4-5 on the page 39.
✽ Note
If you touch
on the control panel
again after connected via Bluetooth
wireless technology, the Bluetooth main
screen appears on the screen.
If you want to cancel, touch [Cancel].
3. Initiate a search for Bluetooth
devices. These settings might be
located in a menu called Bluetooth,
Connections, or Hands-free.
4. Select the your device from the list
of phone.
✽ Note
• It works the same as the wired headset
for mobile phone. The headset functionality is for telephone conversation.
It is not for listening to music.
• Unlike the hands-free functionality,
Headset connection will allow only two
functions “answering calls” and “making a call from the latest call”. Also the
caller’s number is not displayed when
answering calls.
• If connecting through a Bluetooth
phone, the hands-free connection or
headset connection may not operate
depending on the type of the phone.
40
LAN8900EKYN ENG indesign.indd 40
2010-03-25 ¿ÀÀü 10:00:23
Bluetooth wireless technology
Disconnecting/Connecting
again the bluetooth phone
1. Touch [View Bluetooth Device List] on
the “Bluetooth” Screen.
3. Touch the disconnected phone again
to connect your phone. And then
touch [Yes].
3. Touch [Yes].
2. Touch the connected phone. And
then touch [Yes].
The
mark appears again.
Deleting a connected phone
If you no longer need to use a connected phone, you can delete it.
• The connected phone is deleted.
• When not deleting a connected
phone, touch [No].
Changing the passkey
1. Touch [View Bluetooth Device List] on
the “Bluetooth” screen.
Your phone is disconnected and the
mark disappears.
You can change the passkey.
1. Input the passkey using the keypad,
and
.
2. Touch on the right-hand side of the
device name of the phone you want to
delete.
2. Touch [OK].
41
LAN8900EKYN ENG indesign.indd 41
2010-03-25 ¿ÀÀü 10:00:24
Bluetooth wireless technology
Making a call by entering
phone number
The most basic way to make a call is to
simply dial the number.
Connect your unit and bluetooth phone
before you make a call.
button on the control
1. Press the
panel.
The Bluetooth main screen appears
on the screen.
2. Input the phone number you want to
call by touching the number buttons.
And then touch
.
✽ Note
• If you make a mistake while dialing,
touch
to erase one digit at a time.
If you want to erase all digits at a time,
touch and hold .
for long to make a call from
• Touch
a latest call.
• If you want to make an international
telephone call, touch [0] for long, then
input the phone number.
• The user’s recent call history applies
only to the hands-free connection.
(Making a call from a recent call with
the headset connection depends on
the call history of the Bluetooth phone.)
• The headset connection allows only
making a call from a recent call.
Switching the sound path
during a call
3. Touch [Hang Up] to finish the telephone conversations.
You can hear sound through the speaker
of unit and phone by touching [Transfer
Call]/ [Transfer call back].
Switching the microphone
on/off
You can switch the microphone on/off
by touching [Microphone Off]/ [Microphone On].
Answering calls
1. When you receive a call, your phone
rings and the “Incoming Call” pop-up
screen is displayed on the screen.
2. Touch [Accept] to answer the call.
If you want to reject a call, touch
[Refuse].
✽ Note
• If the Call-ID service is available, the
caller’s phone number is displayed.
• If the phone number is in the phone
book, phone book entry’s name is
displayed.
• If the incoming call is from a number
stored in your Contacts, the entry’s
name is displayed. The caller’s phone
number may also be displayed, if available.
• If “Rejecting” function is unusable,
then the phone connected to the
device does not support the rejecting
calls function.
42
LAN8900EKYN ENG indesign.indd 42
2010-03-25 ¿ÀÀü 10:00:24
Bluetooth wireless technology
Using your Phone Book
You can use the phone book entries
stored on the memory of phone supporting PBAP (Phone Book Access
Profile) profile.
After connecting your unit and bluetooth phone via Bluetooth wireless technology, the numbers in your phone’s
phone book is transferred automatically
into phone book.
2. Touch a phone book entry you want
to call.
or
switches to the
Touching
next or previous page in the list.
Calling a number in the phone book
After finding the entry in the phone
book you want to call, you can select the
number and make a call.
1. Press
on the control panel. And
then touch [Phone book].
2. Input the first letter of the entry
in the phone book list you want to
search by using the keypad, then
touch [OK].
3. Touch [Hang Up] to finish the telephone conversations.
3. Touch a phone book entry you want
to call.
Searching the phone book entry by
alphabet
If there are many entries in the phone
book list, it can be useful to display
them in the alphabetical order for easier
searching.
1. Touch [Search by Name] on the
“Phone book” screen.
Touching
or
switches to the
next or previous page in the list.
4. Touch [Hang Up] to finish the telephone conversations.
43
LAN8900EKYN ENG indesign.indd 43
2010-03-25 ¿ÀÀü 10:00:24
Bluetooth wireless technology
Using your Calling list
You can use the calling list stored on
the memory of phone supporting PBAP
(Phone Book Access Profile) profile.
After connecting your unit and bluetooth phone via Bluetooth wireless technology, the numbers in your phone’s
[Outgoing Calls], [Missed Calls], and
[Incoming Calls] list is transferred automatically into calling list.
2. Touch [Outgoing], [Missed], or [Incoming].
Updating the calling list
You can update the numbers in your
phone’s [Outgoing Calls], [Missed Calls],
or [Incoming Calls] list into calling list.
on the control panel. And
1. Press
then touch [Calling lists].
Outgoing Calls
Calling a number in the calling list
After finding the entry you want to call in
the [Outgoing Calls], [Missed Calls], or
[Incoming Calls] list, you can select the
number and make a call.
Missed Calls
1. Press
on the control panel. And
then touch [Calling lists].
2. Touch [Outgoing], [Missed], or [Incoming], then touch [Update].
3. The updated calling lists are
downloaded.
Incoming Calls
3. Touch the entry you want to call.
44
LAN8900EKYN ENG indesign.indd 44
2010-03-25 ¿ÀÀü 10:00:25
Bluetooth wireless technology
Making a call with speed dial
numbers
You can use the phone book entries
stored on the memory of phone supporting PBAP (Phone Book Access
Profile) profile.
You can easily store up 12 phone numbers and later recall them the touch of a
speed dial number.
Touching or switches to the next
or previous page in the list.
3. Touch one of categories you want to
assign to speed dial number.
(For example: Phone book)
Calling a number in the speed dial
list
1. Press
on the control panel. And
then touch [Speed dial].
2. Touch one of speed dial numbers to
make a call.
Registering phone numbers to the
speed dial list
1. Press
on the control panel. And
then touch [Speed dial].
The name (phone number) is stored
in memory. The next time you touch
the same name, the name (phone
number) is recalled from memory.
4. Touch one of phone numbers you
want to assign to speed dial number.
3. Touch [Hang Up] to finish the telephone conversations.
2. Touch and hold one of speed dial
numbers (1-12). (For example: 1)
5. Input the name by using the keypad,
then touch [OK].
✽ Note
Make sure that the speed dial functionality in the Bluetooth phone is enabled
before using.
45
LAN8900EKYN ENG indesign.indd 45
2010-03-25 ¿ÀÀü 10:00:25
CD/MP3/WMA/USB/iPod operation
Playing an audio CD and
MP3/ WMA/ USB/ iPod files
Disc
Insert a disc in the disc slot and playback will start automatically.
iPod
You can play an iPod device on the unit
by connecting the iPod to the USB port
by using the appropriate cable.
Connect an iPod device to the USB port
and playback starts automatically.
For details about iPod, refer to the iPod
User Guide.
Skip to the next track/file ALL
Touch
to select the next track/file.
Skip to the previous track/file
ALL
Touch
time.
within 1 second of playing
Return to the beginning of the current track/file ALL
Touch
after 1 second of playing time.
Audio CD
Search ALL
MP3/WMA CD
USB
You can play the files recorded in a USB
memory device.
Connect a USB device to the USB port
and playback starts automatically.
✽ Note
Use the car cable for exclusive use of
iPod when connecting iPod to the terminals for iPod device for playback.
Touch and hold the
or
buttons
during playback and then release at the
point you want.
46
LAN8900EKYN ENG indesign.indd 46
2010-03-25 ¿ÀÀü 10:00:26
CD/MP3/WMA/USB/iPod operation
Intro scan
Disc - Audio CD
USB
Disc - MP3/WMA
The first 10 seconds of each tracks/files
are played.
Repeat ALL
The current selected tracks/files are
played repeatedly.
1. Touch [Option] during playback.
1. Touch [Option] during playback.
Example: Audio CD
Example: Audio CD
2. Touch [REPEAT] repeatedly.
Disc - MP3/WMA
USB
• [REPEAT Off]: Plays repeatedly all
files within the disc
or USB.
• [REPEAT Track]: Plays repeatedly
the current file.
• [REPEAT Folder]: Plays repeatedly
all files within the
current folder.
iPod
• [REPEAT Off]: Plays repeatedly all
files within the iPod.
• [REPEAT On]: Plays repeatedly the
current file.
2. Touch [SCAN Start].
Disc - Audio CD
3. Touch [SCAN Stop] to cancel the
intro scan.
• [REPEAT Off] : Plays repeatedly all
tracks within the
disc.
• [REPEAT Track] : Plays repeatedly
the current track.
47
LAN8900EKYN ENG indesign.indd 47
2010-03-25 ¿ÀÀü 10:00:26
CD/MP3/WMA/USB/iPod operation
RANDOM ALL
All of the tracks/files are played randomly.
1. Touch [Option] during playback.
2. Touch [RANDOM] repeatedly.
Disc - Audio CD
Disc - MP3/WMA
USB
• [RANDOM Off]: Cancels RANDOM
play.
• [RANDOM Folder]: The unit plays
randomly all files
within current
folder.
• [RANDOM All]: The unit plays randomly all files within
the disc or USB.
iPod
• [RANDOM Off]: Cancels RANDOM
play.
• [RANDOM All]: The unit plays randomly all files within
the iPod.
• [RANDOM Album]: The unit plays
randomly all
files within current album.
• [RANDOM All]: Plays randomly all
files within the disc.
• [RANDOM Off]: Cancels RANDOM
play.
Playing files by classifying into
folder/ Album/ Artist USB
You can play files within the USB by
classifying into folder, album, or artist.
1. Touch [Option] during playback.
2. Touch [Folder], [Album], or [Artist]
during playback.
• [Folder]: Plays the files by classifying into folder.
• [Album]: Plays the files by classifying into album.
• [Artist]: Plays the files by classifying
into artist.
✽ Note
If you want to move to the playlist
screen, touch
.
48
LAN8900EKYN ENG indesign.indd 48
2010-03-25 ¿ÀÀü 10:00:26
CD/MP3/WMA/USB/iPod operation
Locating a folder/file using
the list Disc - Audio CD USB
Disc - MP3/WMA
You can listen to music by displaying the
track/folder/file list.
1. Touch the [List] button during playback.
✽ Note
• In case of MP3/WMA file, touch the
button to move to upper folder.
• Touch the or buttons to select the
list you want to view.
• If you want to move to the playlist
screen, touch
.
Searching music
iPod
You can search iPod for playlist, artist
names, album titles, Genre, songs, composer, audio books, podcasts.
For details about iPod, refer to the iPod
User Guide.
Example: Audio CD
1. Touch [List] during playback.
2. In case of Audio CD, touch the file
you want.
In case of MP3/WMA file, touch the
folder button you want. If there is no
folder, touch the file you want.
2. Touch the desired item.
Audio CD
• [Playlists]: Plays the songs in the
[Playlists].
• [Artists]: Plays the songs in the
[Artists].
• [Albums]: Plays the songs in the
[Albums].
• [Genres]: Plays the songs in the
[Genres].
• [Songs]: Plays the songs in the
[Songs].
• [Composers]: Plays the songs in the
[Composers].
• [Audio books]: Plays the songs/
chapters in the
[Audio books].
• [Podcasts]: Plays the songs/chapters
in the [Podcasts].
✽ Note
• If you want to move to upper folder,
touch
.
• Touch the or buttons to select the
list you want to view.
• If you want to move to the playlist
screen, touch
.
MP3/WMA file
3. The selected track/file is played.
49
LAN8900EKYN ENG indesign.indd 49
2010-03-25 ¿ÀÀü 10:00:26
CD/MP3/WMA/USB/iPod operation
Setting audio book play speed
iPod
Setting the play speed only affects
audio books purchased from the iTunes
store or audible.com.
For details about iPod, refer to the iPod
User Guide.
1. Touch [Option] when you listen to
songs/ chapters in the [Audio book].
• [Audio book Fast]:
Plays the audio books with fast
speed.
• [Audio book Slow]:
Plays the audio books with slow
speed.
✽ Note
If you want to move to the playlist
.
screen, touch
2. Touch [Audio book] repeatedly.
USB device requirement
• This unit supports only USB Flash Drive
and USB External HDD with FAT16 or
FAT32 format.
• Do not extract the USB device during
operation (play, etc.).
• Regular back up is recommended to
prevent data loss.
• If you use a USB extension cable or
USB HUB, the USB device may not be
recognized.
• Some USB devices may not work with
this unit.
• Digital camera and mobile phone are
not supported.
• This unit is not supported when the total
number of files is 10000 or more.
Compatible USB devices
• Devices which require additional
program installation when you have
connected it to a computer, are not supported.
• MP3 player: Flash type MP3 player
The MP3 player requiring installation of a
driver is not supported.
• USB Flash Drive: Devices that support
USB2.0 or USB1.1 .
• [Audio book Normal]:
Plays the audio books with original
speed.
50
LAN8900EKYN ENG indesign.indd 50
2010-03-25 ¿ÀÀü 10:00:27
CD/MP3/WMA/USB/iPod operation
MP3/WMA file requirement
• Sampling Frequency / 16 - 48 kHz
(MP3) 8 - 44.1 kHz (WMA)
• Bit rate / within 8 - 320 kbps (MP3)
5 -160 kbps (WMA)
• CD-R/CD-RW physical format should
be “ISO 9660”
• If you record MP3/WMA files using
software which cannot create a FILE
SYSTEM, for example “Direct-CD”
etc., it will not be possible to playback
MP3/WMA files.
We recommend that you use “EasyCD Creator” which creates an
ISO9660 file system.
Customers should also note that
permission is required in order to
download MP3/WMA files and music
from the Internet. Our company has
no right to grant such permission. Permission should always be sought from
the copyright owner.
iPod device requirement
• Compatibility with your iPod may vary
depending on the type of your iPod.
• Depending on your iPod’s software version, it may not be possible to control
your iPod from this unit. We recommend
installing the latest software version.
• If you have a problem with your iPod,
please visit www.apple.com/support/
ipod.
• This system can receive analog sound
from the following iPod models.
- iPod touch 1th generation
- iPod mini (1st/2th generation)
- iPod nano (1st/3th generation)
- iPod classic (4st/5th/6th generation)
• If content on the iPod is not played back
correctly, update your iPod software
to the latest version. For details about
updating the iPod, check the Apple web
site <http://www.apple. com>.
• Apple is not responsible for the operation of this device or its compliance with
safety and regulatory standards.
51
LAN8900EKYN ENG indesign.indd 51
2010-03-25 ¿ÀÀü 10:00:27
Radio operation
Listening to the radio stations
1. Press the “RADIO” button to select
the radio.
2. Press the “RADIO” repeatedly to
select a band.
The mode switches as follows.
FM t AM t FM...
✽ Note
To select the FM/AM by touching the
on the screen to
screen, touch
.
select the AM and then touch
3. Auto tuning:
Touch / on the screen. Or press
/
on the control panel.
- When a station is received, searching stops.
Manual tuning:
Rotate the Jog dial leftward/ rightward on the control panel.
- The frequencies move up and
down step by step.
Storing and recalling
stations
You can easily store up to 12 preset
stations for later recall at the touch of a
button.
1. Select the band (FM, AM) you want to
store a station into.
2. Select the desired frequency.
3. Touch [Presets] on the screen.
4. Touch and hold one of the preset buttons.
The preset station information will be
displayed.
The selected preset station has been
stored in memory.
If you move to the previous/next page,
touch / .
5. Repeat steps 1 and 4 to preset other
stations.
Next time, if you touch the preset buttons, the station is recalled from the
memory.
✽ Note
When a station is preset on the preset
station button number on which another
station of the same band has already
been preset, the previously preset station is automatically erased.
52
LAN8900EKYN ENG indesign.indd 52
2010-03-25 ¿ÀÀü 10:00:27
Radio operation
AS (Auto search memory)
To scan broadcast frequencies
TA (Traffic announcement)
This is only available for AM reception.
This function lets you automatically store
the strong broadcast frequencies.
The first 10 seconds of each broadcast
frequency are played.
TA function allows the unit to switch to
traffic announcement (TA) from the current source (Another FM station, CD, or
other connected components).
1. Select the band to AM.
1. Touch [Option] on the screen in
AM/FM mode.
1. Touch [Option] on the screen in
AM/FM mode.
2. Touch [Option] on the screen.
2. Touch [TA Off]/ [TA On] on the
screen.
3. Touch [Autostore] on the screen.
2. Touch [SCAN Start] on the screen.
3. Touch [SCAN Stop] to cancel it.
Local stations with the strong signals
are searched and stored automatically in the list menu. And then the
list menu appears on the screen.
[TA On]: Traffic programs and announcements can be automatically received using
TP/TA features.
[TA Off]: Traffic programs and announcements can not be
received.
4. Touch the broadcast frequency you
want.
53
LAN8900EKYN ENG indesign.indd 53
2010-03-25 ¿ÀÀü 10:00:28
Radio operation
NEWS
REGION Auto/Off
This function allows the unit to switch to
news from the current source (Another
FM station, CD, or other connected
components).
This is only available for FM reception.
1. Select the band to FM.
2. Touch [Option] on the screen.
1. Touch [Option] on the screen in
AM/FM mode.
3. Touch [REGION Auto]/ [REGION
Off] on the screen.
2. Touch [NEWS Off]/ [NEWS On] on
the screen.
[NEWS On]: News can be automatically received.
[NEWS Off]: News can not be received.
[REGION Auto]:
The unit switches to another station,
within the same network, broadcasting the same program when the
receiving signals from the current
station become weak.
[REGION Off]:
The unit switches to another station,
within the same network when the
receiving signals from the current
station become weak. (This mode,
the program may differ from the one
currently received.)
54
LAN8900EKYN ENG indesign.indd 54
2010-03-25 ¿ÀÀü 10:00:28
Auxiliary device operation
Using an AUX source
It is possible to use auxiliary equipment
with unit.
1. Press “MEDIA” until “AUX” screen
appears.
AUX Audio
✽ Note
• Some auxiliary devices that don’t have
the video source may not output the
video screen.
• In case of some iPod devices, Use the
iPod cable for exclusive use of iPod for
video playback when connecting iPod
to the AUX connector.
• Video is not available while driving.
(Based on the traffic regulation, Aux
Video is only available whenever vehicle is in stop condition with parking
brake.)
AUX Video
2. Connect an auxiliary device to the
AUX connector, then activate the
auxiliary function.
55
LAN8900EKYN ENG indesign.indd 55
2010-03-25 ¿ÀÀü 10:00:28
Voice recognition system
Voice recognition
Giving voice commands
How to say numbers
Voice recognition allows hands-free
operation of the AV system (RADIO,
CD, USB, iPod), navigation and other
systems equipped on this vehicle, such
as the phone.
on the steering wheel re1. Press
mote control.
Voice recognition requires a certain way
to say numbers in voice commands. Refer to the following examples. (General
rule: Either “zero” or “oh” can be used
for “0”.)
✽ Note
To get the best recognition performance
out of voice recognition, observe the
following:
• Keep the interior of the vehicle as
quiet as possible. Close the windows to
eliminate the surrounding noises (traffic noises, vibration sounds, etc.), which
may prevent the system from recognizing the voice commands correctly.
• Wait until a beep sounds before
speaking a command. Otherwise,
the command will not be recognized
properly.
• Speak in a natural voice without pausing between words.
2. After the beep sounds, say “Help”.
All commands shall be listed which
are presented in active fields.
Frequency
Say frequency number according to the
following example.
“Frequency ninety five comma four”/
“Ninety five comma four mega-hertz”
✽ Note
• If the command is not recognized, the
system announces, 1 st time, “Pardon?”
and 2nd time “Please, repeat”.
• If you want to cancel the voice recognition, press
one more time or
press the any button or touch screen
say “Cancel”.
• If you want to adjust the volume of the
or
on
system feedback, press
the steering wheel remote control or
use the volume knob ( ) on the control while the voice recognition is active.
Phone number
Say phone number according to the following example.
0-1-0-2-0-0-5-2 (Single digit)
56
LAN8900EKYN ENG indesign.indd 56
2010-03-25 ¿ÀÀü 10:00:28
Voice recognition system
Voice command examples
To use the voice recognition function,
saying one command is sometimes
sufficient, but at other times it is necessary to say two or more commands. As
examples, some additional basic operations by voice commands are described
here.
5. After the beep sounds and say “Frequency one-hundred two” or “onehundred two mega hertz”.
6. When the spoken frequency is recognized, the FM frequency is changed
to the 102 MHz.
Example 1: Changing FM Radio &
Frequency
on the steering wheel re1. Press
mote control.
2. After the beep sounds and say “FM”.
5. When the playlist is recognized, it is
played at once.
Example 2: Changing playlist of
USB (CD)
3. When the “FM” command recognized, the main screen will be
changed to the FM main screen.
on the steering wheel
4. Press
remote control.
4. Press
, after the beep sounds,
you can say one of the playlist like a
“micky green oh”.
on the steering wheel
6. Press
remote control.
on the steering wheel re1. Press
mote control.
7. After the beep sounds and say “Next
track” or “Previous track”.
2. After the beep sounds and say “List”.
8. When the command is recognized,
the played list is changed to “Next
track” or “Previous track”.
3. When the command recognized, the
screen will be changed to the USB
(CD) LIST screen.
57
LAN8900EKYN ENG indesign.indd 57
2010-03-25 ¿ÀÀü 10:00:28
Voice recognition system
Example 2: Dial number
To use this function, you need a mobile
phone which is supported a Bluetooth.
Connect your unit and bluetooth phone
before using.
on the steering wheel re1. Press
mote control.
2. After the beep sounds and say “Dial
Number”.
3. When the spoken command is recognized, the screen is changed to the
bluetooth main screen, and then the
system announces “Please say the
phone number”.
5. When the spoken numbers are
recognized, the system announces
the recognized numbers and then a
prompt “and then?”.
6. If you want to make a call the recognized number, say “Call”.
If there is misrecognized number or
you want to delete the number, say
“Clear”.
If you want to finish it at any time, say
“Cancel”.
Help command
If you are controlling the system by voice
commands for the first time or do not
know the appropriate voice command,
say the following command.
on the steering wheel re1. Press
mote control.
4. Say the phone number like
“01020052” (single digit).
3. The voice feedback will announce
“Possible commands are”.
4. After the beep sounds, say “Other
commands”.
Application commands shall be listed
which are presented in active fields.
5. The voice feedback will announce
“Possible commands are”.
6. After the beep sounds, say “AUX”.
The screen is changed to the AUX
screen.
2. After the beep sounds, say “Help”.
All commands shall be listed which
are presented in active fields.
58
LAN8900EKYN ENG indesign.indd 58
2010-03-25 ¿ÀÀü 10:00:29
Voice recognition system
Voice commands
Category
Voice command
Category
Voice command
Category
Voice command
Application
AUX
command
CD
News on
Incoming
iPod
Next station
Missed
Map
Previous station
Outgoing
Radio
TA off
Phone Book
USB
TA on
Call Name
Phone
Preset <number>
Speed Dial <number>
Media
Presets
Call
AM
Calling lists
FM
Speed dial
List
Mobile
Option
Private
Scan Start
Office
Scan Stop
Clear
Correction
Other commands
Frequency “x” comma
“yy”
Cancel
Frequency “xxxx”
No
Autostore
Yes
Region Auto
Category
General
functions
Voice command
Volume down
Volume up
Previous page
Next page
Help
Radio
News off
Phone
Dial Number
Region Off
59
LAN8900EKYN ENG indesign.indd 59
2010-03-25 ¿ÀÀü 10:00:29
Voice recognition system
Voice commands
Category
iPod
Voice command
Repeat Off
Repeat On
Voice command
Category
MP3, CD,
USB
Directory up
Category
Audio CD
Voice command
List
List
Option
Scan Start
Option
Repeat Off
Scan Stop
Repeat Folder
Repeat Track
Random Off
Repeat Off
Scan Start
Random All
Repeat Track
Scan Stop
Random Album
Scan Start
Random All
Audio book Slow
Scan Stop
Random Off
Audio book Normal
Random All
Track Info
Audio book Fast
Random Folder
Next Track
Directory up
Random Off
Previous Track
List
Track Info
Track <Number>
Option
Next Track
OK
Next Track
Previous Track
Previous Track
<Folder>
Track Info
Track <Number>
<Folder>
Album
Track <Number>
Artist
OK
Folder
Category
Navigation
Voice command
Navigation
OK
60
LAN8900EKYN ENG indesign.indd 60
2010-03-25 ¿ÀÀü 10:00:29
Troubleshooting
Cannot identify the current location.
(GPS not receiving)
GPS cannot be used indoors and must
be connected to a power source with
ACC in a vehicle in a location where
the signal from the sky can be received
easily.
When initially connecting the GPS, it
usually takes about 10 minutes to be
working normally, but the connection
speed can differ depending on the
weather condition, and surrounding
obstacles.
If the GPS connection is unstable for a
long period of time, try the following.
• Check if the product is connected to a
power source.
• Check if the back of the GPS product
is in a location where the sky can be
seen well.
• If there are high buildings or if you are
under a tree, move to a location where
there aren’t any obstacles.
Cannot hear the voice guide.
The volume is not set correctly, or it is
turned off. Adjust the volume of voice
guidance.
There is a difference between the driving road and the road on the map in the
product.
Even though GPS is usually very accurate, there is a small margin for error.
When the GPS receiver is installed,
there can be an error of about 10m. But
for newly built roads, the problem could
come from the data update to the map.
Cannot see the map.
Perhaps you cannot see the map even
when you have executed the navigation
menu.
This happens when the data within the
memory is damaged. Delete all the
data in the memory and install the data
again. If the issue persists after installation, contact the A/S center.
The path guide can be different from
the actual path. (Path guide error)
• When the road is closely parallel.
• When the splitting road angle is very
small.
• When there is an adjacent road when
turning.
• When driving on a road that is narrowing fast.
• When driving through the mountain or
where the road is too curvy.
• When the starting, passing and arriving
locations are too close within 1km.
• When you have set the starting, passing or arriving location more than 1km
away from the road.
• When driving through the tunnel.
Map matching
As mentioned, the GPS systems used
by this Navigation System are susceptible to certain errors. Their calculations
may on occasion place you in a location
the map where no road exists. In this
situation, the processing system understands that vehicles travel only on roads,
and is able to correct your position by
adjusting it to a nearby road. This is
called map matching.
With map matching.
With no map
matching.
61
LAN8900EKYN ENG indesign.indd 61
2010-03-25 ¿ÀÀü 10:00:29
Troubleshooting
Symptom
Power doesn’t turn on.
The unit doesn’t operate.
Playback is not possible.
There’s no sound.
Cause
Correction
The ignition switch is NOT turned ON.
Turn the ignition switch to ON.
The ignition switch is NOT set to ACC.
Set the ignition switch to ACC.
The power of unit is turned OFF.
Turn the unit on by pressing
control panel.
Noise and other factors are causing the
built-in microprocessor to operate
incorrectly.
Turn the unit off and then on.
The disc is dirty.
Clean disc.
The loaded disc is a type this unit
cannot play.
Check what type the disc is.
The disc is inserted upside down.
Insert the disc with the label upward.
The files on the disc are an irregular
file format.
Check the file format.
The volume level is low.
Adjust the volume.
The mute is on.
Turn the mute off.
on the
62
LAN8900EKYN ENG indesign.indd 62
2010-03-25 ¿ÀÀü 10:00:29
Specifications
RADIO SECTION
FM
Frequency Range. . . . . . . . . . . . . . . . . . . . . 87.5 to 108 MHz
S/N Ratio . . . . . . . . . . . . . . . . . . . . . . . . . . . . . . . . . . . . 50 dB
Distortion . . . . . . . . . . . . . . . . . . . . . . . . . . . . . . . . . . . . . . 1 %
Usable Sensitivity . . . . . . . . . . . . . . . . . . . . . . . . . . . 10 dBμV
GENERAL
Output Power. . . . . . . . . . . . . . . . . . . . . . 50W x 4CH (Max.)
Power Source . . . . . . . . . . . . . . . . . . . . . . . . . . . . . . . . DC 12V
Speaker impedance . . . . . . . . . . . . . . . . . . . . . . . . . . . . . 4 Ω
Ground System . . . . . . . . . . . . . . . . . . . . . . . . . . . . Negative
Dimensions (W x H x D) . . . . . . . . . 206.4 x 118.4 x 185.4 mm
Net Weight . . . . . . . . . . . . . . . . . . . . . . . . . . . . . . . . . .2.44 kg
AM (MW)
Frequency Range. . . . . . . . . . . . . . . . . . . . . 522 to 1620 kHz
S/N Ratio . . . . . . . . . . . . . . . . . . . . . . . . . . . . . . . . . . . . 45 dB
Distortion . . . . . . . . . . . . . . . . . . . . . . . . . . . . . . . . . . . . .1.0 %
Usable Sensitivity . . . . . . . . . . . . . . . . . . . . . . . . . . .38 dBμV
DISPLAY
LCD . . . . . . . . . . . . . . . . . . . . . . . . . . . . . . 6.5 inch TFT LCD
Resolution . . . . . . . . . . . . . . . . . . . . . . . . . . . . . . 800 X 480
Back Light . . . . . . . . . . . . . . . . . . . . . . . . . . . . . . . CCFL type
CD SECTION
Frequency Response . . . . . . . . . . . . . . . . . . 20 Hz to 20 kHz
S/N Ratio . . . . . . . . . . . . . . . . . . . . . . . . . . . . . . . . . . . . 60 dB
Distortion . . . . . . . . . . . . . . . . . . . . . . . . . . . . . . . . . . . . 0.3 %
Channel Separation (1kHz) . . . . . . . . . . . . . . . . . . . . . . 50 dB
63
LAN8900EKYN ENG indesign.indd 63
2010-03-25 ¿ÀÀü 10:00:29
Index
Address Book . . . . . . . . . . . . . . . . . . . . . . . . . . . . . . . . . . .
Address Search . . . . . . . . . . . . . . . . . . . . . . . . . . . . . . . . . .
Answering calls . . . . . . . . . . . . . . . . . . . . . . . . . . . . . . . . . .
AS (Auto search memory) . . . . . . . . . . . . . . . . . . . . . . . . .
24
23
42
53
Parking . . . . . . . . . . . . . . . . . . . . . . . . . . . . . . . . . . . . . . . . .
Phone Number . . . . . . . . . . . . . . . . . . . . . . . . . . . . . . . . . .
POI Category . . . . . . . . . . . . . . . . . . . . . . . . . . . . . . . . . . . .
POI (Point of Interest) . . . . . . . . . . . . . . . . . . . . . . . . . . . . .
28
26
34
24
Bluetooth wireless technology. . . . . . . . . . . . . . . . . . . . . . . 39
RANDOM . . . . . . . . . . . . . . . . . . . . . . . . . . . . . . . . . . . . . .
REGION Auto/Off . . . . . . . . . . . . . . . . . . . . . . . . . . . . . . . .
Repeat . . . . . . . . . . . . . . . . . . . . . . . . . . . . . . . . . . . . . . . . .
Return to the beginning of the current track/file . . . . . . .
Route Options . . . . . . . . . . . . . . . . . . . . . . . . . . . . . . . . . . .
48
54
47
46
36
Changing the passkey . . . . . . . . . . . . . . . . . . . . . . . . . . . . . . 41
Detour . . . . . . . . . . . . . . . . . . . . . . . . . . . . . . . . . . . . . . . . . .37
Giving voice commands . . . . . . . . . . . . . . . . . . . . . . . . . . . 56
GPS Input . . . . . . . . . . . . . . . . . . . . . . . . . . . . . . . . . . . . . . 27
Search . . . . . . . . . . . . . . . . . . . . . . . . . . . . . . . . . . . . . . . . . 46
Setup . . . . . . . . . . . . . . . . . . . . . . . . . . . . . . . . . . . . . . . . 16-19
Skip to the next track/file . . . . . . . . . . . . . . . . . . . . . . . . . . 46
Skip to the previous track/file . . . . . . . . . . . . . . . . . . . . . . 46
Split Screen/ Full Screen . . . . . . . . . . . . . . . . . . . . . . . . . . 35
Store Destination . . . . . . . . . . . . . . . . . . . . . . . . . . . . . . . . . . 31
Store Position. . . . . . . . . . . . . . . . . . . . . . . . . . . . . . . . . . 31,35
Switching the microphone on/off . . . . . . . . . . . . . . . . . . . . 42
Switching the sound path during a call . . . . . . . . . . . . . . . 42
Help command . . . . . . . . . . . . . . . . . . . . . . . . . . . . . . . . . . 58
Home 1/ Work2/ 3~12. . . . . . . . . . . . . . . . . . . . . . . . . . . . . 32
In City . . . . . . . . . . . . . . . . . . . . . . . . . . . . . . . . . . . . . . . . . .
Info Nearby. . . . . . . . . . . . . . . . . . . . . . . . . . . . . . . . . . . . . .
Info On Route . . . . . . . . . . . . . . . . . . . . . . . . . . . . . . . . . . .
Intro scan . . . . . . . . . . . . . . . . . . . . . . . . . . . . . . . . . . . . . . .
26
38
38
47
TA (Traffic announcement) . . . . . . . . . . . . . . . . . . . . . . . . 53
Tour Planner. . . . . . . . . . . . . . . . . . . . . . . . . . . . . . . 29-30, 35
2D/ 3D . . . . . . . . . . . . . . . . . . . . . . . . . . . . . . . . . . . . . . . . . 34
Kia service . . . . . . . . . . . . . . . . . . . . . . . . . . . . . . . . . . . . . . 26
Last Destinations . . . . . . . . . . . . . . . . . . . . . . . . . . . . . . . . . 24
Making a call by entering phone number . . . . . . . . . . . . . 42
Making a call with speed dial numbers . . . . . . . . . . . . . . . 45
Using Map . . . . . . . . . . . . . . . . . . . . . . . . . . . . . . . . . . . . . . 28
Using your Phone Book. . . . . . . . . . . . . . . . . . . . . . . . . . . . 43
Using your Calling list . . . . . . . . . . . . . . . . . . . . . . . . . . . . . 44
Near Destination . . . . . . . . . . . . . . . . . . . . . . . . . . . . . . . . . 26
Near Position . . . . . . . . . . . . . . . . . . . . . . . . . . . . . . . . . . . . 25
NEWS. . . . . . . . . . . . . . . . . . . . . . . . . . . . . . . . . . . . . . . . . . 54
Voice commands . . . . . . . . . . . . . . . . . . . . . . . . . . . . . . 59-60
Voice recognition . . . . . . . . . . . . . . . . . . . . . . . . . . . . . . . . . 56
64
LAN8900EKYN ENG indesign.indd 64
2010-03-25 ¿ÀÀü 10:00:29
Symbols for the display of traffic problems
If the traffic problem is on the calculated route, the symbol will be highlighted.
Symbol
Description
Symbol
Description
Rock fall
Stationary traffic
Accident
Queuing traffic
Other danger
Wind Storm
Road narrow
Snow, Ice
Chipping
Block road, Closed
Road work
Emergency phone not
work
Slippery road, Rain
65
LAN8900EKYN ENG indesign.indd 65
2010-03-25 ¿ÀÀü 10:00:29
Support - Hotline
Web Site : http://www.navigation.com/kia
International Toll Free Number: 00800 18 23 53 22
Telephone number for
all other countries
(or if Toll Free numbers
are not supported)
: +31 555 384 245
P/N: MFL62880528
LAN8900EKYN ENG indesign.indd 66
2010-03-24 ¿ÀÈÄ 10:44:37
DEUTSCH
BEDIENUNGSANLEITUNG
LADEN . . .
LAN8900EKYN GER HMC indesign.ind1 1
2010-03-25 ¿ÀÀü 9:45:03
Inhaltsverzeichnis
Allgemeine Informationen . . . . . . . . . . . . . . . . .7-10
Sicherheitshinweise . . . . . . . . . . . . . . . . . . . . . . . . . . . . . . . . . . . . . . . . . . . . . . . 7-8
Abspielbare Disc-Typen . . . . . . . . . . . . . . . . . . . . . . . . . . . . . . . . . . . . . . . . . . . . . 9
Umgang mit Discs und mit dem Player . . . . . . . . . . . . . . . . . . . . . . . . . . . . . . . . 9
HINWEISE ZUM URHEBERRECHT . . . . . . . . . . . . . . . . . . . . . . . . . . . . . . . . . . . 10
Entsorgung des Altgerätes . . . . . . . . . . . . . . . . . . . . . . . . . . . . . . . . . . . . . . . . . . 10
Bezeichnung der Komponenten. . . . . . . . . . . . 11-13
Bedienungsfeld . . . . . . . . . . . . . . . . . . . . . . . . . . . . . . . . . . . . . . . . . . . . . . . . . 11-12
Fernbedienung am Lenkrad . . . . . . . . . . . . . . . . . . . . . . . . . . . . . . . . . . . . . . . . . 13
Sicherheitshinweise . . . . . . . . . . . . . . . . . . . . . .14-15
Startfenster . . . . . . . . . . . . . . . . . . . . . . . . . . . . . . . . . . . . . . . . . . . . . . . . . . . . . .
Gerät einschalten/Gerät ausschalten . . . . . . . . . . . . . . . . . . . . . . . . . . . . . . . . . .
Disc einlegen/Disc auswerfen. . . . . . . . . . . . . . . . . . . . . . . . . . . . . . . . . . . . . . . .
Lautstärke einstellen . . . . . . . . . . . . . . . . . . . . . . . . . . . . . . . . . . . . . . . . . . . . . . .
Auswahl einer Quelle über das Bedienungsfeld . . . . . . . . . . . . . . . . . . . . . . . . .
Auswahl der Quelle über den Bildschirm . . . . . . . . . . . . . . . . . . . . . . . . . . . . . .
Rückblickkamera (optional). . . . . . . . . . . . . . . . . . . . . . . . . . . . . . . . . . . . . . . . . .
14
14
14
14
15
15
15
Einstellungen . . . . . . . . . . . . . . . . . . . . . . . . . . .16-19
Allgemeine Funktionen im Menü EINSTELLUNGEN . . . . . . . . . . . . . . . . . . . 16-19
Bluetooth . . . . . . . . . . . . . . . . . . . . . . . . . . . . . . . . . . . . . . . . . . . . . . . . . . . . . . 16
System . . . . . . . . . . . . . . . . . . . . . . . . . . . . . . . . . . . . . . . . . . . . . . . . . . . . . . 16-17
Verkehr/Navigation. . . . . . . . . . . . . . . . . . . . . . . . . . . . . . . . . . . . . . . . . . . . . . . 18
Audio . . . . . . . . . . . . . . . . . . . . . . . . . . . . . . . . . . . . . . . . . . . . . . . . . . . . . . .18-19
Display . . . . . . . . . . . . . . . . . . . . . . . . . . . . . . . . . . . . . . . . . . . . . . . . . . . . . . . . 19
2
LAN8900EKYN GER HMC indesign.ind2 2
2010-03-25 ¿ÀÈÄ 12:41:25
Inhaltsverzeichnis
Bedienung des Navigationssystems . . . . . . . 20-21
Was bedeutet “GPS”? . . . . . . . . . . . . . . . . . . . . . . . . . . . . . . . . . . . . . . . . . . . . 20
Hinweise zu Satellitensignalen. . . . . . . . . . . . . . . . . . . . . . . . . . . . . . . . . . . . . . 20
Empfang von Satellitensignalen . . . . . . . . . . . . . . . . . . . . . . . . . . . . . . . . . . . . 20
Navigationsanzeige zu Beginn. . . . . . . . . . . . . . . . . . . . . . . . . . . . . . . . . . . . . . 20
Symbole auf dem Kartenbildschirm . . . . . . . . . . . . . . . . . . . . . . . . . . . . . . 20-21
Aufrufen des Kartenbildschirms . . . . . . . . . . . . . . . . . . . . . . . . . . . . . . . 20-21
Kartenmaßstab ändern . . . . . . . . . . . . . . . . . . . . . . . . . . . . . . . . . . . . . . . . . 21
Menü Zieleingabe . . . . . . . . . . . . . . . . . . . . . 22-32
Überblick über das Navigationsmenü/Lautstärke des Navigationssystems einstellen . . . 22
Allgemeine Bedienung des Zielort-Menüs. . . . . . . . . . . . . . . . . . . . . . . . . . . . 22
Adressensuche . . . . . . . . . . . . . . . . . . . . . . . . . . . . . . . . . . . . . . . . . . . . . . . . . . 23
Letzte Ziele . . . . . . . . . . . . . . . . . . . . . . . . . . . . . . . . . . . . . . . . . . . . . . . . . . . . . 24
Adressbuch . . . . . . . . . . . . . . . . . . . . . . . . . . . . . . . . . . . . . . . . . . . . . . . . . . . . . 24
POI (Sonderziele) . . . . . . . . . . . . . . . . . . . . . . . . . . . . . . . . . . . . . . . . . . . . . . . . 24
Nahe Standort. . . . . . . . . . . . . . . . . . . . . . . . . . . . . . . . . . . . . . . . . . . . . . . . . 25
In Zielnähe . . . . . . . . . . . . . . . . . . . . . . . . . . . . . . . . . . . . . . . . . . . . . . . . . . . 26
In Ort/Name . . . . . . . . . . . . . . . . . . . . . . . . . . . . . . . . . . . . . . . . . . . . . . . . . . 26
Kia Werkstatt . . . . . . . . . . . . . . . . . . . . . . . . . . . . . . . . . . . . . . . . . . . . . . . . . . 26
Telefon Nummer . . . . . . . . . . . . . . . . . . . . . . . . . . . . . . . . . . . . . . . . . . . . . . . 26
GPS Eingabe. . . . . . . . . . . . . . . . . . . . . . . . . . . . . . . . . . . . . . . . . . . . . . . . . . . . 27
Parken . . . . . . . . . . . . . . . . . . . . . . . . . . . . . . . . . . . . . . . . . . . . . . . . . . . . . . . . 28
Zielführung Fortsetzen/Zielführung Stoppen . . . . . . . . . . . . . . . . . . . . . . . . . . 28
Karten Eingabe . . . . . . . . . . . . . . . . . . . . . . . . . . . . . . . . . . . . . . . . . . . . . . . . . . 28
Tour Planer . . . . . . . . . . . . . . . . . . . . . . . . . . . . . . . . . . . . . . . . . . . . . . . . . .29-30
Ziel Speichern. . . . . . . . . . . . . . . . . . . . . . . . . . . . . . . . . . . . . . . . . . . . . . . . . . . 31
Position Speichern . . . . . . . . . . . . . . . . . . . . . . . . . . . . . . . . . . . . . . . . . . . . . . . 31
Privat 1/Büro2/3-12 . . . . . . . . . . . . . . . . . . . . . . . . . . . . . . . . . . . . . . . . . . . . . . 32
3
LAN8900EKYN GER HMC indesign.ind3 3
2010-03-25 ¿ÀÈÄ 12:41:25
Inhaltsverzeichnis
Verwendung des Landkartenmenüs. . . . . . . .33-38
Überblick über das Landkartenmenü . . . . . . . . . . . . . . . . . . . . . . . . . . . . . . . . . 33
Allgemeine Bedienung des Landkartenmenüs . . . . . . . . . . . . . . . . . . . . . . . . . . 33
POI Kategorie . . . . . . . . . . . . . . . . . . . . . . . . . . . . . . . . . . . . . . . . . . . . . . . . . . . . 34
2D/3D . . . . . . . . . . . . . . . . . . . . . . . . . . . . . . . . . . . . . . . . . . . . . . . . . . . . . . . . . . 34
Display teilen/Vollbild . . . . . . . . . . . . . . . . . . . . . . . . . . . . . . . . . . . . . . . . . . . . . . 35
Position Speichern . . . . . . . . . . . . . . . . . . . . . . . . . . . . . . . . . . . . . . . . . . . . . . . . 35
Tour Planer. . . . . . . . . . . . . . . . . . . . . . . . . . . . . . . . . . . . . . . . . . . . . . . . . . . . . . . 35
Routenoptionen . . . . . . . . . . . . . . . . . . . . . . . . . . . . . . . . . . . . . . . . . . . . . . . . . . . 36
Browser. . . . . . . . . . . . . . . . . . . . . . . . . . . . . . . . . . . . . . . . . . . . . . . . . . . . . . . . . . 37
Umleitung . . . . . . . . . . . . . . . . . . . . . . . . . . . . . . . . . . . . . . . . . . . . . . . . . . . . . . . 37
Info Umgebung . . . . . . . . . . . . . . . . . . . . . . . . . . . . . . . . . . . . . . . . . . . . . . . . . . . 38
Info Zur Route . . . . . . . . . . . . . . . . . . . . . . . . . . . . . . . . . . . . . . . . . . . . . . . . . . . . 38
Bluetooth Wireless-Technologie . . . . . . . . . . .39-45
Hinweise zur Bluetooth Wireless-Technologie . . . . . . . . . . . . . . . . . . . . . . . . . . . 39
Verbindung zwischen Gerät und Bluetooth-Telefon herstellen. . . . . . . . . . .39-40
Verbindung zum Bluetooth-Telefon trennen und wiederherstellen . . . . . . . . . . 41
Ein angeschlossenes Telefon löschen . . . . . . . . . . . . . . . . . . . . . . . . . . . . . . . . . 41
Ändern der Bluetooth Kennung . . . . . . . . . . . . . . . . . . . . . . . . . . . . . . . . . . . . . . 41
Einen Anruf durch Eingabe einer Telefonnummer tätigen . . . . . . . . . . . . . . . . . 42
Tonausgabe während eines Gesprächs wechseln . . . . . . . . . . . . . . . . . . . . . . . . 42
Das Mikrofon ein-/ausschalten . . . . . . . . . . . . . . . . . . . . . . . . . . . . . . . . . . . . . . . 42
Anrufe entgegennehmen . . . . . . . . . . . . . . . . . . . . . . . . . . . . . . . . . . . . . . . . . . . 42
Bedienung des Telefonbuchs . . . . . . . . . . . . . . . . . . . . . . . . . . . . . . . . . . . . . . . . 43
So benutzen Sie Ihre Anrufliste . . . . . . . . . . . . . . . . . . . . . . . . . . . . . . . . . . . . . . 44
Einen Anruf mit Schnellwahlnummern tätigen . . . . . . . . . . . . . . . . . . . . . . . . . . 45
4
LAN8900EKYN GER HMC indesign.ind4 4
2010-03-25 ¿ÀÈÄ 12:41:25
Inhaltsverzeichnis
CD-/MP3-/WMA-/USB-/iPod-Bedienung . .46-51
Wiedergabe einer Audio-CD und MP3-/WMA-/USB-/iPod-Dateien. . . . .46-48
Zum nächsten Titel/zur nächsten Datei springen . . . . . . . . . . . . . . . . . . . . . . 46
Zum vorherigen Titel/zur vorherigen Datei springen. . . . . . . . . . . . . . . . . . . . 46
Zum Anfang des aktuellen Titels/der aktuellen Datei springen . . . . . . . . . . 46
Suchlauf . . . . . . . . . . . . . . . . . . . . . . . . . . . . . . . . . . . . . . . . . . . . . . . . . . . . . . 46
Intro-Scan. . . . . . . . . . . . . . . . . . . . . . . . . . . . . . . . . . . . . . . . . . . . . . . . . . . . . . 47
Wiederholen . . . . . . . . . . . . . . . . . . . . . . . . . . . . . . . . . . . . . . . . . . . . . . . . . . . . 47
Zufallswiedergabe . . . . . . . . . . . . . . . . . . . . . . . . . . . . . . . . . . . . . . . . . . . . . . . 48
Wiedergabe der Dateien durch Klassifizierung in Ordner/ Album/ Artist. . . 48
Ordner/Datei aus der Liste wählen . . . . . . . . . . . . . . . . . . . . . . . . . . . . . . . . . . . 49
So suchen Sie Musik . . . . . . . . . . . . . . . . . . . . . . . . . . . . . . . . . . . . . . . . . . . . . . 49
So richten Sie die Wiedergabegeschwindigkeit des Hörbuchs ein . . . . . . . . . 50
Anforderungen an USB-Geräte/Kompatible USB-Geräte . . . . . . . . . . . . . . . . . 50
Anforderungen an MP3-/WMA-Dateien . . . . . . . . . . . . . . . . . . . . . . . . . . . . . . . 51
Anforderungen an das iPod-Geräte. . . . . . . . . . . . . . . . . . . . . . . . . . . . . . . . . . . 51
Radiobetrieb . . . . . . . . . . . . . . . . . . . . . . . . . .52-54
Radio hören . . . . . . . . . . . . . . . . . . . . . . . . . . . . . . . . . . . . . . . . . . . . . . . . . . . . . . 52
Radiosender speichern und aufrufen. . . . . . . . . . . . . . . . . . . . . . . . . . . . . . . . . . 52
AS (Automatischer Senderspeicher) . . . . . . . . . . . . . . . . . . . . . . . . . . . . . . . . . . 53
Sendestationen anspielen. . . . . . . . . . . . . . . . . . . . . . . . . . . . . . . . . . . . . . . . . . . 53
TA (Verkehrsmeldungen) . . . . . . . . . . . . . . . . . . . . . . . . . . . . . . . . . . . . . . . . . . . 53
NACHRICHTEN . . . . . . . . . . . . . . . . . . . . . . . . . . . . . . . . . . . . . . . . . . . . . . . . . . . 54
Region Auto/Aus. . . . . . . . . . . . . . . . . . . . . . . . . . . . . . . . . . . . . . . . . . . . . . . . . . 54
Bedienung über ein Zusatzgerät . . . . . . . . . . . . . 55
Verwendung einer AUX-Quelle. . . . . . . . . . . . . . . . . . . . . . . . . . . . . . . . . . . . . . . 55
5
LAN8900EKYN GER HMC indesign.ind5 5
2010-03-25 ¿ÀÈÄ 12:41:25
Inhaltsverzeichnis
Spracherkennungssystem . . . . . . . . . . . . . . . 56-60
Spracherkennung . . . . . . . . . . . . . . . . . . . . . . . . . . . . . . . . . . . . . . . . . . . . . . . . . 56
Sprachbefehle geben . . . . . . . . . . . . . . . . . . . . . . . . . . . . . . . . . . . . . . . . . . . . . . 56
So sagen Sie Nummern . . . . . . . . . . . . . . . . . . . . . . . . . . . . . . . . . . . . . . . . . . . . 56
Beispiele für Sprachbefehle . . . . . . . . . . . . . . . . . . . . . . . . . . . . . . . . . . . . . . 57-58
Hilfebefehl . . . . . . . . . . . . . . . . . . . . . . . . . . . . . . . . . . . . . . . . . . . . . . . . . . . . . . . 58
Sprachbefehle . . . . . . . . . . . . . . . . . . . . . . . . . . . . . . . . . . . . . . . . . . . . . . . . .59-60
Fehlersuche . . . . . . . . . . . . . . . . . . . . . . . . . . . 61-62
Technische Daten . . . . . . . . . . . . . . . . . . . . . . . . . 63
Inhalt. . . . . . . . . . . . . . . . . . . . . . . . . . . . . . . . . . . . 64
Symbole zur Anzeige von Verkehrsproblemen . . . . 65
6
LAN8900EKYN GER HMC indesign.ind6 6
2010-03-25 ¿ÀÈÄ 12:41:25
Allgemeine Informationen
Sicherheitshinweise
VORSICHT
GEFAHR VON
STROMSCHLÄGEN. NICHT
ÖFFNEN
VORSICHT: ZUR VERMEIDUNG VON
STROMSCHLÄGEN DIE ABDECKUNG
(BZW. RÜCKSEITE) NICHT ABNEHMEN.
KEINE VOM BENUTZER ZU WARTENDEN
BAUTEILE IM INNERN. WARTUNG NUR
DURCH FACHPERSONAL.
Das Blitzsymbol innerhalb eines
gleichseitigen Dreiecks warnt den
Benutzer vor nicht isolierter, gefährlicher Spannung innerhalb des
Produktgehäuses, die so stark sein
kann, dass für Personen die Gefahr von
Stromschlägen besteht.
Das Ausrufungszeichen innerhalb
eines gleichseitigen Dreiecks weist den
Benutzer auf wichtige Hinweise zur
Bedienung und zur Wartung in der mit
dem Gerät gelieferten Literatur hin.
Das Fahrzeug muss immer sicher
geführt werden. Lassen Sie sich
während der Fahrt nicht durch die
Anweisungen des Navigationssystems
ablenken. Einstellungen oder
Bedienungen niemals während
der Fahrt vornehmen. Halten Sie
das Fahrzeug unter Beachtung der
Straßenverkehrsordnung vor der
Bedienung des Gerätes an.
Aus Sicherheitsgründen werden
bestimmte Funktionen erst bei
angezogener Handbremse aktiviert.
Das Gerät nicht über einen längeren
Zeitraum bei extrem niedrigen oder
hohen Temperaturen betreiben.
(-10°C bis 60°C)
Um die Gefahr von Stromschlägen
zu vermeiden, das Gerät niemals
Tropf- und Spritzwasser, Regen oder
Feuchtigkeit aussetzen.
Das Gerät sollte auf Grund seiner
hohen Gehäusetemperatur nur in einem
Fahrzeug eingebaut betrieben werden.
Die Lautstärke während der Fahrt
möglichst niedrig einstellen.
Das Gerät niemals fallen lassen und
anstoßen.
Um die Gefahr von Stromschlägen
zu vermeiden, die Abdeckung bzw.
Rückseite des Gerätes niemals
abnehmen. Im Gerät befinden sich
keine Bauteile, die vom Benutzer gewartet werden müssen. Wartungsarbeiten
stets von Fachpersonal durchführen
lassen.
7
LAN8900EKYN GER HMC indesign.ind7 7
2010-03-25 ¿ÀÈÄ 12:41:25
Allgemeine Informationen
ACHTUNG:
Niemals während der Fahrt auf den
Monitor blicken. Falls der Fahrer seine
Aufmerksamkeit während der Fahrt zu
sehr auf die Anzeige richtet, können
Unfälle verursacht werden.
Dieses Gerät wurde für Fahrzeuge mit
einer Netzspannung von 12 Volt und
negativer Masse entwickelt.
Stellen Sie vor dem Einbau in einem
Wohnwagen, Transporter oder Bus die
Spannung des Fahrzeugs fest. Um
Kurzschlüsse zu vermeiden, muss das
Batteriekabel E vor dem Einbau
getrennt werden.
Dieses Gerät besitzt ein Laser-System.
Lesen Sie zur richtigen Bedienung
des Gerätes dieses Handbuch sorgfältig durch und bewahren Sie es zum
späteren Nachschlagen auf. Setzen Sie
sich zur Wartung mit einem qualifizierten Servicebetrieb in Verbindung.
Durch Bedienungen, Einstellungen oder
Verfahren, die in dieser Anleitung nicht
erwähnt werden, kann gefährliche
Strahlungfreigesetzt werden.
Um direkten Kontakt mit dem
Laserstrahl zu vermeiden, darf das
Gehäuse nicht geöffnet werden.
Ansonsten tritt Laserstrahlung auf.
NIEMALS IN DEN LASER BLICKEN.
ACHTUNG:
SICHTBARE UND UNSICHTBARE
LASERSTRAHLUNG DER KLASSE
1M BEI GEÖFFNETEM GEHÄUSE.
NICHT DIREKT MIT OPTISCHEN
INSTRUMENTEN ANSCHAUEN.
ACHTUNG :
• Das Navigationssystem bei
ausgeschaltetem Motor ausschalten.
Dies könnte sonst zu einer Entladung
der Fahrzeugbatterie führen. Das
Navigationssystem nur bei eingeschaltetem Motor benutzen.
• Bei Bedienung des
Navigationssystems das Fahrzeug
sicher bei aktivierter Bremse in
Parkposition parken. Wenn Sie das
System während der Fahrt bedienen,
kann dies zu Ablenkung und ernsthaften Unfällen führen.
• Bauen Sie das System nicht auseinander und verändern Sie es nicht.
Dies könnte sonst zu Unfällen, Feuer
oder Stromschlag führen.
• In bestimmten Ländern ist die
Nutzung von Videobildschirmen
während der Fahrt verboten.
Beachten Sie stets die gesetzlichen
Bestimmungen.
• Telefon nicht während der Fahrt
verwenden. Zur Verwendung des
Telefons an einer sicheren Stelle
anhalten.
• Sicherstellen, dass die Lautstärke der
Einheit immer niedrig genug eingestellt ist, um Geräusche von außen
wahrnehmen zu können.
8
LAN8900EKYN GER HMC indesign.ind8 8
2010-03-25 ¿ÀÈÄ 12:41:26
Allgemeine Informationen
Abspielbare Disc-Typen
Umgang mit Discs und mit dem Player
• Bei einer defekten oder
verschmutzten Disc kann die
Lautstärke während der
Wiedergabe plötzlich
abnehmen.
• Discs stets an der
Innenund Außenkante
halten.
• Berühren Sie niemals die
Wiedergabeseite der Disc.
Dieses Gerät kann Audiodateien,
MP3- oder WMA-Dateien von CD-R
oder CD-RW wiedergeben.
• Je nach Aufnahmegerät oder der
CD-R/RW selbst, können einige
CD-R/RW nicht auf dem Gerät wiedergegeben werden.
• Auf keiner der beiden Disc-Seiten
(weder der beschrifteten noch der
Aufnahmeseite) dürfen Aufkleber
oder Etiketten befestigt werden.
• Legen Sie keine ungleichmäßig
geformten CDs ein (z. B. herzförmig
oder achteckig). Ansonsten können
Fehlfunktionen auftreten.
• Wischen Sie die Disc
vor der Wiedergabe
von der Mitte zum
Rand hin mit einem
sauberen Tuch ab.
• Verwenden Sie zur
Reinigung der Disc
keine Lösungsmittel
wie Benzin oder
Alkohol.
Keine Etiketten oder
Klebeband auf die Disc kleben.
Die Disc darf keiner direkten
Sonneneinstrahlung oder
starker Hitze ausgesetzt
werden.
8 cm
Mit diesem Gerät können
keine 8 cm-Discs abgespielt
werden (nur 12 cm-Discs).
9
LAN8900EKYN GER HMC indesign.ind9 9
2010-03-25 ¿ÀÈÄ 12:41:26
Allgemeine Informationen
HINWEISE ZUM URHEBERRECHT
Es ist gesetzlich verboten, urheberrechtlich
geschütztes Material ohne Genehmigung
zu kopieren, auszustrahlen, zu zeigen,
über Kabel zu senden, öffentlich wiederzugeben oder zu verleihen. Dieses Gerät
verfügt über eine Kopierschutzfunktion
von Macrovision. Einige Discs enthalten
Kopierschutzsignale. Wenn Sie die Bilder
dieser Discs über ein Zweitgerät wiedergeben, können Bildstörungen auftreten.
Dieses Gerät verwendet Technologien
zum Urheberrechtsschutz, die durch
Verfahrensansprüche bestimmter USPatente und sonstiger Rechte zum Schutz
geistigen Eigentums der Macrovision
Corporation und anderer Rechteinhaber
geschützt sind. Die Verwendung dieser
Copyrightschutztechnologie muss von
Macrovision Corporation genehmigt
werden und ist ausschließlich für den
Heimgebrauch und andere eingeschränkte Vorführungen zulässig, falls keine
andere Genehmigung von Macrovision
Corporation vorliegt. Reverse-Engineering
oder Zerlegung sind verboten.
Entsorgung des Altgerätes
1. Falls an einem Produkt das
Symbol eines durchgestrichenen
Abfallbehälters angebracht ist,
unterliegt es der EU-Richtlinie
2002/96/EC.
2. Sämtliche elektrischen und
elektronischen Produkte sollten
getrennt vom Hausmüll bei einer
Sammelstelle eines staatlichen oder
lokalen Entsorgungsunternehmens
entsorgt werden.
3. Eine ordnungsgemäße Entsorgung
des Altgerätes hilft bei der
Vermeidung von Umwelt- und somit
von Gesundheitsschäden.
4. Informationen zur Entsorgung
Ihres Altgerätes erhalten Sie bei
Ihrer Stadtverwaltung, Ihrem
Entsorgungsunternehmen oder
bei dem Händler, bei dem Sie das
Produkt gekauft haben.
iPod ist ein Markenzeichen von Apple
Inc., eingetragen in den Vereinigten
Staaten und anderen Ländern.Der
Hinweis “Made for iPod” weist darauf
hin, dass ein elektronisches Gerät für
den Anschluss eines iPod entwickelt
wurde und von Hersteller als ein Gerät
zertifiziert wurde, das den AppleLeistungsstandards entspricht.
“Die Bluetooth Markennamen und
Logos sind Eigentum der Bluetooth
SIG, Inc. LG Electronics besitzt eine
Genehmigung für die Verwendung dieser Marken. Alle anderen Markennamen
und Handelsbezeichnungen sind
Eigentum der jeweiligen Besitzer.”
10
LAN8900EKYN GER HMC indesign.ind10 10
2010-03-25 ¿ÀÈÄ 12:41:26
Bezeichnung der Komponenten
Bedienungsfeld
1 2
7
8 9
3
10
4
RADIO
MAP
11
5
MEDIA
NAV
12
13
6
14
1. Anzeige ein/aus (
)
Anzeige ein- und ausschalten.
4. RADIO
Auswahl des FM/AM-Frequenzbereichs.
2. Eject (Z)
Zum Auswerfen der CD.
5. MEDIA
Auswahl der Quelle: CD, USB, iPod,
AUX
3. Drehregler links ( / )
- Drücken: Gerät ein-/ausschalten
- Drehen: Lautstärkeregelung
6.
/
• Taste drücken.
- Automatischer Sendereinstellung
RADIO
- Musiktitel auf/ab: USB
• Taste gedrückt halten.
- Suche (FF/REW): USB
CD
iPod
CD
iPod
7. Disc-Einschub
11
LAN8900EKYN GER HMC indesign.ind11 11
2010-03-25 ¿ÀÈÄ 12:41:26
Bezeichnung der Komponenten
8. TELEFON ( )
Zum Aktivieren der BluetoothFreisprecheinrichtung.
13. Einstellungen ( )
• Zugang zu den Systemeinstellungen.
(Seite 16)
9. Streckenführung per Sprachausgab e wiederholen ( )
Zur Wiederholung der Ansage
drücken.
10. Drehregler rechts (
)
Im bzw. entgegen dem Uhrzeigersinn drehen.
• Sucht die vorherige oder nächste
Radiofrequenz.
- Manuelles Tuning
• Einen Titel/eine Datei in der Liste
auf/ab.
• ZOOM IN/ZOOM OUT
- Durch Drehen ändern Sie
den Landkartenmaßstab der
Landkartenansicht.
11. MAP
Display-Anzeige der Landkarte des
aktuellen Standorts.
• Drücken und halten um die ID
des Gerätes, die Softwareversion,
die Navigationsversion und die
Kartenversion zu prüfen.
14. Info ( )
Zum Anzeigen des Zielortes, der
Strecke und Verkehrsinformationen,
wenn die Streckenführung aktiv ist.
• Ziel: Anzeige der Informationen
zum aktuellen
Fahrzeugstandort und -zielort.
• Route: Anzeige der
Steckeninformationen vom
aktuellen Fahrzeugstandort
zum -zielort.
• Verkehr: Anzeige der
Verkehrsinformationen.
- Verkehrsinfo Zur Route: Liste der
Verkehrsinformationen zur empfohlenen Strecke vom aktuellen
Fahrzeugstandort zum -zielort wird
angezeigt.
- Verkehrsinfo Umgebung: Die
Liste der Verkehrsinformationen
in der Umgebung der aktuellen
Fahrzeugposition wird angezeigt.
12. NAV
Zugang zum Menü “Ziel”.
Zur Eingabe des Zielorts sind
verschiedene Methoden verfügbar.
12
LAN8900EKYN GER HMC indesign.ind12 12
2010-03-25 ¿ÀÈÄ 12:41:26
Bezeichnung der Komponenten
Fernbedienung am Lenkrad
7
1
6
2
3
5
4
1.
Lautstärke stummschalten.
4.
Diese Taste kurz zur Ablehnung
eines Anrufs im Moment des Anrufs
drücken.
/ )
2. Lautstärke (
Erhöht oder mindert die Lautstärke.
6. U / u
• Drücken Sie diese Taste.
- Automatischer Sendereinstellung:
RADIO
- Musiktitel auf/ab: USB CD iPod
• Drücken und halten Sie diese Taste.
- Manuelle Sendereinstellung: RADIO
- Suche (FF/REW): USB CD
5.
3.
Aktiviert die Bluetooth-Freisprecheinrichtung.
• Diese Taste kurz zur Annahme
eines eingehenden Anrufs drücken.
• Diese Taste kurz zur Anwahl einer
zuletzt angerufenen Nummer drücken.
• Diese Taste länger drücken, um die
Tonausgabe während eines Anrufs
zu ändern.
(FreisprecheinrichtungyTelefon)
• Diese Taste zum Aktivieren des
Spracherkennungs-Modus drücken.
• Diese Taste erneut drücken, um bei
aktivierter Spracherkennung die
Sprachbefehle zu beenden.
iPod
7.
Auswahl der Quelle.
FM t AM t CD t USB t iPod
t AUX t FM...
13
LAN8900EKYN GER HMC indesign.ind13 13
2010-03-25 ¿ÀÈÄ 12:41:27
Sicherheitshinweise
Startfenster
Gerät einschalten
Das Gerät startet, wenn die Zündung
auf Zündungsplus oder geschaltetem
Plus (ACC) steht.
Drücken Sie im ausgeschalteten
Zustand
auf dem Bedienungsfeld.
✽ Hinweis
Beim Einlegen einer Disc in den DiscEinschub wird das Gerät automatisch
eingeschaltet.
- Dann wird der Radio-Modus auf
dem Bildschirm angezeigt.
✽ Hinweis
• Das Gerät erinnert sich an den
Modus, in dem es zuletzt eingestellt war. Der letzte Modus wird
im Memory gespeichert, sogar wenn
die Zündung ausgeschaltet ist. Wenn
die Zündung auf Zündungsplus
oder geschaltetem Plus steht, wird
der Modus automatisch wieder aufgerufen.
• Das Rebooten der Einheit kann einige
Zeit (ca. 20 Sekunden) in Anspruch
nehmen.
Gerät ausschalten
Drücken Sie im eingeschalteten
auf dem Bedienungsfeld.
Zustand
Disc auswerfen
Drücken Sie Z auf dem Bedienpanel.
Die eingelegte Disc wird automatisch
aus dem Disc-Einschub ausgefahren.
✽ Hinweis
Falls die so ausgeworfene Disc nicht
innerhalb von zehn Sekunden
herausgenommen wird, wird sie automatisch wieder in den Disc-Einschub
eingezogen.
Lautstärke einstellen
Disc einlegen
Legen Sie eine Disc in den DiscEinschub ein. Die Wiedergabe startet
automatisch.
Drehen Sie den Lautstärkeregler (
des Bedienungsfeldes.
)
✽ Hinweis
Beim Ausschalten merkt sich das Gerät
automatisch die aktuell eingestellte
Lautstärke. Beim nächsten Einschalten
des Gerätes wird diese Lautstärke wieder eingestellt.
Beim Aus-/Einschalten des Gerätes mit
einer eingestellten Lautstärke von unter
5 wird die Lautstärke automatisch auf
den Wert 5 erhöht.
Beim Aus-/Einschalten des Gerätes mit
einer eingestellten Lautstärke von über
25 wird die Lautstärke automatisch auf
den Wert 25 gesenkt.
14
LAN8900EKYN GER HMC indesign.ind14 14
2010-03-25 ¿ÀÈÄ 12:41:27
Sicherheitshinweise
Auswahl einer Quelle über das
Bedienungsfeld
Auswahl der Quelle über den
Bildschirm
Drücken Sie zur Auswahl einer Quelle
mehrmals die Taste MEDIA.
wechselt in der folgenden Reihenfolge.
CD t USB t iPod t AUX t CD...
Die Quelle kann auf dem Bildschirm
ausgewählt und an die eigenen
Bedürfnisse angepasst werden.
✽ Hinweis
Falls keine Quelle mit dem Gerät verbunden ist, wird die Quelle nicht erkannt.
1. Berühren Sie das Symbol “Quelle”
in der linken oberen Ecke, wenn die
Wiedergabe von einer Quelle erfolgt.
Rückblickkamera (optional)
Bei einer Rückansicht-Kamera ist
der automatische Wechsel von der
Rückansicht-Kamera zu Video möglich,
wenn die Gangschaltung in den
RÜCKWÄRTSGANG (R) geschaltet ist.
Die Rückfahrkamera ermöglicht beim
Zurücksetzen die Sicht hinter das Fahrzeug.
Bei vollständigem Booten der Einheit
wird die Fahrstrecke auf dem Bildschirm
angezeigt.
2. Berühren Sie die gewünschte Quelle.
✽ Hinweis
Falls keine Quelle mit dem Gerät verbunden ist, wird die Quelle nicht erkannt.
✽ Hinweis
• Mit Hilfe einer zusätzlichen
Rückfahrkamera können Sie einen
Anhänger im Auge behalten oder
leichter in einer engen Parklücke einparken. Diese Kamerafunktion darf
nicht zu Unterhaltungszwecken missbraucht werden.
• Objekte im Spiegelbild können näher
erscheinen, als sie es tatsächlich sind.
• Bitte beachten Sie, dass die Ränder
der Bilder der Rückansicht-Kamera
leichte Unterschiede aufweisen können,
abhängig davon,ob eine Vollbildanzeige
beim rückwärts Fahren gewählt wird.
15
LAN8900EKYN GER HMC indesign.ind15 15
2010-03-25 ¿ÀÈÄ 12:41:27
Einstellungen
Allgemeine Funktionen im
Menü EINSTELLUNGEN
Bluetooth
System
Es gibt vier Arten von Bildschirm-Menüs.
Es gibt fünf Arten von Bildschirm-Menüs.
Bluetooth-Geräteliste anzeigen
Hiermit können Sie eine Liste der
verbundenen Bluetooth-Geräte
anzeigen.
Sprache
Hiermit können Sie die Sprache ändern,
die das System verwenden soll.
Das Navigationssystem kann für
eine einfachere Handhabung für Sie
benutzerspezifisch eingerichtet werden:
Bluetooth, System, Verkehr, Navigation,
Audio, Display
1. Schalten Sie das Gerät ein.
auf dem
2. Drücken Sie
Bedienungsfeld.
Suche nach Bluetooth-Geräten
Hiermit können Sie nach BluetoothGeräten suchen. (Seite 39)
3. Berühren Sie die gewünschte
Quelle.
4. Berühren Sie die gewünschten
Einstellungen und dann [OK], um
die Auswahl zu bestätigen.
✽ Hinweis
Über
kehren Sie zum vorherigen
Fenster zurück. Drücken Sie auf MAP,
um zur Landkartenansicht des aktuellen Standorts zurückzukehren.
Autorisierung externer Geräte
Hiermit können Sie, wenn Sie Ihr Gerät und
Ihr Bluetooth-Telefon miteinander verbinden, Ihre Bluetooth-Telefoneinstellungen
nutzen. (Seite 40)
Tippen Sie auf die gewünschte
Sprachen-Schaltfläche.
Bei Bedarf zum Hoch- und RunterScrollen
oder verwenden.
Code ändern
Sie können den Hauptschlüssel
ändern. (Seite 41)
16
LAN8900EKYN GER HMC indesign.ind16 16
2010-03-25 ¿ÀÈÄ 12:41:27
Einstellungen
Uhr
Hiermit können Sie das Zeitformat und die
Sommerzeit einstellen.
Einheiten
Hiermit können Sie die Entfernungseinheiten,
die Ihr Navigationssystem anzeigen soll,
einrichten.
• Zeitformat: Zwischen den Zeitformaten
“12h” und “24h” wählen.
• Sommerzeit: Die Sommerzeit auf “Ein”
oder “Aus” stellen.
Die Uhrzeit wird vom
Gerät automatisch auf
Sommerzeit umgestellt.
Auch wenn die
Sommerzeit-Option auf
“Ein” eingestellt wurde,
stellt das Gerät die normale Uhrzeit ein (nicht
+1 Stunde), auch außerhalb der Sommerzeit.
Wählen Sie zwischen “km” und “mls”.
Demo Navigation
Dies ist eine Demo-Funktion.
Nachdem eine Strecke eingestellt
wurde, wird automatisch eine Simulation
einer Streckenführung zu einem Zielort
angezeigt.
• Demo Navigation
- Aus: Demo-Modus ist ausgestellt.
- 1x: Zum einmaligen Einrichten der
Demofahrweise.
- Loop: Die Demo wird wiederholt
• Geschwindigkeit:
Die Demo-Geschwindigkeit wird eingestellt.
Werkseinstellungen
Hiermit können Sie verschiedene Einstellungen auf die
Werkseinstelllungen zurücksetzen.
- Alle: Hiermit setzen Sie alle
Einstellungen auf die
Werkseinstelllungen zurück.
- Telefon: Hiermit werden alle
Einstellungen, die das Telefon
betreffen, zurückgesetzt.
- Navigation: Hiermit werden alle
Einstellungen, die die
Navigation betreffen,
zurückgesetzt.
- Audio/Media/Radio: Hiermit
werden alle
Einstellungen, die
Audio/Media/
Radio betreffen,
zurückgesetzt.
17
LAN8900EKYN GER HMC indesign.ind17 17
2010-03-25 ¿ÀÈÄ 12:41:28
Einstellungen
Verkehr
Navigation
Audio
Es gibt drei Arten von Bildschirm-Menüs.
Es gibt vier Arten von Bildschirm-Menüs.
Es gibt fünf Arten von Bildschirm-Menüs.
TMC
Wählen Sie “Aus”, “Auto” oder “Ein” für
den TMC (Traffic Message Channel =
Verkehrsfunk).
- Auto: Wenn der Verkehrsfunk auf
der aktuellen Strecke einen
Vorfall registriert hat, sucht das
Navigationssystem automatisch und ohne entsprechende
Meldung nach einer Umgehung.
- Aus: Beendet die Verkehrsfunkfunktion.
- Ein: Wenn der Verkehrsfunk auf
der aktuellen Strecke einen
Vorfall registriert hat, wird im
Navigationssystem ein PopupFenster mit den Informationen zu
dem Vorfall angezeigt.
Automatischer TMC-Sender
Tritt auf der aktuellen Strecke ein TMC
auf, so wird automatisch die stärkste
TMC-Station empfangen.
Ansicht Autobahnkreuz
Hiermit wird das Autobahnkreuz in der
Landkartenansicht angezeigt.
GALA (Geschwindigkeitsabhängige
Lautstärkeregelung)
Bei einer Fahrgeschwindigkeit von über
40 km/h wird die Lautstärke höher ausgegeben als ursprünglich eingestellt.
Sie können GALA auf Aus, Nied.(Niedrig),
Mitt.(Mitten) oder Hoch einstellen.
- Aus: Verwendet die ursprünglich eingestellte Lautstärke unabhängig der
jeweiligen Fahrgeschwindigkeit.
- Nied., Mitt., Hoch: Stellt automatisch
eine der Fahrgeschwindigkeit angepasste Lautstärke ein.
Fahrspurassistent
Hiermit wird die Streckenführung in der
Landkartenansicht verbessert angezeigt.
Alle Routen Planen
Hiermit wird der Plan verschiedener
Strecken in der Landkartenansicht
angezeigt.
Geschwindikkeitswarnung
Hiermit wird die
Geschwindigkeitswarnung in der
Landkartenansicht angezeigt.
Bevorzugter TMC-Sender
Die Einheit empfängt die vom Benutzer
eingestellte TMC-Station. Diese Funktion
wird aktiviert, wenn [Automatischer
TMC-Sender] deaktiviert wird.
Navigationslautstärke
Sie können die Lautstärke der
Navigation einstellen. Auch wenn diese
Option auf “Aus” eingestellt wurde, wird
diese Einstellung zu Beginn einer neuen
Streckenführung automatisch auf “Ein”
eingestellt.
Bestätigungston
Sie können den Touchscreen-Sound auf
Ein/Aus stellen.
18
LAN8900EKYN GER HMC indesign.ind18 18
2010-03-25 ¿ÀÈÄ 12:41:28
Einstellungen
Sound (Standard: Mitte)
Balance/
Fader
Tiefen/Mitten/
Höhen
- Balance: Berühren Sie b oder B, um
den Ton für die rechten und linken
Lautsprecher einzurichten.
- Fader: Berühren Sie v oder V, um
den Ton für die vorderen und hinteren
Lautsprecher einzurichten.
- Tiefen/Mitten/Höhen: Berühren Sie
b oder B, um Tiefen, Mitten oder
Höhen einzurichten.
✽ Hinweis
Berühren Sie [Mitte], um zu den
Standardeinstellungen zurückzukehren.
Power Bass
Sie können Power Bass auf Aus, Niedrig,
Mitten oder Hoch einstellen.
- Aus: Der ursprüngliche Klang wird wiedergegeben.
- Nied., Mitt., Hoch: Stellen Sie
Nied., Mitt. oder Hoch ein, um
die niedrigen Töne zu verstärken.
Display
Es gibt zwei Arten von Bildschirm-Menüs.
Kartenmodus
Um die Sichtbarkeit der
Landkartenansicht bei Tag und
Nacht zu optimieren, können Sie die
Farbkombination der Landkarte wählen.
- Auto: Der Kartenbildschirm wird
je nach Fahrzeuglicht- oder
Beleuchtungssignal angezeigt.
Beleuchtung
ein
Beleuchtung
aus
Fahrzeuglicht
aus (Tag)
Karte: Tag
Karte: Tag
Fahrzeuglicht
ein (Nacht)
Karte: Nacht
Karte: Nacht
Kein
Fahrzeuglicht
Karte: Nacht
Karte: Tag
- Tag: Die Landkartenansicht wird immer
in hellen Farben angezeigt.
- Nacht: Die Landkartenansicht wird
immer in dunklen Farben
angezeigt.
Helligkeit
Sie können die Bildschirmhelligkeit
einstellen.
Sie können die Helligkeit auf Nied., Mitt.
oder Hoch einstellen.
19
LAN8900EKYN GER HMC indesign.ind19 19
2010-03-25 ¿ÀÈÄ 12:41:28
Bedienung des Navigationssystems
Was bedeutet “GPS”?
Empfang von Satellitensignalen
Das globale Positionierungssystem
(GPS) ist ein satellitengestütztes
Navigationssystem, bestehend aus 24
Satelliten, die vom Verteidigungsministerium der USA in der Erdumlaufbahn positioniert wurden. GPS
wurde ursprünglich für militärische
Zwecke entwickelt. In den achtziger
Jahren jedoch hat die Regierung der
Vereinigten Staaten das System für
die zivile Nutzung freigegeben. Das
GPS kann bei jedem Wetter, an jedem
Ort der Erde und rund um die Uhr
genutzt werden. Für die Einrichtung
und Nutzung des GPS fallen keinerlei
Gebühren an.
Bevor das Gerät den aktuellen Standort
bestimmen und Streckenberechnungen
durchführen kann, führen Sie die folgenden Schritte durch:
GPS
GPS
GPS
GPS
1. Wechseln Sie Ihren Standort ins Freie,
an dem sich keine hohen Hindernisse
befinden.
2. Schalten Sie das Gerät ein.
Symbole auf dem
Kartenbildschirm
Aufrufen des Kartenbildschirms
Auf dem Bildschirm des
Navigationssystems werden verschiedene Informationen angezeigt.
Der Empfang der Satellitensignale
kann einige Minuten dauern.
Navigationsanzeige zu Beginn
Nachdem die Zündung auf ACC oder
ON gestellt wurde, wird bei erstmaliger
Eingabe eines Navigationsmodus' ein
Warnhinweis angezeigt.
•
/
:
Es zeigt die Richtung der Landkarte
an.
Beim Berühren ändert sich die
Ausrichtung der Landkarte.
Lesen Sie die Warnung aufmerksam
und drücken Sie [Zustimmen].
•
Es zeigt den aktuelle
Fahrzeugstandort und die
Fahrtrichtung an.
Hinweise zu Satellitensignalen
Zur richtigen Funktion muss das Gerät
Satellitensignale empfangen können.
In geschlossenen Räumen, in der Nähe
von hohen Gebäuden und Bäumen
oder in einer Tiefgarage ist kein
Satellitenempfang möglich.
•
Durch Berühren von [Menü] gelangen
Sie ins Landkarten-Menü.
20
LAN8900EKYN GER HMC indesign.ind20 20
2010-03-25 ¿ÀÈÄ 12:41:28
Bedienung des Navigationssystems
Kartenmaßstab ändern
•
Zeigt den Maßstab der Landkarte an.
1. Berühren Sie
die Landkartenansicht.
•
Zeigt die Ankunftszeit, Entfernung und
verbleibende Zeit bis zum Zielort an.
•
Dieses Symbol erscheint in der
oberen rechten Ecke des Bildschirms,
wenn eine Strecke eingestellt
wurde. Zeigt die Entfernung zum
nächsten Referenzpunkt und
die Abbiegerichtung an diesem
Referenzpunkt an.
2. Durch Berühren von [+] werden
Ihnen die Einzelheiten der Landkarte
angezeigt. Durch Berühren von [-]
wird Ihnen die Landkarte in einer
weiteren Ansicht angezeigt.
•
Zeigt die Geschwindigkeitsbegrenzung
der Straße, die Sie gerade befahren, an.
50 m n100 m n 200 m n 300 m n
500 m n 750 m n 1 km n 2 km n
5 km n 10 km n 20 km n 50 km n
100 km n 200 km n 500 km
3. Wenn Sie den Autozoom einstellen
möchten, berühren Sie
.
21
LAN8900EKYN GER HMC indesign.ind21 21
2010-03-25 ¿ÀÈÄ 12:41:28
Menü Zieleingabe
Überblick über das
Navigationsmenü
Navigationsmenü
Navigation
Adresse
Letzte Ziele
Adressbuch
POI
Parken
Zielführung Fortsetzen/
Zielführung Stoppen
Erweitert
GPS Eingabe
Karten Eingabe
Tour Planer
Ziel Speichern
Position Speichern
Favoriten
Privat 1
Büro 2
3-12
Lautstärke des Navigationssystems einstellen
Drehen Sie zum Einstellen der Lautstärke
des Navigationssystems während der
Sprachausgabe der Streckenführung den
Lautstärkeregler ( ) am Bedienungsauf
feld oder drücken Sie die Taste
dem Bedienungsfeld.
Allgemeine Bedienung des
Zielort-Menüs
1. Schalten Sie das Gerät ein.
2. Drücken Sie NAV auf dem Bedienfeld. Das Navigationsmenü erscheint
auf dem Bildschirm.
3. Berühren Sie [Navigation],
[Erweitert] oder [Favoriten], um die
gewählte Option zu wählen.
Menü [Erweitert]
Menü [Favoriten]
4. Berühren Sie die bevorzugte
Einstellung.
• Adresse: Findet einen Zielort durch
Einstellen einer Adresse. (Seite 23)
• Letzter Ziele : Einstellung eines
Zielortes, den Sie kürzlich gewählt
haben. (Seite 24)
• Adressbuch: Einstellung eines
Zielortes über einen Ort, den Sie
im Adressbuch gespeichert haben.
(Seite 24)
• POI: Sucht einen Zielort aus
verschiedenen Geschäfts- oder
Standortkategorien. (Seite 24-26)
• Parken: Richtet einen Parkplatz als
Zielort ein. (Seite 28)
• Zielführung Fortsetzen/
Zielführung Stoppen : Schalten
die Führung Ein/Aus. (Seite 28)
• GPS Eingabe: Richtet einen
Breiten- und Längengrad als
Zielort ein. (Seite 27)
• Karten Eingabe: Sucht nach einem
Zielort, indem die Landkarte durchsucht wird. (Seite 28)
• Tour Planer: Fügt einen neuen
Zielort oder Streckenpunkt hinzu.
(Seite 29 -30)
• Ziel Speichern: Speichert Ihren
Zielort im Adressbuch. (Seite 31)
• Position Speichern: Speichert Ihren
Standort im Adressbuch. (Seite 31)
• Privat 1/ Büro2/ 3~12: Sie
können z.B. einen Wohnort, einen
Arbeitsort oder einen Ort einstellen, zu dem Sie häufig zurückkehren. (Seite 32)
22
LAN8900EKYN GER HMC indesign.ind22 22
2010-03-25 ¿ÀÈÄ 12:41:29
Menü Zieleingabe
Adressensuche
Sie können den Zielort finden, indem
Sie die Adressen durchsuchen.
5. Geben Sie die ersten Buchstaben
des Straßennamens ein und berühren Sie dann [OK].
Siehe “Routenoptionen” auf Seite 36.
9. Berühren Sie [Start].
1. Drücken Sie [NAV] > Berühren Sie
[Adresse].
2. Stellen Sie das bevorzugte Land ein.
Falls das Land bereits eingestellt ist,
gehen Sie zu Schritt 3.
6. Berühren Sie die Straße in der Liste.
3. Stellen Sie den bevorzugten
Städtenamen ein und berühren Sie
dann [OK].
7. Geben Sie die Hausnummer ein
und dann [OK].
• Wenn Sie Ihren Zielort im
Adressbuch speichern möchten,
berühren Sie [Speichern]. und geben
Sie den Namen Ihres Zielortes ein
und berühren Sie dann [OK].
• Wenn Sie die Landkarte Ihres
Zielortes sehen wollen, berühren Sie
[Karte Zeigen] und dann [Start].
10. Berühren Sie die bevorzugte Strecke
und berühren Sie dann [Start].
Lesen Sie bitte den Hinweis zu den
Routenkriterien auf Seite 36.
4. Berühren Sie die Stadt in der Liste.
8. Stellen Sie die Streckenoptionen ein
und berühren Sie dann [OK].
Gehen Sie gemäß den Bildschirmund akustischen Hinweisen vor.
23
LAN8900EKYN GER HMC indesign.ind23 23
2010-03-25 ¿ÀÈÄ 12:41:29
Menü Zieleingabe
Letzte Ziele
Adressbuch
POI (Sonderziele)
Sie können den einen Zielort, den Sie
kürzlich gewählt haben, suchen.
Max. 50 zuletzt gewählte Zielorte
werden automatisch gespeichert. Wenn
diese 50 zuletzt gewählten Zielorte
überschritten werden, wird der älteste
durch den jüngsten ersetzt.
Sie können als Zielort einen Ort wählen,
den Sie im Adressbuch gespeichert
haben. Um diese Funktion effektiver zu
nutzen, sollten Sie häufig verwendete
Zielorte im Vorhinein speichern.
Zuerst sollten Sie über die Adressensuche
Speicherungen im Adressbuch vornehmen. Siehe Adressensuche auf Seite 23.
Sie können einen Zielort in verschiedenen
Geschäfts- oder Standortkategorien suchen.
1. Drücken Sie [NAV] > Berühren Sie
[Letzte Ziele].
2. Berühren Sie die Stadt in der Liste.
1. Drücken Sie [NAV] > Berühren Sie
[Adressbuch].
2. Berühren Sie den bevorzugten
Zielort in der Liste.
3. Berühren Sie die bevorzugte Strecke
und berühren Sie dann [Start].
Gehen Sie gemäß den Bildschirmund akustischen Hinweisen vor.
1. Drücken Sie [NAV] > Berühren Sie [POI].
2. Berühren Sie eine der
Hauptkategorien.
3. Berühren Sie die bevorzugte Strecke
und berühren Sie dann [Start].
Gehen Sie gemäß den Bildschirmund akustischen Hinweisen vor.
• Nahe Standort: Stellt Sie einen
POI in der Nähe des aktuellen
Fahrzeugstandorts ein. (Seite 25)
• In Zielnähe: Stellt einen POI in der
Nähe des gewählten Zielstandorts ein.
(Seite 26)
• In Ort: Stellt einen POI in der Stadt
ein. (Seite 26)
• Name: Stellt einen POI nach
Bezeichnung der Einrichtung ein.
(Seite 26)
• Kia Werkstatt: Stellt eine Einrichtung
des Kia-Service ein. (Seite 26)
• Telefon Nummer: Wenn Sie die
Telefon Nummer der Einrichtung
kennen, suchen Sie den Ort über die
Eingabe der Nummer. (Seite 26)
24
LAN8900EKYN GER HMC indesign.ind24 24
2010-03-25 ¿ÀÈÄ 12:41:29
Menü Zieleingabe
Nahe Standort
1. Drücken Sie [NAV] > Berühren Sie
[POI] > [Nahe Standort].
5. Berühren Sie [OK], nachdem Sie
den Ort des angezeigten POI
bestätigt haben.
8. Berühren Sie [Start].
2. Berühren Sie eine der
Unterkategorien.
(Zum Beispiel: Notfall)
Wenn Sie einen Anruf tätigen
möchten, berühren Sie [ ]. Dieser
Dienst ist nur verfügbar, wenn
Bluetooth aktiv ist.
3. Berühren Sie eine der Unterkategorien
der nächsten Ebene. (Zum Beispiel:
Krankenhaus)
Gehen Sie gemäß den Bildschirmund akustischen Hinweisen vor.
6. Berühren Sie [Start].
7. Berühren Sie die Strecke Ihrer Wahl.
4. Berühren Sie den bevorzugten POI.
25
LAN8900EKYN GER HMC indesign.ind25 25
2010-03-25 ¿ÀÈÄ 12:41:30
Menü Zieleingabe
In Zielnähe
Name
Telefon Nummer
1. Drücken Sie [NAV] > Berühren Sie
[POI] > [In Zielnähe].
2. Befolgen Sie die Schritte 2-8 auf
Seite 25 (Nahe Standort).
1. Drücken Sie [NAV] > Berühren Sie
[POI] > [Name].
1. Drücken Sie [NAV] > Berühren Sie
[POI] > [Telefon Nummer].
2. Stellen Sie dus bevorzugte Land ein.
2. Geben Sie die Hausnummer ein
und tippen Sie auf [OK].
In Ort
3. Geben Sie die ersten Buchstaben
des Namens der Einrichtung ein
und berühren Sie dann [OK].
1. Drücken Sie [NAV] > Berühren Sie
[POI] > [In Ort].
2. Geben Sie die ersten Buchstaben
des Städtenamens ein und berühren
Sie dann [OK].
3. Berühren Sie die Telefon Nummer
Ihrer Wahl in der Liste.
4. Befolgen Sie die Schritte 4-8 auf
Seite 25 (Nahe Standort).
4. Berühren Sie [OK], nachdem Sie
den Ort des angezeigten POI
bestätigt haben.
Kia Werkstatt
3. Berühren Sie die Stadt in der Liste.
1. Drücken Sie [NAV] > Berühren Sie
[POI] > [Kia Werkstatt].
2. Befolgen Sie die Schritte 4-8 auf
Seite 25 (Nahe Standort).
4. Befolgen Sie die Schritte 2-8 auf
Seite 25 (Nahe Standort).
Wenn Sie einen Anruf tätigen
möchten, berühren Sie [ ]. Dieser
Dienst ist nur verfügbar, wenn
Bluetooth aktiv ist.
5. Befolgen Sie die Schritte 6-8 auf
Seite 25 (Nahe Standort).
26
LAN8900EKYN GER HMC indesign.ind26 26
2010-03-25 ¿ÀÈÄ 12:41:30
Menü Zieleingabe
GPS Eingabe
Sie können den Zielort suchen, indem
Sie Breiten- und Längengrad eingeben.
4. Geben Sie die weiteren Koordinaten
des Breitengrads ein, indem sie die
Dezimalen berühren. (Zum Beispiel:
58’)
6. Berühren Sie [OK].
1. Drücken Sie [NAV] > Berühren Sie
[Erweitert] > [GPS Eingabe].
2. Berühren Sie [Breitengrad].
7. Geben Sie die Koordinaten des
Längengrads ein.
Siehe Schritte 2-6.
(Zum Beispiel: 8°, 42’, 31’’)
8. Tippen Sie nach Abschluss der
Einstellungen auf [Start].
3. Geben Sie den Breitengrad ein,
indem sie die Gradzahl berühren.
(Zum Beispiel: 49°)
5. Geben Sie die weiteren Koordinaten
des Breitengrads ein, indem sie die
Sekunden berühren. (Zum Beispiel:
29’’)
9. Befolgen Sie die Schritte 7-8 auf
Seite 25 (Nahe Standort).
✽ Hinweis
Wenn Sie bei der Eingabe einen Fehler
um jeweils
machen, berühren Sie
ein Zeichen zu löschen.
27
LAN8900EKYN GER HMC indesign.ind27 27
2010-03-25 ¿ÀÈÄ 12:41:31
Menü Zieleingabe
Parken
Karten Eingabe
Sie können den Zielort finden, indem
Sie die Parkeinrichtungen durchsuchen.
Hiermit können Sie nach einem Zielort
suchen, indem Sie die Landkarte
durchsuchen.
1. Drücken Sie [NAV] > Berühren Sie
[Parken].
2. Berühren Sie die Einrichtung Ihrer
Wahl.
4. Berühren Sie die bevorzugte Strecke
und berühren Sie dann [Start].
1. Drücken Sie [NAV] > Berühren Sie
[Erweitert] > [Karten Eingabe].
2. Scrollen Sie über die Landkarte,
platzieren sie den Pointer auf dem
Ort Ihrer Wahl.
Gehen Sie gemäß den Bildschirmund akustischen Hinweisen vor.
3. Befolgen Sie die Schritte 4-8 auf
Seite 25 (Nahe Standort).
Zielführung Fortsetzen/
Zielführung Stoppen
3. Berühren Sie [Start].
Falls Sie das angegebene Ziel nicht
mehr anfahren oder das Ziel ändern
wollen, Drücken Sie [NAV] > Berühren
Sie [Zielführung Stoppen]. Falls Sie die
Fahrt zum Ziel fortsetzen möchten,
tippen Sie auf [Zielführung Fortsetzen].
28
LAN8900EKYN GER HMC indesign.ind28 28
2010-03-25 ¿ÀÈÄ 12:41:31
Menü Zieleingabe
Tour Planer
Mit dem Tourenplaner können Sie die
durchsuchten Strecken bereisen, indem
Sie einen Zielort oder Referenzpunkt
einrichten.
Sie können insgesamt 4 Zielorte oder
Referenzpunkte einrichten.
- Neue Tour: Eine Tour einrichten.
- Tour Laden: Der Tourist wird angezeigt.
- Tour Zeigen: Die letzte Einstellung des
Touristen wird angezeigt.
4. Mit dem Navigationsmenü einen
Zielort einrichten.
(Siehe Seite 22.)
Der von Ihnen eingerichtete Zielort
wird angezeigt.
Wenn Sie einen zusätzlichen
Referenzpunkt brauchen, richten Sie
diesen durch Berühren von [Tourp.
Hinzu] erneut ein.
5. Berühren Sie [Tourp. Hinzu].
Eine Tour einrichten
1. Drücken Sie [NAV] > Berühren Sie
[Erweitert] > [Tour Planer].
7. Berühren Sie [Start].
Tippen Sie zum Speichern der gefundenen Strecken auf [Ja], tippen
Sie ansonsten auf [Nein].
2. Berühren Sie [Neue Tour].
6. Mit dem Menü [Navigation],
[Erweitert] und [Favoriten] einen
Referenzpunkt einrichten.
(Siehe Seite 22.)
8. Geben Sie einen Namen ein und dann [OK].
3. Berühren Sie [Ja].
Die gefundenen Strecken werden
automatisch in [Tour Laden] gespeichert.
9. Gehen Sie gemäß den Bildschirmund akustischen Hinweisen vor.
29
LAN8900EKYN GER HMC indesign.ind29 29
2010-03-25 ¿ÀÈÄ 12:41:31
Menü Zieleingabe
Bearbeiten/Löschen eines Zielorts
oder Streckenpunkts
Sie können den eingerichteten Zielort
bzw. Streckenpunkt verändern oder
löschen.
1. Drücken Sie [NAV] > Berühren Sie
[Erweitert] > [Tour Planer] >
[Tour Laden].
2. Berühren Sie den gewünschten
Touristen.
[Tourliste Sortieren]: Ändert die
bereits eingerichtete
Reihenfolge des Zielortes
und Streckenpunktes.
(Befolgen Sie Schritte 5-6)
[Tourpunkt Löschen]: Löscht den
Streckenpunkt.
(Befolgen Sie
Schritte 7-9)
[Tourliste Löschen]: Der Tourist
wird gelöscht.
(Befolgen Sie
Schritte 10-11)
5. Geben Sie [Tourliste Sortieren] ein und
dann, nach Ändern der Reihenfolge, [OK].
9. Befolgen Sie die Schritte 7-9 auf
Seite 29 (Eine Tour einrichten).
10. Berühren Sie [Tourliste Löschen], um
den eingerichteten Tourist zu löschen.
3. Berühren Sie [Tourliste Bearb.].
4. Berühren Sie die gewünschten Optionen.
8. Berühren Sie den gewünschten
Streckenpunkt.
6. Befolgen Sie die Schritte 7-9 auf
Seite 29 (Eine Tour einrichten).
11. Berühren Sie die gewünschte Tourtliste.
7. Berühren Sie [Tourpunkt Löschen],
um den Tourpunkt zu löschen.
30
LAN8900EKYN GER HMC indesign.ind30 30
2010-03-25 ¿ÀÈÄ 12:41:32
Menü Zieleingabe
Ziel Speichern
Position Speichern
Zielorte, die Sie oft anfahren, können im
Adressbuch gespeichert werden.
Die gespeicherten Zielorte können als
Zielort oder Streckenpunkt leicht nachverfolgt werden.
Dies funktioniert nur dann, wenn die
Zielorte bereits eingerichtet wurden.
Die aktuelle Fahrzeugposition kann im
Adressbuch gespeichert werden.
1. Drücken Sie [NAV] > Berühren Sie
[Erweitert] > [Ziel Speichern].
1. Drücken Sie [NAV] > Berühren Sie
[Erweitert] > [Pos. Speichern].
2. Geben Sie den Namen des aktuellen Standorts ein und berühren Sie
dann [OK].
2. Geben Sie den Namen des Zielortes
ein und berühren Sie dann [OK].
Der aktuelle Fahrzeugstandort wird
automatisch im Adressbuch
gespeichert. (Seite 24)
Der Zielort wird automatisch im
Adressbuch gespeichert. (Seite 24)
31
LAN8900EKYN GER HMC indesign.ind31 31
2010-03-25 ¿ÀÈÄ 12:41:32
Menü Zieleingabe
Privat 1/Büro2/3-12
Wenn Ihr Wohnort, Ihre Arbeitsstelle
und Ihre bevorzugten Orte bereits in
Ihrem Adressbuch gespeichert sind,
kann die Strecke zu diesen Orten leicht
nachverfolgt werden.
Speichern des Wohnortes
1. Drücken Sie [NAV] > Berühren Sie
[Adressbuch].
4. Wenn Sie Ihre Wohnadresse einrichten möchten, berühren Sie [1 Privat].
1. Drücken Sie [NAV] > Berühren Sie
[Favoriten].
2. Berühren Sie [Privat 1].
5. Berühren Sie [OK].
3. Berühren Sie die bevorzugte Strecke
und berühren Sie dann [Start].
2. Berühren Sie
den Ort, nachdem
Sie den bevorzugten Ort eingegeben haben.
3. Berühren Sie [Favoriten].
Suchen der Wohnadresse
✽ Hinweis
• Gehen Sie bei der Einrichtung Ihrer
Arbeitsstelle und der bevorzugten
Orte gleichermaßen wie oben vor.
• Alten Informationen werden durch
neue Informationen, die am selben
Speicherort abgelegt werden, überschrieben.
• Wenn Sie den im Adressbuch
gespeicherten Ort löschen möchten,
berühren Sie [Löschen].
• Um den aktuellen Standort im Menü
[Favoriten] zu speichern, drücken Sie
auf [NAV] > tippen Sie auf [Favoriten]
> halten Sie die gewünschte Nummer
gedrückt > geben Sie einen Namen
ein und tippen Sie auf [OK].
Gehen Sie gemäß den Bildschirmund akustischen Hinweisen vor.
✽ Hinweis
Gehen Sie bei der Einrichtung Ihrer
Arbeitsstelle und der bevorzugten Orte
gleichermaßen wie oben vor.
32
LAN8900EKYN GER HMC indesign.ind32 32
2010-03-25 ¿ÀÈÄ 12:41:32
Verwendung des Landkartenmenüs
Überblick über das
Landkartenmenü
Landkartenmenü
Display
POI Kategorie
2D/3D
Display Teilen/
Vollbild
Route
Position Speichern
Routenoptionen
Tour Planer
Browser
Umleitung
Verkehr
Info Umgebung
Info Zur Route
Allgemeine Bedienung des
Landkartenmenüs
1. Schalten Sie das Gerät ein.
2. Drücken Sie MAP. Die
Landkartenansicht erscheint.
Menü [Route]
3. Berühren Sie [Menü].
Menü [Verkehr]
4. Berühren Sie [Display], [Route] oder
[Verkehr], um die gewählte Option
zu wählen.
5. Berühren Sie die bevorzugte
Einstellung.
Auf den Seiten 34 - 38 finden Sie
weitere Einzelheiten.
Menü [Display]
33
LAN8900EKYN GER HMC indesign.ind33 33
2010-03-25 ¿ÀÈÄ 12:41:33
Verwendung des Landkartenmenüs
POI Kategorie
3. Berühren Sie [OK].
Einige Orientierungspunkte in der
Umgebung können als Symbol auf dem
Bildschirm angezeigt werden.
Hiermit können Sie die Symbole für
den Orientierungspunkt anzeigen oder
verbergen.
1. Drücken Sie [MAP] > Berühren Sie
[Menü] > [Display] > [POI Kategorie].
Die aktivierten Orientierungshilfen
werden in der Landkarte angezeigt.
2D/3D
Für die Landkartenansicht kann 2D und
3D gewählt werden.
- 2D: Die Landkarte wird zweidimensional ähnlich einem Straßenatlas
dargestellt.
- 3D: Die Ansicht erfolgt aus
seiner erhöhten Perspektive.
Diese Ansicht erleichtert die
Wiedererkennung der Straße, da
sie eine Panoramaansicht über
eine längere Entfernung darstellt.
1. Drücken Sie [MAP] > Berühren Sie
[Menü] > [Display] > [2D/3D].
2. Berühren Sie die gewünschten
Symbole. Die Anzeigeeinstellungen
des Symbols werden aus- bzw. eingeblendet, wenn Sie das Symbol
berühren. Das gewählte Symbol
leuchtet auf.
2. Berühren Sie [2D/3D] erneut, um
zur 2D-Ansicht zurückzukehren.
34
LAN8900EKYN GER HMC indesign.ind34 34
2010-03-25 ¿ÀÈÄ 12:41:33
Verwendung des Landkartenmenüs
Display teilen/Vollbild
Position Speichern
Tour Planer
Für die Landkartenansicht kann geteilter Bildschirm oder voller Bildschirm
gewählt werden.
Die aktuelle Fahrzeugposition kann im
Adressbuch gespeichert werden.
Mit dem Tourenplaner können Sie die
durchsuchten Strecken bereisen, indem
Sie einen Zielort oder Referenzpunkt
einrichten.
1. Drücken Sie [MAP] > Berühren Sie
[Menü] > [Display] > [Display teilen].
1. Drücken Sie [MAP] > Berühren
Sie [Menü] > [Route] > [Position
Speichern].
2. Geben Sie den Namen des aktuellen Standorts ein und berühren Sie
dann [OK].
1. Drücken Sie [MAP] > Berühren Sie
[Menü] > [Route] > [Tour Planer].
2. Siehe “Tour Planer” auf den Seiten
29-30.
Display teilen
2. Um zum Voll-Bildschirm-Modus zu
wechseln, berühren Sie [Menü] >
[Display] > [Vollbild].
Vollbild
Der aktuelle Fahrzeugstandort wird
automatisch im Adressbuch gespeichert. (Seite 24)
35
LAN8900EKYN GER HMC indesign.ind35 35
2010-03-25 ¿ÀÈÄ 12:41:34
Verwendung des Landkartenmenüs
Routenoptionen
Sie können die Streckenbedingungen
ändern oder die Streckeninformationen
bestätigen. Richten Sie die passenden
Streckenbedingungen gemäß Ihrem Zweck ein.
1. Drücken Sie [MAP] > Berühren
Sie [Menü] > [Route] >
[Routenoptionen].
2 Berühren Sie die Einstellung Ihrer Wahl.
• Route: Wenn Sie in [Alle Routen
Planen] im EinstellungenMenü keine Einstellungen
vornehmen, stellen Sie die
Streckenoption auf schnell
( ), Kurz ( )
oder Eco ( ).
✽ Hinweis
• Schnelle Strecke: Berechnet die
Strecke mit der kürzesten Fahrzeit.
• Kurze Strecke: Berechnet die
Strecke mit der kürzesten
Entfernung.
• Eco (Ökonomische) Route:
- Um Kraftstoff zu sparen, reduziert
diese Route häufige Stop&GoPausen an Kreuzungen oder
beim Richtungswechsel. Dies wird
anhand einer KraftstoffverbrauchsTabelle und EchtzeitVerkehrsinformationen berechnet.
Diese Route kann allerdings bei
gewissen Fahrbedingungen, z.B.
plötzliches Beschleunigen, eventuell nicht mehr ihren Zweck erfüllen.
- Eco Route kann eventuell die
Fahrzeit und die Strecke verlängern, um Kraftstoff zu sparen.
• TMC
- Auto ( ): Wenn der Verkehrsfunk
auf der aktuellen Strecke einen
Vorfall registriert hat, sucht das
Navigationssystem automatisch und
ohne entsprechende Meldung nach
einer Umgehung.
- Aus ( ): Beendet die
Verkehrsfunkfunktion.
- Ein (
): Wenn der Verkehrsfunk
auf der aktuellen Strecke
einen Vorfall registriert hat,
wird im Navigationssystem
ein Popup-Fenster mit
den Informationen zu
dem Vorfall angezeigt.
✽ Hinweis
Gebührenpflichtige Verkehrsfunkdienste werden nicht unterstützt.
• Mautstraße (
)
- Nutzen: Einschließlich der
Nutzung von Mautstraßen.
- Meiden: Nutzung von Mautstraßen
wird vermieden.
)
• Tunnel (
- Nutzen: Einschließlich der
Nutzung von Tunnels.
- Meiden: Nutzung von Tunnels wird
vermieden.
)
• Autobahn (
- Nutzen: Einschließlich der Nutzung
von Bundesstraßen.
- Meiden: Nutzung von Bundesstraßen
wird vermieden.
• Fähre (
)
- Nutzen: Einschließlich der
Nutzung von Fähren.
- Meiden: Nutzung von Fähren wird
vermieden.
3. Drücken Sie [OK].
Wenn die Landkartenansicht des
aktuellen Standorts oder der
Bildschirm zur Streckeneinrichtung
angezeigt wird, errechnet das System
eine neue Strecke mit den eingestellten Bedingungen.
✽ Hinweis
• Parken Sie das Fahrzeug sicher, bevor
Sie die Streckenbedingungen ändern.
• Das Ändern der Streckenbedingungen
während der Fahrt bedeutet
Unfallgefahr.
36
LAN8900EKYN GER HMC indesign.ind36 36
2010-03-25 ¿ÀÈÄ 12:41:34
Verwendung des Landkartenmenüs
Browser
Umleitung
Bei aktivierter Routenführung kann
ein vergrößerter Streckenabschnitt
angezeigt werden.
Wenn Sie wegen der Verkehrssituation
eine Umgehung fahren möchten, können
Sie mit der Umgehungsfunktion eine
alternative Strecke vom Fahrzeugstandort
zum Zielort berechnen.
1. Drücken Sie die Taste [MAP] >
Tippen Sie auf die Schaltfläche
[Menü] > [Route] > [Browser].
2. Zur Anzeige der Streckenabschnitte
[Zurück] oder [Weiter] drücken.
1. Drücken Sie die Taste [MAP] >
Tippen Sie auf die Schaltfläche
[Menü] > [Route] > [Umleitung].
2. Berühren Sie [Kürzer] oder [Länger],
um für die Umgehung eine Strecke
zu wählen, die Ihrer gewünschten
Entfernung entspricht.
4. Berühren Sie die bevorzugte Strecke
und berühren Sie dann [Start].
Gehen Sie gemäß den Bildschirmund akustischen Hinweisen vor.
✽ Hinweis
Wenn Sie keine Umgehung fahren
müssen, berühren Sie [Menü] > [Route]
> [Umleitung] > [Löschen].
3. Zur Anzeige des vergrößerten
Streckenabschnitts [Abschnitt]
drücken.
4. Um zur vorherigen Anzeige zurückzukehren [Route] drücken.
- Blau: Ursprüngliche Strecke
- Rot: Umgehungsstrecke
3. Berühren Sie [Start].
5. Um zur aktuellen Fahrzeugkarte
zurückzukehren
drücken.
37
LAN8900EKYN GER HMC indesign.ind37 37
2010-03-25 ¿ÀÈÄ 12:41:34
Verwendung des Landkartenmenüs
Info Umgebung
Die Liste der Verkehrsinformationen
in der Umgebung der aktuellen
Fahrzeugposition wird angezeigt.
1. Drücken Sie die Taste [MAP] >
Tippen Sie auf die Schaltfläche
[Menü] > [Verkehr] > [Info Umgebung].
2. Berühren Sie die gewünschte Option, um
die einzelnen Informationen zu prüfen.
3. Berühren Sie nach der Prüfung [Karte Zeigen].
5. Durch Berühren von
gehen Sie
zum vorherigen Fenster. Drücken Sie
MAP, um zur Landkartenansicht des
aktuellen Standorts zurückzukehren
Info Zur Route
Liste der Verkehrsinformationen zur
empfohlenen Strecke vom aktuellen
Fahrzeugstandort zum -zielort wird
angezeigt.
Eine Umgehungsstrecke zur
Vermeidung des Vorfalls vom aktuellen Fahrzeugstandort zum -zielort wird
gesucht. Sie können auch die detaillierten Informationen über die angezeigten Vorfälle prüfen.
1. Drücken Sie die Taste [MAP] >
Tippen Sie auf die Schaltfläche
[Menü] > [Verkehr] > [Info Zur Route].
4. Durch Berühren von [Zoom+] werden Ihnen
die Einzelheiten der Landkarte angezeigt.
Durch Berühren von [Zoom-] wird Ihnen
die Landkarte in einer weiteren Ansicht
angezeigt.
3. Wenn Sie eine Umgehung nutzen
müssen, berühren Sie [Umleitung].
✽ ★inweis
Berühren Sie [Karte Zeigen], wenn Sie
den Ort des Vorfalls auf der Strecke
sehen möchten. Durch Berühren
gehen Sie zum vorherivon
gen Fenster. Drücken Sie MAP, um
zur Landkartenansicht des aktuellen
Standorts zurückzukehren.
4. Berühren Sie die Strecke Ihrer Wahl.
2. Berühren Sie die gewünschte Option,
um die einzelnen Informationen zu
prüfen.
5. Berühren Sie [Start].
Gehen Sie gemäß den Bildschirmund akustischen Hinweisen vor.
38
LAN8900EKYN GER HMC indesign.ind38 38
2010-03-25 ¿ÀÈÄ 12:41:34
Bluetooth Wireless-Technologie
Hinweise zur Bluetooth
Wireless-Technologie
Mit Hilfe der Bluetooth WirelessTechnologie kann eine drahtlose
Verbindung zwischen zwei Geräten
hergestellt werden, wie z. B. zwischen
einem Telefon und dem Gerät. Zur
erstmaligen Verbindung zweier Geräte
muss eine gemeinsame PIN-Nummer
für die Geräte vergeben werden. Nach
einer erfolgreichen Verbindung werden
diese beiden Geräte beim Einschalten
automatisch verbunden.
✽ Hinweise
• An bestimmten Standorten ist die
Bluetooth-Technologie u. U. nur eingeschränkt nutzbar.
• Auf Grund des umfangreichen
Angebotes an Bluetooth-Telefonen und
der verschiedenen Firmware-Versionen
können die Funktionen Ihres Gerätes
beim Bluetooth-Betrieb unterschiedlich
sein.
• Da die Funktionsunterschiede
hauptsächlich auf die
Freisprecheinrichtung des jeweiligen
Modells zurückzuführen sind, wenden
Sie sich bei Fragen an den Hersteller.
• Sie können die Liste der BluetoothTelefonkompatibilität auf der Website
(http://www.navigation.com/kia) ansehen.
Verbindung zwischen Gerät und
Bluetooth-Telefon herstellen
4. Tippen Sie im Bildschirm
“Bluetooth-Geräte” auf das gewünschte Bluetooth-Telefon.
Verbindung mit Hilfe der
Geräteeinstellungen (1)
1. Drücken Sie
auf dem
Bedienungsfeld.
2. Tippen Sie auf die Schaltfläche [Bluetooth].
3. Tippen Sie auf die Schaltfläche
[Suche nach Bluetooth-Geräten].
Tippen Sie zum Abbrechen des
Vorgangs auf die Schaltfläche
[Abbrechen].
5. Geben Sie den Hauptschlüssel
(Standard: 0000) ein, der im
Display Ihres Telefons angezeigt
wird, wenn das Popup-Fenster im
Bildschirm erscheint. Wenn die
Verbindung erfolgreich war, erscheint das Bluetooth-Hauptfenster
auf dem Bildschirm.
Wenn die Verbindung fehlgeschlagen ist, erscheint die entsprechende
Meldung auf dem Bildschirm.
39
LAN8900EKYN GER HMC indesign.ind39 39
2010-03-25 ¿ÀÈÄ 12:41:35
Bluetooth Wireless-Technologie
Verbindung mit Hilfe der
Geräteeinstellungen (2)
1. Drücken Sie
auf dem
Bedienungsfeld.
2. Drücken Sie [Suche nach BluetoothGeräten].
Verbindung mit Hilfe der
Telefoneinstellungen
Die Bluetooth-Funktion Ihres Telefons
ist u. U. standardmäßig ausgeschaltet.
Um die Bluetooth-Funktion zu nutzen, muss diese am Telefon aktiviert
werden. Hinweise finden Sie in der
Bedienungsanleitung des Telefons.
4. Wählen Sie Ihr Gerät aus der Liste
verfügbarer Telefone.
5. Geben Sie den Hauptschlüssel
(Standard: 0000) ein, der im Display
Ihres Telefons angezeigt wird, wenn das
Popup-Fenster im Bildschirm erscheint.
Wenn die Verbindung erfolgreich
war, erscheint das BluetoothHauptfenster auf dem Bildschirm.
1. Aktivieren Sie die Bluetooth-Funktion des Telefons. Diese finden Sie
etwa unter Einstellungen, BluetoothVerbindung oder Freisprechen.
2. Drücken Sie [ ] > Berühren Sie
[Bluetooth] > [Autorisierung externer
Geräte].
3. Befolgen Sie die Schritte 4-5 auf
Seite 39.
✽ Hinweise
Wenn Sie, nachdem Sie die Verbindung
über Bluetooth Wireless-Technologie
hergestellt haben, im Bedienungsfeld
erneut
berühren, erscheint das
Bluetooth-Hauptfenster im Bildschirm.
Tippen Sie zum Abbrechen des
Vorgangs auf die Schaltfläche
[Abbrechen].
3. Starten Sie eine Suche
nach Bluetooth-Geräten. Die
Einstellungen finden Sie beispielsweise in einem Menü wie
Bluetooth, Verbindungen oder
Freisprecheinrichtung.
✽ Hinweise
• Die Funktionsweise gleicht der eines kabelgebundenen Headsets eines Mobiltelefons. Das Headset dient ausschließlich zum Sprechen über das Telefon.
Es eignet sich nicht zum Musik hören.
• Im Gegensatz zur Freisprecheinrichtung
sind beim Einsatz eines Headsets lediglich zwei Funktionen möglich, nämlich
“Anrufe entgegennehmen” und “Letzten
Teilnehmer anrufen”. Zudem wird die
Telefonnummer des Anrufers nicht
angezeigt.
• Je nach Telefonmodell wird die
Freisprecheinrichtung bzw. das Headset
aktiviert, sobald die Verbindung zum
Bluetooth-Gerät hergestellt wurde.
40
LAN8900EKYN GER HMC indesign.ind40 40
2010-03-25 ¿ÀÈÄ 12:41:35
Bluetooth Wireless-Technologie
Verbindung zum Bluetooth-Telefon
trennen und wiederherstellen
1. Berühren Sie im Fenster “Bluetooth”
[Bluetooth-Geräteliste anzeigen].
3. Tippen Sie erneut auf das getrennte
Telefon, um die Verbindung wiederherzustellen. Berühren Sie dann [Ja].
3. Berühren Sie [Ja].
2. Tippen Sie auf das verbundene Telefon.
Tippen Sie anschließend auf die
Schaltfläche [Ja].
Daraufhin erscheint das Symbol
.
Ein angeschlossenes Telefon
löschen
Wenn Sie ein angeschlossenes Telefon nicht
mehr brauchen, können Sie es löschen.
1. Berühren Sie im Fenster “Bluetooth”
[Bluetooth-Geräteliste anzeigen].
• Das angeschlossene Telefon wird
gelöscht.
• Wenn ein angeschlossenes Telefon nicht
gelöscht werden soll, wählen Sie [Nein].
Ändern der Bluetooth Kennung
Sie können die Bluetooth kennung ändern.
Das Telefon wird daraufhin getrennt
und das Symbol wird ausgeblendet.
2. Berühren Sie rechts des Telefons,
das Sie löschen möchten.
1. Geben Sie den Hauptschlüssel über
und
, ein.
das Nummernfeld,
2. Berühren Sie [OK].
41
LAN8900EKYN GER HMC indesign.ind41 41
2010-03-25 ¿ÀÈÄ 12:41:35
Bluetooth Wireless-Technologie
Einen Anruf durch Eingabe
einer Telefonnummer tätigen
Der normale Weg ist, einfach eine
Nummer zu wählen.
Vor einem Anruf muss eine Verbindung
zwischen Gerät und Bluetooth-Telefon
hergestellt werden.
auf dem
1. Drücken Sie die Taste
Bedienteil.
Das Bluetooth-Hauptfenster erscheint auf dem Bildschirm.
2. Tippen Sie die gewünschte
Telefonnummer über die
Nummerntasten ein. Tippen Sie
anschließend auf die Schaltfläche
.
✽ Hinweise
• Falls Sie sich verwählt haben, tippen
Sie auf
, um die letzte eingegebene Ziffer zu löschen. Wenn Sie alle
Ziffern auf einmal löschen möchten,
.
berühren und halten Sie
• Halten Sie die Schaltfläche
gedrückt, um den letzten Teilnehmer
anzurufen.
• Wenn Sie einen internationalen
Telefonanruf tätigen möchten, berühren Sie lange die [0], geben Sie dann
die Telefonnummer ein.
• Die Liste der vorherigen Anrufe ist
nur für die Freisprecheinrichtung gültig. (Bei Anrufen über den HeadsetAnschluss ist nur die Liste der früheren
Anrufe des Bluetooth-Telefons relevant.)
• Über die Headset-Verbindung können
Anrufe nur über die Liste der früheren
Anrufe getätigt werden.
Tonausgabe während eines
Gesprächs wechseln
3. Tippen Sie auf die Schaltfläche
[Auflegen], um ein Gespräch zu beenden.
Sie können einen Ton über den Geräteund Telefonlautsprecher hören, wenn Sie
[Anruf Übergeb.]/[Anruf Rückübertragen]
berühren.
Das Mikrofon ein-/ausschalten
Sie können das Mikrofon ein-/ausschalten, indem Sie [Mikrofon Aus]/
[Mikrofon Ein] berühren.
Anrufe entgegennehmen
1. Bei einem eingehenden Anruf klingelt das Telefon und die Meldung
“Eingehender Anruf” erscheint auf
dem Bildschirm.
2. Tippen Sie auf die Schaltfläche
[Annehmen], um ein Gespräch entgegenzunehmen.
Um ein Gespräch abzuweisen, tippen
Sie auf die Schaltfläche [Ablehnen].
✽ Hinweise
• Falls die Anruferkennung aktiviert ist,
erscheint die Nummer des Anrufers in
der Anzeige.
• Falls die Telefonnummer im
Telefonbuch verzeichnet ist, wird
der Name des Anrufers laut
Telefonbucheintrag angezeigt.
• Falls die Nummer des eingehenden
Anrufs im Telefonbuch verzeichnet ist,
wird der Name des Anrufers angezeigt.
Falls bekannt wird die Telefonnummer
des Anrufers u. U. ebenfalls angezeigt.
• Falls die Schaltfläche “Abweisen”
deaktiviert ist, unterstützt das mit dem
Gerät verbundene Telefon die Funktion
Anruf abweisen nicht.
42
LAN8900EKYN GER HMC indesign.ind42 42
2010-03-25 ¿ÀÈÄ 12:41:36
Bluetooth Wireless-Technologie
Bedienung des Telefonbuchs
Sie können die Telefonbucheinträge
verwenden, die eleforn Telefon mit
PBAP -Funktion (TelefonbuchZugangsprofil) gespeichert sind.
Nachdem Sie Ihr Gerät via BluetoothWireless-Technologie, mit dem
Bluetooth-Telefon verbunden haben,
werden die Nummern des Telefonbuchs
Ihres Telefons automatisch ins
Telefonbuch übertragen.
Eine Nummer im Telefonbuch
anrufen
Nachdem Sie den Eintrag, den Sie
anrufen möchten, im Telefonbuch
gefunden haben, können Sie die
Nummer auswählen und den Anruf tätigen.
1. Drücken Sie die Taste
auf dem
Bedienteil. Tippen Sie anschließend
auf die Schaltfläche [Telefonbuch].
2. Tippen Sie auf einen
Telefonbucheintrag, um die jeweilige
Nummer zu wählen.
oder
Durch Berühren von
gelangen Sie zur nächsten oder
vorherigen Seite in der Liste.
3. Tippen Sie auf die Schaltfläche
[Auflegen], um ein Gespräch zu beenden.
2. Geben Sie den ersten Buchstaben
des Eintrags in der Telefonbuchliste,
die Sie durchsuchen möchten, über
das Nummernfeld ein und berühren
Sie dann [OK].
3. Berühren Sie einen Telefonbucheintrag,
den Sie anwählen möchten.
Einträge im Telefonbuch alphabetisch durchsuchen
Wenn in der Telefonbuchliste viele
Einträge vorhanden sind, kann es
nützlich sein, sie zwecks Erleichterung
der Suche in alphabetischer
Reihenfolge anzuordnen.
1. Tippen Sie im Bildschirm
“Telefonbuch” auf die Schaltfläche
[Nach Name suchen].
Durch Berühren von
oder
gelangen Sie zur nächsten oder
vorherigen Seite in der Liste.
4. Tippen Sie auf die Schaltfläche
[Auflegen], um ein Gespräch zu
beenden.
43
LAN8900EKYN GER HMC indesign.ind43 43
2010-03-25 ¿ÀÈÄ 12:41:36
Bluetooth Wireless-Technologie
So benutzen Sie Ihre Anrufliste
Sie können die Anrufliste verwenden,
die in einem Telefon mit PBAP-Funktion
(Telefonbuch-Zugangsprofil) gespeichert
ist. Nachdem Sie Ihr Gerät via Bluetooth
Wireless-Technologie, mit dem
Bluetooth-Telefon verbunden haben,
werden die Nummern der Listen
[Ausgehende Anrufe], [Anrufe in
Abwesenheit] und [Erhaltene Anrufe]
Ihres Telefons automatisch in die
Anrufliste übertragen.
2. Berühren Sie [Ausgang],
[Abwesenh.] oder [Eingang].
Ausgehende Anrufe
So aktualisieren Sie die Anrufliste
Sie können die Nummern in Ihrer
Liste [Ausgehende Anrufe], [Anrufe in
Abwesenheit] und [Erhaltene Anrufe]
aktualisieren.
auf dem
1. Drücken Sie
Bedienungsfeld. Berühren Sie dann
[Anruflisten].
Eine Nummer in der Anrufliste
anrufen
Nachdem Sie den Eintrag, den Sie
anrufen möchten, in der Liste [Ausgehende Anrufe], [Anrufe in Abwesenheit]
oder [Erhaltene Anrufe] gefunden haben,
können Sie die Nummer auswählen und
einen Anruf tätigen.
1. Drücken Sie
auf dem
Bedienungsfeld. Berühren Sie dann
[Anruflisten].
Anrufe in Abwesenheit
2. Berühren Sie [Ausgang],
[Abwesenh.] oder [Eingang], berühren Sie dann [Update].
3. Die aktualisierten Anruflisten werden
heruntergeladen.
Erhaltene Anrufe
3. Berühren Sie den Eintrag, den Sie
anwählen möchten.
44
LAN8900EKYN GER HMC indesign.ind44 44
2010-03-25 ¿ÀÈÄ 12:41:37
Bluetooth Wireless-Technologie
Einen Anruf mit Schnellwahlnummern tätigen
Sie können Telefonbucheinträge
verwenden, die in einem Telefon mit
PBAP-Funktion (TelefonbuchZugangsprofil) gespeichert sind.
Sie können einfach bis zu 12
Telefonnummern speichern und diese
später über die Schnellwahl erneut anrufen.
Durch Berühren von oder
gelangen Sie zur nächsten oder
vorherigen Seite in der Liste.
3. Berühren Sie eine der Kategorien, die
Sie der Schnellwahlnummer zuweisen
möchten (Zum Beispiel: Telefonbuch)
.
2. Berühren und halten Sie eine der
Schnellwahlnummern (1-12). (Zum
Beispiel: 1)
Eine Nummer in der
Schnellwahlliste anrufen
1. Drücken Sie im Bedienpane .
Berühren Sie dann [Kurzwahl].
Telefonnummern in die
Schnellwahlliste eintragen
1. Drücken Sie im Bedienfeld auf
Berühren Sie dann [Kurzwahl].
Der Name (Telefonnummer) wird im
Speicher abgelegt. Wenn Sie das
nächste Mal denselben Namen be
rühren, wird der Name (die Telefonnummer) dem Speicher entnommen.
4. Berühren Sie eine der Telefonnummern,
die Sie der Schnellwahlnummer
zuweisen möchten.
2. Berühren Sie eine der
Schnellwahlnummern, um einen
Anruf zu tätigen.
3. Tippen Sie auf die Schaltfläche
[Auflegen], um ein Gespräch zu beenden.
5. Geben Sie den Namen über das
Nummernfeld ein und berühren Sie
dann [OK].
✽ Hinweis
Um die Schnellwahlfunktion nutzen zu
können, muss die Schnellwahl für das
Bluetooth-Telefon aktiviert werden.
45
LAN8900EKYN GER HMC indesign.ind45 45
2010-03-25 ¿ÀÈÄ 12:41:37
CD-/MP3-/WMA-/USB-/iPod-Bedienung
Wiedergabe einer Audio-CD und
MP3-/WMA-/USB-/iPod-Dateien
Disc
Legen Sie einen Chip in den
Speicherkartenschlitz ein, die
Wiedergabe startet automatisch.
iPod
Das Gerät kann auch von einem iPod
Dateien wiedergeben, wenn der iPod
über das passende Kabel am USBAnschluss angeschlossen wurde.
Schließen Sie den iPod am USBAnschluss an, die Wiedergabe startet
automatisch.
Im iPod-Benutzerhandbuch finden Sie
weitere Einzelheiten über den iPod.
Zum nächsten Titel/zur nächsten
Datei springen Alle
Berühren Sie
, um den nächsten
Musiktitel/Datei zu wählen.
Zum vorherigen Titel/zur vorherigen
Datei springen Alle
Berühren Sie
binnen 1 Sekunde der
Wiedergabezeit.
Zum Anfang des aktuellen Titels/
der aktuellen Datei springen Alle
Audio-CD
Berühren Sie
nach 1 Sekunde der
Wiedergabezeit.
Suchlauf
MP3-/WMA-CD
USB
Sie können die Dateien, die auf einem USBSpeichermedium gespeichert sind, wiedergeben.
Schließen Sie das USB-Speichermedium am
USB-Anschluss an, die Wiedergabe startet
automatisch.
✽ Hinweise
Benutzen Sie bei ausschließlicher
Nutzung des iPods das Autokabel
für die Verbindung des iPods zu
den Terminals des iPods zwecks
Wiedergabe.
Alle
Halten Sie die Schaltfläche
oder
während der Wiedergabe gedrückt
und lassen Sie sie an der gewünschten
Titelstelle los.
46
LAN8900EKYN GER HMC indesign.ind46 46
2010-03-25 ¿ÀÈÄ 12:41:37
CD-/MP3-/WMA-/USB-/iPod-Bedienung
Intro-Scan
Disc - Audio CD
USB
Disc - MP3/WMA
Die ersten 10 Sekunden des jeweiligen Musiktitels/der Datei werden wiedergegeben.
Wiederholen
Alle
Die aktuell gewählten Musiktitel/Dateien
werden wiederholt wiedergegeben.
1. Berühren Sie während der
Wiedergabe [Option].
1. Berühren Sie während der Wiedergabe
[Option].
Beispiel: Audio-CD
Beispiel: Audio-CD
2. Berühren Sie mehrfach [REPEAT].
2. Berühren Sie [SCAN Start].
Disc - Audio CD
3. Berühren Sie [SCAN Stop], um den
Intro-Scan zu beenden.
• [REPEAT Aus] : Alle Musiktitel des
Speichermediums
werden wiederholt
wiedergegeben.
• [REPEAT Titel] : Der aktuelle
Musiktitel wird
wiederholt wiedergegeben.
Disc - MP3/WMA
USB
• [REPEAT Aus] : Alle Dateien der
Speicherkarte
oder des USBSpeichermediums
werden wiederholt
wiedergegeben.
• [REPEAT Titel] : Die aktuelle Datei
wird wiederholt
wiedergegeben.
• [REPEAT Ordner] : Alle Dateien
des aktuellen
Ordners werden
wiederholt wiedergegeben.
iPod
• [REPEAT Aus]: Alle Musiktitel des
iPods werden wiederholt wiedergegeben.
• [REPEAT Ein]: Die aktuelle
Datei wird wiederholt
wiedergegeben.
47
LAN8900EKYN GER HMC indesign.ind47 47
2010-03-25 ¿ÀÈÄ 12:41:38
CD-/MP3-/WMA-/USB-/iPod-Bedienung
Zufallswiedergabe
Alle
Die aktuell gewählten Musiktitel/Dateien
werden zufällig wiedergegeben.
1. Berühren Sie während der
Wiedergabe [Option].
2. Berühren Sie mehrfach [RANDOM].
Disc - Audio CD
• [RANDOM Alle]: Alle Dateien des
Speichermediums
werden zufällig
wiedergegeben.
• [RANDOM Aus]: Die ZUFALLSWiedergabe wird
beendet.
Disc - MP3/WMA
USB
• [RANDOM Aus]: Die ZUFALLSWiedergabe wird
beendet.
• [RANDOM Ordner]: Alle Dateien
des aktuellen Ordners
werden zufällig
wiedergegeben.
• [RANDOM Alle]: Alle Dateien der
Speicherkarte
oder des USBSpeichermediums
werden zufällig
wiedergegeben.
iPod
• [RANDOM Aus]: Die ZUFALLSWiedergabe wird
beendet.
• [RANDOM Alle]: Alle Dateien des
iPods werden
zufällig wiedergegeben.
• [RANDOM Album]: Alle Dateien
des aktuellen
Albums werden
zufällig wiedergegeben.
Wiedergabe der Dateien durch
Klassifizierung in Ordner/ Album/
Artist USB
Sie können Dateien innerhalb des USB
wiedergeben, indem Sie Ordner, Album
oder Artist klassifizieren.
1. Berühren (Option) während der
Wiedergabe.
2. [Ordner], [Album] oder [Artist]
während der Wiedergabe berühren
• [Ordner]: Wiedergabe der Dateien
durch Klassifizierung im
Ordner.
• [Album]: Wiedergabe der Dateien
durch Klassifizierung im
Album.
• [Interpret]: Wiedergabe der Dateien
durch Klassifizierung
nach Artist.
✽ Hinweise
Möchten Sie zur Playlist-Anzeige,
.
berühren Sie
48
LAN8900EKYN GER HMC indesign.ind48 48
2010-03-25 ¿ÀÈÄ 12:41:38
CD-/MP3-/WMA-/USB-/iPod-Bedienung
Ordner/Datei aus der Liste
wählen Disc - Audio CD USB
Disc - MP3/WMA
Sie können Musik über die Anzeige der
Liste Musiktitel/Ordner/Datei auswählen.
1.
Tippen Sie während der Wiedergabe auf
die Schaltfläche [Liste].
✽ Hinweise
• Im Falle einer MP3/WMA-Datei,
berühren Sie die Schaltfläche
, um
zum nächst höheren Ordner zu gehen.
• Tippen Sie auf die Schaltfläche und ,
um die gewünschte Liste anzuzeigen.
• Wenn Sie das Fenster
„Wiedergabeliste“ öffnen möchten,
.
berühren Sie
So suchen Sie Musik
Beispiel: Audio-CD
2. Im Falle einer Audio-CD, berühren Sie die
gewünschte Datei. Im Falle einer MP3/
WMA-Datei, berühren Sie die Schaltfläche
des gewünschten Ordners. Wenn kein
Ordner angelegt ist, berühren Sie die
gewünschte Datei.
iPod
Sie können den iPod nach
Wiedergabelisten, Interpreten,
Albumtiteln, Genre, Musiktiteln, Komponist,
Hörbüchern, Podcasts durchsuchen.
Im iPod-Benutzerhandbuch finden Sie
weitere Einzelheiten über den iPod.
1. Berühren Sie während der
Wiedergabe [Liste].
2. Berühren Sie das gewünschte Element.
Audio-CD
• [Wiedergabebelisten]: Gibt die Titel der
[Wiedergabebelisten] wieder.
• [Interpreten]: Gibt die Titel von
[Interpreten] wieder.
• [Alben]: Gibt die Titel von [Alben]
wieder.
• [Genres]: Gibt die Titel von
[Genres] wieder.
• [Titel]: Gibt die Titel von [Titel] wieder.
• [Componisten]: Gibt die Titel von
[Componisten] wieder.
• [Hörbücher]: Gibt die Titel/Kapitel
von [Hörbücher] wieder:
• [Podcasts]: Gibt die Titel/Kapitel im
[Podcasts] wieder.
✽ Hinweise
• Wenn Sie zum nächst höheren Ordner
.
gehen möchten, berühren Sie
• Tippen Sie auf die Schaltfläche und ,
um die gewünschte Liste anzuzeigen.
• Wenn Sie das Fenster
„Wiedergabeliste“ öffnen möchten,
.
berühren Sie
MP3/WMA-Datei
3. Der gewählte Titel/die Datei wird wiedergegeben.
49
LAN8900EKYN GER HMC indesign.ind49 49
2010-03-25 ¿ÀÈÄ 12:41:38
CD-/MP3-/WMA-/USB-/iPod-Bedienung
So richten Sie die Wieder
gabegeschwindigkeit des
Hörbuchs ein iPod
Die Einrichtung der Wiedergabegesc
hwindigkeit hat nur Auswirkungen auf
Hörbücher, die im iTunes-Handel oder
über audible.com erworben wurden.
Im iPod-Benutzerhandbuch finden Sie
weitere Einzelheiten über den iPod.
• [Hörbuch Schnell]:
Spielt Hörbücher bei hoher
Geschwindigkeit ab.
• [Hörbuch Langsam]:
Spielt Hörbücher bei niedriger
Geschwindigkeit ab,
✽ Hinweise
Wenn Sie das Fenster „Wiedergabeliste“
.
öffnen möchten, berühren Sie
1. Berühren Sie [Option], wenn Sie Titel/
Kapitel von [Hörbuch] anhören.
Anforderungen an USB-Geräte
• Dieses Gerät unterstützt nur USB-FlashLaufwerke und externe USB-Festplatten
mit den Dateiformaten FAT16 oder
FAT32.
• Das USB-Gerät niemals während der
Dateiübertragung trennen.
• Zur Vermeidung von Datenverlust sollten
regelmäßig Sicherungskopien erstellt werden.
• Bei Verwendung eines USBVerlängerungskabels oder USB-Hubs
wird das USB-Gerät u. U. nicht erkannt
• Bestimmte USB-Geräte funktionieren
nicht zusammen mit diesem Gerät.
• Digitalkameras und Mobiltelefone
werden nicht unterstützt.
• Dieses Gerät wird nicht unterstützt, falls
insgesamt mehr als 10000 Dateien
gespeichert wurden.
Kompatible USB-Geräte
• Geräte, für die zum Anschluss an
einen Computer eine zusätzliche
Softwareinstallation erforderlich ist,
werden nicht unterstützt.
• MP3-Player: MP3-Player mit FlashFunktion.MP3-Player, für die eine
Treiberinstallation erforderlich ist, werden
nicht unterstützt.
• USB-Flash-Laufwerk: Geräte mit USB
2.0- oder USB 1.1-Unterstützung.
2. Berühren Sie mehrfach [Hörbuch].
• [Hörbuch Normal]:
Spielt Hörbücher bei normaler
Geschwindigkeit ab.
50
LAN8900EKYN GER HMC indesign.ind50 50
2010-03-25 ¿ÀÈÄ 12:41:39
CD-/MP3-/WMA-/USB-/iPod-Bedienung
Anforderungen an MP3-/WMA-Dateien
• Sampling-Frequenz: 16 - 48 kHz
(MP3) 8 - 44,1 kHz (WMA)
• Bitrate: zwischen 8 - 320 kbps (MP3)
5 -160 kbps (WMA)
• Die CD-R/CD-RW sollte das Format
“ISO 9660” besitzen.
• Falls MP3-/WM-Dateien mit einer
Software ohne DATEISYSTEM
erzeugt werden, z. B. “Direct-CD”,
können keine MP3-/WMA-Dateien
wiedergegeben werden.
Es wird das Programm “Easy-CD
Creator”empfohlen, mit dem ein
ISO9660-Dateisystem erstellt wird.
Der Kunde sollte beachten, dass für
das Herunterladen von MP3-/WMADateien sowie Musikdateien aus dem
Internet eine Genehmigung erforderlich ist. Unser Unternehmen erteilt
solche Genehmigungen nicht. Diese
sollten immer vom Urheber selbst
eingeholt werden.
Anforderungen an das iPod-Geräte
• Je nach Modell ist Ihr iPod u. U. nicht
mit diesem Gerät kompatibel.
• Ihr iPod kann je nach Software-Version
u. U. nicht über dieses Gerät gesteuert
werden. Es wird empfohlen, die Software
auf die neueste Version zu aktualisieren.
• Falls Sie ein Problem mit Ihrem iPod
haben, besuchen Sie die Webseite www.
apple.com/de/support/ipod.
• Dieses System kann analoge Tondaten
der folgenden iPod-Modelle verarbeiten.
- iPod touch 1. Generation
- iPod mini (1./2. Generation)
- iPod nano (1./3. Generation)
- iPod classic (4./5./6. Generation)
• Falls keine störungsfreie Wiedergabe
mit dem iPod möglich ist, muss die
iPod-Software auf die neueste Version
aktualisiert werden. Weitere Hinweise zur
Aktualisierung des iPod finden Sie auf
der Apple-Website unter <http://www.
apple.com>.
• Apple übernimmt keine Haftung für
den Betrieb dieses Gerät oder dessen
Kompatibilität mit Sicherheitsstandards
und Richtlinien.
51
LAN8900EKYN GER HMC indesign.ind51 51
2010-03-25 ¿ÀÈÄ 12:41:39
Radiobetrieb
Radio hören
1. Tippen Sie zur Auswahl des Radios
auf die Schaltfläche “RADIO”.
2. Tippen Sie zur Auswahl des
Frequenzbandes auf die Schaltfläche
“RADIO”.
Die Quelle wird in der folgenden
Reihenfolge umgeschaltet.
FM t AM t FM...
✽ Hinweise
Um FM/AM über die Bildschirmeingabe
zu wählen, berühren Sie
auf dem
Bildschirm, um AM zu wählen und
.
berühren Sie dann
3. Automatische Sendereinstellung:
Berühren Sie
/
auf dem
Bildschirm. Oder drücken Sie
im Bedienpanel / . Wenn ein
Sender gefunden wurde, wird die
Suche beendet.
4. Halten Sie eine der
Senderschaltflächen gedrückt.
Daraufhin werden Informationen zur
Speicherplatztaste angezeigt.
Der ausgewählte Speicherplatz wurde
im Speicher abgelegt.
Manuelle Sendereinstellung:
Drehen Sie die Sprung-Wahl des
Bedienungsfeldes nach links/rechts.
- Die Frequenzeinstellung verläuft
schrittweise auf- bzw. absteigend.
Radiosender speichern und
aufrufen
Auf einfache Weise können bis zu 12
sechs Sender zum späteren Aufrufen
per Tastendruck gespeichert werden.
1. Wählen Sie das gewünschte
Frequenzband (FM, AM) unter dem
der Sender gespeichert werden soll.
Wenn Sie zur vorherigen/nächsten
Seite gehen möchten, berühren Sie
/ .
5. Wiederholen Sie die Schritte 1 und
4 für weitere Sender. Wenn Sie nun
auf eine der Senderschaltflächen tippen, wird der jeweilige gespeicherte
Sender eingestellt.
2. Wählen Sie die gewünschte Frequenz.
3.Berühren Sie über den Bildschirm
[Presets].
✽ Hinweise
Wird ein Sender auf einer Speichervon
platztaste gespeichert, die bereits von
einem Sender des gleichen Frequenzbereichs belegt ist, wird der vorhandene Sender automatisch gelöscht.
52
LAN8900EKYN GER HMC indesign.ind52 52
2010-03-25 ¿ÀÈÄ 12:41:39
Radiobetrieb
AS (Automatischer
Senderspeicher)
Diese Funktion ist nur bei AM-Empfang
verfügbar.
Mit dieser Funktion können Sie automatisch starke Sendefrequenzen speichern.
1. Auswahl des AM-Frequenzbereichs.
Sendestationen anspielen
TA (Verkehrsmeldungen)
Die ersten 10 Sekunden der jeweiligen
Sendefrequenz werden wiedergegeben.
Mit der TA-Funktion kann das Gerät von
der aktuellen Quelle (einem anderen
FM-Sender, CD oder sonstigen angeschlossenen Komponenten) zur
Verkehrsmeldung (TA) wechseln.
1. Berühren Sie im AM/FM-Modus auf
dem Bildschirm [Option].
1. Berühren Sie im AM/FM-Modus auf
dem Bildschirm [Option].
2. Berühren Sie auf dem Bildschirm
[Option].
3. Berühren Sie auf dem Bildschirm
[Autostore].
2. Berühren Sie [TA Aus]/[TA Ein] auf
dem Bildschirm.
2. Berühren Sie [SCAN Start] auf dem
Bildschirm.
Lokale Sender mit starken Signalen
werden gesucht und automatisch
im Listenmenü gespeichert. Dann
erscheint das Listenmenü auf dem
Bildschirm.
3. Berühren Sie [SCAN Stop] zum
Beenden.
[TA Ein]: Verkehrsprogramme und
-meldungen können mit
den TP/TA-Funktionen
automatisch empfangen
werden.
[TA Aus]: Verkehrsprogramme und
-meldungen können nicht
empfangen werden.
4. Berühren Sie den gewünschten
Sendebereich.
53
LAN8900EKYN GER HMC indesign.ind53 53
2010-03-25 ¿ÀÈÄ 12:41:39
Radiobetrieb
NACHRICHTEN
Region Auto/Aus
Mit dieser Funktion kann das Gerät von
der aktuellen Quelle (einem anderen
FM-Sender, CD oder sonstigen angeschlossenen Komponenten) zur
Verkehrsmeldung (TA) wechseln.
Diese Funktion ist nur bei FM-Empfang
verfügbar.
1. Berühren Sie im AM/FM-Modus auf
dem Bildschirm [Option].
1. Auswahl des FM-Frequenzbereichs.
2. Berühren Sie auf dem Bildschirm
[Option].
3. Berühren Sie [Region Auto]/
[Region Aus] auf dem Bildschirm.
2. Berühren Sie auf dem Bildschirm
[NEWS Aus]/[NEWS Ein].
[NEWS Ein]: Nachrichten können
automatisch empfangen werden.
[NEWS Aus]: Nachrichten können nicht empfangen
werden.
[Region Auto]:
Falls das Empfangssignal des Senders abnimmt, schaltet das Gerät zu
einem anderen Sender innerhalb
des Netzwerks um, der dasselbe
Programm ausstrahlt.
[Region Aus]:
Falls das Empfangssignal des Senders abnimmt, schaltet das Gerät zu
einem Sender innerhalb des Netzwerks um, der dasselbe Programm
ausstrahlt. (Die Sendung kann sich
vom bisherigen Programm unterscheiden.)
54
LAN8900EKYN GER HMC indesign.ind54 54
2010-03-25 ¿ÀÈÄ 12:41:39
Bedienung über ein Zusatzgerät
Verwendung einer AUX-Quelle
Es ist möglich, ein Zusatzgerät mit dem
Gerät zu verwenden.
1. Drücken Sie “MEDIA” bis das “AUX”Fenster erscheint.
AUX-Audio
✽ Hinweise
• Bei einigen Zusatzgeräten, die keine
Videoquelle haben, ist die Wiedergabe
über den Video-Bildschirm nicht
möglich.
• Im Falle einiger iPod-Geräte, benutzen
Sie das iPod-Kabel für die ausschließliche Verwendung des iPods für die
Video-Wiedergabe, wenn Sie den iPod
an den AUX-Anschluss anschließen.
• Video ist während der Fahrt nicht
verfügbar. (Basieren auf den
Verkehrsbestimmungen, ist Aux Video
nur verfügbar, wenn das Fahrzeug
geparkt ist und die Handbremse
angezogen wurde.)
AUX-Video
2. Schließen Sie ein Zusatzgerät an den
AUX-Anschluss an, aktivieren Sie
dann die Zusatzfunktion.
55
LAN8900EKYN GER HMC indesign.ind55 55
2010-03-25 ¿ÀÈÄ 12:41:40
Spracherkennungssystem
Spracherkennung
Sprachbefehle geben
So sagen Sie Nummern
Mit der Spracherkennung können Sie
das AV-System (RADIO, CD, USB, iPod),
Navigation und andere Systeme wie
z.B. Telefon, mit denen dieses Fahrzeug
ausgestattet ist, ohne Einsatz der Hände
bedienen.
an der
1. Drücken Sie
Fernbedienung des Lenkrads.
Die Spracherkennung verlangt, dass die
Zahlen in Sprachbefehlen in einer bestimmten Art und Weise gesprochen werden.
Siehe folgende Beispiele. (Allgemeine
Regel: Entweder “Null” oder “oh” kann für
“0” verwendet werden.)
✽ Hinweise
Um die bestmögliche
Spracherkennungsleistung zu erhalten,
beachten Sie Folgendes:
• Im Fahrzeuginneren sollte es so
leise wie möglich sein. Schließen Sie
zur Vermeidung von Umgebungsgeräuschen (Verkehrgeräusche,
Vibrationsgeräusche etc.) die Fenster,
damit das System die Sprachbefehle
korrekt erkennen kann.
• Warten Sie den Signalton ab, bevor
Sie einen Befehl aufsprechen.
Ansonsten kann der Befehl nicht richtig erkannt werden.
• Sprechen Sie mit natürlicher Stimme
und ohne zwischen den Wörtern zu
pausieren.
2. Nach dem Signalton sagen Sie
“Hilfe”. Alle Befehle, die in aktiven
Feldern eingegeben worden sind,
werden aufgelistet.
Frequenz
Sprechen Sie die Nummer für die
Frequenz gemäß dem folgenden Beispiel:
“Frequenz Fünfundneunzig Komma
Vier”/ “Fünfundneunzig Komma Vier
Megahertz”
✽ Hinweise
• Wenn der Befehl nicht erkannt wird,
meldet das System beim ersten Mal
“Wie bitte?” und beim zweiten Mal
“Wiederholen Sie bitte!”.
• Zum Beenden der Spracherkennung
oder
drücken Sie ein weiteres Mal
drücken Sie eine beliebige Taste oder
berühren Sie den Bildschirm und
sagen “Abbrechen”.
• Um die Lautstärke für Systemmeldungen einzustellen, drücken Sie während
der Spracherkennung die Tasten
und
auf der Fernbedienung am
Lenkrad oder drehen Sie den Lautstärkeregler ( ) am Bedienungsfeld.
Telefonnummer
Sprechen Sie Telefonnummern
gemäß dem folgenden Beispiel:
0-1-0-2-0-0-5-2 (Einzelne Ziffern)
56
LAN8900EKYN GER HMC indesign.ind56 56
2010-03-25 ¿ÀÈÄ 12:41:40
Spracherkennungssystem
Beispiele für Sprachbefehle
Bei Gebrauch der Spracherkennung ist
es manchmal ausreichend, einen Befehl
zu sagen, aber es kann auch erforderlich sein, zwei oder mehr Befehle zu
sagen. Einige zusätzliche Bedienungen
durch Sprachbefehle werden hier
beispielhaft beschreiben.
5. Nach dem Signalton sagen Sie
“Frequenz einhundertzwei” oder
“einhundertzwei megahertz”.
6. Wenn die gesprochene Frequenz
erkannt wird, wechselt die FMFrequenz zu 102 MHz.
Beispiel 1: Ändern des FM-Senders
und der Frequenz
5. Wenn die Wiedergabeliste erkannt
wird, wird sie sofort wiedergegeben.
1. Drücken Sie
an der Fernbedienung
des Lenkrads.
2. After the beep sounds and say “FM”.
Beispiel 2: So ändern Sie die USB
(CD)-Wiedergabeliste
3. Nach Erkennung des Befehls
“FM ” wird d er FM-Bildschirm
angezeigt.
an der Fernbedienung
6. Drücken Sie
des Lenkrads.
1. Drücken Sie
an der Fernbedienung
des Lenkrads.
2. Nach dem Signalton sagen Sie
“Liste”.
an der Fernbedienung
4. Drücken Sie
des Lenkrads.
4. Drücken Sie
nach dem SignalSie können einen Befehl aus der
Wiedergabeliste aussprechen wie z.B.
“micky green oh”.
3. Wenn der Befehl erkannt wurde,
wechselt das Fenster zu dem USB
(CD) LIST-Fenster.
7. Nach dem Signalton sagen Sie
“Nächster Titel” oder “Vorheriger
Titel”.
8. Wenn der Befehl erkannt wird, wechselt die Wiedergabeliste zu “Nächster
Titel” oder “Vorheriger Titel”.
57
LAN8900EKYN GER HMC indesign.ind57 57
2010-03-25 ¿ÀÈÄ 12:41:40
Spracherkennungssystem
Beispiel 2: Eine Nummer wählen
Um diese Funktion zu nutzen, benötigen Sie ein Mobiltelefon mit BluetoothUnterstützung.
Verbinden Sie Ihr Gerät vor dem
Gebrauch mit Bluetooth.
an der
1. Drücken Sie
Fernbedienung des Lenkrads.
2. Nach dem Signalton sagen Sie
“Nummer wählen”.
3. Wenn der Sprachbefehl erkannt
wird, wechselt der Bildschirm zum
Bluetooth-Hauptfenster und dann
meldet das System “Bitte sagen Sie
die Telefonnummer!”.
5. Wenn die gesprochenen Zahlen
erkannt werden, meldet das System
die erkannten Zahlen und dann die
Eingabeaufforderung “und dann?”.
6. Wenn Sie die erkannte Nummer
anrufen möchten, sagen Sie “Anrufen”.
Wurde eine Nummer nicht erkannt
oder möchten Sie die Nummer
löschen, sagen Sie “Löschen”. Sie
können jederzeit beenden, indem Sie
“Abbrechen” sagen.
4. Nach dem Signalton sagen Sie
“Weitere Befehle”.
Daraufhin werden die für das
aktivierte Feld möglichen Befehle
angezeigt.
Hilfebefehl
Wenn Sie das System erstmals über
Sprachbefehle steuern oder den richtigen Sprachbefehl nicht kennen, sagen
Sie den folgenden Befehl.
1. Drücken Sie
an der
Fernbedienung des Lenkrads.
4. Sagen Sie die Telefonnummer wie
z.B. “01020052” in einzelnen Ziffern.
3. Die Sprach-Rückmeldung meldet
“Mögliche Befehle sind:”.
5. Die Sprach-Rückmeldung meldet
“Mögliche Befehle sind”.
6. Nach dem Signalton sagen Sie
“AUX”. Der Bildschirm wechselt zum
AUX-Bildschirm.
2. Nach dem Signalton sagen Sie
“Hilfe”. Alle Befehle, die in aktiven
Feldern eingegeben worden sind,
werden aufgelistet.
58
LAN8900EKYN GER HMC indesign.ind58 58
2010-03-25 ¿ÀÈÄ 12:41:40
Spracherkennungssystem
Sprachbefehle
Kategorie
Sprachbefehl
Anwendungs- AUX
befehl
CD
Radio
Sprachbefehl
News Ein
Kategorie
Telefon
Sprachbefehl
Nummer wählen
News Aus
Eingehend
iPod
Nächster Sender
Abwesenheit
Karte
Vorheriger Sender
Ausgehend
Radio
TA aus
Telefonbuch
USB
TA ein
Name anrufen
Telefon
Preset <nummer>
Kurzwahl <nummer>
Media
Presets
Anrufen
AM
Anruflisten
FM
Kurzwahl
Leiser
Liste
Mobil
Lauter
Option
Privat
Vorherige Seite
Scan Start
Büro
Nächste Seite
Scan Stop
Löschen
Hilfe
Frequenz <x> Komma
<yy>
Korrektur
Kategorie
Allgemeine
Funktion
Kategorie
Sprachbefehl
Weitere Befehle
Abbrechen
Nein
Ja
Frequenz <xxxx>
Autostore
Region Auto
Region Aus
59
LAN8900EKYN GER HMC indesign.ind59 59
2010-03-25 ¿ÀÈÄ 12:41:41
Spracherkennungssystem
Sprachbefehle
Kategorie
iPod
Sprachbefehl
Repeat Aus
Repeat Ein
Kategorie
Sprachbefehl
Kategorie
MP3, CD,
USB
Verzeichnisebene wechseln
Audio CD
Sprachbefehl
Liste
Liste
Option
Scan Start
Option
Repeat Aus
Scan Stop
Repeat Ordner
Repeat Titel
Random Aus
Repeat Aus
Scan Start
Random Alle
Repeat Titel
Scan Stop
Random Album
Scan Start
Random Alle
Hörbuch Langsam
Scan Stop
Random Aus
Audiobook Normal
Random Alle
Titel-Info
Hörbuch Schnell
Random Ordner
Nächster Titel
Verzeichnisebene wechseln
Random Aus
Vorheriger Titel
Liste
Titel-Info
Titel <nummer>
Option
Nächster Titel
Ok
Nächster Titel
Vorheriger Titel
Vorheriger Titel
<Folder>
Titel-Info
Titel <nummer>
<Folder>
Album
Titel <nummer>
Interpret
Ok
Ordner
Kategorie
Navigation
Sprachbefehl
Navigation
Ok
60
LAN8900EKYN GER HMC indesign.ind60 60
2010-03-25 ¿ÀÈÄ 12:41:41
Fehlersuche
Aktueller Standort wird nicht
ermittelt (kein GPS-Empfang)
Aktueller Standort wird nicht
ermittelt (kein GPS-Empfang).
Das GPS-System kann nicht in
geschlossenen Räumen betrieben
werden. Es muss zudem über den
Zigarettenanzünder mit Strom versorgt
werden und das Fahrzeug muss sich
unter freiem Himmel befinden.
Nach der ersten Verbindung ist das
GPS-System nach etwa zehn Minuten
betriebsbereit. Der Verbindungsaufbau
kann sich zudem bei
schlechten Wetterbedingungen
oder Hindernissen verzögern. Gehen
Sie bei andauernd schlechter
GPS-Verbindung wie folgt vor.
• Überprüfen Sie die Stromversorgung
des Gerätes.
• Stellen Sie sicher, dass die Rückseite
des GPS-Gerätes eine freie Sicht zum
Himmel besitzt.
• Wechseln Sie bei hohen Gebäuden
oder unter Bäumen an einen Standort
ohne jegliche Hindernisse.
Es ist keine Sprachausgabe hörbar.
Die Lautstärke wird nicht richtig eingestellt oder ist stumm geschaltet.
Stellen Sie die Lautstärke der
Streckenführung per Sprachausgabe
ein.
Die gerade befahrene Straße und die
Straße auf der Karte unterscheiden sich.
Selbst das genaueste GPS-System
kann einmal fehlerhafte Daten anzeigen.
Nach der Einrichtung des GPSEmpfängers ist eine Fehlertoleranz
von ca. 10 m üblich. Bei neuen
Straßenabschnitten könnte der Fehler
durch nicht aktualisierte Karten hervorgerufen werden.
• Bei der Fahrt durch das Gebirge oder
sehr kurvenreiche Straßenabschnitte.
• Wenn der Startpunkt, die
Streckenpunkte sowie der Zielpunkt
zu nahe beieinander liegen (innerhalb
von 1 km).
• Wenn der Startpunkt, die
Streckenpunkte sowie der Zielpunkt
weiter als 1 km vom nächsten
Straßenverlauf entfernt sind.
• Bei der Fahrt durch einen Tunnel.
Es wird keine Karte angezeigt.
Selbst nach Abschluss aller
Einstellungen im Navigationsmenü wird
keine Karte angezeigt.
Dieser Fehler kann auftreten, wenn
die Daten auf der SD-Speicherkarte
fehlerhaft sind. Löschen Sie sämtliche
Daten auf der SD-Speicherkarte und
installieren Sie die Karten neu. Falls der
Fehler nach einer Neuinstallation weiterhin auftritt, wenden Sie sich an den
Kundendienst.
Kartenangleich
Wie bereits erwähnt unterliegt das
eingesetzte GPS-System einer gewissen
Fehlertoleranz. Bei der Streckenberechnung kann es vorkommen, dass Sie auf
eine Straße geleitet werden, die auf der
Karte nicht verzeichnet ist. Das System
erkennt, dass sich Fahrzeuge nur auf
Straßen bewegen können und kann die
aktuelle Position auf die nächstliegende
Straße korrigieren. Dieser Vorgang wird als
Kartenangleich bezeichnet.
In folgenden Fällen kann die angezeigte Strecke von der tatsächlichen
Fahrstrecke abweichen.
(Streckenfehler)
• Bei zwei nahe nebeneinander liegenden Straßen.
• Bei sehr kleiner Ansicht von
Straßenabzweigungen.
• Bei benachbarten Straßen beim
Abbiegen.
• Bei der Fahrt auf einem sich schnell
verengenden Straßenverlauf.
Mit Kartenangleich.
Ohne
Kartenangleich.
61
LAN8900EKYN GER HMC indesign.ind61 61
2010-03-25 ¿ÀÈÄ 12:41:41
Fehlersuche
Störung
Das Gerät lässtsich nicht einschalten.
Ursache
Behebung
Der Zündungsschalter steht NICHT auf AN. Schalten Sie den Zündungsschalter AN.
Das Gerät funktioniert nicht.
Es ist keine Wiedergabe möglich.
Es ist kein Ton hörbar.
Der Zündungsschalter steht NICHT auf
ACC.
Schalten Sie den Zündungsschalter auf
ACC.
Der Strom der Einheit steht auf AUS.
Schalten Sie die Einheit an, indem Sie
auf dem Kontrollschirm drücken.
Elektrische Störsignale und andere
Faktoren beeinflussen die Funktion des
integrierten Mikroprozessors.
Schalten Sie das Gerät aus und wieder ein.
Die Disc ist verschmutzt.
Reinigen Sie die Disc.
Die eingelegte Disc besitzt ein Format,
das vom Gerät nicht unterstützt wird.
Überprüfen Sie das Format der Disc.
Die Disc wurde umgekehrt eingeführt.
Setzen Sie die Disc mit dem Label nach
oben ein.
Die Dateien auf der Disc haben ein irreguläres Dateiformat.
Prüfen Sie das Dateiformat.
Die Lautstärke ist zu gering eingestellt.
Stummschaltung ist eingeschaltet.
Stellen Sie die Lautstärke ein.
Schalten Sie die Stummschaltung aus.
62
LAN8900EKYN GER HMC indesign.ind62 62
2010-03-25 ¿ÀÈÄ 12:41:41
Technische Daten
RADIO-TEIL
UKW
Frequenzbereich . . . . . . . . . . . . . . . . . . . . 87,5 bis 108 MHz
Störabstand . . . . . . . . . . . . . . . . . . . . . . . . . . . . . . . . . .50 dB
Klirrfaktor . . . . . . . . . . . . . . . . . . . . . . . . . . . . . . . . . . . . . 1 %
Zulässige Empfindlichkeit . . . . . . . . . . . . . . . . . . . . 10 dBμV
ALLGEMEIN
Ausgangsleistung . . . . . . . . . . . . . . . . . .50W x 4 Ka. (Max.)
Stromquelle . . . . . . . . . . . . . . . . . . . . . . . . . . . . . . . . . DC 12V
Widerstand Lautsprecher . . . . . . . . . . . . . . . . . . . . . . . . .4 Ω
Erdungssystem . . . . . . . . . . . . . . . . . . . . . . . . . . . . . Negativ
Abmessungen (B x H x T) . . . . . . . 206,4 x 118,4 x 185,4 mm
Gewicht . . . . . . . . . . . . . . . . . . . . . . . . . . . . . . . . . . . .2,44 kg
AM (MW)
Frequenzbereich . . . . . . . . . . . . . . . . . . . . 522 bis 1620 kHz
Störabstand . . . . . . . . . . . . . . . . . . . . . . . . . . . . . . . . . . 45 dB
Klirrfaktor . . . . . . . . . . . . . . . . . . . . . . . . . . . . . . . . . . . . .1,0 %
Zulässige Empfindlichkeit . . . . . . . . . . . . . . . . . . . .38 dBμV
ANZEIGE
LCD-Anzeige . . . . . . . . . . . . . . . . . . . . . . . . 6,5 Zoll TFT LCD
Auflösung. . . . . . . . . . . . . . . . . . . . . . . . . . . . . . . 800 X 480
Hintergrundbeleuchtung . . . . . . . . . . . . . . . . . . . . . Typ CCFL
CD-TEIL
Frequenzgang . . . . . . . . . . . . . . . . . . . . . . 20 Hz bis 20 kHz
Störabstand . . . . . . . . . . . . . . . . . . . . . . . . . . . . . . . . . .60 dB
Klirrfaktor . . . . . . . . . . . . . . . . . . . . . . . . . . . . . . . . . . . . 0,3 %
Kanaltrennung (1 kHz). . . . . . . . . . . . . . . . . . . . . . . . . .50 dB
63
LAN8900EKYN GER HMC indesign.ind63 63
2010-03-25 ¿ÀÈÄ 12:41:41
Inhalt
Adressbuch . . . . . . . . . . . . . . . . . . . . . . . . . . . . . . . . . . . . .
Adressensuche . . . . . . . . . . . . . . . . . . . . . . . . . . . . . . . . . .
Anrufe entgegennehmen . . . . . . . . . . . . . . . . . . . . . . . . . .
AS (Automatischer Senderspeicher) . . . . . . . . . . . . . . . . .
24
23
42
53
Parken . . . . . . . . . . . . . . . . . . . . . . . . . . . . . . . . . . . . . . . . .
Telefon Nummer . . . . . . . . . . . . . . . . . . . . . . . . . . . . . . . . .
POI Kategorie . . . . . . . . . . . . . . . . . . . . . . . . . . . . . . . . . . .
POI (Sonderziele) . . . . . . . . . . . . . . . . . . . . . . . . . . . . . . . .
28
26
34
24
Bluetooth Wireless-Technologie . . . . . . . . . . . . . . . . . . . . . 39
Zufallswiedergabe . . . . . . . . . . . . . . . . . . . . . . . . . . . . . . .
Region Auto/Aus. . . . . . . . . . . . . . . . . . . . . . . . . . . . . . . . .
Wiederholen. . . . . . . . . . . . . . . . . . . . . . . . . . . . . . . . . . . . .
Zum Anfang des aktuellen Titels/der aktuellen
Datei springen . . . . . . . . . . . . . . . . . . . . . . . . . . . . . . . . . .
Routenoptionen . . . . . . . . . . . . . . . . . . . . . . . . . . . . . . . . . .
48
54
47
Ändern der Bluetooth Kennung . . . . . . . . . . . . . . . . . . . . . . 41
Umleitung . . . . . . . . . . . . . . . . . . . . . . . . . . . . . . . . . . . . . . .37
Sprachbefehle geben . . . . . . . . . . . . . . . . . . . . . . . . . . . . . 56
GPS Eingabe . . . . . . . . . . . . . . . . . . . . . . . . . . . . . . . . . . . . 27
Suchlauf . . . . . . . . . . . . . . . . . . . . . . . . . . . . . . . . . . . . . . . 46
Einstellungen . . . . . . . . . . . . . . . . . . . . . . . . . . . . . . . . . . 16-19
Zum nächsten Titel/zur nächsten Datei springen . . . . . . . 46
Zum vorherigen Titel/zur vorherigen Datei springen . . . . 46
Display teilen/Vollbild . . . . . . . . . . . . . . . . . . . . . . . . . . . . . 35
Ziel Speichern . . . . . . . . . . . . . . . . . . . . . . . . . . . . . . . . . . . . 31
Position Speichern . . . . . . . . . . . . . . . . . . . . . . . . . . . . . 31,35
Das Mikrofon ein-/ausschalten . . . . . . . . . . . . . . . . . . . . . . 42
Tonausgabe während eines Gesprächs wechseln . . . . . . . 42
Hilfebefehl . . . . . . . . . . . . . . . . . . . . . . . . . . . . . . . . . . . . . . 58
Privat 1/Büro2/3-12 . . . . . . . . . . . . . . . . . . . . . . . . . . . . . . . 32
In Ort . . . . . . . . . . . . . . . . . . . . . . . . . . . . . . . . . . . . . . . . . .
Info Umgebung . . . . . . . . . . . . . . . . . . . . . . . . . . . . . . . . . .
Info Zur Route . . . . . . . . . . . . . . . . . . . . . . . . . . . . . . . . . . .
Intro-Scan . . . . . . . . . . . . . . . . . . . . . . . . . . . . . . . . . . . . . .
46
36
26
38
38
47
Kia Werkstatt . . . . . . . . . . . . . . . . . . . . . . . . . . . . . . . . . . . . 26
TA (Verkehrsmeldungen) . . . . . . . . . . . . . . . . . . . . . . . . . . 53
Tour Planer. . . . . . . . . . . . . . . . . . . . . . . . . . . . . . . . 29-30, 35
2D/3D . . . . . . . . . . . . . . . . . . . . . . . . . . . . . . . . . . . . . . . . . 34
Letzte Ziele . . . . . . . . . . . . . . . . . . . . . . . . . . . . . . . . . . . . . 24
Einen Anruf durch Eingabe einer Telefonnummer tätigen 42
Einen Anruf mit Schnellwahlnummern tätigen . . . . . . . . . 45
Karten Eingabe . . . . . . . . . . . . . . . . . . . . . . . . . . . . . . . . . . 28
Bedienung des Telefonbuchs . . . . . . . . . . . . . . . . . . . . . . . 43
So benutzen Sie Ihre Anrufliste . . . . . . . . . . . . . . . . . . . . . 44
In Zielnähe . . . . . . . . . . . . . . . . . . . . . . . . . . . . . . . . . . . . . . 26
Nahe Standort . . . . . . . . . . . . . . . . . . . . . . . . . . . . . . . . . . . 25
NACHRICHTEN . . . . . . . . . . . . . . . . . . . . . . . . . . . . . . . . . . 54
Sprachbefehle . . . . . . . . . . . . . . . . . . . . . . . . . . . . . . . . 59-60
Spracherkennung . . . . . . . . . . . . . . . . . . . . . . . . . . . . . . . . 56
64
LAN8900EKYN GER HMC indesign.ind64 64
2010-03-25 ¿ÀÈÄ 12:41:41
Symbole zur Anzeige von Verkehrsproblemen
Besteht ein Verkehrsproblem auf der berechneten Strecke, so leuchtet dieses Symbol auf.
Symbol
Beschreibung
Symbol
Beschreibung
Steinschlag
Stehender Verkehr
Unfall
Stauender Verkehr
Sonstige Gefahr
Wind Sturm
Enge Fahrbahn
Schnee, Eis
Absplittern
Blockierte Straße,
geschlossen
Straßenarbeiten
Notruf nicht in Betrieb
Rutschige Straße,
Regen
65
LAN8900EKYN GER HMC indesign.ind65 65
2010-03-25 ¿ÀÈÄ 12:41:41
Support - Hotline
Webseite : http://www.navigation.com/kia
Gebührenfreie Rufnummer international : 00800 18 23 53 22
Telefonnummer für
alle anderen Länder
(oder bei fehlender
gebührenfreier Rufnummer) : +31 555 384 245
P/N: MFL62880528
LAN8900EKYN GER HMC indesign.ind66 66
2010-03-25 ¿ÀÀü 9:45:22
FRANÇAIS
MANUEL D’UTILISATION
CHARGEMENT EN COURS . . .
LAN8900EKYN FRE indesign.indd 1
2010-03-24 ¿ÀÈÄ 10:47:15
Table des matières
Informations générales . . . . . . . . . . . . . . . . . . . .7-10
Consignes de sécurité. . . . . . . . . . . . . . . . . . . . . . . . . . . . . . . . . . . . . . . . . . . . . 7-8
Types de disques lisibles. . . . . . . . . . . . . . . . . . . . . . . . . . . . . . . . . . . . . . . . . . . . . 9
Précautions à suivre lors de la manipulation des disques et du lecteur . . . . . . . 9
Remarques sur les droits d'auteur . . . . . . . . . . . . . . . . . . . . . . . . . . . . . . . . . . . . 10
Mise au rebut des produits . . . . . . . . . . . . . . . . . . . . . . . . . . . . . . . . . . . . . . . . . 10
Description des éléments . . . . . . . . . . . . . . . . . 11-13
Panneau de commande . . . . . . . . . . . . . . . . . . . . . . . . . . . . . . . . . . . . . . . . . . 11-12
Télécommande au volant . . . . . . . . . . . . . . . . . . . . . . . . . . . . . . . . . . . . . . . . . . . 13
Fonctionnement de base . . . . . . . . . . . . . . . . .14-15
Écran de démarrage . . . . . . . . . . . . . . . . . . . . . . . . . . . . . . . . . . . . . . . . . . . . . . .
Mise sous tension de l'appareil/Mise hors tension de l'appareil . . . . . . . . . . . .
Insertion d’un disque/Éjection d’un disque. . . . . . . . . . . . . . . . . . . . . . . . . . . . .
Réglage du volume . . . . . . . . . . . . . . . . . . . . . . . . . . . . . . . . . . . . . . . . . . . . . . . .
Sélection d'une source sur le panneau de commande . . . . . . . . . . . . . . . . . . .
Sélection d’une source à partir de l'écran tactile . . . . . . . . . . . . . . . . . . . . . . . .
Caméra de recul (facultative) . . . . . . . . . . . . . . . . . . . . . . . . . . . . . . . . . . . . . . . .
14
14
14
14
15
15
15
Réglage . . . . . . . . . . . . . . . . . . . . . . . . . . . . . . .16-19
Fonctionnement général du menu de configuration . . . . . . . . . . . . . . . . . . . 16-19
Bluetooth . . . . . . . . . . . . . . . . . . . . . . . . . . . . . . . . . . . . . . . . . . . . . . . . . . . . . . 16
Système . . . . . . . . . . . . . . . . . . . . . . . . . . . . . . . . . . . . . . . . . . . . . . . . . . . . . 16-17
Trafic/Navigation . . . . . . . . . . . . . . . . . . . . . . . . . . . . . . . . . . . . . . . . . . . . . . . . 18
Audio . . . . . . . . . . . . . . . . . . . . . . . . . . . . . . . . . . . . . . . . . . . . . . . . . . . . . . .18-19
Affichage . . . . . . . . . . . . . . . . . . . . . . . . . . . . . . . . . . . . . . . . . . . . . . . . . . . . . . 19
2
LAN8900EKYN FRE indesign.indd 2
2010-03-25 ¿ÀÈÄ 12:40:06
Table des matières
Premiers pas avec le système de navigation . . . . 20-21
Qu’est-ce que la technologie GPS ? . . . . . . . . . . . . . . . . . . . . . . . . . . . . . . . . . . 20
À propos des signaux satellite . . . . . . . . . . . . . . . . . . . . . . . . . . . . . . . . . . . . . . . 20
Réception des signaux satellite . . . . . . . . . . . . . . . . . . . . . . . . . . . . . . . . . . . . . . 20
Écran de navigation initial . . . . . . . . . . . . . . . . . . . . . . . . . . . . . . . . . . . . . . . . . . . 20
Informations affichées sur la carte. . . . . . . . . . . . . . . . . . . . . . . . . . . . . . . . . 20-21
Compréhension d'une carte . . . . . . . . . . . . . . . . . . . . . . . . . . . . . . . . . . . . 20-21
Modification de l'échelle d'une carte . . . . . . . . . . . . . . . . . . . . . . . . . . . . . . . . 21
Menu de saisie de la destination . . . . . . . . . . . . . . . .22-32
Présentation du menu de navigation/ Réglage du volume du système de navigation. . . . 22
Fonctionnement général du menu de destination . . . . . . . . . . . . . . . . . . . . . . . 22
Recherche par adresse . . . . . . . . . . . . . . . . . . . . . . . . . . . . . . . . . . . . . . . . . . . . . 23
Dernière Destination . . . . . . . . . . . . . . . . . . . . . . . . . . . . . . . . . . . . . . . . . . . . . . . 24
Carnet D'Adresses. . . . . . . . . . . . . . . . . . . . . . . . . . . . . . . . . . . . . . . . . . . . . . . . . 24
Points D'Intérêt (POI) . . . . . . . . . . . . . . . . . . . . . . . . . . . . . . . . . . . . . . . . . . . . . . 24
Position Proche . . . . . . . . . . . . . . . . . . . . . . . . . . . . . . . . . . . . . . . . . . . . . . . . . 25
Destination Proche. . . . . . . . . . . . . . . . . . . . . . . . . . . . . . . . . . . . . . . . . . . . . . . 26
En Ville/Nom . . . . . . . . . . . . . . . . . . . . . . . . . . . . . . . . . . . . . . . . . . . . . . . . . . . 26
Service Kia . . . . . . . . . . . . . . . . . . . . . . . . . . . . . . . . . . . . . . . . . . . . . . . . . . . . . 26
Numéro De Téléphone. . . . . . . . . . . . . . . . . . . . . . . . . . . . . . . . . . . . . . . . . . . . 26
Saisie GPS . . . . . . . . . . . . . . . . . . . . . . . . . . . . . . . . . . . . . . . . . . . . . . . . . . . . . . . 27
Parking . . . . . . . . . . . . . . . . . . . . . . . . . . . . . . . . . . . . . . . . . . . . . . . . . . . . . . . . . . 28
Continuer Le Guidage/Arrêter Guidage. . . . . . . . . . . . . . . . . . . . . . . . . . . . . . . . 28
Utilisat. Carte . . . . . . . . . . . . . . . . . . . . . . . . . . . . . . . . . . . . . . . . . . . . . . . . . . . . . 28
Planif. Voyage. . . . . . . . . . . . . . . . . . . . . . . . . . . . . . . . . . . . . . . . . . . . . . . . . .29-30
Enreg. Destination . . . . . . . . . . . . . . . . . . . . . . . . . . . . . . . . . . . . . . . . . . . . . . . . . 31
Enreg. Position. . . . . . . . . . . . . . . . . . . . . . . . . . . . . . . . . . . . . . . . . . . . . . . . . . . . 31
Maison 1/Travail 2/3~12 . . . . . . . . . . . . . . . . . . . . . . . . . . . . . . . . . . . . . . . . . . . . 32
3
LAN8900EKYN FRE indesign.indd 3
2010-03-25 ¿ÀÈÄ 12:40:06
Table des matières
Utilisation du menu de la carte . . . . . . . . . . .33-38
Présentation du menu de la carte . . . . . . . . . . . . . . . . . . . . . . . . . . . . . . . . . . . . 33
Fonctionnement général du menu de la carte . . . . . . . . . . . . . . . . . . . . . . . . . . 33
Catégorie De POI . . . . . . . . . . . . . . . . . . . . . . . . . . . . . . . . . . . . . . . . . . . . . . . . . 34
2D/3D . . . . . . . . . . . . . . . . . . . . . . . . . . . . . . . . . . . . . . . . . . . . . . . . . . . . . . . . . . 34
Écran Fractionné/Plein Écran . . . . . . . . . . . . . . . . . . . . . . . . . . . . . . . . . . . . . . . . 35
Enreg. Position. . . . . . . . . . . . . . . . . . . . . . . . . . . . . . . . . . . . . . . . . . . . . . . . . . . . 35
Planif. Voyage. . . . . . . . . . . . . . . . . . . . . . . . . . . . . . . . . . . . . . . . . . . . . . . . . . . . . 35
Options Itinéraire . . . . . . . . . . . . . . . . . . . . . . . . . . . . . . . . . . . . . . . . . . . . . . . . . . 36
Navigateur . . . . . . . . . . . . . . . . . . . . . . . . . . . . . . . . . . . . . . . . . . . . . . . . . . . . . . . 37
Déviation . . . . . . . . . . . . . . . . . . . . . . . . . . . . . . . . . . . . . . . . . . . . . . . . . . . . . . . . 37
Info Proximité. . . . . . . . . . . . . . . . . . . . . . . . . . . . . . . . . . . . . . . . . . . . . . . . . . . . . 38
Info Itinéraire . . . . . . . . . . . . . . . . . . . . . . . . . . . . . . . . . . . . . . . . . . . . . . . . . . . . . 38
Technologie sans fil Bluetooth . . . . . . . . . . . .39-45
Présentation de la technologie sans fil Bluetooth. . . . . . . . . . . . . . . . . . . . . . . . 39
Jumelage de votre appareil avec un téléphone Bluetooth. . . . . . . . . . . . . .39-40
Déconnexion/reconnexion du téléphone Bluetooth . . . . . . . . . . . . . . . . . . . . . . 41
Suppression d'un téléphone connecté . . . . . . . . . . . . . . . . . . . . . . . . . . . . . . . . 41
Modification du code d'accès. . . . . . . . . . . . . . . . . . . . . . . . . . . . . . . . . . . . . . . . 41
Passer un appel en saisissant le numéro de téléphone . . . . . . . . . . . . . . . . . . . 42
Modification du mode d'écoute du son pendant un appel . . . . . . . . . . . . . . . . 42
Activation et désactivation du microphone . . . . . . . . . . . . . . . . . . . . . . . . . . . . . 42
Répondre aux appels . . . . . . . . . . . . . . . . . . . . . . . . . . . . . . . . . . . . . . . . . . . . . . 42
Utilisation de votre répertoire . . . . . . . . . . . . . . . . . . . . . . . . . . . . . . . . . . . . . . . . 43
Utilisation de votre liste d'appels . . . . . . . . . . . . . . . . . . . . . . . . . . . . . . . . . . . . . 44
Appel à partir des numéros abrégés . . . . . . . . . . . . . . . . . . . . . . . . . . . . . . . . . . 45
4
LAN8900EKYN FRE indesign.indd 4
2010-03-25 ¿ÀÈÄ 12:40:06
Table des matières
Utilisation des fonctions CD/MP3/WMA/USB/iPod .46-51
Lecture d'un CD audio et de fichiers MP3/WMA/USB/iPod. . . . . . . . . . . .46-48
Accès à la piste ou au fichier suivant . . . . . . . . . . . . . . . . . . . . . . . . . . . . . . . 46
Accès à la piste ou au fichier précédent . . . . . . . . . . . . . . . . . . . . . . . . . . . . . 46
Retour au début de la piste ou du fichier en cours . . . . . . . . . . . . . . . . . . . . 46
Recherche . . . . . . . . . . . . . . . . . . . . . . . . . . . . . . . . . . . . . . . . . . . . . . . . . . . . . 46
Lecture de l'intro . . . . . . . . . . . . . . . . . . . . . . . . . . . . . . . . . . . . . . . . . . . . . . . . 47
Lecture répétée . . . . . . . . . . . . . . . . . . . . . . . . . . . . . . . . . . . . . . . . . . . . . . . . . 47
Lecture aléatoire . . . . . . . . . . . . . . . . . . . . . . . . . . . . . . . . . . . . . . . . . . . . . . . . 48
Lecture de fichiers par dossier, album ou artiste . . . . . . . . . . . . . . . . . . . . . . 48
Accès à un dossier ou fichier à l'aide de la liste. . . . . . . . . . . . . . . . . . . . . . . . . 49
Recherche de musique . . . . . . . . . . . . . . . . . . . . . . . . . . . . . . . . . . . . . . . . . . . 49
Réglage de la vitesse de lecture des livres audio . . . . . . . . . . . . . . . . . . . . . . . 50
Impératifs à respecter pour les périphériques USB/Périphériques USB compatibles . . 50
Impératifs à respecter pour les fichiers MP3/WMA . . . . . . . . . . . . . . . . . . . . . . 51
Impératifs à respecter pour l'iPod . . . . . . . . . . . . . . . . . . . . . . . . . . . . . . . . . . . . 51
Utilisation de la radio . . . . . . . . . . . . . . . . . . .52-54
Écoute des stations de radio . . . . . . . . . . . . . . . . . . . . . . . . . . . . . . . . . . . . . . . . 52
Enregistrement et rappel des stations . . . . . . . . . . . . . . . . . . . . . . . . . . . . . . . . . 52
Mise en mémoire par recherche automatique . . . . . . . . . . . . . . . . . . . . . . . . . . 53
Balayage des fréquences d'émission . . . . . . . . . . . . . . . . . . . . . . . . . . . . . . . . . . 53
TA (bulletin d'informations routières) . . . . . . . . . . . . . . . . . . . . . . . . . . . . . . . . 53
NEWS. . . . . . . . . . . . . . . . . . . . . . . . . . . . . . . . . . . . . . . . . . . . . . . . . . . . . . . . . . . 54
RÉGION Auto/Off . . . . . . . . . . . . . . . . . . . . . . . . . . . . . . . . . . . . . . . . . . . . . . . . . 54
Utilisation d’un appareil auxiliaire . . . . . . . . . . . . . 55
Utilisation d'une source auxiliaire . . . . . . . . . . . . . . . . . . . . . . . . . . . . . . . . . . . . . 55
5
LAN8900EKYN FRE indesign.indd 5
2010-03-25 ¿ÀÈÄ 12:40:06
Table des matières
Système de reconnaissance vocale . . . . . . . 56-60
Reconnaissance vocale . . . . . . . . . . . . . . . . . . . . . . . . . . . . . . . . . . . . . . . . . . . . . 56
Commandes vocales . . . . . . . . . . . . . . . . . . . . . . . . . . . . . . . . . . . . . . . . . . . . . . . 56
Prononciation des chiffres . . . . . . . . . . . . . . . . . . . . . . . . . . . . . . . . . . . . . . . . . . 56
Exemples de commandes vocales . . . . . . . . . . . . . . . . . . . . . . . . . . . . . . . . . 57-58
Commande d'aide. . . . . . . . . . . . . . . . . . . . . . . . . . . . . . . . . . . . . . . . . . . . . . . . . 58
Commandes vocales . . . . . . . . . . . . . . . . . . . . . . . . . . . . . . . . . . . . . . . . . . . .59-60
Dépannage. . . . . . . . . . . . . . . . . . . . . . . . . . . . 61-62
Caractéristiques techniques . . . . . . . . . . . . . . . . . 63
Index. . . . . . . . . . . . . . . . . . . . . . . . . . . . . . . . . . . . 64
Symboles pour l’affichage des problèmes de circulation . . . 65
6
LAN8900EKYN FRE indesign.indd 6
2010-03-25 ¿ÀÈÄ 12:40:06
Informations générales
Consignes de sécurité
ATTENTION
RISQUE D'ÉLECTROCUTION
NE PAS OUVRIR
ATTENTION : AFIN DE RÉDUIRE LE RISQUE
DE CHOC ÉLECTRIQUE, NE RETIREZ PAS LE
BOÎTIER (NI L'ARRIÈRE).
AUCUNE PIÈCE DE CET APPAREIL N'EST
SUSCEPTIBLE D'ÊTRE RÉPARÉE PAR
L'UTILISATEUR. CONFIEZ L'ENTRETIEN
DE L'APPAREIL À DES PERSONNES
QUALIFIÉES.
Le symbole d'un éclair à l'intérieur d'un
triangle sert à avertir l'utilisateur de la
présence d'une tension dangereuse
non isolée dans le corps de l'appareil,
qui peut être suffisamment élevée pour
provoquer un risque d'électrocution.
Le symbole d'un point d'exclamation
à l'intérieur d'un triangle sert à avertir
l'utilisateur de la présence d'instructions
d'utilisation et de maintenance
(entretien) importantes dans la documentation qui accompagne l'appareil.
Conduisez toujours votre véhicule avec
prudence. Ne vous laissez pas distraire
au volant et soyez toujours attentif aux
conditions de circulation. Si vous voulez
modifier les réglages ou toute autre
fonction, garez-vous à un endroit sûr
et autorisé avant d'effectuer de telles
opérations. Pour renforcer la sécurité, certaines fonctions ne peuvent
être activées que si le frein à main est
enclenché.
N'utilisez pas l'appareil pendant des
périodes prolongées à des températures extrêmement basses ou élevées
(-10 °C à 60 °C)
Afin de réduire les risques de choc
électrique, n’enlevez pas le couvercle
ou la partie arrière de l’appareil. Aucune
pièce de cet appareil n'est susceptible
d'être réparée par l'utilisateur.
Confiez l'entretien de l'appareil à des
personnes qualifiées.
Pour réduire les risques d'incendie ou
de choc électrique, n'exposez pas cet
appareil à la pluie, l'humidité, des projections d'eau ou des éclaboussures.
La température extérieure de l'appareil
peut être extrêmement élevée.
N'utilisez l'appareil qu'après son installation appropriée dans votre véhicule.
Pendant la conduite, réglez le volume
sonore à un niveau convenable.
Ne laissez pas tomber l'appareil et
évitez de le soumettre à des chocs.
7
LAN8900EKYN FRE indesign.indd 7
2010-03-25 ¿ÀÈÄ 12:40:06
Informations générales
ATTENTION
Le conducteur ne doit pas regarder
l'écran tout en conduisant.
Sinon, il pourrait être distrait et provoquer un accident.
Cet appareil est prévu pour les véhicules équipés d'une batterie 12 V avec
prise de masse négative.
Avant de l'installer dans un campingcar, un camion ou un autobus, vérifiez
la tension de la batterie.
Pour éviter tout court-circuit dans le
système électrique, veillez à débrancher
le câble de la batterie E avant de commencer l'installation.
Cet appareil utilise un système laser.
Afin de garantir l'utilisation correcte de
cet appareil, veuillez lire attentivement
ce manuel d'utilisation et conservez-le
pour vous y référer ultérieurement.
Si l'appareil nécessite une intervention
de maintenance, contactez un point de
service après-vente agréé.
L'utilisation de commandes, de
réglages ou de procédures autres que
ceux décrits dans le présent manuel
peut entraîner une exposition à des
radiations dangereuses. Pour éviter
l’exposition directe au faisceau laser,
n’essayez pas d’ouvrir le boîtier. Le
rayonnement laser est visible lorsque
l'appareil est ouvert. NE REGARDEZ
PAS DIRECTEMENT LE FAISCEAU.
ATTENTION
RAYONNEMENT LASER VISIBLE ET
INVISIBLE DE CLASSE 1M EN CAS
D'OUVERTURE. NE REGARDEZ
PAS DIRECTEMENT AVEC DES
INSTRUMENTS OPTIQUES.
ATTENTION
• Ne laissez pas le système de navigation allumé lorsque le moteur est
arrêté. Cela pourrait décharger la batterie du véhicule. Lorsque vous utilisez le système de navigation, laissez
toujours le moteur allumé.
• Avant de manipuler le système de
navigation, commencez par garer
votre véhicule à un endroit sûr et
serrez le frein à main. La manipulation du système pendant la conduite
peut distraire le conducteur et provoquer un accident grave.
• N'essayez pas de démonter ou modifier ce système. Cela pourrait provoquer des accidents, un incendie ou
un choc électrique.
• Des lois limitant l'utilisation des
écrans vidéo pendant la conduite
peuvent exister dans certains pays.
N'utilisez ce système que lorsque la
loi vous y autorise.
• N'utilisez pas votre téléphone en conduisant. Arrêtez-vous à un endroit sûr
pour téléphoner.
• Lorsque vous conduisez, veillez à ce
que le volume de l'appareil ne soit
pas trop fort afin que vous puissiez entendre les sons provenant de
l'extérieur.
8
LAN8900EKYN FRE indesign.indd 8
2010-03-25 ¿ÀÈÄ 12:40:07
Informations générales
Types de disques lisibles
Cet appareil lit les disques CD-R ou
CD-RW contenant des fichiers audio,
MP3 ou WMA.
• Selon les caractéristiques du matériel
d'enregistrement ou du CD-R/RW à
proprement parler, certains disques
CD-R/RW risquent de ne pas être lus
par l'appareil.
• Ne collez rien sur les faces (celle avec
l'étiquette ou celle enregistrée) d'un
disque.
• N'utilisez pas de CD de forme irrégulière (par exemple, en forme de
cœur ou octogonale). Cela pourrait
entraîner des dysfonctionnements.
Précautions à suivre lors de la manipulation des disques et du
lecteur
• L'insertion d'un disque
sale ou défectueux dans
l'appareil peut entraîner des
coupures du son pendant la
lecture.
• Saisissez les disques par les
bords intérieur et extérieur.
• Ne touchez pas la face non
étiquetée des disques.
Ne collez pas de papier ni de
ruban adhésif sur la surface
des disques.
• Nettoyez les disques
avant l'utilisation.
Essuyez les disques
du centre vers
l'extérieur à l'aide
d'un chiffon de nettoyage.
• N'utilisez jamais de
solvants tels que
benzine ou alcool
pour nettoyer les
disques.
N'exposez pas les disques aux
rayons directs du soleil ou à
une chaleur excessive.
8 cm
Cet appareil n'accepte pas
les disques de 8 cm (utilisez
uniquement des disques de
12 cm).
9
LAN8900EKYN FRE indesign.indd 9
2010-03-25 ¿ÀÈÄ 12:40:07
Informations générales
Remarques sur les droits
d'auteur
La loi interdit de copier, diffuser, montrer, transmettre par câble, présenter en
public ou louer du contenu protégé par
droits d'auteur sans autorisation.
Cet appareil intègre la fonction de protection contre la copie développée par
Macrovision. Des signaux de protection
contre la copie sont enregistrés sur
certains disques. Lors de la lecture des
images contenues sur ces disques, des
déformations de l'image apparaîtront.
Cet appareil intègre une technologie
de protection des droits d'auteur qui
est couverte par des revendications de
méthodes de certains brevets américains et par d'autres droits de propriété
intellectuelle détenus par Macrovision
Corporation ainsi que d'autres
détenteurs de droits.
L'utilisation de cette technologie
de protection des droits d'auteur
doit être autorisée par Macrovision
Corporation et est destinée uniquement
à l'utilisation domestique et à d'autres
conditions limitées de visionnage, sauf
autorisation contraire de Macrovision
Corporation.
Les opérations d'ingénierie inverse et
de démontage sont interdites.
Mise au rebut des produits
1. Le pictogramme d'une poubelle
barrée sur le produit indique que le
produit est conforme à la Directive
européenne 2002/96/CE.
2. Tous les déchets électriques et
électroniques doivent être collectés
séparément et transportés par les
services de voirie municipaux vers
des installations spécifiques de collecte des déchets, identifiées en conséquence par le gouvernement ou
par les autorités locales.
3. Le traitement correct de votre
vieil appareil contribue à protéger
l'environnement et la santé des personnes.
4. Pour plus d'informations sur le traitement de votre appareil en fin de vie,
merci de bien vouloir vous adresser
à votre mairie, au service de la voirie
ou au magasin où vous avez acheté
le produit.
iPod est une marque d'Apple Inc.
déposée aux États-Unis et dans
d'autres pays. "Made for iPod" signifie
qu'un accessoire électronique a été
conçu pour se connecter spécifiquement à l'iPod et a été certifié par le
développeur comme répondant aux
standards de performances d'Apple.
"La marque et le logo Bluetooth sont la
propriété de Bluetooth SIG, Inc. et leur
utilisation par LG Electronics est soumise à licence.
Les autres marques et noms de
marques sont la propriété de leurs
détenteurs respectifs."
10
LAN8900EKYN FRE indesign.indd 10
2010-03-25 ¿ÀÈÄ 12:40:07
Description des éléments
Panneau de commande
1 2
7
8 9
3
10
4
RADIO
MAP
11
5
MEDIA
NAV
12
13
6
14
1. Activation/désactivation de
)
l'affichage (
Appuyez sur cette touche pour
alterner entre l'activation et la désactivation de l'affichage.
2. Éjection (Z)
Appuyez sur cette touche pour
éjecter un disque de l'appareil.
4. RADIO
Permet de sélectionner la bande
FM ou AM.
5. MEDIA
Permet de sélectionner une source :
CD, USB, iPod ou AUX.
6.
/
• Appuyez sur cette touche.
- Réglage automatique : RADIO
- Piste suivante/précédente :
USB
CD
iPod
• Maintenez enfoncée cette touche.
- Recherche (avance/retour) :
USB
CD
iPod
7. Fente du disque
3. Molette de gauche ( / )
- Pression : marche/arrêt
- Rotation : contrôle du volume.
11
LAN8900EKYN FRE indesign.indd 11
2010-03-25 ¿ÀÈÄ 12:40:07
Description des éléments
8. Téléphone ( )
Utilisez cette touche pour activer
le mode téléphonie mains libres
Bluetooth.
13.Réglages ( )
• Appuyez sur cette touche pour
accéder aux réglages du système.
(voir page 16).
9. Répétition du guidage vocal ( )
Appuyez sur cette touche pour
répéter le guidage vocal.
)
10. Molette de droite (
Faites-la tourner dans le sens des
aiguilles d'une montre ou dans le
sens inverse.
• Permet de rechercher la fréquence
radio précédente ou suivante.
- Réglage manuel
• Permet de remonter ou descendre
d'une piste ou d'un fichier dans
tous les écrans de liste.
• Zoom avant/arrière
- Tournez cette molette pour
modifier l'échelle de la carte à
l'écran.
• Maintenez cette touche enfoncée pour consulter l'identifiant de
l'appareil, ainsi que les versions
du logiciel, de la navigation et des
cartes.
11. MAP
Appuyez sur cette touche pour
afficher la carte correspondant à
votre position actuelle.
14. Info ( )
Appuyez sur cette touche pour
afficher la destination, l'itinéraire et
les informations sur le trafic lorsque
le guidage routier est actif.
• Destination : affiche la position
actuelle et la destination du véhicule.
• Itinéraire : affiche l'itinéraire entre
la position actuelle du
véhicule et sa destination.
• Trafic : affiche les informations
relatives au trafic.
- Info Trafic Sur L'ltinéraire :
affiche la liste des informations sur le trafic trouvées pour
l'itinéraire recommandé entre la
position actuelle du véhicule et
sa destination.
- Info Trafic De Proximité : affiche
la liste des informations sur
le trafic autour de la position
actuelle du véhicule.
12. NAV
Appuyez sur cette touche pour
accéder au menu Destination.
Vous avez le choix entre différentes
méthodes pour saisir la destination.
12
LAN8900EKYN FRE indesign.indd 12
2010-03-25 ¿ÀÈÄ 12:40:07
Description des éléments
Télécommande au volant
7
1
6
2
3
5
4
1.
4.
Permet de mettre le son en sourdine.
2. Volume (
/ )
Permet d'augmenter ou de diminuer
le niveau du volume.
3.
Permet d'activer le mode téléphonie
mains libres Bluetooth.
• Appuyez brièvement sur cette touche
pour répondre à un appel entrant.
• Appuyez brièvement sur cette touche pour passer un appel à partir
de la liste des derniers appels.
• Appuyez longuement sur cette
touche pour modifier le mode
d'écoute du son pendant un appel.
(Mains libres y Téléphone)
Appuyez brièvement sur cette touche pour refuser un appel.
6. U / u
• Appuyez sur cette touche.
- Réglage automatique : RADIO
- Piste suivante/précédente :
5.
USB
• Appuyez sur cette touche pour
activer le mode de reconnaissance
vocale.
• Appuyez à nouveau sur cette touche pour annuler les commandes
vocales lorsque la reconnaissance
vocale est active.
CD
iPod
• Maintenez enfoncée cette touche.
- Réglage manuel : RADIO
- Recherche (avance/retour) :
USB
CD
iPod
7.
Permet de sélectionner une source.
FM t AM t CD t USB t iPod
t AUX t FM...
13
LAN8900EKYN FRE indesign.indd 13
2010-03-25 ¿ÀÈÄ 12:40:07
Fonctionnement de base
Écran de démarrage
Mise sous tension de l’appareil
L'appareil s'allume lorsque le contact
est mis en position ACC (accessoires)
ou ON (marche).
Appuyez sur la touche
du panneau
de commande lorsque l'appareil est
éteint.
✽ Remarque
Lorsque vous insérez un disque dans la
fente, l'appareil s'allume automatiquement.
- Le mode radio est ensuite affiché
à l'écran.
✽ Remarques
• L'appareil mémorise le mode qui a
été sélectionné la dernière fois. Le
dernier mode est mémorisé même si
le contact est placé en position OFF
(arrêt). Lorsque le contact est placé
en position ACC (accessoires) ou ON
(marche), le mode est automatiquement rappelé.
• La réinitialisation de l'appareil peut
prendre du temps (environ 20 secondes).
Mise hors tension de l’appareil
Appuyez sur la touche
du panneau
de commande lorsque l'appareil est
allumé.
Insertion d’un disque
Insérez un disque dans la fente ; la lecture commence automatiquement.
Éjection d’un disque
Appuyez sur la touche Z du panneau
de commande.
Le disque est éjecté de la fente de
chargement.
✽ Remarque
Si, au bout d’environ 10 secondes, le
disque éjecté n'est pas retiré, il est
automatiquement réinséré dans la fente
de chargement du disque.
Réglage du volume
Tournez le bouton de volume (
panneau de commande.
) du
✽ Remarque
Lorsque vous mettez l'appareil hors
tension, le niveau sonore est automatiquement mémorisé. Chaque fois que
vous rallumez l'appareil, vous retrouvez
le niveau de volume mémorisé.
Si vous diminuez le volume sous le
niveau 5, le volume est réglé au niveau 5.
Si vous augmentez le volume audessus
du niveau 25, le volume est réglé au
niveau 25.
14
LAN8900EKYN FRE indesign.indd 14
2010-03-25 ¿ÀÈÄ 12:40:08
Fonctionnement de base
Sélection d'une source sur le
panneau de commande
Sélection d’une source à partir de l'écran tactile
Appuyez plusieurs fois sur la touche
MEDIA pour sélectionner une source.
Le mode alterne dans l'ordre suivant :
CD t USB t iPod t AUX t CD...
Vous pouvez sélectionner une source à
l’écran pour adapter le fonctionnement
à vos convenances.
✽ Remarque
Si une source n'est pas raccordée à
l'appareil, elle ne sera pas reconnue.
1. Appuyez sur l'icône de la source
dans le coin supérieur gauche de
l'écran pendant la lecture d'une
source.
2. Sélectionnez la source de votre choix.
✽ Remarque
Si une source n'est pas raccordée à
l'appareil, elle ne sera pas reconnue.
Caméra de recul (facultative)
Avec une caméra de recul, il est possible de passer automatiquement de la
caméra vers la vidéo en plaçant le
levier de vitesses en marche arrière (R).
La caméra de recul vous permet également de savoir ce qui se passe derrière
vous pendant que vous conduisez.
Une fois le système complètement
initialisé, la ligne de guidage apparaît à
l'écran.
✽ Remarques
• La caméra de recul sert aussi bien
à garder un œil sur les équipements
remorqués qu'à reculer dans une
place de stationnement étroite.
Ne l'utilisez pas à d'autres fins.
• L’appréciation des distances peut
être faussée : les objets peuvent ainsi
apparaître plus proches ou plus lointains que dans la réalité.
• Veuillez noter que les bords des
images de la caméra de recul peuvent varier légèrement selon que des
images plein écran sont affichées ou
non pendant le recul.
15
LAN8900EKYN FRE indesign.indd 15
2010-03-25 ¿ÀÈÄ 12:40:08
Réglage
Fonctionnement général du
menu de configuration
Bluetooth
Système
Ce menu comporte quatre options.
Ce menu comporte cinq options.
Afficher la liste des dispositifs
Bluetooth
Cette option vous permet d'afficher la liste
des dispositifs Bluetooth jumelés.
Langue (Language)
Cette option vous permet de modifier la
langue utilisée par le système.
Ce système de navigation peut être
personnalisé pour faciliter son fonctionnement. Les catégories de réglage
sont : Bluetooth, Système, Trafic,
Navigation, Audio, Affichage.
1. Allumez l'appareil.
2. Appuyez sur la touche
du
panneau de commande.
Rechercher des dispositifs Bluetooth
Cette option vous permet de rechercher
des dispositifs Bluetooth (voir page 39).
3. Sélectionnez l'option de votre choix.
4. Choisissez les réglages voulus, puis
appuyez sur [OK] pour confirmer
votre sélection.
✽ Remarque
Appuyez sur
pour revenir à l'écran
précédent. Appuyez sur la touche
MAP pour revenir à l'écran de la carte
affichant la position actuelle.
Autorisation du dispositif externe
Cette option vous permet de connecter
votre téléphone à l'appareil en activant les
réglages Bluetooth de votre téléphone
(voir page 40).
Sélectionnez la langue souhaitée.
Utilisez la touche ou
pour défiler
vers le haut ou le bas, si nécessaire.
Modifier le code
Cette option vous permet de modifier le
code d'accès (voir page 41).
16
LAN8900EKYN FRE indesign.indd 16
2010-03-25 ¿ÀÈÄ 12:40:08
Réglage
Horloge
Cette option vous permet de choisir le
format de l'heure et d'activer ou désactiver
l'heure d'été.
• Format de l'heure : choisissez entre un
affichage sur
12 h ou sur 24 h.
• Heure d'été : activez ou désactivez
l'heure d'été. L’appareil
règle l’horloge automatiquement par détection
de l’heure d’été que
l’on soit en été ou non.
Même si le paramétrage
de l’heure d’été est
activé à “On”, l’appareil
règle l’horloge à l’heure
normale (non +1 heure)
s’il ne s’agit pas de la
période de l’heure d’été.
Unités
Cette option vous permet de choisir l'unité
de distance affichée sur votre système de
navigation.
Choisissez entre les kilomètres ("km") et
les miles ("mls").
Démo Navigation
Il s'agit d'une fonction de démonstration. Après qu'un itinéraire a été défini,
une simulation de guidage routier
jusqu'à la destination s'affiche automatiquement.
• Démo Navigation
- Off : le mode de démonstration est
désactivé.
- 1x : le parcours de démonstration est
lu une seule fois.
- Bcle : le parcours de démonstration
est lu à plusieurs reprises.
• Vitesse : détermine la vitesse du
parcours de démonstration.
Réglages préconfigurés
Cette option vous permet de rétablir
différents réglages à leur valeur par
défaut.
- Tout : rétablit l'ensemble des réglages
aux valeurs par défaut.
- Téléphone : rétablit l'ensemble des
réglages relatifs au
téléphone.
- Navigation : rétablit l'ensemble des
réglages relatifs à la navigation.
- Audio-Média-Radio : rétablit
l'ensemble des
réglages relatifs au son, aux
sources et à la
radio.
17
LAN8900EKYN FRE indesign.indd 17
2010-03-25 ¿ÀÈÄ 12:40:09
Réglage
Trafic
Navigation
Audio
Ce menu comporte trois options.
Ce menu comporte quatre options.
Ce menu comporte cinq options.
TMC
Réglez l'option TMC (canal de messages
sur la circulation) sur "Off", "Auto" ou "On".
- Auto : lorsqu'un événement TMC est
détecté sur l'itinéraire en cours, le
système de navigation recherche
automatiquement un itinéraire de
détour sans le préciser.
- Off : désactive la fonction TMC.
- On : lorsqu'un événement TMC est
détecté sur l'itinéraire en cours, le
système de navigation affiche la
fenêtre contextuelle d'information
sur l'événement.
Affichage Embranchements Autoroutes
Cette option affiche les embranchements d'autoroute sur la carte.
SDVC (Contrôle du volume selon la vitesse)
Lorsque la vitesse de votre véhicule est
supérieure à 40 km/h, le niveau sonore
est restitué à un volume supérieur au
niveau d'origine.
Vous pouvez régler cette option de
commande du volume en fonction de la
vitesse sur Off, Bas, Méd ou Élevé.
- Off : retransmet le niveau sonore
d'origine quelle que soit la vitesse de
votre véhicule.
- Bas, Méd, Élevé : restitue automatiquement le niveau sonore en fonction de la vitesse de votre véhicule.
Station TMC Automatique
Lorsqu'un événement TMC est détecté
sur l'itinéraire en cours, la station TMC
dont le signal est le plus fort est reçue
automatiquement.
Alerte Vitesse
Cette option affiche les alertes de
vitesse sur la carte.
Guidage Amélioré Sur Les Bandes De
Circulation
Cette option affiche les bandes de
circulation sur la carte.
Planifier Différents Itinéraires
Cette option affiche les différents itinéraires planifiés sur la carte.
Station TMC Favorite
L'appareil reçoit la station TMC définie
par l'utilisateur. Cette option est activée
lorsque vous annulez la fonction [Station
TMC Automatique].
Volume de la navigation
Vous pouvez activer ou désactiver les
annonces vocales pour la navigation.
Même si le réglage est sur “Off” (désactivé), lors du lancement d’un nouveau
guidage routier, ce paramètre est alors
activé à “On” automatiquement.
Clic de l'écran tactile
Vous pouvez activer ou désactiver le
son de l'écran tactile.
18
LAN8900EKYN FRE indesign.indd 18
2010-03-25 ¿ÀÈÄ 12:40:09
Réglage
Son (valeur par défaut : Centre)
Balance/
Fader
Basses/
Méd/Aigus
- Balance : appuyez sur b ou B pour
régler le son des haut-parleurs
gauche et droit.
- Fader (Atténuateur) : appuyez sur
v ou V pour régler le son des hautparleurs avant et arrière.
- Basses, Méd, Aigus : appuyez sur b
ou B pour régler les basses, les méd
ou les aigus.
✽ Remarque
Appuyez sur [Centre] pour revenir aux
valeurs par défaut.
Power Bass (Graves amplifiés)
Vous pouvez régler cette option sur Off,
Bas, Méd ou Élevé.
- Off : retransmet le son d'origine.
- Bas, Méd, Élevé : choisissez le
réglage d'amplification des graves.
Affichage
Ce menu comporte deux options.
Mode carte
Pour améliorer la visibilité de l'écran
selon qu'il fait jour ou nuit, vous pouvez
changer la combinaison de couleurs de
la carte.
- Auto : L'écran de la carte est affiché avec le signal de luminosité automatique ou le signal
d'éclairage.
Luminosité
automatique
désactivée (jour)
Luminosité
automatique
activée (nuit)
Luminosité
automatique
non détectée
Luminosité
Vous pouvez régler la luminosité de
l'écran.
Choisissez entre Bas, Méd et Élevé.
Éclairage
actif
Éclairage
actif
Carte : jour
Carte : jour
Carte : nuit
Carte : nuit
Carte : nuit
Carte : jour
- Jour : la carte est toujours affichée
avec des couleurs claires.
- Nuit : la carte est toujours affichée
avec des couleurs foncées.
19
LAN8900EKYN FRE indesign.indd 19
2010-03-25 ¿ÀÈÄ 12:40:09
Premiers pas avec le système de navigation
Qu’est-ce que la technologie GPS ?
À propos des signaux satellite
Informations affichées sur la carte
Le système mondial de localisation GPS
est un système de navigation par satellite constitué d'un réseau de 24 satellites placés en orbite par le ministère de
la Défense des États-Unis.
Le GPS a été conçu initialement à des
fins militaires mais, dans les années
1980, le gouvernement a mis le système à disposition des civils.
Le GPS fonctionne dans le monde
entier 24 h/24 et quelles que soient les
conditions météorologiques.
L'utilisation du système GPS n'est
soumise à aucun frais d'installation ni
d'abonnement.
Votre appareil doit recevoir les signaux
satellite pour fonctionner. Si vous vous
trouvez dans un espace fermé, à proximité
d'immeubles élevés ou d'arbres, ou dans un
parking couvert, l'appareil ne sera pas en
mesure de capter les signaux du satellite.
Compréhension d'une carte
GPS
GPS
GPS
GPS
Le système de navigation affiche différentes informations à l'écran.
Réception des signaux satellite
Avant que l'appareil puisse déterminer
votre position et calculer un itinéraire,
vous devez :
1. Rechercher une zone plus dégagée.
2. Allumer l'appareil.
L’acquisition des signaux satellite peut
prendre quelques minutes.
•
Écran de navigation initial
Une fois le contact placé en position ACC
(accessoires) ou ON (marche), lorsque
vous sélectionnez pour la première
fois un mode de navigation, la fenêtre
d'avertissement s'affiche.
Lisez attentivement les instructions, puis
appuyez sur [Accepter].
/
Indique l'orientation de la carte.
Appuyez sur cette icône pour changer l'orientation de la carte.
•
Indique la position actuelle du véhicule et la direction du trajet.
•
Appuyez sur [Menu] pour accéder au
menu de la carte.
20
LAN8900EKYN FRE indesign.indd 20
2010-03-25 ¿ÀÈÄ 12:40:09
Premiers pas avec le système de navigation
Modification de l'échelle d'une carte
•
Indique l'échelle de la carte.
1. Appuyez sur l'icône
sur la carte.
•
Indique l'heure d'arrivée, la distance et
la durée restante jusqu'à destination.
•
Apparaît dans le coin supérieur droit
de l'écran lorsqu'un itinéraire est défini.
Indique la distance jusqu'au prochain
point du parcours et la direction à
prendre une fois arrivé à ce point.
2. Appuyez sur [+] pour afficher
une vue plus détaillée de la carte.
Appuyez sur [-] pour afficher une
vue élargie de la carte.
•
Indique la limitation de vitesse de la
route sur laquelle vous vous trouvez.
50 m n100 m n 200 m n 300 m n
500 m n 750 m n 1 km n 2 km n
5 km n 10 km n 20 km n 50 km n
100 km n 200 km n 500 km
3. Pour régler le zoom automatique,
.
appuyez sur
21
LAN8900EKYN FRE indesign.indd 21
2010-03-25 ¿ÀÈÄ 12:40:09
Menu de saisie de la destination
Présentation du menu de
navigation
Menu de navigation
Navigation
Adresse
Dernière Destination
Carnet D'Adresses
POI
Parking
Continuer Le Guidage/
Arrêter Guidage
Avancé
Saisie GPS
Utilisat. Carte
Planif. Voyage
Enreg. Destination
Enreg. Position
Favoris
Maison 1
Bureau 2
3~12
Réglage du volume du système
de navigation
Pour régler le volume de navigation,
tournez le bouton du volume ( ) situé
sur le panneau de commande pendant
un guidage vocal ou tournez-le durant
un guidage vocal après avoir appuyé sur
la touche
du panneau de commande.
Fonctionnement général du
menu de destination
1. Allumez l'appareil.
2. Appuyez sur la touche NAV du
panneau de commande. Le menu
de navigation apparaît à l'écran.
3. Appuyez sur [Navigation], [Avancé]
ou [Favoris] pour sélectionner
l'option de votre choix.
Menu [Avancé]
Menu [Favoris]
4. Choisissez la méthode de réglage préférée.
• Adresse : permet de trouver une destination en indiquant une adresse (voir
page 23).
• Dernière Destination : permet de choisir pour destination un des derniers
endroits que vous avez définis (voir
page 24).
• Carnet D'Adresses : permet de choisir
pour destination un endroit mémorisé
dans le carnet d'adresses (voir page 24).
• POI : permet de rechercher une destination dans différentes catégories de sociétés ou de lieux (voir pages 24 à 26).
• Parking : permet de choisir un parking
pour destination (voir page 28).
• Continuer Le guidage/Arrêter Guidage :
permet d'activer ou désactiver le guidage (voir page 28).
• Saisie GPS : permet de choisir la destination en définissant une latitude et
une longitude (voir page 27).
• Utilisat. Carte : permet de rechercher
une destination en parcourant la carte
(voir page 28).
• Planif. Voyage : permet d'ajouter une
nouvelle destination ou un point de
cheminement (voir pages 29 à 30).
• Enreg. Destination : permet
d'enregistrer votre destination dans le
carnet d'adresses (voir page 31).
• Enreg. Position : permet d'enregistrer
votre position dans le carnet d'adresses
(voir page 31).
• Maison 1/Travail 2/3~12 : vous pouvez
mémoriser l'emplacement de votre
domicile, de votre travail, ou tout autre
lieu où vous vous rendez fréquemment
(voir page 32).
22
LAN8900EKYN FRE indesign.indd 22
2010-03-25 ¿ÀÈÄ 12:40:10
Menu de saisie de la destination
Recherche par adresse
Vous pouvez trouver votre destination en effectuant une recherche par
adresse.
1. Appuyez sur la touche [NAV] > Puis
appuyez sur [Adresse].
2. Choisissez le pays.
Si le pays est déjà défini, passez à
l'étape 3.
3. Indiquez le nom de la ville, puis
appuyez sur [OK].
5. Indiquez le nom de la rue, puis
appuyez sur [OK].
Reportez-vous à la section "Options
Itinéraire", page 36.
9. Appuyez sur [Démarrer].
6. Choisissez la rue dans la liste.
7. Indiquez le numéro de la rue, puis
appuyez sur [OK].
• Si vous voulez mémoriser votre destination dans le carnet d'adresses,
appuyez sur [Enregistrer]. Saisissez
le nom de votre destination, puis
appuyez sur [OK].
• Si vous voulez afficher la carte de
votre destination, appuyez sur [Afficher
Carte] puis sur [Démarrer].
10. Sélectionnez l'itinéraire préféré, puis
appuyez sur [Démarrer]. Reportezvous à la remarque relative aux
critères de l'itinéraire, page 36.
4. Choisissez la ville dans la liste.
8. Choisissez les options de l'itinéraire,
puis appuyez sur [OK].
Conduisez en suivant les informations
vocales et celles indiquées sur l'écran.
23
LAN8900EKYN FRE indesign.indd 23
2010-03-25 ¿ÀÈÄ 12:40:10
Menu de saisie de la destination
Dernière Destination
Carnet D'Adresses
Points D'Intérêt (POI)
Vous pouvez choisir pour destination un des
derniers endroits que vous avez définis.
Les 50 dernières destinations sont
automatiquement mémorisées. Si le
nombre des dernières destinations
dépasse 50, les plus anciennes sont
remplacées par les nouvelles.
Vous pouvez choisir pour destination un
endroit mémorisé dans le carnet d'adresses.
Pour utiliser cette fonction de manière
plus efficace, les destinations où vous vous
rendez fréquemment doivent être mémorisées au préalable. Tout d'abord, recherchez l'adresse dans le carnet d'adresses.
Reportez-vous à la section Recherche par
adresse, page 23.
Vous pouvez rechercher une destination
dans différentes catégories de sociétés
ou de lieux.
1. Appuyez sur la touche [NAV] > Puis
appuyez sur [POI].
1.
Appuyez sur la touche [NAV] > Puis
appuyez sur [Dernière Destination].
2. Sélectionnez la dernière destination
de votre choix dans la liste.
1. Appuyez sur la touche [NAV] > Puis
appuyez sur [Carnet D'Adresses].
2. Sélectionnez la destination de votre
choix dans la liste.
3. Sélectionnez l'itinéraire préféré, puis
appuyez sur [Démarrer].
Conduisez en suivant les informations
vocales et celles indiquées sur l’écran.
2. Appuyez sur une des catégories
principales.
3. Sélectionnez l’itinéraire préféré, puis
appuyez sur [Démarrer].
Conduisez en suivant les informations
vocales et celles indiquées sur l’écran.
• Position Proche : définit un point
d'intérêt situé à proximité de la
position actuelle du véhicule
(voir page 25).
• Destination Proche : définit un
point d'intérêt situé à proximité de
la destination sélectionnée (voir
page 26).
• En Ville : définit un point d'intérêt
situé en ville (voir page 26).
• Nom : définit un point d'intérêt
en fonction du nom de
l'endroit (voir page 26).
• Service Kia : définit un garage du
réseau Kia (voir page 26).
• Numéro De Téléphone : si vous
connaissez le numéro de téléphone de l'endroit où vous voulez
vous rendre, utilisez-le pour trouver
votre destination (voir page 26).
24
LAN8900EKYN FRE indesign.indd 24
2010-03-25 ¿ÀÈÄ 12:40:10
Menu de saisie de la destination
Position Proche
1. Appuyez sur la touche [NAV] > Puis
appuyez sur [POI] > [Position Proche].
5. Appuyez sur [OK] après avoir
confirmé l'adresse du point d'intérêt
affiché.
8. Appuyez sur [Démarrer].
2. Sélectionnez une des sous-catégories.
(Par exemple : Urgence)
3. Sélectionnez une des sous-catégories
dans le niveau suivant. (Par exemple :
Hôpital)
4. Sélectionnez le point d'intérêt de
votre choix.
Si vous voulez téléphoner au
numéro correspondant, appuyez sur
[ ]. Cette option n'est disponible
que lorsque la fonction Bluetooth
est active.
Conduisez en suivant les informations vocales et celles indiquées sur
l’écran.
6. Appuyez sur [Démarrer].
7. Sélectionnez l'itinéraire préféré.
25
LAN8900EKYN FRE indesign.indd 25
2010-03-25 ¿ÀÈÄ 12:40:11
Menu de saisie de la destination
Destination Proche
Nom
Numéro De Téléphone
1. Appuyez sur la touche [NAV] > Puis
appuyez sur [POI] > [Destination
Proche].
1. Appuyez sur la touche [NAV] > Puis
appuyez sur [POI] > [Nom].
1. Appuyez sur la touche [NAV] > Puis
appuyez sur [POI] > [Numéro De
Téléphone].
2. Suivez les étapes 2 à 8 de la
page 25 (Position Proche).
2. Choisissez le pays.
3. Indiquez le nom de l'endroit, puis
appuyez sur [OK].
2. Indiquez le numéro de téléphone,
puis appuyez sur [OK].
En Ville
1. Appuyez sur la touche [NAV] > Puis
appuyez sur [POI] > [En Ville].
2. Indiquez le nom de la ville, puis
appuyez sur [OK].
4. Suivez les étapes 4 à 8 de la page
25 (Position Proche).
3. Sélectionnez le numéro de téléphone préféré dans la liste.
4. Appuyez sur [OK] après avoir confirmé
l'adresse du point d'intérêt affiché.
Service Kia
1. Appuyez sur la touche [NAV] > Puis
appuyez sur [POI] > [Service Kia].
3. Choisissez la ville dans la liste.
2. Suivez les étapes 4 à 8 de la
page 25 (Position Proche).
Si vous voulez téléphoner au
numéro correspondant, appuyez sur
[ ]. Cette option n'est disponible
que lorsque la fonction Bluetooth
est active.
4. Suivez les étapes 2 à 8 de la
page 25 (Position Proche).
5. Suivez les étapes 6 à 8 de la
page 25 (Position Proche).
26
LAN8900EKYN FRE indesign.indd 26
2010-03-25 ¿ÀÈÄ 12:40:11
Menu de saisie de la destination
Saisie GPS
Vous pouvez choisir votre destination en
indiquant les coordonnées de latitude
et longitude.
4. Saisissez les coordonnées de
latitude en appuyant sur les minutes.
(Par exemple : 58’)
1. Appuyez sur la touche [NAV] >
Puis appuyez sur [Avancé] > [Saisie
GPS].
6. Appuyez sur [OK].
7. Saisissez les coordonnées de longitude.
Reportez-vous aux étapes 2 à 6.
(Par exemple : 8°, 42', 31'')
2. Appuyez sur [Latitude].
8. Une fois les réglages terminés,
appuyez sur [Démarrer].
5. Saisissez les coordonnées de
latitude en appuyant sur les secondes.
(Par exemple : 29’’)
3. Saisissez les coordonnées de
latitude en appuyant sur les degrés.
(Par exemple : 49°)
9. Suivez les étapes 7 à 8 de la
page 25 (Position Proche).
✽ Remarque
Si vous vous trompez lors de la saisie
pour
d'un numéro, appuyez sur
effacer un chiffre à la fois.
27
LAN8900EKYN FRE indesign.indd 27
2010-03-25 ¿ÀÈÄ 12:40:11
Menu de saisie de la destination
Parking
Utilisat. Carte
Vous pouvez trouver votre destination en
effectuant une recherche par parking.
Cette option vous permet de rechercher
une destination en parcourant la carte.
1. Appuyez sur la touche [NAV] > Puis
appuyez sur [Parking].
1. Appuyez sur la touche [NAV] > Puis
appuyez sur [Avancé] > [Utilisat.
Carte].
2. Sélectionnez le parking de votre
choix.
3. Suivez les étapes 4 à 8 de la
page 25 (Position Proche).
2. Faites défiler la carte et placez le
pointeur à l'endroit de votre choix.
4. Sélectionnez l’itinéraire préféré, puis
appuyez sur [Démarrer].
Conduisez en suivant les informations vocales et celles indiquées sur
l’écran.
3. Appuyez sur [Démarrer].
Continuer Le Guidage/Arrêter
Guidage
Si vous n'avez plus besoin de vous rendre à votre destination ou si vous souhaitez changer de destination, appuyez
sur la touche [NAV] > puis appuyez sur
[Arrêter Guidage]. Si vous souhaitez
poursuivre votre route vers votre destination, appuyez sur [Continuer Le
Guidage].
28
LAN8900EKYN FRE indesign.indd 28
2010-03-25 ¿ÀÈÄ 12:40:12
Menu de saisie de la destination
Planif. Voyage
Le planificateur de voyage vous permet de
calculer les itinéraires en définissant des
destinations ou points de cheminement.
Vous pouvez définir un total de quatre
destinations ou points de cheminement.
- Nouveau Voyage : permet de définir
un voyage.
- Charger Le Voyage : permet d'afficher
la liste des voyages.
- Afficher Le Voyage : permet d'afficher
le dernier voyage défini.
4. Choisissez une destination via le
menu de navigation.
(Reportez-vous à la page 22.)
La destination choisie s'affiche.
Si vous devez définir un point de cheminement supplémentaire, appuyez à
nouveau sur [Ajouter Étape].
5. Appuyez sur [Ajouter Étape].
7. Appuyez sur [Démarrer]. Si vous
voulez enregistrer l'itinéraire calculé,
appuyez sur [Oui]. Sinon, appuyez
sur [Non].
Définition d'un voyage
1. Appuyez sur la touche [NAV] > Puis
appuyez sur [Avancé] > [Planif. Voyage].
2. Appuyez sur [Nouveau Voyage].
6. Choisissez un point de cheminement en utilisant le menu
[Navigation], [Avancé] ou [Favoris].
(Reportez-vous à la page 22.)
8. Saisissez un nom, puis appuyez sur [OK].
3. Appuyez sur [Oui].
L'itinéraire calculé est automatiquement mémorisé dans le menu
[Charger Le Voyage].
9. Conduisez en suivant les informations vocales et celles indiquées sur
l’écran.
29
LAN8900EKYN FRE indesign.indd 29
2010-03-25 ¿ÀÈÄ 12:40:12
Menu de saisie de la destination
Édition/suppression d'une destination
ou d'un point de cheminement
Vous pouvez modifier ou supprimer une
destination ou un point de cheminement déjà défini.
1. Appuyez sur la touche [NAV] > Puis
appuyez sur [Avancé] > [Planif. Voyage]
> [Charger Le Voyage].
2. Sélectionnez le voyage de votre choix.
[Trier Liste Voy.] : permet de changer l'ordre des destinations et points de
cheminement déjà définis. (Suivez les étapes 5 à 6.)
[Supprimer Étape Voy.] : permet de
supprimer le point de
cheminement.
(Suivez les étapes 7 à 9.)
[Supprimer Liste Voy.] : permet de
supprimer des voyages
de la liste. (Suivez les
étapes 10 à 11.)
5. Appuyez sur [Trier Liste Voy.], puis
sur [OK] après avoir modifié l'ordre.
3. Appuyez sur [Mod. Liste Voy].
8. Sélectionnez le point de cheminement de votre choix.
9. Suivez les étapes 7 à 9 de la
page 29 (Définition d'un voyage).
10. Appuyez sur [Supprimer Liste Voy.]
pour supprimer un voyage de la liste.
4. Sélectionnez les options de votre
choix.
11. Sélectionnez le voyage de votre choix.
6. Suivez les étapes 7 à 9 de la
page 29 (Définition d'un voyage).
7. Appuyez sur [Supprimer Étape Voy.]
pour supprimer le point de cheminement.
30
LAN8900EKYN FRE indesign.indd 30
2010-03-25 ¿ÀÈÄ 12:40:12
Menu de saisie de la destination
Enreg. Destination
Enreg. Position
Les destinations où vous vous rendez
fréquemment peuvent être enregistrées
dans le carnet d'adresses.
Les destinations enregistrées peuvent
facilement être retrouvées pour être
définies comme destination ou point de
cheminement.
Cette option n'est disponible que lorsque
des destinations ont déjà été définies.
La position actuelle du véhicule
peut être enregistrée dans le carnet
d'adresses.
1. Appuyez sur la touche [NAV] > Puis
appuyez sur [Avancé] > [Enreg.
Destination].
1. Appuyez sur la touche [NAV] > Puis
appuyez sur [Avancé] > [Enreg.
Position].
2. Saisissez le nom de la position
actuelle, puis appuyez sur [OK].
2. Saisissez le nom de la destination,
puis appuyez sur [OK].
La position actuelle du véhicule est
enregistrée automatiquement dans
le carnet d'adresses (voir page 24).
La destination est enregistrée
automatiquement dans le carnet
d'adresses (voir page 24).
31
LAN8900EKYN FRE indesign.indd 31
2010-03-25 ¿ÀÈÄ 12:40:13
Menu de saisie de la destination
Maison 1/Travail 2/3~12
Si l'emplacement de votre domicile, de
votre travail et d'autres endroits favoris
sont déjà enregistrés dans le carnet
d'adresses, vous pouvez facilement les
retrouver pour établir un itinéraire.
4. Si vous voulez définir le lieu de votre
domicile, appuyez sur [1 Maison].
Identification de votre domicile
1. Appuyez sur la touche [NAV] > Puis
appuyez sur [Favoris].
2. Appuyez sur [Maison 1].
Mémorisation de votre domicile
1. Appuyez sur la touche [NAV] > Puis
appuyez sur [Carnet D'Adresses].
2. Appuyez sur
le lieu.
5. Appuyez sur [OK].
3. Sélectionnez l’itinéraire préféré, puis
appuyez sur [Démarrer].
après avoir confirmé
3. Appuyez sur [Favoris].
✽ Remarques
• La procédure permettant de mémoriser votre lieu de travail et vos endroits
favoris est la même que celle utilisée
pour mémoriser votre domicile.
• Toute nouvelle information saisie dans
le même emplacement de stockage
remplace les précédentes données.
• Pour supprimer des endroits mémorisés dans le carnet d'adresses, appuyez
sur [Supprimer].
• Pour mémoriser l'emplacement actuel
dans le menu [Favoris], appuyez sur la
touche [NAV], puis [Favoris], maintenez
enfoncé le numéro de votre choix,
entrez un nom et appuyez sur [OK].
Conduisez en suivant les informations vocales et celles indiquées sur
l’écran.
✽ Remarque
La procédure permettant d'identifier
votre lieu de travail et vos endroits
favoris est la même que celle utilisée
pour identifier votre domicile.
32
LAN8900EKYN FRE indesign.indd 32
2010-03-25 ¿ÀÈÄ 12:40:13
Utilisation du menu de la carte
Présentation du menu de la
carte
Menu de la carte
Afficher
Itinéraire
Trafic
Catégorie De POI
2D/ 3D
Écran Fractionné/
Plein Écran
Fonctionnement général du
menu de la carte
1. Allumez l'appareil.
2. Appuyez sur la touche MAP.
La carte apparaît à l'écran.
Menu [Itinéraire]
3. Appuyez sur [Menu].
Enreg. Position
Options Itinéraire
Planificateur De Voyage
Navigateur
Déviation
Menu [Trafic]
Info Proximité
Info Itinéraire
4. Appuyez sur [Afficher], [Itinéraire]
ou [Trafic] pour sélectionner l'option
de votre choix.
5. Choisissez la méthode de réglage
préférée.
Pour plus de détails, reportez-vous
aux pages 34 à 38.
Menu [Afficher]
33
LAN8900EKYN FRE indesign.indd 33
2010-03-25 ¿ÀÈÄ 12:40:14
Utilisation du menu de la carte
Catégorie De POI
3. Appuyez sur [OK].
Certains points de repère dans la zone
environnante peuvent s'afficher sous forme
d'icônes sur l'écran.
Cela vous permet d'afficher ou de masquer les icônes de points de repère par
type.
1. Appuyez sur la touche [MAP] > Puis
appuyez sur [Menu] > [Afficher] >
[Catégorie De POI].
Les icônes de points de repère
activées s'affichent sur la carte.
2D/3D
Vous pouvez afficher la carte en 2D ou
en 3D.
- 2D : affiche la carte dans un environnement en deux dimensions,
similaire à une carte routière.
- 3D : affiche la carte en relief. Le trajet est plus facile à identifier,
car cet affichage offre une vue
panoramique sur une longue
distance.
1. Appuyez sur la touche [MAP] > Puis
appuyez sur [Menu] > [Afficher] >
[2D/3D].
2. Appuyez sur les icônes de votre
choix. Les réglages d'affichage
des icônes permutent à chaque
fois que vous appuyez sur l'icône.
L'indicateur de l'icône sélectionnée
change de couleur.
2. Appuyez de nouveau sur [2D/3D]
pour revenir à l'écran 2D.
34
LAN8900EKYN FRE indesign.indd 34
2010-03-25 ¿ÀÈÄ 12:40:14
Utilisation du menu de la carte
Écran Fractionné/Plein Écran
Enreg. Position
Planif. Voyage
Vous pouvez afficher la carte en plein
écran ou de manière fractionnée.
La position actuelle du véhicule peut être
enregistrée dans le carnet d'adresses.
1. Appuyez sur la touche [MAP] > Puis
appuyez sur [Menu] > [Afficher] >
[Écran fractionné].
1. Appuyez sur la touche [MAP] > Puis
appuyez sur [Menu] > [Itinéraire] >
[Enreg. Position].
Le planificateur de voyage vous permet
de calculer les itinéraires en définissant
des destinations ou points de cheminement.
2. Saisissez le nom de la position
actuelle, puis appuyez sur [OK].
1. Appuyez sur la touche [MAP] > Puis
appuyez sur [Menu] > [Itinéraire] >
[Planificateur De Voyage].
2. Reportez-vous à la section "Planif.
Voyage", pages 29 à 30.
Écran fractionné
2. Pour passer au mode plein écran,
appuyez sur [Menu] > [Afficher] >
[Plein Écran].
Plein écran
La position actuelle du véhicule est
enregistrée automatiquement dans
le carnet d'adresses (voir page 24).
35
LAN8900EKYN FRE indesign.indd 35
2010-03-25 ¿ÀÈÄ 12:40:14
Présentation du menu de la carte
Options Itinéraire
De L'Itinéraire
Vous pouvez modifier les conditions de
l'itinéraire ou les confirmer. Définissez
les conditions d'itinéraire appropriées à
votre situation.
1. Appuyez
Appuyezsur
surla[MAP]
touche> [MAP]
Puis [Menu]
> Puis >
[L’Itinéraire]
appuyez
sur>[Menu]
[Options> De
[Itinéraire]
L’Itinéraire].
>
[Options Itinéraire].
2. Appuyez sur le réglage de votre choix.
2. Appuyez
• Itinéraire
sur: si
le vous
réglage
ne de
réglez
votrepas
choix.
• Itinéraire : sil'option
vous ne
[Planifier
réglez pas
l'option
Différents
[Planifier
Itinéraires]
Différents
dans le menu
Itinéraires]
de
dans
réglage,
le menu
choisissez
de
réglage,
l'option d'itinéraire
choisissez
l'option
Rapide d'itinéraire
( ), Court ( )
Rapide
ou Éco (( ),). Court ( )
✽ Remarque ou Éco ( ).
• Itinéraire
Éco (économique)
✽ Remarques
- •Pour
diminuer
la consommation
Itinéraire
Rapide
: calcule un itide
carburant,
itinéraire
prendle
néraire
avec cet
le temps
de trajet
en
compte
plus
court.la réduction du nombre
et Court
de redémarrages
•d'arrêts
Itinéraire
: calcule un aux
itinéraiintersections
et aux tournants
en
re avec la distance
la plus courte.
tableau
de consom•fonction
ItinéraireduÉco
(économique)
mation
des informations
du
- Pouravec
diminuer
la consommation
de en
carburant,
cet itinéraire
trafic
temps réel.
Toutefois,prend
cet
en compte
la réduction
du nomitinéraire
peut ne
pas être efficace
brevotre
d'arrêts
et de redémarrages
selon
conduite,
par exemple
aux intersections
aux tournants
si vous
effectuez desetaccélérations
en fonction du tableau de consoudaines.
sommation
informations
- L'Itinéraire
Éco avec
peut des
augmenter
le
du trafic
en temps
réel.
Toutefois,
temps
de conduite
et la
distance
cetéconomiser
itinéraire peut
ne pas être
pour
du carburant.
efficace selon votre conduite, par
• TMC:exemple si vous effectuez des
accélérations soudaines.
Auto ( ):Éco
lorsqu'un
événementle
- -L'Itinéraire
peut augmenter
TMC
est
détecté
sur
temps de conduite et la distance
l'itinéraire
en cours, le
pour économiser
du carburant.
système de navigation
• TMC
affiche la fenêtre con- Auto ( ) : textuelle
lorsqu'und'information
événement
TMC
est détecté
sur
l'événement.
sur l'itinéraire
en
- Non ( ): désactive
la fonction
cours, le système de
TMC.
navigation affiche la
- Oui (
): lorsqu'un
événement
fenêtre contextuelle
TMC
est détecté
d'information
sursur
l'itinéraire
en cours, le
l'événement.
- Off ( ) : désactive
la fonction
système de
navigation
TMC.
affiche l'écran contex- On (
) : lorsqu'un
événement
tuel d'information
sur
TMC
est détecté sur
l'événement.
l'itinéraire en cours, le
• Route À Péage (
)
système de navigation
- Prendre : l'itinéraire
inclut les
affiche la fenêtre
conroutes
à péage.
textuelle
d'information
- Eviter : l'itinéraire
évite les routes
sur l'événement.
à péage.
✽ Remarques
Une TMC payante n'est pas compatible.
• Tunnel
( À) Péage (
)
• Routes
-- Prendre
l'itinéraireinclut
inclutlesles
Prendre : l'itinéraire
tunroutes à péage.
nels.
--Éviter
routes
Eviter :: l'itinéraire
l'itinéraire évite les tunnels.
à péage.
)
• Autoroute
(
• Tunnels
( : l'itinéraire
)
- Prendre
inclut les
inclut les tunnels.
- Prendre : l'itinéraire
autoroutes.
-- Éviter
Éviter: :l'itinéraire
l'itinéraireévite
éviteles
lestunnels.
auto)
• Autoroutes
(
routes.
Prendre : l'itinéraire inclut les
• -Ferry
autoroutes.
- Prendre : l'itinéraire
inclut les fer- Éviter : l'itinéraire évite les autoroutes.
ries.
• Ferries
- Eviter : l'itinéraire évite les ferries.
- Prendre : l'itinéraire inclut les ferries.
- Éviter : sur
l'itinéraire
3. Appuyez
[OK]. évite les ferries.
Lorsque l'écran de la carte corre3. Appuyez
spondantsur
à la[OK].
position actuelle ou
Lorsque
l'écran
dede
la l'itinéraire
carte corresl'écran de
calcul
est
pondantleà système
la position
actuelleunouitiaffiché,
recalcule
l'écran de
calcul
de l'itinéraire
est
néraire
avec
les conditions
définies.
affiché, le système recalcule un itinéraire avec les conditions définies.
✽ Remarque
• Immobilisez toujours le véhicule à un
✽ Remarques
endroit
sûr avant de modifier les con• Immobilisez
toujours le véhicule à
ditions
de l'itinéraire.
un endroit
sûr les
avant
de modifier
• Si vous
modifiez
conditions
de les
conditions
l'itinéraire
toutde
enl'itinéraire.
conduisant, vous ris• Si de
vous
modifiez un
lesaccident.
conditions de
quez
provoquer
l'iti-néraire tout en conduisant, vous
risquez de provoquer un accident.
36
LAN8900EKYN FRE indesign.indd 36
2010-03-25 ¿ÀÈÄ 12:40:14
Utilisation du menu de la carte
Navigateur
Déviation
Vous pouvez voir une vue élargie d'une
section de l'itinéraire lorsque le guidage
est actif.
Si les conditions de circulation vous
incitent à faire un détour, vous pouvez utiliser la fonction de détour pour
calculer un itinéraire alternatif entre la
position actuelle du véhicule et votre
destination.
1. Appuyez sur la touche [MAP] > Puis
appuyez sur [Menu] > [Itinéraire] >
[Navigateur].
1. Appuyez sur la touche [MAP] > Puis
appuyez sur [Menu] > [Itinéraire] >
[Déviation].
2. Appuyez sur [Plus Court] ou [Plus
Long] pour déterminer l'ampleur du
détour inclus dans l'itinéraire.
2. Appuyez sur [Précédent] ou
[Suivant] pour voir les sections de
l'itinéraire.
3. Appuyez sur [Section] pour voir
la vue élargie d'une section de
l'itinéraire.
4. Appuyez sur [Itinéraire] pour revenir
à l'écran précédent.
- Bleu : itinéraire d'origine.
- Rouge : détour.
4. Sélectionnez l’itinéraire préféré, puis
appuyez sur [Démarrer].
Conduisez en suivant les informations vocales et celles indiquées sur
l’écran.
✽ Remarque
Si vous ne voulez pas faire de détour
pendant un itinéraire, appuyez sur
[Menu] > [Itinéraire] > [Déviation] >
[Supprimer].
.
3. Appuyez sur [Démarrer].
5. Appuyez sur
pour revenir à
l'écran de la carte affichant la position actuelle.
37
LAN8900EKYN FRE indesign.indd 37
2010-03-25 ¿ÀÈÄ 12:40:15
Présentation du menu de la carte
Info Proximité
Vous pouvez voir la liste des informations sur le trafic autour de la position
actuelle du véhicule.
1. Appuyez sur la touche [MAP] > Puis
appuyez sur [Menu] > [Trafic] > [Info
Proximité].
2. Appuyez sur l'option de votre choix pour
consulter les informations détaillées.
3. Appuyez sur [Afficher Carte] pour
revenir à la carte.
pour revenir à
5. Appuyez sur
l'écran précédent. Appuyez sur la
touche MAP pour revenir à l'écran
de la carte affichant la position
actuelle.
Info Itinéraire
Vous pouvez voir la liste des informations sur le trafic trouvées pour l'itinéraire recommandé entre la position
actuelle du véhicule et sa destination.
Pour éviter les bouchons, l'appareil
recherche un détour entre la position
actuelle du véhicule et sa destination.
De plus, vous pouvez consulter les
informations détaillées sur les événements affichés.
1. Appuyez sur la touche [MAP] > Puis
appuyez sur [Menu] > [Trafic] > [Info
Itinéraire].
4. Appuyez sur [Zoom +] pour afficher
une vue plus détaillée de la carte.
Appuyez sur [Zoom -] pour afficher
une vue élargie de la carte.
3. Si vous devez prendre un détour,
appuyez sur [Déviation].
✽ Remarque
Appuyez sur [Afficher Carte] si
vous voulez voir la position de
l'événement détecté sur l'itinéraire.
Appuyez sur
pour revenir à
l'écran précédent. Appuyez sur la
touche MAP pour revenir à l'écran
de la carte affichant la position
actuelle.
4. Sélectionnez l'itinéraire préféré.
2. Appuyez sur l'option de votre choix
pour consulter les informations
détaillées.
5. Appuyez sur [Démarrer].
Conduisez en suivant les informations vocales et celles indiquées sur
l'écran.
38
LAN8900EKYN FRE indesign.indd 38
2010-03-25 ¿ÀÈÄ 12:40:15
Technologie sans fil Bluetooth
Présentation de la technologie sans fil Bluetooth
La technologie sans fil Bluetooth permet
d'établir une liaison sans fil entre deux dispositifs, par exemple entre un téléphone
compatible et l'appareil.
La première fois que vous utilisez les deux
dispositifs ensemble, vous devez les jumeler
en établissant un lien à l'aide d'un code PIN.
Après la connexion initiale, les deux dispositifs
peuvent communiquer automatiquement
chaque fois que vous les mettez en marche.
✽ Remarques
• L'utilisation de la technologie Bluetooth
peut être soumise à des restrictions dans
certains endroits.
• En raison du nombre et de la diversité
des téléphones Bluetooth et de la version du microprogramme qu'ils intègrent,
votre appareil peut répondre différemment
lorsque vous l'utilisez via Bluetooth.
• La différence de fonctionnement variant
principalement selon les fonctionnalités
du téléphone mains libres, consultez le
fabricant de votre téléphone pour plus de
précisions.
• Vous pouvez consulter la liste de compatibilité des téléphones Bluetooth sur le site
web (http://www.navigation/kia).
Jumelage de votre appareil
avec un téléphone Bluetooth
4. Sélectionnez le téléphone Bluetooth
dans la fenêtre des résultats de la
recherche « Dispositifs Bluetooth ».
Connexion à l'aide des paramètres de
l'appareil (1)
du
1. Appuyez sur la touche
panneau de commande.
2. Appuyez sur [Bluetooth].
5. Saisissez le code d'accès (valeur par
défaut : 0000) indiqué sur votre
téléphone lorsque la fenêtre contextuelle s'affiche à l'écran.
Une fois la connexion effectuée,
l'écran principal Bluetooth apparaît.
3. Appuyez sur [Rechercher des
dispositifs Bluetooth].
Si la connexion échoue, le message
d'erreur apparaît à l'écran.
Si vous souhaitez annuler, appuyez
sur [Annuler].
39
LAN8900EKYN FRE indesign.indd 39
2010-03-25 ¿ÀÈÄ 12:40:15
Technologie sans fil Bluetooth
Connexion à l'aide des paramètres de
l'appareil (2)
Connexion à l'aide des paramètres
du téléphone
1. Appuyez sur la touche
du
panneau de commande.
Il est possible que la fonction Bluetooth
de votre téléphone soit désactivée
par défaut. Pour utiliser la technologie
Bluetooth, il faut que cette fonction soit
activée sur votre téléphone. Reportezvous au manuel d'utilisation de votre
téléphone.
2. Appuyez sur [Rechercher des dispositifs Bluetooth].
1. Activez le composant Bluetooth du
téléphone. Cette option se trouve
généralement dans un menu appelé
Paramètres, Bluetooth, Connexion, ou
Mains libres.
2. Appuyez sur la touche [ ] >
Puis appuyez sur [Bluetooth] >
[Autorisation du dispositif externe].
3. Suivez les étapes 4 et 5 décrites à
la page 39.
✽ Remarque
Si vous appuyez de nouveau sur la
touche
du panneau de commande
après vous être connecté via la technologie sans fil Bluetooth, l'écran principal
Bluetooth s'affiche.
Si vous souhaitez annuler, appuyez
sur [Annuler].
3. Lancez une recherche des dispositifs Bluetooth. Cette option se trouve
généralement dans un menu appelé
Bluetooth, Connexion, ou Mains libres.
4. Sélectionnez votre appareil dans la
liste proposée par le téléphone.
5. Saisissez le code d'accès (valeur par
défaut : 0000) indiqué sur votre
téléphone lorsque la fenêtre
contextuelle s'affiche à l'écran.
Une fois la connexion effectuée,
l'écran [Bluetooth] apparaît.
✽ Remarques
• Le fonctionnement est le même que celui
d'un casque filaire pour téléphone mobile.
La fonctionnalité du casque est prévue pour
les conversations téléphoniques. Elle n'est
pas prévue pour l'écoute de musique.
• Contrairement à la fonction mains libres, la
connexion du casque ne permet que deux
fonctions : répondre à un appel et passer
un appel à partir du dernier appel.
De plus, le numéro de l'appelant ne s'affiche
pas lorsque vous répondez à un appel.
• En cas de connexion via un téléphone
Bluetooth, le succès de la connexion mains
libres ou du casque dépend du type de
téléphone.
40
LAN8900EKYN FRE indesign.indd 40
2010-03-25 ¿ÀÈÄ 12:40:16
Technologie sans fil Bluetooth
Déconnexion/reconnexion du
téléphone Bluetooth
1. Sélectionnez [Afficher la liste des
dispositifs Bluetooth] sur l'écran
"Bluetooth".
3. Appuyez une nouvelle fois sur le
nom du téléphone à présent déconnecté pour connecter le téléphone.
Appuyez ensuite sur [Oui].
3. Appuyez sur [Oui].
2. Appuyez sur le nom du téléphone
connecté. Appuyez ensuite sur [Oui].
Le symbole
apparaît à nouveau.
Suppression d'un téléphone
connecté
Si vous n'avez plus besoin d'utiliser un
téléphone connecté, vous pouvez le
supprimer.
1. Sélectionnez [Afficher la liste des
dispositifs Bluetooth] sur l'écran
"Bluetooth".
Votre téléphone est déconnecté et le
symbole disparaît.
• Le téléphone connecté est supprimé.
• Si vous ne voulez pas supprimer un
téléphone connecté, appuyez sur [Non].
Modification du code d'accès
Vous pouvez modifier le code d'accès.
1. Saisissez le code d'accès à l'aide du
pavé numérique et des touches
et
.
2. Appuyez sur à droite du nom du
téléphone que vous voulez supprimer.
2. Appuyez sur [OK].
41
LAN8900EKYN FRE indesign.indd 41
2010-03-25 ¿ÀÈÄ 12:40:16
Technologie sans fil Bluetooth
Passer un appel en saisissant
le numéro de téléphone
Le moyen le plus simple de passer un
appel consiste à composer le numéro.
Connectez d'abord votre téléphone
Bluetooth à l'appareil.
du
1. Appuyez sur la touche
panneau de commande.
L'écran principal Bluetooth apparaît
à l'écran.
2. Saisissez le numéro que vous voulez
appeler à l'aide du pavé numérique.
.
Appuyez ensuite sur
3. Appuyez sur [Raccrocher] pour
mettre un terme à la conversation.
✽ Remarques
• Si vous faites une erreur lors de la
saisie d’un numéro, appuyez sur la
pour effacer un chiffre à
touche
la fois. Si vous voulez effacer tous les
chiffres à la fois, appuyez sur
de
manière prolongée.
de manière
• Appuyez sur
prolongée pour passer un appel à
partir des appels récents.
• Si vous voulez passer un appel
international, appuyez sur [0] de
manière prolongée, puis saisissez le
numéro de téléphone.
• L'historique des appels récents s'applique
uniquement à la connexion mains libres.
(La possibilité de passer un appel à partir
des appels récents avec une connexion du
casque dépend de l'historique des appels
du téléphone Bluetooth.)
• La connexion du casque permet de passer
un appel seulement à partir d'un appel
récent.
Modification du mode d'écoute
du son pendant un appel
Vous pouvez entendre le son sur le
haut-parleur de l'appareil ou sur le
téléphone en appuyant sur [Transf.
Appel]/[Retransférer l’appel].
Activation et désactivation du
microphone
Vous pouvez activer et désactiver le
microphone en appuyant sur [Micro
On]/[Micro Off].
Répondre aux appels
1. Lorsque vous recevez un appel,
votre téléphone sonne et la fenêtre
“Appel entrant» apparaît à l’écran.
2. Appuyez sur [Accepter] pour prendre l’appel.
Si vous souhaitez rejeter l’appel,
appuyez sur [Refuser].
✽ Remarques
• Si le numéro de téléphone figure dans
le répertoire téléphonique, le nom de
l'entrée est affiché.
• Si l'appel entrant correspond à un
numéro stocké dans vos contacts, le
nom de l'entrée est affiché.
• Si l'appel entrant correspond à un
numéro stocké dans vos contacts, le
nom de l'entrée est affiché. Le numéro
de téléphone de l'appelant peut
également être affiché, s'il est disponible.
• Si la fonction "Refuser" n'est pas disponible, c'est que le téléphone
connecté à l'appareil ne prend pas en
charge la fonction de rejet d'appels.
42
LAN8900EKYN FRE indesign.indd 42
2010-03-25 ¿ÀÈÄ 12:40:17
Technologie sans fil Bluetooth
Utilisation de votre répertoire
Vous pouvez utiliser les entrées du
répertoire mémorisées dans le téléphone
s'il prend en charge le profil PBAP
(Phone Book Access Profile).
Après avoir connecté votre appareil à
votre téléphone via la technologie sans fil
Bluetooth, les numéros présents dans le
répertoire de votre téléphone sont transférés automatiquement dans le répertoire de l'appareil.
2. Appuyez sur l'entrée du répertoire
que vous voulez appeler.
ou
pour accéder
Appuyez sur
à la page suivante ou précédente
dans la liste.
Appel d'un numéro du répertoire
Après avoir trouvé l'entrée que vous
voulez appeler dans le répertoire, vous
pouvez sélectionner le numéro et passer
un appel.
3. Appuyez sur [Raccrocher] pour
mettre un terme à la conversation.
du
1. Appuyez sur la touche
panneau de commande. Appuyez
ensuite sur [Répertoire].
Si le répertoire comprend de nombreuses entrées, il peut être utile de les
afficher par ordre alphabétique pour
faciliter la recherche.
2. Saisissez la première lettre de
l'entrée dans le répertoire du téléphone que vous voulez rechercher
à l'aide du pavé numérique, puis
appuyez sur [OK].
3. Appuyez sur l'entrée du répertoire
que vous voulez appeler.
Recherche alphabétique dans le
répertoire
1. Appuyez sur [Rechercher par nom]
dans la fenêtre « Répertoire ».
ou
pour accéder
Appuyez sur
à la page suivante ou précédente
dans la liste.
4. Appuyez sur [Raccrocher] pour
mettre un terme à la conversation.
43
LAN8900EKYN FRE indesign.indd 43
2010-03-25 ¿ÀÈÄ 12:40:17
Technologie sans fil Bluetooth
Utilisation de votre liste d'appels
Vous pouvez utiliser la liste d'appels
mémorisée dans votre téléphone s'il
prend en charge le profil PBAP (Phone
Book Access Profile).
Après avoir connecté votre appareil à
votre téléphone via la technologie sans
fil Bluetooth, les numéros présents dans
les listes [Appels sortants], [Appels en
absence] et [Appels entrants] de votre
téléphone sont transférés automatiquement dans la liste d'appels.
2. Appuyez sur [Sortant], [Absence] ou
[Entrant].
Appels sortants
Mise à jour de la liste d'appels
Vous pouvez mettre à jour la liste
d'appels avec les numéros figurant
dans la liste [Appels sortants], [Appels
en absence] et [Appels entrants] de
votre téléphone.
du
1. Appuyez sur la touche
panneau de commande.
Sélectionnez ensuite [Listes App.].
Appel d'un numéro figurant dans la
liste d'appels
Après avoir trouvé l'entrée que vous
voulez appeler dans la liste [Appels sortants], [Appels en absence] et [Appels
entrants], vous pouvez sélectionner le
numéro et passer un appel.
Appels en absence
2. Appuyez sur [Sortant], [Absence] ou
[Entrant], puis sur [Update].
3. La liste d'appels mise à jour est
téléchargée.
1. Appuyez sur la touche
du
panneau de commande.
Sélectionnez ensuite [Listes App.].
Appels entrants
3. Appuyez sur l'entrée de votre choix.
44
LAN8900EKYN FRE indesign.indd 44
2010-03-25 ¿ÀÈÄ 12:40:17
Technologie sans fil Bluetooth
Appel à partir des numéros
abrégés
Vous pouvez utiliser les entrées de
répertoire mémorisées dans votre téléphone s'il prend en charge le profil
PBAP (Phone Book Access Profile).
Vous pouvez enregistrer jusqu'à
12 numéros de téléphone que vous
pouvez ensuite appeler très facilement via
un simple appui sur un numéro abrégé.
Enregistrement de numéros de
téléphone dans la liste des numéros
abrégés
1. Appuyez sur la touche
du panneau de commande. Sélectionnez
ensuite [Appel Rap.].
2. Appuyez de façon prolongée sur un des
numéros abrégés (1 à 12). (Par exemple : 1)
Appuyez sur ou pour accéder
à la page suivante ou précédente
dans la liste.
3. Choisissez dans quelle catégorie
vous voulez enregistrer le numéro.
(Par exemple:Répertoire)
Le nom (numéro de téléphone)
est mémorisé. La prochaine fois
que vous appuierez sur ce nom,
le numéro de téléphone correspondant sera récupéré dans la
mémoire.
Appel d'un numéro figurant dans la
liste des numéros abrégés
1. Appuyez sur la touche
du
panneau de commande.
Sélectionnez ensuite [Appel rap.].
4. Choisissez le numéro de téléphone
auquel vous voulez attribuer le
numéro abrégé.
2. Appuyez sur un des numéros abrégés (noms) pour passer un appel.
5. Saisissez le nom à l'aide du clavier,
puis appuyez sur [OK].
3. Appuyez sur [Raccrocher] pour
mettre un terme à la conversation.
✽ Remarque
Assurez-vous que la fonction de
numéro abrégé est activée sur le téléphone Bluetooth avant de l'utiliser.
45
LAN8900EKYN FRE indesign.indd 45
2010-03-25 ¿ÀÈÄ 12:40:18
Utilisation des fonctions CD/MP3/WMA/USB/iPod
Lecture d'un CD audio et de
fichiers MP3/WMA/USB/iPod
Disc
Insérez un disque dans la fente ; la
lecture commence automatiquement.
iPod
Vous pouvez écouter la musique d'un
iPod en le raccordant au port USB de
l'appareil à l'aide du câble approprié.
Raccordez un iPod au port USB ; la lecture démarrera automatiquement.
Pour plus de détails sur l'iPod, reportezvous au manuel d'utilisation de ce
dernier.
Accès à la piste ou au fichier suivant Tous
Appuyez sur
pour sélectionner la
piste ou au fichier suivant.
Accès à la piste ou au fichier précédent
Tous
Appuyez sur
dans la première seconde de lecture.
Retour au début de la piste ou du
fichier en cours Tous
CD audio
Appuyez sur
lecture.
CD MP3/WMA
Disc
Vous pouvez lire les fichiers enregistrés sur
un périphérique mémoire USB.
Raccordez un périphérique USB au port
USB ; la lecture démarrera automatiquement.
✽ Remarque
Servez-vous du câble de voiture exclusivement pour raccorder l'iPod au connecteur approprié et lire la musique de
celui-ci.
Recherche
après une seconde de
Tous
Appuyez sur
ou
de manière prolongée pendant la lecture, puis relâchez
à l'endroit souhaité.
46
LAN8900EKYN FRE indesign.indd 46
2010-03-25 ¿ÀÈÄ 12:40:18
Utilisation des fonctions CD/MP3/WMA/USB/iPod
Lecture de l'intro
Disc - Audio CD
Disc - MP3/WMA
USB
Les 10 premières secondes de chaque
piste (fichier) sont lues.
Lecture répétée
Tous
Les pistes (fichiers) sélectionnées sont
lues en boucle.
1. Appuyez sur [Option] pendant la lecture.
1. Appuyez sur [Option] pendant la lecture.
Exemple : CD audio
Exemple : CD audio
2. Appuyez à plusieurs reprises sur
[Répéter].
2. Appuyez sur [Balayage Démarrer].
Disc - MP3/WMA
USB
• [Répéter Off] : lit tous les fichiers
de l'iPod en boucle.
• [Répéter Plage] : lit le fichier sélectionné en boucle.
• [Répéter Dossier] : lit tous les fichiers du dossier
sélectionné en
boucle.
iPod
• [Répéter Off] : lit tous les fichiers
de l'iPod en boucle.
• [Répéter On] : lit le fichier
sélectionné en
boucle.
Disc - Audio CD
3. Appuyez sur [Balayage Arrêter] pour
annuler la lecture de l'intro.
• [Répéter Off] : lit toutes les pistes
du disque en boucle.
• [Répéter Plage] : lit la piste
sélectionnée en
boucle.
47
LAN8900EKYN FRE indesign.indd 47
2010-03-25 ¿ÀÈÄ 12:40:18
Utilisation des fonctions CD/MP3/WMA/USB/iPod
Lecture aléatoire
Tous
Toutes les pistes (fichiers) sont lues de
manière aléatoire.
1. Appuyez sur [Option] pendant la lecture.
2. Appuyez à plusieurs reprises sur
[Aléatoire].
Disc - Audio CD
• [Aléatoire Tout] : lit tous les fichiers du disque de
manière aléatoire.
• [Aléatoire Off] : annule la lecture
aléatoire.
Disc - MP3/WMA
USB
• [Aléatoire Off] : annule la lecture
aléatoire.
• [Aléatoire Dossier] : l'appareil lit
tous les fichiers contenus
dans le dossier
sélectionné de
manière aléatoire.
• [Aléatoire Tout] : l'appareil lit tous
les fichiers du
disque ou du périphérique USB de
manière aléatoire.
iPod
• [Aléatoire Off] : annule la lecture
aléatoire.
• [Aléatoire Tout] : l'appareil lit tous
les fichiers contenus dans l'iPod de
manière aléatoire.
• [Aléatoire Album] : l'appareil lit
tous les fichiers contenus
dans l'album
sélectionné de
manière aléatoire.
Lecture de fichiers par dossier,
album ou artiste USB
Vous pouvez lire des fichiers sur le périphérique USB en les classant par dossier, album ou artiste.
1. Appuyez sur [Option] pendant la lecture.
2. Appuyez sur [Dossier], [Album] ou
[Artiste] pendant la lecture.
• [Dossier] : lit les fichiers par dossier.
• [Album] : lit les fichiers par album.
• [Artiste] : lit les fichiers par artiste.
✽ Remarque
Pour accéder à l’écran de la liste
d’écoute, appuyez sur
.
48
LAN8900EKYN FRE indesign.indd 48
2010-03-25 ¿ÀÈÄ 12:40:19
Utilisation des fonctions CD/MP3/WMA/USB/iPod
Vous pouvez écouter de la musique en
affichant la liste des pistes, dossiers et
fichiers.
✽ Remarques
• Dans le cas de fichiers MP3/WMA,
pour accéder au dosappuyez sur
sier supérieur.
ou . pour sélection• Appuyez sur
ner la liste de votre choix.
• Pour accéder à l'écran de la liste
.
d'écoute, appuyez sur
1. Appuyez sur [Liste] pendant la lecture.
Recherche de musique
Accès à un dossier ou un fichier
à l'aide de la liste
Disc - Audio CD
Disc - MP3/WMA
USB
Exemple : CD audio
2. Dans le cas d'un CD audio, appuyez
sur le fichier de votre choix.
Dans le cas de fichiers MP3/WMA,
appuyez sur le dossier de votre
choix. S'il n'existe pas de dossier,
appuyez sur le fichier de votre choix.
iPod
Vous pouvez rechercher de la musique
dans votre iPod par liste d'écoute,
artiste, album, genre, chanson,
compositeur, livre audio ou podcast.
Pour plus de détails sur l'iPod,
reportez-vous au manuel d'utilisation de
ce dernier.
1. Appuyez sur [Liste] pendant la lecture.
• [Liste de lecture] : lit les chansons par liste
d'écoute.
• [Artistes] : lit les chansons par
artiste.
• [Albums] : lit les chansons par
album.
• [Genres] : lit les chansons par genre.
• [Morceaux] : lit toutes les chansons.
• [Compositeurs] : lit les chansons
par compositeur.
• [Livres audio] : lit les chansons/
chapitres par livre
audio.
• [Podcasts] : lit les chansons/chapitres par podcast.
✽ Remarques
• Pour accéder au dossier supérieur,
.
appuyez sur
• Appuyez sur
ou
pour sélectionner la liste de votre choix.
• Pour accéder à l'écran de la liste
.
d'écoute, appuyez sur
2. Sélectionnez l'option de votre choix.
CD audio
Fichier MP3/WMA
3. La piste ou le fichier sélectionné est lu.
49
LAN8900EKYN FRE indesign.indd 49
2010-03-25 ¿ÀÈÄ 12:40:19
Utilisation des fonctions CD/MP3/WMA/USB/iPod
Réglage de la vitesse de lecture des livres audio iPod
Le réglage de la vitesse de lecture
n'affecte que les livres audio achetés
sur iTunes ou audible.com.
Pour plus de détails sur l'iPod, reportezvous au manuel d'utilisation de ce
dernier.
• [livre audio Rapide] : lit les livres
audio à vitesse
rapide.
• [livre audio Lente] : lit les livres audio
à vitesse lente.
✽ Remarque
Pour accéder à l'écran de la liste
.
d'écoute, appuyez sur
1. Appuyez sur [Option] pendant
l'écoute des chansons/chapitres du
livre audio.
2. Appuyez à plusieurs reprises sur
[livre audio].
Impératifs à respecter pour les périphériques USB
• Cet appareil prend en charge les clés
mémoire Flash USB et les disques durs
externes USB au format FAT16 ou FAT32
uniquement.
• Ne retirez pas le périphérique USB pendant
l'utilisation (lecture, etc.).
• Il est recommandé d’effectuer des sauvegardes régulières pour éviter la perte de données.
• Si vous utilisez un câble d’extension USB ou
un concentrateur USB, il se peut que le périphérique USB ne soit pas reconnu.
• Il est possible que certains périphériques
USB ne fonctionnent pas avec cet appareil.
• Les appareils photo numériques et les téléphones mobiles ne sont pas compatibles.
• Cet appareil ne prend pas en charge un
nombre total de fichiers supérieur à 10 000.
Périphériques USB compatibles
• Les périphériques nécessitant l'installation
d'un programme supplémentaire après la
connexion à un ordinateur ne sont pas pris
en charge.
• Lecteur MP3 : lecteur MP3 à mémoire
Flash.
Les lecteurs MP3 nécessitant l'installation
d'un pilote ne sont pas pris en charge.
• Clé USB à mémoire Flash : clés USB 2.0
ou USB 1.1.
• [livre audio Normale] : lit les livres audio
à la vitesse
d'origine.
50
LAN8900EKYN FRE indesign.indd 50
2010-03-25 ¿ÀÈÄ 12:40:19
Utilisation des fonctions CD/MP3/WMA/USB/iPod
Impératifs à respecter pour les fichiers MP3/
WMA
• Fréquence d'échantillonnage : 16-48
kHz (MP3), 8-44,1 kHz (WMA).
• Débit binaire : 8-320 Kbit/s (MP3),
5-160 Kbit/s (WMA).
• Le format physique des CD-R/CDRW doit être "ISO 9660".
• Si vous enregistrez des fichiers MP3/
WMA avec un logiciel ne pouvant
pas créer de système de fichiers (par
exemple Direct-CD), la lecture des
fichiers MP3/WMA sera impossible.
Nous vous conseillons d'utiliser
"Easy-CD Creator", qui crée un système
de fichiers ISO 9660.
Veuillez noter qu’il est nécessaire d’avoir une autorisation pour
télécharger des fichiers MP3 ou WMA
et de la musique depuis internet.
Notre société n’ayant pas le droit
d’accorder une telle autorisation, cette
dernière doit toujours être recherchée auprès du détenteur des droits
d’auteur.
Impératifs à respecter pour l'iPod
• La compatibilité avec votre iPod dépend
du type de votre iPod.
• Selon la version logicielle de votre iPod,
il se peut que vous ne puissiez pas
commander votre iPod à partir de cet
appareil. Nous vous recommandons
d'installer la toute dernière version logicielle.
• Si vous rencontrez un problème avec
votre iPod, consultez le site www.apple.
com/support/ipod.
• Ce système peut recevoir les signaux
analogiques des modèles iPod suivants :
- iPod touch (1re génération)
- iPod mini (1re et 2e générations)
- iPod nano (1re et 3e générations)
- iPod classic (4e, 5e et 6e générations)
• Si le contenu de votre iPod n'est pas lu
correctement, mettez à jour le logiciel
de votre iPod à la toute dernière version.
Pour plus de détails sur la mise à jour
de l'iPod, consultez le site web d'Apple
(www.apple.com/fr/).
• Apple n’est pas responsable du fonctionnement de cet appareil ni de sa
conformité aux normes réglementaires
et de sécurité.
51
LAN8900EKYN FRE indesign.indd 51
2010-03-25 ¿ÀÈÄ 12:40:19
Utilisation de la radio
Écoute des stations de radio
1. Appuyez sur la touche “RADIO”
pour sélectionner l’option Radio.
2. Appuyez sur la touche “RADIO” à
plusieurs reprises pour sélectionner
une bande de fréquence.
Le mode alterne dans l'ordre suivant :
FM t AM t FM...
✽ Remarque
Pour sélectionner la bande FM/AM via
pour sélecl'écran, appuyez sur
tionner la bande AM, puis sur
.
3. Réglage automatique
/
à l'écran, ou
Appuyez sur
bien sur les touches
/
du
panneau de commande.
- Dès qu'une station est reçue, la
recherche s'interrompt.
Réglage manuel
Tournez la molette du panneau de
commande vers la droite ou vers la
gauche.
- Les fréquences sont passées en
revue successivement.
Enregistrement et rappel des
stations
Vous pouvez mémoriser facilement
jusqu'à 12 stations préréglées pour y
accéder ultérieurement en appuyant
simplement sur une touche.
1. Sélectionnez la bande de fréquences
(FM, AM) dans laquelle vous voulez
mémoriser une station.
2. Sélectionnez la fréquence de votre choix.
3. Appuyez sur [Préréglages] à l'écran.
4. Appuyez de manière prolongée sur
un des réglages prédéfinis.
Les informations sur la station prédéfinie s'afficheront.
La station prédéfinie sélectionnée est
ainsi mémorisée.
Pour accéder à la page précédente/
suivante, appuyez sur / .
5. Répétez les étapes 1 et 4 pour prérégler
d’autres stations. Désormais, si vous
appuyez sur l'un des réglages prédéfinis
(1 à 6), la station mémorisée est
rappelée.
✽ Remarque
Si vous préréglez une nouvelle station
pour une touche de station préréglée, la
station précédemment mémorisée est
automatiquement effacée.
52
LAN8900EKYN FRE indesign.indd 52
2010-03-25 ¿ÀÈÄ 12:40:19
Utilisation de la radio
Mise en mémoire par recherche automatique
Balayage des fréquences
d'émission
TA (bulletin d'informations
routières)
Cette fonction n'est disponible que
pour la bande AM. Elle vous permet
de mémoriser automatiquement les
fréquences dont le signal d'émission est
le plus puissant.
Les 10 premières secondes de chaque
fréquence d'émission sont lues.
Cette fonction permet à l'appareil
d'alterner entre la source en cours (une
autre station FM, un CD ou les autres
composants raccordés) et le bulletin
d'informations routières.
1. Appuyez sur [Option] à l'écran en
mode AM/FM.
1. Sélectionnez la bande AM.
2. Appuyez sur [Option] à l'écran.
1. Appuyez sur [Option] à l'écran en
mode AM/FM.
3. Appuyez sur [Mém. Auto] à l'écran.
2. Appuyez sur [TA Off]/[TA On].
2. Appuyez sur [Balayage Démarrer] à
l'écran.
Les stations locales ayant les
signaux les plus puissants sont
recherchées et mémorisées
automatiquement dans le menu Liste.
Celui-ci apparaît ensuite à l'écran.
3. Appuyez sur [Balayage Arrêter] pour
annuler.
[TA On] : les bulletins d'informations
routières et programmes
diffusant des informations
routières peuvent être
reçus automatiquement à
l'aide des fonctions TP/TA.
[TA Off] : les bulletins d'informations
routières et programmes
diffusant des informations
routières ne peuvent pas
être reçus.
4. Appuyez sur la fréquence
d'émission de votre choix.
53
LAN8900EKYN FRE indesign.indd 53
2010-03-25 ¿ÀÈÄ 12:40:20
Utilisation de la radio
NEWS
RÉGION Auto/Off
Cette fonction permet à l'appareil
d'alterner entre la source en cours (une
autre station FM, un CD ou les autres
composants raccordés) et les informations.
Cette fonction n'est disponible que pour
la bande FM.
1. Sélectionnez la bande FM.
2. Appuyez sur [Option] à l'écran.
1. Appuyez sur [Option] à l'écran en
mode AM/FM.
3. Appuyez sur [Région Auto]/ [Région
Off].
2. Appuyez sur [NEWS Off]/[NEWS On].
[NEWS On] : les informations
peuvent être reçues
automatiquement.
[NEWS Off] : les informations ne
peuvent pas être
reçues.
[Région Auto]:
L'appareil bascule sur une autre station
du même réseau, diffusant le même programme, lorsque les signaux de réception
de la station en cours deviennent faibles.
[Région Off]:
L'appareil bascule sur une autre station
du même réseau lorsque les signaux de
réception de la station en cours deviennent
faibles. (Dans ce mode, le programme
peut être différent de celui actuellement
reçu.)
54
LAN8900EKYN FRE indesign.indd 54
2010-03-25 ¿ÀÈÄ 12:40:20
Utilisation d’un appareil auxiliaire
Utilisation d'une source auxiliaire
Il est possible d'utiliser un périphérique
auxiliaire avec cet appareil.
1. Appuyez sur la touche "MEDIA"
jusqu'à ce que l'écran "AUX" apparaisse.
✽ Remarques
• Certains appareils auxiliaires sont
dépourvus de la fonction vidéo ; aucune
image n'apparaît donc à l'écran.
• Dans le cas de certains iPod, utilisez le
câble dédié pour la lecture vidéo pour
raccorder l'iPod au connecteur AUX.
• La vidéo n'est pas disponible pendant la
conduite. (En fonction des réglementations
sur la circulation, la vidéo auxiliaire n'est
disponible que lorsque le véhicule est à
l'arrêt avec le frein à main enclenché.)
Appareil auxiliaire audio
Appareil auxiliaire vidéo
2. Raccordez un appareil auxiliaire au
connecteur AUX, puis activez la fonction auxiliaire.
55
LAN8900EKYN FRE indesign.indd 55
2010-03-25 ¿ÀÈÄ 12:40:20
Système de reconnaissance vocale
Reconnaissance vocale
Commandes vocales
La reconnaissance vocale permet
d'utiliser le système audiovisuel (RADIO,
CD, USB, iPod), le système de navigation et les autres systèmes de ce véhicule, tels que le téléphone, en mode
mains libres.
1. Appuyez sur la touche
commande au volant.
✽ Remarque
Pour obtenir les meilleures performances
de reconnaissance vocale, respectez les
consignes suivantes :
• Faites en sorte que l'intérieur du véhicule soit le moins bruyant possible.
Fermez les fenêtres pour éliminer les
bruits environnants (bruits de circulation,
vibrations, etc.), susceptibles
d'empêcher le système de reconnaître
les commandes vocales correctement.
• Attendez que le signal sonore retentisse avant d'énoncer une commande.
Sinon, la commande ne sera pas
correctement reconnue.
• Parlez de façon naturelle, sans faire de
pause entre les mots.
Prononciation des chiffres
de la télé-
2. Après le signal sonore, dites "Aide".
Toutes les commandes actives doivent s'afficher.
La reconnaissance vocale nécessite
d'énoncer les chiffres d'une certaine
manière dans les commandes vocales.
Reportez-vous aux exemples suivants.
(En règle générale, vous pouvez dire
soit "zéro" soit "o" pour le chiffre "0".)
Fréquences
✽ Remarques
• Si la commande n'est pas reconnue,
le système annonce d'abord “Pardon?”,
puis “Répétez s'il vous plaît.”.
• Pour annuler la reconnaissance vocale,
appuyez à nouveau sur la touche
ou sur n'importe quelle autre touche,
ou appuyez sur “Annuler” à l'écran.
• Pour régler le volume d’accrochage
acoustique du système, appuyez sur
ou
sur la télécommande au
volant ou utilisez le bouton du volume
( ) de la commande alors que la
reconnaissance vocale est active.
Pour prononcer les numéros de
fréquence, utilisez l'exemple suivant.
"Fréquence quatre-vingt-dix cinq
virgule quatre"/"Quatre-vingt-dix cinq
virgule quatre mégahertz"
Numéros de téléphone
Pour prononcer les numéros de téléphone, utilisez l'exemple suivant.
0-1-0-2-0-0-5-2 (chiffre par chiffre)
56
LAN8900EKYN FRE indesign.indd 56
2010-03-25 ¿ÀÈÄ 12:40:20
Système de reconnaissance vocale
Exemples de commandes
vocales
Pour utiliser la fonction de reconnaissance vocale, la prononciation d'une
seule commande est parfois suffisante,
mais d'autres fois, il est nécessaire
d'utiliser deux commandes ou plus.
Cette partie détaille quelques opérations basiques actionnées au moyen de
commandes vocales.
5. Après le signal sonore, dites
"Fréquence un-cent- deux" ou "uncent- deux mégahertz".
6. Une fois la fréquence reconnue, la
fréquence FM est réglée sur 102
MHz.
5. Une fois la liste d'écoute reconnue,
elle est immédiatement lue.
Exemple 1 : changement de
fréquence et de radio FM
1. Appuyez sur la touche
de la
télécommande au volant.
4. Appuyez sur la touche
Après le
signal sonore, vous pouvez prononcer le nom d'une des listes d'écoute,
comme "micky green oh".
Exemple 2 : changement de liste
d'écoute du périphérique USB (CD)
2. Après le signal sonore, dites "FM".
3. Une fois la commande "FM" reconnue, l'écran FM s'affiche à la place
de l'écran principal.
6. Appuyez sur la touche
télécommande au volant.
1. Appuyez sur la touche
commande au volant.
de la télé-
2. Après le signal sonore, dites "Liste".
de la
4. Appuyez sur la touche
télécommande au volant.
3. Une fois la commande reconnue,
l'écran de la liste USB (CD) s'affiche.
de la
7. Après le signal sonore, dites "Plage
suivante" ou "Plage précédente".
8. Une fois la commande reconnue,
l'appareil passe automatiquement à
la "Plage suivante" ou "Plage précédente" dans la liste.
57
LAN8900EKYN FRE indesign.indd 57
2010-03-25 ¿ÀÈÄ 12:40:21
Système de reconnaissance vocale
Exemple 2 : composition d'un
numéro
Pour utiliser cette fonction, vous avez
besoin d'un téléphone mobile prenant
en charge la technologie Bluetooth.
Connectez d'abord votre téléphone
Bluetooth à l'appareil.
1. Appuyez sur la touche
de la
télécommande au volant.
5. Une fois le numéro reconnu, le
système répète le numéro puis
demande "et puis ? ".
6. Si vous voulez appeler ce numéro,
dites "Appeler". Si le numéro a été
mal reconnu ou si vous voulez le
supprimer, dites "Effacer". Pour terminer l'opération à tout moment,
dites "Annuler".
2. Après le signal sonore, dites
"Composer numéro".
Commande d'aide
3. Une fois la commande reconnue,
l'écran principal Bluetooth s'affiche,
puis le système annonce “Veuillez
dire le numéro de téléphone”.
Si vous contrôlez le système via les
commandes vocales pour la première
fois, ou si vous ne connaissez pas la
commande vocale appropriée, dites la
commande suivante.
3. Le système annoncera "Les commandes possibles sont :".
4. Après le signal sonore, dites "Autres
commandes". Les commandes
d'application sont répertoriées dans
des champs actifs.
5. Le système annoncera “Les
commandes possibles sont :”.
6. Après le signal sonore, dites "Aux".
L'écran AUX apparaît.
de la
1. Appuyez sur la touche
télécommande au volant.
4. Dites le numéro de téléphone, par exemple
"01020052" (chiffre par chiffre).
2. Après le signal sonore, dites "Aide".
Toutes les commandes actives doivent s'afficher.
58
LAN8900EKYN FRE indesign.indd 58
2010-03-25 ¿ÀÈÄ 12:40:21
Système de reconnaissance vocale
Commandes vocales
Catégorie
Commande vocales
Commande AUX
d'application CD
Radio
Commande vocales
News Off
Catégorie
Commande vocales
Téléphone
Composer le numéro
News On
Entrant
iPod
Station suivante
En absence
Carte
Station précédente
Sortant
Radio
TA Off
Répertoire
USB
TA On
Appeler un nom
Téléphone
Préréglage <numéro>
Appel rapide <numéro>
Média
Préréglages
Appeler
AM
Listes d'appels
FM
Appel rapide
Liste
Mobile
Option
Privé
Balayage Démarrer
Bureau
Balayage Arrêter
Effacer
Correction
Autres commandes
Fréquence “x” virgule
“yy”
Annuler
Fréquence “xxxx”
Non
Mémoriser auto
Oui
Région Auto
Catégorie
Fonctions
générales
Catégorie
Commande vocales
Baisser le volume
Augmenter le volume
Page précédente
Page suivante
Aide
Région Off
59
LAN8900EKYN FRE indesign.indd 59
2010-03-25 ¿ÀÈÄ 12:40:21
Système de reconnaissance vocale
Commandes vocales
Catégorie
iPod
Commande vocales
Répéter Off
Répéter On
Catégorie
MP3, CD,
USB
Commande vocales
Répertoire haut
Catégorie
Audio CD
Commande vocales
Liste
Liste
Option
Balayage Démarrer
Option
Répéter Off
Balayage Arrêter
Répéter Dossier
Répéter Plage
Aléatoire Off
Répéter Off
Balayage Démarrer
Aléatoire Tout
Répéter Plage
Balayage Arrêter
Aléatoire Album
Balayage Démarrer
Aléatoire Tout
Livre audio Lente
Balayage Arrêter
Aléatoire Off
Livre audio Normale
Aléatoire Tout
Info plage
Livre audio Rapide
Aléatoire Dossier
Plage suivante
Répertoire haut
Aléatoire Off
Plage précédente
Liste
Info plage
Plage <numéro>
Option
Plage suivante
OK
Plage suivante
Plage précédente
Plage précédente
<Folder>
Info plage
Plage <numéro>
<Folder>
Album
Plage <numéro>
Artiste
OK
Dossier
Catégorie
Navigation
Commande vocales
Navigation
OK
60
LAN8900EKYN FRE indesign.indd 60
2010-03-25 ¿ÀÈÄ 12:40:21
Dépannage
Impossible d'identifier la position actuelle.
(Aucune réception GPS).
Votre système GPS ne peut pas être
utilisé en intérieur et doit être connecté
à une source d'alimentation dans un
véhicule se trouvant dans une zone où
l'accès au ciel est bien dégagé.
Lors de la première connexion du GPS,
l'appareil nécessite une dizaine de
minutes avant de fonctionner normalement. La vitesse de connexion peut
toutefois varier en fonction des conditions météorologiques et d'éventuels
obstacles environnants.
Si la connexion GPS est instable pendant un long moment, essayez les
étapes suivantes.
• Vérifiez que l'appareil est correctement
raccordé à une source d'alimentation.
• Vérifiez que l'arrière du GPS a un
accès dégagé au ciel.
• Si vous êtes à proximité de grands
bâtiments ou sous un arbre, déplacezvous dans une zone dégagée.
Impossible d'entendre le guidage vocal.
Le volume n’est pas correctement défini
ou le son est coupé.
Réglez le volume du guidage vocal.
Il existe une différence entre la route
réelle et la route indiquée sur la carte.
Même si le GPS est généralement très
précis, il existe une marge d'erreur.
Une fois le récepteur GPS installé,
il peut y avoir une marge d'erreur
d'environ 10 mètres.
Pour les routes récentes, le problème
peut venir de la mise à jour de la carte.
Impossible de voir la carte.
Il est possible que vous ne puissiez pas
voir la carte même lorsque vous avez
exécuté le menu de navigation.
Cette situation se produit lorsque les
données dans la mémoire sont endommagées.
Supprimez toutes les données de la
mémoire et installez-les de nouveau.
Si le problème persiste après
l'installation, contactez votre centre de
service après-vente.
L'itinéraire de navigation peut être
différent de l'itinéraire réel. (Erreur
d'itinéraire de navigation)
• Lorsque les routes sont parallèles.
• Lorsque l'angle de séparation des routes
est très petit.
• Lorsqu'une route adjacente se trouve
dans un virage.
• Lorsque vous conduisez sur une route
qui se rétrécit rapidement.
• Lorsque vous conduisez en montagne
ou lorsque la route est trop serpentée.
• Lorsque les points de départ, de passage et d'arrivée sont trop proches sur
un trajet inférieur à 1 km.
• Lorsque vous avez défini le point de
départ, de passage ou d'arrivée à plus de
1 km de la route.
• Lorsque vous traversez un tunnel.
Ajustement de la carte
Comme indiqué précédemment, le GPS
utilisé par ce système de navigation est
sujet à certaines erreurs.
Son calcul de positionnement peut parfois indiquer votre position sur la carte à
un endroit où il n'existe aucune route.
Dans ce cas, le système sachant que
les véhicules ne roulent que sur route,
il parvient à corriger votre position en
vous plaçant sur la route la plus proche.
C'est ce que l'on appelle l'ajustement
de la carte.
Avec ajustement
de la carte.
Sans ajustement de
la carte.
61
LAN8900EKYN FRE indesign.indd 61
2010-03-25 ¿ÀÈÄ 12:40:21
Dépannage
Problème
L'appareil ne s'allume pas.
L'appareil ne fonctionne pas.
La lecture est impossible.
Absence de son.
Cause
Solution
Le contact n’est pas en position ON
(marche).
Placez le contact en position ON
(marche).
Le contact n’est pas en position ACC
(accessoires).
Placez le contact en position ACC
(accessoires).
L’appareil n’est pas allumé.
Allumez l’appareil en appuyant sur
sur le panneau de commande.
Certains facteurs, par exemple le
bruit, peuvent provoquer un dysfonctionnement du microprocesseur intégré.
Éteignez puis rallumez l'appareil.
Le disque est sale.
Nettoyez le disque.
Le type de disque inséré ne peut pas
être lu par cet appareil.
Vérifiez le type de disque.
Le disque est inséré à l’envers.
Insérez le disque étiquette vers le haut.
Les fichiers sur le disque ont un format
incorrect.
Vérifiez le format des fichiers.
Le niveau sonore est trop faible.
Réglez le volume.
La fonction sourdine est activée.
Désactivez la sourdine.
62
LAN8900EKYN FRE indesign.indd 62
2010-03-25 ¿ÀÈÄ 12:40:21
Caractéristiques techniques
RADIO
FM
Plage de fréquence . . . . . . . . . . . . . . . . . . . .87,5 à 108 MHz
Rapport signal-bruit . . . . . . . . . . . . . . . . . . . . . . . . . . .50 dB
Distorsion . . . . . . . . . . . . . . . . . . . . . . . . . . . . . . . . . . . . . 1 %
Sensibilité utilisable . . . . . . . . . . . . . . . . . . . . . . . . . 10 dBμV
GÉNÉRALITÉS
Puissance de sortie . . . . . . . . 50 W x 4 canaux (maximum)
Source d'alimentation . . . . . . . . . . . . . . . . . . . . . . . . CC 12 V
Impédance haut-parleur . . . . . . . . . . . . . . . . . . . . . . . . . .4 Ω
Mise à la terre . . . . . . . . . . . . . . . . . . . . . . . . . . . . . Négative
Dimensions (L x H x P) . . . . . . . . . . 206,4 x 118,4 x 185,4 mm
Poids net . . . . . . . . . . . . . . . . . . . . . . . . . . . . . . . . . . .2,44 kg
AM (MW)
Plage de fréquence . . . . . . . . . . . . . . . . . . .522 à 1 620 kHz
Rapport signal-bruit . . . . . . . . . . . . . . . . . . . . . . . . . . . 45 dB
Distorsion . . . . . . . . . . . . . . . . . . . . . . . . . . . . . . . . . . . . . . 1 %
Sensibilité utilisable . . . . . . . . . . . . . . . . . . . . . . . . . .38 dBμV
ÉCRAN
LCD . . . . . . . . . . . . . . . . . . . . . . . . . . . .LCD TFT de 16,5 cm
Résolution . . . . . . . . . . . . . . . . . . . . . . . . . . . . . .800 x 480
Rétroéclairage . . . . . . . . . . . . . . . . . . . . . . . . . . . . Type CCFL
CD
Réponse en fréquence . . . . . . . . . . . . . . . . 20 Hz à 20 kHz
Rapport signal-bruit . . . . . . . . . . . . . . . . . . . . . . . . . . .60 dB
Distorsion . . . . . . . . . . . . . . . . . . . . . . . . . . . . . . . . . . . . 0,3 %
Séparation des voies (1kHz) . . . . . . . . . . . . . . . . . . . . .50 dB
63
LAN8900EKYN FRE indesign.indd 63
2010-03-25 ¿ÀÈÄ 12:40:21
Index
Carnet D'Adresses. . . . . . . . . . . . . . . . . . . . . . . . . . . . . . . .
Recherche par adresse . . . . . . . . . . . . . . . . . . . . . . . . . . . .
Répondre aux appels . . . . . . . . . . . . . . . . . . . . . . . . . . . . .
Mise en mémoire par recherche automatique . . . . . . . . .
24
23
42
53
Parking . . . . . . . . . . . . . . . . . . . . . . . . . . . . . . . . . . . . . . . . .
Numéro De Téléphone . . . . . . . . . . . . . . . . . . . . . . . . . . . .
Catégorie De POI . . . . . . . . . . . . . . . . . . . . . . . . . . . . . . . .
Points D'Intérêt (POI) . . . . . . . . . . . . . . . . . . . . . . . . . . . . .
28
26
34
24
Technologie sans fil Bluetooth . . . . . . . . . . . . . . . . . . . . . . 39
Lecture aléatoire . . . . . . . . . . . . . . . . . . . . . . . . . . . . . . . . .
RÉGION Auto/Off . . . . . . . . . . . . . . . . . . . . . . . . . . . . . . . .
Lecture répétée . . . . . . . . . . . . . . . . . . . . . . . . . . . . . . . . . .
Retour au début de la piste ou du fichier en cours . . . . . . .
Options Itinéraire . . . . . . . . . . . . . . . . . . . . . . . . . . . . . . . . .
48
54
47
46
36
Modification du code d'accès. . . . . . . . . . . . . . . . . . . . . . . . 41
Déviation . . . . . . . . . . . . . . . . . . . . . . . . . . . . . . . . . . . . . . . .37
Commandes vocales . . . . . . . . . . . . . . . . . . . . . . . . . . . . . . 56
Saisie GPS . . . . . . . . . . . . . . . . . . . . . . . . . . . . . . . . . . . . . . 27
Recherche . . . . . . . . . . . . . . . . . . . . . . . . . . . . . . . . . . . . . . 46
Réglage . . . . . . . . . . . . . . . . . . . . . . . . . . . . . . . . . . . . . . 16-19
Accès à la piste ou au fichier suivant . . . . . . . . . . . . . . . . 46
Accès à la piste ou au fichier précédent . . . . . . . . . . . . . 46
Écran Fractionné/Plein Écran . . . . . . . . . . . . . . . . . . . . . . . 35
Enreg. Destination. . . . . . . . . . . . . . . . . . . . . . . . . . . . . . . . . 31
Enreg. Position . . . . . . . . . . . . . . . . . . . . . . . . . . . . . . . . 31,35
Activation et désactivation du microphone . . . . . . . . . . . . 42
Modification du mode d'écoute du son pendant un appel . 42
Commande d'aide. . . . . . . . . . . . . . . . . . . . . . . . . . . . . . . . 58
Maison 1/Travail 2/3~12 . . . . . . . . . . . . . . . . . . . . . . . . . . . 32
En Ville . . . . . . . . . . . . . . . . . . . . . . . . . . . . . . . . . . . . . . . . .
Info Proximité. . . . . . . . . . . . . . . . . . . . . . . . . . . . . . . . . . . .
Info Itinéraire . . . . . . . . . . . . . . . . . . . . . . . . . . . . . . . . . . . .
Lecture de l'intro . . . . . . . . . . . . . . . . . . . . . . . . . . . . . . . . .
26
38
38
47
TA (bulletin d'informations routières) . . . . . . . . . . . . . . . 53
Planif. Voyage. . . . . . . . . . . . . . . . . . . . . . . . . . . . . . 29-30, 35
2D/3D . . . . . . . . . . . . . . . . . . . . . . . . . . . . . . . . . . . . . . . . . 34
Service Kia . . . . . . . . . . . . . . . . . . . . . . . . . . . . . . . . . . . . . . 26
Dernière Destination . . . . . . . . . . . . . . . . . . . . . . . . . . . . . . 24
Utilisat. Carte . . . . . . . . . . . . . . . . . . . . . . . . . . . . . . . . . . . . 28
Utilisation de votre répertoire . . . . . . . . . . . . . . . . . . . . . . 43
Utilisation de votre liste d'appels . . . . . . . . . . . . . . . . . . . . 44
Passer un appel en saisissant le numéro de téléphone . . 42
Appel à partir des numéros abrégés . . . . . . . . . . . . . . . . . 45
Destination Proche . . . . . . . . . . . . . . . . . . . . . . . . . . . . . . . 26
Position Proche . . . . . . . . . . . . . . . . . . . . . . . . . . . . . . . . . . 25
NEWS. . . . . . . . . . . . . . . . . . . . . . . . . . . . . . . . . . . . . . . . . . 54
Commandes vocales . . . . . . . . . . . . . . . . . . . . . . . . . . . 59-60
Reconnaissance vocale . . . . . . . . . . . . . . . . . . . . . . . . . . . . 56
64
LAN8900EKYN FRE indesign.indd 64
2010-03-25 ¿ÀÈÄ 12:40:21
Symboles pour l’affichage des problèmes de circulation
Si l’itinéraire calculé présente des problèmes de circulation, le symbole correspondant sera allumé.
Symbole
Description
Symbole
Description
Chute de pierres
Circulation à l’arrêt
Accident
Bouchon
Autre danger
Vent violent
Route étroite
Neige, verglas
Gravillons
Route bloquée, fermée
Travaux
Borne d’appel hors
service
Route glissante, pluie
65
LAN8900EKYN FRE indesign.indd 65
2010-03-25 ¿ÀÈÄ 12:40:22
Assistance technique
Site web : http://www.navigation.com/kia
Numéro international gratuit: 00800 18 23 53 22
Numéro de téléphone pour
tous les autres pays
(ou si les numéros gratuits
ne sont pas pris en charge)
66
LAN8900EKYN FRE indesign.indd 66
: +31 555 384 245
P/N: MFL62880528
2010-03-24 ¿ÀÈÄ 10:47:34
ESPAÑOL
MANUAL DEL PROPIETARIO
LAN8900EKYN SPA HMC.indd 1
2010-03-24 ¿ÀÈÄ 10:50:29
Índice
Información general . . . . . . . . . . . . . . . . . . . . . .7-10
Notas de seguridad. . . . . . . . . . . . . . . . . . . . . . . . . . . . . . . . . . . . . . . . . . . . . . . 7-8
Tipos de discos reproducibles . . . . . . . . . . . . . . . . . . . . . . . . . . . . . . . . . . . . . . . . 9
Precauciones al manipular los discos y el reproductor. . . . . . . . . . . . . . . . . . . . . 9
INDICACIONES ACERCA DEL COPYRIGHT. . . . . . . . . . . . . . . . . . . . . . . . . . . . 10
Eliminación de su antiguo equipo . . . . . . . . . . . . . . . . . . . . . . . . . . . . . . . . . . . . 10
Nombre de los componentes. . . . . . . . . . . . . . 11-13
Panel de control . . . . . . . . . . . . . . . . . . . . . . . . . . . . . . . . . . . . . . . . . . . . . . . . 11-12
Mando a distancia del volante . . . . . . . . . . . . . . . . . . . . . . . . . . . . . . . . . . . . . . . 13
Funcionamiento básico . . . . . . . . . . . . . . . . . . .14-15
Pantalla inicial . . . . . . . . . . . . . . . . . . . . . . . . . . . . . . . . . . . . . . . . . . . . . . . . . . . .
Encender la unidad/ Apagar la unidad . . . . . . . . . . . . . . . . . . . . . . . . . . . . . . . .
Introducir un disco/ Extraer un disco . . . . . . . . . . . . . . . . . . . . . . . . . . . . . . . . .
Ajuste de volumen . . . . . . . . . . . . . . . . . . . . . . . . . . . . . . . . . . . . . . . . . . . . . . . .
Selección de fuente en el panel de control. . . . . . . . . . . . . . . . . . . . . . . . . . . . .
Selección de fuente en la pantalla. . . . . . . . . . . . . . . . . . . . . . . . . . . . . . . . . . . .
Cámara de visión posterior (opcional) . . . . . . . . . . . . . . . . . . . . . . . . . . . . . . . .
14
14
14
14
15
15
15
Configuración . . . . . . . . . . . . . . . . . . . . . . . . . .16-19
Funcionamiento general del menú Configuración . . . . . . . . . . . . . . . . . . . . . 16-19
Bluetooth . . . . . . . . . . . . . . . . . . . . . . . . . . . . . . . . . . . . . . . . . . . . . . . . . . . . . . 16
Sistema. . . . . . . . . . . . . . . . . . . . . . . . . . . . . . . . . . . . . . . . . . . . . . . . . . . . . . 16-17
Tráfico/ Navegación . . . . . . . . . . . . . . . . . . . . . . . . . . . . . . . . . . . . . . . . . . . . . . 18
Audio . . . . . . . . . . . . . . . . . . . . . . . . . . . . . . . . . . . . . . . . . . . . . . . . . . . . . . .18-19
Pantalla . . . . . . . . . . . . . . . . . . . . . . . . . . . . . . . . . . . . . . . . . . . . . . . . . . . . . . . . 19
2
LAN8900EKYN SPA HMC.indd 2
2010-03-25 ¿ÀÀü 10:02:56
Índice
Introducción a la navegación . . . . . . . . . . . . . 20-21
¿Qué es el GPS? . . . . . . . . . . . . . . . . . . . . . . . . . . . . . . . . . . . . . . . . . . . . . . . . . . 20
Acerca de las señales de satélite . . . . . . . . . . . . . . . . . . . . . . . . . . . . . . . . . . . . . 20
Obtener señales de satélite . . . . . . . . . . . . . . . . . . . . . . . . . . . . . . . . . . . . . . . . . 20
Pantalla de navegación inicial. . . . . . . . . . . . . . . . . . . . . . . . . . . . . . . . . . . . . . . . 20
Indicadores del mapa de pantalla . . . . . . . . . . . . . . . . . . . . . . . . . . . . . . . . . 20-21
Cómo visualizar la pantalla del mapa. . . . . . . . . . . . . . . . . . . . . . . . . . . . . 20-21
Modificación de la escala del mapa . . . . . . . . . . . . . . . . . . . . . . . . . . . . . . . . . 21
Menú de introducción de destino . . . . . . . . . 22-32
Esquema del menú de navegación/ Ajuste del volumen de navegación . . . . . 22
Funciones generales del menú de destino . . . . . . . . . . . . . . . . . . . . . . . . . . . . . 22
Búsqueda de direcciones . . . . . . . . . . . . . . . . . . . . . . . . . . . . . . . . . . . . . . . . . . . 23
Últimos Destinos . . . . . . . . . . . . . . . . . . . . . . . . . . . . . . . . . . . . . . . . . . . . . . . . . . 24
Agenda De Direcciones . . . . . . . . . . . . . . . . . . . . . . . . . . . . . . . . . . . . . . . . . . . . 24
POI (Punto de interés) . . . . . . . . . . . . . . . . . . . . . . . . . . . . . . . . . . . . . . . . . . . . . 24
Posición Cercana . . . . . . . . . . . . . . . . . . . . . . . . . . . . . . . . . . . . . . . . . . . . . . . . 25
Destino Cercano . . . . . . . . . . . . . . . . . . . . . . . . . . . . . . . . . . . . . . . . . . . . . . . . 26
En Ciudad/ Nombre . . . . . . . . . . . . . . . . . . . . . . . . . . . . . . . . . . . . . . . . . . . . . 26
Servicio Kia. . . . . . . . . . . . . . . . . . . . . . . . . . . . . . . . . . . . . . . . . . . . . . . . . . . . . 26
Número De Teléfono . . . . . . . . . . . . . . . . . . . . . . . . . . . . . . . . . . . . . . . . . . . . . 26
Entrada De GPS . . . . . . . . . . . . . . . . . . . . . . . . . . . . . . . . . . . . . . . . . . . . . . . . . . 27
Parquin . . . . . . . . . . . . . . . . . . . . . . . . . . . . . . . . . . . . . . . . . . . . . . . . . . . . . . . . . . 28
Continuar Orient./ Detener Orient.. . . . . . . . . . . . . . . . . . . . . . . . . . . . . . . . . . . . 28
Utilizar Mapa . . . . . . . . . . . . . . . . . . . . . . . . . . . . . . . . . . . . . . . . . . . . . . . . . . . . . 28
Planif. Ruta. . . . . . . . . . . . . . . . . . . . . . . . . . . . . . . . . . . . . . . . . . . . . . . . . . . .29-30
Almacenar Destino . . . . . . . . . . . . . . . . . . . . . . . . . . . . . . . . . . . . . . . . . . . . . . . . 31
Almacenar Posición. . . . . . . . . . . . . . . . . . . . . . . . . . . . . . . . . . . . . . . . . . . . . . . . 31
Casa 1/ Oficina 2/ 3~12 . . . . . . . . . . . . . . . . . . . . . . . . . . . . . . . . . . . . . . . . . . . 32
3
LAN8900EKYN SPA HMC.indd 3
2010-03-25 ¿ÀÀü 10:02:56
Índice
Cómo usar el menú del mapa . . . . . . . . . . . .33-38
Esquema del menú del mapa . . . . . . . . . . . . . . . . . . . . . . . . . . . . . . . . . . . . . . . 33
Funciones generales del menú del mapa . . . . . . . . . . . . . . . . . . . . . . . . . . . . . . 33
Categoría de puntos de interés . . . . . . . . . . . . . . . . . . . . . . . . . . . . . . . . . . . . . . 34
2D/ 3D . . . . . . . . . . . . . . . . . . . . . . . . . . . . . . . . . . . . . . . . . . . . . . . . . . . . . . . . . . 34
Dividir Pantalla/Pantalla Completa. . . . . . . . . . . . . . . . . . . . . . . . . . . . . . . . . . . . 35
Almacenar Posición. . . . . . . . . . . . . . . . . . . . . . . . . . . . . . . . . . . . . . . . . . . . . . . . 35
Planif. Ruta. . . . . . . . . . . . . . . . . . . . . . . . . . . . . . . . . . . . . . . . . . . . . . . . . . . . . . . 35
Opciones De Ruta . . . . . . . . . . . . . . . . . . . . . . . . . . . . . . . . . . . . . . . . . . . . . . . . . 36
Buscador . . . . . . . . . . . . . . . . . . . . . . . . . . . . . . . . . . . . . . . . . . . . . . . . . . . . . . . . 37
Desvío. . . . . . . . . . . . . . . . . . . . . . . . . . . . . . . . . . . . . . . . . . . . . . . . . . . . . . . . . . . 37
Información De Proximidades . . . . . . . . . . . . . . . . . . . . . . . . . . . . . . . . . . . . . . . 38
Información En Ruta . . . . . . . . . . . . . . . . . . . . . . . . . . . . . . . . . . . . . . . . . . . . . . . 38
Tecnología inalámbrica Bluetooth . . . . . . . . .39-45
Comprender la tecnología inalámbrica Bluetooth. . . . . . . . . . . . . . . . . . . . . . . . 39
Conexión de su unidad y del teléfono Bluetooth . . . . . . . . . . . . . . . . . . . . .39-40
Desconexión/Conexión de nuevo del teléfono Bluetooth . . . . . . . . . . . . . . . . . 41
Eliminar un teléfono conectado . . . . . . . . . . . . . . . . . . . . . . . . . . . . . . . . . . . . . . 41
Modificar la clave de acceso. . . . . . . . . . . . . . . . . . . . . . . . . . . . . . . . . . . . . . . . . 41
Realizar una llamada introduciendo un número de teléfono . . . . . . . . . . . . . . . 42
Modificar la ruta de sonido durante una llamada . . . . . . . . . . . . . . . . . . . . . . . . 42
Activar o desactivar el micrófono . . . . . . . . . . . . . . . . . . . . . . . . . . . . . . . . . . . . . 42
Responder llamadas . . . . . . . . . . . . . . . . . . . . . . . . . . . . . . . . . . . . . . . . . . . . . . . 42
Uso de la agenda telefónica. . . . . . . . . . . . . . . . . . . . . . . . . . . . . . . . . . . . . . . . . 43
Cómo usar la lista de llamadas . . . . . . . . . . . . . . . . . . . . . . . . . . . . . . . . . . . . . . 44
Realizar una llamada con un número de marcación rápida. . . . . . . . . . . . . . . . 45
4
LAN8900EKYN SPA HMC.indd 4
2010-03-25 ¿ÀÀü 10:02:57
Índice
Funcionamiento de CD/MP3/WMA/USB/iPod .46-51
Reproducir un CD de audio y archivos MP3/WMA/USB/iPod . . . . . . . . . .46-48
Pasar al siguiente capítulo/pista . . . . . . . . . . . . . . . . . . . . . . . . . . . . . . . . . . . 46
Pasar al capítulo/pista anterior . . . . . . . . . . . . . . . . . . . . . . . . . . . . . . . . . . . . 46
Volver al inicio de la pista/capítulo actual . . . . . . . . . . . . . . . . . . . . . . . . . . . . 46
Búsqueda . . . . . . . . . . . . . . . . . . . . . . . . . . . . . . . . . . . . . . . . . . . . . . . . . . . . . . 46
Reproducir introducción . . . . . . . . . . . . . . . . . . . . . . . . . . . . . . . . . . . . . . . . . . 47
Repetir . . . . . . . . . . . . . . . . . . . . . . . . . . . . . . . . . . . . . . . . . . . . . . . . . . . . . . . . 47
Aleatorio . . . . . . . . . . . . . . . . . . . . . . . . . . . . . . . . . . . . . . . . . . . . . . . . . . . . . . 48
Reproducción de archivos clasificándolos por Carpeta / Álbum / Artista . . 48
Encontrar una carpeta/archivo utilizando la lista. . . . . . . . . . . . . . . . . . . . . . . . . 49
Buscar música . . . . . . . . . . . . . . . . . . . . . . . . . . . . . . . . . . . . . . . . . . . . . . . . . . . 49
Configurar la velocidad de reproducción del audiolibro . . . . . . . . . . . . . . . . . . 50
Requisitos del dispositivo USB/ Dispositivos USB compatibles . . . . . . . . . . . . 50
Requisitos de archivos MP3/WMA . . . . . . . . . . . . . . . . . . . . . . . . . . . . . . . . . . . 51
Requisitos de dispositivo iPod . . . . . . . . . . . . . . . . . . . . . . . . . . . . . . . . . . . . . . . 51
Funcionamiento de la radio . . . . . . . . . . . . . .52-54
Escuchar emisoras de radio . . . . . . . . . . . . . . . . . . . . . . . . . . . . . . . . . . . . . . . . . 52
Guardar y recordar emisoras . . . . . . . . . . . . . . . . . . . . . . . . . . . . . . . . . . . . . . . . 52
AS (memoria de búsqueda automática) . . . . . . . . . . . . . . . . . . . . . . . . . . . . . . . 53
Para reproducir brevemente frecuencias de emisoras . . . . . . . . . . . . . . . . . . . . 53
TA (Aviso de tráfico) . . . . . . . . . . . . . . . . . . . . . . . . . . . . . . . . . . . . . . . . . . . . . . . 53
NOTICIAS . . . . . . . . . . . . . . . . . . . . . . . . . . . . . . . . . . . . . . . . . . . . . . . . . . . . . . . 54
Región Auto/Apagada . . . . . . . . . . . . . . . . . . . . . . . . . . . . . . . . . . . . . . . . . . . . . 54
Funcionamiento del dispositivo auxiliar . . . . . . . . 55
Cómo usar una fuente AUX . . . . . . . . . . . . . . . . . . . . . . . . . . . . . . . . . . . . . . . . . 55
5
LAN8900EKYN SPA HMC.indd 5
2010-03-25 ¿ÀÀü 10:02:57
Índice
Sistema de reconocimiento de voz . . . . . . . 56-60
Reconocimiento de voz. . . . . . . . . . . . . . . . . . . . . . . . . . . . . . . . . . . . . . . . . . . . . 56
Administrar comandos de voz . . . . . . . . . . . . . . . . . . . . . . . . . . . . . . . . . . . . . . . 56
Indicar números mediante la voz . . . . . . . . . . . . . . . . . . . . . . . . . . . . . . . . . . . . . 56
Ejemplos de comandos de voz . . . . . . . . . . . . . . . . . . . . . . . . . . . . . . . . . . . 57-58
Comando de ayuda. . . . . . . . . . . . . . . . . . . . . . . . . . . . . . . . . . . . . . . . . . . . . . . . 58
Comandos de voz . . . . . . . . . . . . . . . . . . . . . . . . . . . . . . . . . . . . . . . . . . . . . .59-60
Solución de problemas . . . . . . . . . . . . . . . . . . 61-62
Especificaciones técnicas . . . . . . . . . . . . . . . . . . . 63
Índice . . . . . . . . . . . . . . . . . . . . . . . . . . . . . . . . . . . 64
Símbolos para mostrar problemas de tráfico . . . . . . . . . . 65
6
LAN8900EKYN SPA HMC.indd 6
2010-03-25 ¿ÀÀü 10:02:57
Información general
Notas de seguridad
PRECAUCIÓN
RIESGO DE DESCARGA
ELÉCTRICA NO ABRIR
PRECAUCIÓN : NO RETIRE LA CARCASA
(O CUBIERTA POSTERIOR) A FIN DE
REDUCIR EL RIESGO DE DESCARGAS
ELÉCTRICAS.
NO INTENTE REPARAR LAS PIEZAS
INTERNAS. DELEGUE TODAS LAS
LABORES DE REPARACIÓN A PERSONAL
DE MANTENIMIENTO CUALIFICADO.
El símbolo del relámpago con punta de
flecha dentro de un triángulo equilátero
está pensado para alertar al usuario de
la presencia de voltajes peligrosos no
aislados en el interior del producto, que
podrían tener la suficiente magnitud
como para constituir un riesgo de descarga eléctrica.
El signo de exclamación dentro de un
triángulo equilátero está diseñado para
alertar al usuario de la presencia de
instrucciones importantes de operación
y mantenimiento (reparación) en la documentación incluida con el aparato.
Conduzca siempre de forma segura.
Evite distraerse con el sistema de navegación mientras conduce y esté siempre
atento a todas las condiciones de todas
las condiciones de conducción.
No modifique las configuraciones o
ninguna función. Apártese de la calzada
de forma segura y legal antes de iniciar
tales acciones. Por razones de la seguridad, ciertas funciones estarán deshabilitadas excepto cuando el freno de mano
esté activado.
No utilice el equipo durante muchas
horas seguidas o a temperaturas
extremadamente bajas o altas.
(-10 °C a 60 °C).
No desmonte la cubierta ni el panel
posterior de este producto a fin de
reducir el riesgo de descargas
eléctricas. No existen piezas
reparables por el usuario en el
interior de esta unidad.
Delegue todas las labores de reparación
a personal de mantenimiento cualificado.
A fin de reducir el riesgo de incendio o
descarga eléctrica, no exponga el
producto a salpicaduras de agua,
lluvia o humedad.
La temperatura en el exterior de la unidad puede ser extremadamente alta,
utilice la unidad después de realizar una
correcta instalación en su vehículo.
Mientras conduce, mantenga el
volumen del sonido a un nivel
adecuado.
No lo deje caer, y evite siempre los golpes fuertes.
7
LAN8900EKYN SPA HMC.indd 7
2010-03-25 ¿ÀÀü 10:02:57
Información general
PRECAUCIÓN:
El conductor no debe mirar el
monitor mientras conduce.
Si lo hiciera podría descuidar la
conducción y provocar un accidente.
Esta unidad es apta para vehículos con
una batería de 12 voltios y una puesta a
tierra negativa.
Antes de instalar la unidad en un vehículo recreativo, en un camión o
autobús, compruebe el voltaje de la
batería a fin de evitar posibles
cortocircuitos en el sistema eléctrico;
asegúrese de desconectar el cable
de la batería E antes de comenzar la
instalación.
Este producto utiliza un sistema láser.
Para garantizar un uso correcto de este
producto, por favor, lea detenidamente
el manual del propietario y guárdelo
para futuras referencias. Si la unidad
precisa mantenimiento, póngase en
contacto con un centro de servicio
autorizado.
La realización de controles, ajustes o
llevar a cabo procedimientos distintos
a los aquí especificados podría resultar
en una exposición peligrosa a la radiación. Para evitar la exposición directa
al rayo láser, no intente abrir la carcasa.
Radiación del láser visible al abrirla. NO
MIRE DIRECTAMENTE AL LÁSER.
PRECAUCIÓN :
RADIACIÓN LÁSER VISIBLE E
INVISIBLE DE CLASE 1M AL ABRIRLO,
NO MIRAR DIRECTAMENTE CON
INSTRUMENTOS ÓPTICOS.
PRECAUCIÓN :
• No deje el sistema de navegación en
funcionamiento con el motor parado.
Si lo hace, podrá descargarse la
batería del coche. Cuando utilice el
sistema de navegación, mantenga
siempre el motor en marcha.
• Si el conductor desea manipular el
sistema de navegación, deberá aparcar el coche en un lugar seguro y
echar el freno de mano.
La manipulación del sistema por
parte del conductor mientras se
conduce puede distraer la atención y
provocar un accidente.
• No desmonte ni modifique este
sistema. Si lo hace, podrá producirse
un accidente, un incendio o una descarga.
• Es posible que algunos países dispongan de leyes que limiten el uso
de aparatos con pantalla de vídeo
mientras se conduce. Utilice el sistema sólo en aquellos lugares donde es
legal su uso.
• No utilice el teléfono mientras conduce. Para usar el teléfono, deberá
detenerse en un lugar seguro.
• Cuando conduzca su vehículo,
asegúrese de mantener el volumen
de la unidad lo suficientemente bajo
como para poder escuchar los sonidos que llegan del exterior.
8
LAN8900EKYN SPA HMC.indd 8
2010-03-25 ¿ÀÀü 10:02:57
Información general
Tipos de discos reproducibles
Precauciones al manipular los discos y el reproductor
• Un disco sucio o defectuoso
introducido en la unidad
puede ser la causa de la
interrupción del sonido
durante la reproducción.
• Sujete el disco por los
bordes internos y externos.
• Esta unidad no reproduce
discos de 8 cm (utilice únicamente discos de 12 cm).
Esta unidad reproduce CD-R o CD-RW
que contengan archivos de audio, MP3 o
WMA.
• Es posible que la unidad no pueda
reproducir algunos discos de CD-R/
RW, según la calidad de estos discos
o del propio equipo de grabación.
• No pegue ningún sello ni etiqueta
en las caras del disco (ni en la cara
grabada ni en la rotulada).
• No utilice CDs de forma irregular
(por ejemplo con forma de corazón u
octogonales). Podría ser causa directa
de averías.
• Limpie el disco
antes de la reproducción. Limpie el
disco desde el centro hacia el exterior
con la ayuda de un
paño limpio.
• No utilice nunca
disolventes, como
benceno o alcohol,
para limpiar el disco.
No peque etiquetas de papel,
cinta, etc. sobre la superficie
del disco.
No exponga el disco a la luz
directa del sol ni a altas temperaturas.
8 cm
Esta unidad no reproduce
discos de 8 cm (utilice únicamente discos de 12 cm).
9
LAN8900EKYN SPA HMC.indd 9
2010-03-25 ¿ÀÀü 10:02:57
Información general
INDICACIONES ACERCA DEL
COPYRIGHT
La ley prohíbe copiar, difundir, mostrar,
emitir por cable, reproducir en público
o alquilar material bajo copyright sin
permiso expreso.
Este producto dispone de la función de
protección contra copia desarrollada
por Macrovision. Las señales de protección contra copia están grabadas en
algunos discos. Al reproducir las imágenes de estos discos en una unidad,
se generará cierto ruido. Este producto
incorpora tecnología de protección del
copyright amparada por demandas de
patentes de EE.UU. y otros derechos de
propiedad intelectual de Macrovision
Corporation y otros propietarios. El
empleo de dicha tecnología debe contar con la autorización de Macrovision
Corporation y es únicamente para uso
doméstico y otros usos de visualización
limitados, a menos que Macrovision
Corporation especifique lo contrario.
Está prohibida la ingeniería inversa o
desmontar la unidad.
Eliminación de su antiguo
equipo
1. Cuando este símbolo de un contenedor con ruedas cruzado por una X
esté grabado en un producto, significará que está cubierto por la Directiva
europea 2002/96/CE.
2. Debe deshacerse de todo producto
electrónico separándolo de la basura
municipal, llevándolo a las instalaciones designadas a tal efecto bien
por el gobierno o bien por las autoridades locales.
3. La eliminación correcta de su antiguo equipo ayudará a evitar las
potenciales consecuencias negativas
para el medio ambiente y la salud
pública.
4. Para obtener más información detallada acerca de la eliminación de su
antiguo equipo, por favor contacte
con su ayuntamiento, servicio de
recogida de basura o la tienda donde
adquirió el producto.
iPod es una marca comercial de Apple Inc,
registrada en los EE.UU. y en otros países.
iPhone es una marca registrada de Apple Inc.
YouTube es una marca registrada de Google Inc.
“Made for iPod” significa que el accesorio
electrónico ha sido diseñado para conectarlo
específicamente a un dispositivo iPod y que está
certificado por el fabricante para cumplir los
estándares de rendimiento de Apple.
“La palabra Bluetooth, su marca y logotipo son propiedad de Bluetooth SIG,
Inc., y cualquier uso de estas marcas
por parte de LG Electronics se realiza
siempre bajo licencia. Otras marcas
registradas y nombres comerciales
pertenecen a sus respectivos propietarios.”
10
LAN8900EKYN SPA HMC.indd 10
2010-03-25 ¿ÀÀü 10:02:57
Nombre de los componentes
Panel de control
1 2
7
8 9
3
10
4
RADIO
MAP
11
5
MEDIA
NAV
12
13
6
14
1. Activar/desactivar pantalla (
)
Pulse para alternar entre activar o
desactivar la pantalla.
2. Expulsar (Z)
Pulse para expulsar el disco de la
unidad.
4. RADIO
Selecciona la banda de FM/AM.
5. MEDIA
Selecciona una fuente: CD, USB,
iPod, AUX.
6.
/
• Pulse este botón.
- Sintonización automática: RADIO
- Pista arriba/abajo: USB CD iPod
• Pulse y mantenga pulsado este
botón.
- Buscar (FF/REW):
USB
3. Dial izquierdo ( / )
- Pulsar: Encender/apagar
- Girar: Control del volumen
CD
iPod
7. Ranura de disco
11
LAN8900EKYN SPA HMC.indd 11
2010-03-25 ¿ÀÀü 10:02:57
Nombre de los componentes
8. TELÉFONO ( )
Utilícelo para activar el sistema
de manos libres del teléfono con
Bluetooth.
13.Configuración ( )
• Pulse para acceder a la
configuración del sistema. (Página 16)
9. Repetir indicación de voz ( )
Pulse para que la voz repita la dirección.
10. Dial derecho (
)
Girarlo hacia la derecha/izquierda.
• Busca la siguiente o la anterior frecuencia de radio.
- Sintonización manual
• Omite una pista/archivo arriba/
abajo en toda la lista de la pantalla.
• ACERCAR/ ALEJAR
- Gire el botón para modificar la
escala del mapa en la pantalla.
• Mantenga presionado para comprobar el identificador del dispositivo,
la versión del software, la versión
de la navegación y la versión del
mapa.
11. MAP
Pulse para que se muestre la pantalla
del mapa con la ubicación actual.
14. Info ( )
Púlselo para visualizar información del
destino, de la ruta y del tráfico cuando
la guía de ruta se encuentre activa.
• Destino: Muestra información del
destino y de la posición
actual del vehículo.
• Ruta: Muestra información de la
ruta desde la posición
actual del vehículo al destino.
• Tráfico: Muestra información sobre
el tráfico.
- Información De Tráfico En Ruta:
Se muestra una lista con la
información del tráfico en la ruta
recomendada desde la posición
actual del vehículo al destino.
- Información De Tráfico Proximidades:
Aparece una lista con la información del tráfico en un radio
cercano a la posición actual del
vehículo.
12. NAV
Pulse para acceder al menú de
destino. Existen varios métodos para
especificar un destino.
12
LAN8900EKYN SPA HMC.indd 12
2010-03-25 ¿ÀÀü 10:02:58
Nombre de los componentes
Mando a distancia del volante
7
1
6
2
3
5
4
4.
1.
Pulse este botón brevemente para
rechazar una llamada en el transcurso
de otra llamada.
Silencia el volumen.
2. Volumen (
/ )
Aumenta o disminuye el volumen.
5.
3.
Activa el sistema de manos libres del
teléfono con Bluetooth.
• Pulse este botón brevemente para
aceptar una llamada entrante.
• Pulse este botón brevemente para
realizar una de las últimas llamadas.
• Pulse este botón de manera más
prolongada para cambiar la vía del
sonido durante una llamada.
(Manos libres y teléfono)
• Pulse este botón para iniciar el
modo de reconocimiento de voz.
• Pulse este botón de nuevo para
cancelar los comandos de voz
mientras se encuentra activo el
reconocimiento de voz.
6. U / u
• Pulse este botón.
- Sintonización automática: RADIO
- Pista arriba/abajo: USB CD iPod
• Pulse y mantenga pulsado este
botón.
- Sintonización manual: RADIO
- Buscar (FF/REW): USB CD iPod
7.
Selecciona una fuente de sonido.
FM t AM t CD t USB t iPod
t AUX t FM...
13
LAN8900EKYN SPA HMC.indd 13
2010-03-25 ¿ÀÀü 10:02:58
Funcionamiento básico
Pantalla inicial
Encender la unidad
La unidad se activa cuando el interruptor de encendido se coloca en la
posición ON o ACC.
Extraer un disco
Pulse
en el panel de control cuando
la unidad esté apagada.
Pulse Z en el panel de control.
El disco se expulsará automáticamente
de la ranura de carga.
✽ Nota
Al introducir el disco en la ranura, la
unidad se enciende automáticamente.
Apagar la unidad
- A continuación, aparece el modo
de radio en la pantalla.
✽ Nota
• La unidad memoriza el último modo
reproducido. El último modo se
guarda en la memoria aunque se
coloque el interruptor de encendido
en la posición OFF. Cuando el interruptor de encendido se coloca en
la posición ON o ACC, el modo se
recupera automáticamente.
• Es posible que el reinicio de la unidad
tarde un poco (unos 20 segundos
aproximadamente).
Pulse
en el panel de control cuando
la unidad esté encendida.
Introducir un disco
Introduzca un disco en la ranura y la
reproducción comenzará automáticamente.
✽ Nota
Si no retira el disco expulsado en un
plazo de 10 segundos, el disco volverá
a introducirse automáticamente en la
ranura de carga.
Ajuste de volumen
Gire el control de volumen (
panel de control.
) del
✽ Nota
Al apagar la unidad, ésta memorizará
automáticamente el nivel actual del
volumen. Cuando vuelva a encender la
unidad, ésta funcionará según el nivel
de volumen memorizado.
Si enciende/apaga la unidad por debajo
del nivel de volumen 5, dicho nivel de
volumen cambiará a 5.
Si enciende/apaga la unidad por encima del nivel de volumen 25, dicho nivel
de volumen cambiará a 25.
14
LAN8900EKYN SPA HMC.indd 14
2010-03-25 ¿ÀÀü 10:02:58
Funcionamiento básico
Selección de fuente en el
panel de control
Selección de fuente en la pantalla
Presione varias veces en MEDIA para
seleccionar una fuente. El modo
cambiará como sigue:
CD t USB t iPod t AUX t CD...
Puede seleccionar el recurso en pantalla para adaptarla a sus necesidades.
✽ Nota
Si no se ha conectado una fuente a la
unidad, dicha fuente no se reconocerá.
1. Presione el icono de la fuente que
aparece en la parte superior izquierda
cuando reproduzca una fuente.
Cámara de visión posterior
(opcional)
Cuando cuente con una cámara
de visión posterior, es posible cambiar automáticamente al vídeo de una
cámara de visión posterior cuando la
palanca de cambios se coloca en la
posición REVERSE (R).
El modo de vista posterior también le
permite comprobar lo que se encuentra
detrás mientras conduce.
2. Presione en la fuente deseada.
Cuando la unidad se reinicie completamente, la línea de guía se muestra en
la pantalla.
✽ Nota
Si no se ha conectado una fuente a
la unidad, dicha fuente no podrá ser
reconocida.
✽ Nota
• La función cámara retrovisora permite
utilizar este producto como ayuda
para vigilar remolques o para dar
marcha atrás al aparcar en una plaza
estrecha. No use esta función con
propósitos de entretenimiento.
• Los objetos en la vista posterior pueden
aparecer más cercanos o más distantes
de lo que lo están en la realidad.
• Recuerde que los bordes de las
imágenes de la cámara de visión
posterior pueden variar ligeramente
si se muestran imágenes a pantalla
completa al ir marcha atrás.
15
LAN8900EKYN SPA HMC.indd 15
2010-03-25 ¿ÀÀü 10:02:58
Configuración
Funcionamiento general del
menú Configuración
Bluetooth
Sistema
Existen cuatro tipos de pantallas de menú.
Existen cinco tipos de pantallas de menú.
Ver la lista de dispositivos de Bluetooth
En esta pantalla podrá visualizar una lista
con los dispositivos Bluetooth enlazados.
Idioma (Language)
Aquí podrá modificar el idioma
utilizado en el sistema.
El sistema de navegación puede personalizarlo a su gusto para que le resulte
más sencillo su uso:
Bluetooth (Bluetooth), System (Sistema),
Traffic (Tráfico), Navigation (Navegación),
Audio (Audio), Display (Pantalla)
1. Encienda la unidad.
2. Pulse
en el panel de control.
Buscar dispositivos de Bluetooth
En esta pantalla podrá buscar dispositivos
Bluetooth. (Página 39)
3. Presione la opción deseada.
4. Presione la configuración que desee
y, a continuación, presione [Acep]
para confirmar la selección.
✽ Nota
Presione
para volver a la pantalla
anterior. Pulse MAP para volver a la pantalla del mapa con la ubicación actual.
Autorización de dispositivos externos
En esta pantalla podrá configurar su conexión cuando conecte la unidad al teléfono
Bluetooth. (Página 40)
Toque el botón del idioma deseado.
Use o para desplazarse hacia
arriba o hacia abajo, si es necesario.
Cambiar clave
Aquí puede modificar la clave de
acceso. (Página 41)
16
LAN8900EKYN SPA HMC.indd 16
2010-03-25 ¿ÀÀü 10:02:58
Configuración
Reloj
En esta pantalla podrá definir el horario de
verano y el formato de hora.
Unidades
En esta pantalla podrá definir la unidad de
distancia que se mostrará en el sistema de
navegación.
Configuración predeterminada
Esta función le permite definir diversos
parámetros con la configuración inicial
predeterminada.
• Formato de hora: Elija el formato de
hora entre “12h” y
“24h”.
• Horario verano: Defina el horario de
verano como “Enc. u
“Apag.”
La unidad ajusta el
reloj automáticamente
al horario de verano o
de invierno. Aunque
el horario de verano
esté configurado
como “Enc.”, la unidad
configurará el reloj al
horario normal (no 1
hora más) cuando se
encuentre en horario
de invierno.
Elija una opción entre “km” y “mls”.
- Todos: Define todos los parámetros
en la configuración predeterminada.
- Teléfono: Inicializa todos los parámetros relacionados con el
teléfono.
- Navegación: Inicializa todos los parámetros relacionados con
la navegación.
- Audio/Media/Radio : Inicializa todos los
parámetros relacionados con el
audio, los medios
y la radio.
Demo de navegación
Esta función es una demostración.
Cuando haya definido una ruta, se
muestra automáticamente una guía de
ruta al destino especificado.
• Demo De navegación
- Apag.: El modo demostración se
- 1x: Define la demostración de la guía
de ruta para visualizarla sólo una
vez.
- Curva: Repite la demostración
• Velocidad: Define la velocidad de la
demostración.
17
LAN8900EKYN SPA HMC.indd 17
2010-03-25 ¿ÀÀü 10:02:59
Configuración
Tráfico
Navegación
Audio
Existen tres tipos de pantallas de menú.
Existen cuatro tipos de pantallas de menú.
Existen cinco tipos de pantallas de menú.
TMC
Defina el TMC (Canal de mensajes de
tráfico) como “Apag., “Auto” o “Enc.”.
- Auto: Cuando se detecta un evento
de TMC en la ruta actual, el
sistema de navegación busca
una ruta alternativa automáticamente sin previo aviso.
- Apag.: Cancela la función TMC.
- Enc: Cuando se detecta un evento de
TMC en la ruta actual, el sistema de
navegación muestra una pantalla
emergente con la información del
suceso.
Emisora TMC Automática
Cuando se detecta un evento de TMC en
la ruta actual, se recibe automáticamente
la emisora TMC de mayor intensidad.
Vista De Cruce De Autopistas
Muestra la intersección con la autovía
en la pantalla del mapa.
Guía De Carriles
Muestra la ruta mejorada en la pantalla
del mapa.
Planear Diferentes Rutas
Muestra las diferentes rutas posibles en
la pantalla del mapa.
Alerta De Velocidad
Muestra la alerta de velocidad en la
pantalla del mapa.
Emisora TMC Favorita
Esta unidad recibe la emisora TMC
almacenada por el usuario. Esta función se activa al cancelar [Emisora TMC
Automática].
SDVC (Control de volumen en
función de la velocidad)
Cuando la velocidad del vehículo es
superior a 40 km/h, el nivel de volumen
es superior al nivel original.
Puede definir el SDVC como Apag., Bajo,
Medio o Alto.
- Apag.: Se mantiene el nivel de volumen original independientemente de la velocidad del
vehículo.
- Bajo, Medio, Alto: El nivel de volumen se ajusta a la velocidad del
vehículo.
Volumen de navegación
Puede definir o cancelar los anuncios de voz de la navegación. Incluso
aunque la configuración sea “Off” (desactivado), al iniciar un nuevo recorrido,
se configurará como “On” (activado)
automáticamente.
Clic de pantalla táctil
Puede activar o desactivar el sonido de
la pantalla táctil.
18
LAN8900EKYN SPA HMC.indd 18
2010-03-25 ¿ÀÀü 10:02:59
Configuración
Sonido (Predeterminado: Centro)
Balance/
Atenuador
Graves/Medios/
Agudos
- Balance: Presione b o B para ajustar
el sonido de los altavoces de la izquierda o de la derecha.
- Atenuador: Presione v o V para ajustar el sonido de los altavoces frontales y traseros.
- Graves, Medios, Agudos: Presione b o
B para ajustar los graves, los medios
o los agudos.
✽ Nota
Presione [Centro] para volver a la configuración predeterminada.
Power Bass
Puede definir los bajos como Apag., Bajo,
Medio o Alto.
- Apag. : Reproduce el sonido original.
- Bajo, Medio, Alto: Defina como bajo,
medio o alto para
aumentar el sonido
de tonos bajos.
Modo Mappa
Para mejorar la visibilidad de la pantalla
del mapa durante el día o la noche,
puede cambiar la combinación de
colores del mapa.
- Auto: La pantalla del mapa se muestra
con la señal de luz automática o
con la señal de iluminación.
Iluminación Iluminación
activada
desactivada
Luz automática
apagada (Día)
Mapa: Día
Mapa: Día
Luz automática
encendida (Noche)
Mapa:
Noche
Mapa:
Noche
Luz automática no
detectada
Mapa:
Noche
Mapa: Día
Pantalla
Existen dos tipos diferentes de menús.
- Día: La pantalla del mapa se muestra
siempre con colores brillantes.
- Noche: La pantalla del mapa se muestra siempre con colores oscuros.
Brillo
Puede definir el brillo de la
pantalla. Defina el brillo de pantalla
como Bajo, Medio, Alto.
19
LAN8900EKYN SPA HMC.indd 19
2010-03-25 ¿ÀÀü 10:02:59
Introducción a la navegación
¿Qué es el GPS?
El sistema de posicionamiento global
(GPS, por sus siglas en inglés) es un
sistema de navegación por satélite formado por una red de 24 satélites puestos en órbita por el Departamento de
defensa de los EE.UU.
El GPS fue ideado originalmente para
aplicaciones militares, pero en los años
ochenta el gobierno puso el sistema a
disposición del uso civil. El GPS funciona bajo cualquier condición atmosférica,
en cualquier lugar del mundo, 24 horas
al día. No existen cuotas de suscripción
ni gastos de instalación para utilizar el
GPS.
GPS
GPS
Acerca de las señales de
satélite
Su unidad debe recibir señales del
satélite para funcionar. Si está bajo
techo, cerca de edificios altos, grandes
árboles, o en un garaje, la unidad no
podrá recibir señales de los satélites.
GPS
Cómo visualizar la pantalla del mapa
El sistema de navegación muestra
diferentes indicadores en la pantalla.
Obtener señales de satélite
Antes de que la unidad pueda encontrar su localización actual y describir
una ruta, debe hacer lo siguiente:
1. Posiciónese en el exterior, en un área
alejada de grandes obstáculos.
2. Encienda la unidad.
Obtener las señales del satélite puede
llevarle algunos minutos.
Pantalla de navegación inicial
GPS
Indicadores del mapa de
pantalla
Aparece la pantalla de precaución
cuando se coloca el interruptor de
encendido en la posición ACC u ON
y se accede por primera vez al modo
de navegación. Lea atentamente la
precaución y, a continuación, presione
[Aceptar]:
•
/
Indica la dirección en el mapa.
Presione para cambiar la orientación
en el mapa.
•
Indica la ubicación actual del vehículo
y la dirección del viaje.
•
Presione [Menú] para acceder al
menú del mapa.
20
LAN8900EKYN SPA HMC.indd 20
2010-03-25 ¿ÀÀü 10:02:59
Introducción a la navegación
Modificación de la escala del mapa
•
Indica la escala del mapa.
1. Presione
la pantalla del mapa.
•
Indica la hora de llegada, la distancia
y el tiempo que resta para llegar al
destino.
•
Aparece en la esquina superior derecha de la pantalla cuando se define
una ruta. Indica la distancia al próximo punto de la guía y la dirección de
desvío en dicho punto.
•
Indica el límite de velocidad en la
carretera por la que está conduciendo.
2. Presione [+] para visualizar el mapa
en detalle.
Presione [-] para visualizar un área
mayor del mapa.
50 m n100 m n 200 m n 300 m n
500 m n 750 m n 1 km n 2 km n
5 km n 10 km n 20 km n 50 km n
100 km n 200 km n 500 km
3. Si desea establecer el zoom
.
automático, presione
21
LAN8900EKYN SPA HMC.indd 21
2010-03-25 ¿ÀÀü 10:03:00
Menú de introducción de destino
Esquema del menú de navegación
Menú de navegación
Navegación
Dirección
Últimos Destinos
Agenda De Direcciones
POI
Parquin
Continuar Orient./
Detener Orient.
Avanzado
Entrada De GPS−
Utilizar Mapa
Planif. Ruta
Almacenar Destino
Almacenar Posición
Favoritos
Casa 1
Oficina 2
3~12
Ajuste del volumen de navegación
Funciones generales del menú
de destino
1. Encienda la unidad.
2. Pulse NAV en el panel de control.
Aparecerá el menú de navegación
en la pantalla.
3. Presione [Navegación] o [Avanzado]
[Favoritos] para seleccionar la
opción deseada.
Menú [Avanzado]
Si desea ajustar el volumen de navegación, gire el control rotatorio ( ) del
panel de control durante la guía por
voz o gírelo durante la guía por voz tras
en el panel de control.
pulsar
Menú [Favoritos]
4. Presione el método de configuración
deseado.
• Dirección: Busca el destino de la dirección
que ha especificado. (Página 23)
• Últimos Destinos: Establece el destino de la
última ubicación especificada. (Página 24)
• Agenda De direcciones: Establece el destino a una ubicación almacenada en la
libreta de direcciones. (Página 24)
• POI: Busca el destino entre varias
categorías de negocios o ubicaciones.
(Páginas 24-26)
• Parquin: Establece el aparcamiento de
acuerdo con el destino. (Página 28)
• Continuar/Detener Orient.: Activa desactiva
la guía Encen/ Apag. (Página 28)
• Entrada De GPS: Define la latitud y la longitud del destino.(Página 27)
• Utilizar Mapa: Busca un destino desplazando el mapa. (Página 28)
• Planif. Ruta: Añade un nuevo destino o un
punto de referencia. (Páginas 29-30)
• Almacenar Destino: Almacena el destino
en la libreta de direcciones. (Página 31)
• Almacenar Posición: Almacena la posición
en la libreta de direcciones. (Página 31)
• Casa 1/ Oficina2/ 3~12: Puede definir la
ubicación del trabajo, del domicilio o de
aquel lugar al que regrese con mayor
frecuencia. (Página 32)
22
LAN8900EKYN SPA HMC.indd 22
2010-03-25 ¿ÀÀü 10:03:00
Menú de introducción de destino
Búsqueda de direcciones
Puede buscar el destino mediante una
dirección.
5. Introduzca algunos caracteres del
nombre de la calle y, a continuación,
presione [Acep].
Consulte las “Opciones De Ruta” de la
página 36.
9. Presione [Iniciar].
1. Pulse [NAV] > Presione [Dirección].
2. Defina el país deseado.
Si el país ya se ha definido, continúe
con el paso 3.
6. Presione la calle en la lista.
3. Elija el nombre de la ciudad
deseada y presione [Acep].
7. Especifique el número de la casa y,
a continuación, presione [Acep].
• Si desea almacenar el destino en
la libreta de direcciones, presione
[Almacenar].
A continuación, introduzca el nombre del destino y presione [Acep].
• Si desea visualizar el mapa del
destino, presione [Mostrar Mapa] y,
a continuación, en [Iniciar].
10. Presione la ruta deseada y, a continuación, [Iniciar]. Consulte la nota sobre
los criterios de ruta en la página 36.
4. Presione la ciudad en la lista.
8. Defina las opciones de ruta y, a
continuación, presione [Acep].
Conduzca de acuerdo con las indicaciones de la voz y de la pantalla.
23
LAN8900EKYN SPA HMC.indd 23
2010-03-25 ¿ÀÀü 10:03:00
Menú de introducción de destino
Últimos Destinos
Agenda De Direcciones
POI (Punto de interés)
Puede buscar el destino de un lugar que
guardó anteriormente como destino.
Se almacenan automáticamente los últimos 50 destinos. Si el número de los últimos destinos sobrepasa los 50, el destino
más antiguo se sustituye por el nuevo.
Puede buscar un destino entre varias
categorías de negocios o lugares.
1. Presione [NAVI] > Toque [Últimos
Destinos].
Puede buscar el destino de un lugar
almacenado en la libreta de direcciones
(Address Book). Para utilizar esta función de una manera más eficaz, debería
almacenar de antemano los destinos
a los que viaja con más frecuencia. En
primer lugar, busque la dirección para
almacenar el destino en la libreta de
direcciones (Address Book). Consulte
Búsqueda de direcciones de la página
23.
2. Presione el último destino que
desee de la lista.
1. Presione [NAVI] > Toque [Agenda De
Direcciones].
2. Presione el destino que desee de la lista.
3. Presione la ruta deseada y, a continuación, [Iniciar].
Conduzca de acuerdo con las indicaciones de la voz y de la pantalla.
3. Presione la ruta deseada y, a continuación, [Iniciar].
Conduzca de acuerdo con las indicaciones de la voz y de la pantalla.
1. Presione [NAVI] > Toque [POI].
2. Presione una de las categorías principales.
• Posición Cercana: Define un punto de
interés cercano a la posición actual del
vehículo. (Página 25)
• Destino Cercano: Define un punto de
interés cercano al destino seleccionado.
(Página 26)
• En Ciudad: Define un punto de interés
ubicado en la ciudad. (Página 26)
• Nombre: Define un punto de interés
según el nombre de la instalación.
(Página 26)
• Servicio Kia: Define un centro de servicio
Kia. (Página 26)
• Número De Teléfono: Si conoce el
número de teléfono del centro, utilice
esta opción para encontrarlo. (Página
26)
24
LAN8900EKYN SPA HMC.indd 24
2010-03-25 ¿ÀÀü 10:03:01
Menú de introducción de destino
Posición Cercana
1. Presione [NAVI] > Toque [POI] >
[Posición Cercana].
5. Presione [Acep] tras confirmar la
ubicación del punto de interés que
aparece en pantalla.
8. Presione [Iniciar].
2. Presione una de las categorías
secundarias.
(Por ejemplo: Emergencia)
Conduzca de acuerdo con las indicaciones de la voz y de la pantalla.
Si desea realizar una llamada telefónica, presione [ ].Sólo está disponible cuando la función Bluetooth
se encuentra activada.
3. Presione una de las categorías
secundarias del siguiente nivel. (Por
ejemplo: Hospital)
6. Presione [Iniciar]
4. Presione el punto de interés deseado.
7. Presione la ruta deseada.
25
LAN8900EKYN SPA HMC.indd 25
2010-03-25 ¿ÀÀü 10:03:01
Menú de introducción de destino
Destino Cercano
Nombre
Número De Teléfono
1. Presione [NAVI] > Toque [POI] >
[Destino Cercano].
1. Presione [NAVI] > Toque [POI] >
[Nombre].
1. Presione [NAVI] > Toque [POI] >
[Número De Teléfono].
2. Siga los pasos 2-8 de la página 25
(Posición Cercana).
2. Defina el país deseado.
2. Especifique el número de teléfono y,
a continuación, presione [Acep].
En Ciudad
1. Presione [NAVI] > Toque [POI] > [En
Ciudad].
3. Introduzca algunos caracteres del
nombre del centro y, a continuación,
presione [Acep].
2. Introduzca algunos caracteres del
nombre de la calle y, a continuación,
presione [Acep].
3. Presione el número de teléfono que
desee de la lista.
4. Siga los pasos 4-8 de la página 25
(Posición Cercana).
4. Presione [Acep] tras confirmar la
ubicación del punto de interés que
aparece en pantalla.
Servicio Kia
3. Presione la ciudad en la lista.
1. Presione [NAVI] > Toque [POI] >
[Servicio Kia].
2. Siga los pasos 4-8 de la página 25
(Posición Cercana).
4. Siga los pasos 2-8 de la página 25
(Posición Cercana).
Si desea realizar una llamada telefónica, presione [ ]. Sólo está disponible cuando la función Bluetooth
se encuentra activada.
5. Siga los pasos 6-8 de la página 25
(Posición Cercana).
26
LAN8900EKYN SPA HMC.indd 26
2010-03-25 ¿ÀÀü 10:03:01
Menú de introducción de destino
Entrada De GPS
Puede buscar el destino si introduce las
coordenadas de latitud y longitud.
4. Introduzca las coordenadas de latitud presionando los minutos. (Por
ejemplo: 58’)
6. Presione [Acep].
1. Presione [NAVI] > Toque
[Avanzado] > [Entrada De GPS].
2. Presione [Latitud].
7. Introduzca las coordenadas de
longitud. Consulte los pasos 2 a 6.
(Por ejemplo: 8°, 42’, 31’’)
8. Cuando termine de configurar todos
los parámetros, presione [Iniciar].
3. Introduzca las coordenadas de
latitud presionando los grados.
(Por ejemplo: 49°)
5. Introduzca las coordenadas de
latitud presionando los segundos.
(Por ejemplo: 29’’)
9. Siga los pasos 7 a 8 de la página
25 (Posición Cercana).
✽ Nota
Si comete un error, presione
borrar los dígitos uno a uno.
para
27
LAN8900EKYN SPA HMC.indd 27
2010-03-25 ¿ÀÀü 10:03:02
Menú de introducción de destino
Parquin
Utilizar Mapa
Puede buscar el destino según el aparcamiento.
Permite buscar un destino desplazando
el mapa.
1. Presione [NAVI] > Toque
[Avanzado] > [Utilizar Mapa].
1. Presione [NAVI] > Toque [Parquin].
2. Presione el lugar deseado.
4. Presione la ruta deseada y, a continuación, [Iniciar].
2. Desplace el mapa y coloque el puntero en forma de cruz sobre la ubicación deseada.
Conduzca de acuerdo con las indicaciones de la voz y de la pantalla.
3. Siga los pasos 4-8 de la página 25
(Posición Cercana).
3. Presione [Iniciar].
Continuar Orient./ Detener
Orient.
Si ya no necesita viajar hasta su destino o si desea modificarlo, Presione
[NAVI] > Toque [Detener Orient.]. Si
reanuda el viaje a su destino, presione
[Continuar Orient.].
28
LAN8900EKYN SPA HMC.indd 28
2010-03-25 ¿ÀÀü 10:03:02
Menú de introducción de destino
Planif. Ruta
El planificador del itinerario le permite
desplazarse a través de las rutas buscadas si configura un destino o un punto
de referencia. Puede definir un total de
4 destinos o puntos de referencia.
- Nuevo Ruta: Define un itinerario.
- Cagar Ruta: Carga el itinerario.
- Mostrar Ruta: Muestra el último itinerario definido.
4. Defina un destino mediante el menú
de navegación. (Consulte la página 22.)
Aparece el destino que se ha definido.
Si necesita un punto de referencia adicional, defínalo presionando de nuevo
[Agr. Punto Ruta].
5. Presione [Agr. Punto Ruta].
Configurar un itinerario
1. Presione [NAVI] > Toque
[Avanzado] > [Planif. Ruta].
7. Presione [Iniciar]. Si desea guardar
las rutas buscadas, presione [Sí].
De lo contrario, presione [No].
2. Presione [Nuevo Ruta].
6. Defina un punto de referencia
mediante los menús [Navegación],
[Avanzado] y [Favoritos].
(Consulte la página 22.)
8. Introduzca un nombre y, a
continuación, presione [Acep].
3. Presione [Sí].
Las rutas encontradas se almacenan
en [Cagar Ruta] de forma automática.
9. Conduzca de acuerdo con las indicaciones de la voz y de la pantalla.
29
LAN8900EKYN SPA HMC.indd 29
2010-03-25 ¿ÀÀü 10:03:03
Menú de introducción de destino
Editar o eliminar un destino o un
punto de referencia
Puede modificar o eliminar un destino
o un punto de referencia ya definido.
1. Presione [NAVI] > Toque [Avanzado] >
[Planif. Ruta] > [Cagar Ruta].
2. Presione el punto de referencia
deseado.
[Ordenar Lista Ruta]: Cambia el orden de
destino y del punto
de referencia ya
definidos. (Siga los
pasos 5 a 6)
[Eliminar Punto Ruta]: Elimina el punto
de referencia.(Siga
los pasos 7 a 9)
[Eliminar Lista Ruta]: Elimina el punto de
referencia.
(Siga los pasos 10
a 11)
5. Presione [Ordenar Lista Ruta] y, a
continuación, [Acep] tras realizar los
cambios deseados en el orden.
8. Presione el punto de referencia deseado.
9. Siga los pasos 7 a 9 de la página
29 (Configurar un itinerario).
10. Presione [Eliminar Lista Ruta] para
eliminar la lista con el punto de referencia definido.
3. Presione [Editar Ruta].
11. Presione el punto de referencia deseado.
4. Presione las opciones deseadas.
6. Siga los pasos 7 a 9 de la página
29 (Configurar un itinerario).
7. Presione [Eliminar Punto Ruta] para
eliminar el punto de referencia.
30
LAN8900EKYN SPA HMC.indd 30
2010-03-25 ¿ÀÀü 10:03:03
Menú de introducción de destino
Almacenar Destino
Almacenar Posición
Los destinos que visite a menudo
pueden almacenarse en la libreta de
direcciones. Los destinos almacenados
pueden recuperarse fácilmente para
definirlos como destinos o puntos de
referencia. Sólo están disponibles cuando
los destinos se han definido previamente.
La posición actual del vehículo puede
almacenarse en la libreta de direcciones.
1. Presione [NAVI] > Toque
[Avanzado] > [Almacenar Destino].
1. Presione [NAVI] > Toque
[Avanzado] > [Almacenar Posición].
2. Introduzca el nombre de la posición
actual y presione [Acep].
2. Introduzca el nombre del destino y
presione [Acep].
La posición actual del vehículo se
almacena en la libreta de direcciones automáticamente.
(Página 24)
El destino se almacena en la libreta
de direcciones automáticamente.
(Página 24)
31
LAN8900EKYN SPA HMC.indd 31
2010-03-25 ¿ÀÀü 10:03:04
Menú de introducción de destino
Casa 1/ Oficina 2/ 3~12
Si las ubicaciones favoritas, de domicilio
y de trabajo ya están almacenadas en
la libreta de direcciones, podrán recuperarse fácilmente para definir la ruta a
cualquiera de estas ubicaciones.
Agenda De Direcciones
1. Presione [NAVI] > Toque [Agenda
De Direcciones].
4. Si desea definir la ubicación como
domicilio, presione [1 Casa].
1. Presione [NAVI] > Toque [Favoritos].
2. Presione [Casa 1].
5. Presione [Acep].
3. Presione la ruta deseada y, a
continuación, [Iniciar].
2. Presione
tras confirmar la
ubicación deseada.
3. Presione [Favoritos].
Encontrar el domicilio
✽ Nota
• El procedimiento para almacenar las
ubicaciones favoritas y de trabajo es el
mismo que para almacenar el domicilio.
• Si introduce nueva información en la
misma posición de almacenamiento
se sobrescriben los datos antiguos.
• Si desea eliminar un destino almacenado en la libreta de direcciones
(Address Book), presione [Eliminar].
• Si desea almacenar la ubicación actual
en el menú [Favoritos], presione [NAV]
> presione [Favoritos] > presione y
mantenga pulsado el número preferido > Introduzca un nombre y presione
[OK].
Conduzca de acuerdo con las indicaciones de la voz y de la pantalla.
✽ Nota
El procedimiento para buscar las
ubicaciones favoritas y de trabajo es el
mismo que para buscar el domicilio.
32
LAN8900EKYN SPA HMC.indd 32
2010-03-25 ¿ÀÀü 10:03:04
Cómo usar el menú del mapa
Esquema del menú del mapa
Menú del mapa
Funciones generales del menú
del mapa
Categoría POI
2D/ 3D
Dividir Pantalla/
Pantalla Completa
1. Encienda la unidad.
3. Presione [Menú].
Ruta
Almacenar Posición
Opciones De Ruta
Planificador De Ruta
Buscador
Desvío
Tráfico
Inf. De Proximidades
Infomación En Ruta
Vista
2. Presione MAP. Aparece la pantalla
del mapa.
4. Presione [Vista], [Ruta] o [Tráfico]
para seleccionar la opción deseada.
[Ruta] menú
[Tráfico] menú
5. Presione el método de configuración deseado.
Consulte información más detallada
en las páginas 34 a 38.
[Vista] menú
33
LAN8900EKYN SPA HMC.indd 33
2010-03-25 ¿ÀÀü 10:03:04
Cómo usar el menú del mapa
Categoría de puntos de
interés
3. Presione [Acep].
Algunas señales de los alrededores
pueden mostrarse como iconos en la
pantalla.
Podrá ocultarlos o visualizarlos según el
tipo de icono.
1. Presione [MAP] > Toque [Menú] >
[Vista] > [Categoría POI].
Los iconos de señales activados
aparecen en el mapa.
2D/ 3D
La vista del mapa puede cambiarse
entre 2D y 3D.
- 2D: Muestra el mapa de forma bidimensional, de manera similar a
un mapa de carreteras.
- 3D: Muestra el mapa con una perspectiva tridimensional. Resulta
fácil reconocer una imagen de la
ruta, ya que proporciona una vista
panorámica de una gran distancia.
1. Presione [MAP] > Toque [Menú] >
[Vista] > [2D/3D].
2. Presione los iconos deseados.
La configuración de pantalla de
iconos se activa y se desactiva
cada vez que presiona el icono. El
indicador del icono seleccionado se
ilumina.
2. Presione [2D/3D] de nuevo para
cambiar a la pantalla 2D.
34
LAN8900EKYN SPA HMC.indd 34
2010-03-25 ¿ÀÀü 10:03:04
Cómo usar el menú del mapa
Dividir Pantalla/Pantalla
Completa
La vista del mapa puede cambiarse de
pantalla dividida a pantalla completa.
1. Presione [MAP] > Toque [Menú] >
[Vista] > [Dividir Pantalla].
Almacenar Posición
Planif. Ruta
La posición actual del vehículo puede
almacenarse en la libreta de direcciones.
El planificador del itinerario le permite
desplazarse a través de las rutas buscadas si configura un destino o un punto
de referencia.
1. Presione [MAP] > Toque [Menú] >
[Ruta] > [Almacenar Posición].
1. Presione [MAP] > Toque [Menú] >
[Ruta] > [Planificador De Ruta].
2. Introduzca el nombre de la posición
actual y presione [Acep].
2. Consulte “Planif. Ruta” en las páginas
29 y 30.
Pantalla dividida
2. Para cambiar al modo de pantalla
completa, presione [Menú] > [Vista
> [Pantalla Completa].
La posición actual del vehículo se
almacena en la libreta de direcciones
automáticamente. (Página 24)
Pantalla completa
35
LAN8900EKYN SPA HMC.indd 35
2010-03-25 ¿ÀÀü 10:03:05
Cómo usar el menú del mapa
Opciones De Ruta
Puede modificar las condiciones de
ruta o confirmar la información de ruta.
Defina la condición de ruta apropiada
según sus necesidades.
1. Presione [MAP] > Toque [Menú] >
[Ruta] > [Opciones De Ruta].
los cruces e intersecciones según
la tabla de consumo de combustible y la información del tráfico en
tiempo real, sin embargo esta ruta
podría no se válida en cuanto a las
condiciones de conducción, como
cuando se produce una rápida aceleración.
- Con el fin de reducir el consumo, la
ruta Eco podría suponer un mayor
tiempo de conducción y una distancia mayor.
• TMC:
- Auto (
2. Presione el elemento de configuración deseado.
• Ruta: Si no define [Planear
Diferentes Rutas] en el menú
de configuración, defina la
opción de ruta como Rápido
( ), Corto ( ) o Eco ( ).
✽ Nota
• Ruta rápida: Calcula una ruta con
el tiempo de viaje más corto.
• Ruta Corta: Calcula la ruta con el
recorrido más corto.
• Ruta Eco (Económica):
- Para ahorrar combustible, se
considera que esta ruta reduce el
número de paradas frecuentes en
): Cuando se detecta un
evento de TMC en la
ruta actual, el sistema de
navegación busca una
ruta alternativa automáticamente sin previo aviso.
- Apagado ( ): Cancela la función TMC.
- Encendida(
): Cuando se detecta
un evento de TMC
en la ruta actual, el
sistema de navegación
muestra una pantalla
emergente con la información del suceso.
✽ Nota
No se admite canal digital de información (TMC) de pago.
• Carr. Peaj (
)
- Utilizar: Incluye las carreteras de peaje.
- Evitar: Evita el uso de carreteras de
peaje.
)
• Túnel (
- Utilizar: Incluye el uso de túneles.
- Evitar: Evita el uso de túneles.
• Carr. Ppal (
)
- Utilizar: Incluye el uso de carreteras
principales.
- Evitar: Evita el uso de carreteras principales.
• Ferry (
)
- Utilizar: Incluye el uso de transbordadores.
- Evitar: Evita el uso de transbordadores.
3. Presione [Aceptar].
Cuando aparezcan las pantallas de configuración de ruta o del mapa de ubicación actual, el sistema calcula de nuevo
una ruta con las condiciones definidas.
✽ Nota
• Detenga siempre el vehículo en un
lugar seguro antes de modificar las
condiciones de ruta.
• Modificar las condiciones de ruta
mientras se conduce, puede ocasionar
un accidente.
36
LAN8900EKYN SPA HMC.indd 36
2010-03-25 ¿ÀÀü 10:03:05
Cómo usar el menú del mapa
Buscador
Desvío
Puede ver una pantalla ampliada de la
sección de la ruta cuando la guía de
ruta está activada.
Si desea desviarse por razones de tráfico, puede utilizar la función de desvío
para calcular una ruta alternativa desde
la ubicación del vehículo al destino.
1. Presione [MAP] > Toque [Menú] >
[Ruta] > [Buscador].
4. Presione la ruta deseada y, a continuación, [Iniciar].
1. Presione [MAP] > Toque [Menú] >
[Ruta] > [Desvío].
2. Presione [Mas corto] o [Ampliar]
para definir una ruta que incluirá un
desvío en la distancia que seleccione.
2. Presione [Anterior] o [Siguiente]
para ver las secciones de la ruta.
Conduzca de acuerdo con las indicaciones de la voz y de la pantalla.
✽ Nota
Si no necesita tomar un desvío cuando
se encuentre en una ruta, presione
[Menú] > [Ruta] > [Desvío] > [Eliminar].
3. Presione [Sección] para ver la pantalla ampliada de la sección de la
ruta.
4. Presione [Ruta] para volver a la pantalla anterior.
- Azul: Ruta original
- Rojo: Ruta de desvío
3. Presione [Iniciar].
para volver a la pan5. Presione
talla de mapa actual del vehículo.
37
LAN8900EKYN SPA HMC.indd 37
2010-03-25 ¿ÀÀü 10:03:05
Cómo usar el menú del mapa
Información De Proximidades
Aparece una lista con la información
del tráfico en un radio cercano a la
posición actual del vehículo.
1. Presione [MAP] > Toque [Menú] >
[Tráfico] > [Inf. De Proximidades].
2. Presione la opción deseada para
comprobar la información detallada.
3. Presione [Mostrar Mapa] tras realizar
la comprobación.
5. Presione
para volver a la pantalla anterior. Pulse MAP para volver
a la pantalla del mapa con la ubicación actual.
3. Si necesita tomar un desvío,
presione [Desvío].
Información En Ruta
Se muestra una lista con la información
del tráfico en la ruta recomendada desde
la posición actual del vehículo al destino.
Se busca una ruta de desvío alternativa
para evitar el problema desde la posición
actual del vehículo al destino. Además,
puede comprobar la información detallada
de los problemas que aparecen en pantalla.
1. Presione [MAP] > Toque [Menú] >
[Tráfico] > [Información En Ruta].
✽ Nota
Presione [Mostrar Mapa], si desea
visualizar el lugar de la ruta en el
que se encuentra el problema.
para volver a la panPresione
talla anterior. Pulse MAP para volver
a la pantalla del mapa con la ubicación actual.
4. Presione la ruta deseada.
2. Presione la opción deseada para
comprobar la información detallada.
4. Presione [Zoom+] para visualizar el
mapa en detalle. Presione [Zoom-]
para visualizar un área mayor del
mapa.
5. Presione [Iniciar].
Conduzca de acuerdo con las
indicaciones de la voz y de la
pantalla.
38
LAN8900EKYN SPA HMC.indd 38
2010-03-25 ¿ÀÀü 10:03:06
Tecnología inalámbrica Bluetooth
Comprender la tecnología
inalámbrica Bluetooth
Conexión de su unidad y del
teléfono Bluetooth
La tecnología inalámbrica Bluetooth
establece un enlace inalámbrico entre
dos dispositivos, como un teléfono y la
unidad.
La primera vez que utilice ambos dispositivos juntos, deberá conectarlos
estableciendo una relación con ayuda
de un código PIN. Tras la conexión inicial, ambos dispositivos podrán conectarse automáticamente cada vez que
los encienda.
Conectar utilizando la configuración de la
unidad (1)
1. Pulse
en el panel de control.
✽ Nota
• Pueden existir restricciones en el uso
de la tecnología Bluetooth en ciertas
ubicaciones.
• Debido a la variedad de teléfonos Bluetooth y a las versiones de
sus firmwares, su dispositivo puede
responder de forma distinta al
funcionar a través de Bluetooth.
• Las diferencias en la operación funcional
según el modelo es principalmente el
resultado de las funciones de un teléfono
con manos libres; consulte al fabricante
del teléfono en caso de duda.
• Puede comprobar la lista de compatibilidad de teléfonos Bluetooth en el sitio
Web (Http://www.navigation.com/kia).
4. Seleccione el teléfono Bluetooth
deseado en la pantalla “Dispositivos
Bluetooth”.
2. Presione [Bluetooth].
3. Presione [Buscar dispositivos de
Bluetooth].
Si desea cancelar la función, toque
[Cancelar].
5. Introduzca la clave de acceso (Valor
predeterminado: 0000) que aparece en la pantalla del teléfono
cuando se muestre la pantalla
emergente en la unidad. Cuando
se haya conectado correctamente,
aparecerá la pantalla principal de
Bluetooth.
Si no se ha conectado correctamente, aparece en pantalla un mensaje de error de conexión.
39
LAN8900EKYN SPA HMC.indd 39
2010-03-25 ¿ÀÀü 10:03:06
Tecnología inalámbrica Bluetooth
Conexión utilizando la
configuración del teléfono (2)
Conexión utilizando la
configuración del teléfono
1. Pulse
La función Bluetooth de su teléfono
puede configurarse para permanecer
desactivada por defecto. Para utilizar la
función Bluetooth, el Bluetooth de su
teléfono debe estar activado. Consulte
el manual de usuario de su teléfono.
en el panel de control.
2. Pulse [Buscar dispositivos de
Bluetooth].
5. Introduzca la clave de acceso (Valor
predeterminado: 0000) que aparece en la pantalla del teléfono
cuando se muestre la pantalla
emergente en la unidad.
Cuando se haya conectado correctamente, aparecerá la pantalla
[Bluetooth].
1. Active el componente Bluetooth del
teléfono. Puede encontrarse en un
menú llamado Ajustes, Bluetooth,
Conexiones o Manos libres.
2. Pulse [ ] > Toque [Bluetooth] >
[Autorización de dispositivos externos].
3. Siga los pasos 4 y 5 de la página 39.
✽ Nota
Si presiona de nuevo
en el panel de
control tras conectarse mediante la tecnología inalámbrica Bluetooth, aparecerá
la pantalla principal de Bluetooth.
Si desea cancelar la función, toque
[Cancelar].
3. Inicie una búsqueda de dispositivos
Bluetooth. Estos ajustes pueden
encontrarse en un menú llamado
Bluetooth, Conexiones o Manos
libres.
4. Seleccione su dispositivo en la lista
de teléfonos.
✽ Nota
• Funciona de forma idéntica a los auriculares con cable para teléfono móvil.
Los auriculares están pensados para
la conversación por teléfono. No están
pensados para escuchar música.
• A diferencia de la funcionalidad del
manos libres, la conexión de los auriculares sólo permitirá dos funciones
“responder a llamadas” y “contestar
a una llamada reciente”. Además el
número de la persona que llama no
aparecerá al responder llamadas.
• Si realiza la conexión a través del teléfono Bluetooth, la conexión con manos
libres o auriculares puede no funcionar
dependiendo del tipo de teléfono.
40
LAN8900EKYN SPA HMC.indd 40
2010-03-25 ¿ÀÀü 10:03:06
Tecnología inalámbrica Bluetooth
Desconexión/Conexión de
nuevo del teléfono Bluetooth
1. Presione [Ver la lista de dispositivos de
Bluetooth] en la pantalla “Bluetooth”.
3. Toque de nuevo el teléfono desconectado para conectar su teléfono. Y
a continuación, presione [Sí].
3. Presione [Sí].
2. Toque el teléfono conectado y
después toques [Sí].
La marca
aparece de nuevo.
Eliminar un teléfono conectado
Si ya no necesita utilizar un teléfono
conectado, puede eliminarlo.
1. Presione [Ver la lista de dispositivos de
Bluetooth] en la pantalla “Bluetooth”.
Su teléfono es desconectado y desaparece la marca .
2. Presione que se encuentra a la
derecha del nombre del dispositivo del
teléfono que desea eliminar.
• El teléfono conectado se elimina.
• Si no desea eliminar el teléfono
conectado, presione [No].
Modificar la clave de acceso
Aquí puede modificar la clave de acceso.
1. Introduzca la clave de acceso mediante
el teclado,
y
.
2. Presione [OK].
41
LAN8900EKYN SPA HMC.indd 41
2010-03-25 ¿ÀÀü 10:03:07
Tecnología inalámbrica Bluetooth
Realizar una llamada introduciendo un número de teléfono
La manera más simple de realizar una
llamada es mediante la marcación del
número.
Conecte su unidad y el teléfono
Bluetooth antes de realizar una llamada.
1. Presione en el panel de control.
Aparece la pantalla principal de
Bluetooth.
2. Introduzca el número de teléfono
al que desea llamar tocando los
botones numéricos y después toque
.
3. Toque [Colgar] para finalizar las
conversaciones telefónicas.
✽ Nota
• Si se equivoca durante la marcación,
presione el botón
para eliminar un
dígito cada vez. Si desea borrar todos
los dígitos de una vez, presione y
.
mantenga presionado
• Presione
unos segundos para
realizar realizar una de las últimas llamadas.
• Si desea realizar una llamada telefónica internacional, mantenga presionado
el [0] durante un tiempo e introduzca
el número de teléfono.
• El historial de llamadas recientes del
usuario sólo es aplicable a la conexión con manos libres (realizar una
llamada a partir de otra reciente con
la conexión por auriculares depende
del historial de llamadas del teléfono
Bluetooth).
• La conexión con auriculares sólo permite realizar una llamada a partir de
otra reciente.
Modificar la ruta de sonido
durante una llamada
Podrá escuchar un sonido a través del
altavoz de la unidad y del teléfono si presiona [Transf. Llam]/ [Transferir Llamada
De Vuelta].
Activar o desactivar el micrófono
Puede activar o desactivar el micrófono si presiona [Micro Apag.] / [Micro
Encen.]
Responder llamadas
1. Al recibir una llamada, el teléfono
sonará y se mostrará la pantalla
emergente “Llamada entrante”.
2. Toque [Aceptar] para contestar a la
llamada.
Si desea rechazar una llamada,
toque [Rechazar].
✽ Nota
• Si el servicio de identificación de llamadas está disponible, el número de teléfono entrante se mostrará en la pantalla.
• Si el número de teléfono se encuentra en
la agenda telefónica, la pantalla mostrará
el nombre de la persona que llama.
• Si la llamada entrante pertenece a un
número almacenado en sus Contactos,
se mostrará el nombre programado en la
entrada. Es posible que también se
muestre el número de la persona que
llama, si está disponible.
• Si la función “Rechazar” se muestra
inutilizable, significará que el teléfono
conectado al dispositivo no admite la
función de rechazar llamadas.
42
LAN8900EKYN SPA HMC.indd 42
2010-03-25 ¿ÀÀü 10:03:07
Tecnología inalámbrica Bluetooth
Uso de la agenda telefónica
Puede utilizar las entradas de la agenda
telefónica almacenada en la memoria
del teléfono compatible con el perfil
PBAP (Perfil de acceso a la agenda telefónica).
Tras conectar la unidad y el teléfono
mediante la tecnología inalámbrica
Bluetooth, los números de la agenda
telefónica se transfieren automáticamente
a la agenda telefónica de la unidad.
2. Toque el teléfono de la agenda al
que desea llamar.
2. Introduzca, mediante el teclado,
la primera letra de la entrada que
desea buscar en la lista y presione
[OK].
o
, se desplaza
Si presiona
a la página anterior o a la siguiente
página de la lista.
Llamar a un número de la agenda
telefónica
3. Toque [Colgar] para finalizar las
conversaciones telefónicas.
Seleccione la entrada de la agenda con
el número al que desea llamar y realice
la llamada.
Buscar una entrada de la agenda
telefónica ordenada por nombres
1. Presione
en el panel de control y
después toque [Agenda].
Si existen muchas entradas en la
agenda telefónica, puede resultar útil
visualizarlas por orden alfabético para
simplificar la búsqueda.
1. Toque [Buscar por nombre] en la
pantalla “Agenda”.
3. Presione la entrada de la agenda a
la que desea llamar.
Si presiona
, se desplaza a
o
la página anterior o a la siguiente
página de la lista.
4. Toque [Colgar] para finalizar las
conversaciones telefónicas.
43
LAN8900EKYN SPA HMC.indd 43
2010-03-25 ¿ÀÀü 10:03:08
Tecnología inalámbrica Bluetooth
Cómo usar la lista de llamadas
Puede utilizar la lista de llamadas almacenada en la memoria del teléfono compatible con el perfil PBAP (Perfil de acceso
PBAP
a
la agenda
(Perfiltelefónica).
de acceso a la agenda telefónica).
Tras
conectar la unidad al teléfono mediTras conectar
ante
la tecnología
la unidad
inalámbrica
al teléfono
Bluetooth,
mediantenúmeros
los
la tecnología
de la inalámbrica
lista de [Llamadas
Bluetooth,
los números
salientes],
[Llamadas
de la listaperdidas]
de [Llamadas
e
salientes], [Llamadas
[Llamadas
entrantes] perdidas]
del teléfono
e se
[Llamadas entrantes]
transfieren
automáticamente
del teléfono
a la lista
se de
transfierendeautomáticamente
llamadas
la unidad.
a la lista de
llamadas de la unidad.
Llamar a un número de la lista de
Llamar
a un número de la lista de
llamadas
Cuando encuentre la entrada deseada
llamadas
2. Presione [Saliente], [Perdida] o
[Entrante].
[Missed]
(Perdidas)
[Incoming]
Puede
actualizar
con loso números
de
(Recibidas).
la lista
de llamadas [Llamadas salientes], [Llamadas perdidas] e [Llamadas
entrantes] del teléfono, la lista de
llamadas de la unidad.
en el panel de control. Y a
1. Pulse
continuación, presione [Lis. Llam.].
Llamadas salientes
Llamadas perdidas
en la listaencuentre
Cuando
[Llamadas
la salientes],
entrada deseada
en la lista [Outgoing
[Llamadas
perdidas] eCalls],
[Llamadas
[Missed
Calls] o [Incoming
entrantes],
puede seleccionar
Calls], puede
el número
selecel número
y realizar la llamada.
ycionar
realizar
la llamada.
en el panel de control. Y a
1. Pulse
continuación, presione [Calling
[Lis. Llam.].
lists]
(Listas de llamadas).
2. Presionela
[Outgoing]
(Realizadas),
Actualizar
lista de llamadas
2. Presione [Saliente], [Perdida] o
[Entrante] y, a continuación,
presione [Update].
3. Las listas de llamadas actualizadas
se descargan.
Llamadas entrantes
3. Presione la entrada a la que desea
realizar la llamada.
3. Presione la entrada a la que desea
realizar la llamada.
44
LAN8900EKYN SPA HMC.indd 44
2010-03-25 ¿ÀÀü 10:03:08
Tecnología inalámbrica Bluetooth
Realizar una llamada con un
número de marcación rápida
Puede utilizar las entradas de la agenda
telefónica almacenada en la memoria del
teléfono compatible con el perfil PBAP
(Perfil de acceso a la agenda telefónica).
Puede almacenar con facilidad hasta 12
números de teléfono y realizar una llamada
a éstos mediante los números de marcación rápida.
Si presiona o , se desplaza a
la página anterior o a la siguiente
página de la lista.
3. Presione una de las categorías a la
que desea asignar el número de marcación rápida.(Por ejemplo: Agenda)
2. Presione y mantenga presionado uno
de los números de marcación rápida
(1-12). (Por ejemplo: 1)
Llamar a un nombre de la lista de
marcación rápida
1. Pulse
en el panel de control. Y a
continuación, presione [Marc. Ráp.].
Agregar números de teléfono a la
lista de marcación rápida
1. Pulse
en el panel de control. Y a
continuación, presione [Marc. Ráp.].
El nombre (número de teléfono) se
almacena en la memoria. La próxima
vez que presione el mismo número,
volverá a llamar al contacto (número
de teléfono) de la memoria.
4. Presione uno de los números de
teléfono que desea asignar a un
número de marcación rápida.
5. Introduzca el nombre mediante el
teclado y presione [OK].
2. Presione un número de marcación
rápida para realizar la llamada.
3. Toque [Colgar] para finalizar las
conversaciones telefónicas.
✽ Nota
Asegúrese de que la funcionalidad de
marcación rápida del teléfono Bluetooth
esté activada antes de su uso.
45
LAN8900EKYN SPA HMC.indd 45
2010-03-25 ¿ÀÀü 10:03:08
Funcionamiento de CD/MP3/WMA/USB/iPod
Reproducir un CD de audio y
archivos MP3/WMA/USB/iPod
Disc
Introduzca un disco en la ranura para que
comience la reproducción automáticamente.
iPod
Puede reproducir un dispositivo iPod en
la unidad si conecta el iPod al puerto
USB mediante el cable apropiado.
Cuando conecta un dispositivo iPod al
puerto USB, la reproducción comienza
automáticamente.
Para obtener información acerca del
iPod, consulte la guía del usuario del
iPod.
Pasar al siguiente capítulo/pista
Todo
Presione
para seleccionar la siguiente pista o archivo.
Pasar al capítulo/pista anterior
Todo
Presione
en el primer segundo de la
reproducción.
Volver al inicio de la pista/capítulo
actual
CD de audio
Todo
Presione
tras el primer segundo de
la reproducción.
MP3/WMA CD
USB
Puede reproducir los archivos guardados en un dispositivo de memoria USB.
Cuando conecta un dispositivo USB al
puerto USB la reproducción comienza
automáticamente.
✽ Nota
Utilice el cable de coche para uso
exclusivo del iPod cuando conecte el
dispositivo iPod a los terminales para
reproducir su contenido.
Búsqueda Todo
Mantenga presionado el botón
o
durante la reproducción y
después suéltelo en el punto deseado.
46
LAN8900EKYN SPA HMC.indd 46
2010-03-25 ¿ÀÀü 10:03:09
Funcionamiento de CD/MP3/WMA/USB/iPod
Reproducir introducción
Disc - Audio CD
USB
Disc - MP3/WMA
Se reproducen los primeros 10 segundos
de cada archivo/pista.
Repetir Todo
Los archivos/pistas seleccionados
actualmente se reproducen de forma
repetida.
1. Presione [Opción] durante la
reproducción.
1. Presione [Opción] durante la
reproducción.
Ejemplo: CD de audio
Ejemplo: CD de audio
2. Presione [Repetir] varias veces.
2. Presione [Buscar Iniciar].
Disc - Audio CD
3. Presione [Buscar Parar] para
cancelar la reproducción de la
introducción de los archivos/pistas.
Disc - MP3/WMA
USB
• [Repetir Apag.] : Reproduce continuamente todos
los archivos del
disco o del dispositivo USB.
• [Repetir Pista] : Reproduce continuamente el archivo
actual.
• [Repetir Carpeta] : Reproduce
continuamente
todos los archivos de la carpeta actual.
• [Repetir Apag.] : Reproduce
continuamente
todas las pistas
del disco.
• [Repetir Pista] : Reproduce continuamente la pista
actual.
iPod
• [Repetir Apag.] : Reproduce continuamente todos
los archivos del
iPod.
• [Repetir Enc.] : Reproduce continuamente el archivo
actual.
47
LAN8900EKYN SPA HMC.indd 47
2010-03-25 ¿ÀÀü 10:03:09
Funcionamiento de CD/MP3/WMA/USB/iPod
Aleatorio Todo
Todas las pistas o archivos se reproducen
de forma aleatoria.
1. Presione [Opción] durante la reproducción.
2. Presione [Aleatorio] varias veces.
Disc - Audio CD
• [Aleatorio Todos] : Reproduce
todos los archivos del disco de
forma aleatoria.
• [Aleatorio Apag.] : Cancela la
reproducción
aleatoria.
Disc - MP3/WMA
USB
• [Aleatorio Apag.] : Cancela la
reproducción
aleatoria.
• [Aleatorio Carpeta] : Reproduce de
forma aleatoria
todos los archivos de la carpeta
actual.
• [Aleatorio Todos] : La unidad reproduce de forma
aleatoria todos
los archivos del
disco o del dispositivo USB.
iPod
• [Aleatorio Apag.] : Cancela la
reproducción
aleatoria.
• [Aleatorio Todos] : La unidad reproduce de forma
aleatoria todos
los archivos del
iPod.
• [Aleatorio Álbum] : Reproduce de
forma aleatoria
todos los archivos del álbum
actual.
Reproducción de archivos clasificándolos por Carpeta / Álbum /
Artista USB
Puede reproducir archivos que se
encuentren dentro del USB clasificáncolso por Carpetas, Álbum o Artísta.
1. Toque el botón [Opción] durante la
reproducción.
2. Toque el botón [Carpeta], [Álbum] o
[Artista] durante la reproducción
• [Carpeta]: Reproduce los archivos clasificándolos por carpetas.
• [Álbum]: Reproduce los archivos
clasificándolos por álbum.
• [Artista]: Reproduce los archivos
clasificándolos por artísta.
✽ Nota
Si desea ir a la pantalla de lista de
.
reproducción, toque el botón
48
LAN8900EKYN SPA HMC.indd 48
2010-03-25 ¿ÀÀü 10:03:10
Funcionamiento de CD/MP3/WMA/USB/iPod
Encontrar una carpeta/archivo
utilizando la lista Disc - Audio CD
Disc - MP3/WMA
USB
Puede escuchar música mediante la
lista de pistas/carpetas/archivos.
1. Presione el botón [Lista] durante la
reproducción.
✽ Nota
• En el caso de archivos MP3/WMA,
para desplapresione el botón
zarse a una carpeta superior.
o
para selec• Presione el botón
cionar la lista que desea visualizar.
• Si desea desplazarse a la pantalla de
la lista de reproducción, presione
.
Buscar música
iPod
Es posible buscar en el iPod lo siguiente: listas de reproducción, nombre del
artista, título del álbum, género, temas,
compositor, audiolibros o podcasts.
Ejemplo: CD de audio
1. Presione [Lista] durante la reproducción.
2. Si se trata de un CD de audio, presione el archivo deseado. Si se trata
de una archivo MP3/WMA, presione
el botón de la carpeta deseada.
Si no existen carpetas, presione el
archivo deseado.
2. Presione el elemento deseado.
CD de audio
• [Listas de reproducción]:
Reproduce los temas de la [Listas
de reproducción].
• [Artistas]: Reproduce los temas del
[Artistas].
• [Álbumes]: Reproduce los temas
del [Álbumes].
• [Géneros]: Reproduce los temas
del [Géneros].
• [Conciones]: Reproduce los temas
de [Conciones]:
• [Compositores]: Reproduce
los temas de
[Compositores].
• [Audiolibros]: Reproduce los
temas/capítulos de
[Audiolibros].
• [Podcasts]: Reproduce los temas/
capítulos del [Podcasts].
✽ Nota
• Si desea desplazarse a la carpeta
.
superior, presione
• Presione el botón
o
para seleccionar la lista que desea visualizar.
• Si desea desplazarse a la pantalla de
.
la lista de reproducción, presione
Archivo MP3/WMA
3. Se reproduce el archivo o pista
seleccionado.
49
LAN8900EKYN SPA HMC.indd 49
2010-03-25 ¿ÀÀü 10:03:10
Funcionamiento de CD/MP3/WMA/USB/iPod
Configurar la velocidad de
reproducción del audiolibro
iPod
La configuración de la velocidad de
reproducción sólo afecta a los audiolibros adquiridos en la tienda iTunes o en
audible.com. Para obtener información
acerca del iPod, consulte la guía del
usuario del iPod.
• [Audiolibro Rápido]:
Reproduce los audiolibros con una
velocidad más rápida.
• [Audiolibro Lento]:
Reproduce los audiolibros con una
velocidad más lenta.
✽ Nota
Si desea desplazarse a la pantalla de la
.
lista de reproducción, presione
1. Presione [Opción] cuando escuche
los temas/capítulos de [Audiolibro].
Requisitos del dispositivo USB
• Esta unidad únicamente admite unidades
de disco Flash USB y discos duros externos USB con formato FAT16 o FAT32.
• No extraiga el dispositivo USB mientras
esté en funcionamiento.
• Es recomendable realizar copias de
seguridad regularmente para evitar
pérdida de datos.
• Si usa un cable de extensión o un concentrador USB, el dispositivo USB no
podrá ser reconocido.
• Algunos dispositivos USB podrían no
funcionar con esta unidad.
• No admite cámaras digitales ni teléfonos
móviles.
• No estarán admitidas unidades con un
número total de archivos superior o igual
a 10000.
Dispositivos USB compatibles
• No son admitidos dispositivos que requieran instalación adicional de programas
tras ser conectados a un ordenador.
• Reproductor MP3: Reproductor MP3 tipo
Flash. No se admitirán reproductores MP3
que requieran la instalación de drivers.
• Unidad USB Flash: Dispositivos que
admitan USB2.0 o USB1.1. (En caso de
conectar al reproductor un USB 2.0,
éste funcionará a la misma velocidad
que un USB 1.1)
2. Presione [Audiolibro] varias veces.
• [Audiolibro Normal]:
Reproduce los audiolibros con la
velocidad original.
50
LAN8900EKYN SPA HMC.indd 50
2010-03-25 ¿ÀÀü 10:03:10
Funcionamiento de CD/MP3/WMA/USB/iPod
−
Requisitos
de archivos MP3/WMA
• Frecuencia de muestreo / 16 - 48
kHz (MP3) 8 - 44.1 kHz (WMA)
• Tasa de bit / entre 8 - 320 kbps
(MP3) 5 -160 kbps (WMA)
• El formato físico del CD-R/CD-RW
deberá ser “ISO 9660”.
• Si graba archivos MP3/WMA mediante un software que no puede crear
un SISTEMA DE ARCHIVOS, como
“Direct-CD”, etc., la reproducción de
archivos MP3/WMA será imposible.
Le recomendamos utilizar “Easy-CD
Creator”, que crea un sistema de
archivos ISO9660.
Los clientes deben tener en cuenta
que es necesario tener un permiso
para poder descargarse archivos
MP3/WMA y música de Internet.
Nuestra empresa no está autorizada
para conceder ese permiso.
El permiso deberá solicitarse siempre al propietario de los derechos de
autor.
aRequisitos del dispositivo iPod
• La compatibilidad con su iPod puede
variar en función del tipo de dispositivo.
• Tal vez no sea posible controlar el iPod
desde la unidad, dependiendo de la
versión de software de su iPod. Se recomienda instalar la versión de software
más reciente.
• Si tiene algún problema con su iPod,
visite www.apple.com/support/ipod.
• Dispositivos iPod compatibles
- iPod touch 1ª generación
- iPod mini (1ª/2ª generación)
- iPod nano (1ª/3ª generación)
- iPod classic (4ª/5ª/6ª generación)
• Si el contenido del iPod no se reproduce correctamente, actualice el software del iPod a la versión más reciente.
Para obtener información sobre cómo
actualizar el iPod, visite el sitio Web de
Apple <http://www.apple.com>.
• Apple no es responsable del funcionamiento de este dispositivo o del
cumplimiento con las normas reguladoras y de seguridad del mismo.
51
LAN8900EKYN SPA HMC.indd 51
2010-03-25 ¿ÀÀü 10:03:10
Funcionamiento de la radio
Escuchar emisoras de radio
1. Presione el botón “RADIO” para
seleccionar la radio.
2. Presione repetidamente “RADIO”
para seleccionar una banda.
El modo cambiará como sigue:
FM t AM t FM...
✽ Nota
Para elegir FM o AM en la pantalla,
con el fin de seleccionar
presione
.
AM y, a continuación, presione
3. Sintonización automática:
Presione
/
en la pantalla.
en el panel
O bien, pulse /
de control. La búsqueda se detiene
cuando se recibe la emisora.
Sintonización manual:
Gire la rueda de sintonización del
panel de control hacia la izquierda/
derecha.
- Las frecuencias se reciben hacia
adelante o hacia atrás una a una.
4. Toque y mantenga presionado uno de
los botones de presintonía.
Se mostrará la información sobre la
emisora presintonizada.
La emisora presintonizada seleccionada ha sido almacenada en la
memoria.
Guardar y recordar emisoras
Podrá almacenar fácilmente hasta 12
emisoras y volver a ellas más tarde con
sólo presionar un botón.
Si desea desplazarse a la página anterior/siguiente, presione
.
1. Seleccione la banda (FM, AM) en la
que desea almacenar una emisora.
5. Repita los pasos 1 y 4 a fin de
presintonizar otras emisoras.
La próxima vez, si presiona los
botones de presintonía, la emisora
será recuperada de la memoria.
2. Seleccione la frecuencia deseada.
3. Presione [Val. pred.] en la pantalla.
✽ Nota
Al programar una emisora en un botón
numérico de presintonía ya configurado,
la configuración anterior se eliminará
automáticamente.
52
LAN8900EKYN SPA HMC.indd 52
2010-03-25 ¿ÀÀü 10:03:10
Funcionamiento de la radio
AS (memoria de búsqueda
automática)
Para reproducir brevemente frecuencias de emisoras
Sólo esta disponible para la recepción
de AM. Esta función permite almacenar
automáticamente las frecuencias de
emisión con buena recepción.
Se reproducen los primeros 10 segundos
de la frecuencia de la emisora.
1. Presione [Opción] en la pantalla en
modo AM/FM.
1. Seleccione la banda de AM.
TA (Aviso de tráfico)
La función TA permite que la unidad
cambie a un aviso de tráfico (TA) desde
la fuente actual (otra emisora FM, un
CD u otros componentes conectados).
1. Presione [Opción] en la pantalla en
modo AM/FM.
2. Presione [TA Apagada] /
[TA Encendida] en la pantalla.
2. Presione [Opción] en la pantalla.
3. Presione [Alm. auto.]en la pantalla.
2. Presione [Buscar Iniciar] en la
pantalla.
Se buscan las emisoras locales con
señales intensas y se almacenan
automáticamente en la lista.
A continuación, aparece la lista en
pantalla.
3. Presione [Buscar Parar] paracancelarla.
[TA Encendida] : Los programas
sobre tráfico y los avisos se
reciben de forma
automática mediante las funciones
TP/TA.
[TA Apagada] : Los programas
sobre tráfico y
los avisos no se
reciben.
4. Presione la frecuencia de la emisora
deseada.
53
LAN8900EKYN SPA HMC.indd 53
2010-03-25 ¿ÀÀü 10:03:11
Funcionamiento de la radio
NOTICIAS
Región Auto/Apagada
Esta función permite que la unidad cambie
a una emisora de noticias desde la fuente
actual (otra emisora FM, un CD u otros
componentes conectados).
Sólo esta disponible para la recepción de FM.
1. Seleccione la banda de FM.
2. Presione [Opción] en la pantalla.
1. Presione [Opción] en la pantalla en
modo AM/FM.
3. Presione [Región Auto]/ [Región
Apagada] en la pantalla.
2. Presione [NEWS Apagada] / [NEWS
Encendida] en la pantalla.
[NEWS Apagada]: Permite recibir noticias
automáticamente.
[NEWS Encendida]: Las noticias no
se reciben.
[Región Auto]:
La función de Seguimiento de red
está activada. La unidad sintonizará
otra emisora, dentro de la misma
red, que emita el mismo programa
cuando las señales de recepción de
la emisora actual sean demasiado
débiles.
[Región Apagada]:
La función de Seguimiento de red
está desactivada. La unidad sintoniza otra emisora, dentro de la
misma red, cuando las señales de
recepción de la emisora actual son
demasiado débiles (en el modo, el
programa puede diferir del recibido
actualmente).
54
LAN8900EKYN SPA HMC.indd 54
2010-03-25 ¿ÀÀü 10:03:11
Funcionamiento del dispositivo auxiliar
Cómo usar una fuente AUX
En esta unidad se puede usar un equipo auxiliar.
1. Pulse “MEDIA” hasta que aparezca la
pantalla “AUX”.
AUX Audio
✽ Nota
• Algunos dispositivos auxiliares que no
disponen de fuente de vídeo es posible
que no envíen señal a la pantalla de
vídeo.
• Algunos dispositivos iPod deben
utilizar el cable exclusivo para iPod
si desea reproducir vídeo cuando
conecte el iPod al conector AUX.
• El vídeo no está disponible durante
la conducción. (Según la normativa
de tráfico, el vídeo auxiliar sólo está
disponible cuando el vehículo está
detenido y tiene activado el freno de
mano.)
AUX Vídeo
2. Conecte un dispositivo auxiliar al
conector AUX y, a continuación,
active la función auxiliar.
55
LAN8900EKYN SPA HMC.indd 55
2010-03-25 ¿ÀÀü 10:03:11
Sistema de reconocimiento de voz
Reconocimiento de voz
Administrar comandos de voz
Indicar números mediante la voz
El reconocimiento de voz permite el
funcionamiento en manos libres del
sistema de AV (RADIO, CD, USB, iPod),
navegación y otros dispositivos equipados en este vehículo, como el teléfono.
1. Pulse
en el mando a distancia del
volante.
El reconocimiento de voz requiere
una forma determinada de decir los
números en los comandos de voz.
Consulte los siguientes ejemplos.
(Regla general: tanto el “cero” como
la exclamación “oh” pueden utilizarse
como “0”.)
✽ Nota
Para que el rendimiento del reconocimiento de voz sea el óptimo, realice lo
siguiente:
• Mantenga el interior del vehículo tan
silencioso como sea posible. Cierre las
ventanas para eliminar los ruidos del
exterior (tráfico, vibraciones, etc.), que
puedan interferir en el reconocimiento
correcto de los comandos de voz.
• Espere hasta que escuche un pitido
antes de grabar un comando. De
lo contrario, dicho comando no se
reconocerá correctamente.
• Hable con un tono natural de voz y sin
pausa entre las palabras.
2. Cuando se escuche el pitido, diga
“Ayuda”. Se muestran todos los comandos incluidos en los campos activos.
Frecuencia
✽ Nota
• Si no se reconoce el comando, el
sistema lo advierte, la primera vez se
escuchará “¿Perdón?” y la segunda,
“Por favor, repita.”.
• Si desea cancelar el reconocimiento
una vez más, pulse
de voz, pulse
cualquier botón o presione la pantalla
y diga “Cancelar”.
• Si desea ajustar el volumen de los
o
comentarios del sistema, pulse
en el control remoto del volante o
utilice el control de volumen ( ) en
el control cuando el reconocimiento
de voz está activado.
Diga el número de frecuencia de acuerdo con el siguiente ejemplo.
“Frecuencia nueve-cero-coma-nuevo” /
“nueve-cero-coma-nuevo megahertz”
Número de teléfono
Diga el número de teléfono de acuerdo
con el siguiente ejemplo.
0-1-0-2-0-0-5-2 (Una sola cifra)
56
LAN8900EKYN SPA HMC.indd 56
2010-03-25 ¿ÀÀü 10:03:12
Sistema de reconocimiento de voz
Ejemplos de comandos de voz
Cuando utilice la función de reconocimiento de voz, a veces es suficiente
decir el comando una vez aunque, en
otras ocasiones, es necesario decir
dos o más comandos. A continuación,
se citan algunos ejemplos de otros
comandos de voz básicos.
5. Cuando se escuche el pitido, diga
“Frecuencia ciento dos” o “ciento dos
megahertz”.
6. Cuando se reconozca el comando de
voz que acaba de especificar, la frecuencia FM cambia a 102 MHz.
Ejemplo 1: Modificación de la radio
FM y la frecuencia
en el mando a distancia
1. Pulse
del volante.
2. Cuando escuche el pitido, diga “FM”.
5. Cuando se reconoce el tema requerido, lo reproduce una vez.
Ejemplo 2: Modificar la lista de reproducción del dispositivo USB (CD)
3. Cuando se reconozca el comando
“FM”, la pantalla principal cambia a la
pantalla principal de FM.
6. Pulse
en el mando a distancia
del volante.
en el mando a distancia
1. Pulse
del volante.
2. Cuando se escuche el pitido, diga
“Lista”.
en el mando a distancia
4. Pulse
del volante.
4. Pulse
, cuando escuche el pitido,
especifique un tema de reproducción
como “micky green oh”.
3. Cuando se reconozca el comando,
la pantalla cambia a la pantalla LIST
(Lista) del dispositivo USB (CD).
7. Cuando se reconoce el comando, se
pasa de la pista que se está reproduciendo a la “Pista siguiente” o a la
“Pista anterior”.
8. Cuando se reconoce el comando, se
pasa de la pista que se está reproduciendo a la “Pista siguiente” o a la
“Pista anterior”.
57
LAN8900EKYN SPA HMC.indd 57
2010-03-25 ¿ÀÀü 10:03:12
Sistema de reconocimiento de voz
Ejemplo 2: Marcar un número
Para utilizar esta función, necesita un
teléfono móvil con Bluetooth.
Conecte la unidad y el teléfono con
Bluetooth antes de comenzar a utilizarlo.
en el mando a distancia del
1. Pulse
volante.
2. Cuando se escuche el pitido, diga
“Marcar número”.
3. Cuando se reconoce el comando de
voz, la pantalla cambia a la pantalla
principal de Bluetooth y, a continuación, el sistema indica "Por favor,
diga el número de teléfono”.
5. Cuando se reconocen los números
dictados, el sistema los repite y
después pregunta "¿y luego?".
6. Si desea realizar una llamada al
número reconocido, diga “Llamada”.
Si el sistema ha reconocido un
número erróneo o desea eliminarlo,
diga “Borrar”. Si desea finalizar en
cualquier momento, diga “Cancelar”.
3. El sistema indica “Comandos posibles
son:”
4. Cuando se escuche el pitido, diga
“Otros comandos”.
Se muestran los comandos de aplicación incluidos en los campos activos.
Comando de ayuda
Si está utilizando por primera vez el
sistema mediante los comandos de voz
o no conoce el comando de voz apropiado, diga el siguiente comando.
en el mando a distancia del
1. Pulse
volante.
5. El sistema indica “Comandos posibles
son:”.
6. Cuando se escuche el pitido, diga
“AUX”.La pantalla cambia a la
pantalla AUX.
2. Cuando se escuche el pitido, diga
“Ayuda”. Se muestran todos los comandos incluidos en los campos activos.
4. Diga el número de teléfono cifra a
cifra, por ejemplo, “01020052”.
58
LAN8900EKYN SPA HMC.indd 58
2010-03-25 ¿ÀÀü 10:03:12
Sistema de reconocimiento de voz
Comandos de voz
Categoría
Comando de voz
Comandos de AUX
aplicaciones
CD
iPod
Mapa
Radio
USB
Teléfono
Media
Categoría
Funciones
generales
Comando de voz
Bajar volumen
Subir volumen
Página anterior
Página siguiente
Ayuda
Otros comandos
Cancelar
No
Sí
Categoría
Radio
Comando de voz
News Apagada
News Encendida
Emisora siguiente
Emisora anterior
TA Apagada
TA Encendida
Predeterminado
<numéro>
Valores predeterminados
AM
FM
Lista
Opción
Buscar Iniciar
Buscar Parar
Frecuencia <x> coma
<yy>
Frecuencia “xxxx”
Almacenamiento automático
Región Automática
Región Apagada
Categoría
Teléfono
Comando de voz
Marcar número
Entrante
Perdida
Saliente
Agenda
Nombre de llamada
Marcación rápida
<numéro>
Llamada
Listas de llamadas
Marcación rápida
Móvil
Privado
Oficina
Borrar
Corrección
59
LAN8900EKYN SPA HMC.indd 59
2010-03-25 ¿ÀÀü 10:03:12
Sistema de reconocimiento de voz
Comandos de voz
Categoría
iPod
Comando de voz
Repetir Apagada
Repetir Encendida
Categoría
MP3, CD,
USB
Comando de voz
Directorio superior
Categoría
Audio CD
Comando de voz
Lista
Lista
Opción
Buscar Iniciar
Opción
Repetir Apagada
Buscar Parar
Repetir Carpeta
Repetir Pista
Aleatorio Apagada
Repetir Apagada
Buscar Iniciar
Aleatorio Todos
Repetir Pista
Buscar Parar
Aleatorio Álbum
Buscar Iniciar
Aleatorio Todos
Audiolibro Lento
Buscar Parar
Aleatorio Apagada
Audiolibro Normal
Aleatorio Todos
Información de pista
Audiolibro Rápido
Aleatorio Carpeta
Pista siguiente
Directorio superior
Aleatorio Apagada
Pista anterior
Lista
Información de pista
Pista <numéro>
Opción
Pista siguiente
Aceptar
Pista siguiente
Pista anterior
Pista anterior
<Folder>
Información de pista
Pista <numéro>
<Folder>
Álbum
Pista <numéro>
Artista
Aceptar
Carpeta
Categoría
Navegación
Comando de voz
Navegación
Aceptar
60
LAN8900EKYN SPA HMC.indd 60
2010-03-25 ¿ÀÀü 10:03:12
Solución de problemas
No puede identificar la ubicación actual
(No se recibe el GPS)
El GPS no puede utilizarse en interiores,
y debe estar conectado a la alimentación con ACC a un vehículo en una
ubicación donde el cielo pueda verse
con claridad. Cuando conecte inicialmente el GPS, normalmente tardará
unos 10 minutos en funcionar con normalidad, pero la velocidad de conexión
puede variar dependiendo de las condiciones atmosféricas y de los obstáculos
cer canos. Si la conexión GPS fuera
inestable durante un período prolongado de tiempo, intente lo siguiente.
• Compruebe si el producto está
conectado a la alimentación.
• Compruebe si la parte posterior del
GPS se encuentra ubicada en un
lugar donde el cielo pueda verse con
claridad.
• Si hubiera edificios altos en las proximidades o si se encontrara bajo un
árbol, desplácese a otra ubicación sin
obstáculos.
No puede escuchar las indicaciones de
voz.
El volumen no está configurado correctamente o está desactivado.
Ajuste el volumen de la guía por voz.
Existe una diferencia entre la
carretera en la que se encuentra y la
dibujada en el mapa del producto.
Aunque por lo general el GPS es un
instrumento preciso, tiene cierto margen de error. Una vez instalado el
receptor de GPS puede existir un rango
de error de aproximadamente 10 m.
Pero en las carreteras de construcción
reciente, el problema podría residir en
la falta de actualización del mapa.
No puede visualizar el mapa.
Esto ocurre cuando no puede ver el
mapa aun cuando ha ejecutado el
menú de navegación. Esta situación
puede darse cuando los datos de la
memoria están dañados. Elimine todos
los datos de la memoria y vuelva a
instalarlos de nuevo. Si el problema
continúa tras la instalación, póngase en
contacto con el centro A/S.
La guía de rutas puede diferir de la
ruta real. (Error de la guía de rutas)
• Cuando la carretera es fielmente paralela.
• Cuando el ángulo de bifurcación de la
carretera es muy reducido.
• Cuando existe una carretera adyacente al girar.
• Cuando conduce por una carretera
que se estrecha rápidamente.
• Cuando conduce por una cadena
montañosa o cuando la carretera tiene
demasiadas curvas.
• Cuando los puntos de inicio, paso y
destino estén demasiado cerca unos
de otros, en un radio de 1 km.
• Cuando haya establecido los puntos de
inicio, paso y destino a más de 1 km.
de la carretera.
• Al pasar por un túnel.
Sincronización del mapa
Como se ha mencionado, el sistema
GPS utilizado por este sistema de
navegación portátil es susceptible
de sufrir ciertos fallos. En ocasiones,
sus cálculos pueden situarle en una
ubicación del mapa donde no existe
ninguna carretera. En esta situación, el
sistema de procesamiento asume que
los vehículos viajan sólo por carreteras,
y es capaz de corregir su posición ajustándola a una carretera cercana. Esto se
llama sincronización de mapas.
Con ajuste de
mapa.
Sin ajuste de
mapa.
61
LAN8900EKYN SPA HMC.indd 61
2010-03-25 ¿ÀÀü 10:03:12
Solución de problemas
Symptom
El equipo no se enciende.
La unidad no funciona.
No es posible reproducir nada.
No reproduce ningún sonido.
Causa
Corrección
El interruptor de encendido NO se ha
activado.
Encienda el interruptor principal.
El interruptor de encendido NO está
configurado como ACC.
Seleccione ACC en el interruptor de
encendido.
La unidad está apagada.
Encienda la unidad sólo pulsando
el panel de control.
El ruido y otros factores causan que el
microprocesador incorporado funcione
erróneamente.
Apague y vuelva a encender la unidad.
El disco está sucio.
Limpie el disco.
El disco introducido es de un tipo que
esta unidad no puede reproducir.
Compruebe de qué tipo de disco se
trata.
El disco se inserta hacia abajo.
Inserte el disco con la etiqueta hacia
arriba.
Los archivos del disco son de un
formato de archivo irregular.
Compruebe el formato del archivo.
El nivel de volumen es bajo.
Ajuste el nivel de volumen.
Está activada la función de silencio.
Desactive la función de silencio.
en
62
LAN8900EKYN SPA HMC.indd 62
2010-03-25 ¿ÀÀü 10:03:13
Especificaciones técnicas
SECCIÓN RADIO
FM
Rango de frecuencia . . . . . . . . . . . . . . . . . . .87.5 a 108 MHz
Relación señal-ruido . . . . . . . . . . . . . . . . . . . . . . . . . . .50 dB
Distorsión . . . . . . . . . . . . . . . . . . . . . . . . . . . . . . . . . . . . . 1 %
Sensibilidad utilizable . . . . . . . . . . . . . . . . . . . . . . . 10 dBμV
GENERAL
Potencia de salida . . . . . . . . . . . . . . . . . . 50W x 4CH (Max.)
Alimentación . . . . . . . . . . . . . . . . . . . . . . . . . . . . . . . . DC 12V
Impedancia del altavoz . . . . . . . . . . . . . . . . . . . . . . . . . . .4 Ω
Sistema de toma a tierra . . . . . . . . . . . . . . . . . . . . Negative
Dimensiones (An. x Al. x Lg.) . . . . . 206,4 x 118,4 x 185,4 mm
Peso neto . . . . . . . . . . . . . . . . . . . . . . . . . . . . . . . . . . .2,44 kg
AM (MW)
Rango de frecuencia . . . . . . . . . . . . . . . . . . 522 a 1620 kHz
Relación señal-ruido . . . . . . . . . . . . . . . . . . . . . . . . . . . 45 dB
Distorsión . . . . . . . . . . . . . . . . . . . . . . . . . . . . . . . . . . . .1,0 %
Sensibilidad utilizable . . . . . . . . . . . . . . . . . . . . . . . .38 dBμV
PANTALLA
LCD . . . . . . . . . . . . . . . . . . . . . . . LCD TFT de 6,5 pulgadas
Resolución . . . . . . . . . . . . . . . . . . . . . . . . . . . . . . 800 X 480
Luz de fondo . . . . . . . . . . . . . . . . . . . . . . . . . . . . . Tipo CCFL
SECCIÓN CD
Rango de frecuencia . . . . . . . . . . . . . . . . . . 20 Hz a 20 kHz
Relación señal-ruido . . . . . . . . . . . . . . . . . . . . . . . . . . .60 dB
Distorsión . . . . . . . . . . . . . . . . . . . . . . . . . . . . . . . . . . . . 0,3 %
Sensibilidad utilizable (1kHz). . . . . . . . . . . . . . . . . . . . .50 dB
63
LAN8900EKYN SPA HMC.indd 63
2010-03-25 ¿ÀÀü 10:03:13
Índice
24
23
42
53
Parquin . . . . . . . . . . . . . . . . . . . . . . . . . . . . . . . . . . . . . . . . .
Número De Teléfono . . . . . . . . . . . . . . . . . . . . . . . . . . . . . .
Categoría de puntos de interés . . . . . . . . . . . . . . . . . . . . .
POI (Punto de interés) . . . . . . . . . . . . . . . . . . . . . . . . . . . .
28
26
34
24
Tecnología inalámbrica Bluetooth . . . . . . . . . . . . . . . . . . . 39
Aleatorio . . . . . . . . . . . . . . . . . . . . . . . . . . . . . . . . . . . . . . .
Región Auto/Apagada. . . . . . . . . . . . . . . . . . . . . . . . . . . . .
Repetir . . . . . . . . . . . . . . . . . . . . . . . . . . . . . . . . . . . . . . . . .
Volver al inicio de la pista/capítulo actual . . . . . . . . . . . . .
Opciones De Ruta . . . . . . . . . . . . . . . . . . . . . . . . . . . . . . . .
48
54
47
46
36
Agenda De Direcciones . . . . . . . . . . . . . . . . . . . . . . . . . . .
Búsqueda de direcciones . . . . . . . . . . . . . . . . . . . . . . . . . .
Responder llamadas . . . . . . . . . . . . . . . . . . . . . . . . . . . . . .
AS (memoria de búsqueda automática) . . . . . . . . . . . . . .
Modificar la clave de acceso. . . . . . . . . . . . . . . . . . . . . . . . . 41
Desvío. . . . . . . . . . . . . . . . . . . . . . . . . . . . . . . . . . . . . . . . . . .37
Búsqueda. . . . . . . . . . . . . . . . . . . . . . . . . . . . . . . . . . . . . . . 46
Configuración . . . . . . . . . . . . . . . . . . . . . . . . . . . . . . . . . 16-19
Pasar al siguiente capítulo/pista . . . . . . . . . . . . . . . . . . . . 46
Pasar al capítulo/pista anterior . . . . . . . . . . . . . . . . . . . . . 46
Dividir Pantalla/Pantalla Completa. . . . . . . . . . . . . . . . . . . 35
Almacenar Destino . . . . . . . . . . . . . . . . . . . . . . . . . . . . . . . . 31
Almacenar Posición. . . . . . . . . . . . . . . . . . . . . . . . . . . . . 31,35
Activar o desactivar el micrófono . . . . . . . . . . . . . . . . . . . . 42
Modificar la ruta de sonido durante una llamada . . . . . . . 42
Administrar comandos de voz . . . . . . . . . . . . . . . . . . . . . . 56
Entrada De GPS . . . . . . . . . . . . . . . . . . . . . . . . . . . . . . . . . 27
Comando de ayuda. . . . . . . . . . . . . . . . . . . . . . . . . . . . . . . 58
Casa 1/ Oficina 2/ 3~12 . . . . . . . . . . . . . . . . . . . . . . . . . . . 32
En Ciudad . . . . . . . . . . . . . . . . . . . . . . . . . . . . . . . . . . . . . .
Información De Proximidades . . . . . . . . . . . . . . . . . . . . . .
Información En Ruta . . . . . . . . . . . . . . . . . . . . . . . . . . . . . .
Reproducir introducción . . . . . . . . . . . . . . . . . . . . . . . . . .
26
38
38
47
TA (Aviso de tráfico) . . . . . . . . . . . . . . . . . . . . . . . . . . . . . . 53
Planif. Rute. . . . . . . . . . . . . . . . . . . . . . . . . . . . . . . . 29-30, 35
2D/ 3D . . . . . . . . . . . . . . . . . . . . . . . . . . . . . . . . . . . . . . . . . 34
Servicio Kia . . . . . . . . . . . . . . . . . . . . . . . . . . . . . . . . . . . . . 26
Últimos Destinos . . . . . . . . . . . . . . . . . . . . . . . . . . . . . . . . . 24
Utilizar Mapa . . . . . . . . . . . . . . . . . . . . . . . . . . . . . . . . . . . . 28
Uso de la agenda telefónica. . . . . . . . . . . . . . . . . . . . . . . . 43
Cómo usar la lista de llamadas . . . . . . . . . . . . . . . . . . . . . 44
Realizar una llamada introduciendo un número de teléfono. . 42
Realizar una llamada con un número de marcación rápida. . 45
Comandos de voz . . . . . . . . . . . . . . . . . . . . . . . . . . . . . 59-60
Reconocimiento de voz. . . . . . . . . . . . . . . . . . . . . . . . . . . . 56
Destino Cercano . . . . . . . . . . . . . . . . . . . . . . . . . . . . . . . . . 26
Posición Cercana. . . . . . . . . . . . . . . . . . . . . . . . . . . . . . . . . 25
NOTICIAS . . . . . . . . . . . . . . . . . . . . . . . . . . . . . . . . . . . . . . 54
64
LAN8900EKYN SPA HMC.indd 64
2010-03-25 ¿ÀÀü 10:03:13
Símbolos para mostrar problemas de tráfico
Si el problema de tráfico se encuentra en la ruta calculada, el símbolo se iluminará.
Símbolo
Descripción
Símbolo
Descripción
Caída de rocas
Atasco de tráfico
Accidente
Tráfico denso
Otro peligro
Tormenta de viento
Estrechamiento de
carretera
Nive, hielo
Gravilla
Carretera bloqueada,
Cerrada
Obras en la carretera
El teléfono de emergencia no funciona
Peligro de deslizamiento, Lluvia
65
LAN8900EKYN SPA HMC.indd 65
2010-03-25 ¿ÀÀü 10:03:13
Soporte – Línea de atención telefónica
Sitio web: http://www.navigation.com/kia
Número internacional gratuito: 00800 18 23 53 22
Número de teléfono para
los demás países
(o si no existen números gratuitos)
: +31 555 384 245
P/N: MFL62880528
LAN8900EKYN SPA HMC.indd 66
2010-03-24 ¿ÀÈÄ 10:50:48
ITALIANO
MANUALE DELL’ UTENTE
LAN8900EKYN ITA HMC.indd 1
2010-03-30 ¿ÀÈÄ 12:13:21
Indice
Informazioni di carattere generale . . . . . . . . . . .7-10
Nota sulla sicurezza. . . . . . . . . . . . . . . . . . . . . . . . . . . . . . . . . . . . . . . . . . . . . . . 7-8
Tipi di dischi registrabili . . . . . . . . . . . . . . . . . . . . . . . . . . . . . . . . . . . . . . . . . . . . . 9
Precauzioni da osservare con i dischi e con il riproduttore . . . . . . . . . . . . . . . . . 9
Nota sui copyright . . . . . . . . . . . . . . . . . . . . . . . . . . . . . . . . . . . . . . . . . . . . . . . . . 10
Smaltimento del vecchio dispositivo . . . . . . . . . . . . . . . . . . . . . . . . . . . . . . . . . . 10
Nome di ciascun componente . . . . . . . . . . . . . 11-13
Pannello di controllo . . . . . . . . . . . . . . . . . . . . . . . . . . . . . . . . . . . . . . . . . . . . . 11-12
Telecomando su sterzo . . . . . . . . . . . . . . . . . . . . . . . . . . . . . . . . . . . . . . . . . . . . . 13
Funzionamento base . . . . . . . . . . . . . . . . . . . . .14-15
Schermata di avvio . . . . . . . . . . . . . . . . . . . . . . . . . . . . . . . . . . . . . . . . . . . . . . . .
Accensione dell’unità/ Spegnimento dell’unità. . . . . . . . . . . . . . . . . . . . . . . . . .
Inserire un disco/ Espulsione di un disco . . . . . . . . . . . . . . . . . . . . . . . . . . . . . .
Regolazione del volume . . . . . . . . . . . . . . . . . . . . . . . . . . . . . . . . . . . . . . . . . . . .
Selezione di una sorgente sul controllo. . . . . . . . . . . . . . . . . . . . . . . . . . . . . . . .
Selezione di una sorgente sullo schermo . . . . . . . . . . . . . . . . . . . . . . . . . . . . . .
Telecamera vista posteriore (opzionale) . . . . . . . . . . . . . . . . . . . . . . . . . . . . . . . .
14
14
14
14
15
15
15
Impostazione . . . . . . . . . . . . . . . . . . . . . . . . . . .16-19
Schema di funzionamento generale del menu di SETUP . . . . . . . . . . . . . . . 16-19
Bluetooth . . . . . . . . . . . . . . . . . . . . . . . . . . . . . . . . . . . . . . . . . . . . . . . . . . . . . . 16
Sistema. . . . . . . . . . . . . . . . . . . . . . . . . . . . . . . . . . . . . . . . . . . . . . . . . . . . . . 16-17
Traffico/ Navigazione . . . . . . . . . . . . . . . . . . . . . . . . . . . . . . . . . . . . . . . . . . . . . 18
Audio . . . . . . . . . . . . . . . . . . . . . . . . . . . . . . . . . . . . . . . . . . . . . . . . . . . . . . .18-19
Display . . . . . . . . . . . . . . . . . . . . . . . . . . . . . . . . . . . . . . . . . . . . . . . . . . . . . . . . 19
2
LAN8900EKYN ITA HMC.indd 2
2010-03-30 ¿ÀÈÄ 12:08:04
Indice
Introduzione alla navigazione . . . . . . . . . . . . . 20-21
Cos'è il GPS? . . . . . . . . . . . . . . . . . . . . . . . . . . . . . . . . . . . . . . . . . . . . . . . . . . . . . 20
Segnali satellitari . . . . . . . . . . . . . . . . . . . . . . . . . . . . . . . . . . . . . . . . . . . . . . . . . . 20
Acquisizione segnali dai satelliti . . . . . . . . . . . . . . . . . . . . . . . . . . . . . . . . . . . . . . 20
Schermata iniziale di navigazione . . . . . . . . . . . . . . . . . . . . . . . . . . . . . . . . . . . . 20
Indicatori sullo schermo della carta geografica. . . . . . . . . . . . . . . . . . . . . . . 20-21
Come visualizzare una mappa sullo schermo . . . . . . . . . . . . . . . . . . . . . . 20-21
Modifica della scala della mappa . . . . . . . . . . . . . . . . . . . . . . . . . . . . . . . . . . . 21
Menu immissione destinazione . . . . . . . . . . . 22-32
Panoramica dei menu di navigazione/ Regolazione del volume di navigazione . . 22
Operazioni generali del menu di destinazione . . . . . . . . . . . . . . . . . . . . . . . . . . 22
Ricerca indirizzo. . . . . . . . . . . . . . . . . . . . . . . . . . . . . . . . . . . . . . . . . . . . . . . . . . . 23
Ultime destinazione. . . . . . . . . . . . . . . . . . . . . . . . . . . . . . . . . . . . . . . . . . . . . . . . 24
Rubrica . . . . . . . . . . . . . . . . . . . . . . . . . . . . . . . . . . . . . . . . . . . . . . . . . . . . . . . . . . 24
POI (Punti di interesse) . . . . . . . . . . . . . . . . . . . . . . . . . . . . . . . . . . . . . . . . . . . . . 24
Vicino Posizione . . . . . . . . . . . . . . . . . . . . . . . . . . . . . . . . . . . . . . . . . . . . . . . . . 25
Vicino Destinazione . . . . . . . . . . . . . . . . . . . . . . . . . . . . . . . . . . . . . . . . . . . . . . 26
In città/ Nome . . . . . . . . . . . . . . . . . . . . . . . . . . . . . . . . . . . . . . . . . . . . . . . . . . 26
Assistenza Kia . . . . . . . . . . . . . . . . . . . . . . . . . . . . . . . . . . . . . . . . . . . . . . . . . . 26
Numero Di Telefono . . . . . . . . . . . . . . . . . . . . . . . . . . . . . . . . . . . . . . . . . . . . . . 26
Ingresso GPS . . . . . . . . . . . . . . . . . . . . . . . . . . . . . . . . . . . . . . . . . . . . . . . . . . . . . 27
Parcheggio. . . . . . . . . . . . . . . . . . . . . . . . . . . . . . . . . . . . . . . . . . . . . . . . . . . . . . . 28
Continua Navigaz./ Stop Navigaz. . . . . . . . . . . . . . . . . . . . . . . . . . . . . . . . . . . . . 28
Uso di una mappa. . . . . . . . . . . . . . . . . . . . . . . . . . . . . . . . . . . . . . . . . . . . . . . . . 28
Pianificatore di escursione . . . . . . . . . . . . . . . . . . . . . . . . . . . . . . . . . . . . . . .29-30
Salva destinazione . . . . . . . . . . . . . . . . . . . . . . . . . . . . . . . . . . . . . . . . . . . . . . . . . 31
Salva posizione . . . . . . . . . . . . . . . . . . . . . . . . . . . . . . . . . . . . . . . . . . . . . . . . . . . 31
Casa 1/ Lavoro2/ 3~12 . . . . . . . . . . . . . . . . . . . . . . . . . . . . . . . . . . . . . . . . . . . . . 32
3
LAN8900EKYN ITA HMC.indd 3
2010-03-30 ¿ÀÈÄ 12:08:04
Indice
Uso del menu mappa . . . . . . . . . . . . . . . . . . .33-38
Panoramica dei menu mappa . . . . . . . . . . . . . . . . . . . . . . . . . . . . . . . . . . . . . . . 33
Operazioni generali del menu mappa . . . . . . . . . . . . . . . . . . . . . . . . . . . . . . . . . 33
Categoria del POI . . . . . . . . . . . . . . . . . . . . . . . . . . . . . . . . . . . . . . . . . . . . . . . . . 34
2D/ 3D . . . . . . . . . . . . . . . . . . . . . . . . . . . . . . . . . . . . . . . . . . . . . . . . . . . . . . . . . . 34
Schermo diviso/ Schermo intero . . . . . . . . . . . . . . . . . . . . . . . . . . . . . . . . . . . . . 35
Salva posizione . . . . . . . . . . . . . . . . . . . . . . . . . . . . . . . . . . . . . . . . . . . . . . . . . . . 35
Pianificatore di escursione . . . . . . . . . . . . . . . . . . . . . . . . . . . . . . . . . . . . . . . . . . 35
Opzioni di percorso . . . . . . . . . . . . . . . . . . . . . . . . . . . . . . . . . . . . . . . . . . . . . . . . 36
Browser. . . . . . . . . . . . . . . . . . . . . . . . . . . . . . . . . . . . . . . . . . . . . . . . . . . . . . . . . . 37
Deviazione . . . . . . . . . . . . . . . . . . . . . . . . . . . . . . . . . . . . . . . . . . . . . . . . . . . . . . . 37
Informazioni locale . . . . . . . . . . . . . . . . . . . . . . . . . . . . . . . . . . . . . . . . . . . . . . . . 38
Info sul percorso . . . . . . . . . . . . . . . . . . . . . . . . . . . . . . . . . . . . . . . . . . . . . . . . . . 38
Tecnologia wireless Bluetooth . . . . . . . . . . . . .39-45
Informazioni di base relative alla tecnologia . . . . . . . . . . . . . . . . . . . . . . . . . . . . 39
Collegamento del vostro apparecchio e di un telefono bluetooth. . . . . . . .39-40
Scollegamento/riconnessione del telefono bluetooth. . . . . . . . . . . . . . . . . . . . . 41
Eliminare un telefono connesso . . . . . . . . . . . . . . . . . . . . . . . . . . . . . . . . . . . . . . 41
Modifica della chiave di accesso . . . . . . . . . . . . . . . . . . . . . . . . . . . . . . . . . . . . . 41
Effettuare una telefonata inserendo un numero . . . . . . . . . . . . . . . . . . . . . . . . . 42
Cambiamento del percorso dell'audio durante una chiamata . . . . . . . . . . . . . . 42
Accensione e spegnimento del microfono . . . . . . . . . . . . . . . . . . . . . . . . . . . . . 42
Rispondere alle chiamate . . . . . . . . . . . . . . . . . . . . . . . . . . . . . . . . . . . . . . . . . . . 42
Utilizzo della rubrica . . . . . . . . . . . . . . . . . . . . . . . . . . . . . . . . . . . . . . . . . . . . . . . 43
Usando l'elenco delle chiamate . . . . . . . . . . . . . . . . . . . . . . . . . . . . . . . . . . . . . . 44
Effettuare una chiamata con i numeri di composizione veloce . . . . . . . . . . . . . 45
4
LAN8900EKYN ITA HMC.indd 4
2010-03-30 ¿ÀÈÄ 12:08:04
Indice
Operazione CD/MP3/WMA/USB/iPod . . . . .46-51
Riproduzione di un audio CD e file MP3/ WMA/ USB/ iPod . . . . . . . . . . .46-48
Come saltare al capitolo/brano successivo . . . . . . . . . . . . . . . . . . . . . . . . . . . 46
Come saltare al capitolo/brano precedente . . . . . . . . . . . . . . . . . . . . . . . . . . 46
Come tornare all'inizio del capitolo/brano attualmente in riproduzione . . . . 46
Ricerca . . . . . . . . . . . . . . . . . . . . . . . . . . . . . . . . . . . . . . . . . . . . . . . . . . . . . . . . 46
Scansione introduttiva . . . . . . . . . . . . . . . . . . . . . . . . . . . . . . . . . . . . . . . . . . . . 47
Ripeti. . . . . . . . . . . . . . . . . . . . . . . . . . . . . . . . . . . . . . . . . . . . . . . . . . . . . . . . . . 47
Casuale . . . . . . . . . . . . . . . . . . . . . . . . . . . . . . . . . . . . . . . . . . . . . . . . . . . . . . . . 48
Riproduzione di file con classificazione per cartella/Album/Artista . . . . . . . . 48
Individuare una cartella/file utilizzando l'elenco . . . . . . . . . . . . . . . . . . . . . . . . . 49
Ricerca musica . . . . . . . . . . . . . . . . . . . . . . . . . . . . . . . . . . . . . . . . . . . . . . . . . . . 49
Impostazione velocità di riproduzione del audiolibro . . . . . . . . . . . . . . . . . . . . . 50
Requisiti dispositivo USB/ Periferiche USB compatibili . . . . . . . . . . . . . . . . . . . 50
Requisiti per i file musicali MP3/WMA . . . . . . . . . . . . . . . . . . . . . . . . . . . . . . . . 51
Requisiti dispositivo iPOD. . . . . . . . . . . . . . . . . . . . . . . . . . . . . . . . . . . . . . . . . . . 51
Funzionamento della radio . . . . . . . . . . . . . . .52-54
Ascolto di stazioni radio . . . . . . . . . . . . . . . . . . . . . . . . . . . . . . . . . . . . . . . . . . . . 52
Memorizzazione e richiamo stazioni . . . . . . . . . . . . . . . . . . . . . . . . . . . . . . . . . . 52
AS (memoria ricerca automatica) . . . . . . . . . . . . . . . . . . . . . . . . . . . . . . . . . . . . 53
Scansione frequenze di trasmissione . . . . . . . . . . . . . . . . . . . . . . . . . . . . . . . . . 53
TA (Annuncio traffico) . . . . . . . . . . . . . . . . . . . . . . . . . . . . . . . . . . . . . . . . . . . . . . 53
NOTIZIE . . . . . . . . . . . . . . . . . . . . . . . . . . . . . . . . . . . . . . . . . . . . . . . . . . . . . . . . . 54
Regione Auto/Off . . . . . . . . . . . . . . . . . . . . . . . . . . . . . . . . . . . . . . . . . . . . . . . . . 54
Funzionamento con dispositivo ausiliario. . . . . . . 55
Uso di una sorgente AUX. . . . . . . . . . . . . . . . . . . . . . . . . . . . . . . . . . . . . . . . . . . 55
5
LAN8900EKYN ITA HMC.indd 5
2010-03-30 ¿ÀÈÄ 12:08:04
Indice
Sistema di riconoscimento vocale . . . . . . . . 56-60
Riconoscimento vocale . . . . . . . . . . . . . . . . . . . . . . . . . . . . . . . . . . . . . . . . . . . . . 56
Fornire ai comandi vocali . . . . . . . . . . . . . . . . . . . . . . . . . . . . . . . . . . . . . . . . . . . 56
Come dire i numeri . . . . . . . . . . . . . . . . . . . . . . . . . . . . . . . . . . . . . . . . . . . . . . . . 56
Esempi di comandi vocali . . . . . . . . . . . . . . . . . . . . . . . . . . . . . . . . . . . . . . . . 57-58
Comando Guida . . . . . . . . . . . . . . . . . . . . . . . . . . . . . . . . . . . . . . . . . . . . . . . . . . 58
Comandi vocali . . . . . . . . . . . . . . . . . . . . . . . . . . . . . . . . . . . . . . . . . . . . . . . .59-60
Risoluzione problemi. . . . . . . . . . . . . . . . . . . . 61-62
Specifiche tecniche . . . . . . . . . . . . . . . . . . . . . . . . . . 63
Indice . . . . . . . . . . . . . . . . . . . . . . . . . . . . . . . . . . . 64
Simboli indicanti problemi di traffico . . . . . . . . . . . . . 65
6
LAN8900EKYN ITA HMC.indd 6
2010-03-30 ¿ÀÈÄ 12:08:05
Informazioni di carattere generale
Nota sulla sicurezza
ATTENZIONE
PERICOLO DI SCOSSE
ELETTRICHE NON APRIRE
ATTENZIONE : PER RIDURRE IL RISCHIO
DI SCOSSE ELETTRICHE, NON SEPARARE
IL PANNELLO SUPERIORE O POSTERIORE.
ALL'INTERNO DEL PRODOTTO NON CI
SONO PARTI UTILIZZABILI DIRETTAMENTE
DALL'UTENTE. LA RIPARAZIONE DEL
PRODOTTO DEVE ESSERE AFFIDATA
AL SOLO PERSONALE TECNICO
AUTORIZZATO.
Il simbolo del lampo all'interno del
triangolo indica all'utente la presenza
di tensioni pericolose non isolate
all'interno del prodotto, tali da costituire
un rischio di scossa elettrica.
Il punto esclamativo all'interno del
triangolo indica all'utente che la documentazione fornita assieme al prodotto
contiene importanti istruzioni sul funzionamento e sulla manutenzione dello
stesso.
Utilizzare sempre il veicolo in modo
sicuro. Non distraetevi dalla guida del
veicolo restando sempre ben consapevoli
di tutte le condizioni di guida. Non modificare le impostazioni o altre funzioni.
Accostare in modo sicuro e legale
prima di effettuare tali operazioni.
Per maggiore sicurezza, alcune funzioni
non sono abilitate se il freno a mano
non è inserito.
Non utilizzare per molte ore a temperature molto alte o basse.
(da -10°C a 60°C)
Per ridurre il rischo di scosse elettriche
non rimuovere il coperchio o il pannello
posteriore del prodotto. L’unità non contiene parti riparabili dall’utente.
La manutenzione deve essere eseguita
esclusivamente da personale qualificato.
Per ridurre il rischio di incendi o scosse
elettriche, si consiglia di non esporre il
prodotto ad acqua, spruzzi, pioggia o
umidità.
La temperatura che si sviluppa
all'esterno dell'unità può essere
estremamente elevata, pertanto il
suo utilizzo è consentito solo previa
un’adeguata installazione nel veicolo.
Durante la guida, mantenere il volume a
livelli adeguati.
Non far cadere l’unità evitando che
subisca forti urti.
7
LAN8900EKYN ITA HMC.indd 7
2010-03-30 ¿ÀÈÄ 12:08:05
Informazioni di carattere generale
ATTENZIONE :
Il guidatore non deve guardare il monitor mentre guida. Se il guidatore guarda
il monitor mentre guida, può distrarsi e
provocare un incidente.
Questa unità è per veicoli con batteria a
12 volt e messa a terra negativa. Prima
dell’installazine in un veicolo turistico,
un autobus, controllare la tensione della
batteria per evitare cortocircuiti al sistema elettrico, scollegare il cavo E della
batteriaprima di iniziare l’installazione.
Questo prodotto è dotato di un sistema
laser. Per garantire l’uso corretto del
prodotto, leggere attentamente il presente manuale di istruzioni e conservarlo per consultazione futura. In caso
siano necessari interventi di assistenza,
rivolgersi a un centro autorizzato.
L’esecuzione di controlli, regolazioni o di
procedure diverse da quelle specificate
nel presente manuale possono
determinare l’eventuale esposizione a
radiazioni pericolose. Per evitare
l’esposizione diretta al fascio laser non
aprire il dispositivo. In caso di apertura
sussiste il pericolo di radiazioni laser
visibili. NON FISSARE LO SGUARDO
SUL FASCIO LASER.
ATTENZIONE :
RADIAZIONI LASER VISIBILI E
INVISIBILI DI CLASSE 3B QUANDO
APERTO NON GUARDARE
DIRETTAMENTE CON STRUMENTI
OTTICI
ATTENZIONE :
• Non tenere il sistema di navigazione
in funzione con il motore spento.
Così facendo si può scaricare la batteria del veicolo. Quando si usa un
sistema di navigazione tenere sempre
il veicolo in moto.
• Quando il conducente desidera utilizzare il sistema di navigazione, prima
deve posteggiare il veicolo in un
luogo sicuro e tirare il freno a mano.
L'azionamento del sistema durante la
guida può distrarre il conducente con
pericolo di incidente.
• Non smontare o scomporre questo
sistema. In caso contrario potrebbero
verificarsi incendi, incidenti o scossa
elettrica.
• Alcuni paesi province possono avere
leggi che limitano l'uso di schermi
video durante la guida. Usare questo
sistema solo dove il suo uso è legale.
• Non usare il telefono durante la
guida. Per usare il telefono fermarsi in
un posto sicuro.
• Durante la guida tenere il volume
dell'unità basso sufficientemente per
sentire i suoni provenienti dall'esterno.
8
LAN8900EKYN ITA HMC.indd 8
2010-03-30 ¿ÀÈÄ 12:08:05
Informazioni di carattere generale
Tipi di dischi registrabili
Precauzioni da osservare con i dischi e con il riproduttore
• Un disco difettoso o sporco
all’interno dell’unità può
determinare alterazioni del
suono durante la riproduzione.
• Il disco deve essere impugnato per la parte interna e i
bordi esterni.
• Non toccare la superficie
del lato privo di etichetta del
disco.
Questa unità riproduce CD-R o CDRW contenenti file audio, o file MP3 o
WMA.
• Dipendendo dalle condizioni delle
apparecchiature di registrazione o del
disco CD-R/RW, alcuni dischi
CD-R/RW non possono essere
riprodotti su questa unità.
• Non applicare sigilli o etichette
adesive sui due lati del disco (il lato
con l’etichetta o il lato registrato).
• Non utilizzare dischi CD di forma
irregolare (ad es., a forma di cuore
o ottagonali). in quanto si possono
determinare problemi di
• Pulire il disco prima
della riproduzione.
Pulire il disco dal
centro verso l’esterno
con un panno.
• Non utilizzare mai
solventi come benzina
o alcool per pulire il
disco.
Non attaccare carta o nastro,
ecc. Sulla superficie.
Non esporre il disco
all’irradiazione solare diretta o
a calore eccessivo.
8 cm
L’unità non funziona con dischi da 8cm (utilizzare solo
dischi da 12cm).
9
LAN8900EKYN ITA HMC.indd 9
2010-03-30 ¿ÀÈÄ 12:08:05
Informazioni di carattere generale
Nota sui copyright
Proibito per legge copiare, diffondere,
mostrare in pubblico, distribuire via
cavo o noleggiare materiale protetto da
copyright senza permesso.
Questo prodotto dispone di funzione
di protezione da copia sviluppato dalla
Macrovision. Indicazioni di protezione
da copia sono registrati su alcuni dischi.
Quando si riproducono le immagini di
questi dischi su un'unità, appare un
disturbo all'immagine. Questo prodotto
incorpora tecnologie di protezione
del copyright protette da alcuni brevetti degli Stati Uniti e da altri diritti di
proprietà intellettuale di Macrovision
Corporation ed altri titolari. L'uso di
questa tecnologia deve essere autorizzato da Macrovision Corporation.
L'apparecchio è destinato esclusivamente all'uso domestico e ad altri
usi limitati, a meno che Macrovision
Corporation non autorizzi diversamente.
Il reverse engineering o il disassemblaggio sono proibiti.
Smaltimento del vecchio dispositivo
1. Se sul prodotto è applicata l’etichetta
riportante il bidone sbarrato significa
che il prodotto è tutelato dalla direttiva europea 2002/96/EC.
2. Tutti i prodotti elettrici o elettronici
devono essere smaltiti separatamente dai rifiuti municipali mediante
punti di raccolta specifici indicati
dalle autorità locali.
3. Lo smaltimento corretto del vecchio
dispositivo aiuta ad impedire conseguenze negative per l’ambiente e la
salute dell’uomo.
4. Per maggiori informazioni dettagliate sullo smaltimento del vecchio
dispositivo, contattare l’ente locale,
il servizio di nettezza urbana o il
negozio dove è stato acquistato il
prodotto.
iPod è un marchio di Apple Inc., registrato negli USA e in altri paesi.
iPhone è un marchio registrato di Apple Inc.
YouTube è un marchio di Google Inc.
La dicitura “Made for iPod” indica che
un dispositivo elettronico è stato progettato in maniera specifica per collegarsi
all'iPod ed è stato certificato dal
produttore come idoneo a soddisfare gli
standard prestazionali di Apple.
“Il marchio e logo Bluetooth ® sono
proprietà della Bluetooth SIG, inc. e
l’uso di questi marchi da parte di LG
Electronics è sotto licenza. Altri marchi
commerciali e nomi commerciali sono
di proprietà dei rispettivi proprietari.”
10
LAN8900EKYN ITA HMC.indd 10
2010-03-30 ¿ÀÈÄ 12:08:05
Nome di ciascun componente
Pannello di controllo
1 2
7
8 9
3
10
4
RADIO
MAP
11
5
MEDIA
NAV
12
13
6
14
1. Display on/off (
)
Premere per alternare tra accensione e spegnimento del display.
2. Espulsione (Z)
Premere per espellere un disco
dall'unità.
4. RADIO
Seleziona la banda FM/AM.
5. MEDIA
Seleziona la sorgente: CD, USB,
iPod, AUX.
3. Rotazione sinistra ( / )
- Premere: Acceso/Spento
- Ruota: Controllo volume
6.
/
• Premere questo pulsante.
- Sintonizzazione automatica:
RADIO
- Traccia su/giù: USB CD iPod
• Premere e tenere premuto questo pulsante.
- Ricerca (FF/REW): USB CD
iPod
7. Slot disco
11
LAN8900EKYN ITA HMC.indd 11
2010-03-30 ¿ÀÈÄ 12:08:06
Nome di ciascun componente
8. TELEFONO ( )
Usare per attivare il telefono vivavoce Bluetooth.
13. IMPOSTAZIONE ( )
• Premere per accedere alle
impostazioni del sistema.(Pagina 16)
9. Ripeti la guida vocale ( )
Premere per ripetere la voce di guida.
10. Rotazione destra (
)
Rotazione senso orario /senso antiorario.
• Cerca la frequenza radio precedente o successiva.
- Sintonia manuale
• Salta una traccia/file verso l'alto/
basso in un elenco su schermo.
• ZOOM AVANTI/ AVANTI INDIETRO
- Ruotare per modificare la scala
della mappa sulla schermata di
mappa.
• Premere tenere premuto per controllare l'ID del dispositivo, la versione
di navigazione e la versione della
mappa.
11. MAP
Premere per visualizzare la schermata
di mappa della posizione corrente.
12. NAV
Premere per inserire un menu di
destinazione. Sono disponibili vari
metodi per inserire una destinazione.
14. Info ( )
Premere per visualizzare il percorso di
destinazione, percorso e info0rmazioni
relative al traffico quando la guida del
percorso è attiva.
• Destinazione: Mostra le informazioni
relative alla posizione
corrente del veicolo e
la sua destinazione.
• Percorso: Mostra le informazioni
stradali dalla posizione
corrente del veicolo fino a
destinazione.
• Traffico: Mostra informazioni relative
al traffico.
- Info Traffico Su Percorso: Viene
visualizzato l'elenco delle
informazioni relative al traffico trovate sul percorso raccomandato
dalla posizione corrente del veicolo
fino alla destinazione.
- Info Traffico Vicinanze: Viene
visualizzato l'elenco delle informazioni
relative alle informazioni sul traffico
relative alla posizione del veicolo.
12
LAN8900EKYN ITA HMC.indd 12
2010-03-30 ¿ÀÈÄ 12:08:06
Nome di ciascun componente
Telecomando su sterzo
7
1
6
2
3
5
4
4.
1.
Premere questo pulsante brevemente per rifiutare una telefonata
durante una telefonata.
Silenzia l'audio.
2. Volume (
/ )
Aumenta o diminuisce il livello del
volume.
3.
Attiva il telefono vivavoce Bluetooth.
• Premere questo pulsante brevemente per ricevere una telefonata
quando c'è una telefonata in arrivo.
• Premere questo pulsante brevemente effettuare una telefonata
dall'ultima telefonata.
• Premere questo pulsante a lungo
per cambiare il percorso audio
durante una telefonata.
(vivavoce y telefono)
6. U / u
• Premere questo pulsante.
- Sintonizzazione automatica:
RADIO
- Traccia su/giù: USB CD iPod
• Premere e tenere premuto questo
pulsante.
- Sintonia manuale: RADIO
- Ricerca (FF/REW): USB CD
5.
• Premere questo pulsante per avviare la modalità di riconoscimento
vocale.
• Premere il pulsante ancora una
volta per annullare i comandi vocali
quando il riconoscimento vocale è
attivo.
iPod
7.
Seleziona una sorgente:
FM t AM t CD t USB t iPod
t AUX t FM...
13
LAN8900EKYN ITA HMC.indd 13
2010-03-30 ¿ÀÈÄ 12:08:06
Funzionamento base
Schermata di avvio
Accensione dell’unità
L'unità si avvia al momento in cui
l'interruttore di accensione viene
posizionato nella posizione ACC o ON.
Premere
sul pannello di controllo
nello stato di spento.
Nota
quando si inserisce un disco,
l'apparecchio si accende automaticamente.
Spegnimento dell’unità
- La modalità radio viene visualizzata
sullo schermo.
Nota
• L'unità memorizza l'ultima modalità
riprodotta. L'ultima modalità viene
salvata in memoria anche se
l'interruttore di accensione è posizionata nella posizione OFF. Quando
l'interruttore di accensione è posizionato nella posizione ACC o ON, la
modalità viene automaticamente richiamata.
• Il riavvio dell'unità può impiegare un
certo tempo (circa 20 secondi).
Premere
sul pannello di controllo
nello stato di acceso.
Inserire un disco
Inserire un disco e la riproduzione inizia
automaticamente.
Espulsione di un disco
Premere Z sul pannello di controllo.
Il disco è espulso automaticamente
dalla feritoia di caricamento.
Nota
Se il disco espulso non viene rimosso
dopo circa 10 secondi, il disco viene
inserito nuovamente nella feritoia di
caricamento.
Regolazione del volume
Ruotare la manopola del volume (
sul pannello di controllo.
)
Nota
Quando si spegne l’unità il livello del
volume corrente viene memorizzato
automaticamente. Accendendo l’unità, il
volume sarà impostato al livello memorizzato.
Se si spegne o accende l'unità sotto il
livello di volume 5, il livello del volume
viene modificato in 5.
Se si spegne accende/spegne l'unità
sopra al livello del volume 25, il livello
del volume viene modificato in 25.
14
LAN8900EKYN ITA HMC.indd 14
2010-03-30 ¿ÀÈÄ 12:08:06
Funzionamento base
Selezione di una sorgente sul
controllo
Selezione di una sorgente
sullo schermo
Premere MEDIA ripetutamente.
La modalità cambia secondo lo schema
seguente.
CD t USB t iPod t AUX t CD...
È possibile selezionare una sorgente
sullo schermo e configurarla secondo le
vostre particolari necessità.
Nota
Se una sorgente non è connessa all'
unità, la sorgente non viene riconosciuta.
1. Toccare l'icona della sorgente nella
posizione superiore sinistra durante
le riproduzione di una sorgente.
Telecamera vista posteriore
(opzionale)
Con una telecamera di vista posteriore è
possibile passare al video da una telecamera di vista posteriore quando la marcia
viene inserita la RETROMARCIA (R).
Tale caratteristica permette di controllare che cosa è presente dietro al veicolo durante la guida.
Quando l'unità e completamente avviata la
linea guida è visualizzata sullo schermo.
2. Toccare la sorgente desiderata.
Nota
Se una sorgente non è connessa
all'unità, la sorgente non viene riconosciuta.
ota
• La funzione telecamera per vedere
dietro al veicolo consente di utilizzare questo prodotto come aiuto per
dare un'occhiata a eventuali rimorchi,
oppure quando si parcheggia in spazi
limitati. Non utilizzare questa funzione
a scopo di divertimento.
• Gli oggetti presenti dietro al veicolo
possono apparire più vicini o più lontani di quanto lo siano in realtà.
• Notare che i bordi delle immagini della
telecamera di vista posteriore possono
essere leggermente diversi in funzione
se durante la retromarcia le immagini
vengono visualizzate a schermo pieno.
15
LAN8900EKYN ITA HMC.indd 15
2010-03-30 ¿ÀÈÄ 12:08:06
Impostazione
Schema di funzionamento
generale del menu di SETUP
Bluetooth
Sistema
Ci sono quattro tipi di menu su schermo.
Ci sono cinque tipi di menu su schermo.
Visualizza elenco dispositivi Bluetooth
Questo permette di visualizzare l'elenco di
dispositivi Bluetooth accoppiati.
Lingua
Questo permette di cambiare la lingua
usata nel sistema.
Il sistema di navigazione può essere
personalizzato per rendere il suo uso
più facile: Bluetooth, Sistema, Traffico,
Navigazione, Audio, Display
1. Accendere l'unità.
2. Premere
sul pannello di controllo.
Ricerca dispositivi Bluetooth
Questo permette di cercare dispositivi
Bluetooth. (Pagina 39)
3. Toccare l'opzione desiderata.
4. Toccare le impostazioni desiderate e
quindi toccare [OK] per confermare
la selezione.
Autorizzazione dispositivo esterno
Questo permette di usare quando si connette l'unità e il telefono bluetooth usando
le impostazioni del telefono bluetooth.
(Pagina 40)
Nota
Toccare
per tornare alla schermata
precedente. Premere MAP per tornare
alla posizione corrente sulla schermata
mappa.
Cambia codice di accesso
Si può modificare la chiave di accesso.
(Pagina 41)
Toccare il pulsante della lingua desiderata.
Usare o per andare avanti o indietro una pagina se necessario.
16
LAN8900EKYN ITA HMC.indd 16
2010-03-30 ¿ÀÈÄ 12:08:07
Impostazione
Orologio
Questo permette di impostare il formato
ora e l'ora legale.
Unità
Questo permette di impostare l'unità di
distanza visualizzata sul sistema di navigazione.
• Formato ora: Alterna il formato ora tra
“12h” e “24h”.
• Ora legale: Imposta l'ora legale
“On” o “Off”.
L’unità imposta automaticamente l’orologio rilevando l’orario estivo.
Anche se l’orario estivo è
impostato a “On”, l’unità
imposta l’orologio all’orario
normale (non +1 ora)
quando non è estate.
Cambia l'unità tra “km” e “mls”.
Demo Navigazione
Questa funzione dimostrativa.
Dopo aver impostato un percorso, viene
visualizzato automaticamente una guida
simulata del percorso fino a destinazione.
Impostazioni di fabbrica
Questo permette di inizializzare varie
impostazioni sulle impostazioni predefinite.
- Tutti: Inizializza tutte le impostazioni
sono impostazioni predefinite.
- Telefono : inizializza tutte le impostazioni relative al telefono.
- Navigazione : inizializza tutte le
impostazioni relative alla
navigazione.
- Audio-Multimediale-Radio:
inizializza tutte le impostazioni relative a
Audio/Multimediale/ Radio.
• Demo Navigazione
- Off: La modalità di dimostrazione è
impostata su off.
- 1x: Imposta la guida di dimostrazione solo una volta.
- Cont.: Ripete la guida di dimostrazione
• Velocità: Imposta la velocità della
guida di dimostrazione.
17
LAN8900EKYN ITA HMC.indd 17
2010-03-30 ¿ÀÈÄ 12:08:07
Impostazione
Traffico
Navigazione
Audio
Ci sono tre tipi di menu su schermo.
Ci sono quattro tipi di menu su schermo.
Ci sono cinque tipi di menu su schermo.
TMC
Cambia il TMC (Traffic Message
Channel) a “Off”, “Auto” oppure “On”.
- Auto: Quando viene trovato un evento TMC sul percorso corrente, il
sistema di navigazione circa un
percorso alternativo automaticamente senza annunci.
- Off: Cancella la funzione TMC.
- On: Quando viene rilevato l'evento
TMC sul percorso corrente, il
sistema di navigazione visualizza lo schermo di popup con le
informazioni dell'evento.
Visualizzazione Svincolo Autostradale
Questo visualizza l'incrocio autostradale
sulla schermata della mappa.
SDVC (Controllo volume dipendente
dalla velocità)
Quando la velocità del vostro veicolo
supera i 40 km all'ora, il livello del volume viene aumentato rispetto al livello
del volume originale.
Potete impostare SDVC su Off, Basso,
Medio, oppure Alto.
- Off: Il livello del volume originale era
sempre utilizzato a prescindere dalla
velocità del veicolo.
- Basso, Medio, Alto: Il livello di uscita
del volume sarà automaticamente
sempre in base alla velocità del veicolo.
Stazione TMC Automatica
Quando viene rilevato un evento TMC,
l'emittente TMC con il segnale più forte
viene ricevuta automaticamente.
Assistente Di Corsia
Questo visualizza la corsia evidenziata
sulla schermata della mappa.
Pianifica Percorsi Diversi
Questo visualizza i diversi percorsi pianificati sulla schermata della mappa.
Avviso Velocità
Questo visualizza attenzione velocità
sulla schermata della mappa.
Stazione TMC Preferita
L'unità riceve la stazione TMC impostata dall'utente. Questo viene attivato
quando si annulla la funzione [Stazione
TMC Automatica].
Volume navigazione
È possibile impostare o annullare gli
annunci vocali della navigazione. Anche
se l’impostazione è “Off”, all’avvio di una
nuova guida di itinerario, viene automaticamente impostato a “On”.
Clic touchscreen
Potete impostare l'audio del touch
screen su On/Off.
18
LAN8900EKYN ITA HMC.indd 18
2010-03-30 ¿ÀÈÄ 12:08:07
Impostazione
Suono (Predefinito: Centro)
Bilanciamento/
Smorzatore
Power Bass
Potete impostare il basso di potenza
(Power Bass) su Off, Basso, Medio, oppure
Alto.
Modalità mappa
Per migliorare la visibilità della mappa
sullo schermo tra giorno e notte, si può
cambiare la combinazione dei colori
della mappa.
- Auto: La mappa sullo schermo viene
visualizzata automaticamente
con colori luminosi o scuri.
Bassi/
Medi/Acuti
- Bilanciamento: Toccare b oppure B
per regolare l'audio degli altoparlanti
sinistro e destro.
- Smorzatore: Toccare v oppure V per
regolare l'audio degli altoparlanti sinistro e destro.
- Bassi, Medi, Acuti: Toccare b oppure B
per regolare il Bassi, Medi oppure Acuti.
- Off: Emette l'audio originale in uscita.
- Basso, Medio, Alto: Impostare il Basso,
Medio, oppure Alto per intensificare i
suoni a basso volume.
Display
Ci sono due tipi di menu su schermo.
Nota
Toccare [Centro] per tornare alle
impostazioni predefinite.
Luminosità
Potete impostare la luminosità dello
schermo.
Impostare la luminosità del display su
Basso, Medio oppure Alto.
Illuminazione
automatica
Off (giorno)
Illuminazione
automatica
On(notte)
Illuminazione
automatica
non rilevata
Illuminazione
On
Illuminazione
Off
Mappa: Giorno
Mappa:
Giorno
Mappa: Notte
Mappa: Notte
Mappa: Notte
Mappa:
Giorno
- Gior.(Giorno): La mappa sullo schermo
viene sempre visualizzata con colori luminosi.
- Notte: La mappa sullo schermo viene
sempre visualizzata con colori
scuri.
19
LAN8900EKYN ITA HMC.indd 19
2010-03-30 ¿ÀÈÄ 12:08:07
Introduzione alla navigazione
Segnali satellitari
Cos'è il GPS?
Il Sistema di posizionamento globale
(GPS) è un sistema di navigazione satellitare costituito dalla rete di 24 satelliti
posizionati in orbita dal dipartimento
della difesa.
degli USA. Il GPS in origine era stato
voluto per applicazioni militari ma nel
1980, il governo ha reso disponibile il
sistema per uso civile. Il GPS funziona
in qualsiasi condizione atmosferica,
ovunque nel mondo e 24 ore al giorno.
Non sono necessary abbonamenti o
tasse di configurazione per utilizzare il
GPS.
GPS
GPS
Il vostro apparecchio deve ricevere i
segnali dal satellite per poter funzionare. Se ci si trova all'interno, vicino ad
edifici molto alti o ad alberi, oppure in
un garage, l'apparecchio non può ricevere il segnale dai satelliti.
Indicatori sullo schermo della
carta geografica
Come visualizzare una mappa sullo
schermo
Il sistema di navigazione visualizza varie
informazioni sullo schermo.
Acquisizione segnali dai satelliti
Prima che l'apparecchio possa identificare la vostra attuale ubicazione e quindi riprodurre un percorso, è necessario
effettuare le seguenti operazioni:
1. Portare il veicolo all'aperto in una
zona senza ostacoli elevati.
2. Accendere l’apparecchio.
L'acquisizione dei segnali dal satelliti
può impiegare diversi minuti.
GPS
GPS
Schermata iniziale di navigazione
La schermata di avvertenza viene
visualizzata sullo schermo dopo aver
inserito l'interruttore di accensione in
posizione ACC o ON, quando si entra
in una modalità di navigazione per la
prima volta. leggere con attenzione
quindi toccare [Accettare].
•
/
Indica la direzione della mappa.
Toccare per modificare l'orientamento
della mappa.
•
Indica la posizione corrente del
veicolo e la direzione di guida.
•
Toccare [Menu] per accedere al menu
della mappa.
20
LAN8900EKYN ITA HMC.indd 20
2010-03-30 ¿ÀÈÄ 12:08:07
Introduzione alla navigazione
Modifica della scala della mappa
•
Indica la scala della mappa.
1. Toccare
mappa.
la schermata della
•
Indica l'ora di arrivo, la distanza e il
tempo residuo fino a destinazione.
•
Appare nell'angolo superiore destro
dello schermo quando viene impostato un percorso. Indica la distanza fino
al prossimo punto guida e il punto di
svolta del punto guido medesimo.
2. Toccare [+] per visualizzare la
mappa in dettaglio.
Toccare [-] per visualizzare la mappa
di un'area più ampia.
•
Indica il limite di velocità sulla strada
sulla quale si sta guidando.
50 m n100 m n 200 m n 300
m n 500 m n 750 m n 1 km n
2 km n 5 km n 10 km n 20 km
n 50 km n 100 km n 200 km n
500 km
3. Se si vuole impostare lo zoom automatico, toccare
.
21
LAN8900EKYN ITA HMC.indd 21
2010-03-30 ¿ÀÈÄ 12:08:08
Menu immissione destinazione
Panoramica dei menu di navigazione
Menu di navigazione
Navigazione
Avanzata
Indirizzo
Ultime Destinaz.
Rubrica Indirizzi
POI
Parcheggio
Continua Navigaz./
Stop Navigaz.
Immissione GPS
Utilizzo Mappa
Pianif. Tour
Memorizza Destinaz.
Memorizza Posizione
Preferiti
Operazioni generali del menu di
destinazione
1. Accendere l'unità.
2. Premere NAV sul comando. Il menù
di navigazione appare sullo schermo.
3. Toccare [Navigazione], [Avanzata]
oppure [Preferiti] per selezionare
l'opzione desiderata.
Casa 1
Lavoro 2
3~12
Regolazione del volume di navigazione
Per regolare il volume di navigazione,
ruotare la manopola del volume ( ) sul
pannello di controllo durante la guida
vocale oppure durante la guida vocale
dopo aver premuto
sul pannello di
controllo.
Menu [Avanzata]
4. Toccare il metodo preferito di
impostazione.
• Indirizzo: Trova una destinazione
inserendo un indirizzo. (Pagina 23)
• Ultime Destinaz.: Imposta come
destinazione una posizione
impostata per ultima. (Pagina 24)
• Rubrica Indirizzi: Imposta la destinazione su una posizione memorizzata nella rubrica. (Pagina 24)
• POI: Cerca una destinazione da
varie categorie di esercizi commerciali o località. (Pagina 24-26)
• Parcheggio: Imposta un parcheggio
come destinazione. (Pagina 28)
• Continua Navigaz./Stop Navigaz.:
Imposta la guida su On/Off. (Pagina 28)
• Immissione GPS: Imposta una latitudine e longitudine come destinazione. (Pagina 27)
• Ulilizzo Mappa: Cerca una destinazione
scorrendo una mappa. (Pagina 28)
• Pianif. Tour: Aggiunge una nuova
destinazione o waypoint.
(Pagina 29-30)
• Memorizza Destinaz.: Memorizza la
destinazione nella rubrica. (Pagina 31)
• Memorizza Posizione.: Memorizza la
posizione nella rubrica. (Pagina 31)
• Casa 1/ Lavoro2/ 3~12: Si può
impostare la posizione della
propria casa, lavoro oppure ecc.
oppure località desiderata alla quale
si desidera tornare più spesso.
(Pagina 32)
Menu [Preferiti]
22
LAN8900EKYN ITA HMC.indd 22
2010-03-30 ¿ÀÈÄ 12:08:08
Menu immissione destinazione
Ricerca indirizzo
Si può trovare la destinazione cercando
l'indirizzo.
1. Premere [NAV] > Toccare [Indirizzo].
5. Impostare i caratteri componenti del
nome della via e quindi toccare [OK].
Fare riferimento alle “Opzioni di
Percorso” a pagina 36.
9. Toccare [Inizia].
2. Impostare il paese preferito.
Se il paese è già stato impostato,
seguire il punto 3.
6. Toccare la via nell'elenco.
3. Impostare il nome città preferito e
quindi toccare [OK].
7. Toccare il numero civico e quindi toccare [OK].
• Se si desidera memorizzare la
propria destinazione nella rubrica
toccare [Memorizza]. Ed immettere
il nome della destinazione quindi
toccare [OK].
• Se si desidera visualizzare la
mappa della destinazione, toccare
[Mostra Mappa] quindi [Inizia].
10. Toccare il percorso preferito, quindi
toccare [Inizia]. Fare riferimento alla
nota relativa ai criteri di percorso a
pagina 36.
4. Toccare la città nell'elenco.
8. Impostare le opzioni di percorso e
quindi toccare [OK].
Guidare seguendo le indicazioni
sullo schermo e le istruzioni vocali.
23
LAN8900EKYN ITA HMC.indd 23
2010-03-30 ¿ÀÈÄ 12:08:08
Menu immissione destinazione
Ultime destinazione
Rubrica
POI (Punti di interesse)
Si può trovare destinazione di una
località che si è impostata recentemente come destinazione.
Vengono memorizzate automaticamente fino alle 50 ultime destinazioni.
Se il numero delle ultime destinazioni è
superiore a 50, destinazione più vecchia
viene sostituita da quella nuova.
Potete trovare destinazione di una
località memorizzata nella rubrica.
Per utilizzare questa funzione in modo
più efficace, le destinazioni alle quali si
viaggia di frequente potrebbero essere
memorizzate in precedenza.
Prima di tutto, memorizzare nella rubrica cercando l'indirizzo.
Fare riferimento a Ricerca indirizzo a
pagina 23.
Potete trovare una destinazione in varie
categorie di esercizi commerciali o località.
1. Premere [NAV] > Toccare [Ultime
Destinaz.].
2. Toccare l'ultima preferita nell'elenco.
3. Toccare il percorso preferito, quindi
toccare [Inizia].
Guidare seguendo le indicazioni
sullo schermo e le istruzioni vocali.
1. Premere [NAV] > Toccare [POI].
2. Toccare una delle categorie principali.
1. Premere [NAV] > Toccare [Rubrica
Indirizzi].
2. Toccare la destinazione preferita
nell'elenco.
3. Toccare il percorso preferito, quindi
toccare [Inizia].
Guidare seguendo le indicazioni
sullo schermo e le istruzioni vocali.
• Vicino Posizione: Imposta un POI
localizzato nelle vicinanze della
posizione corrente del veicolo.
(Pigina 25)
• Vicino Destinazione: Imposta un
POI localizzato vicino alla destinazione selezionata. (Pigina 26)
• In Città: Imposta un POI localizzato nella città. (Pigina 26)
• Nome: Imposta un POI in base al
nome del servizio. (Pigina 26)
• Assistenza Kia: Imposta un servizio
dell'assistenza Kia. (Pigina 26)
• Numero Di Telefono: Se si conosce
il numero di telefono del servizio,
usarlo per trovarlo inserendo il
numero. (Pigina 26)
24
LAN8900EKYN ITA HMC.indd 24
2010-03-30 ¿ÀÈÄ 12:08:09
Menu immissione destinazione
Vicino Posizione
1. Premere [NAV] > Toccare [POI] >
[Vicino Posizione].
5. Toccare [OK] dopo avere confermato
la posizione del POI visualizzato.
8. Toccare [Inizia].
2. Toccare una delle sottocategorie.
(Per esempio: Emergenza)
Se si vuol chiamare con il telefono
toccare [ ]. È disponibile solo
quando il bluetooth è attivo.
3. Toccare una delle sottocategorie
nel livello successivo. (Per esempio:
Ospedale)
Guidare seguendo le indicazioni
sullo schermo e le istruzioni vocali.
6. Toccare [Inizia].
7. Toccare il percorso preferito.
4. Toccare il POI preferito.
25
LAN8900EKYN ITA HMC.indd 25
2010-03-30 ¿ÀÈÄ 12:08:09
Menu immissione destinazione
Vicino Destinazione
Nome
Numero Di Telefono
1. Premere [NAV] > Toccare [POI] >
[Vicino Destinazione].
1. Premere [NAV] > Toccare [POI] >
[Nome].
1. Premere [NAV] > Toccare [POI] >
[Numero Di Telefono].
2. Seguire i passi 2-8 a pagina 25
(Vicino Posizione).
2. Impostare il paese preferito.
2. Immettere il numero di telefono e
quindi toccare [OK].
In città
1. Premere [NAV] > Toccare [POI] >
[In Città].
3. Immettere parte dei caratteri del
nome del servizio e quindi toccare
[OK].
2. Impostare i caratteri componenti del
nome della città e quindi toccare
[OK].
3. Toccare il numero di telefono
preferito nell'elenco.
4. Seguire i passi 4-8 a pagina 25
(Vicino Posizione).
4. Toccare [OK] dopo avere confermato la posizione del POI visualizzato.
Assistenza Kia
1. Premere [NAV] > Toccare [POI] >
[Assistenza Kia].
3. Toccare la città nell'elenco.
2. Seguire i passi 4-8 a pagina 25
(Vicino Posizione).
Se si vuol chiamare con il telefono
toccare [ ]. È disponibile solo
quando il bluetooth è attivo.
5. Seguire i passi 6-8 a pagina 25
(Vicino Posizione).
4. Seguire i passi 2-8 a pagina 25
(Vicino Posizione).
26
LAN8900EKYN ITA HMC.indd 26
2010-03-30 ¿ÀÈÄ 12:08:09
Menu immissione destinazione
Ingresso GPS
Si può trovare una destinazione immettendo le coordinate di latitudine e longitudine.
4. Immettere le coordinate di latitudine
toccando i minuti. (per esempio:
58’)
6. Toccare [OK].
1. Premere [NAV] > Toccare [Avanzata]
> [Immissione GPS].
7. Immettere le coordinate di longitudine. Vedere i punti 2-6.
(per esempio: 8°, 42’, 31’’)
2. Toccare [Latitudine].
5. Immettere le coordinate di latitudine
toccando i secondi. (per esempio:
29’’)
8. Completate le impostazioni, toccare
[Inizia].
3. Immettere le coordinate di latitudine
toccando i gradi. (per esempio: 49°)
9. Seguire i passi 7-8 a pagina 25
(Vicino Posizione).
Nota
Se si commette un errore durante il
per cancellare una
tocco, toccare
cifra alla volta.
27
LAN8900EKYN ITA HMC.indd 27
2010-03-30 ¿ÀÈÄ 12:08:10
Menu immissione destinazione
Parcheggio
Uso di una mappa
Si può trovare la destinazione cercando
un servizio di posteggio.
Questo permette di Cercare una destinazione scorrendo la mappa.
1. Premere [NAV] > Toccare
[Parcheggio].
1. Premere [NAV] > Toccare [Avanzata]
> [Utilizzo Mappa].
2. Toccare un servizio preferito.
2. Scorrere la mappa, posizionare il
puntatore a croce sopra alla località
preferite.
4. Toccare il percorso preferito, quindi
toccare [Inizia].
Guidare seguendo le indicazioni
sullo schermo e le istruzioni vocali.
3. Seguire i passi 4-8 a pagina 25
(Vicino Posizione).
3. Toccare [Inizia].
Continua Navigaz./ Stop
Navigaz.
Se non si desidera più raggiungere
una certa destinazione o se si desidera
cambiarla, Premere [NAV] > Toccare
[Stop Navigaz.]. Se si continua a viaggiare verso la propria destinazione toccare
[Continua Navigaz.].
28
LAN8900EKYN ITA HMC.indd 28
2010-03-30 ¿ÀÈÄ 12:08:10
Menu immissione destinazione
Pianificatore di escursione
Il pianificatore di escursione permette di
viaggiare sulle strade cercate impostando la destinazione oppure waypoint.
Potete impostare complessivamente
quattro destinazioni oppure waypoint .
- Nuovo Tour: Imposta un'escursione.
- Carica Tour: Visualizza il turista.
- Most. Tour: Mostra l'ultimo
turista impostato.
Impostazione di un'escursione
4. Impostare una destinazione
utilizzando il menù di navigazione.
(Vedere a pagina 22.)
Destinazione impostata viene visualizzata.
Se si necessita di un waypoint
aggiuntivo impostarlo toccando
[Aggiungi Tappa].
5. Toccare [Aggiungi Tappa].
7. Toccare [Inizia].
Se si desidera salvare i percorsi cercati, toccare [Sì]. In caso contrario,
toccare [No].
6. Impostare un waypoint utilizzando il
menù [Navigazione], [Avanzata], e
[Preferiti]. (Vedere a pagina 22.)
8. Immettere un nome, quindi toccare [OK].
1. Premere [NAV] > Toccare [Avanzata]
> [Pianif. Tour].
2. Toccare [Nuovo Tour].
3. Toccare [Sì].
I percorsi cercati vengano memorizzati
automaticamente in [Carica Tour].
9. Guidare seguendo le indicazioni
sullo schermo e le istruzioni vocali.
29
LAN8900EKYN ITA HMC.indd 29
2010-03-30 ¿ÀÈÄ 12:08:11
Menu immissione destinazione
Modifiche/ eliminazione di una
destinazione oppure waypoint
Potete modificare o eliminare la destinazione oppure waypoint già impostato.
1. Premere [NAV] > Toccare [Avanzata]
> [Pianif. Tour] > [Carica Tour].
2. Toccare il turista desiderato.
[Ordinare Tour]: Modifiche all'ordine
della destinazione e
waypoint già impostati.
(Seguire nei punti 5-6)
[Elimina Tappa]: Elimina il
waypoint.(Seguire nei
punti 7-9)
[Elimina Tour]: Elimina il turista
(Seguire nei punti
10-11)
5. Toccare [Ordinare Tour] e quindi
toccare [OK] dopo avere modificato
l'ordine.
8. Toccare il waypoint desiderate.
9. Seguire i passi 7-9 a pagina 29
(Impostazione di un'escursione).
10. Toccare [Elimina Tour] per
eliminare il turista impostato.
3. Toccare [Modifica Tour].
11. Toccare il turista desiderato.
4. Toccare le opzioni desiderate.
6. Seguire i passi 7-9 a pagina 29
(Impostazione di un'escursione).
7. Toccare [Elimina Tappa] per
eliminare un waypoint.
30
LAN8900EKYN ITA HMC.indd 30
2010-03-30 ¿ÀÈÄ 12:08:11
Menu immissione destinazione
Salva destinazione
Salva posizione
Le destinazioni che si visitano spesso possono essere memorizzate nella rubrica.
Destinazioni memorizzate possono essere
facilmente richiamate per impostare come
destinazione oppure come waypoint.
Questa funzione è disponibile soltanto
quando destinazioni sono già state
impostate.
La posizione corrente del veicolo può
essere memorizzata nella rubrica.
1. Premere [NAV] > Toccare [Avanzata]
> [Memorizza Posizione].
2. Immettere il nome della posizione
corrente quindi toccare [OK].
1. Premere [NAV] > Toccare [Avanzata]
> [Memorizza Destinaz.].
2. Immettere il nome della destinazione quindi toccare [OK].
La posizione corrente del veicolo è
memorizzata automaticamente nella
rubrica. (Pigina 24)
La destinazione viene memorizzata automaticamente nella rubrica.
(Pigina 24)
31
LAN8900EKYN ITA HMC.indd 31
2010-03-30 ¿ÀÈÄ 12:08:12
Menu immissione destinazione
Casa 1/ Lavoro2/ 3~12
Se la località della vostra abitazione,
località di lavoro e località preferite sono
già memorizzate nella rubrica possono essere facilmente recuperate per
impostare il percorso verso l'abitazione,
località di lavoro e località preferite.
Memorizzazione della propria
abitazione
4. Se si desidera impostare la località
della propria abitazione, toccare
[1 Casa].
Trovare la propria abitazione
5. Toccare [OK].
3. Toccare il percorso preferito, quindi
toccare [Inizia].
1. Premere [NAV] > Toccare [Rubrica
Indirizzi].
1. Premere [NAV] > Toccare [Preferiti].
2. Toccare [Casa 1].
dopo avere confermato
2. Toccare
la località preferita.
3. Toccare [Preferiti].
Nota
• La procedura da seguire per
impostare la località di lavoro e località
preferite è la stessa seguita per
impostare la propria abitazione.
• Informazioni nuove posizionate nella
stessa posizione di memorizzazione
sovrascrivono i dati vecchi.
• Se si desidera eliminare una posizione
memorizzata nella rubrica, toccare
[Elimina].
• Se si desidera memorizzare la
posizione corrente nel menu [Preferiti],
premere [NAV] > toccare [Preferiti] >
toccare e tenere premuto il numero
preferito > Immettere un nome e toccare [OK].
Guidare seguendo le indicazioni
sullo schermo e le istruzioni vocali.
Nota
La procedura da seguire per trovare la
località di lavoro e località preferite è
la stessa seguita per trovare la propria
abitazione.
32
LAN8900EKYN ITA HMC.indd 32
2010-03-30 ¿ÀÈÄ 12:08:12
Uso del menu mappa
Panoramica dei menu mappa
Menu mappa
Visualizza
1. Accendere l'unità.
Categoria POI
2D / 3D
Dividi Schermo/
Schermo Intero
Memorizza Posizione
Percorso
Traffico
Operazioni generali del menu
mappa
2. Premere MAP. Appare la schermata
della mappa
[Percorso] menu
3. Toccare [Menu].
Opzioni Percorso
Pianificazione Tour
Browser
Deviazione
[Traffico] menu
Info Vicinanze
Info Su Percorso
4. Toccare [Visualizza], [Percorso]
oppure [Traffico] per selezionare
l'opzione desiderata.
5. Toccare il metodo preferito di
impostazione.
Per ulteriori informazioni, vedere
pagina 34-38.
[Visualizza] menu
33
LAN8900EKYN ITA HMC.indd 33
2010-03-30 ¿ÀÈÄ 12:08:12
Uso del menu mappa
Categoria del POI
3. Toccare [OK].
2D/ 3D
Some alcuni riferimenti nell'area circostante possono essere visualizzati
sullo schermo come icone.
Questo permette di visualizzare oppure
nascondere le icone di riferimento per
tipo.
1. Premere [MAP] > Toccare [Menu] >
[Visualizza] > [Categoria POI].
Le icone dei riferimenti attivati sono
visualizzate sulla mappa.
La lista ma può essere alternata tra 2D
e 3D.
- 2D: Visualizza la mappa in un ambiente bidimensionale simile a una
cartina stradale.
- 3D: Visualizza la lista da una prospettiva elevata. È facile da riconoscere un'immagine del percorso
poiché fornisce una vista panoramica sulla lunga distanza.
1. Premere [MAP] > Toccare [Menu] >
[Visualizza] > [2D/3D].
2. Toccare le icone desiderate.
Le impostazioni di visualizzazione
delle icone si alternano accensione
spegnimento ogni volta che si toccano icone. L'indicatore dell'icona
selezionata si illumina.
2. Toccare [2D/3D] nuovamente per
passare alla schermata 2D.
34
LAN8900EKYN ITA HMC.indd 34
2010-03-30 ¿ÀÈÄ 12:08:12
Uso del menu mappa
Schermo diviso/ Schermo intero
Salva posizione
Pianificatore di escursione
La vista ma può essere alterna alla
schermata divisa e la schermata intera
La posizione corrente del veicolo può
essere memorizzata nella rubrica.
Il pianificatore di escursione permette di
viaggiare sulle strade cercate impostando
la destinazione oppure waypoint.
1. Premere [MAP] > Toccare [Menu] >
[Visualizza] > [Dividi Schermo].
1. Premere [MAP] > Toccare [Menu] >
[Percorso] > [Memorizza Posizione].
1. Premere [MAP] > Toccare [Menu] >
[Percorso] > [Pianificazione Tour].
2. Immettere il nome della posizione
corrente quindi toccare [OK].
2. Fare riferimento al “Pianificatore di
escursione” alle pagine 29-30.
Dividi Schermo
2. Per passare alla modalità schermo
intero, toccare [Menu] > [Visualizza]
> [Schermo Intero].
La posizione corrente del veicolo è
memorizzata automaticamente nella
rubrica. (Pigina 24)
Schermo Intero
35
LAN8900EKYN ITA HMC.indd 35
2010-03-30 ¿ÀÈÄ 12:08:13
Uso del menu mappa
Opzioni di percorso
Potete modificare le condizioni del percorso oppure confermare le informazioni del percorso. Impostare le condizioni
appropriate del percorso in base ai
propri scopi.
1. Premere [MAP] > Toccare [Menu] >
[Percorso] > [Opzioni Percorso].
2. Toccare l'elemento preferito di
impostazione.
• Percorso: Se non si imposta
[Pianifica Percorsi
Diversi] nel menù di
impostazione, impostare
l'opzione percorso su
Veloce( ), Breve( ) o
Eco( ).
Nota
• Percorso rapido: calcola un percorso
con il minor tempo di percorrenza.
• Percorso breve: calcola un percorso
con la distanza minore.
• Percorso Eco (economia):
- Per risparmiare carburante, questo
percorso contempla la riduzione di
percorsi con arresti e ripartenze frequenti agli incroci e svolte basandosi
sul confronto della tabella dei consumi
carburante con informazioni in tempo
reale relative al traffico, tuttavia questo
percorso può non essere valido in
termini di condizioni di guida come
quello di accelerazioni improvvise.
- Il percorso Eco può comportare
una durata di guida e percorso più
lungo per risparmiare consumo carburante.
• TMC:
- Auto (
- Off (
- On (
): Quando viene trovato un
evento TMC sul percorso
corrente, il sistema di
navigazione circa un percorso alternativo automaticamente senza annunci.
): Cancella la funzione TMC
): Quando viene rilevato
l'evento TMC sul percorso corrente, il sistema
di navigazione visualizza lo
schermo di popup con le
informazioni dell'evento.
Nota
Non è supportato un TMC a pagamento.
)
• Strada A Pagam(
- Usa: Include l'uso delle strade a
pagamento.
- Evitare: Permette di evitare l'uso
delle strade a pagamento.
• Tunnel (
)
- Usa: Include l'uso del tunnel.
- Evitare: Permette di evitare il tunnel.
• Autostrada (
)
- Usa: Include l'uso della strada
principale.
- Evitare: Permette di evitare la strada principale.
• Traghetto (
)
- Usa: Include l'uso di traghetti.
- Evitare: Permette di evitare traghetti.
3. Premere [OK].
Quando la mappa sullo schermo della
località corrente oppure lo schermo
di impostazione percorso vengono
visualizzati, il sistema ricalcola un percorso con impostazioni fornite.
Nota
• Fermare sempre il veicolo in una
posizione sicura prima di modificare le
condizioni del percorso.
• La modifica delle condizioni del percorso durante la guida può essere
causa di incidenti.
36
LAN8900EKYN ITA HMC.indd 36
2010-03-30 ¿ÀÈÄ 12:08:13
Uso del menu mappa
Browser
Deviazione
È possibile vedere una schermata
ingrandita della sezione del percorso
quando è attiva la guida del percorso.
Se si desidera prendere una strada
alternativa a causa delle condizioni del
traffico, si può usare la funzione calcola
percorso alternativo per calcolare un
percorso alternativo dalla posizione del
veicolo fino a destinazione.
1. Premere [MAP] > Toccare [Menu] >
[Percorso] > [Browser].
1. Premere [MAP] > Toccare [Menu] >
[Percorso] > [Deviazione].
2. Toccare [Precedente] o [Successivo]
per vedere le sezioni del percorso.
2. Toccare [Di Meno] oppure [Di Più]
per impostare un percorso che
imposterà una strada alternativa
come distanza selezionata.
4. Toccare il percorso preferito, quindi
toccare [Inizia].
Guidare seguendo le indicazioni
sullo schermo e le istruzioni vocali.
Nota
Se non si necessita prendere una strada
alternativa quando si sta navigando un
percorso, toccare [Menu] > [Percorso] >
[Deviazione] > [Elimina].
3. Toccare [Sezione] per vedere la
schermata ingrandita della sezione
del percorso.
4. Toccare [Percorso] per tornare alla
schermata precedente
- Blu: Percorso originale
- Rosso: Percorso alternativo
3. Toccare [Inizia].
per tornare alla scher5. Toccare
mata mappa corrente del veicolo.
37
LAN8900EKYN ITA HMC.indd 37
2010-03-30 ¿ÀÈÄ 12:08:13
Uso del menu mappa
Informazioni locale
Viene visualizzato l'elenco delle
informazioni relative alle informazioni sul
traffico relative alla posizione del veicolo.
1. Premere [MAP] > Toccare [Menu] >
[Traffico] > [Info Vicinanze].
2. Toccare l'opzione desiderata per controllare le informazioni dettagliate.
3. Toccare [Mostra Mappa] dopo averla
controllata.
5. Toccare
per tornare alla schermata precedente Premere MAP per
tornare alla posizione corrente sulla
schermata mappa.
3. Se si necessita prendere una strada
alternativa toccare [Deviazione].
Info sul percorso
Viene visualizzato l'elenco delle
informazioni relative al traffico trovate sul percorso raccomandato dalla
posizione corrente del veicolo fino alla
destinazione. Viene cercato un percorso
alternativo per evitare l'evento dalla
posizione corrente del veicolo a quella
della destinazione. Inoltre, si può controllare informazioni dettagliate relative
agli eventi visualizzati.
1. Premere [MAP] > Toccare [Menu] >
[Traffico] > [Info Su Percorso].
Nota
Toccare [Mostra Mappa] se si
desidera visualizzare la posizione
dell'evento trovato sul percorso.
per tornare alla scherToccare
mata precedente Premere MAP per
tornare alla posizione corrente sulla
schermata mappa.
4. Toccare il percorso preferito.
2. Toccare l'opzione desiderata per controllare le informazioni dettagliate.
4. Toccare [Zoom +] per visualizzare la
mappa in dettaglio. Toccare [Zoom -] per
visualizzare la mappa di un'area più ampia.
5. Toccare [Inizia].
Guidare seguendo le indicazioni
sullo schermo e le istruzioni vocali.
38
LAN8900EKYN ITA HMC.indd 38
2010-03-30 ¿ÀÈÄ 12:08:13
Tecnologia wireless Bluetooth
Informazioni di base
relative alla tecnologia
Bluetooth wireless La tecnologia
Bluetooth wireless stabilisce un collegamento senza fili fra due dispositivi, come ad esempio un telefono e
l'apparecchio. La prima volta che si utilizzano due dispositivi insieme è necessario collegarli definendo una relazione
fra di loro a mezzo di un codice PIN.
Dopo il collegamento iniziale, i due dispositivi potranno collegarsi automaticamente ogni volta che verranno accesi.
Nota
• Possono esservi delle limitazioni di
uso per la tecnologia Bluetooth in
alcune località.
• A causa della varietà di telefoni
Bluetooth e della versione firmware,
il vostro dispositivo può rispondere
in modo diverso quando si utilizza
Bluetooth.
• Poiché le differenze funzionali tra i
vari modelli dipendono principalmente
dalle caratteristiche del cellulare, in
caso di dubbi rivolgersi al fabbricante
del cellulare.
• Si può consultare l'elenco di compatibilità del telefono Bluetooth sul sito web
(http://www.navigation.com/kia).
Collegamento del vostro apparecchio e di un telefono bluetooth
4. Toccare un telefono bluetooth che si
desidera collegare dalla schermata
“Dispositivi Bluetooth”.
Per collegare utilizzando le impostazioni
dell'apparecchio (1)
1. Premere
sul pannello di controllo.
2. Toccare [Bluetooth].
3. Toccare [Ricerca dispositivi
Bluetooth].
Se si vuole cancellare, toccare
[Annulla].
5. Immettere a chiave (predefinito:
0000) visualizzata sullo schermo
del vostro telefono quando la schermata di popup viene visualizzata
sullo schermo.
Quando il collegamento è avvenuto
con successo la schermata principale
Bluetooth appare sullo schermo.
Quando non è collegato, sullo
schermo appare il messaggio di
collegamento non riuscito.
39
LAN8900EKYN ITA HMC.indd 39
2010-03-30 ¿ÀÈÄ 12:08:14
Tecnologia wireless Bluetooth
Per collegare utilizzando le impostazioni
dell'apparecchio (2)
1. Premere
sul pannello di controllo.
2. Premere [Ricerca dispositivi
Bluetooth].
Per effettuare il collegamento utilizzando le impostazioni del telefono, la caratteristica
Bluetooth del vostro telefono deve
essere disattivata. Per usare la funzione
Bluetooth, Bluetooth deve essere attivato sul vostro telefono. Consultare la
guida dell'utente del vostro telefono.
5. Immettere a chiave (predefinito:
0000) visualizzata sullo schermo del
vostro telefono quando la schermata di
popup viene visualizzata sullo schermo.
Quando il collegamento è avvenuto
con successo la schermata principale
Bluetooth appare sullo schermo.
1. Attivare la componente Bluetooth
del telefono. Questo può essere in
un menu chiamato Impostazioni,
Bluetooth, Connessioni o Vivavoce.
2. Premere [ ] > Toccare [Bluetooth] >
[Autorizzazione dispositivo esterno].
3. Seguire i passi 4-5 a pagina 39.
Nota
Se si tocca
sul pannello di controllo
il nuovamente dopo la connessione
tramite la tecnologia wireless Bluetooth
sullo schermo appare la schermata
principale Bluetooth.
Se si vuole cancellare, toccare [Annulla].
3. Avviate la ricerca per i dispositivi
Bluetooth. Queste impostazioni possono essere in un menu chiamato
Bluetooth, Connessioni o Viva voce.
4. Selezionare il proprio dispositivo
dall'elenco di telefoni.
Nota
• Funziona allo stesso modo degli auricolari con filo per i telefoni cellulari. La
funzionalità della cuffia è idonea alla
conversazione telefonica. Non è idonea per l’ascolto di musica.
• A differenza della funzionalità vivavoce, la connessione tramite auricolare
permette solo le funzionalità di “risposta” e di “effettuare una chiamata
all’ultimo numero". Quando si risponde ad una chiamata, il numero del
chiamante non è visualizzato.
• Se ci si connette ad un telefono
Bluetooth, può non essere attivata la
connessione viva-voce oppure la connessione tramite auricolare, a seconda
del tipo di telefono.
40
LAN8900EKYN ITA HMC.indd 40
2010-03-30 ¿ÀÈÄ 12:08:14
Tecnologia wireless Bluetooth
Scollegamento/riconnessione
del telefono bluetooth
1. Toccare [Visualizza elenco dispositivi Bluetooth] sulla schermata
“Bluetooth”.
3. Toccare nuovamente il telefono disconnesso per ricollegarlo. E quindi
toccare [Si].
3. Toccare [Sì].
2. Toccare il telefono connesso. e quindi
toccare [Sì].
Il contrassegno
riappare.
Eliminare un telefono connesso
Se non si necessita utilizzare più un
telefono connesso questo può essere
eliminati.
1. Toccare [Visualizza elenco dispositivi Bluetooth] sulla schermata
“Bluetooth”.
Il vostro telefono viene scollegato e il
contrassegno scompare
• Il telefono connesso viene eliminato.
• Se non si desidera eliminare un
telefono connesso, toccare [No].
Modifica della chiave di accesso
Si può modificare la chiave di accesso.
1. Immettere la chiave di accesso tramite tastiera ,
e
.
2. Toccare sul lato destro del nome del
dispositivo del telefono che si desidera
eliminare .
2. Toccare [OK].
41
LAN8900EKYN ITA HMC.indd 41
2010-03-30 ¿ÀÈÄ 12:08:14
Tecnologia wireless Bluetooth
Effettuare una telefonata
inserendo un numero
Il modo più semplice per effettuare una
chiamata è quello di comporre il numero.
Collegare il vostro apparecchio con il telefono
bluetooth prima di effettuare la chiamata.
sul pannello
1. Premere il pulsante
di controllo.
La schermata principale Bluetooth
appare sullo schermo.
2. Inserire il numero di telefono desiderato toccando i tasti numerici. e
quindi toccare
.
3. Toccare [Riaggancia] per terminare
la conversazione telefonica
Nota
• In caso di errori durante la composizione del numero, toccare il pulsante
per eliminare una cifra alla volta. Se
si desidera eliminare tutte le cifre alla
volta toccare e tenere premuto .
• Toccare
il pulsante a lungo per
effettuare una chiamata dalle chiamate recenti.
• Se si desidera effettuare una telefonata internazionale toccare [0] a
lungo quindi immettere il numero di
telefono.
• La cronologia delle chiamate recenti
dell’utente è disponibile solo in collegamento viva-voce. (La possibilità di
chiamata dalle chiamate recenti con
un collegamento con le cuffie dipende
dalla cronologia delle chiamate del
cellulare Bluetooth.)
• Il collegamento con le cuffie permette
soltanto di effettuare una chiamata da
una chiamata recente.
Cambiamento del percorso
dell'audio durante una chiamata
Potete ascoltare tramite l'altoparlante
dell'unità o telefono toccando
[Trasf. Chiam.]/ [Trasferisci Richiamata].
Accensione e spegnimento
del microfono
Si può accendere e spegnere il microfono
toccando [Microfono Off]/ [Microfono On].
Rispondere alle chiamate
1. Quando si riceve una chiamata, il
vostro telefono suona e la finestra
pop-up “Chiamata in arrivo” viene
visualizzata sullo schermo.
2. Toccare [Accetta] per rispondere alla chiamata
Se si vuole rifiutare una chiamata,
toccare [Rifiuta].
Nota
• Se è disponibile il servizio Call-ID, il numero
di telefono del chiamante viene visualizzato.
• Se il numero di telefono è presente in rubrica, viene visualizzato il nome del contatto.
• Se la chiamata in arrivo proviene da un
numero memorizzato nei Contatti, viene
visualizzato il nome del contatto. Viene
visualizzato anche il numero di telefono del
chiamante, se disponibile.
• Se la funzione “Rifiuta” non è disponibile,
significa che il telefono collegato non supporta la funzione per il rifiuto delle chiamate.
42
LAN8900EKYN ITA HMC.indd 42
2010-03-30 ¿ÀÈÄ 12:08:15
Tecnologia wireless Bluetooth
Utilizzo della rubrica
Potete utilizzare le voci della rubrica
memorizzate nella memoria del telefono
che supporta un profilo PBAP (Phone
book access profile).
Dopo aver riconnesso la vostra unità con
un telefono tecnologia wirless Bluetooth
, i numeri presenti nella rubrica del telefono vengono trasferiti automaticamente
nella rubrica.
Chiamare presente nella rubrica
Dopo aver individuato la voce nella
rubrica potete selezionare il numero e
fare una telefonata
1. Premere il pulsante
sul pannello di controllo. E quindi toccare
[Rubrica].
2. Toccare la voce della rubrica che si
desidera chiamare.
alterna con
oppure
Toccando
la pagina successiva o precedente
dell'elenco.
3. Toccare [Riaggancia] per terminare
la conversazione telefonica.
2. Nella prima lettera della voce
nell'elenco delle rubriche nell'elenco
della rubrica che si desidera cercare
utilizzando la tastiera quindi toccare
[OK].
3. Toccare la voce della rubrica che si
desidera chiamare.
Ricerca della voce della rubrica in
ordine alfabetico
Se ci sono molte voci nella rubrica può
essere utile visualizzare in ordine alfabetico per facilitare le ricerche.
1. Toccare [Cerca per nome] sulla
schermata “Rubrica”.
alterna con
oppure
Toccando
la pagina successiva o precedente
dell'elenco.
4. Toccare [Riaggancia] per terminare
la conversazione telefonica.
43
LAN8900EKYN ITA HMC.indd 43
2010-03-30 ¿ÀÈÄ 12:08:15
Tecnologia wireless Bluetooth
Usando l'elenco delle chiamate
Potete utilizzare l'elenco chiamata memorizzato nella memoria del telefono
che supporta un profilo PBAP (Phone
book access profile) dopo aver connesso
all'unità e telefono Bluetooth tecnologia
wireless Bluetooth , i numeri nella funzione il telefono è [Chiamate in uscita],
[Chiamate senza risposta], e [Chiamate
in entrata] vengono trasferite automaticamente nell'elenco delle chiamate.
2. Toccare [In uscita], [No risp.],
oppure [In entrata].
Aggiornamento dell'elenco delle
chiamate
Potete aggiornare i numeri nell'elenco
del vostro telefono [Chiamate in uscita],
[Chiamate senza risposta], oppure
[Chiamate in entrata] in un elenco di
chiamata.
Chiamate in uscita
sul pannello di controllo.
1. Premere
E quindi toccare [El. chiamate].
Di chiamare un numero presente
nell'elenco delle chiamate
Dopo aver individuato la voce che si
vuole chiamare nell'elenco [Chiamate
in uscita], [Chiamate senza risposta],
oppure [Chiamate in entrata] si può
selezionare il numero di effettuare la
chiamata.
Chiamate senza risposta
2. Toccare [In uscita], [No risp.],
oppure [In entrata], e quindi toccare
[Update].
3. Gli elenchi di chiamata aggiornati
possono essere scaricati.
sul pannello di controllo.
1. Premere
E quindi toccare [El. chiamate].
Chiamate in entrata
3. Toccare la voce che si desidera
chiamare.
44
LAN8900EKYN ITA HMC.indd 44
2010-03-30 ¿ÀÈÄ 12:08:15
Tecnologia wireless Bluetooth
Effettuare una chiamata con i
numeri di composizione veloce
Potete utilizzare le voci della rubrica
memorizzate nel telefono che sopporta
un profilo PBAP (Phone Book Access
Profile).
Potete facilmente memorizzare 12
numeri di telefono e quindi richiamarli
con un tocco del numero di composizione veloce.
Registrazione dei numeri di telefono
nell'elenco le composizione veloce
1. Premere
sul pannello di controllo. E quindi toccare [Comp. Vel.].
oppure alterna con
Toccando
la pagina successiva o precedente
dell'elenco.
3. Toccare una delle categorie da
assegnare al numero di composizione veloce. (per esempio: Rubrica)
Il nome (numero di telefono) viene
memorizzato in memoria. Al successivo tocco dello stesso nome, il
nome (numero di telefono) viene
richiamato dalla memoria.
Chiamare un numero nell'elenco di
composizione veloce
1. Premere
sul pannello di controllo. E quindi toccare [Com. Vel.].
4. Toccare uno dei numeri di telefono
da assegnare al numero di composizione veloce.
2. Toccare dei numeri di composizione
veloce.
3. Toccare [Riaggancia] per terminare
la conversazione telefonica
2. Toccare e tenere premuto un numero
di composizione veloce (1-12). (per
esempio: 1)
5. Immettere il nome utilizzando il
tastierino quindi toccare [OK].
Nota
Verificare che la funzionalità di chiamata rapida sia abilitata nel cellulare
Bluetooth prima dell’uso.
45
LAN8900EKYN ITA HMC.indd 45
2010-03-30 ¿ÀÈÄ 12:08:16
Operazione CD/MP3/WMA/USB/iPod
Riproduzione di un audio CD
e file MP3/ WMA/ USB/ iPod
Disc
Inserire un disco e la riproduzione inizia
automaticamente.
iPod
Potete un dispositivo iPod l'unità connettendo iPod la porta USB usando il
cavetto appropriato.
Connettere un dispositivo iPod ad una
porta USB e la riproduzione viene avviata.
Per maggiori dettagli riguardo iPod.
vedere la guida dell'utente iPod.
Toccare
per selezionare il prossimo
file/traccia.
Come saltare al capitolo/brano
precedente Tutto
Toccare
entro 1 secondo di tempo di
riproduzione.
Come tornare all'inizio del capitolo/brano
attualmente in riproduzione Tutto
Audio CD
MP3/WMA CD
USB
Si possono riprodurre file registrati su un
dispositivo di memoria USB.
Commettere un dispositivo USB ad una
porta USB e la riproduzione viene avviata.
Come saltare al capitolo/brano successivo Tutto
Nota
Usare il cavetto per auto per un uso
esclusivo dell'iPod quando si connette
l'iPod ai terminali affinché il dispositivo
iPod possa funzione.
Toccare
dopo 1 secondo di tempo di
riproduzione.
Ricerca
Tutto
Tenere premuto
o
durante la
riproduzione e rilasciare al punto desiderato.
46
LAN8900EKYN ITA HMC.indd 46
2010-03-30 ¿ÀÈÄ 12:08:16
Operazione CD/MP3/WMA/USB/iPod
Scansione introduttiva Disc - Audio CD
Ripeti
USB
Disc - MP3/WMA
Vengono riprodotto i primi 10 secondi
di ogni file/traccia.
1. Toccare [Opzione] durante la
riproduzione.
Tutto
I file/tracce selezionati correntemente
sono riprodotti ripetutamente.
1. Toccare [Opzione] durante la riproduzione.
Esempio: Audio CD
2. Toccare [Ripeti] ripetutamente.
Esempio: Audio CD
2. Toccare [Scansione Inizia].
Disc - MP3/WMA
USB
• [Ripeti Off]: Riproduce ripetutamente tutti file
all'interno del disco
oppure USB.
• [Ripeti Traccia]: Riproduce ripetutamente il file corrente.
• [Ripeti Cartella] Riproduce ripetutamente tutti i file
all'interno della
cartella corrente.
iPod
• [Ripeti Off]: Riproduce ripetutamente tutti i file
all'interno dell' iPod.
• [Ripeti On]: Riproduce ripetutamente il file corrente.
Disc - Audio CD
3. Toccare [Scansione Interrompi] per
cancellare la scansione introduttiva.
• [Ripeti Off] : Riproduce ripetutamente tutte le tracce
all'interno del disco.
• [Ripeti Traccia] : Riproduce ripetutamente la traccia
corrente.
47
LAN8900EKYN ITA HMC.indd 47
2010-03-30 ¿ÀÈÄ 12:08:16
Operazione CD/MP3/WMA/USB/iPod
Casuale
Tutto
Tutti i file/tracce sono riprodotti casualmente.
1. Toccare [Opzione] durante la riproduzione.
Disc - MP3/WMA
USB
• [Casuale Off]: Annulla la riproduzione Casuale.
• [Casuale Cartella]: L'unità riproduce casualmente tutti i file
all'interno della
cartella corrente.
• [Casuale Tutti]: L'unità riproduce
casualmente tutti
i file all'interno del
disco oppure USB.
Riproduzione di file con classificazione per cartella/Album/Artista
USB
È possibile riprodurre file in USB classificandoli per cartella, album o artista.
1. Toccare [Option] durante la riproduzione.
2. Toccare [Casuale] ripetutamente.
Disc - Audio CD
• [Casuale Tutti] : Riproduce casualmente tutti i
file all'interno del
disco.
• [Casuale Off]: Annulla la riproduzione Casuale.
iPod
• [Casuale Off]: Annulla la riproduzione Casuale.
• [Casuale Tutti]: L'unità riproduce
casualmente tutti
i file all'interno
dell'iPod.
• [Casuale Album]: L'unità riproduce
casualmente tutti
i file all'interno
dell'album corrente.
2. Toccare [Folder], [Album] o [Artist]
durante la riproduzione.
• [Cartella]: riproduce i file classificandoli per cartella.
• [Album]: riproduce i file classificandoli per album.
• [Artista]: riproduce i file classificandoli
per artista.
Nota
Per passare alla schermata dell’elenco
.
di riproduzione, toccare
48
LAN8900EKYN ITA HMC.indd 48
2010-03-30 ¿ÀÈÄ 12:08:17
Operazione CD/MP3/WMA/USB/iPod
Individuare una cartella/file utilizzando l'elenco Disc - Audio CD
Disc - MP3/WMA
USB
Potete ascoltare la musica visualizzando
l'elenco delle tracce/cartella/file.
1. Toccare il pulsante [Elenco] durante
la riproduzione.
Nota
• Nel caso d file MP3/WMA, toccare il
per passare alla cartella
pulsante
superiore.
o
per selezi• Toccare i pulsanti
onare l’elenco che si desidera visualizzare.
• Se si desidera passare alla schermata
dell'elenco di riproduzione toccare
.
Ricerca musica
Esempio: Audio CD
2. Nel caso di onda Audio CD, toccare il
file desiderato.
Nel caso di file MP3/WMA, toccare
il pulsante cartella desiderato. Non ci
sono cartelle toccare il file desiderato.
iPod
Si può effettuare ricerche sul proprio
iPod per elenco di riproduzione, artista
nomi, titoli di album, genere, canzoni,
compositori, audiolibri, podcast.
Per maggiori dettagli riguardo iPod
vedere la guida dell'utente iPod.
1. Toccare [Elenco] durante la riproduzione.
2. Toccare l'elemento desiderato.
Audio CD
• [Elenchi di riproduzione]: Riproduce
i brani nel [Elenchi di
riproduzione].
• [Artisti]: Riproduce i brani nel
[Artisti].
• [Album]: Riproduce i brani nel
[Album].
• [Generi]: Riproduce i brani nel
[Generi].
• [Brani]: Riproduce i brani nel
[Brani].
• [Compositori]: Riproduce i brani nel
[Compositori].
• [Audiolibri]: Riproduce i brani / capitoli nel [Audiolibri]:
• [Podcast]: Riproduce i brani /
capitoli nel [Podcast].
Nota
• Se si desidera passare alla cartella
.
superiore, toccare
• Toccare i pulsanti
o
per selezionare l’elenco che si desidera visualizzare.
• Se si desidera passare alla schermata
.
dell'elenco di riproduzione toccare
MP3/WMA file
3. Il file/traccia selezionato verrà
riprodotto.
49
LAN8900EKYN ITA HMC.indd 49
2010-03-30 ¿ÀÈÄ 12:08:17
Operazione CD/MP3/WMA/USB/iPod
Impostazione velocità di
riproduzione del audiolibro
iPod
L'impostazione velocità di riproduzione influisce solamente sugli audiolibri
acquistati dal negozio iTunes o audible.
com.
Per maggiori dettagli riguardo iPod
vedere la guida dell'utente iPod.
• [Audiolibro Veloce]:
Riproduce gli audiolibri con la
velocità veloce.
• [Audiolibro Lento]:
Riproduce gli audiolibri con la
velocità lenta.
Nota
Se si desidera passare alla schermata
dell'elenco di riproduzione toccare
.
1. Toccare [Opzione] quando si ascoltano
i brani/capitoli del [Audiolibro].
Requisiti dispositivo USB
• Questa unità supporta solo solo unità
USB Flash e USB HDD esterno con formato FAT16 o FAT32.
• Non estrarre il dispositivo USB durante il
funzionamento (riproduzione, ecc.).
• Si consiglia di eseguire backup regolari
per prevenire la perdita dei dati.
• Se si usa un cavo di prolunga USB o un
hub USB, il dispositivo USB potrebbe non
essere riconosciuto.
• Non tutti i dispositivi USB funzionano
conquesta unità.
• Fotocamere digitali e telefoni cellulari
non sono supportati.
• Questa unità non è supportata quando il
numero di file è di 10000 o più file.
Periferiche USB compatibili
• Non sono supportati i dispositivi che
richiedono l'installazione di un
programma aggiuntivo quando connessi
a computer.
• Lettore MP3: lettore MP3 tipo flash.
Il lettore MP3 che richiede l'installazione
di un driver non è supportato.
• Unità USB Flash: Dispositivi che supportano USB2.0 oppure USB 1.1
(Nel caso venga inserito un USB 2.0 nel
lettore esso funzionerà alla stessa
velocità del USB 1.1)
2. Toccare [Audiolibro] ripetutamente.
• [Audiolibro Normale]:
Riproduce gli audiolibri con la
velocità originale.
50
LAN8900EKYN ITA HMC.indd 50
2010-03-30 ¿ÀÈÄ 12:08:18
Operazione CD/MP3/WMA/USB/iPod
Requisiti per i file musicali MP3/WMA
• Frequenza di campionamento / 16 48 kHz (MP3) 8 - 44.1 kHz (WMA)
• Frequenza bit/ entro 8 - 320 kbps
(MP3) 5 -160 kbps (WMA)
• Il formato fisico del CD-R/CD-RW
deve essere "ISO 9660"
• ISe i file MP3/WMA vengono registrati con un software che non è in
grado di creare un FILE SYSTEM,
come ad esempio “Direct-CD” ecc.,
la riproduzione di file MP3/WMA
risulterà impossibile. Si consiglia l’uso
di “Easy-CD Creator”, che crea un file
system ISO9660.
I clienti devono tenere presente che
per scaricare file MP3/WMA e musicali
da Internet è richiesta autorizzazione.
La nostra azienda non ha alcun diritto
per concedere tale autorizzazione.
L’autorizzazione deve essere sempre
ottenuta dal proprietario del copyright.
Requisiti dispositivo iPOD
• La compatibilità con l’iPod può variare in
funzione del tipo di iPod.
• In funzione della versione software del
proprio iPod, potrebbe non esser possibile controllare il proprio iPod da questa
unità. Si consiglia di installare la versione
più recente del software.
• Questo sistema può ricevere audio
analogico dai seguenti modelli iPod.
- iPod touch 1a generazione
- iPod mini (1a/2a generazione)
- iPod nano (1a/3a generazione)
- iPod classic (4a/5a/6a generazione)
• Se il contenuto sull'ipodermosi non
viene riprodotto in modo corretto,
aggiornare il software del proprio iPod
con la versione più recente. Per dettagli
relativi all'aggiornamento dell'unità iPod,
controllare il sito web Apple <http://
www.apple. com>.
• Apple non è responsabile del funzionamento di questo dispositivo o della sua
conformità agli standard di sicurezza e
normativi.
51
LAN8900EKYN ITA HMC.indd 51
2010-03-30 ¿ÀÈÄ 12:08:18
Funzionamento della radio
Ascolto di stazioni radio
1. Premere il pulsante "RADIO” per
selezionare la radio.
2. Premere ripetutamente “RADIO” per
selezionare una banda. La modalità
cambia nel modo seguente.
FM t AM t FM...
Nota
Per selezionare FM/AM toccando lo
sullo schermo
schermo Toccare
per selezionare AM e quindi toccare
.
3. Sintonia automatica:
Toccare
/
sullo schermo.
Oppure premere
/
sul pannello
di controllo.
- Appena sintonizzata una stazione
la ricerca si arresta.
Sintonia manuale:
Ruotare il selettore a scatti verso
sinistra / verso destra sul pannello di
controllo.
- Le frequenze si muovono verso
l'alto basso un scatto alla volta.
Memorizzazione e richiamo
stazioni
È possibile memorizzare molto facilmente
fino a un massimo dei 12 stazioni preimpostate che potranno essere richiamate in
seguito, premendo semplicemente il rispettivo
pulsante.
1. Selezionare la banda (FM, AM) per memorizzare le informazioni di una stazione.
2. Selezionare la frequenza desiderata.
3. Toccare [Preimpost.] sullo schermo.
4. Toccare e tenere premuto uno dei
tasti di preset.
Le informazioni sulla stazione preimpostata vengono visualizzate. La
stazione pre-impostata è stata memorizzata.
Se si passa alla pagina precedente/
successiva toccare / .
5. Ripetere i passaggi 1 e 4 per
memorizzare altre stazioni. La prossima volta, se si toccano i tasti di preset, la stazione viene richiamata dalla
memoria.
Nota
Quando una stazione è memorizzata sul pulsante di preimpostazione
stazioni su cui è stata preimpostata
un’altra stazione della stessa banda di
frequenza, la stazione precedentemente
impostata viene automaticamente cancellata.
52
LAN8900EKYN ITA HMC.indd 52
2010-03-30 ¿ÀÈÄ 12:08:18
Funzionamento della radio
AS (memoria ricerca automatica)
Questo è solo disponibile per la ricezione
AM.
Questa funzione vi permette di memorizzare
automaticamente le frequenze con segnale
più forte.
1. Selezionare la banda su AM.
Scansione frequenze di trasmissione
Vengono riprodotti i primi 10 secondi di
ogni frequenza trasmessa.
1. Toccare [Opzione] sullo schermo
nella modalità AM/FM.
2. Toccare [Opzione] sullo schermo.
TA (Annuncio traffico)
La funzione TA permette all'unità di passare alla funzione annuncio traffico (TA)
dalla sorgente corrente (un altra stazione
FM, CD o altro componente connesso).
1. Toccare [Opzione] sullo schermo
nella modalità AM/FM.
2. Toccare [TA Off]/ [TA On] sullo schermo.
3. Toccare [Autostore] sullo schermo.
2. Toccare [Scansione Inizia] sullo
schermo.
3. Toccare [Scansione Interroompi] per
annullare.
Le stazioni locali con un segnale
molto forte vengono rilevate e
memorizzate automaticamente nel
menu elenco. E quindi il menu elenco viene visualizzato sullo schermo.
[TA On]: Programmi e annunci
relativi al traffico possono
essere automaticamente
ricevuti usando le funzioni
TP/TA.
[TA Off]: Programmi e annunci relativi al traffico non possono
essere ricevuti.
4. Toccare la frequenza di trasmissione
desiderata.
53
LAN8900EKYN ITA HMC.indd 53
2010-03-30 ¿ÀÈÄ 12:08:18
Funzionamento della radio
NOTIZIE
Regione Auto/Off
Questa funzione permette all'unità di
passare alla funzione notizie (TA) dalla
sorgente corrente (un altra stazione FM,
CD o altro componente connesso).
Questo è solo disponibile per la ricezione FM.
1. Toccare [Opzione] sullo schermo
nella modalità AM/FM.
2. Toccare [Opzione] sullo schermo.
2. Toccare [NEWS Off]/ [NEWS On]
sullo schermo.
[NEWS On]: Notizie possono essere
ricevute automaticamente.
[NEWS Off]: Notizie non possono
essere ricevute automaticamente.
1. Selezionare la banda su FM.
3. Toccare [Regione Auto]/ [Regione
Off] sullo schermo.
[Regione Auto]:
La tracciatura di rete è attivata.
L’unità passa a un’altra stazione,
nella stessa rete che trasmette lo
stesso programma quando il segnale di ricezione dalla stazione corrente diventa debole.
[Regione Off]:
La tracciatura di rete è disattivata.
l’unità passa a un’altra stazione
nella stessa rete quando i segnali
di ricezione dalla stazione corrente
diventano deboli. (Nella modalità il
programma può differire da quello
attualmente in ricezione.)
54
LAN8900EKYN ITA HMC.indd 54
2010-03-30 ¿ÀÈÄ 12:08:19
Funzionamento con dispositivo ausiliario
Uso di una sorgente AUX
È possibile usare apparecchiature ausiliarie con questa unità.
1. Premere “MEDIA” fino alla visualizzazione della schermata “AUX”.
AUX Audio
Nota
• Alcuni dispositivi ausiliari non hanno sorgente video e non possono trasmettere
sullo schermo video.
• Nel caso di alcuni dispositivi iPod, usare
il cavetto iPod per uso esclusivo di iPod
per la riproduzione per video quando si
connette iPod al connettore AUX.
• Video non disponibile durante la
guida. (In funzione del codice della
strada, Aux Video è disponibile solo
quando il veicolo è fermo con il freno
a mano tirato.)
AUX Video
2. Connettere un dispositivo ausiliario
al connettore AUX quindi attivare la
funzione ausiliaria.
55
LAN8900EKYN ITA HMC.indd 55
2010-03-30 ¿ÀÈÄ 12:08:19
Sistema di riconoscimento vocale
Riconoscimento vocale
Fornire ai comandi vocali
Come dire i numeri
Il riconoscimento vocale permette
l'utilizzo in viva voce del sistema AV
(RADIO, CD, USB, iPod), la navigazione
e altri sistemi in dotazione di questo
veicolo, come ad esempio il telefono.
1. Premere
sul telecomando dello
sterzo.
2. Appena si sente il bip, dire “Guida”.
Verranno elencati tutti i comandi presenti nei campi attivi.
Nei comandi vocali il riconoscimento
vocale richiede un modo specifico per
la pronuncia dei numeri. Vedere gli
esempi che seguono. (Regola generale:
Per il numero "0" si può usare “zero”
oppure “oh”.)
Nota
Per ottenere in miglior riconoscimento
vocale possibile, osservare quanto
segue:
• Mantenere lo spazio interno al veicolo
il più silenzioso possibile. Chiudere le
finestre preliminare i rumori di sottofondo (rumori del traffico, rumori di
vibrazione ecc.) che possono impedire
al sistema di riconoscere in modo corretto i comandi vocali.
• Attendere fino a risuonare di un prima
di pronunciare un comando. In caso
contrario, il comando non verrà riconosciuto in modo adeguato.
• Parlare con voce innaturale senza
effettuare pause tra una parola e
l'altra.
Frequenza
Nota
• Se il comando non viene riconosciuto
il sistema annuncia la prima volta
“Come, scusi?” e la seconda volta
“Ripeta, per favore.”.
• Se si desidera annullare il riconosciancora
mento vocale, premere
una volta oppure prendere qualsiasi
pulsante o schermo tocco dicendo
“Annulla”.
• Se si desidera regolare il volume di
feedback del sistema, premere
oppure
sul telecomando dello
sterzo oppure usare la manopola del
volume ( ) sul comando mentre il
riconoscimento vocale è attivo.
Pronunciare il numero di frequenza
come indicato nel seguente esempio.
“Frequenza novantacinque-virgola-quattro
”/“ novantacinque-virgola-quattro
megahertz”
Numero di telefono
Pronunciare il numero telefonico come
indicato nel seguente esempio.
0-1-0-2-0-0-5-2 (cifra singola)
56
LAN8900EKYN ITA HMC.indd 56
2010-03-30 ¿ÀÈÄ 12:08:19
Sistema di riconoscimento vocale
Esempi di comandi vocali
Per usare la funzione di riconoscimento
vocale, a volte è sufficiente pronunciare
un comando ma altre volte sarà necessario pronunciare due o più comandi.
Come esempi, si riportano delle operazioni aggiuntive di base con i relativi
comandi vocali.
5. Dopo il suono del bip e dire
“Frequenza cento due" oppure
“cento due megahertz”.
6. Quando viene riconosciuta la frequenza enunciata, la frequenza FM
viene cambiata a 102 MHz.
Esempio 1: Modifica Radio &
Frequenza FM
1. Premere
sterzo.
5. Quando l'elenco di riproduzione viene
riconosciuto viene riprodotto una volta.
sul telecomando dello
2. Dopo il suono del bip e dire “FM”.
4. Premere
, dopo il suono del bip, si
potrà dire uno degli elenchi di
riproduzione come ad esempio
“micky green oh”.
Esempio 2: Modifica dell'elenco di
riproduzione del USB (CD)
3. Quando il comando “FM” viene riconosciuto, la schermata principale verrà
cambiata alla schermata principale FM.
6. Premere
sterzo.
1. Premere
sterzo.
sul telecomando dello
sul telecomando dello
7. Dopo il suono del bip e dire “Traccia
successiva” oppure “Traccia precedente".
2. Dopo il suono del bip e dire “Elenco”.
4. Premere
sterzo.
sul telecomando dello
3. Quando il comando viene riconosciuto, la schermata cambierà alla schermata
ELENCO USB (CD).
8. Quando il comando viene riconosciuto, l'elenco di riprodotto viene
cambiato a “Traccia successiva”
oppure “Traccia precedente”.
57
LAN8900EKYN ITA HMC.indd 57
2010-03-30 ¿ÀÈÄ 12:08:19
Sistema di riconoscimento vocale
Esempio 2: Numero di composizione
Per usare questa funzione, è necessario
disporre di un telefono cellulare con
supporto Bluetooth.
Prima dell'uso connettere l'unità con il
telefono Bluetooth.
1. Premere
sterzo.
sul telecomando dello
2. Dopo il suono del bip e dire
“Componi numero".
3. Quando il comando vocale viene
riconosciuto, la schermata cambia
alla schermata principale bluetooth e
il sistema annuncia “Per favore, dica
il numero di telefono.”.
5. Quando i numeri di telefono sono
riconosciuti, il sistema annuncia i
numeri conosciuti e quindi enuncia
“e poi?”.
6. Che si desidera effettuare la chiamata al numero riconosciuto dire
“Chiama”.
Se non è stato riconosciuto un
numero oppure si desidera eliminare
il numero enunciato, dire “Cancella”.
Se in qualsiasi momento si vuole terminare l'operazione dire “Annulla”.
Comando Guida
Se si sta controllando il sistema vocale
tramite comandi vocali oppure non si
conosce il comando vocale corretto,
enunciare seguendo comando.
1. Premere
sterzo.
4. Enunciare il numero di telefono come
“01020052” (con cifre singole).
3. La voce di feedback annuncia
“Comandi possibili sono:“.
4. Dopo il suono del bip, dire “Altri
comandi”.
Verranno elencati tutti i comandi
applicativi presenti nei campi attivi.
5. La voce di feedback annuncia
“Comandi possibili sono”.
6. Dopo il suono del bip e dire “AUX”.
La schermata cambia alla schermata
AUX.
sul telecomando dello
2. Appena si sente il bip, dire “Guida”.
Verranno elencati tutti i comandi
presenti nei campi attivi.
58
LAN8900EKYN ITA HMC.indd 58
2010-03-30 ¿ÀÈÄ 12:08:20
Sistema di riconoscimento vocale
Comandi vocali
Categoria
Comando voce
Categoria
Comando voce
Comando
AUX
applicativo
CD
News On
iPod
Stazione successiva
Mappa
Stazione precedente
Radio
TA Off
USB
TA On
Telefono
Preimpostazione <numero>
Media
Preimpostazioni
Radio
News Off
AM
Categoria
Funzioni
generali
Comando voce
FM
Abbassa volume
Elenco
Alza volume
Opzione
Pagina precedente
Scansiona Inizia
Pagina successiva
Scansiona Interrompi
Guida
Altri comandi
Frequenza “x” virgola
“yy”
Annulla
Frequenza “xxxx”
No
Autostore
Sì
Regione Auto
Categoria
Telefono
Comando voce
Componi numero
In entrata
Senza risposta
In uscita
Rubrica
Chiama nome
Composizione veloce
<numero>
Chiama
Elenchi chiamate
Composizione veloce
Cellulare
Privata
Ufficio
Cancella
Correzione
Regione Off
59
LAN8900EKYN ITA HMC.indd 59
2010-03-30 ¿ÀÈÄ 12:08:20
Sistema di riconoscimento vocale
Comandi vocali
Categoria
iPod
Comando voce
Ripeti Off
Ripeti On
Categoria
MP3, CD,
USB
Comando voce
Directory su
Categoria
Audio CD
Comando voce
Elenco
Elenco
Opzione
Scansiona Inizia
Opzione
Ripeti Off
Scansiona Interrompi
Ripeti Cartella
Ripeti Traccia
Casuale Off
Ripeti Off
Scansiona Inizia
Casuale Tutti
Ripeti Traccia
Scansiona Interrompi
Casuale Album
Scansiona Inizia
Casuale Tutti
Audiolibro Lento
Scansiona Interrompi
Casuale Off
Audiolibro Normale
Casuale Tutti
Info traccia
Audiolibro Veloce
Casuale Cartella
Traccia successiva
Directory su
Casuale Off
Traccia precedente
Elenco
Info traccia
Traccia <numero>
Opzione
Traccia successiva
OK
Traccia successiva
Traccia precedente
Traccia precedente
<Folder>
Info traccia
Traccia <numero>
<Folder>
Album
Traccia <numero>
Artista
OK
Cartella
Categoria
Navigazione
Comando voce
Navigazione
OK
60
LAN8900EKYN ITA HMC.indd 60
2010-03-30 ¿ÀÈÄ 12:08:20
Risoluzione problemi
Impossibile identificare il luogo attuale)
(GPS non riceve)
Il GPS non può essere utilizzato
all’interno e deve essere collegato
all’alimentazione ACC del veicolo in un
luogo in cui è ben visibile il cielo.
Quando inizialmente si collega il GPs,
occorrono circa 10 minuti per il corretto
funzionamento, ma la velocità di connessione può essere differente in base
alle condizioni del tempo e agli ostacoli
nelle vicinanze.
Se il collegamento GPS è instabile per
un lungo periodo di tempo, provare
quanto segue.
• Controllare il collegamento
dell’alimentazione al prodotto.
• Controllare se il retro del prodotto GPS
si trova in un luogo in cui il cielo è ben
visibile.
• In presenza di edifici alti o se ci si
trova sotto un albero, spostarsi in un
punto senza ostacoli.
La voce di guida non si sente.
Il volume non è impostato correttamente oppure è spento.
Regolare il volume della guida vocale.
La strada percorsa e quella sulla mappa
del prodotto sono differenti.
Anche se il GPS di solito è molto preciso,
si possono verificare degli scostamenti.
Quando viene installato il ricevitore, può
verificarsi un errore di circa 10m. Per
le strade di recente costruzione però, il
problema potrebbe essere di aggiornamento dei dati della mappa.
Impossibile visualizzare la mappa.
Questo accade quando è impossibile
visualizzare la mappa anche quando è
stato eseguito il menu di navigazione.
Questo accade se i dati in memoria
sono danneggiati. Eliminare tutti i dati
in memoria e installarli nuovamente. Se
il problema persiste dopo l’installazione
contattare il centro di assistenza.
Il percorso di guida è diverso dal percorso attuale.
(Errore di guida percorso)
• Quando la strada è parallela.
• Quado l’angolo della strada che divide
è minimo.
• In presenza di strada adiacente alla
svolta.
• Guidando su una strada che si
restringe rapidamente.
• Guidando in montagna o dove la
strada è curva.
• Quando i luoghi di partenza, passaggio e arrivo sono vicini più di 1km.
• Quando il luoghi di partenza, passaggio
e arrivo si trovano oltre 1km dalla strada.
• Guidando in un tunnel.
Corrispondenza di mappe
Come già menzionato i sistemi GPS
utilizzati dal sistema di navigazione sono
suscettibili a certi errori. In base ai loro
calcoli si può giungere in dei luoghi in
cui non esistono strade. In queste situazioni il sistema di elaborazione capisce
che il veicolo viaggia solo su strada ed è
in grado di correggere la posizione conducendolo a una strada vicina. Questa
funzione è chiamata corrispondenza di
mappe.
Con corrispondenza Senza corrispondi mappa.
denza di mappa.
61
LAN8900EKYN ITA HMC.indd 61
2010-03-30 ¿ÀÈÄ 12:08:20
Risoluzione problemi
Symptom
L'unità non si accende.
Cause
Soluzioni
L’interruttore di accensione NON è acceso.
Ruotare l’interruttore di accensione su
ON.
L’interruttore di accensione NON è impostato ad ACC.
Impostare l’interruttore di accensione su
ACC.
L’unità è spenta.
Accendere l’unità premendo
nello di controllo.
Disturbi e altri fattori stanno causando
l’errato funzionamento del microprocessore integrato.
Spegnere e riaccendere l’unità.
Non è possibile attivare la
Il disco è sporco.
Pulire il disco.
funzione di riproduzione.
Il disco inserito non è supportato
dall’unità
Verificare il tipo di disco.
Il disco è inserito al contrario.
Inserire il disco con l’etichetta verso
l’alto.
Il formato dei file su disco non è regolare.
Verificare il formato file.
Il livello del volume è basso.
Regolare il volume.
L’opzione mute è attivata.
Disattivare l’opzione mute.
L'unità non funziona.
L’audio è assente.
sul pan-
62
LAN8900EKYN ITA HMC.indd 62
2010-03-30 ¿ÀÈÄ 12:08:20
Specifiche tecniche
SEZIONE RADIO
FM
Gamma di frequenza . . . . . . . . . . . . . . . . . .87.5 a 108 MHz
Rapporto segnale/rumore. . . . . . . . . . . . . . . . . . . . . . .50 dB
Distorsione . . . . . . . . . . . . . . . . . . . . . . . . . . . . . . . . . . . . 1 %
Sensibilità utile . . . . . . . . . . . . . . . . . . . . . . . . . . . . . 10 dBμV
GENERALE
Potenza in uscita . . . . . . . . . . . . . . . . . . . 50W x 4CH (Max.)
Alimentazione . . . . . . . . . . . . . . . . . . . . . . . . . . . . . . . DC 12V
Impedenza cassa. . . . . . . . . . . . . . . . . . . . . . . . . . . . . . . .4 Ω
Sistema di messa a terra . . . . . . . . . . . . . . . . . . . . Negative
Dimensioni (W x H x D) . . . . . . . . . 206.4 x 118.4 x 185.4 mm
Peso netto . . . . . . . . . . . . . . . . . . . . . . . . . . . . . . . . . .2.44 kg
AM (MW)
Gamma di frequenza . . . . . . . . . . . . . . . . . 522 a 1620 kHz
Rapporto segnale/rumore. . . . . . . . . . . . . . . . . . . . . . . 45 dB
Distorsione . . . . . . . . . . . . . . . . . . . . . . . . . . . . . . . . . . . .1.0 %
Sensibilità utile. . . . . . . . . . . . . . . . . . . . . . . . . . . . . .38 dBμV
DISPLAY
LCD . . . . . . . . . . . . . . . . . . . . . . . . . . . . . . 6.5 inch TFT LCD
Risoluzione. . . . . . . . . . . . . . . . . . . . . . . . . . . . . . 800 X 480
Retroilluminazione . . . . . . . . . . . . . . . . . . . . . . . . . .tipo CCFL
SEZIONE CD
Risposta di frequenza . . . . . . . . . . . . . . . . . 20 Hz a 20 kHz
Rapporto segnale/rumore. . . . . . . . . . . . . . . . . . . . . . .60 dB
Distorsione . . . . . . . . . . . . . . . . . . . . . . . . . . . . . . . . . . . 0.3 %
Separazione canale (1kHz) . . . . . . . . . . . . . . . . . . . . . .50 dB
63
LAN8900EKYN ITA HMC.indd 63
2010-03-30 ¿ÀÈÄ 12:08:20
Indice
Rubrica . . . . . . . . . . . . . . . . . . . . . . . . . . . . . . . . . . . . . . . . .
Ricerca indirizzo. . . . . . . . . . . . . . . . . . . . . . . . . . . . . . . . . .
Rispondere alle chiamate . . . . . . . . . . . . . . . . . . . . . . . . . .
AS (memoria ricerca automatica) . . . . . . . . . . . . . . . . . . .
Tecnologia wireless Bluetooth
24
23
42
53
Parcheggio. . . . . . . . . . . . . . . . . . . . . . . . . . . . . . . . . . . . . .
Numbero Di Telefono . . . . . . . . . . . . . . . . . . . . . . . . . . . . .
Categoria del POI . . . . . . . . . . . . . . . . . . . . . . . . . . . . . . . .
POI (Punti di interesse) . . . . . . . . . . . . . . . . . . . . . . . . . . . .
28
26
34
24
. . . . . . . . . . . . . . . . . . . . . 39
Casuale . . . . . . . . . . . . . . . . . . . . . . . . . . . . . . . . . . . . . . . .
Regione Auto/Off . . . . . . . . . . . . . . . . . . . . . . . . . . . . . . . .
Ripeti . . . . . . . . . . . . . . . . . . . . . . . . . . . . . . . . . . . . . . . . . .
Come tornare all'inizio del capitolo/brano attualmente in
riproduzione . . . . . . . . . . . . . . . . . . . . . . . . . . . . . . . . . . . .
Opzioni di percorso . . . . . . . . . . . . . . . . . . . . . . . . . . . . . . .
48
54
47
Modifica della chiave di accesso . . . . . . . . . . . . . . . . . . . . . 41
Deviazione . . . . . . . . . . . . . . . . . . . . . . . . . . . . . . . . . . . . . . .37
Fornire ai comandi vocali . . . . . . . . . . . . . . . . . . . . . . . . . . 56
Ingresso GPS . . . . . . . . . . . . . . . . . . . . . . . . . . . . . . . . . . . . 27
Ricerca . . . . . . . . . . . . . . . . . . . . . . . . . . . . . . . . . . . . . . . . 46
Impostazione . . . . . . . . . . . . . . . . . . . . . . . . . . . . . . . . . . 16-19
Come saltare al capitolo/brano successivo . . . . . . . . . . . . 46
Come saltare al capitolo/brano precedente . . . . . . . . . . . 46
Schermo diviso/ Schermo intero . . . . . . . . . . . . . . . . . . . . 35
Salva destinazione . . . . . . . . . . . . . . . . . . . . . . . . . . . . . . . . . 31
Salva posizione . . . . . . . . . . . . . . . . . . . . . . . . . . . . . . . . 31,35
Accensione e spegnimento del microfono . . . . . . . . . . . . 42
Effettuare una telefonata inserendo un numero . . . . . . . . 42
Comando Guida . . . . . . . . . . . . . . . . . . . . . . . . . . . . . . . . . 58
Casa 1/ Lavoro2/ 3~12 . . . . . . . . . . . . . . . . . . . . . . . . . . . . 32
In città . . . . . . . . . . . . . . . . . . . . . . . . . . . . . . . . . . . . . . . . .
Informazioni locale . . . . . . . . . . . . . . . . . . . . . . . . . . . . . . .
Info sul percorso . . . . . . . . . . . . . . . . . . . . . . . . . . . . . . . . .
Scansione introduttiva . . . . . . . . . . . . . . . . . . . . . . . . . . . .
46
36
26
38
38
47
Assistenza Kia . . . . . . . . . . . . . . . . . . . . . . . . . . . . . . . . . . . 26
TA (Annuncio traffico) . . . . . . . . . . . . . . . . . . . . . . . . . . . . . 53
Pianificatore di escursione . . . . . . . . . . . . . . . . . . . 29-30, 35
2D/ 3D . . . . . . . . . . . . . . . . . . . . . . . . . . . . . . . . . . . . . . . . . 34
Ultime destinazione. . . . . . . . . . . . . . . . . . . . . . . . . . . . . . . 24
Effettuare una telefonata inserendo un numero . . . . . . . . 42
Effettuare una chiamata con i numeri di composizione veloce . 45
Uso di una mappa. . . . . . . . . . . . . . . . . . . . . . . . . . . . . . . . 28
Utilizzo della rubrica . . . . . . . . . . . . . . . . . . . . . . . . . . . . . . 43
Usando l'elenco delle chiamate . . . . . . . . . . . . . . . . . . . . . 44
Vicino Destinazione . . . . . . . . . . . . . . . . . . . . . . . . . . . . . . . 26
Vicino Posizione. . . . . . . . . . . . . . . . . . . . . . . . . . . . . . . . . . 25
NOTIZIE . . . . . . . . . . . . . . . . . . . . . . . . . . . . . . . . . . . . . . . . 54
Comandi vocali . . . . . . . . . . . . . . . . . . . . . . . . . . . . . . . 59-60
Riconoscimento vocale . . . . . . . . . . . . . . . . . . . . . . . . . . . . 56
64
LAN8900EKYN ITA HMC.indd 64
2010-03-30 ¿ÀÈÄ 12:08:20
Simboli indicanti problemi di traffico
Se il problema di traffico si trova sul percorso calcolato, il simbolo sarà evidenziato.
Simbolo
Descrizione
Simbolo
Descrizione
Caduta massi
Traffico stazionario
Incidente
Traffico incolonnato
Altro pericolo
Tempesta di vento
Restringimento strada
Neve, ghiaccio
Ghiaia
Strada bloccata, chiusa
Lavori stradali
Telefono di emergenza
fuori servizio
Strada sdrucciolevole,
pioggia
65
LAN8900EKYN ITA HMC.indd 65
2010-03-30 ¿ÀÈÄ 12:08:20
Supporto - Hotline
Sito Web : http://www.navigation.com/kia
Numero verde internazionale: 00800 18 23 53 22
Numero di telefono per
tutti gli altri paesi
( o se I numeri verdi non
sono supportati)
: +31 555 384 245
P/N: MFL62880528
LAN8900EKYN ITA HMC.indd 66
2010-03-30 ¿ÀÈÄ 12:13:21
NEDERLANDS
GEBRUIKSAANWIJZING
BEZIG MET LADEN . . .
LAN8900EKYN DUT HMC .indd 1
2010-03-24 ¿ÀÈÄ 10:45:44
Inhoud
Algemene informatie. . . . . . . . . . . . . . . . . . . . . .7-10
Wenken voor uw veiligheid . . . . . . . . . . . . . . . . . . . . . . . . . . . . . . . . . . . . . . . . . 7-8
Afspeelbare disks . . . . . . . . . . . . . . . . . . . . . . . . . . . . . . . . . . . . . . . . . . . . . . . . . . 9
Voorzorgsmaatregelen bij het handeteren van disks en de speler . . . . . . . . . . . 9
AUTEURSRECHTEN . . . . . . . . . . . . . . . . . . . . . . . . . . . . . . . . . . . . . . . . . . . . . . . 10
Oude apparaten wegdoen . . . . . . . . . . . . . . . . . . . . . . . . . . . . . . . . . . . . . . . . . . 10
Naam van de componenten . . . . . . . . . . . . . . . 11-13
Bedieningspaneel . . . . . . . . . . . . . . . . . . . . . . . . . . . . . . . . . . . . . . . . . . . . . . . 11-12
Afstandsbediening op het stuurwiel . . . . . . . . . . . . . . . . . . . . . . . . . . . . . . . . . . 13
Bediening . . . . . . . . . . . . . . . . . . . . . . . . . . . . . .14-15
Startscherm . . . . . . . . . . . . . . . . . . . . . . . . . . . . . . . . . . . . . . . . . . . . . . . . . . . . . .
Het systeem inschakelen/ Het systeem uitschakelen. . . . . . . . . . . . . . . . . . . . .
Een disk laden/ Een disk uitstoten. . . . . . . . . . . . . . . . . . . . . . . . . . . . . . . . . . . .
Volume aanpassen. . . . . . . . . . . . . . . . . . . . . . . . . . . . . . . . . . . . . . . . . . . . . . . . .
Een bron op het bedieningspaneel selecteren . . . . . . . . . . . . . . . . . . . . . . . . . .
Een bron op het scherm kiezen . . . . . . . . . . . . . . . . . . . . . . . . . . . . . . . . . . . . . .
Achteruitrijcamera (facultatief) . . . . . . . . . . . . . . . . . . . . . . . . . . . . . . . . . . . . . . .
14
14
14
14
15
15
15
Instellingen. . . . . . . . . . . . . . . . . . . . . . . . . . . . .16-19
Bronnen met de afstandsbediening kiezen. . . . . . . . . . . . . . . . . . . . . . . . . . . 16-19
Bluetooth . . . . . . . . . . . . . . . . . . . . . . . . . . . . . . . . . . . . . . . . . . . . . . . . . . . . . . 16
Systeem . . . . . . . . . . . . . . . . . . . . . . . . . . . . . . . . . . . . . . . . . . . . . . . . . . . . . 16-17
Verkeer/ Navigatie . . . . . . . . . . . . . . . . . . . . . . . . . . . . . . . . . . . . . . . . . . . . . . . 18
Audio . . . . . . . . . . . . . . . . . . . . . . . . . . . . . . . . . . . . . . . . . . . . . . . . . . . . . . .18-19
Scherm . . . . . . . . . . . . . . . . . . . . . . . . . . . . . . . . . . . . . . . . . . . . . . . . . . . . . . . . 19
2
LAN8900EKYN DUT HMC .indd 2
2010-03-25 ¿ÀÀü 10:03:37
Inhoud
Beginnen met navigeren. . . . . . . . . . . . . . . . . 20-21
Wat is GPS?. . . . . . . . . . . . . . . . . . . . . . . . . . . . . . . . . . . . . . . . . . . . . . . . . . . . . . 20
Dit moet u weten over satellietsignalen . . . . . . . . . . . . . . . . . . . . . . . . . . . . . . . . 20
Satellietsignalen ontvangen . . . . . . . . . . . . . . . . . . . . . . . . . . . . . . . . . . . . . . . . . 20
Openingsscherm voor navigatie . . . . . . . . . . . . . . . . . . . . . . . . . . . . . . . . . . . . . . 20
Aanwijzingen op het kaartscherm . . . . . . . . . . . . . . . . . . . . . . . . . . . . . . . . . 20-21
Kaartschermen weergeven . . . . . . . . . . . . . . . . . . . . . . . . . . . . . . . . . . . . . 20-21
Een andere kaartschaal kiezen . . . . . . . . . . . . . . . . . . . . . . . . . . . . . . . . . . . . . 21
Invoermenu reisdoel . . . . . . . . . . . . . . . . . . . . . . . . . . . . 22-32
Overzicht navigatiemenu/ Navigatievolume aanpassen . . . . . . . . . . . . . . . . . . . 22
Het reisdoelmenu gebruiken . . . . . . . . . . . . . . . . . . . . . . . . . . . . . . . . . . . . . . . . 22
Adressen opzoeken . . . . . . . . . . . . . . . . . . . . . . . . . . . . . . . . . . . . . . . . . . . . . . . . 23
Laatste Doelen. . . . . . . . . . . . . . . . . . . . . . . . . . . . . . . . . . . . . . . . . . . . . . . . . . . . 24
Adressenboek . . . . . . . . . . . . . . . . . . . . . . . . . . . . . . . . . . . . . . . . . . . . . . . . . . . . 24
POI (Nuttige Plaats) . . . . . . . . . . . . . . . . . . . . . . . . . . . . . . . . . . . . . . . . . . . . . . . 24
Vlak Bij Positie . . . . . . . . . . . . . . . . . . . . . . . . . . . . . . . . . . . . . . . . . . . . . . . . . . 25
Vlak Bij Doel. . . . . . . . . . . . . . . . . . . . . . . . . . . . . . . . . . . . . . . . . . . . . . . . . . . . 26
In Stad/ Naam . . . . . . . . . . . . . . . . . . . . . . . . . . . . . . . . . . . . . . . . . . . . . . . . . . 26
Kia-Service . . . . . . . . . . . . . . . . . . . . . . . . . . . . . . . . . . . . . . . . . . . . . . . . . . . . . 26
Telefoonnummer . . . . . . . . . . . . . . . . . . . . . . . . . . . . . . . . . . . . . . . . . . . . . . . . 26
GPS Invoer . . . . . . . . . . . . . . . . . . . . . . . . . . . . . . . . . . . . . . . . . . . . . . . . . . . . . . . 27
Parkeren . . . . . . . . . . . . . . . . . . . . . . . . . . . . . . . . . . . . . . . . . . . . . . . . . . . . . . . . 28
Navigatie Hervatten/ Navigatie Stoppen . . . . . . . . . . . . . . . . . . . . . . . . . . . . . . . 28
Kaart gebruiken . . . . . . . . . . . . . . . . . . . . . . . . . . . . . . . . . . . . . . . . . . . . . . . . . . . 28
Route Planner . . . . . . . . . . . . . . . . . . . . . . . . . . . . . . . . . . . . . . . . . . . . . . . . .29-30
Opslaan Doel . . . . . . . . . . . . . . . . . . . . . . . . . . . . . . . . . . . . . . . . . . . . . . . . . . . . . 31
Opslaan Positie . . . . . . . . . . . . . . . . . . . . . . . . . . . . . . . . . . . . . . . . . . . . . . . . . . . 31
Thuis 1/ Werk2/ 3~12 . . . . . . . . . . . . . . . . . . . . . . . . . . . . . . . . . . . . . . . . . . . . . . 32
3
LAN8900EKYN DUT HMC .indd 3
2010-03-25 ¿ÀÀü 10:03:37
Inhoud
Gebruik van het kaartmenu . . . . . . . . . . . . . .33-38
Overzicht kaartmenu . . . . . . . . . . . . . . . . . . . . . . . . . . . . . . . . . . . . . . . . . . . . . . . 33
Werken met het kaartmenu . . . . . . . . . . . . . . . . . . . . . . . . . . . . . . . . . . . . . . . . . 33
POI-Categorie . . . . . . . . . . . . . . . . . . . . . . . . . . . . . . . . . . . . . . . . . . . . . . . . . . . . 34
2D/ 3D . . . . . . . . . . . . . . . . . . . . . . . . . . . . . . . . . . . . . . . . . . . . . . . . . . . . . . . . . . 34
Gesplitst scherm / Volledig scherm. . . . . . . . . . . . . . . . . . . . . . . . . . . . . . . . . . . 35
Opslaan Positie . . . . . . . . . . . . . . . . . . . . . . . . . . . . . . . . . . . . . . . . . . . . . . . . . . . 35
Route Planner . . . . . . . . . . . . . . . . . . . . . . . . . . . . . . . . . . . . . . . . . . . . . . . . . . . . 35
Routeopties . . . . . . . . . . . . . . . . . . . . . . . . . . . . . . . . . . . . . . . . . . . . . . . . . . . . . . 36
Browser. . . . . . . . . . . . . . . . . . . . . . . . . . . . . . . . . . . . . . . . . . . . . . . . . . . . . . . . . . 37
Omleiding . . . . . . . . . . . . . . . . . . . . . . . . . . . . . . . . . . . . . . . . . . . . . . . . . . . . . . . 37
Info Vlakbij . . . . . . . . . . . . . . . . . . . . . . . . . . . . . . . . . . . . . . . . . . . . . . . . . . . . . . . 38
Info over route . . . . . . . . . . . . . . . . . . . . . . . . . . . . . . . . . . . . . . . . . . . . . . . . . . . . 38
Draadloze Bluetooth technologie . . . . . . . . . .39-45
Wat u van draadloze Bluetooth technologie moet weten . . . . . . . . . . . . . . . . . . 39
Uw apparaat en een Bluetooth telefoon verbinden. . . . . . . . . . . . . . . . . . . .39-40
Een Bluetooth telefoon afsluiten/weer aansluiten . . . . . . . . . . . . . . . . . . . . . . . . 41
Telefoonverbinding afsluiten . . . . . . . . . . . . . . . . . . . . . . . . . . . . . . . . . . . . . . . . . 41
Toegangscode veranderen . . . . . . . . . . . . . . . . . . . . . . . . . . . . . . . . . . . . . . . . . . 41
Bellen door invoeren van het telefoonnummer . . . . . . . . . . . . . . . . . . . . . . . . . 42
Het geluidspad tijdens een telefoongesprek overschakelen . . . . . . . . . . . . . . . 42
Microfoon in/uitschakelen. . . . . . . . . . . . . . . . . . . . . . . . . . . . . . . . . . . . . . . . . . . 42
Oproepen beantwoorden . . . . . . . . . . . . . . . . . . . . . . . . . . . . . . . . . . . . . . . . . . . 42
Uw telefoonboek gebruiken . . . . . . . . . . . . . . . . . . . . . . . . . . . . . . . . . . . . . . . . . 43
Lijst van recente telefoontjes . . . . . . . . . . . . . . . . . . . . . . . . . . . . . . . . . . . . . . . . 44
Bellen met snelkiesnummers . . . . . . . . . . . . . . . . . . . . . . . . . . . . . . . . . . . . . . . . 45
4
LAN8900EKYN DUT HMC .indd 4
2010-03-25 ¿ÀÀü 10:03:37
Inhoud
CD/MP3/WMA/USB/iPod bedienen . . . . . . .46-51
Audio-cd’s en mp3-, wma-, usb- en iPod-bestanden afspelen . . . . . . . . .46-48
Naar een volgend hoofdstuk/nummer gaan . . . . . . . . . . . . . . . . . . . . . . . . . . 46
Naar een vorig hoofdstuk/nummer gaan . . . . . . . . . . . . . . . . . . . . . . . . . . . . 46
Naar het begin van het huidige hoofdstuk/nummer teruggaan. . . . . . . . . . . 46
Zoeken . . . . . . . . . . . . . . . . . . . . . . . . . . . . . . . . . . . . . . . . . . . . . . . . . . . . . . . . 46
Introscan. . . . . . . . . . . . . . . . . . . . . . . . . . . . . . . . . . . . . . . . . . . . . . . . . . . . . . . 47
Herhalen . . . . . . . . . . . . . . . . . . . . . . . . . . . . . . . . . . . . . . . . . . . . . . . . . . . . . . . 47
In willekeurige volgorde afspelen . . . . . . . . . . . . . . . . . . . . . . . . . . . . . . . . . . . 48
Bestanden afspelen door indeling volgens map/album/artiest . . . . . . . . . . . 48
Een map/bestand opzoeken met de lijst. . . . . . . . . . . . . . . . . . . . . . . . . . . . . . . 49
Muziek zoeken . . . . . . . . . . . . . . . . . . . . . . . . . . . . . . . . . . . . . . . . . . . . . . . . . . . 49
Afspeelsnelheid van audiobooks instellen . . . . . . . . . . . . . . . . . . . . . . . . . . . . . 50
Vereisten voor usb-apparaten/ Compatibele usb-apparaten. . . . . . . . . . . . . . . 50
Vereisten voor mp3- en wma-bestanden . . . . . . . . . . . . . . . . . . . . . . . . . . . . . . 51
Vereisten voor iPod apparaten . . . . . . . . . . . . . . . . . . . . . . . . . . . . . . . . . . . . . . . 51
Radio bedienen . . . . . . . . . . . . . . . . . . . . . . . .52-54
Luisteren naar radiostations . . . . . . . . . . . . . . . . . . . . . . . . . . . . . . . . . . . . . . . . . 52
Stations opslaan en oproepen . . . . . . . . . . . . . . . . . . . . . . . . . . . . . . . . . . . . . . . 52
AS (Automatisch zoeken en opslaan) . . . . . . . . . . . . . . . . . . . . . . . . . . . . . . . . . 53
Zendfrequenties scannen . . . . . . . . . . . . . . . . . . . . . . . . . . . . . . . . . . . . . . . . . . . 53
TA (Verkeersinformatie) . . . . . . . . . . . . . . . . . . . . . . . . . . . . . . . . . . . . . . . . . . . . 53
NIEUWS . . . . . . . . . . . . . . . . . . . . . . . . . . . . . . . . . . . . . . . . . . . . . . . . . . . . . . . . . 54
Regiokeuze autom/uit . . . . . . . . . . . . . . . . . . . . . . . . . . . . . . . . . . . . . . . . . . . . . . 54
Hulpapparaten bedienen . . . . . . . . . . . . . . . . . . . 55
AUX-bronnen gebruiken. . . . . . . . . . . . . . . . . . . . . . . . . . . . . . . . . . . . . . . . . . . . 55
5
LAN8900EKYN DUT HMC .indd 5
2010-03-25 ¿ÀÀü 10:03:37
Inhoud
Spraakherkenningssysteem . . . . . . . . . . . . . 56-60
Spraakherkenning . . . . . . . . . . . . . . . . . . . . . . . . . . . . . . . . . . . . . . . . . . . . . . . . . 56
Gesproken commando’s geven . . . . . . . . . . . . . . . . . . . . . . . . . . . . . . . . . . . . . . 56
Nummers uitspreken. . . . . . . . . . . . . . . . . . . . . . . . . . . . . . . . . . . . . . . . . . . . . . . 56
Voorbeelden van gesproken commando’s. . . . . . . . . . . . . . . . . . . . . . . . . . . 57-58
Help commando . . . . . . . . . . . . . . . . . . . . . . . . . . . . . . . . . . . . . . . . . . . . . . . . . . 58
Gesproken commando’s . . . . . . . . . . . . . . . . . . . . . . . . . . . . . . . . . . . . . . . . .59-60
Problemen oplossen . . . . . . . . . . . . . . . . . . . . 61-62
Specificaties. . . . . . . . . . . . . . . . . . . . . . . . . . . . . . 63
Inhoudsopgave . . . . . . . . . . . . . . . . . . . . . . . . . . . 64
Symbolen voor de weergave van verkeersproblemen . .65
6
LAN8900EKYN DUT HMC .indd 6
2010-03-25 ¿ÀÀü 10:03:37
Algemene informatie
Wenken voor uw veiligheid
WAARSCHUWING
SCHOKGEVAAR
NIET OPENEN
VOORZICHTIG! OPEN HET DEKSEL (OF
DE ACHTERZIJDE) NIET OM DE KANS OP
ELEKTRISCHE SCHOKKEN TE VERMIJDEN BEVAT GEEN ONDERDELEN DIE U ZELF KUNT
REPAREREN. GA VOOR ONDERHOUD EN
REPARATIES NAAR DE LEVERANCIER OF EEN
DESKUNDIGE ONDERHOUDSTECHNICUS.
Deze bliksemschicht met pijlsymbool
in een gelijkzijdige driehoek wijst u op
ongeïsoleerde gevaarlijke spanning in
de kast van het product. Deze spanning
is voldoende sterk om u en anderen
aan een elektrische schok bloot te stellen.
Het uitroepteken in een gelijkzijdige
driehoek wijst u op belangrijke informatie over de bediening en het onderhoud
(service) in de documentatie die u bij
dit product hebt ontvangen.
Denk om uw veiligheid wanneer u een
auto bestuurt. Laat u tijdens het rijden
niet door de auto afleiden en houd uw
aandacht bij het verkeer en het weer.
Verander tijdens het rijden geen knopstanden en functies. Zet uw auto veilig
aan de kant waar het is toegestaan om
knoppen en functies in te stellen. In
verband met uw veiligheid zijn sommige
functies uitgeschakeld tenzij de
hamdrem aangetrokken is.
Gebruik dit apparaat niet langdurig bij
extreem lage of hoge temperaturen
(-10°C tot +60°C).
Stel het apparaat niet bloot aan druipof spatwater om het risico van brand en
elektrische schokken te vermijden.
De temperatuur van de buitenkant van
het apparaat kan erg hoog worden.
Gebruik het apparaat alleen als het
deskundig in uw auto is geïnstalleerd.
Zet het geluid onder het rijden niet te
hard.
Laat het apparaat nooit vallen en stoot
niet hard tegen het apparaat.
Maak het apparaat niet open om het
risico van een elektrische schok te
voorkomen. Het apparaat bevat geen
onderdelen die u als gebruiker zelf kunt
repareren. Laat het onderhoud en reparaties over aan deskundige
servicetechnici.
7
LAN8900EKYN DUT HMC .indd 7
2010-03-25 ¿ÀÀü 10:03:37
Algemene informatie
LET OP :
Kijk niet naar het beeldscherm terwijl u
de auto bestuurt. Doet u dat toch dan
kunt u gemakkelijk afgeleid worden en
een ongeluk veroorzaken.
Het apparaat is geschikt voor auto's
met een 12 V-accu, min aan massa.
Controleer de accuspanning voordat u het apparaat in een reiswagen,
vrachtwagen of bus installeert. Om
kortsluiting te voorkomen moet u de Eaccukabel losmaken voordat u met de
installatie begint.
Dit apparaat gebruikt een lasersysteem.
Lees deze handleiding zorgvuldig door
om ervoor te zorgen dat u dit systeem
goed gebruikt. U kunt deze handleiding later nodig hebben. Bewaar hem
dus goed. Als het apparaat toe is aan
onderhoud neem dan contact op met
een erkend servicecentrum. U loopt het
risico van blootstelling aan gevaarlijke
straling als u andere instellingen op
het apparaat aanbrengt of andere controlewerkzaamheden en procedures bij
het apparaat uitvoert dan die welke in
deze handleiding worden genoemd.
Open nooit de kast van het apparaat om te voorkomen dat u aan
rechtstreekse laserstraling wordt blootgesteld. Bij een geopend apparaat is de
laserstraling zichtbaar. KIJK NIET IN DE
STRAAL!
LET OP :
Als u het apparaat opent, kan het
zichtbare en/of onzichtbare laserstralen van klasse 1M uitzenden. Kijk
nooit rechtstreeks of met een optisch
instrument naar een bron van laserstraling.
LET OP:
• Laat het navigatiesysteem niet ingeschakeld met uitgeschakelde motor.
Door het navigatiesysteem ingeschakeld te laten kan de auto-accu ontladen
worden. Laat altijd de motor draaien
als u het navigatiesysteem gebruikt.
• Als u het navigatiesysteem als bestuurder wilt bedienen, parkeer de auto
dan eerst op een veilige plaats en trek
de handrem aan. Als u het systeem
tijdens het rijden als bestuurder bedient, kunt u afgeleid worden en daardoor een ernstig ongeval veroorzaken.
• Demonteer en verander dit systeem
niet. Doet dat wel, dan riskeert u
ongevallen, brand of een elektrische
schok.
• In sommige landen is het gebruik
van beeldschermen tijdens het besturen van een auto wettelijk verboden.
Gebruik uw systeem alleen als dat
wettelijk is toegestaan.
• Bel nooit terwijl u een auto bestuurt.
Parkeer uw auto op een veilige plek
voordat u de telefoon pakt.
• Zet voordat u wegrijdt het geluidsvolume van uw navigatiesysteem laag
genoeg om de geluiden van buiten te
kunnen horen.
8
LAN8900EKYN DUT HMC .indd 8
2010-03-25 ¿ÀÀü 10:03:37
Algemene informatie
Afspeelbare disks
Voorzorgsmaatregelen bij het hanteren van disks en de speler
• Als u een beschadigde
of vuile disk in de speler
plaatst, kan het geluid tijdens
het afspelen wegvallen.
• Houd een disk altijd aan de
buitenrand vast.
• Raak de kant van de disk
waar geen etiket op zit nooit
aan.
Dit apparaat speelt cd-r en cd-rw disks
die audionummers, mp3- of wma-bestanden bevatten.
• Afhankelijk van de kwaliteit van de
opnameapparatuur of van de cd-r/rw
disk zelf kunnen sommige cd-r/rw
disks niet op dit apparaat worden
afgespeeld.
• Plak geen zegel of etiket op een van
de beide zijden (de zijde met het
label of de zijde met het opnamespoor) van de disk.
• Gebruik geen onregelmatig gevormde disks, bijvoorbeeld hartvormig
of achthoekig. Hierdoor kan de speler
defect raken.
Plak geen papier of plakband
op een disk.
• Maak uw disks vóór
het afspelen altijd
schoon. Veeg met
een zachte schone
doek vanuit het midden naar de rand.
• Gebruik nooit oplosmiddelen zoals
benzeen of alcohol
om een disk schoon
te maken.
Laat een disk nooit in de zon
of op een erg warme plaats
liggen.
8 cm
Dit apparaat is niet geschikt
voor het afspelen van 8-cm
disks. Gebruik alleen 12-cm
disks.
9
LAN8900EKYN DUT HMC .indd 9
2010-03-25 ¿ÀÀü 10:03:37
Algemene informatie
AUTEURSRECHTEN
Het is wettelijk verboden materiaal
waarop auteursrecht rust zonder nadrukkelijke toestemming te kopiëren, uit
te zenden, te vertonen, via de kabel uit
te zenden, openbaar te vertonen of te
verhuren.
Dit systeem is voorzien van de kopieerbeveiligingsfunctie die door Macrovision
is ontwikkeld.
Op bepaalde schijven is een code
opgenomen die het kopiëren van de
schijf tegengaat. Wanneer u het beeldmateriaal van deze disks op een apparaat afspeelt, kan beeldruis ontstaan. Dit
product bevat technologie voor de beveiliging van auteursrechten die beschermd wordt door bepaalde Amerikaanse
patenten en andere rechten op intellectuele eigendom die eigendom zijn
van Macrovision Corporation en andere
rechthebbenden.
Het gebruik van de technologie voor
de beveiliging van auteursrechten
moet nadrukkelijk zijn toegestaan door
Macrovision Corporation en is uitsluitend bedoeld voor gebruik in de
woonomgeving en andere beperkte
toepassingen tenzij Macrovision
Corporation daarvoor ontheffing heeft
verleend. Ontmantelen en demonteren
zijn verboden.
Oude apparaten wegdoen
1. Als dit symbool van een doorgekruiste afvalemmer op een product
staat wil dat zeggen dat het product
aan de Europese richtlijn 2002/96/
EC voldoet.
2. Elektrische en elektronische producten die u wegdoet moeten
gescheiden van het huisvuil bij een
officieel aangewezen adres worden
ingeleverd,
3. Door uw oude apparaten weg
te doen zoals het hoort, helpt u
mogelijke negatieve gevolgen voor
het milieu en de volksgezondheid
voorkomen.
4. Bel voor meer informatie over het
opruimen van uw oude apparaten het
gemeentehuis van uw woonplaats,
het dichtstbijzijnde erkende inleveradres of de winkel waar u het product
hebt gekocht.
De naam iPod is een handelsmerk van Apple
Computer, Inc. dat gedeponeerd is in de
Verenigde Staten en andere landen.
“Made for iPod” betekent dat een elektronisch accessoire speciaal voor aansluiting
op een iPod ontwikkeld is en door de ontwerper is goedgekeurd volgens de kwaliteitsnormen van Apple.
“Het woordmerk en de logo's van
Bluetooth zijn eigendom van Bluetooth
SIG, Inc. en voor het gebruik daarvan
is aan LG Electronics licentie verleend.
Andere handelsmerken en handelsnamen zijn eigendom van de betreffende
eigenaren.”
10
LAN8900EKYN DUT HMC .indd 10
2010-03-25 ¿ÀÀü 10:03:38
Naam van de componenten
Bedieningspaneel
1 2
7
8 9
3
10
4
RADIO
MAP
11
5
MEDIA
NAV
12
13
6
14
1. Scherm aan/uit (
)
Druk hierop om het scherm in en uit
te schakelen.
4. RADIO
Hiermee selecteert u de fm- of de
am-band.
2. Uitstoten (Z)
Druk hierop om een disk uit het
apparaat te stoten.
5. MEDIA
Hiermee selecteert u een bron: cdspeler, usb-stick, iPod of AUX
6.
/
• Druk op deze knop.
- Automatisch afstemmen:
- Frequentieband op/neer:
USB
CD
iPod
• Druk hierop en houd de knop ingedrukt.
- Zoeken (snel vooruit/terug):
USB
3. Naar links draaiend ( / )
- Druk op: Power on/off (Voeding
aan/uit)
- Draaien: Volumeregeling
RADIO
CD
iPod
7. Disksleuf
11
LAN8900EKYN DUT HMC .indd 11
2010-03-25 ¿ÀÀü 10:03:38
Naam van de componenten
8. PHONE (TELEFOON) ( )
Hiermee activeert u de Bluetooth
handsfree telefoon.
13.INSTELLINGEN ( )
• Druk hierop om de systeeminstellingen te openen. (Pagina 16)
9. Gesproken routebegeleiding (voice
guidance) herhalen ( )
Druk hierop om de gesproken
instructie te herhalen.
10. Naar rechts draaiend (
)
Draai deze knop naar rechts of links.
• Zoekt de vorige of de volgende
radiofrequentie.
- Met de hand afstemmen
• Een nummer of bestand overslaan
bij omlaag of omlaag zoeken in
het totaaloverzicht op het scherm.
• ZOOM IN / ZOOM OUT
(INZOOMEN / UITZOOMEN)
- Draai deze knop om de schaal
van de kaart op het kaartscherm
te veranderen.
• Druk een paar tellen hierop om het
typenummer van uw navigatiesysteem, de softwareversie, de navigatieversie en de kaartversie te lezen.
14. Informatie ( )
Druk hierop om het reisdoel, de
route en de verkeersinformatie weer
te geven wanneer de routegeleiding
ingeschakeld is.
• Doel: Toont de informatie over de
huidige positie van de auto
en het reisdoel.
• Route: Toont de route-informatie
vanaf de huidige positie van
de auto naar het reisdoel.
• Verkeer: Toont de verkeersinformatie.
- Info Verkeer Op Route: Overzicht
van verkeerinformatie op de
aanbevolen route vanaf de huidige positie van de auto tot aan
het reisdoel.
- Info Verkeer Vlakbij: Overzicht
van verkeersinformatie rond de
huidige positie van de auto.
11. MAP
Druk hierop om een kaart met de
huidige locatie van de auto te tonen.
12. NAV
Druk hierop om een reisdoelmenu
in te voeren. U kunt een reisdoel op
verschillende manieren invoeren.
12
LAN8900EKYN DUT HMC .indd 12
2010-03-25 ¿ÀÀü 10:03:38
Naam van de componenten
Afstandsbediening op het stuurwiel
7
1
6
2
3
5
4
4.
1.
Druk kort op deze knop om een telefoontje tijdens een ander telefoongesprek te weigeren.
Schakelt het volume stil.
2. Volume ( + / -)
Hiermee zet u het geluid harder of
zachter.
3.
Activeert de Bluetooth handsfree
telefoon.
• Druk kort op deze knop om een
inkomend telefoongesprek aan te
nemen.
• Druk kort op deze knop om de
laatst binnengekomen telefoontjes
terug te bellen.
• Druk een paar tellen op deze knop
om het geluidspad tijdens een telefoontje over te schakelen.
(Handsfree y telefoon)
6. U / u
• Druk op deze knop.
- Automatisch afstemmen:
- Frequentieband op/neer:
USB
5.
• Druk op deze knop om de
spraakherkenning te activeren.
• Druk nog een keer op deze knop
om de gesproken instructies uit
te schakelen wanneer de functie
spraakherkenning ingeschakeld is.
CD
RADIO
iPod
• Druk hierop en houd de knop ingedrukt.
- Met de hand afstemmen: RADIO
- Search (Zoeken) (snel vooruit/
terug): USB CD iPod
7.
Hiermee selecteert u een bron:
FM t AM t CD t USB t iPod
t AUX t FM...
13
LAN8900EKYN DUT HMC .indd 13
2010-03-25 ¿ÀÀü 10:03:38
Bediening
Startscherm
Het systeem inschakelen
Het navigatiesysteem start zodra u de
contactsleutel in de stand ACC of ON
zet.
Druk op het bedieningspaneel op
wanneer het systeem uitgeschakeld is.
✽ Let op
Wanneer u een disk in de disksleuf
plaatst, wordt het apparaat automatisch
ingeschakeld.
- Vervolgens verschijnt de radiomodus
op het scherm.
✽ Let op
• Het navigatiesysteem herinnert zich
de modus die u het laatst gekozen
hebt. Ook als u de contactsleutel in
de stand Uit zet, slaat het systeem de
laatst gekozen modus in het geheugen op. Wanneer u de contactsleutel
in de stand ACC of ON zet, roept het
systeem deze modus automatisch op.
• Het navigatiesysteem heeft ongeveer
20 seconden nodig om opnieuw op
te starten.
Een disk uitstoten
Druk op het bedieningpaneel op Z.
De disk wordt automatisch uit de lade
gestoten.
✽ Let op
Indien de uitestoten disk niet na 10
seconden is verwijderd, wordt de disk
automatisch weer geladen.
Het systeem uitschakelen
Druk op het bedieningspaneel op
wanneer het systeem ingeschakeld is.
Een disk laden
Plaats een disk in de disksleuf waardoor
het afspelen automatisch wordt gestart.
Volume aanpassen
Draai aan de volumeknop (
bedieningspaneel.
) op het
✽ Let op
Als u het systeem uitschakelt, zal het
huidige volumeniveau automatisch
worden onthouden. Zodra u het systeem
weer inschakelt, zal deze functioneren
op het opgeslagen volumeniveau.
Als u het apparaat uit- en inschakelt
onder volumeniveau 5, wordt het volumeniveau gewijzigd in 5.
Als u het apparaat uit- en inschakelt
boven volumeniveau 25, wordt het volumeniveau gewijzigd in 25.
14
LAN8900EKYN DUT HMC .indd 14
2010-03-25 ¿ÀÀü 10:03:39
Bediening
Een bron op het bedieningspaneel selecteren
Een bron op het scherm
kiezen
Druk een paar maal op MEDIA om een
bron te selecteren.
De stand wordt als volgt overgeschakeld.
CD t USB t iPod t AUX t CD...
U kunt de gewenste bron op het
scherm kiezen om deze bij uw speciale
wensen aan te passen.
✽ Let op
Als de gewenste bron niet op het navigatiesysteem is aangesloten, wordt de
bron niet herkend.
1. Raak het pictogram van de bron in
de linker bovenhoek aan om een
bron af te spelen.
Achteruitrijcamera (facultatief)
Als uw auto van een achteruitkijkcamera
is voorzien, kunt u automatisch naar het
beeld van de achteruitkijkcamera overschakelen wanneer u de versnellingshendel in de achteruitrijstand (R) zet.
In de achteruitkijkstand kunt u ook zien wat
zich tijdens het rijden achter u afspeelt.
Nadat het navigatiesysteem is opgestart verschijnt een waarschuwing op het scherm.
2. Raak de gewenste bron aan.
✽ Let op
Als de gewenste bron niet op het navigatiesysteem is aangesloten, wordt de
bron niet herkend.
✽ Let op
• Door op dit systeem een achteruitkijkcamera aan te sluiten kunt u een
aanhanger beter in het oog houden en
gemakkelijker achteruitrijden op een
krappe parkeerplaats. Gebruik deze
functie niet voor andere toepassingen.
• Door de achteruitkijkcamera
waargenomen objecten kunnen dichterbij of verderaf schijnen dan in
werkelijkheid.
• Let erop dat de beeldranden van de
achteruitkijkcamera enigszins verschillen wanneer bij het achteruitrijden
schermvullende beelden worden
weergegeven.
15
LAN8900EKYN DUT HMC .indd 15
2010-03-25 ¿ÀÀü 10:03:39
Instellingen
Bronnen met de
afstandsbediening kiezen
Bluetooth
Systeem
Er zijn vier verschillende schermmenu's.
Er zijn vijf verschillende schermmenu's.
Lijst met Bluetooth-Apparaten weergeven
Hiermee kunt u een overzicht van de
gepaarde Bluetooth apparaten weergeven.
Taal (Language)
Hiermee kiest u een andere taal die in het
systeem wordt gebruikt.
Het navigatiesysteem kan zo worden
aangepast dat het voor u nog gemakkelijker te gebruiken is.
Bluetooth, Systeem, Verkeer, Navigatie,
Audio, Scherm
1. Schakel het apparaat in.
2. Druk op het bedieningpaneel op
.
Bluetooth-Apparaten zoeken
Hiermee kunt u naar Bluetooth apparaten
zoeken. (Pagina 39)
3. Raak de gewenste optie aan.
4. Raak de gewenste instellingen aan
en druk vervolgens op [OK] om uw
keuze te bevestigen.
✽ Let op
Raak
deze optie aan om naar het
vorige scherm terug te gaan.
Druk op MAP om naar de kaart van uw
huidige locatie terug te gaan.
Autorisatie extern Apparaat
Hiermee kunt u uw Bluetooth telefooninstellingen gebruiken wanneer u het navigatiesysteem en een Bluetooth telefoon
verbindt. (Pagina 40)
Raak de gewenste taalknop aan.
Met en kunt u het scherm op en
neer schuiven.
Toegangscode wijzigen
U kunt uw toegangscode veranderen.
(Pagina 41)
16
LAN8900EKYN DUT HMC .indd 16
2010-03-25 ¿ÀÀü 10:03:40
Instellingen
Klok
Hiermee stelt u de tijdsindeling en de
zomertijd in.
Eenheden
Hiermee stelt u de afstandseenheid voor
het navigatiescherm in.
Fabrieksinstellingen
Hiermee zet u verschillende instellingen
naar de standaardinstelling terug.
Kies “km” of “mls".
• Tijdnotatie: Kies de 12-uurs of 24-uurs
tijdsindeling.
• Zomertijd: Kies zomertijd 'Aan” of
“Uit”. Het apparaat stelt
de juiste tijd automatisch
in door de zomertijd te
detecteren, ongeacht of het
op een bepaald moment
zomertijd is of niet. Ook als
de zomertijd op het apparaat is ingeschakeld, stelt
het apparaat buiten het
zomertijdseizoen de standaardtijd in (niet +1 uur).
Navigatiedemo
Dit is een demonstratiefunctie.
Nadat u een route hebt ingesteld, verschijnt automatisch een gesimuleerde
routegeleiding naar een reisdoel.
• Navigatiedemo
- Uit: De demomodus is uitgeschakeld.
- 1x: Stelt de routedemo eenmaal in.
- Lus: De routedemo wordt herhaald.
• Snelheid: Stelt de snelheid van de
routedemo in.
- Alles: Zet alle instellingen naar de
standaardinstelling terug.
- Telefoon: Zet alle instellingen die met
telefoneren te maken hebben naar de standaardinstelling terug.
- Navigatie: Zet alle instellingen die met
navigatie te maken hebben
naar de standaardinstelling
terug.
- Audio/Media/Radio: Zet alle instellingen die met
Audio/Media/
Radio te maken
hebben naar de
standaardinstelling terug.
17
LAN8900EKYN DUT HMC .indd 17
2010-03-25 ¿ÀÀü 10:03:40
Instellingen
Verkeer
Navigatie
Audio
Deze optie biedt drie menu's.
Er zijn vier verschillende schermmenu's.
Er zijn vijf verschillende schermmenu's.
TMC
U kunt de optie TMC (Traffic Message
Channel) instellen op “Uit”, “Auto” of “Aan”.
- Auto: Wanneer uw navigatiesysteem op
de huidige route een TMC-signaal ontvangt, zoekt het automatisch en zonder nader bericht
naar meest geschikte omleiding.
- Uit: Annuleert de TMC-functie.
- Aan: Wanneer uw navigatiesysteem op
de huidige route een
TMC-signaal ontvangt, verschijnt
een voorgrondscherm met informatie over de verkeerssituatie.
Automatische TMC-Zender
Als het navigatiesysteem onderweg
meerdere TMC-signalen tegelijk ontvangt, kiest het systeem automatisch het
krachtigste TMC-signaal.
Weergave Voor Snelwegknooppunten
Het snelwegknooppunt verschijnt op de
kaart.
Uitgebreide Rijbaanhulp
De verbeterde rijstrook verschijnt op de
kaart.
Verschillende Routes Plannen
De verschillende mogelijke routes worden op de kaart weergegeven.
Snelheidswaarschuwing
De maximum toegestane snelheid
wordt op de kaart aangegeven.
Favoriete TMC-Zender
Het navigatiesysteem ontvangt alleen
het TMC-station dat u hebt ingesteld.
Het navigatiesysteem stemt op dit
TMC-station af als u [Automatische
TMC-Zender] annuleert.
SDVC (Snelheidsafhankelijke volumeregeling)
SDVC kan ervoor zorgen dat het
geluidsvolume van uw navigatiesysteem
hoger wordt wanneer u harder rijdt dan 40
km/u.
U kunt de SDVC (Snelheidsafhankelijke
volumeregeling) instellen op Uit, Laag,
Norm. of Hoog.
- Uit: De geluidssterkte van uw navigatiesysteem blijft gelijk, ongeacht uw rijsnelheid.
- Laag, Norm., Hoog: Het geluidsvolume
van uw navigatiesysteem wordt automatisch bij uw rijsnelheid aangepast.
Navigatievolume
U kunt de gesproken rijinstructies van uw
navigatiesysteem in- of uitschakelen. Ook als
het routegeleidingssysteem is uitgeschakeld,
wordt het bij de start van een nieuwe
routegeleiding automatisch ingeschakeld.
Klik op Aanraakscherm
Bij elke aanraking van het scherm hoort u
een klik.
18
LAN8900EKYN DUT HMC .indd 18
2010-03-25 ¿ÀÀü 10:03:41
Instellingen
Geluid (Standaard: Midden)
Balans/
Fader
Bass/ Normaal/
Treble
- Balans: Door b of B aan te raken
regelt u de geluidsbalans tussen de
linker en rechter luidsprekers.
- Fader: Door v of V aan te raken regelt
u de geluidsbalans tussen de luidsprekers voorin en achterin de auto.
- Bass, Normaal, Treble: Door b of B
aan te raken regelt u de weergave van
de Bass, Normaal en Treble tonen.
Power Bass
U kunt de Power Bass-functie (lagetonenversterking) instellen op Uit, Laag, Norm.
of Hoog.
- Uit: Weergave van het originele geluid.
- Laag, Norm., Hoog: Door Laag, Norm.
of Hoog te kiezen zorgt u voor
extra versterking van de lage
tonen.
Scherm
Er zijn twee soorten schermmenu's.
Kaartmodus
Om te zichtbaarheid van het kaartscherm overdag en in het donker te
verbeteren kunt u de kleurencombinatie
van de kaart aanpassen.
- Auto: Het kaartscherm wordt weergegeven d.m.v. autolight of een
verlichtingssignaal.
Verlichting
aan
Verlichting
uit
Autolight uit
(overdag)
Kaart: Dag
Kaart: Dag
Autolight aan
('s nachts)
Kaart: Nacht
Map: Nacht
Kaart: Nacht
Map: Dag
Autolight
wordt niet
gedetecteerd
- Dag: De kaart wordt altijd in
dag kleuren afgebeeld.
- Nacht: De kaart wordt altijd in
nacht kleuren afgebeeld.
✽ Let op
Door [Midden] aan te raken gaat u naar
de standaardinstelling terug.
Helderheid
De helderheid van het scherm is
regelbaar, U kunt de schermhelderheid
instellen op Laag, Norm. (Normaal) of
Hoog.
19
LAN8900EKYN DUT HMC .indd 19
2010-03-25 ¿ÀÀü 10:03:42
Beginnen met navigeren
Wat is GPS?
Het Global Positioning System (GPS
(Wereldwijde Positioneringssysteem) is
een op satellieten gebaseerd navigatiesysteem dat bestaat uit een netwerk van
24 satellieten die door het Amerikaanse
Ministerie van Defensie in een baan om
de aarde zijn gebracht. GPS was oorspronkelijk bedoeld voor militaire toepassingen, maar in de jaren 1980 heeft
de Amerikaanse regering het systeem
vrijgegeven voor gebruik door burgers.
GPS werkt onafhankelijk van het weer,
overal ter wereld, 24 uur per dag. Aan
het gebruik van GPS zijn geen kosten
verbonden.
GPS
GPS
GPS
GPS
Dit moet u weten over
satellietsignalen
Uw apparaat moet satellietsignalen
ontvangen om te kunnen werken. Als
u zich in een gebouw, dichtbij hoge
gebouwen of bomen of in een parkeergarage bevindt, kan het apparaat geen
satellietsignalen ontvangen.
Aanwijzingen op het kaartscherm
Kaartschermen weergeven
Het navigatiesysteem toont verschillende soorten informatie op het scherm.
Satellietsignalen ontvangen
Voordat het apparaat uw huidige plaats
kan bepalen en u de weg kan wijzen,
moet u het volgende doen:
1. Ga naar buiten naar een plek zonder
hoge obstakels.
2. Schakel het apparaat in. Het binnenhalen van satellietsignalen kan een paar
minuten duren.
Openingsscherm voor navigatie
Nadat u de contactsleutel van uw
auto in de stand ACC of ON hebt
gezet, verschijnt een waarschuwing
op het scherm van uw navigatiesysteem wanneer u de navigatiemodus
voor de eerste keer opent. Lees deze
waarschuwing zorgvuldig en raak vervolgens de toets [Accepteren] aan.
•
/
Geeft de richting van de kaart aan.
Aanraken om de oriëntatie van de
kaart te veranderen.
•
Geeft de huidige locatie van de auto
en de rijrichting aan.
•
Raak [Menu] aan om het kaartmenu
te openen.
20
LAN8900EKYN DUT HMC .indd 20
2010-03-25 ¿ÀÀü 10:03:42
Beginnen met navigeren
Een andere kaartschaal kiezen
•
Geeft de schaal van de kaart aan.
1. Raak
op het kaartscherm aan.
•
Geeft de aankomsttijd, de afstand en
de resterende tijd tot het reisdoel aan.
•
Geeft de aankomsttijd, de afstand en
de resterende tijd tot het reisdoel aan.
Verschijnt in de rechterbovenhoek van
het scherm wanneer u een route hebt
ingesteld. Geeft de afstand tot de volgende afslag/manoeuvre aan en de
draairichting bij die afslag.
•
Geeft de maximaal toegestane snelheid aan op de weg waarop u nu rijdt.
2. Raak [+] aan om een gedetailleerde
kaart weer te geven.
Raak [-] aan om een overzichtskaart
weer te geven.
50 m n100 m n 200 m n 300
m n 500 m n 750 m n 1 km n
2 km n 5 km n 10 km n 20 km
n 50 km n 100 km n 200 km n
500 km
3. Raak
aan als u automatisch
zoomen wilt activeren.
21
LAN8900EKYN DUT HMC .indd 21
2010-03-25 ¿ÀÀü 10:03:43
Invoermenu reisdoel
Overzicht navigatiemenu
Navigatiemenu
Navigatie
Adres
Laatste Doelen
Adresboek
POI
Parkeren
Navigatie Hervatten/
Navigatie Stoppen
Geavanceerde
GPS Invoer
Kaart Gebruiken
Route Planner
Opslaan Doel
Opslaan Positie
Favorieten
Thuis 1
Werk 2
3~12
Navigatievolume aanpassen
U kunt het navigatievolume tijdens de
gesproken navigatiebegeleiding aanpassen met de draaiknop voor volume ( )
op het bedieningspaneel of nadat u op het
bedieningspaneel op hebt gedrukt.
Het reisdoelmenu gebruiken
1. Schakel uw navigatiesysteem in.
2. Druk op het bedieningspaneel op
NAV. Het navigatiemenu verschijnt op
het scherm.
3. Raak [Navigatie], [Geavanceerde] of
[Favorieten] aan om de gewenste
optie te selecteren.
[Geavanceerde] menu
4. Raak de instelmethode van uw voorkeur aan.
• Adres: Zoekt een reisdoel op door een
adres op te geven. (Pagina 23)
• Laatste Doelen: Stelt een locatie die u
onlangs hebt ingesteld als reisdoel in.
(Pagina 24)
• Adresboek: Stel een locatie die u in het
adressenboek hebt opgeslagen als reisdoel in. (Pagina 24)
• POI: Points of Interest (Nuttige
Plaatsen) zoekt in verschillende categorieën bedrijven of locaties een reisdoel op. (Pagina 24-26)
• Parkeren: Stelt een parkeerplaats als uw
reisdoel in. (Pagina 28)
• Navigatie Hervatten/ Navigatie Stoppen:
Stelt de routegeleiding in op Aan of Uit.
(Pagina 28)
• GPS Invoer: Stelt een breedtegraad
en een lengtegraad als uw reisdoel in.
(Pagina 27)
• Kaart Gebruiken: Zoekt een reisdoel op
met de kaartbrowser. (Pagina 28)
• Route Planner: Voegt een nieuw reisdoel of tussenstop toe. (Pagina 29-30)
• Opslaan Doel: Slaat uw reisdoel in het
adresboek op. (Pagina 31)
• Opslaan Positie: Slaat uw positie in het
adresboek op. (Pagina 31)
• Thuis 1/ Werk 2/ 3~12: U kunt uw huisadres, kantooradres of elk gewenst
adres opgeven als plaats waar u meestal terugkeert. (Pagina 32)
[Favorieten] menu
22
LAN8900EKYN DUT HMC .indd 22
2010-03-25 ¿ÀÀü 10:03:43
Invoermenu reisdoel
Adressen opzoeken
U kunt een reisdoel vinden door het
adressenboek te doorzoeken.
5. Geef de eerste letters van de straatnaam op en raak vervolgens [OK]
aan.
Zie “Routeopties” op pagina 36.
9. Raak [Starten] aan.
1. Druk op [NAV] > Raak [Adres] aan.
2. Geef het gewenste land op.
Als u het land al eerder hebt
ingesteld, volg dan stap 3.
6. Raak de straat in de lijst aan.
3. Geef de naam van de gewenste stad
op en raak vervolgens [OK] aan.
7. Raak het huisnummer aan en raak
vervolgens [OK] aan.
4. Raak de stad in de lijst aan.
8. Geef de route-opties op en raak
vervolgens [OK] aan.
• Als u uw reisdoel in uw adresboek
wilt opslaan, raak dan [Opslaan]
aan en geef de naam van uw reisdoel op. Raak vervolgens [OK] aan.
• Als u de kaart van uw reisdoel wilt
zien, raak dan eerst [Kaart Weerg.]
aan en vervolgens [Starten].
10. Raak de gewenste route aan en
raak vervolgens [Starten] aan. Zie
de opmerking over routecriteria op
pagina 36.
Volg de aanwijzingen op het scherm
en de gesproken instructies op.
23
LAN8900EKYN DUT HMC .indd 23
2010-03-25 ¿ÀÀü 10:03:44
Invoermenu reisdoel
Laatste Doelen
Adressenboek
POI (Nuttige Plaats)
U kunt de route naar een locatie opzoeken die u als laatste als reisdoel hebt
opgegeven.
Tot 50 laatste reisdoelen worden automatisch opgeslagen. Als het aantal laatste
reisdoelen groter is dan 50 wordt het oudste reisdoel door het nieuwe vervangen.
U kunt het reisdoel naar een locatie
opzoeken die in het adressenboek
opgeslagen is. Om deze functie doeltreffdender te gebruiken, kunt u de reisdoelen waar u vaak heen reist het best
vooraf opslaan. Zoek eerst het adres op
en sla het in het adressenboek op. Zie
Adressen opzoeken op pagina 23.
U kunt een Nuttige Plaats (NP) opzoeken in verschillende categorieën van
bedrijven of locaties.
1. Druk op [NAV] > Raak [Laatste
Doelen] aan.
2. Raak het gewenste laatste reisdoel
in de lijst aan.
3. Raak de gewenste route aan en raak
vervolgens [Starten] aan.
Volg de aanwijzingen op het scherm
en de gesproken instructies op.
1. Druk op [NAV] > Raak [POI] aan.
2. Raak een van de hoofdcategorieën aan.
1. Druk op [NAV] > Raak [Adresboek] aan.
2. Raak het gewenste laatste reisdoel
in de lijst aan.
3. Raak de gewenste route aan en raak
vervolgens [Starten] aan.
• Vlak Bij Positie: Legt een NP vast
dichtbij uw huidige positie. (Pagina
25)
• Vlak Bij Doel: Legt een NP vast dichtbij
het gekozen reisdoel. (Pagina 26)
• In Stad: Legt een NP vast dichtbij
een bepaalde stad. (Pagina 26)
• Naam: Legt een NP vast volgens de
naam ervan. (Pagina 26)
• Kia-Service: Legt de naam van een
Kia servicestation vast. (Pagina 26)
• Telefoonnummer: Als u het telefoonnummer van een faciliteit kent, kunt
u dit gebruiken om deze als NP in te
voeren en terug te zoeken. (Pagina 26)
Volg de aanwijzingen op het scherm
en de gesproken instructies op.
24
LAN8900EKYN DUT HMC .indd 24
2010-03-25 ¿ÀÀü 10:03:46
Invoermenu reisdoel
Vlak Bij Positie
1. Druk op [NAV] > Raak [POI] > [Vlak
Bij Positie] aan.
5. Raak [OK] aan nadat u de locatie
van de weergegeven NP hebt bevestigd.
8. Raak [Starten] aan.
2. Raak een van de subcategorieën
aan. (Bijvoorbeeld: Noodgeval)
Als u de NP wilt bellen, raak dan
[ ] aan. Dit kan alleen als Bluetooth
ingeschakeld is.
3. Raak een van de subcategorieën in
het volgende niveau aan. (Bijvoorbeeld:
Ziekenhuis)
Volg de aanwijzingen op het scherm
en de gesproken instructies op.
6. Raak [Starten] aan.
7. Raak de gewenste route aan.
4. Raak de gewenste NP aan.
25
LAN8900EKYN DUT HMC .indd 25
2010-03-25 ¿ÀÀü 10:03:46
Invoermenu reisdoel
Vlak Bij Doel
Naam
Telefoonnummer
1. Druk op [NAV] > Raak [POI] > [Vlak
Bij Doel].
1. Druk op [NAV] > Raak [POI] > [Naam] aan.
1. Druk op [NAV] > Raak [POI] >
[Telefoonnummer] aan.
2. Volg stap 2-8 op pagina 25 (Vlak
Bij Positie).
2. Raak de eerste letters van de faciliteit
aan en druk vervolgens op [OK].
2. Geef het telefoonnummer op en
druk vervolgens op [OK].
In Stad
1. Druk op [NAV] > Raak [POI] > [In Stad] aan.
2. Geef de eerste letters van de naam van
de stad op en raak vervolgens [OK] aan.
3. Volg stap 4 - 8 op pagina 25
(Vlak Bij Positie).
3. Raak het gewenste telefoonnummer
in de lijst aan.
Kia-Service
1. Druk op [NAV] > Raak [POI] >
[Kia-Service].
4. Raak [OK] aan nadat u de locatie van
de weergegeven NP hebt bevestigd.
2. Volg stap 4-8 op pagina 25
(Vlak Bij Positie).
3. Raak de stad in de lijst aan.
Als u de NP wilt bellen, raak dan
[ ] aan. Dit kan alleen als Bluetooth
ingeschakeld is.
5. Volg stap 6-8 op pagina 25
(Vlak Bij Positie).
4. Volg stap 2-8 op pagina 25
(Vlak Bij Positie).
26
LAN8900EKYN DUT HMC .indd 26
2010-03-25 ¿ÀÀü 10:03:48
Invoermenu reisdoel
GPS Invoer
U kunt een reisdoel vinden door de
coördinaten van de breedtegraad en de
lengtegraad in te voeren.
4. Geef de coördinaten van de
breedtegraad op door de minuten
aan te raken. (Bijvoorbeeld: 58’)
6. Raak [OK] aan.
1. Druk op [NAV] > Raak
[Geavanceerde] > [GPS Invoer] aan.
7. Geef de coördinaten van de
lengtegraad op. Zie stap 2 - 6.
(Bijvoorbeeld: 8°, 42’, 31’’)
2. Raak [Breedtegraad] aan.
8. Raak [Starten] aan als u klaar bent
met de instellingen.
3. Geef de coördinaten van de
breedtegraad op door een graad
aan te raken. (Bijvoorbeeld: 49°)
5. Geef de coördinaten van de
breedtegraad op door de seconden
aan te raken. (Bijvoorbeeld: 29’’)
9. Volg stap 7-8 op pagina 25
(Vlak Bij Positie).
✽ Let op
Als u bij het intoetsen een fout maakt,
aan om telkens één teken
raak dan
te wissen.
27
LAN8900EKYN DUT HMC .indd 27
2010-03-25 ¿ÀÀü 10:03:48
Invoermenu reisdoel
Parkeren
Kaart gebruiken
U kunt een reisdoel vinden door de
parkeerplaats op te zoeken.
U kunt een reisdoel opzoeken met
behulp van de kaartbrowser.
1. Druk op [NAV] > Raak [Parkeren].
1. Druk op [NAV] > Raak [Geavanceerde]
> [Kaart Gebruiken] aan.
4. Raak de gewenste route aan en raak
vervolgens [Starten] aan.
2. Raak de gewenste faciliteit aan.
2. Plaats het aanwijskruisje op de gewenste locatie op de kaart.
Volg de aanwijzingen op het scherm
en de gesproken instructies op.
3. Volg stap 4-8 op pagina 25
(Vlak Bij Positie).
3. Raak [Starten] aan.
Navigatie Hervatten/ Navigatie
Stoppen
U kunt deze functie gebruiken als u
niet langer naar uw bestemming hoeft
te reizen of als u de plaats van bestemming wilt veranderen, Druk op [NAV]
> Raak [Navigatie Stoppen] aan. Raak
[Navigatie Hervatten] aan als u naar uw
reisdoel wilt doorreizen.
28
LAN8900EKYN DUT HMC .indd 28
2010-03-25 ¿ÀÀü 10:03:50
Invoermenu reisdoel
Route Planner
Bij een reisplan legt u niet alleen uw
eindreisdoel vast maar ook één of meer
tussenstops.
U kunt totaal 4 eindreisdoelen of tussenstops opgeven.
- Nieuwe Route: Legt een reisplan vast.
- Route Laden: Toont het reisplan.
- Route Weergeven: Toont het laatst
vastgelegde reisplan.
4. Leg een reisdoel vast met het
navigatiemenu.(Zie pagina 22). Het
opgegeven reisdoel wordt getoond.
Als u een extra tussenstop wilt toevoegen,
leg deze dan vast door [Routepunt
Tvg.] nog een keer aan te raken.
5. Raak [Routepunt Tvg.] aan.
7. Raak [Starten] aan. Als u de gevonden routes wilt opslaan, raak dan [Ja]
aan. Raak anders [Nee] aan.
6. Leg een tussenstop vast met het
menu [Navigatie], [Geavanceerde]
en [Favorieten]. (Zie pagina 22).
8. Om een naam in te voeren raakt u
[OK] aan.
Een reisplan opstellen
1. Druk op [NAV] > Raak [Geavanceerde]
> [Route Planner] aan.
2. Raak [Nieuwe Route] aan.
3. Raak [Ja] aan.
De gevonden routes worden automatisch in
[Route Laden] opgeslagen.
9. Volg de aanwijzingen op het scherm
en de gesproken instructies op.
29
LAN8900EKYN DUT HMC .indd 29
2010-03-25 ¿ÀÀü 10:03:50
Invoermenu reisdoel
Een reisdoel of tussenstop be-werken
of wissen
Een eerder vastgelegd reisdoel of dito
tussenstop kunt u veranderen of wissen.
1. Druk op [NAV] > Raak [Geavanceerde]
> [Route Planner] > [Route Laden] ann.
2. Raak het gewenste reisplan aan.
[Routelijst Sorteren]: Hiermee verandert
u de volgorde van
eerder opgegeven
reisdoelen en tussenstops. (Volg
stap 5 en 6)
[Routepunt Verw.]: Hierdoor wordt de
tussenstop gewist.
(Volg stap 7 en 9)
[Routelijst Verw.]: Hierdoor annuleert
u het reisplan.(Volg
stap 10 en 11)
5. Nadat u de volgorde hebt veranderd
raakt u [Routelijst Sorteren] en
vervolgens [OK] aan.
8. Raak de gewenste tussenstop aan.
9. Volg stap 7-9 op pagina 29
(Een reisplan opstellen).
10. Raak [Routelijst Verw.] aan om het
opgestelde reisplan te wissen.
3. Raak [Routelijst Bw.] aan.
4. Raak de gewenste opties aan.
6. Volg stap 7-9 op pagina 29
(Een reisplan opstellen).
11. Raak het gewenste reisplan aan.
7. Raak [Routepunt Verw.] aan om de
tussenstop te wissen.
30
LAN8900EKYN DUT HMC .indd 30
2010-03-25 ¿ÀÀü 10:03:51
Invoermenu reisdoel
Opslaan Doel
Opslaan Positie
Veelbezochte reisdoelen kunt u in het
adressenboek opslaan.
U kunt de opgeslagen reisdoelen
gemakkelijk terugvinden door ze als
reisdoel of als tussenstop op te geven.
Dit kan alleen als u de reisdoelen eerder
hebt vastgelegd.
U kunt de huidige positie van de auto
in het adressenboek opslaan.
1. Druk op [NAV] > Raak [Geavanceerde]
> [Opslaan Positie] aan.
2. Voer een naam voor de huidige
positie in en raak [OK] aan.
1. Druk op [NAV] > Raak [Geavanceerde]
> [Opslaan Doel] aan.
2. Geef de naam van het reisdoel op
en raak vervolgens [OK] aan.
De huidige positie van de auto wordt
automatisch in het adressenboek
opgeslagen. (Pagina 24)
Het reisdoel wordt automatisch
in het adressenboek opgeslagen.
(Pagina 24)
31
LAN8900EKYN DUT HMC .indd 31
2010-03-25 ¿ÀÀü 10:03:53
Invoermenu reisdoel
Thuis 1/ Werk2/ 3~12
Als uw thuislocatie, werklocatie en
andere favoriete locaties al in het
adressenboek opgeslagen zijn, kunt
u deze gemakkelijk opzoeken om de
route naar uw thuislocatie, werklocatie
en favoriete locaties vast te leggen.
Uw huisadres opslaan
1. Druk op [NAV] > Raak [Adresboek].
4. Raak [1 Thuis] aan als u de locatie
van uw huis wilt instellen.
1. Druk op [NAV] > Raak [Favorieten]
aan.
2. Raak [Thuis 1] aan.
5. Raak [OK] aan.
3. Raak de gewenste route aan en raak
vervolgens [Starten] aan.
2. Raak
aan nadat u de gewenste
locatie hebt bevestigd.
3. Raak [Favorieten] aan.
Uw huis vinden
✽ Let op
• De procedure voor het vastleggen van
uw werklocatie en andere favoriete
locaties is dezelfde als voor het opslaan van uw thuislocatie.
• Als u nieuwe informatie op een bestaande opslagpositie invoert, worden de
oude gegevens overschreven.
• Raak [Verwijderen] aan als u een locatie in het adresboek wilt wissen.
• Doe als volgt om de huidige locatie
in het menu [Favorieten] op te slaan:
druk op [NAV], raak achtereenvolgens
[Favorieten] en het gewenste nummer
aan en blijf hierop drukken, voer daarna
een naam in en druk ten slotte op [OK].
Volg de aanwijzingen op het scherm
en de gesproken instructies op.
✽ Let op
De procedure voor het vinden van uw
werklocatie en andere favoriete locaties
is dezelfde als voor het opslaan van uw
thuislocatie.
32
LAN8900EKYN DUT HMC .indd 32
2010-03-25 ¿ÀÀü 10:03:53
Gebruik van het kaartmenu
Overzicht kaartmenu
Kaartmenu
Weergave
POI-Categorie
2D/ 3D
Gesplitst Scherm
Volledig Scherm
Route
Opslaan Positie
Routeopties
Route Planner
Browser
Omleiding
Verkeer
Info Vlakbij
Info Over Route
Werken met het kaartmenu
1. Schakel het navigatieapparaat in.
2. Druk op MAP. Het kaartscherm
verschijnt.
[Route] menu
3. Raak [Menu] ann.
[Verkeer] menu
4. Raak [Weergave], [Route] of
[Verkeer] aan om de gewenste optie
te selecteren.
5. Raak de instelmethode van uw
voorkeur aan.
Zie voor meer informatie pagina 34 38.
[Weergave] menu
33
LAN8900EKYN DUT HMC .indd 33
2010-03-25 ¿ÀÀü 10:03:54
Gebruik van het kaartmenu
POI-Categorie
3. Raak [OK] aan.
U kunt sommige oriëntatiepunten in de
omgeving als pictogram op het scherm
weergeven.
Ook kunt u de pictogrammen van
oriëntatiepunten weergeven volgens
type of verbergen.
1. Druk op [MAP] > Raak [Menu] >
[Weergave] > [POI-Categorie] aan.
De pictogrammen van geactiveerde
herkenningspunten worden op de
kaart weergegeven.
2D/ 3D
U kunt de kaart tweedimensionaal (2D)
of driedimensionaal (3D) weergeven.
- 2D: Geeft de kaart tweedimensionaal
weer zoals een gedrukte wegenkaart.
- 3D: Geeft de kaart gezien van een
verhoogd perspectief weer.
Hierdoor kunt de weg gemakkelijk
herkennen omdat u deze panoramisch over een grote af-stand
overziet.
1. Druk op [MAP] > Raak [Menu] >
[Weergave] > [2D/3D] aan.
2. Raak de gewenste pictogrammen
aan. Deze pictogrammen verschijnen of verdwijnen elke keer wanneer
u er een aanraakt. Het statuslampje
van het geselecteerde pictogram
licht op.
2. Raak [2D/3D] nogmaals aan om
naar het 2D-scherm over te schakelen.
34
LAN8900EKYN DUT HMC .indd 34
2010-03-25 ¿ÀÀü 10:03:55
Gebruik van het kaartmenu
Gesplitst scherm / Volledig
scherm
U kunt de kaart gedeeltelijk of schermvullend weergeven.
1. Druk op [MAP] > Raak [Menu] >
[Weergave] > [Gesplitst Scherm] aan.
Opslaan Positie
Route Planner
U kunt de huidige positie van de auto
in het adressenboek opslaan.
Bij een reisplan kunt u niet alleen uw
eindreisdoel vastleggen maar ook één
of meer tussenstops.
1. Druk op [MAP] > Raak [Menu] >
[Route] > [Opslaan Positie] aan.
1. Druk op [MAP] > Raak [Menu] >
[Route] > [Route Planner] aan.
2. Voer een naam voor de huidige
positie in en raak [OK] aan.
2. Zie ook “Route Planner” op pagina
29 - 30.
Gesplitst scherm
2. Om naar de schermvullende modus
over te schakelen raakt u achtereenvolgens [Menu] > [Weergave] >
[Volledig Scherm] aan.
De huidige positie van de auto wordt
automatisch in het adressenboek
opgeslagen. (Pagina 24)
Volledig scherm
35
LAN8900EKYN DUT HMC .indd 35
2010-03-25 ¿ÀÀü 10:03:55
Gebruik van het kaartmenu
Routeopties
U kunt de routekarakteristiek veranderen of de route-informatie accepteren.
Stel de routekarakteristiek volgens uw
voorkeur in.
1. Druk op [MAP] > Raak [Menu] >
[Route] > [Routeopties] aan.
2. Raak de gewenste routekarakteristiek aan.
• Route: Als u de optie [Verschillende
Routes Plannen] in het installatiemenu niet hebt ingesteld,
kunt u nu de routeoptie instellen op Snel ( ), Korte ( )
of Eco ( ).
✽ Let op
• Fast Route (Snelle route): Berekent
een route met de kortste reistijd.
• Short Route (Korte route): Berekent
een route met de kortste afstand.
• Eco (Economische) route:
- Om brandstof te besparen wil deze
route op basis van een brandstofconsumptietabel met real time-
verkeers-informatie het frequent
stoppen-en-optrekken op kruis- en
keerpunten verminderen. Deze route
geldt echter niet voor rijomstandigheden als plotseling optrekken.
- Een eco-route vraagt om brandstof
te besparen meer rijtijd en is ook
langer.
• TMC (Traffic Message Channel):
- Auto ( ): Wanneer uw navigatiesysteem op de huidige
route een TMC-signaal
ontvangt, zoekt het
automatisch en zonder
nader bericht naar meest
geschikte omleiding.
- Uit( ): Annuleert de TMC-functie.
- Aan(
): Wanneer uw navigatiesysteem op de huidige route
een TMC-signaal ontvangt,
verschijnt een voorgrondscherm met informatie over
de verkeerssituatie.
✽ Let op
Betalende TMC-diensten worden niet
ondersteund.
)
• Tolweg (
- Gebruiken: Het routeplan omvat
tolwegen.
- Vermijden: Het routeplan vermijdt
tolwegen.
• Tunnel (
)
- Gebruiken: Het routeplan omvat
tunnels.
- Vermijden: Het routeplan vermijdt
tunnels.
• Snelweg (
)
- Gebruiken: Het routeplan omvat
snelwegen.
- Vermijden: Het routeplan vermijdt
snelwegen.
• Veerboot (
)
- Gebruiken: Het routeplan omvat
veerponten.
- Vermijden: Het routeplan vermijdt
veerponten.
3. Druk op [OK].
Wanneer de kaart van uw huidige
locatie of de berekende route op
uw scherm verschijnt, herberekent
het systeem de route volgens de
ingestelde voorwaarden.
✽ Let op
• Parkeer uw auto altijd op een veilige plaats
voordat u de routekarakteristiek verandert.
• U riskeert een ongeval als u de
routekarakteristiek tijdens het rijden
verandert.
36
LAN8900EKYN DUT HMC .indd 36
2010-03-25 ¿ÀÀü 10:03:56
Gebruik van het kaartmenu
Browser
Omleiding
Wanneer u routegeleiding ingeschakeld
hebt, kunt u een routesectie vergroot
op het scherm van uw navigatiesysteem
weergeven.
Als u wegens de verkeerssituatie een
omweg wilt maken kunt u met de
omwegfunctie een alternatieve route
vanaf de locatie van de auto naar uw
reisdoel berekenen.
1. Druk op [MAP] > Raak [Menu] >
[Route] > [Browser] aan.
1. Druk op [MAP] > Raak [Menu] >
[Route] > [Omleiding] aan.
2. Raak [Korter] of [Langer] aan om
een omleidingsroute naar uw reisdoel te berekenen.
2. Raak [Vorige] of [Volgende] aan om
de routesecties weer te geven.
3. Raak [Sectie] aan om de gekozen
routesectie vergroot weer te geven.
4. Raak [Route] aan om naar het
vorige scherm terug te gaan.
4. Raak de gewenste route aan en raak
vervolgens [Starten] aan.
Volg de aanwijzingen op het scherm
en de gesproken instructies op.
✽ Let op
Als u geen omweg hoeft te maken om
uw reisdoel te bereiken, raakt u [Menu]
> [Route] > [Omleiding] > [Verwijderen]
aan.
- Lichtblauw: Oorspronkelijke route
- Rood: Omweg
3. Raak [Starten] aan.
aan om terug te gaan
5. Raak
naar de huidige autokaart.
37
LAN8900EKYN DUT HMC .indd 37
2010-03-25 ¿ÀÀü 10:03:56
Gebruik van het kaartmenu
Info Vlakbij
Overzicht van verkeersinformatie rond
de huidige positie van de auto.
1. Druk op [MAP] > Raak [Menu] >
[Verkeer] > [Info Vlakbij] aan.
2. Raak de gewenste optie aan om
extra informatie op te roepen.
3. Raak [Kaart Weerg.] aan nadat u
deze optie hebt geactiveerd.
5. Raak
aan om naar het vorige
scherm te gaan. Druk op MAP
[Kaart] om terug te gaan naar het
kaartscherm van uw huidige locatie.
Info over route
Overzicht van verkeerinformatie gevonden op de aanbevolen route vanaf de
huidige positie van de auto tot aan het
reisdoel.
Om een bepaalde situatie onderweg te
vermijden zoekt het navigatiesysteem
een omleidingsroute vanaf de huidige
positie van de auto tot aan het reisdoel.
Zo kunt u ook meer informatie over de
gesignaleerde stremming opzoeken.
1. Druk op [MAP] > Raak [Menu] >
[Verkeer] > [Info Over Route] aan.
4. Raak [Zoomen+] aan om een gedetailleerde kaart weer te geven. Raak
[Zoomen-] aan om een overzichtskaart weer te geven.
3. Als u het beter vindt een omweg te
nemen, raak dan [Omleiding] aan.
✽ Let op
Raak [Kaart Weerg.] aan als u de
locatie wilt weergeven van de stremming die het systeem heeft gesaan om naar
ignaleerd. Raak
het vorige scherm te gaan. Druk
op MAP om terug te gaan naar het
kaartscherm van uw huidige locatie.
4. Raak de gewenste route aan.
2. Raak de gewenste optie aan om
extra informatie op te roepen.
5. Raak [Starten] aan.
Volg de aanwijzingen op het scherm
en de gesproken instructies op.
38
LAN8900EKYN DUT HMC .indd 38
2010-03-25 ¿ÀÀü 10:03:57
Draadloze Bluetooth technologie
Wat u van draadloze Bluetooth
technologie moet weten
Draadloze Bluetooth technologie bouwt
een draadloze verbinding op tussen twee
apparaten, zoals uw telefoon en dit apparaat.
De eerste maal dat u twee apparaten
samen gebruikt, moet u ze verbinden door
met behulp van een pincode een onderlinge relatie tot stand te brengen. Nadat
deze eerste verbinding tot stand is gekomen, zullen de beide apparaten telkens
wanneer u ze inschakelt automatisch met
elkaar verbinding maken.
✽ Let op
• Op sommige plaatsen is het gebruik
van Bluetooth technologie aan
beperkingen gebonden.
• Wegens de grote verschillen in
Bluetooth telefoons en hun firmwareversies is het mogelijk dat uw apparaat
verschillend reageert bij gebruikmaking van Bluetooth signalen.
• Neem contact op met de fabrikant
van uw mobiele telefoon als u vragen
mocht hebben over het verschil in
functioneel gebruik per telefoonmodel
als gevolg van de handsfree functionaliteit van de telefoon.
• Op de website kunt u de compatibiliteit van Bluetooth telefoons vergelijken
(http://www.navigation.com/kia).
4. Raak op het scherm “BluetoothApparaten” een Bluetooth telefoon
aan waarmee u verbinding wilt
maken.
Uw apparaat en een Bluetooth
telefoon verbinden
Verbinding maken met behulp van de
instellingen van het apparaat (1)
1. Druk op het bedieningpaneel op
.
2. Raak [Bluetooth] aan.
3. Raak [Bluetooth-Apparaten zoeken]
aan.
Raak [Annuleren] aan als u de
procedure wilt annuleren.
5. Voer de toegangscode in
(Standaard: 0000) die u op het
scherm van uw telefoon ziet wanneer het voorgrondscherm op het
scherm van het navigatiesysteem
verschijnt.
Nadat de aansluiting gemaakt is,
verschijnt het hoofdscherm van
Bluetooth op dit scherm.
39
LAN8900EKYN DUT HMC .indd 39
2010-03-25 ¿ÀÀü 10:03:58
Draadloze Bluetooth technologie
Verbinding maken met behulp van de
instellingen van het apparaat (2)
1. Druk op het bedieningpaneel op
De telefoon instellen voor het
opbouwen van een verbinding
.
2. Druk op [Bluetooth-Apparaten zoeken].
U kunt de Bluetooth functie van uw
telefoon permanent uitschakelen. Om
de Bluetooth functie te gebruiken moet
u de Bluetooth functie op uw telefoon
(weer) inschakelen. Zie de handleiding
van uw mobiele telefoon.
1. U kunt de Bluetooth functies van
de telefoon als volgt inschakelen.
Deze zijn meestal ondergebracht in
een menu met de naam “Settings”
(Instellen), “Bluetooth”, “Connections”
(Verbindingen) of “Handsfree”.
2. Druk op [ ] > Raak [Bluetooth] >
[Autorisatie extern Apparaat ] aan.
3. Volg stap 4-5 op pagina 39.
✽ Let op
Als u nadat Bluetooth een draadloze
verbinding heeft gemaakt nog een keer
op het bedieningspaneel aanraakt,
verschijnt het Bluetooth hoofdscherm
op uw navigatiesysteem.
Raak [Annuleren] aan als u de procedure wilt annuleren.
3. Start het zoeken naar Bluetooth
apparaten. Deze instellingen zijn
meestal ondergebracht in een
menu met de naam “Bluetooth”,
“Connections” (Verbindingen) of
“Handsfree”.
4. Selecteer uw telefoon in
het overzicht van telefoons.
5. Voer de toegangscode in (Standaard:
0000) die u op het scherm van uw telefoon ziet wanneer het voorgrondscherm
op het scherm van het navigatiesysteem
verschijnt.
Nadat de aansluiting gemaakt is,
verschijnt het hoofdscherm van
Bluetooth op dit scherm.
✽ Let op
• Deze functioneert hetzelfde als de bekabelde hoofdtelefoon voor mobiele telefoons. De hoofdtelefoonfunctie is voor
telefoongesprekken. Deze is niet voor het
luisteren naar muziek.
• Anders dan de handsfree-functie staat de
hoofdtelefoonverbinding maar twee functies
(put on one line) toe: “answering calls” en
“making a call from the latest call”. Tevens wordt
het nummer van de beller niet getoond tijdens
het beantwoorden van gesprekken.
• Bij het maken van een verbinding via een
Bluetooth telefoon is het mogelijk dat de
handfree- of hoofdtelefoonfunctie niet
werkt.
40
LAN8900EKYN DUT HMC .indd 40
2010-03-25 ¿ÀÀü 10:03:58
Draadloze Bluetooth technologie
Een Bluetooth telefoon
afsluiten/weer aansluiten
1. Raak op het Bluetooth scherm [Lijst
met Bluetooth-Apparaten weergeven] aan.
3. Raak de afgesloten telefoon opnieuw
aan om een verbinding tot stand te
brengen. Raak vervolgens [Ja] aan.
3. Raak [Ja] aan.
2. Raak de telefoon aan waarmee u
verbinding hebt gemaakt. Raak vervolgens [Ja] aan.
Het
symbool verschijnt opnieuw.
Telefoonverbinding afsluiten
Als u de telefoonverbinding niet langer
nodig hebt, kunt u deze afsluiten.
1. Raak op het Bluetooth scherm [Lijst
met Bluetooth-Apparaten weergeven]
aan.
De verbinding met uw telefoon wordt
verbroken en het symbool verdwijnt.
2. Raak aan rechts van apparaatnaam
van de telefoon die u wilt afsluiten.
• De telefoonverbinding wordt afgesloten.
• Als u de telefoonverbinding niet wilt
afsluiten raakt u [Nee] aan.
Toegangscode veranderen
U kunt uw toegangscode veranderen.
en
op het toet1. Voer met
senblok een nieuwe toegangscode in.
2. Raak [OK] aan.
41
LAN8900EKYN DUT HMC .indd 41
2010-03-25 ¿ÀÀü 10:03:59
Draadloze Bluetooth technologie
Bellen door invoeren van het
telefoonnummer
De gebruikelijke manier om te bellen is
eenvoudig het nummer draaien.
Maak eerst een verbinding tussen uw apparaat en de Bluetooth telefoon voordat u belt.
1. Druk op het bedieningspaneel op de
knop.
Op de website kunt u de compatibiliteit van Bluetooth telefoons
vergelijken.
2. Voer het telefoonnummer dat u wilt
bellen in door de cijfertoetsen aan
vervolgens aan.
te raken. Raak
✽ Let op
• Als u een fout maakt tijdens het bellen, raakt u de
aan om de cijfers
een voor een te verwijderen. Om alle
aan
cijfers ineens te wissen raakt u
en houdt u dat even vast.
• Raak
wat langer aan om het laatst
gebelde nummer te bellen.
• Voor een internationaal gesprek raakt
u [0] wat langer aan en vervolgens
voert u het telefoonnummer in.
• De recente oproepgeschiedenis van
de gebruiker betreft alleen handsfreegesprekken. (Een oproep plaatsen
naar een recent nummer met de
hoofdtelefoon is afhankelijk van de
oproepgeschiedenis van de Bluetooth
telefoon.)
• De hoofdtelefoonverbinding stelt u alleen
in staat om een recente oproep te bellen.
Het geluidspad tijdens een
telefoongesprek overschakelen
3. Door [Ophangen] aan te raken
beëindigt u een telefoongesprek.
U hoort het oproepsignaal via de
luidspreker van het navigatiesysteem
en vervolgens kunt u bellen door
[Doorschakelen] of [Gesprek teruggeven]
aan te raken.
Microfoon in/uitschakelen
U kunt de microfoon aan- en uitzetten
door [Microfoon uit] of [Microfoon aan]
aan te raken.
Oproepen beantwoorden
1. Als u gebeld wordt, hoort u een belsignaal en wordt het pop-upvenster
“Inkomend gesprek” op het scherm
weergegeven.
2. Raak [Accepteren] aan om de
oproep te beantwoorden.
Raak [Weigeren] aan als u het
gesprek niet wilt aannemen.
✽ Let op
• Indien de Nummerherkenning beschikbaar is, wordt het telefoonnummer
van de beller getoond.
• Als het telefoonnummer in het telefoonboek is opgeslagen, wordt de
naam in het telefoonboek getoond.
• Als de beller het nummer heeft van
een van uw Contacten, verschijnt de
naam van de beller. Ook het nummer
van de bellen verschint als dat beschikbaar is.
• Als de “Rejecting” functie onbruikbaar is,
dan ondrsteunt de verbonden telefeoon
de functie voor het afwijzen van oproepen niet.
42
LAN8900EKYN DUT HMC .indd 42
2010-03-25 ¿ÀÀü 10:04:00
Draadloze Bluetooth technologie
Uw telefoonboek gebruiken
U kunt de vermeldingen in het telefoonboek gebruiken die opgeslagen zijn in
het geheugen van een telefoon die
PBAP (Phone Book Access Profile)
ondersteunt.
Nadat u het navigatiesysteem en uw
Bluetooth telefoon via Bluetooth technologie draadloos verbonden hebt, worden
de nummers in het telefoonboek van uw
telefoon automatisch naar het telefoonboek van het systeem overgestuurd.
Een nummer in het telefoonboek
bellen
Nadat u de vermelding van het nummer
dat u wilt bellen in het telefoonboek
gevonden hebt, kunt u het nummer
selecteren en bellen.
1. Druk op het bedieningspaneel op
de knop
en raak vervolgens [Tel.
boek] aan.
2. Raak het nummer in het telefoonboek aan dat u wilt bellen.
2. Voer met het toetsenblok de eerste
letter in van de vermelding in het
telefoonboek die u zoekt en raak
vervolgens [OK] aan.
of
aan om naar de volRaak
gende of de vorige pagina van de
lijst te gaan.
3. Door [Ophangen] aan te raken
beëindigt u een telefoongesprek.
3. Raak het nummer in het telefoonboek aan dat u wilt bellen.
Vermeldingen in het telefoonboek
op alfabet opzoeken
Als het telefoonboek veel vermeldingen
bevat kunt u ze op alfabet sorteren om
ze gemakkelijker op te zoeken.
1. Raak [Zoeken op Naam] op het
scherm “Tel. book” aan.
aan om naar de
Raak
of
volgende of de vorige pagina van de
lijst te gaan.
4. Door [Ophangen] aan te raken
beëindigt u een telefoongesprek.
43
LAN8900EKYN DUT HMC .indd 43
2010-03-25 ¿ÀÀü 10:04:01
Draadloze Bluetooth technologie
Lijst van recente telefoontjes
U kunt de lijst van recente telefoontjes in het geheugen van uw telefoon
gebruiken als deze PBAP (Phone Book
Access Profile) ondersteunt. Nadat u het
navigatiesysteem en uw Bluetooth telefoon via Bluetooth technologie draadloos
verbonden hebt, worden de nummers
in de lijst van [Uitgaande Gesprekken],
[Gemiste Gesprekken] en [Inkomende
Gesprekken] van uw telefoon automatisch naar de lijst van recente
telefoontjes overgestuurd.
2. Raak [Uitgaand], [Gemist] of
[Inkomend] aan.
De lijst van recente telefoontjes
bijwerken
U kunt de nummers in de lijst van uitgaande, gemiste en ontvangen oproepen in uw telefoon naar de lijst van
recent ontvangen telefoontjes
bijwerken.
Uitgaande Gesprekken
1. Druk op het bedieningpaneel op .
Raak vervolgens [Gesprekken] aan.
Een nummer in de lijst van recente
telefoontjes bellen
Nadat u de vermelding die u wilt bellen
in de lijst van [Uitgaande Gesprekken],
[Gemiste Gesprekken] en [Inkomende
Gesprekken] gevonden hebt, kunt u het
nummer selecteren en bellen.
1. Druk op het bedieningpaneel op .
Raak vervolgens [Gesprekken] aan.
Gemiste Gesprekken
2. Raak [Uitgaand], [Gemist] of
[Inkomend] aan en raak vervolgens
[Update] aan.
Inkomende Gesprekken
3. De bijgewerkte lijsten van recente
telefoontjes worden nu gedownload.
3. Raak de vermelding aan die u wilt
bellen.
44
LAN8900EKYN DUT HMC .indd 44
2010-03-25 ¿ÀÀü 10:04:03
Draadloze Bluetooth technologie
Bellen met snelkiesnummers
Als uw telefoon PBAP (Phone Book
Access Profile) ondersteunt, kunt u de
telefonische vermeldingen gebruiken
die in het geheugen van uw telefoon
opge-slagen zijn. Zo kunt u gemakkelijk
12 telefoonnummers opslaan en ze als
snelkiesnummer bellen.
Raak of aan om naar de volgende of de vorige pagina van de
lijst te gaan.
3. Raak een van de categorieën aan die
u aan snelkiesnummers wilt toewijzen.
(Bijvoorbeeld: Telefoonboek)
De naam (telefoonnummer) wordt
in het geheugen opgeslagen. De
volgende keer dat u de naam aanraakt, wordt deze vanuit het geheugen gebeld.
Een nummer vanuit de lijst van
snelkiesnummers bellen
1. Druk op het bedieningpaneel op .
Raak vervolgens [Snelkiezen] aan.
Telefoonnummers aan de lijst van
snelkiesnummers toevoegen
2. Raak een van de snelkiesnummers
aan om te bellen.
1. Druk op het bedieningpaneel op .
Raak vervolgens [Snelkiezen] aan.
4. Raak een van de telefoonnummers
aan die u aan een snelkiesnummer
wilt toewijzen.
2. Raak een van de snelkiesnummers
(1 - 12) aan en houd dit even vast.
(Bijvoorbeeld: 1)
3. Door [Ophangen] aan te raken
beëindigt u een telefoongesprek.
5. Geef dit snelkiesnummer met het
toetsenblok een naam en druk vervolgens op [OK].
✽ Let op
Controleer of de snelkiesfunctie in uw
Bluetooth telefoon geactiveerd is voordat u hiervan gebruik maakt.
45
LAN8900EKYN DUT HMC .indd 45
2010-03-25 ¿ÀÀü 10:04:04
CD/MP3/WMA/USB/iPod bedienen
Audio-cd's en mp3-, wma-,
usb- en iPod-bestanden afspelen Disc
Plaats een disk in de disksleuf waardoor
het afspelen automatisch wordt gestart.
iPod
U kunt ook uw iPod via het navigatiesysteem afspelen. Sluit de iPod met een
usb-kabeltje op de usb-poort aan.
Sluit een iPod op de usb-poort aan en
het afspelen start automatisch.
Zie voor meer informatie de handleiding
van de iPod.
Naar een volgend hoofdstuk/nummer gaan Alle
Raak
aan om het volgende nummer
of bestand te selecteren.
Naar een vorig hoofdstuk/nummer
gaan Alle
Raak
binnen 1 seconde van
afspeeltijd aan.
Naar het begin van het huidige hoofdstuk/nummer teruggaan Alle
Audio-cd
Raak
mp3-, wma- cd
USB
Ook bestanden op een usb-geheugenstick kunt u afspelen.
Sluit een usb-apparaat op de usb-poort
aan en het afspelen start automatisch.
✽ Let op
Gebruik de speciale autokabel de iPod
wanneer u de iPod op de aansluitpunten voor het afspelen van iPods aansluit .
Zoeken
na 1 seconde afspeeltijd aan.
Alle
Raak de
of
tijdens het tijdens
afspelen aan en blijf drukken totdat u
op het gewenste punt bent.
46
LAN8900EKYN DUT HMC .indd 46
2010-03-25 ¿ÀÀü 10:04:05
CD/MP3/WMA/USB/iPod bedienen
Introscan
Disc - Audio CD
USB
Disc - MP3/WMA
De eerste 10 seconden van elk nummer
of bestand worden afgespeeld.
Herhalen
Alle
De momenteel geselecteerde muzieknummers of bestanden worden herhaald afgespeeld.
1. Raak tijdens het afspelen [Optie] aan.
1. Raak tijdens het afspelen [Optie] aan.
Voorbeeld: Audio-cd
Voorbeeld: Audio-cd
2. Raak een paar keer [Herhalen] aan.
2. Raak [Scannen Starten] aan.
Disc - Audio CD
3. Raak [Scannen Stoppen] aan om de
introscan te annuleren.
• [Herhalen Uit] : Alle muzieknummers op de disk
worden herhaald
afgespeeld.
• [Herhalen Track] : Het momenteel
selecteerde
nummer wordt
herhaald
afgespeeld.
Disc - MP3/WMA
USB
• [Herhalen Uit] : Alle muzieknummers op de disk
of usb-stick worden herhaald
afgespeeld.
• [Herhalen Track] : Het momenteel geselecteerde bestand
wordt herhaald
afgespeeld.
• [Herhalen Map] : Alle muzieknummers in de
momenteel geselecteerde map
worden herhaald
afgespeeld.
iPod
• [Herhalen Uit] : Alle bestanden
op de iPod worden herhaald
afgespeeld.
• [Herhalen Aan] : Het momenteel
geselecteerde
bestand wordt
herhaald
afgespeeld.
47
LAN8900EKYN DUT HMC .indd 47
2010-03-25 ¿ÀÀü 10:04:05
CD/MP3/WMA/USB/iPod bedienen
In willekeurige volgorde afspelen
Alle
Alle nummers/bestanden worden in
willekeurige volgorde afgespeeld.
1. Raak tijdens het afspelen [Optie] aan.
2. Raak een paar keer [Random] aan.
Disc - Audio CD
• [Random Alles] : Alle bestanden op
de disk worden in
willekeurige volgorde afgespeeld.
• [Random Uit] : Annuleert het in
willekeurige volgorde afspelen.
Disc - MP3/WMA
USB
• [Random Uit] : Annuleert het in
willekeurige
volgorde afspelen.
• [Random Map] : Het navigatiesysteem speelt alle
bestanden in de
huidige map in
willekeurige
volgorde af.
• [Random Alles] : Het systeem speelt
alle bestanden op
de disk of usbgeheugenstick in
willekeurige
volgorde af.
iPod
• [Random Uit] : Annuleert het in
willekeurige volgorde
afspelen.
• [Random Alles] : Het systeem speelt
alle iPod-bestanden
in willekeurige
volgorde af.
• [Random Album] : Het systeem
speelt alle bestanden in het
momenteel geselecteerde album
in willekeurige
volgorde af.
Bestanden afspelen door indeling
volgens map/album/artiest USB
U kunt op de usb-geheugenstick
opgeslagen bestanden afspelen door
ze in te delen volgens map. album of
artiest.
1. Raak tijdens het afspelen [Optie]
aan.
2. Raak tijdens het afspelen [Map],
[Album] of [Artiest] aan.
• [Map]: Speelt de bestanden af die
volgens map zijn ingedeeld.
• [Album]: Speelt de bestanden af
die volgens album zijn
ingedeeld.
• [Artiest]: Speelt de bestanden af
die volgens artiest zijn
ingedeeld.
✽ Let op
Raak
aan als u naar het scherm van
de afspeellijst wilt gaan.
48
LAN8900EKYN DUT HMC .indd 48
2010-03-25 ¿ÀÀü 10:04:06
CD/MP3/WMA/USB/iPod bedienen
Een map/bestand opzoeken met
de lijst Disc - Audio CD USB
Disc - MP3/WMA
U kunt naar muziek luisteren door de
lijst met muzieknummers, mappen en/
of bestanden op te roepen.
1. Raak tijdens het afspelen de [Lijst]
knop aan.
✽ Let op
• Raak bij mp3- of wma-bestanden de
knop aan om naar de hoogste
map te gaan.
of
knoppen aan om de
• Raak de
lijst die u wilt bekijken, te selecteren.
aan als u naar het scherm
• Raak
van de afspeellijst wilt gaan.
Muziek zoeken
iPod
U kunt op uw iPod zoeken naar afspeellijsten, namen van artiesten, albumtitels,
genre, muzieknummers, componisten,
audiobooks, podcasts e.d. Zie voor meer
informatie de handleiding van de iPod.
Voorbeeld: Audio-cd
2. Raak bij een audio-cd het gewenste
bestand aan.
Raak bij een mp3- of wma-bestand
de gewenste mapknop aan. Als u
geen map ziet, raak dan het gewenste bestand aan.
1. Raak tijdens het afspelen [Lijst] aan.
2. Raak het gewenste onderwerp aan.
• [Afspeellijsten]: Speelt de muzieknummers op de
[Afspeellijsten] af.
• [Artiesten]: Speelt de muzieknummers in [Artiesten] af.
• [Albums]: Speelt de muzieknummers in [Albums] af.
• [Genres]: Speelt de muzieknummers in [Genres] af.
• [Nummers]: Speelt de muzieknummers in [Nummers] af.
• [Componisten]: Speelt de
muzieknummers in [Componisten] af.
• [Audioboeken]: Speelt de muzieknummers/hoofdstukken in het
[Audioboeken] af.
• [Podcasts]: Speelt de muzieknummers/hoofdstukken in
de [Podcasts] af.
✽ Let op
• Raak
aan om naar de hoogste
map te gaan.
• Raak de
of
knoppen aan om de
lijst die u wilt bekijken, te selecteren.
• Raak
aan als u naar het scherm
van de afspeellijst wilt gaan.
Audio-cd
MP3/WMA file
3. Het geselecteerde nummer of
destand wordt afgespeeld.
49
LAN8900EKYN DUT HMC .indd 49
2010-03-25 ¿ÀÀü 10:04:06
CD/MP3/WMA/USB/iPod bedienen
Afspeelsnelheid van
audiobooks instellen
iPod
Alleen van audiobooks die u bij iTunes
of audible.com koopt kunt u de afspeelsnelheid instellen.
Zie voor meer informatie over iPod de
handleiding van de iPod.
1. Raak [Optie] aan wanneer u naar
muzieknummers of hoofdstukken van
het [Audioboek] luistert.
• [Audioboek Snel]:
Speelt audiobooks met de originele
snelheid af.
• [Audioboek Langzaam]:
Speelt audiobooks vertraagd af.
✽ Let op
aan als u naar het scherm van
Raak
de afspeellijst wilt gaan.
2. Raak [Audioboek] een paar keer aan.
Vereisten voor usb-apparaten
• Het navigatiesysteem ondersteunt alleen
0
usb-flash drives en externe usb-hard
disk drives met FAT16- of FAT32-indeling.
• Verwijder het usb-apparaat niet tijdens
gebruik.
• We raden het regelmatig maken van
back-ups aan om gegevensverlies te
voorkomen.
• Indien u een usb-verlengkabel of usbhub gebruikt, is het mogelijk dat het
usb-apparaat niet herkend wordt.
• Sommige usb-apparaten werken niet
samen met dit systeem.
• Digitale camera’s en mobiele telefoons
worden niet ondersteund.
• Dit systeem wordt niet ondersteund als het
totale aantal bestanden groter is dan 10000.
Compatibele usb-apparaten
• Apparaten waarbij extra programma’s
geïnstalleerd moeten worden na het
aansluiten van het apparaat op een
computer, worden niet ondersteund.
• MP3 speler: mp3 speler van flash-type.
Mp3-spelers waarbij de installatie van
een stuurprogramma vereist is, worden
niet ondersteund.
• USB Flash Drive: Toestellen die USB
2.0 of USB 1.1 ondersteunen.
• [Audioboek Normaal]: Speelt
audiobooks met de originele
snelheid af.
50
LAN8900EKYN DUT HMC .indd 50
2010-03-25 ¿ÀÀü 10:04:07
CD/MP3/WMA/USB/iPod bedienen
Vereisten voor mp3- en wma-bestanden
• Bemonsteringsfrequentie/ 16 - 48
kHz (MP3) 8 - 44.1 kHz (WMA)
• Bitsnelheid / Binnen 8 - 320 Kbps
(inclusief VBR) (MP3) 5 -160 Kbps
(WMA)
• CD-R/CD-RW fysiek formaat moet
“ISO 9660” zijn.
• Als u MP3/WMA bestanden
opneemt met software die geen
BESTANDENSYSTEEM kan aanmaken,
bijvoorbeeld “Direct-CD”, e.d. is het
niet mogelijk MP3/WMA bestanden
af te spelen. We raden u aan “EasyCD Creator” te gebruiken dat een
ISO9660 bestandensysteem aanmaakt.
Wij nemen aan dat u weet dat u
toestemming moet hebben voor het
downloaden van mp3- en wma-bestanden van het internet. Wij mogen
deze toestemming niet verlenen.
U moet toestemming hebben van de
eigenaar van het auteursrecht
(“copyright”).
Vereisten voor iPod apparaten
• Compatibiliteit met uw iPod kan verschillen, afhankelijk van het type iPod.
• Afhankelijk van de software van uw iPod
is het niet altijd mogelijk uw iPod met
dit systeem te bedienen. Wij raden aan
de meeste recente softwareversie te
installeren.
• Als u een probleem met uw iPod hebt,
ga dan naar www.apple.com/support/
ipod.
• Het navigatiesysteem kan analoge
geluidssignalen van de volgende iPod
modellen verwerken.
- iPod touch 1e generatie
- iPod mini (1e en 2e generatie)
- iPod nano (1e en 3e generatie)
- iPod classic (4e, 5e en 6e generatie)
• Als het materiaal op de iPod niet correct
wordt afgespeeld, moet u de software
van de iPod met de nieuwste versie
bijwerken. Ga voor meer informatie
over het bijwerken van de iPod naar de
website van Apple: <http://www.apple.
com>.
• Apple is niet verantwoordelijk voor de
werking van dit apparaat en of het
voldoet aan de veiligheids- en wettelijke
voorschriften.
51
LAN8900EKYN DUT HMC .indd 51
2010-03-25 ¿ÀÀü 10:04:07
Radio bedienen
Luisteren naar radiostations
1. Druk op de “RADIO” knop om radio
te selecteren.
2. Druk meermaals op de “RADIO”
knop om een band te selecteren.
De modus wisselt als volgt.
FM t AM t FM...
✽ Let op
Fm/am selecteren door het scherm aan
op het scherm
te raken. Raak
aan om de am-band te selecteren en
raak vervolgens
.
3. Automatisch afstemmen :
Raak
/
op het scherm aan. Of
druk op / op het bedieningspaneel.
- Het doorzoeken van de band stopt
zodra een station is gevonden.
4. Raak een van de voorkeurtoetsen langere tijd en paar tellen aan.
preset-stationsinformatie wordt
getoond. Het geselecteerde
preset-station wordt opgeslagen in
het geheugen.
Met de hand afstemmen :
Draai de jog-knop op het bedieningspaneel naar links of rechts.
- Zo kiest u stap voor stap een
hogere of lagere frequentie.
Stations opslaan en oproepen
U kunt eenvoudig tot 12 stations opslaan om deze later op te roepen met
een druk op een knop.
1.
Selecteeer de band (fm of am)
waarin u een station wilt opslaan.
2.
Selecteer de gewenste frequentie.
3.
Raak [Presets] op het scherm aan.
Raak / aan om naar het vorige of
volgende station te gaan.
5. Herhaal stap 1 en 4 om andere stations op te slaan. Als u een
volgende keer de voorkeurtoetsen
aanraakt, wordt het station uit het
geheugen opgeroepen.
✽ Let op
Waneer u een station opslaat met het
presetnummer dat eerder aan een
ander station toegewezen is, wordt het
andere station automatisch gewist.
52
LAN8900EKYN DUT HMC .indd 52
2010-03-25 ¿ÀÀü 10:04:07
Radio bedienen
AS (Automatisch zoeken en
opslaan)
Deze mogelijkheid is alleen voor
am-ontvangst beschikbaar.
Met deze functie kunt u de krachtigste
zendfrequenties automatisch opslaan.
Zendfrequenties scannen
TA (Verkeersinformatie)
De eerste tien seconden uitgezonden
geluid van elke zendfrequentie worden
weergegeven.
Door middel van de TA-functie kan het
navigatiesysteem vanaf een momenteel
gekozen bron (fm-station, cd-speler of
andere aangesloten component) naar
verkeersinformatie (TA) overschakelen.
1. Raak [Optie] op het scherm in de
am/fm-modus aan.
1. Raak [Optie] op het scherm in de
am/fm-modus aan.
1. Selecteer de am-band.
2. Raak [Optie] op het scherm aan.
2. Raak [TA Uit] of [TA Aan] op het
scherm aan.
3. Raak [Autostore] op het scherm aan.
2. Raak [Scannen Starten] op het
scherm aan.
De plaatselijke stations met het
krachtigste signaal worden opgezocht en automatisch in de lijst van
stations opgeslagen. Deze lijst verschijnt vervolgens op het scherm.
3. Raak [Scannen Stoppen] om deze
optie te annuleren.
[TA Aan]: Met behulp van de
TP/TA-functies kunt u
met uw navigatiesysteem
automatisch verkeersinformatie en meldingen
ontvangen.
[TA Uit] : U ontvangt geen verkeersinformatie en meldingen.
4. Raak de gewenste zendfrequentie aan.
53
LAN8900EKYN DUT HMC .indd 53
2010-03-25 ¿ÀÀü 10:04:08
Radio bedienen
NIEUWS
Regiokeuze autom/uit
Met behulp van de NEWS (Nieuws)functie kunt u met uw navigatiesysteem
overschakelen naar nieuws van de
momenteel geselecteerde bron (fmstation, cd-speler of andere aangesloten
component).
Deze functie is alleen beschikbaar voor
fm-ontvangst.
1. Raak [Optie] op het scherm in de
am/fm-modus aan.
1. Selecteer de fm-band.
2. Raak [Optie] op het scherm aan.
3. Raak [REGIO Auto] of [REGIO Uit]
op het scherm aan.
2. Raak [NEWS Uit] of [NEWS Aan] op
het scherm aan.
[NEWS Aan]: U ontvangt automatisch de beschikbare
nieuwsuitzendingen.
[NEWS Uit]: U ontvangt niet automatisch nieuws-uitzendingen.
[REGIO Auto]:
Netwerk-Tracking is geactiveerd. Het
navigatiesyteem schakelt over naar
een ander station in met hetzelfde
netwerk dat hetzelfde programma
uitzendt als het signaal van het
momenteel afgestemde station te
zwak wordt.
[REGIO Uit]:
Netwerk-Tracking is geactiveerd.
Het navigatiesysteem schakelt over
naar een ander station in hetzelfde
netwerk als het signaal van het huidige station te zwak wordt. (In deze
modus kan het programma verschillen van het momenteel ontvangen
programma.)
54
LAN8900EKYN DUT HMC .indd 54
2010-03-25 ¿ÀÀü 10:04:09
Hulpapparaten bedienen
AUX-bronnen gebruiken
Als u wilt kunt u op uw navigatiesysteem hulpapparatuur aansluiten.
1. Druk op “MEDIA” tot het “AUX”scherm verschijnt.
AUX Audio
✽ Let op
• Hulpapparaten zonder videobron geven
geen beeld weer op het scherm van het
navigatiesysteem.
• Gebruik bij iPod-apparaten de speciale
iPod-kabel voor de weergave van beeld
wanneer u de iPod op de AUX-ingang
aansluit.
• Tijdens het rijden is geen video beschikbaar. (Op grond van de
verkeerswetge-vin is Aux Video alleen
beschikbaar als de auto met aangetrokken handrem geparkeerd is.)
AUX Video
2. Sluit een hulpapparaat op de
“AUX”-aansluitbus aan en schakel
vervolgens de functie “Auxiliary” in.
55
LAN8900EKYN DUT HMC .indd 55
2010-03-25 ¿ÀÀü 10:04:09
Spraakherkenningssysteem
Spraakherkenning
Gesproken commando's geven
Nummers uitspreken
Met behulp van spraakherkenning kunt
u het audio/videosysteem (radio, cd,
usb, iPod), de navigatie en andere hiervoor geschikte systemen zoals de telefoon handsfree bedienen.
1. Druk op de afstandsbediening op het
stuurwiel op
.
Spraakherkenning vereist dat nummers in gesproken commando's op een
bepaalde manier worden uitgesproken.
Zie de volgende voorbeelden.
(Algemene regel: Voor “0” kunt u “nul”
of “oh” gebruiken.)
✽ Let op
Let op het volgende om de beste resultaten met spraakherkenning te bereiken.
• Zorg ervoor dat het auto-interieur
zo rustig mogelijk is. Sluit de ramen
om zoveel mogelijk omgevingsgeluid
(verkeerslawaai, trillingen e.d.) te weren
waardoor het systeem gesproken
commando's niet goed kan herkennen.
• Wacht eerst het piepje af voordat
u een gesproken commando geeft.
Anders wordt het commando niet
goed herkend.
• Spreek normaal zonder pauzes tussen
de woorden
2. Wacht het piepje af en zeg “Help”.
Alle commando's die in actieve
velden beschikbaar zijn verschijnen
op het scherm.
Frequentie
Spreek het woord frequentie number uit
als in het volgende voorbeeld.
“Frequentie vijfennegentig komma vier”/
“ vijfennegentig komma vier megahertz”
✽ Let op
• Als het commando niet wordt
herkend, meldt het systeem eerst
“Pardon?” en de tweede keer [Herhaal
alstublieft.]
• Om de functie Spraakherkenning te
annuleren drukt u nog een keer op
of drukt u op een van de knoppen
of raakt u het scherm aan en zegt u
[Annuleren].
• Om het geluidsvolume van de systeemfeedback aan te passen drukt
u op de afstandsbediening op het
of
of gebruikt u
stuurwiel op
wanneer de stemherkenning actief is
de volumeknop ( ) op het bedieningspaneel.
Telefoonnummers
Spreek telefoonnummers uit als in het
volgende voorbeeld.
0-1-0-2-0-0-5-2 (Getallen afzonderlijk)
56
LAN8900EKYN DUT HMC .indd 56
2010-03-25 ¿ÀÀü 10:04:09
Spraakherkenningssysteem
Voorbeelden van gesproken
commando's
Om de spraakherkenningsfunctie te
gebruiken kunt u soms met één commando volstaan maar soms moet u
meer dan één commando geven. Als
voorbeeld volgen nu een paar veelvoorkomende bedieningshandelingen
door middel van gesproken commando's.
5. Wacht het piepje af en zeg
“Frequentie één-honderd-twee” of
“één-honderd-twee megahertz”.
6. Als het systeem de gesproken frequentie herkent, schakelt het over
naar de fm-frequentie van 102 MHz.
5. Als het systeem de afspeellijst
herkent, wordt deze onmiddellijk
afgespeeld.
Voorbeeld 1: Naar de fm-band en
een fm-frequentie overschakelen
1. Druk op de afstandsbediening op het
.
stuurwiel op
.
4. Wacht het piepje af en druk op
U kunt een van de afspeellijsten
noemen zoals een“micky green oh”.
Voorbeeld 2: De usb (of cd)afspeellijst veranderen
2. Wacht het piepje af en zeg “FM”.
3. Als het systeem het commando “FM”
herkent, schakelt het hoofdscherm
over naar het fm-hoofdscherm.
6. Druk op de afstandsbediening op het
.
stuurwiel op
1. Druk op de afstandsbediening op het
stuurwiel op
.
2. Wacht het piepje af en zeg “Lijst”.
4. Druk op de afstandsbediening op het
stuurwiel op
.
3. Als het systeem het commando
herkent, schakelt het scherm over
naar het scherm met de usb (of cd)afspeellijst.
7. Wacht het piepje af en zeg “Volgende
track” of “Vorige track”.
8. Als het systeem het commando
herkent, schakelt de afgespeelde lijst
over naar “Volgende track” of “Vorige
track”.
57
LAN8900EKYN DUT HMC .indd 57
2010-03-25 ¿ÀÀü 10:04:10
Spraakherkenningssysteem
Voorbeeld 2: Opbellen
Om deze functie te gebruiken hebt
u een telefoon nodig die Bluetooth
ondersteunt. Breng voordat u begint de
verbinding tot stand tussen uw navigatiesysteem en de Bluetooth telefoon.
1. Druk op de afstandsbediening op het
stuurwiel op
.
2. Wacht het piepje af en zeg “Nummer
kiezen”.
3. Als het systeem het gesproken commando herkent, schakelt het scherm
over naar het Bluetooth hoofdscherm en
verschijnt het verzoek “Zeg het telefoonnummer alstublieft”.
5. Als het systeem de gesproken getallen herkent, verschijnt het telefoonnummer op het scherm met de tekst
“en daarna?”.
6. Als u het herkende nummer wilt bellen,
zegt u “Gesprek”.
Als het systeem het nummer niet goed
heeft herkend of wanneer u het nummer wilt
wissen zegt u “Wissen”.
Als de procedure op een bepaald
moment wilt beëindigen, zegt u
“Annuleren”.
4. Wacht het piepje af en zeg “Overige
opdrachten”.
Aanvraag commando's die in actieve
velden beschikbaar zijn verschijnen
op het scherm.
Help commando
Als u het systeem voor de eerste keer
met gesproken commando's bedient of
het goede gesproken commando niet
kent, geef dan het volgende commando.
1. Druk op de afstandsbediening op het
stuurwiel op
.
4. Spreek na de piep het telefoonnummer als afzonderlijke getallen uit.
3. U krijgt de gesproken instructie
“Beschikbare commando's zijn:”.
5. U krijgt de gesproken instructie
“Mogelijke commando's zijn”
6. Wacht het piepje af en zeg “AUX”.
Het scherm schakelt over naar het
AUX scherm.
.
2. Wacht het piepje af en zeg “Help”.
Alle commando's die in actieve
velden beschikbaar zijn verschijnen
op het scherm.
58
LAN8900EKYN DUT HMC .indd 58
2010-03-25 ¿ÀÀü 10:04:10
Spraakherkenningssysteem
Gesproken commando's
Categorie
Gesproken commando's
Commando AUX
voor
CD
toepassingen
iPod
Radio
Gesproken commando's
News uit
Categorie
Telefoon
Gesproken commando's
Nummer kiezen
News aan
Inkomend
Volgende zender
Gemist
Kaart
Vorige zender
Uitgaand
Radio
TA uit
Telefoonboek
USB
TA aan
Naam bellen
Telefoon
Preset <nummer>
Snelkiezen <nummer>
Media
Presets
Gesprek
AM
Gesprekken
FM
Snelkiezen
Volume omlaag
Lijst
Mobiel
Volume omhoog
Optie
Privé
Vorige pagina
Scannen starten
Kantoor
Volgende pagina
Scannen stoppen
Wissen
Help
Frequentie “x” komma
“yy”
Correctie
Categorie
Algemene
functies
Categorie
Gesproken commando's
Overige opdrachten
Annuleren
Nee
Ja
Frequentie “xxxx”
Autostore
Regio auto
Regio uit
59
LAN8900EKYN DUT HMC .indd 59
2010-03-25 ¿ÀÀü 10:04:11
Spraakherkenningssysteem
Gesproken commando's
Categorie
iPod
Gesproken commando's
Herhalen uit
Herhalen aan
Categorie
MP3, CD,
USB
Gesproken commando's
Directory omhoog
Categorie
Audio CD
Gesproken commando's
Lijst
Lijst
Optie
Scannen starten
Optie
Herhalen uit
Scannen stoppen
Herhalen Map
Herhalen Track
Random Uit
Herhalen uit
Scannen starten
Random Aan
Herhalen Track
Scannen stoppen
Random Album
Scannen starten
Random Alles
Audioboek Langzaam
Scannen stoppen
Random Uit
Audioboek Normaal
Random Alles
Trackgegevens
Audioboek Snel
Random Map
Volgende track
Directory omhoog
Random Uit
Vorige track
Lijst
Trackgegevens
Track <nummer>
Optie
Volgende track
OK
Volgende track
Vorige track
Vorige track
<Map>
Trackgegevens
Track <nummer>
<Map>
Album
Track <nummer>
Artiest
OK
Map
Categorie
Navigatie
Gesproken commando's
Navigatie
OK
60
LAN8900EKYN DUT HMC .indd 60
2010-03-25 ¿ÀÀü 10:04:11
Problemen oplossen
Kan huidige locatie niet herkennen.
(GPS niet ontvangen)
GPS kan niet binnenshuis worden
gebruikt en dient te zijn aangesloten
op het vermogen met ACC in een
voertuig in een locatie waar de lucht
duidelijk te zien is.
Na de eerste aansluiting van het GPS,
duurt het ongeveer 10 minuten voordat gebruik wordt gestart, maar de
verbindingssnelheid kan afhangen van
het weer, en omliggende obstakels.
Indien de GPS verbinding langdurig
instabiel is, probeert u het volgende.
• Controleer of het product van vermogen wordt voorzien.
• Controleer of de achterkant van het
GPS product op een locatie is geplaatst waar de lucht goed zichtbaar is.
• Als er hoge gebouwen zijn, of u bevindt zich onder een boom, ga naar
een locatie geen obstakels zijn.
Kan stembegeleiding niet horen.
Het volume is verkeerd ingesteld of uitgeschakeld.
Pas het volume van de gesproken navigatiebegeleiding aan.
Er is een verschil tussen de daadwerkelijke weg en de weg op de kaart in
het product.
Zelfs al is GPS normaliter erg accuraat, er
is een foutmarge.
Indien de GPS ontvanger is geïnstalleerd,
kan er een foutmarge zijn van 10m.
Maar voor nieuw aangelegde wegen
kan het probleem zich voordien in de
bijgewerkte gegevens.
Kan de kaart niet zien.
Dit is als u de kaart niet kan zien, zelfs als
u het navigatie menu heeft uitgevoerd.
Dit gebeurt als de gegevens in het
geheugen beschadigd zijn.
Verwijder alle gegevens in het geheugen
en installeer de gegevens opnieuw.
Neem contact op met de
Klantenservice als het probleem blijft
voordoen.
De padbegeleiding kan anders zijn dan
het daadwerkelijke pad.
(Pad begeleiding fout)
• Indien de weg dicht parallel loopt.
• Indien de wegsplitsingshoek heel klein is.
• Indien er een aangrenzende weg is
tijdens het draaien.
• Indien u op een weg rijdt die erg snel
smaller wordt.
• Indien u door een berg rijdt of als de
weg te bochtig is.
• Als de start, passeer en bestemming
locaties binnen 1km liggen.
• Als u de start, passeer of bestemming
locaties verder dan 1km van de weg.
• Indien u door een tunnel rijdt.
• Indien u tussen hoge gebouwen rijdt.
Kaart Vergelijken
Zoals eerder vermeld, is het GPS dat dit
Navigatiesysteem gebruikt ontvankelijk
voor bepaalde fouten. De berekeningen
kunnen u soms op een locatie plaatsen op de kaart waar geen weg is. In
deze situatie begrijpt het systeem dat
voertuigen alleen op wegen reizen en
zal uw positie aanpassen aan de dichtstbijzijnde weg. Dit noemt men kaart
vergelijken.
Met kaart vergelijken
Zonder kaart
vergelijken
61
LAN8900EKYN DUT HMC .indd 61
2010-03-25 ¿ÀÀü 10:04:11
Problemen oplossen
Symptoom
Navigatiesysteem wordt niet
ingeschakeld.
Oorzaak
Correctie
Het contactslot is NIET ingeschakeld.
Zet het contactslot in de stand “ON”
(Aan).
Het contactslot is NIET naar ACC geschakeld.
Zet het contactslot in de stand “ACC”.
De voeding van het apparaat is uitgeschakeld.
Schakel het apparaat in door op het
te drukken.
besturingspaneel op
Door lawaai en andere factoren werkt de
ingebouwde microprocessor niet goed.
Schakel het systeem uit en weer aan.
De disk vuil.
Reinig de disk.
De geladen disk is van een type dat dit
systeem kan afspelen.
Controleer of u het juiste type disk
gebruikt.
Het systeem werkt niet.
Afspelen is niet mogelijk.
Er is geen geluid.
De disk is ondersteboven geplaatst.
Plaats de disk met het etiket naar boven.
De bestanden op de disk hebben een
afwijkend bestandsformaat.
Controleer het bestandsformaat.
Het volumeniveau is te laag.
Pas het volume aan.
Geluid is uitgezet.
Schakel Mute (Geluidsonderdrukking) uit.
62
LAN8900EKYN DUT HMC .indd 62
2010-03-25 ¿ÀÀü 10:04:11
Specificaties
HOOFDSTUK RADIO
FM
Frequentieband . . . . . . . . . . . . . . . . . . . . . 87.5 tot 108 MHz
Signaal/ruisafstand . . . . . . . . . . . . . . . . . . . . . . . . . . . .50 dB
Vervorming. . . . . . . . . . . . . . . . . . . . . . . . . . . . . . . . . . . . . 1 %
Effectieve gevoeligheid . . . . . . . . . . . . . . . . . . . . . . 10 dBμV
ALGEMEEN
Luidsprekervermogen . . . . . . . . . . . . . . 50W x 4 kan. (Max.)
Voeding . . . . . . . . . . . . . . . . . . . . . . . . . . . . . . . . . . 12 V accu
Luidsprekerimpedantie . . . . . . . . . . . . . . . . . . . . . . . . 4 ohm
Aardingssyteem. . . . . . . . . . . . . . . . . . . . . . . Min aan massa
Afmetingen (bxhxd) . . . . . . . . . . . . 206,4 x 118,4 x 185,4 mm
Netto gewicht. . . . . . . . . . . . . . . . . . . . . . . . . . . . . . . .2,44 kg
AM (MW)
Frequentieband . . . . . . . . . . . . . . . . . . . . . 522 tot 1620 kHz
Signaal/ruisafstand . . . . . . . . . . . . . . . . . . . . . . . . . . . . 45 dB
Vervorming. . . . . . . . . . . . . . . . . . . . . . . . . . . . . . . . . . . .1,0 %
Effectieve gevoeligheid . . . . . . . . . . . . . . . . . . . . . .38 dBμV
BEELDSCHERM
LCD . . . . . . . . . . . . . . . . . . . . . . . . . . . . . . 6,5 inch TFT LCD
Resolutie . . . . . . . . . . . . . . . . . . . . . . . . . . . . . . . 800 x 480
Achtergrondlicht . . . . . . . . . . . . . . . . . . . . . . . . . . Type CCFL
HOOFDSTUK CD
Frequentiegevied . . . . . . . . . . . . . . . . . . . . 20 tot 20.000 Hz
Signaal/ruisafstand . . . . . . . . . . . . . . . . . . . . . . . . . . . .60 dB
Vervorming. . . . . . . . . . . . . . . . . . . . . . . . . . . . . . . . . . . 0,3 %
Kanaalscheiding (1kHz) . . . . . . . . . . . . . . . . . . . . . . . . .50 dB
63
LAN8900EKYN DUT HMC .indd 63
2010-03-25 ¿ÀÀü 10:04:11
Inhoudsopgave
24
23
42
53
Parkeren . . . . . . . . . . . . . . . . . . . . . . . . . . . . . . . . . . . . . . . .
Telefoonnummer . . . . . . . . . . . . . . . . . . . . . . . . . . . . . . . . .
POI-Categorie . . . . . . . . . . . . . . . . . . . . . . . . . . . . . . . . . . .
POI (Nuttige Plaats) . . . . . . . . . . . . . . . . . . . . . . . . . . . . . .
28
26
34
24
Draadloze Bluetooth technologie . . . . . . . . . . . . . . . . . . . . 39
In willekeurige volgorde afspelen . . . . . . . . . . . . . . . . . . . .
Regiokeuze autom/uit . . . . . . . . . . . . . . . . . . . . . . . . . . . . .
Herhalen . . . . . . . . . . . . . . . . . . . . . . . . . . . . . . . . . . . . . . .
Naar het begin van het huidige hoofdstuk/nummer
teruggaan . . . . . . . . . . . . . . . . . . . . . . . . . . . . . . . . . . . . . .
Routeopties . . . . . . . . . . . . . . . . . . . . . . . . . . . . . . . . . . . . .
48
54
47
Adressenboek . . . . . . . . . . . . . . . . . . . . . . . . . . . . . . . . . . .
Adressen opzoeken . . . . . . . . . . . . . . . . . . . . . . . . . . . . . . .
Oproepen beantwoorden . . . . . . . . . . . . . . . . . . . . . . . . . .
AS (Automatisch zoeken en opslaan) . . . . . . . . . . . . . . . .
Toegangscode veranderen . . . . . . . . . . . . . . . . . . . . . . . . . . 41
Omleiding . . . . . . . . . . . . . . . . . . . . . . . . . . . . . . . . . . . . . . .37
Gesproken commando's geven . . . . . . . . . . . . . . . . . . . . . 56
GPS Invoer . . . . . . . . . . . . . . . . . . . . . . . . . . . . . . . . . . . . . . 27
Zoeken . . . . . . . . . . . . . . . . . . . . . . . . . . . . . . . . . . . . . . . . . 46
Instellingen. . . . . . . . . . . . . . . . . . . . . . . . . . . . . . . . . . . . 16-19
Naar een volgend hoofdstuk/nummer gaan . . . . . . . . . . . 46
Naar een vorig hoofdstuk/nummer gaan . . . . . . . . . . . . . 46
Gesplitst scherm / Volledig scherm. . . . . . . . . . . . . . . . . . 35
Opslaan Doel . . . . . . . . . . . . . . . . . . . . . . . . . . . . . . . . . . . . . 31
Opslaan Positie . . . . . . . . . . . . . . . . . . . . . . . . . . . . . . . . 31,35
Microfoon in/uitschakelen. . . . . . . . . . . . . . . . . . . . . . . . . . 42
Het geluidspad tijdens een telefoongesprek
overschakelen . . . . . . . . . . . . . . . . . . . . . . . . . . . . . . . . . . . 42
Help commando . . . . . . . . . . . . . . . . . . . . . . . . . . . . . . . . . 58
Thuis 1/ Werk2/ 3~12 . . . . . . . . . . . . . . . . . . . . . . . . . . . . . 32
In Stad . . . . . . . . . . . . . . . . . . . . . . . . . . . . . . . . . . . . . . . . .
Info Vlakbij . . . . . . . . . . . . . . . . . . . . . . . . . . . . . . . . . . . . . .
Info over route . . . . . . . . . . . . . . . . . . . . . . . . . . . . . . . . . . .
Introscan . . . . . . . . . . . . . . . . . . . . . . . . . . . . . . . . . . . . . . .
46
36
26
38
38
47
TA (Verkeersinformatie) . . . . . . . . . . . . . . . . . . . . . . . . . . . 53
Route Planner . . . . . . . . . . . . . . . . . . . . . . . . . . . . . 29-30, 35
2D/ 3D . . . . . . . . . . . . . . . . . . . . . . . . . . . . . . . . . . . . . . . . . 34
Kia-Service. . . . . . . . . . . . . . . . . . . . . . . . . . . . . . . . . . . . . . 26
Laatste Doelen. . . . . . . . . . . . . . . . . . . . . . . . . . . . . . . . . . . 24
Kaart gebruiken . . . . . . . . . . . . . . . . . . . . . . . . . . . . . . . . . . 28
Uw telefoonboek gebruiken . . . . . . . . . . . . . . . . . . . . . . . . 43
Lijst van recente telefoontjes . . . . . . . . . . . . . . . . . . . . . . . 44
Bellen door invoeren van het telefoonnummer . . . . . . . . 42
Bellen met snelkiesnummers . . . . . . . . . . . . . . . . . . . . . . . 45
Vlak Bij Doel. . . . . . . . . . . . . . . . . . . . . . . . . . . . . . . . . . . . . 26
Vlak Bij Positie . . . . . . . . . . . . . . . . . . . . . . . . . . . . . . . . . . . 25
NIEUWS . . . . . . . . . . . . . . . . . . . . . . . . . . . . . . . . . . . . . . . . 54
Gesproken commando's . . . . . . . . . . . . . . . . . . . . . . . . 59-60
Spraakherkenning . . . . . . . . . . . . . . . . . . . . . . . . . . . . . . . . 56
64
LAN8900EKYN DUT HMC .indd 64
2010-03-25 ¿ÀÀü 10:04:11
Symbolen voor de weergave van verkeersproblemen
Als het verkeersprobleem zich op de berekende route voordoet, licht het symbool op.
Symbool
Beschrijving
Symbool
Beschrijving
Vallende rotsblokken
Stilstaand verkeer
Ongeval
File
Ander gevaar
Harde wind
Wegversmalling
Sneeuw, ijs
Steenslag
Wegversperring,
gesloten
Wegwerkzaamheden
Alarmnummer niet
bereikbaar
Slipgevaar, regen
65
LAN8900EKYN DUT HMC .indd 65
2010-03-25 ¿ÀÀü 10:04:11
Help - Hotline
Website : http://www.navigation.com/kia
Kosteloos internationaal nummer: 0800 18 23 53 22
Telefoonnummer voor alle
andere landen
(of als kosteloze nummers
niet ondersteund worden) :+31 555 384 245
P/N: MFL62880528
LAN8900EKYN DUT HMC .indd 66
2010-03-24 ¿ÀÈÄ 10:46:26