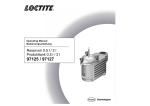
1
R
97102
9710
2
bar
psi CO
N
T
R
1
2
3
4
9710
2
5
6
bar
psi
CONT
bar
psi CO
N
T
8
7
R
XS
1
XS : Start
2: R
ese
rv
XS1
17
16
15
14
13
XS2
oir
Loc
tite
Mad
e in
90–2
60
cat.
VA
C/4
7–
2 A 63 H
M
z
12
11
Ge
(Ire
rman
no.9
y
7102
10
lan
d) L
td.
9
3
Deutsch
6 – 28
English
29 – 51
5
Inhaltsverzeichnis
1
6
Bitte beachten Sie
.............................................
8
1.1
Hervorhebungen . . . . . . . . . . . . . . . . . . . . . . . . . . . . . . . . . . . . . . . . . . . . . . . .
8
1.2
Lieferumfang . . . . . . . . . . . . . . . . . . . . . . . . . . . . . . . . . . . . . . . . . . . . . . . . . . .
8
1.3
Zu Ihrer Sicherheit . . . . . . . . . . . . . . . . . . . . . . . . . . . . . . . . . . . . . . . . . . . . . . .
9
1.4
Einsatzbereich
.................................................
9
2
Gerätebeschreibung . . . . . . . . . . . . . . . . . . . . . . . . . . . . . . . . . . . . . . . . . . . .
10
2.1
Anzeigen, Bedienelemente und Anschlüsse . . . . . . . . . . . . . . . . . . . . . . . . . . .
10
2.2
Funktionsbeschreibung . . . . . . . . . . . . . . . . . . . . . . . . . . . . . . . . . . . . . . . . . . .
12
2.3
Funktionsablauf
................................................
13
2.3.1
Zeitgesteuerter Betrieb . . . . . . . . . . . . . . . . . . . . . . . . . . . . . . . . . . . . . . . . . . .
13
2.3.2
Dauerbetrieb (Continuous Mode) . . . . . . . . . . . . . . . . . . . . . . . . . . . . . . . . . . .
13
3
Technische Daten . . . . . . . . . . . . . . . . . . . . . . . . . . . . . . . . . . . . . . . . . . . . . .
14
3.1
Energiebedarf . . . . . . . . . . . . . . . . . . . . . . . . . . . . . . . . . . . . . . . . . . . . . . . . . .
14
3.1.1
Elektrik . . . . . . . . . . . . . . . . . . . . . . . . . . . . . . . . . . . . . . . . . . . . . . . . . . . . . . .
14
3.1.2
Pneumatik
14
....................................................
3.2
Anschlüsse und Anschlußmaße
....................................
14
3.3
Sonstige Daten . . . . . . . . . . . . . . . . . . . . . . . . . . . . . . . . . . . . . . . . . . . . . . . . .
14
4
Installieren . . . . . . . . . . . . . . . . . . . . . . . . . . . . . . . . . . . . . . . . . . . . . . . . . . . .
15
4.1
Umgebungsbedingungen . . . . . . . . . . . . . . . . . . . . . . . . . . . . . . . . . . . . . . . . .
15
4.2
Platzbedarf . . . . . . . . . . . . . . . . . . . . . . . . . . . . . . . . . . . . . . . . . . . . . . . . . . . .
15
4.3
Grundeinstellung des Gerätes . . . . . . . . . . . . . . . . . . . . . . . . . . . . . . . . . . . . . .
15
4.4
Anschließen des Gerätes
16
.........................................
Inhaltsverzeichnis
5
Dosieren . . . . . . . . . . . . . . . . . . . . . . . . . . . . . . . . . . . . . . . . . . . . . . . . . . . . .
16
5.1
Erste Inbetriebnahme . . . . . . . . . . . . . . . . . . . . . . . . . . . . . . . . . . . . . . . . . . . .
16
5.1.1
Füllen der Produktleitung
.........................................
16
5.1.2
Einstellen der Dosiermenge . . . . . . . . . . . . . . . . . . . . . . . . . . . . . . . . . . . . . . . .
17
5.1.2.1
Zeitgesteuerter Betrieb . . . . . . . . . . . . . . . . . . . . . . . . . . . . . . . . . . . . . . . . . . .
17
5.1.2.2
Dauerbetrieb (Continuous Mode) . . . . . . . . . . . . . . . . . . . . . . . . . . . . . . . . . . .
18
5.2
Nachfüllen des Produktbehälters . . . . . . . . . . . . . . . . . . . . . . . . . . . . . . . . . . . .
19
5.2.1
Produktbehälter mit Nachfüll- und Leermeldung (Automatikbehälter) . . . . . . . . .
19
5.2.2
Produktbehälter ohne Nachfüll- und Leermeldung
......................
20
5.3
Außerbetriebnahme
.............................................
20
5.4
Erneute Inbetriebnahme . . . . . . . . . . . . . . . . . . . . . . . . . . . . . . . . . . . . . . . . . .
20
6
Pflege und Wartung . . . . . . . . . . . . . . . . . . . . . . . . . . . . . . . . . . . . . . . . . . . .
21
7
Beseitigen von Störungen . . . . . . . . . . . . . . . . . . . . . . . . . . . . . . . . . . . . . . .
21
8
Technische Unterlagen . . . . . . . . . . . . . . . . . . . . . . . . . . . . . . . . . . . . . . . . . .
23
8.1
Steckerbelegung . . . . . . . . . . . . . . . . . . . . . . . . . . . . . . . . . . . . . . . . . . . . . . . .
23
8.2
Belegung des Druckluftanschlusses . . . . . . . . . . . . . . . . . . . . . . . . . . . . . . . . .
26
9
Anhang . . . . . . . . . . . . . . . . . . . . . . . . . . . . . . . . . . . . . . . . . . . . . . . . . . . . . .
27
9.1
-Konformitätserklärungen
......................................
27
9.2
Garantiebestimmungen . . . . . . . . . . . . . . . . . . . . . . . . . . . . . . . . . . . . . . . . . . .
28
9.3
Ansprechpartner für Service . . . . . . . . . . . . . . . . . . . . . . . . . . . . . . . . . . . . . . .
28
7
1
1.1
Bitte beachten Sie
Hervorhebungen
Gefahr!
Verweist auf Sicherheitsregeln und fordert Vorsichtsmaßnahmen, die den Betreiber des
Gerätes oder andere Personen vor Verletzungen oder Lebensgefahr schützen.
Achtung!
Hebt hervor, was getan oder unterlassen werden muß, um das Gerät oder andere Sachwerte
nicht zu beschädigen.
☞
Hinweis
Gibt Empfehlungen zum besseren Handhaben des Gerätes bei Bedien- und Einstellvorgängen sowie
Pflegearbeiten.
Die halbfett gedruckten Zahlen im Text beziehen sich auf die entsprechende Positionsnummer in der
Abbildung auf der Seite 3.
●
1.2
Der Punkt hebt einen Handlungsschritt hervor.
Handlungsschritte in Abbildungen sind durch
Pfeile dargestellt.
Werden mehrere Handlungsschritte in einer
Abbildung dargestellt, bedeutet ein
Schwarzer Pfeil = 1. Handlungsschritt
Grauer Pfeil
= 2. Handlungsschritt
Weißer Pfeil
= 3. Handlungsschritt
Lieferumfang
1 Steuergerät 97102;
1 Netzkabel;
1 Bedienungsanleitung 97102.
☞
8
Bedingt durch die technische Entwicklung können Abbildungen und Beschreibungen in dieser
Bedienungsanleitung vom tatsächlich ausgelieferten Gerät in Details abweichen.
1
1.3
Bitte beachten Sie
Zu Ihrer Sicherheit
Für den gefahrlosen und erfolgreichen Einsatz des Gerätes diese Anleitung vollständig lesen.
Werden die Anweisungen nicht befolgt, übernimmt der Hersteller keine Gewährleistung.
Bei Schäden am Netzkabel oder Gehäuse kann es zum lebensgefährlichen Berühren
spannungsführender Teile kommen.
● Vor jedem Gebrauch Netzkabel und Gerät kontrollieren.
Ein beschädigtes Netzkabel oder Gerät nicht in Betrieb nehmen!
Das beschädigte Netzkabel durch ein Neues ersetzen.
● Das Gerät darf nur vom autorisierten Loctite-Service geöffnet und repariert werden.
1.4
Einsatzbereich
Das halbautomatische Steuergerät 97102 steuert das exakte Auftragen von LOCTITE-Produkten aus
einem Produktbehälter über ein Dosierventil.
Es kann mit folgenden LOCTITE-Geräten zu einem Dosiersystem kombiniert werden:
1 Produktbehälter
(Produkttank oder Kartuschen-Entleerungsgerät mit oder ohne Nachfüll- und Leermeldung);
1 Pneumatisches Dosierventil.
Je nach Gerätezusammenstellung des Dosiersystems ist es möglich
– anaerob aushärtende,
– mit UV-Licht aushärtende und
– mit Luftfeuchtigkeit aushärtende Cyanacrylat-Klebstoffe zu dosieren.
9
2
Gerätebeschreibung
2.1
☞
1
Anzeigen, Bedienelemente und Anschlüsse
●
Siehe Abbildung Seite 3.
Digitalanzeige
Anzeige der Dosierzeit [s] für einen Dosierablauf.
– Während des Dosierens im zeitgesteuerten Betrieb wird die noch verbleibende Dosierzeit angezeigt.
– Während des Dosierens im Dauerbetrieb wird die ablaufende Dosierzeit angezeigt.
Anzeige des am Druckregler 8 eingestellten Dosierdruckes [bar] oder [psi].
Anzeige von Fehlermeldungen (siehe Kapitel 7).
2
Taste
oder
Tasten zum Verändern der Dosierzeit für einen Dosierablauf.
Nach Drücken der Taste
oder
beginnt die Anzeige der Dosierzeit [s] in der Digitalanzeige zu
blinken. Die angezeigte Dosierzeit wird mit der Taste
verlängert und mit der Taste
verkürzt.
Die Dosierzeit ist von 0.01 bis 99.9 s einstellbar.
3
Taste
Taste zum Speichern neu eingestellter Werte der Dosierzeit [s] und des Dosierdrucks [bar] oder [psi].
Wenn die Anzeige der Dosierzeit [s] in der Digitalanzeige blinkt, wird durch Drücken der Taste
angezeigte Dosierzeit gespeichert, und die Anzeige hört auf zu blinken.
die
Bei einer Fehlermeldung „ Press. 0.83 NOK “ mit Piepton wird durch Drücken der Taste
die
Fehlermeldung quittiert. Der Wert 0.83 [bar/psi] ist nur ein Beispiel für den angezeigten Dosierdruck
(siehe Kapitel 7).
Bei der Fehlermeldung „ PRESS ENTER; >Tank Inactive< “ wird durch Drücken (PRESS) der Taste
(ENTER) der Automatikbehälter (Tank) belüftet (siehe Abschnitt 5.2.1).
4
Taste
Taste zum Füllen der Produktleitung (siehe Abschnitt 5.1.1).
Die LED leuchtet, solange die Taste
gedrückt wird.
Beim Drücken der Taste
im zeitgesteuerten Betrieb ändert sich die Anzeige der Dosierzeit nicht.
Es wird solange Produkt dosiert, wie die Taste
gedrückt wird.
Beim Drücken der Taste
im Dauerbetrieb ändert sich die Anzeige der Dosierzeit.
(Siehe Abschnitt 2.3)
10
2
Gerätebeschreibung
bar
5
Taste psi
Taste zum Umschalten der Maßeinheit des Dosierdrucks in der Digitalanzeige.
bar
psi
Nach jedem Drücken der Taste
wechselt die Anzeige des eingestellten Dosierdrucks in der
Digitalanzeige in die jeweils andere Maßeinheit [bar] oder [psi] mit dem entsprechenden Wert.
6
CONT
Taste
Taste zum Umschalten vom zeitgesteuerten Betrieb in den Dauerbetrieb (continuous mode).
Die leuchtende LED in der Taste
zeigt den Dauerbetrieb an (siehe Abschnitt 5.2.2.2).
CONT
Durch Drücken der Taste
wird die Anzeige der Dosierzeit in der Digitalanzeige auf 0.00 s gesetzt
und blinkt. Beim Dosieren wird in der Digitalanzeige jeweils von 0.00 s beginnend die ablaufende
Dosierzeit angezeigt. Die zuletzt angezeigte Dosierzeit bleibt bis zum nächsten Start erhalten.
CONT
– Umschalten zurück in den zeitgesteuerten Betrieb ohne Speichern der Dosierzeit
durch erneutes Drücken der Taste
. Die LED in der Taste
erlischt. In der Digitalanzeige
erscheint wieder die zuvor im zeitgesteuerten Betrieb gespeicherte Dosierzeit.
CONT
CONT
– Umschalten zurück in den zeitgesteuerten Betrieb mit Speichern der Dosierzeit
durch Drücken der Taste
. Die LED in der Taste
erlischt. Die angezeigte Dosierzeit wird
gespeichert, und die Anzeige hört auf zu blinken.
CONT
7
Netzschalter I/O (EIN/AUS)
Mit dem Netzschalter wird das Steuergerät ein- und ausgeschaltet.
Bei Anschluß eines Produktbehälters gilt zusätzlich:
Stellung I (EIN) – Der Behälter wird mit dem am Präzisionsdruckregler
eingestellten Dosierdruck automatisch belüftet.
Stellung O (AUS) – Der Behälter wird automatisch entlüftet.
8
Präzisionsdruckregler
Präzisionsregler zum Einstellen des Dosierdrucks.
Durch Drehen des Reglerknopfes wird der Dosierdruck im Bereich von 0.00 bar bis 7.00 bar (0.00 psi
bis 100 psi) eingestellt.
Erscheint die Fehlermeldung „ Press. 0.83 NOK “ mit Piepton, wurde der Dosierdruck um mehr als
± 10 % verändert. Der Wert 0.83 [bar/psi] ist nur ein Beispiel für den angezeigten Dosierdruck (siehe
Kapitel 7).
Durch Drücken der Taste
wird der angezeigte Dosierdruck als neuer Vergleichswert für die
automatische Drucküberwachung gespeichert. Die Fehlermeldung mit Piepton verschwindet.
11
2
Gerätebeschreibung
9
Abluft-Schalldämpfer
10
Steuerluftanschluß
(Dosierventil), koaxial
Hier wird der koaxiale Druckluftschlauch bzw. mit Anschlußadapter der einfache Druckluftschlauch
zum Dosierventil angeschlossen (Belegung siehe Abschnitt 8.2).
11
Druckluftanschluß
(Produktbehälter), koaxial
Hier wird der koaxiale Druckluftschlauch vom Produktbehälter angeschlossen.
Außenschlauch O – Versorgung des Steuergerätes mit ungeregelter Druckluft aus dem externen
Druckluftnetz (Belegung siehe Abschnitt 8.2).
Innenschlauch I – Versorgung des Produktbehälters mit geregelter Druckluft aus dem Steuergerät.
● Achten Sie darauf, daß die Schlauchenden des koaxialen Druckluftschlauches immer gerade und
sauber abgeschnitten sind. Es kann sonst zu keinen oder fehlerhaften Funktionen der Dosiergeräte
kommen.
☞
12
Netzsicherung
Entfernen, Überbrücken oder Außerkraftsetzen der Sicherheitseinrichtungen kann zu Schäden
am Gerät führen und ist deshalb verboten!
13
Netzkabel
14
Netz-Gerätestecker
15
Fußschalter (als Zubehör extra zu bestellen!)
Signalgeber zum Starten eines Dosierablaufs.
Die Dosierzeit im zeitgesteuerten Betrieb entspricht dem Wert auf der Digitalanzeige und ist unabhängig davon, wie lange der Fußschalter gedrückt wird (siehe Abschnitt 2.3.1).
Im Dauerbetrieb wird Produkt dosiert, solange der Fußschalter gedrückt wird (siehe Abschnitt 2.3.2).
16
Buchse XS1: Start
Hier wird der Fußschalter 15 angeschlossen.
17
Buchse XS2: Reservoir
Hier wird der Produktbehälter (Reservoir) angeschlossen.
2.2
Funktionsbeschreibung
Das halbautomatische Steuergerät 97102 regelt den eingestellten Dosierdruck im Produktbehälter
und steuert das pneumatische Öffnen des Dosierventils entsprechend der vorgegebenen Dosierzeit.
Das Startsignal zum Dosieren wird von einem externen Fußschalter übernommen.
Fehlermeldungen werden in der Digitalanzeige angezeigt und zusätzlich durch einen Piepton
signalisiert (siehe Kapitel 7).
12
2
Gerätebeschreibung
Bei Anschluß eines Produktbehälters wird durch das Ein- bzw. Ausschalten des Steuergerätes auch
die automatische Be- bzw. Entlüftung des Behälters gesteuert.
Nur der Automatikbehälter 97106 / 97108 wird nach erfolgter Leermeldung automatisch entlüftet.
Das Steuergerät signalisiert, wenn der Automatikbehälter nachgefüllt wurde. Durch Bestätigung dieser
Meldung mit der Taste
wird der Automatikbehälter wieder belüftet.
2.3
2.3.1
Funktionsablauf
Zeitgesteuerter Betrieb
Siehe auch Abschnitt 5.1.2.1!
Betätigungszeit
des Startauslösers
Dauer des
Startsignals
Dosierzeit
t
2.3.2
Dauerbetrieb (continuous mode)
Siehe auch Abschnitt 5.1.2.2!
Betätigungszeit
des Startauslösers
Dauer des
Startsignals
Dosierzeit
t
13
3
3.1
3.1.1
3.1.2
3.2
Technische Daten
Energiebedarf
Elektrik
Netzanschluß
90 – 260 VAC; 47 – 63 Hz
Leistungsaufnahme
ca. 40 W
Netzsicherung
Glasrohr-Feinsicherung, 2 AM
Interne Steuerspannungen
5 VDC; 12 VDC; 24 VDC
Pneumatik
Druckluftversorgung
min. 2.00 bar (29.0 psi); max. 12.00 bar (174 psi)
Qualität
Wird die geforderte Qualität nicht erreicht,
LOCTITE-Wartungseinheit installieren.
gefiltert 10 µm, ölfrei, nicht kondensierend
Regelbereich des Druckreglers
0.00 – 7.00 bar (0.00 – 100 psi)
Druckanzeige
0.00 – 7.00 bar (0.00 – 100 psi)
Zubehör-Bestellnummer 97120
Anschlüsse und Anschlußmaße
Netzanschluß
für Kaltgerätekupplung IEC 320 nach VDE 0625
Schlauchgröße Steuerluftanschluß, koaxial
Außen-Ø 6,3 mm, TW06 B-20, Fa. SMC
(Dosierventil)
Schlauchgröße Druckluftanschluß, koaxial
Außen-Ø 9,5 mm, TW09 B-20, Fa. SMC
(Produktbehälter)
Abmessungen
3.3
14
B x H x T: 145 x 230 x 260 mm
Sonstige Daten
Schutzgrad
IP 33 nach VDE 0470, Teil 1 / EN 60529-1991
Betriebstemperatur
+10 °C bis +40 °C (+50 °F bis +104 °F)
Lagertemperatur
-10 °C bis +60 °C (+14 °F bis +140 °F)
Gewicht
2,8 kg
Dauerschalldruckpegel
< 70 dB(A)
4
4.1
Installieren
Umgebungsbedingungen
– Keine kondensierende Luftfeuchtigkeit
– Kein Spritzwasser
4.2
Platzbedarf
145 mm
min 150 mm
260 mm
230 mm
97102
R
4.3
Grundeinstellung des Gerätes
9710
2
bar
psi CO
NT
R
15
4
4.4
Installieren
Anschließen des Gerätes
XS
1:
XS Start
2: Re
servo
XS1
XS2
ir
Loct
Mad
260
VAC
/47
2 AM–63 Hz
5
5.1
5.1.1
Ger
(Irela
man
.no
y
.97
102
nd)
Ltd.
Dosieren
Erste Inbetriebnahme
Füllen der Produktleitung
●
☞
e in
cat
90–
ite
Prüfen, daß der Produktbehälter, das Dosierventil und der Fußschalter gemäß deren
Bedienungsanleitungen korrekt angeschlossen sind.
Um Luftblasen beim Dosieren zu vermeiden, muß die Produktleitung gefüllt und dadurch entlüftet
werden.
● Das Dosierventil gemäß dessen Bedienungsanleitung positionieren, um ein blasenfreies Füllen der
Produktleitung zu gewährleisten.
Auffangbehälter unter das Dosierventil stellen,
da Produkt austreten wird.
● Den Netzschalter 7 auf Stellung I (EIN) umschalten.
●
Mit dem Druckregler 8 den Dosierdruck 0.50
bar (ca. 7.00 psi) einstellen.
●
Die Taste
drücken, bis das Produkt
blasenfrei aus der Dosiernadel fließt.
9710
2
●
Bei zähflüssigeren Produkten den Druck
langsam schrittweise erhöhen, bis Produkt
austritt.
Das Dosierventil nach unten halten, um
unkontrolliertes Herausspritzen von Produkt zu vermeiden.
16
bar
psi CO
NT
bar
psi
R
CONT
5
5.1.2
5.1.2.1
Dosieren
Einstellen der Dosiermenge
Zeitgesteuerter Betrieb
Diese Betriebsart wird bei punktförmiger Benetzung bzw. Tropfendosierung genutzt.
Mit den Tasten
oder
die Dosierzeit
0.50 s einstellen (Werkseinstellung).
Die Anzeige der Dosierzeit in der Digitalanzeige beginnt zu blinken.
● Mit dem Druckregler 8 den Dosierdruck
0.50 bar (ca. 7 psi) einstellen.
Eine Fehlermeldung „ Press. 0.83 NOK “ mit
Piepton ist möglich. Der Wert 0.83 [bar/psi] ist
nur ein Beispiel für den angezeigten Dosierdruck
(siehe Kapitel 7).
●
Die Taste
drücken, um den eingestellten
Dosierdruck als Vergleichswert für die automatische Drucküberwachung zu speichern.
Die Fehlermeldung mit Piepton verschwindet.
● Den Fußschalter 15 drücken, um die Dosiermenge zu prüfen.
9710
2
bar
psi CO
NT
bar
psi
CONT
R
●
bar
psi
CONT
Ist die Dosiermenge zu klein:
●
Den Dosierdruck erhöhen und speichern. Anschließend die Dosiermenge prüfen.
Den Handlungsablauf wiederholen, bis die gewünschte Dosiermenge annähernd erreicht wird.
Wurde die gewünschte Dosiermenge annähernd erreicht:
● Die Dosiermenge exakt einstellen durch Verändern der Dosierzeit mit den Tasten
● Den Fußschalter 15 drücken, um die Dosiermenge zu prüfen.
oder
.
Speichern der eingestellten Dosiermenge für weitere Dosierungen:
● Die Taste
drücken. Die Anzeige der Dosierzeit in der Digitalanzeige hört auf zu blinken.
Wird die gewünschte Dosiermenge nicht erreicht:
● Mit größerer (bzw. kleinerer) Dosiernadel die Handlungsschritte gemäß Abschnitt 5.1.2.1
wiederholen.
17
5
5.1.2.2
Dosieren
Dauerbetrieb (Continuous Mode)
Diese Betriebsart wird bei wegabhängiger Benetzung bzw. Raupendosierung genutzt.
●
Mit dem Druckregler 8 den Dosierdruck
0.50 bar (ca. 7 psi) einstellen.
Eine Fehlermeldung „ Press. 0.83 NOK “ mit
Piepton ist möglich. Der Wert 0.83 [bar/psi] ist
nur ein Beispiel für den angezeigten Dosierdruck
(siehe Kapitel 7).
●
Die Taste
drücken, um den eingestellten
Dosierdruck als Vergleichswert für die automatische Drucküberwachung zu speichern.
Die Fehlermeldung mit Piepton verschwindet.
●
Die Taste
drücken.
Die leuchtende LED in der Taste
zeigt den
Dauerbetrieb an. Die Anzeige der Dosierzeit in
der Digitalanzeige wird auf 0.00 s gesetzt und
blinkt.
9710
2
bar
psi CO
NT
bar
psi
R
CONT
CONT
●
bar
psi
CONT
Den Fußschalter 15 drücken, bis die Dosiermenge annähernd erreicht ist.
Wird die Dosiermenge zu langsam erreicht:
● Den Dosierdruck erhöhen und speichern. Anschließend die Dosiermenge prüfen.
Den Handlungsablauf wiederholen, bis die gewünschte Dosiermenge annähernd erreicht wird.
☞
– Umschalten zurück in den zeitgesteuerten Betrieb ohne Speichern der Dosierzeit
durch erneutes Drücken der Taste
. Die LED in der Taste
erlischt. In der Digitalanzeige
erscheint wieder die zuvor im zeitgesteuerten Betrieb gespeicherte Dosierzeit.
CONT
CONT
– Umschalten zurück in den zeitgesteuerten Betrieb mit Speichern der Dosierzeit
durch Drücken der Taste
. Die LED in der Taste
erlischt. Die angezeigte Dosierzeit wird
gespeichert, und die Anzeige hört auf zu blinken.
CONT
Wird die gewünschte Dosiermenge nicht erreicht:
● Mit größerer (bzw. kleinerer) Dosiernadel die Handlungsschritte gemäß Abschnitt 5.1.2.2
wiederholen.
18
CONT
5
5.2
5.2.1
Dosieren
Nachfüllen des Produktbehälters
Produktbehälter mit Nachfüll- und Leermeldung (Automatikbehälter)
Fehlermeldung „ --- Refill ---“ (Nachfüllen)
(siehe Kapitel 7):
9710
2
Die Anzeige der Fehlermeldung blinkt.
●
bar
psi CO
NT
Produkt zum Nachfüllen bereitstellen.
R
Fehlermeldung „ --- Empty --- “ (Leer) mit
Piepton:
9710
2
Die Anzeige der Fehlermeldung blinkt.
Der Dosierablauf wird abgebrochen und es kann
kein Dosierablauf mehr gestartet werden.
●
☞
Die Taste
stellen.
bar
psi CO
NT
bar
psi
drücken, um den Piepton abzu-
CONT
R
Der Automatikbehälter 97106 / 97108 wird nach der Leermeldung automatisch entlüftet.
● Den Automatikbehälter entsprechend dessen Bedienungsanleitung nachfüllen und wieder
verschließen.
„ PRESS ENTER
>Tank Inactive< “
(Produktbehälter (Tank) nicht belüftet):
● Die Taste
1x drücken(PRESS ENTER).
Der Automatikbehälter wird belüftet.
Fehlermeldung
In der Digitalanzeige blinkt die Fehlermeldung
„ Press. 0.83 NOK “ mit Piepton.
Der Wert 0.83 [bar/psi] ist nur ein Beispiel für den
angezeigten Dosierdruck (siehe Kapitel 7).
☞
bar
psi
CONT
Die Fehlermeldung „ Press. 0.83 NOK “ mit Piepton verschwindet von selbst, wenn der Dosierdruck im Produktbehälter nicht mehr als 10 % vom gespeicherten Vergleichswert der automatischen
Druckkontrolle abweicht.
Nachdem die Fehlermeldung „ Press. 0.83 NOK “ mit Piepton verschwunden ist:
Das Dosieren mit den gespeicherten Werten für Dosierzeit und Dosierdruck fortsetzen.
●
19
5
5.2.2
☞
Dosieren
Produktbehälter ohne Nachfüll- und Leermeldung
Wenn Luftblasen beim Dosieren auftreten, muß geprüft werden, ob der Produktbehälter leer ist.
Beim Dosieren von Cyanacrylat-Klebstoffen den Produktbehälter sofort nachfüllen, weil Luft
in der Produktleitung zu Aushärtungen von Produkt führt!
● Den Produktbehälter gemäß dessen Bedienungsanleitung von Hand entlüften und prüfen.
●
5.3
●
Die leere Produktflasche oder Kartusche im Produktbehälter gegen eine volle auswechseln.
●
Den Produktbehälter wieder von Hand belüften.
●
Das Dosieren mit dem eingestellten Dosierdruck fortsetzen.
Außerbetriebnahme
●
Den Netzschalter 7 auf Stellung O (AUS) umschalten.
Außerbetriebnahme für längere Stillstandszeiten
Bei Arbeitspausen von länger als 14 Tagen das System außer Betrieb nehmen, um
Aushärtungen von Produkt zu vermeiden.
● Den Netzschalter 7 auf Stellung O (AUS) umschalten.
●
5.4
Produktbehälter und Dosierventil gemäß deren Bedienungsanleitungen außer Betrieb nehmen.
Erneute Inbetriebnahme
●
Den Netzschalter 7 auf Stellung I (EIN) umschalten.
●
Das Dosieren mit den gespeicherten Werten fortsetzen oder die Dosiermenge gemäß Abschnitt
5.1.2 neu einstellen.
Inbetriebnahme nach längeren Stillstandszeiten
20
●
Installation gemäß Kapitel 4 überprüfen.
●
Inbetriebnahme gemäß Abschnitt 5.1.
6
Pflege und Wartung
Das Gerät bedarf keiner besonderen Pflege und Wartung.
7
Beseitigen von Störungen
Art der Störung
Mögliche Ursachen
Abhilfe
Digitalanzeige leuchtet nicht.
– Keine Netzspannung vorhanden.
– Netzschalter 7 in Stellung O (AUS).
– Netzsicherung 12 defekt.
– Netzkabel 13 defekt.
– Steuergerät defekt.
● Netzspannung
– Keine Druckluft vorhanden.
– Produktbehälter nicht eingeschaltet oder
defekt.
● Druckluftzufuhr
Keine Wertänderung auf
Digitalanzeige.
– Steuergerät defekt.
In der Digitalanzeige blinkt die
Fehlermeldung (mit Piepton):
Press. (Pressure)
= Dosierdruck.
0.83 [bar/psi]
= Beispiel für den angezeigten
Dosierdruck.
NOK (Not O. K.)
= Nicht in Ordnung.
– Gerät war ausgeschaltet und der Druckregler 8 pegelt gerade den eingestellten
Dosierdruck ein. Der angezeigte
Dosierdruck wird ständig größer.
– Druckregler 8 wurde versehentlich um
mehr als ±10 % verstellt.
– Dosierdruck wurde um mehr als ±10 %
neu eingestellt.
– Undichtigkeit im System.
sicherstellen.
7 auf Stellung I (EIN).
● Netzsicherung 12 prüfen/erneuern.
● Netzkabel 13 austauschen.
● Loctite Service.
● Netzschalter
sicherstellen
überprüfen
(siehe Bedienungsanleitung des Produktbehälters).
● Loctite Service
● Produktbehälter
● Abwarten,
bis der Druckregler 8 den eingestellten Dosierdruck eingepegelt hat.
Fehlermeldung und Piepton verschwinden, wenn der angezeigte Dosierdruck
-10 % vom gespeicherten Vergleichswert
erreicht hat.
● Druckregler 8 nachstellen, bis Fehlermeldung und Piepton verschwinden.
● Taste
drücken, um den angezeigten
Dosierdruck als neuen Vergleichswert für
die automatische Drucküberwachung zu
speichern.
Danach verschwinden Fehlermeldung
und Piepton.
● System auf Dichtheit prüfen.
Loctite Service.
Gewünschter Druck wird nicht
erreicht.
– Vordruck unzureichend.
● Vordruck
Gefaßte Abluft bläst oder an
den Koaxialverschraubungen
bläst es.
– Schlauch nicht korrekt montiert bzw.
Schlauch nicht sauber abgeschnitten.
● Koaxialen
erhöhen.
Druckluftschlauch kontrollieren
(siehe Abschnitt 2.1).
21
7
Beseitigen von Störungen
Art der Störung
Mögliche Ursachen
Abhilfe
Kein, zuwenig bzw. zuviel
Produkt.
– Dosierdruck nicht richtig eingestellt.
– Druckluftschlauch nicht richtig angeschlossen.
– Dosiernadel verstopft oder zu klein bzw.
zu groß.
– Dosierventil defekt.
● Dosierdruck
oder
CONT
– LED defekt.
● Loctite
– Automatikbehälter leer.
In der Digitalanzeige blinkt die
Fehlermeldung (mit Piepton):
Empty = Leer.
– Automatikbehälter nachgefüllt, aber noch
nicht belüftet.
In der Digitalanzeige blinkt die
Fehlermeldung:
– Stecker an Buchse XS1: Start 16 lose.
– Fußschalter 15 defekt.
– Steuergerät defekt.
22
auswechseln.
– Steuergerät defekt.
– Taste defekt.
– Steuergerät defekt.
Kein Startsignal
● Dosiernadel
überprüfen
(siehe Bedienungsanleitung Dosierventil).
● Produktbehälter überprüfen
(siehe Bedienungsanleitung Produktbehälter).
● Loctite Service
– Produktbehälter nicht eingeschaltet oder
defekt.
LED in Taste
leuchtet nicht
richtig einstellen.
richtig anschließen.
● Druckluftschlauch
● Dosierventil
Service.
Wenn die Taste funktioniert (anhand der
Digitalanzeige prüfen), ist bis zum Loctite
Service ein Notbetrieb möglich.
● Loctite Service.
● Loctite Service.
● Automatikbehälter
nachfüllen.
In der Digitalanzeige erscheint vorher die
Fehlermeldung:
Refill = Nachfüllen.
belüften.
Taste
1x drücken (PRESS ENTER).
Der Automatikbehälter wird belüftet.
(Abschnitt 5.2.1)
● Automatikbehälter
● Netzschalter
7 auf Stellung O (AUS)
umschalten. Stecker festschrauben.
Netzschalter 7 auf Stellung I (EIN)
umschalten.
● Fußschalter 15 auswechseln.
● Loctite Service.
8
8.1
Technische Unterlagen
Steckerbelegung
Niemals externe Spannung an Pol 9 von XS1 und XS2 anlegen!
XS1: Start über Fußschalter
Steuergerät XS1
Fußschalter
1
Start
Signal
1
2
2
3
3
4
4
5
5
6
6
7
7
2
Start
S1
1
0
1
8
9
Pot. 0 VDC
+24 VDC output
8
9
XS1: Externer Start
Steuergerät XS1
1
Externes Startsignal
Start
1
2
2
3
3
4
4
5
5
6
6
7
7
1
2
+24 VDC
Signal
Start
1
0
8
9
Pot. 0 VDC
8
0 VDC
9
23
8
Technische Unterlagen
XS1: Start über Näherungsschalter
Näherungsschalter
Steuergerät XS1
1
1
blau
2
2
schwarz
3
3
braun
4
4
Start
Signal
Start
5
0 VDC
6
7
7
9
Pot. 0 VDC
+ 24 VDC
0
PNP
(Schließer)
5
6
8
1
8
9
XS2: Digitaler Produkttank mit Leermeldung
Steuergerät XS2
1
1
blau
2
schwarz
3
3
braun
4
4
2
5
Tank nachfüllen
Tank leer
0 VDC / GND
5
6
6
7
7
8
9
24
Digitaler Tank (1 Sensor)
Tankerkennung
8
+ 24 VDC
9
Tank leer
PNP (Schließer)
Signal
1
Tank leer
0
8
Technische Unterlagen
XS2: Digitaler Produkttank mit Nachfüll- und Leermeldung
Steuergerät XS2
1
Digitaler Tank (2 Sensoren)
1
blau
2
schwarz
3
3
braun
4
4
2
5
Tank nachfüllen
Tank leer
0 VDC / GND
1
Tank nachfüllen
PNP (Schließer)
6
blau
7
7
schwarz
Tankerkennung
8
braun
+ 24 VDC
9
9
Tank nachfüllen
0
5
6
8
Signal
1
Tank leer
PNP (Schließer)
Tank leer
0
XS2: Automatischer Produkttank 97106 / 97108
Steuergerät XS2
1
2
Automatiktank
Tank nachfüllen
Tank leer
1
1
2
2
1
2
Signal
1
Tank nachfüllen
3
3
4
4
1
Tank leer
5
max. 1,8 W
0 VDC
5
6
6
7
7
8
9
Tankerkennung
8
+ 24 VDC
9
0
0
GND
Tank-Ventil
Tank-Ventil
1
0
25
8
8.2
Technische Unterlagen
Belegung des Druckluftanschlusses
I
0
Geregelte Druckluft
Vorschubeinheit vor
Dosierventil (doppeltwirkender
Betätigungszylinder) offen
Ungeregelte Druckluft
Vorschubeinheit zurück
Dosierventil (doppeltwirkender
Betätigungszylinder) geschlossen
Dosierventil (durch Feder geschlossen):
Diesen Ausgang schließen!
26
9
9.1
Anhang
-Konformitätserklärungen
Konformitätserklärung
im Sinne der EG-Richtlinie über die elektromagnetische Verträglichkeit 89/336/EWG, Anhang I
Loctite (Ireland) Ltd.
Hersteller
Tallaght Business Park
Whitestown,
Tallaght, Dublin 24, Ireland
erklärt, daß das nachfolgend bezeichnete Gerät aufgrund seiner Konzipierung und Bauart den unten aufgeführten
europäischen Richtlinien, harmonisierten Normen, nationalen Normen und technischen Spezifikationen entspricht.
Bezeichnung des Gerätes
Halbautomatisches Steuergerät
Gerätenummer
97102
Einschlägige EG-Richtlinien
EG-Richtlinie Elektromagnetische Verträglichkeit
89/336/EWG i. d. F. 93/68/EWG
Angewandte harmonisierte Normen
EN 50082-1 1992; EN 55014 / 4.1993;
IEC 801-2, 3, 4
Bei einer nicht mit uns abgestimmten Änderung des Gerätes verliert diese Erklärung ihre Gültigkeit.
Konformitätserklärung
im Sinne der EG-Maschinen-Richtlinie 89/392/EWG, Anhang II A
Hersteller
Loctite (Ireland) Ltd.
Tallaght Business Park
Whitestown,
Tallaght, Dublin 24, Ireland
erklärt, daß das nachfolgend bezeichnete Gerät aufgrund seiner Konzipierung und Bauart den unten aufgeführten
europäischen Richtlinien, harmonisierten Normen, nationalen Normen und technischen Spezifikationen entspricht.
Bezeichnung des Gerätes
Halbautomatisches Steuergerät
Gerätenummer
97102
Einschlägige EG-Richtlinien
EG-Maschinen-Richtlinie 89/392/EWG i. d. F. 93/68/EWG
Angewandte harmonisierte Normen
DIN EN 292 Teil 1
Datum / Hersteller-Unterschrift
1995
Angaben zum Unterzeichner
President – Worldwide Manufacturing
11.1991; DIN EN 292 Teil 2
11.1991
(Peter G. Dowling)
Bei einer nicht mit uns abgestimmten Änderung des Gerätes verliert diese Erklärung ihre Gültigkeit.
27
9
9.2
Anhang
Garantiebestimmungen (nur für Deutschland)
Garantieklausel
1 Soweit Fehler bei Produkten, auf welche sich diese Bedienungsanleitung unter Halbautomatisches Steuergerät
97102 (nachstehend „Produkte“ genannt) bezieht, vorhanden sein sollten, beträgt die Gewährleistungsfrist
sechs Monate.
2 Die Gewährleistungsrechte des Bestellers setzen voraus, daß dieser seinen nach §§ 377, 378 HGB
geschuldeten Untersuchungs- und Rügepflichten ordnungsgemäß nachgekommen ist. Loctite verpflichtet sich,
innerhalb der Gewährleistungsfrist die von ihr gelieferten Produkte wahlweise zu reparieren, auszutauschen
oder den Kaufpreis zu erstatten (zuzüglich Fracht- und Versicherungskosten, soweit solche vom Besteller
bezahlt wurden.) Soweit sich nachstehend nichts anderes ergibt, sind weitergehende Ansprüche des Bestellers
– gleich aus welchen Rechtsgründen – ausgeschlossen. Loctite haftet deshalb nicht für Schäden, die nicht am
Liefergegenstand selbst entstanden sind; insbesondere haftet Loctite nicht für entgangenen Gewinn oder
sonstige Vermögensschäden des Bestellers. Vorstehende Haftungsfreizeichnung gilt nicht, soweit die
Schadensursache auf Vorsatz oder grober Fahrlässigkeit beruht. Sie gilt ferner dann nicht, wenn der Besteller
wegen des Fehlens einer zugesicherten Eigenschaft Schadensersatzansprüche wegen Nichterfüllung gemäß
§§ 463, 480 Abs. 2 BGB geltend macht. Wird innerhalb der Gewährleistungsfrist ein Mangel festgestellt, so ist
das entsprechende Teil an Loctite zurückzusenden. Ein Begleitschreiben mit Angabe der Rechnungsnummer,
unter der das Produkt bezogen wurde, sowie der Ursache für die Rücksendung ist beizufügen.
Die Rücklieferung von Komponenten zur Reparatur muß ohne fremde Teile erfolgen; im Fall der
Mängelbeseitigung trägt Loctite die Material-, Transport- und Arbeitskosten, soweit sich diese nicht dadurch
erhöhen, daß die Kaufsache an einen anderen als den ursprünglichen Ort verbracht wurde (§ 476 a BGB). Die
Kosten von Ein- und Ausbaumaßnahmen trägt Loctite nur zur Hälfte, maximal jedoch bis zur Höhe des
Kaufpreises. Für Ersatzlieferung und Nachbesserung haftet Loctite sechs Monate. Wird eine Komponente
und/oder ein von Loctite geliefertes Teil oder System ohne Zustimmung von Loctite geändert oder repariert,
zweckentfremdet oder nicht in Übereinstimmung mit den Vorschriften von Loctite installiert und in Betrieb
gesetzt, erlischt die Gewährleistung.
Eine weitergehende Haftung auf Schadensersatz als in Ziffer 1 und 2 vorgesehen, ist – ohne Rücksicht auf die
Rechtsnatur des geltend gemachten Anspruchs – ausgeschlossen. Die vorstehende Regelung gilt nicht für
Ansprüche gemäß §§ 1 und 4 Produkthaftungsgesetz. Gleiches gilt bei anfänglichem Unvermögen oder zu
vertretender Unmöglichkeit. Soweit die Haftung von Loctite ausgeschlossen oder beschränkt ist, gilt dies auch
für die persönliche Haftung der Angestellten, Arbeitnehmer, Mitarbeiter, Vertreter und Erfüllungsgehilfen von
Loctite.
9.3
Ansprechpartner für Service
Wenden Sie sich an Ihre örtliche Loctite Vertretung.
28
Contents
1
Please observe the following . . . . . . . . . . . . . . . . . . . . . . . . . . . . . . . . . . . . .
31
1.1
Emphasized Sections . . . . . . . . . . . . . . . . . . . . . . . . . . . . . . . . . . . . . . . . . . . .
31
1.2
Items Supplied . . . . . . . . . . . . . . . . . . . . . . . . . . . . . . . . . . . . . . . . . . . . . . . . .
31
1.3
For Your Safety . . . . . . . . . . . . . . . . . . . . . . . . . . . . . . . . . . . . . . . . . . . . . . . . .
32
1.4
Usage . . . . . . . . . . . . . . . . . . . . . . . . . . . . . . . . . . . . . . . . . . . . . . . . . . . . . . . .
32
2
Description . . . . . . . . . . . . . . . . . . . . . . . . . . . . . . . . . . . . . . . . . . . . . . . . . . .
33
2.1
Displays, Operating Elements and Connections . . . . . . . . . . . . . . . . . . . . . . . .
33
2.2
Theory of Operation . . . . . . . . . . . . . . . . . . . . . . . . . . . . . . . . . . . . . . . . . . . . .
35
2.3
Functional Sequence
............................................
36
2.3.1
Time Controlled Mode
...........................................
36
2.3.2
Continuous Mode . . . . . . . . . . . . . . . . . . . . . . . . . . . . . . . . . . . . . . . . . . . . . . .
36
Technical Data
................................................
37
3.1
Energy Requirements . . . . . . . . . . . . . . . . . . . . . . . . . . . . . . . . . . . . . . . . . . . .
37
3.1.1
Electrics . . . . . . . . . . . . . . . . . . . . . . . . . . . . . . . . . . . . . . . . . . . . . . . . . . . . . .
37
3.1.2
Pneumatics . . . . . . . . . . . . . . . . . . . . . . . . . . . . . . . . . . . . . . . . . . . . . . . . . . . .
37
3.2
Connections and Dimensions . . . . . . . . . . . . . . . . . . . . . . . . . . . . . . . . . . . . . .
37
3.3
Other Data . . . . . . . . . . . . . . . . . . . . . . . . . . . . . . . . . . . . . . . . . . . . . . . . . . . .
37
4
Installation . . . . . . . . . . . . . . . . . . . . . . . . . . . . . . . . . . . . . . . . . . . . . . . . . . . .
38
4.1
Environmental Conditions . . . . . . . . . . . . . . . . . . . . . . . . . . . . . . . . . . . . . . . . .
38
4.2
Space Requirements
............................................
38
4.3
Basic Settings of the Unit . . . . . . . . . . . . . . . . . . . . . . . . . . . . . . . . . . . . . . . . .
38
4.4
Connecting the Unit . . . . . . . . . . . . . . . . . . . . . . . . . . . . . . . . . . . . . . . . . . . . .
39
3
29
Contents
5
...................................................
39
5.1
First Operation . . . . . . . . . . . . . . . . . . . . . . . . . . . . . . . . . . . . . . . . . . . . . . . . .
39
5.1.1
Priming the Feed Line . . . . . . . . . . . . . . . . . . . . . . . . . . . . . . . . . . . . . . . . . . . .
39
5.1.2
Adjusting the Dispensed Quantity . . . . . . . . . . . . . . . . . . . . . . . . . . . . . . . . . . .
40
5.1.2.1
Time Controlled Mode
...........................................
40
5.1.2.2
Continuous Mode . . . . . . . . . . . . . . . . . . . . . . . . . . . . . . . . . . . . . . . . . . . . . . .
41
Refilling the Product Reservoir
.....................................
42
5.2.1
Product Reservoir with Low Level Sensor (Automatic Reservoir) . . . . . . . . . . . .
42
5.2.2
Product Reservoir without Low Level Sensor
..........................
43
5.3
Shutdown . . . . . . . . . . . . . . . . . . . . . . . . . . . . . . . . . . . . . . . . . . . . . . . . . . . . .
43
5.4
Returning to Operation . . . . . . . . . . . . . . . . . . . . . . . . . . . . . . . . . . . . . . . . . . .
43
6
Care and Maintenance . . . . . . . . . . . . . . . . . . . . . . . . . . . . . . . . . . . . . . . . . .
44
7
Troubleshooting . . . . . . . . . . . . . . . . . . . . . . . . . . . . . . . . . . . . . . . . . . . . . . .
44
8
Documentation . . . . . . . . . . . . . . . . . . . . . . . . . . . . . . . . . . . . . . . . . . . . . . . .
46
8.1
Pin Connection Convention . . . . . . . . . . . . . . . . . . . . . . . . . . . . . . . . . . . . . . . .
46
8.2
Pneumatic Connection Convention . . . . . . . . . . . . . . . . . . . . . . . . . . . . . . . . . .
49
Annex
.......................................................
50
9.1
-Declarations of Conformity . . . . . . . . . . . . . . . . . . . . . . . . . . . . . . . . . . . . .
50
9.2
Warranty . . . . . . . . . . . . . . . . . . . . . . . . . . . . . . . . . . . . . . . . . . . . . . . . . . . . . .
51
9.3
Service Representative . . . . . . . . . . . . . . . . . . . . . . . . . . . . . . . . . . . . . . . . . . .
51
5.2
9
30
Dispensing
1
1.1
Please observe the following
Emphasized Sections
Warning!
Refers to safety regulations and requires safety measures that protect the operator or other
persons from injury or danger to life.
Caution!
Emphasizes what must be done or avoided so that the unit or other property is not damaged.
☞
Notice
Gives recommendations for better handling of the unit during operation or adjustment as well as for
service activities.
The numbers printed in bold in the text refer to the corresponding position numbers in the illustration
on page 3.
●
1.2
The point emphasizes an instruction step.
Instruction steps in the illustrations are indicated
with arrows.
When several instruction steps are indicated in
an illustration, the shading of the arrow has the
following meaning:
Black arrow
= 1st step
Grey arrow
= 2nd step
White arrow
= 3rd step
Items Supplied
1 Semi-Automatic Controller 97102;
1 Power Cord;
1 Instruction Manual 97102.
☞
As a result of technical development, the illustrations and descriptions in this instruction manual can
deviate in detail from the actual unit delivered.
31
1
1.3
Please observe the following
For Your Safety
For safe and successful operation of the unit, read these instructions completely.
If the instructions are not observed, the manufacturer can assume no responsibility.
Damage to the power cord or the housing can result in contact with voltage carrying parts that
is dangerous to life.
● Check the power cord and the unit before each use.
If the power cord or the unit is damaged, do not operate!
Replace a damaged power cord with a new one.
● The unit may be opened and repaired only by an authorized Loctite service representative.
1.4
Usage
The Semi-Automatic Controller 97102 controls the exact application of LOCTITE Products from a
product reservoir by means of a dispensing valve.
It can be combined with the following LOCTITE Units to from a dispensing system:
1 Product reservoir
(product tank or cartridge reservoir emptying unit with or without low level and empty sensor).
1 Pneumatic dispensing valve.
Depending on the combination of components, it is possible to dispense the following products:
– Anaerobic curing adhesives
– UV light curing adhesives
– Humidity curing cyanacrylate adhesives
32
2
Description
2.1
☞
Displays, Operating Elements and Connections
●
See the illustrationon page 3.
1
Digital Display
Display of the dispensing time [s] for a dispensing sequence.
– During dispensing in time controlled mode, the dispensing time remaining is indicated.
– During dispensing in continuous mode, the elapsed dispensing time is indicated.
Display of the dispensing pressure [bar] or [psi] set on the pressure regulator 8.
Display of error messages (see Chapter 7).
2
Button
or
Buttons for changing the dispensing time for a dispensing sequence.
When button
or
is pressed, the display of the dispensing time [s] in the digital display begins to
blink. The dispensing time indicated is increased with button
and decreased with button
.
The dispensing time is adjustable from 0.01 to 99.9 s.
3
Button
Button for the storage of the new values set for the dispensing time [s] and the dispensing pressure
[bar] or [psi].
When the indication of the dispensing time [s] in the digital display blinks, the indicated dispensing
time is stored by pressing button
and the display stops blinking.
For an error message „ Press. 0.83 NOK “ with beeping, the error message is acknowledged by
pressing button
The value 0.83 [bar/psi] is only an example for the indication of a dispensing
pressure (see Chapter 7).
If the error message „ PRESS ENTER; >Tank Inactive< “ appears, the automatic reservoir ( Tank )
is pressurized by pressing ( PRESS ) button
( ENTER ) (see Section 5.2.1).
4
Button
Button for filling the product line (see Section 5.1.1).
The LED lights as long as button
is pressed.
When button
is pressed in time-controlled mode, the dispensing time is not changed.
The product is dispensed as long as button
is pressed.
When button
in pressed in continuous mode, the dispensing time is changed (see Section 2.3)
33
2
Description
bar
5
Button psi
Button for switching the measuring units for the dispensing pressure in the digital display.
After each pressing of button
the indication of the selected dispensing pressure in the digital
display changes to the other measuring unit [bar] or [psi] with the corresponding value.
bar
psi
6
CONT
Button
Button for switching from time controlled mode to continuous mode.
The lighting of the LED in button
indicates continuous mode (see Section 5.2.2.2).
By pressing button
the indication of the dispensing time in the digital display is set to 0.00 s and
blinks. During dispensing, the elapsed dispensing time is indicated in the digital display beginning
each time with 0.00 s. The last dispensing time remains displayed until the next start.
– Switching back to time controlled mode without storage of the dispensing time by renewed
pressing of button
. The LED in button
extinguishes. In the digital display, the dispensing time
previously stored for the time controlled mode reappears.
– Switching back to time controlled mode with storage of the dispensing time by pressing
button
. The LED in button
extinguishes. The indicated dispensing time is stored and the
display stops blinking.
CONT
CONT
CONT
CONT
CONT
7
Power Switch I/O (ON/OFF)
The control unit is switched on and off with the power switch.
When a product reservoir is connected, the following also applies:
Position I (ON) – The reservoir is automatically pressurized with the dispensing pressure set
on the precision pressure regulator.
Position O (OFF) – The reservoir is automatically depressurized.
34
8
Precision Pressure Regulator
Precision regulator for adjusting the dispensing pressure.
By turning the regulator knob, the dispensing pressure is adjusted in the range from 0.00 to 7.00 bar
(0.00 to 100 psi).
If the error message „ Press. 0.83 NOK “ appears with beeping, the dispensing pressure was
changed more than ± 10 %. The value 0.83 [bar/psi] is only an example for the displayed dispensing
pressure (see Chapter 7).
By pressing button
the indicated dispensing pressure is stored as the new comparison value for
automatic pressure monitoring. The error message and beeping is eliminated.
9
Exhaust Air Silencer
2
Description
10
Control Air Connection
(Dispensing Valve), Coaxial
The coaxial pneumatic hose or, with adapter, the single pneumatic hose to the dispensing valve is
connected here (for connections, see Section 8.2).
11
Pneumatic Supply
(Product Reservoir), Coaxial
The coaxial pneumatic hose from the product reservoir is connected here.
Outer hose O – Supply for the control unit with unregulated pressurized air from the external
pneumatic system (For connections, see Section 8.2).
Inner hose I – Supply of the product reservoir with regulated pressurized air from the control unit.
● Please pay attention that the ends of the tubes of the co-axial air hose are cut in a straight and clean
way. Otherwise the dispensing equipment can not function at all or only defectively.
☞
12
Power Fuse
Removing, jumpering or putting out of operation of the safety devices can result in damage to
the unit and is therefore prohibited!
13
Power Cord
14
Power Supply Socket
15
Footswitch (Accessory to be ordered separately!)
Signalling device for starting the dispensing sequence.
The dispensing time in time-controlled mode corresponds to the value on the digital display and is
independent of the length of time that the Footswitch is depressed (see Section 2.3.1).
In continuous mode, the product is dispensed as long as the Footswitch is depressed
(see Section 2.3.2).
16
Socket XS1: Start
The Footswitch 15 is connected here.
17
Socket XS2: Reservoir
The product reservoir is connected here.
2.2
Theory of Operation
The Semi-Automatic Controller 97102 controls the selected dispensing pressure in the product
reservoir and the pneumatic opening of the dispensing valve according to the selected dispensing
time.
The start signal for dispensing is provided by an external Footswitch.
Error messages are shown on the digital display and are accompanied by a beeping tone (see
Chapter 7).
35
2
Description
When a product reservoir is connected, the pressurization or depressurization of the automatic
reservoir is automatically controlled when the control unit is switched on or off.
When an empty signal is received, the automatic reservoir 97106 / 97108 is automatically depressurized.
The control unit indicates that the automatic reservoir was refilled. By acknowledging this message
with button
the automatic reservoir is again pressurized.
2.3
2.3.1
Functional Sequence
Time Controlled Mode
Also see Section 5.1.2.1!
Activation time
of the start switch
Duration
of the start signal
Dispensing time
t
2.3.2
Continuous Mode
Also see Section 5.1.2.2!
Activation time
of the start switch
Duration
of the start signal
Dispensing time
t
36
3
3.1
3.1.1
3.1.2
3.2
Technical Data
Energy Requirements
Electrics
Power supply
90 – 260 VAC; 47 – 63 Hz
Power consumption
Approx. 40 W
Power protection
Glass tube, fine wire fuse, 2 AM
Internal control voltages
5 VDC; 12 VDC; 24 VDC
Pneumatics
Pneumatic supply
min. 2 bar (29 psi); max. 12 bar (174 psi)
Quality
If the required quality is not achieved,
install a LOCTITE filter regulator.
Filtered 10 µm, oil-free, non-condensing
Regulation range of the pressure regulator
0.00 – 7.00 bar (0.00 – 100 psi)
Pressure indication
0.00 – 7.00 bar (0.00 – 100 psi)
Accessory Order No. 97120
Connections and Dimensions
Power connection
Cold appliance coupl. IEC 320 acc. to VDE 0625
Pneum. hose size Control air conn., coaxial
External dia. 6,3 mm, TW06 B-20, Co. SMC
(Dispensing Valve)
Pneumatic hose size Pneumatic supply, coaxial
External dia 9,5 mm, TW09 B-20, Co. SMC
(Product reservoir)
Dimensions
3.3
W x H x D: 145 x 230 x 260 mm
Other Data
Protection grade
IP 33 acc. to VDE 0470, Part 1 / EN 60529-1991
Operating temperature
+10 °C to +40 °C (+50 °F to +104 °F)
Storage temperature
-10 °C to +60 °C (+14 °F to +140 °F)
Weight
2,8 kg
Continuous sound pressure level
< 70 dB(A)
37
4
4.1
Installation
Environmental Conditions
– Non-condensing humidity
– No splash water
4.2
Space Requirements
145 mm
min 150 mm
260 mm
230 mm
97102
R
4.3
Basic Settings of the Unit
9710
2
bar
psi CO
NT
R
38
4
4.4
Installation
Connecting the Unit
XS
1:
XS Start
2: Re
servo
XS1
XS2
ir
Loct
Mad
260
VAC
/47
2 AM–63 Hz
5
5.1
5.1.1
Ger
(Irela
man
.no
y
.97
102
nd)
Ltd.
Dispensing
First Operation
Priming the Feed Line
●
☞
e in
cat
90–
ite
Check that the product reservoir, the dispensing valve and the Footswitch are connected correctly
according to their instruction manuals.
To avoid air bubbles during dispensing, the product line must be filled and then purged of air.
● Position the dispensing valve as specified in its instruction manual to ensure bubble-free filling of the
product line.
Place a container under the dispensing valve since the product will flow out.
Switch the power switch 7 to the position I (ON).
● With the pressure regulator 8, set the
dispensing pressure to 0.50 bar
(approx. 7.00 psi).
● Press button
until the product flows free of
bubbles from the dispensing needle.
●
●
For viscous products, increase the pressure
slowly in steps until the product flows out.
9710
2
bar
psi CO
NT
bar
psi
CONT
R
Hold the dispensing valve pointing downward
to prevent uncontrolled squirting out of the product.
39
5
5.1.2
5.1.2.1
Dispensing
Adjusting the Dispensed Quantity
Time Controlled Mode
This mode of operation is used for spot shaped wetting or drop dispensing.
With buttons
or
set the dispensing time
to 0.50 s (factory setting). The indication of the
dispensing time in the digital display begins
blinking.
● With the pressure regulator 8 set the dispensing
pressure to 0.50 bar (approx. 7 psi). An error
message „ Press. 0.83 NOK “ with beeping is
possible. The value 0.83 [bar/psi] is only an
example for the indicated dispensing pressure
(see Chapter 7).
●
Press button
to store the dispensing
pressure setting as the comparison value for
automatic pressure monitoring. The error
message with beeping is eliminated.
● Press the Footswitch 15 to check the dispensed
quantity.
9710
2
bar
psi CO
NT
bar
psi
CONT
R
●
bar
psi
CONT
If the dispensed quantity is too small:
● Increase the dispensing pressure and store. Check the dispensed quantity again.
Repeat this sequence until the desired dispensed quantity is roughly achieved.
When the desired dispensed quantity is roughly achieved:
● Set the exact dispensed quantity by changing the dispensing time with button
● Press the Footswitch 15 to check the dispensed quantity.
or
.
Storing of the dispensed quantity setting for subsequent dispensings:
● Press button
. The indication of the dispensing time in the digital display stops blinking.
If the desired dispensed quantity is not achieved:
● With a larger (or smaller) dispensing needle, repeat the steps of Section 5.1.2.1.
40
5
5.1.2.2
Dispensing
Continuous Mode
This mode of operation is used for wettings of varying lengths or for the application of beads.
With the pressure regulator 8 set the dispensing
pressure to 0.50 bar (approx. 7 psi). An error
message „ Press. 0.83 NOK “ with beeping is
possible. The value 0.83 [bar/psi] is only an
example for the indicated dispensing pressure
(see Chapter 7).
● Press button
to store the dispensing
pressure setting as the comparison value for
automatic pressure monitoring.
The error message with beeping is eliminated.
●
●
9710
2
bar
psi CO
NT
bar
psi
CONT
R
Press button
. The lighting of the LED in
button
indicates continuous mode. The
indication of the dispensing time in the digital
display is set to 0.00 s and blinks.
CONT
CONT
●
Press the Footswitch 15 until the dispensed
quantity is roughly achieved.
bar
psi
CONT
When the dispensed quantity is achieved too slowly:
● Increase the dispensing pressure and store. Check the dispensed quantity again.
Repeat this sequence until the desired dispensed quantity is roughly achieved.
☞
– Switching back to time controlled mode without storage of the dispensing time by renewed
pressing of button
. The LED in button
extinguishes. In the digital display, the dispensing time
previously stored for the time controlled mode reappears.
CONT
CONT
– Switching back to time controlled mode with storage of the dispensing time by pressing
button
. The LED in button
extinguishes. The indicated dispensing time is stored and the
display stops blinking.
CONT
If the desired dispensed quantity is not achieved:
● With a larger (or smaller) dispensing needle, repeat the steps of Section 5.1.2.2.
41
5
5.2
5.2.1
Dispensing
Refilling the Product Reservoir
Product Reservoir with Low Level Sensor (Automatic Reservoir)
Error message „ --- Refill ---“
(see Chapter 7):
9710
2
The error message display blinks.
●
bar
psi CO
NT
Prepare product for refilling.
R
Error message „ --- Empty --- “ with beeping:
9710
2
The error message display blinks. The dispensing
sequence is interrupted and no further dispensing
sequence can be started.
●
Press the button
bar
psi CO
NT
bar
psi
to stop the beeping.
CONT
R
☞
The automatic reservoir 97106 / 97108 is automatically depressurized following the empty message.
● Refill the automatic reservoir according to its instruction manual and reconnect.
Error message
„ PRESS ENTER
>Tank Inactive< “
(product reservoir ( Tank ) not pressurized):
●
Press button
once ( PRESS ENTER ). The
automatic reservoir is pressurized.
The error message „ Press. 0.83 NOK “
( Press. = Dispensing pressure)
blinks in the digital display with beeping.
The value 0.83 [bar/psi] is only an example for
the indication of the dispensing pressure (see Chapter 7).
☞
bar
psi
CONT
The error message „Press 0.83 NOK“ with beeping disappears by itself when the dispensing
pressure in the product reservoir does not deviate more than 10 % from the stored comparison value
of the automatic pressure control.
After the error message „ Press. 0.83 NOK “ with beeping has disappeared:
● Continue dispensing with the stored values for dispensing time and pressure.
42
5
5.2.2
☞
Dispensing
Product Reservoir without Low Level Sensor
When air bubbles occur during dispensing, check if the product reservoir is empty.
For the dispensing of cyanacrylate adhesives, refill the product reservoir immediately since
air in the product line results in curing of the product!
● Purge the product reservoir of air by hand and check in accordance with its instruction manual.
●
5.3
●
Replace the empty product bottle or cartridge in the reservoir with a full one.
●
Purge the product reservoir of air by hand again.
●
Continue dispensing with the selected dispensing pressure.
Shutdown
●
Switch the power switch 7 to the position O (OFF).
Shutdown for Longer Periods of Non-use
For pauses in the work of longer than 14 days, place the system out of operation to prevent
curing of the product.
● Switch the power switch 7 to the position O (OFF).
● Put the product reservoir and dispensing valve out of operation according to their instructions
manuals.
5.4
Returning to Operation
Switch the power switch 7 to the position I (ON).
● Continue dispensing with the stored values or readjust the dispensed quantity according to Section
5.1.2.
●
Returning to Operation after Longer Periods of Non-use
Check the installation according to Chapter 4.
● Return to operation according to Section 5.1.
●
43
6
Care and Maintenance
The unit requires no special care and maintenance.
7
Troubleshooting
Type of malfunction
Possible causes
Correction
The digital display does not
light.
– No power voltage present.
– Power switch 7 in position O (OFF).
– Power fuse 12 is defect.
– Power cord 13 is defect.
– Control unit is defect.
● Check
No change in the value on the
digital display.
– No air pressure present.
– Product reservoir not switched on or
defect.
– Control unit is defect.
● Check
The error message (with
beeping) blinks in the digital
display:
– The unit was switched off and the
pressure regulator 8 in now adjusting to
the dispensing pressure setting. The
indicated dispensing pressure is
increased continuously.
● Wait
Press.
= Dispensing pressure
0.83 [bar/psi]
= Example for the indication
of dispensing pressure.
NOK
= Not O.K.
– Pressure regulator 8 was unintentionally
changed by more than ±10 %.
– Dispensing pressure was set to a new
value of more than ±10 %.
– Leak in the system.
the power voltage.
power switch 7 to position I (ON).
● Check/replace fuse 12.
● Replace power cord 13.
● Loctite Service.
● Switch
pneumatic supply.
product reservoir (see instruction
manual for product reservoir).
● Loctite Service
● Check
until the pressure regulator 8 has
adjusted the dispensing pressure.
The error message and beeping are
eliminated when the indicated dispensing
pressure is within -10 % of the stored
comparison value.
● Adjust pressure regulator 8 until the error
message and beeping are eliminated.
● Press button
to store the indicated
dispensing pressure as the new
comparison value for the automatic
pressure monitoring. This eliminates the
error message and beeping.
● Check system for leakage.
Loctite Service.
The desired pressure is not
achieved.
– Supply pressure inadequate.
● Increase
Bundled exhaust air is
blowing or at the co-axial
thread joint it is blowing.
– Co-axial air hose not correct connected
or not cutted in a straight and clean way.
● Check
44
the supply pressure.
co-axial air hose
(see Section 2.1).
7
Troubleshooting
Type of malfunction
Possible causes
Correction
No product, too little or too
much product.
– Dispensing pressure not set correctly.
– Pressure hose not properly connected.
– Dispensing needle is clogged, too small
or too large.
– Dispensing valve not correctly connected
or defect.
– Product reservoir not switched on or
defect.
– Controller is defect.
● Adjust
– LED defect.
● Loctite
LED in button
not light.
or
CONT
does
– Button defect.
– Control unit is defect.
No start signal.
dispensing pressure setting.
air pressure hose correctly.
● Replace the dispensing needle.
● Connect
● Check
the dispensing valve (see
instruction manual for dispensing valve).
● Check product reservoir (see instruction
manual for product reservoir).
● Loctite Service.
Service.
When the button is operational (check by
means of the digital display), the unit can
be used until repaired by Loctite Service.
● Loctite Service.
● Loctite Service.
– Automatic reservoir empty.
The error message (with beeping) blinks
in the digital display:
● Refill
– Automatic reservoir refilled but not yet
pressurized. The error message blinks in
the digital display:
● Pressurize
Tank
= Automatic reservoir .
Inactive = Not pressurized.
– Plug on the socket XS1: Start 16 is
loose.
– Footswitch 15 defect.
– Control unit is defect.
automatic reservoir
(see Section 5.2).
The error message appears previously in
the digital display:
the automatic reservoir.
Press button
(ENTER). The automatic
reservoir is pressurized.
● Switch
the power switch 7 to the
position O (OFF).
Tighten the screws of the plug.
Switch the power switch 7 to the
position I (ON).
● Replace the Footswitch 15.
● Loctite Service.
45
8
8.1
Documentation
Pin Connection Convention
Never connect any external voltage on pin 9 of XS1 or XS2!
XS1: Start via Footswitch
Controller XS1
Footswitch
1
Start
Signal
1
2
2
3
3
4
4
5
5
6
6
7
7
2
Start
S1
1
0
1
8
9
Pot. 0 VDC
+24 VDC output
8
9
XS1: External Start
Controller XS1
1
External Start
Start
1
2
2
3
3
4
4
5
5
6
6
7
7
1
2
+24 VDC
Signal
Start
1
0
8
9
46
Pot. 0 VDC
8
9
0 VDC
8
Documentation
XS1: Start via Promixity Switch
Controller XS1
1
Proximity Switch
1
blue
2
2
black
3
3
brown
4
4
Start
Signal
Start
5
0 VDC
6
7
7
9
Pot. 0 VDC
+ 24 VDC
0
PNP
(Closer)
5
6
8
1
8
9
XS2: Digital Level Sensor Reservoir (Empty Signal)
Controller XS2
1
Digital Level Sensor
1
blue
2
black
3
3
brown
4
4
2
5
Tank REFILL
Tank EMPTY
0 VDC / GND
6
7
7
9
1
Tank EMPTY
0
5
6
8
Tank EMPTY
PNP (Closer)
Signal
Identification
Signal
8
+ 24 VDC
9
47
8
Documentation
XS2: Digital Level Sensor Reservoir (Refill and Empty Signal)
Controller XS2
1
2 Digital Level Sensors
1
blue
2
black
3
3
brown
4
4
2
5
Tank REFILL
Tank EMPTY
0 VDC / GND
1
Tank REFILL
PNP (Closer)
6
blue
7
7
black
Identification
Signal
8
brown
+ 24 VDC
9
9
Tank REFILL
0
5
6
8
Signal
1
Tank EMPTY
PNP (Closer)
Tank EMPTY
0
XS2: Automatic Reservoir 97106 / 97108
Controller XS2
1
2
Automatic Reservoir
Tank REFILL
Tank EMPTY
1
1
2
2
1
2
Signal
1
Tank REFILL
3
3
4
4
5
5
1
Tank EMPTY
max. 1,8 W
6
7
7
8
9
48
0 VDC
6
Identification
Signal
8
+ 24 VDC
9
0
0
GND
Tank Valve
Tank Valve
1
0
8
8.2
Documentation
Pneumatic Connection Convention
I
0
Regulated Pressure
Advancing Slide forwards
Dispensing Valve (doubled actuated) open
Unregulated Pressure
Advancing Slide backwards
Dispensing Valve (doubled actuated) close
Dispensing Valve (single actuated):
Close this outlet!
49
9
9.1
Annex
-Declarations of Conformity
Declaration of Conformity
In accordance with the EC Regulations for Electro-Magnetic Compatibility 89/336/EWG, Appendix I
Loctite (Ireland) Ltd.
Manufacturer
Tallaght Business Park
Whitestown,
Tallaght, Dublin 24, Ireland
declares that the unit designated in the following is, as a result of its design and construction, in accordance with the
European regulations, harmonized standards, national standards and technical specifications listed below.
Designation of the unit
Semi-Automatic Controller
Unit number
97102
Applicable EC Regulations
EC Regulations for Electro-Magnetic Compatibility
89/336/EWG in the version 93/68/EWG
Applicable harmonized standards
EN 50082-1 1992; EN 55014 / 4.1993;
IEC 801-2, 3, 4
For changes to the unit that were not approved by Loctite, this declaration loses its validity.
Declaration of Conformity
In accordance with the EC Machine Regulations 89/392/EWG, Appendix II A
Manufacturer
Loctite (Ireland) Ltd.
Tallaght Business Park
Whitestown,
Tallaght, Dublin 24, Ireland
declares that the unit designated in the following is, as a result of its design and construction, in accordance with the
European regulations, harmonized standards, national standards and technical specifications listed below.
Designation of the unit
Semi-Automatic Controller
Unit number
97102
Applicable EC Regulations
EG-Machine Regulations 89/392/EWG, version 93/68/EWG
Applicable harmonized standards
DIN EN 292 Part 1
Date / Manufacturer’s signature
1995
Information regarding the Signer
President – Worldwide Manufacturing
11.1991; DIN EN 292 Part 2 11.1991
For changes to the unit that were not approved by Loctite, this declaration loses its validity.
50
(Peter G. Dowling)
9
9.2
Annex
Warranty (excluding Germany)
STANDARD WARRANTY CLAUSE FOR USERS IN EUROPE
Loctite expressly warrants that all products referred to in this Operating Manual under Semi-Automatic Controller
97102 (hereafter called “Products”) shall be free from defects in materials and workmanship. Loctite’s liability
shall be limited, at its option, to replacing those Products which are shown to be defective either in materials or
workmanship or to credit to the purchaser the amount of the purchase price thereof (plus freight and insurance
charges paid therefore by the user). The purchaser’s sole and exclusive remedy for breach or warranty shall be
such replacement or credit A claim of defect in materials or workmanship in any Products shall be allowed only
when it is submitted to Loctite in writing within one month after discovery of the defect or after the time the defect
should reasonably have been discovered [and in any event within twelve months after the delivery of the
Products to the purchaser]. No such claim shall be allowed in respect of Products which have been neglected or
improperly stored, transported, handled, installed, connected, operated, used or maintained or in the event of
unauthorized modification or the Products [including, where products, parts or attachments for use in connection
with the Products are available from Loctite, the use of products, parts or attachments which are not
manufactured by Loctite.]
No Products shall be returned to Loctite for any reason without Loctite’s prior written approval. Products shall be
returned freight prepaid, in accordance with Loctite’s instructions.
EXCEPT FOR THE EXPRESS WARRANTY CONTAINED IN THIS SECTION, LOCTITE MAKES NO
WARRANTY OF ANY KIND WHATSOEVER, EXPRESS OR IMPLIED, WITH RESPECT TO THE PRODUCTS.
ALL WARRANTIES OF MERCHANTABILITY, FITNESS FOR A PARTICULAR PURPOSE, AND OTHER
WARRANTIES OF WHATEVER KIND (INCLUDING AGAINST PATENT OR TRADEMARK INFRINGEMENT)
ARE HEREBY DISCLAIMED BY LOCTITE AND WAIVED BY THE PURCHASER.
THIS SECTION SETS FORTH EXCLUSIVELY ALL OF LOCTITE’S LIABILITY TO THE PURCHASER IN
CONTRACT, IN PART OR OTHERWISE IN THE EVENT OF DEFECTIVE PRODUCTS.
WITHOUT LIMITATION OF THE FOREGOING, TO THE FULLEST EXTENT POSSIBLE UNDER APPLICABLE
LAWS, LOCTITE EXPRESSLY DISCLAIMS ANY LIABILITY WHATSOEVER FOR ANY DAMAGES INCURRED
DIRECTLY OR INDIRECTLY IN CONNECTION WITH THE SALE OR USE OF, OR OTHERWISE IN
CONNECTION WITH, THE PRODUCTS, INCLUDING, WITHOUT LIMITATION, LOSS OF PROFITS AND
SPECIAL, INDIRECT OR CONSEQUENTIAL DAMAGES, WHETHER CAUSED BY LOCTITE’S NEGLIGENCE
OR OTHERWISE.
9.3
Service Representative
Contact Your local Loctite Representative.
51
Loctite (Ireland) Ltd.
Tallaght Business Park
Whitestown,
Tallaght, Dublin 24, Ireland
© 1994 Loctite Corporation
8950062 – 05/99