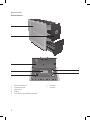
1
de
en
fr
it
nl
es
Tassenwärmer / Cup warmer
Bedienungsanleitung Tassenwärmer
Cup Warmer Instructions for Use
Mode d’emploi du chauffe-tasses
Istruzioni per l’uso scaldatazze
Gebruiksaanwijzing kopjeswarmer
Modo de empleo para calentador de tazas
Manual de instruções do dispositivo de aquecimento de chávenas
Bruksanvisning koppvärmare
Руководство по эксплуатации подогревателя чашек
JURA Type 571
pt
sv
ru
JURA Tassenwärmer / Cup Warmer
IMPORTANT SAFEGUARDS
Follow the basic safety precautions
ZZ Always attach plug to appliance first, then
When using electrical appliances, basic safety
precautions should always be followed, to reduce
the risk of fire, electric shock, and/or injury to persons, including the following:
ZZ Read all instructions.
ZZ To protect against fire, electric shock and
injury to persons, do not immerse cord,
plugs, or body of machine in water or other
liquid.
ZZ Do not touch hot surfaces. Use handles or
knobs.
ZZ Close supervision is necessary when any
appliance is used by or near children.
ZZ Unplug from outlet when not in use and
before cleaning. Allow to cool before
putting on or taking off parts.
ZZ Do not operate any appliance with a damaged cord or plug or after the appliance
malfunctions, or has been damaged in any
manner. Return appliance to the nearest
authorized service facility for examination,
repair or adjustment.
ZZ The use of accessory attachement not recommended by the appliance manufacturer may result in fire, electric shock, or injury
to persons.
ZZ Do not use outdoors.
ZZ Do not let the cord hang over the edge of
a table or counter, or touch hot surfaces.
ZZ Do not place on or near a hot gas or electric
burner, or in a heated oven.
plug cord into the wall outlet. To disconnect, turn any control to »off«, then remove
plug from wall outlet.
ZZ Do not use appliance for other than intented use.
ZZ For household use only.
Special cord set instructions
a. A short power supply cord is provided to
reduce the risk resulting from becoming
entangled in or tripping over a long cord.
b. Longer extension cords are available and
may be used if care is exercised in their
use.
c. If an extension cord is used,
1. the marked electrical rating of the extension cord should be at least as great as
the electrical rating of the appliance, and
2. if the appliance is of the grounded type,
the extension cord should be a grounding type 3-wire cord, and
3. the longer cord shall be arranged so that
it will not drape over the counter top or
tabletop where it can be pulled on by
children of tripped over.
Warning
To reduce the risk of fire or electric shock, do not
remove any service covers. No user serviceable
parts inside. Repair should be done by authorized
personnel only.
SAVE THESE INSTRUCTIONS
2
JURA Tassenwärmer / Cup Warmer
Caution
This appliance is for household use only. Any
servicing other than cleaning and user maintenance should be performed by an authorized
service representative:
ZZ Do not immerse base in water or try to disassemble.
ZZ To reduce the risk of fire or electric shock,
do not remove the base. No user serviceable parts inside. Repair should be done by
authorized service personnel only.
ZZ Keep the cord away from hot parts of the
appliance during operation.
ZZ Never clean with scouring powders or hard
implements.
NEVER DO (or you will void your
warranty protection):
ZZ Never do anything with the appliance
which is not described in the User‘s
Manual. In case of doubt, call your dealer.
3
JURA Tassenwärmer / Cup Warmer
4
de
JURA-Tassenwärmer
Ihr JURA-Tassenwärmer
Symbolbeschreibung............................................................................................................................................. 5
Bedienelemente...................................................................................................................................................... 6
Wichtige Hinweise
7
Bestimmungsgemäße Verwendung................................................................................................................... 7
Zu Ihrer Sicherheit.................................................................................................................................................. 7
1Vorbereiten
9
Lieferumfang........................................................................................................................................................... 9
Aufstellen und anschließen................................................................................................................................... 9
2 Tassen erwärmen (Manuelles Einschalten)
10
3 Automatisches Ein- und Ausschalten
10
Uhrzeit einstellen...................................................................................................................................................10
Automatisches Einschalten..................................................................................................................................10
Automatisches Ausschalten..................................................................................................................................11
Automatisches Ein- und Ausschalten deaktivieren..........................................................................................11
4Displayanzeigen
11
5Pflege
11
6 Umweltgerechte Entsorgung
12
7 Technische Daten
12
Symbolbeschreibung
Warnhinweise:
VORSICHT
Beachten Sie stets die Informationen,
die mit VORSICHT oder WARNUNG mit
Warnpiktogramm gekennzeichnet sind.
Das Signalwort WARNUNG weist Sie auf
mögliche, schwere Verletzungen hin,
das Signalwort VORSICHT auf mögliche,
leichte Verletzungen.
Verwendete Symbole:
E
Hinweise und Tipps, damit Ihnen der
Umgang mit Ihrem Tassenwärmer noch
leichter fällt.
T
Handlungsaufforderung. Hier werden
Sie zu einer Aktion aufgefordert.
5
JURA-Tassenwärmer
Bedienelemente
1
2
3
6
4
7
5
1
2
3
4
5
6
JURA-Tassenwärmer
Tassenschublade
Abdeckung
Display
Taste Ein/Aus Q mit Betriebsanzeige
6
7
Pfeiltaste
Uhrtaste
de
JURA-Tassenwärmer
Wichtige Hinweise
Bestimmungsgemäße Verwendung
Das Gerät ist für den privaten
Hausgebrauch konzipiert und
konstruiert. Das Gerät dient ausschließlich dazu, Tassen in den
ausziehbaren Tassenschubladen
abzustellen und zu erwärmen. Jede
andere Verwendung gilt als nicht
bestimmungsgemäß. Die JURA
Elektroapparate AG übernimmt
keine Haftung für Folgen aus nicht
bestimmungsgemäßer Verwendung.
Lesen und beachten Sie diese Bedienungsanleitung vollständig vor
Gebrauch des Geräts. Halten Sie die
Bedienungsanleitung beim Gerät
verfügbar und geben Sie sie bei
Bedarf an nachfolgende Anwender
weiter.
Zu Ihrer Sicherheit
Lesen und beachten Sie die folgenden wichtigen Sicherheitshinweise sorgfältig.
So vermeiden Sie Lebensgefahr
durch Stromschlag:
ZZ Benutzen Sie nur das von JURA
mitgelieferte original Netzkabel.
ZZ Nehmen Sie nie ein Gerät mit
Beschädigungen oder schadhaftem Netzkabel in Betrieb.
ZZ
ZZ
ZZ
ZZ
ZZ
ZZ
ZZ
Nehmen Sie das Gerät nie mit
nassen Händen in Betrieb.
Achten Sie vor der Inbetriebnahme darauf, dass das Netzkabel trocken ist.
Schließen Sie das Gerät nur mit
dem im Lieferumfang enthaltenen Netzkabel an das Wechselstromnetz an.
Bei Hinweisen auf Beschädigungen, beispielsweise Schmorgeruch, trennen Sie das Gerät
unverzüglich vom Netz und
wenden Sie sich an den JURAService.
Achten Sie darauf, dass sich das
Gerät und das Netzkabel nicht in
der Nähe von heißen Oberflächen oder offenen Flammen
befinden.
Achten Sie darauf, dass das
Netzkabel nicht eingeklemmt
wird oder an scharfen Kanten
scheuert.
Öffnen und reparieren Sie das
Gerät niemals selbst. Nehmen
Sie keine Veränderungen am
Gerät vor, die nicht in der Bedienungsanleitung beschrieben
sind. Das Gerät enthält Strom
führende Teile.
7
JURA-Tassenwärmer
Ein beschädigtes Gerät ist nicht
sicher und kann Verletzungen und
Brand verursachen. So vermeiden
Sie Schäden und damit mögliche
Verletzungs- und Brandgefahren:
ZZ Lassen Sie das Netzkabel niemals
lose herabhängen. Das Netzkabel
kann zur Stolperfalle werden
oder beschädigt werden.
ZZ Schützen Sie das Gerät vor
Witterungseinflüssen wie Regen,
Frost und direkter Sonneneinstrahlung.
ZZ Verwenden Sie das Gerät nicht
zum Aufbewahren und Erwärmen
von Getränken oder anderen
Lebensmitteln.
ZZ Augezogene Tassenschubladen
nicht schwer belasten.
ZZ Stellen Sie keine feuchten oder
nassen Tassen in die Tassenschubladen.
ZZ Tauchen Sie das Gerät, das
Netzkabel und die Anschlüsse
nicht in Wasser.
ZZ Stellen Sie das Gerät und seine
Einzelteile nicht in die Spülmaschine.
ZZ Schalten Sie das Gerät vor Reinigungsarbeiten aus und ziehen Sie
den Netzstecker. Wischen Sie das
Gerät stets feucht, aber niemals
nass ab und schützen Sie es vor
dauerhaftem Spritzwasser. Die
8
ZZ
ZZ
ZZ
ZZ
ZZ
ZZ
ZZ
inneren Seitenwände nicht
reinigen.
Das Gerät nur an Netzspannung
gemäß Typenschild anschließen.
Das Typenschild ist auf der
Unterseite des Geräts angebracht. Weitere technische Daten
finden Sie im
Kapitel 7 »Technische Daten«).
Schalten Sie das Gerät bei längerer Abwesenheit aus und
ziehen Sie den Netzstecker.
Betreiben Sie das Gerät nur unter
Aufsicht.
Kinder dürfen Reinigungs- und
Wartungsarbeiten nicht ohne
Aufsicht durch eine verantwortliche Person durchführen.
Lassen Sie Kinder nicht mit dem
Gerät spielen.
Halten Sie Kinder unter acht
Jahren vom Gerät fern beziehungsweise beaufsichtigen Sie
diese ständig.
Kinder ab acht Jahren dürfen das
Gerät nur ohne Aufsicht bedienen, wenn sie über den sicheren
Umgang damit aufgeklärt wurden. Kinder müssen mögliche
Gefahren einer falschen Bedienung erkennen und verstehen
können.
de
JURA-Tassenwärmer
Personen, einschließlich Kinder, die
aufgrund ihrer
Z physischen, sensorischen oder
geistigen Fähigkeiten oder
Z Unerfahrenheit oder Unkenntnis
nicht in der Lage sind, das Gerät
sicher zu bedienen, dürfen das
Gerät nicht ohne Aufsicht oder
Anweisung durch eine verantwortliche Person nutzen.
1
Vorbereiten
Lieferumfang
Im Lieferumfang sind enthalten:
Z JURA-Tassenwärmer
Z Bedienungsanleitung
Z Netzkabel
Aufstellen und anschließen
Beachten Sie beim Aufstellen Ihres Tassenwärmers
folgende Punkte:
Z Stellen Sie das Gerät auf eine waagrechte
Fläche.
Z Wählen Sie den Standort des Geräts so, dass
es vor Überhitzung geschützt ist.
J
WARNUNG
Lebensgefahr durch Stromschlag bei Betrieb mit
schadhaftem Netzkabel.
T Nehmen Sie nie ein Gerät mit schadhaftem
Netzkabel in Betrieb.
T Stellen Sie das Gerät vorsichtig auf den Kopf.
T Verbinden Sie das Netzkabel mit dem Gerät.
E
An der Unterseite des Tassenwärmers
können Sie das Netzkabel je nach benötigter
Länge verstauen.
T Stellen Sie das Gerät wieder auf die
Standfüße.
T Stecken Sie den Netzstecker in eine
Netzsteckdose.
Im Display unter der Abdeckung wird OFF
angezeigt.
9
JURA-Tassenwärmer
2 Tassen erwärmen
(Manuelles Einschalten)
TT Drücken Sie die Uhrtaste, um das Uhrzeitformat zu bestätigen.
00:00 (Beispiel), die Stunden blinken.
TT Drücken Sie die Pfeiltasten, um die Stunden
einzustellen.
TT Drücken Sie die Uhrtaste, um die Einstellung
der Stunden zu bestätigen.
10:00 (Beispiel), die Minuten blinken.
TT Drücken Sie die Pfeiltasten, um die Minuten
einzustellen.
10:30 (Beispiel)
TT Drücken Sie die Uhrtaste, um die Einstellung
der Minuten zu bestätigen.
Im Display erscheint ON oder OFF, je
nachdem, ob das Gerät ein- oder ausgeschaltet ist.
JJ Verbrennungsgefahr. Die Abstellflächen
der Tassenschubladen können während
des Betriebs heiß werden.
TT Berühren Sie nicht die Abstellflächen der Tassenschubladen.
TT Öffnen Sie eine Tassenschublade.
TT Stellen Sie die Tassen in die Tassenschublade
und schließen Sie diese.
Q T Schalten Sie das Gerät mit der Taste Ein/Aus
ein.
Die Betriebsanzeige leuchtet und das Gerät
beginnt, die Tassen zu erwärmen. Im Display
unter der Abdeckung wird ON angezeigt.
EE
EE
Wenn Sie das Gerät ausschalten möchten,
drücken Sie die Taste Ein/Aus Q. Die
Betriebsanzeige leuchtet nicht mehr, im
Display wird OFF angezeigt.
Ist die Funktion »Automatisches Ausschalten« nicht aktiviert, so schaltet sich das Gerät
nach 12 Stunden aus, um Energie zu sparen.
3 Automatisches Ein- und Ausschalten
EE
Wird das Gerät vom Netz getrennt, werden
alle Einstellungen zurückgesetzt.
Uhrzeit einstellen
Für die Funktion »Automatisches Ein- und
Ausschalten« müssen Sie zunächst die Uhrzeit
einstellen:
TT Öffnen Sie die Abdeckung.
TT Drücken Sie die Uhrtaste.
Im Display erscheint AM 12:00.
TT Drücken Sie eine der Pfeiltasten, um das
Uhrzeitformat zu wechseln (AM/PM oder
24h).
10
EE
Sie können die Einstellung der Uhrzeit
jederzeit ändern. Drücken Sie hierzu die
Uhrtaste zwei Mal und nehmen Sie die
Änderung vor.
Automatisches Einschalten
TT Öffnen Sie die Abdeckung.
TT Drücken Sie die Uhrtaste.
Im Display wird die von Ihnen eingestellte
Uhrzeit angezeigt.
TT Drücken Sie eine der Pfeiltasten.
ON --:-TT Drücken Sie die Uhrtaste.
--:-- , die Stunden blinken.
TT Drücken Sie die Pfeiltasten, um die Stunden
einzustellen.
AUTO ON 07:00 (Beispiel)
TT Drücken Sie die Uhrtaste, um die Einstellung
der Stunden zu bestätigen.
AUTO ON 07:00 (Beispiel), die Minuten
blinken.
TT Drücken Sie die Pfeiltasten, um die Minuten
einzustellen.
AUTO ON 07:30 (Beispiel)
TT Drücken Sie die Uhrtaste, um die Einstellung
der Minuten zu bestätigen.
Im Display erscheint AUTO (ON oder OFF, je
nachdem, ob das Gerät ein- oder ausgeschaltet ist).
de
JURA-Tassenwärmer
Automatisches Ausschalten
TT Drücken Sie zwei Mal eine der Pfeiltasten.
EE
TT Drücken Sie die Uhrtaste.
AUTO OFF 18:30 (Beispiel)
Ist die Funktion »Automatisches Ausschalten« nicht aktiviert, so schaltet sich das Gerät
nach 12 Stunden aus, um Energie zu sparen.
AUTO OFF 18:30 (Beispiel), die Stunden
blinken.
TT Stellen Sie Stunden auf »00«.
TT Drücken Sie die Uhrtaste.
AUTO OFF 00:30 (Beispiel), die Minuten
blinken.
TT Drücken Sie die Pfeiltasten, bis »--:--«
angezeigt wird.
TT Drücken Sie die Uhrtaste, um die Einstellung
zu bestätigen.
Das automatische Ausschalten ist deaktiviert.
TT Öffnen Sie die Abdeckung.
TT Drücken Sie die Uhrtaste.
Im Display wird die von Ihnen eingestellte
Uhrzeit angezeigt.
TT Drücken Sie zwei Mal eine der Pfeiltasten.
AUTO OFF --:-- (Beispiel)
TT Drücken Sie die Uhrtaste.
AUTO OFF --:-- (Beispiel), die Stunden
blinken.
TT Drücken Sie die Pfeiltasten, um die Stunden
einzustellen.
AUTO OFF 18:00 (Beispiel)
TT Drücken Sie die Uhrtaste, um die Einstellung
der Stunden zu bestätigen.
AUTO OFF 18:00 (Beispiel), die Minuten
blinken.
TT Drücken Sie die Pfeiltasten, um die Minuten
einzustellen.
AUTO OFF 18:30 (Beispiel)
TT Drücken Sie die Uhrtaste, um die Einstellung
der Minuten zu bestätigen.
Im Display erscheint AUTO (ON oder OFF, je
nachdem, ob das Gerät ein- oder ausgeschaltet ist).
4Displayanzeigen
ZZ
ZZ
ZZ
ZZ
5Pflege
EE
Automatisches Ein- und Ausschalten deaktivieren
Ist die Funktion »Automatisches Ausschalten« nicht aktiviert, so schaltet sich das Gerät
nach 12 Stunden aus, um Energie zu sparen.
Verwenden Sie zur Pflege keine scharfen,
scheuernden Reinigungsmittel oder harten
Gegenstände. Dies kann das Gerät beschädigen.
TT Ziehen Sie vor jedem Reinigen des Geräts
Um das automatische Ein- oder Ausschalten zu
deaktivieren, müssen Sie die jeweilige Uhrzeit auf
»--:--« stellen.
EE
ON: Gerät ist manuell eingeschaltet
OFF: Gerät ist manuell ausgeschaltet
AUTO ON: Gerät ist automatisch eingeschaltet
AUTO OFF: Gerät ist automatisch ausgeschaltet
den Netzstecker aus der Netzsteckdose.
TT Reinigen Sie das Gerät außen mit einem
weichen, feuchten Tuch (z.B. Mikrofaser).
EE
Mikrofasertücher von JURA sind im
Fachhandel erhältlich.
Beispiel: So deaktivieren Sie das automatische
Ausschalten.
TT Öffnen Sie die Abdeckung.
TT Drücken Sie die Uhrtaste.
11
JURA-Tassenwärmer
6 Umweltgerechte Entsorgung
Technische Änderungen
Technische Änderungen vorbehalten.
Altgeräte bitte umweltgerecht entsorgen.
H
Feedback
Altgeräte enthalten wertvolle recyclingfähige
Materialien, die einer Verwertung zugeführt
werden sollten. Entsorgen Sie Altgeräte deshalb
über geeignete Sammelsysteme.
Copyright
Ihre Meinung ist uns wichtig!
Nutzen Sie den Kontakt-Link unter www.jura.com.
7 Technische Daten
Spannung
120 V, 60 Hz
(nur USA/Kanada)
120–240 V, 50–60 Hz
(Europa, übrige Länder)
Sicherheitsprüfung
UL 1026
IEC/EN 60335-1
IEC/EN 60335-2-12
Leistung
40 W (nur USA/Kanada)
60 W (Messung nach ca. 6 Min.)
(max. 110 W) (Europa, Australien,
Neuseeland, übrige Länder)
Gewicht
ca. 3,8 kg
Kabellänge
ca. 1,1 m
Maße
(B x H x T)
12,2 x 30,6 x 34,9 cm
Richtlinien
Das Gerät entspricht den folgenden Richtlinien:
ZZ 2006/95/EG – Niederspannungsrichtlinie
ZZ 2004/108/EG – Elektromagnetische Verträglichkeit
ZZ 2009/125/EG – Energierichtlinie
ZZ 2011/65/EU – RoHS-Richtlinie
12
Die Bedienungsanleitung enthält Informationen,
die durch Copyright geschützt sind. Fotokopieren
oder Übersetzen in eine andere Sprache ist ohne
vorherige schriftliche Zustimmung durch die
JURA Elektroapparate AG nicht zulässig.
JURA Elektroapparate AG
Kaffeeweltstraße 10
CH-4626 Niederbuchsiten
www.jura.com
de
JURA Cup Warmer
Your JURA cup warmer
Symbol description............................................................................................................................................... 13
Control elements...................................................................................................................................................14
Important information
15
Proper use...............................................................................................................................................................15
For your safety.......................................................................................................................................................15
1Preparation
17
Supplied as standard............................................................................................................................................ 17
Set-up and connection......................................................................................................................................... 17
2 Warming cups (manual switch-on)
17
3 Automatic switch-on / switch-off
17
Setting the time..................................................................................................................................................... 17
Automatic switch-on.............................................................................................................................................18
Automatic switch-off.............................................................................................................................................18
Deactivating automatic switch-on / switch-off................................................................................................18
4Displays
19
5Maintenance
19
6 Environmentally neutral disposal
19
7 Technical data
19
Symbol description
Warning:
CAUTION
Always take note of any information
marked with the CAUTION or WARNING
symbol. The signal word WARNING
points out potential risk of serious
injury, and the signal word CAUTION
potential risk of slight injury.
Symbols used:
E
Information and tips to make use of
your cup warmer even easier.
T
Prompt to take action. This symbol
means that you are being prompted to
perform some action.
13
en
JURA Cup Warmer
Control elements
1
2
3
6
4
7
5
1
2
3
4
5
14
JURA Cup Warmer
Cup drawer
Cover
Display
On/off button Q with operation indicator
lamp
6
7
Arrow button
Clock button
de
JURA Cup Warmer
Important information
Proper use
The machine was designed and
built for domestic use. The machine
should only be used to heat cups
placed in the pull-out cup drawers.
Use for any other purpose will be
deemed improper. JURA Elektroapparate AG cannot accept any
responsibility for the consequences
of improper use.
Before using the machine always
read these instructions for use
thoroughly and completely and
comply with the instructions they
contain. Keep these instructions for
use close to the machine and pass
them on to the next user if applicable.
For your safety
Please read and note carefully the
following important safety information.
To avoid the life-threatening danger
of electric shock:
ZZ Only use the original mains cable
supplied by JURA.
ZZ Never use a machine which has
been damaged or with a defective mains cable.
ZZ Never use the machine when
you have wet hands.
ZZ Make sure the mains cable is dry
before first-time use.
ZZ
ZZ
ZZ
ZZ
ZZ
Only connect the machine to the
AC mains power with the mains
cable supplied with the machine.
In the event of signs of damage,
for example if there is a smell of
burning, unplug the machine
immediately from the mains
supply and contact JURA service.
Make sure that the machine and
the mains cable are not located
close to hot surfaces or naked
flames.
Be careful to ensure that the
mains cable does not get caught
and does not rub against sharp
edges.
Never open and repair the
machine yourself. Do not modify
the machine in any way that is
not described in the instructions
for use. The machine contains
live parts.
A defective machine is not safe and
could cause injury or fire. To avoid
damage and any associated risk of
injury or fire:
ZZ Never allow the mains cable to
loosely hang down. The mains
cable can be tripped over or
damaged.
ZZ Protect the machine from environmental influences such as
rain, frost and direct sunlight.
ZZ Do not use the machine to store
or heat up drinks or other foods.
15
en
JURA Cup Warmer
ZZ
ZZ
ZZ
ZZ
ZZ
ZZ
ZZ
ZZ
ZZ
ZZ
16
Do not place heavy loads on the
extended cup drawers.
Do not place damp or wet cups
in the cup drawers.
Do not put the machine, mains
cable or connectors in water.
Do not put the machine or any
individual parts in the dishwasher.
Turn the machine off and disconnect the mains plug before
starting any cleaning operation.
Always wipe the machine with a
damp cloth rather than a wet
one, and protect it from prolonged water splash. Do not
clean the inner side panels.
Only connect the machine to the
mains voltage in accordance
with the information on the
rating plate. The rating plate is
located on the underside of the
machine. Further technical data
is given in Chapter 7, ‘Technical
data’.
Turn the machine off and disconnect the mains plug if you will be
away for any length of time.
Do not leave the machine unattended when it is in operation.
Children may not clean or service the machine unless supervised by a responsible person.
Do not allow children to play
with the machine.
ZZ
ZZ
Keep children under the age of 8
away from the machine, or
supervise them constantly.
Children aged 8 and over may
only operate the machine without supervision if they have been
instructed in how to use it safely.
Children must be able to recognise and understand the potential dangers arising from incorrect use.
The machine is only allowed to be
used by people who can use it
safely. People, including children,
who do not have the
ZZ physical, sensory or mental
capabilities or
ZZ experience or knowledge
to use the machine safely must be
supervised by a responsible person
when using it, or be instructed in
how to use it correctly.
de
JURA Cup Warmer
1
Preparation
Supplied as standard
The following items are supplied as standard:
Z JURA Cup Warmer
Z Instructions for use
Z Mains cable
Set-up and connection
When setting up your cup warmer, observe the
following:
Z Set the machine down on a horizontal surface.
Z Choose a spot for the machine which is
protected against overheating.
2 Warming cups (manual switch-on)
J
Risk of burns. The storage surfaces in the
cup drawers can get hot during operation.
T Do not touch the storage surfaces in the cup
drawers.
T Open a cup drawer.
T Place the cups in the cup drawer and close it.
Q T Switch the machine on with the on/off
button.
The operation indicator lamp lights up and
the machine starts to warm the cups. ON is
displayed below the cover.
E
J
WARNING
If the machine is operated with a defective mains
cable, there is a danger of electric shock.
T Never use a machine which has a defective
mains cable.
E
When you want to switch off the machine,
press the on/off button Q. The operation
indicator lamp goes out and OFF is
displayed.
If the “Automatic switch-off” function is not
activated, the machine will switch off after
12 hours to save energy.
T Carefully turn the machine upside down and
set it down.
T Connect the mains cable to the machine.
E
Spare cable can be stored on the underside
of the cup warmer depending on the length
of cable required.
3 Automatic switch-on / switch-off
E
If the machine is disconnected from the
mains, all settings are reset.
Setting the time
T Set the machine down the right way up
again.
T Insert the mains plug into a power socket.
OFF is displayed below the cover.
For the ‘automatic switch-on / switch-off’ function,
you must first set the time:
T Open the cover.
T Press the Clock button.
AM 12:00 appears on the display.
T Press one of the arrow buttons to change
the time format (AM/PM or 24h).
T Press the Clock button to confirm the time
format.
00:00 (example), the hours flash.
T Use the arrow buttons to set the hours.
T Press the Clock button to confirm the hours
setting.
10:00 (example), the minutes flash.
T Use the arrow buttons to set the minutes.
10:30 (example)
17
en
JURA Cup Warmer
TT Press the Clock button to confirm the
TT Use the arrow buttons to set the hours.
minutes setting.
ON or OFF appears in the display depending
on whether the machine is switched on or
off.
EE
AUTO OFF 18:00 (example)
TT Press the Clock button to confirm the hours
setting.
AUTO OFF 18:00 (example), the minutes
flash.
TT Use the arrow buttons to set the minutes.
AUTO OFF 18:30 (example)
TT Press the Clock button to confirm the
minutes setting.
AUTO ON or AUTO OFF appears in the
display (depending on whether the machine
is switched on or off).
You can change the time setting at any time.
To do this, press the Clock button twice and
make the necessary changes.
Automatic switch-on
TT Open the cover.
TT Press the Clock button.
The time set by the user is displayed.
TT Press one of the arrow buttons.
ON --:--
TT Press the Clock button.
--:-- , the hours flash.
TT Use the arrow buttons to set the hours.
AUTO ON 07:00 (example)
TT Press the Clock button to confirm the hours
setting.
AUTO ON 07:00 (example), the minutes
flash.
TT Use the arrow buttons to set the minutes.
AUTO ON 07:30 (example)
TT Press the Clock button to confirm the
minutes setting.
AUTO ON or AUTO OFF appears in the
display (depending on whether the machine
is switched on or off).
Automatic switch-off
EE
If the “Automatic switch-off” function is not
activated, the machine will switch off after
12 hours to save energy.
TT Open the cover.
TT Press the Clock button.
The time set by the user is displayed.
TT Press one of the arrow buttons twice.
AUTO OFF --:-- (example)
TT Press the Clock button.
AUTO OFF --:-- (example), the hours flash.
18
Deactivating automatic switch-on / switch-off
To deactivate automatic switch-on or switch-off,
you must set the relevant time to ‘--:--’.
EE
If the “Automatic switch-off” function is not
activated, the machine will switch off after
12 hours to save energy.
Example: Here is how to deactivate automatic
switch-off.
TT Open the cover.
TT Press the Clock button.
TT Press one of the arrow buttons twice.
AUTO OFF 18:30 (example)
TT Press the Clock button.
AUTO OFF 18:30 (example), the hours flash.
TT Set the hours to ‘00’.
TT Press the Clock button.
AUTO OFF 00:30 (example), the minutes
flash.
TT Press the arrow buttons until ‘--:--’ is
displayed.
TT Press the Clock button to confirm the
setting.
Automatic switch-off is deactivated.
de
JURA Cup Warmer
4Displays
ZZ ON: Machine is switched on manually
ZZ OFF: Machine is switched off manually
ZZ AUTO ON: Machine is switched on automati-
7 Technical data
en
Voltage
120 V, 60 Hz
(USA/Canada only)
120–240 V, 50–60 Hz
(Europe, other countries)
Safety test
UL 1026
IEC/EN 60335-1
IEC/EN 60335-2-12
Power
40 W (USA/Canada only)
60 W (Measurement after
approx. 6 min.) (max. 110 W)
(Europe, Australia, New
Zealand, other countries)
Weight
Approx. 3.8 kg
Cable length
Approx. 1.1 m
Dimensions
(W x H x D)
12.2 x 30.6 x 34.9 cm
cally
ZZ AUTO OFF: Machine is switched off automatically
5Maintenance
EE
Do not use any sharp, corrosive or abrasive
cleaning agents or hard objects for
maintenance. This may damage the
machine.
TT Before cleaning the machine disconnect the
mains plug from the power socket.
TT Clean the outside of the machine with a
soft, damp cloth (e.g. a microfibre cloth).
EE
JURA microfibre cloths are available from
stockists.
6 Environmentally neutral disposal
Please dispose of old machines in an environmentally neutral way.
H
Old machines contain valuable materials capable
of being recycled which should be salvaged for
recycling. Please therefore dispose of old machines
via suitable collection systems.
Directives
The machine complies with the following
directives:
ZZ 2006/95/EC – Low Voltage Directive
ZZ 2004/108/EC – Electromagnetic Compatibility
ZZ 2009/125/EC – Ecodesign Directive
ZZ 2011/65/EC – RoHS Directive
Technical changes
We reserve the right to make technical changes.
Feedback
Your opinion is important to us!
Use the contact link at www.jura.com.
19
JURA Cup Warmer
Copyright
The instructions for use contain information which
is protected by copyright. It is not permitted to
photocopy or translate these instructions for use
into another language without the express written
consent of JURA Elektroapparate AG.
JURA Elektroapparate AG
Kaffeeweltstrasse 10
CH-4626 Niederbuchsiten
www.jura.com
20
de
Chauffe-tasses JURA
Votre chauffe-tasses JURA
Description des symboles....................................................................................................................................21
Eléments de commande..................................................................................................................................... 22
Informations importantes
23
Utilisation conforme............................................................................................................................................ 23
Pour votre sécurité............................................................................................................................................... 23
1Préparation
25
Matériel fourni....................................................................................................................................................... 25
Installation et branchement............................................................................................................................... 25
2 Chauffage des tasses (allumage manuel)
26
3 Allumage et extinction automatiques
26
Réglage de l’heure................................................................................................................................................26
Allumage automatique........................................................................................................................................26
Extinction automatique....................................................................................................................................... 27
Désactivation de l’allumage et de l’extinction automatiques...................................................................... 27
4Affichages
27
5Entretien
27
6 Elimination écologique
28
7 Caractéristiques techniques
28
Description des symboles
Mises en garde :
ATTENTION
Tenez toujours compte des informations signalées par ATTENTION ou
AVERTISSEMENT avec un pictogramme
de danger. Le mot AVERTISSEMENT
signale un risque de blessure grave ; le
mot ATTENTION signale un risque de
blessure légère.
Symboles utilisés :
E
Informations et conseils destinés à
vous faciliter encore l’utilisation du
chauffe-tasses.
T
Demande d’action. Ce symbole vous
invite à accomplir une action.
21
fr
Chauffe-tasses JURA
Eléments de commande
1
2
3
6
4
7
5
1
2
3
4
5
22
Chauffe-tasses JURA
Tiroir à tasses
Couvercle
Visuel
Touche Marche/Arrêt Q avec témoin de
fonctionnement
6
7
Touche fléchée
Touche de réglage de l’heure
de
Chauffe-tasses JURA
Informations importantes
Utilisation conforme
Cet appareil a été conçu et construit
pour un usage domestique privé. Il
sert exclusivement à ranger des
tasses dans les tiroirs à tasses
coulissants et à faire chauffer des
tasses. Toute autre utilisation est
considérée comme non conforme.
La société
JURA Elektroapparate AG décline
toute responsabilité relative aux
conséquences d’une utilisation non
conforme.
Lisez entièrement ce mode d’emploi avant d’utiliser l’appareil et
respectez-le impérativement.
Conservez ce mode d’emploi à
proximité de l’appareil et remettezle aux utilisateurs suivants, le cas
échéant.
Pour votre sécurité
Lisez et observez soigneusement les
importantes consignes de sécurité
suivantes.
Pour éviter tout risque d’électrocution :
ZZ Utilisez exclusivement le câble
secteur d'origine fourni par JURA.
ZZ Ne mettez jamais en service un
appareil endommagé ou dont le
câble secteur est défectueux.
ZZ Ne mettez jamais l’appareil en
service avec les mains mouillées.
ZZ
ZZ
ZZ
ZZ
ZZ
ZZ
Avant la mise en service, vérifiez
que le câble secteur est sec.
Pour brancher l’appareil au
réseau alternatif, utilisez exclusivement le câble secteur fourni.
Si vous remarquez des signes de
détérioration, par exemple une
odeur de brûlé, débranchez
immédiatement l’appareil du
secteur et contactez le service
après-vente JURA.
Assurez-vous que l’appareil et le
câble secteur ne se trouvent pas
à proximité de surfaces chaudes
ou de flammes nues.
Assurez-vous que le câble secteur n’est pas coincé ou qu’il ne
frotte pas contre des arêtes
vives.
N’ouvrez et ne réparez jamais
l’appareil vous-même. N’apportez à l’appareil aucune modification qui ne soit pas décrite dans
le mode d’emploi. L’appareil
comporte des pièces sous tension.
Un appareil endommagé n’est pas
sûr et peut être à l’origine de blessures ou d’un incendie. Pour éviter
les dommages et donc les risques
de blessure et d’incendie :
ZZ Ne laissez jamais le câble secteur
pendre de manière lâche. Le
câble secteur peut provoquer
une chute ou être endommagé.
23
fr
Chauffe-tasses JURA
ZZ
ZZ
ZZ
ZZ
ZZ
ZZ
ZZ
ZZ
24
Protégez l’appareil des intempéries telles que la pluie, le gel et le
rayonnement solaire direct.
N’utilisez pas l’appareil pour
stocker et faire chauffer des
boissons ou d’autres denrées
alimentaires.
Ne chargez pas trop lourdement
les tiroirs à tasses lorsqu’ils sont
tirés.
Ne placez pas de tasses humides
ou mouillées dans les tiroirs à
tasses.
Ne plongez pas l’appareil, le
câble secteur et les raccordements dans l’eau.
Ne mettez pas l’appareil et ses
composants au lave-vaisselle.
Avant tous travaux de nettoyage,
mettez l’appareil hors tension et
débranchez la fiche secteur.
Essuyez l’appareil avec un chiffon
humide, mais jamais mouillé, et
protégez-le des projections d’eau
permanentes. Ne nettoyez pas
l’intérieur des parois latérales.
Raccordez l’appareil uniquement
sur une tension secteur
conforme aux indications de la
plaque signalétique. La plaque
signalétique se trouve au-dessous de l’appareil. Vous trouverez d’autres caractéristiques
techniques au chapitre 7 « Caractéristiques techniques ».
ZZ
ZZ
ZZ
ZZ
ZZ
ZZ
En cas d’absence prolongée,
éteignez l’appareil et débranchez
la fiche secteur.
Utilisez toujours l’appareil sous
surveillance.
Les enfants ne doivent pas
effectuer de travaux de nettoyage et de maintenance sans
la surveillance d’une personne
responsable.
Ne laissez pas les enfants jouer
avec la machine.
Maintenez les enfants en dessous de huit ans à distance de la
machine ou surveillez-les en
permanence.
Les enfants à partir de huit ans
peuvent faire fonctionner la
machine sans surveillance uniquement s’ils ont reçu des
explications quant à son utilisation sûre. Ils doivent être en
mesure d’identifier et de comprendre les risques d’une mauvaise utilisation.
Les personnes, y compris les
enfants,
ZZ qui, en raison de leurs capacités
physiques, sensorielles ou mentales
ZZ ou de leur inexpérience ou
méconnaissance,
ne seraient pas à même d’utiliser
l’appareil en toute sécurité, ne sont
de
Chauffe-tasses JURA
autorisées à utiliser ce dernier que
sous la surveillance ou en suivant
les consignes d’une personne
responsable.
1
Préparation
Matériel fourni
Le matériel fourni comprend :
Z Chauffe-tasses JURA
Z Mode d’emploi
Z Câble secteur
fr
Installation et branchement
Respectez les points suivants lors de l’installation
de votre chauffe-tasses :
Z Placez l’appareil sur une surface horizontale.
Z Sélectionnez un emplacement à l’abri de toute
source de chaleur excessive.
J
AVERTISSEMENT
Risque d’électrocution en cas de fonctionnement
avec un câble secteur défectueux.
T Ne mettez jamais en service un appareil
dont le câble secteur est défectueux.
T Placez délicatement l’appareil la tête en bas.
T Reliez le câble secteur à l’appareil.
E
Vous pouvez ranger le câble sous le
chauffe-tasses selon la longueur nécessaire.
T Remettez l’appareil sur ses pieds.
T Branchez la fiche secteur dans une prise de
courant.
OFF s’affiche sur le visuel placé sous le
couvercle.
25
Chauffe-tasses JURA
2 Chauffage des tasses (allumage
manuel)
TT Appuyez sur les touches fléchées pour régler
les heures.
TT Appuyez sur la touche de réglage de l’heure
JJ Risque de brûlure. Les surfaces de
pour confirmer le réglage des heures.
10:00 (par exemple), les minutes clignotent.
TT Appuyez sur les touches fléchées pour régler
les minutes.
10:30 (par exemple)
TT Appuyez sur la touche de réglage de l’heure
pour confirmer le réglage des minutes.
ON ou OFF apparaît sur le visuel, selon que
l’appareil est allumé ou éteint.
rangement des tiroirs à tasses peuvent
devenir chaudes en cours de fonctionnement.
TT Ne touchez pas les surfaces de rangement
des tiroirs à tasses.
TT Ouvrez l’un des tiroirs à tasses.
TT Placez les tasses dans le tiroir à tasses et
refermez ce dernier.
Q T Allumez l’appareil à l’aide de la touche
Marche/Arrêt.
Le témoin de fonctionnement s’allume et
l’appareil commence à faire chauffer les
tasses. ON s’affiche sur le visuel placé sous le
couvercle.
EE
EE
Si vous souhaitez éteindre l’appareil,
appuyez sur la touche Marche/Arrêt Q. Le
témoin de fonctionnement s’éteint, OFF
s’affiche sur le visuel.
Si la fonction « Extinction automatique » est
désactivée, la machine s’éteint au bout de 12
heures pour économiser l’énergie.
3 Allumage et extinction automatiques
EE
Lorsque la machine est débranchée, tous les
réglages sont réinitialisés.
Réglage de l’heure
Pour la fonction « Allumage et extinction automatiques », vous devez d’abord régler l’heure :
TT Ouvrez le couvercle.
TT Appuyez sur la touche de réglage de l’heure.
AM 12:00 apparaît sur le visuel.
TT Appuyez sur l’une des touches fléchées pour
modifier le format de l’heure (AM/PM ou 24h).
TT Appuyez sur la touche de réglage de l’heure
pour confirmer le format de l’heure.
00:00 (par exemple), les heures clignotent.
26
EE
Vous pouvez modifier le réglage de l’heure à
tout moment. Pour ce faire, appuyez deux
fois sur la touche de réglage de l’heure et
apportez les modifications souhaitées.
Allumage automatique
TT Ouvrez le couvercle.
TT Appuyez sur la touche de réglage de l’heure.
Le visuel affiche l’heure que vous avez
réglée.
TT Appuyez sur l’une des touches fléchées.
ON --:-TT Appuyez sur la touche de réglage de l’heure.
--:-- , les heures clignotent.
TT Appuyez sur les touches fléchées pour régler
les heures.
AUTO ON 07:00 (par exemple)
TT Appuyez sur la touche de réglage de l’heure
pour confirmer le réglage des heures.
AUTO ON 07:00 (par exemple), les minutes
clignotent.
TT Appuyez sur les touches fléchées pour régler
les minutes.
AUTO ON 07:30 (par exemple)
TT Appuyez sur la touche de réglage de l’heure
pour confirmer le réglage des minutes.
AUTO apparaît sur le visuel (ON ou OFF,
selon que l’appareil est allumé ou éteint).
de
Chauffe-tasses JURA
Extinction automatique
EE
TT Appuyez deux fois sur l’une des touches
fléchées.
AUTO OFF 18:30 (par exemple)
TT Appuyez sur la touche de réglage de l’heure.
AUTO OFF 18:30 (par exemple), les heures
clignotent.
TT Réglez les heures sur « 00 ».
TT Appuyez sur la touche de réglage de l’heure.
AUTO OFF 00:30 (par exemple), les minutes
clignotent.
TT Appuyez sur les touches fléchées jusqu’à ce
que « --:-- » s’affiche.
TT Appuyez sur la touche de réglage de l’heure
pour confirmer le réglage.
L’extinction automatique est désactivée.
Si la fonction « Extinction automatique » est
désactivée, la machine s’éteint au bout de
12 heures pour économiser l’énergie.
TT Ouvrez le couvercle.
TT Appuyez sur la touche de réglage de l’heure.
Le visuel affiche l’heure que vous avez
réglée.
TT Appuyez deux fois sur l’une des touches
fléchées.
AUTO OFF --:-- (par exemple)
TT Appuyez sur la touche de réglage de l’heure.
AUTO OFF --:-- (par exemple), les heures
clignotent.
TT Appuyez sur les touches fléchées pour régler
les heures.
AUTO OFF 18:00 (par exemple)
TT Appuyez sur la touche de réglage de l’heure
pour confirmer le réglage des heures.
AUTO OFF 18:00 (par exemple), les minutes
clignotent.
TT Appuyez sur les touches fléchées pour régler
les minutes.
AUTO OFF 18:30 (par exemple)
TT Appuyez sur la touche de réglage de l’heure
pour confirmer le réglage des minutes.
AUTO apparaît sur le visuel (ON ou OFF,
selon que l’appareil est allumé ou éteint).
4Affichages
ZZ ON : l’appareil est allumé manuellement.
ZZ OFF : l’appareil est éteint manuellement.
ZZ AUTO ON : l’appareil est allumé automatiquement.
ZZ AUTO OFF : l’appareil est éteint automatiquement.
5Entretien
EE
Désactivation de l’allumage et de l’extinction
automatiques
TT Avant chaque nettoyage de l’appareil,
Pour désactiver l’allumage ou l’extinction
automatiques, vous devez régler l’heure correspondante sur « --:-- ».
EE
débranchez la fiche secteur de la prise de
courant.
TT Nettoyez l’intérieur de l’appareil avec un
chiffon doux (p. ex. en microfibre) et
humide.
Si la fonction « Extinction automatique » est
désactivée, la machine s’éteint au bout de
12 heures pour économiser l’énergie.
EE
Exemple : voici comment désactiver l’extinction
automatique.
TT Ouvrez le couvercle.
TT Appuyez sur la touche de réglage de l’heure.
Pour l’entretien, n’utilisez ni détergents
agressifs ou abrasifs ni objets durs. Cela peut
endommager l’appareil.
Les chiffons en microfibre JURA sont
disponibles chez votre revendeur.
27
fr
Chauffe-tasses JURA
6 Elimination écologique
Modifications techniques
Sous réserve de modifications techniques.
Eliminez les anciens appareils de manière
écologique.
Vos réactions
H
Votre avis compte pour nous !
Utilisez le lien de contact sur www.jura.com.
Les anciens appareils contiennent des matériaux
recyclables de valeur qui doivent être récupérés.
Eliminez-les par le biais des systèmes de collecte
appropriés.
Ce mode d’emploi contient des informations
protégées par un copyright. Il est interdit de
photocopier ou de traduire ce mode d’emploi dans
une langue étrangère sans l’accord écrit préalable
de JURA Elektroapparate AG.
7 Caractéristiques techniques
JURA Elektroapparate AG, Kaffeeweltstrasse 10,
CH-4626 Niederbuchsiten
www.jura.com
Copyright
Tension
120 V, 60 Hz
(USA/Canada uniquement)
120–240 V, 50–60 Hz
(Europe, autres pays)
Contrôle de
sécurité
UL 1026
IEC/EN 60335-1
IEC/EN 60335-2-12
Puissance
40 W (USA/Canada uniquement)
60 W (mesure réalisée après 6 min.
environ) (maximum 110 W)
(Europe, Australie, NouvelleZélande, autres pays)
Poids
3,8 kg env.
Longueur du 1,1 m env.
câble
Dimensions
(l x h x p)
12,2 x 30,6 x 34,9 cm
Directives
Cet appareil est conforme aux directives suivantes :
ZZ 2006/95/CE – directive basse tension
ZZ 2004/108/CE – compatibilité électromagnétique
ZZ 2009/125/CE – directive sur les produits
consommateurs d’énergie
ZZ 2011/65/UE – directive RoHS
28
de
Scaldatazze JURA
Lo scaldatazze JURA
Descrizione dei simboli adottati........................................................................................................................29
Elementi di comando...........................................................................................................................................30
Avvertenze importanti
31
Uso conforme.........................................................................................................................................................31
Per la Sua sicurezza...............................................................................................................................................31
1 Operazioni preliminari
33
Dotazione............................................................................................................................................................... 33
Collocazione e collegamento............................................................................................................................. 33
2 Riscaldare le tazze (attivazione manuale)
34
3 Accensione e spegnimento automatico
34
Regolazione dell’ora.............................................................................................................................................34
Accensione automatica.......................................................................................................................................34
Spegnimento automatico...................................................................................................................................34
Disattivare l’accensione e lo spegnimento automatico................................................................................ 35
4 Visualizzazioni sul display
35
5Manutenzione
35
6 Smaltimento conforme alle normative ambientali
35
7 Dati tecnici
36
Descrizione dei simboli adottati
Avvertenze:
ATTENZIONE
Osservare sempre scrupolosamente le
informazioni contrassegnate con il
pittogramma ATTENZIONE o AVVERTENZA. La segnalazione AVVERTENZA
indica il pericolo di possibili lesioni
gravi; la segnalazione ATTENZIONE
indica il pericolo di possibili lesioni lievi.
Simboli adottati:
E
Indicazioni e suggerimenti utili per
facilitare l’uso dello scaldatazze.
T
Intervento richiesto. Il simbolo segnala
che l’utente deve eseguire un’operazione.
29
it
Scaldatazze JURA
Elementi di comando
1
2
3
6
4
7
5
1
2
3
4
5
30
Scaldatazze JURA
Cassetto forato
Coperchio
Display
Interruttore di esercizio ON/OFF Q con
indicatore di funzionamento
6
7
Tasto freccia
Tasto orologio
de
Scaldatazze JURA
Avvertenze importanti
Uso conforme
L’apparecchio è stato progettato e
costruito per il solo uso domestico.
L’apparecchio serve esclusivamente
a depositare e riscaldare tazze nei
cassetti forati estraibili. Ogni altro
utilizzo è da considerarsi improprio.
La JURA Elektroapparate AG declina
ogni responsabilità per conseguenze derivanti da un uso non
conforme.
Leggere e osservare le presenti
istruzioni per l’uso per intero prima
di utilizzare l’apparecchio. Conservare le istruzioni per l’uso vicino
all’apparecchio per la consultazione
futura e consegnarle agli eventuali
utilizzatori successivi.
Per la Sua sicurezza
Si raccomanda di leggere con
attenzione e attenersi scrupolosamente alle seguenti norme di
sicurezza.
In questo modo si previene il pericolo di folgorazione:
ZZ Utilizzare solo il cavo di alimentazione originale fornito da JURA.
ZZ Non mettere mai in funzione
l’apparecchio danneggiato o con
il cavo di alimentazione difettoso.
ZZ
ZZ
ZZ
ZZ
ZZ
ZZ
ZZ
Non mettere mai in funzione
l’apparecchio con le mani
bagnate.
Prima della messa in funzione
assicurarsi che il cavo di alimentazione sia asciutto.
Collegare l’apparecchio alla rete
a corrente alternata solo con il
cavo di alimentazione fornito in
dotazione.
In caso di danneggiamento, ad
esempio se si sente odore di cavi
bruciati, occorre scollegare
immediatamente l’apparecchio
dalla rete di alimentazione
elettrica e rivolgersi al servizio di
assistenza JURA.
Assicurarsi che l’apparecchio e il
cavo di alimentazione non siano
vicini a fonti di calore o a fiamme
libere.
Assicurarsi che il cavo di alimentazione non sia schiacciato o si
usuri a contatto con spigoli vivi o
taglienti.
Non aprire, né tentare mai di
riparare da soli l’apparecchio.
Non apportare modifiche all’apparecchio salvo quelle descritte
nelle istruzioni per l’uso. L’apparecchio contiene componenti
sotto tensione.
31
it
Scaldatazze JURA
L’apparecchio, se danneggiato, non
è più sicuro e può provocare lesioni
e incendi. Per prevenire danni ed
eventuali lesioni e pericoli di incendio:
ZZ Evitare che il cavo di alimentazione penzoli liberamente.
Posizionare il cavo di alimentazione in modo che non possa
essere danneggiato e che nessuno possa inciamparvi.
ZZ Non esporre mai l’apparecchio
agli agenti atmosferici quali
pioggia, gelo e irraggiamento
solare diretto.
ZZ Non utilizzare l’apparecchio per
conservare e riscaldare bibite o
altri generi alimentari.
ZZ Non sovraccaricare i cassetti
forati estratti.
ZZ Non deporre tazze umide o
bagnate nei cassetti forati.
ZZ Non immergere mai in acqua
l’apparecchio, il cavo di alimentazione e le connessioni.
ZZ Non lavare l’apparecchio e i suoi
componenti in lavastoviglie.
ZZ Prima di effettuare interventi di
pulizia, scollegare l’apparecchio
dalla rete di alimentazione. Pulire
l’apparecchio con un panno
umido ma non bagnato, proteggendo l’apparecchio dagli schizzi
d’acqua continui. Non pulire le
pareti laterali interne.
32
ZZ
ZZ
ZZ
ZZ
ZZ
ZZ
ZZ
Collegare l’apparecchio solo ad
una tensione di rete corrispondente a quella indicata sulla
targhetta. La targhetta è applicata sul lato inferiore dell’apparecchio. (Per ulteriori dati tecnici,
consultare il capitolo 7 «Dati
tecnici»).
In caso di assenze prolungate,
spegnere l’apparecchio e staccare la spina dalla presa di
corrente.
Far funzionare l’apparecchio solo
sotto sorveglianza.
Non è ammessa l’esecuzione di
lavori di pulizia e manutenzione
da parte di bambini senza la
supervisione da parte di una
persona responsabile.
Non consentire ai bambini di
giocare con l’apparecchio.
Tenere lontano dall’apparecchio i
bambini al di sotto degli otto
anni, ovvero sorvegliarli costantemente.
I bambini a partire dagli otto
anni possono usare l’apparecchio
senza supervisione solamente se
sono stati istruiti sull’uso in
condizioni di sicurezza. I bambini
devono essere in grado di individuare e comprendere possibili
pericoli derivanti da un uso
errato.
de
Scaldatazze JURA
Le persone, inclusi i bambini, che a
causa delle
Z loro capacità fisiche, sensoriali o
mentali o
Z a causa della loro inesperienza o
mancata conoscenza
non sono in grado di usare l’apparecchio in sicurezza, non possono
usare l’apparecchio senza assistenza
o supervisione da parte di una
persona responsabile.
1
Operazioni preliminari
Dotazione
Sono forniti in dotazione:
Z Scaldatazze JURA
Z Istruzioni per l’uso
Z Cavo di alimentazione
Collocazione e collegamento
Adottare le seguenti precauzioni per la collocazione dello scaldatazze:
Z Collocare l’apparecchio su una superficie
orizzontale.
Z Collocare l’apparecchio in modo che sia
protetto da surriscaldamento.
it
J
AVVERTENZA
Pericolo di folgorazione in caso di uso dell’apparecchio con il cavo di alimentazione danneggiato.
T Non mettere mai in funzione l’apparecchio
con il cavo di alimentazione danneggiato.
T Capovolgere l’apparecchio con cautela.
T Collegare il cavo di alimentazione con
l’apparecchio.
E
Il lato inferiore dello scaldatazze consente di
stipare il cavo di alimentazione nell’apposito
avvolgicavo in funzione della lunghezza
necessaria.
T Ricollocare l’apparecchio sui piedini di
appoggio.
T Inserire la spina in una presa di alimentazione.
Sul display sotto il coperchio viene visualizzato OFF.
33
Scaldatazze JURA
2 Riscaldare le tazze (attivazione
manuale)
TT Per confermare le ore impostate, premere il
tasto orologio.
10:00 (esempio), lampeggiano i minuti.
TT Premere i tasti freccia per impostare i minuti.
10:30 (esempio)
TT Per confermare i minuti impostati, premere
il tasto orologio.
Sul display viene visualizzato ON o OFF, a
seconda che l’apparecchio sia attivato o
disattivato.
JJ Pericolo di ustioni. Le superfici di appoggio dei cassetti forati possono surriscaldarsi durante il funzionamento.
TT Non toccare le superfici di appoggio dei
cassetti forati.
TT Aprire un cassetto forato.
TT Deporre le tazze nel cassetto forato e
richiudere il cassetto.
EE
Q T Attivare l’apparecchio tramite l’interruttore
di esercizio ON/OFF.
L’indicatore di funzionamento si accende e
l’apparecchio inizia a riscaldare le tazze. Sul
display sotto il coperchio viene visualizzato
ON.
EE
EE
Accensione automatica
TT Aprire il coperchio.
TT Premere il tasto orologio.
Se si intende disattivare l’apparecchio,
premere l’interruttore di esercizio ON/OFF Q.
L’indicatore di funzionamento non è più
acceso e nel display viene visualizzato OFF.
Se non è attivata la funzione «Spegnimento
automatico», l’apparecchio si spegne dopo
12 ore per risparmiare energia.
Sul display viene visualizzata l’ora impostata.
TT Premere uno dei tasti freccia.
ON --:-TT Premere il tasto orologio.
--:-- , lampeggiano le ore.
TT Premere i tasti freccia per impostare le ore.
AUTO ON 07:00 (esempio)
TT Per confermare le ore impostate, premere il
tasto orologio.
AUTO ON 07:00 (esempio), lampeggiano i
minuti.
TT Premere i tasti freccia per impostare i
minuti.
AUTO ON 07:30 (esempio)
TT Per confermare i minuti impostati, premere
il tasto orologio.
Sul display appare AUTO (ON o OFF, a
seconda che l’apparecchio sia attivato o
disattivato).
3 Accensione e spegnimento automatico
EE
Se l’apparecchio viene scollegato dalla rete,
tutte le impostazioni vengono resettate.
Regolazione dell’ora
Per la funzione «Accensione e spegnimento
automatico» è innanzitutto necessario impostare
l’ora:
TT Aprire il coperchio.
TT Premere il tasto orologio.
Sul display viene visualizzato AM 12:00.
TT Premere uno dei tasti freccia per cambiare il
formato ora (AM/PM oppure 24h).
TT Premere il tasto orologio per confermare il
formato ora.
00:00 (esempio), lampeggiano le ore.
TT Premere i tasti freccia per impostare le ore.
34
L’impostazione dell’ora può essere modificata in qualsiasi momento. A tale scopo
premere due volte il tasto orologio ed
effettuare la modifica.
Spegnimento automatico
EE
Se non è attivata la funzione «Spegnimento
automatico», l’apparecchio si spegne dopo
12 ore per risparmiare energia.
de
Scaldatazze JURA
TT Aprire il coperchio.
TT Premere il tasto orologio.
TT Premere i tasti freccia finché viene visualiz-
Sul display viene visualizzata l’ora impostata.
TT Premere due volte uno dei tasti freccia.
AUTO OFF --:-- (esempio)
TT Premere il tasto orologio.
AUTO OFF --:-- (esempio), lampeggiano le
ore.
TT Premere i tasti freccia per impostare le ore.
AUTO OFF 18:00 (esempio)
TT Per confermare le ore impostate, premere il
tasto orologio.
AUTO OFF 18:00 (esempio), lampeggiano i
minuti.
TT Premere i tasti freccia per impostare i
minuti.
AUTO OFF 18:30 (esempio)
TT Per confermare i minuti impostati, premere
il tasto orologio.
Sul display appare AUTO (ON o OFF, a
seconda che l’apparecchio sia attivato o
disattivato).
TT Premere il tasto orologio per confermare
zato «--:--».
l’impostazione.
Lo spegnimento automatico è disattivato.
4 Visualizzazioni sul display
ZZ ON: l’apparecchio è stato attivato manualmente
ZZ OFF: l’apparecchio è stato disattivato
manualmente
ZZ AUTO ON: l’apparecchio è stato acceso
automaticamente
it
ZZ AUTO OFF: l’apparecchio è stato spento
automaticamente
5Manutenzione
EE
Non usare detergenti aggressivi e abrasivi o
oggetti duri per la manutenzione. Questi
possono danneggiare l’apparecchio.
TT Prima di ogni pulizia dell’apparecchio,
Disattivare l’accensione e lo spegnimento
automatico
togliere la spina dalla presa di alimentazione.
TT Pulire l’esterno dell’apparecchio con un
Per disattivare l’accensione o lo spegnimento
automatico, l’ora relativa va impostata su «--:--».
EE
Se non è attivata la funzione «Spegnimento
automatico», l’apparecchio si spegne dopo
12 ore per risparmiare energia.
Esempio: così viene disattivato lo spegnimento
automatico.
TT Aprire il coperchio.
TT Premere il tasto orologio.
TT Premere due volte uno dei tasti freccia.
AUTO OFF 18:30 (esempio)
TT Premere il tasto orologio.
AUTO OFF 18:30 (esempio), lampeggiano le
ore.
TT Impostare le ore su «00».
TT Premere il tasto orologio.
AUTO OFF 00:30 (esempio), lampeggiano i
minuti.
panno morbido e umido (ad es. in microfibra).
EE
I panni in microfibra di JURA sono disponibili
presso i rivenditori specializzati.
6 Smaltimento conforme alle normative
ambientali
Smaltire gli apparecchi usati in conformità con le
normative ambientali.
H
Gli apparecchi usati contengono materiali utili che
devono essere avviati al riciclaggio. Pertanto
occorre smaltire gli apparecchi usati servendosi
degli appositi sistemi di raccolta.
35
Scaldatazze JURA
7 Dati tecnici
Tensione
120 V, 60 Hz
(solo USA/Canada)
120–240 V, 50–60 Hz
(Europa, altri paesi)
Marchi di sicurezza
UL 1026
IEC/EN 60335-1
IEC/EN 60335-2-12
Assorbimento
40 W (solo USA/Canada)
60 W (misurazione dopo
circa 6 min.) (max. 110 W)
(Europa, Australia, Nuova
Zelanda, altri paesi)
Peso
ca. 3,8 kg
Lunghezza del cavo
ca. 1,1 m
Dimensioni (LxAxP)
12,2 x 30,6 x 34,9 cm
Direttive
L’apparecchio è conforme alle seguenti direttive:
ZZ 2006/95/CE – Direttiva bassa tensione
ZZ 2004/108/CE – Compatibilità elettromagnetica
ZZ 2009/125/CE – Direttiva ErP
ZZ 2011/65/UE – Direttiva RoHS
Modifiche tecniche
Con riserva di modifiche tecniche.
La Sua opinione
La Sua opinione è importante per noi!
Ce la comunichi contattandoci tramite il sito
www.jura.com.
Copyright
Le istruzioni per l’uso contengono informazioni che
sono protette da copyright. È vietato fotocopiare o
tradurre il documento in un’altra lingua senza
previa autorizzazione scritta da parte della
JURA Elektroapparate AG.
36
JURA Elektroapparate AG
Kaffeeweltstrasse 10
CH-4626 Niederbuchsiten
www.jura.com
de
JURA kopjeswarmer
Uw JURA kopjeswarmer
Beschrijving van de symbolen........................................................................................................................... 37
Bedieningselementen..........................................................................................................................................38
Belangrijke aanwijzingen
39
Reglementair gebruik..........................................................................................................................................39
Voor uw veiligheid................................................................................................................................................39
1Voorbereiden
41
Leveringsomvang..................................................................................................................................................41
Plaatsen en aansluiten..........................................................................................................................................41
2 Kopjes verwarmen (handmatig inschakelen)
41
3 Automatisch in- en uitschakelen
41
Tijd instellen...........................................................................................................................................................41
Automatisch inschakelen....................................................................................................................................42
Automatisch uitschakelen...................................................................................................................................42
Automatisch in- en uitschakelen deactiveren.................................................................................................42
4Display-indicaties
43
5Onderhoud
43
6 Milieuvriendelijke afvoer
43
7 Technische gegevens
43
nl
Beschrijving van de symbolen
Waarschuwingen:
VOORZICHTIG
Lees altijd de informatie die is gemarkeerd met VOORZICHTIG of met
WAARSCHUWING met een waarschuwingsteken. Het signaalwoord
WAARSCHUWING wijst u op het gevaar
van ernstige verwondingen, het
signaalwoord VOORZICHTIG wijst u op
het gevaar van lichte verwondingen.
Gebruikte symbolen:
E
Aanwijzingen en tips om het gebruik
van de kopjeswarmer nog makkelijker
voor u te maken.
T
Verzoek tot actie. Hier wordt u
verzocht een handeling uit te voeren.
37
JURA kopjeswarmer
Bedieningselementen
1
2
3
6
4
7
5
1
2
3
4
5
38
JURA kopjeswarmer
Kopjeslade
Afdekking
Display
Toets Aan/Uit Q met bedrijfsindicatie
6
7
Pijltjestoets
Kloktoets
de
JURA kopjeswarmer
Belangrijke aanwijzingen
Reglementair gebruik
Het apparaat is ontwikkeld en
gebouwd voor particulier gebruik.
Het apparaat is uitsluitend bedoeld
om kopjes in de uittrekbare kopjeslade te plaatsen en op te warmen.
Ieder ander gebruik wordt
beschouwd als niet reglementair
gebruik. JURA Elektroapparate AG
kan niet aansprakelijk worden
gesteld voor de gevolgen van niet
reglementair gebruik.
Lees deze gebruiksaanwijzing vóór
gebruik van het apparaat volledig
door en neem de aanwijzingen in
acht. Bewaar deze gebruiksaanwijzing in de nabijheid van het apparaat
en geef de gebruiksaanwijzing,
indien nodig, door aan volgende
gebruikers.
Voor uw veiligheid
Lees de onderstaande belangrijke
veiligheidsaanwijzingen aandachtig
door en neem deze in acht.
Zo voorkomt u levensgevaar door
elektrische schokken:
ZZ Gebruik uitsluitend het originele
netsnoer dat door JURA wordt
meegeleverd.
ZZ Neem nooit een beschadigd
apparaat of een apparaat met
beschadigd netsnoer in gebruik.
ZZ
ZZ
ZZ
ZZ
ZZ
ZZ
ZZ
Neem het apparaat nooit met
natte handen in gebruik.
Let er vóór de inbedrijfstelling op
dat het netsnoer droog is.
Sluit het apparaat alleen met het
meegeleverde netsnoer aan op
het wisselstroomnet.
Zijn er tekenen die duiden op
beschadigingen, zoals bijvoorbeeld brandlucht, trek dan
onmiddellijk de stekker uit het
stopcontact en neem contact op
met de JURA service.
Zorg ervoor dat het apparaat en
het netsnoer zich niet in de
buurt van hete oppervlakken of
open vuur bevinden.
Zorg ervoor dat het netsnoer
niet wordt afgeklemd of langs
scherpe randen schuurt.
Open het apparaat niet en
probeer het nooit zelf te repareren. Voer geen wijzigingen aan
het apparaat uit die niet in de
gebruiksaanwijzing worden
beschreven. Het apparaat bevat
stroomgeleidende onderdelen.
Een beschadigd apparaat is niet
veilig en kan verwondingen en
brand veroorzaken. Schade en
mogelijk gevaar voor verwonding
en brandgevaar voorkomt u als
volgt:
39
nl
JURA kopjeswarmer
ZZ
ZZ
ZZ
ZZ
ZZ
ZZ
ZZ
ZZ
ZZ
40
Laat het netsnoer nooit los hangen. Het netsnoer kan een struikelblok vormen of beschadigd raken.
Bescherm het apparaat tegen
weersinvloeden zoals regen,
vorst en direct zonlicht.
Gebruik het apparaat niet om
dranken of andere levensmiddelen te bewaren of op te warmen.
Uitgetrokken kopjesladen niet
zwaar belasten.
Plaats geen vochtige of natte
kopjes in de kopjesladen.
Dompel het apparaat, het netsnoer en de aansluitingen nooit
onder in water.
Plaats het apparaat en de afzonderlijke onderdelen niet in de
vaatwasser.
Schakel het apparaat vóór reinigingswerkzaamheden uit en trek
de netstekker uit het stopcontact. Veeg het apparaat altijd
vochtig, echter nooit nat af en
bescherm het apparaat tegen
continu spatwater. De zijwanden
aan de binnenkant niet reinigen.
Het apparaat alleen aansluiten
op de netspanning zoals aangegeven op het typeplaatje. Het
typeplaatje bevindt zich aan de
onderzijde van het apparaat.
Meer technische gegevens vindt
u in hoofdstuk 7, “Technische
gegevens”.
ZZ
ZZ
ZZ
ZZ
ZZ
ZZ
Schakel het apparaat uit als u het
gedurende een langere tijd niet
gebruikt en trek de netstekker uit
het stopcontact.
Gebruik het apparaat uitsluitend
onder toezicht.
Kinderen mogen reinigings- en
onderhoudswerkzaamheden
uitsluitend onder toezicht van
een verantwoordelijke persoon
uitvoeren.
Laat kinderen niet met het
apparaat spelen.
Kinderen onder acht jaar uit de
buurt van het apparaat houden resp.
permanent in de gaten houden.
Kinderen vanaf acht jaar mogen
het apparaat uitsluitend zonder
toezicht bedienen als de veilige
omgang met het apparaat
uitgelegd is. Kinderen moeten
mogelijke gevaren door een
foutieve bediening kunnen
herkennen en begrijpen.
Personen, inclusief kinderen, die
vanwege hun
ZZ fysieke, zintuiglijke of verstandelijke vermogens of
ZZ onervarenheid of onwetendheid
niet in staat zijn het apparaat veilig
te gebruiken, mogen het apparaat
niet zonder toezicht of instructie
van een verantwoordelijke persoon
gebruiken.
de
JURA kopjeswarmer
1
Voorbereiden
Leveringsomvang
Tot de leveringsomvang behoren:
Z JURA kopjeswarmer
Z Gebruiksaanwijzing
Z Netsnoer
2 Kopjes verwarmen (handmatig
inschakelen)
J
Verbrandingsgevaar. De plateaus van de
kopjesladen kunnen tijdens bedrijf heet
worden.
T Raak de plateaus van de kopjesladen niet aan.
Plaatsen en aansluiten
Neem bij het opstellen van de kopjeswarmer de
volgende punten in acht:
Z Plaats het apparaat op een horizontaal
oppervlak.
Z Kies de plaats voor het apparaat zodanig, dat
het apparaat tegen oververhitting beschermd
is.
J
WAARSCHUWING
Levensgevaar door elektrische schok bij gebruik
met een beschadigd netsnoer.
T Neem nooit een apparaat met een beschadigd netsnoer in gebruik.
T Open een kopjeslade.
T Plaats de kopjes in de kopjeslade en sluit de
kopjeslade.
Q T Schakel het apparaat in met behulp van de
toets Aan/Uit.
De bedrijfsindicatie brandt en het apparaat
begint de kopjes te verwarmen. Op de
display onder de afdekking wordt ON
weergegeven.
E
E
T Plaats het apparaat voorzichtig op zijn kop.
T Sluit het netsnoer aan op het apparaat.
Als u het apparaat wilt uitschakelen, drukt u
op de toets Aan/Uit Q. De bedrijfsindicatie
brandt niet meer, op de display wordt OFF
weergegeven.
Als de functie »Automatisch uitschakelen«
niet geactiveerd is, wordt het apparaat na
12 uur automatisch uitgeschakeld om
energie te besparen.
3 Automatisch in- en uitschakelen
E
Als het apparaat van het elektriciteitsnet
wordt losgekoppeld, worden alle instellingen
gereset.
Tijd instellen
E
Aan de onderzijde van de kopjeswarmer
kunt u het netsnoer, afhankelijk van de
benodigde lengte, opbergen.
T Plaats het apparaat weer op de pootjes.
T Steek de netstekker in een stopcontact.
Op de display onder de afdekking wordt OFF
weergegeven.
Voor de functie “Automatisch in- en uitschakelen”
dient u eerst de tijd in te stellen:
T Open de afdekking.
T Druk op de kloktoets.
Op de display wordt AM 12:00 weergegeven.
T Druk op een van de pijltjestoetsen om het
tijdformaat te selecteren (AM/PM of 24h).
T Druk op de kloktoets om het tijdformaat te
bevestigen.
00:00 (voorbeeld), de uren knipperen.
41
nl
JURA kopjeswarmer
TT Druk op de pijltjestoetsen om de uren in te
stellen.
TT Druk op de kloktoets om de instelling van
de uren te bevestigen.
10:00 (voorbeeld), de minuten knipperen.
TT Druk op de pijltjestoetsen om de minuten in
te stellen.
10:30 (voorbeeld)
TT Druk op de kloktoets om de instelling van
de minuten te bevestigen.
Op de display wordt ON of OFF weergegeven, afhankelijk van de vraag of het apparaat
in- of uitgeschakeld is.
EE
Automatisch uitschakelen
EE
TT Open de afdekking.
TT Druk op de kloktoets.
Op de display wordt de door u ingestelde
tijd weergegeven.
TT Druk twee keer op een van de pijltjestoetsen.
AUTO OFF --:-- (voorbeeld)
TT Druk op de kloktoets.
AUTO OFF --:-- (voorbeeld), de uren
knipperen.
TT Druk op de pijltjestoetsen om de uren in te
stellen.
AUTO OFF 18:00 (voorbeeld)
TT Druk op de kloktoets om de instelling van
de uren te bevestigen.
AUTO OFF 18:00 (voorbeeld), de minuten
knipperen.
TT Druk op de pijltjestoetsen om de minuten in
te stellen.
AUTO OFF 18:30 (voorbeeld)
TT Druk op de kloktoets om de instelling van
de minuten te bevestigen.
Op de display wordt AUTO weergegeven
(ON of OFF, afhankelijk van de vraag of het
apparaat in- of uitgeschakeld is).
U kunt de instelling van de tijd altijd
wijzigen. Druk de kloktoets hiervoor twee
keer in en voer de wijziging uit.
Automatisch inschakelen
TT Open de afdekking.
TT Druk op de kloktoets.
Op de display wordt de door u ingestelde
tijd weergegeven.
TT Druk op een van de pijltjestoetsen.
ON --:-TT Druk op de kloktoets.
--:-- , de uren knipperen.
TT Druk op de pijltjestoetsen om de uren in te
stellen.
AUTO ON 07:00 (voorbeeld)
TT Druk op de kloktoets om de instelling van
de uren te bevestigen.
AUTO ON 07:00 (voorbeeld), de minuten
knipperen.
TT Druk op de pijltjestoetsen om de minuten in
te stellen.
AUTO ON 07:30 (voorbeeld)
TT Druk op de kloktoets om de instelling van
de minuten te bevestigen.
Op de display wordt AUTO weergegeven
(ON of OFF, afhankelijk van de vraag of het
apparaat in- of uitgeschakeld is).
42
Als de functie »Automatisch uitschakelen«
niet geactiveerd is, wordt het apparaat na 12
uur automatisch uitgeschakeld om energie
te besparen.
Automatisch in- en uitschakelen deactiveren
Om het automatisch in- of uitschakelen te
deactiveren, moet u de betreffende tijd op “--:--”
zetten.
EE
Als de functie »Automatisch uitschakelen«
niet geactiveerd is, wordt het apparaat na
12 uur automatisch uitgeschakeld om
energie te besparen.
de
JURA kopjeswarmer
Voorbeeld: zo deactiveert u het automatisch
uitschakelen.
TT Open de afdekking.
TT Druk op de kloktoets.
TT Druk twee keer op een van de pijltjestoetsen.
AUTO OFF 18:30 (voorbeeld)
TT Druk op de kloktoets.
AUTO OFF 18:30 (voorbeeld), de uren
knipperen.
TT Zet de uren op “00”.
TT Druk op de kloktoets.
AUTO OFF 00:30 (voorbeeld), de minuten
knipperen.
TT Druk op de pijltjestoetsen tot “--:--” wordt
weergegeven.
TT Druk op de kloktoets om de instelling te
bevestigen.
Het automatisch uitschakelen is gedeactiveerd.
EE
Microvezeldoeken van JURA zijn verkrijgbaar
bij de dealer.
6 Milieuvriendelijke afvoer
Oude apparaten milieuvriendelijk afvoeren.
H
Oude apparaten bevatten waardevolle, recyclebare
materialen die gerecycled dienen te worden. Oude
apparaten dienen derhalve bij de desbetreffende
inzamelpunten aangeboden te worden.
7 Technische gegevens
nl
Spanning
120 V, 60 Hz (alleen VS/Canada)
120–240 V, 50–60 Hz
(Europa, overige landen)
Veiligheidscontrole
UL 1026
IEC/EN 60335-1
IEC/EN 60335-2-12
Vermogen
40 W (alleen VS/Canada)
60 W (meting na ca. 6 min.)
(max. 110 W) (Europa, Australië,
Nieuw-Zeeland, overige landen)
Gewicht
ca. 3,8 kg
Kabellengte
ca. 1,1 m
Afmetingen
(b x h x d)
12,2 x 30,6 x 34,9 cm
4Display-indicaties
ZZ ON: apparaat is handmatig ingeschakeld
ZZ OFF: apparaat is handmatig uitgeschakeld
ZZ AUTO ON: apparaat is automatisch ingeschakeld
ZZ AUTO OFF: apparaat is automatisch uitgeschakeld
5Onderhoud
EE
Gebruik voor het onderhoud geen scherpe,
schurende reinigingsmiddelen of harde
voorwerpen. Hierdoor kan het apparaat
beschadigd raken.
TT Trek altijd de netstekker uit het stopcontact
voordat u het apparaat reinigt.
TT Reinig het apparaat van buiten met een
zachte, vochtige doek (bijvoorbeeld microvezeldoek).
43
JURA kopjeswarmer
Richtlijnen
Het apparaat voldoet aan de volgende richtlijnen:
ZZ 2006/95/EG – laagspanningsrichtlijn
ZZ 2004/108/EG – elektromagnetische compatibiliteit
ZZ 2009/125/EG – richtlijn ecodesign
ZZ 2011/65/Eu – RoHs-richtlijn
Technische wijzigingen
Technische wijzigingen voorbehouden.
Feedback
Wij stellen uw mening zeer op prijs!
Gebruik hiervoor de contactlink op www.jura.com.
Copyright
De gebruiksaanwijzing bevat informatie die door
copyright is beschermd. Fotokopiëren of vertalen
in een andere taal is zonder voorafgaande
schriftelijke toestemming van
JURA Elektroapparate AG niet toegestaan.
JURA Elektroapparate AG
Kaffeeweltstrasse 10
CH-4626 Niederbuchsiten
www.jura.com
44
de
Calentador de tazas JURA
Su calentador de tazas JURA
Descripción de símbolos.....................................................................................................................................45
Elementos de control...........................................................................................................................................46
Advertencias importantes
47
Utilización conforme a lo previsto..................................................................................................................... 47
Para su seguridad................................................................................................................................................. 47
1Preparación
49
Equipamiento........................................................................................................................................................49
Instalación y conexión.........................................................................................................................................49
2 Calentar tazas (conexión manual)
50
3 Conexión y desconexión automáticas
50
Ajustar la hora.......................................................................................................................................................50
Conexión automática...........................................................................................................................................50
Desconexión automática......................................................................................................................................51
Desactivar la conexión y desconexión automáticas........................................................................................51
4 Indicaciones en el visualizador
51
5Conservación
51
6 Eliminación respetuosa con el medioambiente
52
7 Datos técnicos
52
es
Descripción de símbolos
Advertencias:
ATENCIÓN
Tenga siempre en cuenta la información
que va acompañada de ATENCIÓN o
ADVERTENCIA con pictograma de
advertencia. La palabra de señalización
ADVERTENCIA hace referencia a posibles
lesiones graves y la palabra de
señalización ATENCIÓN, a posibles
lesiones leves.
Símbolos utilizados:
E
Advertencias y consejos para que el
manejo de su calentador de tazas sea
aún más fácil.
T
Requerimiento de acción. Aquí se
requiere una acción por su parte.
45
Calentador de tazas JURA
Elementos de control
1
2
3
6
4
7
5
1
2
3
4
5
46
Calentador de tazas JURA
Cajón para tazas
Tapa
Visualizador
Botón de mando marcha/parada Q con
indicador de funcionamiento
6
7
Botón de flecha
Botón de la hora
de
Calentador de tazas JURA
Advertencias importantes
Utilización conforme a lo previsto
El aparato está concebido y fabricado para el uso doméstico. El
aparato sirve únicamente para
colocar tazas en los cajones extraíbles correspondientes y para calentar las mismas. Cualquier otra
aplicación no se considerará conforme a lo previsto. JURA Elektroapparate AG no asume ninguna
responsabilidad por las consecuencias derivadas de una utilización no
conforme a lo previsto.
Lea y observe completamente el
presente modo de empleo antes de
usar el aparato. Guarde el modo de
empleo junto al aparato y entréguelo, llegado el caso, a usuarios
posteriores.
Para su seguridad
Lea y observe atentamente las
siguientes indicaciones importantes
relativas a la seguridad.
Así se evitará un peligro de muerte
por descarga eléctrica:
ZZ Sólo utilice el cable de alimentación original suministrado por
JURA.
ZZ No ponga nunca el aparato en
funcionamiento si presenta
daños o si el cable de alimentación está deteriorado.
ZZ
ZZ
ZZ
ZZ
ZZ
ZZ
ZZ
Nunca ponga el aparato en
funcionamiento con las manos
mojadas.
Antes de la puesta en funcionamiento, preste atención a que el
cable de alimentación esté seco.
Conecte el aparato a la red de
corriente alterna únicamente
utilizando el cable de alimentación incluido en el equipamiento.
Si se advierten indicios de posibles daños, por ejemplo olor a
quemado, desconecte el aparato
inmediatamente de la alimentación y póngase en contacto con
el servicio técnico de JURA.
Preste atención a que el aparato
y el cable de alimentación no se
encuentren en la proximidad de
superficies calientes o llamas
abiertas.
Preste atención a que el cable de
alimentación no quede apretado
ni roce en cantos vivos.
No abra nunca el aparato ni
intente repararlo usted mismo.
No realice modificaciones en el
aparato que no estén descritas
en el modo de empleo. El aparato contiene componentes
conductores de corriente.
47
es
Calentador de tazas JURA
Un aparato dañado no es seguro y
puede provocar lesiones y quemaduras. Así se evitan daños y, con
ello, el peligro de sufrir lesiones y
quemaduras:
ZZ No deje nunca el cable de alimentación suelto y colgando. El
cable de alimentación puede
provocar tropezones o resultar
dañado.
ZZ No exponga el aparato a las
influencias meteorológicas como
lluvia, heladas y radiación solar
directa.
ZZ No utilice el aparato para guardar
y calentar bebidas u otros alimentos.
ZZ No someta los cajones extraídos
a cargas pesadas.
ZZ No coloque tazas húmedas o
mojadas en los cajones.
ZZ No sumerja el aparato, el cable
de alimentación ni las conexiones en agua.
ZZ No coloque el aparato ni sus
componentes en el lavavajillas.
ZZ Antes de proceder a los trabajos
de limpieza, desconecte el
aparato y desenchufe el enchufe
de alimentación. Limpie el
aparato siempre con un paño
húmedo, nunca mojado, y
protéjalo de salpicaduras de
agua continuadas. No limpie las
paredes laterales interiores.
48
ZZ
ZZ
ZZ
ZZ
ZZ
ZZ
ZZ
Conecte el aparato sólo al voltaje
de la red especificado según la
placa de características técnicas.
La placa de características técnicas va fijada en la parte inferior
del aparato. Para más datos
técnicos, consulte el capítulo 7
‘Datos técnicos’.
En el caso de una ausencia
prolongada, desconecte el
aparato y desenchufe el enchufe
de alimentación.
Opere el aparato únicamente
bajo supervisión.
Los niños no deben realizar
trabajos de limpieza o mantenimiento sin la supervisión de una
persona responsable.
No permitir a los niños jugar con
la máquina.
Mantener a los niños menores
ocho años lejos de la máquina o
permanecer constantemente
atento.
Los niños a partir de ocho años
pueden utilizar la máquina sin
supervisión si han entendido
cómo manejarla con seguridad.
Deben saber y entender los
peligros derivados de una utilización incorrecta.
de
Calentador de tazas JURA
Las personas, incluyendo a los
niños, que por sus
Z capacidades físicas, sensoriales o
mentales, o por su
Z falta de experiencia o conocimientos
no sean capaces de utilizar el aparato de forma segura, no deberán
hacer uso del aparato sin la supervisión o instrucción por parte de una
persona responsable.
1
Preparación
Equipamiento
El equipamiento incluye:
Z Calentador de tazas JURA
Z Modo de empleo
Z Cable de alimentación
Instalación y conexión
Preste atención a los siguientes puntos al instalar
su calentador de tazas:
Z Coloque el aparato sobre una superficie
horizontal.
Z Seleccione el lugar del aparato de tal modo
que esté protegido contra sobrecalentamiento.
J
ADVERTENCIA
Peligro de muerte por descarga eléctrica en caso
de funcionamiento con un cable de alimentación
defectuoso.
T Nunca ponga el aparato en funcionamiento
si el cable de alimentación está dañado.
T Coloque el aparato cuidadosamente boca
abajo.
T Conecte el cable de alimentación con el
es
aparato.
E
En la parte inferior del calentador de tazas
podrá guardar el cable de alimentación en
función de la longitud requerida.
T Vuelva a colocar el aparato sobre las patas.
T Inserte el enchufe de alimentación en una
toma de corriente.
En el visualizador debajo de la tapa se indica
OFF.
49
Calentador de tazas JURA
2 Calentar tazas (conexión manual)
TT Pulse el botón de la hora para confirmar el
ajuste de las horas.
10:00 (ejemplo), los minutos parpadean.
TT Pulse los botones de flecha para ajustar los
minutos.
10:30 (ejemplo)
TT Pulse el botón de la hora para confirmar el
ajuste de los minutos.
En el visualizador aparece ON u OFF,
dependiendo de si el aparato está conectado
o desconectado.
JJ Peligro de quemaduras. Las superficies de
apoyo de los cajones para tazas pueden
calentarse durante el funcionamiento.
TT No toque las superficies de apoyo de los
cajones para tazas.
TT Abra uno de los cajones para tazas.
TT Coloque las tazas en el cajón y ciérrelo.
Q T Conecte el aparato con el botón de mando
marcha/parada.
Se enciende el indicador de funcionamiento
y el aparato comienza a calentar las tazas. En
el visualizador debajo de la tapa se indica ON.
EE
EE
Si desea desconectar el aparato, pulse el
botón de mando marcha/parada Q. El
indicador de funcionamiento está apagado y
en el visualizador se indica OFF.
Si la función «Desconexión automática» no
está activada, la máquina se desconecta
transcurridas 12 horas para ahorrar energía.
3 Conexión y desconexión automáticas
EE
Si se desconecta el aparato de la red se
restablecen todos los ajustes.
Ajustar la hora
Para la función ‘Conexión y desconexión automáticas’ primero deberá ajustar la hora:
TT Abra la tapa.
TT Pulse el botón de la hora.
En el visualizador aparece AM 12:00.
TT Pulse uno de los botones de flecha para
cambiar el formato de la hora (AM/PM o
24h).
TT Pulse el botón de la hora para confirmar el
formato de la hora.
00:00 (ejemplo), las horas parpadean.
TT Pulse los botones de flecha para ajustar las
horas.
50
EE
Podrá modificar el ajuste de la hora en todo
momento. A tal efecto, pulse dos veces el
botón de la hora y realice el cambio.
Conexión automática
TT Abra la tapa.
TT Pulse el botón de la hora.
En el visualizador se indica la hora que haya
ajustado.
TT Pulse uno de los botones de flecha.
ON --:-TT Pulse el botón de la hora.
--:-- , las horas parpadean.
TT Pulse los botones de flecha para ajustar las
horas.
AUTO ON 07:00 (ejemplo)
TT Pulse el botón de la hora para confirmar el
ajuste de las horas.
AUTO ON 07:00 (ejemplo), los minutos
parpadean.
TT Pulse los botones de flecha para ajustar los
minutos.
AUTO ON 07:30 (ejemplo)
TT Pulse el botón de la hora para confirmar el
ajuste de los minutos.
En el visualizador aparece AUTO (ON u OFF,
dependiendo de si el aparato está conectado
o desconectado).
de
Calentador de tazas JURA
Desconexión automática
EE
Si la función «Desconexión automática» no
está activada, la máquina se desconecta
transcurridas 12 horas para ahorrar energía.
TT Abra la tapa.
TT Pulse el botón de la hora.
En el visualizador se indica la hora que haya
ajustado.
TT Pulse dos veces uno de los botones de
flecha.
AUTO OFF --:-- (ejemplo)
TT Pulse el botón de la hora.
AUTO OFF --:-- (ejemplo), las horas
parpadean.
TT Pulse los botones de flecha para ajustar las
horas.
AUTO OFF 18:00 (ejemplo)
TT Pulse el botón de la hora para confirmar el
ajuste de las horas.
AUTO OFF 18:00 (ejemplo), los minutos
parpadean.
TT Pulse los botones de flecha para ajustar los
minutos.
AUTO OFF 18:30 (ejemplo)
TT Pulse el botón de la hora para confirmar el
ajuste de los minutos.
En el visualizador aparece AUTO (ON u OFF,
dependiendo de si el aparato está conectado
o desconectado).
Desactivar la conexión y desconexión
automáticas
EE
Ejemplo: así se desactiva la desconexión automática.
TT Abra la tapa.
TT Pulse el botón de la hora.
TT Pulse dos veces uno de los botones de
flecha.
AUTO OFF 18:30 (ejemplo)
TT Pulse el botón de la hora.
AUTO OFF 18:30 (ejemplo), las horas
parpadean.
TT Ajuste las horas a ‘00’.
TT Pulse el botón de la hora.
AUTO OFF 00:30 (ejemplo), los minutos
parpadean.
TT Pulse los botones de flecha hasta que se
indique ‘--:--’.
TT Pulse el botón de la hora para confirmar el
ajuste.
La desconexión automática está desactivada.
4 Indicaciones en el visualizador
ZZ ON: el aparato está conectado manualmente
ZZ OFF: el aparato está desconectado manualmente
ZZ AUTO ON: el aparato está conectado automáticamente
ZZ AUTO OFF: el aparato está desconectado
automáticamente
5Conservación
EE
Si la función «Desconexión automática» no
está activada, la máquina se desconecta
transcurridas 12 horas para ahorrar energía.
No utilice productos de limpieza agresivos o
abrasivos ni objetos duros para la conservación. Esto podría dañar el aparato.
TT Antes de cada limpieza del aparato,
desenchufe el enchufe de alimentación de la
toma de corriente.
TT Limpie el exterior del aparato con un paño
suave y húmedo (p. ej. microfibra).
Para desactivar la conexión y desconexión
automáticas, deberá ajustar la hora en cuestión a
‘--:--’.
EE
Los paños de microfibra JURA pueden
adquirirse en comercios especializados.
51
es
Calentador de tazas JURA
6 Eliminación respetuosa con el medioambiente
Elimine los aparatos antiguos de forma respetuosa
con el medioambiente.
Modificaciones técnicas
Reservado el derecho a introducir modificaciones
técnicas.
Observaciones del cliente
H
¡Su opinión nos importa!
Utilice el enlace de contacto en www.jura.com.
Los aparatos antiguos contienen valiosos materiales reciclables que deberían destinarse al reciclado.
Por este motivo, los aparatos antiguos deben
eliminarse a través de sistemas de recogida
apropiados.
El modo de empleo contiene información
protegida por copyright. Queda prohibido
fotocopiarlo o traducirlo a otro idioma sin el
consentimiento previo por escrito de
JURA Elektroapparate AG.
7 Datos técnicos
JURA Elektroapparate AG, Kaffeeweltstrasse 10,
CH-4626 Niederbuchsiten, www.jura.com
Copyright
Voltaje
120 V, 60 Hz
(sólo EE. UU./Canadá)
120–240 V, 50–60 Hz
(Europa, demás países)
Comprobación de
seguridad
UL 1026
IEC/EN 60335-1
IEC/EN 60335-2-12
Potencia
40 W (sólo EE. UU./Canadá)
60 W (medición después de
aprox. 6 min.) (máx. 110 W)
(Europa, Australia, Nueva
Zelanda, demás países)
Peso
aprox. 3,8 kg
Longitud del cable aprox. 1,1 m
Medidas
(An. x Al. x P)
12,2 x 30,6 x 34,9 cm
Directivas
El aparato cumple las siguientes directivas:
ZZ 2006/95/CE – Directiva de Baja Tensión
ZZ 2004/108/CE – Compatibilidad electromagnética
ZZ 2009/125/CE – Directiva sobre energía
ZZ 2011/65/UE – Directiva RoHS
52
de
Dispositivo de aquecimento de chávenas JURA
O seu dispositivo de aquecimento de chávenas JURA
Descrição dos símbolos....................................................................................................................................... 53
Elementos de comando......................................................................................................................................54
Indicações importantes
55
Utilização conforme a finalidade.......................................................................................................................55
Para a sua segurança............................................................................................................................................55
1Preparação
57
Caixa original......................................................................................................................................................... 57
Instalar e ligar........................................................................................................................................................ 57
2 Aquecer chávenas (ligação manual)
58
3 Ligar e desligar automático
58
Definir a hora.........................................................................................................................................................58
Ligar automático...................................................................................................................................................58
Desligar automático.............................................................................................................................................58
Desactivar o ligar e desligar automático..........................................................................................................59
4 Indicações do visor
59
5Manutenção
59
6 Eliminação ecológica
59
7 Dados técnicos
60
es
Descrição dos símbolos
Advertências:
CUIDADO
Cumpra sempre as informações
assinaladas com CUIDADO ou ATENÇÃO
e os respectivos pictogramas de aviso. A
palavra ATENÇÃO alerta para eventuais
ferimentos graves e a palavra CUIDADO
alerta para eventuais ferimentos
ligeiros.
pt
Símbolos utilizados:
E
Notas e sugestões para facilitar ainda
mais o manuseamento do seu
dispositivo de aquecimento de
chávenas.
T
Solicitação de acção. Aqui o utilizador
é solicitado a executar uma acção.
ru
53
Dispositivo de aquecimento de chávenas JURA
Elementos de comando
1
2
3
6
4
7
5
1
2
3
4
5
54
Dispositivo de aquecimento de chávenas
JURA
Gaveta das chávenas
Tampa
Visor
Tecla Liga/Desliga Q com indicador de
funcionamento
6
7
Tecla de seta
Tecla das horas
de
Dispositivo de aquecimento de chávenas JURA
Indicações importantes
Utilização conforme a finalidade
O aparelho foi concebido e construído para o uso doméstico. O aparelho serve exclusivamente para
colocar as chávenas nas gavetas de
chávenas extensíveis e aquecê-las.
Qualquer outra forma de utilização
é considerada incorrecta. A JURA
Elektroapparate AG não assumirá
quaisquer responsabilidades pelas
consequências de uma utilização
não conforme a sua finalidade.
Antes da utilização do aparelho, leia
e cumpra rigorosamente este
manual de instruções. Mantenha o
manual de instruções nas proximidades do aparelho e entregue-o, se
for o caso, ao próximo utilizador.
Para a sua segurança
Leia atentamente e respeite as
importantes instruções de segurança apresentadas a seguir.
Assim, evita-se o perigo de morte
por choque eléctrico:
ZZ Utilize apenas o cabo de ligação
original fornecida pela JURA.
ZZ Nunca utilize um aparelho se
este ou o seu cabo de ligação à
corrente apresentar danos.
ZZ Nunca utilize o aparelho se tiver
as mãos molhadas.
ZZ
ZZ
ZZ
ZZ
ZZ
ZZ
Antes da colocação em funcionamento, tenha atenção para que o
cabo de ligação à corrente esteja
seco.
Ligue o aparelho à corrente
alternada apenas com o cabo de
ligação à corrente fornecido na
caixa original.
Em caso de sinais de danos
como, por exemplo, cheiro a
queimado, desligue o aparelho
imediatamente da rede eléctrica
e entre em contacto com o
serviço pós-venda da JURA.
Certifique-se de que o aparelho
e o cabo de ligação à corrente
não se encontram nas proximidades de superfícies quentes ou
chamas abertas.
Preste atenção para que o cabo
de ligação à corrente não seja
prensado nem encostado a
arestas vivas.
Nunca abra ou repare o aparelho
por conta própria. Não realize
alterações no aparelho que não
estejam descritas no manual de
instruções. O aparelho contém
peças condutoras de corrente
eléctrica.
55
es
pt
ru
Dispositivo de aquecimento de chávenas JURA
Um aparelho danificado não é
seguro e poderá constituir causa de
incêndio ou ferimentos. Assim
poderá evitar danos e consequentes
perigos de ferimentos e incêndio:
ZZ Nunca deixe o cabo de ligação à
corrente pendurado. O cabo de
ligação à corrente poderá representar perigo de queda ou
poderá ser danificado.
ZZ Proteja o aparelho contra elementos climáticos como chuva,
geada ou luz solar directa.
ZZ Não utilize o aparelho para
armazenar e aquecer bebidas ou
outros géneros alimentícios.
ZZ Não sobrecarregue as gavetas de
chávenas extraídas.
ZZ Não coloque chávenas húmidas
ou molhadas na gaveta de
chávenas.
ZZ Não mergulhe o aparelho, o
cabo de ligação nem as suas
peças de ligação em água.
ZZ Não coloque o aparelho e as suas
peças soltas na máquina de lavar
a loiça.
ZZ Antes de efectuar a operação de
limpeza no aparelho, desligue o
mesmo e retire a ficha da
tomada de electricidade. Limpe
o aparelho sempre com um
pano húmido, mas nunca
molhado. Proteja-o contra
respingos de água permanentes.
56
ZZ
ZZ
ZZ
ZZ
ZZ
ZZ
ZZ
Não limpe as paredes laterais
interiores.
Conecte o aparelho apenas a
uma fonte de electricidade que
esteja conforme o indicado na
placa de características. A placa
de características está localizada
no lado inferior do aparelho. Para
mais informações sobre os
dados técnicos, consulte o
capítulo 7 “Dados técnicos”.
Em caso de ausência prolongada, desligue o aparelho e retire
a ficha da tomada eléctrica.
Opere o aparelho apenas sob
supervisão.
Os trabalhos de limpeza ou de
manutenção não podem ser
realizados por crianças sem a
supervisão de uma pessoa
responsável.
Não permita que as crianças
brinquem com o aparelho.
Mantenha as crianças com idade
inferior a oito anos afastadas do
aparelho ou supervisione de
perto os seus movimentos.
As crianças com idade superior a
oito anos só podem utilizar o
aparelho sem supervisão se já
tiverem sido suficientemente
elucidadas sobre o manuseamento seguro do mesmo. As
crianças devem ser capazes de
de
Dispositivo de aquecimento de chávenas JURA
reconhecer e compreender os
possíveis perigos de uma utilização incorreta do aparelho.
1
Preparação
Caixa original
A caixa original inclui:
Z Dispositivo de aquecimento de chávenas JURA
Z Manual de instruções
Z Cabo de ligação
As pessoas, inclusivamente as
crianças, que não estão aptas a
utilizar o aparelho com segurança
Instalar e ligar
Ao montar o seu dispositivo de aquecimento de
devido
chávenas, observe os seguintes pontos:
Z às suas faculdades físicas, sensoZ Coloque o aparelho sobre uma superfície
riais ou mentais ou
horizontal.
Z Escolha um local no qual o aparelho fique
Z à sua inexperiência ou falta de
protegido contra sobreaquecimento.
conhecimento
não devem utilizar o aparelho sem a
supervisão ou orientação de uma
J ATENÇÃO
Perigo de morte por choque eléctrico se a máquina
pessoa responsável.
for utilizada com o cabo de ligação danificado.
T Nunca utilize o aparelho se o cabo de
ligação apresentar danos.
T Vire o aparelho cuidadosamente para ficar
com a parte de cima virada para baixo.
T Conecte o cabo de ligação ao aparelho.
es
pt
E
Na parte inferior do dispositivo de aquecimento de chávenas pode guardar o cabo de
ligação conforme o comprimento necessário.
T Volte a colocar o aparelho de novo sobre as
suas bases de apoio em posição normal.
T Insira a ficha da rede na tomada de
electricidade.
No visor por baixo da tampa é exibido OFF.
57
ru
Dispositivo de aquecimento de chávenas JURA
2 Aquecer chávenas (ligação manual)
TT Prima as teclas de setas para ajustar os
minutos.
10:30 (exemplo)
TT Prima a tecla das horas para confirmar o
ajuste dos minutos.
No visor é exibido ON ou OFF, dependendo
se o aparelho está ligado ou desligado.
JJ Perigo de queimadura. As superfícies de
apoio das gavetas das chávenas podem
ficar quentes durante o funcionamento.
TT Não toque nas superfícies de apoio das
gavetas das chávenas.
TT Abra uma gaveta de chávenas.
TT Coloque as chávenas na gaveta de chávenas
EE
e feche-a.
Poderá alterar o ajuste da hora a qualquer
altura. Para isso, prima a tecla das horas
duas vezes e efectue a alteração.
Q T Ligue o aparelho com a tecla Liga/Desliga.
O indicador de funcionamento acende e o
aparelho começa a aquecer as chávenas. No
visor por baixo da tampa é exibido ON.
Ligar automático
TT Abra a tampa.
TT Prima a tecla das horas.
No visor é exibida a hora ajustada.
EE
EE
TT Prima uma das teclas de setas.
Se quiser desligar o aparelho, prima a tecla
Liga/Desliga Q. O indicador de funcionamento não acende mais, no visor é exibido
OFF.
Se a função “Desligar automático” não
estiver ativada, o aparelho desliga-se ao fim
de 12 horas para poupar energia.
ON --:--
TT Prima a tecla das horas.
--:-- , as horas piscam.
TT Prima as teclas de setas para ajustar as
horas.
AUTO ON 07:00 (exemplo)
TT Prima a tecla das horas para confirmar o
ajuste das horas.
AUTO ON 07:00 (exemplo), os minutos
piscam.
TT Prima as teclas de setas para ajustar os
minutos.
AUTO ON 07:30 (exemplo)
TT Prima a tecla das horas para confirmar o
ajuste dos minutos.
No visor é exibido AUTO (ON ou OFF,
dependendo se o aparelho está ligado ou
desligado).
3 Ligar e desligar automático
EE
Se o aparelho for desligado da rede, todos
os ajustes são repostos.
Definir a hora
Para a função “Ligar e desligar automático” tem de
ajustar primeiro a hora:
TT Abra a tampa.
TT Prima a tecla das horas.
No visor é exibido AM 12:00.
TT Prima uma das teclas de seta para mudar o
formato das horas (AM/PM ou 24h).
TT Prima a tecla das horas para confirmar o
formato das horas.
00:00 (exemplo), as horas piscam.
TT Prima as teclas de setas para ajustar as horas.
TT Prima a tecla das horas para confirmar o
ajuste das horas.
10:00 (exemplo), os minutos piscam.
58
Desligar automático
EE
Se a função “Desligar automático” não
estiver ativada, o aparelho desliga-se ao fim
de 12 horas para poupar energia.
TT Abra a tampa.
TT Prima a tecla das horas.
No visor é exibida a hora ajustada.
de
Dispositivo de aquecimento de chávenas JURA
TT Prima duas vezes uma das teclas de setas.
AUTO OFF --:-- (exemplo)
TT Prima a tecla das horas.
AUTO OFF --:-- (exemplo), as horas piscam.
TT Prima as teclas de setas para ajustar as
horas.
AUTO OFF 18:00 (exemplo)
TT Prima a tecla das horas para confirmar o
ajuste das horas.
AUTO OFF 18:00 (exemplo), os minutos
piscam.
TT Prima as teclas de setas para ajustar os
minutos.
AUTO OFF 18:30 (exemplo)
TT Prima a tecla das horas para confirmar o
ajuste dos minutos.
No visor é exibido AUTO (ON ou OFF,
dependendo se o aparelho está ligado ou
desligado).
4 Indicações do visor
ZZ ON: o aparelho está ligado manualmente
ZZ OFF: o aparelho está desligado manualmente
ZZ AUTO ON: o aparelho está ligado automaticamente
ZZ AUTO OFF: o aparelho está desligado automaticamente
5Manutenção
EE
Para a manutenção, não utilize produtos de
limpeza abrasivos ou objectos duros. Isso
pode danificar o aparelho.
TT Antes de cada limpeza do aparelho, retire a
ficha da rede da tomada eléctrica.
TT Limpe o exterior do aparelho com um pano
macio e húmido (p.ex., pano de microfibras).
Desactivar o ligar e desligar automático
Para desactivar o ligar ou desligar automático deve
colocar a respectiva hora em “--:--”.
EE
Se a função “Desligar automático” não
estiver ativada, o aparelho desliga-se ao fim
de 12 horas para poupar energia.
Exemplo: Deste modo, desactiva o desligar
automático.
TT Abra a tampa.
TT Prima a tecla das horas.
TT Prima duas vezes uma das teclas de setas.
AUTO OFF 18:30 (exemplo)
TT Prima a tecla das horas.
AUTO OFF 18:30 (exemplo), as horas piscam.
TT Coloque as horas em “00”.
TT Prima a tecla das horas.
AUTO OFF 00:30 (exemplo), os minutos
piscam.
TT Prima as teclas de setas até ser exibido
“--:--”.
TT Prima a tecla das horas para confirmar o
ajuste.
O desligar automático está desactivado.
EE
Os panos de microfibras da JURA estão à
venda em lojas especializadas.
6 Eliminação ecológica
es
Por favor, elimine os aparelhos velhos de forma
ecológica.
H
pt
Os aparelhos velhos possuem materiais recicláveis
valiosos e devem ser entregues para a reciclagem.
Portanto, elimine os seus aparelhos velhos através
de postos de recolha adequados.
ru
59
Dispositivo de aquecimento de chávenas JURA
7 Dados técnicos
Tensão
120 V, 60 Hz
(apenas EUA/Canadá)
120–240 V, 50–60 Hz
(Europa, restantes países)
Teste de segurança UL 1026
IEC/EN 60335-1
IEC/EN 60335-2-12
Potência
40 W (apenas EUA/Canadá)
60 W (medição após aprox.
6 minutos) (máx. 110 W)
(Europa, Austrália, Nova
Zelândia, restantes países)
Peso
aprox. 3,8 kg
Comprimento do
cabo
aprox. 1,1 m
Dimensões
(L x A x P)
12,2 x 30,6 x 34,9 cm
Directivas
O aparelho cumpre as exigências das seguintes
directivas:
ZZ 2006/95/CE – Diretiva de baixa tensão
ZZ 2004/108/CE – Compatibilidade eletromagnética
ZZ 2009/125/CE – Diretiva sobre energia
ZZ 2011/65/UE – Diretiva RoHS
Alterações técnicas
Reservados os direitos de alterações técnicas.
Sugestões
A sua opinião é importante!
Utilize o acesso de contacto na página
www.jura.com.
60
Direitos de autor
O manual de instruções contém informações
protegidas por direitos de autor. As fotocópias ou
traduções para outra língua não são admissíveis
sem a autorização prévia por escrito pela
JURA Elektroapparate AG.
JURA Elektroapparate AG, Kaffeeweltstrasse 10,
CH-4626 Niederbuchsiten
www.jura.com
de
JURA koppvärmare
Din koppvärmare från JURA
Symbolbeskrivning................................................................................................................................................61
Manöverorgan.......................................................................................................................................................62
Viktig information
63
Användning för avsett ändamål.........................................................................................................................63
För din säkerhet....................................................................................................................................................63
1Förberedelser
65
Leverans..................................................................................................................................................................65
Uppställning och anslutning..............................................................................................................................65
2 Uppvärmning av koppar (manuell igångsättning)
65
3 Programmerbar automatisk igångsättnings- och avstängningstid
65
Inställning av klockan...........................................................................................................................................65
Programmerbar automatisk igångsättning.....................................................................................................66
Programmerbar automatisk avstängningstid.................................................................................................66
Deaktivering av programmerbar automatisk igångsättnings- och avstängningstid...............................66
4Displayindikeringar
67
5Skötsel
67
6 Miljövänlig avfallshantering
67
7 Tekniska data
67
Symbolbeskrivning
Varningar:
OBSERVERA
Följ alltid de anvisningar som är märkta
med OBSERVERA eller VARNING och en
varningssymbol. Signalordet VARNING
används när det finns risk för allvarlig
personskada och signalordet OBSERVERA när det finns risk för mindre
allvarliga personskador.
sv
Symboler som används:
E
Anvisningar och tips som gör det ännu
lättare för dig att använda din koppvärmare.
T
Uppmaning till åtgärd. Du blir
uppmanad att vidta en åtgärd.
61
JURA koppvärmare
Manöverorgan
1
2
3
6
4
7
5
1
2
3
4
5
62
JURA koppvärmare
Låda för kopparna
Lock
Display
Knapp Till/Från Q med driftsindikering
6
7
Pilknapp
Tidsknapp
de
JURA koppvärmare
Viktig information
Användning för avsett ändamål
Apparaten är utformad och konstruerad för privat hushållsbruk. Apparaten är endast avsedd för placering
och uppvärmning av koppar i de
utdragbara lådorna. All annan
användning är inte ändamålsenlig.
JURA Elektroapparate AG påtar sig
inget ansvar för följderna om
apparaten används för något annat
ändamål än det avsedda.
Läs igenom hela denna bruksanvisning innan du använder apparaten
och följ anvisningarna. Ha bruksanvisningen tillgänglig nära apparaten
och lämna över den till eventuella
framtida användare.
För din säkerhet
Läs och observera noggrant de
följande viktiga säkerhetsföreskrifterna.
Så här gör du för att inte utsätta dig
för livsfara genom elektrisk stöt:
ZZ Använd endast originalnätkabeln
från JURA som ingår i leveransen.
ZZ Använd aldrig apparaten om den
är skadad eller om nätsladden är
trasig.
ZZ Använd aldrig apparaten om du
är våt om händerna.
ZZ Se till att nätsladden är torr
innan du tar apparaten i drift.
ZZ
ZZ
ZZ
ZZ
ZZ
Använd endast nätsladden som
ingår i leveransen för att ansluta
apparaten till växelströmsnätet.
Om du misstänker att apparaten
är skadad, till exempel om den
luktar bränt, ska du omedelbart
dra ut nätsladden och kontakta
JURAs service.
Var noga med att inte placera
apparaten eller nätsladden i
närheten av varma ytor eller
öppen eld.
Se till att nätsladden inte kläms
eller skaver mot vassa kanter.
Försök aldrig själv öppna och
laga apparaten. Gör inga ändringar på apparaten som inte
finns beskrivna i bruksanvisningen. Apparaten innehåller
strömförande delar.
En skadad apparat är inte säker och
kan orsaka personskador och brand.
Gör så här för att undvika skador på
apparaten vilka innebär risk för
brand och personskador:
ZZ Låt aldrig nätsladden hänga löst.
Man kan snubbla på nätsladden,
eller så kan den bli skadad.
ZZ Skydda apparaten mot regn,
frost och direkt solljus etc.
ZZ Apparaten får inte användas för
förvaring och uppvärmning av
drycker eller andra livsmedel.
63
sv
JURA koppvärmare
ZZ
ZZ
ZZ
ZZ
ZZ
ZZ
ZZ
ZZ
ZZ
ZZ
ZZ
64
Utdragna lådor för koppar får
inte belastas tungt.
Ställ aldrig fuktiga eller våta
koppar i utdragslådorna.
Sänk aldrig ner apparaten,
nätsladden eller anslutningarna i
vatten.
Apparaten och dess detaljer ska
inte diskas i maskin.
Stäng av apparaten före rengöring och dra ut nätsladden.
Använd en fuktig, men aldrig våt,
trasa när du torkar av apparaten
och skydda den mot ständiga
vattenstänk. Rengör inte de inre
sidoväggarna.
Anslut apparaten endast till
nätspänning enligt typskylten.
Typskylten sitter på apparatens
undersida. Övriga tekniska data
finns i kapitel 7 ”Tekniska data”.
Stäng av apparaten och dra ut
nätsladden om du ska vara borta
en längre tid.
Använd apparaten endast under
uppsikt.
Barn får inte genomföra rengörings- och underhållsarbeten
utan uppsikt av en ansvarig
person.
Låt inte barn leka med apparaten.
Håll barn som är yngre än åtta år
borta från apparaten eller ha
dem under ständig uppsikt.
ZZ
Barn som är äldre än åtta år får
endast använda apparaten utan
uppsikt om de har informerats
om hur den används på ett
säkert sätt. Barnen måste kunna
känna igen och förstå eventuella
risker med felaktig användning.
Personer, inklusive barn, som på
grund av
ZZ fysiska, sensoriska eller kognitiva
funktionshinder eller på grund av
ZZ oerfarenhet eller okunskap
inte på ett säkert sätt kan sköta
apparaten, får endast använda den
om en ansvarig person ger anvisningar eller håller uppsikt.
de
JURA koppvärmare
1
Förberedelser
Leverans
I leveransen ingår:
Z JURA koppvärmare
Z Bruksanvisning
Z Nätsladd
Uppställning och anslutning
Observera följande när du ställer upp din koppvärmare:
Z Placera apparaten på plant underlag.
Z Placera apparaten så att den inte kan bli
överhettad.
2 Uppvärmning av koppar (manuell
igångsättning)
J
Risk för brännskador. Avställningsytorna i
lådorna för kopparna kan bli varma i
samband med användningen.
T Rör inte vid avställningsytorna i lådorna för
kopparna.
T Dra ut en låda.
T Ställ in kopparna i lådan och stäng den.
Q T Sätt i gång apparaten med knappen Till/Från.
Driftsindikeringen lyser och apparaten börjar
med uppvärmningen av kopparna.
Displayen under locket visar ON.
E
J
VARNING
Livsfara p.g.a. elektriska stötar vid användning med
trasig nätsladd.
T Använd aldrig apparaten om nätsladden är
trasig.
T Vänd apparaten försiktigt upp och ner.
T Anslut nätsladden till apparaten.
E
Om du vill stänga av apparaten trycker du
på knappen Till/Från Q. Driftsindikeringen
slocknar och displayen visar OFF.
Om funktionen ”Automatisk avstängning”
inte är aktiverad, så stänger apparaten av sig
efter 12 timmar för att spara energi.
3 Programmerbar automatisk igångsättnings- och avstängningstid
E
Om strömförsörjningen bryts så återställs
alla inställningar.
Inställning av klockan
E
Om du inte behöver använda nätsladden i
dess fulla längd kan du stuva undan resten
av sladden på koppvärmarens undersida.
T Vänd apparaten rätt igen.
T Anslut nätsladden till ett eluttag.
Displayen under locket visar OFF.
För funktionen ”Programmerbar automatisk
igångsättnings- och avstängningstid” måste du
först ställa in klockan:
T Öppna locket.
T Tryck på tidsknappen.
Displayen visar AM 12:00.
T Tryck på en av pilknapparna för att byta
tidsformatet (AM/PM eller 24 h).
T Tryck på tidsknappen för att bekräfta
tidsformatet.
00:00 (exempel), timmarna blinkar.
T Tryck på pilknapparna för att ställa in
timmarna.
sv
65
JURA koppvärmare
TT Bekräfta inställningen av timmarna genom
TT Öppna locket.
TT Tryck på tidsknappen.
att trycka på tidsknappen.
10:00 (exempel), minuterna blinkar.
TT Tryck på pilknapparna för att ställa in
minuterna.
10:30 (exempel)
TT Bekräfta inställningen av minuterna genom
att trycka på tidsknappen.
Beroende på om apparaten är på- eller
frånslagen visas ON eller OFF på displayen.
EE
Det inställda klockslaget visas på displayen.
TT Tryck två gånger på en av pilknapparna.
AUTO OFF --:-- (exempel)
TT Tryck på tidsknappen.
AUTO OFF --:-- (exempel), timmarna blinkar.
TT Tryck på pilknapparna för att ställa in
timmarna.
AUTO OFF 18:00 (exempel)
TT Bekräfta inställningen av timmarna genom
att trycka på tidsknappen.
AUTO OFF 18:00 (exempel), minuterna
blinkar.
TT Tryck på pilknapparna för att ställa in
minuterna.
AUTO OFF 18:30 (exempel)
TT Bekräfta inställningen av minuterna genom
att trycka på tidsknappen.
Displayen visar AUTO (ON eller OFF,
beroende på om apparaten är på- eller
frånslagen).
Du kan ändra tidsinställningen när du vill.
Tryck två gånger på tidsknappen och utför
ändringen.
Programmerbar automatisk igångsättning
TT Öppna locket.
TT Tryck på tidsknappen.
Det inställda klockslaget visas på displayen.
TT Tryck på en av pilknapparna.
ON --:--
TT Tryck på tidsknappen.
--:-- , timmarna blinkar.
TT Tryck på pilknapparna för att ställa in
timmarna.
AUTO ON 07:00 (exempel)
TT Bekräfta inställningen av timmarna genom
att trycka på tidsknappen.
AUTO ON 07:00 (exempel), minuterna
blinkar.
TT Tryck på pilknapparna för att ställa in
minuterna.
AUTO ON 07:30 (exempel)
TT Bekräfta inställningen av minuterna genom
att trycka på tidsknappen.
Displayen visar AUTO (ON eller OFF,
beroende på om apparaten är på- eller
frånslagen).
Programmerbar automatisk avstängningstid
EE
66
Om funktionen ”Automatisk avstängning”
inte är aktiverad, så stänger apparaten av sig
efter 12 timmar för att spara energi.
Deaktivering av programmerbar automatisk
igångsättnings- och avstängningstid
EE
Om funktionen ”Automatisk avstängning”
inte är aktiverad, så stänger apparaten av sig
efter 12 timmar för att spara energi.
För att deaktivera den programmerbara automatiska igångsättnings- och avstängningstiden ska du
ange ”--:--” för respektive klockslag.
Exempel: Så här deaktiverar du den programmerbara automatiska avstängningstiden.
TT Öppna locket.
TT Tryck på tidsknappen.
TT Tryck två gånger på en av pilknapparna.
AUTO OFF 18:30 (exempel)
TT Tryck på tidsknappen.
AUTO OFF 18:30 (exempel), timmarna
blinkar.
TT Ställ in timmarna på ”00”.
de
JURA koppvärmare
TT Tryck på tidsknappen.
AUTO OFF 00:30 (exempel), minuterna
blinkar.
TT Tryck på pilknapparna tills ”--:--” visas.
TT Tryck på tidsknappen för att bekräfta
inställningen.
Den programmerbara automatiska
avstängningstiden är deaktiverad.
4Displayindikeringar
ZZ ON: Apparaten har satts i gång manuellt
ZZ OFF: Apparaten har stängts av manuellt
ZZ AUTO ON: Apparaten har satts i gång
automatiskt
ZZ AUTO OFF: Apparaten har stängts av automatiskt
6 Miljövänlig avfallshantering
Begagnade apparater ska avfallshanteras på ett
miljövänligt sätt.
H
Begagnade apparater innehåller värdefulla material
som kan och bör återvinnas. Avfallshantera därför
begagnade apparater via lämpliga uppsamlingssystem.
7 Tekniska data
Spänning
120 V, 60 Hz
(endast USA/Kanada)
120–240 V, 50–60 Hz
(Europa, övriga länder)
Säkerhetskontroll
UL 1026
IEC/EN 60335-1
IEC/EN 60335-2-12
Uteffekt
40 W (endast USA/Kanada)
60 W (mätning efter ca 6 min.)
(max. 110 W) (Europa,
Australien, Nya Zeeland, övriga
länder)
Vikt
ca 3,8 kg
Sladdlängd
ca 1,1 m
Mått (B x H x D)
12,2 x 30,6 x 34,9 cm
5Skötsel
EE
Använd inte starka rengöringsmedel med
slipmedel eller hårda föremål vid skötseln.
Detta kan skada apparaten.
TT Dra alltid ut nätsladden ur eluttaget innan
du börjar rengöra apparaten.
TT Rengör apparaten utvändigt med en mjuk,
fuktig trasa (t.ex. mikrofiberduk).
EE
Mikrofiberdukar från JURA finns i fackbutiker.
sv
67
JURA koppvärmare
Direktiv
Apparaten uppfyller kraven i följande direktiv:
ZZ 2006/95/EG – Lågspänningsdirektivet
ZZ 2004/108/EG – Elektromagnetisk kompatibilitet
ZZ 2009/125/EG – Energidirektivet
ZZ 2011/65/UE – RoHS direktivet
Tekniska ändringar
Med förbehåll för tekniska ändringar.
Feedback
Din åsikt är viktig för oss!
Använd kontaktlänken på www.jura.com.
Copyright
Bruksanvisningen innehåller information som
skyddas av upphovsrätten. Kopiering eller översättning till ett annat språk är inte tillåten utan
föregående skriftligt tillstånd från JURA.
JURA Elektroapparate AG
Kaffeeweltstrasse 10
CH-4626 Niederbuchsiten
www.jura.com
68
de
Подогреватель чашек JURA
Ваш подогреватель чашек JURA
Описание символов...........................................................................................................................................69
Элементы управления......................................................................................................................................70
Важные указания
71
Использование по назначению.......................................................................................................................71
Ради Вашей безопасности.................................................................................................................................71
1Подготовка
74
Комплект поставки............................................................................................................................................. 74
Установка и подключение............................................................................................................................... 74
2 Подогрев чашек (включение вручную)
74
3 Автоматическое включение и выключение
74
Настройка времени............................................................................................................................................ 75
Автоматическое включение............................................................................................................................. 75
Автоматическое выключение.......................................................................................................................... 75
Дезактивация функции автоматического включения и выключения................................................ 76
4 Индикация состояний на дисплее
76
5Обслуживание
76
6 Утилизация в соответствии с экологическими требованиями
77
7 Технические данные
77
Описание символов
Предупреждения:
ВНИМАНИЕ
Обязательно обращайте внимание на
информацию, которая сопровождается сигнальными словами ВНИМАНИЕ или ОСТОРОЖНО в сочетании с
предупредительным знаком.
Сигнальное слово ОСТОРОЖНО
предупреждает о риске получения
тяжелых травм, а сигнальное слово
ВНИМАНИЕ - о риске получения
легких травм.
Используемые символы:
E
Указания и советы, облегчающие
процесс пользования подогревателем чашек.
T
Требуемое действие. В этом случае
Вам необходимо выполнить то или
иное действие.
ru
69
Подогреватель чашек JURA
Элементы управления
1
2
3
6
4
7
5
1
2
3
4
5
70
Подогреватель чашек JURA
Выдвижная полка для чашек
Крышка
Дисплей
Кнопка «Вкл./Выкл.» Q с индикатором
рабочего состояния
6
7
Кнопка со стрелкой
Кнопка настройки времени
de
Подогреватель чашек JURA
Важные указания
ность для жизни из-за удара
электрическим током:
Использование по назначению
ZZ Используйте только оригиПодогреватель чашек предусмональный сетевой шнур, входятрен и разработан для бытового
щий в комплект поставки
использования. Подогреватель
компании JURA.
чашек предусмотрен исключиZZ ни в коем случае не эксплуатительно для подогрева чашек,
руйте подогреватель чашек с
установленных на выдвижные
дефектами или с поврежденполки. Любое иное использованым сетевым шнуром;
ние будет рассматриваться как
ZZ ни в коем случае не эксплуатииспользование не по назначеруйте подогреватель чашек,
нию. Компания JURA
предварительно не вытерев
Elektroapparate AG не несет ответнасухо мокрые руки;
ственности за последствия,
ZZ перед запуском в эксплуатасвязанные с использованием
цию следите за тем, чтобы
подогревателя чашек не по назнасетевой шнур был сухим;
чению.
ZZ подключайте подогреватель
чашек к сети переменного тока
Перед использованием подогретолько посредством сетевого
вателя чашек полностью прочтите
шнура, входящего в комплект
данное руководство по эксплуапоставки;
тации. Храните руководство по
ZZ в случае появления признаков
эксплуатации рядом с подогреваповреждения, например,
телем чашек и, при необходимозапаха горелого, немедленно
сти, передавайте его следующим
отключите подогреватель
пользователям.
чашек от сети и обратитесь в
центр сервисного обслуживаРади Вашей безопасности
ния компании JURA;
Внимательно прочтите и тщательно соблюдайте нижеследую- ZZ следите за тем, чтобы подогреватель чашек и сетевой
щие важные указания по технике
шнур не находились вблизи
безопасности.
горячих поверхностей или
Соблюдая следующие указания,
открытого пламени;
Вы сможете предотвратить опас71
ru
Подогреватель чашек JURA
ZZ
ZZ
следите за тем, чтобы сетевой
шнур не был зажат и не терся
об острые кромки;
никогда не открывайте и не
ремонтируйте подогреватель
чашек самостоятельно. Не
вносите никаких изменений в
подогреватель чашек, которые
не описываются в руководстве
по эксплуатации. В подогревателе чашек имеются токопроводящие детали.
Поврежденный подогреватель
чашек может стать причиной
получения травм или возгорания.
Во избежание повреждений,
возможных травм и возгорания
соблюдайте следующие указания:
ZZ никогда не оставляйте свисающим сетевой шнур. Вы можете
споткнуться о него или повредить его;
ZZ не допускайте воздействия на
подогреватель чашек таких
погодных факторов, как
дождь, мороз и прямые солнечные лучи;
ZZ не используйте подогреватель
чашек для хранения и подогрева напитков или других
продуктов питания;
ZZ не допускайте чрезмерной
нагрузки на выдвинутые полки
для чашек;
72
ZZ
ZZ
ZZ
ZZ
ZZ
ZZ
ZZ
не ставьте на полки для чашек
влажные или мокрые чашки;
не опускайте подогреватель
чашек, его сетевой шнур и
патрубки в воду;
не мойте подогреватель чашек
и его отдельные детали в посудомоечной машине;
перед очисткой выключите
подогреватель чашек и выньте
сетевой штекер. Всегда протирайте подогреватель чашек
влажной, но не мокрой тканью
и не допускайте постоянного
попадания на подогреватель
чашек брызг воды. Не выполняйте очистку внутренней
поверхности боковых стенок;
подключайте подогреватель
чашек только к сети с напряжением, указанным на заводской
табличке. Заводская табличка
находится на нижней стороне
подогревателя чашек. Дополнительные технические данные приведены в главе 7
«Технические данные»;
на время длительного отсутствия выключайте подогреватель чашек и вынимайте сетевой штекер;
во время использования
подогревателя чашек всегда
контролируйте его работу.
de
Подогреватель чашек JURA
ZZ
ZZ
ZZ
ZZ
Дети не могут выполнять
работы по очистке и техобслуживанию кофе-машины за
исключением лишь тех случаев, когда эти работы выполняются под контролем ответственного лица;
Не допускайте, чтобы дети
играли с кофе- машиной;
Всегда присматривайте за
детьми младше восьми лет,
если они находятся рядом с
кофе-машиной;
Дети старше восьми лет могут
самостоя- тельно использовать кофе-машину, только если
они ознакомлены с правилами
безо- пасного обращения с
ней. Дети должны знать и
понимать, какая опасность
может возникнуть в результате
неправильного обращения с
кофе-машиной.
не способны безопасно им пользоваться, разрешено эксплуатировать подогреватель чашек
исключительно под контролем
или руководством ответственного лица.
Лицам, а также детям, которые
вследствие
ZZ физических, сенсорных или
психических нарушений либо
ZZ отсутствия опыта и знаний в
обращении с подогревателем
чашек
ru
73
Подогреватель чашек JURA
1
Подготовка
T Вставьте сетевой штекер в сетевую
розетку.
На дисплее, находящемся под крышкой,
отображается OFF.
Комплект поставки
В комплект поставки включено следующее:
Z подогреватель чашек JURA;
Z руководство по эксплуатации;
Z сетевой шнур.
Установка и подключение
При установке подогревателя чашек соблюдайте следующее:
Z поставьте подогреватель чашек на
горизонтальную поверхность;
Z выберите место установки подогревателя
чашек так, чтобы не допускать его перегрева.
2 Подогрев чашек (включение
вручную)
J
Опасность ожога.Во время
эксплуатации поверхности выдвижных
полок для чашек могут сильно
нагреться.
T Не прикасайтесь к поверхностям
выдвижных полок для чашек.
T Выдвиньте полку для чашек.
T Поставьте чашки на полку и задвиньте
J
ОСТОРОЖНО
Опасность для жизни из-за удара
электрическим током при работе с
поврежденным сетевым шнуром.
T Ни в коем случае не эксплуатируйте
подогреватель чашек с поврежденным
сетевым шнуром.
полку.
Q T Включите подогреватель чашек при
помощи кнопки «Вкл./Выкл.».
Загорается индикатор рабочего состояния, и подогреватель чашек начинает
процесс подогрева чашек. На дисплее,
находящемся под крышкой, отображается
ON.
T Аккуратно поставьте подогреватель чашек
верхней стороной вниз.
E
T Подсоедините сетевой шнур к подогревателю чашек.
E
Если Вы хотите выключить подогреватель чашек, нажмите кнопку «Вкл./
Выкл.» Q. Индикатор рабочего состояния
гаснет, и на дисплее отображается OFF.
Если функция «Автоматическое
выключение» не активирована, то в целях
экономии электроэнергии устройство
выключается по истечении 12 часов.
3 Автоматическое включение и
выключение
E
С нижней стороны подогревателя чашек
можно уложить неиспользованную часть
сетевого шнура.
T Снова поставьте подогреватель чашек на
опорные ножки.
74
E
В случае отсоединения подогревателя
чашек от сети все настройки будут
сброшены.
de
Подогреватель чашек JURA
Настройка времени
TT Нажмите кнопку настройки времени.
Для задействования функции «Автоматическое
включение и выключение» предварительно
необходимо настроить время.
TT Откройте крышку.
TT Нажмите кнопку настройки времени.
На дисплее появляется AM 12:00.
TT Нажмите на одну из кнопок со стрелками,
чтобы изменить формат отображения
времени (AM/PM или 24ч).
TT Нажмите кнопку настройки времени для
подтверждения формата отображения
времени.
00:00 (пример), поле для указания
значения часов мигает.
TT Нажимайте кнопки со стрелками для
настройки значения часов.
TT Нажмите кнопку настройки времени,
чтобы подтвердить настройку значения
часов.
10:00 (например), поле для указания
значения минут мигает.
TT Нажимайте кнопки со стрелками для
настройки значения минут.
10:30 (пример)
TT Нажмите кнопку настройки времени,
чтобы подтвердить настройку значения
минут.
На дисплее появляется ON или OFF, в
зависимости от состояния подогревателя
чашек: включенное или выключенное.
--:-- , поле для указания значения часов
мигает.
TT Нажимайте кнопки со стрелками для
настройки значения часов.
AUTO ON 07:00 (пример)
TT Нажмите кнопку настройки времени,
чтобы подтвердить настройку значения
часов.
AUTO ON 07:00 (пример), поле для
указания значения минут мигает.
TT Нажимайте кнопки со стрелками для
настройки значения минут.
AUTO ON 07:30 (пример)
TT Нажмите кнопку настройки времени,
чтобы подтвердить настройку значения
минут.
На дисплее появляется AUTO (ON или
OFF, в зависимости от состояния подогревателя чашек: включенное или выключенное).
EE
Настроенное значение времени можно
изменить в любой момент. Для этого
дважды нажмите кнопку настройки
времени и внесите изменения.
Автоматическое включение
TT Откройте крышку.
TT Нажмите кнопку настройки времени.
На дисплее отобразится ранее настроенное значение времени.
TT Нажмите одну из кнопок со стрелками.
ON --:--
Автоматическое выключение
EE
Если функция «Автоматическое
выключение» не активирована, то в целях
экономии электроэнергии устройство
выключается по истечении 12 часов.
TT Откройте крышку.
TT Нажмите кнопку настройки времени.
На дисплее отобразится ранее настроенное значение времени.
TT Дважды нажмите одну из кнопок со
стрелками.
AUTO OFF --:-- (пример)
TT Нажмите кнопку настройки времени.
AUTO OFF --:-- (пример), поле для
указания значения часов мигает.
TT Нажимайте кнопки со стрелками для
настройки значения часов.
AUTO OFF 18:00 (пример)
ru
75
Подогреватель чашек JURA
TT Нажмите кнопку настройки времени,
чтобы подтвердить настройку значения
часов.
AUTO OFF 18:00 (пример), поле для
указания значения минут мигает.
TT Нажимайте кнопки со стрелками для
настройки значения минут.
AUTO OFF 18:30 (пример)
TT Нажмите кнопку настройки времени,
чтобы подтвердить настройку значения
минут.
На дисплее появляется AUTO (ON или
OFF, в зависимости от состояния подогревателя чашек: включенное или выключенное).
TT Нажмите кнопку настройки времени для
подтверждения настройки.
Функция автоматического выключения
дезактивирована.
4 Индикация состояний на дисплее
ZZ ON: подогреватель чашек включен
вручную.
ZZ OFF: подогреватель чашек выключен
вручную.
ZZ AUTO ON: подогреватель чашек включен
автоматически.
ZZ AUTO OFF: подогреватель чашек выключен
автоматически.
Дезактивация функции автоматического
включения и выключения
Для дезактивации функции автоматического
включения или выключения необходимо
установить соответствующее значение времени
на «--:--».
EE
5Обслуживание
EE
Если функция «Автоматическое
выключение» не активирована, то в целях
экономии электроэнергии устройство
выключается по истечении 12 часов.
Не используйте для обслуживания
подогревателя чашек острые, царапающие поверхность чистящие средства, а
также твердые предметы. Это может
привести к повреждению подогревателя
чашек.
TT Каждый раз перед очисткой подогреваПример: дезактивация функции автоматического выключения.
TT Откройте крышку.
TT Нажмите кнопку настройки времени.
TT Дважды нажмите одну из кнопок со
стрелками.
AUTO OFF 18:30 (пример)
TT Нажмите кнопку настройки времени.
AUTO OFF 18:30 (пример), поле для
указания значения часов мигает.
TT Установите значение часов на «00».
TT Нажмите кнопку настройки времени.
AUTO OFF 00:30 (пример), поле для
указания значения минут мигает.
TT Нажимайте кнопки со стрелками до тех
пор, пока на дисплее не отобразится
«--:--».
76
теля чашек вынимайте сетевой штекер из
сетевой розетки.
TT Внешние поверхности подогревателя
чашек очищайте мягкой влажной тканью
(например, микроволоконной салфеткой).
EE
Микроволоконные салфетки компании
JURA можно приобрести в специализированных магазинах.
de
Подогреватель чашек JURA
6 Утилизация в соответствии с
экологическими требованиями
Старое оборудование утилизируйте в соответствии с экологическими требованиями.
H
Старое оборудование содержит ценные
материалы, пригодные для переработки и
вторичного использования. По этой причине
утилизируйте его посредством соответствующих систем сбора отходов.
Директивы
Подогреватель чашек соответствует требованиям следующих директив:
ZZ 2006/95/EG – Директива по низковольтному
оборудованию;
ZZ 2004/108/EG – Директива по электромагнитной совместимости;
ZZ 2009/125/EG – Директива по энергопотреблению;
ZZ 2011/65/EC – Директива ЕС по ограничению
применения определенных материалов в
электрических и электронных приборах
Технические изменения
Права на технические изменения сохраняются.
7 Технические данные
Напряжение
120 В, 60 Гц
(только США/Канада)
120-240 В, 50-60 Гц
(Европа, другие страны)
Проверка
надежности
UL 1026
IEC/EN 60335-1
IEC/EN 60335-2-12
Мощность
40 Вт (только США/Канада)
60 Вт (измерение прим.
через 6 мин.) (до 110 Вт)
(Европа, Австралия, Новая
Зеландия, другие страны)
Масса
ок. 3,8 кг
Длина сетевого ок. 1,1 м
шнура
Размеры
(Ш х В х Г)
Отзывы
Ваше мнение важно для нас!
Воспользуйтесь для этого контактной ссылкой
на интернет-странице www.jura.com.
Авторское право
Данное руководство по эксплуатации содержит
информацию, защищенную авторским правом.
Фотокопирование или перевод руководства на
другой язык не разрешается без предварительного письменного разрешения компании JURA
Elektroapparate AG.
JURA Elektroapparate AG
Kaffeeweltstrasse 10
CH-4626 Niederbuchsiten
www.jura.com.
12,2 x 30,6 x 34,9 см
ru
77
78
de
ru
79
Art. 71316/Cup Warmer/de-ru/201302
80