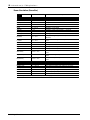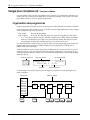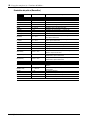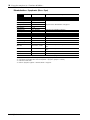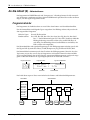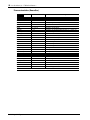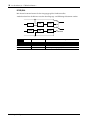
1
DIGITAL REVERBERATOR
Owner’s Manual
Manuel d’instructions
Bedienungsanleitung
Manual del propietario
DATA/CURSOR
DIGITAL REVERBERATOR
7
8
9
EQ ON
4
5
6
STORE
GATE
GATE ON
1
2
3
CANCEL
UTILITY
LEVEL/
BAL
OTHERS
0
•
–
RECALL/
ENTER
BYPASS
EQ
PRESET
USER
PROGRAM
PROGRAM
INFINITE
POWER
DEC
MIDI
PRE EFFECT EQ
INPUT
0
FREQ
100
GAIN
300
FREQ
800
GAIN
4k
2k
FREQ
10k
GAIN
ON
COMPARE
50
700 -15
+15
350
5k
-15
+15
2k
20k -15
+10
L
FINE
MAIN
STEREO
L
R MONO
CLIP
-3
-6
-9
-12
-18
-24
-36
-00
PARAMETER
INC
R
L
R
LOW
MID
HIGH
+15
ON/ OFF
FCC INFORMATION (U.S.A.)
1. IMPORTANT NOTICE: DO NOT MODIFY THIS UNIT!
This product, when installed as indicated in the instructions contained in this manual, meets FCC requirements. Modifications not expressly approved by Yamaha
may void your authority, granted by the FCC, to use the product.
2. IMPORTANT: When connecting this product to accessories and/or another product use only high quality shielded cables. Cable/s supplied with this product MUST
be used. Follow all installation instructions. Failure to follow instructions could void your FCC authorization to use this product in the USA.
3. NOTE: This product has been tested and found to comply with the requirements listed in FCC Regulations, Part 15 for Class “B” digital devices. Compliance with
these requirements provides a reasonable level of assurance that your use of this product in a residential environment will not result in harmful interference with
other electronic devices. This equipment generates/uses radio frequencies and, if not installed and used according to the instructions found in the users manual, may
cause interference harmful to the operation of other electronic devices. Compliance with FCC regulations does not guarantee that interference will not occur in all
installations. If this product is found to be the source of interference, which can be determined by turning the unit “OFF” and “ON”, please try to eliminate the
problem by using one of the following measures:
Relocate either this product or the device that is being affected by the interference.
Utilize power outlets that are on different branch (circuit breaker or fuse) circuits or install AC line filter/s.
In the case of radio or TV interference, relocate/reorient the antenna. If the antenna lead-in is 300 ohm ribbon lead, change the lead-in to coaxial type cable.
If these corrective measures do not produce satisfactory results, please contact the local retailer authorized to distribute this type of product. If you can not locate the
appropriate retailer, please contact Yamaha Corporation of America, Electronic Service Division, 6600 Orangethorpe Ave, Buena Park, CA 90620
* This applies only to products distributed by YAMAHA CORPORATION OF AMERICA.
IMPORTANT NOTICE FOR
THE UNITED KINGDOM
Connecting the Plug and Cord
WARNING: THIS APPARATUS MUST BE EARTHED
IMPORTANT: The wires in this mains lead are coloured in accordance with
the following code:
GREEN-AND-YELLOW
BLUE
BROWN
: EARTH
: NEUTRAL
: LIVE
As the colours of the wires in the mains lead of this apparatus may not
correspond with the coloured markings identifying the terminals in your
plug, proceed as follows:
The wire which is coloured GREEN and YELLOW must be connected to
the terminal in the plug which is marked by the letter E or by the safety earth
symbol or coloured GREEN and YELLOW.
The wire which is coloured BLUE must be connected to the terminal which
is marked with the letter N or coloured BLACK.
The wire which is coloured BROWN must be connected to the terminal
which is marked with the letter L or coloured RED.
* This applies only to products distributed by YAMAHA KEMBLE
MUSIC (U.K.) LTD.
ADVARSEL!
Lithiumbatteri—Eksplosionsfare ved fejlagtig
håndtering. Udskiftning må kun ske med batteri
af samme fabrikat og type. Levér det brugte
batteri tilbage til leverandoren.
VARNING
Explosionsfara vid felaktigt batteribyte. Använd
samma batterityp eller en ekvivalent typ som
rekommenderas av apparattillverkaren.
Kassera använt batteri enligt fabrikantens
instruktion.
VAROITUS
Paristo voi räjähtää, jos se on virheellisesti
asennettu. Vaihda paristo ainoastaan
laitevalmistajan suosittelemaan tyyppiin. Hävitä
käytetty paristo valmistajan ohjeiden
mukaisesti.
Precautions i
Precautions
Avoid excessive heat, humidity, dust, and vibration
Keep the unit away from locations where it is likely to be exposed to high temperatures or
humidity – such as near radiators, stoves, in direct sunlight, etc. Avoid locations which are subject to excessive dust accumulation. Extreme vibrations can cause mechanical damage.
Avoid physical shocks
Strong physical shocks can damage the unit. Handle it with care.
Install the unit with plenty of space for ventilation
This unit should be installed in such a way as to maintain a gap of 10cm or more between the
rear of the unit and the wall. This will prevent heat build-up inside the unit and possible fire hazard.
Do not open the unit, or attempt repairs or modifications yourself
This product contains no user-serviceable parts. Prefer all maintenance to qualified Yamaha service personnel. Opening the unit and/or tampering with the internal circuitry will void the warranty.
Make sure the power is off before making or removing connections
Always turn the power OFF prior to connecting or disconnecting cables. This is important to prevent damage to the unit itself as well as other connected equipment.
Handle cables carefully
Always plug and unplug cables – including the AC cord – by gripping the connector, not the
cord.
Clean with a soft dry cloth
Never use solvents such as benzine or thinner to clean the unit. Wipe it clean with a soft, dry
cloth.
Always use the correct power source
Make sure the power source voltage specified on the rear panel matches your local AC mains
supply:
US & Canadian Model: 120V AC, 60 Hz
General Model: 230V AC, 50 Hz
UK Model: 240V AC, 50 Hz
Back-up battery
This unit contains a long-life lithium battery which maintains the contents of user memory locations even when the unit is off. With normal use, the battery should last approximately five
years. If the battery voltage falls below a certain level, the message “WARNING LOW BATTERY” will appear on the screen when the power is turned on. If this occurs, have the battery
replaced at a qualified Yamaha service center.
Warning: DO NOT ATTEMPT TO REPLACE THE BATTERY YOURSELF. OPENING THE UNIT
AND/OR TAMPERING WITH THE INTERNAL CIRCUITRY WILL VOID THE WARRANTY.
ProR3 Digital Reverberator
ii Contents
Contents
Introduction . . . . . . . . . . . . . . . . . . . . . . . . . . . . . . .1
ERROR Messages of the ProR3 . . . . . . . . . . . . 36
Front panel . . . . . . . . . . . . . . . . . . . . . . . . . . . . . . . .2
Specifications . . . . . . . . . . . . . . . . . . . . . . . . . . . . 37
Rear panel. . . . . . . . . . . . . . . . . . . . . . . . . . . . . . . . .6
Dimensions . . . . . . . . . . . . . . . . . . . . . . . . . . . . . . 38
Block Diagram . . . . . . . . . . . . . . . . . . . . . . . . . . . 38
Basic use – using a preset program – . . . . .7
MIDI data format . . . . . . . . . . . . . . . . . . . . . Add-1
Connections . . . . . . . . . . . . . . . . . . . . . . . . . . . . . .7
Turning the power on (off). . . . . . . . . . . . . . . . . .7
Adjusting the input level . . . . . . . . . . . . . . . . . . .8
Selecting effect programs . . . . . . . . . . . . . . . . . . .8
Preset Program List . . . . . . . . . . . . . . . . . . . . . . . .9
Advanced uses (1) . . . . . . . . . . . . . . . . . . . . . . .12
The bypass function . . . . . . . . . . . . . . . . . . . . . .12
Pre-effect EQ. . . . . . . . . . . . . . . . . . . . . . . . . . . . .12
The INFINITE function. . . . . . . . . . . . . . . . . . . .13
Advanced uses (2) – Editing functions – . .14
How programs are organized . . . . . . . . . . . . . .14
Editing procedure . . . . . . . . . . . . . . . . . . . . . . . .15
Program parameters 1 (Primary effects) . . . . .18
Reverberation (Reverb) . . . . . . . . . . . . . . . .18
Early Reflections (ER) . . . . . . . . . . . . . . . . . .19
User ER parameter . . . . . . . . . . . . . . . . .19
Room Simulation (RoomSim) . . . . . . . . . . .20
Reverb + Echo (Rev + Ech) . . . . . . . . . . . . .21
Reverb + Early Reflections (Rev + ER) . . . .22
Reverb + Chorus (Rev + Cho) . . . . . . . . . . .23
Reverb + Symphonic (Rev + Sym) . . . . . . .24
Reverb + Flanger (Rev + Flg) . . . . . . . . . . . .25
Reverb + Pitch Change (Rev + Pit) . . . . . . .26
Reverb + Auto Pan (Rev + PAN) . . . . . . . .27
Common parameters . . . . . . . . . . . . . . . . . .27
Program paramaters 2 (Secondary effects) . . .28
DFL . . . . . . . . . . . . . . . . . . . . . . . . . . . . . . . . .28
COMP . . . . . . . . . . . . . . . . . . . . . . . . . . . . . . .29
EQ . . . . . . . . . . . . . . . . . . . . . . . . . . . . . . . . . .30
GATE . . . . . . . . . . . . . . . . . . . . . . . . . . . . . . .31
LEVEL/BAL . . . . . . . . . . . . . . . . . . . . . . . . .32
Advanced uses (3) – Utility functions – . . .33
Memory protect settings. . . . . . . . . . . . . . . . . . .33
Input mode setting . . . . . . . . . . . . . . . . . . . . . . .33
MIDI channel setting. . . . . . . . . . . . . . . . . . . . . .34
Setting the MIDI program change table . . . . . .34
Transmitting a MIDI bulk dump. . . . . . . . . . . .35
Assigning MIDI controllers . . . . . . . . . . . . . . . .35
Initializing the ProR3 . . . . . . . . . . . . . . . . . . . . .36
ProR3 Digital Reverberator
1. Transmitted data . . . . . . . . . . . . . . . . . . . Add-1
2. Receive data . . . . . . . . . . . . . . . . . . . . . . . Add-5
MIDI Implementation Chart . . . . . . . . . . Add-9
Introduction 1
Introduction
Thank you for purchasing the Yamaha ProR3 Digital Reverberator. The ProR3 marks a new era in
Yamaha’s reverberation technology. Third-generation Yamaha digital signal processors (DSP)
with 32 bit digital signal processing and high-performance 20 bit linear A/D and D/A converters provide unprecedented density and resolution, with breathtakingly dynamic impact. The
ultra-high quality analog input and output circuitry achieves a dynamic range of 110 dB, providing incredibly natural reverberance with a noiseless decay.
The ProR3 has 10 primary effects; reverb, early reflection, room simulation, and combinations of
reverb with echo, chorus, flanging, pitch change, and auto pan, etc. A pre-effect EQ is provided
in front of the primary effect, and following the primary effect, dynamic filter, compressor, EQ,
gate, level, and balance stages are provided. In stereo input mode, full stereo reverb is provided.
In addition to 90 preset programs for immediate use, 90 user memory locations are provided for
your own custom settings.
The stereo inputs and outputs feature both balanced XLR type and 1/4" phone jack connectors,
for connection to a variety of equipment. The input and output level selectors (–10 dB/+4 dB)
also allow flexibility in level adjustment. Programs can be selected from an external MIDI device,
and bulk data dumps can also be performed.
The Yamaha ProR3 digital reverberator is the result of an important step forward in digital reverberation technology. It provides a previously unattainable level of rich reverberation effects,
sound quality, and operability, and is an ideal reverberator for use in any situation, from the
home studio to pro audio recording and PA work.
In order to take full advantage of the ProR3’s functionality and enjoy years of trouble-free use,
please read this manual carefully.
ProR3 Digital Reverberator
2 Front panel
Front panel
2
1
3
4
6
5
DATA/CURSOR
DIGITAL REVERBERATOR
8
9
PARAMETER
FINE
7
8
9
EQ ON
4
5
6
STORE
GATE
GATE ON
1
2
3
CANCEL
UTILITY
LEVEL/
BAL
OTHERS
0
•
–
RECALL/
ENTER
BYPASS
MAIN
PROGRAM
INFINITE
POWER
INC
R
L
7
CLIP
-3
-6
-9
-12
-18
-24
-36
STEREO
L
R MONO
EQ
PRESET
USER
PROGRAM
MIDI
FREQ
GAIN
DEC
PRE EFFECT EQ
INPUT
0
100
FREQ
300
800
GAIN
2k
FREQ
4k
10k
GAIN
COMPARE
50
700 -15
+15
350
5k
-15
+15
2k
20k -15
ON/ OFF
ON
+15
+10
-00
L
R
LOW
MID
HIGH
A
0
1
B
C D
INPUT level meters (L/R)
This is a stereo LED meter with 8 segments for each channel. The segments respectively indicate
levels of –36 dB, –24 dB, –18 dB, –12 dB, –9 dB, –6 dB, –3 dB, and CLIP.
Note: The level meters are located in the circuitry after the A/D converter. This means that the CLIP
indicator will indicate clipping of the digital signal. Adjust the input level so that the CLIP indicator
does not light.
2
PROGRAM number display
This is a two-digit seven-segment display that indicates the currently selected program number.
If this display is blinking, a new program has been selected but its contents have not yet been
recalled.
3
Status indicators
These are six LEDs which indicate program status and other functions of the ProR3.
STEREO, L/R MONO
The input mode of the currently selected program is shown by three indicators. The ProR3 has
four input modes (Stereo, LR/Mix, R-Mono, L-Mono), selected by the UTILITY key. When both
L/R Mono indicators are lit, LR/Mix mode is selected.
PRESET/USER
These indicators show the program status. Use the PROGRAM key to select the status. When the
PRESET indicator is lit, preset programs are selected. When the USER indicator is lit, user programs are selected.
MIDI
This indicator will light while MIDI data is being received from an external device connected to
the MIDI IN connector.
4
LCD
This backlit LCD shows the name of the selected program and the program parameter values.
Messages related to operation will also appear here.
ProR3 Digital Reverberator
Front panel 3
5
DATA/CURSOR keys
The DATA keys (INC) (DEC) are used to modify the value of the selected parameter.
The CURSOR keys (√) (®) are used to select parameters displayed in the LCD.
When the PROGRAM indicator is lit, the DATA keys are used to select the program that you
wish to recall.
6
PARAMETER keys
These keys select effect parameters. Each time a key is pressed, it will cycle through the parameter pages, and will finally return to the first page.
MAIN
FINE
A
B
EQ
EQ ON
C
GATE
GATE ON
LEVEL/
BAL
OTHERS
D
F
E
6-A MAIN key
This key accesses the main parameters. The indicator will light, and you will be able to
edit the main parameters of the program.
6-B
FINE key
This key accesses secondary parameters of the program. The indicator will light, and you
will be able to edit the secondary parameters of the program.
6-C EQ, EQ ON keys
The EQ key accesses the parameters of the three-band post-effect equalizer. The indicator
will light, and you will be able to edit the EQ type, frequency, gain, and Q for each band.
The EQ ON key turns the post-effect equalizer on/off. When the equalizer is on, the green
indicator will light.
LOW
MID
HIGH
Type
Peaking/Shelving
Peaking
Peaking/Shelving
Gain
±15 dB
±15 dB
±15 dB
32 Hz to 2.2 kHz
250 Hz to 5.6 kHz
500 Hz to 20 kHz
0.1 to 5.0
0.1 to 5.0
0.1 to 5.0
Frequency
Q
6-D GATE, GATE ON keys
The GATE key accesses the gate parameters. The indicator will light, and you will be able
to edit the level and balance, etc.
The GATE ON key turns the gate on/off. When the gate is on, the green indicator will
light.
6-E
LEVEL/BAL key
This key lets you adjust the effect balance (the level balance between the direct sound and
the effect sound). When you press the key, the red indicator will light.
6-F
OTHERS key
This key has two functions. When you press the key, the red indicator will light.
1 Specify a program title (see page 16).
2 Select the parameters to be controlled by MIDI Control Change messages (see page 16
and 35).
ProR3 Digital Reverberator
4 Front panel
7
Numeric keys
These keys are used to directly input the number of a program that you wish to recall, or to input
parameter values.
When you use the numeric keys to input a parameter value, the value will blink until it is finalized. Press the RECALL/ENTER key to finalize the value. To return to the original value, press
the CANCEL key. Some parameters cannot be entered using the numeric keys.
To specify a negative value (for example an equalizer gain of –9 dB), use the “–” key. To specify a
value with a decimal point (for example an equalizer Q of 2.5), use the “.” key.
7
8
9
4
5
6
STORE
1
2
3
CANCEL
0
•
–
RECALL/
ENTER
PROGRAM
A
B
C
D
7-A PROGRAM key
This key is used when selecting programs. Each time you press the key, the program status
will alternate between PRESET and USER.
7-B
STORE key
This key is used to store the settings of a program that you created.
7-C CANCEL key
This key is used to cancel a value that was entered by the numeric keys.
7-D RECALL/ENTER key
This key is used to recall a program whose number was entered by the numeric keys, or to
finalize a parameter value.
8
INFINITE key
When this key is pressed, the indicator will light, and the RevTime parameter will be dramatically lengthened. This produces the effect of a “freeze-frame” or “stop-motion” sound.
9
POWER switch
This switch turns the power on/off.
When the power is turned on, the program that was last being used when the power was turned
off will be selected.
10 INPUT level control (L, R)
The inner knob is the input level for the left channel, and the outer knob is the input level for the
right channel. The knobs are coaxial for convenience when you are adjusting the level of a stereo
source.
ProR3 Digital Reverberator
Front panel 5
11 PRE EFFECT EQ, ON controls
This is a three-band parametric equalizer that equalizes the signal before the effect. The center
frequency and gain can be set for each band.
The ON key turns the pre-effect equalizer on/off. When the equalizer is on, the green indicator
will light.
Frequency
Gain
LOW
MID
HIGH
50 Hz to 700 Hz
350 Hz to 5 kHz
2 kHz to 20 kHz
±15 dB
±15 dB
±15 dB
12 COMPARE key
After editing the parameters of a program, you can use this key to compare the edited sound
with the sound of the program at the time it was recalled. When the red indicator is lit, you are
hearing the original sound of the program.
13 UTILITY key
Use this key when you wish to make settings for system parameters such as memory protect,
input mode, and MIDI parameters. When you press the key, the red indicator will light.
14 BYPASS key
When this key is pressed, the input signal will be output directly without passing through the
effect, and the red indicator will light.
This is a convenient way to quickly compare the unprocessed sound with the processed sound.
ProR3 Digital Reverberator
6 Rear panel
Rear panel
E
F
MIDI
OUTPUT
G
INPUT
R
THRU
OUT
L
R
L
IN
R
L
R
–10dB +4dB
L
–10dB +4dB
H
15 MIDI connectors
These are 5 pin DIN type standard MIDI IN, MIDI OUT, and MIDI THRU connectors.
These connectors are used when transmitting program change messages or control change messages from an external MIDI device to the ProR3, or when transmitting program bulk dump data
from the ProR3 to another device.
16 OUTPUT jacks
These are balanced output jacks which output the analog return signal to your mixer or multitrack recorder, etc. A pair of XLR-3-32 connectors and a pair of 1/4" phone jacks are provided.
The level select switch selects either +4 dB or –10 dB as the nominal output level.
17 INPUT jacks
These are balanced input jacks which input the analog signal from your mixer or multi-track
recorder to the ProR3. If the source is monaural, use the UTILITY key to select an appropriate
input jack (see page 33).
A pair of XLR-3-31 connectors and a pair of 1/4" phone jacks are provided.
The level select switch selects either +4 dB or –10 dB as the nominal input level.
18 Level select switches
These switches change the level of the input/output jacks between +4 dB and –10 dB.
Set them to match the level of the connected equipment.
XLR3-31 type pin arrangement
Hot
2
1
Ground
(Earth)
3
Cold
1/4" phone plug signal connections
Ground
Cold
ProR3 Digital Reverberator
Hot
XLR3-32 type pin arrangement
Ground
(Earth)
1
2
3
Hot
Cold
Basic use – using a preset program – 7
Basic use – using a preset program –
Here’s how to select a preset program and use it without adjusting any parameters.
Connections
1. Connect the sound source to the INPUT jacks.
Warning: Before making connections, make sure that the power is turned off for all
your equipment.
For a stereo sound source, connect the outputs of both channels to the INPUT jacks. For a monaural sound source, use the L input jack.
If the sound source has XLR connectors, make connections using the XLR-3-31 connectors of the
ProR3. If not, use the 1/4" phone jacks.
2. Connect the OUTPUT jacks to the mixer or other external device.
If the mixer has XLR connectors, make connections using the XLR-3-32 connectors of the ProR3.
If not, use the 1/4" phone jacks.
Note: You may also use a cable which converts between XLR connectors and TRS 1/4" phone jacks.
3. Connect the ProR3 to an AC outlet.
Turning the power on (off)
1. Press the POWER switch to turn the power on. (Pressing it again will turn the power off.)
YAMAHA
ProR3
Digital Reverberator
Copyright(c) 1995 YAMAHA
The initial display will appear for a few seconds, and then the program that was being used
when the power was last turned off will be selected.
Large Hall 1
RevTime =
Reverb
2.5s
Note: When turning on the equipment in a system, always turn on each device in sequence of the signal flow, starting from signal sources and ending with the power amp. Observing this sequence will
prevent damage to speakers, to other equipment, or to your hearing which can be caused by the noise
that occurs when a device is turned on. Turn on the ProR3 before the other connected equipment.
When turning off the power of the system, turn off devices starting with the power amp and working
backward toward the signal sources.
ProR3 Digital Reverberator
8 Basic use – using a preset program –
Adjusting the input level
When the power has been turned on for the ProR3 and the other equipment, make the sound
sources produce sound, and adjust the input level of the ProR3.
1. Rotate the INPUT level controls while watching the INPUT level meters.
Set the levels to achieve maximum S/N ratio while not allowing the CLIP indicators to light.
Selecting effect programs
There are two ways to select programs.
• Use the INC/DEC keys.
Press the INC or DEC key to select a program.
If you hold down a key, the program numbers will change in succession.
• Use the numeric keys and the RECALL/ENTER key.
1 Use the numeric keys to select the program number, and the PROGRAM indicator will
blink.
If you enter the wrong number, press the CANCEL key, and use the numeric keys to enter
the number once again.
If you select a number other than 1–90, the display will indicate “ NO PROGRAM No Type”. Press the CANCEL key to return to the previous display.
**
**
2 Press the RECALL/ENTER key to recall the program.
When the program is recalled, the PROGRAM indicator will change from blinking to lit.
If you select a number other than 1–90 and press the RECALL/ENTER key, the display
will indicate “ Program Number Error ”. Press the CANCEL key to return to the previous display.
*
*
Note: If the display asks “Recall? Are you sure?” when you select a program, this indicates that the
data of the program has been edited. If you wish to save this edited data, use the procedure “Saving a
program” given on page 16.
If you do not need to save the edited data, press the RECALL/ENTER key to recall the selected program.
ProR3 Digital Reverberator
Basic use – using a preset program – 9
Preset Program List
No.
Title
Type
Description
Large Hall
1
Large Hall 1
Reverb
2
Large Hall 2
Reverb
3
New Hall
Reverb
The ProR3’s standard hall-type reverb. Simulates a large hall with good acoustics, and is suitable for any instrument.
A program with a slight delay between the sparse early reflections and the rich
reverberation.
4
Wide Hall
Reverb
A program simulating a spacious and uncolored hall.
5
Breathless Hall
Reverb
A bit of character. Bright, strong, and somewhat long reverb.
Medium Hall
6
Medium Hall 1
Reverb
7
Medium Hall 2
Reverb
8
Wonder Hall
Reverb
9
Gothic Hall
Rev+Cho
10
Bright Ham
Reverb
A bright medium sized hall.
A standard medium-sized hall reverb.
Reverb with a lighter feel than the large hall type. Try it with percussion.
A combination of chorus and a somewhat long reverb. Try it on solo instruments,
vocals, or pads.
Small Hall
11
Small Hall 1
Reverb
An idealized small hall with a small stage.
12
Small Hall 2
Reverb
An even smaller hall. The internal compressor is on, producing a damped reverb
sound.
13
Small Dark Hall
Rev+ER
Small hall, somewhat darker in tone. Try it on vocals in a minor key.
14
Pool
Reverb
Small hall program with many early reflections.
15
Open Hall
Reverb
Small hall with open space. For vocals.
Large Room
16
Large Room 1
Reverb
Simulation of a large room with hard walls. A thick and somewhat idiosyncratic
sound. Try it on percussion.
17
Large Room 2
Reverb
Compared to Large Room 1, a room with more naturalness and transparency.
18
Mood Room
Reverb
Large room with slightly darker tone.
19
Soft Room
Reverb
Large room with mellow tone.
20
Attack Room
Rev+Pit
Combines a pitch change (±9 cents) with a room. Creates depth for vocals or
solo instruments.
Medium Room
21
Medium Room 1
Reverb
Simulates a medium sized studio with good acoustics. Apply to a 2-channel
source for “live in the studio.”
22
Medium Room 2
Reverb
Simulates a somewhat live recording studio with wood walls.
23
Dark Room
Reverb
A studio slightly smaller than Medium Room 2, with a natural acoustics.
24
Quick Room
Reverb
A dry-sounding studio with wood and metal walls. For brass or percussion.
25
Aquarium
RoomSim
26
Wood Room
RoomSim
Simulates the reverberation of a medium-sized studio. Try on bass drum.
27
Chorus Room
Rev+Cho
28
Delayed Room
RoomSim
An echo room with an 82 ms pre-delay. For sax or solo instruments.
29
Comp. Chamber
RoomSim
A room program for snare or percussion. Use Threshold to adjust the degree of
compression.
Adds the airiness of a medium room to thicken the sound.
Small Room
30
Small Room 1
RoomSim
31
Small Room 2
Rev+Cho
32
Small Studio
RoomSim
33
Bright Studio
Reverb
RoomSim
34
Kick Chamber
35
Tiny Room
36
Near You
The small room programs are extremely short reverbs created with hip-hop in
mind. These are meant to be applied in small amounts, so that the sound
appears either dry or to have the natural acoustics of a studio. They are especially effective on sequenced instruments, synth brass, and on instruments
recorded in a dead studio.
ER
Rev+Pit
ProR3 Digital Reverberator
10 Basic use – using a preset program –
No.
Title
Type
Description
Special Room
37
Power Drum Room
RoomSim
Adds a strong live ambiance to drums. Try it on sampled drums.
38
Soft Space
Rev+Cho
A percussive short reverb with chorus added. Gives ambiance to drums, lead
instruments, and vocals.
39
Droid Short
Reverb
40
Droid Long
Reverb
41
Tile Room
RoomSim
42
Coliseum
Reverb
43
Opera
Reverb
44
Delay Hall
45
Train Station
Ech→Rev
Reverb
46
Tile Bathroom
ER
47
Closet
ER
48
Motel Chorus
ER
49
Pitch Room
Pit→Rev
Simulates an early and extremely expensive digital reverb unit.
The bright ambiance of a tiled room.
Long reverb of a wide space, simulating a coliseum.
Fairly long reverb with a 52 ms delay between the early reflections and the
reverb.
A combination of hall-type reverb and delay. Set the L and R Delay and IniDly
parameters to match the tempo of the song.
Try this when you need echoing footsteps in a late-night train station.
These programs provide early reflections alone. Try them when you wish to add
room ambiance to drums, percussion, guitar, line-recorded bass, electric piano,
and solo instruments.
Reverb applied to a pitch change (±8 cents). For vocals or chorus.
Plate
50
Beauty Plate
Reverb
Sub-reverb settings have been boosted. Try it on an electric piano.
51
Arena Plate
Reverb
Simulates a gigantic arena like the Budokan in Tokyo.
52
Vocal Plate 1
Reverb
Try it on vocals. Especially nice for ballads.
53
Vocal Plate 2
54
Vocalese
55
String Plate
Reverb
Rev+Cho
Reverb with a darker feel than Vocal Plate 1.
Chorus is lightly applied to the reverb. Try it on guitar and keyboards.
Reverb
Try it on strings for an even more beautiful sound.
56
Home Plate
Reverb
Metal plate reverb from the good old days.
57
LA Plate Short
Reverb
58
LA Plate Long
Reverb
Simulations of the bright and crisp plate reverb preferred in studios on the US
west coast.
59
Short Perc.Plate
Reverb
Short and bright percussion plate. Set the IniDelay parameter according to the
tempo.
60
Long Plate
Reverb
Longer plate reverb. Try it on organ pads etc.
Gate
61
ER Gate 1
ER
62
ER Gate 2
ER
63
ER for Kick
ER
64
Power Gate 1
ER
65
Power Gate 2
ER
66
Room Gate
ER
67
Gated Rev 1
Reverb
68
Gated Rev 2
Reverb
69
Reverse Gate 1
ER
70
Reverse Gate 2
ER
These are gated reverbs with only the early reflections.
ER Gate 1 is a natural and uncolored gate. ER Gate 2 is a bit metallic. ER for Kick
is for when you want to fatten up a thin sounding bass drum.
Adjust the Liveness and RoomSize parameters as desired.
As the names suggest, Power Gate 1 and Power Gate 2 are for when you want to
make the drums really stand out.
These are standard combinations of reverb + noise gate. Compared to the gated
programs consisting only of E.Ref, more detailed settings are required to fit them
to your song, but this also means that you have more control.
These simulate the gated reverb effect produced by a tape running backwards,
like the Reverse Gate programs on the REV7 and REV5. Make settings to match
the tempo of the song.
Effect Reverb
71
Reverb Flange 1
Reverb
72
Reverb Flange 2
Rev→Flg
73
Reverb Flange 3
Rev→Flg
74
Reverb Flange 4
Rev→Flg
75
Dark Moon
Rev→Flg
76
Filter Flange
Rev→Flg
ProR3 Digital Reverberator
Reverb Flange 1 is natural. Reverb Flange 2 through Reverb Flange 4 sound progressively deeper and more showy.
Basic use – using a preset program – 11
No.
Title
Type
Reverb
Description
77
Super Long Decay
An effect like an extremely long tunnel.
78
Slow Pan Reverb
Rev→Pan
A fairly long reverb is panned slowly.
79
Sub Aqua
Pit→Rev
Water sounds producing a “sprong” when applied to a rim shot. When applied to
strings, a saw-like sound results.
80
Thud
Pit→Rev
81
Alien Attack
Pit→Rev
82
High Filter
Reverb
83
High Mid Filter
Reverb
84
Low Mid Filter
Reverb
85
Low Filter
Reverb
86
Chorus Reverb
Rev+Cho
87
Symphonic Rev 1
Rev+Sym
88
Symphonic Rev 2
Sym→Rev
89
Echo Reverb 1
Ech→Rev
90
Echo Reverb 2
Ech→Rev
Turns an acoustic instrument into a synth! Produces an auto-wah like effect when
applied to guitar.
Effect reverb with a sense of definite pitch created by the dynamic filter. Try it on
rim shots, or percussive instruments and sound effects.
This program combines a chorus effect and reverb to create spaciousness and
depth.
A multi-phase chorus combined symphonic effect and reverb creates spaciousness and depth, with a multi-phase chorus.
Reverb is applied to a stereo feedback echo of up to 400 ms left and right.
ProR3 Digital Reverberator
12 Advanced uses (1)
Advanced uses (1)
The bypass function
When you press the BYPASS key, the circuit will be switched so that the input sound is output
directly. This function provides an easy way to make a quick comparison between the sound processed by the effect program and the unprocessed sound. When the effect is bypassed, the red
indicator will light.
PRE
EFFECT
EQ
BYPASS
EFFECT
ON
Pre-effect EQ
The PRE EFFECT EQ controls allow you to make settings for the three-band pre-effect equalizer.
For each band, you can set the center frequency and the gain.
Frequency
Gain
LOW
MID
HIGH
50 Hz to 700 Hz
350 Hz to 5 kHz
2 kHz to 20 kHz
±15 dB
±15 dB
±15 dB
1. Press the PRE EFFECT EQ ON key to turn on the equalizer.
The green indicator will light.
2. Select a band, and rotate its control knobs to adjust the gain.
3. Rotate the FREQ (frequency) control of the selected band.
To hear the effect of the equalizer, first adjust the gain level of the selected band, and then adjust
the frequency.
The equalizer control settings are not stored in the program memory. If the equalizer is turned
on, its settings will affect all programs.
Note: The pre-effect equalizer controls are located in the circuit after the INPUT level meters. This
means that you need to be careful when setting gain levels, since even if the gain is raised excessively
and digital clipping occurs, this will not be indicated by the meters.
ProR3 Digital Reverberator
Advanced uses (1) 13
The INFINITE function
The INFINITE function lets you set an extremely long reverb time. This is effective when used on
the ending of a song, etc.
The INFINITE key can be used in the following two ways.
• Press and immediately release the INFINITE key.
The reverb time will be set to the maximum. Press the key once again and the reverb time will
return to the original value.
• Press hold the INFINITE key.
The reverb time will be set to the maximum as long as you continue holding the key. When
you release the key, the reverb time will return to the original value.
Note: For programs whose primary effect is early reflection (ER) and do not have a RevTime parameter, therefore this key will have no effect.
ProR3 Digital Reverberator
14 Advanced uses (2) – Editing functions –
Advanced uses (2) – Editing functions –
Preset programs are “ready-made” programs. In contrast, user programs can be tailor-made to
meet your needs. This section explains how you can edit your own programs.
How programs are organized
Each of the ProR3 program consists of two main stages; the primary effect and the secondary
effects.
Of these, the primary effect can be selected from one of the following ten types, and will depend
on the program that you select.
Single type:
Compound type:
Reverb, ER, Room Sim
Rev+Ech, Rev+ER, Rev+Cho, Rev+Sym, Rev+Flg, Rev+Pit, Rev+PAN
The “+” in compound type effects such as “Rev+Ech” means that these
effects simultaneously apply both reverb (Rev) and echo (Ech). You can
select the order in which these occur; i.e., whether reverb will be
applied and then echo, or echo applied and then reverb.
The secondary effects are supplementary, and are the following five which are provided for each
program: DFL (dynamic filter), COMP (compressor), EQ, GATE, and LEVEL/BAL.
The primary effect is the decisive factor in determining the character of the entire effect, and if
you know its type, you will have a good idea of how the entire program will sound. For this reason, when the program is shown in the LCD, the primary effect type used by that program will
be shown along with the program number and title, and is also given in the list.
Program title
Program number
Primary effect type
Large Hall 1
RevTime =
Parameter
Reverb
2.5s
Parameter value
The ProR3 has separate dedicated keys for recalling the parameters of the primary effect and the
secondary effects.
Secondary effects
Primary effect
Reverb
ER
Room Sim
Rev+Ech
Rev+ER
Rev+Cho
Rev+Sym
Rev+Flg
Rev+Pit
Rev+PAN
MAIN
ProR3 Digital Reverberator
DFL
FINE
COMP
EQ
EQ
GATE
EQ
ON
GATE
GATE
ON
LEVEL/
BAL
LEVEL/
BAL
Advanced uses (2) – Editing functions – 15
Editing procedure
1) Selecting a program
Refer to the list of preset programs on page 9 or the included preset program list, and select the
number of the program that you wish to edit.
At this time, it is not possible to change the type of the primary effect, so make your choice of
type carefully.
Primary effect type
Large Hall 1
RevTime =
Reverb
2.5s
2) Editing parameters
1. Press the key which accesses the program parameter that you wish to edit. For example
to edit primary effect parameters, press the MAIN key or FINE key. To edit GATE parameters, press the GATE key.
Pages 18 and following have lists of the parameters which are accessed by each key.
2. Repeatedly press the key until the parameter that you wish to edit appears.
3. Use the cursor keys (√) (®) to move the cursor to the parameter that you wish to edit.
4. There are two ways to set the value of a parameter.
• Press the INC or DEC key to set the value.
If you continue holding down a key, the value will continue to change.
• Use the numeric keys and the RECALL/ENTER key to set the value.
1 Use the numeric keys to enter the value, and the data will blink. If you make a mistake,
press the CANCEL key, and input the value once again using the numeric keys.
2 Press the RECALL/ENTER key to finalize the setting.
5. By pressing the COMPARE key, you can compare the sound after the parameter was
edited with the sound that the program had when it was recalled.
6. If you wish to edit the parameter again, return to step 3.
7. If you wish to edit a different parameter in the same effect, return to step 2.
8. If you wish to edit a different effect, refer to step 1.
ProR3 Digital Reverberator
16 Advanced uses (2) – Editing functions –
3) Entering a title
You can enter a program name of up to 16 characters for each of your own effect programs.
1. Press the OTHERS key.
The red indicator will light. Each time you press the OTHERS key, the title edit page and two
controller parameter pages will alternate.
Title Edit
[Dread Lurgi Verb]
2. Use the CURSOR keys (√) (®) to select the location of the character.
The cursor will indicate the location when a character can be selected. Each time you press the
CURSOR key, the cursor will move to the next/previous character location, and will “wrap
around” when it reaches the end of the title.
3. Press the INC or DEC key to change the character. You can also use the numeric keys to
enter numerals.
If you continue holding the INC or DEC key, the character will continue to change. The numerals
0 through 9, a “–” (minus), and a “.” (decimal point) can be entered using the numeric keys.
4) Setting MIDI control parameters
You can specify parameters to be controlled via MIDI, and the range of control. (refer page 35)
1. Press the OTHERS key to access the MIDI control page.
Ctr1-1 Prm
RevTIM
Min
Max
0.0% 100.0
2. Use the CURSOR keys (√) (®) to select parameters.
3. Use the INC and DEC keys to set the parameters.
Control 1 Prm
–
Select the parameter controlled by MIDI controller 1
Control 1 Min
0.0–100.0%
Minimum value of the range of MIDI controller 1
Control 1 Max
0.0–100.0%
Maximum value of the range of MIDI controller 1
Control 2 Prm
–
Select the parameter controlled by MIDI controller 2
Control 2 Min
0.0–100.0%
Minimum value of the range of MIDI controller 2
Control 2 Max
0.0–100.0%
Maximum value of the range of MIDI controller 2
5) Saving a program
Up to 90 programs whose parameters you have edited can be saved as USER programs.
1. Press the STORE key.
The PROGRAM indicator will blink, and a message will appear to ask the storing location.
Circus Big Top
Reverb
Store from P01 to U01 ?
ProR3 Digital Reverberator
Advanced uses (2) – Editing functions – 17
If the USER program area is protected (i.e., if Memory Protect is ON), a message of “MEMORY
PROTECTED” will appear.
If this occurs, turn off the Memory Protect utility function as explained on page 33 before storing
your program.
2. The upper line of the display will show the title of the program that already occupies the
storing destination.
Use the INC/DEC keys or the numeric keys to select the storing destination.
Vocal Plate 2
Reverb
Store from P01 to U40 ?
If you use the numeric keys to enter a number outside of the range of 1–90, a message of “ NO
PROGRAM No Type” will appear. Press the CANCEL key to return to the previous display.
**
**
3. To store the program, press the STORE key. To cancel, press the CANCEL key.
Low Mid Filter
Reverb
This Program is Stored
A message of “This Program is Stored” will appear briefly, and then the previous display will
reappear.
If a number outside of the range of 1–90 has been entered using the numeric keys, a message of
“ Store Number Error ” will appear. Press the CANCEL key to return to the previous display.
**
**
ProR3 Digital Reverberator
18 Advanced uses (2) – Editing functions –
Program parameters 1 (Primary effects)
Reverberation (Reverb)
Key
Parameter
Value
Description
MAIN
RevTime
0.3 ~ 99.0 s
Reverb time of primary reverberation (the time required for 60
dB of decay at 1 kHz)
IniDelay
0.1 ~ 200.0 ms
Delay time until the primary reverb begins
HighRatio
X0.1 ~ X1.0
Reverb time of the high frequency components of the reverb;
relative to RevTime
LowRatio
X0.1 ~ X2.4
Reverb time of the low frequency components of the reverb;
relative to RevTime
Diffusion
0 ~ 10
Spread of the reverb sound
Reverb Type
*1
Type of reverb tone
ER/REV Balance
0/100 ~ 100/0
Level balance between early reflections and reverb
ER/REV Delay
0.1 ~ 100.0 ms
Time difference between beginning of early reflections and
beginning of reverb
Liveness
0 ~ 10
Decay characteristics of early reflections; 0:dead, 10:live
Density
0 ~ 100
Density of the early reflections
HPF
Thru, 40 Hz ~ 1.0 kHz
Cutoff frequency of the high pass filter
LPF
400 Hz ~ 20 kHz, Thru
Cutoff frequency of the low pass filter
Rev2 Time
X0.1 ~ X10.0
Decay time of the secondary reverb; relative to primary
reverb
Rev2 Delay *2
0.0 ~ 100.0 ms
Time difference between primary reverb and secondary
reverb
Rev2 Level *2
0 ~ 100%
Level of secondary reverb; relative to primary reverb
Mod Freq
0.05 ~ 40.00 Hz
Frequency of reverb modulation
Mod Depth
0 ~ 100%
Depth of reverb modulation
Mod Delay
0.1 ~ 30 ms
Shorter values produce modulation in the high range, longer
values in the low range.
FINE
Common parameters
Refer to “Common parameters” on page 27
*1 Small Hall, Large Hall, Vocal plate, Perc.Plate, Spring, Echo Room, Strings, Snare, Reverb Flange
*2 Only when the input mode is either L-Mono, R -Mono, or LR-Mix.
ProR3 Digital Reverberator
Advanced uses (2) – Editing functions – 19
Early Reflections (ER)
Key
Parameter
Value
Description
MAIN
ER Type
*1
Type of early reflection simulation
IniDelay
0.1 ~ 200.0 ms
Delay time until early reflections are heard
Liveness
0 ~ 10
Decay characteristics of the early reflections; 0: dead, 10: live
RoomSize
0.1 ~ 25.0
Spacing of reflections
Diffusion
0 ~ 10
Spread of the early reflections
ER Number
1 ~ 40
Number of early reflections
FeedBack Delay
0.1 ~ 1000.0 ms
Delay time of feedback
FeedBack Gain
–99 ~ +99%
Amount of feedback; “-” inverts the phase
FeedBack High
0.1 ~ 1.0
Amount of high range feedback; relative to FeedBack Gain
Density
0 ~ 100
Density of reflections
HPF
Thru, 40 Hz ~ 1.0 kHz
Cutoff frequency of high pass filter
LPF
400 Hz ~ 20 kHz, Thru
Cutoff frequency of low pass filter
0 ~ 10
Modulation level
FINE
Space Mod
Common parameters
Refer to “Common parameters” on page 27
*1 Small Hall, Large Hall, Random, Reverse, Plate, Spring, User A, User B, User C, User D
User ER parameter
There are four User ER banks; A–D.
For each bank, you can specify 40 reflections.
For each reflection, you can specify the delay time, level, and panning.
Key
Parameter
Value
Description
FINE
A-01 Delay
0.1 ~ 1000.0 ms
Delay time of first reflection of bank A
A-01 Level
–100 ~ +100%
Level of first reflection of bank A
A-01 Pan
L16 ~ R16
Pan position of first reflection of bank A
•
•
•
D-40 Pan
Return to the beginning of FINE (ER Number)
ProR3 Digital Reverberator
20 Advanced uses (2) – Editing functions –
Room Simulation (RoomSim)
Key
Parameter
Value
Description
MAIN
RevTime
0.3 ~ 99.0 s
Decay time of reverb
IniDelay
0.1 ~ 200.0 ms
Delay time until reverb is heard
Width
0.5 ~ 46.7 m
Simulation of room width
Height
0.5 ~ 46.7 m
Simulation of ceiling height
Depth
0.5 ~ 46.7 m
Simulation of room depth
Wall Vary
0 ~ 30
Simulation of wall roughness (flat 0 → rough 30)
Wall Vary Fine
–100 ~ +100
Fine adjustment of wall simulation
Listening Position
Front, Center, Rear
Seating position in the room
HighRatio
X0.1 ~ X1.0
Decay time of high range reverb components; relative to
RevTime
LowRatio
X0.1 ~ X2.4
Decay time of low range reverb components; relative to RevTime
Diffusion
0 ~ 10
Spread of the reverb sound
Width Fine
–100 ~ +100
Fine adjustment of width simulation
Height Fine
–100 ~ +100
Fine adjustment of height simulation
Depth Fine
–100 ~ +100
Fine adjustment of depth simulation
Width Decay
RT X0.1 ~ 10.0
Decay time of width component of reverb; relative to RevTime
Height Decay
RT X0.1 ~ 10.0
Decay time of height component of reverb; relative to RevTime
Depth Decay
RT X0.1 ~ 10.0
Decay time of depth component of reverb; relative to RevTime
ER/REV Balance
0/100 ~ 100/0
Level balance of early reflections and reverb
ER/REV Delay
0.1 ~ 100.0 ms
Time difference between early reflections and reverb
Density
0 ~ 100
Density of reflections
HPF
Thru, 40 Hz ~ 1.0 kHz
Cutoff frequency of high pass filter
LPF
400 Hz ~ 20 kHz, Thru
Cutoff frequency of low pass filter
0 ~ 10
Modulation level
FINE
Space Mod
Common parameters
ProR3 Digital Reverberator
Refer to “Common parameters” on page 27
Advanced uses (2) – Editing functions – 21
Reverb + Echo (Rev + Ech)
Key
Parameter
Value
Description
MAIN
REV RevTime
0.3 ~ 99.0 s
REV IniDelay
0.1 ~ 200.0 ms
REV HighRatio
X0.1 ~ X1.0
REV LowRatio
X0.1 ~ X2.4
REV Diffusion
0 ~ 10
Refer to “Reverberation” items on page 18
ECHO Lch Delay
0.1 ~ 400.0 ms
Left channel delay time
ECHO Rch Delay
0.1 ~ 400.0 ms
Right channel delay time
ECHO Lch FeedBack
–99 ~ +99%
Left channel feedback amount
ECHO Rch FeedBack
–99 ~ +99%
Right channel feedback amount
ECHO High Ratio
0.1 ~ 1.0
High range feedback amount
ECHO/REV Balance *1
0/100 ~ 100/0
Level balance of echo and reverb
REV Rev Mix *2
0 ~ 100%
Reverb amount
REV Reverb Type
*3
Type of reverb tone
REV Density
0 ~ 100
Density of reverb
REV HPF
Thru, 40 Hz ~ 1.0 kHz
Cutoff frequency of reverb high pass filter
REV LPF
400 Hz ~ 20 kHz, Thru
Cutoff frequency of reverb low pass filter
FINE
REV Space Mod
0 ~ 10
Modulation level of reverb
ECHO Lch IniDelay
0.1 ~ 400.0 ms
Time until the L channel echo appears
ECHO Rch IniDelay
0.1 ~ 400.0 ms
Time until the R channel echo appears
REV Patch
*4
Connection of reverb and echo
Common parameters
*1
*2
*3
*4
Refer to “Common parameters” on page 27
Only when REV Patch is parallel (Reverb + Echo)
Only when REV Patch is serial (Reverb → Echo, Echo → Reverb)
Hall, Room, Vocal, Plate
Reverb + Echo, Echo → Reverb, Reverb → Echo
ProR3 Digital Reverberator
22 Advanced uses (2) – Editing functions –
Reverb + Early Reflections (Rev + ER)
Key
Parameter
Value
Description
MAIN
REV RevTime
0.3 ~ 99.0 s
REV IniDelay
0.1 ~ 200.0 ms
REV HighRatio
X0.1 ~ X1.0
REV LowRatio
X0.1 ~ X2.4
REV Diffusion
0 ~ 10
ER Type
*1
ER IniDelay
0.1 ~ 100.0 ms
ER Liveness
0 ~ 10
ER RoomSize
0.1 ~ 25.0
ER Diffusion
0 ~ 10
Refer to “Reverberation” items on page 18
Refer to “Early reflection” items on page 19
FINE
ER/REV Balance *2
0/100 ~ 100/0
Level balance of ER and reverb
REV Rev Mix *3
0 ~ 100%
Reverb amount
REV Reverb Type
*4
Type of reverb tone
REV Density
0 ~ 100
Density of reverb
REV HPF
Thru, 40 Hz ~ 1.0 kHz
Cutoff frequency of reverb high pass filter
REV LPF
400 Hz ~ 20 kHz, Thru
Cutoff frequency of reverb low pass filter
REV Space Mod
0 ~ 10
Modulation level of reverb
ER Number
1 ~ 14
Number of early reflections
ER Density
0 ~ 100
Density of early reflections
ER HPF
Thru, 40 Hz ~ 1.0 kHz
Cutoff frequency of ER high pass filter
ER LPF
400 Hz ~ 20 kHz, Thru
Cutoff frequency of ER low pass filter
REV Patch
*5
Connection of reverb and ER
Common parameters
*1
*2
*3
*4
*5
Refer to “Common parameters” on page 27
Small Hall, Large Hall, Random, Reverse, Plate, Strings
Only when REV Patch is parallel (Reverb + ER)
Only when REV Patch is serial (Reverb → ER, ER → Reverb)
Hall, Room, Vocal, Plate
Reverb + E.Ref., E.Ref. → Reverb, Reverb → E.Ref.
ProR3 Digital Reverberator
Advanced uses (2) – Editing functions – 23
Reverb + Chorus (Rev + Cho)
Key
Parameter
Value
Description
MAIN
REV RevTime
0.3 ~ 99.0 s
REV IniDelay
0.1 ~ 200.0 ms
REV HighRatio
X0.1 ~ X1.0
REV LowRatio
X0.1 ~ X2.4
REV Diffusion
0 ~ 10
Refer to “Reverberation” items on page 18
CHO Mod Freq
0.05 ~ 40.00 Hz
Chorus modulation frequency
CHO DM Depth
0 ~ 100%
Chorus delay time modulation depth
CHO AM Depth
0 ~ 100%
Chorus amplitude modulation depth
CHO/REV Balance *1
0/100 ~ 100/0
Level balance of chorus and reverb
REV Rev Mix *2
0 ~ 100%
Reverb amount
REV Reverb Type
*3
Type of reverb tone
REV Density
0 ~ 100
Density of reverb
REV HPF
Thru, 40 Hz ~ 1.0 kHz
Cutoff frequency of reverb high pass filter
REV LPF
400 Hz ~ 20 kHz, Thru
Cutoff frequency of reverb low pass filter
REV Space Mod
0 ~ 10
Modulation level of reverb
REV Patch
*4
Connection of reverb and ER
FINE
Common parameters
*1
*2
*3
*4
Refer to “Common parameters” on page 27
Only when REV Patch is parallel (Reverb + Chorus)
Only when REV Patch is serial (Reverb → Chorus, Chorus → Reverb)
Hall, Room, Vocal, Plate
Reverb + Chorus, Chorus → Reverb, Reverb → Chorus
ProR3 Digital Reverberator
24 Advanced uses (2) – Editing functions –
Reverb + Symphonic (Rev + Sym)
Key
Parameter
Value
Description
MAIN
REV RevTime
0.3 ~ 99.0 s
REV IniDelay
0.1 ~ 200.0 ms
REV HighRatio
X0.1 ~ X1.0
REV LowRatio
X0.1 ~ X2.4
REV Diffusion
0 ~ 10
SYM Mod Freq
0.05 ~ 40.00 Hz
Symphonic modulation frequency
SYM Depth
0 ~ 100%
Symphonic modulation depth
SYM/REV Balance *1
0/100 ~ 100/0
Level balance of reverb and symphonic
REV Rev Mix *2
0 ~ 100%
Reverb amount
REV Reverb Type
*3
Type of reverb tone
REV Density
0 ~ 100
Density of reverb
REV HPF
Thru, 40 Hz ~ 1.0 kHz
Cutoff frequency of reverb high pass filter
REV LPF
400 Hz ~ 20 kHz, Thru
Cutoff frequency of reverb low pass filter
REV Space Mod
0 ~ 10
Modulation level of reverb
*4
Connection of symphonic and reverb
Refer to “Reverberation” items on page 18
FINE
REV Patch
Common parameters
*1
*2
*3
*4
Refer to “Common parameters” on page 27
Only when REV Patch is parallel (Reverb + Symphon)
Only when REV Patch is serial (Reverb → Symphon, Symphon → Reverb)
Hall, Room, Vocal, Plate
Reverb + Symphon, Symphon → Reverb, Reverb → Symphon
ProR3 Digital Reverberator
Advanced uses (2) – Editing functions – 25
Reverb + Flanger (Rev + Flg)
Key
Parameter
Value
Description
MAIN
REV RevTime
0.3 ~ 99.0 s
REV IniDelay
0.1 ~ 200.0 ms
REV HighRatio
X0.1 ~ X1.0
REV LowRatio
X0.1 ~ X2.4
REV Diffusion
0 ~ 10
FLA Mod Freq
0.05 ~ 40.00 Hz
Modulation frequency of the flanger
FLA Depth
0 ~ 100%
Modulation depth of flanger
FLA Delay
0.1 ~ 100.0 ms
Larger values produce modulation in the low range, and
smaller values in the high range
FLA FeedBack Gain
0 ~ 100%
Feedback amount of the flanger
FLA/REV Balance *1
0/100 ~ 100/0
Level balance of reverb and flanger
REV Rev Mix *2
0 ~ 100%
Reverb amount
REV Reverb Type
*3
Type of reverb tone
REV Density
0 ~ 100
Density of reverb
REV HPF
Thru, 40 Hz ~ 1.0 kHz
Cutoff frequency of reverb high pass filter
REV LPF
400 Hz ~ 20 kHz, Thru
Cutoff frequency of reverb low pass filter
REV Space Mod
0 ~ 10
Modulation level of reverb
*4
Connection of flanger and reverb
Refer to “Reverberation” items on page 18
FINE
REV Patch
Common parameters
*1
*2
*3
*4
Refer to “Common parameters” on page 27
Only when REV Patch is parallel (Reverb + Flange)
Only when REV Patch is serial (Reverb → Flange, Flange → Reverb)
Hall, Room, Vocal, Plate
Reverb + Flange, Flange → Reverb, Reverb → Flange
ProR3 Digital Reverberator
26 Advanced uses (2) – Editing functions –
Reverb + Pitch Change (Rev + Pit)
Key
Parameter
Value
Description
MAIN
REV RevTime
0.3 ~ 99.0s
REV IniDelay
0.1 ~ 200.0 ms
REV HighRatio
X0.1 ~ X1.0
REV LowRatio
X0.1 ~ X2.4
REV Diffusion
0 ~ 10
PIT Pitch 1
↓Oct ~ ↑Oct
PIT Pitch 2
↓Oct ~ ↑Oct
Shift amount of pitch 2
PIT Fine 1
–100 ~ +100 cent
Fine adjustment to shift amount of pitch 1
PIT Fine 2
–100 ~ +100 cent
Fine adjustment to shift amount of pitch 2
PIT Delay 1
0.1 ~ 300.0 ms
Pitch 1 delay time
PIT Delay 2
0.1 ~ 300.0 ms
Pitch 2 delay time
PIT Feedback 1
0 ~ 99%
Pitch 1 feedback amount
PIT Feedback 2
0 ~ 99%
Pitch 2 feedback amount
PIT Pan 1
L16 ~ R16
Pitch 1 pan position
PIT Pan 2
L16 ~ R16
Pitch 2 pan position
PIT/REV Balance *1
0/100 ~ 100/0
Level balance of reverb and pitch change
REV Rev Mix *2
0 ~ 100%
Reverb amount
REV Reverb Type
*3
Type of reverb tone
REV Density
0 ~ 100
Density of reverb
REV HPF
Thru, 40 Hz ~ 1.0 kHz
Cutoff frequency of reverb high pass filter
REV LPF
400 Hz ~ 20 kHz, Thru
Cutoff frequency of reverb low pass filter
REV Space Mod
0 ~ 10
Modulation level of reverb
PIT Pitch Balance
0 ~ 100%
Balance of direct sound and pitch shifted sound
PIT Base Key
OFF, C1 ~ C6
*5
*4
Selection of effect combination
Refer to “Reverberation” items on page 18
Shift amount of pitch 1
FINE
REV Patch
Common parameters
*1
*2
*3
*4
*5
Refer to “Common parameters” on page 27
Only when REV Patch is parallel (Reverb + Pitch)
Only when REV Patch is serial (Reverb → Pitch, Pitch → Reverb)
Hall, Room, Vocal, Plate
Reverb + Pitch, Pitch → Reverb, Reverb → Pitch
Set this parameter when you wish to use note messages from a MIDI keyboard etc. to control the pitch difference
between the input sound and the pitch shifted sound.
The pitch difference between the input sound and the pitch shifted sound will be determined by the pitch difference
between the Base Key specified by this parameter and the note-on message that is received. For example if the Base
Key is set to C4, an incoming note-on message of C3 would shift the pitch down one octave, and an incoming noteon message of D4 would shift the pitch up a whole step.
* MIDI note number 60 is considered C3.
* The range of the actual pitch change is ±1 octave, so even if the specified pitch difference exceeds 1 octave, the
resulting pitch change will stay within this range.
* If Base Key is set OFF, MIDI note-on messages will not control the pitch.
* When using MIDI note-on messages to control the amount of the pitch shift, the pitch of the last-input note-on
message will set the Pitch parameter.
ProR3 Digital Reverberator
Advanced uses (2) – Editing functions – 27
Reverb + Auto Pan (Rev + PAN)
Key
Parameter
Value
Description
MAIN
REV RevTime
0.3 ~ 99.0 s
REV IniDelay
0.1 ~ 200.0 ms
REV HighRatio
X0.1 ~ X1.0
REV LowRatio
X0.1 ~ X2.4
REV Diffusion
0 ~ 10
PAN Speed
0.05 ~ 40.00 Hz
Modulation frequency of auto-pan
PAN Depth
0 ~ 100%
Modulation depth of auto-pan
PAN Direction
L→R, L←R, L ↔R
Direction of panning movement
PAN/REV Balance *1
0/100 ~ 100/0
Level balance of reverb and auto-pan
REV Rev Mix *2
0 ~ 100%
Reverb amount
REV Reverb Type
*3
Type of reverb tone
REV Density
0 ~ 100
Density of reverb
REV HPF
Thru, 40 Hz ~ 1.0 kHz
Cutoff frequency of reverb high pass filter
REV LPF
400 Hz ~ 20 kHz, Thru
Cutoff frequency of reverb low pass filter
REV Space Mod
0 ~ 10
Modulation level of reverb
REV Patch
*4
Connection of auto-pan and reverb
Refer to “Reverberation” items on page 18
FINE
Common parameters
*1
*2
*3
*4
Refer to “Common parameters” on page 27
Only when REV Patch is parallel (Reverb + PAN)
Only when REV Patch is serial (Reverb → PAN, PAN → Reverb)
Hall, Room, Vocal, Plate
Reverb + PAN, PAN → Reverb, Reverb → PAN
Common parameters
Key
Parameter
Value
Description
FINE
1stRef-1 Delay
0.1 ~ 200.0 ms
1stRef-1 Lvl
0 ~ 100%
Delay time of reflection 1
Level of reflection 1
1stRef-1 Pan
L16 ~ R16
Pan position of reflection 1
Delay time of reflection 2
1stRef-2 Delay
0.1 ~ 200.0 ms
1stRef-2 Lvl
0 ~ 100%
Level of reflection 2
1stRef-2 Pan
L16 ~ R16
Pan position of reflection 2
Input Mix *1
0 ~ 100%
Stereo-mix adjustment
continues to DFL
*1 Only for stereo mode
ProR3 Digital Reverberator
28 Advanced uses (2) – Editing functions –
Program paramaters 2 (Secondary effects)
DFL
By using the dynamic filter you can create wah effects in which the frequency response is
changed by the level of the input signal.
Key
Parameter
Value
Description
FINE
DFL Dynamic Filter
OFF, ON
DFL effect on/off
DFL Filter Type
LPF, HPF, BPF
Filter type selection
DFL Frq.Center
100 Hz ~ 3.2 kHz
Center frequency of the filter
DFL Resonance
0 ~ 20
Filter resonance
DFL Shift
Up/Down
Direction in which center frequency will change in response
to the level of the input signal
DFL Sens
1 ~ 10
Sensitivity to the input signal
DFL Decay
1 ~ 10
Speed at which the center frequency will return after shifting
DFL Patch
PreREV, PostREV
Place the filter patch point before or after the reverb
continues to COMP
ProR3 Digital Reverberator
Advanced uses (2) – Editing functions – 29
COMP
The compressor can be used to compress level changes in the input signal, enhancing presence
even for low level signals.
In the last page of the compressor parameters, the amount of gain reduction is shown as a bar
graph, allowing you to see the operation of the compressor
dB
0
Ratio = 2:1
Output Level
–10
Threshold = -20dB
–20
–30
–40
Knee = SoftKnee
–50
–60
–70
dB
–70
Key
–60
Parameter
–50
–40
–30 –20 –10
Input Level
0
Value
Description
FINE
COMP Compressor
OFF/ON
Compressor on/off
COMP Threshold Level
–54 ~ 0 dB
Threshold level
COMP Output Level
–15 ~ +15 dB
Compressor output level
COMP Ratio
1:1 ~ 00:1
Compression ratio
COMP Knee
SoftKnee, Medium,
HardKnee
Mode of change in threshold level
COMP Attack Time
0 ~ 500 ms
Attack time
COMP Release Time
6 ~ 2400 ms
Release time
COMP GR
Bar graph
Gain reduction amount is displayed as a bar graph
Return to the beginning of FINE (However if the primary effect is ER, continue to User ER)
ProR3 Digital Reverberator
30 Advanced uses (2) – Editing functions –
EQ
A three-band parametric equalizer is located after the compressor, allowing you to adjust the
low, mid, and high frequency ranges of the sound.
LOW
MID
HIGH
Type
Peaking/Shelving
Peaking
Peaking/Shelving
Gain
±15 dB
±15 dB
±15 dB
32 Hz to 2.2 kHz
250 Hz to 5.6 kHz
500 Hz to 20 kHz
0.1 to 5.0
0.1 to 5.0
0.1 to 5.0
Frequency
Q
Key
Parameter
Value
Description
EQ
Low EQ Type
Peaking, Shelving
Low Gain
–15 ~ +15 dB
Select EQ type for low range
Set low range gain
Low Freq
32 Hz ~ 2.2 kHz
Adjust low range frequency
Low Q *1
0.1 ~ 5.0
Set Q factor of low range
Mid Gain
–15 ~ +15 dB
Set mid range gain
Mid Freq
250 Hz ~ 5.6 kHz
Adjust mid range frequency
Mid Q
0.1 ~ 5.0
Set Q factor of mid range
High EQ Type
Peaking, Shelving
Select EQ type for high range
High Gain
–15 ~ +15 dB
Set high range gain
High Freq
500 Hz ~ 20 kHz
Adjust high range frequency
High Q *1
0.1 ~ 5.0
Set Q factor of high range
OFF/ON
Equalizer on/off
EQ ON
POST EQ
*1 When EQ Type is Peaking
ProR3 Digital Reverberator
Advanced uses (2) – Editing functions – 31
GATE
The gate allows you to create gated reverb effects.
Gated reverb is an effect in which the reverb sound is cut off during its decay by detecting the
level of the signal and opening and closing a gate.
dB
+20
+10
0
Output Level
–10
–20
–30
–40
Threshold = –40dB
–50
–60
–70
dB
–70
Key
–60
Parameter
–50
–40
–30 –20 –10
Input Level
0
Value
+10
+20
Description
GATE
Threshold Level
–60 ~ 0 dB
Threshold
Trigger Delay
0.1 ~ 100 ms
Delay until the gate functions
Hold Time
1 ~ 5759 ms
Time from the hold time that the gate remains open
Release time
6 ~ 24000 ms
Time from the hold time until the gate closes
MIDI Trigger
OFF/ON
External MIDI control settings related to gating
Detect
at-GATE, Pre-REV
Point at which level is detected
GATE GR
Bar graph
Gate open/shut operation is shown by a bar graph
OFF/ON
Gate on/off
GATE ON
Gate
ProR3 Digital Reverberator
32 Advanced uses (2) – Editing functions –
LEVEL/BAL
Here you can set the output level.
You can also adjust the balance between the direct sound and the effect sound.
Key
GATE
BAL
LEVEL
GATE
BAL
LEVEL
Parameter
BYPASS
Value
Description
LEVEL/BAL
Effect Balance
0 ~ 100%
Ratio of effect sound and direct sound
Output Level
–∞, –50 ~ +6 dB
Output level adjustment
ProR3 Digital Reverberator
Advanced uses (3) – Utility functions – 33
Advanced uses (3) – Utility functions –
Here’s how to make settings for system parameters such as memory protect, input mode, and
MIDI parameters.
Memory protect settings
1. Press the UTILITY key to access the memory protect page.
The red indicator will light.
Memory Protect
ON
2. Press the INC or DEC key to turn the setting ON or OFF.
This function protects the data in USER program memory from being accidentally overwritten.
ON: Write prohibit
OFF: Write permit
Input mode setting
The ProR3 has four input modes; Stereo, LR-Mix, R-Mono, and L-Mono.
1. Press the UTILITY key to access the input mode page.
2. Press the INC or DEC key to select the input mode.
Input Mode
LR-Mix
LR-MIX: The left and right input signals will be mixed and processed. The effect sound will be
of higher quality than for STEREO.
STEREO: The left and right input signals will be processed separately, and the stereo placement
of the input sound will be reflected in the effect sound as well.
L-Mono: Only the left input signal will be processed, and the bypass signal will be output to left
and right.
R-Mono: Only the right input signal will be processed, and the bypass signal will be output to
left and right.
ProR3 Digital Reverberator
34 Advanced uses (3) – Utility functions –
MIDI channel setting
Here’s how to set the MIDI transmit and receive channel.
1. Press the UTILITY key to access the MIDI channel setting page.
MIDI Channel
OMNI
2. Press the INC or DEC key to set the channel.
OMNI: All channels 1–16 will be received, and the transmit channel will be 1.
1–16:
Transmission and reception will take place on the specified channel.
OFF:
MIDI data will be neither transmitted nor received.
Setting the MIDI program change table
You can make settings for each of the four MIDI program change table banks of the ProR3. With
the factory preset settings, MIDI program numbers 1–90 correspond to USER program numbers
1–90, and MIDI program numbers 91–128 correspond to PRESET program numbers 1–38.
1. Repeatedly press the UTILITY key until the MIDI program change table page appears.
MIDI PGM Change Table
BANK:A PGM
1= ProR U01
2. Use the CURSOR keys (√) (®) to select a parameter.
3. Press the INC or DEC key to set the parameter. You can also use the numeric keys to
directly enter a MIDI program number.
BANK
A–D
Specify the program change bank
PGM
1–128
The MIDI program number
U01–U90, P01–P90
This is the ProR3 program number which will be recalled when the MIDI program number is received. U01–U90 and P01–P90 respectively indicate
USER and PRESET program numbers.
With a setting of ..., nothing will be recalled. *
ProR
---
* --- also can be input by CANCEL key.
ProR3 Digital Reverberator
Advanced uses (3) – Utility functions – 35
Transmitting a MIDI bulk dump
The ProR3 allows you to transmit any type of data as a bulk dump; memory, program memory
(all programs or a specified program), banks, user ER, or system memory.
1. Repeatedly press the UTILITY key until the MIDI Bulk Out page appears.
MIDI Bulk Out
All
Press ENTER
2. Use the CURSOR keys (√) (®) to select a parameter.
3. Press the INC or DEC key to select the value.
All
All data (Program, Bank, UserER, System)
Program
U01–U90,
All
The data of the specified USER program.
If All is selected, data for all USER programs.
Bank
A–D,
All
The data of the specified Bank program change table.
If All is selected, data for all Bank data.
UserER
A–D,
All
The specified User ER data
If All is selected, all User ER data.
System
System data settings made for utility functions such as Input Mode, etc.
4. Press the RECALL/ENTER key to execute the bulk dump.
Before you begin transmission, make sure that the MIDI device to which the ProR3 is connected
is ready to receive a bulk dump.
Assigning MIDI controllers
Here’s how to assign MIDI control numbers to the two controllers. The ProR3 can respond to two
controllers, and a separate page is provided to make settings for each controller.
1. Repeatedly press the UTILITY key until one of the controller assign pages appears.
Controller-1 Assign
OFF
2. Press the INC or DEC key to specify the control number.
The parameter selected in “Setting MIDI control parameters” of page 16 can be controlled in realtime by receiving the specified control change message.
ProR3 Digital Reverberator
36 ERROR Messages of the ProR3
Initializing the ProR3
If you wish to restore the ProR3 to the factory settings, use the following procedure to initialize
it.
1. Hold down the STORE key and press the POWER switch to turn the power on.
The following message will appear in the display; “Press [ENTER] to initialize ProR3”.
2. Press the RECALL/ENTER key to execute initialization.
Pressing any other key will cancel the procedure.
Warning: When you initialize, all user data will be erased. All settings of user programs,
the program change tables, and system-related settings will return to the factory
default settings.
Before you press RECALL/ENTER, check once again that you really want to execute initialization.
ERROR Messages of the ProR3
“ Program Number Error ”
*
*
“
Data Error
******
******”
“
** Store Number Error **”
“
** MEMORY PROTECTED ! **”
“
LOW BATTERY
ProR3 Digital Reverberator
“
Selected a program number greater than 90.
General data error. If necessary, re-initialize the ProR3.
Selected a program number greater than 90.
Memory protection command of the UTILITY function is
ON.
The internal battery is low. Take the unit to a Yamaha service center to have the battery replaced.
Specifications 37
Specifications
Frequency response
20 Hz ~ 20 kHz, +1.0 dB, –1.5 dB
Dynamic range
110 dB (typical), not less than 104 dB
Hum and noise *1
less than –80 dB *2
Distortion
less than 0.007% (1 kHz, maximum level)
Number of channels
2 (balanced signal)
Nominal level
+4 dB / –10 dB *2
Maximum level
+24 dB (with level switch at +4 dB) *2
Impedance
20 kΩ
Number of channels
2 (balanced signal)
Nominal level
+4 dB / –10 dB *2
Maximum level
+24 dB (with level switch at +4 dB) *2
Impedance
150 Ω
A/D convertors
20-bit linear
D/A convertors
20-bit linear
Sampling frequency
44.1 kHz
Preset programs
1 ~ 90
User programs
1 ~ 90
Audio Characteristics
Input
Output
A/D and D/A Convertors
Program Memory
MIDI Control
Program change, Control change, Bulk dump, Note ON, Parameter change
USA and Canada
120V AC, 60 Hz
General
230V AC, 50 Hz
Power Requirements
Power Consumption
35W
Dimensions (W × D × H)
480 × 398.5 × 89 mm
Weight
5.5 kg
INPUT Level
Controls
PRE EFFECT EQ - FREQ × 3 (LOW, MID, HIGH)
PRE EFFECT EQ - GAIN × 3 (LOW, MID, HIGH)
Buttons
ON (PRE EFFECT EQ) *3, √ (left CURSOR button),
® (right CURSOR button), INC (DATA button)
DEC (DATA button), COMPARE *3, MAIN *3
FINE *3, EQ *3, EQ ON *3, GATE *3, GATE ON *3
LEVEL/BAL *3, OTHERS *3, Numeric keypad (including “-”
and “.” buttons), PROGRAM *3, STORE, CANCEL
RECALL/ENTER, INFINITE *3, UTILITY *3, BYPASS *3
Switch
POWER
Displays
24 character × 2 lines LCD
8-segment LED – INPUT level meters × 2
7-segment LED – PROGRAM number
6-segment LED – Status indicators
Button LED indicators × 14
Connectors
INPUT L/R (XLR-3-31 × 2) and (1/4” phone jacks × 2)
OUTPUT L/R (XLR-3-32 × 2) and (1/4” phone jacks × 2)
MIDI – IN, OUT, THRU (5P DIN × 3)
Switches
Level switch (+4/–10) × 2
Front panel
Rear Panel
*1 Hum & Noise are measured with a filter equivalent to a 20 Hz to 20 kHz band-pass filter that has an infinite dB/octave attenuation.
*2 0 dB = 0.755 Vrms.
*3 LED above the button.
ProR3 Digital Reverberator
38 Specifications
370
H: 89
22.3
D: 398.5
Dimensions
W: 480
Unit: mm
All specifications subject to change without notice.
Block Diagram
95/10/18
Pre
Effect
EQ
L
DFL
COMP
EQ
GATE
L
LEVEL/
BAL
+4dB
INPUT L
L
+4dB
Selected
Effect
INPUT
MODE
–10dB
–10dB
INPUT
Pre
Effect
EQ
R
L
BYPASS
DFL
COMP
EQ
GATE
LEVEL/
BAL
OUTPUT
R
INPUT R
R
ProR3 Digital Reverberator
R
MIDI data format Add-1
MIDI data format
1. Transmitted data
1-1 System information
#1 Program bulk data
This data can be transmitted on the currently selected MIDI channel.
This data is transmitted when you select a program in the Utility Bulk Dump display and execute, or when a Program Bulk Dump Request message is received.
Data will be transmitted for the User program of the specified number.
Also, if the program number is “A11”, data for User programs 1–90 will be transmitted consecutively.
STATUS
ID No.
SUB STATUS
FORMAT No.
BYTE COUNT
BYTE COUNT
DATA NAME
PROGRAM No.
DATA
11110000(F0H)
01000011(43H)
0000nnnn(0nH)
01111110(7EH)
00000010(02H)
01111000(64H)
01001100(4CH)
01001101(4DH)
00100000(20H)
00100000(20H)
00111000(38H)
01000001(41H)
00111000(38H)
00110011(33H)
01001101(4DH)
0mmmmmmm
0ddddddd
CHECK SUM
EOX
0eeeeeee
11110111(F7H)
n=0-15
"L"
"M"
Space
Space
"8"
"A"
"8"
"3"
"M"
m=1-90
Memory bulk (346bytes)
0ddddddd
ProR3 Digital Reverberator
Add-2 MIDI data format
#2 Bank/Program Change Table bulk data
This data can be transmitted on the currently selected MIDI channel.
This data is transmitted when you select a bank in the Utility Bulk Out display and execute, or
when a Program Change Table Bulk Dump Request message is received.
Also, if the memory number is “A11”, data for banks 1–4 (A through D) will be transmitted consecutively.
STATUS
ID No.
SUB STATUS
FORMAT No.
BYTE COUNT
BYTE COUNT
DATA NAME
BANK No.
DATA
CHECK SUM
EOX
ProR3 Digital Reverberator
11110000(F0H)
01000011(43H)
0000nnnn(0nH)
01111110(7EH)
00000010(02H)
00001010(0AH)
01001100(4CH)
01001101(4DH)
00100000(20H)
00100000(20H)
00111000(38H)
01000001(41H)
00111000(38H)
00110011(33H)
01010100(54H)
0zzzzzzz
0ddddddd
:
:
0ddddddd
0eeeeeee
11110111(F7H)
n=0-15
"L"
"M"
Space
Space
"8"
"A"
"8"
"3"
"T"
z=1-4
Bank Program change (256bytes)
MIDI data format Add-3
#3 User ER Pattern bulk data
This data can be transmitted on the currently selected MIDI channel.
This data is transmitted when you select a User ER pattern in the Utility Bulk Out display and
execute, or when a User ER Pattern Bulk Dump Request message is received.
Also, if the User ER number is “A11”, data for patterns 1–4 (A through D) will be transmitted
consecutively.
STATUS
ID No.
SUB STATUS
FORMAT No.
BYTE COUNT
BYTE COUNT
DATA NAME
PATTERN No.
DATA
CHECK SUM
EOX
11110000(F0H)
01000011(43H)
0000nnnn(0nH)
01111110(7EH)
00000011(03H)
01010010(52H)
01001100(4CH)
01001101(4DH)
00100000(20H)
00100000(20H)
01000001(41H)
00111000(38H)
00110011(33H)
01000101(45H)
0zzzzzzz
0ddddddd
:
:
0ddddddd
0eeeeeee
11110111(F7H)
n=0-15
"L"
"M"
Space
Space
"8"
"A"
"8"
"3"
"E"
z=1-4
User ER pattern memory (480bytes)
ProR3 Digital Reverberator
Add-4 MIDI data format
#4 System Setup bulk data
This data can be transmitted on the currently selected MIDI channel.
This data is transmitted when you select System Setup in the Utility Bulk Out display and execute, or when a System Setup Bulk Dump Request message is received.
STATUS
ID No.
SUB STATUS
FORMAT No.
BYTE COUNT
BYTE COUNT
DATA NAME
DATA
CHECK SUM
EOX
11110000(F0H)
01000011(43H)
0000nnnn(0nH)
01111110(7EH)
00000000(00H)
00011010(1AH)
01001100(4CH)
01001101(4DH)
00100000(20H)
00100000(20H)
00111000(38H)
01000001(41H)
00111000(38H)
00110011(33H)
01010011(53H)
00100000(20H)
0ddddddd
:
:
0ddddddd
0eeeeeee
11110111(F7H)
n=0-15
"L"
"M"
Space
Space
"8"
"A"
"8"
"3"
"S"
space
System setup memory (16bytes)
#5 Parameter Change data
This data can be transmitted on the currently selected MIDI channel.
This data is transmitted when ProR3 receives a Parameter Value Request message is received.
STATUS
ID No.
SUB STATUS
FORMAT No.
DEVICE CODE
PARAMETER No.
DATA
EOX
ProR3 Digital Reverberator
11110000(F0H)
01000011(43H)
0001nnnn(1nH)
00011110(1EH)
00000101(05H)
0ppppppp
0ppppppp
0ddddddd
:
:
0ddddddd
11110111(F7H)
n=0-15
Parameter change memory (5bytes)
MIDI data format Add-5
2. Receive data
2-1 Channel information
#1 Note On
This message can be received on the currently selected MIDI channel.
If the MIDI Trigger parameter is ON, it will be received as a gate trigger.
When a pitch-type reverb program is selected, it will be received to control the pitch. The velocity value is ignored. If the Base Key parameter is OFF, the pitch will not be controlled.
STATUS
NOTE No.
VELOCITY
1001nnnn(9nH)
0kkkkkkk
0vvvvvvv
n=0-15
k=0-127
v=0-127
#2 Control Change
This message can be received on the currently selected MIDI channel.
When this message is received, it will control the parameter being modified by the corresponding foot controller as specified by the Control Assign table.
STATUS
CONTROL No
CONTROL VALUE
1011nnnn(BnH)
0ccccccc
0vvvvvvv
n=0-15
c=1-31, 64–95
v=0–127
#3 Program Change
This message can be received on the currently selected MIDI channel.
When this message is received, a program will be selected as specified by the Program Change
table of that bank.
STATUS
PROGRAM No.
1100nnnn(CnH)
0pppppp0
n=0-15
c=0-127
2-2 System information
#1 Program bulk dump request
This message can be received on the currently selected MIDI channel.
When this message is selected, the program of the specified User program number will be transmitted as bulk data.
STATUS
ID No.
SUB STATUS
FORMAT No.
DATA NAME
PROGRAM No.
EOX
11110000(F0H)
01000011(43H)
0010nnnn(2nH)
01111110(7EH)
01001100(4CH)
01001101(4DH)
00100000(20H)
00100000(20H)
00111000(38H)
01000001(41H)
00111000(38H)
00110011(33H)
01001101(4DH)
0mmmmmmm
11110111(F7H)
n=0-15
"L"
"M"
Space
Space
"8"
"A"
"8"
"3"
"M"
m=1-90
ProR3 Digital Reverberator
Add-6 MIDI data format
#2 Bank/Program Change Table bulk dump request
This message can be received on the currently selected MIDI channel.
When this message is received, the Program Change Table of the specified bank will be transmitted as bulk data.
STATUS
ID No.
SUB STATUS
FORMAT No.
DATA NAME
BANK No.
EOX
11110000(F0H)
01000011(43H)
0010nnnn(2nH)
01111110(7EH)
01001100(4CH)
01001101(4DH)
00100000(20H)
00100000(20H)
00111000(38H)
01000001(41H)
00111000(38H)
00110011(33H)
01010100(54H)
0zzzzzzz
11110111(F7H)
n=0-15
"L"
"M"
Space
Space
"8"
"A"
"8"
"3"
"T"
z=1-4
#3 User ER Pattern bulk dump request
This message can be received on the currently selected MIDI channel.
When this message is received, the data for the ER Pattern of the specified number will transmitted as bulk data.
STATUS
ID No.
SUB STATUS
FORMAT No.
DATA NAME
PATTERN No.
EOX
ProR3 Digital Reverberator
11110000(F0H)
01000011(43H)
0010nnnn(2nH)
01111110(7EH)
01001100(4CH)
01001101(4DH)
00100000(20H)
00100000(20H)
00111000(38H)
01000001(41H)
00111000(38H)
00110011(33H)
01000101(45H)
0zzzzzzz
11110111(F7H)
n=0-15
"L"
"M"
Space
Space
"8"
"A"
"8"
"3"
"E"
z=1-4
MIDI data format Add-7
#4 System Setup bulk dump request
This message can be received on the currently selected MIDI channel.
When this message is received, the System Setup data will transmitted as bulk data.
STATUS
ID No.
SUB STATUS
FORMAT No.
DATA NAME
EOX
11110000(F0H)
01000011(43H)
0010nnnn(2nH)
01111110(7EH)
01001100(4CH)
01001101(4DH)
00100000(20H)
00100000(20H)
00111000(38H)
01000001(41H)
00111000(38H)
00110011(33H)
01010011(53H)
00100000(20H)
11110111(F7H)
n=0-15
"L"
"M"
Space
Space
"8"
"A"
"8"
"3"
"S"
Space
#5 Bank Change request
This message can be received on the currently selected MIDI channel.
When this message is received, the specified bank will be selected.
STATUS
ID No.
SUB STATUS
FORMAT No.
DATA NAME
BANK No.
EOX
11110000(F0H)
01000011(43H)
0010nnnn(2nH)
01111110(7EH)
01001100(4CH)
01001101(4DH)
00100000(20H)
00100000(20H)
00111000(38H)
01000001(41H)
00111000(38H)
00110011(33H)
01010101(55H)
0zzzzzzz
11110111(F7H)
n=0-15
"L"
"M"
Space
Space
"8"
"A"
"8"
"3"
"U"
z=1-4
#6 Program bulk dump
The transmitted data is identical to “Program bulk data.”
#7 Bank/Program Change Table bulk data
The transmitted data is identical to “Bank/Program Change Table bulk data.”
#8 User ER Pattern bulk data
The transmitted data is identical to “User ER Pattern bulk data.”
#9 System Setup bulk data
The transmitted data is identical to “System Setup bulk data.”
#10 Parameter Change data
The transmitted data is identical to “Parameter Change data.”
ProR3 Digital Reverberator
Add-8 MIDI data format
#11 Parameter Value Request
This message can be received on the currently selected MIDI channel.
When this message is received, the value of the parameter specified by the parameter number
will be transmitted as Parameter Change data.
STATUS
ID No.
SUB STATUS
FORMAT No.
DEVICE CODE
PARAMETER No.
EOX
ProR3 Digital Reverberator
11110000(F0H)
01000011(43H)
0010nnnn(2nH)
00011110(1EH)
00000101(05H)
0ppppppp
0ppppppp
11110111(F7H)
n=0-15
Manuel d’instructions
Français
EFFET DE RÉVERBÉRATION NUMÉRIQUE
Précautions i
Précautions
Evitez toute exposition à une chaleur, une humidité, une quantité de poussière et de vibrations excessives
Evitez de placer l’appareil dans un lieu exposé à des températures élevées ou une forte humidité
(évitez la proximité de radiateurs, poêles, l’exposition au soleil, etc.). De même, les endroits
poussiéreux ou sujets à des vibrations sont à proscrire pour éviter tout endommagement.
Evitez les chocs
Des chocs violents peuvent endommager l’appareil. Maniez-le avec soin.
Veillez à laisser assez d’espace autour de l’appareil pour garantir une bonne ventilation.
Gardez au moins un espace de 10 cm entre l’arrière de l’appareil et le mur. Cela évitera toute
accumulation interne de chaleur qui risquerait de provoquer une surchauffe de l’appareil et
éventuellement un incendie.
N’ouvrez pas le boîtier de l’appareil et n’essayez pas de le réparer ou le
modifier vous-même.
Ce produit ne contient aucune pièce réparable par l’utilisateur. Adressez-vous pour tout entretien ou réparation à un SAV agréé par Yamaha. Si vous ouvrez l’appareil et/ou touchez aux circuits internes, vous perdez le bénéfice de la garantie.
Assurez-vous que l’appareil est hors tension avant d’effectuer ou de supprimer des connexions
Mettez toujours les appareils concernés hors tension avant de brancher et de débrancher des
câbles. C’est vital pour éviter d’endommager l’appareil ainsi que tout autre matériel qui y est
relié.
Maniez les câbles avec précaution
Branchez et débranchez toujours les câble (ainsi que le cordon d’alimentation) en tirant sur la
prise et non sur le câble.
Nettoyez avec un chiffon doux et sec
N’utilisez jamais de solvants tels que de l’essence ou de la térébenthine pour nettoyer l’appareil.
Essuyez-le avec un chiffon doux et sec.
Utilisez toujours une source d’alimentation adéquate
Assurez-vous que la tension spécifiée à l’arrière de l’appareil correspond à celle de vos prises
secteur:
Modèle USA & canadien: 120V CA, 60 Hz
Modèle général: 230V CA, 50 Hz
Modèle pour la Grande-Bretagne: 240V CA, 50 Hz
Pile
Cet appareil contient une pile au lithium longue durée qui conserve le contenu des mémoires
utilisateur lorsque l’appareil est hors tension. Pour un usage normal, cette pile doit durer environ cinq ans. Si la tension de la pile baisse au-delà d’un certain niveau, le message “WARNING
LOW BATTERY” apparaît à l’écran lors de la mise sous tension. Dans ce cas, adressez-vous à un
SAV agréé par Yamaha pour faire remplacer la pile.
Avertissement: N’ESSAYEZ PAS DE REMPLACER LA PILE VOUS-MEME. L’OUVERTURE DU
BOITIER ET/OU LA MODIFICATION DES CIRCUITS INTERNES ANNULE LA GARANTIE.
ProR3 Effet de réverbération
ii Table des matières
Table des matières
Introduction . . . . . . . . . . . . . . . . . . . . . . . . . . . . . . . 1
Face avant . . . . . . . . . . . . . . . . . . . . . . . . . . . . . . . . 2
Face arrière . . . . . . . . . . . . . . . . . . . . . . . . . . . . . . . 6
Usage élémentaire
– Utilisation d’un programme usine – . . . . . . 7
Connexions. . . . . . . . . . . . . . . . . . . . . . . . . . . . . . .
Mise sous (hors) tension. . . . . . . . . . . . . . . . . . . .
Réglage du niveau d’entrée . . . . . . . . . . . . . . . . .
Sélection de programmes d’effet . . . . . . . . . . . .
Liste de programmes usine . . . . . . . . . . . . . . . . .
7
7
8
8
9
Usage plus complexe (3)
– Fonctions utilitaires – . . . . . . . . . . . . . . . . . . . . 33
Verrouillage de la mémoire . . . . . . . . . . . . . . . .
Mode d’entrée . . . . . . . . . . . . . . . . . . . . . . . . . . .
Réglage du canal MIDI . . . . . . . . . . . . . . . . . . . .
Tableau de changements de
programme MIDI . . . . . . . . . . . . . . . . . . . . . . . .
Transmission de blocs de données
(Bulk Dump). . . . . . . . . . . . . . . . . . . . . . . . . . . . .
Assignation de commandes de contrôle
MIDI . . . . . . . . . . . . . . . . . . . . . . . . . . . . . . . . . . .
Initialisation du ProR3 . . . . . . . . . . . . . . . . . . . .
33
33
34
34
35
35
36
Usage plus complexe (1) . . . . . . . . . . . . . . . . 12
Messages d’erreur du ProR3 . . . . . . . . . . . . . . 36
La fonction Bypass . . . . . . . . . . . . . . . . . . . . . . . 12
Egaliseur pré-effet . . . . . . . . . . . . . . . . . . . . . . . . 12
La fonction INFINITE. . . . . . . . . . . . . . . . . . . . . 13
Fiche technique . . . . . . . . . . . . . . . . . . . . . . . . . . 37
Usage plus complexe (2)
– Fonctions d’édition – . . . . . . . . . . . . . . . . . . . 14
MIDI data format . . . . . . . . . . . . . . . . . . . . . . Add-1
Organisation des programmes . . . . . . . . . . . . .
Procédure d’édition . . . . . . . . . . . . . . . . . . . . . .
Paramètres de programme 1
(Effect principal) . . . . . . . . . . . . . . . . . . . . . . . . .
Réverbération (Reverb) . . . . . . . . . . . . . . . .
Premières réflexions (ER) . . . . . . . . . . . . . .
Paramètres ER utilisateur . . . . . . . . . . .
Simulation de pièce (RoomSim) . . . . . . . . .
Réverbération + Echo (Rev + Ech) . . . . . . .
Réverbération + Premières réflexions
(Rev + ER) . . . . . . . . . . . . . . . . . . . . . . . . . . .
Réverbération + Chorus (Rev + Cho) . . . .
Réverbération + Symphonic (Rev + Sym) .
Réverbération + Flanger (Rev + Flg) . . . . .
Réverbération + Changement de hauteur
(Rev + Pit) . . . . . . . . . . . . . . . . . . . . . . . . . . .
Réverbération + Auto Pan (Rev + Pan) . . .
Paramètres communs . . . . . . . . . . . . . . . . . .
Paramètres de programme 2
(Effects secondaires) . . . . . . . . . . . . . . . . . . . . . .
DFL . . . . . . . . . . . . . . . . . . . . . . . . . . . . . . . . .
COMP . . . . . . . . . . . . . . . . . . . . . . . . . . . . . . .
EQ . . . . . . . . . . . . . . . . . . . . . . . . . . . . . . . . . .
GATE . . . . . . . . . . . . . . . . . . . . . . . . . . . . . . .
LEVEL/BAL (niveau/balance) . . . . . . . . .
ProR3 Effet de réverbération
14
15
18
18
19
19
20
21
22
23
24
25
26
27
27
28
28
29
30
31
32
Dimensions. . . . . . . . . . . . . . . . . . . . . . . . . . . . . . 38
Schéma . . . . . . . . . . . . . . . . . . . . . . . . . . . . . . . . . 38
1. Transmitted data . . . . . . . . . . . . . . . . . . . . Add-1
2. Receive data . . . . . . . . . . . . . . . . . . . . . . . . Add-5
MIDI Implementation Chart . . . . . . . . . . . Add-9
Introduction 1
Introduction
Nous vous remercions d’avoir porté votre choix sur le ProR3 Digital Reverberator de Yamaha. Le
ProR3 annonce une ère nouvelle dans la technologie de réverbération de Yamaha: celle des processeurs de signaux numériques (DSP) de la troisième génération avec un traitement numérique
du signal à 32 bits et des convertisseurs A/N et N/A linéaires à 20 bits hautement performants.
Ces avancées offrent une densité et une résolution jamais atteintes à ce jour et dont l’impact
dynamique coupe le souffle. Les circuits d’entrée et de sortie analogiques sont d’une extraordinaire qualité et autorisent une plage dynamique de 110 dB offrant ainsi une réverbération
incroyablement naturelle avec un étouffement sans bruit.
Le ProR3 dispose de 10 effets primaires: réverbération, premières réflexions, simulation de pièce
et des combinaisons de réverbération avec de l’écho, du chorus, du flanging, des changements
de hauteur, de l’auto pan, etc. Un égaliseur pré-effet est prévu avant l’effet principal et après
l’effet principal, vous trouverez des étages de filtre dynamique, compresseur, égaliseur, Gate
(porte), niveau et balance. En mode d’entrée stéréo, vous disposez d’une réverbération entièrement stéréo. Outre les 90 programmes d’usine, prêts à l’emploi, le ProR3 met 90 mémoires utilisateur à votre disposition pour vos propres réglages.
Les entrées et sorties stéréo proposent aussi bien des prises XLR que des prises jack 1/4" symétriques vous permettant de brancher une vaste gamme de matériel. Les sélecteurs de niveau
d’entrée et de sortie (–10 dB/+4 dB) font également preuve de souplesse lors du réglage de
niveau. Vous pouvez sélectionner les programmes à partir d’un appareil MIDI externe et procéder à des échanges de blocs de données SysEx (Bulk Dump).
Le ProR3 Digital Reverberator de Yamaha est le produit d’un grand pas en avant en matière de
technologie de réverbération numérique. Il offre des effets de réverbération d’une richesse
exceptionnelle, une qualité de son et une maniabilité uniques. Il constitue une boîte de réverbération idéale quelle que soit son affectation: elle fera des merveilles tant dans un studio personnel que lors d’enregistrements audio professionnels ou au sein d’une installation d’amplification
de salles.
Pour tirer le meilleur parti de votre ProR3, sans le moindre problème, durant de longues années,
veuillez lire attentivement ce manuel.
ProR3 Effet de réverbération
2 Face avant
Face avant
2
1
3
4
6
5
DATA/CURSOR
DIGITAL REVERBERATOR
8
9
PARAMETER
FINE
7
8
9
EQ ON
4
5
6
STORE
GATE
GATE ON
1
2
3
CANCEL
UTILITY
LEVEL/
BAL
OTHERS
0
•
–
RECALL/
ENTER
BYPASS
MAIN
PROGRAM
INFINITE
POWER
INC
R
L
7
CLIP
-3
-6
-9
-12
-18
-24
-36
STEREO
L
R MONO
EQ
PRESET
USER
PROGRAM
MIDI
FREQ
GAIN
DEC
PRE EFFECT EQ
INPUT
0
100
FREQ
300
800
GAIN
2k
FREQ
4k
10k
GAIN
COMPARE
50
700 -15
+15
350
5k
-15
+15
2k
20k -15
ON/ OFF
ON
+15
+10
-00
L
R
LOW
MID
HIGH
A
0
1
B
C D
Niveaumètres d’entrée INPUT (L/R)
Il s’agit d’un niveaumètre stéréo à 8 segments pour chaque canal. Les segments indiquent les
niveaux suivants: –36 dB, –24 dB, –18 dB, –12 dB, –9 dB, –6 dB, –3 dB et CLIP (saturation).
Remarque: Les niveaumètres sont placés après le convertisseur A/N. Cela signifie donc que l’indicateur CLIP fait état de distorsion pour le signal numérique. Réglez le niveau d’entrée de telle sorte que
l’indicateur CLIP ne s’allume pas.
2
Affichage de numéro de programme (PROGRAM)
Il s’agit d’un affichage à deux chiffres et sept segments qui indique le numéro de programme
sélectionné.
Si cet affichage clignote, cela signifie qu’un nouveau programme a été sélectionné mais que son
contenu n’a pas encore été chargé.
3
Indicateurs de statut
Ces six témoins indiquent le statut du programme ainsi que d’autres fonctions du ProR3.
STEREO, L/R MONO
Trois indicateurs sont dévolus au mode d’entrée du programme sélectionné. Le ProR3 dispose
de quatre modes d’entrée (Stereo, LR/Mix, R-Mono, L-Mono) que vous sélectionnez avec la touche UTILITY. Lorsque les deux indicateurs L/R Mono sont allumés, le mode LR/Mix est activé.
PRESET/USER
Ces indicateurs font état du statut du programme. Servez-vous de la touche PROGRAM pour
sélectionner le statut. Lorsque l’indicateur PRESET est allumé, vous pouvez effectuer votre choix
parmi les programmes usine. Lorsque l’indicateur USER est allumé, vous avez le choix entre vos
propres programmes.
MIDI
Cet indicateur s’allume lorsque des données MIDI sont reçues en provenance d’un appareil
externe branché à la borne MIDI IN.
4
Ecran à cristaux liquides
Cet écran à cristaux liquides, éclairé par l’arrière, donne le nom du programme sélectionné ainsi
que les valeurs des paramètres du programme. Les messages touchant au fonctionnement sont
également affichés ici.
ProR3 Effet de réverbération
Face avant 3
5
Touches DATA/CURSOR
Les touches DATA (INC) (DEC) servent à modifier la valeur du paramètre sélectionné.
Les touches CURSOR (√) (®) permettent de choisir un paramètre affiché à l’écran.
Lorsque l’indicateur PROGRAM est allumé, les touches DATA permettent de sélectionner le programme que vous désirez charger.
6
Touches PARAMETER
Ces touches vous permettent de sélectionner les paramètres d’effet. Chaque fois qu’une touche
est enfoncée, elle passe d’une page de paramètre à l’autre et finit par revenir à la première page.
MAIN
FINE
A
B
EQ
EQ ON
C
GATE
GATE ON
LEVEL/
BAL
OTHERS
D
F
E
6-A Touche MAIN
Cette touche vous donne accès aux paramètres principaux (Main). Lorsque l’indicateur
s’allume, vous pouvez éditer (modifier) les paramètres principaux du programme.
6-B
Touche FINE
Cette touche vous donne accès aux paramètres secondaires du programme. Lorsque
l’indicateur s’allume, vous pouvez éditer (modifier) les paramètres secondaires du programme.
6-C Touches EQ, EQ ON
La touche EQ donne accès aux paramètres de l’égaliseur à trois bandes post-effet. Lorsque
l’indicateur s’allume, vous pouvez éditer des paramètres tels que le type d’égalisation (en
crête ou en plateau), la fréquence, le gain et le Q (bande passante) pour chaque bande.
La touche EQ ON active/désactive l’égaliseur post-effet. Lorsqu’il est activé, le témoin
vert s’allume.
GRAVES
MEDIANES
AIGUES
Type
Crête/Plateau
Crête
Crête/Plateau
Gain
±15 dB
±15 dB
±15 dB
32 Hz à 2.2 kHz
250 Hz à 5.6 kHz
500 Hz à 20 kHz
0.1 à 5.0
0.1 à 5.0
0.1 à 5.0
Fréquence
Q
6-D Touches GATE, GATE ON
La touche GATE donne accès aux paramètres Gate. Lorsque l’indicateur s’allume, vous
pouvez éditer le niveau et la balance, etc.
La touche GATE ON active/désactive le Gate. Lorsqu’il est activé, le témoin vert s’allume.
6-E
Touche LEVEL/BAL
Cette touche vous permet de régler la balance d’effet (la balance entre le volume du signal
direct et du signal d’effet). Lorsque vous appuyez sur cette touche, le témoin rouge
s’allume.
6-F
Touche OTHERS
Cette touche a deux fonctions. Lorsque vous appuyez sur la touche, le témoin rouge
s’allume.
1 Elle permet d’entrer un titre de programme (voyez la page 16).
2 Elle permet de sélectionner les paramètres contrôlés par des commandes de contrôle
MIDI (voyez la page 16 et 35).
ProR3 Effet de réverbération
4 Face avant
7
Pavé numérique
Ces touches servent à entrer directement le numéro d’un programme que vous voulez charger
ou des valeurs de paramètres.
Lorsque vous utilisez le pavé numérique pour entrer une valeur de paramètre, la valeur clignotera jusqu’à la confirmation. Appuyez sur la touche RECALL/ENTER pour confirmer la valeur.
Si vous désirez revenir à la valeur précédente, appuyez sur la touche CANCEL. Certains paramètres ne peuvent pas être réglés au moyen du pavé numérique.
Pour entrer une valeur négative (un gain d’égalisation de –9 dB, par exemple), utilisez la touche
“–”. Pour entrer une valeur décimale (un Q de 2.5, par exemple), utilisez la touche “.”.
7
8
9
4
5
6
STORE
1
2
3
CANCEL
0
•
–
RECALL/
ENTER
PROGRAM
A
B
C
D
7-A Touche PROGRAM
Cette touche sert à sélectionner des programmes. Chaque pression de la touche fait alterner le statut du programme entre PRESET et USER (programme usine et utilisateur).
7-B
Touche STORE
Cette touche vous permet de sauvegarder les réglages d’un programme que vous avez
créé.
7-C Touche CANCEL
Cette touche permet d’annuler une valeur que vous avez entrée avec le pavé numérique.
7-D Touche RECALL/ENTER
Cette touche sert à charger un programme dont le numéro a été entré avec le pavé numérique ou à confirmer une valeur de paramètre.
8
Touche INFINITE
Une pression sur cette touche allume le témoin et allonge considérablement le paramètre RevTime pour produire un effet "d’arrêt sur son".
9
Interrupteur POWER
Cet interrupteur met l’appareil sous/hors tension.
Lors de la mise sous tension, le programme utilisé en dernier lieu avant la mise hors tension sera
sélectionné.
10 Commande de niveau d’entrée INPUT (L, R)
Le bouton intérieur est la commande de niveau d’entrée pour le canal gauche tandis que le bouton extérieur est celle du canal droit. Les boutons sont coaxiaux ce qui facilite le travail de
réglage du niveau pour une source stéréo.
ProR3 Effet de réverbération
Face avant 5
11 Commandes PRE EFFECT EQ, ON
Il s’agit d’un égaliseur trois bandes paramétrique qui égalise le signal avant effet. La fréquence
centrale et le gain peuvent être réglés pour chaque bande.
La touche ON active/désactive l’égaliseur pré-effet. Lorsqu’il est activé, le témoin vert s’allume.
Fréquence
Gain
GRAVES
MEDIANES
AIGUES
50 Hz à 700 Hz
350 Hz à 5 kHz
2 kHz à 20 kHz
±15 dB
±15 dB
±15 dB
12 Touche COMPARE
Après avoir édité les paramètres d’un programme, vous pouvez vous servir de cette touche pour
comparer le son édité avec le son du programme tel qu’il a été chargé. Lorsque le témoin rouge
est allumé, vous entendez le son original du programme.
13 Touche UTILITY
Utilisez cette touche si vous désirez procéder à des réglages de paramètres système tels que le
verrouillage de la mémoire, le mode d’entrée et les paramètres MIDI. Lorsque vous appuyez sur
cette touche, le témoin rouge s’allume.
14 Touche BYPASS
Lorsque cette touche est enfoncée, le signal d’entrée sort directement sans passer par l’effet et le
témoin rouge s’allume.
Elle constitue un moyen facile de comparer rapidement le son non traité avec le son traité.
ProR3 Effet de réverbération
6 Face arrière
Face arrière
E
F
MIDI
OUTPUT
G
INPUT
R
THRU
OUT
L
R
L
IN
R
L
R
–10dB +4dB
L
–10dB +4dB
H
15 Bornes MIDI
Il s’agit de bornes de type DIN à 5 broches standard MIDI IN, MIDI OUT et MIDI THRU.
Ces bornes servent à transmettre au ProR3 des messages de changement de programme ou de
commande de contrôle venant d’un appareil MIDI externe ainsi qu’à faire des transferts de données SysEx (Bulk Dump) du ProR3 vers un autre appareil.
16 Bornes OUTPUT
Ces sorties symétriques acheminent le signal de retour analogique vers votre table de mixage ou
enregistreur multipiste, etc. Vous trouverez une paire de prises XLR-3-32 et une paire de prises
jack 1/4". Le commutateur de niveau vous offre le choix entre un niveau de sortie nominal de +4
dB ou de –10 dB.
17 Bornes INPUT
Ces entrées symétriques permettent d’acheminer le signal de votre table de mixage ou enregistreur multipiste vers le ProR3. Si la source est mono, servez-vous de la touche UTILITY pour
sélectionner une entrée adéquate (voyez la page 33).
Vous trouverez une paire de prises XLR-3-31 et une paire de prises jack 1/4".
Le commutateur de niveau vous permet de sélectionner un niveau d’entrée nominal de +4 dB ou
de –10 dB.
18 Commutateurs de sélection de niveau
Ces commutateurs vous permettent de choisir un niveau d’entrée/de sortie de +4 dB ou –10 dB.
Réglez-les en fonction du niveau du matériel branché.
Disposition d’une prise de type XLR-3-31
Chaud
2
1
3
Masse
(Earth)
Cold
Connexion avec fiche jack 1/4"
Masse
Chaud
Froid
ProR3 Effet de réverbération
Disposition d’une prise de type XLR-3-32
Masse
(Earth)
1
2
3
Chaud
Froid
Usage élémentaire – Utilisation d’un programme usine – 7
Usage élémentaire – Utilisation d’un programme usine –
Voici comment charger un programme usine et l’utiliser sans en modifier les paramètres.
Connexions
1. Branchez la source sonore aux prises INPUT.
Avertissement: Avant de procéder aux branchements, assurez-vous que tous les
appareils concernés sont hors tension.
Pour une source sonore stéréo, branchez les sorties des deux canaux aux prises INPUT. Pour une
source mono, servez-vous de la prise d’entrée L.
Si la source sonore dispose de prises XLR, servez-vous des bornes XLR-3-31 du ProR3. Sinon, utilisez les prises jacks 1/4".
2. Branchez les bornes OUTPUT à la table de mixage ou à un autre appareil externe.
Si la table de mixage dispose de prises XLR, servez-vous des bornes XLR-3-32 du ProR3. Sinon,
utilisez les prises jacks 1/4".
Remarque: Vous pouvez également vous servir d’un câble de conversion entre des bornes XLR et des
bornes jack TRS 1/4".
3. Raccordez le ProR3 à une prise secteur.
Mise sous (hors) tension
1. Appuyez sur l’interrupteur POWER pour mettre l’appareil sous tension. Une seconde pression le mettra hors tension.
YAMAHA
ProR3
Digital Reverberator
Copyright(c) 1995 YAMAHA
L’affichage initial apparaît durant quelques secondes puis le programme utilisé en dernier lieu
avant la mise hors tension est sélectionné.
Large Hall 1
RevTime =
Reverb
2.5s
Remarque: Lors de la mise sous tension d’une chaîne d’appareils, respectez toujours l’ordre que suit le
signal: commencez par les sources de signaux et terminez par l’amplificateur. Cette séquence évite tout
endommagement des haut-parleurs et de matériel ~ainsi que de votre ouïe qui peut souffrir du bruit
produit par un appareil mis sous tension. Allumez le ProR3 avant les autres appareils. Lorsque vous
coupez l’alimentation du système, commencez par mettre l’amplificateur hors tension et poursuivez
jusqu’aux sources de signaux.
ProR3 Effet de réverbération
8 Usage élémentaire – Utilisation d’un programme usine –
Réglage du niveau d’entrée
Lorsque le ProR3 et les autres appareils sont sous tension, lancez les sources de signaux et réglez
le niveau d’entrée du ProR3.
1. Tournez les commandes de niveau d’entrée INPUT tout en surveillant les Niveaumètres
INPUT.
Réglez le niveau de sorte à obtenir le meilleur rapport signal/bruit sans que les indicateurs CLIP
ne s’allument.
Sélection de programmes d’effet
Il y a deux manières de sélectionner des programmes.
• Utilisez les touches INC/DEC.
Appuyez sur la touche INC ou DEC pour choisir un programme.
Si vous maintenez une touche enfoncée, les numéros de programme changent en succession
rapide.
• Utilisez le pavé numérique et la touche RECALL/ENTER.
1 Utilisez le pavé numérique pour choisir le numéro de programme et l’indicateur PROGRAM clignote.
Si vous entrez le mauvais numéro, appuyez sur la touche CANCEL et servez-vous une
fois de plus du pavé numérique pour entrer le bon numéro.
Si vous sélectionnez un numéro autre que 1~90, l’écran affiche “ NO PROGRAM
Type”. Appuyez sur la touche CANCEL pour revenir à l’écran précédent.
**
**No
2 Appuyez sur la touche RECALL/ENTER pour charger le programme.
Une fois le programme chargé, l’indicateur PROGRAM cesse de clignoter et reste allumé.
Si vous sélectionnez un numéro autre que 1~90 et appuyez sur la touche RECALL/
ENTER, l’écran affiche “ Program Number Error ”. Appuyez sur la touche CANCEL
pour revenir à l’écran précédent.
*
*
Remarque: Si l’écran vous demande “Recall? Are you sure?” (Chargement? Etes-vous sûr?) lorsque
vous sélectionnez un programme, cela signifie que les données du programme en cours ont été éditées.
Si vous désirez conserver ces modifications, sauvegardez le programme; voyez "Sauvegarde d’un programme" à la page 16.
Si vous ne souhaitez pas conserver ces données, appuyez sur la touche RECALL/ENTER pour charger
le programme sélectionné.
ProR3 Effet de réverbération
Usage élémentaire – Utilisation d’un programme usine – 9
Liste de programmes usine
No.
Titre
Type
Description
Large Hall
1
Large Hall 1
Reverb
2
Large Hall 2
Reverb
3
New Hall
Reverb
Programme avec un léger retard entre les maigres premières réflexions et la
riche réverbération.
4
Wide Hall
Reverb
Programme simulant une salle vaste et non peinte.
5
Breathless Hall
Reverb
Réverbération avec caractère: brillante, forte et un peu longue.
Réverbération de type "Hall" standard du ProR3; simule une grande salle avec
une bonne acoustique. Pour n’importe quel instrument.
Medium Hall
6
Medium Hall 1
Reverb
7
Medium Hall 2
Reverb
8
Wonder Hall
Reverb
9
Gothic Hall
Rev+Cho
10
Bright Ham
Reverb
Une salle moyenne brillante.
Réverbération standard de salle moyenne.
Réverbération plus légère que le type Large Hall. Essayez-la avec de la percussion.
Combinaison de Chorus et d’une réverbération assez longue. Essayez-la avec
des instruments solo, du chant ou des nappes d’accords.
Small Hall
11
Small Hall 1
Reverb
Une petite salle idéalisée avec une petite scène.
12
Small Hall 2
Reverb
Une salle encore plus petite. Le compresseur interne est activé et atténue le son
de la réverbération.
13
Small Dark Hall
Rev+ER
Petite salle de tonalité un peu plus sombre. A essayer avec des voix en mineur.
14
Pool
Reverb
Petite salle avec de nombreuses réflexions premières.
15
Open Hall
Reverb
Petite salle avec espace ouvert. Pour chant.
Large Room
16
Large Room 1
Reverb
Simulation d’une grande pièce avec des murs durs. Un son épais et typique. A
essayer avec de la percussion.
17
Large Room 2
Reverb
Comparé à Large Room 1, une pièce avec plus de naturel et de transparence.
18
Mood Room
Reverb
Grande pièce avec une tonalité légèrement plus sombre.
19
Soft Room
Reverb
Grande pièce avec une tonalité douce.
20
Attack Room
Rev+Pit
Combine un changement de hauteur (±9 cents) avec une pièce. Ajoute de la profondeur au chant ou aux instruments solo.
Medium Room
21
Medium Room 1
Reverb
Simule un studio de taille moyenne avec une bonne acoustique. Utilisez une
source à deux canaux pour un effet “live in the studio.”
22
Medium Room 2
Reverb
Simule un studio d’enregistrement avec des murs en bois.
23
Dark Room
Reverb
Un studio un peu plus petit que Medium Room 2, avec une acoustique naturelle.
24
Quick Room
Reverb
Un studio sec avec des murs en bois et métal. Pour cuivres ou percussion.
25
Aquarium
RoomSim
Simule la réverbération d’un studio moyen. A essayer avec une grosse caisse.
26
Wood Room
RoomSim
27
Chorus Room
Rev+Cho
28
Delayed Room
RoomSim
Une chambre d’écho avec 82ms de pré-delay. Pour sax ou instruments solo.
29
Comp. Chamber
RoomSim
Programme room pour caisse claire ou percussion. Utilisez Threshold pour régler
le taux de compression.
Ajoute l’espace d’une pièce moyenne pour épaissir le son.
ProR3 Effet de réverbération
10 Usage élémentaire – Utilisation d’un programme usine –
No.
Titre
Type
Description
Small Room
30
Small Room 1
RoomSim
31
Small Room 2
Rev+Cho
32
Small Studio
RoomSim
33
Bright Studio
Reverb
34
Kick Chamber
RoomSim
35
Tiny Room
36
Near You
ER
Les programmes Small Room sont des réverbérations extrêmement brèves
créées en vue d’un effet techno. Utilisez-les en petite quantité pour que le son ait
l’air sec ou semble bénéficier de l’acoustique naturelle d’un studio. Ces programmes sont particulièrement recommandés pour des instruments joués sur séquenceurs, des cuivres de synthé et des instruments enregistrés dans un studio sans
réverbération.
Rev+Pit
Special Room
37
Power Drum Room
RoomSim
38
Soft Space
Rev+Cho
39
Droid Short
Reverb
40
Droid Long
Reverb
41
Tile Room
RoomSim
42
Coliseum
Reverb
43
Opera
Reverb
44
Delay Hall
45
Train Station
Ech→Rev
Reverb
Ajoute une forte atmosphère live à la batterie. Essayez-le avec des sons de batterie échantillonnés.
Une réverbération percutante, brève avec du Chorus. Ajoute de l’atmosphère à la
batterie, aux instruments principaux et au chant.
Simule une des premières boîtes de réverbération numérique extrêmement coûteuses.
Brillance d’une pièce carrelée.
Longue réverbération d’un grand espace, simulant un colisée.
Réverbération relativement longue avec un retard de 52ms entre les réflexions
premières et la réverbération.
Combinaison de réverbération de type Hall et de delay (retard). Réglez les paramètres L et R Delay ainsi que IniDly en fonction du tempo du morceau.
Essayez ce programme lorsque vous devez ajouter de l’écho aux pas d’une personne arpentant une gare en attendant le dernier train.
46
Tile Bathroom
ER
47
Closet
ER
48
Motel Chorus
ER
49
Pitch Room
Pit→Rev
Réverbération appliquée à des changements de hauteur (±8 cents). Pour chant
ou choeur.
50
Beauty Plate
Reverb
Les réglages de sous-réverbération ont été accentués. A essayer sur un piano
électrique.
51
Arena Plate
Reverb
Simule une salle immense telle que le Budokan de Tokyo.
52
Vocal Plate 1
Reverb
A essayer sur le chant. Particulièrement heureux pour des ballades.
53
Vocal Plate 2
Reverb
Réverbération plus sombre que Vocal Plate 1.
54
Vocalese
55
String Plate
Reverb
Enjolive encore davantage le son des cordes.
56
Home Plate
Reverb
Réverbération de plaque métallique du bon vieux temps.
Simulations de la réverbération brillante et serrée par plaque fort prisée par les
studios de la côte ouest des Etats-Unis.
Ces programmes ne donnent que des réflexions premières. A essayer si vous
désirez ajouter une atmosphère de pièce à la batterie, la percussion, la guitare, la
basse enregistrée par ligne, le piano électrique et les instruments solo.
Plate
Rev+Cho
Réverbération légèrement teintée de Chorus. A essayer sur de la guitare et des
keyboards.
57
LA Plate Short
Reverb
58
LA Plate Long
Reverb
59
Short Perc.Plate
Reverb
Plaque de percussion brève et brillante. Réglez le paramètre IniDelay en fonction
du tempo.
60
Long Plate
Reverb
Réverbération de plaque plus longue. A essayer avec des nappes d’orgue.
61
ER Gate 1
ER
62
ER Gate 2
ER
Gate
63
ER for Kick
ER
64
Power Gate 1
ER
65
Power Gate 2
ER
66
Room Gate
ER
ProR3 Effet de réverbération
Réverbérations avec effet Gate ne contenant que les premières réflexions.
ER Gate 1est un Gate naturel et sans coloration. ER Gate 2 est un peu métallique. ER for Kick permet d’épaissir un son de grosse caisse maigre.
Réglez les paramètres Liveness et RoomSize comme vous le désirez.
Comme les noms le suggèrent, Power Gate 1 et Power Gate 2 permettent de
faire ressortir méchamment les tambours.
Usage élémentaire – Utilisation d’un programme usine – 11
No.
Titre
Type
Description
Combinaisons standard de réverbération et de noise gate: ces programmes
demandent des réglages plus précis que les programmes avec Gate qui ne contiennent que des premières réflexions pour s’adapter au morceau mais cela
signifie aussi que vous les contrôlez mieux.
Simulent l’effet de réverbération avec Gate produit par une bande tournant à l’envers à l’instar des programmes Reverse Gate des REV7 et REV5. Ajustez les
réglages en fonction du tempo du morceau.
67
Gated Rev 1
Reverb
68
Gated Rev 2
Reverb
69
Reverse Gate 1
ER
70
Reverse Gate 2
ER
Effect Reverb
71
Reverb Flange 1
Reverb
72
Reverb Flange 2
Rev→Flg
73
Reverb Flange 3
Rev→Flg
74
Reverb Flange 4
Rev→Flg
75
Dark Moon
Rev→Flg
76
Filter Flange
Rev→Flg
77
Super Long Decay
78
Slow Pan Reverb
Rev→Pan
Une réverbération assez longue se déplace lentement dans l’image stéréo.
79
Sub Aqua
Pit→Rev
Sonorités aquatiques produisant un "sprong" sur un son Rim Shot. Sur des cordes, le son prend des allures de scie.
80
Thud
Pit→Rev
81
Alien Attack
Pit→Rev
Reverb
82
High Filter
Reverb
83
High Mid Filter
Reverb
84
Low Mid Filter
Reverb
85
Low Filter
86
Chorus Reverb
Reverb Flange 1 est naturel. Reverb Flange 2~ Reverb Flange 4 sont progressivement plus profonds et plus démonstratifs.
Effet de tunnel fort long.
Transforme un instrument acoustique en synthé! Produit un effet de type autowah si vous l’utilisez sur une guitare.
Réverbération avec une impression de hauteur bien circonscrite, créée par le filtre dynamique. Essayez-le sur des coups de cymbale ou des instruments de percussion et des effets de son.
Reverb
Rev+Cho
Combinaison de Chorus et de réverbération pour créer espace et profondeur.
Chorus multi-phase combiné avec un effet symphonique et de la réverbération
crée de l’espace et de la profondeur.
87
Symphonic Rev 1
Rev+Sym
88
Symphonic Rev 2
Sym→Rev
89
Echo Reverb 1
Ech→Rev
90
Echo Reverb 2
Ech→Rev
Réverbération appliquée à un écho rétroactif stéréo allant jusqu’à 400ms à gauche et à droite.
ProR3 Effet de réverbération
12 Usage plus complexe (1)
Usage plus complexe (1)
La fonction Bypass
Lorsque vous appuyez sur la touche BYPASS, le signal d’entrée ressort directement. Cette fonction vous permet de procéder à des comparaisons rapides entre le son traité par le programme
d’effet et le son non traité. Lorsque l’effet est contourné (bypassed), le témoin rouge s’allume.
PRE
EFFECT
EQ
BYPASS
EFFECT
ON
Egaliseur pré-effet
La commande PRE EFFECT EQ vous permet d’effectuer des réglages pour l’égaliseur trois bandes pré-effet. Pour chaque bande, vous pouvez déterminer la fréquence et le gain.
Fréquence
Gain
GRAVES
MEDIANES
AIGUES
50 Hz à 700 Hz
350 Hz à 5 kHz
2 kHz à 20 kHz
±15 dB
±15 dB
±15 dB
1. Appuyez sur la touche PRE EFFECT EQ ON pour activer l’égaliseur.
Le témoin vert s'allume.
2. Sélectionnez une bande et tournez son bouton pour en régler le gain.
3. Tournez le bouton FREQ (fréquence) de la bande sélectionnée.
Pour entendre l’effet de l’égaliseur, réglez d’abord le gain de la bande sélectionnée puis réglez la
fréquence.
Les réglages de l’égaliseur ne sont pas conservés dans la mémoire du programme. Si l’égaliseur
est activé, ses réglages affecteront tous les programmes.
Remarque: Les commandes de l’égaliseur pré-effet sont situées après les Niveaumètres INPUT. Cela
signifie donc que vous devez être prudent lorsque vous réglez le gain car si celui-ci est trop fort et provoque de la distorsion numérique, les Niveaumètres ne l’indiqueront pas.
ProR3 Effet de réverbération
Usage plus complexe (1) 13
La fonction INFINITE
La fonction INFINITE vous permet de régler un temps de réverbération extrêmement long. C’est
parfois efficace à la fin d’un morceau, etc.
Voici les deux façons de vous servir de la touche INFINITE.
• Appuyez et relâchez immédiatement la touche INFINITE.
Le temps de réverbération sera réglé au maximum. Appuyez une fois de plus sur la touche
pour ramener le temps de réverbération à sa valeur initiale.
• Appuyez sur la touche INFINITE et maintenez-la enfoncée.
Le temps de réverbération sera réglé au maximum tant que vous maintenez la touche enfoncée. Dès que vous la relâchez, le temps de réverbération reprend sa valeur initiale.
Remarque: Pour des programmes dont l’effet principal est ER (Early Reflection ou réflexions premières), cette touche restera sans effet puisqu’ils n’ont pas de paramètres RevTime (temps de réverbération).
ProR3 Effet de réverbération
14 Usage plus complexe (2) – Fonctions d’édition –
Usage plus complexe (2) – Fonctions d’édition –
Les programmes usine sont des programmes prêts à l’emploi. Les programmes utilisateur, par
contre, sont faits sur mesure pour répondre à vos besoins spécifiques. Cette section vous explique comment éditer et créer vos propres programmes.
Organisation des programmes
Chaque programme du ProR3 se divise en deux parties: l’effet principal et les effets secondaires.
Pour sélectionner l’effet principal, vous avez le choix entre les 10 possibilités suivantes; il dépendra du programme que vous avez choisi.
Type simple:
Type composé:
Reverb, ER, Room Sim
Rev+Ech, Rev+ER, Rev+Cho, Rev+Sym, Rev+Flg, Rev+Pit, Rev+PAN
Le “+” des effets composés tels que “Rev+Ech”signifie que ces effets utilisent simultanément de la réverbération et de l’écho. Vous pouvez choisir l’ordre dans lequel ces effets
sont appliqués: d’abord de la réverbération et puis de l’écho ou l’inverse.
Les effets secondaires viennent après; il s’agit des effets suivants, disponibles pour chaque programme: DFL (filtre dynamique), COMP (compresseur), EQ (égaliseur), GATE (porte) et
LEVEL/BAL (niveau/balance).
L’effet principal constitue le facteur décisif pour la définition du caractère de l’effet. Si vous en
connaissez le type, vous aurez déjà une idée fort claire du programme. C’est pourquoi le type
d’effet principal est affiché à côté du nom et du numéro du programme à l’écran et figure également dans la liste.
Numéro de programme
Nom de programme
Type d’effet principal
Large Hall 1
RevTime =
Paramètre
Reverb
2.5s
Valeur du paramètre
Le ProR3 dispose de touches séparées pour charger les paramètres de l’effet principal et des
effets secondaires.
Effets secondaires
Effet principal
Reverb
ER
Room Sim
Rev+Ech
Rev+ER
Rev+Cho
Rev+Sym
Rev+Flg
Rev+Pit
Rev+PAN
MAIN
ProR3 Effet de réverbération
DFL
FINE
COMP
EQ
EQ
GATE
EQ
ON
GATE
GATE
ON
LEVEL/
BAL
LEVEL/
BAL
Usage plus complexe (2) – Fonctions d’édition – 15
Procédure d’édition
1) Sélection d’un programme
Voyez la liste des programmes usine à la page 9 ou la fiche incluse “Preset Program List” et sélectionnez le numéro du programme que vous désirez éditer.
Il n’est plus possible de changer le type de l’effet principal; veillez donc bien à choisir celui qu’il
vous faut.
Type d’effet principal
Large Hall 1
RevTime =
Reverb
2.5s
2) Edition de paramètres
1. Appuyez sur la touche qui donne accès aux paramètres du programme que vous souhaitez éditer. Ainsi, pour éditer les paramètres de l’effet principal, appuyez sur la touche
MAIN. Pour éditer les paramètres du Gate, appuyez sur la touche GATE.
Les pages 18 et suivantes contiennent les listes des paramètres accessibles par les différentes touches.
2. Appuyez à plusieurs reprises sur la touche jusqu’à ce que le paramètre voulu apparaisse.
3. Utilisez les touches du curseur (√) (®) pour amener le curseur sur le paramètre que vous
voulez éditer.
4. Il y a deux manières de régler la valeur d’un paramètre.
• Appuyez sur la touche INC ou DEC pour déterminer la valeur.
Si vous maintenez une de ces touches enfoncée, la valeur change de façon continue.
• Servez-vous du pavé numérique et de la touche RECALL/ENTER pour déterminer la valeur.
1 Servez-vous du pavé numérique pour entrer la valeur et les données se mettent à clignoter. Si vous vous êtes trompé, appuyez sur la touche CANCEL et entrez la valeur voulue
avec le pavé numérique.
2 Appuyez sur la touche RECALL/ENTER pour confirmer la valeur entrée.
5. En appuyant sur la touche COMPARE, vous pouvez comparer le son après édition du
paramètre et le son initial.
6. Si vous désirez encore modifier le paramètre, retournez à l’étape 3.
7. Si vous voulez éditer un paramètre différent pour le même effet, retournez à l’étape 2.
8. Si vous désirez éditer un autre effet, reprenez la procédure à partir de l’étape 1.
ProR3 Effet de réverbération
16 Usage plus complexe (2) – Fonctions d’édition –
3) Entrer un titre
Vous pouvez entrer un nom pouvant compter jusqu’à 16 caractères pour chacun de vos programmes.
1. Appuyez sur la touche OTHERS.
Le témoin rouge s’allume. Chaque fois que vous appuyez sur la touche OTHERS, la page d’édition du titre ainsi que deux pages de paramètres de contrôle sont affichées tour à tour.
Title Edit
[Dread Lurgi Verb]
2. Servez-vous des touches du curseur (√) (®) pour choisir l’emplacement du caractère.
Le curseur indique l’endroit d’insertion d’un caractère. Chaque pression sur la touche du curseur déplace ce dernier sur la position précédente/suivante et recommence au début lorsqu’il
atteint la fin du titre.
3. Appuyez sur la touche INC ou DEC pour changer le caractère. Vous pouvez également
vous servir des touches du pavé numérique pour entrer des chiffres.
Si vous maintenez la touche INC ou DEC enfoncée, les caractères continuent à défiler. Les chiffres de 0 à 9, le “–” (moins) et un “.” (point) peuvent être entrés avec les touches du pavé numérique.
4) Réglage des paramètres pilotés via MIDI.
Vous pouvez déterminer les paramètres qui seront pilotés via MIDI ainsi que leur plage de
réglage (voyez la page 35).
1. Appuyez sur la touche OTHERS pour accéder à la page de contrôle MIDI.
Ctr1-1 Prm
RevTIM
Min
Max
0.0% 100.0
2. Servez-vous des touches du curseur (√) (®) pour sélectionner les paramètres.
3. Utilisez la touche INC et DEC pour régler ces paramètres.
Control 1 Prm
–
Sélectionne le paramètre piloté par la commande de contrôle MIDI 1
Control 1 Min
0.0–100.0%
Valeur minimale de la plage de la commande de contrôle MIDI 1
Control 1 Max
0.0–100.0%
Valeur maximale de la plage de la commande de contrôle MIDI 1
Control 2 Prm
–
Sélectionne le paramètre piloté par la commande de contrôle MIDI 2
Control 2 Min
0.0–100.0%
Valeur minimale de la plage de la commande de contrôle MIDI 2
Control 2 Max
0.0–100.0%
Valeur maximale de la plage de la commande de contrôle MIDI2
5) Sauvegarde d’un programme
Il est possible de sauvegarder jusqu’à 90 programmes dont vous avez modifié les paramètres
sous forme de programmes utilisateur (USER).
1. Appuyez sur la touche STORE.
L’indicateur PROGRAM clignote et un message vous demande dans quelle mémoire vous désirez sauvegarder le programme.
ProR3 Effet de réverbération
Usage plus complexe (2) – Fonctions d’édition – 17
Circus Big Top
Reverb
Store from P01 to U01 ?
Si la mémoire USER est verrouillée (si le paramètre Memory Protect est sur ON), un message
“MEMORY PROTECTED” apparaît.
Dans ce cas, coupez le verrouillage de la mémoire en question avec la fonction utilitaire Memory
Protect décrite à la page 33 avant de sauvegarder votre programme.
2. La ligne supérieure de l’écran affiche le titre du programme résidant dans la mémoire
sélectionnée.
Servez-vous des touches INC/DEC ou du pavé numérique pour sélectionner la mémoire.
Vocal Plate 2
Reverb
Store from P01 to U40 ?
Si vous vous servez des touches du pavé numérique pour entrer un chiffre non compris dans la
plage 1~90, le message “ NO PROGRAM No Type” apparaît. Appuyez sur la touche CANCEL pour revenir à l’écran précédent.
**
**
3. Pour sauvegarder le programme appuyez sur la touche STORE. Pour annuler le processus, appuyez sur la touche CANCEL.
Low Mid Filter
Reverb
This Program is Stored
Le message “This Program is Stored” (Ce programme est sauvegardé) apparaît brièvement avant
que l’écran ne repasse à l’affichage précédent.
Si vous avez choisi un numéro qui sort de la plage 1~90 avec les touches du pavé numérique, le
message “ Store Number Error ” apparaît. Appuyez sur la touche CANCEL pour revenir à
l’écran précédent.
**
**
ProR3 Effet de réverbération
18 Usage plus complexe (2) – Fonctions d’édition –
Paramètres de programme 1 (Effect principal)
Réverbération (Reverb)
Touche
Paramètre
Valeur
Description
MAIN
RevTime
0.3 ~ 99.0 s
Temps de réverbération de la réverbération primaire (temps
nécessaire pour 60 dB d’étouffement à 1 kHz).
IniDelay
0.1 ~ 200.0 ms
Temps de retard avant le début de la réverbération primaire.
HighRatio
X0.1 ~ X1.0
Temps de réverbération des composants haute fréquence de
la réverbération; dépend de RevTime.
LowRatio
X0.1 ~ X2.4
Temps de réverbération des composants basse fréquence
de la réverbération; dépend de RevTime.
Diffusion
0 ~ 10
Diffusion de la réverbération.
Reverb Type
*1
Type de réverbération.
ER/REV Balance
0/100 ~ 100/0
Balance de niveau entre premières réflexions et réverbération
ER/REV Delay
0.1 ~ 100.0 ms
Différence de temps entre le début des premières réflexions
et le début de la réverbération
Liveness
0 ~ 10
Caractéristiques d’étouffement des premières réflexions;
0:très brèves, 10: très longues
FINE
Density
0 ~ 100
Densité des premières réflexions
HPF
Thru, 40 Hz ~ 1.0 kHz
Fréquence de coupure du filtre passe-haut.
LPF
400 Hz ~ 20 kHz, Thru
Fréquence de coupure du filtre passe-bas.
Rev2 Time
X0.1 ~ X10.0
Temps d'étouffement de la réverbération secondaire; dépend
de la réverbération primaire.
Rev2 Delay *2
0.0 ~ 100.0 ms
Différence de temps entre la réverbération primaire et la
réverbération secondaire.
Rev2 Level *2
0 ~ 100%
Niveau de réverbération secondaire; dépend de la réverbération primaire.
Mod Freq
0.05 ~ 40.00 Hz
Fréquence de la modulation de réverbération.
Mod Depth
0 ~ 100%
Profondeur de la modulation de réverbération.
Mod Delay
0.1 ~ 30 ms
Des valeurs brèves produisent de la modulation dans les
aiguës et des valeurs longues en produisent dans les graves.
Paramètres communs
Voyez la section “Paramètres communs” à la page 27
*1 Small Hall, Large Hall, Vocal Plate, Perc.Plate, Spring, Echo Room, Strings, Snare, Reverb Flange
*2 Uniquement lorsque le mode d’entrée est L-Mono, R -Mono ou LR-Mix.
ProR3 Effet de réverbération
Usage plus complexe (2) – Fonctions d’édition – 19
Premières réflexions (ER)
Touche
Paramètre
Valeur
Description
MAIN
ER Type
*1
Type de simulation des premières réflexions.
IniDelay
0.1 ~ 200.0 ms
Temps de retard avant le début des premières réflexions.
Liveness
0 ~ 10
Caractéristiques d’étouffement des premières réflexions;
0: très brèves, 10: très longues.
RoomSize
0.1 ~ 25.0
Espacement des réflexions.
Diffusion
0 ~ 10
Diffusion des premières réflexions.
FINE
ER Number
1 ~ 40
Nombre de premières réflexions.
FeedBack Delay
0.1 ~ 1000.0 ms
Temps de retard de la rétroaction.
FeedBack Gain
–99 ~ +99%
Quantité de rétroaction; “-” inverse la phase
FeedBack High
0.1 ~ 1.0
Quantité de rétroaction des aiguës; dépend de FeedBack
Gain.
Density
0 ~ 100
Densité des réflexions.
HPF
Thru, 40 Hz ~ 1.0 kHz
Fréquence de coupure du filtre passe-haut.
LPF
400 Hz ~ 20 kHz, Thru
Fréquence de coupure du filtre passe-bas.
0 ~ 10
Niveau de modulation.
Space Mod
Paramètres communs
Voyez la section “Paramètres communs” à la page 27.
*1 Small Hall, Large Hall, Random, Reverse, Plate, Spring, User A, User B, User C, User D
Paramètres ER utilisateur
Il y a quatre banques utilisateur (User) pour les premières réflexions: A–D.
Vous pouvez spécifier 40 types de réflexions pour chaque banque.
Pour chaque type de réflexion, déterminez le temps de retard, le niveau et la position stéréo.
Touche
Paramètre
Valeur
Description
FINE
A-01 Delay
0.1 ~ 1000.0 ms
Temps de retard des premières réflexions de la banque A.
A-01 Level
–100 ~ +100%
Niveau des premières réflexions de la banque A.
A-01 Pan
L16 ~ R16
Position stéréo des premières réflexions de la banque A.
•
•
•
D-40 Pan
Retour au premier paramètre FINE (ER Number)
ProR3 Effet de réverbération
20 Usage plus complexe (2) – Fonctions d’édition –
Simulation de pièce (RoomSim)
Touche
Paramètre
Valeur
Description
MAIN
RevTime
0.3 ~ 99.0 s
Temps d'étouffement de la réverbération.
Temps de retard avant le début de la réverbération.
IniDelay
0.1 ~ 200.0 ms
Width
0.5 ~ 46.7 m
Simulation de la largeur de la pièce.
Height
0.5 ~ 46.7 m
Simulation de la hauteur du plafond.
Depth
0.5 ~ 46.7 m
Simulation de la profondeur de la pièce.
Wall Vary
0 ~ 30
Simulation des murs (lisses 0 → rugueux 30)
Wall Vary Fine
–100 ~ +100
Réglage fin de la simulation des murs.
Listening Position
Front, Center, Rear
Position dans la pièce.
HighRatio
X0.1 ~ X1.0
Temps d'étouffement des composants aigus de la réverbération; dépend de RevTime.
LowRatio
X0.1 ~ X2.4
Temps d'étouffement des composants graves de la réverbération; dépend de RevTime.
Diffusion
0 ~ 10
Diffusion de la réverbération.
Width Fine
–100 ~ +100
Réglage fin de la simulation de largeur.
Height Fine
–100 ~ +100
Réglage fin de la simulation de hauteur.
Depth Fine
–100 ~ +100
Réglage fin de la simulation de profondeur.
Width Decay
RT X0.1 ~ 10.0
Temps d'étouffement des composants de largeur de la réverbération; dépend de RevTime
Height Decay
RT X0.1 ~ 10.0
Temps d'étouffement des composants de hauteur de la
réverbération; dépend de RevTime
Depth Decay
RT X0.1 ~ 10.0
Temps d'étouffement des composants de profondeur de la
réverbération; dépend de RevTime
ER/REV Balance
0/100 ~ 100/0
Balance de niveau entre les premières réflexions et la réverbération.
ER/REV Delay
0.1 ~ 100.0 ms
Différence de temps entre les premières réflexions et la
réverbération.
Density
0 ~ 100
Densité des réflexions.
HPF
Thru, 40 Hz ~ 1.0 kHz
Fréquence de coupure du filtre passe-haut.
LPF
400 Hz ~ 20 kHz, Thru
Fréquence de coupure du filtre passe-bas.
0 ~ 10
Niveau de modulation.
FINE
Space Mod
Paramètres communs
ProR3 Effet de réverbération
Voyez la section “Paramètres communs” à la page 27
Usage plus complexe (2) – Fonctions d’édition – 21
Réverbération + Echo (Rev + Ech)
Touche
Paramètre
Valeur
Description
MAIN
REV RevTime
0.3 ~ 99.0 s
REV IniDelay
0.1 ~ 200.0 ms
REV HighRatio
X0.1 ~ X1.0
REV LowRatio
X0.1 ~ X2.4
REV Diffusion
0 ~ 10
Voyez la section “Réverbération” à la page 18
ECHO Lch Delay
0.1 ~ 400.0 ms
Temps de retard du canal gauche.
ECHO Rch Delay
0.1 ~ 400.0 ms
Temps de retard du canal droit.
ECHO Lch FeedBack
–99 ~ +99%
Quantité de rétroaction du canal gauche.
ECHO Rch FeedBack
–99 ~ +99%
Quantité de rétroaction du canal droit.
ECHO High Ratio
0.1 ~ 1.0
Quantité de rétroaction des aigus.
FINE
ECHO/REV Balance *1
0/100 ~ 100/0
Balance de niveau entre écho et réverbération.
REV Rev Mix *2
0 ~ 100%
Quantité de réverbération.
REV Reverb Type
*3
Type de réverbération.
REV Density
0 ~ 100
Densité de réverbération.
REV HPF
Thru, 40 Hz ~ 1.0 kHz
Fréquence de coupure du filtre passe-haut de réverbération.
REV LPF
400 Hz ~ 20 kHz, Thru
Fréquence de coupure du filtre passe-bas de réverbération.
REV Space Mod
0 ~ 10
Niveau de modulation de réverbération.
ECHO Lch IniDelay
0.1 ~ 400.0 ms
Temps avant apparition de l’écho du canal gauche.
ECHO Rch IniDelay
0.1 ~ 400.0 ms
Temps avant apparition de l’écho du canal droit.
REV Patch
*4
Connexion de la réverbération et l’écho
Paramètres communs
*1
*2
*3
*4
Voyez la section “Paramètres communs” à la page 27
Uniquement lorsque REV Patch est parallèle (Reverb + Echo)
Uniquement lorsque REV Patch est en série (Reverb → Echo, Echo → Reverb)
Hall, Room, Vocal, Plate
Reverb + Echo, Echo → Reverb, Reverb → Echo
ProR3 Effet de réverbération
22 Usage plus complexe (2) – Fonctions d’édition –
Réverbération + Premières réflexions (Rev + ER)
Touche
Paramètre
Valeur
Description
MAIN
REV RevTime
0.3 ~ 99.0 s
REV IniDelay
0.1 ~ 200.0 ms
REV HighRatio
X0.1 ~ X1.0
REV LowRatio
X0.1 ~ X2.4
REV Diffusion
0 ~ 10
ER Type
*1
ER IniDelay
0.1 ~ 100.0 ms
ER Liveness
0 ~ 10
ER RoomSize
0.1 ~ 25.0
ER Diffusion
0 ~ 10
Voyez la section “Réverbération” à la page 18
Voyez la section “Premières réflexions” à la page 19
FINE
ER/REV Balance *2
0/100 ~ 100/0
Balance de niveau entre les premières réflexions et la réverbération.
REV Rev Mix *3
0 ~ 100%
Quantité de réverbération.
REV Reverb Type
*4
Type de réverbération.
REV Density
0 ~ 100
Densité de réverbération.
REV HPF
Thru, 40 Hz ~ 1.0 kHz
Fréquence de coupure du filtre passe-haut de la réverbération.
REV LPF
400 Hz ~ 20 kHz, Thru
Fréquence de coupure du filtre passe-bas de la réverbération.
Niveau de modulation de la réverbération.
REV Space Mod
0 ~ 10
ER Number
1 ~ 14
Nombre des premières réflexions.
ER Density
0 ~ 100
Densité des premières réflexions.
ER HPF
Thru, 40 Hz ~ 1.0 kHz
Fréquence de coupure du filtre passe-haut des premières
réflexions.
ER LPF
400 Hz ~ 20 kHz, Thru
Fréquence de coupure du filtre passe-bas des premières
réflexions.
*5
Connexion de la réverbération et des premières réflexions.
REV Patch
Paramètres communs
*1
*2
*3
*4
*5
Voyez la section “Paramètres communs” à la page 27
Small Hall, Large Hall, Random, Reverse, Plate, Strings
Uniquement lorsque REV Patch est parallèle (Reverb + ER)
Uniquement lorsque REV Patch est en série (Reverb → ER, ER → Reverb)
Hall, Room, Vocal, Plate
Reverb + E.Ref., E.Ref. → Reverb, Reverb →E.Ref.
ProR3 Effet de réverbération
Usage plus complexe (2) – Fonctions d’édition – 23
Réverbération + Chorus (Rev + Cho)
Touche
Paramètre
Valeur
Description
MAIN
REV RevTime
0.3 ~ 99.0 s
REV IniDelay
0.1 ~ 200.0 ms
REV HighRatio
X0.1 ~ X1.0
REV LowRatio
X0.1 ~ X2.4
REV Diffusion
0 ~ 10
Voyez la section “Réverbération” à la page 18
CHO Mod Freq
0.05 ~ 40.00 Hz
Fréquence de modulation du Chorus.
CHO DM Depth
0 ~ 100%
Profondeur de modulation du temps de retard du Chorus.
CHO AM Depth
0 ~ 100%
Profondeur de modulation de l’amplitude du Chorus.
CHO/REV Balance *1
0/100 ~ 100/0
Balance de niveau entre chorus et réverbération.
REV Rev Mix *2
0 ~ 100%
Quantité de réverbération.
REV Reverb Type
*3
Type de réverbération.
REV Density
0 ~ 100
Densité de la réverbération.
REV HPF
Thru, 40 Hz ~ 1.0 kHz
Fréquence de coupure du filtre passe-haut de la réverbération.
REV LPF
400 Hz ~ 20 kHz, Thru
Fréquence de coupure du filtre passe-bas de la réverbération.
REV Space Mod
0 ~ 10
Niveau de modulation de la réverbération.
REV Patch
*4
Connexions de la réverbération et des premières réflexions.
FINE
Paramètres communs
*1
*2
*3
*4
Voyez la section “Paramètres communs” à la page 27
Uniquement lorsque REV Patch est parallèle (Reverb + Chorus)
Uniquement lorsque REV Patch est en série (Reverb → Chorus, Chorus → Reverb)
Hall, Room, Vocal, Plate
Reverb + Chorus, Chorus → Reverb, Reverb → Chorus
ProR3 Effet de réverbération
24 Usage plus complexe (2) – Fonctions d’édition –
Réverbération + Symphonic (Rev + Sym)
Touche
Paramètre
Valeur
Description
MAIN
REV RevTime
0.3 ~ 99.0 s
REV IniDelay
0.1 ~ 200.0 ms
REV HighRatio
X0.1 ~ X1.0
REV LowRatio
X0.1 ~ X2.4
REV Diffusion
0 ~ 10
SYM Mod Freq
0.05 ~ 40.00 Hz
Fréquence de modulation Symphonic.
SYM Depth
0 ~ 100%
Profondeur de modulation Symphonic.
SYM/REV Balance *1
0/100 ~ 100/0
Balance de niveau entre réverbération et effet Symphonic.
REV Rev Mix *2
0 ~ 100%
Quantité de réverbération.
REV Reverb Type
*3
Type de réverbération.
REV Density
0 ~ 100
Densité de réverbération
REV HPF
Thru, 40 Hz ~ 1.0 kHz
Fréquence de coupure du filtre passe-haut de la réverbération.
REV LPF
400 Hz ~ 20 kHz, Thru
Fréquence de coupure du filtre passe-bas de la réverbération.
REV Space Mod
0 ~ 10
Niveau de modulation de la réverbération
*4
Connexion de symphonic et réverbération
Voyez la section “Réverbération” à la page 18
FINE
REV Patch
Paramètres communs
*1
*2
*3
*4
Voyez la section “Paramètres communs” à la page 27
Uniquement lorsque REV Patch est parallèle (Reverb + Symphon)
Uniquement lorsque REV Patch est en série (Reverb → Symphon, Symphon → Reverb)
Hall, Room, Vocal, Plate
Reverb + Symphon, Symphon → Reverb, Reverb → Symphon
ProR3 Effet de réverbération
Usage plus complexe (2) – Fonctions d’édition – 25
Réverbération + Flanger (Rev + Flg)
Touche
Paramètre
Valeur
Description
MAIN
REV RevTime
0.3 ~ 99.0 s
REV IniDelay
0.1 ~ 200.0 ms
REV HighRatio
X0.1 ~ X1.0
REV LowRatio
X0.1 ~ X2.4
REV Diffusion
0 ~ 10
FLA Mod Freq
0.05 ~ 40.00 Hz
Fréquence de modulation du flanger.
FLA Depth
0 ~ 100%
Profondeur de modulation du flanger.
FLA Delay
0.1 ~ 100.0 ms
Des valeurs élevées produisent de la modulation pour les
graves tandis que des valeurs basses en produisent pour les
aiguës.
FLA FeedBack Gain
0 ~ 100%
Quantité de rétroaction du flanger.
0/100 ~ 100/0
Balance de niveau entre réverbération et flanger.
REV Rev Mix *2
0 ~ 100%
Quantité de réverbération.
REV Reverb Type
*3
Type de réverbération.
REV Density
0 ~ 100
Densité de la réverbération.
REV HPF
Thru, 40 Hz ~ 1.0 kHz
Fréquence de coupure du filtre passe-haut de la réverbération.
REV LPF
400 Hz ~ 20 kHz, Thru
Fréquence de coupure du filtre passe-bas de la réverbération.
REV Space Mod
0 ~ 10
Niveau de modulation de la réverbération.
REV Patch
*4
Connexion du flanger et de la réverbération.
Voyez la section “Réverbération” à la page 18
FINE
FLA/REV Balance *1
Paramètres communs
*1
*2
*3
*4
Voyez la section “Paramètres communs” à la page 27
Uniquement lorsque REV Patch est parallèle (Reverb + Flange)
Uniquement lorsque REV Patch est en série (Reverb → Flange, Flange → Reverb)
Hall, Room, Vocal, Plate
Reverb + Flange, Flange → Reverb, Reverb → Flange
ProR3 Effet de réverbération
26 Usage plus complexe (2) – Fonctions d’édition –
Réverbération + Changement de hauteur (Rev + Pit)
Touche
Paramètre
Valeur
Description
MAIN
REV RevTime
0.3 ~ 99.0s
REV IniDelay
0.1 ~ 200.0 ms
REV HighRatio
X0.1 ~ X1.0
REV LowRatio
X0.1 ~ X2.4
REV Diffusion
0 ~ 10
PIT Pitch 1
↓Oct ~ ↑Oct
PIT Pitch 2
↓Oct ~ ↑Oct
Changement de la hauteur 2.
PIT Fine 1
–100 ~ +100 cent
Réglage fin du changement de la hauteur 1.
PIT Fine 2
–100 ~ +100 cent
Réglage fin du changement de la hauteur 2.
PIT Delay 1
0.1 ~ 300.0 ms
Temps de retard de la hauteur 1.
PIT Delay 2
0.1 ~ 300.0 ms
Temps de retard de la hauteur 2.
PIT Feedback 1
0 ~ 99%
Quantité de rétroaction de la hauteur 1.
PIT Feedback 2
0 ~ 99%
Quantité de rétroaction de la hauteur 2.
PIT Pan 1
L16 ~ R16
Position stéréo de la hauteur 1.
PIT Pan 2
L16 ~ R16
Position stéréo de la hauteur 2.
0/100 ~ 100/0
Balance de niveau entre réverbération et le changement de
hauteur.
REV Rev Mix *2
0 ~ 100%
Quantité de réverbération.
REV Reverb Type
*3
Type de réverbération.
REV Density
0 ~ 100
Densité de la réverbération.
REV HPF
Thru, 40 Hz ~ 1.0 kHz
Fréquence de coupure du filtre passe-haut de la réverbération.
REV LPF
400 Hz ~ 20 kHz, Thru
Fréquence de coupure du filtre passe-bas de la réverbération.
REV Space Mod
0 ~ 10
Niveau de modulation de la réverbération.
PIT Pitch Balance
0 ~ 100%
Balance entre le son direct et le son avec changement de
hauteur.
PIT Base Touche
OFF, C1 ~ C6
*5
REV Patch
*4
Sélection d’une combinaison d’effets.
Voyez la section “Réverbération” à la page 18
Changement de la hauteur 1.
FINE
PIT/REV Balance *1
Paramètres communs
*1
*2
*3
*4
*5
Voyez la section “Paramètres communs” à la page 27
Uniquement lorsque REV Patch est parallèle (Reverb + Pitch)
Uniquement lorsque REV Patch est en série (Reverb → Pitch, Pitch → Reverb)
Hall, Room, Vocal, Plate
Reverb + Pitch, Pitch → Reverb, Reverb → Pitch
Réglez ce paramètre lorsque vous voulez utiliser des messages de note venant d’un clavier MIDI ou autre pour piloter la différence de hauteur entre le son initial et le son avec changement de hauteur.
La différence de hauteur entre le son initial (d’entrée) et le son avec changement de hauteur sera déterminée par la
différence entre la note de base (Base Key) précisée avec ce paramètre et le message de note enclenchée reçu.
Ainsi, si la note de base (Base Key) est réglée sur C4 (Do4), un message de note enclenchée C3 (Do3) abaisse la
hauteur d’une octave tandis qu’un message de note enclenchée D4 (Ré4) relève la hauteur de deux demi-tons.
* Le numéro de note MIDI 60 correspond à C3.
* La plage du changement de hauteur actuel est de ±1 octave de sorte que même si la différence de hauteur spécifiée dépasse une octave, le changement de hauteur effectif restera dans cette plage.
* Si Base Key est sur OFF, les messages de note enclenchée MIDI ne piloteront pas la hauteur.
* Lorsque vous utilisez des messages de note enclenchée MIDI pour piloter le changement de hauteur, la hauteur
du dernier message de note enclenchée reçu déterminera le paramètre Pitch (hauteur).
ProR3 Effet de réverbération
Usage plus complexe (2) – Fonctions d’édition – 27
Réverbération + Auto Pan (Rev + Pan)
Touche
Paramètre
Valeur
Description
MAIN
REV RevTime
0.3 ~ 99.0 s
REV IniDelay
0.1 ~ 200.0 ms
REV HighRatio
X0.1 ~ X1.0
REV LowRatio
X0.1 ~ X2.4
REV Diffusion
0 ~ 10
PAN Speed
0.05 ~ 40.00 Hz
Fréquence de modulation de l’auto-pan.
PAN Depth
0 ~ 100%
Profondeur de modulation de l’auto-pan.
PAN Direction
L→R, L←R, L ↔R
Direction du déplacement.
PAN/REV Balance *1
0/100 ~ 100/0
Balance de niveau entre réverbération et auto-pan.
REV Rev Mix *2
0 ~ 100%
Quantité de réverbération.
Voyez la section “Réverbération” à la page 18
FINE
REV Reverb Type
*3
Type de réverbération.
REV Density
0 ~ 100
Densité de la réverbération.
REV HPF
Thru, 40 Hz ~ 1.0 kHz
Fréquence de coupure du filtre passe-haut de la réverbération.
REV LPF
400 Hz ~ 20 kHz, Thru
Fréquence de coupure du filtre passe-bas de la réverbération.
REV Space Mod
0 ~ 10
Niveau de modulation de la réverbération.
REV Patch
*4
Connexion de l’auto-pan et de la réverbération
Paramètres communs
*1
*2
*3
*4
Voyez la section “Paramètres communs” à la page 27
Uniquement lorsque REV Patch est parallèle (Reverb + PAN)
Uniquement lorsque REV Patch est en série (Reverb → PAN, PAN → Reverb)
Hall, Room, Vocal, Plate
Reverb + PAN, PAN → Reverb, Reverb → PAN
Paramètres communs
Touche
Paramètre
Valeur
Description
FINE
1stRef-1 Delay
0.1 ~ 200.0 ms
1stRef-1 Lvl
0 ~ 100%
Temps de retard des premières réflexions 1.
Niveau des premières réflexions 1.
1stRef-1 Pan
L16 ~ R16
Position stéréo des premières réflexions 1.
1stRef-2 Delay
0.1 ~ 200.0 ms
Temps de retard des premières réflexions 2.
1stRef-2 Lvl
0 ~ 100%
Niveau des premières réflexions 2.
1stRef-2 Pan
L16 ~ R16
Position stéréo des premières réflexions 2.
Input Mix *1
0 ~ 100%
Réglage du mixage stéréo.
Suite avec DFL
*1 Uniquement pour le mode stéréo
ProR3 Effet de réverbération
28 Usage plus complexe (2) – Fonctions d’édition –
Paramètres de programme 2 (Effects secondaires)
DFL
En vous servant du filtre dynamique, vous pouvez créer des effets wah pour lesquels la réponse
en fréquence change en fonction du niveau du signal d’entrée.
Touche
Paramètre
Valeur
Description
FINE
DFL Dynamic Filter
OFF, ON
Filtre dynamique activé/désactivé.
DFL Filter Type
LPF, HPF, BPF
Sélection du type de filtre.
DFL Frq.Center
100 Hz ~ 3.2 kHz
Fréquence centrale du filtre.
DFL Resonance
0 ~ 20
Résonance du filtre.
DFL Shift
Up/Down
Direction dans laquelle la fréquence centrale change en
fonction du niveau du signal d’entrée.
DFL Sens
1 ~ 10
Sensibilité au signal d’entrée.
DFL Decay
1 ~ 10
Vitesse à laquelle la fréquence centrale se rétablit après une
modification.
DFL Patch
PreREV, PostREV
Insertion de l’effet DFL avant ou après la réverbération.
Suite avec COMP
ProR3 Effet de réverbération
Usage plus complexe (2) – Fonctions d’édition – 29
COMP
Le compresseur peut servir à comprimer les changements de niveau du signal d’entrée, accentuant ainsi leur présence même pour les signaux de bas niveau.
A la dernière page des paramètres du compresseur, la réduction du gain est affichée sous forme
de graphe à barres, vous permettant de visualiser l’action du compresseur.
dB
0
Niveau de sortie
Ratio = 2:1
–10
Threshold = -20dB
–20
–30
–40
Knee = SoftKnee
–50
–60
–70
dB
–70
Touche
–60
Paramètre
–50
–40 –30 –20 –10
Niveau d’entrée
0
Valeur
Description
FINE
COMP Compressor
OFF/ON
Compresseur activé/coupé.
COMP Threshold Level
–54 ~ 0 dB
Seuil.
COMP Output Level
–15 ~ +15 dB
Niveau de sortie du compresseur.
COMP Ratio
1:1 ~ 00:1
Taux de compression.
COMP Knee
SoftKnee, Medium,
HardKnee
Mode de changement du seuil.
COMP Attack Time
0 ~ 500 ms
Temps d’attaque.
COMP Release Time
6 ~ 2400 ms
Temps de relâchement.
COMP GR
Graphe à barres
La réduction du gain est affichée sur un graphe à barres.
Retour au premier paramètre FINE (si l’effet principal est ER, il poursuit avec les paramètres User ER)
ProR3 Effet de réverbération
30 Usage plus complexe (2) – Fonctions d’édition –
EQ
Un égaliseur trois bandes est situé juste après le compresseur et vous permet de régler les bandes
de fréquence des graves, médianes et aiguës du signal.
GRAVES
MEDIANES
AIGUES
Type
Crête/Plateau
Crête
Crête/Plateau
Gain
±15 dB
±15 dB
±15 dB
32 Hz à 2.2 kHz
250 Hz à 5.6 kHz
500 Hz à 20 kHz
0.1 à 5.0
0.1 à 5.0
0.1 à 5.0
Fréquence
Q
Touche
Paramètre
Valeur
Description
EQ
Sélectionne le type d’égalisation (crête ou plateau) pour les
graves.
Low EQ Type
Peaking, Shelving
Low Gain
–15 ~ +15 dB
Détermine le gain des graves.
Low Freq
32 Hz ~ 2.2 kHz
Détermine la fréquence des graves.
Low Q *1
0.1 ~ 5.0
Déterminé la bande passante des graves.
Mid Gain
–15 ~ +15 dB
Détermine le gain des médianes.
Mid Freq
250 Hz ~ 5.6 kHz
Détermine la fréquence des médianes.
Mid Q
0.1 ~ 5.0
Déterminé la bande passante des médianes.
High EQ Type
Peaking, Shelving
Sélectionne le type d’égalisation des aiguës.
High Gain
–15 ~ +15 dB
Détermine le gain des aiguës.
High Freq
500 Hz ~ 20 kHz
Détermine la fréquence des aiguës.
High Q *1
0.1 ~ 5.0
Déterminé la bande passante des aiguës.
OFF/ON
Egaliseur activé/coupé.
EQ ON
POST EQ
*1 Lorsque le type d’égalisation choisi est Peaking (crête).
ProR3 Effet de réverbération
Usage plus complexe (2) – Fonctions d’édition – 31
GATE
Le Gate vous permet de créer des effets de réverbération coupée.
La réverbération avec Gate (porte) coupe brutalement le son de la réverbération. Cet effet a été
rendu célèbre grâce au batteur devenu chanteur d’un groupe bien connu.
dB
+20
+10
Niveau de sortie
0
–10
–20
–30
–40
Threshold = –40dB
–50
–60
–70
dB
–70
Touche
–60
Paramètre
–50
–40 –30 –20 –10
Niveau d’entrée
0
+10
+20
Valeur
Description
GATE
Threshold Level
–60 ~ 0 dB
Seuil.
Trigger Delay
0.1 ~ 100 ms
Retard avant le fonctionnement du Gate (de la porte).
Hold Time
1 ~ 5759 ms
Durée d’ouverture du Gate.
Release time
6 ~ 24000 ms
Vitesse de fermeture du Gate.
MIDI Trigger
OFF/ON
Contrôle MIDI externe du Gate.
Detect
at-GATE, Pre-REV
Point de détection du niveau du signal.
GATE GR
Bar graph
Ouverture/fermeture du Gate illustrée par un graphe à barres.
OFF/ON
Gate activé/coupé.
GATE ON
Gate
ProR3 Effet de réverbération
32 Usage plus complexe (2) – Fonctions d’édition –
LEVEL/BAL (niveau/balance)
Ici, vous pouvez régler le niveau de sortie.
Vous pouvez également régler la balance entre le signal direct et le signal d’effet.
Touche
GATE
BAL
LEVEL
GATE
BAL
LEVEL
Paramètre
Valeur
BYPASS
Description
LEVEL/BAL
Effect Balance
0 ~ 100%
Taux de signal direct et de signal d’effet.
Output Level
–∞, –50 ~ +6 dB
Réglage du niveau de sortie.
ProR3 Effet de réverbération
Usage plus complexe (3) – Fonctions utilitaires – 33
Usage plus complexe (3) – Fonctions utilitaires –
Voici comment effectuer des réglages pour des paramètres système tels que le verrouillage de la
mémoire, le mode d’entrée et les paramètres MIDI.
Verrouillage de la mémoire
1. Appuyez sur la touche UTILITY pour avoir accès à la page Memory protect.
Le témoin rouge s’allume.
Memory Protect
ON
2. Appuyez sur la touche INC ou DEC pour activer ou couper le verrouillage de la
mémoire.
Cette fonction a pour but de protéger les données des mémoires de programme USER (utilisateur) et d’éviter qu’elles ne soient accidentellement effacées.
ON: Impossible de sauvegarder des données
OFF: Possible de sauvegarder des données
Mode d’entrée
Le ProR3 dispose de quatre modes d’entrée: Stereo, LR-Mix, R-Mono et L-Mono.
1. Appuyez sur la touche UTILITY pour avoir accès à la page Input Mode.
2. Appuyez sur la touche INC ou DEC pour sélectionner le mode d’entrée.
Input Mode
LR-Mix
LR-MIX: Les signaux d’entrée gauche et droit seront mélangés et traités. Le signal d’effet sera
de meilleure qualité que pour STEREO.
STEREO: Les signaux d’entrée gauche et droit seront traités séparément et le placement stéréo
du signal d’entrée sera reproduit pour le signal d’effet.
L-Mono: Seul le signal d’entrée gauche sera traité et, en mode bypass (contournement), il sera
envoyé aux sorties gauche et droite.
R-Mono: Seul le signal d’entrée droit sera traité et, en mode bypass (contournement), il sera
envoyé aux sorties gauche et droite.
ProR3 Effet de réverbération
34 Usage plus complexe (3) – Fonctions utilitaires –
Réglage du canal MIDI
Voici comment déterminer le canal de transmission et de réception MIDI.
1. Appuyez sur la touche UTILITY pour accéder à la page MIDI channel setting.
MIDI Channel
OMNI
2. Appuyez sur la touche INC ou DEC pour régler le canal.
OMNI: Tous les canaux 1–16 seront reçus et le canal de transmission sera le canal 1.
1–16:
La transmission et la réception se feront sur le canal choisi.
OFF:
Les données MIDI ne seront ni transmises ni reçues.
Tableau de changements de programme MIDI
Vous pouvez effectuer des réglages de tableau de changement de programme pour chacune des
quatre banques du ProR3. Les réglages par défaut font correspondre les numéros de programme
MIDI 1~90 aux numéros de programmes utilisateur (U) et les numéros de programme MIDI
91~128 aux numéros de programme usine (Preset) 1~38.
1. Appuyez sur la touche UTILITY jusqu’à ce que la page MIDI program change table
apparaisse.
MIDI PGM Change Table
BANK:A PGM
1= ProR U01
2. Utilisez les touches du curseur (√) (®) pour sélectionner un paramètre.
3. Appuyez sur la touche INC ou DEC pour régler le paramètre. Vous pouvez également
vous servir des touches du pavé numérique pour entrer directement un numéro de programme MIDI.
BANK
A–D
Spécifie la banque de changement de programme.
PGM
1–128
Numéro de programme MIDI.
U01–U90, P01–P90
Numéro de programme du ProR3 qui sera rappelé à la réception du numéro
de programme MIDI. U01–U90 et P01–P90 indiquent respectivement les
numéros de programme utilisateur et Preset (usine).
Pour un réglage..., rien ne se produit. *
ProR
---
* --- peut aussi être entré avec la touche CANCEL.
ProR3 Effet de réverbération
Usage plus complexe (3) – Fonctions utilitaires – 35
Transmission de blocs de données (Bulk Dump)
Le ProR3 vous permet de transmettre n’importe quel type de données sous forme de blocs: vous
pouvez envoyer les données de la mémoire, d’un ou de plusieurs programmes, des banques, des
ER utilisateur ou de la mémoire système.
1. Appuyez sur la touche UTILITY jusqu’à ce que la page MIDI Bulk Out apparaisse.
MIDI Bulk Out
All
Press ENTER
2. Utilisez les touches du curseur (√) (®) pour sélectionner un paramètre.
3. Appuyez sur la touche INC ou DEC pour sélectionner la valeur.
All
Toutes les données (Program, Bank, UserER, System)
Program
U01–U90,
All
Les données du programme utilisateur spécifié.
Si All est choisi, il s’agit des données de tous les programmes utilisateur.
Bank
A–D,
All
Les données de la banque de changement de programme spécifiée.
Si All est choisi, il s’agit des données de toutes les banques.
UserER
A–D,
All
Les données ER utilisateurs spécifiées
Si All est choisi, il s’agit de toutes les données ER utilisateur.
System
Données des réglages système (fonctions utilitaires: mode d’entrée, etc.)
4. Appuyez sur la touche RECALL/ENTER pour effectuer la transmission de bloc de données.
Avant de commencer la transmission, assurez-vous que l’appareil MIDI branché au ProR3 est
prêt à recevoir un bloc de données.
Assignation de commandes de contrôle MIDI
Voici comment assigner un numéro de contrôle MIDI aux deux commandes de contrôle. Le
ProR3 peut réagir aux injonctions de deux commandes de contrôle et chaque commande dispose
d’une page séparée pour ses réglages.
1. Appuyez sur la touche UTILITY jusqu’à ce qu’une des pages d’assignation de commande
de contrôle apparaisse.
Controller-1 Assign
OFF
2. Appuyez sur la touche INC ou DEC pour entrer le numéro de contrôle.
Le paramètre choisi dans la section "Réglage des paramètres pilotés via MIDI" à la page 16 peut
être piloté en temps réel avec la commande de contrôle sélectionnée.
ProR3 Effet de réverbération
36 Messages d’erreur du ProR3
Initialisation du ProR3
Si vous souhaitez rappeler tous les réglages usine du ProR3, suivez la procédure d’initialisation
suivante.
1. Maintenez la touche STORE enfoncée et appuyez sur l’interrupteur POWER pour mettre
l’appareil sous tension.
Le message suivant apparaît à l’écran: “Press [ENTER] to initialize ProR3”.
2. Appuyez sur la touche RECALL/ENTER pour effectuer l’initialisation.
Appuyez sur n’importe quelle autre touche pour annuler la procédure.
Avertissement: Lorsque vous initialisez les réglages, toutes les données utilisateur
seront perdues. Tous les réglages des programmes utilisateur, des tableaux de changement de programme ainsi que les réglages système reviennent aux valeurs usine.
Avant d’appuyer sur la touche RECALL/ENTER, demandez-vous une fois de plus si c’est bien
ce que vous voulez faire.
Messages d’erreur du ProR3
“ Program Number Error ”
Vous avez choisi un numéro de programme plus grand
que 90.
“
****** Data Error ******”
“
** Store Number Error **”
Erreur générale. Si nécessaire, initialisez le ProR3.
“
La fonction Memory Protect est sur ON.
*
*
“
** MEMORY PROTECTED ! **”
LOW BATTERY
ProR3 Effet de réverbération
“
Vous avez choisi un numéro de programme plus grand
que 90.
La pile interne est usée. Adressez-vous à un SAV agréé
par Yamaha pour faire remplacer la pile.
Fiche technique 37
Fiche technique
Réponse en fréquence
20 Hz ~ 20 kHz, +1.0 dB, –1.5 dB
Plage de dynamique
110 dB (typique), pas moins de 104 dB
Rapport signal/bruit*1
Moins de –80 dB *2
Distorsion
Moins de 0.007% (1 kHz, niveau maximum)
Nombre de canaux
2 (signal symétrique)
Caractéristiques audio
Niveau nominal
+4 dB / –10 dB *2
Niveau maximum
+24 dB (avec le commutateur de niveau sur +4 dB) *2
Impédance
20 kΩ
Nombre de canaux
2 (signal symétrique)
Entrée
Niveau nominall
+4 dB / –10 dB *2
Niveau maximum
+24 dB (avec le commutateur de niveau sur +4 dB) *2
Impédance
150 Ω
Convertisseurs A/N
Linéaires à 20 bits
Sortie
Convertisseurs
A/N et N/A
Mémoire de
programmes
Contrôle MIDI
Convertisseurs N/A
Linéaires à 20 bits
Fréquence d’échantillonnage
44.1 kHz
Programmes usine (Preset)
1~ 90
Programmes utilisateur (User)
1 ~ 90
Changement de programme, commande de contrôle, transmission de données SysEx, note enclenchée,
changement de paramètre
USA et Canada
120V CA, 60 Hz
Modèle général
230V CA, 50 Hz
Alimentation
Consommation
35W
Dimensions (L × P × H)
480 × 398,5 × 89 mm
Poids
5,5 kg.
INPUT (Niveau d’entrée)
Commandes
PRE EFFECT EQ - FREQ × 3 (LOW, MID, HIGH)
PRE EFFECT EQ - GAIN × 3 (LOW, MID, HIGH)
Touches
ON (PRE EFFECT EQ) *3, √ (touche du curseur gauche), ® (touche du
curseur droite), INC (incrémentation, touche du DATA), DEC (décrémentation, touche du DATA), COMPARE *3, MAIN *3, FINE *3, EQ *3, EQ
ON *3, GATE *3, GATE ON*3, LEVEL/BAL *3, OTHERS *3
Pavé numérique (comprenant les touches “-” et “.”), PROGRAM *3,
STORE, CANCEL, RECALL/ENTER, INFINITE *3, UTILITY, BYPASS *3
Interrupteur
POWER
Ecran, indicateurs
24 caractères × 2 lignes, à cristaux liquides
Mètres de niveau d’entrée (INPUT) à 8 segments × 2
Affichage PROGRAM à 7 segments
Indicateurs de statut à 6 diodes
Témoin de touche × 14
Bornes
INPUT L/R (XLR-3-31 × 2) et (1/4” prise jacks × 2)
OUTPUT L/R (XLR-3-32 × 2) et (1/4” prise jacks × 2)
MIDI – IN, OUT, THRU (5P DIN × 3)
Commutateurs
Commutateur de niveau (+4/–10) × 2
Face avant
Face arrière
*1 Le rapport signal/bruit est mesuré avec un filtre passe-bande équivalent à un filtre allant de 20 Hz à 20 kHz avec affaiblissement infini
dB/octave.
*2 0 dB = 0,755 Vrms.
*3 Témoin au-dessus de la touche.
ProR3 Effet de réverbération
38 Fiche technique
370
H: 89
22.3
P: 398.5
Dimensions
L: 480
Unit: mm
Toutes ces caractéristiques peuvent être modifiées sans préavis.
Schéma
95/10/18
Pre
Effect
EQ
L
DFL
COMP
EQ
GATE
L
LEVEL/
BAL
+4dB
INPUT L
L
+4dB
Selected
Effect
INPUT
MODE
–10dB
–10dB
INPUT
Pre
Effect
EQ
R
L
BYPASS
DFL
COMP
EQ
GATE
LEVEL/
BAL
OUTPUT
R
INPUT R
R
ProR3 Effet de réverbération
R
Deutsch
DIGITAL-HALLGERÄT
Bedienungsanleitung
Vorsichtsmaßnahmen i
Vorsichtsmaßnahmen
Meiden Sie extreme Hitze, Feuchtigkeit, staubige Orte sowie starke Vibrationen
Stellen Sie dieses Gerät niemals an einen Ort, an dem es extremen Temperaturen oder starker
Feuchtigkeit ausgesetzt ist – also niemals in die Nähe von Heizkörpern, Öfen, in das direkte Sonnenlicht usw. Meiden Sie außerdem extrem staubige Orte. Starke Vibrationen können zu mechanischen Störungen führen.
Umsichtig behandeln
Behandeln Sie dieses Gerät mit der gebotenen Umsicht.
Am besten stellen Sie es an einen Ort, an dem eine ausreichende Belüftung gewährleistet ist.
Lassen Sie zwischen der Geräterückseite und der Wand einen Freiraum von mindestens 10cm.
Auf diese Weise kann es intern nämlich nicht zu Wärmestaus kommen, so daß zu keiner Zeit
Brand- oder Schlaggefahr zu befürchten ist.
Öffnen Sie niemals das Gerät und überlassen Sie alle Wartungsarbeiten dem
qualifizierten Kundendienst
Dieses Gerät enthält keine Teile, die vom Anwender selbst gewartet werden dürfen. Überlassen
Sie alle Wartungsarbeiten dem qualifizierten Yamaha-Kundendienst. Bedenken Sie, daß beim
Öffnen dieses Gerätes automatisch der Garantieanspruch erlischt.
Vor dem Anschließen ausschalten
Schalten Sie das Gerät AUS, bevor Sie Kabelverbindungen herstellen oder lösen. Nur so sind Sie
nämlich sicher, daß weder das ProR3 noch die übrigen Geräte beschädigt werden.
Kabel vorsichtig behandeln
Ziehen Sie beim Lösen eines Kabelanschlusses –sowie des Netzanschlusses– immer am Stecker
und niemals am Kabel, um das Reißen der Adern zu vermeiden.
Mit weichem, trockenem Tuch reinigen
Verwenden Sie zum Reinigen des ProR3 niemals Waschbenzin oder Lösungsmittel. Wischen Sie
es mit einem weichen, trockenen Tuch ab.
Immer die richtige Netzspannung verwenden
Schließen Sie dieses Gerät immer an eine Steckdose an, die die auf der Geräterückseite erwähnte
Netzspannung führt:
Modell für die USA und Kanada: 120V AC, 60 Hz
Allgemeines Modell: 230V AC, 50 Hz
Modell für das Vereinigte Königreich: 240V AC, 50 Hz
Pufferbatterie
Dieses Gerät enthält eine Lithiumbatterie für die Stromspeisung der Anwenderspeicher bei ausgeschaltetem Gerät. Bei normaler Verwendung beträgt die Lebensdauer dieser Batterie ungefähr
fünf Jahre. Sinkt die Spannung unter den erforderlichen Mindestwert ab, so erscheint beim Einschalten die Meldung “WARNING LOW BATTERY” im Display. Lassen Sie die Batterie dann so
schnell wie möglich von einem anerkannten Yamaha-Kundendienst ersetzen.
Warnung: VERSUCHEN SIE DIE BATTERIE NIEMALS SELBST ZU ERSETZEN. BEIM ÖFFNEN DES
GERÄTES UND/ODER BEIM VERSUCH, SELBST ETWAS ZU REPARIEREN ERLISCHT AUTOMATISCH DER GARANTIEANSPRUCH.
ProR3 Digital-Hallgerät
ii Inhaltsverzeichnis
Inhaltsverzeichnis
Vorweg . . . . . . . . . . . . . . . . . . . . . . . . . . . . . . . . . . . .1
Frontplatte . . . . . . . . . . . . . . . . . . . . . . . . . . . . . . . . .2
Rückseite . . . . . . . . . . . . . . . . . . . . . . . . . . . . . . . . . .6
Los geht’s
– Anwahl eines Werksprogramms – . . . . . . .7
Anschlüsse . . . . . . . . . . . . . . . . . . . . . . . . . . . . . . .7
Ein- und ausschalten . . . . . . . . . . . . . . . . . . . . . . .7
Einstellen des Eingangspegels . . . . . . . . . . . . . . .8
Anwahl eines Effektprogramms . . . . . . . . . . . . .8
Werksprogramme
(Effektprogramme im PRESET-Bereich) . . . . . .9
An die Arbeit (1) . . . . . . . . . . . . . . . . . . . . . . . . . .12
Bypass-Funktion . . . . . . . . . . . . . . . . . . . . . . . . .12
Entzerrer vor dem Effekt
(PRE EFFECT EQ) . . . . . . . . . . . . . . . . . . . . . . . .12
INFINITE-Funktion. . . . . . . . . . . . . . . . . . . . . . .13
An die Arbeit (2) – Editierfunktionen – . . . .14
Programmstruktur. . . . . . . . . . . . . . . . . . . . . . . .14
Editieren . . . . . . . . . . . . . . . . . . . . . . . . . . . . . . . .15
Programmparameter 1 (Primäreffekt) . . . . . . .18
Hall (Reverb) . . . . . . . . . . . . . . . . . . . . . . . . .18
Erstreflexionen (ER) . . . . . . . . . . . . . . . . . . .19
User ER-Parameter . . . . . . . . . . . . . . . . . . . .19
Zimmersimulation (RoomSim) . . . . . . . . . .20
Hall + Echo (Rev + Ech) . . . . . . . . . . . . . . . .21
Hall + Erstreflexionen (Rev + ER) . . . . . . .22
Hall + Chorus (Rev + Cho) . . . . . . . . . . . . .23
Hall + Symphonic (Rev + Sym) . . . . . . . . . .24
Hall + Flanger (Rev + Flg) . . . . . . . . . . . . . .25
Hall + Tonhöhenverschiebung (Rev + Pit) 26
Hall + Auto Pan (Rev + PAN) . . . . . . . . . . .27
Common-Parameter . . . . . . . . . . . . . . . . . . .27
Programmparameter 2 (Sekundäreffekt) . . . . .28
DFL . . . . . . . . . . . . . . . . . . . . . . . . . . . . . . . . .28
COMP . . . . . . . . . . . . . . . . . . . . . . . . . . . . . . .29
EQ . . . . . . . . . . . . . . . . . . . . . . . . . . . . . . . . . .30
GATE . . . . . . . . . . . . . . . . . . . . . . . . . . . . . . .31
LEVEL/BAL . . . . . . . . . . . . . . . . . . . . . . . . .32
ProR3 Digital-Hallgerät
Wenn wirklich alles stimmen soll – UtilityFunktionen – . . . . . . . . . . . . . . . . . . . . . . . . . . . . . .33
Speichersicherung (Memory Protect) . . . . . . . .33
Eingangsbetrieb (Input Mode). . . . . . . . . . . . . .33
Einstellen des MIDI-Kanals . . . . . . . . . . . . . . . .34
Programmwechseltabelle . . . . . . . . . . . . . . . . . .34
SysEx-Datenblöcke senden (Bulk Dump) . . . .35
MIDI-Steuerbefehle . . . . . . . . . . . . . . . . . . . . . . .35
Initialisieren des ProR3 . . . . . . . . . . . . . . . . . . . .36
Fehlermeldungen des ProR3. . . . . . . . . . . . . .36
Spezifikationen . . . . . . . . . . . . . . . . . . . . . . . . . .37
Abmessungen. . . . . . . . . . . . . . . . . . . . . . . . . . . .38
Blockschaltbild . . . . . . . . . . . . . . . . . . . . . . . . . . .38
MIDI data format . . . . . . . . . . . . . . . . . . . . . Add-1
1. Transmitted data . . . . . . . . . . . . . . . . . . . Add-1
2. Receive data . . . . . . . . . . . . . . . . . . . . . . . Add-5
MIDI Implementation Chart . . . . . . . . . . Add-9
Vorweg 1
Vorweg
Vielen Dank, daß Sie sich für das Digital-Hallgerät ProR3 von Yamaha entschieden haben. Das
ProR3 stellt einen neuen wichtigen Schritt in der Halltechnologie dar – und wieder heißt der
Hersteller Yamaha. Dank des Digital-Signalprozessors (DSP) der dritten Generation mit seiner
32-Bit Signalverarbeitung und seinen leistungsfähigen 20Bit A/D- und D/A-Wandlern, bietet
dieses Hallgerät Effekte von bisher ungeahnter Dichte und Transparenz sowie eine atemberaubende Dynamik. Die hochqualitativen analogen Ein- und Ausgangsschaltkreise bieten einen
Dynamikumfang von 110dB und somit einen überaus natürlichen Hall, der absolut rauschfrei
ausklingt.
Das ProR3 bietet 10 Primäreffekte: Hall, Erstreflexionen, Raumhall und Kombinationen von Hall
mit Echo, Chorus, Flanger, Pitch Shift (Transposition), Auto-Pan usw. Jeder Primäreffekt ist mit
einer Eingangsentzerrung ausgestattet, während sich hinter dem Primäreffekt ein Dynamikfilter,
ein Kompressor, ein Entzerrer, ein Gate, eine Lautstärke- und Panoramaregelung befinden. Im
Stereo-Eingangsbetrieb ist das Gerät voll-stereo. Außer den 90 Werksprogrammen bietet das
ProR3 90 Anwenderspeicher, in denen Sie Ihre eigenen Einstellungen unterbringen können.
Die Stereo Ein- und -Ausgänge sind als symmetrische XLR- und 1/4”-Klinkenbuchsen ausgeführt, so daß man so gut wie jede Signalquelle anschließen kann. Mit den Eingangs- und Ausgangspegelwahlschaltern (–10 dB/+4 dB) kann man den optimalen Ein- und Ausgangspegel einstellen. Außerdem kann man die gewünschten Programme via MIDI anwählen und die Einstellungen als SysEx-Datenblöcke extern speichern.
Das Yamaha ProR3 Digital-Hallgerät ist das Ergebnis eines großen Schrittes für die Halltechnologie: Erstmals bekommt man einen wirklich “knackigen” Hall erstaunlicher Frische geboten, dessen Klangqualität hervorragend ist, ohne die befürchtete Anwenderunfreundlichkeit nach sich
zu ziehen. All diese Vorzüge machen das ProR3 zu einem Traumgerät für Heimstudios, professionelle Tonstudios und Beschallungsanlagen.
Bitte lesen Sie sich diese Bedienungsanleitung gründlich durch, damit Sie auch wirklich alle
Funktionen und Vorzüge des ProR3 kennenlernen.
ProR3 Digital-Hallgerät
2 Frontplatte
Frontplatte
2
1
3
4
6
5
DATA/CURSOR
DIGITAL REVERBERATOR
8
9
PARAMETER
FINE
7
8
9
EQ ON
4
5
6
STORE
GATE
GATE ON
1
2
3
CANCEL
UTILITY
LEVEL/
BAL
OTHERS
0
•
–
RECALL/
ENTER
BYPASS
MAIN
PROGRAM
INFINITE
POWER
INC
R
L
7
CLIP
-3
-6
-9
-12
-18
-24
-36
STEREO
L
R MONO
EQ
PRESET
USER
PROGRAM
MIDI
FREQ
GAIN
DEC
PRE EFFECT EQ
INPUT
0
100
FREQ
300
800
GAIN
2k
FREQ
4k
10k
GAIN
COMPARE
50
700 -15
+15
350
5k
-15
+15
2k
20k -15
ON/ OFF
ON
+15
+10
-00
L
R
LOW
MID
HIGH
A
0
1
B
C D
INPUT-Pegelmeter (L/R)
Hierbei handelt es sich um achtgliedrige LED-Ketten für die Stereo-Eingangskanäle. Die einzelnen Glieder der LED-Ketten beziehen Sie auf folgende Pegelwerte: –36 dB, –24 dB, –18 dB,
–12 dB, –9 dB, –6 dB, –3 dB und CLIP.
Achtung: Das Signal der Pegelmeter wird hinter dem A/D-Wandler abgegriffen. Mithin bedeutet das
Leuchten der CLIP-Diode, daß das Digital-Signal verzerrt. Stellen Sie den Eingangspegel also jeweils
so ein, daß die CLIP-Diode zu keiner Zeit leuchtet.
2
PROGRAM-Nummernanzeige
In diesem zweistelligen LED-Display (7 Segmente) erscheint jeweils die Nummer des zuletzt
aufgerufenen Effektprogramms.
Blinkt die hier angezeigte Nummer, so haben Sie das betreffende Programm zwar bereits angewählt, aber noch nicht aufgerufen.
3
Statusdioden
Diese sechs Dioden zeigen jeweils den Status des aktiven Programms sowie der übrigen Funktionen des ProR3 an.
STEREO, L/R MONO
Diese drei Dioden beziehen sich auf den Eingangsbetrieb. Das ProR3 bietet vier Eingangsbetriebsarten (Stereo, LR/Mix, R-Mono, L-Mono), die man mit dem UTILITY-Taster anwählen
kann. Wenn beide L/R Mono-Dioden leuchten, ist der LR/Mix-Betrieb angewählt.
PRESET/USER
Diese Dioden zeigen den Programmstatus an. Den Status wählt man übrigen mit dem PROGRAM-Taster. Wenn die PRESET-Diode leuchtet, können nur Werksprogramme gewählt werden. Leuchtet hingegen die USER-Diode, können nur Anwenderspeicher aufgerufen werden.
MIDI
Diese Diode leuchtet nur, wenn das ProR3 MIDI-Daten empfängt. Das setzt voraus, daß Sie den
MIDI-Ausgang des Senders mit der MIDI IN-Buchse des ProR3 verbinden.
4
LCD
In diesem LCD-Display erscheinen der Name des angewählten Effektprogramms sowie die
Parameterwerte dieses Programms. Außerdem zeigt das Display bisweilen Meldungen an, die
sich auf die Verwendung oder den Status des ProR3 beziehen.
ProR3 Digital-Hallgerät
Frontplatte 3
5
DATA/CURSOR Taster
Mit den DATA-Tastern (INC) (DEC) kann der Wert des angewählten Parameters geändert werden.
Mit den CURSOR-Tastern (√) (®) können Sie einen im Display angezeigten Parameter anfahren.
Wenn die PROGRAM-Diode leuchtet, dienen die DATA-Taster zur Anwahl des nächsten/vorigen Programms, das Sie aufrufen möchten.
6
PARAMETER-Taster
Diese Taster dienen zum Anwählen der Effektparameter. Wenn Sie einen dieser Taster wiederholt drücken, wird jeweils die nächste Parameterseite aufgerufen. Schließlich zeigt das Display
wieder die erste Parameterseite an.
MAIN
FINE
A
B
EQ
EQ ON
C
GATE
GATE ON
LEVEL/
BAL
OTHERS
D
F
E
6-A MAIN-Taster
Mit diesem Taster haben Sie Zugriff auf die Hauptparameter (Main). Wenn die dazugehörige Diode leuchtet, können Sie die Hauptparameter des aktiven Programms editieren.
6-B
FINE-Taster
Mit diesem Taster haben Sie Zugriff auf die Sekundärparameter des aktiven Programms.
Auch hier gilt, daß die dazugehörige Diode leuchten muß.
6-C EQ-, EQ ON-Taster
Mit dem EQ-Taster haben Sie Zugriff auf die Dreibandentzerrung, die sich hinter dem
Effekt befindet. Wenn die dazugehörigen Diode leuchtet, können Sie den Entzerrungstyp,
die Frequenz-, die Anhebung/Absenkung sowie die Güte der drei Bänder einstellen.
Mit dem EQ ON-Taster können Sie die Entzerrung hinter dem Effekt abwechselnd einund ausschalten. Wenn die Entzerrung aktiv ist, leuchtet die grüne Diode.
LOW
MID
HIGH
Glocke/Kuhschwanz
Glocke
Glocke/Kuhschwanz
±15 dB
±15 dB
±15 dB
Frequenz
32 Hz~2.2 kHz
250 Hz~5.6 kHz
500 Hz~20 kHz
Q (Güte)
0.1~5.0
0.1~5.0
0.1~5.0
Typ
Anhebung/
Absenkung
6-D GATE-, GATE ON-Taster
Mit dem GATE-Taster haben Sie Zugriff auf die Parameter des Gate-Effekts. Wenn die
dazugehörige Diode leuchtet, kann der Pegel, die Balance usw. eingestellt werden.
Mit dem GATE ON-Taster kann der Gate-Effekt ein- und ausgeschaltet werden. Ist er eingeschaltet, so leuchtet die grüne Diode.
6-E
LEVEL/BAL-Taster
Mit diesem Taster kann das Verhältnis zwischen dem Original- und dem Effektsignal eingestellt werden. Wenn Sie diesen Taster drücken, leuchtet die rote Diode.
ProR3 Digital-Hallgerät
4 Frontplatte
6-F
OTHERS-Taster
Dieser Taster hat zwei Funktionen. Wenn Sie ihn drücken, leuchtet die rote Diode.
1 Eingabe des Programmnamens (siehe Seite 16).
2 Anwahl der Parameter, die Sie mit MIDI-Steuerbefehlen einstellen möchten (siehe
Seite 16 und 35).
7
Zehnertastenfeld
Mit diesen Tastern können Sie die Nummer des gewünschten Programms direkt eintippen.
Außerdem können Sie über dieses Feld Parameterwerte einstellen.
Wenn Sie einen Parameterwert mit dem Zehnertastenfeld eingeben, blinkt der Wert, bis Sie ihn
bestätigen. Um einen Wert zu bestätigen, müssen Sie den RECALL/ENTER-Taster drücken.
Wenn Sie nach der Eingabe eines Wertes doch lieber den ursprünglichen Wert beibehalten möchten, drücken Sie statt dessen auf CANCEL. Es gibt Parameter, deren Wert nicht mit dem Zehnertastenfeld eingegeben werden kann.
Um einen negativen Wert einzugeben (z.B. die Absenkung eines EQ-Frequenzbandes auf
“-9dB”), müssen Sie den “–” Taster drücken. Um einen Dezimalwert (z.B. den Gütewert Q= 2.5)
einzugeben, müssen Sie den “.” Taster drücken.
7
8
9
4
5
6
STORE
1
2
3
CANCEL
0
•
–
RECALL/
ENTER
PROGRAM
A
B
C
D
7-A PROGRAM-Taster
Mit diesem Taster können Sie den Programmspeicherbereich anwählen. Wenn Sie ihn
mehrmals betätigen, wird abwechselnd der PRESET- und der USER-Bereich angewählt.
7-B
STORE-Taster
Drücken Sie diesen Taster, wenn Sie die geänderten Einstellungen im USER-Bereich speichern möchten.
7-C CANCEL-Taster
Mit diesem Taster können Sie einen mit dem Zehnertastenfeld eingegebenen (aber noch
nicht bestätigten) Wert wieder rückgängig machen.
7-D RECALL/ENTER-Taster
Mit diesem Taster können Sie das Programm aufrufen, dessen Nummer Sie mit dem Zehnertastenfeld eingegeben haben. Außerdem können Sie hiermit den blinkenden Parameterwert bestätigen.
8
INFINITE-Taster
Wenn Sie diesen Taster drücken, leuchtet die dazugehörige Diode, um anzuzeigen, daß der RevTime-Parameter entscheidend verlängert wird. Auf diese Art entsteht ein “Freeze Frame” oder
“Endlos”-Eindruck.
9
POWER-Taster
Mit diesem Taster schalten Sie das ProR3 ein und aus.
Beim Einschalten wird jeweils das zuletzt verwendete Effektprogramm aufgerufen.
ProR3 Digital-Hallgerät
Frontplatte 5
10 INPUT-Pegelregler (L, R)
Mit dem inneren Regler können Sie den Eingangspegel des linken Kanals einstellen. Der äußere
Regler dient zum Einstellen des rechten Kanalpegels. Diese konzentrischen Regler erlauben
demnach eine genaue Pegeleinstellung für Stereo-Signalquellen.
11 PRE EFFECT EQ-Regler, ON-Taster
Hierbei handelt es sich um eine parametrische Dreibandentzerrung, die sich vor dem Effekt
befindet. Es kann die Frequenz sowie die Anhebung/Absenkung aller drei Frequenzbänder eingestellt werden.
Mit dem ON-Taster können Sie den Entzerrer vor dem Effekt ein- und ausschalten. Wenn der
Entzerrer eingeschaltet ist, leuchtet die grüne Diode.
Frequencz
Anhebung/Absenkung
LOW
MID
HIGH
50 Hz~700 Hz
350 Hz~5 kHz
2 kHz~20 kHz
±15 dB
±15 dB
±15 dB
12 COMPARE-Taster
Nach dem Editieren bestimmter Programmparameter möchten Sie die Neufassung vielleicht mit
dem Original vergleichen, um zu hören, ob Sie Fortschritte gemacht haben. Wenn nach dem
Drücken dieses Tasters die rote Diode leuchtet, hören Sie wieder die Originalfassung des Effektprogramms.
13 UTILITY-Taster
Verwenden Sie diesen Taster, wenn Sie einen Systemparameter (z.B. die Speichersicherung), den
Eingangsbetrieb bzw. die MIDI-Parameter einstellen möchten. Wenn Sie diesen Taster drücken,
leuchtet die rote Diode.
14 BYPASS-Taster
Wenn Sie diesen Taster drücken, wird das an den Eingängen anliegende Signal direkt mit den
Ausgängen verbunden. In dem Fall leuchtet die rote Diode.
Mit diesem Taster lassen sich sehr leicht A/B-Vergleiche (mit/ohne Effekt) anstellen.
ProR3 Digital-Hallgerät
6 Rückseite
Rückseite
E
F
MIDI
OUTPUT
G
INPUT
R
THRU
OUT
L
R
L
IN
R
L
R
–10dB +4dB
L
–10dB +4dB
H
15 MIDI-Buchsen
Hierbei handelt es sich um 5stiftige DIN-Buchsen, die MIDI IN, MIDI OUT und MIDI THRU heißen.
Über die MIDI IN-Buchse können Sie Programmwechsel- und Steuerbefehle zum ProR3 senden,
mit denen Programme angewählt und Parameter editiert werden können. Über die MIDI OUTBuchse können Sie die Einstellungen des ProR3 zu einem externen MIDI-Gerät senden.
16 OUTPUT-Buchsen
Hierbei handelt es sich um symmetrische Ausgangsbuchsen, an denen das analoge Effektsignal
für die Effektrückwege des Mischpults usw. anliegt. Die Ausgänge sind als XLR-3-32- und 1/4”Klinkenbuchsen ausgeführt. Mit dem Pegelschalter können Sie den Ausgangsnennpegel auf
-10dB oder +4dB stellen.
17 INPUT-Buchsen
Hierbei handelt es sich um symmetrische Eingangsbuchsen, an die Sie das Effekthinwegsignal
(AUX Send) des Mischpults usw. anlegen müssen. Wenn die Signalquelle mono ist, müssen Sie
den UTILITY-Taster drücken und die richtige Eingangsbuchse wählen (siehe Seite 33).
Die Eingangsbuchsen sind als XLR-3-31- sowie als 1/4”-Klinkenbuchsen ausgeführt.
Mit dem Pegelschalter können Sie den Eingangsnennpegel auf -10dB oder +4dB stellen.
18 Pegelschalter
Mit diesen Schaltern kann die Ein- und Ausgangsempfindlichkeit auf -10dB bzw. +4dB gestellt
werden.
Stellen Sie die Schalter so ein, daß die Empfindlichkeit dem externen Gerät entspricht.
Stiftbelegung: XLR-3-31
Heiß
2
1
3
Stiftbelegung: XLR-3-32
Masse
Kalt
Belegung der 1/4”-Klinkenbuchsen
Masse
Heiß
Kalt
ProR3 Digital-Hallgerät
Masse
1
2
3
Heiß
Kalt
Los geht’s – Anwahl eines Werksprogramms – 7
Los geht’s – Anwahl eines Werksprogramms –
Sehen wir uns jetzt einmal an, wie man ein Werksprogramm (des PRESET-Bereiches) anwählt
und verwendet ohne gleich die Parameter zu editieren.
Anschlüsse
1. Verbinden Sie die Ausgänge der Signalquelle mit den INPUT-Buchsen.
Warnung: Schalten Sie alle betroffenen Geräte aus, bevor Sie sie aneinander
anschließen.
Handelt es sich um eine Stereo-Signalquelle, müssen Sie ihre beiden Ausgänge mit den beiden
Eingängen verbinden. Eine Mono-Signalquelle verbinden Sie bitte mit der INPUT L-Buchse.
Wenn die Signalquelle mit XLR-Buchsen ausgestattet ist, verbinden Sie sie mit den XLR-3-31Buchsen des ProR3. Andernfalls verwenden Sie die 1/4”-Klinkenbuchsen.
2. Verbinden Sie die OUTPUT-Buchsen mit den Eingängen des Mischpultes oder eines anderen Gerätes.
Wenn das Mischpult usw. mit XLR-Buchsen ausgestattet ist, verbinden Sie es mit den XLR-3-32Buchsen des ProR3. Andernfalls verwenden Sie die 1/4”-Klinkenbuchsen.
Achtung: Es können auch Kabel verwendet werden, die an einem Ende mit einem XLR- und am anderen Ende mit einer TRS-Klinke ausgestattet sind.
3. Schließen Sie das ProR3 an eine Steckdose an.
Ein- und ausschalten
1. Drücken Sie den POWER-Taster, um das ProR3 einzuschalten. (Drücken Sie ihn noch einmal, um das ProR3 wieder auszuschalten.)
YAMAHA
ProR3
Digital Reverberator
Copyright(c) 1995 YAMAHA
Nun erscheint zuerst die Begrüßungsanzeige. Anschließend wird wieder das Programm aufgerufen, das Sie vor dem Ausschalten verwendet haben.
Large Hall 1
RevTime =
Reverb
2.5s
Achtung: Beim Einschalten mehrerer Geräte sollten Sie immer dem Signalfluß folgen, also zuerst die
Signalquelle und ganz zuletzt die Endstufe einschalten. Wenn Sie diese Reihenfolge beibehalten, kann
es zu keiner Zeit zu Signalspitzen kommen, die entweder die Lautsprecher oder sogar Ihr Gehör in Mitleidenschaft ziehen. Schalten Sie das ProR3 auf jeden Fall vor der Endstufe ein. Beim Ausschalten
gehen Sie am besten in umgekehrter Reihenfolge vor: Schalten Sie zuerst die Endstufe, anschließend das
ProR3 und zuletzt die Signalquellen aus.
ProR3 Digital-Hallgerät
8 Los geht’s – Anwahl eines Werksprogramms –
Einstellen des Eingangspegels
Wenn das ProR3 sowie die übrigen Geräte eingeschaltet sind, müssen Sie die Signalquelle so einstellen, daß sie ein Signal anbietet. Dann können Sie nämlich den Eingangspegel des ProR3 einstellen.
1. Behalten Sie die INPUT-Meter im Auge, während Sie die INPUT-Regler einstellen.
Achten Sie beim Einpegeln darauf, daß der Signalpegel so hoch wie möglich eingestellt wird.
Die CLIP-Dioden dürfen allerdings nicht leuchten.
Anwahl eines Effektprogramms
Effektprogramme kann man auf zwei Arten anwählen:
• Mit den DEC/INC-Tastern.
Drücken Sie den INC- oder DEC-Taster, um das nächste bzw. vorige Effektprogramm anzuwählen. Sie können diese Taster auch gedrückt halten, um schneller zu einem weiter entfernten Programm zu gehen.
• Mit dem Zehnertastenfeld und dem RECALL/ENTER-Taster.
1 Stellen Sie die Nummer des gewünschten Programms mit dem Zehnertastenfeld ein. Die
PROGRAM-Diode blinkt nun.
Wenn Sie die falsche Programmnummer eingegeben haben, drücken Sie den CANCELTaster. Geben Sie anschließend die richtige Nummer ein.
Wenn sich die eingegebene Programmnummer nicht im Bereich 1~90 befindet, zeigt das
Display die Meldung “ NO PROGRAM No Type” an. Drücken Sie den CANCELTaster, um wieder zur vorigen Anzeige zurückzukehren.
**
**
2 Drücken Sie den RECALL/ENTER-Taster, um das angewählte Programm aufzurufen.
Sobald die Parameter dieses Programms geladen sind, leuchtet die PROGRAM-Diode
statt zu blinken.
Wenn sich die eingegebene Programmnummer nicht im Bereich 1~90 befindet und Sie
trotzdem den RECALL/ENTER-Taster drücken, zeigt das Display die Meldung “ Program Number Error ” an. Drücken Sie CANCEL, um zur vorigen Anzeige zurückzukehren.
*
*
Achtung: Wenn die Frage “Recall? Are you sure?” angezeigt wird, bedeutet das, daß das vorige Programm geändert, aber nicht gespeichert worden ist. Das können Sie nun nachholen. Siehe “5) Speichern eines Programms” auf Seite 16.
Wenn Sie die Änderungen nicht mehr brauchen, drücken Sie RECALL/ENTER, um das neue Programm aufzurufen.
ProR3 Digital-Hallgerät
Los geht’s – Anwahl eines Werksprogramms – 9
Werksprogramme (Effektprogramme im PRESET-Bereich)
Nr.
Title
Typ
Beschreibung
Large Hall
1
Large Hall 1
Reverb
2
Large Hall 2
Reverb
3
New Hall
Reverb
Normales Hallprogramm des ProR3, das eine Nachempfindung eines Saals mit
guter Akustik darstellt und sich für alle Instrumente eignet.
Ein Programm mit geringfügiger Verzögerung zwischen den Erstreflexionen und
dem eigentlichen Hall.
4
Wide Hall
Reverb
Programm, das einen großen Saal ohne Signalfärbung simuliert.
5
Breathless Hall
Reverb
Etwas mehr Charakter. Heller, satter und langer Hall.
Medium Hall
6
Medium Hall 1
Reverb
7
Medium Hall 2
Reverb
Normales Hallprogramm, das eine Nachempfindung eines mittelgroßen Saals
darstellt.
8
Wonder Hall
Reverb
Etwas “leichterer” Hall als Large Hall. Eignet sich für Percussion.
9
Gothic Hall
Rev+Cho
10
Bright Ham
Reverb
Heller, mittelgroßer Saal.
Kombination eines Chorus und langen Halls. Eignet sich für Soli, Stimmen und
“Teppiche”.
Medium Hall
11
Small Hall 1
Reverb
Ein idealer kleiner Saal mit kleiner Bühne.
12
Small Hall 2
Reverb
Ein noch kleinerer Saal. Der interne Kompressor ist eingeschaltet, so daß der
Hall etwas gedämpft wird.
13
Small Dark Hall
Rev+ER
Kleiner Saal, mit dunklerem Hall. Eignet sich für Gesang in Moll-Tonarten.
14
Pool
Reverb
Kleiner Saal mit zahlreichen Erstreflexionen.
15
Open Hall
Reverb
Kleiner Saal mit ausreichend “Luft zum Atmen”. Eignet sich für Gesang.
Large Room
16
Large Room 1
Reverb
Simuliert einen großen Raum mit Betonwänden. Fetter, etwas eigenwilliger
Klang. Eignet sich für Percussion.
17
Large Room 2
Reverb
Im Vergleich zu Large Room 1 ein natürlicherer Raum mit mehr Transparenz.
18
Mood Room
Reverb
Großes Zimmer mit etwas dunklerem Hall.
19
Soft Room
Reverb
Großes Zimmer mit weichem Hall.
20
Attack Room
Rev+Pit
Kombination einer Tonhöhenänderung (±9 Cent) mit einem Zimmer. Versieht
Gesang und Soloparts mit etwas mehr Tiefe.
Medium Room
21
Medium Room 1
Reverb
Simuliert ein mittleres Studio mit guter Akustik. Am besten eine Stereo-Signalquelle anlegen, um den “live im Studio” Charakter zu erzielen.
22
Medium Room 2
Reverb
Akustik eines Studios mit Holzwänden.
23
Dark Room
Reverb
Etwas kleineres Studio als Medium Room 2 mit natürlicher Akustik.
24
Quick Room
Reverb
Ein “trockenes” Studio mit Holz- und Metallwänden. Eignet sich für Blechbläser
und Percussion.
25
Aquarium
RoomSim
Hall eines mittleren Studios. Eignet sich für Bassdrum.
26
Wood Room
RoomSim
27
Chorus Room
Rev+Cho
Simuliert den offenen Charakter eines mittleren Zimmers, mit dem ein Signal
etwas “angedickt” werden kann.
28
Delayed Room
RoomSim
Zimmer mit Echo (82ms Verzögerung). Für Saxophon und Soloparts.
29
Comp. Chamber
RoomSim
Zimmerhall für Snare und Percussion. Mit Threshold kann das Kompressionsverhältnis geändert werden.
ProR3 Digital-Hallgerät
10 Los geht’s – Anwahl eines Werksprogramms –
Nr.
Title
Typ
Beschreibung
Small Room
30
Small Room 1
RoomSim
31
Small Room 2
Rev+Cho
32
Small Studio
RoomSim
33
Bright Studio
Reverb
34
Kick Chamber
RoomSim
35
Tiny Room
36
Near You
ER
Die Small Room-Programme bieten einen extrem kurzen Hall, der sich vor allem
für Techno eignet. Da man jeweils nur eine Idee dieses Halltyps verwenden
sollte, kann man das bearbeitete Signal “trocken” halten, aber trotzdem die Studioakustik nachempfinden. Eignen sich besonders für sequenzergesteuerte
Parts, Synthi-Bläser und Instrumente, die ohne Rauminformation aufgenommen
wurden.
Rev+Pit
Special Room
37
Power Drum Room
RoomSim
38
Soft Space
Rev+Cho
39
Droid Short
Reverb
40
Droid Long
Reverb
41
Tile Room
RoomSim
42
Coliseum
Reverb
43
Opera
Reverb
44
Delay Hall
Ech→Rev
Reverb
Versieht das Schlagzeug mit einem Live-Charakter. Eignet sich für SchlagzeugSamples.
Perkussiver, kurzer Hall mit etwas Chorus. Rauminformation für Schlagzeug,
Solo-Instrumente und Gesang.
Simuliert eines der ersten und teuersten Digital-Hallgeräte.
Heller Hall eines Raums mit Fliesenwänden.
Langer Hall eines großen Gebäudes, z.B. eines Kolosseums.
Relativ langer Hall mit 52ms-Verzögerung (Pre-Delay) zwischen den Erstreflexionen und dem eigentlichen Hall.
Kombination eines Saalhalls und eines langen Delays. Mit L und R Delay sowie
IniDly können Sie das Programm auf das Tempo abstimmen.
45
Train Station
46
Tile Bathroom
ER
Das Programm für Fußschritte in einem verlassenen Bahnhof.
47
Closet
ER
48
Motel Chorus
ER
49
Pitch Room
Pit→Rev
50
Beauty Plate
Reverb
Hervorgehobener Sub-Reverb-Anteil. Vielleicht für elektrisches Klavier.
51
Arena Plate
Reverb
Große Halle, wie z.B. H.-M. Schleyer in Stuttgart.
Diese Programme enthalten nur Erstreflexionen. Sie eignen sich für die Rauminformation für Schlagzeug, Percussion, Gitarre, direkt ins Pult gespielte Baßparts,
elektrisches Klavier und Solo-Instrumente.
Hall, der an den Pitch Shifter angelegt wird (±8 Cent). Für Gesang oder Chor.
Plate
52
Vocal Plate 1
Reverb
Für Gesang. Eignet sich besonders für Balladen.
53
Vocal Plate 2
Reverb
Etwas dunklerer Hall als Vocal Plate 1.
54
Vocalese
55
String Plate
Rev+Cho
Reverb
Hall, der mit einer Prise Chorus versehen wird. Für Gitarre und Keyboards.
Hiermit machen Sie die Streicher noch schöner.
56
Home Plate
Reverb
Metallplattenhall aus der guten alten Zeit.
Nachempfindungen des hellen Plattenhalls, der sich an der Westküste noch
immer großer Beliebtheit erfreut.
57
LA Plate Short
Reverb
58
LA Plate Long
Reverb
59
Short Perc.Plate
Reverb
Kurzer und heller Plattenhall für Percussion. Stellen Sie den IniDelay-Parameter
dem Tempo entsprechend ein.
60
Long Plate
Reverb
Langer Plattenhall. Für Orgelakkorde usw.
ProR3 Digital-Hallgerät
Los geht’s – Anwahl eines Werksprogramms – 11
Nr.
Title
Typ
Beschreibung
Gate
61
ER Gate 1
ER
62
ER Gate 2
ER
63
ER for Kick
ER
64
Power Gate 1
ER
65
Power Gate 2
ER
66
Room Gate
ER
67
Gated Rev 1
Reverb
68
Gated Rev 2
Reverb
69
Reverse Gate 1
ER
70
Reverse Gate 2
ER
Diese sind Gate Reverb-Effekte, die nur Erstreflexionen enthalten. ER Gate 1 ist
ein natürliches Gate-Programm. ER Gate 2 hat einen etwas forscheren Klang.
ER for Kick gibt einer etwas dünnen Bassdrum mehr Saft.
Die Liveness- und RoomSize-Parameter können Sie den Anforderungen entsprechend einstellen.
Wie der Name bereits besagt, sind Power Gate 1 und Power Gate 2 Programme,
mit denen man z.B. das Schlagzeug besonders hervorheben kann.
Standard-Kombinationen von Hall + Noise Gate. Im Gegensatz zu den ER GateProgrammen, die nur Erstreflexionen enthalten, muß man hier etwas länger
“fummeln”, bis der Sound stimmt. Andererseits hat man jedoch eine bessere
Kontrolle.
Simuliert den Gate Reverb-Effekt eines rückwärts laufenden Bandes. Dieser
Effekt ist z.B. auf dem REV7 und dem REV5 bereits erfolgreich vorexerziert worden. Einstellungen dem Tempo entsprechend ändern.
Effect Reverb
71
Reverb Flange 1
Reverb
72
Reverb Flange 2
Rev→Flg
73
Reverb Flange 3
Rev→Flg
74
Reverb Flange 4
Rev→Flg
75
Dark Moon
Rev→Flg
76
Filter Flange
Rev→Flg
77
Super Long Decay
78
Slow Pan Reverb
Rev→Pan
Relativ langer Hall, der sich langsam hin- und herbewegt.
79
Sub Aqua
Pit→Rev
Wassermusik, mit einem “Schroing”-Effekt im Falle eines Rimshots. Bei Einsatz
mit Streichern ergibt sich ein Sägezahn-Sound.
80
Thud
Pit→Rev
81
Alien Attack
Pit→Rev
82
High Filter
Reverb
Reverb Flange 1 ist ein natürlicher Effekt. Reverb Flange 2 bis Reverb Flange 4
werden immer intensiver und eignen sich besonders, um Eindruck zu schinden.
Der Effekt eines überaus langen Tunnels.
Macht aus einem akustischen Instrument einen Synthesizer! Automatischer WahWah-Effekt, der z.B. oft von Gitarristen verwendet wird.
Reverb
83
High Mid Filter
Reverb
84
Low Mid Filter
Reverb
85
Low Filter
Reverb
Effekt-Hall mit deutlich wahrnehmbarer Tonhöhe dank des dynamischen Filters.
Eignet sich für Rimshots sowie Percussion und Klangeffekte.
86
Chorus Reverb
Rev+Cho
Chorus kombiniert mit Hall. Verleiht dem Signal mehr Tiefe.
87
Symphonic Rev 1
Rev+Sym
88
Symphonic Rev 2
Sym→Rev
Chorus mit mehreren Phasen kombiniert mit Hall, mit dem mehr Tiefe und eben
etwas Chorus erzielt werden.
89
Echo Reverb 1
Ech→Rev
90
Echo Reverb 2
Ech→Rev
Hall, der an ein Stereo-Echo mit Rückkopplung angelegt wird. Maximale Verzögerungszeit: 400ms.
ProR3 Digital-Hallgerät
12 An die Arbeit (1)
An die Arbeit (1)
Bypass-Funktion
Wenn Sie den BYPASS-Taster drücken, wird das Eingangssignal direkt an die Ausgänge angelegt. Mit dieser Funktion können Sie also sehr leicht A/B-Vergleiche anstellen, um zu erfahren,
ob das Klangbild tatsächlich besser geworden ist. Wenn die BYPASS-Funktion eingeschaltet ist,
leuchtet die rote Diode.
PRE
EFFECT
EQ
BYPASS
EFFECT
ON
Entzerrer vor dem Effekt (PRE EFFECT EQ)
Mit den PRE EFFECT EQ-Bedienelementen können Sie den Dreibandentzerrer vor dem Effekt
einstellen. Es kann jeweils die Frequenz und die Anhebung/Absenkung eingestellt werden.
Frequenz
Anhebung/Absenkung
LOW
MID
HIGH
50 Hz~700 Hz
350 Hz~5 kHz
2 kHz~20 kHz
±15 dB
±15 dB
±15 dB
1. Drücken Sie den PRE EFFECT EQ ON-Taster, um den Entzerrer einzuschalten.
Die grüne Diode leuchtet nun.
2. Stellen Sie die gewünschte Anhebung/Absenkung ein.
3. Drehen Sie am FREQ-Regler (Frequenz), um die Zentrallfrequenz des Bandes einzustellen.
Am besten heben Sie den Pegel dieses Frequenzbandes erst einmal an, bevor Sie eine andere Frequenz wählen, damit Sie auch hören, wie sich das Klangergebnis ausnimmt.
Die Einstellung dieser Entzerrung wird übrigens nicht gespeichert. Die hier vorgenommenen
Einstellungen gelten also für alle Effektprogramme.
Achtung: Mit diesem Entzerrer wird das Eingangssignal hinter den INPUT-Metern bearbeitet. Stellen Sie also niemals extreme Werte ein, da eine eventuelle Signalverzerrung nicht von den Metern
angezeigt wird. Außerdem handelt es sich dann um besonders unschöne Digital-Verzerrung.
ProR3 Digital-Hallgerät
An die Arbeit (1) 13
INFINITE-Funktion
Mit der INFINITE-Funktion erzielen Sie eine extrem lange Halldauer, die sich z.B. für das Ende
eines Titels oder für Reggae-Musik eignet.
Der INFINITE-Taster kann auf zwei Arten bedient werden:
• Drücken Sie den INFINITE-Taster und lassen Sie ihn sofort wieder los.
Hierdurch wird die Halldauer (RevTime) auf den Höchstwert gestellt. Drücken Sie den Taster
noch einmal, um wieder die programmierte Halldauer aufzurufen.
• Halten Sie den INFINITE-Taster gedrückt.
Die Halldauer bleibt nun so lange auf dem Höchstwert, bis Sie den Taster wieder freigeben.
Um also wieder die programmierte Halldauer zu erzielen, lassen Sie den Taster einfach los.
Achtung: Dieser Taster ist nicht belegt für Primärprogramme, die keinen RevTime-Parameter enthalten. Hierzu gehören z.B. die ER-Programme (Erstreflexionen).
ProR3 Digital-Hallgerät
14 An die Arbeit (2) – Editierfunktionen –
An die Arbeit (2) – Editierfunktionen –
Die Programme im PRESET-Bereich sind “Stangenware”. Allerdings können Sie alle notwendigen Änderungen vornehmen und diese dann im USER-Bereich speichern. Hier wollen wir Ihnen
zeigen, wie man eigene Programme erstellt.
Programmstruktur
Die Programme des ProR3 bestehen aus zwei Teilen: dem Primär- und dem Sekundäreffekt.
Für die Primäreffekte sind folgende Typen vorgesehen. Der Effekttyp richtet sich jeweils nach
dem angewählten Programm.
Einfache Typen:
Kombinationen:
Reverb, ER, Room Sim
Rev+Ech, Rev+ER, Rev+Cho, Rev+Sym, Rev+Flg, Rev+Pit, Rev+PAN
Das “+” der Kombinationstypen (z.B. “Rev+Ech”) bedeutet, daß beide
Effekte gleichzeitig verwendet werden (also sowohl Hall (Rev) als
auch Echo). Die Reihenfolge dieser beiden Effekte ist einstellbar, also
Hall vor Echo oder umgekehrt.
Die Sekundäreffekte sind eigentlich Ergänzungen. Alle Effektprogramme enthalten jeweils alle
fünf Typen: DFL (dynamisches Filter), COMP (Kompressor), EQ, GATE und LEVEL/BAL.
Die Primäreffekte bestimmen jeweils den Charakter des Effektprogramms. Wenn Sie also den
Typ kennen, wissen Sie, um was für ein Programm es sich handelt. Damit Sie sofort im Bilde
sind, wird den Effekttyp des im LCD-Display angezeigten Effektprogramms auch jeweils angegeben. Außerdem finden Sie die Typenangabe jeweils in der Übersicht auf Seite 9.
Programmname
Programmnummer
Typ des Primäreffekts
Large Hall 1
RevTime =
Parameter
Reverb
2.5s
Parameterwert
Das ProR3 bietet separate Taster zum Aufrufen der Primär- und Sekundäreffektparameter.
Sekundäreffekt
Primäreffekt
Reverb
ER
Room Sim
Rev+Ech
Rev+ER
Rev+Cho
Rev+Sym
Rev+Flg
Rev+Pit
Rev+PAN
MAIN
ProR3 Digital-Hallgerät
DFL
FINE
COMP
EQ
EQ
GATE
EQ
ON
GATE
GATE
ON
LEVEL/
BAL
LEVEL/
BAL
An die Arbeit (2) – Editierfunktionen – 15
Editieren
1) Programmanwahl
Siehe die Übersicht auf Seite 9 oder die beiliegende “Preset Program List”, um das gewünschte
Programm möglichst schnell zu finden.
Hier kann man keinen anderen Effekttyp wählen. Also rufen Sie am besten ein Programm auf,
das den benötigten Effekttyp enthält.
Typ des Primäreffekts
Large Hall 1
RevTime =
Reverb
2.5s
2) Ändern der Parameterwerte
1. Drücken Sie den Taster, mit dem Sie Zugriff auf den Parameter haben, den Sie ändern
möchten. Um z.B. die Primäreffektparameter zu editieren, drücken Sie den MAIN- oder
FINE-Taster. Um die Gate-Parameter einstellen zu können, müssen Sie den GATE-Taster
betätigen.
Auf Seite 18 ff. finden Sie eine Parameterübersicht, in der auch die benötigten Taster aufgeführt
sind.
2. Drücken Sie den Taster wiederholt, bis der benötigte Parameter angezeigt wird.
3. Führen Sie den Cursor mit (√) (®) zum gewünschten Parameter.
4. Der Parameterwert kann auf zwei Arten eingestellt werden:
• Mit dem INC- und DEC-Taster.
Diese Taster können Sie auch gedrückt halten, um einen weiter entfernten Wert schneller
anzufahren.
• Mit dem Zehnertastenfeld und dem RECALL/ENTER-Taster.
1 Stellen Sie den gewünschten Wert mit dem Zehnertastenfeld ein. Der Wert blinkt nun im
Display. Wenn Sie sich getäuscht haben, drücken Sie den CANCEL-Taster und geben
anschließend den richtigen Wert ein.
2 Drücken Sie den RECALL/ENTER-Taster, um den neuen Wert zu bestätigen.
5. Wenn Sie die neue Fassung mit dem Original vergleichen möchten, drücken Sie den
COMPARE-Taster. Dann werden nämlich zeitweilig die programmierten Einstellungen aufgerufen.
6. Fahren Sie mit dem 3. Schritt fort, wenn Sie den Parameterwert noch einmal ändern
möchten.
7. Fahren Sie mit dem 2. Schritt fort, um einen anderen Parameter zu editieren.
8. Kehren Sie zum 1. Schritt zurück, um einen anderen Effekt zu editieren.
ProR3 Digital-Hallgerät
16 An die Arbeit (2) – Editierfunktionen –
3) Programmname
Der Name eines Effektprogramms darf maximal 16 Zeichen enthalten.
1. Drücken Sie den OTHERS-Taster.
Die rote Diode leuchtet nun. Wenn Sie den OTHERS-Taster mehrmals drücken, erscheinen
abwechselnd die Title Edit- und die beiden Controller-Seiten.
Title Edit
[Dread Lurgi Verb]
2. Führen Sie den Cursor mit (√) (®) zu der Zeichenposition, die Sie ändern möchten.
Der Cursor zeigt jeweils die Position an, für die Sie ein anderes Zeichen programmieren können.
Drücken Sie einen CURSOR-Taster, um zur nächsten oder vorigen Zeichenposition zu springen.
Am Beginn bzw. Ende des Namens springt der Cursor automatisch zum Ende bzw. Beginn des
Namens.
3. Mit INC und DEC können Sie der angewählten Position ein anderes Zeichen zuordnen.
Über das Zehnertastenfeld können sie Ziffern eingeben.
Wenn Sie DEC oder INC gedrückt halten, durchlaufen Sie alle verfügbaren Zeichen. Die Ziffern
0~9, das Minus (–) und der Punkt (.) können mit dem Zehnertastenfeld eingegeben werden.
4) Einstellen der MIDI-Funktionen
Sie können auch wählen, welche Parameter via MIDI eingestellt werden sollen und in welchem
Bereich das möglich ist (siehe Seite 35).
1. Drücken Sie den OTHERS-Taster, um die MIDI Control-Seite aufzurufen.
Ctr1-1 Prm
RevTIM
Min
Max
0.0% 100.0
2. Führen Sie den Cursor mit (√) (®) zum gewünschten Parameter.
3. Stellen Sie den Parameterwert mit DEC und INC ein.
Control 1 Prm
–
Zuordnung eines Parameters zu MIDI Controller 1.
Control 1 Min
0.0–100.0%
Kleinster Wert, der mit MIDI Controller 1 eingestellt werden kann.
Control 1 Max
0.0–100.0%
Höchster Wert, der mit MIDI Controller 1 eingestellt werden kann.
Control 2 Prm
–
Zuordnung eines Parameters zu MIDI Controller 2
Control 2 Min
0.0–100.0%
Kleinster Wert, der mit MIDI Controller 1 eingestellt werden kann.
Control 2 Max
0.0–100.0%
Höchster Wert, der mit MIDI Controller 1 eingestellt werden kann.
5) Speichern eines Programms
Wie bereits erwähnt, können Sie bis zu 90 eigene Programme im USER-Bereich speichern.
1. Drücken Sie den STORE-Taster.
Die PROGRAM-Diode blinkt nun. Außerdem werden Sie gefragt, in welchem Speicher die Einstellungen abgelegt werden sollen.
ProR3 Digital-Hallgerät
An die Arbeit (2) – Editierfunktionen – 17
Circus Big Top
Reverb
Store from P01 to U01 ?
Wenn der USER-Speicherbereich gesichert ist (d.h. wenn Memory Protect aktiv ist), zeigt das
Display “MEMORY PROTECTED” an.
In dem Fall müssen Sie den Speicher mit der UTILITY Memory Protect-Funktion entsichern.
Alles Weitere hierzu finden Sie auf Seite 33.
2. In der oberen Display-Zeile erscheint der Name des Programms, das sich gegenwärtig in
dem gewählten Speicher befindet.
Wählen Sie mit DEC/INC den Speicher an, in dem Sie Ihre Einstellungen unterbringen möchten.
Vocal Plate 2
Reverb
Store from P01 to U40 ?
Wenn sich die eingegebene Programmnummer nicht im Bereich 1~90 befindet, zeigt das Display
die Meldung “**NO PROGRAM**No Type” an. Drücken Sie den CANCEL-Taster, um wieder
zur vorigen Anzeige zurückzukehren.
3. Drücken Sie den STORE-Taster noch einmal, um das Programm im gewählten Speicher
abzulegen. Wenn Sie es sich anders überlegt haben, drücken Sie statt dessen CANCEL.
Low Mid Filter
Reverb
This Program is Stored
Das Display zeigt nun kurz die Meldung “This Program is Stored” an (Programm ist gespeichert). Anschließend erscheint wieder die zuvor aufgerufene Display-Seite.
Wenn Sie eine Nummer außerhalb des Bereichs 1~90 mit dem Zehnertastenfeld eingegeben
haben, wird “ Store Number Error ” (falsche Speichernummer) angezeigt. Drücken Sie
dann den CANCEL-Taster, um zur vorigen Display-Seite zurückzukehren.
**
**
ProR3 Digital-Hallgerät
18 An die Arbeit (2) – Editierfunktionen –
Programmparameter 1 (Primäreffekt)
Hall (Reverb)
Taster
Parameter
Wert
Beschreibung
MAIN
RevTime
0.3 ~ 99.0 s
Halldauer des Primärhalls (die Zeit, die verstreicht, bis ein
1kHz-Signal um 60dB abklingt).
IniDelay
0.1 ~ 200.0 ms
Verzögerung bis zum Beginn des Primärhalls.
HighRatio
X0.1 ~ X1.0
Halldauer der hohen Frequenzen im Verhältnis zu RevTime.
LowRatio
X0.1 ~ X2.4
Halldauer der tiefen Frequenzen im Verhältnis zu RevTime
Diffusion
0 ~ 10
Halldichte.
Reverb Type
*1
Halltyp.
ER/REV Balance
0/100 ~ 100/0
Lautstärkeverhältnis zwischen den Erstreflexionen und dem
Hall.
ER/REV Delay
0.1 ~ 100.0 ms
Verzögerung des Halls im Verhältnis zu den Erstreflexionen.
Liveness
0 ~ 10
Abklingrate der Erstreflexionen; 0: trocken, 10: lang
Density
0 ~ 100
Dichte der Erstreflexionen.
HPF
Thru, 40 Hz ~ 1.0 kHz
Grenzfrequenz des Hochpaßfilters.
LPF
400 Hz ~ 20 kHz, Thru
Grenzfrequenz des Tiefpaßfilters.
Rev2 Time
X0.1 ~ X10.0
Abklingrate des Sekundärhalls im Verhältnis zum Primärhall.
Rev2 Delay *2
0.0 ~ 100.0 ms
Verzögerung des Sekundärhalls im Verhältnis zum Primärhall.
Rev2 Level *2
0 ~ 100%
Pegel des Sekundärhalls im Verhältnis zum Primärhall.
Mod Freq
0.05 ~ 40.00 Hz
Frequenz der Hallmodulation.
Mod Depth
0 ~ 100%
Intensität der Hallmodulation.
Mod Delay
0.1 ~ 30 ms
Kurze Werte bewirken eine Modulation der hohen Frequenzen. Längere Werte bewirken eine Modulation der tiefen Frequenzen.
FINE
Common-Parameter
Siehe “Common-Parameter” auf Seite 27
*1 Small Hall, Large Hall, Vocal Plate, Per.Plate, Spring, Echo Room, Strings, Snare, Reverb Flange
*2 Nur wenn der Eingangsbetrieb L-Mono, R -Mono oder LR-Mix lautet.
ProR3 Digital-Hallgerät
An die Arbeit (2) – Editierfunktionen – 19
Erstreflexionen (ER)
Taster
Parameter
Wert
Beschreibung
MAIN
ER Type
*1
Erstreflexionstyp
Verzögerung bis zum Beginn der Erstreflexionen.
IniDelay
0.1 ~ 200.0 ms
Liveness
0 ~ 10
Abklingrate der Erstreflexionen; 0: trocken, 10: lang
RoomSize
0.1 ~ 25.0
Abstand der Reflexionen.
Diffusion
0 ~ 10
Breite der Erstreflexionen.
ER Number
1 ~ 40
Anzahl Erstreflexionen.
FeedBack Delay
0.1 ~ 1000.0 ms
Verzögerung der Rückkopplung.
FeedBack Gain
–99 ~ +99%
Rückkopplungsgrad; Mit “–” Werten wird die Phase umgekehrt.
FeedBack High
0.1 ~ 1.0
Rückkopplungsgrad der Höhen im Verhältnis zu FeedBack
Gain.
Density
0 ~ 100
Dichte der Erstreflexionen.
HPF
Thru, 40 Hz ~ 1.0 kHz
Grenzfrequenz des Hochpaßfilters.
LPF
400 Hz ~ 20 kHz, Thru
Grenzfrequenz des Tiefpaßfilters.
0 ~ 10
Modulationspegel.
FINE
Space Mod
Common-Parameter
Siehe “Common-Parameter” auf Seite 27
*1 Small Hall, Large Hall, Random, Reverse, Plate, Spring, User A, User B, User C, User D
User ER-Parameter
Es gibt vier User ER-Bänke: A–D.
Es können jeweils 40 Reflexionen je Bank eingestellt werden.
Außerdem können die Verzögerungszeit, der Pegel und die Stereoposition der Reflexionen eingestellt werden.
Taster
Parameter
Wert
Beschreibung
FINE
A-01 Delay
0.1 ~ 1000.0 ms
Verzögerungszeit der ersten Reflexion in Bank A.
A-01 Level
–100 ~ +100%
Pegel der ersten Reflexion in Bank A.
A-01 Pan
L16 ~ R16
Stereoposition der ersten Reflexion in Bank A.
•
•
•
D-40 Pan
Rückkehr zum Beginn der FINE-Parameter (ER Number).
ProR3 Digital-Hallgerät
20 An die Arbeit (2) – Editierfunktionen –
Zimmersimulation (RoomSim)
Taster
Parameter
Wert
Beschreibung
MAIN
RevTime
0.3 ~ 99.0 s
Halldauer.
Verzögerung bis zum Beginn des Halls.
IniDelay
0.1 ~ 200.0 ms
Width
0.5 ~ 46.7 m
Simulation der Raumbreite.
Height
0.5 ~ 46.7 m
Simulation der Deckenhöhe.
Depth
0.5 ~ 46.7 m
Simulation der Raumtiefe.
Wall Vary
0 ~ 30
Simulation der Wandbeschaffenheit (eben 0 → uneben 30)
Wall Vary Fine
–100 ~ +100
Feineinstellung der Wandbeschaffenheit.
Listening Position
Front, Center, Rear
Ort, an dem sich der Hörer befindet.
HighRatio
X0.1 ~ X1.0
Halldauer der hohen Frequenzen im Verhältnis zu RevTime.
LowRatio
X0.1 ~ X2.4
Halldauer der tiefen Frequenzen im Verhältnis zu RevTime.
Diffusion
0 ~ 10
Breite des Hallsignals.
Width Fine
–100 ~ +100
Feineinstellung der Raumbreite.
Height Fine
–100 ~ +100
Feineinstellung der Deckenhöhe.
Depth Fine
–100 ~ +100
Feineinstellung der Raumtiefe.
Width Decay
RT X0.1 ~ 10.0
Abklingrate der Breiteninformation im Verhältnis zu RevTime.
Height Decay
RT X0.1 ~ 10.0
Abklingrate der Höheninformation im Verhältnis zu RevTime.
Depth Decay
RT X0.1 ~ 10.0
Abklingrate der Tiefeninformation im Verhältnis zu RevTime.
ER/REV Balance
0/100 ~ 100/0
Lautstärke der Erstreflexionen im Verhältnis zum Hall.
ER/REV Delay
0.1 ~ 100.0 ms
Verzögerung des Halls im Verhältnis zu den Erstreflexionen.
Density
0 ~ 100
Dichte der Erstreflexionen.
HPF
Thru, 40 Hz ~ 1.0 kHz
Grenzfrequenz des Hochpaßfilters.
LPF
400 Hz ~ 20 kHz, Thru
Grenzfrequenz des Tiefpaßfilters.
0 ~ 10
Modulationspegel.
FINE
Space Mod
Common-Parameter
ProR3 Digital-Hallgerät
Siehe “Common-Parameter” auf Seite 27.
An die Arbeit (2) – Editierfunktionen – 21
Hall + Echo (Rev + Ech)
Taster
Parameter
Wert
Beschreibung
MAIN
REV RevTime
0.3 ~ 99.0 s
REV IniDelay
0.1 ~ 200.0 ms
REV HighRatio
X0.1 ~ X1.0
REV LowRatio
X0.1 ~ X2.4
REV Diffusion
0 ~ 10
Siehe “Hall (Reverb)” auf Seite 18.
ECHO Lch Delay
0.1 ~ 400.0 ms
Verzögerung des linken Kanals.
ECHO Rch Delay
0.1 ~ 400.0 ms
Verzögerung des rechten Kanals.
ECHO Lch FeedBack
–99 ~ +99%
Rückkopplungsgrad des linken Kanals.
ECHO Rch FeedBack
–99 ~ +99%
Rückkopplungsgrad des rechten Kanals.
ECHO High Ratio
0.1 ~ 1.0
Rückkopplungsgrad der hohen Frequenzen.
ECHO/REV Balance *1
0/100 ~ 100/0
Lautstärkeverhältnis des Echos und des Halls.
REV Rev Mix *2
0 ~ 100%
Hallanteil.
REV Reverb Type
*3
Halltyp.
REV Density
0 ~ 100
Dichte des Halls.
REV HPF
Thru, 40 Hz ~ 1.0 kHz
Grenzfrequenz des Hall-Hochpaßfilters.
REV LPF
400 Hz ~ 20 kHz, Thru
Grenzfrequenz des Hall-Tiefpaßfilters.
FINE
REV Space Mod
0 ~ 10
Modulationspegel des Halls.
ECHO Lch IniDelay
0.1 ~ 400.0 ms
Verzögerung bis zum Beginn des L-Echos.
ECHO Rch IniDelay
0.1 ~ 400.0 ms
Verzögerung bis zum Beginn des R-Echos.
REV Patch
*4
Verbindung zwischen dem Hall und dem Echo.
Common-Parameter
*1
*2
*3
*4
Siehe “Common-Parameter” auf Seite 27.
Nur wenn REV Patch parallel eingestellt ist (Reverb + Echo)
Nur wenn REV Patch in Serie geschaltet ist (Reverb → Echo, Echo → Reverb)
Hall, Room, Vocal, Plate
Reverb + Echo, Echo → Reverb, Echo → Reverb
ProR3 Digital-Hallgerät
22 An die Arbeit (2) – Editierfunktionen –
Hall + Erstreflexionen (Rev + ER)
Taster
Parameter
Wert
Beschreibung
MAIN
REV RevTime
0.3 ~ 99.0 s
REV IniDelay
0.1 ~ 200.0 ms
REV HighRatio
X0.1 ~ X1.0
REV LowRatio
X0.1 ~ X2.4
REV Diffusion
0 ~ 10
ER Type
*1
ER IniDelay
0.1 ~ 100.0 ms
ER Liveness
0 ~ 10
ER RoomSize
0.1 ~ 25.0
ER Diffusion
0 ~ 10
Siehe “Hall (Reverb)” auf Seite 18.
Siehe “Erstreflexionen (ER)” auf Seite 19.
FINE
ER/REV Balance *2
0/100 ~ 100/0
Lautstärkeverhältnis zwischen ER und Hall.
REV Rev Mix *3
0 ~ 100%
Hallanteil.
REV Reverb Type
*4
Halltyp.
REV Density
0 ~ 100
Dichte des Halls.
REV HPF
Thru, 40 Hz ~ 1.0 kHz
Grenzfrequenz des Hall-Hochpaßfilters
REV LPF
400 Hz ~ 20 kHz, Thru
Grenzfrequenz des Hall-Tiefpaßfilters
REV Space Mod
0 ~ 10
Modulationspegel des Halls.
ER Number
1 ~ 14
Anzahl Erstreflexionen.
ER Density
0 ~ 100
Dichte der Erstreflexionen.
ER HPF
Thru, 40 Hz ~ 1.0 kHz
Grenzfrequenz des ER-Hochpaßfilters.
ER LPF
400 Hz ~ 20 kHz, Thru
Grenzfrequenz des ER-Tiefpaßfilters
REV Patch
*5
Verbindung zwischen dem Hall und den Erstreflexionen.
Common-Parameter
*1
*2
*3
*4
*5
Siehe “Common-Parameter” auf Seite 27.
Small Hall, Large Hall, Random, Reverse, Plate, Strings
Nur wenn REV Patch parallel geschaltet ist (Reverb + ER)
Nur wenn REV Patch in Serie geschaltet ist (Reverb → ER, ER → Reverb)
Hall, Room, Vocal, Plate
Reverb + E.Ref., E.Ref. → Reverb, Reverb → E.Ref.
ProR3 Digital-Hallgerät
An die Arbeit (2) – Editierfunktionen – 23
Hall + Chorus (Rev + Cho)
Taster
Parameter
Wert
Beschreibung
MAIN
REV RevTime
0.3 ~ 99.0 s
REV IniDelay
0.1 ~ 200.0 ms
REV HighRatio
X0.1 ~ X1.0
REV LowRatio
X0.1 ~ X2.4
REV Diffusion
0 ~ 10
Siehe “Hall (Reverb)” auf Seite 18.
CHO Mod Freq
0.05 ~ 40.00 Hz
CHO DM Depth
0 ~ 100%
Chorus-Modulationsgeschwindigkeit.
Modulationsintensität der Chorus-Tiefe.
CHO AM Depth
0 ~ 100%
Amplitudenmodulationsintensität des Chorus’.
CHO/REV Balance *1
0/100 ~ 100/0
Lautstärkeverhältnis zwischen dem Chorus und dem Hall.
REV Rev Mix *2
0 ~ 100%
Hallanteil.
REV Reverb Type
*3
Halltyp.
REV Density
0 ~ 100
Dichte des Halls.
REV HPF
Thru, 40 Hz ~ 1.0 kHz
Grenzfrequenz des Hall-Hochpaßfilters.
REV LPF
400 Hz ~ 20 kHz, Thru
Grenzfrequenz des Hall-Tiefpaßfilters.
REV Space Mod
0 ~ 10
Modulationspegel des Halls.
REV Patch
*4
Verbindung zwischen dem Hall und dem Chorus.
FINE
Common-Parameter
*1
*2
*3
*4
Siehe “Common-Parameter” auf Seite 27.
Nur wenn REV Patch parallel geschaltet ist (Reverb + Chorus)
Nur wenn REV Patch in Serie geschaltet ist (Reverb → Chorus, Chorus → Reverb)
Hall, Room, Vocal, Plate
Reverb + Chorus, Chorus → Reverb, Reverb → Chorus
ProR3 Digital-Hallgerät
24 An die Arbeit (2) – Editierfunktionen –
Hall + Symphonic (Rev + Sym)
Taster
Parameter
Wert
Beschreibung
MAIN
REV RevTime
0.3 ~ 99.0 s
REV IniDelay
0.1 ~ 200.0 ms
REV HighRatio
X0.1 ~ X1.0
REV LowRatio
X0.1 ~ X2.4
REV Diffusion
0 ~ 10
SYM Mod Freq
0.05 ~ 40.00 Hz
Modulationsgeschwindigkeit des Symphonic-Effekts.
SYM Depth
0 ~ 100%
Modulationsintensität des Symphonic Effekts.
0/100 ~ 100/0
Lautstärkeverhältnis zwischen dem Hall und dem Symphonic-Effekt.
REV Rev Mix *2
0 ~ 100%
Hallanteil.
REV Reverb Type
*3
Halltyp.
REV Density
0 ~ 100
Dichte des Halls.
REV HPF
Thru, 40 Hz ~ 1.0 kHz
Grenzfrequenz des Hall-Hochpaßfilters.
REV LPF
400 Hz ~ 20 kHz, Thru
Grenzfrequenz des Hall-Tiefpaßfilters.
REV Space Mod
0 ~ 10
Modulationspegel des Halls.
REV Patch
*4
Verbindung zwischen dem Hall und dem Symphonic-Effekt.
Siehe “Hall (Reverb)” auf Seite 18.
FINE
SYM/REV Balance *1
Common-Parameter
*1
*2
*3
*4
Siehe “Common-Parameter” auf Seite 27
Nur wenn REV Patch parallel geschaltet ist (Reverb + Symphon)
Nur wenn REV Patch in Serie geschaltet ist (Reverb → Symphon, Symphon → Reverb)
Hall, Room, Vocal, Plate
Reverb + Symphon, Symphon → Reverb, Reverb → Symphon
ProR3 Digital-Hallgerät
An die Arbeit (2) – Editierfunktionen – 25
Hall + Flanger (Rev + Flg)
Taster
Parameter
Wert
Beschreibung
MAIN
REV RevTime
0.3 ~ 99.0 s
REV IniDelay
0.1 ~ 200.0 ms
REV HighRatio
X0.1 ~ X1.0
REV LowRatio
X0.1 ~ X2.4
REV Diffusion
0 ~ 10
FLA Mod Freq
0.05 ~ 40.00 Hz
Modulationsgeschwindigkeit des Flangers.
FLA Depth
0 ~ 100%
Modulationsintensität des Flangers.
FLA Delay
0.1 ~ 100.0 ms
Längere Werte bewirken eine Modulation der tiefen Frequenzen. Kürzere Werte bewirken eine Modulation der hohen Frequenzen.
FLA FeedBack Gain
0 ~ 100%
Rückkopplungsgrad des Flangers.
0/100 ~ 100/0
Lautstärkeverhältnis zwischen Hall und Flanger.
REV Rev Mix *2
0 ~ 100%
Hallanteil.
REV Reverb Type
*3
Halltyp.
REV Density
0 ~ 100
Dichte des Halls.
REV HPF
Thru, 40 Hz ~ 1.0 kHz
Grenzfrequenz des Hall-Hochpaßfilters
REV LPF
400 Hz ~ 20 kHz, Thru
Grenzfrequenz des Hall-Tiefpaßfilters
REV Space Mod
0 ~ 10
Modulationspegel des Halls.
REV Patch
*4
Verbindung zwischen dem Flanger und dem Hall.
Siehe “Hall (Reverb)” auf Seite 18.
FINE
FLA/REV Balance *1
Common-Parameter
*1
*2
*3
*4
Siehe “Common-Parameter” auf Seite 27.
Nur wenn REV Patch parallel geschaltet ist (Reverb + Flange)
Nur wenn REV Patch in Serie geschaltet ist (Reverb → Flange, Flange → Reverb)
Hall, Room, Vocal, Plate
Reverb + Flange, Flange → Reverb, Reverb → Flange
ProR3 Digital-Hallgerät
26 An die Arbeit (2) – Editierfunktionen –
Hall + Tonhöhenverschiebung (Rev + Pit)
Taster
Parameter
Wert
Beschreibung
MAIN
REV RevTime
0.3 ~ 99.0s
REV IniDelay
0.1 ~ 200.0 ms
REV HighRatio
X0.1 ~ X1.0
REV LowRatio
X0.1 ~ X2.4
REV Diffusion
0 ~ 10
PIT Pitch 1
↓Oct ~ ↑Oct
PIT Pitch 2
↓Oct ~ ↑Oct
Grobe Tonhöhenverschiebung von Pitch 2.
PIT Fine 1
–100 ~ +100 cent
Feinstimmung von Pitch 1.
PIT Fine 2
–100 ~ +100 cent
Feinstimmung von Pitch 2.
Siehe “Hall (Reverb)” auf Seite 18.
Grobe Tonhöhenverschiebung von Pitch 1.
PIT Delay 1
0.1 ~ 300.0 ms
Verzögerung von Pitch 1.
PIT Delay 2
0.1 ~ 300.0 ms
Verzögerung von Pitch 2.
PIT Feedback 1
0 ~ 99%
Rückkopplungsgrad von Pitch 1.
PIT Feedback 2
0 ~ 99%
Rückkopplungsgrad von Pitch 2.
PIT Pan 1
L16 ~ R16
Stereoposition von Pitch 1.
PIT Pan 2
L16 ~ R16
Stereoposition von Pitch 2.
0/100 ~ 100/0
Lautstärkeverhältnis zwischen Hall und Tonhöhenverschiebung.
REV Rev Mix *2
0 ~ 100%
Hallanteil.
REV Reverb Type
*3
Halltyp.
REV Density
0 ~ 100
Dichte des Halls.
REV HPF
Thru, 40 Hz ~ 1.0 kHz
Grenzfrequenz des Hall-Hochpaßfilters.
REV LPF
400 Hz ~ 20 kHz, Thru
Grenzfrequenz des Hall-Tiefpaßfilters.
REV Space Mod
0 ~ 10
Modulationspegel des Halls.
PIT Pitch Balance
0 ~ 100%
Balance zwischen dem Direktsignal und der Tonhöhenverschiebung.
PIT Base Key
OFF, C1 ~ C6
*5
REV Patch
*4
Anwahl der Effektkombination.
FINE
PIT/REV Balance *1
Common-Parameter
*1
*2
*3
*4
*5
Siehe “Common-Parameter” auf Seite 27.
Nur wenn REV Patch parallel geschaltet ist (Reverb + Pitch)
Nur wenn REV Patch in Serie geschaltet ist (Reverb → Pitch, Pitch → Reverb)
Hall, Room, Vocal, Plate
Reverb + Pitch, Pitch → Reverb, Reverb → Pitch
Stellen Sie diesen Parameter ein, wenn Sie das Intervall zwischen dem Originalsignal und der Tonhöhenverschiebung mit Notenbefehlen eines MIDI-Tasteninstruments bestimmen möchten.
Das Intervall zwischen dem Originalsignal und dem transponierten Signal kann anhand des Abstands zwischen
Base Key und der gesendeten Notennummer ermittelt werden. Wenn Base Key z.B. “C4” lautet, wird die Tonhöhe
beim Drücken der Taste C3 auf dem MIDI-Tasteninstrument um eine Oktave gesenkt, während sie bei Empfang
eines D4 um zwei Halbtöne angehoben wird.
* Die MIDI-Notennummer “60” vertritt hier das C3.
* Das maximale Transpositionsintervall beträgt eine Oktave. Wenn also größere Intervalle errechnet werden, wird
der Höchstwert eingestellt (1 Oktave).
* Wenn Base Key= OFF, kann man das Intervall nicht mit MIDI-Notennummern einstellen.
* Zum Errechnen des Transpositionsintervalls wird jeweils die zuletzt gesendete MIDI-Notennummer verwendet.
ProR3 Digital-Hallgerät
An die Arbeit (2) – Editierfunktionen – 27
Hall + Auto Pan (Rev + PAN)
Taster
Parameter
Wert
Beschreibung
MAIN
REV RevTime
0.3 ~ 99.0 s
REV IniDelay
0.1 ~ 200.0 ms
REV HighRatio
X0.1 ~ X1.0
REV LowRatio
X0.1 ~ X2.4
REV Diffusion
0 ~ 10
PAN Speed
0.05 ~ 40.00 Hz
Modulationsgeschwindigkeit des Auto Pan-Effekts.
PAN Depth
0 ~ 100%
Modulationsintensität des Auto Pan-Effekts.
PAN Direction
L→R, L←R, L ↔R
Richtung der Positionsänderungen.
0/100 ~ 100/0
Lautstärkeverhältnis zwischen dem Hall und dem Auto PanEffekt.
REV Rev Mix *2
0 ~ 100%
Hallanteil.
REV Reverb Type
*3
Halltyp.
REV Density
0 ~ 100
Dichte des Halls.
Siehe “Hall (Reverb)” auf Seite 18.
FINE
PAN/REV Balance *1
REV HPF
Thru, 40 Hz ~ 1.0 kHz
Grenzfrequenz des Hall-Hochpaßfilters.
REV LPF
400 Hz ~ 20 kHz, Thru
Grenzfrequenz des Hall-Tiefpaßfilters.
REV Space Mod
0 ~ 10
Modulationspegel des Halls.
REV Patch
*4
Verbindung zwischen dem Auto Pan-Effekt und dem Hall.
Common-Parameter
*1
*2
*3
*4
Siehe “Common-Parameter” auf Seite 27.
Nur wenn REV Patch parallel geschaltet ist (Reverb + PAN)
Nur wenn REV Patch in Serie geschaltet ist (Reverb → PAN, PAN → Reverb)
Hall, Room, Vocal, Plate
Reverb + PAN, PAN → Reverb, Reverb → PAN
Common-Parameter
Taster
Parameter
Wert
Beschreibung
FINE
1stRef-1 Delay
0.1 ~ 200.0 ms
Verzögerung der ersten Reflexion.
1stRef-1 Lvl
0 ~ 100%
Pegel der ersten Reflexion.
1stRef-1 Pan
L16 ~ R16
Stereoposition der ersten Reflexion.
1stRef-2 Delay
0.1 ~ 200.0 ms
Verzögerung der zweiten Reflexion.
1stRef-2 Lvl
0 ~ 100%
Pegel der zweiten Reflexion.
1stRef-2 Pan
L16 ~ R16
Stereoposition der zweiten Reflexion.
Input Mix *1
0 ~ 100%
Stereo-Mix-Einstellung
Geht weiter bis DFL
*1 Nur im Stereo-Betrieb.
ProR3 Digital-Hallgerät
28 An die Arbeit (2) – Editierfunktionen –
Programmparameter 2 (Sekundäreffekt)
DFL
Das dynamische Filter kann zum Erzielen von WahWah-Effekten verwendet werden. Dabei richtet sich die Grenzfrequenz dann nach dem Pegel des Eingangssignals.
Taster
Parameter
Wert
Beschreibung
FINE
DFL Dynamic Filter
OFF, ON
Ein-/Ausschalten des DFL-Effekts.
DFL Filter Type
LPF, HPF, BPF
Anwahl des DFL-Filtertyps.
DFL Frq.Center
100 Hz ~ 3.2 kHz
Zentralfrequenz des Filters.
DFL Resonance
0 ~ 20
Filterresonanz.
DFL Shift
Up/Down
Richtung, in die die Zentralfrequenz anhand des Eingangspegels verschoben wird.
DFL Sens
1 ~ 10
Signalpegelbedingte Empfindlichkeit.
DFL Decay
1 ~ 10
Geschwindigkeit, mit der die Zentralfrequenz wieder zum
Ausgangswert zurückkehrt.
DFL Patch
PreREV, PostREV
Einschleifen des Filters vor oder hinter dem Hall.
Im Anschluß hieran: COMP
ProR3 Digital-Hallgerät
An die Arbeit (2) – Editierfunktionen – 29
COMP
Mit dem Kompressor können Pegelschwankungen des Eingangssignals ausgebügelt oder
zumindest reduziert werden, was z.B. den Hallanteil bei leisen Signalen verbessert.
Auf der letzten Kompressorseite wird die Pegelreduzierung anhand einer Balkengrafik angezeigt, so daß Sie die Funktion des Kompressors optisch nachvollziehen können.
dB
0
Ratio = 2:1
Ausgangspegel
–10
Threshold = -20dB
–20
–30
–40
Knee = SoftKnee
–50
–60
–70
dB
–70
Taster
Parameter
–60
–50
–40 –30 –20 –10
Eingangspegel
0
Wert
Beschreibung
FINE
COMP Compressor
OFF/ON
Ein-/Ausschalten des Kompressors.
COMP Threshold Level
–54 ~ 0 dB
Grenzpegelwert.
COMP Output Level
–15 ~ +15 dB
Ausgangspegel des Kompressors.
COMP Ratio
1:1 ~ 00:1
Kompressionsverhältnis.
COMP Knee
SoftKnee, Medium,
HardKnee
Breite des Grenzpegelwerts.
COMP Attack Time
0 ~ 500 ms
Anstiegszeit.
COMP Release Time
6 ~ 2400 ms
Abklingrate.
COMP GR
Balkenkette
Die Pegelreduzierung wird mit Hilfe einer Balkenkette angezeigt.
Rückkehr zum Beginn der FINE-Parameter. (Wenn der Primäreffekt jedoch ER lautet, folgen nun die User ER-Parameter.)
ProR3 Digital-Hallgerät
30 An die Arbeit (2) – Editierfunktionen –
EQ
Gleich hinter dem Kompressor befindet sich ein parametrischer Dreibandentzerrer, mit dem
man den Frequenzgang (Tiefen, Mitten und Höhen) einstellen kann.
Typ
LOW
MID
HIGH
Glocke/Kuhschwanz
Glocke
Glocke/Kuhschwanz
±15 dB
±15 dB
±15 dB
32 Hz~2.2 kHz
250 Hz~5.6 kHz
500 Hz~20 kHz
0.1~5.0
0.1~5.0
0.1~5.0
Anhebung/Absenkung
Frequency
Q (Güte)
Taster
Parameter
Wert
Beschreibung
EQ
Low EQ Type
Peaking, Shelving
Low Gain
–15 ~ +15 dB
Filtercharakteristik für die Tiefen.
Anhebung/Absenkung der Tiefen.
Low Freq
32 Hz ~ 2.2 kHz
Frequenz der Tiefen.
Low Q *1
0.1 ~ 5.0
Güte (Bandbreite) der Tiefen.
Mid Gain
–15 ~ +15 dB
Anhebung/Absenkung der Mitten.
Mid Freq
250 Hz ~ 5.6 kHz
Frequenz der Mitten.
Mid Q
0.1 ~ 5.0
Güte der Mitten.
High EQ Type
Peaking, Shelving
Filtercharakteristik für die Höhen.
High Gain
–15 ~ +15 dB
Anhebung/Absenkung der Höhen.
High Freq
500 Hz ~ 20 kHz
Frequenz der Höhen.
High Q *1
0.1 ~ 5.0
Güte der Höhen.
OFF/ON
Ein-/Ausschalten des Entzerrers.
EQ ON
POST EQ
*1 Wenn EQ Type= Peaking
ProR3 Digital-Hallgerät
An die Arbeit (2) – Editierfunktionen – 31
GATE
Mit dem Gate-Effekt erzielen Sie Gate Reverb-Effekte.
Gate Reverb ist ein Effekt, bei dem der Hall urplötzlich ausgeschaltet wird. Der Effekt wurde
dank eines erfolgreichen singenden Schlagzeugers weltberühmt.
dB
+20
+10
0
Ausgangspegel
–10
–20
–30
–40
Threshold = –40dB
–50
–60
–70
dB
–70
Taster
–60
Parameter
–50
–40 –30 –20 –10
Eingangspegel
0
Wert
+10
+20
Beschreibung
GATE
Threshold Level
–60 ~ 0 dB
Grenzwert.
Verzögerung bis zum Einsatz des Gates.
Trigger Delay
0.1 ~ 100 ms
Hold Time
1 ~ 5759 ms
Die Zeit, bis sich das Gate wieder schließt.
Release time
6 ~ 24000 ms
Geschwindigkeit, mit der sich das Gate wieder schließt.
MIDI Trigger
OFF/ON
Auslösen des Gates anhand eines MIDI-Befehls.
Detect
at-GATE, Pre-REV
Stelle, an der der Signalpegel zum Öffnen und Schließen des
Gates überwacht wird.
GATE GR
Balkenkette
Die Balkenkette zeigt an, wann sich das Gate öffnet und
schließt.
OFF/ON
Ein-/Ausschalten des Gates.
GATE ON
Gate
ProR3 Digital-Hallgerät
32 An die Arbeit (2) – Editierfunktionen –
LEVEL/BAL
Mit diesem Parameter können Sie den Ausgangspegel des ProR3 einstellen.
Außerdem kann hier die Balance zwischen dem Eingangs- und Effektsignal bestimmt werden.
Taster
GATE
BAL
LEVEL
GATE
BAL
LEVEL
Parameter
Wert
BYPASS
Beschreibung
LEVEL/BAL
Effect Balance
0 ~ 100%
Verhältnis zwischen dem Eingangs- und Effektsignal.
Output Level
–∞, –50 ~ +6 dB
Einstellung des Ausgangspegels.
ProR3 Digital-Hallgerät
Wenn wirklich alles stimmen soll – Utility-Funktionen – 33
Wenn wirklich alles stimmen soll – Utility-Funktionen –
Hier wollen wir Ihnen zeigen, wie man die Systemparameter (Speichersicherung, Eingangsbetrieb) sowie die MIDI-Parameter einstellt.
Speichersicherung (Memory Protect)
1. Drücken Sie den UTILITY-Taster, um die Memory Protect-Seite aufzurufen.
Die rote Diode leuchtet nun.
Memory Protect
ON
2. Drücken Sie INC oder DEC, um den Speicher zu (ent)sichern.
Mit dieser Funktion können Sie die Programme im USER-Bereich vor Fremdeingriffen schützen.
ON: Speicher gesichert (es kann nichts gespeichert werden)
OFF: Speicher entsichert
Eingangsbetrieb (Input Mode)
Das ProR3 bietet drei Eingangsbetriebsarten: Stereo, LR-Mix, R-Mono und L-Mono.
1. Drücken Sie den UTILITY-Taster, bis die Input Mode-Seite angezeigt wird.
2. Wählen Sie mit DEC und INC den gewünschten Eingangsbetrieb an.
Input Mode
LR-Mix
LR-MIX: Die Signale des linken und rechten Eingangskanals werden gemischt und gemeinsam
verarbeitet. Dadurch hat das Effektsignal wahrscheinlich eine bessere Qualität als im
STEREO-Betrieb.
STEREO: Die Signale des linken und rechten Eingangskanals werden separat verarbeitet, so daß
sich die Stereoposition auch im Effektsignal niederschlägt.
L-Mono: Nur das Signal des linken Eingangskanals wird verarbeitet. Im BYPASS-Betrieb wird
es an beide Ausgänge angelegt.
R-Mono: Nur das Signal des rechten Eingangskanals wird verarbeitet. Im BYPASS-Betrieb wird
es an beide Ausgänge angelegt.
ProR3 Digital-Hallgerät
34 Wenn wirklich alles stimmen soll – Utility-Funktionen –
Einstellen des MIDI-Kanals
Hier zeigen wir Ihnen, wie man den MIDI–Übertragungs- und Empfangskanal einstellt:
1. Drücken Sie den UTILITY-Taster, um die MIDI-Seite aufzurufen.
MIDI Channel
OMNI
2. Mit DEC und INC können Sie nun den gewünschten MIDI-Kanal einstellen.
OMNI: Das ProR3 empfängt auf allen MIDI-Kanälen, sendet aber nur auf Kanal 1.
1–16:
Das ProR3 sendet und empfängt auf dem hier eingestellten MIDI-Kanal.
OFF:
Es werden weder MIDI-Daten empfangen noch gesendet.
Programmwechseltabelle
Das ProR3 bietet vier Programmwechselbänke für die Zuordnung der internen Programme zu
MIDI-Programmnummern. Ab Werk lautet die Zuordnung folgendermaßen: die Programme
1~90 des USER-Bereiches sind den MIDI-Nummern 1~90 zugeordnet, während die PRESET-Programme 1~38 den MIDI-Nummern 91~128 zugeordnet sind.
1. Drücken Sie den UTILITY-Taster, bis die Seite mit der Programmwechseltabelle erscheint.
MIDI PGM Change Table
BANK:A PGM
1= ProR U01
2. Führen Sie den Cursor mit (√) (®) zum benötigten Parameter.
3. Stellen Sie mit DEC und INC den gewünschten Wert ein. Die MIDI-Programmnummer
kann auch direkt über das Zehnertastenfeld eingetippt werden.
BANK
A–D
Anwahl der Programmwechselbank.
PGM
1–128
MIDI-Programmnummer.
U01–U90, P01–P90
ProR
---
Das ProR3-Programm, das bei Empfang der betreffenden MIDIProgrammnummer angewählt wird. U01~U90 beziehen sich auf die
Programme im USER-Bereich und P01~P90 vertreten die Programme im
PRESET-Bereich.
Wenn irgendwo “...” steht, kann das Programm nicht via MIDI aufgerufen
werden. *
* --- kann man mit dem CANCEL-Taster eingeben.
ProR3 Digital-Hallgerät
Wenn wirklich alles stimmen soll – Utility-Funktionen – 35
SysEx-Datenblöcke senden (Bulk Dump)
Alle Daten des ProR3 können gemeinsam oder separat zu einem MIDI-Empfänger gesendet werden: Programmspeicher (alle Programme oder nur ein Programm), Bänke, User ER (AnwenderErstreflexionen) und Inhalt des Systemspeichers.
1. Drücken Sie den UTILITY-Taster, bis die MIDI Bulk Out-Seite angezeigt wird.
MIDI Bulk Out
All
Press ENTER
2. Wählen Sie den benötigten Parameter mit (√) (®) an.
3. Stellen Sie den gewünschten Wert mit INC und DEC ein.
All
Alle Daten (Programme, Bänke, User ER, System)
Program
U01–U90,
All
Die Daten des gewählten USER-Programms.
Wenn Sie All wählen, werden alle USER-Programme gesendet.
Bank
A–D,
All
Die Daten der gewählten Programmwechselbank.
Wenn Sie All wählen, werden alle vier Bänke gesendet.
UserER
A–D,
All
Die gewählten User ER-Daten.
Wenn Sie All wählen, werden alle User ER-Daten gesendet.
System
Systemeinstellungen (Eingangsbetrieb usw.).
4. Drücken Sie den RECALL/ENTER-Taster, um die gewählten Daten zu senden.
Am besten schauen Sie vorher kurz nach, ob der Empfänger bereit ist. Handelt sich um einen
Sequenzer, dann sollten Sie nun die Aufzeichnung starten.
MIDI-Steuerbefehle
Das ProR3 bietet zwei “Controller”, denen man einen MIDI-Steuerbefehl zuordnen kann. Die
Zuordnung der beiden Controller muß auf zwei separaten Seiten erfolgen.
1. Drücken Sie den UTILITY-Taster, bis eine der beiden Controller-Seiten angezeigt wird.
Controller-1 Assign
OFF
2. Stellen Sie die MIDI-Steuernummer mit DEC und INC ein.
Es kann jeweils der unter “4) Einstellen der MIDI-Funktionen” auf Seite 16 angewählte Parameter via MIDI eingestellt werden. Das gelingt allerdings nur, wenn Sie den MIDI-Steuerbefehl
auch (auf dem richtigen Kanal) senden.
ProR3 Digital-Hallgerät
36 Fehlermeldungen des ProR3
Initialisieren des ProR3
Wenn Sie irgendwann Heimweh bekommen nach den werksseitig programmierten Einstellungen, sollten Sie das ProR3 initialisieren.
1. Halten Sie den STORE-Taster gedrückt, während Sie das ProR3 einschalten (POWER).
Sicherheitshalber erscheint nun folgende Meldung im Display: “Press [ENTER] to initialize
ProR3”.
2. Drücken Sie also den RECALL/ENTER-Taster, um das ProR3 zu initialisieren.
Wenn Sie es sich anders überlegt haben, drücken Sie irgend einen anderen Taster.
Warnung: Beim Initialisieren werden alle Programme im USER-Bereich überschrieben.
Statt Ihrer Einstellungen werden also wieder die werksseitig programmierten Programme, Programmwechselbänke und Systemeinstellungen geladen.
Bevor Sie RECALL/ENTER drücken, kratzen Sie sich am besten noch einmal das linke Ohrläppchen und fragen sich, ob Ihre eigenen Einstellungen wirklich gelöscht werden dürfen.
Fehlermeldungen des ProR3
“ Program Number Error ”
*
*
“
Data Error
******
******”
“
** Store Number Error **”
“
** MEMORY PROTECTED ! **”
“
LOW BATTERY
ProR3 Digital-Hallgerät
“
Die eingegebene Programmnummer ist größer als 90.
Allgemeiner Datenfehler. Initialisieren Sie das ProR3.
Die eingegebenen Speichernummer ist größer als 90.
Der Speicher ist gesichert. Entsichern Sie ihn (UTILITYFunktion).
Die Pufferbatterie ist beinahe erschöpft. Lassen Sie sie
vom Yamaha-Kundendienst ersetzen.
Spezifikationen 37
Spezifikationen
Frequenzgang
20 Hz ~ 20 kHz, +1.0 dB, –1.5 dB
Dynamikumfang
110 dB (typisch), auf jeden Fall aber 104 dB
Fremdspannungsabstand *1
Geringer als –80 dB *2
Klirrfaktor
Kleiner als 0.007% (1 kHz, bei Höchstpegel)
Audio
Kanäle
2 (symmetrisch)
Nennpegel
+4 dB / –10 dB *2
Höchstpegel
+24 dB (Pegelschalter auf +4 dB) *2
Impedanz
20 kΩ
Eingänge
Kanäle
2 (symmetrisch)
Nennpegel
+4 dB / –10 dB *2
Höchstpegel
+24 dB (Pegelschalter auf +4 dB) *2
Impedanz
150 Ω
A/D-Wandler
20 Bit linear
D/A-Wandler
20 Bit linear
Sampling-Frequenz
44.1 kHz
Preset-Bereich
1 ~ 90
User-Bereich
1 ~ 90 (Anwenderspeicher)
Ausgänge
A/D- und D/A-Wandler
Programmspeicher
MIDI-Steuerung
Programmwechsel, Steuerbefehle, Datenblockabwurf, Note-an, Parameteränderung.
USA und Kanada
120V AC, 60 Hz
Allgemein
230V AC, 50 Hz
Stromanforderungen
Leistungsaufnahme
35W
Abmessungen (B × T × H)
480 × 398.5 × 89 mm
Gewicht
5,5 kg.
INPUT (Eingangspegel)
Regler
PRE EFFECT EQ - FREQ × 3 (LOW, MID, HIGH)
PRE EFFECT EQ - GAIN × 3 (LOW, MID, HIGH)
Taster
ON (PRE EFFECT EQ)*3, √ (Cursor nach links),
® (Cursor nach rechts), INC (DATA-Taster)
DEC (DATA-Taster), COMPARE *3, MAIN *3
FINE *3, EQ *3, EQ ON *3, GATE *3, GATE ON *3
LEVEL/BAL *3, OTHERS *3, Zehnertastenfeld (darunter “-”
und “.” Taster), PROGRAM *3, STORE, CANCEL
RECALL/ENTER, INFINITE *3, UTILITY *3, BYPASS *3
Schalter
POWER
Displays
24 Zeichen x 2 Zeilen LCD, 8segmentige LED-Ketten:
INPUT-Meter × 2, 7mentiges LED-Display – PROGRAMNummernanzeige, 6segmentige LED-Anzeige – StatusAnzeige, LED-Dioden der Taster × 14
Anschlüsse
INPUT L/R (XLR-3-31 × 2) und (1/4” Klinkenbuchsen × 2)
OUTPUT L/R (XLR-3-32 × 2) und (1/4” Klinkenbuchsen × 2)
MIDI – IN, OUT, THRU (5P DIN × 3)
Schalter
Eingangspegel (+4/–10) × 2
Frontplatte
Rückseite
*1 Der Fremdspannungsabstand wurde mit einem äquivalenten Bandpaßfilter (20 Hz ~ 20 kHz) mit unendlicher dB/Oktave-Abschwächung gemessen.
*2 0 dB = 0.755 Vrms.
*3 Dioden über den Tastern
ProR3 Digital-Hallgerät
38 Spezifikationen
370
H: 89
22.3
T: 398.5
Abmessungen
B: 480
Unit: mm
Änderungen der technischen Daten ohne Vorankündigung jederzeit vorbehalten.
Blockschaltbild
95/10/18
Pre
Effect
EQ
L
DFL
COMP
EQ
GATE
L
LEVEL/
BAL
+4dB
INPUT L
L
+4dB
Selected
Effect
INPUT
MODE
–10dB
–10dB
INPUT
Pre
Effect
EQ
R
L
BYPASS
DFL
COMP
EQ
GATE
LEVEL/
BAL
OUTPUT
R
INPUT R
R
ProR3 Digital-Hallgerät
R
Additions
Manual del propietario
Español
REVERBERADOR DIGITAL
Precauciones i
Precauciones
Evitar el calor excesivo, humedad, polvo y vibraciones
Mantenga la unidad alejada de lugares donde haya la posibilidad de que quede expuesta a altas
temperaturas o humedad, como cerca de radiadores, estufas, luz solar directa, etc. Evite los lugares donde se pueda acumular mucho polvo. Las vibraciones excesivas pueden causar daños
mecánicos.
Evitar los golpes
La unidad puede dañarse si recibe golpes fuertes. Manéjela con cuidado.
Instale la unidad en un lugar con abundante espacio para su ventilación.
La unidad deberá instalarse de tal manera que quede un espacio libre de 10 cm o más entre la
parte trasera de la misma y la pared. Esto evitará que se acumule calor dentro de la unidad y
posibles riesgos de incendio.
No abrir la unidad, o intentar repararla o modificarla
Esta unidad no contiene partes que pueda reparar o cambiar el usuario. Todos los trabajos de
mantenimiento deberán ser realizados por personal de servicio cualificado de Yamaha. El abrir la
unidad y/o la alteración de los circuitos internos invalidará la garantía.
Asegurarse de que la alimentación está desconectada antes de hacer
conexiones o desconexiones
Asegúrese siempre de que la alimentación está desconectada antes de conectar o desconectar
cables. Esto es muy importante para evitar daños a la unidad, así como a otros equipos conectados a la misma.
Manejar los cables con cuidado
Enchufe y desenchufe los cables -incluido el de alimentación- cogiendo siempre el conector, no el
cable.
Limpiar con un paño suave
No utilice nunca disolventes, bencina o diluyente para limpiar la unidad. Límpiela con un paño
suave y seco.
Utilizar siempre la fuente de alimentación correcta
Asegúrese de que la tensión de fuente de alimentación especificada en el panel trasero, coincida
con la corriente alterna (CA) suministrada localmente:
Modelo para Estados Unidos y Canadá: 120 V CA, 60 Hz
Modelo general: 230 V CA, 50 Hz
Modelo para el Reino Unido: 240 V CA, 50 Hz
Pila de apoyo
Esta unidad contiene una pila de litio de larga duración que preserva el contenido de las ubicaciones de la memoria del usuario incluso cuando la unidad está apagada. En condiciones de uso
normal, la pila deberá durar cinco años aproximadamente. Si la tensión de la pila desciende por
debajo de cierto nivel, al desconectar la alimentación aparecerá el mensaje "WARNING LOW
BATTERY" en la pantalla. Si se da el caso, lleve la unidad a un centro servicio de reparación
Yamaha cualificado para que cambien la pila.
Aviso: NO INTENTE CAMBIAR LA PILA USTED MISMO. EL ABRIR LA UNIDAD Y/O LA ALTERACION DE LOS CIRCUITOS INTERNOS INVALIDARA LA GARANTIA.
Reverberador Digital ProR3
ii Índice general
Índice general
Introducción . . . . . . . . . . . . . . . . . . . . . . . . . . . . . . 1
Panel frontal . . . . . . . . . . . . . . . . . . . . . . . . . . . . . . 2
Panel trasero . . . . . . . . . . . . . . . . . . . . . . . . . . . . . . 6
Uso básico –utilización de un
programa de preajuste– . . . . . . . . . . . . . . . . . . 7
Conexiones . . . . . . . . . . . . . . . . . . . . . . . . . . . . . . .
Conexión y desconexión de la alimentación . . .
Ajuste del nivel de entrada . . . . . . . . . . . . . . . . .
Selección de programas de efectos . . . . . . . . . . .
Lista de programas de preajuste . . . . . . . . . . . .
7
7
8
8
9
Usos más avanzados (1) . . . . . . . . . . . . . . . . . 12
Usos más avanzados (3)
–Funciones de UTILITY– . . . . . . . . . . . . . . . . . . . 33
Ajustes para protección de la memoria . . . . . .
Ajuste del modo de entrada . . . . . . . . . . . . . . .
Ajuste del canal MIDI . . . . . . . . . . . . . . . . . . . .
Ajuste de la tabla de cambio de
programa MIDI . . . . . . . . . . . . . . . . . . . . . . . . . .
Transmisión de un conjunto volumétrico
MIDI . . . . . . . . . . . . . . . . . . . . . . . . . . . . . . . . . . .
Asignación de controladores MIDI . . . . . . . . .
Inicialización del ProR3 . . . . . . . . . . . . . . . . . . .
33
33
34
34
35
35
36
Mensajes de ERROR del ProR3 . . . . . . . . . . . 36
La función de paso . . . . . . . . . . . . . . . . . . . . . . . 12
Ecualizador de pre-efecto . . . . . . . . . . . . . . . . . 12
La función INFINITE . . . . . . . . . . . . . . . . . . . . . 13
Especificaciones . . . . . . . . . . . . . . . . . . . . . . . . . 37
Usos más avanzados (2)
–Funciones de edición– . . . . . . . . . . . . . . . . . 14
MIDI data format . . . . . . . . . . . . . . . . . . . . . .Add-1
Cómo están organizados los programas . . . . .
Procedimiento para la edición . . . . . . . . . . . . .
Parámetros del programa 1 (Efecto primario)
Reverberación (Reverb) . . . . . . . . . . . . . . . .
Reflexiones iniciales (ER) . . . . . . . . . . . . . . .
Parámetro del usuario (User ER) . . . . .
Simulación de cuarto (RoomSim) . . . . . . . .
Reverb + Eco (Rev + Ech) . . . . . . . . . . . . . . .
Reverb + Reflexiones iniciales (Rev + ER) .
Reverb + Coros (Rev + Cho) . . . . . . . . . . . .
Reverb + Sinfónico (Rev + Sym) . . . . . . . . .
Reverb + Rebordeador (Rev + Flg) . . . . . . .
Reverb + Cambio de Tono (Rev + Pit) . . . .
Reverb + Giro automático (Rev + PAN) . .
Parámetros comuness . . . . . . . . . . . . . . . . . .
Parámetros del programa 2
(Effectos secundarios) . . . . . . . . . . . . . . . . . . . .
Filtro dinámico (DFL) . . . . . . . . . . . . . . . . . .
Compresor (COMP) . . . . . . . . . . . . . . . . . . .
Ecualizador (EQ) . . . . . . . . . . . . . . . . . . . . . .
GATE (compuerta) . . . . . . . . . . . . . . . . . . . .
Nivel/equilibrio (LEVEL/BAL) . . . . . . . . .
Reverberador Digital ProR3
14
15
18
18
19
19
20
21
22
23
24
25
26
27
27
28
28
29
30
31
32
Dimensiones . . . . . . . . . . . . . . . . . . . . . . . . . . . . 38
Diagramas en Bloques . . . . . . . . . . . . . . . . . . . . 38
1. Transmitted data . . . . . . . . . . . . . . . . . . . .Add-1
2. Receive data . . . . . . . . . . . . . . . . . . . . . . . .Add-5
MIDI Implementation Chart . . . . . . . . . . .Add-9
Introducción 1
Introducción
Muchísimas gracias por la adquisición del reverberador digital ProR3 Yamaha. El ProR3 marca
una nueva era en la tecnología de reverberación Yamaha. La tercera generación de procesadores
de señal digital (DSP) con procesado de señal digital de 32 bit y convertidores lineales A/D y D/
A de gran rendimiento de 20 bit ofrecen una densidad y resolución sin precedentes, con un
impacto dinámico imponente. La circuitería de entrada y salida análoga de calidad ultra-alta
alcanza una gama dinámica de 110 dB, que ofrece una reverberación natural increíble con un
decaimiento exento de ruidos.
El ProR3 está dotado de 10 efectos primarios: reverberación, reflexión inicial, simulación de sala,
combinaciones de reverberación y eco, coros, rebordeado, cambio de tono, giro automático, etc.
Delante del efecto primario ha sido instalado un ecualizador de pre-efecto, y, tras él, un filtro
dinámico, un compresor, un ecualizador, una compuerta, un nivel, y etapas de equilibrio. En el
modo de entrada de estéreo, se ha provisto reverberación estéreo completa. Además de los 90
programas preajustados en fábrica para uso inmediato, se han provisto otras 90 ubicaciones de
memoria del usuario para que usted pueda realizar ajustes personalizados.
Las entradas y salidas estéreo presentan los conectores tipo XLR y tomas audiofónicas de 1/4",
ambos equilibrados, para conexión a una variada gama de equipos. Los selectores de nivel de
entrada y salida (–10 dB/+4 dB) permiten también flexibilidad en el nivel de ajuste. Los programas se pueden seleccionar desde un dispositivo MIDI externo, y también se puede realizar transferencia de datos volumétricos en conjunto.
El reverberador digital Yamaha ProR3 es el resultado de un importante paso hacia adelante en la
tecnología de reverberación digital. Ofrece un nivel de admirables efectos de reverberación, calidad de sonido y operabilidad no conseguidos hasta ahora, y es un reverberador ideal para usar
en cualquier situación, tanto en un estudio doméstico como en un trabajo de grabación profesional y PA.
Para aprovechar completamente las funcionabilidad del ProR3 y disfrutar de él durante muchos
años sin problemas, lea atentamente este manual.
Reverberador Digital ProR3
2 Panel frontal
Panel frontal
2
1
3
4
6
5
DATA/CURSOR
DIGITAL REVERBERATOR
8
9
PARAMETER
FINE
7
8
9
EQ ON
4
5
6
STORE
GATE
GATE ON
1
2
3
CANCEL
UTILITY
LEVEL/
BAL
OTHERS
0
•
–
RECALL/
ENTER
BYPASS
MAIN
PROGRAM
INFINITE
POWER
INC
R
L
7
CLIP
-3
-6
-9
-12
-18
-24
-36
STEREO
L
R MONO
EQ
PRESET
USER
PROGRAM
MIDI
FREQ
GAIN
DEC
PRE EFFECT EQ
INPUT
0
100
FREQ
300
800
GAIN
2k
FREQ
4k
10k
GAIN
COMPARE
50
700 -15
+15
350
5k
-15
+15
2k
20k -15
ON/ OFF
ON
+15
+10
-00
L
R
LOW
MID
HIGH
A
0
1
B
C D
Medidor de nivel de entrada (INPUT) (L/R) (der./izq.)
Este es un medidor LED estéreo con 8 segmentos para cada canal. Los segmentos indican niveles
de –36 dB, –24 dB, –18 dB, –12 dB –9 dB, –6 dB, –3 dB, y CLIP respectivamente.
Nota: Los medidores de nivel se encuentran ubicados en el circuiteado tras el convertidor A/D. Esto
quiere decir que el indicador CLIP indicará la limitación de la señal digital. Ajuste el nivel de entrada de
forma que el indicador CLIP no se ilumine.
2
Presentación del número de programa (PROGRAM)
Esta es una presentación de siete segmentos de dos dígitos que indica el número de programa
seleccionado actualmente.
Si esta presentación parpadea, significa que se ha elegido un nuevo programa cuyo contenido no
ha sido llamado todavía.
3
Indicadores de estado
Estos son seis LED que indican el estado del programa y otras funciones del ProR3.
STEREO, L/R MONO
El modo de entrada del programa seleccionado actualmente se muestra mediante tres indicadores. El ProR3 dispone de cuatro modos de entrada (Stereo, LR/Mix, R-Mono, L-Mono), seleccionados con la tecla UTILITY. Cuando ambos indicadores L/R Mono se iluminan, se selecciona el
modo LR/Mix.
PRESET/USER
Estos indicadores muestran el estado del programa. Utilice la tecla PROGRAM para seleccionar
el estado. Cuando se ilumina el indicador PRESET, se seleccionan programas preajustados en
fábrica. Cuando se ilumina el indicador USER, se seleccionan programas del usuario.
MIDI
Este indicador se ilumina durante la recepción de datos MIDI procedentes de un dispositivo
externo conectado al conector MIDI IN.
4
Pantalla de cristal líquido (LCD)
Este LCD con luz de fondo muestra el nombre del programa seleccionado y los valores de parámetro del programa. Los mensajes relacionados con la operación también aparecerán aquí.
Reverberador Digital ProR3
Panel frontal 3
5
Teclas de datos/cursor (DATA/CURSOR)
Las teclas de DATA (IN) (DEC) sirven para modificar el valor del parámetro seleccionado.
Las teclas de CURSOR (√) (®) sirven para seleccionar los parámetros mostrados en el LCD.
Cuando indicador PROGRAM está iluminado, las teclas de DATA sirven para seleccionar el programa que desea llamar.
6
Teclas de parámetro (PARAMETER)
Estas teclas seleccionan los parámetros de efectos. Cada vez que se presiona una tecla de estas, se
mueve por las páginas de parámetros y, finalmente, se regresa a la primera página.
MAIN
FINE
A
B
EQ
EQ ON
C
GATE
GATE ON
LEVEL/
BAL
OTHERS
D
F
E
6-A Tecla principal (MAIN)
Con esta tecla se accede a los parámetros principales. El indicador se ilumina, y el usuario
puede editar los parámetros principales del programa.
6-B
Tecla secundaria (FINE)
Con esta tecla se accede a los parámetros secundarios del programa. El indicador se ilumina, y el usuario puede editar los parámetros secundarios del programa.
6-C Teclas de ecualizador (EQ, EQ ON)
Con la tecla EQ se accede a los parámetros del ecualizador de efectos posteriores de tres
bandas. El indicador se ilumina, y el usuario puede editar el tipo de ecualizador, frecuencia, ganancia y el Q para cada banda.
La tecla EQ ON activa/desactiva el ecualizador de efecto posterior. Cuando el ecualizador
está activado, se ilumina el indicador verde.
Tipo
Ganancia
Frecuencia
Q
LOW (bajo)
MID (medio)
HIGH (alto)
Agudización/Declinación
Agudización
Agudización/Declinación
±15 dB
±15 dB
±15 dB
32 Hz a 2,2 kHz
250 Hz a 5,6 kHz
500 Hz a 20 kHz
0,1 a 5,0
0,1 a 5,0
0,1 a 5,0
6-D Teclas de compuerta (GATE, GATE ON)
Con la tecla GATE se accede a los parámetros de compuerta. El indicador se ilumina, y el
usuario puede editar el nivel y el equilibrio, etc.
La tecla GATE ON activa/desactiva la compuerta. Cuando la compuerta está activada, se
ilumina el indicador verde.
6-E
Tecla de nivel/equilibrio (LEVEL/BAL)
Esta tecla permite equilibrar el efecto (equilibrio de volumen entre el sonido directo y el
sonido de efecto). Cuando se presiona esta tecla, se ilumina el indicador rojo.
Reverberador Digital ProR3
4 Panel frontal
6-F
Teclas de otras funciones (OTHERS)
Esta tecla tiene dos funciones. Cuando se presiona, se ilumina el indicador rojo.
1 Especificación de un título de programa (ver página 16).
2 Selección de los parámetros que van a ser controlados por los mensajes de cambio de
control MIDI (ver página 16, 35).
7
Teclas numéricas
Estas teclas sirven para introducir directamente el número de un programa que el usuario desea
llamar, o para introducir valores de parámetros.
Cuando el usuario utiliza las teclas numéricas para introducir un valor de parámetro, el valor
parpadea hasta finalizar. Presione la tecla RECALL/ENTER para finalizar. Para volver al valor
original, presione la tecla CANCEL. Algunos parámetros no se pueden introducir con las teclas
numéricas.
Para especificar un valor negativo (por ejemplo, una ganancia de ecualizador de –9 dB), utilice la
tecla “– ”. Para especificar un valor con un decimal (por ejemplo, un ecualizador Q de 2,5), utilice
la tecla “.”.
7
8
9
4
5
6
STORE
1
2
3
CANCEL
0
•
–
RECALL/
ENTER
PROGRAM
A
B
C
D
7-A Tecla de programa (PROGRAM)
Esta tecla sirve para seleccionar programas. Cada vez que se presiona esta tecla, el estado
del programa cambia alternativamente entre PRESET y USER.
7-B
Tecla de almacenamiento (STORE)
Esta tecla sirve para almacenar los ajustes de un programa creado por el usuario.
7-C Tecla para cancelar (CANCEL)
Esta tecla sirve para cancelar un valor introducido con las teclas numéricas.
7-D Tecla para llamar/introducir (RECALL/ENTER)
Esta tecla sirve para llamar un programa cuyo número ha sido introducido con las teclas
numéricas, o para finalizar un valor de parámetro.
8
Tecla de infinito (INFINITE)
Cuando se presiona esta tecla, se ilumina el indicador, y el parámetro RevTime se alarga enormemente. Esto produce el efecto de un sonido de “congelación de encuadre” o “congelación de
movimiento”.
9
Conmutador de alimentación (POWER)
Sirve para conectar/desconectar la alimentación.
Cuando se conecta la alimentación se selecciona el programa que estaba en uso cuando se desconecto la alimentación por última vez.
10 Control de nivel de entrada (INPUT) (L, R) (izq., der.)
El anillo interior sirve para introducir el nivel del canal izquierdo, y el anillo exterior para introducir el nivel del canal derecho. Los anillos son coaxiales para conveniencia del usuario cuando
vaya a ajustar el nivel de una fuente en estéreo.
Reverberador Digital ProR3
Panel frontal 5
11 Controles de ecualizador de pre-efecto (PRE EFFECT EQ, ON)
Este es un ecualizador paramétrico de tres bandas que ecualiza la señal previa al efecto. Se puede
ajustar la frecuencia central y ganancia para cada banda.
La tecla ON activa y desactiva el ecualizador de pre- efecto. Cuando el ecualizador está activado,
se ilumina el indicador verde.
Frecuencia
Ganancia
LOW (bajo)
MID (medio)
HIGH (alto)
50 Hz a 700 Hz
350 Hz a 5 kHz
2 kHz a 20 kHz
±15 dB
±15 dB
±15 dB
12 Tecla de comparación (COMPARE)
Después de editar los parámetros de un programa, el usuario puede usar esta tecla para comparar el sonido editado con el sonido original del programa. Cuando esté iluminado el indicador
rojo, usted estará escuchando el sonido original del programa.
13 Tecla de utilidades (UTILITY)
Utilice esta tecla cuando desee realizar los ajustes para los parámetros del sistema, como protección de memoria, modo de introducción, y parámetros MIDI. Cuando se presiona esta tecla, se
ilumina el indicador rojo.
14 Tecla de paso libre (BYPASS)
Cuando se presiona esta tecla, la señal de entrada sale directamente sin pasar a través del efecto,
y se ilumina el indicador rojo.
Esta es una forma conveniente de comparar rápidamente el sonido sin procesar con el procesado.
Reverberador Digital ProR3
6 Panel trasero
Panel trasero
E
F
MIDI
OUTPUT
G
INPUT
R
THRU
OUT
L
R
L
IN
R
L
R
–10dB +4dB
L
–10dB +4dB
H
15 Conectores MIDI
Estos son unos conectores estándar tipo DIN de 5 contactos MIDI IN, MIDI OUT y MIDI TRHU.
Se utilizan cuando se transmiten mensajes de cambio de programa o mensajes de cambio de control de un dispositivo MIDI exterior al ProR3, o cuando se transmiten datos en conjunto volumétrico del programa del ProR3 a otro dispositivo.
16 Tomas OUTPUT
Estas son tomas de salida equilibradas para salida de la señal de retorno análoga hacia su mezclador o grabador de multipistas, etc. Se proveen un par de conectores XLR-3-32 y un par de
tomas para audiófono de 1/4". El selector de nivel selecciona +4 dB o –10 dB como nivel de
salida nominal.
17 Tomas INPUT
Estas son tomas de entrada equilibradas para entrada de la señal análoga procedente de su mezclador o grabador de multipistas con destino al ProR3. Si la fuente de sonido es monofónica, utilice la tecla UTILITY para seleccionar la toma de entrada apropiada (ver página 33).
Se proveen un par de conectores XLR-3-31 y un par de tomas para audiófono de 1/4".
El conmutador de selección de nivel selecciona +4 dB o –10 dB como nivel de entrada nominal.
18 Conmutadores de selección de nivel
Estos conmutadores cambian el nivel las tomas de entrada/salida entre +4 dB y –10 dB.
Ajústelos de forma que concuerden con el nivel del equipo conectado.
Disposición del conector tipo XLR-3-31
Vivo
2
1
Masa
(tierra)
3
Mueerto
Conexiones para la señal de audiófono de 1/4"
Tierra
Vivo
Mueerto
Reverberador Digital ProR3
Disposición del conector tipo XLR-3-32
Masa
(tierra)
1
2
3
Vivo
Mueerto
Uso básico –utilización de un programa de preajuste– 7
Uso básico –utilización de un programa de preajuste–
Aquí se muestra la forma de seleccionar un programa de preajuste y cómo utilizarlo sin ajuste de
parámetros.
Conexiones
1. Conecte la fuente de sonido a las tomas INPUT.
Aviso: Antes de realizar las conexiones, asegúrese de que la alimentación de todos
sus equipos está desconectada.
Para una fuente de sonido estéreo, conecte las salidas de ambos canales a las tomas INPUT. Para
una fuente de sonido monofónica, utilice la toma de entrada L.
Si la fuente de sonido tiene conectores XLR, realice las conexiones utilizando los conectores XLR3-31 del ProR3. Si no tiene este tipo de conectores, utilice las tomas para audiófono de 1/4".
2. Conecte las tomas OUTPUT al mezclador u otro dispositivo externo
Si el mezclador tiene conectores XLR, realice las conexiones utilizando los conectores XLR-3-32
del ProR3. Si no tiene este tipo de conectores, utilice las tomas para audiófono de 1/4".
Nota: También se puede usar un cable que convierte entre los conectores XLR y las tomas para audiófono de 1/4".
3. Conecte el ProR3 a una toma de CA.
Conexión y desconexión de la alimentación
1. Presione el conmutador POWER para conectar la alimentación. (Presione de nuevo para
desconectarla.)
YAMAHA
ProR3
Digital Reverberator
Copyright(c) 1995 YAMAHA
Aparecerá la presentación inicial durante unos cuantos segundos, y luego se selecciona el programa que estaba en uso cuando se desconectó la alimentación por última vez.
Large Hall 1
RevTime =
Reverb
2.5s
Nota: Cuando conecte la alimentación de los equipos de un sistema, conecte siempre cada uno de los
equipos siguiendo la secuencia del flujo de la señal, comenzando por las fuentes de la señal y finalizando
con la alimentación. Siguiendo esta secuencia se evitarán daños a los altavoces, a otros equipos, o a los
oídos del usuario, lo cual puede ocurrir debido al ruido que se produce cuando se conecta un dispositivo.
Conecte la alimentación del ProR3 antes de conectarla a cualquier otro equipo. Al desconectar la alimentación del sistema, desconecte los dispositivos comenzando por la alimentación y continuando hacia
atrás hasta las fuentes de la señal.
Reverberador Digital ProR3
8 Uso básico –utilización de un programa de preajuste–
Ajuste del nivel de entrada
Cuando se haya conectado la alimentación del ProR3 y demás equipos, reproduzca sonido de las
fuentes de sonido y ajuste el nivel de entrada del ProR3.
1. Gire los controles de nivel de entrada INPUT a la vez que observa los medidores de
entrada de nivel INPUT.
Ajústelos de forma que consiga los valores máximos de S/N (señal/ruido) sin dejar que el indicador CLIP se encienda.
Selección de programas de efectos
Hay dos formas de seleccionar programas.
• Utilice las teclas INC/DEC.
Presione la tecla IN o DEC para seleccionar un programa.
Si se mantiene presionada una tecla, los números de programa se cambiarán en sucesión.
• Utilice las teclas numéricas y la tecla RECALL/ENTER.
1 Utilice las teclas numéricas para seleccionar el número de programa. El indicador PROGRAM parpadeará.
Si se equivoca al introducir un número, presione la tecla CANCEL, y luego utilice las
teclas numéricas para introducirlo de nuevo.
Si selecciona un número no comprendido entre el 1 y 90, la pantalla mostrará el mensaje
“ NO PROGRAM No Type”. Presione la tecla CANCEL para volver a la presentación
previa.
**
**
2 Presione la tecla RECALL/ENTER para llamar un programa.
Cuando se presenta el programa, el indicador PROGRAM deja de parpadear y se ilumina.
Si selecciona un número no comprendido entre 1 y 90 y presiona la tecla RECALL/
ENTER, en la pantalla se presentará el mensaje “ Program Number error ”. Presione la
tecla CANCEL para volver a la presentación previa.
*
*
Nota: Si cuando selecciona un programa en la pantalla aparece el mensaje “Recall? Are you sure?”
(¿Llamar? ¿Está seguro?), significará que los datos del programa han sido editados. Si desea salvar
estos datos editados, utilice el procedimiento “Cómo salvar un programa”, que encontrará en la
página 17.
Si no necesita salvar los datos editados, presione la tecla RECALL/ENTER para llamar el programa
seleccionado.
Reverberador Digital ProR3
Uso básico –utilización de un programa de preajuste– 9
Lista de programas de preajuste
Nº
Nombre
Tipo
Descripción
Large Hall
1
Large Hall 1
Reverb
2
Large Hall 2
Reverb
3
New Hall
Reverb
Un con una ligera demora entre las reflexiones poco densas iniciales y la reverberación abundante.
4
Wide Hall
Reverb
Un programa que simula una sala espaciosa e incolora.
5
Breathless Hall
Reverb
Un poco de carácter. Reverberación clara, potente y algo larga.
Reverberación estándar tipo sala del ProR3. Simula una gran sala de buena
resonancia acústica, y es apropiada para cualquier instrumento.
Medium Hall
6
Medium Hall 1
Reverb
7
Medium Hall 2
Reverb
8
Wonder Hall
Reverb
9
Gothic Hall
Rev+Cho
10
Bright Ham
Reverb
Una sala de tamaño medio con sonidos claros.
Una reverberación normal de una sala de tamaño medio.
Reverberación con una sensación algo más ligera que la del tipo de una sala
grande. Probar con percusión.
Una combinación de coros y reverberación algo larga. Probar con instrumentos
para solo, vocales o batería electrónica.
Small Hall
11
Small Hall 1
Reverb
Una supuesta sala pequeña con un escenario pequeño.
12
Small Hall 2
Reverb
Una sala aún más pequeña. El compresor interno está activado, produciendo un
amortiguamiento del sonido de reverberación.
13
Small Dark Hall
Rev+ER
Una sala pequeña, de tonos algo más apagados. Pruébelo con vocales en un
tono menor.
14
Pool
Reverb
Programa para una sala pequeña con mucha reflexión inicial.
15
Open Hall
Reverb
Sala pequeña con espacio abierto. Para vocales.
Large Room
16
Large Room 1
Reverb
Simulación de un cuarto grande de paredes duras. Un sonido recio e idiosincrático, de alguna forma. Pruébelo con percusión.
17
Large Room 2
Reverb
Comparada con Large Room 1, ésta sería una sala de más naturalidad y transparencia.
18
Mood Room
Reverb
Un cuarto grande con tonos ligeramente más ensombrecidos.
19
Soft Room
Reverb
Un cuarto grande con tonos algo más dulces.
20
Attack Room
Rev+Pit
Combina un cambio de tono (±9 intervalo) con un cuarto. Crea profundidad para
vocales o instrumentos para solo.
Medium Room
21
Medium Room 1
Reverb
Simula un estudio se tamaño medio de buena resonancia acústica. Aplicarlo a
una fuente de dos canales para música “en vivo en el estudio”.
22
Medium Room 2
Reverb
Simula algo así como un estudio de paredes de madera para grabación en vivo.
23
Dark Room
Reverb
Un estudio ligeramente más pequeño que el Medium Room 2, con resonancia
acústica natural.
24
Quick Room
Reverb
Un estudio de sonido seco con paredes de madera y metal. Para instrumentos
de latón o percusión.
25
Aquarium
RoomSim
26
Wood Room
RoomSim
27
Chorus Room
Rev+Cho
28
Delayed Room
RoomSim
Simula la reverberación de un estudio de tamaño medio. Probar un bombo.
Añade la atmósfera de un cuarto mediano para dar más solidez al sonido.
Un cuarto de eco, con un retardo previo de 82 ms. Para saxofón e instrumentos
para solo.
Reverberador Digital ProR3
10 Uso básico –utilización de un programa de preajuste–
Nº
29
Nombre
Comp. Chamber
Tipo
Descripción
RoomSim
Un programa para cuarto, para tambor militar o percusión. Utilizar el umbral para
ajustar los grados de compresión.
Small Room
30
Small Room 1
RoomSim
31
Small Room 2
Rev+Cho
32
Small Studio
RoomSim
33
Bright Studio
Reverb
34
Kick Chamber
RoomSim
35
Tiny Room
36
Near You
Los programas para cuartos pequeños son de reverberaciones extremadamente
cortas, creados con el hip-hop en mente. Están pensados para ser aplicados en
pequeñas cantidades, de forma que el sonido parezca seco o que tenga la naturalidad acústica de un estudio. Son especialmente efectivos con instrumentos
secuenciados, de cobre de sintetizador con instrumentos grabados en un estudio
sordo.
ER
Rev+Pit
Special Room
37
Power Drum Room
RoomSim
Añade un ambiente potente y vivo a los tambores. Pruébelo con tambores muestreados.
38
Soft Space
Rev+Cho
Una reverberación corta de percusión con coros añadidos. Añade ambiente a los
tambores, instrumentos guía y vocales.
39
Droid Short
Reverb
40
Droid Long
Reverb
41
Tile Room
RoomSim
42
Coliseum
Reverb
Reverberación larga de un espacio amplio, simulación de un coliseo.
43
Opera
Reverb
Reverberación bastante grande con 52 ms de retardo entre las reflexiones iniciales y la reverberación.
44
Delay Hall
Ech→Rev
Una combinación de reverberación tipo sala y retardo. Ajustar los parámetros del
retardo L y R y IniDly de forma que concuerden con el tempo de la canción.
45
Train Station
Reverb
Utilice esta reverberación cuando necesite el eco de unos pasos en una estación
de tren en la madrugada.
46
Tile Bathroom
ER
47
Closet
ER
48
Motel Chorus
ER
49
Pitch Room
Pit→Rev
50
Beauty Plate
Reverb
Se han realzado los ajustes de sub-reverberación. Pruébelo con el piano eléctrico.
51
Arena Plate
Reverb
Simula un estadio cubierto gigante como el Budokan de Tokio.
52
Vocal Plate 1
Reverb
Pruébelo con vocales. Especialmente agradable para baladas.
53
Vocal Plate 2
Reverb
Reverberación con una sensación más apagada que la de Vocal Plate 1.
54
Vocalese
55
String Plate
Reverb
Pruébelo con cuerdas para conseguir un sonido más agradable.
56
Home Plate
Reverb
Reverberación de placa metálica de tiempos nostálgicos.
57
LA Plate Short
Reverb
58
LA Plate Long
Reverb
Simulación de reverberación de placa clara y vibrante preferida en la costa oeste
de los Estados Unidos.
59
Short Perc.Plate
Reverb
Placa de percusión corta y clara. Ajustar el parámetro IniDelay según el tempo.
60
Long Plate
Reverb
Reverberación de placa más grande. Pruébela con órganos, etc.
Simula una unidad de reverberación digital nueva extremadamente cara.
El ambiente claro de una sala embaldosada.
Estos programas ofrecen reflexiones iniciales propias. Pruébelos cuando desee
añadir el ambiente de cuarto a los tambores, percusión, guitarra, graves grabados en línea, piano eléctrico e instrumentos para solo.
Reverberación aplicada a un cambio de tono (±8 intervalo) para vocales o coros.
Plate
Reverberador Digital ProR3
Rev+Cho
A la reverberación se le aplican coros ligeramente. Pruébelo con guitarras y
teclados.
Uso básico –utilización de un programa de preajuste– 11
Nº
Nombre
Tipo
Descripción
Gate
61
ER Gate 1
ER
62
ER Gate 2
ER
63
ER for Kick
ER
64
Power Gate 1
ER
65
Power Gate 2
ER
66
Room Gate
ER
67
Gated Rev 1
Reverb
68
Gated Rev 2
Reverb
69
Reverse Gate 1
ER
70
Reverse Gate 2
ER
Estas son compuertas de reverberación sólo con reflexiones iniciales.
La compuerta ER Gate 1 es natural e incolora. ER Gate 2 es un poco metálica.
ER for Kick es para cuando quiera escuchar un tambor bajo de sonido fino.
Ajustar los parámetros de Liveness y RoomSize según se desee.
Como indican sus nombres, Power Gate 1 y Power Gate 2 sirven para cuando
desee que los tambores sobresalgan de verdad.
Estas son combinaciones estándar de reverberación y sonido de compuerta.
Comparables con los programas de compuerta consistiendo sólo en E.Ref, se
necesita de más ajustes para configurarlos a su canción, lo que también se traduce en un mayor control.
Este simula el efecto de reverberación de compuerta producido por una cinta con
movimiento hacia atrás, como los programas de Reverse Gate de REV7 y REV5.
Realice ajustes de manera que concuerden con el tempo de la canción.
Effect Reverb
71
Reverb Flange 1
Reverb
72
Reverb Flange 2
Rev→Flg
73
Reverb Flange 3
Rev→Flg
74
Reverb Flange 4
Rev→Flg
75
Dark Moon
Rev→Flg
76
Filter Flange
Rev→Flg
77
Super Long Decay
78
Slow Pan Reverb
Rev→Pan
Una reverberación bastante larga que gira lentamente.
79
Sub Aqua
Pit→Rev
Sonido de agua produciendo un gorgoteo cuando es aplicada al círculo de un
tambor. Cuando se aplica sobre cuerdas, produce un sonido parecido a la sierra.
80
Thud
Pit→Rev
81
Alien Attack
Pit→Rev
82
High Filter
Reverb
83
High Mid Filter
Reverb
84
Low Mid Filter
Reverb
85
Low Filter
Reverb
86
Chorus Reverb
Rev+Cho
87
Symphonic Rev 1
Rev+Sym
88
Symphonic Rev 2
Sym→Rev
89
Echo Reverb 1
Ech→Rev
90
Echo Reverb 2
Ech→Rev
Reverb
Reverb Flange 1 es natural. Reverb Flange 2 a 4 suenan progresivamente más
profundo y espectacular.
El efecto de un túnel extremadamente largo.
Convierte un instrumento acústico en uno de sintetizador. Produce un efecto
parecido a un auto-wah cuando se aplica a una guitarra.
Efecto de reverberación con una sensación de tono claro creado por un filtro
dinámico. Pruébelo con círculo de tambor, instrumentos de percusión y efectos
de sonido.
Este programa combina un efecto de coros y reverberación para crear espaciosidad y profundidad.
A multi-phase chorus combined symphonic effect and reverb creates spaciousness and depth, with a multi-phase chorus.
Reverberación aplicada a un eco de realimentación acústica estéreo de hasta
400 ms a derecha e izquierda.
Reverberador Digital ProR3
12 Usos más avanzados (1)
Usos más avanzados (1)
La función de paso
Cuando el usuario presiona la tecla BYPASS, el circuito cambia, dando salida directa al sonido de
entrada. Esta función ofrece una forma sencilla de comparar rápidamente el sonido procesado
por el programa de efectos con el sonido sin procesar. Cuando el sonido pasa directamente, el
indicador rojo se ilumina.
PRE
EFFECT
EQ
BYPASS
EFFECT
ON
Ecualizador de pre-efecto
Los controles PRE EFFECT EQ permiten realizar arreglos para el ecualizador de pre-efecto de
tres bandas. El usuario puede ajustar la frecuencia central y la ganancia para cada banda.
Frecuencia
Ganancia
LOW (bajo)
MID (medio)
HIGH (alto)
50 Hz a 700 Hz
350 Hz a 5 kHz
2 kHz a 20 kHz
±15 dB
±15 dB
±15 dB
1. Presione la tecla PRE EFFECT EQ ON para encender el ecualizador.
El indicador verde se enciende.
2. Seleccione una banda, y gire su perilla de control para ajustar la ganancia.
3. Gire el control FREQ (frecuencia) de la banda seleccionada.
Para escuchar el efecto del ecualizador, ajuste primero el nivel de ganancia de la banda seleccionada, y luego ajuste la frecuencia.
Los ajustes de control del ecualizador no están almacenados en la memoria del programa. Si se
enciende el ecualizador, sus ajustes afectarán a todos los programas.
Nota: Los controles del ecualizador de pre-efecto se encuentran ubicados en el circuito, después de los
medidores de nivel de entrada INPUT. Esto quiere decir que al ajustar los niveles de ganancia se deberá
proceder con cuidado, ya que incluso elevando demasiado la ganancia y produciéndose limitación, no se
indicará en los medidores.
Reverberador Digital ProR3
Usos más avanzados (1) 13
La función INFINITE
La función INFINITE le permite ajustar un tiempo de reverberación extremadamente largo. Es
efectiva cuando se utiliza al final de una canción, etc.
La tecla INFINITE se puede usar de las dos formas siguientes.
• Presione la tecla INFINITE y libérela inmediatamente.
El tiempo de reverberación es ajustado al máximo. Presione otra vez la tecla para que el
tiempo de reverberación vuelva al valor original.
• Mantenga presionada la tecla INFINITE.
El tiempo de reverberación se mantendrá al máximo hasta que libere la tecla. Cuando la libere,
el tiempo de reverberación volverá al valor original.
Nota: Para los programas cuyo efecto primario sea el de reflexión inicial (ER) y que tenga un parámetro RevTime, esta tecla no tendrá efecto.
Reverberador Digital ProR3
14 Usos más avanzados (2) –Funciones de edición–
Usos más avanzados (2) –Funciones de edición–
Los programas de preajuste son programas “ya hechos”. Por el contrario, los programas del
usuario pueden ser confeccionados según las necesidades de cada uno. Esta sección explica
cómo editar sus propios programas.
Cómo están organizados los programas
Cada uno de los programas del ProR3 consiste en dos partes principales; el efecto primario y los
secundarios.
De estos, el efecto primario puede seleccionarse de uno de los diez tipos siguientes, y dependerá
del tipo de programa que elija.
Tipo único:
Reverb, ER, Room Sim
Tipo compuesto: Rev+Ech, Rev+ER, Rev+Cho, Rev+Sym, Rev+Flg, Rev+pit, Rev+PAN
El “+” en tipos de efecto compuesto, como “Rev+Ech”, significa que estos
efectos aplican reverberación (Rev) y eco (Ech) simultáneamente. El usuario puede elegir el orden en el que desee aplicarlos; por ejemplo, que se
aplique primero la reverberación y luego el eco, o primero el eco y después la reverberación.
Los efectos secundarios son suplementarios, y son los cinco siguientes, que son los ofrecidos
para cada programa: DFL (filtro dinámico), COMP (compresor), EQ (ecualizador), GATE (compuerta) y LEVEL/BAL (nivel/equilibrio).
El efecto primario es el factor decisivo para la determinación del carácter del efecto global, y si se
conoce su tipo, se puede obtener una buena idea de cómo va a sonar el programa completo. Por
esta razón, cuando aparece el programa en el LCD, el tipo de efecto primario usado por el programa se muestra junto con el número de programa y nombre, y también aparece en la lista.
Titulo del programa
Número del programa
Tipo de efecto primario
Large Hall 1
RevTime =
Parámetro
Reverb
2.5s
Valor del parámetro
El ProR3 tiene teclas dedicadas por separado para llamar los parámetros de los efectos primario
y secundarios.
Efectos secundarios
Efecto primario
Reverb
ER
Room Sim
Rev+Ech
Rev+ER
Rev+Cho
Rev+Sym
Rev+Flg
Rev+Pit
Rev+PAN
MAIN
Reverberador Digital ProR3
DFL
FINE
COMP
EQ
EQ
GATE
EQ
ON
GATE
GATE
ON
LEVEL/
BAL
LEVEL/
BAL
Usos más avanzados (2) –Funciones de edición– 15
Procedimiento para la edición
1) Cómo seleccionar un programa
Consulte la lista de los programas de preajuste en la página 9 o la lista de “Preset Program List”
incluida, y seleccione el número del programa que desee editar.
Ahora, ya no se podrá cambiar el tipo de efecto primario, por lo tanto, elija con cuidado el tipo
que desee.
Tipo de efecto primario
Large Hall 1
RevTime =
Reverb
2.5s
2) Edición de parámetros
1. Presione la tecla que dé acceso al parámetro del programa que desee editar. Por
ejemplo, para editar los parámetros del efecto primario, presione la tecla MAIN o FINE.
Para editar los parámetros de GATE, presione la tecla GATE.
La página 18 y subsiguientes contienen listas de parámetros a los que se puede acceder con cada
tecla.
2. Presione la tecla repetidamente hasta que aparezca el parámetro que desea editar.
3. Utilice las teclas de CURSOR (√) (®) para mover el cursor hasta el parámetro que desee
editar.
4. Existen dos formas de fijar el valor de un parámetro.
• Presione la tecla INC o DEC para fijar el valor.
Si continúa presionando la tecla, el valor seguirá cambiando.
• Utilice las teclas numéricas y la tecla RECALL/ENTER para fijar el valor.
1 Utilice las teclas numéricas para introducir el valor, y los datos parpadearán. Si se equivoca, presione la tecla CANCEL y vuelva a introducir el valor usando las teclas numéricas.
2 Presione la tecla RECALL/ENTER para finalizar la fijación del valor.
5. Si presiona la tecla COMPARE, podrá comparar el sonido posterior a la edición del parámetro con el sonido que tenía el programa cuando lo llamó.
6. Si desea volver a editar el parámetro, vuelva al paso 3.
7. Si desea editar un nuevo parámetro en el mismo efecto, vuelva al paso 2.
8. Si desea editar un efecto diferente, consulte el paso 1.
Reverberador Digital ProR3
16 Usos más avanzados (2) –Funciones de edición–
3) Cómo introducir un título
El usuario puede introducir nombres de programa de hasta 16 caracteres para cada programa de
efecto que realice.
1. Presione la tecla OTHER.
El indicador rojo se ilumina. Cada vez que presione la tecla OTHER, alternarán la página de edición de título y dos hojas del parámetro del controlador.
Title Edit
[Dread Lurgi Verb]
2. Utilice las teclas de CURSOR (√) (®) para seleccionar la ubicación del carácter.
El cursor indicará la ubicación cuando se pueda seleccionar un carácter. Cada vez que presione
una tecla de CURSOR, el cursor se moverá a la ubicación del siguiente/previo carácter, y
“retorna” cuando llegue al final del título.
3. Presione la tecla INC o DEC para cambiar el carácter. También puede usar las teclas
numéricas para introducir números.
Si mantiene presionada la tecla INC o REC, el carácter seguirá cambiando. Los números 0 a 10,
un signo “–” (menos), y “.” (punto) se pueden introducir con las teclas numéricas.
4) Ajuste de los parámetros de control MIDI
El usuario puede especificar los parámetros que van a ser controlados vía MIDI, y la gama de
control. (ver página 35)
1. Presione la tecla OTHERS para acceder a la hoja de control MIDI.
Ctr1-1 Prm
RevTIM
Min
Max
0.0% 100.0
2. Utilice las teclas de CURSOR (√) (®) para seleccionar los parámetros.
3. Utilice las teclas INC y DEC para fijar los parámetros
Control 1 Prm
–
Selecciona el parámetro controlado por el controlador MIDI 1.
Control 1 Min
0,0–100,0%
Valor mínimo de la gama del controlador MIDI 1.
Control 1 Max
0,0–100,0%
Valor máximo de la gama del controlador MIDI 1.
Control 2 Prm
–
Selecciona el parámetro controlado por el controlador MIDI 2.
Control 2 Min
0,0–100,0%
Valor mínimo de la gama del controlador MIDI 2.
Control 2 Max
0,0–100,0%
Valor máximo de la gama del controlador MIDI 2.
Reverberador Digital ProR3
Usos más avanzados (2) –Funciones de edición– 17
5) Cómo salvar un programa
Se pueden guardar hasta un total de 90 programas cuyos parámetros ha editado el usuario como
programas USER.
1. Presione la tecla STORE.
El indicador PROGRAM parpadea, y aparecerá un mensaje preguntándole por la ubicación
donde lo desea guardar.
Circus Big Top
Reverb
Store from P01 to U01 ?
Si el área del programa USER está protegida (por ejemplo, Memory Protect está en ON), aparecerá el mensaje “MEMORY PROTECTED”.
Si se da el caso, apague la función de protección de memoria poniéndola en OFF, como se explica
en la página 33 antes de almacenar el programa.
2. La línea superior de la pantalla muestra el título del parámetro del programa que ya
ocupa el lugar donde desea almacenar.
Utilice las teclas INC/DEC o las teclas numéricas para seleccionar el lugar de almacenamiento.
Vocal Plate 2
Reverb
Store from P01 to U40 ?
Si utiliza las teclas numéricas para introducir un número que no esté comprendido entre 1 a 90,
aparecerá el mensaje “ NO PROGRAM No Type”. Presione la tecla CANCEL para volver a
la presentación previa.
**
**
3. Para almacenar el programa, presione la tecla STORE. Para cancelar, presione la tecla
CANCEL.
Low Mid Filter
Reverb
This Program is Stored
El mensaje “This Program is Stored” (este programa está almacenado) aparecerá un momento, y
luego aparecerá la presentación previa.
Si se introduce un número no comprendido entre 1 a 90 con las teclas numéricas, aparecerá el
mensaje “ Store Number Error ”. Presione la tecla CANCEL para volver a la presentación
anterior.
**
**
Reverberador Digital ProR3
18 Usos más avanzados (2) –Funciones de edición–
Parámetros del programa 1 (Efecto primario)
Reverberación (Reverb)
Tecla
Parámetro
Valor
Descripción
MAIN
RevTime
0.3 ~ 99.0 s
Tiempo de reverb de la reverberación primaria (el tiempo
necesario para la extinción de 60 dB a 1 kHz)
IniDelay
0.1 ~ 200.0 ms
Tiempo de retardo hasta que empieza la reverb primaria
HighRatio
X0.1 ~ X1.0
Tiempo de reverb de los componentes de alta frecuencia de
la reverb; relativo a RevTime
LowRatio
X0.1 ~ X2.4
Tiempo de reverb de los componentes de baja frecuencia de
la reverb; relativo a RevTime
Diffusion
0 ~ 10
Expansión del sonido de reverb
Reverb Type
*1
Tipo de tono de reverb
ER/REV Balance
0/100 ~ 100/0
Equilibrio de nivel entre la reflexión inicial y la reverb
ER/REV Delay
0.1 ~ 100.0 ms
La diferencia entre el comienzo de la reflexión inicial y el
comienzo de la reverb
Liveness
0 ~ 10
Características de la extinción de sonido de reflexión inicial;
0:sordo, 10:vivo
Density
0 ~ 100
Densidad de las reflexiones iniciales
HPF
Thru, 40 Hz ~ 1.0 kHz
Frecuencia de corte del filtro de paso alto
LPF
400 Hz ~ 20 kHz, Thru
Frecuencia de corte del filtro de paso bajo
Rev2 Time
X0.1 ~ X10.0
Tiempo de extinción de la reverb secundaria: relativa a la
reverb primaria
Rev2 Delay *2
0.0 ~ 100.0 ms
Diferencia de tiempo entre la reverb primaria y secundaria
Rev2 Level *2
0 ~ 100%
Nivel de reverb secundaria; relativa a la reverb primaria
Mod Freq
0.05 ~ 40.00 Hz
Frecuencia de la modulación de reverb
Mod Depth
0 ~ 100%
Profundidad de la modulación de reverb
Mod Delay
0.1 ~ 30 ms
Los valores cortos producen modulación en la gama alta, los
largos, en la baja
FINE
Parámetros comunes
Consultar “Parámetros comuness” en la página 27
*1 Small Hall, Large Hall, Vocal Plate, Perc.Plate, Spring, Echo Room, Strings, Snare, Reverb Flange
*2 Sólo cuando el modo de entrada es L-Mono, R-Mono o LR- Mix.
Reverberador Digital ProR3
Usos más avanzados (2) –Funciones de edición– 19
Reflexiones iniciales (ER)
Tecla
Parámetro
Valor
Descripción
MAIN
ER Type
*1
Tipo de simulación de reflexión inicial
IniDelay
0.1 ~ 200.0 ms
Tiempo de retardo hasta que se oyen las reflexiones iniciales
Liveness
0 ~ 10
Características de la extinción de sonido de reflexión inicial;
0:sordo, 10:vivo
RoomSize
0.1 ~ 25.0
Espaciamiento de reflexiones
Diffusion
0 ~ 10
Expansión de las reflexiones iniciales
FINE
ER Number
1 ~ 40
Número de reflexiones iniciales
FeedBack Delay
0.1 ~ 1000.0 ms
Tiempo de retardo de realimentación
FeedBack Gain
–99 ~ +99%
Cantidad de realimentación; “.” invierte la fase
FeedBack High
0.1 ~ 1.0
Cantidad de realimentación de gama alta; relativa a FeedBack Gain
Density
0 ~ 100
Densidad de las reflexiones
HPF
Thru, 40 Hz ~ 1.0 kHz
Frecuencia de corte del filtro de paso alto
LPF
400 Hz ~ 20 kHz, Thru
Frecuencia de corte del filtro de paso bajo
0 ~ 10
Nivel de modulación
Space Mod
Parámetros comunes
Consultar “Parámetros comuness” en la página 27
*1 Small hall, Large hall, Random, Reverse, Plate, Spring, User A, User B, User C, User D
Parámetro del usuario (User ER)
Hay cuatro bancos User ER; A-D.
Para cada banco se pueden especificar 40 reflexiones.
Para cada reflexión se pueden especificar el tiempo de retardo, nivel y giro.
Tecla
Parámetro
Valor
Descripción
FINE
A-01 Delay
0.1 ~ 1000.0 ms
Tiempo de retardo de la primera reflexión del banco A
A-01 Level
–100 ~ +100%
Nivel de la primera reflexión del banco A
A-01 Pan
L16 ~ R16
Posición de giro de la primera reflexión del banco A
•
•
•
D-40 Pan
Regresar al principio de FINE (ER Number)
Reverberador Digital ProR3
20 Usos más avanzados (2) –Funciones de edición–
Simulación de cuarto (RoomSim)
Tecla
Parámetro
Valor
Descripción
MAIN
RevTime
0.3 ~ 99.0 s
Tiempo de extinción de la reverb
IniDelay
0.1 ~ 200.0 ms
Tiempo de retardo hasta que se oye la reverb
Width
0.5 ~ 46.7 m
Simulación de anchura del cuarto
Height
0.5 ~ 46.7 m
Simulación de altura del cuarto
Depth
0.5 ~ 46.7 m
Simulación de largura del cuarto
Wall Vary
0 ~ 30
Simulación de la rugosidad de las paredes (lisa 0 --> rugosa
30)
Wall Vary Fine
–100 ~ +100
Ajuste fino de simulación de pared
Listening Position
Front, Center, Rear
Lugar de escucha en el cuarto
HighRatio
X0.1 ~ X1.0
Tiempo de extinción de los componentes de reverb de gama
alta; relativo a RevTime
LowRatio
X0.1 ~ X2.4
Tiempo de extinción de los componentes de reverb de gama
baja; relativo a RevTime
Diffusion
0 ~ 10
Expansión de reverb
Width Fine
–100 ~ +100
Ajuste fino de simulación de anchura
Height Fine
–100 ~ +100
Ajuste fino de simulación de altura
Depth Fine
–100 ~ +100
Ajuste fino de simulación de largura
Width Decay
RT X0.1 ~ 10.0
Tiempo de extinción del componente de anchura de reverb;
relativo a RevTime
Height Decay
RT X0.1 ~ 10.0
Tiempo de extinción del componente de altura de reverb;
relativo a RevTime
Depth Decay
RT X0.1 ~ 10.0
Tiempo de extinción del componente de largura de reverb;
relativo a RevTime
ER/REV Balance
0/100 ~ 100/0
Equilibrio de nivel de reflexiones iniciales y reverb
ER/REV Delay
0.1 ~ 100.0 ms
Diferencia de tiempo entre reflexiones iniciales y reverb
Density
0 ~ 100
Densidad de las reflexiones
HPF
Thru, 40 Hz ~ 1.0 kHz
Frecuencia de corte del filtro de paso alto
LPF
400 Hz ~ 20 kHz, Thru
Frecuencia de corte del filtro de paso bajo
0 ~ 10
Nivel de modulación
FINE
Space Mod
Parámetros comunes
Reverberador Digital ProR3
Consultar “Parámetros comuness” en la página 27
Usos más avanzados (2) –Funciones de edición– 21
Reverb + Eco (Rev + Ech)
Tecla
Parámetro
Valor
Descripción
MAIN
REV RevTime
0.3 ~ 99.0 s
REV IniDelay
0.1 ~ 200.0 ms
REV HighRatio
X0.1 ~ X1.0
REV LowRatio
X0.1 ~ X2.4
REV Diffusion
0 ~ 10
Consultar los ítemes “Reverberación” en la página 18
ECHO Lch Delay
0.1 ~ 400.0 ms
Tiempo de retardo del canal izquierdo
ECHO Rch Delay
0.1 ~ 400.0 ms
Tiempo de retardo del canal derecho
ECHO Lch FeedBack
–99 ~ +99%
Cantidad de realimentación del canal izquierdo
ECHO Rch FeedBack
–99 ~ +99%
Cantidad de realimentación del canal derecho
ECHO High Ratio
0.1 ~ 1.0
Cantidad de realimentación de gama alta
ECHO/REV Balance *1
0/100 ~ 100/0
Equilibrio de nivel de eco y reverb
REV Rev Mix *2
0 ~ 100%
Cantidad de reverb
REV Reverb Type
*3
Tipo de tono de reverb
REV Density
0 ~ 100
Densidad de reverb
REV HPF
Thru, 40 Hz ~ 1.0 kHz
Frecuencia de corte del filtro de paso alto de reverb
REV LPF
400 Hz ~ 20 kHz, Thru
Frecuencia de corte del filtro de paso bajo de reverb
FINE
REV Space Mod
0 ~ 10
Nivel de modulación de reverb
ECHO Lch IniDelay
0.1 ~ 400.0 ms
Tiempo hasta que aparece el eco en el canal izquierdo (L)
ECHO Rch IniDelay
0.1 ~ 400.0 ms
Tiempo hasta que aparece el eco en el canal derecho (R)
REV Patch
*4
Conexión de reverb y eco
Parámetros comunes
*1
*2
*3
*4
Consultar “Parámetros comuness” en la página 27
Sólo cuando REV Patch está en paralelo (Reverb + Echo)
Sólo cuando REV Patch está en serie (Reverb → Echo, Echo → Reverb)
Hall, Room, Vocal, Plate
Reverb + Echo, Echo → Reverb, Reverb → Echo
Reverberador Digital ProR3
22 Usos más avanzados (2) –Funciones de edición–
Reverb + Reflexiones iniciales (Rev + ER)
Tecla
Parámetro
Valor
Descripción
MAIN
REV RevTime
0.3 ~ 99.0 s
REV IniDelay
0.1 ~ 200.0 ms
REV HighRatio
X0.1 ~ X1.0
REV LowRatio
X0.1 ~ X2.4
REV Diffusion
0 ~ 10
ER Type
*1
ER IniDelay
0.1 ~ 100.0 ms
ER Liveness
0 ~ 10
ER RoomSize
0.1 ~ 25.0
ER Diffusion
0 ~ 10
Consultar los ítemes “Reverberación” en la página 18
Consultar los ítemes “Reflexión inicial” en la página 19
FINE
ER/REV Balance *2
0/100 ~ 100/0
Equilibrio de nivel de ER y reverb
REV Rev Mix *3
0 ~ 100%
Cantidad de reverb
REV Reverb Type
*4
Tipo de tono de reverb
REV Density
0 ~ 100
Densidad de reverb
REV HPF
Thru, 40 Hz ~ 1.0 kHz
Frecuencia de corte del filtro de paso alto de reverb
REV LPF
400 Hz ~ 20 kHz, Thru
Frecuencia de corte del filtro de paso bajo de reverb
REV Space Mod
0 ~ 10
Nivel de modulación de reverb
ER Number
1 ~ 14
Número de reflexiones iniciales
ER Density
0 ~ 100
Densidad de las reflexiones iniciales
ER HPF
Thru, 40 Hz ~ 1.0 kHz
Frecuencia de corte del filtro de paso alto de ER
ER LPF
400 Hz ~ 20 kHz, Thru
Frecuencia de corte del filtro de paso bajo de ER
REV Patch
*5
Conexión de reverb y ER
Parámetros comunes
*1
*2
*3
*4
*5
Consultar “Parámetros comuness” en la página 27
Small hall, Large hall, Random, Reverse, Plate, Strings
Sólo cuando REV Patch está en paralelo (Reverb + ER)
Sólo cuando REV Patch está en serie (Reverb → ER, ER → Reverb)
Hall, Room, Vocal, Plate
Reverb + E.Ref., E.Ref. → Reverb, Reverb → E.Ref.
Reverberador Digital ProR3
Usos más avanzados (2) –Funciones de edición– 23
Reverb + Coros (Rev + Cho)
Tecla
Parámetro
Valor
Descripción
MAIN
REV RevTime
0.3 ~ 99.0 s
REV IniDelay
0.1 ~ 200.0 ms
REV HighRatio
X0.1 ~ X1.0
REV LowRatio
X0.1 ~ X2.4
REV Diffusion
0 ~ 10
Consultar los ítemes “Reverberación” en la página 18
CHO Mod Freq
0.05 ~ 40.00 Hz
CHO DM Depth
0 ~ 100%
Frecuencia de modulación de coros
Profundidad de modulación del tiempo de retardo del coro
CHO AM Depth
0 ~ 100%
Profundidad de modulación de la amplitud del coro
CHO/REV Balance *1
0/100 ~ 100/0
Equilibrio de nivel del coro y reverb
REV Rev Mix *2
0 ~ 100%
Cantidad de reverb
REV Reverb Type
*3
Tipo de tono de reverb
REV Density
0 ~ 100
Densidad de reverb
REV HPF
Thru, 40 Hz ~ 1.0 kHz
Frecuencia de corte del filtro de paso alto de reverb
REV LPF
400 Hz ~ 20 kHz, Thru
Frecuencia de corte del filtro de paso bajo de reverb
REV Space Mod
0 ~ 10
Nivel de modulación de reverb
REV Patch
*4
Conexión de reverb y ER
FINE
Parámetros comunes
*1
*2
*3
*4
Consultar “Parámetros comuness” en la página 27
Sólo cuando REV Patch está en paralelo (Reverb + Chorus)
Sólo cuando REV Patch está en serie (Reverb → Chorus, Chorus → Reverb)
Hall, Room, Vocal, Plate
Reverb + Chorus, Chorus → Reverb, Reverb → Chorus
Reverberador Digital ProR3
24 Usos más avanzados (2) –Funciones de edición–
Reverb + Sinfónico (Rev + Sym)
Tecla
Parámetro
Valor
Descripción
MAIN
REV RevTime
0.3 ~ 99.0 s
REV IniDelay
0.1 ~ 200.0 ms
REV HighRatio
X0.1 ~ X1.0
REV LowRatio
X0.1 ~ X2.4
REV Diffusion
0 ~ 10
SYM Mod Freq
0.05 ~ 40.00 Hz
Frecuencia de modulación sinfónica
SYM Depth
0 ~ 100%
Profundidad de modulación sinfónica
SYM/REV Balance *1
0/100 ~ 100/0
Equilibrio de nivel de eco y sinfonía
REV Rev Mix *2
0 ~ 100%
Cantidad de reverb
REV Reverb Type
*3
Tipo de tono de reverb
REV Density
0 ~ 100
Densidad de reverb
REV HPF
Thru, 40 Hz ~ 1.0 kHz
Frecuencia de corte del filtro de paso alto de reverb
REV LPF
400 Hz ~ 20 kHz, Thru
Frecuencia de corte del filtro de paso bajo de reverb
REV Space Mod
0 ~ 10
Nivel de modulación de reverb
*4
Conexión de sinfonía y reverb
Consultar los ítemes “Reverberación” en la página 18
FINE
REV Patch
Parámetros comunes
*1
*2
*3
*4
Consultar “Parámetros comuness” en la página 27
Sólo cuando REV Patch está en paralelo (Reverb + Symphon)
Sólo cuando REV Patch está en serie (Reverb → Symphon, Symphon → Reverb)
Hall, Room, Vocal, Plate
Reverb + Symphon, Symphon → Reverb, Reverb → Symphon
Reverberador Digital ProR3
Usos más avanzados (2) –Funciones de edición– 25
Reverb + Rebordeador (Rev + Flg)
Tecla
Parámetro
Valor
Descripción
MAIN
REV RevTime
0.3 ~ 99.0 s
REV IniDelay
0.1 ~ 200.0 ms
REV HighRatio
X0.1 ~ X1.0
REV LowRatio
X0.1 ~ X2.4
REV Diffusion
0 ~ 10
Consultar los ítemes “Reverberación” en la página 18
FLA Mod Freq
0.05 ~ 40.00 Hz
Frecuencia de modulación del rebordeador
FLA Depth
0 ~ 100%
Profundidad de modulación del rebordeador
FLA Delay
0.1 ~ 100.0 ms
Los valores grandes producen modulación en la gama baja,
los pequeños, en la alta
FLA FeedBack Gain
0 ~ 100%
Cantidad de realimentación del rebordeador
FLA/REV Balance *1
0/100 ~ 100/0
Equilibrio de nivel de reverb y rebordeador
REV Rev Mix *2
0 ~ 100%
Cantidad de reverb
REV Reverb Type
*3
Tipo de tono de reverb
REV Density
0 ~ 100
Densidad de reverb
REV HPF
Thru, 40 Hz ~ 1.0 kHz
Frecuencia de corte del filtro de paso alto de reverb
REV LPF
400 Hz ~ 20 kHz, Thru
Frecuencia de corte del filtro de paso bajo de reverb
REV Space Mod
0 ~ 10
Nivel de modulación de reverb
*4
Conexión de rebordeador y reverb
FINE
REV Patch
Parámetros comunes
*1
*2
*3
*4
Consultar “Parámetros comuness” en la página 27
Sólo cuando REV Patch está en paralelo (Reverb + Flange)
Sólo cuando REV Patch está en serie (Reverb → Flange, Flange → Reverb)
Hall, Room, Vocal, Plate
Reverb + Flange, Flange → Reverb, Reverb → Flange
Reverberador Digital ProR3
26 Usos más avanzados (2) –Funciones de edición–
Reverb + Cambio de Tono (Rev + Pit)
Tecla
Parámetro
Valor
Descripción
MAIN
REV RevTime
0.3 ~ 99.0s
REV IniDelay
0.1 ~ 200.0 ms
REV HighRatio
X0.1 ~ X1.0
REV LowRatio
X0.1 ~ X2.4
REV Diffusion
0 ~ 10
PIT Pitch 1
↓Oct ~ ↑Oct
PIT Pitch 2
↓Oct ~ ↑Oct
Cantidad de cambio de tono 2
PIT Fine 1
–100 ~ +100 cent
Ajuste fino de cantidad de cambio de tono 1
PIT Fine 2
–100 ~ +100 cent
Ajuste fino de cantidad de cambio de tono 2
PIT Delay 1
0.1 ~ 300.0 ms
Tiempo de retardo de tono 1
PIT Delay 2
0.1 ~ 300.0 ms
Tiempo de retardo de tono 2
PIT Feedback 1
0 ~ 99%
Cantidad de realimentación de tono 1
PIT Feedback 2
0 ~ 99%
Cantidad de realimentación de tono 2
PIT Pan 1
L16 ~ R16
Posición de giro de tono 1
PIT Pan 2
L16 ~ R16
Posición de giro de tono 2
PIT/REV Balance *1
0/100 ~ 100/0
Equilibrio de nivel de reverb y cambio de tono
REV Rev Mix *2
0 ~ 100%
Cantidad de reverb
REV Reverb Type
*3
Tipo de tono de reverb
REV Density
0 ~ 100
Densidad de reverb
REV HPF
Thru, 40 Hz ~ 1.0 kHz
Frecuencia de corte del filtro de paso alto de reverb
REV LPF
400 Hz ~ 20 kHz, Thru
Frecuencia de corte del filtro de paso bajo de reverb
REV Space Mod
0 ~ 10
Nivel de modulación de reverb
PIT Pitch Balance
0 ~ 100%
Equilibrio del sonido directo y del sonido de tono cambiado
PIT Base Key
OFF, C1 ~ C6
*5
*4
Selección de combinación de efectos
Consultar los ítemes “Reverberación” en la página 18
Cantidad de cambio de tono 1
FINE
REV Patch
Parámetros comunes
*1
*2
*3
*4
*5
Consultar “Parámetros comuness” en la página 27
Sólo cuando REV Patch está en paralelo (Reverb + Pitch)
Sólo cuando REV Patch está en seriel (Reverb → Pitch, Pitch → Reverb)
Hall, Room, Vocal, Plate
Reverb + Pitch, Pitch → Reverb, Reverb → Pitch
Ajuste este parámetro cuando desee usar mensajes con nota de un teclado MIDI, etc. para controlar la diferencia de
tono entre el sonido de entrada y el sonido cambiado de tono.
La diferencia de tono entre el sonido de entrada y el sonido cambiado de tono vendrá determinado por la diferencia
de tono entre el Base Key (tono básico) especificado por este parámetro y la nota en el mensaje que se recibe. Por
ejemplo, Si Base Key está ajustado en C4, una nota entrante en el mensaje de C3 cambiará el tono un octavo hacia
abajo, y una nota entrante en el mensaje de D4 cambiará el tono un paso completo hacia arriba.
* La nota MIDI número 60 se considera C3.
* La gama del cambio de tono actual es ±1 octavo, de tal manera que incluso si la diferencia del tono especificado
excede 1 octavo, el cambio de tono resultante se mantendrá dentro de esta gama.
* Si Base Key es ajustado en OFF, la nota MIDI en los mensajes no controlará el tono.
* Cuando se utilice los mensajes con nota MIDI para controlar la cantidad de cambio de tono, el tono del último
mensaje con nota introducido no fijará el parámetro del tono.
Reverberador Digital ProR3
Usos más avanzados (2) –Funciones de edición– 27
Reverb + Giro automático (Rev + PAN)
Tecla
Parámetro
Valor
Descripción
MAIN
REV RevTime
0.3 ~ 99.0 s
REV IniDelay
0.1 ~ 200.0 ms
REV HighRatio
X0.1 ~ X1.0
REV LowRatio
X0.1 ~ X2.4
REV Diffusion
0 ~ 10
Consultar los ítemes “Reverberación” en la página 18
PAN Speed
0.05 ~ 40.00 Hz
Frecuencia de modulación de giro automático
PAN Depth
0 ~ 100%
Profundidad de modulación de giro automático
PAN Direction
L→R, L←R, L ↔R
Dirección del movimiento de giro
PAN/REV Balance *1
0/100 ~ 100/0
Equilibrio de nivel de reverb y giro automático
REV Rev Mix *2
0 ~ 100%
Cantidad de reverb
REV Reverb Type
*3
Tipo de tono de reverb
REV Density
0 ~ 100
Densidad de reverb
REV HPF
Thru, 40 Hz ~ 1.0 kHz
Frecuencia de corte del filtro de paso alto de reverb
REV LPF
400 Hz ~ 20 kHz, Thru
Frecuencia de corte del filtro de paso bajo de reverb
REV Space Mod
0 ~ 10
Nivel de modulación de reverb
REV Patch
*4
Conexión de giro automático y reverb
FINE
Parámetros comunes
*1
*2
*3
*4
Consultar “Parámetros comuness” en la página 27
Sólo cuando REV Patch está en paralelo (Reverb + PAN)
Sólo cuando REV Patch está en serie (Reverb → PAN, PAN → Reverb)
Hall, Room, Vocal, Plate
Reverb + PAN, PAN → Reverb, Reverb → PAN
Parámetros comuness
Tecla
Parámetro
Valor
Descripción
FINE
1stRef-1 Delay
0.1 ~ 200.0 ms
1stRef-1 Lvl
0 ~ 100%
Tiempo de retardo de reflexión 1
Nivel de reflexión 1
1stRef-1 Pan
L16 ~ R16
Posición de giro de reflexión 1
1stRef-2 Delay
0.1 ~ 200.0 ms
Tiempo de retardo de reflexión 2
1stRef-2 Lvl
0 ~ 100%
Nivel de reflexión 2
1stRef-2 Pan
L16 ~ R16
Posición de giro de reflexión 2
Input Mix *1
0 ~ 100%
Ajuste de mezcla estéreo
Continúa en DFL
*1
Sólo para el modo estéreo
Reverberador Digital ProR3
28 Usos más avanzados (2) –Funciones de edición–
Parámetros del programa 2 (Effectos secundarios)
Filtro dinámico (DFL)
Utilizando el filtro dinámico, el usuario puede crear efectos wah, en los que la respuesta de frecuencia es cambiada por el nivel de la señal de entrada.
Tecla
Parámetro
Valor
Descripción
FINE
DFL Dynamic Filter
OFF, ON
Encender/apagar el efecto DFL
DFL Filter Type
LPF, HPF, BPF
Selección del tipo de filtro
DFL Frq.Center
100 Hz ~ 3.2 kHz
Frecuencia central del filtro
DFL Resonance
0 ~ 20
Resonancia del filtro
DFL Shift
Up/Down
Dirección en la que cambiará la frecuencia central en respuesta al nivel de la señal de entrada
DFL Sens
1 ~ 10
Sensibilidad a la señal de entrada
DFL Decay
1 ~ 10
Velocidad a la que la frecuencia central retornará después
de cambiar
DFL Patch
PreREV, PostREV
Coloca el punto provisional del filtro antes o después de la
reverb
Continúa en COMP
Reverberador Digital ProR3
Usos más avanzados (2) –Funciones de edición– 29
Compresor (COMP)
El compresor se puede usar para comprimir los cambios de nivel en la señal de entrada, realzando su presencia incluso para las de bajo nivel.
En la última página de los parámetros del compresor se muestra la cantidad de reducción de
ganancia en forma de gráfico de barra, permitiendo ver la operación del compresor.
dB
0
Relación = 2:1
–10
Umbral = –20 dB
Nivel de salida
–20
–30
–40
Curva = Curva suave
–50
–60
–70
dB
–70
Tecla
Parámetro
–60
–50 –40 –30 –20
Nivel de entrada
–10
0
Valor
Descripción
FINE
COMP Compressor
OFF/ON
Encender/apagar el compresor
COMP Threshold Level
–54 ~ 0 dB
Nivel del umbral
COMP Output Level
–15 ~ +15 dB
Nivel de salida del compresor
COMP Ratio
1:1 ~ 00:1
Relación de compresión
COMP Knee
SoftKnee, Medium,
HardKnee
Forma de cambio de nivel del umbral
COMP Attack Time
0 ~ 500 ms
Tiempo de ataque
COMP Release Time
6 ~ 2400 ms
Tiempo de emisión
COMP GR
Bar graph
La cantidad de reducción de ganancia se muestra como gráfico de barra
Regresar al principio de FINE (sin embargo, si el efecto primario es ER (reflexión inicial), continuar con User ER)
Reverberador Digital ProR3
30 Usos más avanzados (2) –Funciones de edición–
Ecualizador (EQ)
Después del compresor hay un ecualizador paramétrico de tres bandas, que permite ajustar las
gamas de frecuencia baja, media y alta del sonido.
Tipo
LOW (bajo)
MID (medio)
HIGH (alto)
Agudización/Declinación
Agudización
Agudización/Declinación
±15 dB
±15 dB
±15 dB
32 Hz a 2,2 kHz
250 Hz a 5,6 kHz
500 Hz a 20 kHz
0,1 a 5,0
0,1 a 5,0
0,1 a 5,0
Ganancia
Frecuencia
Q
Tecla
Parámetro
Valor
Descripción
EQ
Low EQ Type
Peaking, Shelving
Low Gain
–15 ~ +15 dB
Selección de tipo de EQ para gama baja
Fija la ganancia de gama baja
Low Freq
32 Hz ~ 2.2 kHz
Ajusta la frecuencia de gama baja
Low Q *1
0.1 ~ 5.0
Fija el factor Q de gama baja
Mid Gain
–15 ~ +15 dB
Fija la ganancia gama media
Mid Freq
250 Hz ~ 5.6 kHz
Ajusta la frecuencia de gama media
Mid Q
0.1 ~ 5.0
Fija el factor Q de gama media
High EQ Type
Peaking, Shelving
Selecciona EQ para gama alta
High Gain
–15 ~ +15 dB
Fija la ganancia de gama alta
High Freq
500 Hz ~ 20 kHz
Ajusta la frecuencia de gama alta
High Q *1
0.1 ~ 5.0
Fija el factor Q de gama alta
OFF/ON
Apagado/encendido del ecualizador
EQ ON
POST EQ
*1 Cuando EQ Type está en Agudización
Reverberador Digital ProR3
Usos más avanzados (2) –Funciones de edición– 31
GATE (compuerta)
La compuerta le permite crear efectos de reverberación interrumpida.
La reverberación interrumpida es un efecto en el que el sonido de reverberación es cortado
durante su extinción detectando el nivel de la señal y abriendo y cerrando la compuerta.
dB
+20
+10
0
Nivel de salida
–10
–20
–30
–40
Umbral = –40 dB
–50
–60
–70
dB
–70
Tecla
–60
Parámetro
–50
–40 –30 –20 –10
Nivel de salida
Valor
0
+10
+20
Descripción
GATE
Threshold Level
–60 ~ 0 dB
Umbral
Trigger Delay
0.1 ~ 100 ms
Retardo hasta que funciona la compuerta
Hold Time
1 ~ 5759 ms
Tiempo que la compuerta permanece abierta desde el
momento de retención
Release time
6 ~ 24000 ms
Tiempo hasta que la compuerta se cierra desde el momento
de retención
MIDI Trigger
OFF/ON
Ajustes de control MIDI externo relacionados con la compuerta
Detect
at-GATE, Pre-REV
Punto en el que se detecta el nivel
GATE GR
Bar graph
La operación de abertura/cierre se muestra mediante un gráfico de barra
OFF/ON
Abertura/cierre de la compuerta
GATE ON
Gate
Reverberador Digital ProR3
32 Usos más avanzados (2) –Funciones de edición–
Nivel/equilibrio (LEVEL/BAL)
Aquí se puede fijar el nivel de salida.
También se puede ajustar el equilibrio entre el sonido directo y el sonido del efecto.
Tecla
GATE
BAL
LEVEL
GATE
BAL
LEVEL
Parámetro
Valor
BYPASS
Descripción
LEVEL/BAL
Effect Balance
0 ~ 100%
Relación de sonido de efecto y sonido directo
Output Level
–∞, –50 ~ +6 dB
Ajuste del nivel de salida
Reverberador Digital ProR3
Usos más avanzados (3) –Funciones de UTILITY– 33
Usos más avanzados (3) –Funciones de UTILITY–
Aquí se muestra cómo realizar ajustes para los parámetros del sistema, tales como protección de
la memoria, modo de entrada, y parámetros MIDI.
Ajustes para protección de la memoria
1. Presione la tecla UTILITY para acceder a la hoja de protección de la memoria.
Se ilumina el indicador rojo.
Memory Protect
ON
2. Presione la tecla INC o DEC para activar o desactivar el ajuste.
Esta función protege los datos de la memoria del programa del usuario (USER), evitando que
puedan ser sobreescritos accidentalmente.
ON: No se puede escribir
OFF: Se puede escribir
Ajuste del modo de entrada
El ProR3 tiene cuatro modos de entrada: Stereo, LR-Mix, R-Mono y L-Mono
1. Presione la tecla UTILITY para acceder a la página de modo de entrada.
2. Presione la tecla INC o DEC para seleccionar el modo de entrada.
Input Mode
LR-Mix
LR-Mix: Las señales de entrada derecha e izquierda serán mezcladas y procesadas. El sonido
con este efecto será de calidad superior al de Stereo.
Stereo:
Las señales de entrada derecha serán procesadas por separado, y la ubicación estéreo
del sonido de entrada se verá también reflejado en el sonido se efecto.
L-Mono: Sólo se procesa la señal de entrada izquierda, y la señal de desvío sale por el canal
izquierdo y derecho.
R-Mono: Sólo se procesa la señal de entrada derecha, y la señal de desvío sale por el canal
izquierdo y derecho.
Reverberador Digital ProR3
34 Usos más avanzados (3) –Funciones de UTILITY–
Ajuste del canal MIDI
Aquí se muestra como ajustar el canal MIDI de transmisión y recepción.
1. Presione la tecla UTILITY para acceder a la página de ajuste de canal MIDI.
MIDI Channel
OMNI
2. Presione la tecla INC o DEC para fijar el canal.
OMNI: Se recibirán todos los canales 1 a 16, y la transmisión ser hará por el canal 1.
1–16:
La transmisión y la recepción se harán por el canal especificado.
OFF:
Los datos MIDI no se transmitirán ni se recibirán.
Ajuste de la tabla de cambio de programa MIDI
El usuario puede hacer cambios en cada uno de los cuatro bancos de la tabla de cambio de programa MIDI del ProR3. Con los preajustes realizados en fábrica, los números 1–90 del programa
MIDI corresponden a los números 1–90 del programa del usuario (USER), y los números 91–128
del programa MIDI corresponden a los números 1–38 del programa de preajuste (PRESET).
1. Presione repetidamente la tecla UTILITY hasta que aparezca la hoja de la tabla de cambio de programa MIDI.
MIDI PGM Change Table
BANK:A PGM
1= ProR U01
2. Utilice las teclas de CURSOR (√) (®) para seleccionar un parámetro.
3. Presione la tecla INC o DEC para fijar el parámetro. También se pueden usar las teclas
numéricas para introducir directamente el número de programa MIDI.
BANK
A–D
Especifica el banco de cambio de programa
PGM
1–28
El número de programa MIDI
U01–U90, P01–P90
Este es el número de programa ProR3 que puede ser llamado cuando se
recibe el número de programa MIDI. U01–U90 y P01–P90 indican los números de programa USER y PRESET respectivamente.
Con un ajuste de ---, no se podrá llamar nada. *
ProR
---
*--- se puede introducir también con la tecla CANCEL.
Reverberador Digital ProR3
Usos más avanzados (3) –Funciones de UTILITY– 35
Transmisión de un conjunto volumétrico MIDI
El ProR3 permite transmitir cualquier tipo de datos como conjunto volumétrico; memoria,
memoria de programa (todos los programas o sólo los especificados), bancos, User ER, o sistema
de memoria.
1. Presione repetidamente la tecla UTILITY hasta que aparezca la hoja MIDI Bulk Out.
MIDI Bulk Out
All
Press ENTER
2. Utilice las teclas de CURSOR (√) (®) para seleccionar un parámetro.
3. Presione la tecla INC o DEC para seleccionar el valor.
All
Todos los datos (program, bank, UserER, system)
Program
U01–U90,
All
Los datos del programa USER especificado.
Si se selecciona All, se eligen los datos de todos los programas USER.
Bank
A–D,
All
Los datos de la tabla de cambio del programa Bank especificado.
Si se selecciona All, se eligen los datos de todos los datos Bank.
UserER
A–D,
All
Los datos de User ER especificados.
Si se selecciona All, se eligen todos los datos de User ER.
System
Ajustes de los datos del sistema hechos para las funciones de utilidad, tales
como modo de entrada, etc.
4. Presione la tecla RECALL/ENTER para ejecutar la transferencia del conjunto de datos.
Antes de comenzar la transferencia, asegúrese de que el dispositivo MIDI al que está conectado
el ProR3 está preparado para recibir un conjunto volumétrico de datos.
Asignación de controladores MIDI
Aquí se muestra la forma de asignar números de control MIDI a los dos controladores. El ProR3
puede responder a dos controladores, y para ello se provee una hoja de ajuste para cada uno de
los controladores.
1. Presione la tecla UTILITY repetidamente hasta que aparezca la hoja asignada al controlador.
Controller-1 Assign
OFF
2. Presione la tecla INC o DEC para especificar el número de control.
El parámetro seleccionado en “Ajuste de los parámetros de control MIDI” en la página 16 pueden ser controlados en tiempo real recibiendo el mensaje de cambio de control especificado.
Reverberador Digital ProR3
36 Mensajes de ERROR del ProR3
Inicialización del ProR3
Si desea reponer los ajustes de fábrica del ProR3, realice el procedimiento siguiente para inicializarlo.
1. Mantenga presionada la tecla STORE y presione el conmutador POWER para desconectar la alimentación.
En la pantalla aparecerá el siguiente mensaje: “Press [ENTER] to initialize ProR3” (presione
[ENTER] para inicializar el ProR3).
2. Presione la tecla RECALL/ENTER para ejecutar la inicialización.
Cualquier otra tecla cancelará el procedimiento.
Aviso: Cuando hace la inicialización, se borran todos los datos del usuario. Todos los
ajustes de los programas del usuario, tablas de cambio de programa y ajustes relacionados con el sistema vuelven a los ajustes por defecto de fábrica.
Antes de presionar la tecla RECALL/ENTER, confirme una vez más que de verdad desea ejecutar la inicialización.
Mensajes de ERROR del ProR3
“ Program Number Error ”
“
Data Error
”
*
*
******
******
“
Number Error
** Store
**” ”
“
MEMORY PROTECTED !
**
**
“
LOW BATTERY
Reverberador Digital ProR3
“
Se ha seleccionado un número superior a 90.
Error de datos general. Inicialice el ProR3 si fuera necesario.
Se ha seleccionado un número de programa superior a 90.
El comando de protección de memoria de la función UTILITY está en ON.
La pila interna está descargada. Lleve la unidad a un centro de servicio Yamaha para que le cambien la pila.
Especificaciones 37
Especificaciones
Características de audio
Entrada
Salida
Convertidores A/D y D/A
Memoria del programa
Control MIDI
Alimentación
Respuesta de frecuencia
20 Hz ~ 20 kHz, + 1,0 dB, –1,5 dB
Gama dinámica
110 dB (típica), no menos de 104 dB
Zumbido y ruido *1
menos de –80 dB *2
Distorsión
menos de 0,007% (1 kHz, nivel máx.)
Número de canales
2 (señal equilibrada)
Nivel nominal
+4 dB / –10 dB *2
Nivel máximo
+24 dB (con el conmutador de nivel a +4 dB) *2
Impedancia
20 kΩ
Número de canales
2 (señal equilibrada)
Nivel nominal
+4 dB / –10 dB *2
Nivel máximo
+24 dB (con el conmutador de nivel a +4 dB) *2
Impedancia
150 Ω
Convertidores A/D
20 bit lineales
Convertidores D/A
20 bit lineales
Frecuencia de muestreo
44,1 kHz
Programas de preajuste
1 ~ 90
Programas del usuario
1 ~ 90
Cambio de programa, cambio de control, conjunto volumétrico, Note ON, cambio de parámetro
Estados Unidos y Canadá
120 V CA, 60 Hz
General
230 V CA, 50 Hz
Consumo eléctrico
35 W
Dimensiones (an × prf × al)
480 × 398,5 × 89 mm
Peso
5,5 kg
Nivel INPUT
Controles
PRE EFFECT EQ - FREQ x 3 (LOW, MID, HIGH)
PRE EFFECT EQ - GAIN x 3 (LOW, MID, HIGH)
Botones
ON (PRE EFFECT EQ) *3, √ (botón CURSOR izq),
® (botón CURSOR der), INC (botón DATA)
DEC (botón DATA), COMPARE *3, MAIN *3, FINE *3, EQ *3, EQ ON *3,
GATE *3, GATE ON *3, LEVEL/BAL *3, OTHERS *3
Teclado numérico (incluye los botones “–” y “.”), PROGRAM *3, STORE,
CANCEL, RECALL/ENTER, INFINITE *3, UTILITY *3, BYPASS *3
Conmutador
POWER
Presentación
LCD de 24 caracteres × 2 líneas
Medidores de nivel LED-INPUT de 8 segmentos × 2
Número LED-PROGRAM de 7 segmentos
Indicadores de estado LED-Status de 6 segmentos
Indicadores LED en botón × 14
Conectores
INPUT L/R (XLR-3-31 × 2) y (tomas para audiófono de 1/4" × 2)
OUTPUT L/R (XLR-3-32 × 2) y (tomas para audiófono de 1/4" × 2)
MIDI - IN, OUT, THRU (5P DIN × 3)
Conmutadores
Conmutador de nivel (+4/–10) × 2
Panel frontal
Panel trasero
*1 El zumbido y ruido son medidos con un filtro de paso de banda equivalente a 20 Hz a 20 kHz con una atenuación dB/octava infinita.
*2 0 dB = 0,755 Vrms.
*3 LED sobre el botón
Reverberador Digital ProR3
38 Especificaciones
370
al: 89
22.3
prf: 398.5
Dimensiones
an: 480
Todas las especificaciones están sujetas a cambio sin previo aviso.
Diagramas en Bloques
95/10/18
Pre
Effect
EQ
L
DFL
COMP
EQ
GATE
L
LEVEL/
BAL
+4dB
INPUT L
L
+4dB
Selected
Effect
INPUT
MODE
INPUT
Pre
Effect
EQ
R
L
BYPASS
–10dB
–10dB
DFL
COMP
EQ
GATE
LEVEL/
BAL
OUTPUT
R
INPUT R
R
Reverberador Digital ProR3
R
YAMAHA
[Digital Reverberator]
Model: ProR3
MIDI Implementation Chart
Function...
Transmitted
Recognized
Date:11/1-1995
Version:1.0
Remarks
Basic
Channel
Default
Changed
Mode
Default
Messages
Altered
x
OMNI on/OMNI off
x
x
**************
x
Note
Number
: True voice
x
**************
0 - 127
x
Velocity
Note ON
Note OFF
x
x
x
x
After
Touch
Key’s
Ch’s
x
x
x
x
Pitch Bend
x
x
Control
Change
x
1 - 31
64 - 95
x
**************
0 - 127
*2
o
o
Bulk Dump
Prog
Change
: True #
System Exclusive
x
x
1-16, off
1-16, off
Common
: Song Pos
: Song Sel
: Tune
x
x
x
x
x
x
System
Real Time
: Clock
: Commands
x
x
x
x
Aux
Messages
: Local ON/OFF
: All Notes OFF
: Active Sense
: Reset
x
x
x
x
x
x
x
x
Notes
Memorized
Memorized
*1
*1 : Note ON/OFF is recognized only for pitch change and MIDI trigger.
*2 : For program 1 - 128, memory (preset #1 - #90, user #1 - #90) is selected.
o:Yes
x:No
VT83890 R1 1 IP
96 03 1000 AP Printed in Japan
YAMAHA CORPORATION
P.O.Box 1, Hamamatsu, Japan