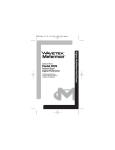
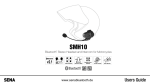
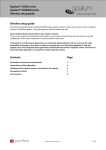
1
GB
F
VARIOUS OPERATING MODES
EXEMPLES DE MODES DE FONCTIONNEMENT
D
I
VERSCHIEDENE BETRIEBSARTEN
ESEMPI DI MODALITA' DI FUNZIONAMENTO
“K" type thermocouple
Thermocouple de type "K"
BLUE BLAU
BLEU BLU
BROWN BRAUN
MARRON MARRONE
+
-
„K"-Thermoelement
Termocoppia tipo "K"
GB Temperature
(with thermocouple) Connect a K-type thermocouple to the EL-2-IR via the
phono socket.
(internal) Short Link 3 to use the internal sensor or use a short circuited phono
plug.
F pH (avec électrode combinée)
Connectez la sonde à l'EL-2-IR via le support phono. Ouvrir Liaison 2.
REMARQUES: Il n'est pas nécessaire d'ouvrir la Liaison 2 si la sonde SENTEK
P14 est utilisée.
Température
(avec thermocouple) Connectez un thermocouple de type K à l'EL-2-IR via le
support phono.
(interne) Court-circuitez la liaison 3 pour utiliser le capteur interne ou utilisez
une fiche phono court-circuitée.
°
C
D pH-Wert (mit Kombinationselektrode)
Schließen Sie die Sonde über die Phonobuchse am EL-2-IR an. Öffnen Sie
Verbindung 2.
ANMERKUNGEN: Verbindung 2 muß nicht geöffnet werden, wenn die
SENTEK P14-Sonde benutzt wird.
D Temperatur
(mit Thermoelement) Schließen Sie ein K-Thermoelement mit einer
Phonobuchse an das EL-2-IR an.
(intern) Schließen Sie die Verbindung 3 KURZ, um den internen Fühler zu
benutzen, oder verwenden Sie einen kurzgeschlossenen Phonostecker.
I
pH (con elettrodo di combinazione)
Collegare la sonda all'apparecchio EL-2-IR mediante la presa phono. Aprire
il collegamento 2.
NOTA: Qualora venga utilizzata la sonda SENTEK P14, non è necessario aprire
il collegamento 2.
I
Temperatura
(con termocoppia) Collegare una termocoppia tipo "K" all'apparecchio EL-2IR tramite la presa phono.
(interna) Cortocircuitare il collegamento 3 per utilizzare il sensore interno
oppure utilizzare una spina phono cortocircuitata.
+
SENSOR
CAPTEUR
SENSOR
SENSORE
- 0-20V D.C.
GB
GB Voltage (0-2V/0-20V)
Connect the voltage to the EL-2-IR via the phono socket. Voltages exceeding
20V require an external potential divider network.
F
F Tension (0-2V/0-20V)
Connectez la tension à l'EL-2-IR via le support phono. Les tensions supérieures à
20V nécessitent un diviseur de tension externe.
Humidity
Connect a capacitive humidity to the EL-2-IR via the phono socket.
Sensor range - 200 to 300pF (Sensitivity - 0.5 to 1.0pF per %RH)
Humidité
Connectez un capteur d'humidité capacitif à l'EL-2-IR via le support phono.
Gamme du capteurÊ: 200 à 300pF (SensibilitéÊ: 0,5 à 1,0pF par % RH).
D
D
Spannung (0 2V/0 20V)
Schließen Sie die Spannung über die Phonobuchse an den EL-2-IR an.
Spannungen über 20V erfordern ein externes Potentialteilernetzwerk.
Feuchtigkeit
Schließen Sie einen Kapazitäts-Feuchtigkeitssensor mit einer Phonobuchse an
den EL-2-IR an.
Sensormeßbereich - 200 bis 300 pF. (Empfindlichkeit 0,5 bis 1pF pro % r.L.)
I
Tensione (0-2 V/0-20 V)
Collegare la tensione all'apparecchio EL-2-IR mediante la presa phono. Le
tensioni superiori a 20 V richiedono una rete esterna con partitore di tensione.
I
Umidità
Collegare un sensore di umidità capacitivo all'apparecchio EL-2-IR mediante
la presa phono.
Portata del sensore: da 200 a 300 pF (Sensibilità: da 0.5 a 1.0 pF per% U.R.)
+
1Ω
6watt
EL-2-IR
GB pH (with combination electrode)
Connect the probe to the EL-2-IR via the phono socket. Open link 2.
NOTE: There is no need to open Link 2 if the SENTEK P14 probe is used.
F
+
0-2A D.C.
0-5V
GB Current (0-2A)
Connect a 1R6 Watt resistor to the EL-2-IR via the phono socket. Select the 02V range in EL-WIN. Select "A" in Display Symbols.
GB Rate Count
Connect a 0-5V pulse to the EL-2-IR via the phono socket. The counter
increments on the falling edge.
F Courant (0-2A)
Connectez une résistance 1R6 Watt à l'EL-2-IR via le support phono.
Sélectionnez la gamme 0-2V dans l'EL-WIN. Sélectionnez «A» dans les
Symboles d'Affichage.
F Comptage de la vitesse
Connectez une pulsation 0-5V à l'EL-2-IR via le support phono. Le compteur
incrémente sur le front de descente.
D RATENZÄHLUNG
Schließen Sie einen Impuls von 0 -5V über die Phonobuchse am EL-2-IR an.
Das Zählwerk wird am an der abfallenden Rand Flanke inkrementiert.
Strom (0 -2A)
Schließen Sie einen 1R6 Watt Widerstand über die Phonobuchse am EL-2-IR
an. Wählen Sie den Spannungsbereich 0 2V in der EL-WIN-Software und „A"
unter Anzeigensymbolen aus.
I
I
Conteggio di frequenza
Collegare un impulso a 0-5 V all'apparecchio EL-2-IR mediante la presa phono.
Il contatore viene incrementato sul fronte cadente.
Corrente (0-2 A)
Collegare una resistenza da 1R6 W all'apparecchio EL-2-IR mediante la presa
phono. Selezionare la portata 0-2 V all'interno del software EL-WIN.
Selezionare "A" tra i simboli su display.
Specifications liable to change without prior warning
EL-2-IR
Issue 3
February/2000
M.C.
Applies to EL-2-IR
F
Spécifications peuvent changer sans préavis
EL-2-IR
Edition 3
février/2000
M.C.
Applique à EL-2-IR
D
Die technischen Daten können ohne vorherige Ankündigung geändert werden
EL-2-IR
Ausgabe 3
Februar/2000
M.C.
Gilt für EL-EL-2-IR
I
Specifiche soggette a variazione senza preavviso
EL-2-IR
Versione 3
Febbraio/2000
M.C.
Applicabile a EL-2-IR
8
EasyLog-2 with InfraRed
Communications
This datasheet should be read in conjunction with the EL-2 datasheet.
EasyLog-2 avec liaisons
Infrarouges
Cette fiche technique doit être lue en parallèle avec la fiche
technique de l'EL-2
EasyLog-2 mit
Infrarotkommunikation
Dieses Datenblatt muß zusammen mit dem Datenblatt EL-2 gelesen werden.
0
0V
D
GB
pH PROBE
SONDE pH
pH-SONDE
SONDA DI pH
EasyLog-2 con comunicazione
ad infrarossi
La presente scheda tecnica deve essere letta unitamente alla
scheda tecnica dell'apparecchio EL-2
LASCAR ELECTRONICS LIMITED,
MODULE HOUSE,
WHITEPARISH, SALISBURY,
WILTSHIRE SP5 2SJ UK
TEL: +44 (0)1794 884567
FAX: +44 (0)1794 884616
E-MAIL: [email protected]
LASCAR ELECTRONICS, INC.
PO BOX 8204,
SAVANNAH, GA 31412
TEL: +1 (912) 234 2048
FAX: +1 (912) 234 2049
E-MAIL: [email protected]
www.lascarelectronics.com
1
The EL-2-IR data logger enables both infra-red and/or RS-232 communication between the logger and the P.C.,
Psion Workabout and EL-HL. EL-2-IR is an easy method of measuring, displaying and recording temperature,
humidity, pH, voltage, current, etc., with a memory for 8064 readings and a battery life of up to 3 years**. EL-2-IR
can operate as a 'stand alone' logger or be permanently connected to a system. The EL-2-IR serial link is
addressable and up to 8 loggers can be connected to one serial port. The P.C. software operates under Windows
3.1 and does not require specialist skill to operate. Data output is in text format and can be easily integrated into
any popular spreadsheet. Graphical output is possible under EL-WIN. Consult the EasyLog software manual for
further details.
• RS232 and Infra-red Communications
• Uses IrDA Communication Standard
• Multi-function
• Ideal For Use In Hazardous Environments
• No Extra Software Needed
• Line-of-sight Communication
• Battery Powered
Cable communications
The RS232 cable will work as normal, regardless of whether the IR circuitry is on or not. However, attempting to use both the cable and the infra-red
simultaneously will result in communication errors.
At the PC
The EL-2-IR is designed to communicate with devices which have IrDA-compatible infra-red ports. If your computer doesn't have one of these,
Lascar's EasyLink-IR can be used to convert a normal serial port. Simply plug the EasyLink-IR into the 9-way serial port, point it in the right direction. If
you use a serial extension cable, ensure that it is a straight-through. Null modem and Lascar EasyLog cables will not work.
Operating Instructions
Step 1: Simply hold down the button for 2-3 seconds. The Actiwave symbol will flash once.
Step 2: Place the logger in line of sight of the IR port on your PC.
Step 3: That's it!
REAR VIEW of EL-2-IR
with back cover removed
+ LITHIUM -
BATTERY
SHORTED
OPEN
On-Board Link (Link 2)
Normally SHORTED
Cut to OPEN
Solder
Link 1
USING EXTERNAL SIGNALS
PIN FUNCTIONS
A1, A2, REF Output for test diagnostics. Do not use.
HA High Alarm output = V+ when alarmed.
SW 'Push to record event' input. Active low - operated by front switch, subject to Push-to-Start.
RS Reset input. Active low - operated by RESET switch. NOTE - logging will stop and restart at 0 time.
LA Low Alarm output = V+ when alarmed.
A+ Output = V+ when a reading is in progress.
V+ Battery positive.
DO NOT APPLY AN EXTERNAL SUPPLY VOLTAGE
V- Battery negative.
ACROSS THESE PINS WITH BATTERY IN PLACE.
Only connect outputs to high impedance inputs, otherwise performance will be affected and battery life drastically reduced.
BATTERY REPLACEMENT
Only use ½AA 3.6V lithium. The list below is not exhaustive. Check with supplier that the battery you are ordering is 'press fit' and is not fitted with
solder tags. Take care to connect correctly. DO NOT PRESS ON LCD WHEN INSERTING BATTERY.
Manufacturer's Order Code
n/a
n/a
1107 501 100
1551-02-210-000
WARNING: Handle lithium batteries carefully - observe warnings on battery casing.
Dispose of in accordance with local regulations.
LK3
LK2
EXEMPLES DE MODES DE FONCTIONNEMENT
Sélectionnez la gamme de mesure adéquate dans l'EL-WIN avant de connecter
un capteur ou d'appliquer une tension au module.
Recalibrez l'EL-2 via l'EL-WIN avant utilisation.
VUE ARRIERE DE L'EL-2-IR
SANS LE COUVERCLE ARRIERE
COURT-CIRCUITEE
OUVERTE
Liaison montée sur la carte (Liaison 2)
Normalement FERMEE
Couper pour OUVRIR
PILE AU
LITHIUM
-
Liaison à
Souder 1
SW
VHA
REF
A2
RS
V+
LA
A+
A1
LK3
RESET
LK2
Normalement OUVERTE
Souder pour FERMER
D
Batterielaufzeit
Die IR-Schaltung nimmt im abgestellten Zustand fast überhaupt keinen Strom auf. Wenn sie permanent abgestellt ist, hält die Batterie fast genauso
lang wie bei normalen EL-2. Im eingeschalteten Zustand steigt der Stromverbrauch stark an. Im eingeschalteten Zustand verkürzt sich die Laufzeit der
Batterie dramatisch. Wenn das jedoch keine Schwierigkeiten mit sich bringt (wie z.B. wenn Sie eine externe Stromversorgung verwenden), stellen Sie
die Lötverbindung 1 her, siehe Abbildung, wodurch die IR-Schaltung permanent eingeschaltet bleibt.
VERSCHIEDENE BETRIEBSARTEN
Wählen Sie den zutreffenden Meßbereich in EL-WIN, bevor Sie einen Sensor
anschließen oder das Modul unter Spannung stellen.
Kalibrieren Sie EL-2 neu über EL-WIN vor der erneuten Inbetriebnahme.
ANSICHT VON HINTEN AUF DEN
EL-2-IR mit abgenommener Abdeckung
+ LITHIUM -
BATTERIE
Steckverbindungen (Verbindungen 1 u. 3)
KURZGESCHLOSSEN
OFFEN
LP-Verbindung (Verbindung 2)
Normalerweise KURZGESCHLOSSEN
Zum ÖFFNEN durchtrennen
Lötverbindung 1
SW
VHA
REF
A2
RS
V+
LA
A+
A1
LK3
RESET
LK2
Normalerweise OFFEN Zum
KURZSCHLIESSEN zulöten
I
Autonomia della batteria
Qualora il circuito IR sia disattivato, i consumi di corrente ad esso relativi sono potenzialmente nulli. Per tale motivo, se il circuito è costantemente
disattivato, l'autonomia della batteria dell'apparecchio EL-2-IR risulterà praticamente identica a quella di un normale EL-2. Quando il circuito IR viene
attivato, i consumi di corrente aumentano sensibilmente. Se il circuito è costantemente attivo, l'autonomia della batteria risulterà notevolmente
ridotta. Tuttavia, se ciò non costituisce un problema (es. in caso di impiego di un'alimentazione esterna), la realizzazione del collegamento a saldare 1,
come illustrato nello schema, consente l'attivazione costante del circuito IR.
ESEMPI DI MODALITA' DI FUNZIONAMENTO
Selezionare la portata di misurazione corretta all'interno di EL-WIN prima di
collegare un sensore o di applicare una tensione al modulo.
Prima dell'uso, ricalibrare l'apparecchio EL-2 mediante il software EL-WIN.
VISTA POSTERIORE di EL-2-IR
con coperchio posteriore smontato
+ BATTERIA -
AL LITIO
Collegamenti ad innesto (collegamenti 1 e 3)
CORTOCIRCUITATO
APERTO
Collegamento integrato (collegamento 2)
Normalmente CHIUSO
Interrompere per APRIRE
Normalmente APERTO
Saldare per CHIUDERE
2
RS
V+
LA
A+
A1
F
Durée de vie des piles
Le circuit IR ne consomme pratiquement aucun courant lorsqu'il est désactivé. De ce fait, la durée de vie de la pile de l'EL-2-IR sera quasiment
identique à celle de l'EL-2 normal. Lorsque le circuit IR est activé, la consommation en courant augmente de manière sensible. S'il est activé en
permanence, la durée de vie de la pile sera considérablement réduite. Toutefois, si cela ne constitue pas un problème (si vous utilisez une
alimentation externe, p.ex.), le circuit IR pourra être activé en permanence en utilisant la liaison à souder de la façon indiquée sur le schéma.
Liaisons enfichables (Liaison 1 & 3)
For experienced EasyLog users
Pressing the button to turn on the IR circuitry will not affect the logger itself, e.g. if it's in push to start, or push to log mode. Conversely, a short press, say
for a push to log, will not affect the IR circuitry. The duration that the button is held down for determines what the press is intended for.
SW
VHA
REF
A2
RESET
Normally OPEN
Solder to SHORT
+
IR timeout
To maximise battery life, after no communications activity has occurred for about five minutes the IR circuitry will automatically shut down. If the
button is held down until the Actiwave flashes, the timeout period will be reset.
Part Number
ER 3S TC
LS3
SL-750/S
½AA/S
VARIOUS OPERATING MODES
Select the correct measurement range in EL-WIN before connecting a sensor
or applying a voltage to the module.
Re-calibrate the EL-2 via EL-WIN prior to use.
Pluggable Links (Links 1 & 3)
Communications area
Communications can take place at a distances from 0m (i.e."nose-to-nose") to 1m. The EL-2-IR and the IR port on the PC should be pointing at each
other. The IR beam spans about 30°, so the two devices do not have to be directly aligned, however there should be a clear line-of-sight between the
two.
Manufacturer
MAXELL
SAFT
SONNENSCHEIN
TADIRAN
GB Battery Life
The IR circuitry draws virtually zero current when it is turned off. Because of this, if it is permanently off, the battery life of the
EL-2-IR will be
practically the same as a normal EL-2. When the IR circuitry is turned on, current consumption dramatically increases. If it is permanently on, the
battery life will be drastically reduced. However, if this is not a problem (e.g. if using an external power supply) making solder link 1, as shown in the
diagram, will cause the IR circuitry to stay on all the time.
7
Collegamento
SW
VHA
REF
A2
RS
V+
LA
A+
A1
a saldare 1
RESET
LK3
LK2
Specification
GB
Temperature
('K' type thermocouple)
Temperature
(Internal)
Humidity
pH
Voltage
Current
Rate count
Frequency
Battery
Serial link
Sensor connection
Memory
Sample rate
Spécification
F
Température
(Thermocouple de type "K")
Température
(interne)
Humidité
pH
Tension
Courant
Comptage du débit
Fréquence
Batterie
Liaison série
Connexion du capteur
Capacité mémoire
Cadence d'enregistrement
Spezifikation
D
Temperatur
(K-Thermoelement)
Temperatur
(intern)
Feuchtigkeit
pH-Wert
Spannung
Strom
Zählrate
Frequenz
Batterie
Serielle Verbindung
Sensoranschluß
Speicher
Meßrate
Specifiche
Temperatura
(termocoppia tipo "K")
Temperatura
(interna)
Umidità
pH
I
Tensione
Corrente
Conteggio di frequenzaunità
Frequenza
Batteria
Collegamento seriale
Connessione sensore
Capacità di memoria
Frequenza di registrazione
Range
Resolution
Accuracy
-25 to +200°C
1°C
±1°C
-13 to +392 °F
1°F
±2°F
-10 to +50°C
1°C
±1°C
+14 to +122°F
1°F
±2°F
5 to 95% RH
1% RH
*
0 to 14pH
0.1pH*
±0.1pH*
0 to 2V D.C.
0.01V
±1%
0 to 20V D.C.
0.1V
0 to 2A
0.01A
±1%
0 to 255
1 unit
N/A
40 to 400Hz
N/A
±2Hz
3.6V ½AA lithium (up to 3 years life) **
8 Pin Mini DIN
Phono
Up to 8000 readings
1 sample per 5 seconds to 1 per 12 hours.
Plage
Résolution
Précision
-25 à +200°C
-13 à +392 °F
-10 à +50°C
+14 à +122°F
5 à 95% RH
0 à 14pH
0 à 2V D.C.
0 à 20V D.C.
0 à 2A
0 à 255
40 à 400Hz
1°C
1°F
1°C
1°F
1% RH
0,1pH*
0,01V
0,1V
0,01A
1 unité
N/A
±1°C
±2°F
±1°C
±2°F
*
±0,1pH*
±1%
±1%
N/A
±2Hz
3,6 V ½AA lithium (durée de vie jusqu'à 3 ans) **
Mini DIN 8 broches
Phono
Jusqu'à 8000 lectures
INFRARED COMMUNICATIONS
Specification
Min
Baud rate
Communication distance ➀
0
Communication cone
Current consumption
2
of IR circuitry (on)
Current consumption
of IR circuitry (off)
Note 1: Under normal lighting conditions.
Typ
Max
Unit
1/3.3
bps
m/ft
°
2.5
mA
9600
±15
2.3
µA
0.1
• Liaisons RS232 et Infrarouges
• Aucun Logiciel Supplémentaire Nécessaire
• Utilise la Norme de Communication IrDA
• Liaison en Visibilité Directe
• Multifonction
• Alimentation par batterie
• Idéal pour une Utilisation dans des Environnements Dangereux
* Sensor dependent.
** Battery life dependent on input mode and sample rate.
Zone de communication
La communication peut s'effectuer à une distance comprise entre 0 (c.-à-d. «de nez à nez») et 1 m. Le EL-2-IR et le port IR du PC doivent être en face
l'un de l'autre. Le faisceau IR a une envergure d'environ 30°. Par conséquent, les deux appareils n'ont pas besoin d'être directement alignés. Il devra
toutefois y avoir une visibilité directe entre les deux appareils.
LIAISONS INFRAROUGES
Spécification
Min
Typ
Max
Vitesse de Transmission
9600
Distance de Communication ➀
0
1/3,3
Cône de Communication
±15
Consommation en courant
2
2,3
2,5
du circuit IR (actif)
Consommation en courant
0,1
du circuit IR (inactif)
Note 1: Dans des conditions normales d'éclairage.
Unité
bps
m/ft
°
mA
µA
* Dépend du capteur
** Durée de vie de la batterie variable en fonction du mode
d'entrée et de la cadence d'échantillonnage.
De 1 échantillon toutes les 5 secondes à 1 toutes les 12 heures.
Bereich
Auflösung
Genauigkeit
-25 bis +200°C
-13 bis +392 °F
-10 bis +50°C
+14 bis +122°F
5 bis 95% r.L.
0 bis 14 pH
0 bis 2V DC
0 bis 20V D.C.
0 bis 2A
0 bis 255
40 bis 400Hz
1°C
1°F
1°C
1°F
1 % r.L.
0,1 pH*
0,01V
0,1V
0,01A
1 Einheit
Entfällt
±1°C
±2°F
±1°C
±2°F
*
±0,1 pH
±1%
±1%
Entfällt
±2Hz
3,6V ½ AA Lithium (Laufzeit von bis zu 3 Jahren) **
8 PIN-Mini-DIN
Phono
bis zu 8000 Messungen
1 Messung/5s bis 1 pro 12 Stunden
Portata
Risoluzione
Precisione
-25 a +200°C
-13 a +392 °F
-10 a +50°C
+14 a +122°F
5 a 95% U.R.
0 a 14pH
0 a 2V c.c.
0 a 20V c.c..
0 a 2A
0 a 255
40 a 400Hz
1°C
1°F
1°C
1°F
1% U.R.
0.1pH*
0.01V
0.1V
0.01A
1 unità
n.a.
±1°C
±2°F
±1°C
±2°F
*
±0.1pH*
±1%
±1%
n.a.
±2Hz
Al litio ½AA 3.6 V (con autonomia fino a 3 anni)**
Mini DIN a 8 pin
Phono
Fino a 8000 letture
Da 1 campione ogni 5 secondi a 1 campione ogni 12 ore
6
INFRAROTE KOMMUNIKATION
Spezifikation
Min
Baudrate
Kommunikationsentfernung ➀
0
Kommunikationskonus
Stromverbrauch
2
IR-Schaltung (Ein)
Stromverbrauch
IR-Schaltung (Aus)
Anmerkung 1: Bei normaler Beleuchtung.
Typ
Max
Einheit
1/3,3
B/s
m/ft
°
2,5
mA
9600
±15
2,3
µA
0,1
* Je nach Sensor
** Batterielaufzeit abhängig vom Eingangsbetrieb und von der
Meßrate.
COMUNICAZIONE AD INFRAROSSI
Specifiche
L'enregistreur de données EL-2-IR est capable de communiquer par liaisons infrarouges et/ou RS-232 avec un PC,
un Psion Workabout et un EH-HL. Il permet de mesurer, d'afficher et d'enregistrer facilement la température,
l'humidité, le pH, la tension, le courant, etc., et dispose d'une mémoire pour 8064 lectures et d'une autonomie
pouvant aller jusqu'à 3 ans**. Le EL-2-IR peut fonctionner comme enregistreur «autonome» ou être connecté en
permanence à un système. La liaison série de l'EL-2-IR est adressable et jusqu'à 8 enregistreurs peuvent être
connectés à un port série. Le logiciel PC fonctionne sous Windows 3.1 et ne demande pas de connaissances
particulières. La sortie des données se fait sous format texte et peut facilement s'intégrer dans les tableurs les plus
courants. La sortie graphique est possible sous EL-WIN. Pour plus de détails, consultez le manuel logiciel de
l'EasyLog.
Min
Typ
Baud rate
9600
Distanza di comunicazione ➀
0
Cono di comunicazione
±15
Consumi di corrente
2
2.3
del circuito IR (attivo)
Consumi di corrente
0.1
del circuito IR (disattivato)
Nota 1: In normali condizioni di illuminazione.
Max
U.M.
1/3.3
bps
m/piedi
°
2.5
mA
µA
* In funzione del sensore.
** L'autonomia della batteria dipende dalla modalità di ingresso
e dalla frequenza di campionamento.
Communication par câble
Le câble RS232 fonctionnera normalement, que le circuit IR soit activé ou non. Toutefois, le fait d'essayer d'utiliser simultanément le câble et
l'infrarouge entraînera des erreurs de communication.
Sur le PC
Le EL-2-IR a été conçu pour communiquer avec des appareils équipés de ports infrarouges compatibles IrDA. Si votre ordinateur n'en possède pas,
vous pouvez utiliser le EasyLink-IR de Lascar pour convertir un port série normal. Branchez simplement le EasyLink-IR dans le port série 9 directions et
tournez-le dans la bonne direction. Si vous utilisez un câble-prolongateur série, vérifiez qu'il est direct. Les câbles modem nul et Lascar EasyLog ne
fonctionneront pas.
Mode d'emploi
Etape 1: Maintenez simplement le bouton appuyé pendant 2 ou 3 secondes. Le symbole Actiwave clignote une fois.
Etape 2: Placez l'enregistreur en face du port IR de votre PC.
Etape 3: Voilà!
Arrêt automatique de l'IR
Pour optimiser la durée de vie des piles, le circuit IR se mettra automatiquement hors service si aucune communication n'est effectuée pendant
environ cinq minutes. Si le bouton est maintenu enfoncé jusqu'à ce que Actiwave clignote, la période d'arrêt automatique sera réinitialisée.
Pour les utilisateur expérimentés de l'EasyLog
Le fait d'appuyer sur le bouton pour activer le circuit IR n'affecte pas l'enregistreur en soi, p.ex. s'il est en mode «appuyer pour démarrer» ou «appuyer
pour enregistrer». Inversement, une brève pression pour un «appuyer pour enregistrer», par exemple, n'affectera pas le circuit IR. L'effet obtenu en
appuyant sur un bouton dépend de la durée pendant laquelle il est maintenu enfoncé.
UTILISATION DES SIGNES EXTERIEURS - FONCTIONS DES BROCHES
A1, A2, REF Sortie pour diagnostics de contrôle. Ne pas utiliser.
HA Sortie Alarme Haute = V+ en cas d'alarme.
SW Entrée "appuyer pour enregistrer événement". Activation basse puissance par le commutateur avant à poussoir. Appuyez pour
démarrer.
RS Entrée remise à zéro. Activation basse puissance par le commutateur REMISE A ZERO. REMARQUE: l'enregistrement est interrompu
et reprend au temps 0.
LA Sortie Alarme Basse = V+ en cas d'alarme.
A+ Sortie = V+ lorsqu'une lecture est en cours.
V+ Batterie positive.
NE PAS APPLIQUER DE TENSION D'ALIMENTATION EXTERIEURE
V- Batterie négative.
SUR CES BROCHES LORSQUE LA BATTERIE EST EN PLACE.
Connectez uniquement les sorties à des entrées à grande impédance, sans quoi les performances seront moindres et la durée de vie de la
batterie sera considérablement diminuée.
REMPLACEMENT DE LA BATTERIE
N'utiliser que des batteries à lithium ½AA 3,6 V. La liste ci-dessous n'est pas exhaustive. Vérifiez auprès du fabricant que la batterie commandée est
montée "par pression", sans lames à braser. Faites attention à connecter correctement la batterie. NE PAS POUSSER SUR LCD LORS DE
L'INSERTION DE LA BATTERIE.
FABRICANT
MAXELL
SAFT
SONNENSCHEIN
TADIRAN
NUMERO DE PIECE
ER 3S TC
LS3
SL-750/S
½AA/S
CODE COMMANDE FABRICANT
ne s'applique pas
ne s'applique pas
1107 501 100
1551-02-210-000
AVERTISSEMENT Manipulez les batteries au lithium avec précaution en tenant compte des avertissements
indiqués sur l’emballage. Conformez-vous à la réglementation locale pour la mise au rebut.
3
Der EL-2-IR Datenlogger dient der Kommunikation zwischen dem Logger und einem PC, einem Psion Workabout
oder EL-HL über ein infrarotes oder RS232-Interface. Der EL-2-IR dient dem Messen, Anzeigen und Aufzeichnen
von Temperatur, Feuchtigkeit, pH-Wert, Spannung, Strom etc. und beinhaltet einen Speicher für 8064 Messungen
sowie eine Batterie, die eine Laufzeit von bis zu 3 Jahren ** verspricht. Der EL-2-IR kann als allein stehender oder
integrierter Systemdatenlogger eingesetzt werden. Die serielle Verbindung des EL-2-IR kann adressiert werden. So
wird der Anschluß von bis zu acht Loggern an die serielle Buchse des Geräts möglich. Die PC-Software läuft unter
dem Windows 3.1 Betriebssystem und erfordert keine besonderen Fachkenntnisse. Daten werden als Text
ausgegeben und können ohne weiteres in die gängigsten Kalkulationstabellen eingelesen werden. Die grafische
Ausgabe erfolgt unter EL-WIN. Für weitere Einzelheiten beachten Sie bitte Ihre EasyLog-Softwareanleitung.
• RS232 und infrarote Kommunikation
• Benutzt den IrDA-Kommunikationsstandard
• Multifunktionell
• Es wird keine zusätzliche Software benötigt
• Ideal für gefährliche Umgebungen
• Kommunikation im Blickfeld
• Batteriebetrieb
Kommunikationsbereich
Die Kommunikation kann über eine Entfernung von 0 bis 1 m (und zwar einander zugewandt) zustande kommen. Die EL-2-IR- und die IR-Buchse des
PCs müssen aufeinander ausgerichtet sein. Der IR-Strahl breitet sich über einen Bereich von 30° aus, so daß beide Geräte nicht unbedingt genau
aufeinander abgestimmt sein müssen. Sie müssen aber im gegenseitigen Blickfeld stehen.
Kabelkommunikation
Das RS232-Kabel funktioniert auf normale Weise, egal ob die IR-Schaltung ein- oder ausgeschaltet ist. Ein Versuch, das Kabel und den Infrarotverkehr
gleichzeitig zu verwenden, führt jedoch zu Kommunikationsfehlern.
Am PC
Der EL-2-IR dient der Kommunikation mit Geräten, die mit einer IrDA-kompatiblen IR-Buchse ausgerüstet sind. Wenn Ihr Rechner keine solche
Buchse aufweist, kann das EasyLink-IR von Lascar zum Umrüsten der normalen Seriellbuchse benutzt werden. Stecken Sie einfach das EasyLink-IR in
die 9-Weg-Seriellbuchse, und richten Sie es entsprechend aus. Stellen Sie, wenn Sie ein serielles Verlängerungskabel verwenden sicher, daß es ein
Linearkabel ist. Nullmodem und EasyLog-Kabel von Lascar funktionieren hierbei nicht.
Bedienungsanleitungen
Schritt 1: Halten Sie einfach die Taste 2 3 Sekunden lang gedrückt. Dann blinkt das Actiwave-Symbol einmal.
Schritt 2: Positionieren Sie den Logger in Sichtweite der IR-Buchse an Ihrem PC.
Schritt 3: Das ist schon alles!
IR-Zeitsperre
Um die Laufzeit der Batterie zu maximieren, schaltet sich die IR-Schaltung automatisch ab, wenn es fünf Minuten lang zu keiner Aktivität gekommen
ist. Wenn die Taste so lange gedrückt gehalten wird, bis Actiwave blinkt, wird die Zeitsperre zurückgestellt.
Für erfahrene EasyLog-Benutzer
Das Drücken der Taste zum Einschalten der IR-Schaltung bleibt für den Logger selbst wirkungslos, d.h. im Drücken-zum-Starten- oder im Drückenzum-Aufzeichnungsbetrieb. Umgekehrt bleibt ein kurzes Drücken beispielsweise zum Drücken-zum-Aufzeichnen für die IR-Schaltung wirkungslos.
Die Dauer des Gedrückthaltens der Taste bestimmt den Zweck der Betätigung.
VERWENDUNG EXTERNER SIGNALE - PIN-FUNKTION
A1, A2, Ref. Ausgang für Testdiagnostik. Freilassen.
HA Ausgang Alarm hoch = V+ im Alarmzustand.
SW „SchiebenDrücken zum Aufzeichnen"-Eingang. Aktiv tief Aktivierung durch Frontschalter, abhängig von SchiebenDrücken-zum
Starten.
RS Rückstelleingang. Aktiv tief wird durch den RÜCKSTELL-Schalter aktiviert. ANMERKUNG Logging stoppt und startet wieder bei 0-Zeit.
LA Ausgang Alarm niedrig = V+ im Alarmzustand.
A+ Ausgang = V+, wenn gemessen wird.
V+ Batteriepluspol
BEI EINGELEGTER BATTERIE NIE EXTERNEN
V- Batterieminuspol
STROM AN DIESEN PIN ANSETZEN.
Ausgänge nur an Eingängen mit hoher Impedanz anschließen, sonst wird die Leistung beeinträchtigt und die Laufzeit der Batterie bedeutend
reduziert.
BATTERIEWECHSEL
Verwenden Sie nur ½ AA 3,6V Lithiumbatterien. Die nachfolgende Liste versteht sich nicht als exklusive. Prüfen Sie bei Ihrem Lieferanten, ob diese
Batterie eingepreßt werden kann und keine Lötnasen aufweist. Achten Sie auf die polrichtige Verbindung. DRÜCKEN SIE BEIM EINLEGEN DER
BATTERIE NICHT AUF DIE LCD.
Hersteller
MAXELL
SAFT
SONNENSCHEIN
TADIRIAN
Bestell-NR.
ER 35 TC
LS3
SL-750/S
½ AA/S
Hersteller-Bestellcode
Entfällt
Entfällt
1107 501 100
1551-02-210-000
WARNUNG: Behandeln Sie Lithiumbatterien mit Vorsicht. Achten Sie auf die Warnungen auf dem Batteriegehäuse.
Entsorgen Sie diese Batterien in Übereinstimmung mit einschlägigen lokalen Vorschriften.
4
Il registratore di dati EL-2-IR rende possibile la comunicazione ad infrarossi e/o tramite RS232 tra il registratore e un
PC, un Psion Workabout o un apparecchio EL-HL. L'apparecchio EL-2-IR consente di misurare, visualizzare e
registrare con estrema facilità valori di temperatura, umidità, pH, tensione, corrente, ecc. grazie ad una memoria
in grado di contenere 8064 letture e ad una batteria che presenta un'autonomia fino a 3 anni**. L'apparecchio EL2-IR può essere utilizzato come registratore "stand-alone" oppure come modulo costantemente collegato ad un
sistema. Il collegamento seriale di EL-2-IR è indirizzabile; in questo modo, è possibile collegare fino a 8 registratori
ad una sola porta seriale. Il software per PC funziona in ambiente Windows 3.1 e non richiede particolari
competenze per essere impiegato. L'uscita dei dati, disponibile in formato testo, può essere facilmente importata
nei fogli elettronici più comuni. La rappresentazione grafica può essere eseguita con il programma EL-WIN. Per
ulteriori informazioni consultare il manuale del software EasyLog.
• Comunicazione ad infrarossi e tramite RS232
• Impiego dello standard di comunicazione IrDA
• Multifunzione
• Ideale per l'utilizzo in ambienti pericolosi
• Non richiede ulteriori software
• Comunicazione a raggio visivo
• Alimentazione a batteria
Area di comunicazione
La comunicazione può avere luogo a distanze comprese tra 0 m (ossia "testa a testa") e 1 m. L'apparecchio EL-2-IR e la porta IR del PC devono essere
orientati l'uno verso l'altro. Il raggio IR presenta un cono di circa 30°, in modo che i due dispositivi non debbano essere direttamente allineati. Deve
comunque esservi un raggio visivo libero tra i due dispositivi.
Comunicazione tramite cavo
Il cavo RS232 funziona normalmente, indipendentemente dal fatto che il circuito IR sia attivo o meno. Tuttavia, qualora si tenti di impiegare
contemporaneamente il cavo e gli infrarossi, ne conseguiranno errori di comunicazione.
Sul PC
L'apparecchio EL-2-IR è stato progettato per comunicare con dispositivi dotati di porte ad infrarossi IrDA compatibili. Qualora il proprio computer ne
sia sprovvisto, è possibile utilizzare EasyLink-IR di Lascar per trasformare una normale porta seriale. A tale scopo, è sufficiente collegare EasyLink-IR
alla porta seriale a 9 vie ed orientarlo nella giusta direzione. Se viene impiegato un cavo di prolunga seriale, assicurarsi che sia del tipo "passante
diritto". I cavi EasyLog di Lascar o i cavi null modem non funzionano.
Istruzioni per l'uso
Fase 1: Tenere premuto il pulsante per 2-3 secondi. Il simbolo Actiwave lampeggerà una volta.
Fase 2: Posizionare il registratore sul raggio visivo della porta IR del PC.
Fase 3: Il sistema è pronto.
Timeout IR
Per ottimizzare l'autonomia della batteria, qualora non venga effettuata alcuna comunicazione per un tempo di circa 5 minuti, il circuito IR si disattiva
automaticamente. Se il pulsante viene tenuto premuto sino a quando Actiwave inizia a lampeggiare, l'intervallo di timeout viene resettato.
Per gli operatori esperti di EasyLog
La pressione del pulsante per l'attivazione del circuito IR non influisce sul registratore, che si trova, ad esempio, in modalità Push-to-Start (Premere per
avviare) o Push-to-Log (Premere per registrare). Al contrario, una breve pressione, ad esempio per attivare la modalità Push-to-Log, non influisce sul
circuito IR. La durata della pressione del pulsante ne determina la relativa funzione.
IMPIEGO DI SEGNALI ESTERNI - FUNZIONE DEI PIN
A1, A2, REF: per i test di diagnostica. Da non utilizzare.
HA: Uscita di allarme alto = V+ in presenza di allarme.
SW: Ingresso "Push to record event" (Premere per registrare evento). Attivo basso, azionato mediante l'interruttore anteriore, subordinato
a "Push-to-Start" (Premere per avviare).
RS: Ingresso di reset. Attivo basso, azionato mediante l'interruttore RESET. NOTA: La registrazione si interrompe e si avvia nuovamente al
tempo 0.
LA: Uscita di allarme basso = V+ in presenza di allarme.
A+: Uscita = V+ quando è in corso una lettura.
V+: Polo positivo della batteria.
NON APPLICARE UNA TENSIONE DI ALIMENTAZIONE ESTERNA
V-: Polo negativo della batteria.
A QUESTI PIN QUANDO LA BATTERIA E' INSTALLATA.
Collegare le uscite esclusivamente ad ingressi ad alta impedenza. In caso contrario, il rendimento ne risulterà alterato e l'autonomia della
batteria si ridurrà notevolmente.
SOSTITUZIONE DELLA BATTERIA
Utilizzare esclusivamente batterie al litio ½AA da 3.6 V. L'elenco riportato di seguito non è esaustivo. Verificare con il fornitore che la batteria
ordinata sia di tipo "press fit" e non debba essere montata con linguette a saldare. Prestare attenzione ad eseguire correttamente i collegamenti.
NON ESERCITARE PRESSIONE SUL DISPLAY LCD DURANTE L'INSERIMENTO DELLA BATTERIA.
Produttore
MAXELL
SAFT
SONNENSCHEIN
TADIRAN
N. Comp.
ER3STC
LS3
SL-750/S
½AA/S
Codice Ordinazione Produttore
non applicabile
non applicabile
1107 501 100
1551-02-210-000
AVVERTENZA: Le batterie al litio devono essere maneggiate con cautela, rispettando le avvertenze riportate sul contenitore.
Procedere allo smaltimento conformemente alle norme locali in vigore.
5
Specification
GB
Temperature
('K' type thermocouple)
Temperature
(Internal)
Humidity
pH
Voltage
Current
Rate count
Frequency
Battery
Serial link
Sensor connection
Memory
Sample rate
Spécification
F
Température
(Thermocouple de type "K")
Température
(interne)
Humidité
pH
Tension
Courant
Comptage du débit
Fréquence
Batterie
Liaison série
Connexion du capteur
Capacité mémoire
Cadence d'enregistrement
Spezifikation
D
Temperatur
(K-Thermoelement)
Temperatur
(intern)
Feuchtigkeit
pH-Wert
Spannung
Strom
Zählrate
Frequenz
Batterie
Serielle Verbindung
Sensoranschluß
Speicher
Meßrate
Specifiche
Temperatura
(termocoppia tipo "K")
Temperatura
(interna)
Umidità
pH
I
Tensione
Corrente
Conteggio di frequenzaunità
Frequenza
Batteria
Collegamento seriale
Connessione sensore
Capacità di memoria
Frequenza di registrazione
Range
Resolution
Accuracy
-25 to +200°C
1°C
±1°C
-13 to +392 °F
1°F
±2°F
-10 to +50°C
1°C
±1°C
+14 to +122°F
1°F
±2°F
5 to 95% RH
1% RH
*
0 to 14pH
0.1pH*
±0.1pH*
0 to 2V D.C.
0.01V
±1%
0 to 20V D.C.
0.1V
0 to 2A
0.01A
±1%
0 to 255
1 unit
N/A
40 to 400Hz
N/A
±2Hz
3.6V ½AA lithium (up to 3 years life) **
8 Pin Mini DIN
Phono
Up to 8000 readings
1 sample per 5 seconds to 1 per 12 hours.
Plage
Résolution
Précision
-25 à +200°C
-13 à +392 °F
-10 à +50°C
+14 à +122°F
5 à 95% RH
0 à 14pH
0 à 2V D.C.
0 à 20V D.C.
0 à 2A
0 à 255
40 à 400Hz
1°C
1°F
1°C
1°F
1% RH
0,1pH*
0,01V
0,1V
0,01A
1 unité
N/A
±1°C
±2°F
±1°C
±2°F
*
±0,1pH*
±1%
±1%
N/A
±2Hz
3,6 V ½AA lithium (durée de vie jusqu'à 3 ans) **
Mini DIN 8 broches
Phono
Jusqu'à 8000 lectures
INFRARED COMMUNICATIONS
Specification
Min
Baud rate
Communication distance ➀
0
Communication cone
Current consumption
2
of IR circuitry (on)
Current consumption
of IR circuitry (off)
Note 1: Under normal lighting conditions.
Typ
Max
Unit
1/3.3
bps
m/ft
°
2.5
mA
9600
±15
2.3
µA
0.1
• Liaisons RS232 et Infrarouges
• Aucun Logiciel Supplémentaire Nécessaire
• Utilise la Norme de Communication IrDA
• Liaison en Visibilité Directe
• Multifonction
• Alimentation par batterie
• Idéal pour une Utilisation dans des Environnements Dangereux
* Sensor dependent.
** Battery life dependent on input mode and sample rate.
Zone de communication
La communication peut s'effectuer à une distance comprise entre 0 (c.-à-d. «de nez à nez») et 1 m. Le EL-2-IR et le port IR du PC doivent être en face
l'un de l'autre. Le faisceau IR a une envergure d'environ 30°. Par conséquent, les deux appareils n'ont pas besoin d'être directement alignés. Il devra
toutefois y avoir une visibilité directe entre les deux appareils.
LIAISONS INFRAROUGES
Spécification
Min
Typ
Max
Vitesse de Transmission
9600
Distance de Communication ➀
0
1/3,3
Cône de Communication
±15
Consommation en courant
2
2,3
2,5
du circuit IR (actif)
Consommation en courant
0,1
du circuit IR (inactif)
Note 1: Dans des conditions normales d'éclairage.
Unité
bps
m/ft
°
mA
µA
* Dépend du capteur
** Durée de vie de la batterie variable en fonction du mode
d'entrée et de la cadence d'échantillonnage.
De 1 échantillon toutes les 5 secondes à 1 toutes les 12 heures.
Bereich
Auflösung
Genauigkeit
-25 bis +200°C
-13 bis +392 °F
-10 bis +50°C
+14 bis +122°F
5 bis 95% r.L.
0 bis 14 pH
0 bis 2V DC
0 bis 20V D.C.
0 bis 2A
0 bis 255
40 bis 400Hz
1°C
1°F
1°C
1°F
1 % r.L.
0,1 pH*
0,01V
0,1V
0,01A
1 Einheit
Entfällt
±1°C
±2°F
±1°C
±2°F
*
±0,1 pH
±1%
±1%
Entfällt
±2Hz
3,6V ½ AA Lithium (Laufzeit von bis zu 3 Jahren) **
8 PIN-Mini-DIN
Phono
bis zu 8000 Messungen
1 Messung/5s bis 1 pro 12 Stunden
Portata
Risoluzione
Precisione
-25 a +200°C
-13 a +392 °F
-10 a +50°C
+14 a +122°F
5 a 95% U.R.
0 a 14pH
0 a 2V c.c.
0 a 20V c.c..
0 a 2A
0 a 255
40 a 400Hz
1°C
1°F
1°C
1°F
1% U.R.
0.1pH*
0.01V
0.1V
0.01A
1 unità
n.a.
±1°C
±2°F
±1°C
±2°F
*
±0.1pH*
±1%
±1%
n.a.
±2Hz
Al litio ½AA 3.6 V (con autonomia fino a 3 anni)**
Mini DIN a 8 pin
Phono
Fino a 8000 letture
Da 1 campione ogni 5 secondi a 1 campione ogni 12 ore
6
INFRAROTE KOMMUNIKATION
Spezifikation
Min
Baudrate
Kommunikationsentfernung ➀
0
Kommunikationskonus
Stromverbrauch
2
IR-Schaltung (Ein)
Stromverbrauch
IR-Schaltung (Aus)
Anmerkung 1: Bei normaler Beleuchtung.
Typ
Max
Einheit
1/3,3
B/s
m/ft
°
2,5
mA
9600
±15
2,3
µA
0,1
* Je nach Sensor
** Batterielaufzeit abhängig vom Eingangsbetrieb und von der
Meßrate.
COMUNICAZIONE AD INFRAROSSI
Specifiche
L'enregistreur de données EL-2-IR est capable de communiquer par liaisons infrarouges et/ou RS-232 avec un PC,
un Psion Workabout et un EH-HL. Il permet de mesurer, d'afficher et d'enregistrer facilement la température,
l'humidité, le pH, la tension, le courant, etc., et dispose d'une mémoire pour 8064 lectures et d'une autonomie
pouvant aller jusqu'à 3 ans**. Le EL-2-IR peut fonctionner comme enregistreur «autonome» ou être connecté en
permanence à un système. La liaison série de l'EL-2-IR est adressable et jusqu'à 8 enregistreurs peuvent être
connectés à un port série. Le logiciel PC fonctionne sous Windows 3.1 et ne demande pas de connaissances
particulières. La sortie des données se fait sous format texte et peut facilement s'intégrer dans les tableurs les plus
courants. La sortie graphique est possible sous EL-WIN. Pour plus de détails, consultez le manuel logiciel de
l'EasyLog.
Min
Typ
Baud rate
9600
Distanza di comunicazione ➀
0
Cono di comunicazione
±15
Consumi di corrente
2
2.3
del circuito IR (attivo)
Consumi di corrente
0.1
del circuito IR (disattivato)
Nota 1: In normali condizioni di illuminazione.
Max
U.M.
1/3.3
bps
m/piedi
°
2.5
mA
µA
* In funzione del sensore.
** L'autonomia della batteria dipende dalla modalità di ingresso
e dalla frequenza di campionamento.
Communication par câble
Le câble RS232 fonctionnera normalement, que le circuit IR soit activé ou non. Toutefois, le fait d'essayer d'utiliser simultanément le câble et
l'infrarouge entraînera des erreurs de communication.
Sur le PC
Le EL-2-IR a été conçu pour communiquer avec des appareils équipés de ports infrarouges compatibles IrDA. Si votre ordinateur n'en possède pas,
vous pouvez utiliser le EasyLink-IR de Lascar pour convertir un port série normal. Branchez simplement le EasyLink-IR dans le port série 9 directions et
tournez-le dans la bonne direction. Si vous utilisez un câble-prolongateur série, vérifiez qu'il est direct. Les câbles modem nul et Lascar EasyLog ne
fonctionneront pas.
Mode d'emploi
Etape 1: Maintenez simplement le bouton appuyé pendant 2 ou 3 secondes. Le symbole Actiwave clignote une fois.
Etape 2: Placez l'enregistreur en face du port IR de votre PC.
Etape 3: Voilà!
Arrêt automatique de l'IR
Pour optimiser la durée de vie des piles, le circuit IR se mettra automatiquement hors service si aucune communication n'est effectuée pendant
environ cinq minutes. Si le bouton est maintenu enfoncé jusqu'à ce que Actiwave clignote, la période d'arrêt automatique sera réinitialisée.
Pour les utilisateur expérimentés de l'EasyLog
Le fait d'appuyer sur le bouton pour activer le circuit IR n'affecte pas l'enregistreur en soi, p.ex. s'il est en mode «appuyer pour démarrer» ou «appuyer
pour enregistrer». Inversement, une brève pression pour un «appuyer pour enregistrer», par exemple, n'affectera pas le circuit IR. L'effet obtenu en
appuyant sur un bouton dépend de la durée pendant laquelle il est maintenu enfoncé.
UTILISATION DES SIGNES EXTERIEURS - FONCTIONS DES BROCHES
A1, A2, REF Sortie pour diagnostics de contrôle. Ne pas utiliser.
HA Sortie Alarme Haute = V+ en cas d'alarme.
SW Entrée "appuyer pour enregistrer événement". Activation basse puissance par le commutateur avant à poussoir. Appuyez pour
démarrer.
RS Entrée remise à zéro. Activation basse puissance par le commutateur REMISE A ZERO. REMARQUE: l'enregistrement est interrompu
et reprend au temps 0.
LA Sortie Alarme Basse = V+ en cas d'alarme.
A+ Sortie = V+ lorsqu'une lecture est en cours.
V+ Batterie positive.
NE PAS APPLIQUER DE TENSION D'ALIMENTATION EXTERIEURE
V- Batterie négative.
SUR CES BROCHES LORSQUE LA BATTERIE EST EN PLACE.
Connectez uniquement les sorties à des entrées à grande impédance, sans quoi les performances seront moindres et la durée de vie de la
batterie sera considérablement diminuée.
REMPLACEMENT DE LA BATTERIE
N'utiliser que des batteries à lithium ½AA 3,6 V. La liste ci-dessous n'est pas exhaustive. Vérifiez auprès du fabricant que la batterie commandée est
montée "par pression", sans lames à braser. Faites attention à connecter correctement la batterie. NE PAS POUSSER SUR LCD LORS DE
L'INSERTION DE LA BATTERIE.
FABRICANT
MAXELL
SAFT
SONNENSCHEIN
TADIRAN
NUMERO DE PIECE
ER 3S TC
LS3
SL-750/S
½AA/S
CODE COMMANDE FABRICANT
ne s'applique pas
ne s'applique pas
1107 501 100
1551-02-210-000
AVERTISSEMENT Manipulez les batteries au lithium avec précaution en tenant compte des avertissements
indiqués sur l’emballage. Conformez-vous à la réglementation locale pour la mise au rebut.
3
The EL-2-IR data logger enables both infra-red and/or RS-232 communication between the logger and the P.C.,
Psion Workabout and EL-HL. EL-2-IR is an easy method of measuring, displaying and recording temperature,
humidity, pH, voltage, current, etc., with a memory for 8064 readings and a battery life of up to 3 years**. EL-2-IR
can operate as a 'stand alone' logger or be permanently connected to a system. The EL-2-IR serial link is
addressable and up to 8 loggers can be connected to one serial port. The P.C. software operates under Windows
3.1 and does not require specialist skill to operate. Data output is in text format and can be easily integrated into
any popular spreadsheet. Graphical output is possible under EL-WIN. Consult the EasyLog software manual for
further details.
• RS232 and Infra-red Communications
• Uses IrDA Communication Standard
• Multi-function
• Ideal For Use In Hazardous Environments
• No Extra Software Needed
• Line-of-sight Communication
• Battery Powered
Cable communications
The RS232 cable will work as normal, regardless of whether the IR circuitry is on or not. However, attempting to use both the cable and the infra-red
simultaneously will result in communication errors.
At the PC
The EL-2-IR is designed to communicate with devices which have IrDA-compatible infra-red ports. If your computer doesn't have one of these,
Lascar's EasyLink-IR can be used to convert a normal serial port. Simply plug the EasyLink-IR into the 9-way serial port, point it in the right direction. If
you use a serial extension cable, ensure that it is a straight-through. Null modem and Lascar EasyLog cables will not work.
Operating Instructions
Step 1: Simply hold down the button for 2-3 seconds. The Actiwave symbol will flash once.
Step 2: Place the logger in line of sight of the IR port on your PC.
Step 3: That's it!
REAR VIEW of EL-2-IR
with back cover removed
+ LITHIUM -
BATTERY
SHORTED
OPEN
On-Board Link (Link 2)
Normally SHORTED
Cut to OPEN
Solder
Link 1
USING EXTERNAL SIGNALS
PIN FUNCTIONS
A1, A2, REF Output for test diagnostics. Do not use.
HA High Alarm output = V+ when alarmed.
SW 'Push to record event' input. Active low - operated by front switch, subject to Push-to-Start.
RS Reset input. Active low - operated by RESET switch. NOTE - logging will stop and restart at 0 time.
LA Low Alarm output = V+ when alarmed.
A+ Output = V+ when a reading is in progress.
V+ Battery positive.
DO NOT APPLY AN EXTERNAL SUPPLY VOLTAGE
V- Battery negative.
ACROSS THESE PINS WITH BATTERY IN PLACE.
Only connect outputs to high impedance inputs, otherwise performance will be affected and battery life drastically reduced.
BATTERY REPLACEMENT
Only use ½AA 3.6V lithium. The list below is not exhaustive. Check with supplier that the battery you are ordering is 'press fit' and is not fitted with
solder tags. Take care to connect correctly. DO NOT PRESS ON LCD WHEN INSERTING BATTERY.
Manufacturer's Order Code
n/a
n/a
1107 501 100
1551-02-210-000
WARNING: Handle lithium batteries carefully - observe warnings on battery casing.
Dispose of in accordance with local regulations.
LK3
LK2
EXEMPLES DE MODES DE FONCTIONNEMENT
Sélectionnez la gamme de mesure adéquate dans l'EL-WIN avant de connecter
un capteur ou d'appliquer une tension au module.
Recalibrez l'EL-2 via l'EL-WIN avant utilisation.
VUE ARRIERE DE L'EL-2-IR
SANS LE COUVERCLE ARRIERE
COURT-CIRCUITEE
OUVERTE
Liaison montée sur la carte (Liaison 2)
Normalement FERMEE
Couper pour OUVRIR
PILE AU
LITHIUM
-
Liaison à
Souder 1
SW
VHA
REF
A2
RS
V+
LA
A+
A1
LK3
RESET
LK2
Normalement OUVERTE
Souder pour FERMER
D
Batterielaufzeit
Die IR-Schaltung nimmt im abgestellten Zustand fast überhaupt keinen Strom auf. Wenn sie permanent abgestellt ist, hält die Batterie fast genauso
lang wie bei normalen EL-2. Im eingeschalteten Zustand steigt der Stromverbrauch stark an. Im eingeschalteten Zustand verkürzt sich die Laufzeit der
Batterie dramatisch. Wenn das jedoch keine Schwierigkeiten mit sich bringt (wie z.B. wenn Sie eine externe Stromversorgung verwenden), stellen Sie
die Lötverbindung 1 her, siehe Abbildung, wodurch die IR-Schaltung permanent eingeschaltet bleibt.
VERSCHIEDENE BETRIEBSARTEN
Wählen Sie den zutreffenden Meßbereich in EL-WIN, bevor Sie einen Sensor
anschließen oder das Modul unter Spannung stellen.
Kalibrieren Sie EL-2 neu über EL-WIN vor der erneuten Inbetriebnahme.
ANSICHT VON HINTEN AUF DEN
EL-2-IR mit abgenommener Abdeckung
+ LITHIUM -
BATTERIE
Steckverbindungen (Verbindungen 1 u. 3)
KURZGESCHLOSSEN
OFFEN
LP-Verbindung (Verbindung 2)
Normalerweise KURZGESCHLOSSEN
Zum ÖFFNEN durchtrennen
Lötverbindung 1
SW
VHA
REF
A2
RS
V+
LA
A+
A1
LK3
RESET
LK2
Normalerweise OFFEN Zum
KURZSCHLIESSEN zulöten
I
Autonomia della batteria
Qualora il circuito IR sia disattivato, i consumi di corrente ad esso relativi sono potenzialmente nulli. Per tale motivo, se il circuito è costantemente
disattivato, l'autonomia della batteria dell'apparecchio EL-2-IR risulterà praticamente identica a quella di un normale EL-2. Quando il circuito IR viene
attivato, i consumi di corrente aumentano sensibilmente. Se il circuito è costantemente attivo, l'autonomia della batteria risulterà notevolmente
ridotta. Tuttavia, se ciò non costituisce un problema (es. in caso di impiego di un'alimentazione esterna), la realizzazione del collegamento a saldare 1,
come illustrato nello schema, consente l'attivazione costante del circuito IR.
ESEMPI DI MODALITA' DI FUNZIONAMENTO
Selezionare la portata di misurazione corretta all'interno di EL-WIN prima di
collegare un sensore o di applicare una tensione al modulo.
Prima dell'uso, ricalibrare l'apparecchio EL-2 mediante il software EL-WIN.
VISTA POSTERIORE di EL-2-IR
con coperchio posteriore smontato
+ BATTERIA -
AL LITIO
Collegamenti ad innesto (collegamenti 1 e 3)
CORTOCIRCUITATO
APERTO
Collegamento integrato (collegamento 2)
Normalmente CHIUSO
Interrompere per APRIRE
Normalmente APERTO
Saldare per CHIUDERE
2
RS
V+
LA
A+
A1
F
Durée de vie des piles
Le circuit IR ne consomme pratiquement aucun courant lorsqu'il est désactivé. De ce fait, la durée de vie de la pile de l'EL-2-IR sera quasiment
identique à celle de l'EL-2 normal. Lorsque le circuit IR est activé, la consommation en courant augmente de manière sensible. S'il est activé en
permanence, la durée de vie de la pile sera considérablement réduite. Toutefois, si cela ne constitue pas un problème (si vous utilisez une
alimentation externe, p.ex.), le circuit IR pourra être activé en permanence en utilisant la liaison à souder de la façon indiquée sur le schéma.
Liaisons enfichables (Liaison 1 & 3)
For experienced EasyLog users
Pressing the button to turn on the IR circuitry will not affect the logger itself, e.g. if it's in push to start, or push to log mode. Conversely, a short press, say
for a push to log, will not affect the IR circuitry. The duration that the button is held down for determines what the press is intended for.
SW
VHA
REF
A2
RESET
Normally OPEN
Solder to SHORT
+
IR timeout
To maximise battery life, after no communications activity has occurred for about five minutes the IR circuitry will automatically shut down. If the
button is held down until the Actiwave flashes, the timeout period will be reset.
Part Number
ER 3S TC
LS3
SL-750/S
½AA/S
VARIOUS OPERATING MODES
Select the correct measurement range in EL-WIN before connecting a sensor
or applying a voltage to the module.
Re-calibrate the EL-2 via EL-WIN prior to use.
Pluggable Links (Links 1 & 3)
Communications area
Communications can take place at a distances from 0m (i.e."nose-to-nose") to 1m. The EL-2-IR and the IR port on the PC should be pointing at each
other. The IR beam spans about 30°, so the two devices do not have to be directly aligned, however there should be a clear line-of-sight between the
two.
Manufacturer
MAXELL
SAFT
SONNENSCHEIN
TADIRAN
GB Battery Life
The IR circuitry draws virtually zero current when it is turned off. Because of this, if it is permanently off, the battery life of the
EL-2-IR will be
practically the same as a normal EL-2. When the IR circuitry is turned on, current consumption dramatically increases. If it is permanently on, the
battery life will be drastically reduced. However, if this is not a problem (e.g. if using an external power supply) making solder link 1, as shown in the
diagram, will cause the IR circuitry to stay on all the time.
7
Collegamento
SW
VHA
REF
A2
RS
V+
LA
A+
A1
a saldare 1
RESET
LK3
LK2
GB
F
VARIOUS OPERATING MODES
EXEMPLES DE MODES DE FONCTIONNEMENT
D
I
VERSCHIEDENE BETRIEBSARTEN
ESEMPI DI MODALITA' DI FUNZIONAMENTO
“K" type thermocouple
Thermocouple de type "K"
BLUE BLAU
BLEU BLU
BROWN BRAUN
MARRON MARRONE
+
-
„K"-Thermoelement
Termocoppia tipo "K"
GB Temperature
(with thermocouple) Connect a K-type thermocouple to the EL-2-IR via the
phono socket.
(internal) Short Link 3 to use the internal sensor or use a short circuited phono
plug.
F pH (avec électrode combinée)
Connectez la sonde à l'EL-2-IR via le support phono. Ouvrir Liaison 2.
REMARQUES: Il n'est pas nécessaire d'ouvrir la Liaison 2 si la sonde SENTEK
P14 est utilisée.
Température
(avec thermocouple) Connectez un thermocouple de type K à l'EL-2-IR via le
support phono.
(interne) Court-circuitez la liaison 3 pour utiliser le capteur interne ou utilisez
une fiche phono court-circuitée.
°
C
D pH-Wert (mit Kombinationselektrode)
Schließen Sie die Sonde über die Phonobuchse am EL-2-IR an. Öffnen Sie
Verbindung 2.
ANMERKUNGEN: Verbindung 2 muß nicht geöffnet werden, wenn die
SENTEK P14-Sonde benutzt wird.
D Temperatur
(mit Thermoelement) Schließen Sie ein K-Thermoelement mit einer
Phonobuchse an das EL-2-IR an.
(intern) Schließen Sie die Verbindung 3 KURZ, um den internen Fühler zu
benutzen, oder verwenden Sie einen kurzgeschlossenen Phonostecker.
I
pH (con elettrodo di combinazione)
Collegare la sonda all'apparecchio EL-2-IR mediante la presa phono. Aprire
il collegamento 2.
NOTA: Qualora venga utilizzata la sonda SENTEK P14, non è necessario aprire
il collegamento 2.
I
Temperatura
(con termocoppia) Collegare una termocoppia tipo "K" all'apparecchio EL-2IR tramite la presa phono.
(interna) Cortocircuitare il collegamento 3 per utilizzare il sensore interno
oppure utilizzare una spina phono cortocircuitata.
+
SENSOR
CAPTEUR
SENSOR
SENSORE
- 0-20V D.C.
GB
GB Voltage (0-2V/0-20V)
Connect the voltage to the EL-2-IR via the phono socket. Voltages exceeding
20V require an external potential divider network.
F
F Tension (0-2V/0-20V)
Connectez la tension à l'EL-2-IR via le support phono. Les tensions supérieures à
20V nécessitent un diviseur de tension externe.
Humidity
Connect a capacitive humidity to the EL-2-IR via the phono socket.
Sensor range - 200 to 300pF (Sensitivity - 0.5 to 1.0pF per %RH)
Humidité
Connectez un capteur d'humidité capacitif à l'EL-2-IR via le support phono.
Gamme du capteurÊ: 200 à 300pF (SensibilitéÊ: 0,5 à 1,0pF par % RH).
D
D
Spannung (0 2V/0 20V)
Schließen Sie die Spannung über die Phonobuchse an den EL-2-IR an.
Spannungen über 20V erfordern ein externes Potentialteilernetzwerk.
Feuchtigkeit
Schließen Sie einen Kapazitäts-Feuchtigkeitssensor mit einer Phonobuchse an
den EL-2-IR an.
Sensormeßbereich - 200 bis 300 pF. (Empfindlichkeit 0,5 bis 1pF pro % r.L.)
I
Tensione (0-2 V/0-20 V)
Collegare la tensione all'apparecchio EL-2-IR mediante la presa phono. Le
tensioni superiori a 20 V richiedono una rete esterna con partitore di tensione.
I
Umidità
Collegare un sensore di umidità capacitivo all'apparecchio EL-2-IR mediante
la presa phono.
Portata del sensore: da 200 a 300 pF (Sensibilità: da 0.5 a 1.0 pF per% U.R.)
+
1Ω
6watt
EL-2-IR
GB pH (with combination electrode)
Connect the probe to the EL-2-IR via the phono socket. Open link 2.
NOTE: There is no need to open Link 2 if the SENTEK P14 probe is used.
F
+
0-2A D.C.
0-5V
GB Current (0-2A)
Connect a 1R6 Watt resistor to the EL-2-IR via the phono socket. Select the 02V range in EL-WIN. Select "A" in Display Symbols.
GB Rate Count
Connect a 0-5V pulse to the EL-2-IR via the phono socket. The counter
increments on the falling edge.
F Courant (0-2A)
Connectez une résistance 1R6 Watt à l'EL-2-IR via le support phono.
Sélectionnez la gamme 0-2V dans l'EL-WIN. Sélectionnez «A» dans les
Symboles d'Affichage.
F Comptage de la vitesse
Connectez une pulsation 0-5V à l'EL-2-IR via le support phono. Le compteur
incrémente sur le front de descente.
D RATENZÄHLUNG
Schließen Sie einen Impuls von 0 -5V über die Phonobuchse am EL-2-IR an.
Das Zählwerk wird am an der abfallenden Rand Flanke inkrementiert.
Strom (0 -2A)
Schließen Sie einen 1R6 Watt Widerstand über die Phonobuchse am EL-2-IR
an. Wählen Sie den Spannungsbereich 0 2V in der EL-WIN-Software und „A"
unter Anzeigensymbolen aus.
I
I
Conteggio di frequenza
Collegare un impulso a 0-5 V all'apparecchio EL-2-IR mediante la presa phono.
Il contatore viene incrementato sul fronte cadente.
Corrente (0-2 A)
Collegare una resistenza da 1R6 W all'apparecchio EL-2-IR mediante la presa
phono. Selezionare la portata 0-2 V all'interno del software EL-WIN.
Selezionare "A" tra i simboli su display.
Specifications liable to change without prior warning
EL-2-IR
Issue 3
February/2000
M.C.
Applies to EL-2-IR
F
Spécifications peuvent changer sans préavis
EL-2-IR
Edition 3
février/2000
M.C.
Applique à EL-2-IR
D
Die technischen Daten können ohne vorherige Ankündigung geändert werden
EL-2-IR
Ausgabe 3
Februar/2000
M.C.
Gilt für EL-EL-2-IR
I
Specifiche soggette a variazione senza preavviso
EL-2-IR
Versione 3
Febbraio/2000
M.C.
Applicabile a EL-2-IR
8
EasyLog-2 with InfraRed
Communications
This datasheet should be read in conjunction with the EL-2 datasheet.
EasyLog-2 avec liaisons
Infrarouges
Cette fiche technique doit être lue en parallèle avec la fiche
technique de l'EL-2
EasyLog-2 mit
Infrarotkommunikation
Dieses Datenblatt muß zusammen mit dem Datenblatt EL-2 gelesen werden.
0
0V
D
GB
pH PROBE
SONDE pH
pH-SONDE
SONDA DI pH
EasyLog-2 con comunicazione
ad infrarossi
La presente scheda tecnica deve essere letta unitamente alla
scheda tecnica dell'apparecchio EL-2
LASCAR ELECTRONICS LIMITED,
MODULE HOUSE,
WHITEPARISH, SALISBURY,
WILTSHIRE SP5 2SJ UK
TEL: +44 (0)1794 884567
FAX: +44 (0)1794 884616
E-MAIL: [email protected]
LASCAR ELECTRONICS, INC.
PO BOX 8204,
SAVANNAH, GA 31412
TEL: +1 (912) 234 2048
FAX: +1 (912) 234 2049
E-MAIL: [email protected]
www.lascarelectronics.com
1