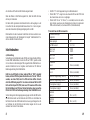
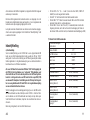
1
CEP AG INTERNET http://www.cepag.com
BEDIENUNGSANLEITUNG OPERATING INSTRUCTIONS
MODE D’EMPLOI
GEBRUIKSAANWIJZING
Version
01/04
Impressum
Diese Bedienungsanleitung ist eine Publikation der CEP AG; D-82041 Oberhaching
Alle Rechte einschließlich Übersetzung vorbehalten. Reproduktionen jeder Art, z. B.
Fotokopie, Mikroverfilmung, oder die Erfassung in elektronischen Datenverarbeitungsanlagen, bedürfen der schriftlichen Genehmigung des Herausgebers.
Nachdruck, auch auszugsweise, verboten.
Diese Bedienungsanleitung entspricht dem technischen Stand bei Drucklegung.
Änderung in Technik und Ausstattung vorbehalten.
© Copyright 2003 by CEP AG, Germany; www.cepag.com; [email protected]
Imprint
These operating instructions are published by CEP AG, Raiffeisenallee 12b
82041 Oberhaching/Germany; www.cepag.com; [email protected]
No reproduction (including translation) is permitted in whole or part e.g. photocopy,
microfilming or storage in electronic data processing equipment, without the express
written consent of the publisher.
The operating instructions reflect the current technical specifications at time of print.
We reserve the right to change the technical or physical specifications.
© Copyright 2003 by CEP AG, Germany; www.cepag.com; [email protected]
Note de l´éditeur
Cette notice est une publication de la société CEP AG, Raiffeisenallee 12b
82041 Oberhaching/Germany; www.cepag.com; [email protected]
Tous droits réservés, y compris traduction. Toute reproduction, quel que soit le type,
par exemple photocopies, microfilms ou saisie dans des traitements de texte electronique est soumise à une autorisation préalable écrite de l`éditeur.
Impression, même partielle, interdite.
Cette notice est conforme à la règlementation en vigueur lors de l´impression.
Données techniques et conditionnement soumis à modifications sans aucun préalable.
© Copyright 2003 par CEP AG, Germany; www.cepag.com; [email protected]
Impressum
Deze gebruiksaanwijzing is een publikatie van CEP AG; Germany
Alle rechten, inclusief de vertaling, voorbehouden. Reprodukties van welke aard dan
ook, fotokopie, microfilm of opgeslagen in een geautomatiseerd gegevensbestand,
alleen met schriftelijke toestemming van de uitgever.
Nadruk, ook in uittreksel, verboden.
Deze gebruiksaanwijzing voldoet aan de technische eisen bij het ter perse gaan. Wijzigingen in techniek en uitrusting voorbehouden.
© Copyright 2003 by CEP AG, Germany; www.cepag.com; [email protected]
*10-03/HK
Einfaches Telemetrie
Modul STD32
Seite 3 - 15
Simple Telemetry
Device STD32
Page 16 - 27
Module de télémétrie
simple STD32
Page 28 - 40
Eenvoudige telemetriemodule STD32
Page 41 - 53
CEP AG Internet: www.cepag.com; E-Mail: [email protected]
Diese Bedienungsanleitung gehört zu diesem Produkt. Sie ent-
hält wichtige Hinweise zur Inbetriebnahme und Handhabung. Achten
Sie hierauf, auch wenn Sie dieses Produkt an Dritte weitergeben.
Heben Sie deshalb diese Bedienungsanleitung zum Nachlesen auf!
Eine Auflistung der Inhalte finden Sie in dem Inhaltsverzeichnis mit Angabe
der entsprechenden Seitenzahlen auf Seite 3.
These Operating Instructions are part of the product. They con-
tain important information on commissioning and installation. Please
follow them, including when passing this product on to third parties.
Please keep the Operating Instructions for future reference!
The contents page on page 16 lists the contents of these instructions
together with the relevant page number.
Le présent mode d'emploi fait partie intégrante du produit. Il
comporte des directives importantes pour la mise en service et la
manipulation de l’appareil. Tenir compte de ces remarques, même en
cas de transfert du produit à un tiers.
Conserver le présent mode d'emploi afin de pouvoir le consulter à tout
moment.
La table des matières se trouve à la page 28.
Deze gebruiksaanwijzing hoort bij dit product en bevat belan-
grijke richtlijnen voor de ingebruikneming en het gebruik. Let hierop,
ook als u dit product aan derden doorgeeft.
Bewaar daarom de gebruiksaanwijzing om deze in voorkomende gevallen
te kunnen raadplegen!
In de inhoudsopgave op pagina 41 vindt u puntsgewijs de behandelde
onderwerpen met vermelding van het bijbehorende paginanummer.
2
55
Inhaltsverzeichnis
Achtung! unbedingt lesen . . . . . . . . . . . . . . . . . . . . . . . . . . . . . . . . . . . .3
Hinweis . . . . . . . . . . . . . . . . . . . . . . . . . . . . . . . . . . . . . . . . . . . . . . . . .4
Sicherheitshinweise . . . . . . . . . . . . . . . . . . . . . . . . . . . . . . . . . . . . . . . .4
Betriebsbedingungen . . . . . . . . . . . . . . . . . . . . . . . . . . . . . . . . . . . . . . .6
Bestimmungsgemäße Verwendung . . . . . . . . . . . . . . . . . . . . . . . . . . . . .7
Einführung . . . . . . . . . . . . . . . . . . . . . . . . . . . . . . . . . . . . . . . . . . . . . . .7
Anschlüsse und LEDs . . . . . . . . . . . . . . . . . . . . . . . . . . . . . . . . . . . . . . .7
Inbetriebnahme . . . . . . . . . . . . . . . . . . . . . . . . . . . . . . . . . . . . . . . . . . .8
Funktion . . . . . . . . . . . . . . . . . . . . . . . . . . . . . . . . . . . . . . . . . . . . . . . . .9
Bedienung . . . . . . . . . . . . . . . . . . . . . . . . . . . . . . . . . . . . . . . . . . . . . .12
Behebung von Störungen . . . . . . . . . . . . . . . . . . . . . . . . . . . . . . . . . . .14
Technische Daten . . . . . . . . . . . . . . . . . . . . . . . . . . . . . . . . . . . . . . . . .15
Achtung! unbedingt lesen
Diese Bedienungsanleitung enthält wichtige Hinweise zur Inbetriebnahme
und Handhabung des STD32, bitte lesen Sie diese aufmerksam, bevor Sie
das STD32 in Betrieb nehmen!
Bei Schäden, die durch die Nichtbeachtung der Bedienungsanleitung entstehen, erlischt der Garantieanspruch! Für Folgeschäden, die daraus resultieren, übernehmen wir keine Haftung.
Bei Sach- oder Personenschäden, die durch unsachgemäße Handhabung
oder Nichtbeachtung der Sicherheitshinweise verursacht werden, übernehmen wir keine Haftung. In solchen Fällen erlischt jeder Garantieanspruch.
Das STD32 ist mit hoch integrierten Bausteinen bestückt. Diese elektronischen Bauteile sind technologisch bedingt sehr empfindlich gegen Entladungen statischer Elektrizität.
54
3
Bitte berühren Sie das STD32 daher nur an den Seitenrändern und vermeiden Sie die Berührung der Pins von Bauelementen auf der Platine.
Hinweise
Derjenige, der eine Baugruppe durch Erweiterung bzw. Gehäuseeinbau
betriebsbereit macht, gilt nach DIN VDE 0869 als Hersteller und ist verpflichtet, bei Weitergabe des Gerätes alle Begleitpapiere mitzuliefern und
auch seinen Namen und Anschrift anzugeben. Geräte, die aus Baugruppen
selbst zusammengestellt werden sind sicherheitstechnisch wie ein industrielles Produkt zu betrachten.
Während des Betriebs des STD32 können automatisch GSM-Kurznachrichten (SMS) verschickt werden, wodurch Ihnen in der Regel Kosten entstehen.
Technische gegevens
• GSM: Dual Band EGSM 900/1800 MHz
compatibel met ETSI GSM fase 2+ standaard
• Uitgangsvermogen:
Class 4 (2W @ 900 MHz)
Class 1 (1W @ 1800 MHz)
• Temperatuurbereik: -30°C - +75°C
• Gewicht: ca. 110g
• Afmetingen: ca. 100x53x25 mm (lxbxh)
• Bedrijfsspanning: 9-15V
• Stroomopneming: ≤ 500 mA
• Max. schakelstroom: 6A
Max. schakelspanning: 250V AC
• Ingangsspanning (digitale ingangen)
logisch 1:
12 V
logisch 0:
0V
Ingangsstroom:
10mA
Sicherheitshinweise
Beim Umgang mit Produkten, die mit elektrischer Spannung in Berührung kommen, müssen die gültigen VDEVorschriften beachtet werden, insbesondere VDE 0100,
VDE 0550/0551, VDE 0700, VDE 0711 und VDE 0860.
• Vor dem Öffnen eines Gerätes stets den Netzstecker ziehen oder sicherstellen, dass das Gerät stromlos ist.
• Bauteile, Baugruppen oder Geräte dürfen nur in Betrieb genommen
werden, wenn sie vorher berührungssicher in ein Gehäuse eingebaut
wurden. Während des Einbaus müssen sie stromlos sein.
• Werkzeuge dürfen an Geräten, Bauteilen oder Baugruppen nur benutzt
werden, wenn sichergestellt ist, dass die Geräte von der Versorgungsspannung getrennt sind und elektrische Ladungen, die in den im Gerät
befindlichen Bauteilen gespeichert sind, vorher entladen wurden.
4
Hotline
Bij technische problemen en vragen m.b.t. de STD32 staat u onze hotline
als volgt ter beschikking:
Ma. – vr.: . . . . . . . 9:00 – 17:00
Hotline: . . . . . . . . +49 (0) 89 / 450 292 11
of
[email protected]
Stand: november 2003; Wijzigingen voorbehouden
53
Foutbeeld
Mogelijke oorzaak
Oplossing
GSM-LED gaat uit
na ca. 3 min.
Niet geconfigureerd
Configuratie-telefoongesprek uitvoeren
STD32 reageert niet Apparaat is reeds
op een configuratie- geconfigureerd
telefoongesprek
(neemt de hoorn
niet op)
Terugzetten op fabriekinstellingen.
STD32 reageert niet Verkeerd IMEI nummer IMEI – nummer controop een configuratie- in de SMS / SMS werd leren. / SMS transmisSMS
(nog) niet teruggesteld sie kan een beetje
duren
STD32 reageert niet
op SMS of telefoongesprekken,
ofschoon het in het
GSM net is ingeboekt
52
De mobiele telefoon
draagt geen telefoonnummer over
("Incognito Modus")
De mobiele telefoon zo
instellen, dat de telefoonnummers worden
overgedragen.
• Spannungsführende Kabel oder Leitungen, mit denen das Gerät, das
Bauteil oder die Baugruppe verbunden ist, müssen stets auf Isolationsfehler oder Bruchstellen untersucht werden. Bei Feststellen eines Fehlers in der Zuleitung muss das gerät unverzüglich aus dem Betrieb
genommen werden, bis die defekte Leitung ausgewechselt worden ist.
• Bei Einsatz von Bauelementen oder Baugruppen muss stets auf die
strikte Einhaltung der in der zugehörigen Beschreibung genannten
Kenndaten für elektrische Größen hingewiesen werden.
• Wenn aus einer vorliegenden Beschreibung für den nichtgewerblichen
Endverbraucher nicht eindeutig hervorgeht, welche elektrischen Kennwerte für ein Bauteil oder eine Baugruppe gelten, wie eine externe
Beschaltung durchzuführen ist oder welche externen Bauteile oder
Zusatzgeräte angeschlossen werden dürfen und welche Anschlusswerte diese externen Komponenten haben dürfen, so muss stets ein Fachmann um Auskunft ersucht werden.
• Es ist vor der Inbetriebnahme eines Gerätes generell zu prüfen, ob dieses Gerät oder Baugruppe grundsätzlich für den Anwendungsfall, für
den es verwendet werden soll, geeignet ist! Im Zweifelsfall sind unbedingt Rückfragen bei Fachleuten, Sachverständigen oder den Herstellern der verwendeten Baugruppen notwendig!
• Bitte beachten Sie, dass Bedien- und Anschlussfehler außerhalb unseres Einflussbereiches liegen. Verständlicherweise können wir für Schäden, die daraus entstehen keinerlei Haftung übernehmen.
• Geräte, die an einer Spannung > 35 Volt betrieben werden, dürfen nur
vom Fachmann angeschlossen werden.
• Die Inbetriebnahme darf grundsätzlich nur erfolgen, wenn die Schaltung absolut berührungssicher in ein Gehäuse eingebaut ist.
• Sind Messungen am geöffneten Gehäuse unumgänglich, so muss aus
Sicherheitsgründen ein Trenntrafo zwischengeschaltet werden, oder,
wie bereits erwähnt, die Spannung über ein geeignetes Netzteil, (das
den Sicherheitsbestimmungen entspricht) zugeführt werden.
• Alle Verdrahtungsarbeiten dürfen nur im spannungslosen Zustand ausgeführt werden.
5
Betriebsbedingungen
• Betreiben Sie das STD32 nur mit einer Betriebsspannung zwischen 9-15V
und beachten Sie die Polarität! (siehe Abb.1) Die Stromquelle muss mindestens 500 mA liefern können. Verwenden Sie ein Netzgerät als Spannungsquelle, so muss dies unbedingt den VDE-Vorschriften entsprechen!
• Bei Geräten mit einer Betriebsspannung >35 Volt darf die Endmontage
nur vom Fachmann unter Einhaltung der VDE-Bestimmungen vorgenommen werden!
• An der Baugruppe angeschlossene Verbraucher dürfen eine Anschlussleistung von max. 1000W pro Relais nicht überschreiten.
• Die maximale Schaltspannung beträgt 250V AC (Wechselstrom)
• Der durch die Leiterbahnbreite bedingte maximale Schaltstrom (pro
Relais) beträgt 6A.
• Die Betriebslage des Gerätes ist beliebig
• Bei der Installation des Gerätes ist auf ausreichenden Kabelquerschnitt
der Anschlussleitungen zu achten.
• Die zulässige Umgebungstemperatur darf während des Betriebs 0°C
nicht unter- und 40°C nicht überschreiten.
• Bei Bildung von Kondenswasser muss eine Akklimatisierungszeit von
bis zu 2 Stunden abgewartet werden.
• Das Gerät ist von Blumenvasen, Badewannen, Waschtischen, Flüssigkeiten usw. ferzuhalten.
• Das Gerät ist zu Betrieb in trockenen und sauberen Räumen bestimmt.
• Schützen Sie das Gerät vor Feuchtigkeit, Spritzwasser und Hitzeeinwirkung.
• Setzen Sie das Gerät keinen starken Vibrationen aus.
• Betreiben Sie das Gerät nicht in einer Umgebung in welcher brennbare
gase, Dämpfe oder Stäube vorhanden sind oder vorhanden sein könnten.
• Eine Reparatur des Geräts darf nur vom Fachmann vorgenommen werden.
• Falls das Gerät repariert werden muss, dürfen ausschließlich OriginalErsatzteile verwendet werden. Die Verwendung abweichender Ersatzteile kann zu ernsthaften Sach- und Personenschäden führen.
6
Alle commando’s kunnen, door het afsluitende punt gescheiden, in een
SMS gelijktijdig worden verzonden.
De secondeaanwijzingen kunnen 1-3 plaatsen hebben. Geldige waarden
zijn bijv.: 1 of 90 of 999.
Let a.u.b. op het verschil tussen het cijfer 0 en de letter O! (O1ON. bevat
tweemaal de letter O, V1:0. bevat eenmaal het cijfer 0)
d) Voorbeeld voor SMS commando’s
Startmelding uit, relais 1 aan, relais 2 uit, activeringsduur ingang 1: 5 sec.:
SMS: 2759 S:0.O1ON.O2OFF.I1:5.
Schakelduur van relais 1 op 90 seconden:
SMS: 2759 O1:90.
Terugzetten in de fabriektoestand:
SMS: 2759 R:
Verhelpen van storingen
Foutbeeld
Mogelijke oorzaak
GSM-LED blijft
donker
Geen voedingsspanning Voedingsapparaat aansluiten
Oplossing
GSM-LED gaat uit Geen SIM kaart of PIN
na enkele seconden niet "0000"
SIM kaarten PIN op
"0000" zetten
GSM-LED
permanent aan
Antenne aansluiten /
Antennepositie
veranderen
Geen GSM net
beschikbaar /
geen antenne
gemonteerd
51
Bediening
Bestimmungsgemäße Verwendung
a) Schakelen per telefoongesprek
Bel na de configuratie (zie hoofdstuk: inbedrijfstelling) het telefoonnummer
van de in de STD32 ingelegde SIM-kaart. Let erop dat uw mobiele telefoon
daarbij het telefoonnummer overdraagt. (Als test kunt u een andere mobiele telefoon bellen, daar moet uw telefoonnummer of uw naam worden aangegeven). Het relais moet dan afhankelijk van de configuratie een bepaalde tijd aantrekken. De relaisstatus LED voor relais 1 brandt gedurende
deze tijd.
Der bestimmungsgemäße Einsatz des Gerätes ist das ferngesteuerte einund ausschalten von Geräten über das GSM Netz sowie die Fernabfrage
der Zustände der Eingänge und die Generierung von SMS Nachrichten
nach Zustandsenderungen der Eingänge. Ein anderer Einsatz als der vorgegebene ist nicht zulässig.
b) Alarm-SMS activeren
Leg voor 1 seconde (fabriekconfiguratie) een spanning van 12V aan een
ingang aan, let hierbij op de polariteit! Daarna wordt een alarm-SMS aan
uw mobiele telefoon gestuurd.
Das STD32 ist ein einfach zu installierendes und zu bedienendes Telemetriemodul.
c) SMS commando zenden
Om uw STD32 tegen onrechtmatige toegang te beschermen, moet elke
SMS aan de STD32 met de laatste 4 plaatsen van het IMEI nummer van uw
STD32 beginnen! Uw IMEI vindt u op de GSM-module:
Außer dem STD32 benötigen Sie nur noch eine freigeschaltete SIM Karte
eines beliebigen Netzbetreibers (z.B.: D1, Vodafone, E-Plus, O2).
Einführung
Mit dem STD32 können über ein herkömmliches Mobiltelefon zwei Relais
geschaltet und der Zustand zweier digitaler Eingänge überwacht werden.
Typische Anwendungen sind das Schalten von (Garagen-) Türöffnern,
Beleuchtungen und Alarmanlagen sowie die Erzeugung von Alarmmeldungen (Alarm-SMS) oder die Abfrage von Türsensoren, Bewegungsmeldern,
Füllstandssensoren etc.
Anschlüsse und LEDs
De laatste plaatsen van het IMEI zijn het password voor uw apparaat, dat u
geheim moet gehouden. Het IMEI kan niet worden veranderd!
Alle commando’s (behalve R: en ST?) moeten met een punt worden beëindigd!
50
Wie in Abb. 1 dargestellt, verfügt das STD 32 über vier Schraubklemmen
Paare. Zwei Paare (In1, In2) sind die Eingänge zu zwei Optokopplern. Die
anderen zwei Paare (Relais1, Relais2) sind die Ausgänge (Schalter) der 2
Relais auf dem STD32.
Am Anschluss PWR wird die Spannungs-versorgung des STD32 angeschlossen.
7
Am Anschluss ANT wird die GSM Antenne eingeschraubt.
Wenn das Modul im GSM Netz eingebucht ist, blinkt die GSM LED etwa
einmal pro 2 Sekunden.
Die Status LEDs signalisieren den Zustand der Ein- und Ausgänge. L1 und
L2 leuchten falls das entsprechende Relais aktiviert ist. L3 und L4 signalisieren den Zustand der Optokoppler Eingänge IN1 und IN2.
Bitte beachten Sie den maximalen Schaltstrom der Relais und den maximalen Eingangsstrom der Optokoppler! Im Kapitel "Inbetriebnahme" finden Sie weitere Information hierzu!
• De SMS "R:" zet het apparaat terug in de fabriektoestand.
• Met de SMS "ST?" vraagt men een antwoord-SMS van de STD32 met
de actuele status van de in- en uitgangen.
• Met de SMS "A1:xxx" of "A2:xxx" (x = seconden) kan men de vertraging instellen, waarna na een schakelproces de status in de antwoordSMS wordt verstuurd (x=0; antwoord-SMS of; fabriektoestand)
f) Overzicht van de SMS commando’s
Op fabriekinstellingen
terugzetten
Status opvragen
R:
ST?
Start SMS aan/uit
S:1. / S:0.
Inbetriebnahme
Relais 1 aan
Relais 1 uit
O1ON.
O1OFF.
a) Vorbereitung
Sie benötigen zur Inbetriebnahme des STD32 eine freigeschaltete SIM Karte eines GSM Netzbetreibers, bei der die PIN auf "0000" gesetzt worden
ist. Sie können zur Einstellung der PIN ein gewöhnliches Mobiltelefon verwenden. Entnehmen Sie das Vorgehen zum Ändern der PIN bitte der
Bedienungsanleitung Ihres Mobiltelefons.
Relais 2 aan
Relais 2 uit
O2ON.
O2OFF.
Schakelduur
relais 1
O1:xxx. (seconden)
Schakelduur
relais 2
O2:xxx. (seconden)
Pauze voor terugmelding (relais 1)
A1:xxx. (seconden)
Falls Sie eine SIM Karte mit einer anderen PIN als "0000" eingelegt
haben, wird das STD32 bei jedem Einschalten eine "falsche" PIN verwenden, was dazu führt, dass Ihre PIN nach dem dritten Versuch
durch die SIM Karte gesperrt ist. Sie müssen in diesem Fall Ihrer SIM
Karte mit der Super-PIN (PUK) eine neue PIN zuweisen. Bitte sehen
für die Einstellung der PIN, bzw. für das Rücksetzen einer gesperrten
PIN mit der PUK in der Bedienungsanleitung Ihres Mobiltelefon nach.
Vor dem Anlegen der Versorgungsspannung legen sie bitte die SIM Karte in
den SIM-Karten-Halter auf der Rückseite des STD32 ein. Verschieben Sie
hierfür den Deckel des SIM-Karten-Halters ein wenig und klappen Sie ihn
auf. Schieben Sie die SIM-Karte in den Deckel, klappen Sie ihn zu und
arretieren Sie ihn durch Verschieben.
8
Pauze voor terugmelding (relais 2)
A2:xxx. (seconden)
Activeringsduur ingang 1
I1:xxx. (seconden)
Activeringsduur ingang 2
I2:xxx. (seconden)
Inverteren
ingang 1
V1:x. (x= 1/0 )
Inverteren
ingang 2
V2:x. (x= 1/0 )
49
• Als de digitale ingang IN1 voor een seconde werd geactiveerd, zendt de
STD32 een SMS met de inhoud "EVENT ALARM 1" aan de ingestelde
mobiele telefoon.
• Als de digitale ingang IN2 voor een seconde wordt geactiveerd, zendt
de STD32 een SMS met de inhoud "EVENT ALARM 2" aan de ingestelde mobiele telefoon.
Falls nicht schon geschehen, schließen Sie die GSM Antenne an.
d) Schakelen per SMS
• Nadat de STD32 een SMS met de inhoud "O1ON" door de ingestelde
mobiele telefoon heeft ontvangen, schakelt het relais 1 voor een seconde. Bij de SMS "O2ON" schakelt het relais 2 voor een seconde.
Warten Sie bis die GSM-LED angefangen hat zu blinken.
e) Configuratie-SMS
• Met een SMS met de inhoud "O1:xxx"of "O2:xxx"(xxx = seconden) kan
men de schakeltijden van de relais configureren. De STD32 slaat deze
instellingen ook na het scheiden van de voedingsspanning op.
• Als over een configuratie-SMS de schakeltijd voor een relais op de
waarde 0 werd gezet, schakelt de STD32 bij elk telefoongesprek het
bijbehorende relais permanent om. Als het relais vooraf actief was, is
het daarna inactief en omgekeerd.
Alleen in dat geval schakelt een SMS met de inhoud "O1ON" van de
ingestelde mobiele telefoon het relais permanent in. Een SMS met de
inhoud "O1OFF" schakelt dan het relais 1 weer permanent uit. Overeenkomstig gedraagt zich het relais 2 bij SMS boodschappen met de
inhouden "O2ON" en "O2OFF"
• Door een SMS met de inhoud "I1:xxx" of "I2:xxx" (xxx = seconden) kunnen
voor beide ingangen de tijden worden geconfigureerd, welke de ingangen
moeten worden geactiveerd, opdat de STD32 een alarm-SMS zendt.
• Door een SMS met de inhoud "V1:x" of "V2:x" (x = 1 of 0) kan de polariteit van de ingangen worden verwisseld. Bij x=1 wordt een alarmSMS gezonden als de ingang langer dan de geconfigureerde tijd niet
geactiveerd is.
• Met de SMS "S:x" (X = 1 of 0) kan de start-SMS (START-UP ALARM) inof uitgeschakeld worden.
48
Danach stellen Sie die Verbindung zur Versorgungsspannung her. Die
GSM-LED fängt kurz danach an dauerhaft zu leuchten. Das STD32 wird
nun automatisch versuchen, sich in das GSM Netz einzubuchen. Sobald
das STD32 in das GSM Netz eingebucht ist, blinkt die GSM-LED etwa einmal alle 2 Sekunden. b) Konfigurations-Anruf
Rufen Sie dann mit dem Mobiltelefon, mit dem Sie das STD32 fernsteuern
wollen, die Rufnummer der SIM Karte im STD32 an. Der Anruf wird vom
STD32 angenommen und wenige Sekunden danach wieder beendet. Sie
hören aber nichts! Durch diesen Anruf wird das STD32 auf das entsprechende Mobiltelefon eingestellt. Das STD32 kann ab diesem Konfigurations-Anruf nur über dieses Mobil-telefon bedient werden!
Falls Sie ein anderes Mobiltelefon mit Ihrem STD32 verwenden wollen,
müssen Sie das Gerät vor einem erneuten Konfigurations-Anruf mit einer
Konfigurations-SMS auf die Fabrikeinstellungen zurücksetzen (siehe Kapitel: Konfigurations-SMS).
Funktion
Nachdem das STD32 konfiguriert ist (siehe Kapitel Inbetriebnahme) stehen
folgende Funktionen zur Verfügung:
c) Grundfunktionen
• Nach dem Anlegen der Betriebsspannung sendet das STD32 automatisch eine SMS mit dem Inhalt "START-UP ALARM" an die eingestellte
Telefonnummer.
• Nachdem das STD32 vom eingestellten Mobiltelefon aus angerufen
wurde, schaltet das Relais 1 für eine Sekunde. Optional kann danach
eine Bestätigungs-SMS vom STD32 verschickt werden mit dem Status
aller Ein- und Ausgänge (siehe auch Konfigurations-SMS).
9
• Wenn der digitale Eingang IN1 für eine Sekunde aktiviert wird, sendet
das STD32 eine SMS mit dem Inhalt "EVENT ALARM 1" an das eingestellte Mobiltelefon.
• Wenn der digitale Eingang IN2 für eine Sekunde aktiviert wird, sendet
das STD32 eine SMS mit dem Inhalt "EVENT ALARM 2" an das eingestellte Mobiltelefon.
d) Schalten per SMS
• Nachdem das STD32 eine SMS mit dem Inhalt "O1ON" vom eingestellte Mobil-telefon erhalten hat, schaltet das Relais 1 für eine Sekunde.
Bei der SMS "O2ON" schaltet das Relais 2 für eine Sekunde.
e) Konfigurations-SMS
• Mit einer SMS mit dem Inhalt "O1:xxx"oder "O2:xxx"(xxx = Sekunden)
kann man die Schaltzeiten der Relais konfigurieren. Das STD32 speichert diese Einstellungen auch nach dem Trennen von der Versorgungsspannung.
• Falls über eine Konfigurations-SMS die Schaltzeit für ein Relais auf den
Wert 0 gesetzt wurde, schaltet das STD32 bei jedem Anruf das entsprechende Relais dauerhaft um. War das Relais vorher aktiv, ist es danach
inaktiv und umgekehrt.
Nur in diesem Fall schaltet eine SMS mit dem Inhalt "O1ON" vom eingestellte Mobil-telefon das Relais 1 dauerhaft ein. Eine SMS mit Inhalt
"O1OFF" schaltet dann das Relais 1 wieder dauerhaft aus. Entsprechend verhält sich das Relais 2 auf SMS Nachrichten mit den Inhalten
"O2ON" und "O2OFF"
• Durch eine SMS mit dem Inhalt "I1:xxx" oder "I2:xxx" (xxx = Sekunden)
können für beide Eingänge die Zeiten konfiguriert werden, die die Eingänge aktiviert werden müssen, damit das STD32 eine Alarm-SMS
aussendet.
• Durch eine SMS mit dem Inhalt "V1:x" oder "V2:x" (x = 1 oder 0) kann
die Polarität der Eingänge vertauscht werden. Bei x=1 wird eine AlarmSMS gesendet falls der Eingang länger als die konfigurierte Zeit nicht
aktiviert ist.
10
Daarna brengt u de verbinding met de voedingsspanning tot stand. De
GSM-LED begint kort daarna permanent te branden. De STD32 zal nu
automatisch proberen zich in het GSM net in te boeken. Zodra de STD32 in
het GSM net ingeboekt is, knippert de GSM-LED ongeveer eenmaal om de
2 seconden.
b) Configuratie-telefoongesprek
Wacht tot de GSM-LED is begonnen te knipperen.
Bel dan met de mobiele telefoon, waarmee u de STD32 via afstandsbediening wilt bedienen, het telefoonnummer van de SIM kaart in de STD32. Het
telefoongesprek wordt door de STD32 aangenomen en enkele seconden
daarna weer beëindigd. U hoort echter niets! Door het telefoongesprek
wordt de STD32 op de mobiele telefoon ingesteld. De STD32 kan vanaf het
configuratie-telefoongesprek alleen via deze mobiele telefoon worden
bediend!
Als u een andere mobiele telefoon met uw STD32 wilt gebruiken, moet u
het apparaat vóór een nieuw configuratie-telefoongesprek op de fabrieksinstellingen terugzetten (zie hoofdstuk: configuratie-SMS).
Functie
Nadat de STD32 is geconfigureerd (zie hoofdstuk Inbedrijfstelling) staan de
volgende functies ter beschikking:
c) Basisfuncties
• Na het aanleggen van de bedrijfsspanning zendt de STD32 automatisch
een SMS met de inhoud "START-UP ALARM" aan het ingestelde telefoonnummer.
• Nadat de STD32 door de ingestelde mobiele telefoon werd gebeld,
schakelt het relais 1 voor een seconde.
47
Als de module in het GSM net ingeboekt is, knippert de GSM LED ongeveer
eenmaal per 2 seconden.
De status LEDs signaliseren de toestand van de in- en uitgangen. L1 en L2
branden als de bijbehorende relais geactiveerd is. L3 en L4 signaliseren de
toestand van de opto-koppeling ingangen IN1 en IN2.
Let op de maximale schakelstroom van de relais en de maximale ingangsstroom van de opto-koppelingen! In het hoofdstuk "Inbedrijfstelling" vindt
u verdere informatie!
• Mit der SMS "S:x" (X = 1 oder 0) kann die Start-SMS (START-UP
ALARM) ein- oder ausgeschaltet werden.
• Die SMS "R:" setzt das Gerät in den Fabrikzustand zurück.
• Mit der SMS "ST?" fordert man eine Antwort-SMS vom STD32 mit dem
aktuellen Status der Ein- und Ausgänge an.
• Mit der SMS "A1:xxx" oder "A2:xxx" (x = Sekunden) kann man die Verzögerung einstellen, nach der nach einem Schaltvorgang der Status in
der Antwort-SMS verschickt wird (x=0 bedeutet: keine Bestätigungs-SMS)
f) Übersicht der SMS Kommandos
Inbedrijfstelling
Auf Fabrikeinstellungen
Zurücksetzen
R:
a) Voorbereiding
Voor de inbedrijfstelling van de STD32 hebt u een vrijgeschakelde SIM
kaart van een GSM netwerkexploitant nodig, waarbij de PIN op "0000"
werd gezet. U kunt voor de instelling van de PIN een gewoonlijke mobiele
telefoon gebruiken. In de gebruiksaanwijzing van uw mobiele telefoon is
beschreven hoe u de PIN moet veranderen.
Status anfordern
ST?
Start SMS ein/aus
S:1. / S:0.
Relais 2 ein
O2ON.
Als u een SIM kaart met een andere PIN dan "0000" hebt ingelegd, zal
de STD32 bij elk inschakelen een "verkeerde" PIN gebruiken, wat
ertoe leidt dat uw PIN na de derde proef door de SIM kaart geblokkeerd is. In dat geval moet u uw SIM kaart met de super-PIN (PUK)
een nieuwe PIN toewijzen. De instelling van de PIN resp. het terugzetten van een geblokkeerde PIN met PUK is in de gebruiksaanwijzing
van uw mobiele telefoon beschreven.
Relais 2 aus
O2OFF.
Vóór het aanleggen van de voedingsspanning legt u a.u.b. de SIM kaart in
de SIM-kaarthouder aan de achterzijde van de STD32 in. Verschuif hiervoor de deksel van de SIM-kaarthouder een beetje en klap hem open.
Schuif de SIM-kaart in de deksel, klap hem toe en arrêteer hem door verschuiven.
Relais 1 ein
Relais 1 aus
O1ON.
O1OFF.
Schaltdauer Relais 1
O1:xxx. (Sekunden)
Schaltdauer Relais 2
O2:xxx. (Sekunden)
Pause vor Rückmeldung (Relais 1)
A1:xxx. (Sekunden)
Pause vor Rückmeldung (Relais 2)
A2:xxx. (Sekunden)
Aktivierungsdauer
Eingang 1
I1:xxx. (Sekunden)
Aktivierungsdauer
Eingang 2
I2:xxx. (Sekunden)
Indien nog niet gebeurt, sluit u de GSM antenne aan.
46
11
Invertierung
Eingang 1
V1:x. (x= 1/0 )
Invertierung
Eingang 2
V2:x. (x= 1/0 )
Doelgericht gebruik
Het doelgerichte gebruik van het apparaat is het in- en uitschakelen van
apparaten over het GSM net via afstandsbediening alsmede het afvragen
van de toestanden van de ingangen via afstandsbediening en het genereren van SMS boodschappen na toestandsveranderingen van de ingangen.
Elk ander gebruik is niet toelaatbaar.
Bedienung
a) Schalten per Anruf
Rufen Sie nach erfolgter Konfiguration (siehe Kapitel: Inbetriebnahme) die
Rufummer der in das STD32 eingelegten SIM-Karte an. Achten Sie darauf,
dass Ihr Mobiltelefon dabei die Rufnummer überträgt. (Zum Test können
Sie ein anderes Mobiltelefon anrufen, dort muss Ihre Telefonnummer oder
Ihr Name angezeigt werden). Das Relais sollte dann je nach Konfiguration
eine bestimmte Zeit anziehen. Die Relais-Status LED für Relais 1 leuchtet
während dieser Zeit.
Inleiding
b) Alarm-SMS auslösen
Legen Sie für 1 Sekunde (Fabrik Konfiguration) eine Spannung von 12V an
einen Eingang an, beachten Sie hierbei die Polung! Es wird daraufhin eine
Alarm-SMS an Ihr Mobiltelefon geschickt.
Typische toepassingen zijn het schakelen van (garage-) deuropeners, verlichtingen en alarminstallaties alsmede het genereren van alarmmeldingen (alarm-SMS) of het afvragen van deursensoren, bewegingsmelders,
niveausensoren etc.
c) SMS Kommando schicken
Um Ihr STD32 vor unberechtigten Zugriff zu schützen, muss jede SMS an
das STD32 mit den letzen 4 Stellen der IMEI Nummer Ihres STD32 beginnen! Ihre IMEI finden Sie auf dem GSM-Modul:
Aansluitingen en LEDs
De STD32 is een eenvoudig te installeren en te bedienen telemetriemodule.
Met de STD32 kunnen via een gebruikelijke mobiele telefoon twee relais
geschakeld en de toestand van twee digitale ingangen bewaakt worden.
Naast de STD32 hebt u alleen nog een vrijgeschakelde SIM kaart van een
willekeurige netwerkexploitant (bijv.: D1, Vodae, E-Plus, O2) nodig.
Zoals in afb. 1 weergegeven, beschikt de STD 32 over vier klemschroef
paren. Twee paren (In1, In2) zijn de ingangen van twee opto-koppelingen.
De andere twee paren (relais1, relais2) zijn de uitgangen (schakelaar) van
de 2 relais op de STD32.
Aan de aansluiting PWR wordt de spannings-toevoer van de STD32 aangesloten.
Aan de aansluiting ANT wordt de GSM antenne ingeschroefd.
12
45
Bedrijfsvoorwaarden
• Gebruik de STD32 alleen met een bedrijfsspanning tussen 9-15V en let
op de polariteit! (zie afb. 1) De stroombron moet tenminste 500 mA
kunnen leveren. Als u een voedingsapparaat als spanningsbron
gebruikt, moet het aan de VDE-voorschriften voldoen!
• Bij apparaten met een bedrijfsspanning >35 volt mag de eindmontage
alleen door een vakman met naleving van de VDE-voorschriften worden
uitgevoerd!
• Aan de bouwgroep aangesloten verbruikers mogen een aansluitvermogen van max. 1000W per relais niet overschrijden.
• De maximale schakelspanning bedraagt 250V AC (wisselstroom)
• De maximale schakelstroom op grond van de geleiderbaanbreedte (per
relais) bedraagt 6A.
• De bedrijfspositie van het apparaat is willekeurig.
• Bij de installatie van het apparaat dient op voldoende kabeldwarsdoorsnede van de aansluitleidingen te worden gelet.
• De toegelaten omgevingstemperatuur mag gedurende het bedrijf 0°C
niet onder- en 40°C niet overschrijden.
• Bij de vorming van condenswater moet een acclimatiseringstijd van tot
2 uur worden afgewacht.
• Het apparaat mag niet in de nabijheid van bloemvazen, badkuipen,
wastafels, vloeistoffen etc. worden gebruikt.
• Het apparaat is voor het bedrijf in droge en zuivere ruimten bestemd.
• Bescherm het apparaat tegen vochtigheid, spatwater en hitte.
• Stel het apparaat niet bloot aan sterke vibraties.
• Gebruik het apparaat niet in een omgeving, waar brandbare gassen,
dampen of stof aanwezig zijn of aanwezig kunnen zijn.
• Een reparatie van het apparaat mag alleen door een vakman worden
uitgevoerd.
• Als het apparaat moet worden gerepareerd, mogen uitsluitend originele
reserveonderdelen worden gebruikt. Het gebruik van afwijkende reserveonderdelen kan tot ernstige materiële en persoonlijke schade leiden.
44
Die letzten Ziffern der IMEI sind also das Kennwort für Ihr Gerät und sollten
von Ihnen geheim gehalten werden. Die IMEI ist nicht änderbar!
Alle Kommandos (außer R: und ST?) müssen mit einem Punkt abgeschlossen werden!
Alle Kommandos können, durch jeweils den abschließenden Punkt
getrennt, in einer SMS gleichzeitig versendet werden.
Die Sekundenangaben können 1-3 Stellen haben. Gültige Werte sind z.B.:
1 oder 90 oder 999.
Bitte beachten Sie den Unterschied zwischen der Ziffer 0 und dem Buchstaben O! (O1ON. enthält zweimal den Buchstaben O, V1:0. enthält einmal
die Ziffer 0)
d) Beispiel für SMS Kommandos
Startmeldung aus, Relais 1 an, Relais 2 aus, Aktivierungsdauer Eingang 1:
5 Sek.:
SMS: 2759 S:0.O1ON.O2OFF.I1:5.
Schaltdauer von Relais 1 auf 90 Sekunden:
SMS: 2759 O1:90.
Zurücksetzen in den Fabrikzustand:
SMS: 2759 R:
13
Behebung von Störungen
Fehlerbild
Mögliche
Ursache
Lösung
GSM-LED bleibt
dunkel
Keine
Versorgungsspannung
Keine SIM Karte
oder PIN nicht
"0000"
Kein GSM Netz
verfügbar/ keine
Antenne
angesteckt
Netzgerät
anschließen
GSM-LED erlischt
nach einigen
Sekunden
GSM-LED
dauerhaft an
SIM Karten
PIN auf
"0000" setzen
Antenne
anschließen /
Antennenposition
ändern
GSM-LED erlischt
nach ca. 3 min
Nicht konfiguriert
KonfigurationsAnruf ausführen
STD32 reagiert
nicht auf einen
KonfigurationsAnruf (hebt nicht
nicht ab)
Gerät ist bereits
konfiguriert
Rücksetzen auf
Fabrikeinstellungen.
STD32 reagiert
nicht auf eine
KonfigurationsSMS
Falsche IMEI
Nummer in der
SMS / SMS
wurde (noch)
nicht zugestellt
IMEI – Nummer prüfen. /
SMS Zustel
lung kann
etwas dauern
STD32 reagiert
nicht auf SMS
oder Anrufe,
obwohl es im
GSM Netz
eingebucht ist
Das Mobiltelefon
überträgt keine
Telefonnummer
("Incognito Modus")
Das Mobiltelefon so
einstellen, das
Telefonnummern
übertragen werden
14
• Spanningvoerende kabels of leidingen, waarmee het apparaat, het
onderdeel of de bouwgroep verbonden is, moeten steeds op isolatiefouten of breukplaatsen worden onderzocht. Als een fout in de toevoerleiding wordt vastgesteld, moet het apparaat onmiddellijk buiten werking
worden gesteld tot de defecte leiding werd uitgewisseld.
• Bij gebruik van bouwelementen of bouwgroepen moet steeds op de
strikte naleving van de in de bijbehorende beschrijving genoemde karakteristieke gegevens voor elektrische grootheden worden gewezen.
• Als uit een beschrijving voor de niet industriële eindverbruiker niet duidelijk blijkt, welke elektrische karakteristieke waarden voor een onderdeel of een bouwgroep gelden, hoe een externe bedrading dient te worden uitgevoerd of welke extra apparaten mogen worden aangesloten en
welke aansluitwaarden deze externe componenten mogen hebben,
moet steeds een vakman om inlichtingen worden gevraagd.
• Voor de inbedrijfstelling van een apparaat dient principieel te worden
gecontroleerd, of het apparaat of de bouwgroep principieel voor de toepassing, waarvoor het zal worden gebruikt, geschikt is! In geval van
twijfel dienen vakmannen, deskundigen of de producenten van de
gebruikte bouwgroepen te worden gevraagd!
• Neemt u a.u.b. in acht, dat bedienings- en aansluitingsfouten buiten
onze invloedssfeer liggen. Begrijpelijkerwijze zijn wij voor schade, die
daaruit ontstaat, niet verantwoordelijk.
• Apparaten, die aan een spanning > 35 volt worden gebruikt, mogen
alleen door een vakman worden aangesloten.
• De inbedrijfstelling mag principieel alleen worden uitgevoerd, als de
schakeling absoluut aanraakveilig in een huis is ingebouwd.
• Als metingen aan het geopende huis onvermijdelijk zijn, moet om veiligheidsredenen een scheidingstransformator worden tussengeschakeld of, zoals reeds gezegd, de spanning over een geschikt voedingsapparaat (dat aan de veiligheidsbepalingen voldoet) worden
toegevoerd.
• Alle bedradingswerkzaamheden mogen uitsluitend in spanningsloze
toestand worden uitgevoerd.
43
U mag de STD32 daarom alleen aan de zijranden aanraken en moet vermijden de Pins van bouwelementen op de
printplaat aan te raken.
Richtlijnen
Degene, die een bouwgroep door uitbreiding resp. huisinbouw bedrijfsklaar maakt, geldt volgens DIN VDE 0869 als producent en is verplicht alle
documenten mee te leveren en ook zijn naam en adres aan te geven.
Apparaten, die uit bouwgroepen worden samengesteld, dienen veiligheidstechnisch als een industrieel product te worden beschouwd.
Gedurende het bedrijf van de STD32 kunnen automatisch korte GSMboodschappen (SMS) worden verstuurd, waardoor in de regel kosten ontstaan.
Technische Daten
• GSM: Dual Band EGSM 900/1800 MHz
Kompatibel mit ETSI GSM Phase 2+ Standard
• Ausgangsleistung:
Class 4 (2W @ 900 MHz)
Class 1 (1W @ 1800 MHz)
• Temperaturbereich: -30°C - +75°C
• Gewicht: ca. 110g
• Abmessungen: ca. 100x53x25 mm (LxBxH)
• Betriebsspannung: 9-15V
• Stromaufnahme: ≤ 500 mA
• Max. Schaltstrom: 6A
Max. Schaltspannung: 250V AC
• Eingangsspannung (digitale Eingänge)
logisch 1:
12 V
logisch 0:
0V
Eingangsstrom:
10mA
Veiligheidsaanwijzingen
Bij het omgaan met producten, die met elektrische spanning in contact komen, dienen de geldige VDE-voorschriften in acht te worden genomen, in het bijzonder VDE 0100,
VDE 0550/0551, VDE 0700, VDE 0711 en VDE 0860.
• Voordat een apparaat wordt geopend steeds de netstekker trekken of
verzekeren, dat het apparaat stroomloos is.
• Onderdelen, bouwgroepen of apparaten mogen alleen in bedrijf worden
gesteld, als ze vooraf in een huis werden ingebouwd, zodat ze beveiligd
tegen aanraken zijn. Gedurende de inbouw moeten ze stroomloos zijn.
• Gereedschappen mogen aan apparaten, onderdelen of bouwgroepen
alleen worden gebruikt, als verzekerd is, dat de apparaten van de voedingsspanning gescheiden zijn en elektrische ladingen, die in de onderdelen van het apparaat opgeslagen zijn, vooraf werden ontladen.
42
Hotline
Bei technischen Problemen und Fragen rund um das STD32 steht Ihnen
unsere Hotline zu folgenden Zeiten zur Verfügung:
Mo. – Fr.: . . . . . . . 9:00 – 17:00
Hotline: . . . . . . . . 089 / 450 292 11
oder
[email protected]
Stand: November 2003; Änderungen vorbehalten
15
Table of contens
Inhoud
Important information ............................................................................16
Advice ...................................................................................................17
Safety Instructions .................................................................................17
Operating conditions..............................................................................18
Proper Use.............................................................................................19
Introduction ...........................................................................................19
Connectors and LEDs.............................................................................20
Startup ..................................................................................................20
Function ................................................................................................22
Operation...............................................................................................24
Troubleshooting.....................................................................................26
Technical data .......................................................................................27
Hotline...................................................................................................27
Opgelet! opmerkzaam lezen ..................................................................41
Richtlijn .................................................................................................42
Veiligheidsaanwijzingen.........................................................................42
Bedrijfsvoorwaarden..............................................................................44
Doelgericht gebruik ...............................................................................45
Inleiding.................................................................................................45
Aansluitingen en LEDs ...........................................................................45
Inbedrijfstelling ......................................................................................46
Functie ..................................................................................................47
Bediening ..............................................................................................50
Verhelpen van storingen ........................................................................51
Technische gegevens ............................................................................53
Important information
This user manual contains important information for startup and use of the
STD32. Read it carefully before you start working with the STD32.
The warranty will be null and void should damage occur due to non-compliance with these instructions for use. We cannot accept any responsibility for consequential loss.
Opgelet! opmerkzaam lezen
Deze gebruiksaanwijzing bevat belangrijke richtlijnen voor de inbedrijfstelling en het gebruik van de STD32, leest u a.u.b. deze richtlijnen opmerkzaam door voordat u de STD32 in bedrijf stelt!
We cannot be held responsible for material loss or personal injury that is
due to incompetent use or non-compliance with the safety instructions.
The warranty will be null and void in such circumstances.
Bij schade, die door niet-naleving van de gebruiksaanwijzing ontstaat, vervalt de garantieclaim! Voor uit een schadegeval voortvloeiende verdere
schade zijn wij niet aansprakelijk.
The STD32 contains highly integrated components which can be damaged
by electrostatic discharge.
Bij materiële of persoonlijke schade, die door ondeskundig gebruik of nietnaleving van de veiligheidsaanwijzingen wordt veroorzaakt, zijn wij niet
aansprakelijk. In deze gevallen vervalt elke garantieclaim.
Therefore only touch the STD32 on the edges and avoid to
touch the pins of components on the board.
De STD32 is met hoog geïntegreerde bouwstenen uitgerust. Deze elektronische onderdelen zijn op grond van de technologie zeer gevoelig tegen
ontladingen van statische elektriciteit.
16
41
Advice
• Tension d’entrée (entrées numériques)
logique 1:
12 V
logique 0:
0V
Courant d’entrée:
10mA
The one who makes the module operational by adding further components
or putting it into a housing, is seen as manufacturer according to DIN VDE
0869 and obliged to hand out all necessary documents with the device and
to indicate his name and address. Devices which are made out of modules
have to be considered as an industrial product from the safety perspective.
Hotline
En cas de problèmes techniques et pour toute question concernant le
STD32, notre hotline est à votre disposition aux horaires suivants :
Lundi – Vendredi: . . . . .9:00 – 17:00
Hotline: . . . . . . . . . . . . .49 (0)89 / 450 292 11
ou
[email protected]
Dernière actualisation novembre 2003; sous réserve de modifications.
During use of the STD32 Short Messages (SMS) can be generated automatically. Costs may occur for you by this SMS traffic.
Safety Instructions
When using products which are exposed to electric voltage
the valid VDE-regulations have to be observed. Especially
VDE 0100, VDE 0550/0551, VDE 0700, VDE 0711 and VDE
0860 are applicable.
• Before opening of a device always pull the mains adapter or make sure
that the device is disconnected from the power supply.
• Components, modules or devices have to be build into a housing before
they are put into operation. During installation they need to be voltage free.
• You are only allowed to use tools on components, modules or devices if
the devices are disconnected from the supply voltage and the electric
charge which may still be stored in some components inside the device
have been discharged.
• All cables and wires which are energized and connected to the device,
the module or components have to be checked regularly for any damage of the isolation shield or fractures of the cables. If the supply cables
are visibly damaged the device has to be taken out of operation immediately until the faulty cable has been exchanged.
• When using components or modules it is necessary to strictly observe the
specification given in the corresponding description of these components.
40
17
• If a description for a private end-customer not clearly states which
electric data is valid for a component or a module, how to wire the device, which external components or additional devices can be connected
or which parameters these components are allowed to have always
contact a specialist.
• Before putting into operation a device it has to be clarified whether this
device or module is meant for the field of application is should be used
in. In case of doubt ask specialists or the manufacturer of the used
components.
• Please note that we are not responsible for any errors in usage or
connection. Therefore we cannot accept any responsibility for consequential loss.
• Devices which operate with >35 Volt have to be connected by a specialist.
• Before putting the device into operation it has to be build into a housing
to make sure that no voltage is on the outside.
• In case that measurements with the opened housing are necessary, an
isolating-transformer has to be integrated for saftey reasons. Alternatively the voltage can be supplied by an appropriate power supply which
complies with the safety regulations. All wiring work has to be done in a
voltage free state only.
Operating conditions
• Operate the STD32 only with a supply voltage between 9-15V and have
in mind the polarity! (see picture1) The power supply has to deliver at
least 500mA. If you use a mains adapter for power supply it has to be
conform with the VDE regulations.
• Devices with an operating voltage >35 Volt have to be installed by a
specialist observing the VDE regulations.
• Loads connected to the device are not allowed to exceed 1000W per
relay.
• The maximum voltage is 250V AC (alternating current)
18
Manifestation
Cause possible
Solution
Le LED GSM
s’éteint après
environ 3 min.
Pas de configuration
Procéder à l’appel de
configuration
Le STD32 ne réagit L’appareil est déjà
pas aux appels de configuré
configuration
(ne décroche pas)
Remise aux paramètres
de sortie d’usine.
Le STD32 ne réagit Numéro IMEI erroné
pas à un SMS de
dans le SMS / le SMS
configuration
n’a pas encore été
délivré
Vérifier le numéro IMEI.
/ L’acheminement du
SMS peut prendre un
certain temps
Le STD32 ne réagit
pas aux SMS ou
aux appels, bien
qu’il soit enregistré
sur le réseau GSM
Paramétrer le tél.
mobile de sorte que le
N° de tél. soit transmis.
Le tél. mobile ne
transmet pas de N°
de tél.
(« Mode incognito »)
Caractéristiques techniques
• GSM: Dual Band EGSM 900/1800 MHz
compatible avec ETSI GSM Phase 2+ Standard
• Puisance de sortie:
Class 4 (2W @ 900 MHz)
Class 1 (1W @ 1800 MHz)
• Plage de température: -30°C - +75°C
• Poids: ca. 110g
• Dimensions: ca. 100x53x25 mm (LxBxH)
• Tension de fonctionnement: 9-15V
• Consommation: ≤ 500 mA
• Courant de commutation max. 6A
Tension d’enclenchement max: 250V AC
39
Tous les ordres, pourvu qu’ils soient séparés par le point final, peuvent
être envoyés simultanément dans un SMS.
L’indication des secondes peut comporter de 1 à 3 chiffres. Exemples de
valeurs acceptées : 1 oder 90 oder 999.
Veuillez noter la différence entre le chiffre 0 et la lettre O! (O1ON. contient
2 fois la lettre O, V1:0. contient 1 fois le chiffre 0)
d) Exemple d’ordres SMS
Avis de lancement (« Start ») arrêté, relais 1 en marche, relais 2 arrêté,
durée d’activation entrée 1: 5 secondes:
SMS: 2759 S:0.O1ON.O2OFF.I1:5.
Durée relais 1 portée à 90 secondes:
SMS: 2759 O1:90.
Remise aux paramètres de sortie d’usine:
• The maximum switching power per relay is 6A (depending on the width
of the PCB tracks)
• No special operation position of the device has to be observed.
• When installing the device make sure that the supply cable has a sufficient diameter
• During operation the temperature has to be between 0° and 40° Celsius.
• In case of condensation allow a period of acclimatisation of up to 2
hours.
• Keep away the device from flower vases, bath tubs, washbasins, liquids
etc.
• The device is meant for operation in dry and clean rooms.
• Protect the device from humidity, spray water and heat.
• Do not expose the device to heavy vibrations.
• Do not operate the device in areas where are or could be inflammable
gas, vapours or dust.
• The unit may only be repaired by a specialist.
• Only original parts have to be used when repairing the unit. The use of
differing spare parts can cause serious material loss or personal injury.
SMS: 2759 R:
Dysfonctionnements et remèdes
Manifestation
Cause possible
Solution
Le LED GSM
reste sombre
Le LED GSM
s’éteint après
quelques secondes
Pas d’alimentation
électrique
Pas de carte SIM ou
le PIN n’est pas "0000"
Brancher le bloc
d’alimentation
Mettre le PIN de la carte
SIM sur "0000"
LED GSM en
permanence en
marche
Réseau GSM non
disponible / antenne
non branchée
Brancher l’antenne
/modifier la position de
l’antenne
38
Proper Use
The device is designed for the remote switching of devices via the GSM
network as well as the remote retrieval of status information of the inputs
and the generation of SMS messages after status has changed at the
inputs. A different use apart from the one described above is not allowed.
Introduction
The STD32 is a telemetry module which is easy to install and simple to use.
With the STD32 you can control two relays and monitor the status of two
digital inputs with a common mobile phone.
19
Apart from the STD32 you only need a valid SIM Card of any network
provider (GSM 900 / 1800 MHz).
Typical fields of application are the opening of (garage) doors, switching on
and off light and alarm devices as well as generating alarm messages
(SMS) or the retrieval of information from door sensors, movement sensors
or level sensors etc.
Connectors and LEDs
As described in picture 1 the STD 32 has four pairs of screw terminals.
Two pairs (In1, In2) are inputs to two optocouplers. The other two pairs
(Relay1, Relay2) are outputs (switches) of the 2 relays of the STD32.
PWR: connect the supply voltage of the STD32 here.
ANT: connect the GSM antenna here.
When the engine is booked into the GSM network the GSM LED is flashing
once every 2 seconds.
Utilisation
a) Pilotage par appel téléphonique
La configuration terminée (cf. chapitre "Mise en route"), appelez le numéro de la carte SIM introduite dans le STD32 en veillant à ce que votre téléphone mobile transmette le numéro d’appel. (En manière de test, appelez
un autre téléphone mobile; votre numéro ou votre nom doivent apparaître
sur le display du portable en question). Le relais doit alors réagir pendant
un temps qui sera fonction de la configuration et pendant lequel le LED
correspondant s’allume.
b) Déclencher une alarme SMS
Induisez une tension de 12 V pendant 1 seconde (configuration d’usine) à
une entrée (en veillant à respecter la polarité !). Une SMS d’alarme sera
aussitôt envoyée à votre téléphone mobile.
c) Envoyer un ordre SMS
Afin de protéger votre STD32 de tout accès non autorisé, chaque SMS
adressé au STD32 doit commencer par les 4 derniers chiffres du numéro
IMEI de votre TDS32. Vous trouverez votre IMEI sur le module GSM:
The status LEDs show the status of the inputs and outputs. L1 and L2 are
on if the corresponding relay is activated. L3 and L4 signal the status of the
optocoupler inputs IN1 and IN2.
Please observe the maximum output voltage of the relays and the maximum input voltage of the inputs! In the following chapter "Startup" you will
find further information on this.
Startup
a) Preparation
You need an activated SIM card of a GSM network provider. The PIN of this
card has to be set to "0000". To change the PIN you can use a common
mobile phone. The instructions how to change the PIN are described in the
manual of your mobile phone.
20
Les derniers chiffres de l’IMEI représentent par conséquent le code de
votre appareil, raison pour laquelle il convient de le tenir secret. L’IMEI ne
peut pas être modifé!
Tous les ordres (à l’exception de R: et ST?) doivent s’achever par un point!
37
• Un SMS "ST?" demande une réponse SMS au STD32 au sujet du statut
momentané des sorties et entrées..
• Un SMS "A1:xxx" ou "A2:xxx" (x = secondes) permet de paramétrer le
retard à l’issue duquel le statut consécutif à une opération de commutation est envoyé par SMS-réponse (x=0; pas de SMS-réponse)
f) Tableau des ordres SMS
Remise aux paramètres
de sortie d’usine
Demande de statut
R:
ST?
SMS init. marche/arrêt
S:1. / S:0.
Relais 1 marche
Relais 1 arrêt
O1ON.
O1OFF.
Relais 2 marche
Relais 2 arrêt
O2ON.
O2OFF.
Durée de mise en circuit relais 1
O1:xxx. (secondes)
Durée de mise en circuit relais 2
O2:xxx. (secondes)
Pause avant réaction (relais 1)
A1:xxx. (secondes)
Pause avant réaction (relais 2)
A2:xxx. (secondes)
Durée d’activation entrée 1
I1:xxx. (secondes)
Durée d’activation entrée 2
I2:xxx. (secondes)
Inversion
entrée 1
V1:x. (x= 1/0 )
Inversion
Entrée 2
V2:x. (x= 1/0 )
36
If you use a SIM card with a PIN different from "0000" in the STD32,
the STD32 will use a "wrong" PIN after every restart. After the third
trial your SIM card will be blocked. In this case you need to use the
"Super-PIN" or "PUK" to assign a new PIN to your card. Please look
into the user guide of your mobile phone. There you find how to use
the PUK to de-block the SIM card.
Before connecting the supply voltage to the STD32 please insert the SIM
card into the SIM card holder on the backside of the STD32: To open the
SIM card holder move it sideward and flip it open; insert the card (mind the
orientation) and close it again. To fix it move the top sideward in opposite
direction.
Connect the antenna, if not already done.
Now connect the power supply. Shortly after that the GSM LED will shine
constantly. Now the STD32 will automatically try to connect to the GSM
network. As soon as this is done, the GSM LED will be flashing once every
2 seconds.
b) Configuration call
Wait until the GSM LED is flashing.
Now take the mobile phone with which you want to control the STD32 and
call the phone number of the SIM card which is inside the STD32. The
STD32 will accept the call and cancel it a few seconds later. You will hear
nothing during the established call. With this call the STD32 is configured
to the mobile phone. From now on the STD32 can only be operated by this
mobile phone(or this SIM card in another phone).
If you want to use another mobile phone with a different phone number
with your STD32 you have to set it back to the factory settings before you
can make a new configuration call (see chapter "configuration SMS”).
21
Function
After having configured the STD32 the following functions are available
(see chapter "Startup"):
c) Basic functions
• The STD32 is automatically sending an SMS with the text "START-UP
ALARM" to the configured phone number after the supply voltage is
connected.
• When you call the STD32 from the configured mobile phone the relay 1
switches for one second. Optionally the STD32 is able to send a reply
SMS with the status of the inputs and outputs (see Configuration SMS).
• When the digital input IN1 is activated for one second, the STD32 sends a
SMS with the text "EVENT ALARM1" to the preconfigured phone number
• When the digital input IN2 is activated for one second, the STD32 sends a
SMS with the text "EVENT ALARM2" to the preconfigured phone number.
d) Switching per SMS
• Before sending SMS messages to the STD32 please read "SMS Commands” in chapter "Operation".
• After the STD32 has received a SMS with the text "O1ON" from the
configured mobile phone, the relay 1 switches for one second. With the
SMS "O2ON" relay 2 switches for one second.
• If the switching time has been set to 0 by a configuration SMS the
relays switch permanently (see e)).
e) Configuration SMS
• Before sending SMS messages to the STD32 please read "Send SMS
Commands” in chapter "Operation".
• A SMS with the text "O1:xxx"oder "O2:xxx"(xxx = seconds) configures
the switching time of the relays. The STD32 saves these settings so
that they are still available after the supply voltage has been restored.
• If the switching time has been set to 0 by a configuration SMS the corresponding relay switches permanently at every call. If the relay has
been active before it will afterwards be inactive and vice versa.
22
• Lorsque l’entrée numérique IN1 est activée pendant une seconde, le
STD32 envoie un SMS indiquant "EVENT ALARM 1" au téléphone mobile paramétré.
• Lorsque l’entrée numérique IN2 est activée pendant une seconde, le
STD32 envoie un SMS indiquant "EVENT ALARM 2" au téléphone mobile paramétré.
d) Pilotage par SMS
• Lorsque le STD32 a reçu un SMS porteur du message "O1ON" émis par
le téléphone mobile, le relais 1 est mis en circuit pendant l’espace d’une seconde.
e) SMS de configuration
• Un SMS indiquant "O1:xxx" ou "O2:xxx"(xxx = secondes) permet de
configurer les périodes de mise en circuit des relais. Le STD32 mémorise ces paramètres, même après avoir été mis hors-tension.
• Si, par l’intermédiaire d’un SMS de configuration, la périodicité de mise
en circuit d’un relais a reçu la valeur 0, le STD32 fait basculer le relais
en question de façon permanente. Si le relais était activé auparavant, il
est ensuite désactivé et vice-versa. Ce n’est que dans ce cas de figure
qu’un SMS indiquant "O1ON" et envoyé par le téléphone mobile met en
circuit le relais de façon permanente. Inversement, un SMS indiquant
"O1OFF", le met hors circuit de façon permanente. Le relais 2 réagit de
manière identique aux SMS portant les indications. "O2ON" et "O2OFF"
• Un SMS indiquant "I1:xxx" ou "I2:xxx" (xxx = secondes) permet de
configurer les temps des deux entrées au cours desquels elles doivent
être activées, afin que le STD32 envoie une alarme SMS
• Un SMS indiquant "V1:x" ou "V2:x" (x = 1 ou 0) permet d’échanger les
polarités des entrées. Pour x=1, un SMS d’alarme est émis, si l’entrée
n’est pas acrivée plus longtemps que le temps configuré.
• Un SMS indiquant "S:x" (X = 1 ou 0) permet de mettre en circuit ou
hors circuit le SMS de lancement (START-UP ALARM).
• Un SMS "R:" remet l’appareil aux paramètres de sortie d’usine.
35
Branchez maintenant l’antenne GSM, au cas où ce n’aurait pas déjà été fait.
Procédez ensuite à la mise sous tension. Le LED GSM s’allume peu après
et demeure allumé. A présent, le STD32 tente de s’enregistrer automatiquement sur le réseau GSM. Aussitôt qu’il y est parvenu, le LED clignote
toutes les deux secondes environ.
b) Appel de configuration
Attendez jusqu’à ce que le LED GSM ait commencé à clignoter.
•
Appelez ensuite le numéro de la carte SIM du STD32 à partir du téléphone
mobile à l’aide duquel vous souhaitez piloter le STD32. Le STD32 va
prendre l’appel et y mettre fin quelques secondes plus tard, sans que
vous-même n’entendiez rien. Cet appel aura eu pour effet de paramétrer le
STD32 sur le téléphone mobile dont l’appel est issu. A partir de dorénavant, le STD32 ne peut plus être piloté que par l’intermédiaire du téléphone mobile sur lequel a été effectué cet appel de configuration !
•
Si vous souhaitez utiliser un autre téléphone mobile, il est indispensable de
remettre l’appareil aux paramètres de sortie d’usine à l’aide d’un SMS de
configuration, en préalable à tout nouvel appel de configuration (cf. chapitre « SMS de configuration »).
•
•
•
•
In this case a SMS with the text "O1ON" from the configured mobile
phone switches the relay 1 permanently on. A SMS with "O1OFF" permanently switches off relay 1. Relay 2 is reacting accordingly to SMS
messages with "O2ON" and "O2OFF". In case the switching time is not
set to 0 "O1ON" and "O1OFF"("O2ON" and "O2OFF") have the same
effect as described under d).
With a SMS with the text "I1:xxx" or "I2:xxx" (xxx = seconds) you can
configure the time the inputs have to be activated before the STD32
sends out an alarm SMS.
A SMS with the text "V1:x" or "V2:x" (x = 1 or 0) can change the polarity of the inputs. If x=1 an alarm SMS will be sent in case the input has
not been activated for the configured time.
You can activate or deactivate the Start up SMS (START-UP ALARM)
with the SMS "S:x" (x = 1 or 0).
The SMS "R:" is setting the STD32 back to the factory settings.
To get a feedback of the actual status of the inputs and outputs just
send a SMS with "ST?”.
The SMS "A1:xxx" or "A2:xxx" (x = seconds) sets the delay after which
a reply SMS is sent after an output has been activated (x=0; no reply).
f) Table of SMS Commands
Factory settings
Status of I/Os
R:
ST?
Fonction
Start SMS on/off
S:1. / S:0.
Une fois le STD32 configuré (cf. chapitre mise en route), les fonctions suivantes sont à votre disposition:
Relais 1 on
Relais 1 off
O1ON.
O1OFF.
c) Fonctions de base
• Après la mise sous tension, le STD32 envoie automatiquement un SMS
indiquant "START-UP ALARM" au numéro de téléphone paramétré.
• Le STD32 ayant reçu un appel du téléphone mobile, il met le relais 1 en
circuit pendant l’espace d’une seconde.
Relais 2 on
Relais 2 off
O2ON.
O2OFF.
Switching time
Relais 1
O1:xxx. (seconds)
Switching time
Relais 2
O2:xxx. (seconds)
34
23
Delay before reply (Relais 1)
A1:xxx. (seconds)
Delay before reply (Relais 2)
A2:xxx. (seconds)
Time of activation Input 1
I1:xxx. (seconds)
Time of activation Input 2
I2:xxx. (seconds)
Invert
Input 1
V1:x. (x= 1/0 )
Invert
Input 2
V2:x. (x= 1/0 )
Lorsque le module s’est enregistré sur le réseau GSM, le LED GSM clignote une fois toutes les 2 secondes environ.
Les LEDs de statuts indiquent le statut des entrées et sorties. L1 et L2 sont
allumées lorsque le relais correspondant est activé. L3 et L4 indiquent le
statut des octocoupleurs entrées IN1 et IN2.
Veuillez respecter le courant de commutation maximal des relais et le courant d’entrée maximal des octocoupleurs ! Vous trouverez de plus amples
informations à ce sujet au chapitre
"mise en service".
Operation
Mise en service
a) Switching by phone call
After successful configuration (see chapter "Startup") please call the
phone number of the SIM card which is inside the STD32. Take care that
your mobile phone is transmitting the phone number (to check that you can
call another mobile phone; your phone number or name must be visible on
the display then) Now the relay should switch for a certain time according
to the configuration. The status LED for relay 1 is shining during that.
a) Préparation
Pour la mise en service du STD 32, vous devez disposer d’une carte SIM
activée fournie par un opérateur de téléphonie mobile GSM, sur laquelle le
PIN est placé sur "0000". Pour paramétrer le PIN, vous pouvez utiliser un
téléphone mobile usuel. Veuillez consulter la notice d’emploi de votre téléphone mobile pour modifier le PIN.
b) Generate an alarm SMS
Connect 12V (factory setting) to an input for one second and mind the
polarity. An alarm SMS will be sent to your mobile phone.
Si vous avez introduit une carte SIM avec un PIN différent du "0000",
le STD32 emploiera un PIN erroné à chaque mise en route, avec pour
conséquence que la carte SIM bloquera votre PIN au troisième essai.
Dans un tel cas, vous devez assigner un nouveau PIN à la carte SIM à
l’aide du super PIN (PUK). Veuillez consulter la notice d’emploi de
votre téléphone mobile, qui vous indiquera la marche à suivre pour
paramétrer le PIN ou débloquer un PIN à l’aide du PUK.
c) Send SMS Commands
To protect your STD32 against unauthorized use every SMS has to start
with the last 4 digits of the IMEI number. YOUR IMEI is printed on the GSMengine of your STD32.
24
Veuillez placer la carte SIM dans l’espace prévu à cet effet et situé sur l’arrière du STD32 avant la mise sous tension. A cette fin, repoussez légèrement le couvercle de protection du support de la carte SIM et ouvrez-le.
Introduisez la carte dans le couvercle, refermez-le et verrouillez-le en le
repoussant.
33
Utilisation conforme
La destination de l’appareil est de permettre la mise en route et l’arrêt à
distance d’appareils via le réseau GSM, ainsi que l’interrogation à distance
des entrées et l’émission de SMS suite à une modification des entrées.
Toutre autre utilisation que celle expressément indiquée ci-dessus n’est
pas autorisée.
Introduction
The last digits of the IMEI are the password to your device and should be
kept confidential. The IMEI cannot be changed!
Le STD32 est un module de télémétrie d’un maniement et d’une installation aisées.
All Commands (except R: and ST?) must end with a full stop (.)!
Par l’intermédiaire d’un simple téléphone mobile, le STD32 permet de piloter 2 relais et de surveiller le statut de deux entrées numériques.
En dehors du STD32, vous n’avez besoin pour cela que d’une carte téléphonique SIM activée fournie par un opérateur de téléphonie mobile (z.B.:
Vodafone, Bouygues, Itinéris, E-Plus).
Au nombre des applications typiques, on notera l’ouverture et la fermeture
de portes (y compris de garages), l’éclairage et le pilotage d’alarmes ainsi
que l’émission de messages d’alarme (SMS) ou l’interrogation de capteurs
divers (de portes, de mouvements, de niveaux etc).
All Commands can be sent in one SMS; each command has to separated
from the next by a full stop.
The parameters for the seconds can have 1-3 digits. Valid parameters are
e.g. 1 or 90 or 999.
Please observe the difference between the figure 0 and the letter O!
(O1ON. contains twice the letter O, V1:0. contains once the figure 0)
d) Examples for SMS Commands
Start up Alarm off, Relay 1 on, Relay 2 off, time of activation of input 1: 5
sec.:
SMS: 2759 S:0.O1ON.O2OFF.I1:5.
Switching time of relay 1 = 90 seconds:
Branchements et LEDs
Le STD 32 est équipé de 4 paires de bornes à vis, ainsi que le montre la fig.
1. (In1, In2) sont les entrées de 2 octocoupleurs. Les 2 autres paires
(Relais1, Relais2) sont les sorties (commutateurs) des 2 relais sur le STD32.
SMS: 2759 O1:90.
Factory settings:
SMS: 2759 R:
L’alimentation électrique du STD32 est fournie à partir du raccord PWR.
L’antenne GSM est vissée sur le raccord ANT.
32
25
Troubleshooting
Problem
Possible reason
Solution
GSM LED stays dark
No supply voltage-
Connect power supply
GSM LED dies after
a few seconds
No SIM card or PIN
not "0000”
Put PIN to "0000" or
insert SIM card
GSM LED constantly on No GSM network
Connect antenna /
available / no antenna Change antenna
connected
position
GSM LED dies after
3 minutes
No configuration
Make configuration
call
STD32 does not react Device is already
on configuration call configured
(not accepting the call)
Set back to factory
settings
STD32 does not react Wrong IMEI number
on configuration SMS in the SMS / SMS not
yet delivered
Check IMEI number. /
Wait until SMS is
delivered
STD32 does not react
on SMS, or call,
although booked to
the network
Activate the transmission of the phone
number in your mobile
phone
26
The mobile phone
does not transmit the
phone number
("Incognito")
• Pour les appareils fonctionnant sur une tension >35 Volts: le montage
final ne doit être effectué que par un spécialiste et en respectant les
directives VDE !
• La puissance connectée des appareils reliés au prêt-à-monter ne doit
pas excéder 1000W par relais.
• La tension d’enclenchement maximale est de 250V AC (courant alternatif)
• Le courant de commutation maximum par relais est de 6A (liés à la largeur de la bande conductive) par relais.
• La position de l’appareil est indifférente.
• Lors de l’installation de l’appareil, on veillera à ce que le diamètre des
câbles de connexion soit de taille suffisante.
• La température ambiante autorisée pendant le fonctionnement ne doit
pas excéder 40° ni descendre au-dessous de 0°.
• En cas de formation de condensation, on devra respecter un délai
d’acclimatation pouvant aller jusqu’à 2 heures.
• On tiendra l’appareil éloigné des vases, baignoires et de façon générale de tout liquide.
• L’appareil est conçu pour être utilisé dans un environnement propre et
sec.
• Tenez l’appareil à l’abri de l’humidité, des projections d’eau et des
effets de la chaleur.
• Evitez d’exposer l’appareil à de fortes vibrations.
• Ne faites pas fonctionner l’appareil dans un environnement où des gaz
inflammables, des vapeurs ou des poussières pourraient se trouver.
• L’appareil ne doit être réparé que par un spécialiste.
• Au cas où l’appareil devrait être réparé, n’utiliser exclusivement que
des pièces originales. L’utilisation de pièces autres fait courir le risque
de dommages matériels et corporels sérieux.
31
• L’utilisation d’éléments ou de prêts-à-monter exige de s’en tenir strictement aux caractéristiques assignées pour les grandeurs électriques,
caractéristiques figurant dans leurs descriptifs respectifs.
• Si un descriptif ne permet pas à un utilisateur non commercial de connaître avec certitude la ou les valeurs électriques s’appliquant à tel ou
tel élément ou prêt-à-monter, ni de déterminer la manière exacte d’effectuer une connexion externe, ou encore de savoir comment connecter
des éléments ou des appareils supplémentaires externes et d’en connaître les charges de connexion, il convient dans tous les cas d’avoir
recours à l’avis d’un spécialiste.
• De façon générale, avant toute mise en service, on vérifiera que l’appareil ou le prêt-à-monter sont bien à même de remplir les fonctions
auxquelles on les destine ! En cas de doute, il est indispensable de s’adresser à des spécialistes, des experts ou au constructeur!
• Veuillez prendre en considération le fait qu’erreurs de montage ou de manipulation ne relèvent pas de notre sphère d’influence et que nous ne saurions être tenus pour responsables des dommages qui en résulteraient.
• Tout appareil fonctionnant sur une tension > 35 Volt ne doit être branché que par un spécialiste.
• La mise en service ne sera effectuée que si le commutateur est totalement protégé des contacts par un boîtier.
• Au cas où des mesures boîtier ouvert s’avèreraient inévitables, on
devra intercaler au préalable, par mesure de sécurité, un transformateur de séparation ou fournir la tension par l’intermédiaire d’un bloc
d’alimentation approprié répondant aux normes de sécurité.
• Toutes les opérations de câblage doivent être effectuées hors-tension.
Technical data
• GSM: Dual Band EGSM 900/1800 MHz
Compatible with ETSI GSM Phase 2+ Standard
• Output power:
Class 4 (2W @ 900 MHz)
Class 1 (1W @ 1800 MHz)
• Temperature range: 0°C - +40°C
• Weight: ca. 110g
• Dimensions: ca. 100x53x25 mm (lxwxh)
• Supply voltage: 9-15V
• Power consumption: ≤ 500 mA
• Max. output voltage: 6A
Max. voltage: 250V AC
• Input voltage (digital inputs)
logic 1:
12 V
logic 0:
0V
input current:
10mA
Hotline
In case of technical problems or questions concerning the STD32 our hotline is available for you:
Monday – Friday: . . . . . . 9:00 – 17:00
Hotline: . . . . . . . . . . . . . +49 89 / 450292-11
or
[email protected]
Conditions d’exploitation
• Ne faites fonctionner le STD32 qu’avec une tension comprise entre 9 et
15 V et ayez soin de respecter la polarité! (cf. fig. 1) La source de courant doit impérativement être en mesure de fournir un minimum de 500
mA. Si vous avez recours à un boîtier d’alimentation comme source de
courant, celui-ci doit absolument satisfaire aux normes VDE!
30
Issue: November 2003
Subject to change without notice!
27
Table de matières
Remarques
Attention! A lire impérativement.............................................................28
Remarque..............................................................................................29
Instructions relatives à la sécurité..........................................................29
Conditions d’exploitation........................................................................30
Utilisation conforme...............................................................................32
Introduction ...........................................................................................32
Branchements et LEDs ..........................................................................32
Mise en service .....................................................................................33
Fonction ................................................................................................34
Utilisation ..............................................................................................37
Dysfonctionnements et remèdes............................................................38
Caractéristiques techniques...................................................................39
Au regard de la norme DIN VDE 0869, est considéré comme constructeur
quiconque procède à l’assemblage et/ou à la modification - par exemple
par l’adjonction d’un capot - d’un prêt-à-monter à des fins d’exploitation.
Lors de la remise de l’appareil à un tiers, la loi lui fait obligation de transmettre tous les documents y afférants, ainsi que son nom et son adresse.
Considérés sous l’aspect de la sécurité, les appareils assemblés à partir de
prêts-à-monter doivent être regardés comme des produits industriels.
Attention! A lire impérativement
Cette notice d’emploi contient des indications importantes relatives à la
mise en service et au maniement du STD32 ; veuillez les lire attentivement
avant de procéder à sa mise en route!
Les dommages causés par le non-respect des indications figurant sur la
notice d’emploi ne sont pas couverts par la garantie. Le constructeur décline toute responsabilité pour les dommages subséquents.
Il en va de même pour tous les dommages matériels ou corporels provoqués par un maniement non conforme ou la non-observation des instructions de sécurité.
Le STD32 est équipé d’éléments électroniques intégrés d’une haute compacité. De par leur technologie, ces éléments sont particulièrement sensibles aux décharges d’électricité statiques.
Ayez soin par conséquent de ne toucher le STD32 que sur
les côtés et veuillez éviter tout contact avec les pins des
éléments situés sur la platine.
28
Pendant le fonctionnement du STD32, des messages courts (SMS) peuvent
être automatiquement émis, ce qui, en règle générale, occasionne des frais.
Instructions relatives à la sécurité
La manipulation de produits qui entrent en contact avec
des tensions électriques impose de respecter les normes
VD en vigueur, en particulier les VDE 0100, VDE
0550/0551, VDE 0700, VDE 0711 und VDE 0860.
• Toujours retirer la prise de courant ou s’assurer que l’appareil n’est pas
sous tension avant de procéder à l’ouverture.
• Eléments, prêt-à-monter ou pièces ne seront mis en service qu’après
avoir été montés à l’abri d’un capot afin de prévenir tout contact. Ils
seront maintenus hors-tension pendant l’assemblage.
• S’assurer de même qu’ils se trouvent hors-tension et que les tensions
électriques emmagasinées ont été déchargées, en préalable à toute
intervention effectuée à l’aide d’outils.
• On examinera avec le plus grand soin les câbles et circuits conducteurs
reliés aux éléments, pièces ou prêt-à-monter, afin de déceler d’éventuels déficits d’isolation ou points de rupture. Si un défaut est décelé,
l’appareil doit être aussitôt mis hors-service jusqu’à ce que le circuit
incriminé ait été remplacé.
29