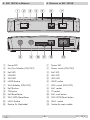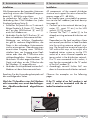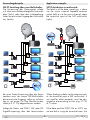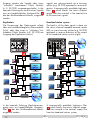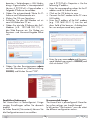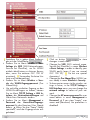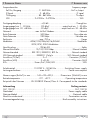
1
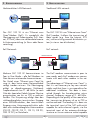
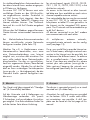
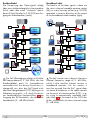
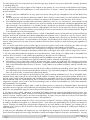
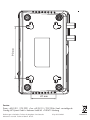
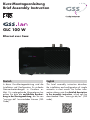
KLASSE Kurz-Montageanleitung Brief Assembly Instruction CLASS GLC 100 W Ethernet over Coax Deutsch English In dieser Kurz-Montageanleitung wird die Installation und Konfiguration für einfache Netzwerkverbindungen in Kurzform erklärt. Für weitergehende Informationen beachten Sie bitte die ausführliche Beschreibung in der Montageanleitung, die Sie von "www.gss.de" herunterladen können (QRCode). This brief assembly instruction describes the installation and configuration of simple networks in short words. For further information please note the detailed description in the assembly instruction, which can be downloaded from "www.gss.de/en" (QR code). GLC100W_D GLC100W_EN Deutsch 1 English W ichtige I nformationen 1 I mpor tant information +40 +5 5 cm 10 cm 5 cm 0 VORSICHT: UM DIE GEFAHR EINES ELEKTROSCHOCKS ZU VERMEIDEN, SOLLTEN SIE NIEMALS DAS GEHÄUSE ÖFFNEN. ES BEFINDEN SICH IM GERÄT KEINE TEILE DIE VOM ANWENDER REPARIERT WERDEN KÖNNEN, BEI BEDARF WENDEN SIE SICH AN QUALIFIZIERTE SERVICEFACHKRÄFTE. ATTENTION: IN ORDER TO REDUCE THE RISK OF ELECTRIC SHOCK, DO NOT OPEN THE CABINET. INSIDE THE CABINET THERE ARE NO PART WHICH CAN BE REPAIRED BY THE USER. IF NECESSARY CONTACT QUALIFIED SERVICE TECHNICIANS. Sicherheitsvorkehrungen: Dieses Gerät wurde nach Vorgaben internationaler Sicherheitsstandards hergestellt. Zu ihrem eigenen Schutz sollten Sie die Sicherheitsvorkehrungen sorgfältig durchlesen, bevor Sie ihr neues Gerät in Betrieb nehmen. Der Hersteller übernimmt keine Haftung für Schäden, die durch unsachgemäße Handhabung und durch Nichteinhaltung der Sicherheitsvorkehrungen entstanden sind. Safety Precautions: This device was manufactured according to the specifications of international safety standards. For your own protection, you should read the safety instructions carefully before using your new device. The manufacturer assumes no liability for damages caused by improper handling or by ignoring the safety precautions. • Dieses Gerät ist für die Übertragung von Datensignalen über Koaxkabel bestimmt. Jede andere Verwendung ist ausdrücklich ausgeschlossen. • Betreiben Sie das Gerät ausschließlich mit dem beiliegenden Netzkabel. • Wenn das Gerät starken Temperaturschwankungen ausgesetzt ist, z.B. beim Transport vom Kalten ins Warme, lassen Sie es mindestens zwei Stunden im Betriebsraum stehen, bevor Sie es an das Stromnetz anschließen. • Setzen Sie das Gerät keinerlei Feuchtigkeit aus. Das Gerät ist für den Betrieb in trockenen Räumen bestimmt. • This device is designed to transmit data signals via coaxial cables. Any other use is expressly prohibited. • Operate the device only with the supplied AC cable. • If the device is subject to a sudden change in temperature, for example when brought in from the cold to a warm room, let it stand for at least two hours before you connect it to the mains supply. • Do not expose the device to any moisture. The device is designed for use in dry rooms. • Place the device on a flat, solid surface for use. - 2 - GLC 100 W • Betreiben Sie das Gerät auf einer ebenen und harten Unterlage. • Stellen Sie eine ausreichende Belüftung des Gerätes sicher. Sorgen Sie dafür, dass links und rechts ein freier Raum von etwa 5 cm, oben von 10 cm zur Verfügung steht, damit die Luft ungehindert zirkulieren kann und das Gerät nicht überhitzt. Decken Sie die Lüftungsschlitze niemals mit Zeitungen, Tischtüchern, Gardinen, usw. ab. • Stellen Sie keine mit Flüssigkeit gefüllten Gefäße oder offene Brandquellen (z.B. Kerzen) auf das Gerät. • Betreiben Sie das Gerät nicht in unmittelbarer Nähe von Heizelementen oder in der prallen Sonne. • Das Gerät sollte bei Temperaturen von 0ºC bis 40ºC betrieben werden. Verwenden Sie das Gerät nur in einem gemäßigten Klima, nicht unter tropischen Bedingungen. • Vermeiden Sie Kurzschlüsse! • Gewitter stellen eine Gefahr für jedes elektrische Gerät dar. Auch bei ausgeschaltetem Gerät kann es durch einen Blitz einschlag in das Stromnetz und/oder in die Antennenanlage beschädigt werden. Trennen Sie deshalb bei einem Gewitter oder bei längeren Betriebspausen (z.B. Urlaub) das Gerät vom Netz und von der Antennenanlage. • Schließen Sie nur geeignete Zubehörteile an. • Bei Beschädigung Stromzufuhr zum Gerät unterbrechen. • Öffnen Sie das Gerät auf keinen Fall. Schäden durch fehlerhaften Anschluss und/ oder unsachgemäße Handhabung sind von jeglicher Haftung ausgeschlossen. • Make sure the device is adequately ventilated. Make sure that the left and right, a free space of about 5 cm, 10 cm above is available to allow the air to circulate freely and the device does not overheat. Never cover the vents with newspapers, tablecloths, curtains, etc.. • Do not place anything on the device which could initiate fires (e.g. candles) or contain liquids. • Do not use the device close to heating units or in direct sunlight. • The device should be operated at temperatures of 0 ºC to 40 ºC. Use the device only in a moderate climate, not in tropical conditions. • Avoid short circuits! • Thunderstorms are a danger to all electrical devices. Even if the device is switched off, it can be damaged by a stroke of lightning to the mains or the antenna cable. Therefore always disconnect the device from the mains and from the antenna unit during a thunderstorm or extended shutdowns (e.g. holidays). • Connect only appropriate accessories. • In case of a damage, interrupt the power supply. • Never open the device under any circumstances. No liability is accepted for damage caused by faulty connections or inappropriate handling of the device. The devices meet the EU directives 2006/95/EC, 2004/108/EC and 2011/65/EU. The product fulfils the guidelines and standards for CE labelling. Die Anforderungen der EG-Richtlinien 2006/95/EG, 2004/108/EG und 2011/65/EU werden erfüllt. Das Produkt erfüllt die Richtlinien und Normen zur CE-Kennzeichnung - 3 - GLC 100 W 2 K ur zbeschreibung 2 B rief Herkömmliches LAN-Netzwerk: Traditional LAN network: description Smart-TV Router Das GLC 100 W ist ein "Ethernet over Coax"-Modem (EoC). Es ermöglicht die Übertragung von Datensignalen (z.B. Internet, IPTV etc.) über eine vorhandene koaxiale Antennenverteilung (in Stern- oder Baumverteilung). The GLC 100 W is an "Ethernet over Coax" (EoC) modem. It allows the transmission of data signals (e.g. from the Internet, IPTV etc.) via an existing coaxial distribution system (in star or tree distribution). EoC-Netzwerk: EoC network: Ethernet over Coax Smart-TV Router Power EoC LAN Wifi Power Mehrere GLC 100 W kommunizieren im Peer to Peer Mode – alle EoC-Modems im Netz können miteinander kommunizieren. Der Vorteil einer "Ethernet over Coax"-Lösung ist, dass keine neuen Netzwerkkabel verlegt werden müssen. Die Übertragung erfolgt im dämpfungsarmen RückkanalFrequenzbereich von 2…68 MHz. Je nach Güte des koaxialen Kabels können Übertragungsstrecken von bis zu 700 m realisiert werden. Die Einspeisung erfolgt über den rückkanaltauglichen terrestrischen Eingang eines SAT-Multischalters, den terrestrischen Eingang einer Antennenverteilstruktur oder über eine rückkanaltaugliche Antennendose (OR 02, OR 09, OR 11, OR 15, OR 20, ORS 13 DC) im Verteilnetz. EoC LAN WiFi The EoC modems communicate in peer to peer mode, each EoC modem can communicate with each other modem in the network. The advantage of "Ethernet over Coax" is that it is not necessary to lay new network cables and that there is no expenditure for additional installation. The data is transmitted through the low-attenuation return channel, frequency range of 2…68 MHz. Depending on the quality of the coaxial cable, transmission distances of up to 700 m can be realized. The feeding in is done via the terrestrial input of the SAT multiswitch capable for return-channel signals, via the terrestrial input of the antenna distributor structure or via an antenna socket capable - 4 - GLC 100 W An rückkanaltauglichen Antennendosen stehen dann Internet- bzw. andere eingespeiste IP-Daten zur Verfügung. An einem GLC 100 W können zwei netzwerkfähige Geräte an den LAN-Anschlüssen angeschlossen werden. Zusätzlich ist ein WiFi Access Point integriert, über den z.B. Handys oder Tablet-PCs Zugang zum Internet erhalten können. Das Netzwerk kann auf bis zu 64 EoC-Geräte ausgebaut werden. Alle an den EoC-Modems angeschlossenen Geräte können untereinander kommunizieren. for return-channel signals (OR 02, OR 09, OR 11, OR 15, OR 20, ORS 13 DC) in the distribution network. An access to the Internet or other transmitted data are then available on each return channel capable antenna sockets. Two networkable devices can be connected to one GLC 100 W. In addition e.g. mobile phones or tablet PCs can get access to the Internet via the integrated WiFi access point. The IP network can be extended to up to 64 EoC devices. All devices connected to an EoC modem can communicate with each other. Bei Mehrteilnehmer-Antennennetzwerken können verschlüsselte, private Netzwerke konfiguriert werden (siehe Seite 13). At multiple-user antenna networks, encrypted private networks can be configured (see page 13). Möchten Sie z.B. in Hotelzimmern einen Internetanschluss bereitstellen, muss zwar eine Netzwerkverbindung zum Internet möglich sein, zwischen den einzelnen Zimmern sollte jedoch keine Netzwerkverbindung bestehen. Um dies zu verwirklichen, kann ein sogenannter Master/Slave-Betrieb eingestellt werden. Wenden Sie sich bei Bedarf an Ihren zuständigen Vertriebspartner (www.gss.de —> Vertriebspartner), da das Netzwerk hierfür speziell konfiguriert werden muss. If e.g. you would like to provide Internet access in hotel rooms, although a network connection to the Internet must be possible, but not between the different rooms. To achieve this, a so-called master / slave mode can be set. If you have any need for this, please contact your sales partner (www.gss.de -> Sales partners) because the network must be configured specifically for this purpose. 3 M ontage 3 A ssembly Das Gerät wird überwiegend als "Standgerät" (4 Gummifüße) betrieben. The device is operated primarily as a stand mounted unit (4 rubber feet). Auf der Unterseite sind 4 Halterungen zur Wandmontage vorhanden. Mit jeweils 2 Schrauben sind verschiedene Ausrichtungen möglich. Eine Bohrschablone finden Sie auf der letzten Seite dieser Anleitung. 4 brackets for wall mounting are provided on the bottom. With 2 screws each different orientations are possible. A drill template can be found on the last page of this manual. - 5 - GLC 100 W 4 GLC 100 W im Ü berblick 4 O ver view 12 345 6 OFF ON of GLC 100 7 OFF Power LAN2 W ON WiFi 110-230V~ 50-60Hz EoC 8 1 2 3 4 5 6 7 8 9 0 ! @ # Power-LED TV EoC Reset WiFi WPS Reset 9 0 ! @ Ein-/Aus-Schalter (ON/OFF) EoC-LED LAN-LED WiFi-LED LAN2-Buchse WiFi-Schalter (ON/OFF) EoC-Buchse TV-Buchse EoC-Reset-Taster WiFi WPS/Reset-Taster LAN1-Buchse Buchse für Netzkabel LAN1 # 1 Power LED 2 Power switch (ON/OFF) 3 EoC LED 4 LAN LED 5 WiFi LED 6 LAN2 socket 7 WiFi switch (ON/OFF) 8 EoC socket 9 TV socket 0 EoC reset button ! WiFi WPS/Reset button @ LAN1 socket # Socket for mains cable - 6 - GLC 100 W 5 I nstallation und I nbetriebnahme 5 I nstallation and commissioning Installation Installation Alle Komponenten der koaxialen Antennenverteilung müssen den Rückkanal-Frequenzbereich 2…68 MHz unterstützen. Im einfachsten Fall stellen Sie eine EoCVerbindung über 2 EoC-Modems her (siehe Kurzbeschreibung Seite 4). • Schließen Sie jeweils bis zu 2 netzwerkfähige Geräte (z.B. Router, PC, Smart-TV etc.) an den LAN-Buchsen 6 und @ eines EoC-Modems an. • Verbinden Sie die EoC-F-Buchsen 8 mit dem vorhandenen Antennenverteilnetz. Abhängig von örtlichen Gegebenheiten gibt es mehrere Möglichkeiten, die Daten in die vorhandene Antennennetzstruktur einzuspeisen. Über den passiven terrestrischen Eingang eines SAT-Multischalters bzw. am Ausgang einer Kopfstation oder über die CTV-Buchse einer rückkanaltauglichen Antennendose im Verteilnetz. Ein dort angeschlossenes TVGerät wird dann an der TV-Buchse des EoC-Modems 9 angeschlossen. • Verbinden Sie entsprechend weitere EoCModems mit dem Antennenverteilnetz. All components of the coaxial distributor structure must support the return channel frequency range of 2…68 MHz. In the simplest case, you establish a connection via two EoC modems (see brief description page 4). • Connect up to two network devices (e.g. router, PC, smart TV etc.) to the LAN sockets 6/@ on one. • Connect the "EoC" F socket 8 to the already existing antenna distribution network. Dependant on the local conditions there are several possibilities to feed the data into the existing antenna network structure. Via the passive terrestrial input of a SAT multiswitch resp. at the output of a head-end station system or via the CTV socket of a return channel capable antenna socket in the distribution network. If a TV was connected to this socket, it can then be connected to the TV socket of the EoC modem 9. • Accordingly connect further EoC modems to the antenna distribution network. Beachten Sie die Anwendungsbeispiele auf den nachfolgenden Seiten. Observe the examples on the following pages. Wird der TV-Anschluss eines EoC-Modems nicht verwendet, muss er mit dem beiliegenden Abschlusswiderstand abgeschlossen werden! If the TV socket of an EoC modem is not used, it must be terminated with the attached termination resistor! Power EoC LAN WiFi - 7 - GLC 100 W Anwendungsbeispiele Application examples SAT-ZF-Verteilung über einen Multischalter: Die Einspeisung des Datensignals erfolgt z.B. über eine rückkanaltaugliche Antennendose (links), oder über den rückkanaltauglichen terrestrischen Eingang des Multischalters (rechts). SAT IF distribution via multiswitch: The feed in of the data signal e.g. is done via the return channel capable antenna socket (left) or via the return channel capable terrestrial input of the SAT multiswitch (right). SR 203 Router Power TV EoC LAN WiFi Receiver QRS13DC Power EoC LAN TV WiFi Power EoC LAN WiFi Receiver Receiver TV TV QRS13DC Power EoC LAN QRS13DC WiFi Power EoC LAN WiFi Receiver Receiver TV TV QRS13DC Power EoC LAN QRS13DC WiFi Power EoC LAN WiFi Receiver Receiver TV TV QRS13DC QRS13DC Power Power EoC LAN Receiver QRS13DC EoC LAN WiFi WiFi Router Bei einer Daten-Einspeisung über die Antennendose muss bei einem SAT-Multischalter der terrestrische Eingang, sofern er nicht belegt ist, mit einem 75 Ohm Abschlusswiderstand (z.B. FT 75) abgeschlossen werden. When feeding in data via the antenna socket, the terrestrial input a SAT multiswitch, if not used for other purposes, must be connected to a terminating resistor (e.g. FT 75) of 75 ohms. Erfolgt die Daten- und DVB-T-, FM- oder BKSignal-Einspeisung über den terrestrischen If the data and the DVB-T, FM or CATV signal are fed in using the terrestrial input, the - 8 - GLC 100 W Eingang werden die Signale über einen "rückwärts" betriebenen 2-fach Verteiler (z. B. SR 203) zusammengeschaltet. In die koaxiale Zuleitung der terrestrischen Signale muss ein handelsübliches Hochpassfilter , das den Rückkanalbereich blockt, eingesetzt werden. signals are interconnected via a two-way splitter (e.g. SR 203) operated in reverse direction. A commercially available high-pass filter , which blocks the return channel range, must be inserted in the coaxial line of the terrestrial signals. Kopfstation: Die Einspeisung des Datensignals erfolgt über eine rückkanaltaugliche Antennendose (links), oder über einen in "rückwärts" betriebenen 2-fach Verteiler (z.B. SR 203) am Ausgang der Kopfstation (rechts). Head-end station system: The feed in of the data signal is done via the return channel capable antenna socket (left), or via a two-way splitter (e.g. SR 203) operated in reverse direction at the output of the head-end station system (right). Router Power HbbTV + DVB-C/T OR… Power EoC LAN LAN EoC LAN WiFi IPTV + DVB-C/T WiFi HbbTV + DVB-C/T OR… Power EoC LAN WiFi OR… Power EoC LAN IPTV + DVB-C/T WiFi HbbTV + DVB-C/T OR… Power EoC LAN WiFi OR… Power EoC LAN IPTV + DVB-C/T WiFi Router OR… Power In die koaxiale Zuleitung (Kopfstationsausgang) muss ein handelsübliches Hochpassfilter , das den Rückkanalbereich blockt, eingesetzt werden. WiFi OR… Power OR… EoC LAN IPTV + DVB-C/T WiFi HbbTV + DVB-C/T Power EoC SR 203 EoC LAN WiFi A commercially available high-pass filter , which blocks the return channel range, must be inserted in the coaxial supply line from the head-end station system. - 9 - GLC 100 W Breitbandkabel Die Einspeisung des Datensignals erfolgt über eine rückkanaltaugliche Antennendose (links), oder über einen "rückwärts" betriebenen 2-fach Verteiler (z.B. SR 203) am Ausgang des Kabelmodems (rechts). Broadband cable The feed in of the data signal is done via the return channel capable antenna socket (left), or via a two-way splitter (e.g. SR 203) operated in reverse direction at the output of the broadband cable modem (right). POI POI Cable Router LAN EoC HbbTV + DVB-C SR 203 Power Power EoC LAN EoC LAN WiFi HbbTV + DVB-C WiFi HbbTV + DVB-C Power Power EoC LAN EoC LAN WiFi HbbTV + DVB-C WiFi HbbTV + DVB-C Power Power EoC LAN EoC LAN WiFi HbbTV + DVB-C WiFi HbbTV + DVB-C Power Power EoC LAN CTV EoC LAN WiFi HbbTV + DVB-C WiFi Router Power Die EoC-Übertragung erfolgt im Rückkanal-Frequenzbereich 2…68 MHz, der bei Breitbandkabel auch für Internetdienste verwendet wird. Aus diesem Grund muss sichergestellt sein, dass das EoC-Signal nicht über den Übergabepunkt (POI) Störungen im Kabelnetz verursacht – z.B. durch Einsatz eines handelsüblichen Hochpassfilters am Ausgang des BK-Verstärkers, der den Rückkanalbereich (2…68 MHz) blockt. EoC LAN WiFi The EoC transmission is done in the return channel frequency range of 2…68 MHz, which is also used for Internet services in broadband networks. For this reason, it must be ensured that the EoC signal does not cause disturbances in the cable network via the point of interconnection (POI) – e.g. by using a commercially available highpass filter at the output of the CATV amplifier, which blocks the return channel range (2…68 MHz). - 10 - GLC 100 W Inbetriebnahme Commissioning Nachdem alle Verbindungen hergestellt wurden, können die EoC-Geräte mit dem Netzschalter 2 eingeschaltet und die angeschlossenen Geräte (PC, Notebook etc.) hochgefahren werden. As soon as all connections have been established, the EoC devices can be switched on by pressing the power switches 2 and the connected devices (PC, notebook etc.) can be booted up. Die Power-LED 1 blinkt während des BootVorgangs und leuchtet dauerhaft, sobald das Gerät betriebsbereit ist. The Power LED 1 flashes during the boot process and lights continuously as soon as the device is ready for operation. Die EoC-LED 3 leuchtet, sobald eine EoCVerbindung zu einem anderen Gerät besteht. Bei Datenverkehr blinkt die EoC-LED. Leuchtet die EoC-LED rot, ist die Dämpfung des koaxialen Netzwerks zu hoch. Überprüfen Sie in diesem Fall die koaxiale Verkabelung bzw. verkürzen Sie die Abstände der Geräte zueinander. Wenn keine EoC-Verbindung hergestellt werden kann… – prüfen Sie, ob eine koaxiale Verbindung besteht. – prüfen Sie, ob alle Komponenten der koaxialen Antennenverteilung den Rückkanal-Frequenzbereich 2…68 MHz unterstützen. The EoC LED 3 light up as soon as a connection to an other device is established. During data traffic the EoC LED flashes. If the EoC LED light red, the attenuation of the coaxial network is too high. In this case check the coaxial network resp. short the distance between the devices. If no EoC connection can be established… – check whether a coaxial connection exists. – check whether all components of the coaxial distributor structure support the return channel frequency range of 2…68 MHz. Die LAN-LED 4 leuchtet, wenn Verbindungen zu den angeschlossenen Geräten hergestellt sind. Bei Datenverkehr blinkt die LED. The LAN LED 4 light up if connections to devices are established. During data transfer the LED is flashing. WiFi-Verbindung WiFi connection Der integrierte AccessPoint ist für den Betrieb in Europa (WiFi-Kanäle 1…13) vorkonfiguriert. Schalten Sie bei Bedarf den integrierten AccessPoint mit dem WiFi-Schalter # ein. Die WiFi-LED 5 leuchtet. Bei WiFi-Datenverkehr blinkt die LED. The integrated access point is preconfigured for use in Europe (WiFi channels 1…13). If required switch on the integrated access point by WiFi switch #. The WiFi LED 5 light up. During WiFi data transfer the LED is flashing. Die SSID (der WiFi-Netzwerkname) lautet "EoC – xxxxxx", wobei xxxxxx den letzten Stellen der WiFi-MAC-Adresse des Geräts The "EoC es to MAC - 11 - SSID (WiFi network name) is – xxxxxx", where xxxxxx matchthe last digits of the device's WiFi address. The network is WPA2 GLC 100 W entspricht. Das Netzwerk ist WPA2-verschlüsselt. Das werkseitig eingestellte Passwort ist "0000000000000000" (16 x 0). Sie sollten das Werkseitige durch ein neues Kennwort ersetzen und bei Bedarf die SSID ändern. Wie Sie Änderungen an der Konfiguration des AccessPoints vornehmen können, ist ab Seite 15 beschrieben. Standby-Modus Ein EoC-Modem schaltet nach einigen Minuten ohne Datenverkehr in den StandbyModus. Die Power-LED blinkt. EoC-Werksreset Mit der EoC-Reset-Taste 0 wird das EoCModem auf Werkseinstellung zurückgesetzt. • Entfernen Sie die Abdeckung der Taste. • Halten Sie die EoC-Reset-Taste mit einer aufgebogenen Büroklammer 10 Sekunden gedrückt (bis die Power-LED kurz ausgeht). Das öffentliche Netzwerk "HomePlugAV" ist wieder hergestellt. Im Standby-Modus hat die Reset-Taste keine Funktion. encrypted. The factory default password is "0000000000000000" (16 x 0). You should replace it with a new password and if required change the SSID. How to change the configuration of the access point, is described from page 15 on. Standby mode After some minutes without data transfer, an EoC modem switches into standby mode. The Power LED flashes. EoC Factory defaults Using the EoC Reset button 0 the EoC modem can be reset to the factory default setting. • Remove the cover from the key. • Hold the EoC reset button depressed for 10 seconds using a bent up paper clip (until the power LED becomes off for a short time). The public network "HomePlugAV" is restored. The reset button does not work in standby mode. - 12 - GLC 100 W 6 K onfiguration 6 C onfiguration Ein EoC-Netzwerk besteht aus zwei oder mehreren (maximal 64) EoC-Modems, die denselben Netzwerkschlüssel verwenden. In einer vorhandenen Mehrteilnehmer-Antennenanlage können sich alle Geräte miteinander verbinden (Werkseinstellung). An EoC network consists of two or more (max. 64) EoC modems using the same network key. In an existing antenna system with several participants, all devices can "see" each other (factory default). Security-Funktion Security function Wird die Antennenanlage mit fremden Teilnehmern benutzt, können Sie sich ihr eigenes privates EoC-Netzwerk aufbauen. Durch die Absicherung Ihres EoC-Netzwerkes schützen Sie die Informationen, die Sie über das Netzwerk versenden, vor ungewolltem Zugriff. Dies ist besonders in Mehrfamilienhäusern, Bürogebäuden, Schulen und anderen Gebäuden relevant. Es gibt zwei Möglichkeiten, um Ihr EoCNetzwerk abzusichern: – Mit der EoC-Reset-Taste 0 generieren Sie automatisch einen zufälligen Netzwerkschlüssel. – Über die Konfigurations-Software legen Sie einen Schlüssel für Ihr EoCNetzwerk fest (Download unter http://www.gss.de). Die Bedienung der Konfigurations-Software ist in der Bedienungsanleitung der GLC 100 W (Download über QR-Code Seite 1) beschrieben. If the antenna system is also used by other participants, you can build up your own private EoC network. By securing your EoC network, you protect all information sent via the network against inadvertent access. This is particularly important in multi-family homes, office buildings, schools and other buildings. There are two possibilities to secure your EoC network: – Using the EoC reset button 0, you can generate a random network key. – Define a key for your EoC network with the help of the configuration software (download under http://www.gss.de. The operation of the configuration software is described in the GLC 100 W operating instruction (download via QR code page 1). Privates EoC Netzwerk mit Verschlüsselung: Private EoC network with encryption: Achten Sie darauf, dass die Geräte nicht in Standby-Mode sind! Die Power-LED muss dauerhaft leuchten. • Löschen Sie den Netzwerkschlüssel durch Drücken der EoC-Reset-Taste 0 an der Rückseite des GLC 100 W von 5…8 Sekunden. Nach dem Loslassen gehen die Power-LED und die EoC-LED kurz aus. Führen Sie diesen Schritt bei allen Geräten durch, die Sie zu einem privaten Netzwerk hinzufügen möchten. Make sure that the devices are not in Standby mode! The power LED must light continuously. • Delete the network key by pressing the EoC reset button 0 on the rear side of the GLC 100 W for 5…8 seconds. According to the "release" of the EoC reset button the Power LED and the EoC LED are switched off for a short time. Carry out this step for all devices that should be integrated in a private network. - 13 - GLC 100 W Die ersten beiden Geräte verbinden: • Halten Sie die EoC-Reset-Taste Ihres EoCGerätes 0,5…0,8 Sekunden gedrückt. Nach dem "Loslassen" der EoC-ResetTaste, fängt die Power-LED an zu blinken. • Drücken Sie innerhalb von 2 Minuten beim nächsten EoC-Modem wieder für 0,5…0,8 Sekunden die EoC-Reset-Taste. Nach dem "Loslassen" der EoC-ResetTaste, fängt die Power-LED an zu blinken. Es wird ein neuer Netzwerkschlüssel zwischen den beiden EoC-Modems generiert und die Geräte verbinden sich miteinander. • Überprüfen Sie die LEDs an den EoC-Geräten. Die Power-LEDs müssen blinken, während die Geräte verbunden werden. Warten Sie etwa eine Minute, während sich die EoC-Geräte verbinden. Nach Abschluss des Vorgangs leuchten die Power-LEDs wieder normal. Wenn die Power-LED nicht blinkt, nachdem Sie die EoC-Reset-Taste losgelassen haben, haben Sie diese zu kurz oder zu lange gedrückt. Versuchen Sie es erneut und drücken Sie die EoC-Reset-Taste 0,5…0,8 Sekunden. Sollten die EoCLEDs an den EoC-Geräten nicht leuchten, sind die EoC-Geräte nicht verbunden. Wiederholen Sie in diesem Fall die Schritte in diesem Abschnitt. Weitere Geräte integrieren: • Halten Sie die EoC-Reset-Taste eines EoC-Gerätes des privaten Netzwerks für 0,5…0,8 Sekunden gedrückt. Nach dem "Loslassen" der EoC-Reset-Taste fängt die Power-LED an zu blinken. • Drücken Sie innerhalb von 2 Minuten beim nächsten EoC-Modem, das Sie integrieren möchten, wieder für 0,5…0,8 Sekunden die EoC-Reset-Taste (dessen Netzwerkschlüssel muss zuvor gelöscht sein). Nach dem "Loslassen" der EoC-Reset-Taste fängt die Power-LED an zu blinken. Der private Netzwerkschlüssel des Connect the first two devices: • Hold the EoC reset button of your EoC device depressed for 0.5…0.8 seconds. According to the "release" of the EoC reset button the Power LED starts flashing. • Within the next two minutes press the EoC reset button on the next EoC modem for 0.5…0.8 seconds. According to the "release" of the EoC reset button the Power LED starts flashing. A new network key between the two EoC modems is generated and the devices establish a connection. • Check the LEDs on the EoC devices. The Power LEDs must flash during the connection establishment of the devices. Wait for approx. one minute while the EoC devices get connected with each other. As soon as the procedure is finished, the power LEDs are again permanently lit. If the Power LED is not flashing after having pressed the EoC reset button, you have pressed the key for a too short or long time. Try it again and press the EoC reset button for 0.5…0.8 seconds. If the EoC LEDs are not lit on both EoC devices, the EoC devices are not connected. In this case repeat the steps in this section. Integrate further devices: • Hold the EoC reset button of any EoC device of the private network depressed for 0.5…0.8 seconds. According to the "release" of the EoC reset button the Power LED starts flashing. • Within the next two minutes press the EoC reset button on the next EoC modem, which you would like to integrate, for 0.5…0.8 seconds (its network key must be deleted before). According to the "release" of the EoC reset button the Power LED starts flashing. The network key of the first EoC modem is transferred to the device without network key, a connection is established. - 14 - GLC 100 W ersten Geräts wird an das EoC-Modem ohne Netzwerkschlüssel weitergegeben, die Geräte verbinden sich miteinander. Wenn keine EoC-Verbindung hergestellt werden kann… – Stellen Sie bei den Geräten, die sich nicht verbinden lassen, die Werkseinstellungen wieder her (Seite 12), löschen Sie dann erneut den Netzwerkschlüssel und versuchen Sie das Gerät erneut in Ihre private Gruppe zu integrieren. – Stellen Sie die Verbindung mit Hilfe der Konfigurations-Software, die Sie unter http://www.gss.de herunterladen können, her. Die Bedienung der Konfigurations-Software ist in der Montageanleitung beschrieben (Download über QR-Code auf Seite 1). If no EoC connection can be established… – Reset devices which can not establish a connection to factory defaults (page 12), delete the network key again and try again to integrate the device to your private network. – Establish the connection using the configuration software which can be downloaded under http://www.gss.de/en. The operation of the configuration software is described in the assembling instruction (download via QR code on page 1). AccessPoint AccessPoint Konfigurationsseite Der integrierte AccessPoint wird über einen Web-Browser konfiguriert. Die Werks-IPAdresse lautet 192.168.100.111 und die Subnetz-Maske 255.255.255.0. Configuration site The integrated AccessPoint is to be configured via an Internet browser. The default IP address is 192.168.100.111 and the Subnet mask is 255.255.255.0. Werksreset Sollten Sie keinen Zugriff mehr auf den AccessPoint haben, können Sie das Gerät auf die Werkseinstellungen zurücksetzen. • Drücken Sie die WiFi WPS/Reset-Taste mindestens 10 Sekunden. • Schalten Sie das Gerät aus und wieder ein. Das Gerät ist jetzt wieder im Auslieferungszustand. Im Standby-Modus hat die WiFi WPS/ Reset-Taste keine Funktion. Factory reset If you no longer have access to the Access Point, you can reset the device to factory defaults. • Hold the WiFi WPS/Reset button depressed for 10 seconds. • Switch the device off and on. The factory defaults are restored. The WiFi WPS/Reset button does not work in standby mode. Zugriff auf die Konfigurationsseite Der Konfigurations-PC muss sich im IPAdressbereich des AccessPoints befinden. • Änderung Sie bei Bedarf die IP-Adresse Ihres PC über… Systemsteuerung > Netzwerk- und Freiga Access to the configuration site The configuration PC must be within the IP address range of the AccessPoint. • If necessary change the IP address of your PC via… Control Panel > Network and Sharing Center > Connections > LAN Connection > Properties > Internet Protocol Ver- - 15 - GLC 100 W • • • • becenter > Verbindungen > LAN Verbindung > Eigenschaften > Internetprotokoll Version 4 (TCP/IPv4) > Eigenschaften > Folgende IP-Adresse verwenden: Geben Sie entsprechende Werte für IPAdresse und Subnetzmaske ein. Klicken Sie OK zum Speichern. Schließen Sie das EoC-Modem mit einem LAN-Kabel am PC an. Geben Sie jetzt die IP-Adresse des EoCModems (z.B. 192.168.100.111) in den Web Browser ein. Ein Dialog zur Benutzer- und Kennwort-Eingabe öffnet sich. • Geben Sie den Benutzernamen admin und das Kennwort ein (Werkseinstellung 000000) und klicken Sie auf "OK". Empfohlene Änderungen Der AccessPoint ist vorkonfiguriert. Einige wenige Einstellungen sollten Sie dennoch ändern! Im linken Bereich (Site contents) können Sie die Konfigurationsmenüs auswählen. • • • • sion 4 (TCP/IPv4) > Properties > Use the following IP address: Enter the corresponding values for the IP address and the Subnet mask. Click on the OK button to save. Connect the EoC modem to the PC via a LAN cable. Enter the IP address of the EoC modem (e.g. 192.168.100.111) into the address field of the browser. A dialog box for user and password entry opens. • Enter the user name admin and the password (default password is 000000) and click on button "OK". Recommended changes The AccessPoint is preconfigured. Nevertheless a few settings you should change! In left section "Site contents" you can select the different configuration menus. - 16 - GLC 100 W Speichern Sie in jedem Menü Änderungen mit der Schaltfläche . • Ändern Sie im Menü Wireless > Basic Settings die SSID (WiFi-Netzwerkname, Service Set IDentifier), um Ihr WLAN einfach identifizieren zu können (besonders, wenn Sie mehrere GLC 100 W einsetzen). Verwenden Sie keine Umlaute und Sonderzeichen! • Ändern Sie im Menü Wireless > Security das WLAN-Zugangspasswort (PreShared Key). • Um zukünftig einfacher Zugang zu den WLAN-Einstellungen zu haben, können Sie im Menü TCP/IP Settings > LAN Interface die Netzwerkeinstellungen auf Werte Ihres Netzwerks ändern. • Ändern Sie im Menü Management > Password das AccessPoint-Zugangspasswort für den Benutzer (User Name) admin. Wenn Sie hier "leere" Felder speichern, wird der Zugangsschutz aufgehoben! Click on button to store changes in each menu. • Change the SSID (WiFi network name, Service Set IDentifier) in menu Wireless > Basic Settings in order to identify your WLAN easily (even if you use several GLC 100 W). Do not use special characters! • Change the Pre-Shared Key (WLAN access code) in menu Wireless > Security. • To have easier access to the wireless settings in future, in the TCP/IP Settings > LAN Interface menu you can change the network settings to values of your network. • Change the AP access password for user name admin in menu Management > Password. If you store "empty" user name and password, the protection is disabled! - 17 - GLC 100 W Weitere Einstellungen sind in der Montageanleitung beschrieben (Download über QR-Code auf Seite 1). Further settings are described in the assembling instruction (download via QR code on page 1). Region Ab Werk ist die Region "Europa" (WiFiKanäle 1…13) eingestellt. Möchten Sie den AccessPoint in Ländern betreiben, in denen die Kanäle 12 und 13 verboten sind, müssen Sie eine andere Region einstellen. • Starten Sie Ihren Browser. • Geben Sie in die Adresszeile Region Ex factory "Europe" (WiFi channels 1…13) is set for the region. If you would like to operate the AccessPoint outside of Europe, you have to set another region. • Start your browser. • Enter http://WLAN-IP-Adresse/syscmd.asp http://WLAN IP address/syscmd.asp ein z.B.: in the address line e.g.: http://192.168.100.111/syscmd.asp http://192.168.100.111/syscmd.asp • Geben Sie in das "System Command"Eingabefeld folgende Zeichenfolge ein: • Enter following string in the system command input field: flash set HW_WLAN0_REG_DOMAIN 1 DOMAIN 1 = Channels 1…11 DOMAIN 3 = Channels 1…13 flash set HW_WLAN0_REG_DOMAIN 1 DOMAIN 1 = Kanal 1…11 DOMAIN 3 = Kanal 1…13 • Klicken Sie auf die Schaltfläche "Apply", um den Systembefehl auszuführen. • Geben Sie in das "System Command"Eingabefeld reboot ein: • Klicken Sie auf die Schaltfläche "Apply", um den Systembefehl auszuführen. • Click the "Apply" button to execute the system command. • Enter reboot in the system command input field: • Click the "Apply" button to execute the system command. • Prüfen Sie anschließend im Konfigurationsmenü Wireless > Basic Settings > Channel Number, ob die entsprechenden Kanäle angezeigt werden. • After that, check whether the corresponding channels are displayed in the configuration menu Wireless > Basic Settings > Channel Number. - 18 - GLC 100 W 7 Technische D aten 7 Technical data Frequenzbereiche Frequency ranges EoC-Ein-/Ausgang................................2…862 MHz.....................................EoC in-/output IP-Signal...............................................2…68 MHz...............................................IP signal TV-Ausgang........................................85…862 MHz........................................... TV output WiFi...........................................2.412GHz…2.472GHz...........................................WiFi Durchgangsdämpfung....................................<0,5 dB..................................................Through loss Ausgangspegel min. 1…30 MHz.................. 100 dBμV........................output level min. 1…30 MHz Ausgangspegel min. 30…68 MHz................. 90 dBμV.......................output level min. 30…68 MHz Netzwerk........................................... max. 64 EoC Modems............................................ Network Brutto Datenrate...........................................500 Mbps........................................... Gross data rate Netto Datenrate...........................................230 Mbps.............................................. Net data rate Reichweite.................................................max. 700 m....................................................... Range Modulation............................... 4096/1024/256/64/16/8-QAM............................... Modulation QPSK, BPSK, ROBO Modulation Verschlüsselung...........................................128 bit AES........................................................Safety Ethernet-Schnittstelle.............................10/100/1000 Mbps.................................Ethernet Interface Netzwerkstandard........................IEEE 1901, IEEE802.3, 802.3u.........................Network standard WiFi-Netzwerkstandard......................... IEEE802.11/b/g/n.........................WiFi Network standard Anschlüsse (TV/EoC)........................................2 x F....................................... Connectors (TV/EoC) Anschlüsse (LAN)..........................................2 x RJ 45......................................... Connectors (LAN) LEDs.................................................Power /EoC /LAN/WiFi.................................................LEDs Schaltnetzteil............................ 110-230 V~ 50/60 Hz............. Switching Power supply Leistungsaufnahme..............................max. 6 W............................. Power consumption Abmessungen (BxHxT) in mm........... 145 x 33 x 82,5............ Dimensions (WxHxD) in mm Betriebstemperatur.............................0°C…40°C....................... Operating temperature Entspricht den Normen...........EN 50083-2 Klasse/Class A .Corresponds to the standards Lieferumfang Packing contents GLC 100 W............................................. 1 ............................................GLC 100 W Netzkabel................................................ 1................................... Power supply cable Netzwerkkabel......................................... 1..........................................Network cable Abschlusswiderstand................................. 1....................................Termination resistor Kurzmontageanleitung............................... 1.......................... Brief assembly instructions - 19 - GLC 100 W 8 A nhang Ver wendete O pen S ource S oftware GoAhead Web Server: 8 A ppendix U sed O pen S ource S oftware Website: http://embedthis.com/goahead/index.html Lizenz/Licence: GNU GENERAL PUBLIC LICENSE, Version 2 L izenz L icence GNU GENERAL PUBLIC LICENSE Version 2, June 1991 Copyright (C) 1989, 1991 Free Software Foundation, Inc. 51 Franklin Street, Fifth Floor, Boston, MA 02110-1301, USA Everyone is permitted to copy and distribute verbatim copies of this license document, but changing it is not allowed. Preamble The licenses for most software are designed to take away your freedom to share and change it. By contrast, the GNU General Public License is intended to guarantee your freedom to share and change free software--to make sure the software is free for all its users. This General Public License applies to most of the Free Software Foundation's software and to any other program whose authors commit to using it. (Some other Free Software Foundation software is covered by the GNU Lesser General Public License instead.) You can apply it to your programs, too. When we speak of free software, we are referring to freedom, not price. Our General Public Licenses are designed to make sure that you have the freedom to distribute copies of free software (and charge for this service if you wish), that you receive source code or can get it if you want it, that you can change the software or use pieces of it in new free programs; and that you know you can do these things. To protect your rights, we need to make restrictions that forbid anyone to deny you these rights or to ask you to surrender the rights. These restrictions translate to certain responsibilities for you if you distribute copies of the software, or if you modify it. For example, if you distribute copies of such a program, whether gratis or for a fee, you must give the recipients all the rights that you have. You must make sure that they, too, receive or can get the source code. And you must show them these terms so they know their rights. We protect your rights with two steps: (1) copyright the software, and (2) offer you this license which gives you legal permission to copy, distribute and/or modify the software. Also, for each author's protection and ours, we want to make certain that everyone understands that there is no warranty for this free software. If the software is modified by someone else and passed on, we want its recipients to know that what they have is not the original, so that any problems introduced by others will not reflect on the original authors' reputations. Finally, any free program is threatened constantly by software patents. We wish to avoid the danger that redistributors of a free program will individually obtain patent licenses, in effect making the program proprietary. To prevent this, we have made it clear that any patent must be licensed for everyone's free use or not licensed at all. The precise terms and conditions for copying, distribution and modification follow. TERMS AND CONDITIONS FOR COPYING, DISTRIBUTION AND MODIFICATION 0. This License applies to any program or other work which contains a notice placed by the copyright holder saying it may be distributed under the terms of this General Public License. The "Program", below, refers to any such program or work, and a "work based on the Program" means either the Program or any derivative work under copyright law: that is to say, a work containing the Program or a portion of it, either verbatim or with modifications and/or translated into another language. (Hereinafter, translation is included without limitation in the term "modification".) Each licensee is addressed as "you". Activities other than copying, distribution and modification are not covered by this License; they are outside its scope. The act of running the Program is not restricted, and the output from the Program is covered only if its contents constitute a work based on the Program (independent of having been made by running the Program). Whether that is true depends on what the Program does. 1. You may copy and distribute verbatim copies of the Program's source code as you receive it, in any medium, provided that you conspicuously and appropriately publish on each copy an appropriate copyright notice and disclaimer of warranty; keep intact all the notices that refer to this License and to the absence of any warranty; and give any other recipients of the Program a copy of this License along with the Program. - 20 - GLC 100 W You may charge a fee for the physical act of transferring a copy, and you may at your option offer warranty protection in exchange for a fee. 2. You may modify your copy or copies of the Program or any portion of it, thus forming a work based on the Program, and copy and distribute such modifications or work under the terms of Section 1 above, provided that you also meet all of these conditions: a) You must cause the modified files to carry prominent notices stating that you changed the files and the date of any change. b) You must cause any work that you distribute or publish, that in whole or in part contains or is derived from the Program or any part thereof, to be licensed as a whole at no charge to all third parties under the terms of this License. c) If the modified program normally reads commands interactively when run, you must cause it, when started running for such interactive use in the most ordinary way, to print or display an announcement including an appropriate copyright notice and a notice that there is no warranty (or else, saying that you provide a warranty) and that users may redistribute the program under these conditions, and telling the user how to view a copy of this License. (Exception: if the Program itself is interactive but does not normally print such an announcement, your work based on the Program is not required to print an announcement.) These requirements apply to the modified work as a whole. If identifiable sections of that work are not derived from the Program, and can be reasonably considered independent and separate works in themselves, then this License, and its terms, do not apply to those sections when you distribute them as separate works. But when you distribute the same sections as part of a whole which is a work based on the Program, the distribution of the whole must be on the terms of this License, whose permissions for other licensees extend to the entire whole, and thus to each and every part regardless of who wrote it. Thus, it is not the intent of this section to claim rights or contest your rights to work written entirely by you; rather, the intent is to exercise the right to control the distribution of derivative or collective works based on the Program. In addition, mere aggregation of another work not based on the Program with the Program (or with a work based on the Program) on a volume of a storage or distribution medium does not bring the other work under the scope of this License. 3. You may copy and distribute the Program (or a work based on it, under Section 2) in object code or executable form under the terms of Sections 1 and 2 above provided that you also do one of the following: a) Accompany it with the complete corresponding machine-readable source code, which must be distributed under the terms of Sections 1 and 2 above on a medium customarily used for software interchange; or, b) Accompany it with a written offer, valid for at least three years, to give any third party, for a charge no more than your cost of physically performing source distribution, a complete machine-readable copy of the corresponding source code, to be distributed under the terms of Sections 1 and 2 above on a medium customarily used for software interchange; or, c) Accompany it with the information you received as to the offer to distribute corresponding source code. (This alternative is allowed only for noncommercial distribution and only if you received the program in object code or executable form with such an offer, in accord with Subsection b above.) The source code for a work means the preferred form of the work for making modifications to it. For an executable work, complete source code means all the source code for all modules it contains, plus any associated interface definition files, plus the scripts used to control compilation and installation of the executable. However, as a special exception, the source code distributed need not include anything that is normally distributed (in either source or binary form) with the major components (compiler, kernel, and so on) of the operating system on which the executable runs, unless that component itself accompanies the executable. If distribution of executable or object code is made by offering access to copy from a designated place, then offering equivalent access to copy the source code from the same place counts as distribution of the source code, even though third parties are not compelled to copy the source along with the object code. 4. You may not copy, modify, sublicense, or distribute the Program except as expressly provided under this License. Any attempt otherwise to copy, modify, sublicense or distribute the Program is void, and will automatically terminate your rights under this License. However, parties who have received copies, or rights, from you under this License will not have their licenses terminated so long as such parties remain in full compliance. 5. You are not required to accept this License, since you have not signed it. However, nothing else grants you permission to modify or distribute the Program or its derivative works. These actions are prohibited by law if you do not accept this License. Therefore, by modifying or distributing the Program (or any work based on the Program), you indicate your acceptance of this License to do so, and all its terms and conditions for copying, distributing or modifying the Program or works based on it. 6. Each time you redistribute the Program (or any work based on the Program), the recipient automatically receives a license from the original licensor to copy, distribute or modify the Program subject to these terms and conditions. You may - 21 - GLC 100 W not impose any further restrictions on the recipients' exercise of the rights granted herein. You are not responsible for enforcing compliance by third parties to this License. 7. If, as a consequence of a court judgment or allegation of patent infringement or for any other reason (not limited to patent issues), conditions are imposed on you (whether by court order, agreement or otherwise) that contradict the conditions of this License, they do not excuse you from the conditions of this License. If you cannot distribute so as to satisfy simultaneously your obligations under this License and any other pertinent obligations, then as a consequence you may not distribute the Program at all. For example, if a patent license would not permit royalty-free redistribution of the Program by all those who receive copies directly or indirectly through you, then the only way you could satisfy both it and this License would be to refrain entirely from distribution of the Program. If any portion of this section is held invalid or unenforceable under any particular circumstance, the balance of the section is intended to apply and the section as a whole is intended to apply in other circumstances. It is not the purpose of this section to induce you to infringe any patents or other property right claims or to contest validity of any such claims; this section has the sole purpose of protecting the integrity of the free software distribution system, which is implemented by public license practices. Many people have made generous contributions to the wide range of software distributed through that system in reliance on consistent application of that system; it is up to the author/donor to decide if he or she is willing to distribute software through any other system and a licensee cannot impose that choice. This section is intended to make thoroughly clear what is believed to be a consequence of the rest of this License. 8. If the distribution and/or use of the Program is restricted in certain countries either by patents or by copyrighted interfaces, the original copyright holder who places the Program under this License may add an explicit geographical distribution limitation excluding those countries, so that distribution is permitted only in or among countries not thus excluded. In such case, this License incorporates the limitation as if written in the body of this License. 9. The Free Software Foundation may publish revised and/or new versions of the General Public License from time to time. Such new versions will be similar in spirit to the present version, but may differ in detail to address new problems or concerns. Each version is given a distinguishing version number. If the Program specifies a version number of this License which applies to it and "any later version", you have the option of following the terms and conditions either of that version or of any later version published by the Free Software Foundation. If the Program does not specify a version number of this License, you may choose any version ever published by the Free Software Foundation. 10. If you wish to incorporate parts of the Program into other free programs whose distribution conditions are different, write to the author to ask for permission. For software which is copyrighted by the Free Software Foundation, write to the Free Software Foundation; we sometimes make exceptions for this. Our decision will be guided by the two goals of preserving the free status of all derivatives of our free software and of promoting the sharing and reuse of software generally. NO WARRANTY 11. BECAUSE THE PROGRAM IS LICENSED FREE OF CHARGE, THERE IS NO WARRANTY FOR THE PROGRAM, TO THE EXTENT PERMITTED BY APPLICABLE LAW. EXCEPT WHEN OTHERWISE STATED IN WRITING THE COPYRIGHT HOLDERS AND/OR OTHER PARTIES PROVIDE THE PROGRAM "AS IS" WITHOUT WARRANTY OF ANY KIND, EITHER EXPRESSED OR IMPLIED, INCLUDING, BUT NOT LIMITED TO, THE IMPLIED WARRANTIES OF MERCHANTABILITY AND FITNESS FOR A PARTICULAR PURPOSE. THE ENTIRE RISK AS TO THE QUALITY AND PERFORMANCE OF THE PROGRAM IS WITH YOU. SHOULD THE PROGRAM PROVE DEFECTIVE, YOU ASSUME THE COST OF ALL NECESSARY SERVICING, REPAIR OR CORRECTION. 12. IN NO EVENT UNLESS REQUIRED BY APPLICABLE LAW OR AGREED TO IN WRITING WILL ANY COPYRIGHT HOLDER, OR ANY OTHER PARTY WHO MAY MODIFY AND/OR REDISTRIBUTE THE PROGRAM AS PERMITTED ABOVE, BE LIABLE TO YOU FOR DAMAGES, INCLUDING ANY GENERAL, SPECIAL, INCIDENTAL OR CONSEQUENTIAL DAMAGES ARISING OUT OF THE USE OR INABILITY TO USE THE PROGRAM (INCLUDING BUT NOT LIMITED TO LOSS OF DATA OR DATA BEING RENDERED INACCURATE OR LOSSES SUSTAINED BY YOU OR THIRD PARTIES OR A FAILURE OF THE PROGRAM TO OPERATE WITH ANY OTHER PROGRAMS), EVEN IF SUCH HOLDER OR OTHER PARTY HAS BEEN ADVISED OF THE POSSIBILITY OF SUCH DAMAGES. END OF TERMS AND CONDITIONS - 22 - GLC 100 W - 23 - GLC 100 W 90 mm 41 mm Service: Phone: +49 (0) 911 / 703 2221 • Fax: +49 (0) 911 / 703 2326 • Email: [email protected] Grundig SAT Systems GmbH • Beuthener Straße 43 • D-90471 Nürnberg Änderungen vorbehalten. Technische Angaben ohne Gewähr. © by GSS GmbH Alterations reserved. Technical data E. & O.E. 04062014