1
Troubleshooting
[GB]
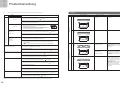
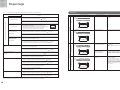
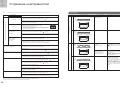
Indicators
Please read this section to troubleshoot any problem before requesting repair services.
Trouble
Status indicator lights
Solutions
Indicator status
Always On
ON
Power Switch might be set to OFF.
→If so, set Power Switch to ON. ( See page 5)
Has Filter accumulated dust or debris?
→Clean Filter if there is an accumulation of dust or debris. ( See page 9)
Normal state
An indicator is lit dimly all the time.
Power is being supplied
(While the dryer is activated)
An indicator is lit brighter than on standby.
Fan motor is malfunctioning
The dryer is not working.
Clean the filter if it is dirty. ( See page 9)
Clean the bottom of the unit if it is dirty.
LED (right)
Drying compartment
Always On
ON
The dryer is activated
No dry air blown when hands put in.
Power is being supplied
(Standby)
Sensor
Due to the location of Sensors, detection of hands is difficult in some places,
including between Sensors and near the corners (hatched areas in the illustration).
→Align the fingers and put both hands fully into the drying compartment in places
other than the hatched areas in the illustration. If the air blows, the dryer is
working properly.
Sensors
See below
Is the ambient temperature within operating temperature limits?
→ Set the temperature within 0 to 40 °C (32 to 104 °F).
Right and left indicators flash alternately
(Flasing pattern ②)
LED (left)
Standby
Has the Circuit Breaker ON been tripped?
→If it is OFF, please reset it.
Only the right indicator flashes
(Flashing pattern ①)
Operation of the product/Corrective actions
OFF
No light
Lights on
Meaning of the indicators
Has something been placed inside the unit that could be blocking a sensor?
→If there is something in the unit, remove it.
OFF
LED (left)
LED (right)
See below
Is the sensor dirty?
→ If the sensor is not clean, wipe it with a damp micro fibre cloth. ( See page 8)
If the problem persists after the sensor is cleaned, the sensor is malfunctioning.
Drying compartment
Only the right indicator is flashing (the left one is off)
ON
Stopping 1-2 seconds later is normal.
Flashing pattern ①
Dryer not stopped when hands
removed
Is the sensor dirty?
→If the sensor is not clean, wipe it with a damp micro fibre cloth.( See page 8)
Warm air is not blown.
(only for units with a heater)
Heater Power Switch might be set to OFF.
→If so, set Heater Power Switch to ON. ( See page 5)
Warm air is blown
(Only for the unit with a heater) Heater Power Switch might be set to ON.
→If so, set Heater Power Switch to OFF. ( See page 5)
Is the ambient temperature high?
→ The air might fell warmer when the temperature is high.
Is the dryer active for a long time?
→ The air might become warmer when active for a long time due to heat from the fan motor.
The air volume is weak
LED (right)
Abnormality with the power
terminal block temperature fuse
The dryer is not working.
Replacing it may solve the problem.
Consult with the installation contractor
(or the shop where you bought the unit).
Drying compartment
Sensors keep malfunctioning
Right and left indicators flash alternately
ON
Flasing pattern ②
Has Filter accumulated dust or debris?
→Clean Filter if there is an accumulation of dust or debris.( See page 9)
LED (left)
Controller is malfunctioning
Abnormal state
Is the ambient temperature low?
→ The air might feel colder when the temperature is low.
Thermistor is malfunctioning
OFF
OFF
LED (left)
LED (right)
The dryer may operate even if some sensors
malfunction.
Verify that sensors are clean. If they are not
clean, wipe them with a damp micro fibre cloth.
( See page 8)
If the indicator does not turn off after
performing these actions, consult with the
installation contractor (or the shop where you
bought the unit).
Drying compartment
Has Filter accumulated dust or debris?
→Clean Filter if there is an accumulation of dust or debris. ( See page 9)
Is the Fan Strength Switch set to LOW?
→Set the Fan Strength Switch to HI.( See page 5)
If the problem still persists after performing suggested actions, turn off the power switch and set the breaker to "Off."
Then consult with the installation contractor (or the shop where you purchased the unit). (See the back cover of this manual for contact details.)
10
11