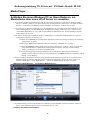
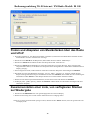
1
Bedienungsanleitung
1-21
Instruction Manual
22-41
Wi-Fi Internet / FM Radio
Model: IR 100
Bedienungsanleitung Wi-Fi Internet / FM Radio Modell: IR 100
_____________________________________________________________________________________________________________
Inhalt
Sicherheitshinweise
2- 4
Was Sie benötigen, bevor Sie Ihren IR 100 benutzen können
5
Bedienung (Am Gerät, Fernbedienung, Anschlüsse)……. .................................. ..................... ........5-6
Installation & Anschluss…................................................................................................................ 7
Schritte zum Anschluss an Ihr Netzwerk…………………….................................................................8
Schritt 1 – Anschluss des Internetradios......................................................................................................... 8
Schritt 2 – Suche nach einem kabellosen Netzwerk ………............ ................................................................ 8
Schritt 3 – Anschluss an ein kabelloses Netzwerk ….............................. .......................................................9
Auswahl eines Radiosenders……..…........................................................ ............................... ..........10
Zurück zum Menü, während der Musikwiedergabe.. ........................... ..................................... ........10
Speichern eines Radiosenders……...................................................... .............................................. 11
Abspielen eines gespeicherten Senders................................................. ............................................ .11
Anfordern eines Senders, der zurzeit nicht zu empfangen ist ............. .................................................12
Sender, die Sie nicht bearbeiten können ,aber hören………................. ............................ ...................12
Nutzen des UKW Radios…………………………............................. ........ .........................................12
Einstellung der Uhr….......................................................................... ............................ ......................12
Einstellung des Alarms.................................................................................................... .......................13
Media Player
14
Nutzen Sie einen Windows PC um Ihre Musikstücke über einen UPnP Server einzustellen... ...... ........14
Das Finden des Radios und das Abspielen über UPnP……………........................... .......................15
Einstellung für die Liste von Stücken zur Wiedergabe……………......................... .........................15
Das Einstellen von UPnP Stücken zum späteren Abspielen...................................... ........................16
Das Erstellen von Alben für eine spätere Wiedergabe................................................ .......................16
Bedienung der Wiedergabe….................................................................................... ........................16
Das Löschen von Musikstücken während des Ablaufs............................................. .........................16
Das Abspielen von Stücken in zufälliger Reihenfolge............................................ ...........................16
Das Abspielen von Stücken im wiederholter Reihenfolge..................................... ............................17
Einstellungs Menu
17
Die Auswahl der Einstellungen im Konfigurationsmenu………................................ .......................17
<Network Konfiguration>..................................................................................................................17
Konfiguration des Radios auf eine feste IP Adresse.......................................................... ................17
Konfiguration des Radios bei Nutzung einer Kabelverbindung……………............... ......................18
Konfiguration des Radios per WIFI - Verbindung………..…………...................... .........................18
Konfiguration, um das Radio mit Kabel oder über WIFI zu verbinden…………......……...............18
<Version>...........................................................................................................................................18
<Upgrade Firmware>..........................................................................................................................18
<Sprache>...........................................................................................................................................18
<Factory Reset>..................................................................................................................................19
<Register>...........................................................................................................................................19
<Set Time / Date>...............................................................................................................................19
Konfiguration ‘Meine Seite’
19
Registrieren eines Accounts auf der Reciva’s Webseite........................ .............................................19
Konfiguration ‘Mein Profil’.............................................................. ..................................................19
Konfiguration ‘Meine Sender’.......................................................... ..................................................20
Konfiguration ‘Meine Programme’......................................... ...........................................................20
Konfiguration ‘Meine Podcasts’....................................... ..................................................................20
Problembehebung
Technische Daten
20
21
1
Bedienungsanleitung Wi-Fi Internet / FM Radio Modell: IR 100
_____________________________________________________________________________________________________________
Sicherheitshinweise
Sicherheitshinweise
Achtung: Um di e Gefahr eines St rom s chlages zu verm eiden, darf an
dies em Gerät keine Veränderung vorgenom men werden!
Das Öffnen des Gerät es s owi e Veränderungen am Gerät dürfen nur durch
autoris i ert e Pers onen vorgenom men werden.
Wichti ge Si cherheits hi nwei s e:
-Vor Inbetriebnahm e les en Sie di e BDA s orgfäl ti g durch
-Di es es Gerät i s t nur für den Innengebrauch vorges ehen
Steckdos e
-Di es es Gerät darf nur an ei ner dafür vorges ehenen
anges chlos s en werden.
-Di es es Gerät darf kei ner Feuchti gkeit aus ges et zt werden.
-Stel len Si e s icher, das s das Gerät frei s t eht.
Wärm equell e
-Stel len Si e s i cher, das s das Gerät nicht i n Nähe einer
s teht .
-Acht en Sie darauf , das s das Ans chlus s kabel nicht bes chädi gt wird.
Das Bl it zs ymbol s oll den Benut zer vor nicht i s oli ert en gefährli chen
Spannungen im Gerätegehäus e warnen. Dies e Spannung könnte groß
genug s ei n, um Pers onen durch ei nen elekt ri s chen Schl ag zu verl etzen.
Das Aus rufezeichen s ol l den Benut zer darauf aufmerks am m achen ,
das s die Bes chreibung, di e mi t dem Gerät aus gel iefert wi rd, wi chti ge
Bedi enungs -und Wart ungs hinwei s e
ent hält
Informationen zur Ents orgung des A ltgerätes :
Ihr P rodukt is t aus qualitativ hochw ertigen und w ieder verw ertbaren M aterialien gebaut .
M it dies em Zeichen erfüllt das P rodukt die EU -N orm 2002/96/EC
Bitte ents orgen S ie Ihr G erät nicht im H aus müll s ondern an ents prechender Werts toffs ammlung.
D as G erät ents pricht der EU -N orm (73/23/EEC)
s ow ie der elektromagnetis chen K ompatibilität (89/336/EEC)
2
Bedienungsanleitung Wi-Fi Internet / FM Radio Modell: IR 100
_____________________________________________________________________________________________________________
Sicherheitshinweise
Umgang mit Batterien
Batterien können brennbare Stoffe enthalten. Bei unsachgemäßer Behandlung können Batterien auslaufen, sich stark erhitzen,
entzünden oder gar explodieren, was Schäden für Ihr Gerät und Ihre Gesundheit zur Folge haben könnte. Befolgen Sie folgende
Hinweise: Halten Sie Kinder von Batterien fern. Sollten Batterien verschluckt worden sein, melden Sie dies sofort Ihrem Arzt. Laden
Sie niemals Batterien (es sei denn, dies ist ausdrücklich angegeben). Entladen Sie Batterien niemals durch hohe Leistungsabgabe.
Schließen Sie Batterien niemals kurz. Setzen Sie Batterien niemals übermäßiger Wärme wie Sonnenschein, Feuer oder dergleichen
aus! Zerlegen oder verformen Sie Batterien nicht. Ihre Hände oder Finger könnten verletzt werden oder Batterieflüssigkeit könnte in
Ihre Augen oder auf Ihre Haut gelangen. Sollte dies passieren, spülen Sie die entsprechenden Stellen mit einer großen Menge klaren
Wassers und informieren Sie umgehend Ihren Arzt. Vermeiden Sie starke Stöße und Erschütterungen. Vertauschen Sie niemals die
Polarität. Achten Sie darauf, dass die Pole Plus (+) und Minus (-) korrekt eingesetzt sind, um Kurzschlüsse zu vermeiden. Reinigen
Sie bei Bedarf Batterie- und Gerätekontakte vor dem Einlegen. Vermischen Sie keine neuen und alten Batterien oder Batterien
unterschiedlichen Typs. Dies könnte bei Ihrem Gerät zu Fehlfunktionen führen. Darüber hinaus würde sich die schwächere Batterie zu
stark entladen. Entfernen Sie verbrauchte Batterien sofort aus dem Gerät. Entfernen Sie die Batterien aus Ihrem Gerät, wenn dieses
über einen längeren Zeitraum nicht benutzt wird. Ersetzen Sie alle verbrauchten Batterien in einem Gerät gleichzeitig mit neuen
Batterien des gleichen Typs. Isolieren Sie die Kontakte der Batterien mit einem Klebestreifen, wenn Sie Batterien lagern oder
entsorgen wollen.
Elektrogeräte nicht in Kinderhand!
Lassen Sie Kinder niemals unbeaufsichtigt elektrische Geräte benutzen. Halten Sie auch die Verpackungsfolien von Kindern fern. Es
besteht Erstickungsgefahr.
Sicheres Aufstellen
Verwenden Sie das Gerät ausschließlich in trockenen Räumen. Wenn Sie den Receiver von einer kalten in eine warme Umgebung
bringen, kann sich im Inneren des Receivers Feuchtigkeit niederschlagen. Warten Sie in diesem Fall etwa zwei bis drei Stunden, bevor
Sie ihn in Betrieb nehmen. Stellen Sie das Gerät auf eine feste und ebene Oberfläche. Stellen Sie das Gerät mit mindestens 10 cm
Abstand zur Wand auf. Decken Sie die Belüftungsöffnungen nicht ab. Vermeiden Sie die Nähe von: – Wärmequellen, wie z. B.
Heizkörpern, – Geräten mit starken Magnetfeldern, wie z. B. Lautsprechern. Stellen Sie keine offenen Brandquellen, wie z.B.
brennende Kerzen, auf das Gerät. Stellen Sie das Gerät nicht auf empfindliche Oberflächen.
Sicheres Anschließen
Schließen Sie das Gerät nur an eine gut erreichbare und fachgerecht installierte Steckdose mit 230 V ~ 50 Hz an. Der Netzstecker
muss frei zugänglich sein, damit Sie das Gerät im Notfall einfach und schnell vom Stromnetz trennen können. Verlegen Sie das
Netzkabel so, dass niemand darüber stolpern oder darauf treten kann. Verwenden Sie keine Verlängerungskabel. Knicken oder
quetschen Sie das Netzkabel nicht. Ziehen Sie das Netzkabel stets am Stecker aus der Steckdose.
Sicherer Gebrauch
Ziehen Sie den Netzstecker aus der Steckdose und entfernen Sie das Antennenkabel vom Gerät, wenn Sie das Gerät längere Zeit nicht
benutzen oder wenn sich ein Gewitter nähert. Das Netzkabel darf während des Betriebs nicht um das Gerät gewickelt sein oder heiße
Oberflächen berühren. Lassen Sie keine Feuchtigkeit in das Gehäuse gelangen. Fassen Sie das Gerät, das Netzkabel und den
Netzstecker nie mit nassen Händen an. Es besteht die Gefahr eines elektrischen Schlags. Sollten Fremdkörper oder Flüssigkeit in das
Gerät gelangen, ziehen Sie sofort den Netzstecker aus der Steckdose. Lassen Sie das Gerät von qualifiziertem Fachpersonal
überprüfen, bevor Sie es wieder in Betrieb nehmen. Andernfalls besteht die Gefahr eines elektrischen Schlags. Benutzen Sie das Gerät
nie, wenn es beschädigt ist, oder Sie Schäden am Netzkabel oder Stecker feststellen. Ziehen Sie bei Beschädigungen des Geräts sofort
den Stecker aus der Steckdose. Öffnen Sie nie das Gerät. Wenden Sie sich im Störungsfall an unser Service Center oder eine andere
geeignete Fachwerkstatt. Die Fernbedienung besitzt eine Infrarot-Diode der Klasse 1. Betrachten Sie die LED nicht mit optischen
Geräten.
3
Bedienungsanleitung Wi-Fi Internet / FM Radio Modell: IR 100
_____________________________________________________________________________________________________________
4
Bedienungsanleitung Wi-Fi Internet / FM Radio Modell: IR 100
_____________________________________________________________________________________________________________
Was Sie benötigen, um Ihr Internet Radio anzuschließen
Bevor Sie Ihr Internet Radio benutzen, benötigen Sie:
•
•
•
Einen Breitband - Internet Anschluss.
Kabelloser Anschluss (Wi-Fi), angeschlossen an ein Breitband - Internet, bevorzugt über einen Router.
Wenn Sie keine kabellose Anschlussmöglichkeit haben, können Sie einen Kabelanschluss verwenden. Ein
kabelloser Anschluss wird bevorzugt.
•
•
Sie können im Menü zwischen kabellos und Kabelanschluss wählen.
Wenn Ihr kabelloses Netzwerk auf Wired Equivalent Privacy (WEP) oder auf Wi-Fi Protected Access (WPA)
eingestellt ist, benötigen Sie den WEP oder WPA Code, damit Ihr Internet Radio mit dem Router Daten
austauschen kann.
Bevor Sie fortfahren, stellen Sie sicher, dass Ihr drahtloses Netzwerk angeschaltet ist und zum Breitband Internet
Zugang hat. Um diesen Bereich des Gerätes zum Laufen zu bringen, sollten Sie die Bedienungsanleitung mit der des
Routers lesen.
Bedienung des Gerätes
Vorderseite
1.VFD Display: Wenn Sie das Gerät einschalten erscheint das VFD Display nach ca. 15 Sekunden.
2. Auf/Ab Einstellung UKW:
Einstellung der Frequenz im manuellen Internet Mode: Auf/Ab Um ins Menü zu kommen, drücken Sie den Knopf und
wählen Sie durch drehen einen Menüpunkt aus.
3. LED Leuchte: Die Lampe leuchtet rot, wenn das Gerät ausgeschaltet ist. Die Uhrzeit wird angezeigt.
4. BACK: Drücken Sie diese Tate, um in das Hauptmenü zurück zu gelangen.
5/6. Tune+/- : Wenn das Gerät auf UKW steht, drücken Sie auto - search - next/previous - station.
I<< / >>I : Wenn das Gerät auf Media player steht, drücken Sie previous, um in das nächst Stück zu kommen.
7. >II: Wenn das Gerät auf Media player steht, drücken Sie diese Taste für Start und Pause.
Hinweis: Im UKW Modus können Sie das Gerät upgraden.
8. Reply: In der Zukunft können Sie hier über den Internet Service mehr erfahren. Zurzeit ohne Funktion.
9. Browse: Wenn das Gerät auf Media player steht, drücken Sie diese Taste, und nutzen den Knopf um aus dem
Musikalbum ein Stück auszuwählen. Mit Drücken bestätigen.
10. Mode: Hier können Sie zwischen UKW und Internet Radio wählen.
11. Standby: Drücken Sie diese Taste, um das Gerät auszuschalten. Die Uhrzeit erscheint.
5
Bedienungsanleitung Wi-Fi Internet / FM Radio Modell: IR 100
_____________________________________________________________________________________________________________
Fernbedienung
1.Standby: Drücken Sie diese Taste, um das Gerät an und aus zu schalten.
2. >II: Wenn das Gerät im Media player mode steht, drücken Sie hier für Start oder Pause
Hinweis: In der Zukunft können Sie hier UKW verwalten.
3. Stop key: Wenn das Gerät auf Media player mode steht, können Sie es hier stoppen.
4/5. Tune+/- : Im UKW Modus können Sie hier die Sender wählen.
I<< / >>I: Wenn sich das Gerät im Media player mode befindet, kommen Sie hier zum nächsten Titel.
6/11. Auf / Ab Tasten.
Für UKW: Manuelles Einstellen der Frequenz.
Für das Internet Radio: Auf und Ab im Menü.
7. MODE: UKW und Internet - Radio - Einstellung
8. SELECT: Drücken Sie diese Taste, um ins Hauptmenu zu kommen
9. PL-Mode: Wenn das Gerät auf Media steht, starten Sie mit dieser Taste. Start Funktion in 4 Bereichen:
1. Shuffle (Aus), Repeat (Aus) 2. Shuffle (An), Repeat (Aus)
3. Shuffle (Aus), Repeat (An), 4. Shuffle (An), Repeat (An)
10. BACK: Drücken Sie diese Taste, um im Menü zurück zu kommen.
12. REPLY: Eine Zukunftsfunktion, um mit dem Internet Server in Kontakt zu treten.
14. Wenn das Gerät im Media player steht, drücken Sie diese Taste um einen Titel aus der Liste zu wählen. Drücken Sie den Knopf, um
das Stück zu bestätigen.
15. (1-6):Radio Speicher. Wenn Sie auf UKW oder auf Internet Radio stehen, drücken Sie die Taste für 3 Sekunden um den Sender zu
speichern.
Anschlüsse am Gerät
1. Power Schalter: Dieser Hauptschalter schaltet das Gerät ein oder aus.
2. Sicherungshalter: In dieser Halterung befindet sich eine 20mm T0.5A 250V Sicherung. "Wichtig:" Beim Wechseln
der Sicherung nehmen Sie das Netzkabel ab.
3. Netzkabelanschluss: Gehen Sie sicher, dass das Netzkabel nicht beschädigt wird.
4. Warnhinweise: Die Bilder zeigen an, dass es um hohe Spannungen geht. (Näheres auf den Seiten 2-5).
5. Anschluss für die UKW Antenne..
6. Ausgangsbuchsen: Verbinden Sie diese mit Ihrem Verstärker
7. Anschluss für ein LAN Kabel
8. Anschluss für die 2.4G Internet Wi-Fi Antenne.
6
Bedienungsanleitung Wi-Fi Internet / FM Radio Modell: IR 100
_____________________________________________________________________________________________________________
Installation / Anschluss
Um das Internet Radio zu benutzen, müssen Sie es mit einem Verstärker verbinden. (Es ist nicht möglich am Radio Lautsprecher anzuschließen) Die folgende Zeichnung zeigt Ihnen den richtigen Anschluss. 7
Bedienungsanleitung Wi-Fi Internet / FM Radio Modell: IR 100
_____________________________________________________________________________________________________________
Schritte um Ihr Internet Radio am Netzwerk
anzuschließen
Schritt 1 – Schalten Sie das Gerät ein
Schließen Sie das Gerät mit dem mitgelieferten Netzkabel an. Nach dem Sie das Gerät eingeschaltet haben, warten Sie
bitte 15 Sekunden bis sich das Display anschaltet.
Hinweis: Wenn Sie Ihrem Gerät eine dauerhafte IP Adresse geben wollen, schauen Sie am Ende der
Bedienungsanleitung unter Network Konfiguration.
Wenn das Display angeht, erscheint:
Initialising
network
Nach einigen Sekunden wechselt es zu:
Scanning
Schritt 2 – Suche nach einem kabellosen Netzwerk
Wenn im Display steht <Scan for networks>, drücken Sie die SELECT Taste.
(Hinweis: Wenn Sie an irgendeinem Punkt einen Fehler machen, drücken Sie die BACK Taste, um zu dem vorherigen
Punkt zu gelangen)
Das Internet Radio sucht nun alle kabellosen Netzwerke und im Display steht:
Scanning
Wenn kein Netzwerk gefunden wurde, steht im Display:
No Wireless
Networks Found
Wenn das der Fall ist, funktioniert Ihr Router nicht. Kontrollieren Sie diesen mit Hilfe der Bedienungsanleitung
Wenn das Radio Netzwerke gefunden hat, erscheinen im Display die Namen der Netzwerke, die die jeweiligen
Netzwerkeinrichter vergeben haben Zum Beispiel:
< My Home Network >
Es ist möglich, dass Ihr Radio mehrere Netzwerke findet. Wählen Sie das Netzwerk, mit dem Sie
verbunden werden wollen. Benutzen Sie dazu den Drehknopf.
8
Bedienungsanleitung Wi-Fi Internet / FM Radio Modell: IR 100
_____________________________________________________________________________________________________________
Schritt 3 – Anschluss an das kabellose Netzwerk
Wenn das Netzwerk mit dem Sie verbunden werden wollen im Display erscheint, drücken Sie die Select Taste:
Wenn das Netzwerk nicht konfiguriert ist, erscheint im Display:
Connecting to
network
Dann:
Network OK
Wenn im Display steht:
Enter WEP key
Oder:
Enter WPA key
Dann braucht das Netzwerk einen Code wie: Wired Equivalent Privacy (WEP) oder Wi-Fi Protected Access
(WPA). In diesem Fall müssen Sie den korrekten WEP oder WPA Code im Radio eingeben, damit das Internet
Radio mit Ihrem Netzwerk in Kontakt treten kann.
Nur die Person, die das Netzwerk eingerichtet hat, kennt diesen Code. Setzen Sie sich mit dieser Person in
Verbindung, um den Code zu erfragen.
Nach 3 Sekunden steht im Display “Code Entrey Mode”. Um den Code einzugeben, drehen Sie den Knopf
solange, bis die Zahl oder der Buchstabe erscheint. Drücken Sie die Select Taste. Beachten Sie, dass Sie den
Code exakt eingeben . Achten Sie auf Groß- und Kleinschrift.
Nachdem Sie den Code korrekt eingegeben haben, drücken Sie die Select Taste.
Das Internet Radio ist nun mit Ihrem Router verbunden.
Auswahl eines Radiosenders
1. Drücken Sie die Select Taste, um zum Hauptmenü zurück zu gelangen.
(Hinweis: Wenn Sie einen Fehler machen, können Sie jederzeit mit der Back Taste zum
vorherigen Menü zurück.)
< Stations >
2. Wenn im Display nicht < Stations >steht wie abgebildet, drehen Sie den Knopf bis im Display >Stations<
steht.
3. Drücken Sie die Select Taste.
4. Drehen Sie den Knopf bis im Display steht <Location> oder <Genre>.
<Location> gibt Ihnen die Möglichkeit, aus den Listen nach Ihren Wünschen ein Land
auszuwählen.
9
Bedienungsanleitung Wi-Fi Internet / FM Radio Modell: IR 100
_____________________________________________________________________________________________________________
<Genre> gibt Ihnen die Möglichkeit, Sender nach Ihrem Musikgeschmack auszuwählen. Zum
Beispiel: Klassik, Rock, Sport, Nachrichten, etc.
5. Drücken Sie die SELECT Taste, um eine Liste auszuwählen.
<Location>
1. Drehen Sie den Knopf, um eine Region auszuwählen (oder wählen Sie ‘All’ für alle Länder),
2. Drücken Sie die SELECT Taste.
3. Drehen Sie den Knopf bis zu dem Land Ihrer Wahl.
4. Drücken Sie die SELECT Taste.
5. Drehen Sie den Knopf bis zu dem Sender, den Sie hören möchten.
6. Drücken Sie die SELECT Taste und warten Sie, bis der Sender geladen ist.
Beachten Sie, dass nicht alle Sender 24 Stunden auf Sendung sind, und dass nicht alle Sender
immer senden.
Wenn Sie Sender die Sie anfordern nicht hören, bedeutet das, dass diese Sender gerade nicht
ausstrahlen oder nicht online sind. Lesen Sie auch unter: Angewählte Sender, die nicht zu hören
sind.
<Genre>
1. Drehen Sie am Knopf bis im Display die Richtung Ihres Musikgeschmackes steht, dann drücken Sie die
SELECT Taste.
2. Drehen Sie am Knopf bis der Sender, den Sie hören möchten, erscheint.
3. Drücken Sie die SELECT Taste und warten Sie, bis der Sender geladen ist.
Beachten Sie, dass nicht alle Sender 24 Stunden auf Sendung sind, und dass nicht alle Sender
immer senden.
Wenn Sie Sender, die Sie anfordern nicht hören, bedeutet das, dass diese Sender gerade nicht
ausstrahlen oder nicht online sind. Lesen Sie auch unter: Angewählte Sender, die nicht zu hören
sind.
<Search>
1. Drücken Sie SELECT bis < Search > im Display erscheint.
2. Geben Sie die gesuchte Musikrichtung ein. Benutzen Sie den Knopf, um eine Musikrichtung anzuwählen,
drücke die SELECT Taste. Nachdem Sie Ihre Musikrichtung gefunden haben, drehen Sie auf END und
drücken die SELECT Taste.
3. Das Gerät sucht alle Sender mit der Musikrichtung, die Sie eingegeben haben. Benutzen Sie den Knopf, um
einen Sender auszuwählen und drücken Sie die SELECT Taste.
Zurück zum Menü während der Musikwiedergabe
Während das Internet Radio einen Sender spielt, wird im Display der Sendername und die Bit Rate angezeigt.
Sie können jederzeit durch die SELECT Taste zum Menü zurück – dadurch kommen Sie zum ‘Stations’ Menü
– oder Sie gelangen durch die BACK Taste zum Hauptmenü.
Speichern eines Radiosenders
Während ein Radiosender spielt, drücken Sie die Speichertasten (Taste 1 bis 6 auf der Fernbedienung) bis im
Display steht
10
Bedienungsanleitung Wi-Fi Internet / FM Radio Modell: IR 100
_____________________________________________________________________________________________________________
Assigned to
Preset #
Die Nummer # der Taste die Sie gedrückt halten.
Abspielen eines gespeicherten Senders.
Wenn ein Radiosender wiedergegeben wird, drücken Sie bitte die Stationsspeicher 1 bis 6, für den Speicher,
den Sie belegen möchten. (Beachten Sie bitte: Ein bereits gespeicherter Sender wird durch diesen Vorgang
überschrieben.).
Auswahl eines Senders, der zur Zeit nicht sendet
Wenn Sie einen Sender speichern möchten, der zur Zeit nicht online ist, können Sie auf die Seite
http://www.reciva.com/ gehen und den Sender in Ihrer Liste speichern..
Auswahl innerhalb eines Senders
Einige Radiosender bieten verschiedene Möglichkeiten innerhalb des Senders an. Zum Beispiel können Sie in
einigen Sendern vorherige Aufnahmen anhören. Wenn Sie diese Funktion innerhalb eines Senders anwählen,
startet die Wiedergabe nicht sofort sondern im Display erscheint:
< Live >
1. Drehen Sie den Knopf und wählen Sie<Live> oder <On Demand>, drücken Sie die SELECT Taste
Wenn Sie <Live> nutzen, hören Sie das gerade gesendete.
Wenn Sie <On Demand> nutzen, haben Sie verschiedene Möglichkeiten zur Auswahl.
Was im Display erscheint, hängt am Sender den Sie gewählt haben – die folgenden Schritte sind
nur Möglichkeiten!
2. Wenn Sie <On Demand> nutzen, erscheint im Display der Name des Programms. Drehen Sie den Knopf auf
das gewünschte Programm und drücken Sie die SELECT Taste.
3. Wenn Sie ein Programm ausgesucht haben, welches Sie hören möchten, fängt es entweder sofort an zu
spielen, oder im Display erscheint eine Liste, an welchen Tagen Sie diesen Sender hören können. Benutzen
Sie den Knopf, um die Tage anzuwählen, an denen das Program gesendet wird und drücken Sie die
SELECT Taste.
4. Nachdem Sie den Tag ausgewählt haben, können Sie eine Startzeit eingeben. Geben Sie die Startzeit über den
Knopf ein und drücken Sie die SELECT Taste.
5. Sender, die Ihnen eine Uhrzeit zur Verfügung stellen, geben Ihnen die Möglichkeit über schnellen Vorlauf
und schnellen Rücklauf zu dem Punkt zu gelangen, zu dem Sie wollen. Wenn Sie die Taste SKIP TO
PREVIOUS TRACK oder SKIP TO NEXT TRACK drücken, wird die Zeit angezeigt. Es wird die
gespielte Zeit angezeigt. Nun können Sie durch drehen des Knopfes die Zeit verändern. Ebenfalls können
Sie über die Tasten SKIP TO PREVIOUS TRACK oder SKIP TO NEXT TRACK eine Zeiteinstellung
vornehmen. Wenn Sie erneut die SELECT Taste drücken, spielt das Program von diesem Punkt an.
6. Wenn Sie im Internet Radio ein Programm haben, welches Ihnen die Startzeit ermöglicht, werden die
Radiofunktionstasten automatisch zu Bedientasten .z.B. drücken Sie die Pause Taste, um die Wiedergabe
anzuhalten. Drücken Sie die Starttaste, um mit der Wiedergabe fortzufahren.
11
Bedienungsanleitung Wi-Fi Internet / FM Radio Modell: IR 100
_____________________________________________________________________________________________________________
Benutzen des Radios für den UKW Empfang
Wenn das Radio auf FM Tuner steht, können Sie UKW Sender empfangen.
1. Den Eingang des UKW Tuners wählen Sie mit der ‘Mode’ Taste. Drücken Sie die ‘Mode’ Taste erneut und
Sie gelangen wieder zum Internet Radio.
Sie kommen ebenfalls in den UKW Tuner, wenn Sie im Hauptmenü auf Tuner gehen.
2. Während das Radio auf UKW Tuner steht, wird die UKW Frequenz die gerade eingestellt ist angezeigt.
Drehen Sie den Knopf im Uhrzeigersinn, um die Frequenz zu erhöhen, gegen den Uhrzeigersinn senken Sie
die Frequenz.
3. Drücken Sie die TUNE+/- Tasten am Gerät oder auf der Fernbedienung, um automatisch Sender zu suchen.
4. Um einen Sender zu speichern, halten Sie einen der Senderspeicher gedrückt. Verfahren Sie so wie bei dem
Internet Radio.
5. Um einen UKW Sender aufzurufen, drücken Sie nur kurz eine der Speichertasten.
Einstellung des Datums und der Zeit
1. Drücken Sie die SELECT Taste. (Hinweis: Wenn Sie einen Fehler machen, können Sie jederzeit durch das
Betätigen der Back Taste zum vorherigen Menüpunkt zurück gelangen.)
2. Drehen Sie am Knopf, bis im Display steht <Settings>.
< Settings >
3. Drücken Sie die SELECT Taste.
4. Drehen Sie am Knopf, bis im Display steht <Set Time/Date>.
< Set Time/Date >
5. Drücken Sie die SELECT Taste.
Set Time 14:03
6. Drehen Sie am Knopf, bis die richtige Zeit (STD.) eigestellt ist. Drücken Sie die SELECT Taste.
Set Time 15:03
7. Drehen Sie am Knopf, bis die richtige Zeit (Min.) eigestellt ist. Drücken Sie die SELECT Taste.
8. Nachdem Sie die Zeit richtig eingestellt haben, verfahren Sie mit dem Datum ebenfalls so.
Set Date 15:06
12
Bedienungsanleitung Wi-Fi Internet / FM Radio Modell: IR 100
_____________________________________________________________________________________________________________
Einstellung des Alarms
1. Drücken Sie die SELECT Taste. (Hinweis: Wenn Sie einen Fehler machen, können Sie jederzeit durch
drücken der BACK Taste zurück in das vorherige Menü.)
2. Drehen Sie am Knopf, bis im Display steht<Alarm Clock>.
<
Alarm Clock >
3. Drücken Sie die SELECT Taste.
4. Drehen Sie am Knopf, bis im Display steht <Set Alarms>.
< Set Alarms >
5. Drehen Sie am Knopf, bis im Display steht <Set Alarm>.
< 1 OFF 00:00
Sunday >
6. Drehen Sie den Knopf, um zwischen variablem Alarm und ‘Disable All’ zu wählen. Drücken Sie die
SELECT Taste auf ‘Disable All’ jeder Alarm ist ausgeschaltet. Nun steht im Display ‘All alarms disabled’
und das für 3 Sekunden. Nun wird wieder der Sender angezeigt.
All alarms
disabled
7. Wenn Sie einen der Alarmpunkte anwählen, haben Sie die Möglichkeit eine Alarmzeit einzugeben.
Set Alarm 15:06
9. Drehen Sie am Knopf, bis die Zeit (Std.) eingebgeben ist, dann drücken Sie die SELECT Taste.
Set Alarm
07:06
10. Drehen Sie am Knopf, bis die Min. richtig eingegeben sind und drücken Sie die SELECT Taste.
Alarm Set: 07:45
11. Drehen Sie am Knopf, um auszuwählen zwischen ‘Once’, ‘Every day’, ‘Weekly’, ‘Weekdays’
und‘Weekends’. Wenn Sie ‘Once’ oder ‘Weekly’ auswählen, dann müssen Sie einen Tag auswählen, an
dem der Alarm aktiviert werden soll. Drücken Sie die SELECT Taste.
12. Am Ende müssen Sie noch zwischen einem Alarmsignal oder einem Sender wählen. Wenn Sie das getan
haben, drücken Sie die SELECT Taste.
13
Bedienungsanleitung Wi-Fi Internet / FM Radio Modell: IR 100
_____________________________________________________________________________________________________________
Media Player
Schließen Sie einen Windows PC an Ihrem Radio an, um
Musikstücke über einen UPnP Server zu verwalten.
1. Wenn Ihr PC mit Microsoft Windows XP oder Windows Vista ausgestattet ist, können Sie Windows Media
Player 11 (WMP11) benutzen. Um Ihren UPnP (Universal Plug and Play) media Server 1.0. Windows Media
Player 11 von der Microsoft Webseite auf ihrem Rechner zu installieren, verfahren Sie wie folgt.
2. Als erstes wird der Windows Media Player 11 alle Musikstücke, die sich auf Ihrem Rechner befinden, in einer
Datei zusammenfassen. Um neue Musikstücke der Datei hinzu zufügen wählen Sie ‘File > Add to Library…
>Eine andere Möglichkeit ist: click ‘Add’ und Sie wählen die Musikstücke aus, die Sie hinzufügen möchten
und bestätigen Sie mit ‘OK’.
3. Nun müssen Sie Ihr Internet Radio am Windows Media Player 11 anschließen und konfigurieren. Um das zu
ermöglichen, gehen Sie bitte wie folgt vor.
a. Drücken Sie auf BACK, um ins Hauptmenü zugelangen. Drehen Sie solange am Knopf, bis im Display
‘Media Player’ erscheint.
b. Drücken Sie SELECT und drehen Sie dann, bis im Display ‘UPNP Servers’ erscheint.
c. Drücken Sie SELECT und das Radio sucht nach allen UPnP Servern. Achtung, dieser Vorgang kann
einige Sekunden dauern . Während des Suchlaufs steht im Display ‘[Empty]’. Es steht solange
‘[Empty]’ im Display ,bis ein Server gefunden wurde.
d. Nach einem erfolgreichen Suchlauf wählen Sie Ihren UPnP Server. Wenn mehrere UPnP Server
gefunden wurden, wählen Sie Ihren aus und bestätigen Sie mit SELECT (Hinweis: Das Radio zeigt im
Display ‘Access Denied’).
4. Ihr PC wird Ihnen nun mitteilen, dass ein Gerät gefunden wurde und an ihrem UPnP Server angeschlossen ist.
Damit Ihr Radio die Erlaubnis bekommt auf Ihre media Files zuzugreifen, müssen Sie unter `Library’ im
Windows Media Player 11 auf ‘Media Sharing…’ gehen, um ‘Media Sharing’ Windows zu öffnen.
Wählen Sie ‘Media Sharing…’ for Windows Media Player 11:
5. Im ‘Media Sharing’ Fenster wird Ihr Radio als unbekanntes Gerät aufgeführt. Klicken Sie auf die ‘unknown
device‘ Liste und klicken Sie auf ‘Allow’ dann klicken Sie auf ‘OK’.
Erlaubnis das Radio anzuschließen:
14
Bedienungsanleitung Wi-Fi Internet / FM Radio Modell: IR 100
_____________________________________________________________________________________________________________
Finden und Abspielen von Musikstücken über das Radio
und UPnP
1. Wenn der UPnP Server mit dem Internet Radio verbunden ist, können Sie Ihre Musikstücke ebenfalls mit dem
Internet Radio verwalten. Verfahren Sie wie folgt:
2. Drücke die Taste BACK für das Hauptmenü, dann wählen Sie die Funktion ‘Media Player’.
3. Drücken Sie SELECT und wählen Sie über den Knopf den Punkt ‘UPnP Servers’.
4. Drücken Sie SELECT und das Radio wird nach allen UPnP Servern suchen. Hinweis, dieser Vorgang kann
einige Sekunden dauern, bis das Radio eine komplette Suche durchgeführt hat. Während des Suchlaufs steht im
Display ‘[Empty]’.
5. Nach erfolgreicher Suche, wählen Sie Ihren UPnP Server über den Knopf aus und bestätigen mit SELECT.
6. Das Radio wird jetzt eine Medialiste im Display wie z.B. ‘Music’, ‘Playlists’ etc. anzeigen. Drehen Sie den
Knopf auf die gewünschte Kategorie und drücken Sie die Taste SELECT, dann wählen Sie eine Unterkategorie
und drücken wieder SELECT. Zum Beispiel können Sie zwischen Musik und Alben wählen.
7. Drehen Sie mit dem Knopf auf die Musikstücke, die Sie hören wollen und drücken Sie SELECT.
8. Im Display steht ‘[Add to Queue]’, drücken Sie SELECT und das Radio wird die Stücke hinzufügen und diese
automatisch abspielen.
Zusammenstellen einer Liste, von verfügbaren Stücken
zur Wiedergabe
1. Drücken Sie die BROWSE Taste. Der gerade abgespielte Titel steht im Display.
2. Drehen Sie am Knopf, um zu sehen welche Stücke Ihnen zur Verfügung stehen..
Wenn Sie zu einem speziellen Stück springen wollen, drücken Sie die SELECT Taste, wenn der gewünschte Titel
im Display steht.
15
Bedienungsanleitung Wi-Fi Internet / FM Radio Modell: IR 100
_____________________________________________________________________________________________________________
Zusammenstellen von UPnP Titeln für die spätere Wiedergabe
1. Wählen Sie einen Titel aus.
2. Drücken Sie die SELECT Taste. ‘Track Added To Queue’ steht im Display.
Zusammenstellung von Alben für die spätere Wiedergabe
1. Wählen Sie ein Album aus.
2. Drücken Sie die SELECT Taste.
3. Drehen Sie am Knopf, bis ‘[Add To Queue]’ im Display steht.
4. Drücken Sie die SELECT Taste. ‘Tracks Added to Queue’ steht im Display.
Bedienung bei der Wiedergabe
1. Drücken Sie die STOP Taste, um die Wiedergabe zu Stoppen.
2. Drücken Sie die PLAY/PAUSE Taste, um einen gerade gespielten Titel anzuhalten. Betätigen Sie die Taste ein
weiteres Mal, um mit der Wiedergabe fortzufahren.
3. Drücken Sie die SKIP TO PREVIOUS TRACK Taste, um einen Titel aus einer Liste zu starten.
4. Drücken Sie die SKIP TO NEXT TRACK Taste, um den nächsten Titel aus einer Liste zu starten.
Löschen eines Titels au seiner Liste
1. Drücken Sie die BROWSE Taste. Das gerade gespielte Stück wird angezeigt.
2. Drehen Sie den Knopf zu dem Titel, der aus der Liste gelöscht werden soll.
3. Drücken und halten Sie die STOP Taste für 2 Sekunden.
4. Drehen Sie den Knopf bis zu ‘Yes’ oder ‘No’.
5. Drücken Sie SELECT, um zu bestätigen, dass der Titel aus der Liste gelöscht werden soll.
6. Wenn Sie ‘Yes’ wählen, erscheint ‘Removed From Queue’ im Display.
7. Um alle Titel aus einer Liste zu löschen, drücken Sie BACK bis der ‘Media Player’ im Menü erscheint. Drücken
Sie SELECT und drehen Sie den Knopf bis zu ‘Clear Queue’. Drücken Sie SELECT.
Abspielen von Titeln in zufälliger Reihenfolge
1. Wählen Sie Ihre Titel die Sie sich ausgesucht haben.
2. Gehen Sie im Hauptmenü auf 'Media Player' und benutzen Sie die SELECT und BACK Tasten.
3. Drücken Sie die SELECT Taste.
4. Drehen Sie den Knopf bis 'Playback Mode' im Display steht.
5. Drücken Sie die SELECT Taste.
6. Drehen Sie den Knopf bis 'Shuffle' im Display steht.
7. Drücken Sie die SELECT Taste
8. Drehen Sie den Knopf auf YES/NO und bestätigen Sie den Zufalls Modus.
Das wiederholte Abspielen von Titeln
16
Bedienungsanleitung Wi-Fi Internet / FM Radio Modell: IR 100
_____________________________________________________________________________________________________________
1. Wählen Sie sich Ihre Titel, die Sie sich ausgesucht haben.
2. Gehen Sie im Hauptmenü auf 'Media Player' und benutzen Sie die SELECT und BACK Tasten.
3. Drücken Sie die SELECT Taste.
4. Drehen Sie den Knopf bis 'Playback Mode' im Display steht.
5. Drücken Sie die SELECT Taste.
6. Drehen Sie den Knopf bis 'Repeat' im Display steht.
7. Drücken Sie die SELECT Taste.
8. Drehen Sie den Knopf auf YES/NO und bestätigen Sie das wiederholte Abspielen von Titeln.
Einstellungs Menü
Nutzen der Möglichkeiten im Menü Einstellungen
1. Drücken Sie die SELECT Taste.
(Hinweis: Wenn Sie einen Fehler machen, können Sie jederzeit durch drücken der BACK Taste
zum vorherigen Menüpunkt zurück.)
2. Drehen Sie den Knopf, bis ‘Settings’ im Display steht
3. Drücken Sie die SELECT Taste.
4. Drehen Sie den Knopf, bis die gewünschte Funktion angezeigt wird.
5. Drücken Sie die SELECT Taste, um die verschiedenen Möglichkeiten im Display zu sehen. Die
Möglichkeiten werden weiter unten aufgeführt.
<Netzwerk Konfiguration>
Dieser Menüpunkt ermöglicht Ihnen, Ihr Radio einem neuen Netzwerk zuzuordnen oder die Netzwerk
Parameter manuell zu konfigurieren. Das ist sehr hilfreich, wenn Sie Ihr Internetradio bei Freunden oder
Bekannten nutzen wollen.
Anschluss des Radios über eine feste IP Adresse
Um Ihr Radio mit einer festen IP Adresse zu versehen, müssen Sie Folgendes beachten.
1. Wählen Sie an Ihrem Radio ‘Settings > Network config > Edit Config’ Menu, und dann drücken Sie
SELECT.
2. Im Radiodisplay steht nun ‘Auto (DHCP)? YES / NO’. Drehen Sie den Knopf und wählen Sie ‘NO’.
Dann drücken Sie SELECT.
3. Nun sind Sie in der Lage Ihre IP Adresse, die Sie dem Radio geben wollen, über den Knopf einzugeben.
Um die vergebene Nummer zu bestätigen, drücken Sie SELECT. Die Nummer ist jetzt die feste IP
Adresse des Radios.
4. Das Radio wird nun nach dem benötigten Netzwerk fragen. Sie können so vorgehen, wie bereits mit der
IP Adresse.
5. Sie werden nun aufgefordert, den neuen Zugang des Radios in Ihrem Netzwerk einzugeben.
17
Bedienungsanleitung Wi-Fi Internet / FM Radio Modell: IR 100
_____________________________________________________________________________________________________________
6. Nun müssen Sie noch die DNS IP Adresse für das Radio eingeben. Bei manchen Netzwerken müssen Sie
noch die ISP’s DNS IP Adressen eingeben, welche Sie auf Ihrer ISP’s unter support auf Ihrer
Webseite finden.
7. Nachdem Sie die oben aufgeführten Informationen eingegeben haben, wird Ihr Radio nun schnelleren
und besseren Empfang zu Ihrem Netzwerk haben. Wenn Sie Ihr Gerät wieder über DHCP einstellen
möchten, (um automatisch Ihre Netzwerkinformationen zu bekommen) wählen Sie bitte ‘Configure >
Network config > Edit Config’ und dann set ‘Auto (DHCP)? YES / NO’ auf ‘YES’.
Wenn Ihr Radio an einem Kabelnetzwerk angeschlossen ist, dann sind Sie in der Lage Ihr Radio über Ethernet
Anschluss (RJ45) oder über einen Wi-Fi Router zu konfigurieren.
Anschluss des Radios über ein Ethernet Kabel
Im ‘Network config’ Menü des Radios wählen Sie ‘Wired/Wireless’. Dieses Menü gibt Ihnen drei
Möglichkeiten: ‘Wireless Only’, ‘Wired’ und ‘Auto’. Wählen Sie ‘Wired Only’, dann haben Sie nur
eingeschränkte Möglichkeiten, und Sie können mit dem Netzwerk nur über Ethernet kommunizieren. Das Radio
ist dann nicht in der Lage alle kabellosen Möglichkeiten zu nutzen.
Anschluss des Radios über einen Wi-Fi Anschluss
Wählen Sie den ‘Wireless Only’ Punkt aus dem ‘Wired/Wireless’ Menü und Ihr Radio wird nur über die WI-Fi
Anschluss mit dem Netzwerk kommunizieren. Das Radio ist nicht mehr über einen Kabelanschluss mit dem
Netzwerk verbunden.
Anschluss des Radios über ein Ethernet oder über einen kabellosen
Anschluss
Wählen Sie die ‘Auto’ Funktion aus dem ‘Wired/Wireless’ Menü und Ihr Radio ist in der Lage über einen
Ethernet Anschluss, oder wenn es möglich ist, über einen WI-FI Anschluss mit dem Netzwerk zu
kommunizieren.
Wenn das Radio einen Anschluss zum Netzwerk gefunden hat, wird diese Verbindung bestehen bleiben,
solange das Radio eingeschaltet ist.
Das ‘Network Config’ Menü kann Ihnen auch eine Warnung geben, wenn das Signal einer Internetverbindung
zu schwach ist. Sie können diese Funktion aktivieren, indem Sie unter ‘Signal Warning’auf die Funktion ‘Yes’
gehen.
<Version>
Zeigt Ihnen die Version der Bauteile, die in Ihrem Internetradio verwendet wurden.
<Upgrade Firmware>
Benutzen Sie diese Funktion nur, wenn Sie eine neue Firmware für Ihr Radio von Reciva portal aus dem
Internet laden wollen. Wenn eine neue Software erhältlich ist, wird Ihr Radio Sie fragen, ob Sie diese
DOWNLOADEN wollen oder nicht. Hinweis: An dieser Stelle können Sie die Taste BACK drücken, um den
DOWNLOAD abzubrechen. Ein “Firmware upgrade” wird einige Minuten dauern, schalten Sie das Gerät
während des DOWNLOADS nicht aus, da Sie ansonsten einen nicht wieder zu reparierenden Schaden anrichten.
<Sprache>
Ermöglicht Ihnen, die Sprache des Displays zu wechseln.
18
Bedienungsanleitung Wi-Fi Internet / FM Radio Modell: IR 100
_____________________________________________________________________________________________________________
<Werkseinstellung>
Hiermit stellen Sie den Zustand wieder her, den das Gerät gehabt hat, als es unser Werk verlassen hat. Ein
Zurückstellen auf den Werkszustand hat zur Folge, dass alle Ihre Programmierungen und
Netzwerkeinstellungen verloren gehen.
<Registrieren>
Hier können Sie Ihr Internet Radio auf Reciva Customer portal: http://www.reciva.com/ registrieren lassen.
<Einstellung Zeit/Datum>
Benutzen Sie diese Möglichkeit, um Ihre Zeit - und Datumsanzeige vorzunehmen. Um einen Alarm einzustellen,
schauen Sie bitte unter Einstellung Alarm “Setting the alarms”.
Einstellung ‘Meine Einstellung’
Das Anfordern eines Accounts auf der Reciva’s website
1. Öffnen Sie die website, http://www.reciva.com in Ihrem Computer.
2. Klicken Sie auf ‘Register’ und folgen der Anweisung, um einen eigenen Account zu erstellen. Bitte beachten
Sie, dass während der Registrierung eine E-Mail mit Ihren Zugangsdaten an Sie geschickt wird. Bitte geben
Sie diese Zugangsdaten ein.
3. Nach der Anmeldung in Ihrem Account, haben Sie auf der linken Seite der Webseite die Möglichkeit, Ihre
persönlichen Daten in ‘My Profile’, ‘My Stations’, ‘My Streams’, ‘My Radios’ und ‘My Podcasts’,
einzugeben.
4. Sie können jetzt Ihr Internet Radio in Ihrem Account unter ‘My Radios’ anmelden. In der ‘My Radios’
Anmeldung werden Sie aufgefordert eine achtstellige Seriennummer einzugeben. Diese Nummer finden
Sie unter ‘Settings > Version’ im Menü des Radios. Sie müssen ebenfalls einen siebenstelligen
Registrierungscode eingeben, den Sie im ‘Configure > Register’ Menü des Radios finden.
Einstellung ‘Mein Profil’
Wenn Sie sich bei Reciva angemeldet haben, können Sie Ihre persönlichen Daten unter ‘My Profile’ eingeben.
Klicken Sie auf ‘My Profile’, um den jetzigen Status Ihrer Anmeldung zu sehen. Sie können jetzt Ihre Daten,
wie Ihre Adresse, Benutzer Name, Passwort usw. eingeben. Ergänzen Sie Ihre Daten und klicken Sie auf
‘Update’, um Ihre Daten zu sichern.
Einstellung ‘My Stations’
19
Bedienungsanleitung Wi-Fi Internet / FM Radio Modell: IR 100
_____________________________________________________________________________________________________________
1. Es ist möglich, nach Radiosendern zu suchen, die auf der Seite Reciva’s stations’ angeboten werden. Sie
können jederzeit einen Sender, der im Display angezeigt wird, über ‘Add to My Stations’ Ihrer Liste
hinzufügen.
2. Klicken Sie auf den ‘Add to My Stations’ Link und der Sender wird zu Ihrer Liste ‘My Stations’ hinzugefügt.
Klicken Sie auf ‘My Stations’, dann suchen Sie einen Sender, den Sie bearbeiten wollen. Sie sind nun in
der Lage Ihre Liste zu bearbeiten.
3. Wenn Sie einen Internet Sender in Ihrer ‘My Stations’ Liste haben, können Sie diesen Sender über Ihr
Internet Radio abspielen. Diese Sender stehen Ihrem Radio unter dem Menüpunkt <Stations > My Stuff >
My Stations’ zur Verfügung. Bitte beachten Sie, dass diese Sender nur dann zur Verfügung stehen, wenn
Ihr Radio vorher die neue Station List herunter geladen hat. Die schnellste Möglichkeit eine neue Liste
herunterzuladen ist: Schalten Sie das Radio “aus“ und wieder „an“.
Einstellung ‘Meine Streams’
1. Wenn Sie bei Reciva angemeldet sind, können Sie Ihre eigenen Internet Streams erstellen. Benutzen Sie
hierfür in Ihrem Internet Radio die Funktion ‘My Streams’.
2. Klicken Sie auf ‘My Streams’ und Sie können einen Sendernamen und den URL Stream eingeben. Der
Media Stream URL stellt einen Link zum aktuellen audio Stream her. Wenn Sie die Daten eines Senders
oder einer Webseite haben, geben Sie diese bitte über Reciva’s website, http://www.reciva.com ein.
3. Wenn Sie einen eigenen Stream für Ihr Internet Radio haben, können Sie in ‘My Streams’ diese Liste über
Ihr Internet Radio abspielen. Diesen Sender finden Sie in Ihrem Radio unter dem Menüpunkt ‘Stations >
My Stuff > My Streams’. Beachten Sie bitte, dass dieser Stream nur von Ihrem Radio zu empfangen ist, bis
Sie einen neuen Stream laden. Um einen neuen Stream herunterzuladen, schalten Sie Ihr Radio aus und
wieder ein.
Einstellung ‘My Podcasts’
1. Es ist möglich, Ihrem Radio einen audio Podcast (RSS feeds) hinzuzufügen. Gehen Sie über Ihren Reciva
Account auf Ihr Internet Radio.. Um einen Podcast hinzuzufügen, geben Sie einfach Ihren Account ein und
klicken Sie auf den Link ‘My Podcasts’.
2. Auf Ihrer ‘My Podcasts’ Einstellung können Sie Ihren Podcast eingeben, indem Sie einen URL und einen
Podcast Namen eingeben. Dieser erscheint nun auf Ihrer Webseite. Bitte achten Sie darauf, dass die
Podcast URL eine direkte RSS Adresse hat, die mit ‚.xml endet zum Beispiel:
http://someurl.com/podcast.xml
3. Wenn nun ein Podcast in Ihrer ‘My Podcasts’ Liste zur Verfügung steht, müssen Sie diese Daten auf Ihr
Internet Radio bekommen. Ihre Podcasts werden unter dem Menüpunkt: ‘Stations > My Stuff > My
Podcasts’ aufgelistet. Bitte beachten Sie, dass der Podcast nur auf Ihrem Radio zu hören ist, wenn Sie die
neue Liste heruntergeladen haben. Damit Ihr Radio sofort die neue Liste herunterlädt, schalten Sie Ihr
Radio aus und wieder an.
Problembehebung
Wenn Sie irgendwelche Probleme mit Ihrem kabellosen Internet Radio haben, können Sie schnell Hilfe bekommen,
wenn Sie die Seite http://www.reciva.com aufrufen.
Wenn Sie Probleme haben, das Radio an einem kabellosen Netzwerk anzuschließen, können Ihnen diese Schritte
weiterhelfen.
1. Kontrollieren Sie, ob ein Computer, der über Wi-Fi angeschlossen ist, ins Internet kommt. Benutzen Sie dasselbe
Netzwerk.
20
Bedienungsanleitung Wi-Fi Internet / FM Radio Modell: IR 100
_____________________________________________________________________________________________________________
2. Kontrollieren Sie, ob der DHCP Server erreichbar ist, und ob Sie eine feste IP Adresse für das Radio benutzen. Sie
können eine feste IP Adresse an Ihrem Radio einstellen, indem Sie über Menü’ Settings -> Network Config -> Edit
Config’, und dann ‘No’ für ‘Auto (DHCP)’ wählen.
3. Kontrollieren Sie, ob in Ihrem Netzwerk die Firewall die Ausgänge blockiert. Als Minimum, braucht Ihr Radio einen
Anschluss zu UDP und TCP Eingängen 80, 554, 1755, 5000, 6000 und 7070.
4. Kontrollieren Sie, ob Ihr Anschluss nicht auf eine MAC Adresse eingestellt ist. Sie können sehen, ob Ihr Radio auf
eine MAC Adresse eingestellt ist, unter: ‘Settings -> Network Config -> View Config -> MAC address’.
5. Wenn Sie ein verschlüsseltes Netzwerk nutzen, kontrollieren Sie, ob Sie den richtigen Code in Ihrem Radio
eingegeben haben. Kontrollieren Sie, ob Sie den richtigen Schlüssel und das richtige Passwort im Radio eingegeben
haben. Beachten Sie, dass der Schlüssel richtig eingegeben wird. Wenn Sie zu einem codierten Netzwerk Anschluss
suchen, steht im Display des Radios: ‘Wireless error’ gefolgt von 5 Nummern. Geben Sie das korrekte Passwort Ihres
Netzwerkes ein. Wenn das Problem nicht behoben ist, müssen Sie einen Computer Spezialisten für den Anschluss
bestellen.
Wenn Ihr Radio am Netzwerk angeschlossen ist, aber nicht alle Sender abspielt, kann das an einem der folgenden Punkte
liegen:
1. Der Sender strahlt zu dieser Zeit des Tages nicht aus. (Denken Sie an die verschiedenen Zeitzonen).
2. Der Sender hat die maximale Anzahl der Zuhörer erreicht..
3. Den Sender gibt es gar nicht mehr.
4. Die Anzeige des Senders ist nicht von diesem Tag.
5. Die Internet Verbindung zwischen dem Server und Ihnen ist zu schwach.
Nutzen Sie Ihren PC, um den Stream über die Webseite wiederzugeben.
Wenn der Sender über Ihren PC abgespielt wird, nutzen Sie http://www.reciva.com/, um uns darüber in Kenntnis zu
setzen. Wir ändern dann die Daten, die vom Radio benutzt werden.
Technische Daten
FM FREQUENCY RANGE: 87.5 – 108 MHz
Speicherplätze: 6
Internet Radio Speicherplätze: 6
Netzteil: AC 230V 50 Hz
Maximale Stromaufnahme: 15W
Abmessungen: 430 X 283 X 117 mm
21
Instruction Manual Wi-Fi Internet / FM Radio Model: IR 100
_____________________________________________________________________________________________________________
Content
23
Safety instructions
What you need before you can use your Internet radio
24
Controls (Front Panel, Remote Control, Rear Panel).........................................................24
Steps for connecting your radio to your wireless network.................................................27
Step 1 - Power up the radio .................................................................................27
Step 2 - Scan for a wireless network connection .................................................27
Step 3 - Connect to the wireless network ............................................................28
Choosing a radio station to listen to...................................................................................28
Returning to the menu while a station is playing...............................................................29
Storing a radio station in a preset.......................................................................................29
Playing a preset radio station .............................................................................................30
Requesting a station that is currently unavailable..............................................................30
Stations which enable you to choose what you listen to....................................................30
Using your radio for tuning into FM stations ....................................................................31
Setting the clock ................................................................................................................31
Setting the alarm ................................................................................................................32
Media Player
Set up a Windows PC to allow the radio to access your audio files via a UPnP server.....33
Locating and playing media files using the radio and UPnP .............................................34
Browsing the list of tracks currently queued up for playback............................................35
Queuing up UPnP tracks for playback later.......................................................................35
Queuing up albums for playback later ...............................................................................35
Controlling playback .........................................................................................................35
Removing tracks from the queue .......................................................................................35
Playing tracks in random order ..........................................................................................35
Playing tracks in the queue repeatedly...............................................................................36
Settings menu
36
Choosing the option you want from the Configure menu..................................................36
<Network Config>.............................................................................................................37
Configuring the radio to use a static IP address...................................................37
Configuring the radio to only use a wired Ethernet connection ..........................37
Configuring the radio to only use a Wi-Fi connection ........................................37
Configuring the radio to use either an Ethernet or a wireless connection ...........37
<Version> ..........................................................................................................................38
<Upgrade Firmware>.........................................................................................................38
<Language> .......................................................................................................................38
<Factory Reset>.................................................................................................................38
<Register> .........................................................................................................................38
<Set Time / Date>..............................................................................................................38
Configuring ‘My Stuff’
38
Registering an account on Reciva’s website......................................................................38
Configuring ‘My Profile’...................................................................................................39
Configuring ‘My Stations’.................................................................................................39
Configuring ‘My Streams’.................................................................................................39
Configuring ‘My Podcasts’................................................................................................39
Troubleshooting
40
Specifications
41
22
Instruction Manual Wi-Fi Internet / FM Radio Model: IR 100
_____________________________________________________________________________________________________________
Safety instructions
23
Instruction Manual Wi-Fi Internet / FM Radio Model: IR 100
_____________________________________________________________________________________________________________
What you need before you can use your Internet radio
Before you can use your Internet radio, you need the following:
•
•
●
●
•
A broadband Internet connection.
A wireless access point (Wi-Fi) connected to your broadband Internet, preferably via a router.
If you have not wireless network, you can use Lan wire connected to your broadband internet, preferably
Via a router.
You can select to use wireless or LAN wire in the setting menu.
If your wireless network is configured to use Wired Equivalent Privacy (WEP) or Wi-Fi Protected Access
(WPA) data encryption then you need to know the WEP or WPA code so you can get the Internet radio to
communicate with the network.
Before you continue, make sure that your wireless access point is powered up and connected to your broadband
Internet. To get this part of the system working you must read the instructions supplied with the wireless access
point.
Controls
Front panel
1
2
3
4
5
6 7
8
9 10 11
1.VFD Display. Once power switch turn to ON place, VFD come up screen after about 15 seconds.
2. Up/down move.
FM mode: adjust the frequency by manual
Internet Radio mode: up/down move in the menu.
Press the knob to go to main menu or select item on the menu.
3. LED Indicator: The indicator turn on in red colour when the unit is in standby clock mode.
4. BACK: Press to go back to previous menu
5/6. Tune+/- : When unit in FM mode, press to auto search next/previous station.
I<< / >>I : When unit in Media player mode, press to skip to previous/next track.
7. >II : When unit in Media play mode, press to start play or pause.
Info: For future upgrade function of FM mode.
8. Reply. For future spare function, communication with the internet service.
existing this key is no function.
9. Browse: When unit in Media play mode, press this key , and use the knob to browse
the play list, press the knob to select one track to play.
10. Mode: FM and Internet radio mode change
11. Standby: press to turn to standby clock mode, press again to back to normal mode.
24
Instruction Manual Wi-Fi Internet / FM Radio Model: IR 100
_____________________________________________________________________________________________________________
Remote Control
1
3
2
6
4
5
7
8
12
13
9
10
14
11
15
1.Standby: press to turn to standby clock mode, press again to back to normal mode.
2. >II : When unit in Media play mode, press to start play or pause.
Info: For future upgrade function of FM mode.
3. Stop key: When unit in Media play mode, press to stop playing.
4/5. Tune+/- : When unit in FM mode, press to auto search next/previous station.
I<< / >>I : When unit in Media player mode, press to skip to previous/next track.
6/11. Up/down move key.
FM mode: adjust the station frequency by manual.
Internet Radio mode: up/down move in the menu.
7. MODE: FM and Internet radio mode change .
8. SELECT: Press to go to main menu or select item on the menu
9. PL-Mode: When unit in Media mode, press to change media play mode.
Media play mode with 4 statuses:
1. Shuffle (OFF), Repeat (OFF) 2. Shuffle (ON), Repeat (OFF)
3. Shuffle (OFF), Repeat (ON), 4. Shuffle (ON), Repeat (ON)
10. BACK: Press to go back to previous menu .
12. REPLY: For future spare function, communication with the internet service.
existing this key is no function.
14. When unit in Media play mode, press this key , and use the knob to browse
the play list, press the knob to select one track to play.
15. (1-6) are radio preset station numbers.
When the unit is in FM mode or Internet Radio mode, Press the number key and hold
for about 2 seconds to save the present station to the number.
Rear Panel
IR 1 00
1 2 3
5
4
6
8
7
1.POWER SWITCH: Switches mains ower on/off to internal
components.
2. FUSE HOLDER: fitted with 20mm T0.5A 250V fuse.
4. WARNING ICONS: Please be aware that
"IMPORTANT:"
Remove the mains plug from the mains socket before
attempting to check/replace the fuse located on this
fuse holder.
3. MAINS CABLE INLET JACK: Please ensure that the
input cable strain relief not been damaged.
5. FM tuner Antenna input jack.
this unit contains high
voltages, and
should not be opened.
6. Music Signal Output jack.
7. LAN wire input jack
8. 2.4G internet Wi-Fi antenna input jack.
25
Instruction Manual Wi-Fi Internet / FM Radio Model: IR 100
_____________________________________________________________________________________________________________
Making The Connection
It is necessary to connect this tuner to an external amplifier and loudspeaker set up, (It is not possible to connect
loudspeakers directly to this radio). Please see the following diagrams which detail required connections:
INTERNET RADIO IR 100
IR 1 00
AMPLIFIER
26
Instruction Manual Wi-Fi Internet / FM Radio Model: IR 100
_____________________________________________________________________________________________________________
Steps for connecting your radio to your wireless
network
Step 1 - Power up the radio
Connecting a power supply with a correct rating, turn power switch on, wait for about 15 seconds, Display
light up.
Note: if you would like to give your radio a static IP address then please see the ‘Network config’ section
under the ‘Settings’ section at the end of the guide.
The display on the front of the radio will light up and say:
Initialising
network
After a few seconds, this will change to show:
Scanning
Step 2 - Scan for a wireless network connection
When the display says <Scan for networks>, press the SELECT button.
(Note: if you make a mistake at any point, press the BACK button to go back to the previous screen.)
The radio will now scan for all available wireless networks and will display:
Scanning
If it can’t find one then the display will say:
No Wireless
Networks Found
If this happens then you will have to get your wireless access point working - see the instructions supplied
with it.
When the radio finds your wireless network, it displays the ESSID for the access point on the screen - this
is a name that is allocated to the access point by the person who set up the network - for example:
<
My Home Network
>
It is possible, and in some locations highly likely, that your radio will find more than one wireless access
point, in which case you can choose which one you want to connect to. Turn the knob on the radio to see
the ESSID for each access point the radio has found.
27
Instruction Manual Wi-Fi Internet / FM Radio Model: IR 100
_____________________________________________________________________________________________________________
Step 3 - Connect to the wireless network
When the ESSID for the access point you want to connect to is displayed on the screen, press the SELECT
button.
If your network is not configured to need an encryption code, the screen should say:
Connecting to
Network
Then:
Network OK
If the screen displays either:
Enter WEP key
Or:
Enter WPA key
Then the network is using one of the encryption systems: Wired Equivalent Privacy (WEP) or Wi-Fi
Protected Access (WPA). You therefore need to enter the correct WEP or WPA code into the radio to get it
to communicate with your network.
Only the person who set up the network in the first place knows this code; if that person is not you then you
need to find out what it is.
After 3 seconds, the display goes into the code entry mode. To enter the code, use the knob to select each
character of the code in turn, pressing the SELECT button after each character. Note that WEP and WPA
codes are sensitive to upper and lower case characters so you must enter them exactly.
After the final character, use the knob to select the END character and press the SELECT button.
The radio should now be able to connect to the network.
Choosing a radio station to listen to
1.
Press the SELECT button to return to the top-level menu.
(Note: if you make a mistake at any point, press the BACK button to go back to the previous
screen.)
<
Stations
>
2.
If the screen does not say < Stations > as shown above, turn the knob until it does.
3.
Press the SELECT button.
4.
Turn the knob to choose from <Location> or <Genre>.
<Location> enables you to choose from the radio stations provided by any country which you
choose from a list.
<Genre> enables you to choose radio stations according to their content, for example Classic
Rock, Sport, News, etc.
28
Instruction Manual Wi-Fi Internet / FM Radio Model: IR 100
_____________________________________________________________________________________________________________
5.
Press the SELECT button to choose the option you want.
<Location>
1.
Turn the knob until the display shows the region you want (or select ‘All’ to display all countries),
2.
Press the SELECT button.
3.
Turn the knob until the display shows the country you want.
4.
Press the SELECT button.
5.
Turn the knob until the display shows the station you want.
6.
Press the SELECT button and wait until the radio connects to that station.
Note that some radio stations do not broadcast 24 hours per day, and some stations are not
always on-line.
If this station has on-demand content (that is, it gives the option of listening to programmes
which have already been broadcast), see “Stations which enable you to choose what you listen
to”.
X
X
<Genre>
1.
Turn the knob until the display shows the type of content you want, then press the SELECT button.
2.
Turn the knob until the display shows the station you want.
3.
Press the SELECT button and wait until the radio connects to that station.
Note that some radio stations do not broadcast 24 hours per day, and some stations are not
always on-line.
If this station has on-demand content (that is, it gives the option of listening to programmes
which have already been broadcast), see “Stations which enable you to choose what you listen
to”.
X
X
<Search>
1.
Press SELECT on < Search > section.
2.
Enter some character that you want to search, use the knob to select each character in turn, pressing
the SELECT button after each character. After the final character, use the knob to select the END
character and press the SELECT button
3.
The unit will search all station name with characters that you entered, use the knob to select one station,
and press the SELECT button.
Returning to the menu while a station is playing
When the Internet radio is playing a radio station it will display the station’s name and bit rate. You can
return to the radio’s menu section at any time by either pressing the SELECT button – which will take you
to the ‘Stations’ menu - or the BACK button to return to the previous menu item.
Storing a radio station in a preset
Whilst a radio station is playing, hold down one of the preset buttons (numbered 1 to 6 on remote control)
until the screen says
29
Instruction Manual Wi-Fi Internet / FM Radio Model: IR 100
_____________________________________________________________________________________________________________
Assigned to
Preset #
Where # is the number of the button you held down.
Playing a preset radio station
When a radio station is playing, briefly press one of the preset buttons, 1 to 6, for the station you want.
(Note, do not hold the button down - if you do then the station currently playing will overwrite the one
stored in the preset; be careful).
Requesting a station that is currently unavailable
If you want to listen to a particular radio station which is currently not available online, you can visit the
Reciva website at http://www.reciva.com/ and put in a request to add the station to the list.
Stations which enable you to choose what you listen
to
Some radio stations can provide a number of options associated with their station; for example, some
stations enable you to listen to programmes that have already been broadcast. When you select a radio
station that has this facility, the station does not start playing immediately, but instead the display shows:
<
1.
Live
>
Turn the knob to choose <Live> or <On Demand>, then press the SELECT button.
If you choose <Live> then the radio plays the current output from this station as normal.
If you choose <On Demand> then more screens are displayed where you choose what you
want to listen to.
What is displayed will depend on the station you have chosen - the following steps are only a
guide.
2.
When you choose <On Demand>, the display shows the names of the programmes. Turn the knob to
choose the program you want, then press the SELECT button.
3.
When you have chosen the programme you want to listen to, either it will just start playing, or the
display may show a list of days for you to choose from - use the knob to set the day the programme
was broadcast, then press the SELECT button.
4.
After you have chosen the day, you may be able to choose the Start Time. Set the Start Time using the
knob and press the SELECT button.
5.
Programmes which enable you to choose the time also enable you to fast-forward and rewind to the
part you want while the radio is playing. When you press the SKIP TO PREVIOUS TRACK or
SKIP TO NEXT TRACK button, the elapsed time that the programme has been playing is displayed.
You can now turn the knob to change this time. You can also use the SKIP TO PREVIOUS TRACK
or SKIP TO NEXT TRACK buttons to adjust the time. When you press the SELECT button again,
the programme will play from that point.
6.
Once the Internet radio is playing a programme that allows you to choose its start time, the radio’s
preset buttons become playback-control buttons for the stream; e.g. you can press PAUSE at any time
to pause the stream, and then press PLAY to resume playing. It is only possible to assign this type of
stream to a preset numbered 1 – 6.
30
Instruction Manual Wi-Fi Internet / FM Radio Model: IR 100
_____________________________________________________________________________________________________________
Using your radio for tuning into FM stations
If your radio supports an FM tuner, then you will be able to access standard FM stations from it.
1.
You can access the radio’s FM tuner by pressing the ‘Mode’. Pressing the ‘Mode’ button again , turn to
Internet radio again.
You can also access the FM tuner by selecting the ‘Tuner’ menu item from the radio’s main menu.
2.
Whilst the radio is in its FM tuner state, it will display what FM frequency it is currently tuned into.
Turning the rotary encoder clockwise will increase the FM frequency the radio is tuned into and
turning it anticlockwise will decrease the frequency.
3.
Press TUNE+/- button on front panel or remote control to auto search next / previous station.
4.
To save an FM frequency to the radio’s memory, press and hold down a preset button in the same way
that you would save an Internet station to a preset.
5.
To access a saved FM frequency, simply press the preset button assigned to the saved frequency.
Setting the time and date
1.
Press the SELECT button. (Note: if you make a mistake at any point, press the BACK button to go
back to the previous screen.)
2.
Turn the knob until the display says <Settings>.
<
Settings
>
3.
Press the SELECT button.
4.
Turn the knob until the display says <Set Time/Date>.
<
5.
Set Time/Date
>
Press the SELECT button.
Set Time
14:03
6.
Turn the knob until the hour setting is correct, then press the SELECT button.
Set Time
15:03
7.
Turn the knob until the minute setting is correct, then press the SELECT button.
8.
After finished set time, display will come to Set Date section, the operation is same as Set Time.
Set Date
15:06
31
Instruction Manual Wi-Fi Internet / FM Radio Model: IR 100
_____________________________________________________________________________________________________________
Setting the alarm
1.
Press the SELECT button. (Note: if you make a mistake at any point, press the BACK button to go
back to the previous screen.)
2.
Turn the knob until the display says <Alarm Clock>. Note, on some radios, you will need to access the
‘Alarm’ menu from the radio’s ‘Setting’ menu.
<
Alarm Clock
3.
Press the SELECT button.
4.
Turn the knob until the display says <Set Alarms>.
<
5.
>
Turn the knob until the display says <Set Alarm>.
<
6.
Set Alarms
>
1 OFF 00:00 Sunday
>
Turn the knob to swap between the various alarms and ‘Disable All’. Pressing the SELECT button on
‘Disable All’ will cause all the alarms to be turned off. The display will then say ‘All alarms disabled’
for 3 seconds, then returns to the radio station display.
All alarms disabled
7.
If you select one of the numbered alarms, then the radio will allow you to select the time for the alarm.
Set Alarm
15:06
9.
Turn the knob until the hour setting is correct, then press the SELECT button.
Set Alarm
07:06
10. Turn the knob until the minute setting is correct, then press the SELECT button.
Alarm Set:
07:45
11. Turn the knob to choose between ‘Once’, ‘Every day’, ‘Weekly’, ‘Weekdays’ and ‘Weekends’. If you
choose ‘Once’ or ‘Weekly’, then you will need to choose which day you would the alarm to be
activated on and then press the SELECT button.
12. Finally, you will need to select which type of alarm you would like to use: the radio’s buzzer or a
station that is assigned to a preset and then press the SELECT button.
32
Instruction Manual Wi-Fi Internet / FM Radio Model: IR 100
_____________________________________________________________________________________________________________
Media Player
Set up a Windows PC to allow the radio to access your
audio files via a UPnP server
1.
If your PC is running Microsoft Windows XP or Windows Vista, then you can use Windows Media Player
11 (WMP11) to act as your UPnP (Universal Plug and Play) media server 1.0. Windows Media Player 11
may be downloaded from Microsoft’s website and installed by following the instructions detailed in its
installation wizard.
2.
Once installed, Windows Media Player 11 will create a library from all the media files available to it on
your PC. To add new media files to the library, select ‘File > Add to Library… > Advanced Options’, click
‘Add’ and choose the files you wish to add and click ‘OK’.
3.
You will now need to connect your Internet radio to Windows Media Player 11 and configure it to allow the
radio to access your media library. In order to this, you will need to do the following:
4.
a.
Keep pressing BACK to get to the radio’s top-level menu and then turn the rotary knob to select
‘Media Player’.
b.
Press SELECT and then turn the knob to section ‘UPNP Servers’.
c.
Press SELECT and the radio will scan for all available UPnP servers. Note, this may take a few
seconds for the radio to complete its scan and before the scan has completed, the radio will display
‘[Empty]’. The radio will continue to display ‘[Empty]’ if no UPnP servers are found.
d.
After a successful scan, select your UPnP server, by rotating the knob if there is more than one
UPnP server, and then press SELECT (note, your radio will display ‘Access Denied’ at this stage).
Your PC will now prompt you that a device has attempted to connect to your UPnP server. In order to allow
the radio to have access to the media files, you will need to click the ‘Library’ tab from Windows Media
Player 11 and select the ‘Media Sharing…’ item to open the ‘Media Sharing’ window.
Selecting ‘Media Sharing…’ for Windows Media Player 11:
33
Instruction Manual Wi-Fi Internet / FM Radio Model: IR 100
_____________________________________________________________________________________________________________
5.
From the ‘Media Sharing’ window, the radio will be listed as an unknown device. Click on the unknown
device listed, then click the ‘Allow’ button and then click ‘OK’.
Allowing the Radio to Connect:
Locating and playing media files using the radio and
UPnP
1.
Once the UPnP server is configured to share media files with the Internet radio, you can play the files by
doing the following on the radio.
2.
Keep pressing BACK to get to the radio’s top-level menu and then turn the knob to select ‘Media Player’.
3.
Press SELECT and then turn the knob to section ‘UPNP Servers’.
4.
Press SELECT and the radio will scan for all available UPnP servers. Note, this may take a few seconds
for the radio to complete its scan and before the scan has completed, the radio will display ‘[Empty]’. The
radio will continue to display ‘[Empty]’ if no UPnP servers are found.
5.
After a successful scan, select your UPnP server, by rotating the knob if there is more than one UPnP server,
and then press SELECT.
6.
The radio will now list the media categories available from the UPnP server, e.g. ‘Music’, ‘Playlists’ etc.
Turn the knob to select which category you wish to browse, press SELECT and turn the knob to a sub
category and press SELECT again. For example, you could select ‘Music’ and then ‘Album’.
7.
Turn the knob to the media files that you wish to play and press SELECT.
8.
The radio will display ‘[Add to Queue]’, press SELECT and the radio will add the tracks to its queue and
begin playing them automatically.
34
Instruction Manual Wi-Fi Internet / FM Radio Model: IR 100
_____________________________________________________________________________________________________________
Browsing the list of tracks currently queued up for
playback
1.
Press the BROWSE button. The currently playing track name will be displayed.
2.
Turn the knob to see which tracks are queued up for playback.
3.
If you want to jump to a particular place in the queue then press the SELECT button when the required
track is displayed.
Queuing up UPnP tracks for playback later
1.
Move to the required track.
2.
Press the SELECT button. ‘Track Added To Queue’ will be displayed.
Queuing up albums for playback later
1.
Highlight the required album.
2.
Press the SELECT button.
3.
Turn the knob until ‘[Add To Queue]’ is displayed.
4.
Press the SELECT button. ‘Tracks Added to Queue’ will be displayed.
Controlling playback
1.
Use the STOP button to stop playback.
2.
Use the PLAY/PAUSE button to either pause a currently playing track or to restart a currently paused track
or to restart a stopped track.
3.
Use the SKIP TO PREVIOUS TRACK button to start playback of the previous track in the queue.
4.
Use the SKIP TO NEXT TRACK button to start playback of the next track in the queue.
Removing tracks from the queue
1.
Press the BROWSE button. The currently playing track name will be displayed.
2.
Turn the knob to select the track you want to remove from the queue.
3.
Press and hold the STOP button for 2 seconds.
4.
Turn the knob to section ‘Yes’ or ‘No’.
5.
Press SELECT to confirm whether you actually want to delete the track from the queue.
6.
If ‘Yes’ was selected then ‘Removed From Queue’ will be displayed.
7.
To remove all tracks from the queue, keep pressing BACK until the ‘Media Player’ menu item is selected,
press SELECT and then turn the knob to select ‘Clear Queue’ and press SELECT again.
Playing tracks in random order
1.
Select the individual tracks as described previously.
2.
Navigate to top-level menu item 'Media Player' using the SELECT and BACK buttons.
35
Instruction Manual Wi-Fi Internet / FM Radio Model: IR 100
_____________________________________________________________________________________________________________
3.
Press the SELECT button.
4.
Turn the knob until 'Playback Mode' is displayed.
5.
Press the SELECT button.
6.
Turn the knob until 'Shuffle' is displayed.
7.
Press the SELECT button.
8.
Turn the knob to select YES/NO to confirm that shuffle mode should be enabled.
Playing tracks in the queue repeatedly
1.
Select the individual tracks as described previously.
2.
Navigate to top-level menu item 'Media Player' using the SELECT and BACK buttons.
3.
Press the SELECT button.
4.
Turn the knob until 'Playback Mode' is displayed.
5.
Press the SELECT button.
6.
Turn the knob until 'Repeat' is displayed.
7.
Press the SELECT button.
8.
Turn the knob to select YES/NO to confirm that repeat mode should be enabled.
Settings menu
Choosing the option you want from the Settings menu
1.
Press the SELECT button.
(Note: if you make a mistake at any point, press the BACK button to go back to the previous
screen.)
2.
Turn the knob until ‘Settings’ is displayed
3.
Press the SELECT button.
4.
Turn the knob until the display shows the option you want.
5.
Press the SELECT button to choose the option shown on the display. The options are explained below.
36
Instruction Manual Wi-Fi Internet / FM Radio Model: IR 100
_____________________________________________________________________________________________________________
<Network Config>
This menu enables you to configure your radio’s network settings, scan again for a connection to another
wireless network, or to manually configure the network parameters. This is useful if you take your Internet
radio to another building where you want to use it.
Configuring the radio to use a static IP address
In order for your radio to use a static IP address on your network, you will need to do the following:
1.
From your radio, select the ‘Settings > Network config > Edit Config’ menu and then press
SELECT.
2.
The radio will now display ‘Auto (DHCP)? YES / NO’. Turn the radio’s rotary encoder to select
‘NO’ and then press SELECT.
3.
You will now be able to enter the IP address you wish to give your radio by using the rotary
encoder to select the desired numbers followed by pressing SELECT to end inputting the address.
4.
The radio will now prompt you to enter the required network mask for the network. You will be
able to enter this in the same way as before for entering the IP address.
5.
You will now need to enter the default gateway’s IP address used by the radio on the network.
6.
Finally, you will need to enter the DNS IP address for the radio. On some networks, you may need
to enter your ISP’s DNS IP address, which should be available on your ISP’s support page on their
website.
7.
After entering the above information, the radio will now connect successfully to your network. In
order to make the radio use DHCP again (to automatically get its network information when it
attempts to connect to a network), you will need to select ‘Configure > Network config > Edit
Config’ and then set ‘Auto (DHCP)? YES / NO’ to ‘YES’.
If your radio supports wired networking then you will be able to configure your radio to connect to your
network via an available Ethernet connection (RJ45) or via a Wi-Fi router:
Configuring the radio to only use a wired Ethernet connection
From the radio’s ‘Network config’ menu, select ‘Wired/Wireless’. This menu will present you with three
options: ‘Wireless Only’, ‘Wired’ and ‘Auto’. Selecting ‘Wired Only’ will allow cause the radio to reboot
and then only use its Ethernet connection to communicate with the network. The radio will also disable its
wireless network capabilities.
Configuring the radio to only use a Wi-Fi connection
Selecting the ‘Wireless Only’ option from the ‘Wired/Wireless’ menu will allow cause the radio to reboot
and then only use its Wi-Fi connection to communicate with the network. The radio will also disable its
Ethernet connection.
Configuring the radio to use either an Ethernet or a wireless
connection
Selecting the ‘Auto’ option from the ‘Wired/Wireless’ menu will allow cause the radio to reboot and then
attempt to establish an Ethernet connection, if it is available, to communicate with the network. Otherwise,
the radio will attempt to establish a Wi-Fi connection to the network.
Once the radio has established a certain type of connection to the network, then this type of connection will
remain in use while the radio is on.
37
Instruction Manual Wi-Fi Internet / FM Radio Model: IR 100
_____________________________________________________________________________________________________________
The ‘Network Config’ menu also allows you to choose whether or not the Internet radio displays a warning
message when its network signal strength is low. You can enable this feature by selecting ‘Signal Warning’
and then selecting ‘Yes’.
<Version>
Displays the versions numbers of the various parts of software and hardware on your Internet radio.
<Upgrade Firmware>
Use this option to download new firmware for the radio from the Reciva portal on the Internet. If there is
new firmware available, then the radio will prompt you if you want to download it or not. Note, at this stage,
you can press the radio’s BACK button to cancel the radio beginning a firmware upgrade. A Firmware
upgrade may take several minutes, so do no switch off the power to the radio until the operation is complete
otherwise the radio may become permanently damaged.
<Language>
Allows you to change the display language.
<Factory Reset>
Puts all the settings back to their defaults as they were when they left the factory. If you perform a factory
reset on your radio you will lose all your presets and your wireless network connection.
<Register>
This will display a key that can be used to register the radio on the Reciva Customer portal:
http://www.reciva.com/
<Set Time/Date>
Use this option to set the time and date, to set an alarm and to view the current alarm setting, see “Setting
the alarms”.
X
X
Configuring ‘My Stuff’
Registering an account on Reciva’s website
1.
Open the website, http://www.reciva.com from your Internet browser.
38
Instruction Manual Wi-Fi Internet / FM Radio Model: IR 100
_____________________________________________________________________________________________________________
2.
Click on the ‘Register’ link and follow the on-screen instructions to register an account. Please note,
during the registration process, a validation code will be sent to you via email. Please enter this code
when prompted to do so.
3.
After logging into your account, you will be able to edit your information for ‘My Profile’, ‘My
Stations’, ‘My Streams’, ‘My Radios’ and ‘My Podcasts’ from the left-hand side of the website.
4.
You can now add your Internet Radio to your account on the website by accessing the ‘My Radios’
link. From the ‘My Radios’ section, you will need to enter in your radio’s eight digit serial number,
which can be found from the ‘Settings > Version’ menu on the radio, and you will also need to enter in
your radio’s seven digit registration code, which can be found from the ‘Configure > Register’ menu on
the radio.
Configuring ‘My Profile’
Once logged into you Reciva account, you can edit your account’s details from your ‘My Profile’
section.
Click on the ‘My Profile’ link to view your account’s current information. This information will
include various details such as your address, user name, password etc. Edit your details and then click
on the ‘Update’ button to save them.
Configuring ‘My Stations’
1.
It is possible to search for radio stations that are available in Reciva’s stations’ database from Reciva’s
website. Whenever stations are searched for on the website, they will be displayed in a list of search
results together with a link to ‘Add to My Stations’.
2.
Clicking on the ‘Add to My Stations’ link, will add the station to your account’s ‘My Stations’ list.
Clicking on ‘My Stations’ and then selecting the station will allow you to edit this list.
3.
Once you have Internet stations available in your ‘My Stations’ list, you may play these stations from
your Internet Radio. These stations will be available on your radio from the menu item: ‘Stations > My
Stuff > My Stations’. Please note, the stations will only be available to your radio once your radio has
downloaded a new stations’ list. To cause the radio to download a new stations’ list immediately,
please remove and reconnect the power to your radio.
Configuring ‘My Streams’
1.
Once logged into your Reciva website account, you can add your own Internet radio streams to your
‘My Streams’.
2.
Clicking on ‘My Streams’ will prompt you to enter the station’s name and its media stream URL. The
media stream URL should be a link to a website’s actual audio stream. If you have any doubt about
locating the media stream URL from a webpage, then please refer to the FAQs section on Reciva’s
website, http://www.reciva.com.
3.
Once you have Internet radio streams available in your ‘My Streams’ list, you may play these stations
from your Internet Radio. These stations will be available on your radio from the menu item: ‘Stations
> My Stuff > My Streams’. Please note, the streams will only be available to your radio once your
radio has downloaded a new stations’ list. To cause the radio to download a new stations’ list
immediately, please remove and reconnect the power to your radio.
Configuring ‘My Podcasts’
1.
It is possible to add audio podcasts (RSS feeds) to your Reciva account that can be accessed on your
Internet radio. To add a podcast, simply login to your account and then click on the ‘My Podcasts’ link.
39
Instruction Manual Wi-Fi Internet / FM Radio Model: IR 100
_____________________________________________________________________________________________________________
2.
From your ‘My Podcasts’ section, you can add your chosen podcast by entering in the podcast’s name
and its URL as prompted by the website. Please note, the podcast URL will have to be a direct RSS
feed which will end with the ‘.xml’ extension e.g. http://someurl.com/podcast.xml
3.
Once you have podcasts available in your ‘My Podcasts’ list, you may access these feeds from your
Internet Radio. These podcasts will be available on your radio from the menu item: ‘Stations > My
Stuff > My Podcasts’. Please note, the podcasts will only be available to your radio once your radio has
downloaded a new stations’ list. To cause the radio to download a new stations’ list immediately,
please remove and reconnect the power to your radio.
Troubleshooting
If you experience any trouble with your wireless Internet radio, then you may find it useful to visit the help section
on our webpage: http://www.reciva.com
If you have trouble connecting the radio to your wireless network, these steps may help to resolve the problem:
1. Confirm that a Wi-Fi connected PC can access the Internet (i.e. can browse the web) using the same network.
2. Check that a DHCP server is available, or that you have configured a static IP address on the radio. You can
configure a static IP address on the radio using the menu item ‘Settings -> Network Config -> Edit Config’, and then
select ‘No’ for ‘Auto (DHCP)’.
3. Check that your network’s firewall is not blocking any outgoing ports. As a minimum, the radio needs access to
UDP and TCP ports 80, 554, 1755, 5000, 6000 and 7070.
4. Check your access point does not restrict connections to particular MAC addresses. You can view the radio’s
MAC address using the menu item ‘Settings -> Network Config -> View Config -> MAC address’.
5. If you have an encrypted network, check that you have entered the correct key or passphrase into the radio.
Remember that text-format keys are case sensitive. If, when attempting to connect to an encrypted network, your
radio displays: ‘Wireless error’ followed by a 5-digit number, then please ensure that you enter the correct
passphrase for the network. If the problem persists, then you may need to consult your network configuration.
If your radio can connect to the network successfully, but is unable to play particular stations, it may be due to one of
the following causes:
1. The station is not broadcasting at this time of the day (remember it may be located in a different time zone).
2. The station has reached the maximum allowed number of simultaneous listeners.
3. The station is not broadcasting anymore.
40
Instruction Manual Wi-Fi Internet / FM Radio Model: IR 100
_____________________________________________________________________________________________________________
4. The link on the radio is out of date.
5. The Internet connection between the server (often located in a different country) and you is slow.
Try using a PC to play back the stream via the broadcaster’s web site.
If you can play back the station with a PC, use the form at http://www.reciva.com/ to notify us so that we can change
the station data that is used by the radio.
SPECIFICATIONS
FM FREQUENCY RANGE:
FM PRESET STATIONS:
INTERNET RADIO PRESET STATIONS:
POWER SUPPLY:
MAX POWER CONSUMPTIONS:
DIMEMSIONS:
87.5 – 108 MHz
6
6
AC 230V 50 Hz
15W
430 X 283 X 117 mm (with feet)
41