1
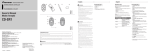
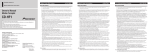
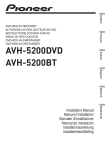
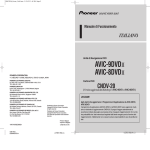
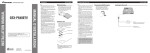
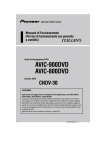
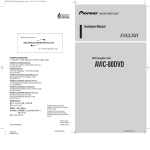
A
B
C
D
VOICE COMMAND PACK
WARNING
ENSEMBLE DE COMMANDE VOCALE
E
F
G
H
Owner’s Manual
Mode d’emploi
Fig.1, Abb.1, Afb.1
CD-VC1
1
2
3
4
8
5
6
7
Fig.2, Abb.2, Afb.2
4-1, MEGURO 1-CHOME, MEGURO-KU, TOKYO 153-8654, JAPAN
PIONEER ELECTRONICS (USA) INC.
This device complies with Part 15 of the FCC Rules.
Operation is subject to the following two conditions:
(1) This device may not cause harmful interference, and (2) this device must accept any interference received, including
interference that may cause undesired operation.
P.O. Box 1540, Long Beach, California 90801-1540, U.S.A.
TEL: (800) 421-1404
PIONEER EUROPE NV
Haven 1087, Keetberglaan 1, B-9120 Melsele, Belgium
TEL: (0) 3/570.05.11
PIONEER ELECTRONICS ASIACENTRE PTE. LTD.
253 Alexandra Road, #04-01, Singapore 159936
TEL: 65-6472-1111
Infomation to User
Alteration or modifications carried out without appropriate authorization may invalidate the user’s right to operate the
equipment.
PIONEER ELECTRONICS AUSTRALIA PTY. LTD.
178-184 Boundary Road, Braeside, Victoria 3195, Australia
TEL: (03) 9586-6300
300 Allstate Parkway, Markham, Ontario L3R OP2, Canada
TEL: (905) 479-4411
PIONEER ELECTRONICS DE MEXICO, S.A. de C.V.
Blvd. Manuel Avila Camacho 138 10 piso
Col. Lomas de Chapultepec, Mexico, D.F. 11000
TEL: 55-9178-4270
Published by Pioneer Corporation.
Copyright © 2003 by Pioneer Corporation.
All rights reserved.
Publication de Pioneer Corporation.
Copyright © 2003 Pioneer Corporation.
Tous droits de reproduction et de traduction
réservés.
Printed in China
Imprimé en Chine
< KNKFF > < 03L00000 >
<CZR5014-A> E
• Keep the lithium battery out of reach of children.
Should the battery be swallowed, immediately consult a doctor.
• Avoid installing this unit in such a location where
the operation of the steering wheel and the gearshift
lever may be prevented. Otherwise, it may result in a
traffic accident.
• Do not operate this unit while manipulating the
steering wheel. Or it might result in a traffic accident.
• In case you operate this unit unavoidably during driving, neglect looking ahead carefully. Otherwise,
you will be ready to run the risk of being involved in
a traffic accident.
• If any of the following troubles occurs, immediately
stop the use of this unit and consult with a dealer
from whom you purchased this unit:
– the unit is smoking.
– the unit is emitting abnormal odor.
– a foreign object has entered the unit.
– liquid has been spilled on or into the unit.
If you continue to use this unit without a remedy, the
unit may be damaged badly, which leads to a serious
accident or fire.
CAUTION
PIONEER CORPORATION
PIONEER ELECTRONICS OF CANADA, INC.
<ENGLISH>
WARNING:
Handling the cord on this product or cords associated with accessories sold with the product will expose you to lead, a
chemical known to the State of California and other governmental entities to cause cancer and birth defects or other
reproductive harm. Wash hands after handling.
• Do not recharge, disassemble, heat or dispose of battery
in fire.
• Use a CR2032 (3 V) lithium battery only. Never use
other types of battery with this unit.
• Do not handle the battery with metallic tools.
• Do not store the lithium battery with metallic materials.
• When disposing of used batteries, please comply with
governmental regulations or environmental public institution’s rules that apply in your country/area.
• Always check carefully that you are loading battery
with its (+) and (–) poles facing in the proper directions.
• Install this unit using only the parts supplied with this
unit. If other parts are used, this unit may be damaged
or dismounted itself, which leads to an accident or trouble.
• Install this unit as required by this manual. Failure to do
so may cause an accident.
• Do not install this unit near the doors where rainwater
is likely to be spilled on the unit. Incursion of water
into the unit may cause smoking or fire.
• The volume of the car stereo should be so adjusted that
you can hear a loud sound occurring outside your car. If
any happening sound outside your car is deafened by
music from the car stereo when you are driving, this
condition can be a factor of being involved in a traffic
accident.
• Do not leave this unit free inside the car. When the car
stops or turns a curve, the unit might drop on the floor.
If the unit is rolled and put under the brake pedal, it
might prevent the driver from braking well, causing a
serious trouble. Be sure to fix this unit to the steering
wheel.
• Do not disassemble or modify this unit. To do so may
cause a fault.
Accessories
A Remote control unit × 1
B Holder × 1
C Belt × 2
D Microphone × 1
E Mic clip × 1
F Double-sided tape × 1
G Clamper × 5
H Lithium battery (CR2032, 3V) × 1
Operation mode
By switching the Operation mode (Main mode,
Navigation mode) you can use one remote control to
operate different equipment.
Main mode :
Operates Pioneer AV Head Unit (e.g. AVH-P7500DVD,
AVH-P6500DVD, AVH-P6400CD, AVH-P6400R)
Main mode operation (Fig 2)
q NAVI/AUDIO button
Pressing this button switches the Operation mode.
w VOICE button
You can use the VOICE button to start voice
recognition, allowing you to operate the
Navigation System by speech.
e SRC (SOURCE) button
Switches between sources and switches power
ON/OFF. (Depending on the connected units, operation may differ slightly.)
r 5, ∞, 2, 3 button
Operates the same as the Head Unit’s 5, ∞, 2, 3
button or the Joystick.
t POS button
Press this button to view the map or return to guidance. Also, when the map is scrolling, pressing this
button returns to the map display of your surroundings.
u Transmitter
This transmits the remote control signals.
i +/– button
The Pioneer AV Head Unit’s sound volume can be
adjusted.
Navigation mode (navigation oper
ation) (Fig 2)
The SRC (SOURCE) button, and 2 / 3 buttons are
not used in Navigation mode.
Navigation mode :
Navigation operation
q NAVI/AUDIO button
Pressing this button switches the Operation mode.
Before you begin, set the Operation mode switching
method. The Operation mode switching changes in
accordance with the settings below.
w VOICE button
You can use the VOICE button to start voice
recognition, allowing you to operate the
Navigation System by speech.
Switching method
Main mode
J
Navigation mode
Navigation mode only
Setting method
Press the VOICE button
while pressing the
GUIDE/TRAFFIC button.
Press the SRC
(SOURCE) button while
pressing the
GUIDE/TRAFFIC button.
When using with the Pioneer AV Head Unit, set to
Main mode. If you wish to use Navigation operation
only, set to Navigation mode. (‘‘Main mode’’ is
default or factory setting.)
r 5/∞ button
The map can be enlarged or reduced. If a menu list
extends over several pages, switch to the previous
page or the next page.
t POS button
Press this button to view the map or return to guidance. Also, when the map is scrolling, pressing this
button returns to the map display of your surroundings.
y GUIDE/TRAFFIC button
Press this button if you want to hear the voice
guidance again. If this button is pressed for more
than two seconds, you can listen to traffic information on your route (where available).
u Transmitter
This transmits the remote control signals.
i +/– button
The volume of the navigation guide voice can be
adjusted.
Microphone
After pressing the VOICE button to start voice operation, this microphone hears your commands.
For further information, refer to the Navigation
System manual.
<ESPAÑOL>
ADVERTENCIA
• Mantenga la pila de litio fuera del alcance de los
niños. Si la pila fuese tragada, consulte con un médico inmediatamente.
• Evite instalar esta unidad en un lugar en el que la
operación del volante y la palanca de cambio sea
impedida. De otra manera, podría resultar en un
accidente de tráfico.
• No opere esta unidad mientras maneja el volante, o
podría resultar en un accidente de tráfico.
• En el caso de que inevitablemente opere esta unidad
mientras conduce, mire hacia adelante cuidadosamente. De otro modo, prepárese para correr el riesgo
de verse implicado en un accidente de tráfico.
• Si ocurriera cualquiera de los siguientes problemas,
inmediatamente deje de usar esta unidad y consulte
con el concesionario a quien comprù esta unidad:
– la unidad emite humo.
– la unidad emite olores anormales.
– un objeto extraño ha entrado en la unidad.
– se ha derramado líquido sobre o dentro de la
unidad.
Si continúa utilizando esta unidad sin reparar el
fallo, la unidad se dañará aún más, lo que llevará a
un serio accidente o incendio.
PRECAUCION
• No recargue, desarme, caliente ni tire la pila al
fuego.
• Utilice solamente una pila de litio CR2032 (3 V). No
utilice otros tipos de pilas con esta unidad.
• No toque la pila con instrumentos metálicos.
• No guarde la pila de litio con materiales metálicos.
• Al descartarse de las pilas usadas, cumpla con las
reglas gubernamentales o reglas de la institución
pública del medio ambiente aplicables en su
país/área.
• Siempre revise cuidadosamente que está cargando la
pila con los polos (+) y (–) dirigidos en las direcciones correctas.
• Instale esta unidad utilizando solamente las piezas
provistas con la misma. Si se utilizara otras piezas,
la unidad podría deñarse o desarmarse por si misma,
lo que conllevaría a un accidente o problema.
• Instale esta unidad tal como se indica en el manual.
Si falla en efectuar la instalación así, podría causar
un accidente.
• No instale esta unidad cerca de las puertas donde sea
probable que el agua de la lluvia se derrame sobre la
unidad. La incursión de agua dentro de la unidad
podría causar la emisión de humos o incendio.
• El volumen del estéreo del coche deberá ajustarse de
tal forma que se pueda escuchar un sonido fuerte que
ocurre fuera del coche. Si un sonido de fuera del
coche fuese ensordecido por la música del estéreo
cuando está conduciendo, esta condición podría ser
un factor de la causa de un accidente de tráfico.
• No deje esta unidad libre dentro del coche. Cuando
el coche se detenga o voltee una curva, la unidad
podría caerse en el piso. Si la unidad rodara y se
pusiera debajo del pedal del freno, esto podría evitar
que el conductor haga el frenado debidamente, causando serios problemas. Asegúrese de fijar esta
unidad al volante.
• Ne desarme ni haga cambios en esta unidad, si no
podría resultar en fallos.
Accesorios
A Unidad de control remoto × 1
B Soporte × 1
C Correa × 2
D Micrófono × 1
E Sujetador de micrófono × 1
F Cinta con adhesivo en ambos lados × 1
G Retén × 5
H Pila de litio (CR2032, 3V) × 1
Modo de funcionamiento
Al activar el modo de funcionamiento (modo principal, modo de navegación), puede utilizar un control
remoto para utilizar otro equipo.
Modo principal:
Permite operar la unidad de control AV de Pioneer (p.
ej. AVH-P7500DVD, AVH-P6500DVD, AVHP6400CD, AVH-P6400R)
Modo de navegación:
Funcionamiento de navegación
En primer lugar, configure el método de conmutación
del modo de funcionamiento. La conmutación del
modo de funcionamiento cambia de acuerdo con las
opciones de configuración descritas a continuación.
Método de conmutación
Modo principal
J
Modo de navegación
Modo de navegación
solamente
Método de configuración
Pulse el botón VOICE a
la vez que el botón
GUIDE/TRAFFIC.
Pulse el botón SRC
(SOURCE) a la vez que el
botón GUIDE/TRAFFIC.
Cuando utilice el control remoto con la unidad de
control AV de Pioneer, configure la opción al Modo
principal. Si desea utilizar únicamente el funcionamiento de navegación, configure la opción al
Modo navegación. (El “Modo principal” es el valor
de configuración predeterminado o de fábrica.)
Funcionamiento en modo principal
(Fig 2)
q Botón NAVI/AUDIO
Al pulsar este botón se conecta el modo de funcionamiento.
w Botón VOICE
Puede utilizar el botón VOICE para iniciar el
reconocimiento de voz, lo que le permitirá controlar el sistema de navegación mediante la voz.
e Botón SRC (SOURCE)
Alterna entre las fuentes y conecta/desconecta
(ON/OFF) la alimentación. (Dependiendo de las
unidades conectadas, el funcionamiento puede
diferir ligeramente.)
r Botón 5, ∞, 2, 3
Funciona del mismo modo que el botón 5, ∞, 2,
3 de la unidad de control o que el mando omnidireccional.
t Botón POS
Si pulsa este botón verá el mapa o volverá al modo
de guía. Además, cuando se mueve el mapa, al pulsar este botón se regresa a la pantalla en la que el
mapa muestra los alrededores del vehículo.
u Transmisor
Transmite las señales del control remoto.
i Botón +/–
El volumen del sonido de la unidad de control AV
de Pioneer puede ajustarse.
Modo de navegación (funcionamiento
de navegación) (Fig 2)
El botón SRC (SOURCE) y los botones 2 / 3 no
se utilizan en el modo de navegación.
q Botón NAVI/AUDIO
Al pulsar este botón se conecta el modo de funcionamiento.
w Botón VOICE
Puede utilizar el botón VOICE para iniciar el
reconocimiento de voz, lo que le permitirá controlar el sistema de navegación mediante la voz.
r Botón 5/∞
El mapa puede ampliarse o reducirse. Si una lista
de menú ocupa varias páginas, desplácese a la
página anterior o a la página siguiente.
t Botón POS
Si pulsa este botón verá el mapa o volverá al modo
de guía. Además, cuando se mueve el mapa, al pulsar este botón se regresa a la pantalla en la que el
mapa muestra los alrededores del vehículo.
y Botón GUIDE/TRAFFIC
Presione este botón si desea oír de nuevo las
instrucciones de la guía de voz. Si el botón se
pulsa durante más de dos segundos, puede
escuchar información del tráfico en su itinerario
(donde esté disponible).
u Transmisor
Transmite las señales del control remoto.
i Botón +/–
El volumen de la voz de guía de navegación
puede ajustarse.
Micrófono
Después de pulsar el botón VOICE para iniciar la
operación por voz, este micrófono capta sus órdenes.
Para obtener más información, consulte el manual
del Sistema de navegación.
<DEUTSCH>
WARNUNG
• Die Lithiumbatterie Außer Reichweite Kleiner
Kinder halten. Sollte die Batterie verschluckt werden, sofort einen Arzt Aufsuchen.
• Installieren Sie dieses Gerät nicht an einer Stelle, wo
die Betätigung des Lenkrads und Schalthebels behindert werden kann, da es in diesem Fall leicht zu
einem Verkehrsunfall kommen kann.
• Betätigen Sie dieses Gerät nicht, während Sie das
Lenkrad bewegen. Dadurch könnte es zu einem
Verkehrsunfall kommen.
• Sollte eine Bedienung dieses Geräts während des
Fahrens unvermeidlich sein, schauen Sie trotzdem
immer nach vorn auf die Straße. Andernfalls können
Sie leicht in einen Verkehrsunfall verwickelt werden.
• Stellen Sie in den folgenden Störungsfällen die
Benutzung dieses Geräts sofort ein und wenden Sie
sich an den Händler, bei dem Sie es gekauft haben:
– us dem Gerät kommt Rauch.
– Das Gerät gibt einen anomalen Geruch ab.
– Ein Fremdkörper ist in das Gerät eingedrungen.
– Flüssigkeit ist auf oder in das Gerät verschüttet
worden.
Wenn Sie das Gerät in diesen Fällen weiterhin
benutzen, kann es schwer beschädigt werden und
einen ernsten Unfall oder Brand verursachen.
VORSICHT
• Die Batterie nicht aufladen, auseinandernehmen,
erhitzen oder ins Feuer werfen.
• Nur eine Lithiumbatterie vom Typ CR2032 (3 V)
verwenden. Niemals einen anderen Batterietyp für
dieses Gerät verwenden.
• Die Batterie nicht mit Metallwerkzeugen handhaben.
• Die Batterie nicht zusammen mit
Metallgegenständen lagern.
• Gebrauchte Batterien müssen in Übereinstimmung
mit den Umweltschutzvorschriften des jeweiligen
Landes/Gebiets entsorgt werden.
• Beim Einsetzen der Batterie immer darauf achten,
daß Pluapol (+) und Minuspol (–) in die richtige
Richtung weisen.
• Für die Installation dieses Geräts sollten nur die mitgelieferten Teile benutzt werden. Bei Verwendung
anderer Teile kann das Gerät beschädigt werden oder
sich lösen, was zu einem Unfall oder Problemen
führen kann.
• Dieses Gerät ist entsprechend den hier gegebenen
Anweisungen zu installieren. Andernfalls kann es zu
einem Unfall kommen.
• Installieren Sie dieses Gerät nicht in der Nähe der
Türen, wo Regenwasser auf das Gerät spritzen kann.
In das Gerät eindringendes Wasser kann
Rauchentwicklung oder einen Brand verursachen.
• Die Lautstärke der Autostereo-Anlage sollte so
eingestellt werden, daß Sie laute Geräusche
außerhalb Ihres Autos hören können. Wenn die
Musik in Ihrem Auto beim Fahren so laut ist, daß Sie
alarmierende Außengeräusche nicht mehr hören,
kann das dazu führen, daß Sie in einen
Verkehrsunfall verwickelt werden.
• Lassen Sie dieses Gerät nicht frei im Auto liegen, da
es in diesem Fall beim Bremsen oder Kurvenfahren
auf den Boden fallen kann. Wenn das Gerät unter
das Bremspedal rollt, kann es den Fahrer beim
Bremsen behindern, was einen schweren Unfall zur
Folge haben kann. Besfestigen Sie dieses Gerät
unbedingt am Lenkrad.
• Dieses Gerät darf nicht auseinandergenommen oder
modifiziert werden. Dadurch könnte ein
Betriebsversagen vetursacht werden.
Zubehör
A Fernbedienung × 1
B Halter × 1
C Riemen × 2
D Mikrofon × 1
E Mikrofonhalter × 1
F Doppelseiting haftendes Klebeband × 1
G Klemme × 5
H Lithium-Batterie (CR2032, 3V) × 1
Betriebsart
Durch Umschalten des Betriebsmodus
(Standardbetrieb, Navigationsbetrieb) können Sie mit
nur einer Fernbedienung verschiedene Geräte steuern.
Standardbetrieb:
Zur Steuerung des Pioneer AV-Hauptgeräts (z. B. AVHP7500DVD, AVH-P6500DVD, AVH-P6400CD, AVHP6400R)
Navigationsbetrieb:
Zum Navigieren
Wählen Sie zunächst den Umschaltmodus für die
Betriebsarten aus. Folgende Einstellungen stehen zur
Verfügung:
Umschaltmodus
Standardbetrieb
J
Navigationsbetrieb
Nur Navigationsbetrieb
So stellen Sie den
Umschaltmodus ein
Drücken Sie gleichzeitig
die VOICE-Taste und die
GUIDE/TRAFFIC-Taste.
Drücken Sie gleichzeitig
die SRC (SOURCE)Taste und die
GUIDE/TRAFFIC-Taste.
Wenn Sie das Gerät mit dem Pioneer AV-Hauptgerät
verwenden, stellen Sie den Standardmodus ein. Wenn
Sie lediglich den Navigationsbetrieb nutzen möchten,
stellen Sie den Navigationsmodus ein. (Der
"Standardmodus" ist bereits werksseitig voreingestellt.)
Standardbetrieb (Abb 2)
q NAVI/AUDIO-Taste
Durch Drücken dieser Taste schalten Sie in eine
andere Betriebsart.
w VOICE-Taste
Durch Drücken der VOICE-Taste schalten Sie die
Sprachsteuerung ein. Bei eingeschalteter
Sprachführung können Sie das Navigationssystem
ausschließlich durch Ihre Stimme steuern.
e SRC (SOURCE)-Taste
Schaltet zwischen Programmquellen um und dient
zum Ein- und Ausschalten. (Je nach angeschlossenen Geräten kann der Betrieb etwas abweichen.)
r 5, ∞, 2, 3 -Taste
Die Tasten haben die gleichen Funktionen wie die
Pfeiltasten 5, ∞, 2, 3 des Hauptgeräts oder der
Joystick.
t POS-Taste
Drücken Sie diese Taste, um die Karte anzuzeigen
oder zur Zielführung zurückzukehren. Während
des Blätterns durch die Karte kehren Sie durch
Drücken dieser Taste zur Anzeige der
Umgebungskarte zurück.
u Transmitter
Überträgt die Signale der Fernbedienung.
i +/– -Taste
Sie können die Lautstärke des Pioneer AVHauptgerätes nach Wunsch einstellen.
Navigationsbetrieb (Navigieren)
(Abb 2)
Im Navigationsbetrieb werden die SRC (SOURCE)Taste sowie die Pfeiltasten 2 / 3 nicht verwendet.
q NAVI/AUDIO-Taste
Durch Drücken dieser Taste schalten Sie in eine
andere Betriebsart.
w VOICE-Taste
Durch Drücken der VOICE-Taste schalten Sie die
Sprachsteuerung ein. Bei eingeschalteter
Sprachführung können Sie das Navigationssystem
ausschließlich durch Ihre Stimme steuern.
r 5/∞ -Taste
Zum Vergrößern oder Verkleinern der Karte. Bei
mehrseitigen Menüs in Listenform Blättern zur
vorherigen oder nächsten Seite.
t POS-Taste
Drücken Sie diese Taste, um die Karte anzuzeigen
oder zur Zielführung zurückzukehren. Während
des Blätterns durch die Karte kehren Sie durch
Drücken dieser Taste zur Anzeige der
Umgebungskarte zurück.
y GUIDE/TRAFFIC-Taste
Drücken Sie diese Taste, wenn Sie die
Sprachführung wieder hören wollen. Wenn Sie
diese Taste länger als zwei Sekunden drücken,
können Sie die Verkehrsinformationen für Ihre
Fahrtroute hören (wo verfügbar).
u Transmitter
Überträgt die Signale der Fernbedienung.
i +/– -Taste
Einstellen der Ansagelautstärke des
Navigationssystems.
Mikrofon
Nach der Aktivierung der Sprachführung durch
Drücken der VOICE-Taste sprechen Sie die Befehle
in dieses Mikrofon.
Weitere Informationen finden Sie in der
Bedienungsanleitung des Navigationssystems.
<FRANÇAIS>
AVERTISSEMENT
• Garder la pile au lithium hors d‘atteinte d‘enfants. Si
une pile est avalée, consulter immediatement un
medecin.
• Eviter d’installer cette unité dans un endroit où elle
peut gêner l’utilisation du volant de direction et du
levier de commande des vitesses. Cela pourrait
provoquer un accident de la circulation.
• Ne pas utiliser cette unité tout en manipulant le
volant. Cela pourrait provoquer un accident.
• Au cas où cette unité doit absolument être utilisée en
conduisant, ne pas quitter la route des yeux. Sinon il
y a un risque d’être impliqué dans un accident.
• Si l’un des problèmes suivants se produit, arrêter
immédiatement d’utiliser cette unité et prendre contact avec le distributeur où l’unité a été achetée:
– de la fumée sort de l’unité.
– l’unité dégage une odeur anormale.
– un objet a pénétré dans l’unité.
– un liquide a été renversé sur ou dans l’unité.
Si cette unité continue à être utilisée sans prendre
aucune mesure, elle peut être sérieusement endommagée et provoquer un grave accident ou un
incendie.
ATTENTION
• Ne pas recharger, demonter. chauffer une pile ni la jeter
dans un feu.
• N’utiliser qu’une pile au lithium CR2032 (3 V)
N’utiliser. Jamais d’autre type de pile avec cette unité.
• Ne pas manipuler la pile avec un outil métalligue.
• Ne pas ranger une pile au lithium avec des objects
métalligues.
• Lors de la mise au rebut des piles usagées, respectez les
règlements en vigueur dans le pays en matière de conservation ou de protection de l’environnement.
• Verifier toujours soigneusement de charger la pile avec
ses poles (+) et (–) dans le bon sens.
• N’installer cette unité qu’en utilisant les pièces qui sont
fournies avec celle-ci. Si d’autres pièces sont utilisées,
l’unité peut être endommagée ou se démonter, ce qui
peut provoquer un accident ou un problème.
• Installer cette unité conformément à ce manuel. Sinon
cela pourrait provoquer un accident.
• Ne pas installer cette unité près des portes où de l’eau
de pluie peut la mouiller. La pénétration d’eau dans l’unité peut provoquer de la fumée ou un incendie.
• Le volume de l’auto-stéréo doit être réglé de sorte à
pouvoir entendre un bruit fort à l’extérieur de la
voiture. Si un bruit se produisant à l’extérieur de la
voiture est étouffé par la musique de l’auto-stéréo pendant la conduite, cela peut être un facteur contribuant à
être impliqué dans un accident.
• Ne pas laisser cette unité non fixée dans la voiture. Lors
d’un arrêt ou d’un virage, elle peut tomber sur le
plancher. Si l’unité roule et se place sous la pédale de
frein, elle peut empêcher le conducteur de bien freiner
et provoquer un sérieux problème. Toujours fixer cette
unité au volant de direction.
• Ne pas démonter ni modifier cette unité. Cela pourrait
la faire fonctionner mal.
Accessoires
A Télécommande × 1
B Support × 1
C Courroie × 2
D Microphone × 1
E Attache du microphone × 1
F Ruban double face × 1
G Collier × 5
H Pile au lithium (CR2032, 3V) × 1
Mode de fonctionnement
En activant le mode de fonctionnement (mode principal, mode navigation), vous pouvez utiliser la télécommande pour différents équipements.
Mode principal :
Opération de l’appareil central AV (par ex. AVHP7500DVD, AVH-P6500DVD, AVH-P6400CD, AVHP6400R)
q Touche NAVI/AUDIO
En appuyant sur cette touche, vous changez de
mode de fonctionnement.
w Touche VOICE
Vous pouvez utiliser cette touche VOICE pour
démarrer la reconnaissance vocale vous permettant
de commander le système de navigation vocalement.
e Touche SRC (SOURCE)
Cette touche permet de passer d’une source à
l’autre et de marche (ON) à arrêt (OFF). (Selon les
unités reliées, le rôle de cette touche peut légèrement différer.)
r Touche 5, ∞, 2, 3
Effectue les mêmes opérations que la touche 5, ∞,
2, 3 ou la manette de l’appareil central.
t Touche POS
Appuyez sur cette touche pour visualiser la carte
ou retourner au guidage. De plus, lor sque la carte
défile, le fait d’appuyer sur cette touche permet de
retourner à l’affichage de la carte de votre environnement.
u Transmetteur
Il transmet les signaux de commande à distance.
i Touche +/–
Le volume de l’appareil central AV Pioneer peut
être réglé.
Mode navigation :
Opération de navigation
Tout d’abord, réglez la méthode de commutation du
mode de fonctionnement. La commutation du mode
de fonctionnement change en fonction des
paramètres, comme indiqué ci-dessous.
Méthode de commutation
Mode principal
J
Mode navigation
Uniquement le mode
navigation
Fonctionnement du mode principal
(Fig 2)
Méthode de réglage
Pressez et maintenez la
touche GUIDE/TRAFFIC et
pressez la touche VOICE.
Pressez et maintenez la
touche GUIDE/TRAFFIC et
pressez la touche SRC
(SOURCE).
Lors de l’utilisation avec l’appareil central AV
Pioneer, sélectionnez le mode principal. Si vous
souhaitez seulement utiliser la fonction navigation,
sélectionnez le mode Navigation. (“Mode principal”
par défaut ou paramétrage d’usine.)
Mode navigation (opération de
navigation) (Fig 2)
La touche SRC (SOURCE) et les touches 2 / 3 ne
sont pas utilisées dans le mode navigation.
q Touche NAVI/AUDIO
En appuyant sur cette touche, vous changez de
mode de fonctionnement.
w Touche VOICE
Vous pouvez utiliser cette touche VOICE pour
démarrer la reconnaissance vocale vous permettant
de commander le système de navigation vocalement.
r Touche 5/∞
La carte peut être élargie ou réduite. Si une liste
de menu s’étend au-delà de plusieurs pages,
cette touche permet de passer à la page précédente
ou suivante.
t Touche POS
Appuyez sur cette touche pour visualiser la carte
ou retourner au guidage. De plus, lor sque la carte
défile, le fait d’appuyer sur cette touche permet de
retourner à l’affichage de la carte de votre environnement.
y Touche GUIDE/TRAFFIC
Appuyez sur cette touche si vous voulez réécouter
le guidage vocal. Si vous appuyez plus de deux
secondes sur cette touche, vous pouvez écouter les
informations sur le trafic routier de votre itinéraire
(si elles sont disponibles).
u Transmetteur
Il transmet les signaux de commande à distance.
i Touche +/–
Le volume de la voix du guide de navigation peut
être réglé.
Microphone
Après avoir appuyé sur la touche VOICE pour
démarrer le fonctionnement de la voix, ce microphone entend vos ordres.
Pour obtenir des informations supplémentaires,
veuillez consulter les manuels du Système de
Navigation.
<ITALIANO>
AVVERTIMENTO
• Tenere la pila al litio fuori dalla portata dei bambini.
Se si ingerisce accidentalmente la pila, consultare
immediatamente un medico.
• Evitare di installare questa unità in luoghi dove
possa interferire con l’uso del volante o della leva
del cambio. Altrimenti ne possono risultare incidenti
stradali.
• Non usare questa unità mentre si gira il volante,
altrimenti potrebbe verificarsi un incidente stradale.
• Nel caso sia inevitabile usare l’unità durante la
guida, non trascurare di guardare la strada.
Altrimenti si corre il rischio di essere coinvolti in
incidenti stradali.
• Nel caso si verifichi uno dei seguenti problemi, cessare immediatamente l’uso dell’unità e consultare il
rivenditore presso cui è avvenuto l’acquisto.
– L’unità emette fumo.
– L’unità emette odori strani.
– Un oggetto estraneo è penetrato nell’unità.
– Liquido è stato rovesciato su o dentro l’unità.
Se si continua ad usare l’unità senza porre rimedio al
problema, l’unità può essere seriamente danneggiata,
causando seri incidenti o incendi.
ATTENZIONE
• Non ricaricare la pila, non smontarla, non esporla al
calore e non eliminarla gettandola nel fuoco.
• Usare soltanto una pila al litio CR2032 (3 V). Non
usare mai pile di tipo diverso con questa unità.
• Non prendere la pila servendosi di atterezzi metallici.
• Non riporre la pila al litio insieme a materiali metallici.
• Per eliminare le batterie usate, rispettare i regolamenti
stabiliti dal governo o dagli enti pubblici per la tutela
dell’ambiente applicabili nel vostro paese/area geografica.
• Fare sempre attenzione ad inserire la pila con i suoi poli
(+) e (–) rivolti nella direzione corretta.
• Installare l’unità usando solo le parti in dotazione all’unità. Se si usano altre parti, questa unità può essere danneggiata o smontata, causando incidenti o problemi.
• Installare l’unità come precisato nel manuale.
Altrimenti potrebbero verificarsi incidenti.
• Non installare l’unità vicino alle portiere dove acqua
piovana possa essere rovesciata sull’unità. La penetrazione di acqua nell’unità può causare l’emissione di
fumo o incendi.
• Il volume dell’autostereo deve essere regolato in modo
che sia possibile sentire forti suoni originati fuori dall’auto. Se suoni originati fuori dall’auto sono coperti
dallla musica dell’autostereo durante la guida, questo
può portare ad incidenti stradali.
• Non lasciare l’unità libera all’interno dell’auto. Quando
si frena o si esegue una curva l’unità potrebbe cadere.
Se l’unità va a finire sotto il pedale del freno può
impedire al conducente di frenare bene e causare seri
problemi. Assicurarsi di fissare l’unità al volante.
• Non smontare o modificare questa unità. Ciò potrebbe
causare guasti.
Accessori
A Unità telecomando × 1
B Supporto × 1
C Cinghia × 2
D Microfono × 1
E Fermaglio microfono × 1
F Nastro a doppio lato adesivo × 1
G Fermafilo × 5
H Pila al Litio (CR2032, 3V) × 1
Modo di funzionamento
Commutando il Modo di funzionamento (modo principale, modo navigazione) potete usare un telecomando per azionare diverse apparecchiature.
Modo principale :
Aziona l’apparecchio principale Pioneer AV (es. AVHP7500DVD, AVH-P6500DVD, AVH-P6400CD, AVHP6400R)
Modo navigazione :
Funzionamento navigazione
Prima di tutto, impostare il metodo di commutazione
del Modo di funzionamento. La commutazione del
Modo di funzionamento varia secondo le
impostazioni come qui di seguito descritto.
Metodo di commutazione
Modo principale
J
Modo navigazione
Soltanto modo navigazione
Metodo di impostazione
Premere il tasto VOICE
mentre si preme il tasto
GUIDE/TRAFFIC.
Premere il tasto SRC
(SOURCE) mentre si
preme il tasto
GUIDE/TRAFFIC.
Quando si usa l’apparecchio principale Pioneer AV,
selezionare il modo Principale. Desiderando utilizzare
solamente il funzionamento navigazione, selezionare
il modo Navigazione. (“Modo manuale” è l’impostazione predefinita o preimpostata in fabbrica).
Funzionamento Modo principale.
(Fig 2)
q Tasto NAVI/AUDIO
Premendo questo tasto si commuta il Modo di funzionamento.
w Tasto VOICE
Potete usare il tasto VOICE per avviare il
riconoscimento vocale, che consente di azionare il
Sistema di Navigazione parlando.
e Tasto SRC (SOURCE)
Commuta tra le sorgenti e accende/spegne
(ON/OFF). (in base alle unità collegate, il funzionamento può essere leggermente diverso).
r Tasto 5, ∞, 2, 3
Agisce nello stesso modo del tasto 5, ∞, 2, 3
dell’apparecchio principale o del Joystick.
t Tasto POS
Premere questo tasto per visualizzare la cartina o
ritornare alla guida. Inoltre, quando la cartina sta
scorrendo, premendo questo tasto si ritorna alla
visualizzazione della cartina dei Vostri dintorni.
u Trasmettitore
Trasmette i segnali del telecomando.
i Tasto +/–
Può essere regolato il volume audio dell’unità principale Pioneer AV.
Modo navigazione (funzionamento
navigazione) (Fig 2)
Il tasto SRC (SOURCE) ed i tasti 2 / 3 nel Modo
navigazione non sono utilizzati.
q Tasto NAVI/AUDIO
Premendo questo tasto si commuta il Modo di funzionamento.
w Tasto VOICE
Potete usare il tasto VOICE per avviare il
riconoscimento vocale, che consente di azionare il
Sistema di Navigazione parlando.
r Tasto 5/∞
La cartina può essere ingrandita o ridotta. Se un
elenco menu si estende su diverse pagine, passare
alla pagina precedente o alla pagina successiva.
t Tasto POS
Premere questo tasto per visualizzare la cartina o
ritornare alla guida. Inoltre, quando la cartina sta
scorrendo, premendo questo tasto si ritorna alla
visualizzazione della cartina dei Vostri dintorni.
y Tasto GUIDE/TRAFFIC
Premere questo tasto se si vuole riascoltare il
direzionamento vocale. Se questo tasto viene premuto per più di due secondi, potete ascoltare le
informazioni del traffico sul vostro percorso (dove
disponibili).
u Trasmettitore
Trasmette i segnali del telecomando.
i Tasto +/–
Può essere regolato il volume della voce della
guida di navigazione.
Microfono
Dopo avere premuto il tasto VOICE per avviare il
funzionamento vocale, questo microfono ascolta i
vostri comandi.
Per ulteriori informazioni, fare riferimento al relativo
manuale.
<NEDERLANDS>
WAARSCHUWING
• Houd de lithiumbatterij buiten het bereik van kleine
kinderen. Raadpleeg direct een arts indien een batterij per ongeluk is ingeslikt.
• Installeer de stuurafstandsbediening niet op plaatsen
waar het het sturen of de bediening van de versnellingspook en andere mechanismen zou kunnen
hinderen. Een verkeerde plaats kan ernstige
ongelukken veroorzaken.
• Gebruik dit toestel niet terwijl u het stuur beweegt.
Dit kan leiden tot een verkeersongeval.
• Als u het toestel per ongeluk bedient terwijl u aan
het rijden bent, moet u toch uw aandacht bij het verkeer houden. Doet u dit niet, dan loopt u gevaar het
slachtoffer te worden van een verkeersongeval.
• Als zich een van de volgende problemen voordoet,
dient u het gebruik van dit toestel onmiddellijk te
staken en de dealer van wie u het gekocht heeft te
raadplegen:
– er komt rook uit het toestel.
– er komt een vreemde geur uit het toestel.
– er is een vreemd voorwerp in het toestel terecht
gekomen.
– er is vloeistof op of in het toestel terecht gekomen.
Als u het toestel blijft gebruiken zonder deze problemen te hebben opgelost, kan het toestel ernstig
beschadigd raken, hetgeen kan leiden tot een ernstig
ongeval of brand.
LET OP
• Laad de batterij niet op, demonteer niet en gooi niet in
een vuur.
• Gebruik uitsluitend een CR2032 (3 V) lithiumbatterij.
Het gebruik van andere batterijen kan ernstige problemen veroorzaken.
• Raak de batterij niet met metalen voorwerpen of
gereedschap aan.
• Bewaar de batterij niet samen met metalen voorwerpen.
• Wanneer u de batterijen weggooit, dient u zich te
houden aan de in uw land/gebied daaromtrent geldende
regelgeving.
• Controleer altijd zorgvuldig of u de batterijen met de
(+) en (–) polen in de juiste richting heeft geplaatst.
• Installeer dit toestel uitsluitend met behulp van de met
het toestel meegeleverde onderdelen. Bij gebruik van
andere onderdelen kan het toestel beschadigd of los
raken, hetgeen kan leiden tot een ongeval of andere
problemen.
• Installeer de stuurafstandsbediening zoals in deze
gebruiksaanwijzing wordt beschreven. Dit nalaten kan
ongelukken veroorzaken.
• Installeer de stuurafstandsbediening niet in de buurt van
de portieren waar het gemakkelijk aan regenwater
wordt blootgesteld. Vocht in de stuurafstandsbediening
veroorzaakt mogelijk rook of brand.
• Het volume van de autostereo moet zo worden ingesteld
dat u belangrijke geluiden van buiten uw auto kunt blijven horen. Als dergelijke geluiden van buiten uw auto
worden overstemd door de muziek uit uw autostereo
terwijl u aan het rijden bent, kan dit negatief bijdragen
aan uw kans op een ongeval.
• Laat dit toestel in geen geval los rondslingeren in uw
auto. Wanneer de auto stopt of een bocht maakt kan het
toestel dan namelijk op de vloer terecht komen en als
het vervolgens onder uw rempedaal rolt, kunt u niet
meer remmen, hetgeen tot allerlei narigheid kan leiden.
U moet dus dit toestel aan het stuur bevestigen.
• Haal dit toestel niet uit elkaar en breng er geen
wijzigingen in aan. Dit zal storingen veroorzaken.
Accessoire
A Afstands-bediening × 1
B Houder × 1
C Riem × 2
D Microfoon × 1
E Microfoonclip × 1
F Dubbelzijdig kleefband× 1
G Klem × 5
H Lithiumbatterij (CR2032, 3V) × 1
Bedieningsmodus
Bij het omschakelen van de bedieningsmodus (hoofdmodus, navigatiemodus) kunt u één afstandsbediening
gebruiken om de verschillende apparaten te bedienen.
Hoofdmodus :
Bedient de Pioneer AV hoofd-unit (zoals bijv. AVHP7500DVD, AVH-P6500DVD, AVH-P6400CD, AVHP6400R)
Navigatiemodus :
Voor de navigatiebediening
Stel allereerst de omschakelmethode van de bedieningsmodus in. Het omschakelen van de bedieningsmodus verandert in overeenstemming met de
onderstaande basisinstellingen.
Omschakelmethode
Hoofdmodus
J
Navigatiemodus
Uitsluitend de navigatiemodus
Instelmethode
Druk op de VOICE toets
terwijl u op de
GUIDE/TRAFFIC toets
drukt.
Druk op de SRC
(SOURCE) toets terwijl u
op de GUIDE/TRAFFIC
toets drukt.
Maak gebruik van de hoofdmodus wanneer u de
Pioneer AV hoofd-unit gebruikt. Maak gebruik van de
navigatiemodus als u uitsluitend de navigatiebesturing wilt gebruiken. (“Hoofdmodus” is de standaardof fabrieksinstelling.)
Navigatiemodus (navigatiebediening)
(Afb 2)
Werking van de hoofdmodus (Afb 2)
q NAVI/AUDIO toets
Door op deze toets te drukken wordt de bedieningsmodus omgeschakeld.
q NAVI/AUDIO toets
Door op deze toets te drukken wordt de bedieningsmodus omgeschakeld.
w VOICE toets
U gebruikt de VOICE toets om de spraakherkenning te starten, zodat u het navigatiesysteem met
uw stem kunt besturen.
e SRC (SOURCE) toets
Hiermee kunt u schakelen tussen de signaalbronnen en de stroom in-/uitschakelen. (Afhankelijk
van de aangesloten toestellen, kan de bediening
iets afwijken.)
r 5, ∞, 2, 3 toets
Werkt hetzelfde als de 5, ∞, 2, 3 toets of de joystick van de hoofd-unit.
t POS toets
Druk op deze toets om de kaart te tonen of terug te
keren naar de begeleiding. Tevens keert u bij het
verschuiven van de kaart door op deze toets te
drukken terug naar de kaart van uw omgeving.
u Zender
Deze stuurt de signalen door van de afstandsbediening.
i +/– toets
Het geluidsvolume van de Pioneer AV hoofd-unit
kan worden afgesteld.
De SRC (SOURCE) toets, en 2 / 3 toetsen worden
niet gebruikt in de navigatiemodus.
w VOICE toets
U gebruikt de VOICE toets om de spraakherkenning te starten, zodat u het navigatiesysteem met
uw stem kunt besturen.
r 5/∞ toets
De kaart kan worden vergroot of verkleind. Als een
menulijst meerdere pagina’s in beslag neemt,
schakelt u naar de vorige of de volgende pagina.
t POS toets
Druk op deze toets om de kaart te tonen of terug te
keren naar de begeleiding. Tevens keert u bij het
verschuiven van de kaart door op deze toets te
drukken terug naar de kaart van uw omgeving.
y GUIDE/TRAFFIC toets
Druk op deze toets als u de stembegeleiding niet
goed hoort. Als u deze toets langer dan twee seconden indrukt, kunt u luisteren naar de verkeersinformatie over uw route (indien beschikbaar).
u Zender
Deze stuurt de signalen door van de afstandsbediening.
i +/– toets
Het volume van de begeleidende stem van de navigatie kan worden geregeld.
Microfoon
Nadat u op de VOICE toets hebt gedrukt om de
spraakbediening te starten, hoort deze microfoon uw
opdrachten.
Voor meer informatie verwijzen wij u naar de handleiding voor het navigatiesysteem.
D
q
w
e
1 Fit the mic cord in the groove.
E
D
Fig. 12
Abb. 12
Afb. 12
E
Fig. 10
Abb. 10
Afb. 10
Fig.3, Abb.3, Afb.3
Fig.7, Abb.7, Afb.7
Fig.6, Abb.6, Afb.6
Fig.4, Abb.4, Afb.4
F
G
E
2 Install the clip on the
steering column away
from the steering wheel.
r
Fig. 13
Abb. 13
Afb. 13
t
G
*1
Fig. 11
Abb. 11
Afb. 11
Fig.5, Abb.5, Afb.5
Fig.8, Abb.8, Afb.8
Fig.9, Abb.9, Afb.9
Fig. 14
Abb. 14
Afb. 14
<ENGLISH>
Preparation
Installing the lithium battery. (Fig. 3)
Open the back lid of this unit and place a lithium battery “CR2032” in this unit with its positive (+) side
up.
Replacing the lithium battery. (Fig. 4)
• Replace the battery with a CR2032 lithium battery.
• Replace the battery in the unit using a non metallic tapered bar.
Installation
WARNING
• Avoid installing this unit in such a location where
the operation of safety devices such as airbags is
prevented by this unit. Otherwise, there is a danger of a fatal accident.
• Fix this unit securely to the steering wheel with
the belt attached to the unit. If this unit is loose, it
disturbs driving stability, which may result in a
traffic accident.
• Do not attach this unit to the outer circumference
of the steering wheel. Otherwise, it disturbs driving stability, causing a traffic accident. Always
attach this unit to the inner circumference of the
steering wheel as shown (Fig. 5).
Note:
• Do not install this unit in a place that may
obstruct the driver’s view.
• Since interior layout differs depending on the
type of vehicle, the ideal installation location
for the unit also differs. When installing the
unit, select a location that assures optimum
transmission of signals from the unit to
Pioneer AV Head Unit.
Installing the Unit on a Left-HandDrive Car
1. Hook the belt on to the holder.
(Fig. 6)
2. Fix the holder to the inside edge of
the steering wheel so that the
holder is facing the driver. (Fig. 7)
qwWrap the belt around the outside edge
of the steering wheel, passing the end
through the slot in the holder.
ePull on the belt to tighten it then secure it
using the other two hooks on the holder.
3. rCut off the extra portion of the
belt. (Fig. 8)
tIf some of the belt still protrudes, fold it
back into the slot so that it does not interfere with driving.
4. Fasten the other belt in the same
way. (Fig. 8)
5. Install the remote control unit in
the holder (Fig. 9).
When removing the remote control unit
from the holder, move the corrugated
release section (*1) toward the steering
wheel as far as possible before sliding the
remote control unit toward you.
Installing the Microphone
• Install the microphone in a place where its direction and distance from the driver make it easiest
to pick up the driver’s voice.
• Make sure to connect the Microphone to the
Navigation System after the Navigation System is
turned off. (ACC OFF)
Mounting on the sun visor
1. Install the microphone in the mic
clip. (Fig. 10)
2. Attach the mic clip to sun visor.
(Fig. 11)
Install the microphone on the sun visor when it is in
the up position. It cannot recognize the driver’s
voice if the sun visor is in the down position.
Installation on the steering column
1. Install the microphone in the mic
clip. (Fig. 12)
2. Mount the mic clip on the steering
column. (Fig. 12,13)
1. Fit the mic cord in the groove.
2. Install the clip on the steering column away
from the steering wheel.
Adjusting the microphone angle
(Fig.14)
The microphone angle can be adjusted by moving
forward or backward the microphone clip angle.
Specifications
General
Power source . . . . . . . . . . . . . . . . . . . . . . 3 V DC
(Lithium Battery: CR2032)
Dimensions . . . . . . 38 (W) × 67 (H) × 18 (D) mm
Weight . . . . . . . . . . . . . . . . . . . . . . . . . . . . . 37 g
(including holder and battery)
Wavelength . . . . . . . . . . . . . . . . 940 nm ± 50 nm
Output . . . . . . . . . typ;14 mw/sr per Infrared LED
(2 LEDs used)
Microphone
Jack . . . . . . . . . . . . . . . . . . . . . . . . . . . . ø2.5 mm
Cable length . . . . . . . . . . . . . . . . . . . . . . . . . . 4 m
Weight . . . . . . . . . . . . . . . . . . . . . . . . . . . . . . 34 g
(including Mic clip and cable)
<ESPAÑOL>
Preparación
Instalación de la batería de litio. (Fig. 3)
Abra la tapa posterior de esta unidad y coloque la pila
de litio “CR2032” con el lado positivo (+) dirigido
hacia arriba.
Reemplazo de la pila de litio. (Fig. 4)
• Cambie la pila con una pila de litio CR2032.
• Cambie la pila en la unidad utilizando una barra
puntiaguda no metálica.
Instalación
ADVERTENCIA
Note:
•
Specifications and the design are subject to possible modification without notice due to
improvements.
• Evite instalar esta unidad en un lugar en el que la
operación de los dispositivos de seguridad tales
como las bolsas de aire sea impedida por esta
unidad. De otra manera, hay el peligro de un accidente fatal.
• Fije esta unidad seguramente al volante con la
correa adjunta. Si ésta se aflojara, esto interrumpirá la estabilidad del manejo, lo que podría resultar en un accidente de tráfico.
• No instale esta unidad fuera de la circunferencia
del volante. De otra manera, esto interrumpirá la
estabilidad del manejo, causando un accidente de
tráfico. Siempre instale esta unidad en el interior
de la circunferencia del volante, tal como se indica (Fig. 5).
Nota:
• No instale esta unidad en un lugar en el que
obstruya la visión del conductor.
• Como la disposición interior difiere dependiendo del tipo de vehículo, la ubicación de
instalación ideal para la unidad también
difiere. Al instalar la unidad, seleccione una
ubicación que garantice la transmisión óptima
de las señales de la unidad a la unidad de control AV de Pioneer.
Instalación de la unidad en el
coche de manejo del lado izquierdo
1. Enganche la correa al soporte.
(Fig. 6)
2. Fije el soporte al borde interior
del volante, de tal forma que el
soporte mire al conductor. (Fig. 7)
qwEnvuelva el borde exterior del volante
con la correa y pase el extremo por la ranura del soporte.
eTire de la correa para tensarla y fíjela a
los otros dos enganches del soporte.
3. rCorte la porción restante de la
correa. (Fig. 8)
tSi sigue sobresaliendo parte de la correa,
dóblela e introdúzcala de nuevo en la ranura, para que no moleste durante la conducción.
4. Fije la otra correa de la misma
forma. (Fig. 8)
5. Instale la unidad de control remoto en el sujetador (Fig. 9).
Cuando quite la unidad de control remoto
del sujetador, mueva la sección de liberación corrugada (*1) hacia el volante en
lo posible y deslice la unidad de control
remoto hacia usted.
Instalación del micrófono
• Instale el micrófono en un lugar en donde su
dirección y distancia desde el conductor, pueda
captar al máximo la voz del conductor.
• Asegúrese de conectar el Micrófono al Sistema de
navegación después de haber apagado el Sistema
de navegación (ACC OFF).
Montaje en la visera
1. Instale el micrófono en el sujetador de micrófono. (Fig. 10)
2. Fije el sujetador de micrófono a la
visera. (Fig. 11)
Instale el micrófono en la visera cuando se encuentra
en la posición superior. No podrá reconocer la voz del
conductor si la visera se encuentra en la posición
inferior (hacia abajo).
Instalación en la columna de dirección
1. Instale el micrófono en el sujetador de micrófono. (Fig. 12)
2. Monte el sujetador de micrófono en
la columna de dirección. (Fig. 12,13)
1. Fije el micrófono en la ranura.
2. Instale el sujetador en la columna de direccción
hacia atrás.
Ajuste del ángulo del micrófono
(Fig.14)
El ángulo del micrófono se puede ajustar moviendo
hacia delante o hacia atrás el ángulo del clip del
micrófono.
Especificaciones
General
Fuente de alimentación ................................ 3 V CC
(pila de litio: CR2032)
Dimensiones ........ 38 (An) × 67 (Al) × 18 (Pr) mm
Peso .................................................................. 37 g
(incluyendo la funda y la pila)
Micrófono
Clavija . . . . . . . . . . . . . . . . . . . . . . . . . . ø2.5 mm
Cable longitud . . . . . . . . . . . . . . . . . . . . . . . . 4 m
Peso .................................................................. 34 g
(incluyendo sujetador de micrófono y cable)
Nota:
•
Las especificaciones y el diseño están sujetos a
posibles modificaciones sin previo aviso debido
a mejoramientos.
<DEUTSCH>
Vorbereitung
Setzen Sie die Lithiumbatterie ein.
(Abb. 3)
Öffnen Sie die rückwärtige Abdeckung dieses Geräts
und setzen Sie eine Lithiumbatterie “CR2032” mit
dem Pluspol (+) nach oben ein.
Auswechseln der Lithiumbatterie.
(Abb. 4)
• Die Batterie durch eine Lithiumbatterie vom Typ
CR2032 ersetzen.
• Zum Auswechseln der Batterie einen nicht-metallischen spitzen Gegenstand verwenden.
Einbau
WARNUNG
• Installieren Sie dieses Gerät nicht an einer Stelle,
wo es den Betrieb von Sicherheitseinrichtungen
wie Airbags beeinträchtigt, da in diesem Fall die
Gefahr eines tödlichen Unfalls besteht.
• Befestigen Sie dieses Gerät mit dem an dem Gerät
angebrachten Riemen am Lenkrad. Wenn dieses
Gerät lose ist, stört es die Fahrstabilität, was zu
einem Verkehrsunfall führen kann.
• Bringen Sie dieses Gerät nicht am Außenumkreis
des Lenkrads an, weil es dann die Fahrstabilität
stören und dadurch einen Verkehrsunfall verursachen kann. Bringen Sie dieses Gerät wie gezeigt
am Innenumkreis des Lenkrads an (Abb. 5).
Hinweis:
• Installieren Sie dieses Gerät nicht an einer
Stelle, wo es die Sicht des Fahrers beeinträchtigen kann.
• Da der Fahrzeuginnenraum je nach
Fahrzeugtyp unterschiedlich gestaltet ist, gibt
es keinen allgemeingültigen idealen
Montagepunkt für das Gerät. Wählen Sie bei
der Installation des Gerätes einen Ort, an dem
für eine optimale Signalübertragung vom
Gerät zum Pioneer AV-Hauptgerät gesorgt ist.
Installation des Geräts in einem
Auto mit Linkslenkung
1. Haken Sie das Band in den Halter
ein. (Abb. 6)
2. Fixieren Sie den Halter an der
Innenseite des Lenkrades, so dass
der Halter zum Fahrer zeigt.
(Abb. 7)
qwWickeln Sie das Band um die
Außenkante des Lenkrades und fädeln Sie
das Ende durch den Schlitz im Halter.
eZiehen Sie das Band straff an, sichern
Sie es dann mit Hilfe der beiden anderen
Haken am Halter.
3. rSchneiden Sie überschüssiges
Band ab. (Abb. 8)
tWenn nach wie vor ein Stück des Bandes
hervorstehen sollte, legen Sie es in den
Schlitz ein, damit es beim Fahren nicht im
Wege ist.
4. Befestigen Sie das zweite Band auf
die gleiche Weise. (Abb. 8)
5. Die Fernbedienung in den Halter
einsetzen (Abb. 9).
Bewegen Sie beim Herausnehmen der
Fernbedienung aus dem Halter den geriffelten Freigabeteil (*1) so weit wie möglich
zum Lenkrad hin und bewegen Sie die
Fernbedienung auf sich zu.
Einbauen des Mikrofons
• Bringen Sie das Mikrofon an einer Stelle an, die
von der Richtung und Entfernung her zur
Erfassung der Sprachkommandos des Fahrers am
geeignetsten ist.
• Achten Sie darauf, das Mikrofon an das
Navigationssystem anzuschließen, nachdem das
Navigationssystem ausgeschaltet (ACC OFF)
wurde.
Befestigung an der Sonnenblende
1. Setzen Sie das Mikrofon in den
Mikrofonhalter ein. (Abb. 10)
2. Anbringen des Mikrofonhalters an
der Sonnenblende. (Abb. 11)
Bringen Sie das Mikrofon in gehobener Position der
Sonnenblende an dieser an. Wenn die Sonnenblende
heruntergeklappt ist, können Sprachkommandos vom
Fahrer nicht erkannt werden.
Installation an der Lenksäule
1. Setzen Sie das Mikrofon in den
Mikrofonhalter ein. (Abb. 12)
2. Befestigen Sie den Mikrofonhalter
an der Lenksäule. (Abb. 12,13)
1. Führen Sie das Mikrofonkabel in die Nut ein.
2. Bringen Sie den Halter nach hinten weisend an
der Lenksäule an.
Anpassen des Mikrofonwinkels
(Abb.14)
Sie können den Mikrofonwinkel verstellen, indem Sie
das Mikrofonclip-Winkelstück vorwärts und rückwärts bewegen.
Technische Daten
Allgemein
Spannungsversorgung . . . . . . .3 V Gleichspannung
(Lithiumbatterie: CR2032)
Abmessungen . . . . . .38 (B) × 67 (H) × 18 (T) mm
Gewicht . . . . . . . . . . . . . . . . . . . . . . . . . . . . . 37 g
(einschließlich Halter und Batterie)
Mikrofon
Buchse . . . . . . . . . . . . . . . . . . . . . . . . . . ø2.5 mm
Kabellänge . . . . . . . . . . . . . . . . . . . . . . . . . . . 4 m
Gewicht ............................................................ 34 g
(einschließlich Mikrofonhalter und Kabel)
Hinweis:
•
Technische Änderungen zum Zwecke der
Produktverbesserung sind ohne Vorankündigung vorbehalten.
<FRANÇAIS>
Préparation
Installation de la pile au lithium. (Fig. 3)
Ouvrir le couvercle arrière de cette unité et placer une
pile au lithium “CR2032” dans cette unité avec son
pôle positif (+) vers le haut.
Remplacement de la pile au lithium.
(Fig. 4)
• Remplacer la pile par une pile au lithium CR2032.
• Remplacer la pile dans l‘unité en utilisant une
barre conique non métallique.
Installation
AVERTISSEMENT
• Eviter d’installer cette unité dans un endroit où
elle empêche le fonctionnement d’un dispositif de
sécurité, comme celui du sac gonflable. Cela
entraînerait un risque d’accident fatal.
• Fixer solidement cette unité au volant de direction
à l’aide de la courroie fournie avec l’unité. Si
cette unité est relâchée, elle gêne la stabilité de la
conduite, ce qui peut entraîner un accident.
• Ne pas fixer cette unité à la circonférence
extérieure du volant de direction. Elle gênerait la
stabilité de la conduite et provoquerait un accident. Toujours fixer cette unité à la circonférence
intérieure du volant de direction, comme illustré
(Fig. 5).
Remarque:
• Ne pas installer cette unité dans un endroit où
elle peut gêner la visibilité du conducteur.
• Etant donné que l’agencement de l’habitacle
varie en fonction du véhicule, l’emplacement
idéal d’installation de l’appareil diffère
pareillement. Avant l’installation, choisissez
un emplacement qui permette la meilleure
transmission des signaux émis vers l’appareil
central AV Pioneer.
Installation de l’unité sur une
voiture à direction à gauche
1. Accrochez la courroie sur le support. (Fig. 6)
2. Fixez le support sur le rebord
intérieur du volant pour que le
support soit en face du conducteur. (Fig. 7)
qwEntourez la courroie autour du rebord
extérieur du volant et faites passer son
extrémité dans la fente du support.
eTirez sur la courroie pour la serrer puis
fixez-la en utilisant les deux autres crochets
du support.
3. rCoupez la partie de la courroie
qui dépasse. (Fig. 8)
tSi une partie de la courroie dépasse
encore, rabattez-la dans la fente pour qu’il
n’y ait pas d’interférence avec la conduite.
4. Fixez l’autre courroie de la même
manière. (Fig. 8)
5. Installer l’unité de télécommande
dans le support (Fig. 9).
Pour retirer l’unité de té du support, déplacer autant que possible la section de libération striée (*1) vers le volant de direction
avant de faire glisser l’unité de télécommande vers soi.
Installation du microphone
• Installez le microphone en le dirigeant vers le
conducteur et à une distance telle qu’il puisse
aisément capter la voix de celui-ci.
• Assurez-vous que le Système de Navigation est
débranché (CCA OFF) quand vous branchez le
Microphone du Système de Navigation.
Fixation au pare-soleil
1. Engagez le microphone dans son
attache. (Fig. 10)
2. Fixez l’attache au pare-soleil. (Fig.11)
Fixez le microphone au pare-soleil relevé. Le microphone ne peut pas capter correctement la voix du
conducteur si le pare-soleil est abaissé.
Fixation à la colonne de direction
1. Engagez le microphone dans son
attache. (Fig. 12)
2. Fixez l’attache du microphone à la
colonne de direction. (Fig. 12,13)
1. Placez le cordon du microphone dans la rainure.
2. Fixez l’attache à la colonne de direction de
manière qu’elle soit dirigée vers l’arrière.
Régler l’angle du microphone (Fig.14)
On peut régler l’angle du microphone en bougeant la
cornière de fixation du microphone vers l’avant ou
vers l’arrière.
Caractéristiques techniques
Généralités
Source d’alimentation . . . . . . . . . . . . . . . . 3 V CC
(pile au lithium: CR2032)
Dimensions . . . . . . . 38 (L) × 67 (H) × 18 (P) mm
Poids . . . . . . . . . . . . . . . . . . . . . . . . . . . . . . . 37 g
(y compris le support et la pile)
Microphone
Jack . . . . . . . . . . . . . . . . . . . . . . . . . . . . ø2.5 mm
Longueur du câble . . . . . . . . . . . . . . . . . . . . . 4 m
Poids . . . . . . . . . . . . . . . . . . . . . . . . . . . . . . . 34 g
(y compris l’attache du microphone et le câble)
Remarque:
•
Du fait d’améliorations, les caractéristiques techniques
et la présentation sont susceptibles de modification
sans préavis.
<ITALIANO>
Preparativi
Installazione della batteria al litio.
(Fig. 3)
Aprire il coperchio sul retro dell’unità e inserire una
pila al litio “CR2032” nell’unità con il lato positivo
(+) rivolto verso l’alto.
Sostituzione della pila al litio. (Fig. 4)
• Sostituire la pila con una pila al litio CR2032.
• Sostituire la pila nell‘unità usando una barra rastremata non metallica.
Installazione
AVVERTIMENTO
• Evitare di installare questa unità in luoghi dove il
funzionamento di dispositivi di sicurezza come
palloni a gonfiaggio automatico possa essere ostacolato dall’apparecchio. Altrimenti c’è il rischio di
incidenti mortali.
• Fissare questa unità saldamente al volante con la
cinghia in dotazione. Se l’unità non è ben fissata,
disturba la stabilità di guida e può causare incidenti stradali.
• Non applicare questa unità alla circonferenza
esterna del volante, altrimenti disturba la stabilità
di guida e causa incidenti stradali. Applicare sempre l’unità alla circonferenza interna del volante
come illustrato (Fig. 5).
Nota:
• Non installare questa unità dove possa ostruire
la vista del conducente.
• Poiché la struttura interna differisce da una
vettura all’altra, anche la posizione ideale per
l’installazione dell’apparecchio è diversa. Per
l’installazione dell’apparecchio, scegliere una
posizione che assicuri una trasmissione ottimale dei segnali dall’apparecchiatura principale Pioneer AV.
Installazione dell’unità su un’auto
con volante a sinistra
1. Agganciare la cintura al supporto.
(Fig. 6)
2. Fissare il supporto al bordo interno del volante in modo tale che il
supporto sia rivolto verso il conducente. (Fig. 7)
qwAvvolgere la cintura attorno al bordo
esterno del volante, facendo passare
l’estremità nello slot del supporto.
eTirare la cintura fino a tenderla, quindi
bloccarla mediante gli altri due ganci del
supporto.
3. rTagliare la parte in eccedenza.
(Fig. 8)
tQualora vi siano ancora parti di cintura
che sporgono, ripiegarle nello slot, in modo
tale che non possano creare interferenze.
4. Procedere nello stesso modo anche
per l’altra cintura. (Fig. 8)
5. Installare l’unità del telecomando
sul supporto (Fig. 9).
Togliendo il telecomando dal supporto,
spostare la parte corrugata di rilascio (*1)
per quanto possibile verso il volante prima
far scorrere il telecomando verso di sè.
Installazione del microfono
• Installare il microfono in una posizione in cui la
direzione e la distanza dal conducente siano ottimali per la ricezione dei comandi.
• Collegare il microfono al sistema di navigazione
solo dopo averlo spento (ACC OFF).
Installazione sul parasole
1. Inserire il microfono nel fermaglio
del microfono. (Fig. 10)
2. Applicare il fermaglio del microfono al parasole. (Fig. 11)
Installare il microfono sul parasole quando questo è
sollevato. Se il parasole fosse abbassato, il microfono
non potrebbe raccogliere la voce del conducente.
Installazione sul piantone dello sterzo
Caratteristiche tecniche
Generale
Alimentazione .............................................. 3 V CC
(pila al litio CR2032)
Dimensioni ................ 38 (L) × 67 (A) × 18 (P) mm
Peso .................................................................. 37 g
(inclusi supporto e pila)
Microfono
Jack . . . . . . . . . . . . . . . . . . . . . . . . . . . . ø2.5 mm
Lunghezza cavo . . . . . . . . . . . . . . . . . . . . . . . 4 m
Peso . . . . . . . . . . . . . . . . . . . . . . . . . . . . . . . . 34 g
(inclusi Fermaglio microfono e cavo)
<NEDERLANDS>
Voorbereidingen
Plaats de lithiumbatterij. (Afb. 3)
Open de klep aan de achterkant van dit toestel en doe
een lithium batterij van het type “CR2032” in het
toestel met de positieve (+) pool naar boven.
Vervangen van de lithium batterij. (Afb. 4)
• Vervang de batterij door een CR2032 lithiumbatterij.
• Vervang de batterij in het toestel met behulp van
een taps toelopend, niet metalen voorwerp.
Nota:
•
Le caratteristiche tecniche e il design sono
soggetti a possibili modifiche senza preavviso
dovute a miglioramenti.
1. Inserire il microfono nel fermaglio
del microfono. (Fig. 12)
2. Installare il fermaglio del microfono sul piantone dello sterzo.
(Fig. 12,13)
1. Inserire il cavo del microfono nella scanalatura.
2. Installare il fermaglio sulla parte inferiore del
piantone dello sterzo.
Regolazione dell'angolazione del
microfono (Fig.14)
L'angolazione del microfono può essere regolata spostando in avanti o indietro l'angolo della clip.
Installeren van de stuurafstandbediening in een auto met het stuur
links
1. Haak de riem op de houder vast.
(Afb. 6)
2. Bevestig de houder aan de binnenste rand van het stuur zodat de
houder in de richting van de
bestuurder wijst. (Afb. 7)
qwWikkel de riem rond de buitenste rand
van het stuur en plaats het uiteinde door de
gleuf in de houder.
eTrek de riem aan en zet hem vervolgens
met de twee overige haken aan de houder
vast.
3. rKnip het overtollige gedeelte
van de riem af (Afb. 8).
Installeren
WAARSCHUWING
• Installeer de stuurafstandsbediening niet op plaatsen waar het de werking van veiligheidsmechanismen, bijvoorbeeld een airbag, zou kunnen hinderen. Een verkeerde plaats kan ernstige
ongelukken veroorzaken.
• Bevestig de stuurafstandsbediening stevig aan het
stuur met gebruik van de riem. Een loszittende
stuurafstandsbediening kan het besturen van de
auto hinderen met mogelijk ongelukken tot
gevolg.
• Bevestig dit toestel in geen geval aan de buitenrand van het stuur. Hier zal het toestel in de weg
zitten bij het besturen van uw auto, hetgeen zal
leiden tot verkeersongevallen. Bevestig dit toestel
altijd aan de binnenrand van het stuur, zoals afgebeeld (Afb. 5).
Opmerking:
• Plaats de stuurafstandsbediening niet ergens
waar het het zicht van de bestuurder zou kunnen verslechteren.
• De ideale plaats voor de installatie van de unit
is verschillend afhankelijk van het interieur
van de auto. Kies een plaats waar de signalen
goed van de unit naar de Pioneer AV hoofdunit kunnen worden gestuurd.
tAls een gedeelte van de riem er nog
steeds uitsteekt dan kunt u dit uiteinde in de
gleuf vouwen om te voorkomen dat dit
uiteinde het besturen van de auto belemmerd.
4. Maak de andere riem op dezelfde
manier vast (Afb. 8).
5. Plaats de stuurafstandsbediening
in de houder. (Afb. 9)
Bij het verwijderen van de stuurafstandsbediening uit de houder moet u het geribbelde
gedeelte (*1) zo ver mogelijk naar het stuur
drukken en dan de stuurafstandsbediening
naar u toe schuiven.
Installatie van de microfoon
• Installeer de microfoon op een plek waar de richting en de afstand tot de bestuurder het oppikken
van de stem van de bestuurder vergemakkelijken.
• Sluit de microfoon op het navigatiesysteem aan
nadat u het navigatiesysteem heeft uitgezet (ACC
OFF).
Monteren aan de zonneklep
1. Maak de microfoon vast aan de
microfoonclip. (Afb. 10)
2. Bevestig de microfoonclip aan de
zonneklep. (Afb. 11)
Doe de microfoonclip aan de zonneklep wanneer
deze naar boven geklapt is. De stem van de bestuurder zal niet herkend worden wanneer de zonneklep
naar beneden staat.
Installatie op de stuurkolom
1. Maak de microfoon vast aan de
microfoonclip. (Afb. 12)
2. Bevestig de microfoonclip op de
stuurkolom. (Afb. 12,13)
1. Klem het microfoonsnoer in de groef.
2. Zet de clip een beetje naar achteren op de stuurkolom.
De richting van de microfoon
afstellen (Afb.14)
De richting van de microfoon kan afgesteld worden
door de microfoonklem naar voren of achteren te verplaatsen.
Technische gegevens
Algemeen
Spanningsbron .............................. 3 V gelijkstroom
(Lithiumbatterij: CR2032)
Afmetingen: ................ 38 (b) × 67 (h) × 18 (d) mm
Gewicht ............................................................ 37 g
(inclusief houder en batterij)
Microfoon
Aansluiting . . . . . . . . . . . . . . . . . . . . . . . ø2.5 mm
Kabel lengte . . . . . . . . . . . . . . . . . . . . . . . . . . 4 m
Gewicht . . . . . . . . . . . . . . . . . . . . . . . . . . . . . 34 g
(inclusief Microfoonclip en Kabel)
Opmerking:
•
Technische gegevens en ontwerp zijn ter produktverbetering zonder voorafgaande kennisgeving wijzigbaar.