1
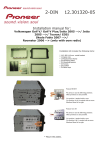
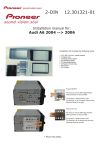
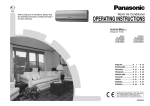
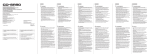
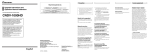
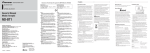
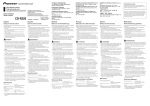
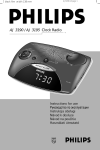
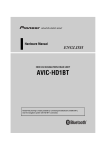
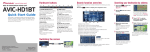
English STEERING REMOTE CONTROLLER WARNING TELECOMMANDE AU VOLANT Fig. 1 Abb. 1 Afb. 1 êËÒ. 1 Owner’s Manual Mode d’emploi q CD-SR1 w e r t y u PIONEER CORPORATION CAUTION i Fig. 2 Abb. 2 Afb. 2 êËÒ. 2 Information to User 4-1, MEGURO 1-CHOME, MEGURO-KU, TOKYO 153-8654, JAPAN PIONEER ELECTRONICS (USA) INC. Alteration or modifications carried out without appropriate authorization may invalidate the user's right to operate the equipment. P.O. Box 1540, Long Beach, California 90801-1540, U.S.A. TEL: (800) 421-1404 PIONEER EUROPE NV This device complies with part 15 of the FCC Rules. Operation is subject to the following two conditions: (1) This device may not cause harmful interference, and (2) this device must accept any interference received, including interference that may cause undesired operation. Haven 1087, Keetberglaan 1, B-9120 Melsele, Belgium TEL: (0) 3/570.05.11 PIONEER ELECTRONICS ASIACENTRE PTE. LTD. 253 Alexandra Road, #04-01, Singapore 159936 TEL: 65-6472-7555 PIONEER ELECTRONICS AUSTRALIA PTY. LTD. 178-184 Boundary Road, Braeside, Victoria 3195, Australia TEL: (03) 9586-6300 PIONEER ELECTRONICS OF CANADA, INC. 300 Allstate Parkway, Markham, Ontario L3R OP2, Canada TEL: 1-877-283-5901 PIONEER ELECTRONICS DE MEXICO, S.A. de C.V. Blvd. Manuel Avila Camacho 138 10 piso Col. Lomas de Chapultepec, Mexico, D.F. 11000 TEL: 55-9178-4270 Published by Pioneer Corporation. Copyright © 2006 by Pioneer Corporation. All rights reserved. Publication de Pioneer Corporation. Copyright © 2006 Pioneer Corporation. Tous droits de reproduction et de traduction réservés. Printed in China Imprimé en Chine < KOKNX > < 06B00000 > <CZR5048-A> E • Keep the lithium battery out of reach of children. Should the battery be swallowed, immediately consult a doctor. • Avoid installing this unit where it could interfere with the operation of the steering wheel or gearshift lever or an accident could result. • Do not operate this unit while handling the steering wheel. Or it might result in an accident. • If you must operate this unit while driving, do not take your eyes off the road or an accident could result. • If any of the following problems occur, immediately stop using this unit and consult your dealer from whom you purchased this unit: – smoke coming from the unit. – abnormal odors or smells. – a foreign object has entered the unit. – liquid has been spilled on or into the unit. If you continue to use the unit when it is not operating properly, damage could result in an accident or fire. WARNING Handling the cord on this product or cords associated with accessories sold with the product may expose you to chemicals listed on proposition 65 known to the State of California and other governmental entities to cause cancer and birth defects or other reproductive harm. Wash hands after handling. • Do not recharge, disassemble, heat or dispose of battery in fire. • Use a CR2032 (3 V) lithium battery only. Never use other types of battery with this unit. • Do not handle the battery with metallic tools. • Do not store the lithium battery with metallic materials. • When disposing of used batteries, please comply with governmental regulations or environmental public institution’s rules that apply in your country/area. • Always check carefully that you are loading battery with its (+) and (–) poles facing in the proper directions. • Install this unit using only the parts supplied with this unit. If other parts are used, this unit may be damaged or dismounted itself, which leads to an accident or trouble. • Install this unit as required by this manual. Failure to do so may cause an accident. • Do not install this unit near the doors where rainwater is likely to be spilled on the unit. Incursion of water into the unit may cause smoking or fire. • Keep the volume of the car audio at a level so that sounds from outside the car can still be heard. If you cannot hear sounds from outside the car your chances of being involved in an accident are increased. • Do not leave this unit free inside the car. When the car stops or turns a curve, the unit might drop on the floor. If the unit rolls and gets under the brake pedal, it might prevent the driver from braking well, causing a serious trouble. Be sure to fix this unit to the steering wheel. • Do not disassemble or modify this unit. To do so may cause a fault. English Accessories (Fig. 1) Operation mode Key Finder (Fig. 2) A Remote control unit × 1 By switching the Operation mode (MODE 1, MODE 2, MODE 3) you can use one remote control to operate different equipment. MODE 1 : Used when you operate HDD navigation systems (e.g. AVIC-HD1BT, AVIC-Z1). MODE 2 : Will be used in future products. MODE 3 : Used when you operate the Pioneer Head Unit. PHONE MENU button* MODE 1: Switches to the mode to operate a Bluetooth unit. (Refer to the operation manual of your navigation system.) MODE 3: Press to select the phone as the source. B Holder × 1 C Belt × 2 D Lithium battery (CR2032, 3V) × 1 Before you begin, set the Operation mode switching method. The Operation mode switching changes in accordance with the settings below. Switching method Setting method MODE 1* Press the VR CANCEL/ON HOOK button while pressing the 2 button. MODE 2 Press the VR CANCEL/ON HOOK button while pressing the SOURCE button. MODE 3 Press the SOURCE button while pressing the 2 button. * Default VR ACTIVATION / OFF HOOK button* MODE 1: • Starts voice recognition. • Sets the phone function to the OFF HOOK status. (Refer to the operation manual of your navigation system.) MODE 3: Press to start talking on the phone while operating a phone source. VR CANCEL / ON HOOK button* MODE 1: • Cancels voice recognition. • Sets the phone function to the ON HOOK status. (Refer to the operation manual of your navigation system.) MODE 3: While operating a phone source, press to end a phone call or reject an incoming call. 5/∞/2/3 button Operates the same as the Head Unit‘s or Navigation Unit‘s 5/∞/2/3 button or the Joystick. BAND/ESC button This functions as the BAND button (or BAND touch key) when using different sources. SOURCE button Switches between sources and switches power ON/OFF. (Depending on the connected units, operation may differ slightly.) Transmitter This transmits the remote control signals. +/– button The Pioneer audio source sound volume can be adjusted. * The phone function is available only when a Bluetooth unit is connected. Español ADVERTENCIA • Mantenga la pila de litio fuera del alcance de los niños. Si la pila fuese tragada, consulte con un médico inmediatamente. • Evite instalar esta unidad donde la misma podría interferir con la operación del volante de dirección o la palanca del cambio de marchas, ya que esto podría causar un accidente. • No opere esta unidad mientras maneja el volante de dirección. O esto podría causar un accidente. • Cuando necesite operar esta unidad mientras conduce el automóvil, no quite los ojos de la carretera, ya que esto podría resultar en un accidente. • Cuando ocurra cualquiera de los problemas a continuación, pare de utilizar esta unidad inmediatamente y consulte el revendedor donde ha comprada la unidad. – humo desde la unidad. – olores anormales. – un objeto extraño ha entrado en la unidad. – se ha derramado o entrado líquido en la unidad. Si se continúa a utilizar la unidad cuando no esté funcionando correctamente, el daño podría resultar en un accidente o fuego. PRECAUCION • No recargue, desarme, caliente ni tire la pila al fuego. • Utilice solamente una pila de litio CR2032 (3 V). No utilice otros tipos de pilas con esta unidad. • No toque la pila con instrumentos metálicos. • No guarde la pila de litio con materiales metálicos. • Al descartarse de las pilas usadas, cumpla con las reglas gubernamentales o reglas de la institución pública del medio ambiente aplicables en su país/área. • Siempre revise cuidadosamente que está cargando la pila con los polos (+) y (–) dirigidos en las direcciones correctas. • Instale esta unidad utilizando solamente las piezas provistas con la misma. Si se utilizara otras piezas, la unidad podría deñarse o desarmarse por si misma, lo que conllevaría a un accidente o problema. • Instale esta unidad tal como se indica en el manual. Si falla en efectuar la instalación así, podría causar un accidente. • No instale esta unidad cerca de las puertas donde sea probable que el agua de la lluvia se derrame sobre la unidad. La incursión de agua dentro de la unidad podría causar la emisión de humos o incendio. • Mantenga el volumen del componente de audio del automóvil de modo que pueda oír los sonidos de tráfico exteriores. Si no puede oír los sonidos del exterior del automóvil, se eleva su probabilidad de envolverse en un accidente. • No deje esta unidad libre dentro del coche. Cuando el coche se detenga o voltee una curva, la unidad podría caerse en el piso. Si la unidad rodara y se pusiera debajo del pedal del freno, esto podría evitar que el conductor haga el frenado debidamente, causando Español serios problemas. Asegúrese de fijar esta unidad al volante. • Ne desarme ni haga cambios en esta unidad, si no podría resultar en fallos. Accesorios (Fig. 1) A Unidad de control remoto × 1 B Soporte × 1 C Correa × 2 D Pila de litio (CR2032, 3V) × 1 Deutsch Modo de funcionamiento Al activar el modo de funcionamiento (MODE 1, MODE 2, MODE 3), puede utilizar un control remoto para utilizar otro equipo. MODE 1: Se utiliza para operar sistemas de navegación de HDD (por ejemplo, AVIC-HD1BT, AVIC-Z1). MODE 2: Se utilizará en futuros productos. MODE 3: Se utiliza para operar la unidad principal Pioneer. En primer lugar, configure el método de conmutación del modo de funcionamiento. La conmutación del modo de funcionamiento cambia de acuerdo con las opciones de configuración descritas a continuación. Método de conmutación Método de configuración MODE 1* Pulse el botón VR CANCEL/ON HOOK a la vez que el botón 2. MODE 2 Pulse el botón VR CANCEL/ON HOOK a la vez que el botón SOURCE. MODE 3 Pulse el botón SOURCE a la vez que el botón 2. * Ajuste predeterminado Guía de botones (Fig. 2) Botón PHONE MENU* MODE 1: Cambia al modo para operar una unidad Bluetooth. (Consulte el manual de instrucciones de su sistema de navegación.) MODE 3: Presione este botón para seleccionar el teléfono como la fuente. Botón VR ACTIVATION / OFF HOOK* MODE 1: • Inicia el reconocimiento de voz. • Pone la función de teléfono en el estado DESCOLGADO(OFF HOOK). (Consulte el manual de instrucciones de su sistema de navegación.) MODE 3: Presione para comenzar a hablar en el teléfono mientras utiliza una fuente telefónica. Botón VR CANCEL / ON HOOK* MODE 1: • Cancela el reconocimiento de voz. • Pone la función de teléfono en el estado COLGADO(ON HOOK). (Consulte el manual de instrucciones de su sistema de navegación.) MODE 3: Al utilizar una fuente telefónica, presione este botón para terminar una llamada o rechazar una llamada entrante. Botón 5/∞/2/3 Funciona de la misma forma que el botón 5/∞/2/3 o joystick de la unidad principal o unidad de navegación. Botón BAND/ESC Funciona como el botón BAND (o tecla de toque BAND) cuando se utilizan fuentes diferentes. Botón SOURCE Alterna entre las fuentes y conecta/desconecta (ON/OFF) la alimentación. (Dependiendo de las unidades conectadas, el funcionamiento puede diferir ligeramente.) Transmisor Transmite las señales del control remoto. Botón +/– Se puede ajustar el volumen del sonido de la fuente de audio de Pioneer. * La función de teléfono sólo está disponible cuando una unidad Bluetooth está conectada. WARNUNG • Die Lithiumbatterie Außer Reichweite Kleiner Kinder halten. Sollte die Batterie verschluckt werden, sofort einen Arzt Aufsuchen. • Installieren Sie dieses Gerät nicht an einer Stelle, wo es beim Lenken oder Schalten stören und zur Ursache für einen Unfall werden könnte. • Betätigen Sie dieses Gerät nicht, während Sie aktiv lenken müssen. Dies könnte zu einem Unfall führen. • Wenn Sie dieses Gerät während der Fahrt bedienen müssen, nehmen Sie den Blick nicht von der Fahrbahn, da Sie anderenfalls einen Unfall verursachen können. • Falls eine der folgenden Störungen auftritt, stellen Sie den Gebrauch unverzüglich ein und setzen Sie sich mit dem Händler in Verbindung, bei dem Sie dieses Gerät erworben haben: – Rauch tritt vom Gerät aus. – Gerät entwickelt ungewöhnliche Gerüche. – ein Fremdkörper ist in das Gerät eingedrungen. – eine Flüssigkeit ist auf oder in das Gerät gelangt. Fortsetzung des Betriebs bei nicht richtig funktionierendem Gerät kann zu einem Unfall oder Brand führen. VORSICHT • Die Batterie nicht aufladen, auseinandernehmen, erhitzen oder ins Feuer werfen. • Nur eine Lithiumbatterie vom Typ CR2032 (3 V) verwenden. Niemals einen anderen Batterietyp für dieses Gerät verwenden. • Die Batterie nicht mit Metallwerkzeugen handhaben. • Die Batterie nicht zusammen mit Metallgegenständen lagern. • Gebrauchte Batterien müssen in Übereinstimmung mit den Umweltschutzvorschriften des jeweiligen Landes/Gebiets entsorgt werden. • Beim Einsetzen der Batterie immer darauf achten, daß Pluapol (+) und Minuspol (–) in die richtige Richtung weisen. • Für die Installation dieses Geräts sollten nur die mitgelieferten Teile benutzt werden. Bei Verwendung anderer Teile kann das Gerät beschädigt werden oder sich lösen, was zu einem Unfall oder Problemen führen kann. • Dieses Gerät ist entsprechend den hier gegebenen Anweisungen zu installieren. Andernfalls kann es zu einem Unfall kommen. • Installieren Sie dieses Gerät nicht in der Nähe der Türen, wo Regenwasser auf das Gerät spritzen kann. In das Gerät eindringendes Wasser kann Rauchentwicklung oder einen Brand verursachen. • Stellen Sie die Lautstärke der Auto-Stereoanlage so ein, dass Außengeräusche noch gut wahrgenommen werden können. Wenn Außengeräusche nicht mehr wahrnehmbar sind, erhöht sich die Unfallgefahr. • Lassen Sie dieses Gerät nicht frei im Auto liegen, da es in diesem Fall beim Bremsen oder Kurvenfahren auf den Boden fallen kann. Wenn das Gerät auf dem Deutsch Boden herumrollt und unter das Bremspedal gelangt, könnte es die Bremsfunktion beeinträchtigen und gefährliche Situationen hervorrufen. Besfestigen Sie dieses Gerät unbedingt am Lenkrad. • Dieses Gerät darf nicht auseinandergenommen oder modifiziert werden. Dadurch könnte ein Betriebsversagen vetursacht werden. Zubehör (Abb. 1) A Fernbedienung × 1 B Halter × 1 C Riemen × 2 D Lithium-Batterie (CR2032, 3V) × 1 Betriebsart Tastenübersicht (Abb. 2) Durch Umschalten des Betriebsmodus (MODE 1, MODE 2, MODE 3) können Sie mit nur einer Fernbedienung verschiedene Geräte steuern. MODE 1: Zur Steuerung der HDD-Navigationssysteme (z. B. AVIC-HD1BT, AVIC-Z1). MODE 2: Ist für zukünftige Produkte vorgesehen. MODE 3: Zur Steuerung des Pioneer-Hauptgeräts. PHONE MENU- Taste* MODE 1: Schaltet auf den Modus zur Steuerung eines Bluetooth-Geräts um. (Beachten Sie bitte die Bedienungsanleitung Ihres Navigationssystems.) MODE 3: Zur Wahl des Telefons als Programmquelle. Wählen Sie zunächst den Umschaltmodus für die Betriebsarten aus. Folgende Einstellungen stehen zur Verfügung: Umschaltmodus So stellen Sie den Umschaltmodus ein MODE 1* Drücken Sie gleichzeitig die VR CANCEL/ON HOOK-Taste und die 2-Taste. MODE 2 Drücken Sie gleichzeitig die VR CANCEL/ON HOOK-Taste und die SOUCE-Taste. MODE 3 Drücken Sie gleichzeitig die SOURCE-Taste und die 2-Taste. * Standardeinstellung VR ACTIVATION/OFF HOOK- Taste* MODE 1: • Beginnt mit der Spracherkennung. • Stellt die Telefonfunktion auf den ABGEHOBENStatus (OFF HOOK). (Beachten Sie bitte die Bedienungsanleitung Ihres Navigationssystems.) MODE 3: Drücken, um das Telefon zu verwenden, wenn ein Telefon als Programmquelle gewählt wurde. VR CANCEL/ON HOOK- Taste* MODE 1: • Schaltet die Spracherkennung aus. • Stellt die Telefonfunktion auf den HÖRER AUFGELEGT-Status (ON HOOK). (Beachten Sie bitte die Bedienungsanleitung Ihres Navigationssystems.) MODE 3: Wenn ein Telefon als Programmquelle gewählt wurde, wird durch Drücken dieser Taste ein aktiver Anruf beendet oder ein eingehender Anruf abgewiesen. 5/∞/2/3-Taste Weist dieselben Funktionen wie die Tasten 5/∞/2/3 des Hauptgeräts oder der Navigationseinheit bzw. der Joystick auf. BAND/ESC-Taste Fungiert bei Verwendung von verschiedenen Quellen als Taste Band (oder Sensortaste BAND). SOURCE-Taste Schaltet zwischen Programmquellen um und dient zum Ein- und Ausschalten. (Je nach angeschlossenen Geräten kann der Betrieb etwas abweichen.) Transmitter Überträgt die Signale der Fernbedienung. +/– - Taste Dient zum Einstellen der Lautstärke der PioneerTonquelle. * Die Telefon-Funktion steht nur zur Verfügung, wenn ein Bluetooth-Gerät angeschlossen ist. Français AVERTISSEMENT • Garder la pile au lithium hors d’atteinte d’enfants. Si une pile est avalée, consulter immediatement un medecin. • Évitez d’installer cette unité dans un endroit où elle peut gêner l’utilisation du volant ou levier de vitesse car cela pourrait entraîner un accident. • N’utilisez pas cette unité lorsque vous manipulez le volent. Sinon, cela pourrait entraîner un accident. • Si vous devez utiliser cette unité en conduisant, n’enlevez pas vos yeux de la route car cela pourrait entraîner un accident. • Si un des problèmes suivant se produit, arrêtez immédiatement d’utiliser l’unité et consultez le revendeur auprès duquel vous avez acheté cette unité: – de la fumée sort de l’appareil. – une odeur anormale apparaît. – un objet étranger est entré dans l’unité. – un liquide a coulé sur ou dans l’unité. Si vous continuez d’utiliser l’unité quand elle ne fonctionne pas correctement, cela peut entraîner un accident ou un incendie. ATTENTION • Ne pas recharger, demonter. chauffer une pile ni la jeter dans un feu. • N’utiliser qu’une pile au lithium CR2032 (3 V) N’utiliser. Jamais d’autre type de pile avec cette unité. • Ne pas manipuler la pile avec un outil métalligue. • Ne pas ranger une pile au lithium avec des objects métalligues. • Lors de la mise au rebut des piles usagées, respectez les règlements en vigueur dans le pays en matière de conservation ou de protection de l’environnement. • Verifier toujours soigneusement de charger la pile avec ses poles (+) et (–) dans le bon sens. • N’installer cette unité qu’en utilisant les pièces qui sont fournies avec celle-ci. Si d’autres pièces sont utilisées, l’unité peut être endommagée ou se démonter, ce qui peut provoquer un accident ou un problème. • Installer cette unité conformément à ce manuel. Sinon cela pourrait provoquer un accident. • Ne pas installer cette unité près des portes où de l’eau de pluie peut la mouiller. La pénétration d’eau dans l’unité peut provoquer de la fumée ou un incendie. • Réglez le volume de l’autoradio à niveau où les sons extérieurs de la voiture peuvent être entendus. Si vous ne pouvez pas entendre les sons de l’extérieur de la voiture, vous avez plus de risques d’être impliqué dans un accident de la circulation. • Ne pas laisser cette unité non fixée dans la voiture. Lors d’un arrêt ou d’un virage, elle peut tomber sur le plancher. Si l’unité roule et se place sous la pédale de frein, elle peut empêcher le conducteur de bien freiner et provoquer un sérieux problème. Toujours fixer cette unité au volant de direction. • Ne pas démonter ni modifier cette unité. Cela pourrait la faire fonctionner mal. Français Italiano Accessoires (Fig. 1) Mode de fonctionnement Disposition des touches (Fig. 2) A Télécommande × 1 En activant le mode de fonctionnement (MODE 1, MODE 2, MODE 3), vous pouvez utiliser la télécommande pour différents équipements. MODE 1: S’utilise pour commander des systèmes de navigation à HDD (p. ex. AVIC-HD1BT, AVIC-Z1). MODE 2: Réservée pour des produits qui apparaîtront dans l’avenir. MODE 3: S’utilise pour commander l’unité principale Pioneer. Touche PHONE MENU* MODE 1: Fait passer au mode permettant de commander un appareil Bluetooth. (Se reporter au mode d’emploi du système de navigation utilisé.) MODE3: Appuyez sur cette touche pour choisir le téléphone comme source. B Support × 1 C Courroie × 2 D Pile au lithium (CR2032, 3V) × 1 Tout d’abord, réglez la méthode de commutation du mode de fonctionnement. La commutation du mode de fonctionnement change en fonction des paramètres, comme indiqué ci-dessous. Méthode de commutation MODE 1* MODE 2 MODE 3 * Par défaut Méthode de réglage Pressez et maintenez la touche 2 et pressez la touche VR CANCEL/ON HOOK. Pressez et maintenez la touche SOURCE et pressez la touche VR CANCEL/ON HOOK. Pressez et maintenez la touche 2 et pressez la touche SOURCE. Touche VR ACTIVATION/OFF HOOK* MODE 1: • Active la reconnaissance vocale. • Met la fonction téléphone sur l’état DÉCROCHÉ (OFF HOOK). (Se reporter au mode d’emploi du système de navigation utilisé.) MODE3: Appuyez pour commencer à parler dans le téléphone lors de l’utilisation d’une source téléphone. Touche VR CANCEL/ON HOOK* MODE 1: • Annule la reconnaissance vocale. • Met la fonction téléphone sur l’état RACCROCHÉ (ON HOOK). (Se reporter au mode d’emploi du système de navigation utilisé.) MODE 3: Lors de l’utilisation d’une source téléphone, appuyez pour terminer un appel ou rejeter un appel entrant. Touche 5/∞/2/3 Fonctionne comme la touche 5/∞/2/3 ou le levier de commande de l’unité principale ou de l’unité de navigation. Touche BAND/ESC Fonctionne comme la touche BAND (ou la touche sensitive BAND) lors de l’utilisation de diverses sources. Touche SOURCE Cette touche permet de passer d’une source à l’autre et de marche (ON) à arrêt (OFF). (Selon les unités reliées, le rôle de cette touche peut légèrement différer.) Transmetteur Il transmet les signaux de commande à distance. Touche +/– Le volume sonore de la source audio Pioneer peut être réglé. * La fonction téléphone est disponible seulement quand un appareil Bluetooth est connecté. AVVERTIMENTO • Tenere la pila al litio fuori dalla portata dei bambini. Se si ingerisce accidentalmente la pila, consultare immediatamente un medico. • Non installare questa unità ove possa interferire con la manovra del volante o del cambio, poiché in tal caso si potrebbe verificare un incidente. • Non utilizzare l’unità durante la rotazione del volante. In tal caso si potrebbe infatti verificare un incidente. • Qualora sia necessario utilizzare l’unità durante la guida, non distogliere lo sguardo dalla strada poiché in tal caso si potrebbe infatti verificare un incidente. • All’eventuale verificarsi degli eventi di seguito elencati interrompere immediatamente l’utilizzo dell’unità e rivolgersi quindi al relativo rivenditore: – Fuoriuscita di fumo dall’unità. – Formazione di odori anomali. – Penetrazione di corpi estranei nell’unità. – Riversamento di liquidi sull’unità oppure la loro penetrazione all’interno. L’uso continuato dell’unità in modo non idoneo potrebbe dar luogo ad incidenti o ad incendi. ATTENZIONE • Non ricaricare la pila, non smontarla, non esporla al calore e non eliminarla gettandola nel fuoco. • Usare soltanto una pila al litio CR2032 (3 V). Non usare mai pile di tipo diverso con questa unità. • Non prendere la pila servendosi di atterezzi metallici. • Non riporre la pila al litio insieme a materiali metallici. • Per eliminare le batterie usate, rispettare i regolamenti stabiliti dal governo o dagli enti pubblici per la tutela dell’ambiente applicabili nel vostro paese/area geografica. • Fare sempre attenzione ad inserire la pila con i suoi poli (+) e (–) rivolti nella direzione corretta. • Installare l’unità usando solo le parti in dotazione all’unità. Se si usano altre parti, questa unità può essere danneggiata o smontata, causando incidenti o problemi. • Installare l’unità come precisato nel manuale. Altrimenti potrebbero verificarsi incidenti. • Non installare l’unità vicino alle portiere dove acqua piovana possa essere rovesciata sull’unità. La penetrazione di acqua nell’unità può causare l’emissione di fumo o incendi. • Mantenere gli apparecchi audio della vettura ad un livello sonoro tale da consentire l’ascolto dei rumori provenienti dall’esterno. L’impossibilità di udire i rumori provenienti dall’esterno della vettura aumenta infatti la possibilità che si verifichino incidenti. • Non lasciare l’unità libera all’interno dell’auto. Quando si frena o si esegue una curva l’unità potrebbe cadere. Se, rotolando, l’unità va a finire sotto il pedale del freno, può impedire al conducente di frenare bene e causare quindi seri problemi. Assicurarsi di fissare l’unità al volante. • Non smontare o modificare questa unità. Ciò potrebbe causare guasti. Italiano Accessori (Fig. 1) Modo di funzionamento Elenco dei tasti (Fig. 2) A Unità telecomando × 1 Commutando il Modo di funzionamento (MODE 1, MODE 2, MODE 3) potete usare un telecomando per azionare diverse apparecchiature. MODE 1: Da selezionare per controllare il sistema di navigazione su disco fisso (quale, ad esempio, l’AVICHD1BT o l’AVIC-Z1). MODE 2: Modalità predisposta per l’utilizzo di apparecchi futuri. MODE 3: Da selezionare per controllare l’unità principale Pioneer. 1) Tasto PHONE MENU* MODE 1: Commuta alla modalità per il controllo delle unità Bluetooth. (Consultare al riguardo il manuale d’uso del sistema di navigazione in uso) MODE 3: Premere questo tasto per selezionare il telefono come sorgente. B Supporto × 1 C Cinghia × 2 D Pila al Litio (CR2032, 3V) × 1 Prima di tutto, impostare il metodo di commutazione del Modo di funzionamento. La commutazione del Modo di funzionamento varia secondo le impostazioni come qui di seguito descritto. Metodo di commutazione Metodo di impostazione MODE 1* Premere il tasto VR CANCEL/ON HOOK mentre si preme il tasto 2. MODE 2 Premere il tasto VR CANCEL/ON HOOK mentre si preme il tasto SOURCE. MODE 3 Premere il tasto SOURCE mentre si preme il tasto 2. * Predefinita Tasto VR ACTIVATION/OFF HOOK MODE 1: • Avvia la funzione di riconoscimento vocale. • Imposta la funzione telefono nello stato di CORNETTA SOLLEVATA (OFF HOOK), (Consultare al riguardo il manuale d’uso del sistema di navigazione in uso) MODE 3: Premere questo tasto per iniziare la conversazione quando viene utilizzato il telefono come sorgente. Tasto VR CANCEL/ON HOOK MODE 1: • Annulla la funzione di riconoscimento vocale. • Imposta la funzione telefono nello stato di CORNETTA ABBASSATA (ON HOOK). (Consultare al riguardo il manuale d’uso del sistema di navigazione in uso) MODE 3: Quando viene utilizzato il telefono come sorgente, premere questo tasto per terminare una chiamata o respingere una telefonata in arrivo. Tasto 5/∞/2/3 Opera allo stesso modo del tasto 5/∞/2/3 o della joystick dell’unità principale o dell’unità di navigazione. Tasto BAND/ESC Opera come il tasto BAND (o il tasto a sfioramento BAND) in caso di utilizzo di sorgenti diverse. Tasto SOURCE Commuta tra le sorgenti e accende/spegne (ON/OFF). (in base alle unità collegate, il funzionamento può essere leggermente diverso.) Trasmettitore Trasmette i segnali del telecomando. Tasto +/– Consente di regolare il volume della sorgente audio Pioneer. * La funzione telefonica è disponibile esclusivamente quando è collegata una unità Bluetooth. Nederlands WAARSCHUWING • Houd de lithiumbatterij buiten het bereik van kleine kinderen. Raadpleeg direct een arts indien een batterij per ongeluk is ingeslikt. • Installeer dit toestel niet op een plek waar het de bediening van het stuurwiel, de versnellingspook of andere bedieningsorganen zou kunnen hinderen, want dit zou kunnen leiden tot ongelukken. • Bedien dit toestel niet terwijl u aan het sturen bent. Dit kan namelijk leiden tot ongelukken. • Als u dit toestel moet bedienen terwijl u aan het rijden bent, neem dan in geen geval uw ogen van de weg, want dit zou kunnen leiden tot ongelukken. • Staak het gebruik van dit toestel onmiddellijk wanneer één van de volgende problemen zich voordoet en raadpleeg de dealer van wie u het toestel gekocht heeft: – er komt rook uit het toestel. – het toestel produceert een abnormale geur. – er is een vreemd voorwerp in het toestel terecht gekomen. – er is vloeistof op of in het toestel gemorst. Als u het toestel toch blijft gebruiken alhoewel het niet naar behoren functioneert, kan er schade ontstaan die zou kunnen leiden tot ongelukken of brand. Nederlands • Laat dit toestel in geen geval los rondslingeren in uw auto. Wanneer de auto stopt of een bocht maakt kan het toestel dan namelijk op de vloer terecht komen. Als het vervolgens onder uw rempedaal rolt, kunt u niet meer remmen, hetgeen tot allerlei narigheid kan leiden. U moet dus dit toestel aan het stuur bevestigen. • Haal dit toestel niet uit elkaar en breng er geen wijzigingen in aan. Dit zal storingen veroorzaken. Accessoire (Afb. 1) A Afstands-bediening × 1 B Houder × 1 C Riem × 2 D Lithiumbatterij (CR2032, 3V) × 1 Bedieningsmodus Namen van de toetsen (Afb. 2) Bij het omschakelen van de bedieningsmodus (MODE 1, MODE 2, MODE 3) kunt u één afstandsbediening gebruiken om de verschillende apparaten te bedienen. MODE 1: Gebruikt wanneer u HDD navigatiesystemen bedient (bijv. AVIC-HD1BT, AVIC-Z1). MODE 2: Zal worden gebruikt voor toekomstige producten. MODE 3: Gebruikt wanneer u het Pioneer hoofdtoestel bedient. PHONE MENU toets* MODE 1: Schakelt over naar de functie voor het bedienen van een Bluetooth toestel. (Raadpleeg de handleiding van uw navigatiesysteem.) MODE 3: Druk op deze toets om de telefoon als signaalbron te kiezen. Stel allereerst de omschakelmethode van de bedieningsmodus in. Het omschakelen van de bedieningsmodus verandert in overeenstemming met de onderstaande basisinstellingen. Omschakelmethode Instelmethode MODE 1* MODE 2 MODE 3 LET OP • Laad de batterij niet op, demonteer niet en gooi niet in een vuur. • Gebruik uitsluitend een CR2032 (3 V) lithiumbatterij. Het gebruik van andere batterijen kan ernstige problemen veroorzaken. • Raak de batterij niet met metalen voorwerpen of gereedschap aan. • Bewaar de batterij niet samen met metalen voorwerpen. • Wanneer u de batterijen weggooit, dient u zich te houden aan de in uw land/gebied daaromtrent geldende regelgeving. • Controleer altijd zorgvuldig of u de batterijen met de (+) en (–) polen in de juiste richting heeft geplaatst. • Installeer dit toestel uitsluitend met behulp van de met het toestel meegeleverde onderdelen. Bij gebruik van andere onderdelen kan het toestel beschadigd of los raken, hetgeen kan leiden tot een ongeval of andere problemen. • Installeer de stuurafstandsbediening zoals in deze gebruiksaanwijzing wordt beschreven. Dit nalaten kan ongelukken veroorzaken. • Installeer de stuurafstandsbediening niet in de buurt van de portieren waar het gemakkelijk aan regenwater wordt blootgesteld. Vocht in de stuurafstandsbediening veroorzaakt mogelijk rook of brand. • Houd het volume van uw autostereo op een niveau waarbij u nog steeds geluiden van buiten kunt blijven horen. Als u geen geluiden van buiten de auto meer kunt horen, heeft u een verhoogde kans op ongelukken. êÛÒÒÍËÈ * Standaardinstelling Druk op de VR CANCEL/ON HOOK toets terwijl u op de 2 toets drukt. Druk op de VR CANCEL/ON HOOK toets terwijl u op de SOURCE toets drukt. Druk op de SOURCE toets terwijl u op de 2 toets drukt. VR ACTIVATION/OFF HOOK toets* MODE 1: • Begint de stemherkenning. • Zet de telefoonfunctie in de VAN DE HAAK (OFF HOOK) stand. (Raadpleeg de handleiding van uw navigatiesysteem.) MODE 3: Druk op deze knop om een telefoongesprek te beginnen als u de telefoon gebruikt. VR CANCEL/ON HOOK toets* MODE 1: • Annuleert de stemherkenning. • Zet de telefoonfunctie in de OP DE HAAK (ON HOOK) stand. (Raadpleeg de handleiding van uw navigatiesysteem.) MODE 3: Druk op deze toets om een gesprek te beëindigen of een inkomend gesprek te weigeren als u de telefoon gebruikt. 5/∞/2/3 toets Werkt hetzelfde als de 5/∞/2/3 toets(en) of de Joystick van het hoofdtoestel of het navigatiesysteem. BAND/ESC toets Deze werkt als de BAND toets (of de BAND schermknop) bij gebruik van diverse signaalbronnen. SOURCE toets Hiermee kunt u schakelen tussen de signaalbronnen en de stroom in-/uitschakelen. (Afhankelijk van de aangesloten toestellen, kan de bediening iets afwijken.) Zender Deze stuurt de signalen door van de afstandsbediening. +/– toets Het volume van de Pioneer geluidsbron kan worden ingesteld. * De telefoonfunctie is alleen beschikbaar wanneer er een Bluetooth toestel is aangesloten. èêÖÑìèêÖÜÑÖçàÖ • ï‡ÌËÚ ÎËÚËÂ‚Û˛ ·‡Ú‡ÂÈÍÛ ‚ ̉ÓÒÚÛÔÌÓÏ ‰Îfl ‰ÂÚÂÈ ÏÂÒÚÂ. Ç ÒÎÛ˜‡Â Ôӄ·Ú˚‚‡ÌËfl ·‡Ú‡ÂÈÍË, ÌÂωÎÂÌÌÓ Ó·‡ÚËÚÂÒ¸ Í ‚‡˜Û. • àÁ·Â„‡ÈÚ ÛÒÚ‡ÌÓ‚ÍË ‰‡ÌÌÓ„Ó ÔË·Ó‡ Ú‡Ï, „‰Â ÓÌ ÏÓÊÂÚ ·˚Ú¸ ÔÓÏÂıÓÈ ‚ ‡·ÓÚ ÛÎÂ‚Ó„Ó ÍÓÎÂÒ‡ ËÎË Ì‡ ÛÓ‚Ì ÔÂÂÍβ˜ÂÌËfl Ô‰‡˜, Ë̇˜Â ÓÌ ÏÓÊÂÚ ÒÚ‡Ú¸ ÂÁÛθڇÚÓÏ ‡‚‡ËË. • ç ÓÔÂËÛÈÚ ‰‡ÌÌ˚Ï ÔË·ÓÓÏ ‚Ó ‚ÂÏfl ÛÔ‡‚ÎÂÌËfl Û΂˚Ï ÍÓÎÂÒÓÏ Ï‡¯ËÌ˚. ùÚÓ ÏÓÊÂÚ ÒÚ‡Ú¸ ÂÁÛθڇÚÓÏ ‡‚‡ËË. • ÖÒÎË Ç˚ ‰ÓÎÊÌ˚ ÓÔÂËÓ‚‡Ú¸ ‰‡ÌÌ˚Ï ÔË·ÓÓÏ, Ì ÓÚ‚Ó‰ËÚ „·Á ÓÚ ‰ÓÓ„Ë, Ë̇˜Â ˝ÚÓ ÏÓÊÂÚ ÒÚ‡Ú¸ ÂÁÛθڇÚÓÏ ‡‚‡ËË. • ÖÒÎË ‚ÓÁÌËÍ· β·‡fl ËÁ ÔÓ·ÎÂÏ, ÌÂωÎÂÌÌÓ ÔÂ͇ÚËÚ ÔÓθÁÓ‚‡ÌË ‰‡ÌÌ˚Ï ÔË·ÓÓÏ Ë ÔÓÍÓÌÒÛθÚËÛÈÚÂÒ¸ Ò ‰ËÎÂÓÏ, Û ÍÓÚÓÓ„Ó Ç˚ ÔËÓ·ÂÎË ‰‡ÌÌ˚È ÔË·Ó: – ËÁ ÔË·Ó‡ ˉÂÚ ‰˚Ï. – ÔË·Ó ‚˚‰ÂÎflÂÚ ÌÂÓ·˚˜Ì˚È Á‡Ô‡ı. – ‚ ÔË·Ó ÔÓÔ‡ÎÓ ËÌÓÓ‰ÌÓ ÚÂÎÓ. – ÊˉÍÓÒÚ¸ ÔÓÎË·Ҹ ̇ ÔË·Ó ËÎË ÔÓԇ· ‚ÌÛÚ¸ Ì„Ó. ÖÒÎË Ç˚ ÔÓ‰ÓÎʇÂÚ ËÒÔÓθÁÓ‚‡Ú¸ ÔË·Ó, ÍÓ„‰‡ ÓÌ ‡·ÓÚ‡ÂÚ Ì ԇ‚ËθÌÓ, ˝ÚÓ ÏÓÊÂÚ ÔË‚ÂÒÚË Í Â„Ó ÔÓ‚ÂʉÂÌ˲ ËÎË ‚ÓÁ„Ó‡Ì˲. êÛÒÒÍËÈ • ê„ÛÎËÛÈÚ ÛÓ‚Â̸ Á‚Û͇ ‰Ë̇ÏËÍÓ‚ ‡‚ÚÓÏÓ·ËÎfl Ú‡Í, ˜ÚÓ·˚ Ç˚ ÏÓ„ÎË ÒÎ˚¯‡Ú¸ Á‚ÛÍË Ò̇ÛÊË. ÖÒÎË Ç˚ Ì ÒÎ˚¯ËÚ Á‚ÛÍÓ‚ Ò̇ÛÊË, ÚÓ ‚‡¯Ë ¯‡ÌÒ˚ ÔÓÔ‡ÒÚ¸ ‚ ‡‚‡Ë˛ Û‚Â΢˂‡˛ÚÒfl. • ç ÓÒÚ‡‚ÎflÈÚ ‰‡ÌÌ˚È ÔË·Ó ÌÂÔËÍÂÔÎÂÌÌ˚Ï ‚ χ¯ËÌÂ. äÓ„‰‡ χ¯Ë̇ ÓÒڇ̇‚ÎË‚‡ÂÚÒfl ËÎË ÔÓ‚Ó‡˜Ë‚‡ÂÚ ÔÓ ÍË‚ÓÈ, ÔË·Ó ÏÓÊÂÚ ÛÔ‡ÒÚ¸ ̇ ÔÓÎ. ÖÒÎË ÔË·Ó ÔÓ͇ÚËÚÒfl Ë ÔÓÔ‡‰ÂÚ ÔÓ‰ Ô‰‡Î¸ ÚÓÏÓÁ‡, ˝ÚÓ ÏÓÊÂÚ ÔÂÔflÚÒÚ‚Ó‚‡Ú¸ ÚÓÏÓÊÂÌ˲ Ë Ô˂‰ÂÚ Í Ò¸fiÁÌÓÈ ÔÓ·ÎÂÏÂ. ì·Â‰ËÚÂÒ¸, ˜ÚÓ Á‡ÙËÍÒËÓ‚‡ÎË ÔË·Ó Ì‡ Û΂ÓÏ ÍÓÎÂÒÂ. • ç ‡Á·Ë‡ÈÚÂ Ë Ì ÏÓ‰ËÙˈËÛÈÚ ‰‡ÌÌ˚È ÔË·Ó. Ñ·fl Ú‡Í, Ç˚ ÏÓÊÂÚ Òӂ¯ËÚ¸ ӯ˷ÍÛ. ÄÍÒÂÒÒÛ‡˚ (êËÒ. 1) A èË·Ó ‰ËÒڇ̈ËÓÌÌÓ„Ó ÛÔ‡‚ÎÂÌËfl × 1 B ÑÂʇÚÂθ × 1 C êÂÏÂ̸ × 2 D ãËÚË‚‡fl ·‡Ú‡ÂÈ͇ (CR2032, 3V) × 1 ꇷӘËÈ ÂÊËÏ äÌÓÔ͇ ÇˉÓËÒ͇ÚÂÎfl (êËÒ.2) ÇÍβ˜‡fl éÔ‡ˆËÓÌÌ˚È ÂÊËÏ (MODE 1, MODE 2, MODE 3) Ç˚ ÏÓÊÂÚ ËÒÔÓθÁÓ‚‡Ú¸ ÔË·Ó ‰ËÒڇ̈ËÓÌÌÓ„Ó ÛÔ‡‚ÎÂÌËfl, ˜ÚÓ·˚ ÛÔ‡‚ÎflÚ¸ ‡Á΢Ì˚Ï Ó·ÓÛ‰Ó‚‡ÌËÂÏ. MODE 1 : àÒÔÓθÁÛÂÚÒfl, ÍÓ„‰‡ Ç˚ ÛÔ‡‚ÎflÂÚ ̇‚Ë„‡ˆËÓÌÌÓÈ ÒËÒÚÂÏÓÈ HDD (̇ÔËÏÂ, AVICHD1BT, AVIC-Z1). MODE 2 : ÅÛ‰ÂÚ ËÒÔÓθÁÓ‚‡Ì ‚ ·Û‰Û˘Ëı ËÁ‰ÂÎËflı. MODE 3 : àÒÔÓθÁÛÂÚÒfl, ÍÓ„‰‡ Ç˚ ÛÔ‡‚ÎflÂÚ É·‚Ì˚Ï ÛÒÚÓÈÒÚ‚ÓÏ Pioneer. äÌÓÔ͇ PHONE MENU* MODE 1: Ç˚Íβ˜‡ÚÂÎË ÂÊËχ ÛÔ‡‚ÎÂÌËfl ÛÒÚÓÈÒÚ‚‡ Bluetooth. (éÚÒ˚·ÂÚ Í Û˜ÌÓÏÛ ÛÔ‡‚ÎÂÌ˲ ‚‡¯ÂÈ Ì‡‚Ë„‡ˆËÓÌÌÓÈ ÒËÒÚÂÏ˚) MODE 3: ç‡ÊÏËÚÂ, ˜ÚÓ·˚ ‚˚·‡Ú¸ ÚÂÎÂÙÓÌ Í‡Í ËÒÚÓ˜ÌËÍ. è‰ ÚÂÏ Í‡Í Ç˚ ̇˜ÌÂÚ ÛÒڇ̇‚ÎË‚‡Ú¸ ꇷӘËÈ ÂÊËÏ ÂÊËχ ÔÂÂÍβ˜ÂÌËfl. ꇷӘËÈ ÂÊËÏ ÔÂÂÍβ˜ÂÌËfl ‰ÓÎÊÂÌ ËÁÏÂÌflÚ¸Òfl ‚ ÒÓÓÚ‚ÂÚÒÚ‚ËË Ò ÏÂÚÓ‰ÓÏ ÛÒÚ‡ÌÓ‚ÍË, Ô˂‰ÂÌÌ˚Ï ÌËÊ . êÂÊËÏ ÔÂÂÍβ˜ÂÌËfl MODE 1* ç‡ÊÏËÚ ÍÌÓÔÍÛ VR CANCEL/ ON HOOK , ÔÓ͇ ̇ʇڇ ÍÌÓÔ͇ 2. MODE 2 ç‡ÊÏËÚ ÍÌÓÔÍÛ VR CANCEL/ ON HOOK, ÔÓ͇ ̇ʇڇ ÍÌÓÔ͇ SOURCE. MODE 3 ç‡ÊÏËÚ ÍÌÓÔÍÛ SOURCE, ÔÓ͇ ̇ʇڇ ÍÌÓÔ͇ 2. ÇçàåÄçàÖ • ç ÔÂÂÁ‡flʇÈÚÂ, Ì ‡Á·Ë‡ÈÚÂ, Ì ̇„‚‡ÈÚÂ Ë Ì ÔÓÏ¢‡ÈÚ ·‡Ú‡ÂÈÍÛ ‚·ÎËÁË Ó„Ìfl. • àÒÔÓθÁÛÈÚ ÚÓθÍÓ ÎËÚËÂ‚Û˛ ·‡Ú‡ÂÈÍÛ CR2032 (3 V). çËÍÓ„‰‡ Ì ËÒÔÓθÁÛÈÚ ‰Û„Ë ÚËÔ˚ ·‡Ú‡ÂÂÍ ‰Îfl ‰‡ÌÌÓ„Ó ÔË·Ó‡. • ç ÚÓ„‡ÈÚ ·‡Ú‡ÂÈÍÛ ÏÂÚ‡Î΢ÂÒÍËÏË ËÌÒÚÛÏÂÌÚ‡ÏË. • ç ı‡ÌËÚ ÎËÚËÂ‚Û˛ ·‡Ú‡ÂÈÍÛ Ò ÏÂÚ‡Î΢ÂÒÍËÏË Ï‡Ú¡·ÏË. • èË ÛÚËÎËÁ‡ˆËË ËÒÔÓθÁÓ‚‡ÌÌ˚ı ·‡Ú‡ÂÂÍ, ÔÓʇÎÛÈÒÚ‡, ÒΉÛÈÚ „ÓÒÛ‰‡ÒÚ‚ÂÌÌ˚Ï Ô‡‚ËÎ‡Ï ËÎË Ô‡‚ËÎ‡Ï ˝ÍÓÎӄ˘ÂÒÍÓÈ ÒÎÛÊ·˚, ÍÓÚÓ˚ ÔËÌflÚ˚ ‚ ‚‡¯ÂÈ ÒÚ‡ÌÂ/‡ÈÓÌÂ. • ÇÒ„‰‡ ‚ÌËχÚÂθÌÓ ÔÓ‚ÂflÈÚÂ, Í‡Í Ç˚ ÛÒڇ̇‚ÎË‚‡ÂÚ ·‡Ú‡ÂÈÍÛ, Ò Âfi (+) Ë (–) ÔÓÎ˛Ò‡ÏË ‚ ÒÓÓÚ‚ÂÚÒÚ‚Û˛˘Ëı ̇ԇ‚ÎÂÌËflı. • ìÒÚ‡Ìӂ͇ ‰‡ÌÌÓ„Ó ÔË·Ó‡ ËÒÔÓθÁÛÂÚ ÚÓθÍÓ ÔÓÒÚ‡‚ÎflÂÏ˚Â Ò ÌËÏ ˜‡ÒÚË. ÖÒÎË ‰Îfl ÛÒÚ‡ÌÓ‚ÍË ·Û‰ÛÚ ËÒÔÓθÁÓ‚‡Ì˚ ‰Û„Ë ˜‡ÒÚË, ÚÓ ÔË·Ó ÏÓÊÂÚ ·˚Ú¸ ÔÓ‚ÂʉÂÌ ËÎË Ò‡ÏÓÔÓËÁ‚ÓθÌÓ ‰ÂÏÓÌÚËÓ‚‡Ì, ˜ÚÓ Ô˂‰ÂÚ Í ‡‚‡ËË ËÎË ÌÂÔËflÚÌÓÒÚË. • ìÒÚ‡Ìӂ͇ ‰‡ÌÌÓ„Ó ÔË·Ó‡ ÔÓ͇Á‡Ì‡ ‚ ˝ÚÓÏ ÛÍÓ‚Ó‰ÒÚ‚Â. ç‚˚ÔÓÎÌÂÌË Ú·ӂ‡ÌËÈ ÛÍÓ‚Ó‰ÒÚ‚‡ ÏÓÊÂÚ ÔË‚ÂÒÚË Í ÌÂÒ˜‡ÒÚÌÓÏÛ ÒÎÛ˜‡˛. • ç ÛÒڇ̇‚ÎË‚‡ÈÚ ‰‡ÌÌ˚È ÔË·Ó ‚·ÎËÁË ‰‚ÂË, „‰Â ‚ ÌÂ„Ó ÏÓÊÂÚ ÔÓÔ‡ÒÚ¸ ‰Óʉ‚‡fl ‚Ó‰‡. èÓÔ‡‰‡ÌË ‚Ó‰˚ ‚ ÔË·Ó ÏÓÊÂÚ ÔË‚ÂÒÚË Í ÔÓfl‚ÎÂÌ˲ ‰˚χ ËÎË Â„Ó ‚ÓÁ„Ó‡Ì˲. êÂÊËÏ ÛÒÚ‡ÌÓ‚ÍË * ÑÂÙÓÎÚ äÌÓÔ͇ VR ACTIVATION / OFF HOOK MODE 1: • á‡ÔÛÒÍË „ÓÎÓÒÓ‚Ó„Ó ‡ÒÔÓÁ̇‚‡ÌËfl. • ìÒÚ‡ÌÓ‚ÍË ÚÂÎÂÙÓÌÌ˚ı ÙÛÌ͈ËÈ ‚ ÔÓÁˈËË ÓÚ‚ÂÚ‡ (OFF HOOK). (éÚÒ˚·ÂÚ Í Û˜ÌÓÏÛ ÛÔ‡‚ÎÂÌ˲ ‚‡¯ÂÈ Ì‡‚Ë„‡ˆËÓÌÌÓÈ ÒËÒÚÂÏ˚) MODE 3: ç‡ÊÏËÚÂ, ˜ÚÓ·˚ ̇˜‡Ú¸ ‡Á„Ó‚Ó ÔÓ ÚÂÎÂÙÓÌÛ ‚Ó ‚ÂÏfl ‡·ÓÚ˚ ÚÂÎÂÙÓÌÌÓ„Ó ËÒÚÓ˜ÌË͇. äÌÓÔ͇ VR CANCEL/ ON HOOK MODE 1: • éÚÏÂÌ˚ „ÓÎÓÒÓ‚Ó„Ó ‡ÒÔÓÁ̇‚‡ÌËfl. • ìÒÚ‡ÌÓ‚ÍË ÚÂÎÂÙÓÌÌ˚ı ÙÛÌ͈ËÈ ‚ ÔÓÁˈËË ÓÚÏÂÌ˚ (ON HOOK). (éÚÒ˚·ÂÚ Í Û˜ÌÓÏÛ ÛÔ‡‚ÎÂÌ˲ ‚‡¯ÂÈ Ì‡‚Ë„‡ˆËÓÌÌÓÈ ÒËÒÚÂÏ˚) MODE 3: ÇÓ ‚ÂÏfl ‡·ÓÚ˚ ÚÂÎÂÙÓÌÌÓ„Ó ËÒÚÓ˜ÌË͇ ̇ÊÏËÚ ÍÓ̈ ÚÂÎÂÙÓÌÌÓ„Ó ‡Á„Ó‚Ó‡ ËÎË ÓÚ͇Á ‚ıÓ‰fl˘Ëı Á‚ÓÌÍÓ‚. äÌÓÔ͇ 5/∞/2/3 ìÔ‡‚ÎflÈÚ ڇÍÊÂ, Í‡Í É·‚Ì˚Ï ÛÒÚÓÈÒÚ‚ÓÏ ËÎË ç‡‚Ë„‡ˆËÓÌÌ˚Ï ÛÒÚÓÈÒÚ‚ÓÏ 5/∞/2/3 ÍÌÓÔÍÓÈ ËÎË ‰ÊÓÈÒÚËÍÓÏ. äÌÓÔ͇ BAND / ESC ùÚË ÙÛÌ͈ËË Ú‡ÍË ÊÂ, Í‡Í ÍÌÓÔ͇ BAND (ËÎË BAND ÒÂÌÒÓ̇fl Í·‚˯‡), ÍÓ„‰‡ ËÒÔÓθÁÛ˛ÚÒfl ‡ÁÌ˚ ËÒÚÓ˜ÌËÍË. äÌÓÔ͇ SOURCE Ç˚Íβ˜‡ÚÂÎË ÏÂÊ‰Û ËÒÚÓ˜ÌË͇ÏË Ë ‚˚Íβ˜‡ÚÂÎË ÔËÚ‡ÌËfl ON / OFF. (ꇷÓÚ‡ ÏÓÊÂÚ ÓÚ΢‡Ú¸Òfl, ‚ Á‡‚ËÒËÏÓÒÚË ÓÚ ÔÓ‰ÒÓ‰ËÌÂÌÌ˚ı ÛÒÚÓÈÒÚ‚.) 艇ژËÍ éÌ Ô‰‡ÂÚ Ò˄̇Î˚ ÔÛθڇ ‰ËÒڇ̈ËÓÌÌÓ„Ó ÛÔ‡‚ÎÂÌËfl. äÌÓÔ͇ +/– ÉÓÏÍÓÒÚ¸ Á‚Û͇ ‡Û‰ËÓ ËÒÚÓ˜ÌË͇ Pioneer ÏÓÊÂÚ ·˚Ú¸ ÓÚ„ÛÎËÓ‚‡Ì‡. * îÛÌ͈Ëfl ÚÂÎÂÙÓ̇ ‰ÓÒÚÛÔ̇ ÚÓθÍÓ, ÍÓ„‰‡ ÔÓ‰Íβ˜ÂÌÓ ÛÒÚÓÈÒÚ‚Ó Bluetooth. English Deutsch If you want to dispose this product, do not mix it with general household waste. There is a separate collection system for used electronic products in accordance with legislation that requires proper treatment, recovery and recycling. Private households in the 25 member states of the EU, in Switzerland and Norway may return their used electronic products free of charge to designated collection facilities or to a retailer (if you purchase a similar new one). For countries not mentioned above, please contact your local authorities for the correct method of disposal. By doing so you will ensure that your disposed product undergoes the necessary treatment, recovery and recycling and thus prevent potential negative effects on the environment and human health. Español Si desea deshacerse de este producto, no lo mezcle con los residuos generales de su hogar. De conformidad con la legislación vigente, existe un sistema de recogida distinto para los productos electrónicos que requieren un procedimiento adecuado de tratamiento, recuperación y reciclado. Las viviendas privadas en los 25 estados miembros de la UE, en Suiza y Noruega pueden devolver gratuitamente sus productos electrónicos usados en las instalaciones de recolección previstas o bien en las instalaciones de minoristas (si adquieren un producto similar nuevo). En el caso de los países que no se han mencionado en el párrafo anterior, póngase en contacto con sus autoridades locales a fin de conocer el método de eliminación correcto. Al actuar siguiendo estas instrucciones, se asegurará de que el producto de desecho se somete a los procesos de tratamiento, recuperación y reciclaje necesarios, con lo que se previenen los efectos negativos potenciales para el entorno y la salud humana. Français Mischen Sie dieses Produkt, wenn Sie es entsorgen wollen, nicht mit gewöhnlichen Haushaltsabfällen. Es gibt ein getrenntes Sammelsystem für gebrauchte elektronische Produkte, über das die richtige Behandlung, Rückgewinnung und Wiederverwertung gemäß der bestehenden Gesetzgebung gewährleistet wird. Privathaushalte in den 25 Mitgliedsstaaten der EU, in der Schweiz und in Norwegen können ihre gebrauchten elektronischen Produkte an vorgesehenen Sammeleinrichtungen kostenfrei zurückgeben oder aber an einen Händler zurückgeben (wenn sie ein ähnliches neues Produkt kaufen). Bitte wenden Sie sich in den Ländern, die oben nicht aufgeführt sind, hinsichtlich der korrekten Verfahrensweise der Entsorgung an die örtliche Kommunalverwaltung. Auf diese Weise stellen Sie sicher, dass das zu entsorgende Produkt der notwendigen Behandlung, Rückgewinnung und Wiederverwertung unterzogen wird, und so mögliche negative Einflüsse auf die Umwelt und die menschliche Gesundheit vermieden werden. Nederlands Si vous souhaitez vous débarrasser de cet appareil, ne le mettez pas à la poubelle avec vos ordures ménagères. Il existe un système de collecte séparé pour les appareils électroniques usagés, qui doivent être récupérés, traités et recyclés conformément à la législation. Les habitants des 25 états membres de l’UE, de Suisse et de Norvège peuvent retourner gratuitement leurs appareils électroniques usagés aux centres de collecte agréés ou à un déaillant (si vous rachetez un appareil similaire neuf). Dans les pays qui ne sont pas mentionnés cidessus, veuillez contacter les autorités locales pour savoir comment vous pouvez vous débarrasser de vos appareils. Vous garantirez ainsi que les appareils dont vous vous débarrassez sont correctement récupérés, traités et recyclés et préviendrez de cette facon les impacts néfastes possibles sur l’environnement et la santé humaine. Italiano Se si vuole eliminare questo prodotto, non gettarlo insieme ai rifiuti domestici. Esiste un sistema di raccolta differenziata in conformità alle leggi che richiedono appositi trattamenti, recupero e riciclo. I privati cittadini dei venticinque paesi membri dell’UE, di Svizzera e Norvegia, possono restituire senza alcun costo i loro prodotti elettronici usati ad appositi servizi di raccolta o a un rivenditore (se si desidera acquistarne uno simile). Per i paesi non citati qui sopra, si prega di prendere contatto con le autorità locali per il corretto metodo di smaltimento. In questo modo, si è sicuri che il proprio prodotto eliminato subiràs il trattamento, il recupero e il riciclo necessari per prevenire gli effetti potenzialmente negativi sull’fambiente e sulla vita dell’uomo. Deponeer dit product niet bij het gewone huishoudelijk afval wanneer u het wilt verwijderen. Er bestaat een speciaal wettelijk voorgeschreven verzamelsysteem voor de juiste behandeling, het opnieuw bruikbaar maken en de recycling van gebruikte elektronische producten. In de 25 lidstaten van de EU, Zwitserland en Noorwegen kunnen particulieren hun gebruikte elektronische producten gratis bij de daarvoor bestemde verzamelplaatsen of een verkooppunt (indien u aldaar een gelijkwaardig nieuw product koopt) inleveren. Indien u zich in een ander dan bovengenoemd land bevindt kunt u contact opnemen met de plaatselijke overheid voor informatie over de juiste verwijdering van het product. Zodoende zorgt u ervoor dat het verwijderde product op de juiste wijze wordt behandeld, opnieuw bruikbaar wordt gemaakt, t gerecycleerd en het niet schadelijk is voor de gezondheid en het milieu. English Preparation Installing the Unit on a Left-HandDrive Car Preparación Instalación de la unidad en el coche de manejo del lado izquierdo Installing the lithium battery (Fig. 3) 1. Hook the belt on to the holder (Fig. 6). Instalación de la batería de litio (Fig. 3) 1. Enganche la correa al soporte (Fig. 6). Open the back lid of this unit and place a lithium battery “CR2032” in this unit with its positive (+) side up. Note • When using for the first time, pull out the film protruding from the tray. Replacing the lithium battery (Fig. 4) • Replace the battery with a CR2032 lithium battery. • Replace the battery in the unit using a non metallic tapered bar. Fig. 3 Abb. 3 Afb. 3 êËÒ. 3 Fig. 4 Abb. 4 Afb. 4 êËÒ. 4 Fig. 6 Abb. 6 Afb. 6 êËÒ. 6 Fig. 7 Abb. 7 Afb. 7 êËÒ. 7 Español Installation WARNING • Avoid installing this unit in such a location where the operation of safety devices such as airbags is prevented by this unit. Otherwise, there is a danger of a fatal accident. • Fix this unit securely to the steering wheel with the belt attached to the unit. If this unit is loose, it disturbs driving stability, which may result in a traffic accident. • Do not attach this unit to the outer circumference of the steering wheel. Otherwise, it disturbs driving stability, causing a traffic accident. Always attach this unit to the inner circumference of the steering wheel as shown (Fig. 5). Notes • Do not install this unit in a place that may obstruct the driver’s view. • Since interior layout differs depending on the type of vehicle, the ideal installation location for the unit also differs. When installing the unit, select a location that assures optimum transmission of signals from the unit to Pioneer Head Unit. 2. Fix the holder to the inside edge of the steering wheel so that the holder is facing the driver (Fig. 7). Wrap the belt around the outside edge of the steering wheel, passing the end through the slot in the holder. Pull on the belt to tighten it then secure it using the other two hooks on the holder. 3. r Cut off the extra portion of the belt (Fig. 8). If some of the belt still protrudes, fold it back into the slot so that it does not interfere with driving. 4. Fasten the other belt in the same way (Fig. 8). 5. Install the remote control unit in the holder (Fig. 9). When removing the remote control unit from the holder, move the corrugated release section (*1) toward the steering wheel as far as possible before sliding the remote control unit toward you. Specifications General Power source ...................... 3 V DC (Lithium Battery: CR2032) Dimensions (W × H × D): .... 38 × 67 × 22 mm Weight ................................. 45 g (including holder and battery) Infered Remote Control <Wavelength> .................. 940 nm ±50 nm <Output> .......................... typ; 14 mw/sr per infrared LED (2LEDs used) Note • Specifications and the design are subject to possible modification without notice due to improvements. Fig. 5 Abb. 5 Afb. 5 êËÒ. 5 Fig. 8 Abb. 8 Afb. 8 êËÒ. 8 Fig. 9 Abb. 9 Afb. 9 êËÒ. 9 Abra la tapa posterior de esta unidad y coloque la pila de litio “CR2032” con el lado positivo (+) dirigido hacia arriba. Nota 2. Fije el soporte al borde interior del volante, de tal forma que el soporte mire al conductor (Fig. 7). • Cuando utilice por primera vez, tire la parte saliente de la película desde la bandeja. Envuelva el borde exterior del volante con la correa y pase el extremo por la ranura del soporte. Reemplazo de la pila de litio (Fig. 4) Tire de la correa para tensarla y fíjela a los otros dos enganches del soporte. • Cambie la pila con una pila de litio CR2032. • Cambie la pila en la unidad utilizando una barra puntiaguda no metálica. Instalación ADVERTENCIA • Evite instalar esta unidad en un lugar en el que la operación de los dispositivos de seguridad tales como las bolsas de aire sea impedida por esta unidad. De otra manera, hay el peligro de un accidente fatal. • Fije esta unidad seguramente al volante con la correa adjunta. Si ésta se aflojara, esto interrumpirá la estabilidad del manejo, lo que podría resultar en un accidente de tráfico. • No instale esta unidad fuera de la circunferencia del volante. De otra manera, esto interrumpirá la estabilidad del manejo, causando un accidente de tráfico. Siempre instale esta unidad en el interior de la circunferencia del volante, tal como se indica (Fig. 5). Notas • No instale esta unidad en un lugar en el que obstruya la visión del conductor. • Como la disposición interior difiere dependiendo del tipo de vehículo, la ubicación ideal para la instalación de la unidad también difiere. Cuando instale la unidad, seleccione un lugar que asegure la transmisión óptima de las señales de la unidad a la unidad principal Pioneer. 3. r Corte la porción restante de la correa (Fig. 8). Si sigue sobresaliendo parte de la correa, dóblela e introdúzcala de nuevo en la ranura, para que no moleste durante la conducción. 4. Fije la otra correa de la misma forma (Fig. 8). 5. Instale la unidad de control remoto en el sujetador (Fig. 9). Cuando quite la unidad de control remoto del sujetador, mueva la sección de liberación corrugada (*1) hacia el volante en lo posible y deslice la unidad de control remoto hacia usted. Especificaciones General Fuente de alimentación ..... 3 V CC (pila de litio: CR2032) Dimensiones ...................... 38 (An) × 67 (Al) × 22 (Pr) mm Peso .................................... 45 g (incluyendo la funda y la pila) Nota • Las especificaciones y el diseño están sujetos a posibles modificaciones sin previo aviso debido a mejoramientos. Deutsch Français Italiano Nederlands Vorbereitung Installation des Geräts in einem Auto mit Linkslenkung Préparation Installation de l’unité sur une voiture à direction à gauche Preparativi Installazione dell’unità su un’auto con volante a sinistra Voorbereidingen Installeren van de stuurafstandbediening in een auto met het stuur links Setzen Sie die Lithiumbatterie ein (Abb. 3) 1. Haken Sie das Band in den Halter ein (Abb. 6). Installation de la pile au lithium (Fig. 3) 1. Accrochez la courroie sur le support (Fig. 6). Installazione della batteria al litio (Fig. 3) 1. Agganciare la cintura al supporto (Fig. 6). Plaats de lithiumbatterij (Afb. 3) 1. Haak de riem op de houder vast (Afb. 6). Öffnen Sie die rückwärtige Abdeckung dieses Geräts und setzen Sie eine Lithiumbatterie “CR2032” mit dem Pluspol (+) nach oben ein. Hinweis • Vor erstmaligem Gebrauch ziehen Sie die vom Fach vorstehende Folie heraus. Auswechseln der Lithiumbatterie (Abb. 4) • Die Batterie durch eine Lithiumbatterie vom Typ CR2032 ersetzen. • Zum Auswechseln der Batterie einen nicht-metallischen spitzen Gegenstand verwenden. Einbau WARNUNG • Installieren Sie dieses Gerät nicht an einer Stelle, wo es den Betrieb von Sicherheitseinrichtungen wie Airbags beeinträchtigt, da in diesem Fall die Gefahr eines tödlichen Unfalls besteht. • Befestigen Sie dieses Gerät mit dem an dem Gerät angebrachten Riemen am Lenkrad. Wenn dieses Gerät lose ist, stört es die Fahrstabilität, was zu einem Verkehrsunfall führen kann. • Bringen Sie dieses Gerät nicht am Außenumkreis des Lenkrads an, weil es dann die Fahrstabilität stören und dadurch einen Verkehrsunfall verursachen kann. Bringen Sie dieses Gerät wie gezeigt am Innenumkreis des Lenkrads an (Abb. 5). Hinweise • Installieren Sie dieses Gerät nicht an einer Stelle, wo es die Sicht des Fahrers beeinträchtigen kann. • Die ideale Montagestelle richtet sich nach der der Innenraumgestaltung des jeweiligen Fahrzeugs. Wählen Sie eine Montagestelle, die optimale Signalübertragung vom Gerät zum Pioneer Hauptteil gewährleistet. 2. Fixieren Sie den Halter an der Innenseite des Lenkrades, so dass der Halter zum Fahrer zeigt (Abb. 7). Ouvrir le couvercle arrière de cette unité et placer une pile au lithium “CR2032” dans cette unité avec son pôle positif (+) vers le haut. Remarque Wickeln Sie das Band um die Außenkante des Lenkrades und fädeln Sie das Ende durch den Schlitz im Halter. • Lors d’une première utilisation, retirez le film qui dépasse du plateau. Ziehen Sie das Band straff an, sichern Sie es dann mit Hilfe der beiden anderen Haken am Halter. Remplacement de la pile au lithium (Fig. 4) 3. r Schneiden Sie überschüssiges Band ab (Abb. 8). Wenn nach wie vor ein Stück des Bandes hervorstehen sollte, legen Sie es in den Schlitz ein, damit es beim Fahren nicht im Wege ist. 4. Befestigen Sie das zweite Band auf die gleiche Weise (Abb. 8). 5. Die Fernbedienung in den Halter einsetzen (Abb. 9). Bewegen Sie beim Herausnehmen der Fernbedienung aus dem Halter den geriffelten Freigabeteil (*1) so weit wie möglich zum Lenkrad hin und bewegen Sie die Fernbedienung auf sich zu. Technische Daten Allgemein Spannungsversorgung .......3 V Gleichspannung (Lithiumbatterie: CR2032) Abmessungen ....................38 (B) × 67 (H) × 22 (T) mm Gewicht................................45 g (einschließlich Halter und Batterie) Hinweis • Technische Änderungen zum Zwecke der Produktverbesserung sind ohne Vorankündigung vorbehalten. • Remplacer la pile par une pile au lithium CR2032. • Remplacer la pile dans l’unité en utilisant une barre conique non métallique. Installation AVERTISSEMENT • Eviter d’installer cette unité dans un endroit où elle empêche le fonctionnement d’un dispositif de sécurité, comme celui du sac gonflable. Cela entraînerait un risque d’accident fatal. • Fixer solidement cette unité au volant de direction à l’aide de la courroie fournie avec l’unité. Si cette unité est relâchée, elle gêne la stabilité de la conduite, ce qui peut entraîner un accident. • Ne pas fixer cette unité à la circonférence extérieure du volant de direction. Elle gênerait la stabilité de la conduite et provoquerait un accident. Toujours fixer cette unité à la circonférence intérieure du volant de direction, comme illustré (Fig. 5). Remarques • Ne pas installer cette unité dans un endroit où elle peut gêner la visibilité du conducteur. • Puisque la disposition intérieure diffère en fonction du type de véhicule, l’emplacement d’installation idéal pour l’unité diffère aussi. Lors de l’installation de l’unité, sélectionnez un emplacement qui assure la meilleure transmission des signaux de l’unité à l’unité principale Pioneer. 2. Fixez le support sur le rebord intérieur du volant pour que le support soit en face du conducteur (Fig. 7). Aprire il coperchio sul retro dell’unità e inserire una pila al litio “CR2032” nell’unità con il lato positivo (+) rivolto verso l’alto. Nota Entourez la courroie autour du rebord extérieur du volant et faites passer son extrémité dans la fente du support. • Quando si usa per la prima volta, estrarre la pellicola che sporge dal vassoio. Tirez sur la courroie pour la serrer puis fixez-la en utilisant les deux autres crochets du support. Sostituzione della pila al litio (Fig. 4) 3. r Coupez la partie de la courroie qui dépasse (Fig. 8). Si une partie de la courroie dépasse encore, rabattez-la dans la fente pour qu’il n’y ait pas d’interférence avec la conduite. 4. Fixez l’autre courroie de la même manière (Fig. 8). 5. Installer l’unité de télécommande dans le support (Fig. 9). Pour retirer l’unité de té du support, déplacer autant que possible la section de libération striée (*1) vers le volant de direction avant de faire glisser l’unité de télécommande vers soi. Caractéristiques techniques Généralités Source d’alimentation ....... 3 V CC (pile au lithium: CR2032) Dimensions ........................ 38 (L) × 67 (H) × 22 (P) mm Poids ................................... 45 g (y compris le support et la pile) Remarque • Du fait d’améliorations, les caractéristiques techniques et la présentation sont susceptibles de modification sans préavis. • Sostituire la pila con una pila al litio CR2032. • Sostituire la pila nell’unità usando una barra rastremata non metallica. Installazione AVVERTIMENTO • Evitare di installare questa unità in luoghi dove il funzionamento di dispositivi di sicurezza come palloni a gonfiaggio automatico possa essere ostacolato dall’apparecchio. Altrimenti c’è il rischio di incidenti mortali. • Fissare questa unità saldamente al volante con la cinghia in dotazione. Se l’unità non è ben fissata, disturba la stabilità di guida e può causare incidenti stradali. • Non applicare questa unità alla circonferenza esterna del volante, altrimenti disturba la stabilità di guida e causa incidenti stradali. Applicare sempre l’unità alla circonferenza interna del volante come illustrato (Fig. 5). Note • Non installare questa unità dove possa ostruire la vista del conducente. • Poiché la disposizione interna dell’abitacolo varia in funzione del tipo di veicolo, cambia altresì il punto ideale d’installazione dell’unità. Prima d’installare l’unità si raccomanda di individuare il punto che assicura l’ottimale trasmissione dei segnali da questa stessa unità all’unità Pioneer principale. 2. Fissare il supporto al bordo interno del volante in modo tale che il supporto sia rivolto verso il conducente (Fig. 7). Avvolgere la cintura attorno al bordo esterno del volante, facendo passare l’estremità nello slot del supporto. Tirare la cintura fino a tenderla, quindi bloccarla mediante gli altri due ganci del supporto. 3. r Tagliare la parte in eccedenza (Fig. 8). Qualora vi siano ancora parti di cintura che sporgono, ripiegarle nello slot, in modo tale che non possano creare interferenze. 4. Procedere nello stesso modo anche per l’altra cintura (Fig. 8). 5. Installare l’unità del telecomando sul supporto (Fig. 9). Togliendo il telecomando dal supporto, spostare la parte corrugata di rilascio (*1) per quanto possibile verso il volante prima far scorrere il telecomando verso di sè. Caratteristiche tecniche Generale Alimentazione ..................... 3 V CC (pila al litio CR2032) Dimensioni ......................... 38 (L) × 67 (A) × 22 (P) mm Peso .................................... 45 g (inclusi supporto e pila) Nota • Le caratteristiche tecniche e il design sono soggetti a possibili modifiche senza preavviso dovute a miglioramenti. Open de klep aan de achterkant van dit toestel en doe een lithium batterij van het type “CR2032” in het toestel met de positieve (+) pool naar boven. Opmerking • Wanneer u het toestel voor het eerst gaat gebruiken, dient u de folie die uit de lade steekt te verwijderen. Vervangen van de lithium batterij (Afb. 4) • Vervang de batterij door een CR2032 lithiumbatterij. • Vervang de batterij in het toestel met behulp van een taps toelopend, niet metalen voorwerp. Installeren WAARSCHUWING • Installeer de stuurafstandsbediening niet op plaatsen waar het de werking van veiligheidsmechanismen, bijvoorbeeld een airbag, zou kunnen hinderen. Een verkeerde plaats kan ernstige ongelukken veroorzaken. • Bevestig de stuurafstandsbediening stevig aan het stuur met gebruik van de riem. Een loszittende stuurafstandsbediening kan het besturen van de auto hinderen met mogelijk ongelukken tot gevolg. • Bevestig dit toestel in geen geval aan de buitenrand van het stuur. Hier zal het toestel in de weg zitten bij het besturen van uw auto, hetgeen zal leiden tot verkeersongevallen. Bevestig dit toestel altijd aan de binnenrand van het stuur, zoals afgebeeld (Afb. 5). Opmerkingen • Plaats de stuurafstandsbediening niet ergens waar het het zicht van de bestuurder zou kunnen verslechteren. • Omdat de indeling van het interieur afhangt van het type voertuig, kunnen er grote verschillen zijn in de ideale installatieplek voor dit toestel. Kies voor het installeren van het toestel een plek waarvandaan de signalen van dit toestel goed kunnen worden verstuurd naar het Pioneer Hoofdtoestel. 2. Bevestig de houder aan de binnenste rand van het stuur zodat de houder in de richting van de bestuurder wijst (Afb. 7). Wikkel de riem rond de buitenste rand van het stuur en plaats het uiteinde door de gleuf in de houder. Trek de riem aan en zet hem vervolgens met de twee overige haken aan de houder vast. 3. r Knip het overtollige gedeelte van de riem af (Afb. 8). Als een gedeelte van de riem er nog steeds uitsteekt dan kunt u dit uiteinde in de gleuf vouwen om te voorkomen dat dit uiteinde het besturen van de auto belemmerd. 4. Maak de andere riem op dezelfde manier vast (Afb. 8). 5. Plaats de stuurafstandsbediening in de houder (Afb. 9). Bij het verwijderen van de stuurafstandsbediening uit de houder moet u het geribbelde gedeelte (*1) zo ver mogelijk naar het stuur drukken en dan de stuurafstandsbediening naar u toe schuiven. Technische gegevens Algemeen Spanningsbron ................... 3 V gelijkstroom (Lithiumbatterij: CR2032) Afmetingen: ........................ 38 (b) × 67 (h) × 22 (d) mm Gewicht ............................... 45 g (inclusief houder en batterij) Opmerking • Technische gegevens en ontwerp zijn ter produktverbetering zonder voorafgaande kennisgeving wijzigbaar. êÛÒÒÍËÈ èÓ‰„ÓÚӂ͇ ìÒÚ‡Ìӂ͇ èË·Ó‡ ̇ χ¯Ë̇ı Ò ÛÎfiÏ Ò Î‚ÓÈ ÒÚÓÓÌ˚ ìÒÚ‡Ìӂ͇ ÎËÚË‚ÓÈ ·‡Ú‡ÂÈÍË (êËÒ. 3) 1. á‡ÍÂÔËÚ ÂÏÂ̸ ̇ ‰ÂʇÚÂΠ(êËÒ. 6). éÚÍÓÈÚ Á‡‰Ì˛˛ Í˚¯ÍÛ ‰‡ÌÌÓ„Ó ÔË·Ó‡ Ë ÛÒÚ‡ÌÓ‚ËÚ ÎËÚËÂ‚Û˛ ·‡Ú‡ÂÈÍÛ “CR2032” ‚ ÔË·Ó Ò Â„Ó (+) ÒÚÓÓÌ˚. èËϘ‡ÌË • äÓ„‰‡ ÛÒڇ̇‚ÎË‚‡ÂÚ Ô‚˚È ‡Á, ‚˚ÚflÌËÚ ÔÎÂÌÍÛ, ÚÓ˜‡˘Û˛ ËÁ ÊÂÎӷ͇. á‡ÏÂ̇ ÎËÚË‚ÓÈ ·‡Ú‡ÂÈÍË (êËÒ. 4) • á‡ÏÂÌflÈÚ ·‡Ú‡ÂÈÍÛ ÚÓθÍÓ Ì‡ ÎËÚËÂ‚Û˛ ·‡Ú‡ÂÈÍÛ CR2032. • á‡ÏÂ̇ ·‡Ú‡ÂÈÍË ‚ ÔË·Ó ÔÓËÁ‚Ó‰ËÚÒfl Ò ÔÓÏÓ˘¸˛ ÌÂÏÂÚ‡Î΢ÂÒÍÓ„Ó ÍÎËÌӂˉÌÓ„Ó ·ÛÒ͇. ìÒÚ‡Ìӂ͇ èêÖÑìèêÖÜÑÖçàÖ • àÁ·Â„‡ÈÚ ÛÒÚ‡ÌÓ‚ÍË ‰‡ÌÌÓ„Ó ÔË·Ó‡ ‚ Ú‡ÍËı ÏÂÒÚ‡ı, „‰Â Ò‡·‡Ú˚‚‡ÂÚ ÛÒÚÓÈÒÚ‚Ó ·ÂÁÓÔ‡ÒÌÓÒÚË, Ú‡ÍÓÂ Í‡Í ÔÌ‚ÏÓÔӉۯ͇, Ó̇ ·Û‰ÂÚ Ï¯‡Ú¸ ‰‡ÌÌÓÏÛ ÔË·ÓÛ. à̇˜Â ÒÛ˘ÂÒÚ‚ÛÂÚ ÓÔ‡ÒÌÓÒÚ¸ ÌÂÒ˜‡ÒÚÌÓ„Ó ÒÎÛ˜‡fl Ò Ù‡Ú‡Î¸Ì˚Ï ËÒıÓ‰ÓÏ. • èÓ˜ÌÓ Á‡ÙËÍÒËÛÈÚ ‰‡ÌÌ˚È ÔË·Ó Ì‡ Û΂ÓÏ ÍÓÎÂÒ ‡‚ÚÓÏÓ·ËÎfl Ò ÔÓÏÓ˘¸˛ ÂÏÌfl, ÔË·„‡ÂÏÓ„Ó Í ‰‡ÌÌÓÏÛ ÔË·ÓÛ. ÖÒÎË ‰‡ÌÌ˚È ÔË·Ó Ì ÔËÍÂÔÎÂÌ, ˝ÚÓ ÏÓÊÂÚ Ì‡Û¯ËÚ¸ ÒÚ‡·ËθÌÓÒÚ¸ ‰‚ËÊÂÌËfl, ÍÓÚÓ‡fl Ô˂‰ÂÚ Í ‰ÓÓÊÌÓÏÛ ÔÓËÒ¯ÂÒڂ˲. • ç ÔËÍÂÔÎflÈÚ ‰‡ÌÌ˚È ÔË·Ó Í ‚̯ÌÂÈ ÓÍÛÊÌÓÒÚË ÛÎÂ‚Ó„Ó ÍÓÎÂÒ‡ ‡‚ÚÓÏÓ·ËÎfl. à̇˜Â ˝ÚÓ Ì‡Û¯ËÚ ÒÚ‡·ËθÌÓÒÚ¸ ‰‚ËÊÂÌËfl Ë ·Û‰ÂÚ Ô˘ËÌÓÈ ‰ÓÓÊÌÓ„Ó ÔÓËÒ¯ÂÒÚ‚Ëfl. ÇÒ„‰‡ ÔËÍÂÔÎflÈÚ ‰‡ÌÌ˚È ÔË·Ó Ì‡ ‚ÌÛÚÂÌÌÂÈ ÓÍÛÊÌÓÒÚË ÛÎÂ‚Ó„Ó ÍÓÎÂÒ‡ ‡‚ÚÓÏÓ·ËÎfl Í‡Í ÔÓ͇Á‡ÌÓ (êËÒ. 5). èËϘ‡ÌËfl • ç ÛÒڇ̇‚ÎË‚‡ÈÚ ‰‡ÌÌ˚È ÔË·Ó ‚ ÏÂÒÚÂ, ‚ ÍÓÚÓÓÏ ÏÓÊÂÚ Á‡Í˚‚‡Ú¸Òfl ‚Ó‰ËÚÂθÒÍËÈ Ó·ÁÓ. • í‡Í Í‡Í ‚ÌÛÚÂÌÌ ‡ÒÔÓÎÓÊÂÌË ÓÚ΢‡ÂÚÒfl ‚ Á‡‚ËÒËÏÓÒÚË ÓÚ ÚËÔ‡ Ú‡ÌÒÔÓÚÌÓ„Ó Ò‰ÒÚ‚‡, ˉ‡θÌÓ ÏÂÒÚÓÔÓÎÓÊÂÌË ‰‡ÌÌÓ„Ó ÔË·Ó‡ Ú‡ÍÊ ‡Á΢ÌÓ. äÓ„‰‡ ÛÒڇ̇‚ÎË‚‡ÂÚ ÔË·Ó, ‚˚·ÂËÚ ÏÂÒÚÓ, ÍÓÚÓÓ ӷÂÒÔ˜ËÚ ÓÔÚËχθÌÛ˛ Ô‰‡˜Û Ò˄̇ÎÓ‚ ÓÚ ÔË·Ó‡ Í ÉÓÎÓ‚ÌÓÏÛ ÔË·ÓÛ Pioneer. 2. á‡ÙËÍÒËÛÈÚ ‰ÂʇÚÂθ ̇ ‚ÌÛÚÂÌÌÂÏ Í‡Â ÛÎÂ‚Ó„Ó ÍÓÎÂÒ‡ Ú‡Í, ˜ÚÓ·˚ ‰ÂʇÚÂθ «ÒÏÓÚÂλ ̇ ‚Ó‰ËÚÂÎfl (êËÒ. 7). é·ÂÌËÚ ÂÏÂ̸ ‚ÓÍÛ„ ̇ÛÊÌÓ„Ó Í‡fl ÛÎÂ‚Ó„Ó ÍÓÎÂÒ‡, ÔÓÔÛÒÚË‚ Â„Ó ÍÓ̈ ˜ÂÂÁ ˘Âθ ‚ ‰ÂʇÚÂÎÂ. èÓÚflÌËÚ ÂÏÂ̸, ˜ÚÓ·˚ Á‡ÚflÌÛÚ¸ „Ó, Á‡ÚÂÏ Á‡ÍÂÔËÚ „Ó, ËÒÔÓθÁÛfl ‰‚‡ ‰Û„Ëı Ͳ˜Í‡ ‚ ‰ÂʇÚÂÎÂ. 3. r éÚÂʸÚ ÎË¯Ì˛˛ ˜‡ÒÚ¸ ÂÏÌfl (êËÒ. 8). ÖÒÎË ˜‡ÒÚ¸ ÂÏÌfl ‚Ò ¢ ‚˚ÒÓ‚˚‚‡ÂÚÒfl, Á‡„ÌËÚÂ Â„Ó ‚ ˘Âθ Ú‡Í, ˜ÚÓ·˚ ÓÌ Ì Ï¯‡Î ‚Ó‰ËÚÂβ. 4. èËÍÂÔËÚ ‰Û„ÓÈ ÂÏÂ̸ ‚ ÚÓÈ Ê ÔÓÒΉӂ‡ÚÂθÌÓÒÚË (êËÒ. 8). 5. ìÒÚ‡ÌÓ‚ËÚ ÔË·Ó ‰ËÒڇ̈ËÓÌÌÓ„Ó ÛÔ‡‚ÎÂÌËfl ‚ ‰ÂʇÚÂΠ(êËÒ. 9). èË Û‰‡ÎÂÌËË ÔË·Ó‡ ‰ËÒڇ̈ËÓÌÌÓ„Ó ÛÔ‡‚ÎÂÌËfl ËÁ ‰ÂʇÚÂÎfl, Ô‰‚Ë̸Ú ËÙÎÂÌÛ˛ ÒÂÍˆË˛ (*1) ÔÓ Ì‡Ô‡‚ÎÂÌ˲ Í Û΂ÓÏÛ ÍÓÎÂÒÛ ÔÓ ‚ÓÁÏÓÊÌÓÒÚË ‰‡Î¸¯Â Ô‰ ÒÍÓθÊÂÌËÂÏ ÔË·Ó‡ ‰ËÒڇ̈ËÓÌÌÓ„Ó ÛÔ‡‚ÎÂÌËfl ÔÓ Ì‡Ô‡‚ÎÂÌ˲ Í Ç‡Ï. ëÔˆËÙË͇ˆËfl éÒÌÓ‚ÌÓ àÒÚÓ˜ÌËÍ ÔËÚ‡ÌËfl ...........3 V DC (ãËÚË‚‡fl ·‡Ú‡ÂÈ͇: CR2032) ê‡ÁÏÂ˚ (W × H × D): .....38 × 67 × 22 ÏÏ ÇÂÒ .................................45 „ (‚Íβ˜‡fl ‰ÂʇÚÂθ Ë ·‡Ú‡ÂÈÍÛ) èËϘ‡ÌË • ëÔˆËÙË͇ˆËË Ë ‰ËÁ‡ÈÌ ÔË·Ó‡ ÏÓ„ÛÚ ÏÓ‰ËÙˈËÓ‚‡Ú¸Òfl ·ÂÁ ۂ‰ÓÏÎÂÌËfl ËÁ-Á‡ ÛÒӂ¯ÂÌÒÚ‚Ó‚‡ÌËfl.