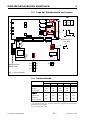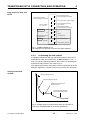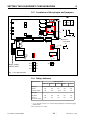
1
Vakuum-Lösungen ApplikationsUnterstützungen Service LEYBOLD VAKUUM GA 05.212/7 View our inventory TURBOTRONIK NT 10 NT 12 NT 13 Elektronische Frequenzwandler Electronic frequency converters Kat.-Nr. / Cat. No. 859 00 859 01 859 04 859 05 859 06 859 07 Gebrauchsanleitung Operating Instructions INHALTSVERZEICHNIS SICHERHEIT - WARNHINWEISE ....................................... 4 1 BESCHREIBUNG 1.1 Funktion und Aufbau ...............................................................5 1.1.1 TURBOTRONIK NT 10 .................................................... 6 1.1.2 TURBOTRONIK NT 12 .....................................................6 1.1.3 TURBOTRONIK NT 13 mit Druck Trigger ......................... 6 1.2 Technische Daten ................................................................... 7 1.3 Lieferumfang ..........................................................................7 1.4 Zubehör .................................................................................. 9 2 TURBOTRONIK NT10 ANSCHLUß UND BETRIEB 2.1 Gerätekonfiguration .............................................................. 10 2.1.1 Netzspannungsbereich ................................................... 10 2.1.2 Relaisbelegung ............................................................... 10 2.1.3 Resonanzüberwachung .................................................. 10 2.2 TURBOTRONIK einbauen .................................................... 11 2.3 Elektrischer Anschluß ........................................................... 11 2.3.1 Relais-Kontakte anschließen .......................................... 11 2. 4 Betriebsarten / Fernsteuerung .............................................. 12 1. Betrieb über die Tasten „START“ und „STOP“ ...................... 12 2. Fernbedienung über 2 externe Taster ................................... 12 3. Fernbedienung über einen externen Schalter ....................... 13 4. Automatisches Starten durch Netz einschalten ..................... 13 2.5 Bedienung ............................................................................ 13 3 TURBOTRONIK NT12 ANSCHLUß UND BETRIEB 3.1 Gerätekonfiguration .............................................................. 14 3.1.1 Netzspannungsbereich ................................................... 14 3.1.2 Relaisbelegung ............................................................... 14 3.1.3 Resonanzüberwachung .................................................. 14 3.2 TURBOTRONIK einbauen .................................................... 15 3.3 Elektrischer Anschluß ........................................................... 15 3.3.1 Relais-Kontakte anschließen .......................................... 15 3.4 Betriebsarten / Fernbedienung ............................................. 16 1. Fernbedienung über 2 externe Taster ................................... 16 2. Fernbedienung über einen externen Schalter ....................... 17 3. Automatisches Starten durch Netz einschalten ..................... 17 3.5 Bedienung ............................................................................ 17 4 TURBOTRONIK NT13 ANSCHLUß UND BETRIEB 4.1 Gerätekonfiguration .............................................................. 18 4.1.1 Netzspannungsbereich ................................................... 18 4.1.2 Relaisbelegung ............................................................... 18 4.1.3 Resonanzüberwachung .................................................. 18 4.2 TURBOTRONIK einbauen .................................................... 19 © LEYBOLD VAKUUM GMBH –2– GA 05.212/7 - 04/97 INHALTSVERZEICHNIS 4.3 Elektrischer Anschluß ........................................................... 19 4.3.1 Relais-Kontakte anschließen .......................................... 19 4.3.2 Meßbuchsen anschließen. ............................................. 20 4.4 Betriebsarten / Fernsteuerung .............................................. 21 4.5 Bedienung ............................................................................ 21 5 GERÄTEKONFIGURATION EINSTELLEN 5.1 Netzspannugnbereich umstellen .......................................... 22 5.2 Platinen ausbauen ................................................................ 23 5.3 Lage der Steckkontakte und Jumper .................................... 24 5.4 Relaiszustände ..................................................................... 24 5.5 Konfiguration Relais K1 einstellen ........................................ 25 5.6 Konfiguration Relais K1 einstellen ........................................ 25 5.7 Resonanzüberwachung einstellen ........................................ 26 5.8 Jumperfeld S2 ...................................................................... 26 5.9 Motorfrequenz messen ......................................................... 27 5.10 Anschlußbeispiele für Fernbedienung .................................. 28 6 FEHLERSUCHE ....................................................... 29 EG HERSTELLERERKLÄRUNG ....................................... 31 EG KONFORMITÄTSERKLÄRUNG ................................. 32 WERKSBESCHEINIGUNG .............................................. 33 ABBILDUNGEN Fig.1 TURBOTRONIK NT10 ............................................................6 Fig.2 TURBOTRONIK NT12 ............................................................6 Fig.3 TURBOTRONIK NT13 ............................................................6 Fig. 4 Maßzeichnungen ...................................................................8 Fig. 5 Rückseite der TURBOTRONIK NT10 .................................. 12 Fig. 6 TURBOTRONIK NT 12; Pin-Belegung ................................ 16 Fig. 7 TURBOTRONIK NT 13; Pin-Belegung ................................ 20 Fig. 8 Spannung an den Meßbuchsen ........................................... 20 Fig. 9 -10 Netzspannungsbereich umstellen .................................. 22 Fig. 11 Layout Platinen .................................................................. 24 Fig. 12 - 16 Konfiguration Relais K1 einstellen .............................. 25 Fig. 17 - 21 Konfiguration Relais K2 einstellen ......................... 25/26 Fig. 22 Jumper Resonanzüberwachung ........................................ 26 Fig. 23 - 26 Jumperfeld S2 ....................................................... 26/27 Fig. 27 Diagramm Motorfrequenz messen ..................................... 27 Fig. 28 Anschluß Motorfrequenz messen ...................................... 27 Fig. 29 - 34 Anschlußbeispiele Fernbedienung .............................. 28 Hinweis (5/3) = Verweis auf eine Abbildung. Die erste Ziffer gib die NR. der Abbildung an, die zweite Ziffer die Position in dieser Abbildung. © LEYBOLD VAKUUM GMBH –3– GA 05.212/7 - 04/97 SICHERHEIT - WARNHINWEISE Warnung vor der Gefährlichkeit dieses Gerätes Dieses Gerät führt gefährliche elektrische Spannungen! Tod, schwere Körperverletzungen oder erheblicher Sachschaden können die Folge sein, wenn die Anweisungen in dieser Betriebsanleitung nicht befolgt werden. Nur entsprechend qualifiziertes Personal darf an diesem Gerät arbeiten. Dieses Personal muß mit allen Warnhinweisen und den Maßnahmen vertraut sein, die in dieser Betriebsanleitung für das Transportieren, Aufstellen, Bedienen und die Fehlerbehebung des Gerätes gegeben werden. Der erfolgreiche und sichere Umgang mit diesem Gerät ist vom fachgemäßen und fachgerechten Transportieren, Aufstellen und Bedienen des Gerätes abhängig. Vorsicht Vor dem Öffnen des Gerätes das Netz abtrennen! Bei Anlegen von Fremdspannung größer 42 V an die Anschlußklemmen des Gerätes sind die VDE-Sicherheitsbestimmungen zu beachten! Vorsicht Das Gerät enthält elektrostatisch gefährdete Bauelemente (EGB)! Qualifiziertes Personal Unter qualifiziertem Personal sind Elektrofachkräfte oder elektrotechnisch unterwiesene Personen im Sinne der EN 60204 Teil 1, 3.55 bzw. 3.30 zu verstehen. Bestimmungsgemäße Verwendung Die elektronischen Frequenzwandler NT10, NT12 und NT13 sind ausschließlich zum Betrieb der Turbomolekularpumpen TURBOVAC 50 (Kat. Nr. 854 00, 854 01, 854 02 und 853 99) TURBOVAC 50D (Kat. Nr. 856 60, 856 61, 856 62 und 856 63) zu verwenden. Zum Anschluß an die obengenannten Turbomolekularpumpen sind ausschließlich die unter Abschnitt 1.4 aufgeführten Verbindungsleitungen zu verwenden. Bei einer nicht mit uns abgestimmten Änderung des Gerätes oder einer nicht bestimmungsgemäßen Verwendung des Geräts verliert die EG-Herstellererklärung ihre Gültigkeit! Eigenmächtige Umbauten und Manipulationen des Gerätes sind aus Sicherheitsgründen verboten. Eine Änderung der Konstruktion und der technischen Daten behalten wir uns vor. Definition Vorsicht Vorsicht: Steht bei Arbeits- und Betriebsverhalten, die genau einzuhalten sind, um eine Gefährdung von Personen auszuschließen. Definition Achtung Achtung: Bezieht sich auf Arbeits- und Betriebsverhalten, die genau einzuhalten sind, um Beschädigungen oder Zerstörungen des Gerätes zu vermeiden. Die Betriebsanleitung für künftige Verwendung aufbewahren! © LEYBOLD VAKUUM GMBH –4– GA 05.212/7 - 04/97 BESCHREIBUNG 1 1.1 Funktion und Aufbau Bestimmung und Funktion Die elektronischen Frequenzwandler TURBOTRONIK NT 10, NT 12 und NT 13 dienen zum Antrieb der TURBOVAC 50 und 50D. Sie unterscheiden sich: im Gehäuse, in den Anschlußsteckern, den Bedienmöglichkeiten, im Lieferumfang und in der Auslieferungskonfiguration. Der elektronische Frequenzwandler formt die einphasige Netzspannung in eine dreiphasige Wechselspannung zur Steuerung des Asynchronmotors der TURBOVAC um. Die Frequenzwandler arbeiten nach einem Zeittakt: Für ca. 1 Sekunde wird der Motor angetrieben, in den darauffolgenden 0,1 Sekunden werden Überwachungsmessungen durchgeführt. Betriebszustände Folgende Betriebszustände werden über LEDs angezeigt: Netzspannung liegt an, Hochlauf, Normal und Störung Über 2 Relais-Ausgänge stehen wahlweise verschiedene Signale zur Verfügung. Hochlauf und Betrieb Nach dem Start läuft die Pumpe kontinuierlich mit maximalem Strom hoch. Zur Kennzeichnung leuchtet die gelbe LED „ACCEL“ (Hochlauf). Nach Erreichen von ca. 90 % der Nenn- Drehzahl leuchtet die grüne LED „NORMAL“, die LED „ACCEL“ geht aus. Die Drehzahl wird kontinuierlich überwacht und geregelt. Wenn durch äußere Einflüsse, z. B. größere Gaszufuhr, die Drehzahl auch bei maximal zulässigem Strom nicht gehalten werden kann, sinkt sie ab, die Pumpe arbeitet aber weiter. Bei Unterschreiten einer Drehfrequenz von ca. 500 Hz leuchtet am Frequenzwandler die LED „ACCEL“ auf. Die TURBOTRONIK versucht nun, die Pumpe wieder auf ihre Sollfrequenz hochzufahren. Ausgänge Die Ausgänge der Frequenzwandler sind leerlauf- und kurzschlußfest. Der elektronische Frequenzwandler TURBOTRONIK kann potentialfrei an externe Steuer- und Überwachungs-Einrichtungen angeschlossen werden. Bei der Verbindungsleitung TURBOTRONIK - TURBOVAC sind Längen bis zu 100 m möglich. © LEYBOLD VAKUUM GMBH –5– GA 05.212/7 - 04/97 BESCHREIBUNG 1 1.1.1 TURBOTRONIK NT 10 Tischgerät oder zum Einbau in ein Rack 1/4 19", 3 HE Frontseite: Folien-Tastatur, 4 LEDs, Tasten „START“ und „STOP“ Gehäuse: Aluminium-Strangpreßprofil. Rückseite: 10-poliger Phönix-Stecker für FernÜberwachung und -Steuerung, 5-poliger Stecker für TURBOVAC-Anschluß, Netz-Anschlußleitung mit Schutzkontaktstecker 3 m lang und ein Netzschalter Fig.1 TURBOTRONIK NT10 1.1.2 TURBOTRONIK NT 12 Einbaugerät Frontseite: 4 LEDs. Gehäuse: Stahlblechgehäuse mit Abschirmplatte Rückseite: Messer-Kontaktleiste nach DIN 41 612 mit 15 Kontakten zum Anschluß der TURBOVAC, des Netzes und der Fernüberwachung und Fernsteuerung Hinweis Zur Netztrennung muß anlagenseitig ein Schalter installiert werden! Fig.2 TURBOTRONIK NT12 1.1.3 TURBOTRONIK NT 13 mit Druck Trigger Zum Einbau in ein Rack 1/4 19", 3 HE Frontseite: Folienbeschichtete Frontplatte mit 4 LEDs und 2 Meßbuchsen Gehäuse: Aluminium-Strangpreßprofil Rückseite: Blech, Messer-Kontaktleiste nach DIN 41 612 mit 15 Kontakten zum Anschluß der TURBOVAC, des Netzes und der Fernüberwachung und Fernsteuerung Hinweis Fig.3 TURBOTRONIK NT13 © LEYBOLD VAKUUM GMBH Zur Netztrennung muß anlagenseitig ein Schalter installiert werden! –6– GA 05.212/7 - 04/97 BESCHREIBUNG 1 1.2 Technische Daten Netz Netzspannungs-Bereiche ...................... 100-140 V AC,-10%/+16% umschaltbar auf .............................................. 200-240 V AC, ±10% Netzfrequenz ..................................................................... 50/60 Hz Netzsicherung (F1 intern) ............................................. T 1A / 250 V Nenn-Drehzahl der TURBOVAC ................ 72.000 min-1 = 1200 Hz Leistungsaufnahme kurzzeitig (Hochlauf) .............................................. bis 64 VA (45 W) dauernd (Nenndrehzahl) ............................................. 35 VA (18 W) Ruhebetrieb .................................................................... 6 VA (3 W) Ausgänge Spannung ........................................................................... 3 x 150 V Nennfrequenz ..................................................................... 1200 Hz Frequenzbereich der Ausgangsspannung .................. 220-1250 Hz Umgebungstemperatur bei Betrieb ....................................................................... 0°C - 40°C bei Lagerung ............................................................ -40°C bis+85°C Max. Belastung der Relais-Kontakte Schaltspannung .................................................. £ 250 V~, £ 30 V= Schaltstrom ................................................................ £ 6 A~, £ 5 A= Schaltleistung bei Gleichstrom ........................................... £ 150 W Schaltleistung bei Wechselstrom .................................... £ 1500 VA Schutzart Die Geräte entsprechen der Schutzart IP20 gemäß EN 60 529. Eine erhöhte Schutzart z.B. IP54 ist ausschließlich durch Einbau der Geräte in Zusatzkomponenten realisierbar. Gewicht TURBOTRONIK NT 10 ........................................................... 1,5 kg TURBOTRONIK NT 12 ........................................................... 1,1 kg TURBOTRONIK NT 13 ........................................................... 1,5 kg Abmessungen und Gehäusemaße (siehe Fig. 4) TURBOTRONIK NT 10 ................................................ 1/4 19", 3 HE TURBOTRONIK NT 13 ................................................ 1/4 19", 3 HE 1.3 Lieferumfang Die Verbindungsleitung zur TURBOVAC ist nicht im Lieferumfang enthalten! 1.3.1 TURBOTRONIK NT 10 TURBOTRONIK NT 10, Feinsicherungen, Gegenstecker für Phönix-Stecker (Steuerklemmleiste X10), aufsteckbarer Gerätefuß für den Tischbetrieb, vier Klebefüße, 4 Linsenkopfschrauben M 3x8, die Netzleitung ist angebaut. 1.3.2 TURBOTRONIK NT 12 TURBOTRONIK NT 12, Feinsicherungen. 1.3.3 TURBOTRONIK NT 13 TURBOTRONIK NT 13, Feinsicherungen, 4 Schrauben für den Rack-Einbau. © LEYBOLD VAKUUM GMBH –7– GA 05.212/7 - 04/97 BESCHREIBUNG 1 TURBOTRONIK NT10 TURBOTRONIK NT12 TURBOTRONIK NT13 Schalttafelausbruch für TURBOTRONIK NT10 und N13 Fig. 4 Maßzeichnungen der TURBOTRONIK NT10, NT12, NT13 © LEYBOLD VAKUUM GMBH –8– GA 05.212/7 - 04/97 BESCHREIBUNG 1 1.4 Zubehör Bestell-Informationen Kat.-Nr. Elektronische Frequenzwandler TURBOTRONIK NT 10 200 V - 240 V ..................................................................... 859 00 100 V - 120 V ..................................................................... 859 01 TURBOTRONIK NT 12 200 V - 240 V ..................................................................... 859 04 100 V - 120 V ..................................................................... 859 05 TURBOTRONIK NT 13 200 V - 240 V ..................................................................... 859 06 100 V - 120 V ..................................................................... 859 07 Verbindungsleitung Verbindungsleitungen von der TURBOVAC zur TURBOTRONIK NT10 3 m lang ........................................................................... 5 m lang ........................................................................... 10 m lang ........................................................................... 20 m lang ........................................................................... 857 50 857 51 857 52 857 53 TURBOTRONIK NT12 3 m lang ........................................................................... 857 54 TURBOTRONIK NT13 1 m lang ........................................................................... 857 56 Mit der Verbindungsleitung (nur NT12, NT13) wird ein Gegenstekker für Messerkontaktleisten X11 inkl. 15 Kontaktstiften geliefert . Zubehör für Rack-Einbau für NT 12 auf Anfrage. © LEYBOLD VAKUUM GMBH –9– GA 05.212/7 - 04/97 TURBOTRONIK NT10 ANSCHLUß UND BETRIEB 2 Der Anschluß darf nur von einer Elektrofachkraft entsprechend den geltenden IEC (internationalen), EN (europäischen) und/oder nationalen Richtlinien durchgeführt werden oder unter deren Leitung und Aufsicht. Vorsicht Im Innern der TURBOTRONIK NT10 liegen lebensgefährliche Spannungen an. Bei allen Arbeiten am geöffneten Gerät ist es vorher vom Netz zu trennen. 2.1 Gerätekonfiguration 2.1.1 Netzspannungsbereich Die TURBOTRONIK NT 10 kann mit zwei Netzspannungen betrieben werden, zwischen 200-240 V oder zwischen 100-120 V. Sie ist werkseitig auf einen Netzspannungsbereich eingestellt, je nach Bestellnummer, siehe Kat.Nr. unter Abschnitt 1.4. Achtung Die TURBOTRONIK wird beschädigt, wenn sie mit der falschen Netzspannung betrieben wird. Zum Umstellen des Netzspannungsbereiches siehe unter Abschnitt 5.1. 2.1.2 Relaisbelegung Auslieferungszustand Die TURBOTRONIK NT10 hat 2 Relais, an deren Ausgängen die Signale „NORMAL“ (K 1) und „FAIL“/ Störung (K 2) zur Verfügung stehen. Relaisbelegung umstellen Das Relais K 1 steht als Wechsler zur Verfügung. Die RelaisFunktion von K2 kann mit einem Jumper umgestellt werden. Außerdem kann Relais K 2 kann von Arbeitskontakt auf Ruhekontakt umgestellt werden. K2: Steuerung Vorvakuumpumpe Das Relais K 2 kann zur „Steuerung der Vorvakuumpumpe“ benutzt werden. In diesem Fall ist es aktiv nach dem Starten und inaktiv nach dem Stoppen der TURBOVAC, siehe dazu Abschnitt 5. 2.1.3 Tip Wir empfehlen Ihnen, jede Änderung der Relaisbelegung oder das Ausschalten der Resonanzüberwachung am Gerät oder in der zum Gerät gehörenden Gebrauchsanleitung zu notieren. © LEYBOLD VAKUUM GMBH Resonanzüberwachung Die TURBOTRONIK NT 10 hat eine Resonanzüberwachung für die TURBOVAC 50D. Die Resonanzüberwachung schaltet den Antrieb ab und zeigt eine Störung an, wenn die Pumpe länger als ca. 1 Minute im Drehzahlbereich zwischen 45000 und 55000 min-1 bleibt. Die Resonanzüberwachung ist im Auslieferungszustand aktiv und kann zum Betrieb der TURBOVAC 50 ausgeschaltet werden, siehe dazu Abschnitt 5.6. Achtung Betrieb der TURBOVAC 50D ohne Resonanzüberwachung kann zu Lagerschäden bei der Pumpe führen. – 10 – GA 05.212/7 - 04/97 TURBOTRONIK NT10 ANSCHLUß UND BETRIEB 2 2.2 TURBOTRONIK einbauen Als Tischgerät betreiben Die TURBOTRONIK NT 10 wird in einem Gehäuse als Tischgerät geliefert. Auf Wunsch kann an der Unterseite ein Gerätefuß angebracht werden. Dazu den Gerätefuß von der Geräterückseite in die unterste Nut der Eckleiste einsetzen und nach vorne schieben, bis er einrastet. Die vier Klebefüße an der Unterseite des Gerätefußes und im hinteren Bereich des Gerätes aufkleben. Rack-Einbau Die TURBOTRONIK NT 10 läßt sich in ein Rack einbauen. Hierbei auf ausreichende Belüftung achten. Die Umgebungstemperatur darf 40°C bei Betrieb nicht übersteigen. Falls die Rückseite der TURBOTRONIK nach dem Einbau nicht mehr zugänglich ist, den Netzschalter (5/2) vorher einschalten. Zum Einbau in einen 19"-Einbaurahmen dienen die in der Frontplatte vorhandenen vier Bohrungen. 2.3 Elektrischer Anschluß Die Verbindungsleitung zur TURBOVAC an der Buchse (5/4) und am Motor der TURBOVAC einstecken. Die im Stecker befindliche Schraube eindrehen und damit den Stecker gegen Abfallen sichern. Hinweis Durch unterschiedliche Stifte am Stecker der Pumpe ist falsches Aufstecken unmöglich. Bei ordnungsgemäßem Zusammenbau erfüllt diese Steckverbindung die Schutzart IP 65. Stellen Sie die Verbindungsleitung selbst her, darf diese bis zu 100 m lang sein. Verwenden Sie nur eine doppelt abgeschirmte Leitung mit entsprechender Isolation. Für weitere Informationen erbitten wir Ihre Anfrage! Vorsicht Schutzleiterverbindung Hoher Ableitstrom! Wenn die Verbindungsleitung TURBOVACTURBOTRONIK länger als 10 m ist, beide Geräte zusätzlich mit Schutzerde verbinden. Die Erdungsleitung (5/3) an der zentralen Masseschiene anschließen. Mit der Netzanschlußleitung (5/1) den Netzanschluß herstellen. 2.3.1 Relais-Kontakte anschließen An den Pins 5, 6, 7 können die Betriebszustände „NORMAL“ und „ACCEL“ (Hochlauf) abgefragt werden. Pins 6-7 geschlossen: „NORMAL“ Pins 5-6 geschlossen: „ACCEL“, Stillstand oder Störung. Die Pins 9 und 10 sind bei Auftreten einer Störung gebrückt (Arbeitskontakt). Die Relais können auch anders belegt sein, siehe dazu Abschnitt 2.1.2 und Kapitel 5. Die Relaiskontakte dürfen mit Netzspannung oder Funktionskleinspannung belegt werden. Hierbei die entsprechenden Sicherheitsbestimmungen beachten. © LEYBOLD VAKUUM GMBH – 11 – GA 05.212/7 - 04/97 TURBOTRONIK NT10 ANSCHLUß UND BETRIEB 2 5 Steuer-Eingänge und Relais-Ausgänge (Phönix-Stecker, X10) 1 2 3 4 5 6 7 8 9 10 4 Spannungsversorgung der TURBOVAC 3 Anschluß für Erdungsleitung (Gewindebolzen M4 mit Mutter und Zahnscheibe) TURBOVAC 1 2 3 START STOP 4 5 6 NORMAL OPERATION 7 8 9 10 FAILURE/ FOREPUMP MAIN 2 Netzschalter HV PE FUSE: 100..120V/T1A 200..240V/T1A 1 Netzleitung Fig.5 Rückseite der TURBOTRONIK NT10 2. 4 Betriebsarten / Fernsteuerung Im Auslierungszustand der TURBOTRONIK NT 10 sind 4 Betriebsarten möglich durch Beschaltung der Eingänge 1, 2 und 3 des Steuersteckers X10 auf der Rückseite der TURBOTRONIK . Die Gerätekonfiguration kann aber durch Steckbrücken und Jumper auf andere Funktionen umgestellt werden, siehe dazu Abschnitt 5. Schaltungsbeispiele zur Fernbedienung siehe Abschnitt 5.9. Betriebsart 1 1. Betrieb über die Tasten „START“ und „STOP“ Brücke zwischen Pin 2 und 3 (Auslieferungszustand). Mit den Tasten „START“ und „STOP“ auf der Folientastatur wird die TURBOVAC gestartet und gestoppt. Betriebsart 2 2. Fernbedienung über 2 externe Taster Wird „START“ (Pin 1) mit einem Schließer mindestens 3 Sekunden mit Pin 2 verbunden, startet die TURBOVAC. Wird die Verbindung der beiden Eingänge Pin 2 und 3 „STOP“ mit einem Öffner getrennt, stoppt die TURBOVAC. © LEYBOLD VAKUUM GMBH – 12 – GA 05.212/7 - 04/97 TURBOTRONIK NT10 ANSCHLUß UND BETRIEB Betriebsart 3 2 3. Fernbedienung über einen externen Schalter Brücke zwischen Pin 1 und 2 herstellen. Wird „STOP2“ (Pin 3) an die Brücke Pin 1-2 gelegt, startet die TURBOVAC. Wird die Verbindung wieder getrennt, stoppt die TURBOVAC. Betriebsart 4 4. Automatisches Starten durch Netz einschalten Die 3 Pins 1, 2 und 3 miteinander verbinden. Beim Anlegen der Netzspannung startet die TURBOVAC automatisch. Die TURBOTRONIK kann außerdem über Relais, Optokoppler oder Open Collector angesteuert werden. 2.5 Bedienung TURBOVAC starten Die TURBOTRONIK einschalten, die LED „POWER“ muß leuchten. Die Taste „START“ drücken oder die TURBOVAC über eine Fernbedienung starten, siehe Abschnitt 2.4. Die Pumpe läuft hoch. Die LED „ACCEL“ (Hochlauf) leuchtet. Nach Erreichen von ca. 90 % der Nenndrehzahl leuchtet die LED „NORMAL“, die LED „ACCEL“ verlöscht. TURBOVAC abschalten Die Taste „STOP“ drücken oder die TURBOVAC über eine Fernbedienung abschalten, siehe Abschnitt 2.4. Nur die LED „POWER“ leuchtet. Nach dem Beheben einer Störung ebenfalls die Taste „STOP“ drücken oder die TURBOVAC über eine Fernbedienung abschalten und dann erst wieder starten. © LEYBOLD VAKUUM GMBH – 13 – GA 05.212/7 - 04/97 TURBOTRONIK NT12 ANSCHLUß UND BETRIEB 3 Der Anschluß darf nur von einer Elektrofachkraft entsprechend den geltenden IEC (internationalen), EN (europäischen) und/oder nationalen Richtlinien durchgeführt werden oder unter deren Leitung und Aufsicht. Vorsicht Die Messerkontaktleiste der TURBOTRONIK NT12 ist nicht berührungssicher. Das Gerät muß deshalb in ein Gehäuse berührungssicher eingebaut werden. Im Innern der TURBOTRONIK liegen lebensgefährliche Spannungen an. Bei allen Arbeiten am geöffneten Gerät ist es vorher vom Netz zu trennen. 3.1 Gerätekonfiguration 3.1.1 Netzspannungsbereich Die TURBOTRONIK NT 12 kann mit zwei Netzspannungen betrieben werden, zwischen 200-240 V oder zwischen 100-120 V. Sie ist werkseitig auf einen Netzspannungsbereich eingestellt, je nach Bestellnummer, siehe Kat.Nr. unter Abschnitt 1.4. Achtung! Die TURBOTRONIK wird beschädigt, wenn sie mit der falschen Netzspannung betrieben wird. Zum Umstellen des Netzspannungsbereiches siehe unter Abschnitt 5.1. 3.1.2 Relaisbelegung Ausliferungszustand Der TURBOTRONIK NT 12 hat 2 Relais, an deren Ausgängen die Signale „NORMAL“ (K 1) und „FAIL“/Störung (K 2) im Auslieferungszustand zur Verfügung stehen. Relaisbelegung umstellen Diese Relais-Funktionen können mit Jumpern umgestellt werden . Außerdem können beide Relais von Arbeitskontakt auf Ruhekontakt umgestellt werden. Siehe dazu Abschnitt 5. K2: Steuerung Vorvakuumpumpe Das Relais K 2 kann zur „Steuerung der Vorvakuumpumpe“ benutzt werden. In diesem Fall ist es aktiv nach dem Starten und inaktiv nach dem Stoppen der TURBOVAC. 3.1.3 Resonanzüberwachung Die TURBOTRONIK NT 12 hat eine Resonanzüberwachung für die TURBOVAC 50D. Die Resonanzüberwachung schaltet den Antrieb ab und zeigt eine Störung an, wenn die Pumpe länger als ca. 1 Minute im Drehzahlbereich zwischen 45000 und 55000 min-1 bleibt. Die Resonanzüberwachung ist im Auslieferungszustand aktiv und kann zum Betrieb der TURBOVAC 50 ausgeschaltet werden; siehe dazu Abschnitt 5.6. © LEYBOLD VAKUUM GMBH – 14 – GA 05.212/7 - 04/97 TURBOTRONIK NT12 ANSCHLUß UND BETRIEB 3 Achtung Betrieb der TURBOVAC 50D ohne Resonanzüberwachung kann zu Lagerschäden bei der Pumpe führen. Tip Wir empfehlen Ihnen, jede Änderung der Relais-Belegung oder das Ausschalten der Resonanzüberwachung am Gerät oder in der zum Gerät gehörenden Gebrauchsanleitung zu notieren. Außerdem kann die Belegung der Steuereingänge so geändert werden, daß die Motorfrequenz der TURBOVAC gemessen werden kann, siehe dazu Abschnitt 5.8. 3.2 TURBOTRONIK einbauen Die TURBOTRONIK mit M3-Schrauben einbauen. Die Abdeckhaube hat dazu 4 Bohrungen, siehe Fig. 4, Maßzeichnungen. Hierbei auf ausreichende Belüftung achten! Die Umgebungstemperatur darf 40°C bei Betrieb nicht übersteigen. 3.3 Elektrischer Anschluß Der Anschluß für das Netz, die TURBOVAC, die Relais und Steuereingänge geschieht über die Messerkontaktleiste an der Rückseite des Gerätes; Pin-Belegung siehe Fig. 6. Vorsicht An verschiedenen Stellen der Kontaktleiste kann Netzspannung anliegen. Deshalb Anschlüsse an der Messerkontaktleiste nur berühren, wenn die TURBOTRONIK vom Netz getrennt ist. Mit der Verbindungsleitung zur TURBOVAC wird ein Gegenstecker zur Messerkontaktleiste geliefert. Schließen Sie die Verbindungsleitung nach der beiliegenden Zeichnung „Montagehinweis Pumpenkabel“ an. Stellen Sie die Verbindungsleitung selbst her, darf diese bis zu 100 m lang sein. Verwenden Sie nur eine doppelt abgeschirmte Leitung mit entsprechender Isolation. Für weitere Informationen erbitten wir Ihre Anfrage! Vorsicht Schutzleiterverbindung Hoher Ableitstrom! Wenn die Verbindungsleitung TURBOVACTURBOTRONIK länger als 10 m ist, beide Geräte zusätzlich mit Schutzerde verbinden. 3.3.1 Relais-Kontakte anschließen An den Pins 8 und 10 können die Betriebszustände „NORMAL“ und „ACCEL“ (Hochlauf) abgefragt werden. Pins 8-10 geschlossen: „NORMAL“. Pins 8-10 offen: „ACCEL“, Stillstand oder Störung. Beim Beim Auftreten eines Fehlers zieht Relais 2 an und die Pins 12 und 14 sind gebrückt (Arbeitskontakt). © LEYBOLD VAKUUM GMBH – 15 – GA 05.212/7 - 04/97 TURBOTRONIK NT12 ANSCHLUß UND BETRIEB 3 Die Relais können auch anders belegt sein, siehe dazu Abschnitt 5.4. Die Relaiskontakte dürfen mit Netzspannung oder Funktionskleinspannung belegt werden. Hierbei die entsprechenden Sicherheitsbestimmungen beachten. 3.4 Betriebsarten / Fernbedienung Messerkontaktleiste X11 Eingang 3: "STOP 2" 4 Eingang 2: "STOP 1" 8 8/10 Relaiskontakt "NORMAL" geschlossen "ACCEL" offen 6 10 12/14 Relaiskontakt "Fail" "Fail" = geschlossen TURBOVAC L1 L3 PE (Schutzleiter) 2. Kabelschirm 12 14 Eingang 1: "START" 20 L2 24 Masse 1.Kabelschirm 28 N (Nulleiter) 32 PE (Schutzleiter) 18 22 26 NETZ L (Phase) 16 30 Fig. 6 TURBOTRONIK NT 12 Pin-Belegung der Messerkontaktleiste im Auslieferungszustand. Im Auslierungszustand der TURBOTRONIK NT 12 sind 3 Betriebsarten durch Beschaltung der Steuereingänge Pin 4, 6 und 16 der Messerkontaktleiste möglich. Die Gerätekonfiguration kann aber durch Steckbrücken und Jumper auf andere Funktionen umgestellt werden, siehe dazu Abschnitt 5. Schaltungsbeispiele zur Fernbedienung siehe Abschnitt 5.9. Betriebsart 1 1. Fernbedienung über 2 externe Taster Wird „START“ (Pin 16) mindestens 3 Sekunden mit Pin 4 über einen Schließer-Taster verbunden, startet die TURBOVAC. Wird die Verbindung der Eingänge „Stop“ (Pin 4 u. 6) mit einem Öffner getrennt, stoppt die TURBOVAC. © LEYBOLD VAKUUM GMBH – 16 – GA 05.212/7 - 04/97 TURBOTRONIK NT12 ANSCHLUß UND BETRIEB Betriebsart 2 3 2. Fernbedienung über einen externen Schalter Brücke zwischen Pin 4 und 16 herstellen. Wird „STOP2“ (Pin 6) über einen Schalter an Pin 4 gelegt, startet die TURBOVAC. Wird die Verbindung wieder getrennt, stoppt die TURBOVAC. Betriebsart 3 3. Automatisches Starten durch Netz einschalten Alle 3 Pins (4, 6, 16) miteinander verbinden. Beim Anlegen von Netzspannung startet die TURBOVAC automatisch. Die TURBOTRONIK kann außerdem über Relais, Optokoppler oder Open Collector angesteuert werden. 3.5 Bedienung TURBOVAC starten Netzspannung für die TURBOTRONIK einschalten, die LED „POWER“ muß leuchten. TURBOVAC über Fernbedienung starten, siehe Abschnitt 3.4. Die TURBOVAC läuft hoch. Die LED „ACCEL“ (Hochlauf) leuchtet. Nach Erreichen von ca. 90 % der Nenndrehzahl leuchtet die LED „NORMAL“, die LED „ACCEL“ verlöscht. TURBOVAC abschalten Die TURBOVAC über die Fernbedienung abschalten; siehe Abschnitt 3.4. Nur die LED „POWER“ leuchtet. Nach dem Beheben einer Störung ebenfalls die TURBOVAC über die Fernbedienung abschalten und dann erst wieder starten. © LEYBOLD VAKUUM GMBH – 17 – GA 05.212/7 - 04/97 TURBOTRONIK NT13 ANSCHLUß UND BETRIEB 4 Der Anschluß darf nur von einer Elektrofachkraft entsprechend den geltenden IEC (internationalen), EN (europäischen) und/oder nationalen Richtlinien durchgeführt werden oder unter deren Leitung und Aufsicht. Vorsicht Die Messerkontaktleiste der TURBOTRONIK NT13 ist nicht berührungssicher. Das Gerät muß deshalb in ein Gehäuse berührungssicher eingebaut werden. Im Innern der TURBOTRONIK liegen lebensgefährliche Spannungen an. Bei allen Arbeiten am geöffneten Gerät ist es vorher vom Netz zu trennen. 4.1 Gerätekonfiguration 4.1.1 Netzspannungsbereich Die TURBOTRONIK NT 13 kann mit zwei Netzspannungen betrieben werden, zwischen 180-260 V oder zwischen 90-140 V. Sie ist werkseitig auf einen Netzspannungsbereich eingestellt, je nach Bestellnummer, siehe Kat.Nr. unter Abschnitt 1.4. Achtung Die TURBOTRONIK wird beschädigt, wenn sie mit der falschen Netzspannung betrieben wird. Zum Umstellen des Netzspannungsbereiches siehe unter Abschnitt 5.1. 4.1.2 Relaisbelegung Auslieferungszustand Die TURBOTRONIK NT 13 hat 2 Relais. Das Relais K 1 wird als Druck Trigger benutzt. Es wird geschaltet, wenn ein vorgegebener Zwischenkreisstrom in der TURBOTRONIK unterschritten wird. Dieser Zwischenkreisstrom entspricht bei definierten Verhältnissen einem bestimmten Druck. Das Relais K 2 wird im Auslieferzustand nicht genutzt. Wenn es angeschlossen wird, stehen die Netzspannungsausgänge an den Pins 12 und 14 nicht mehr zur Verfügung. Relaisbelegung umstellen Die Relais können auf Wunsch so belegt werden, daß K1 den Betriebszustand „NORMAL“ anzeigt und das Relais K2 kann zur Anzeige von Störungen oder zur Steuerung der Vorvakuumpumpe verwendet werden. Außerdem kann von Arbeitskontakt auf Ruhekontakt umgestellt werden. Siehe dazu Abschnitt 5. 4.1.3 Tip Wir empfehlen Ihnen, jede Änderung der Relaisbelegung oder das Ausschalten der Resonanzüberwachung am Gerät oder in der zum Gerät gehörenden Gebrauchsanleitung zu notieren. © LEYBOLD VAKUUM GMBH Resonanzüberwachung Die TURBOTRONIK NT 13 hat eine Resonanzüberwachung für die TURBOVAC 50D. Die Resonanzüberwachung schaltet den Antrieb ab und zeigt eine Störung an, wenn die Pumpe länger als ca. 1 Minute im Drehzahlbereich zwischen 45000 und 55000 min-1 bleibt. Die Resonanzüberwachung ist im Auslieferungszustand aktiv und kann zum Betrieb der TURBOVAC 50 ausgeschaltet werden, siehe dazu Abschnitt 5.6 – 18 – GA 05.212/7 - 04/97 TURBOTRONIK NT13 ANSCHLUß UND BETRIEB 4 Achtung Betrieb der TURBOVAC 50D ohne Resonanzüberwachung kann zu Lagerschäden bei der Pumpe führen. 4.2 TURBOTRONIK einbauen Rack-Einbau Die TURBOTRONIK NT 13 ist vorgesehen für den Einbau in einen 19"-Einbaurahmen. Zum Einbau dienen die in der Frontplatte vorhandenen vier Bohrungen. Auf ausreichende Belüftung achten, die Umgebungs-Temperatur darf 40°C bei Betrieb nicht übersteigen. 4.3 Elektrischer Anschluß Der Anschluß für das Netz, die TURBOVAC, die Relais und Steuereingänge geschieht über die Messerkontaktleiste an der Rückseite des Gerätes; Pin-Belegung siehe Fig. 7. Vorsicht An verschiedenen Stellen der Kontaktleiste kann Netzspannung anliegen. Deshalb Anschlüsse an der Messerkontaktleiste nur berühren, wenn die TURBOTRONIK vom Netz getrennt ist. Mit der Verbindungsleitung zur TURBOVAC wird ein Gegenstecker zur Messerkontaktleiste geliefert. Schließen Sie die Verbindungsleitung nach der beiliegenden Zeichnung „Montagehinweis Pumpenkabel“ an. Stellen Sie die Verbindungsleitung selbst her, darf diese bis zu 100 m lang sein. Verwenden Sie nur eine doppelt abgeschirmte Leitung mit entsprechender Isolation. Für weitere Informationen erbitten wir Ihre Anfrage! Vorsicht Schutzleiterverbindung Hoher Ableitstrom! Wenn die Verbindungsleitung TURBOVACTURBOTRONIK länger als 10 m ist, beide Geräte zusätzlich mit Schutzerde verbinden. 4.3.1 Relais-Kontakte anschließen (siehe auch Fig. 8) An den Pins 8 und 10 kann ein Druck Trigger abgefragt werden. Pins 8-10 geschlossen: der Zwischenkreisstrom in der TURBOTRONIK ist kleiner als ein vorgegebener Grenzwert. Pins 8-10 offen: der Zwischenkreisstrom in der TURBOTRONIK ist größer als ein vorgegebener Grenzwert. Die Einstellung des Grenzwerts hängt stark vom Einsatzfall ab. Dazu erbitten wir bei Bedarf Ihre Anfrage. Die Relaiskontakte dürfen mit Netzspannung oder Funktionskleinspannung belegt werden. Hierbei die entsprechenden Sicherheitsbestimmungen beachten. © LEYBOLD VAKUUM GMBH – 19 – GA 05.212/7 - 04/97 TURBOTRONIK NT13 ANSCHLUß UND BETRIEB 4 Messerkontaktleiste X11 NT13 Bei der Auslieferung nicht belegt! 4 Bei der Auslieferung nicht belegt! 8 8/10 Relaiskontakt "Druck Trigger" 12 Netz N (Nulleiter) z.B. für Lüfter 16 Bei der Auslieferung nicht belegt! 20 L2 24 Masse 1.Kabelschirm 28 N (Nulleiter) 32 PE (Schutzleiter) 6 10 Netz L (Phase) z.B. für Lüfter L1 TURBOVAC L3 PE (Schutzleiter) 2. Kabelschirm 14 18 22 26 NETZ L (Phase) 30 Fig. 7 TURBOTRONIK NT 13; Pin-Belegung der Messerkontaktleiste im Auslieferzustand 4.3.2 Meßbuchsen anschließen. An den Meßbuchsen der Frontplatte liegt eine Spannung an, die proportional dem Zwischenkreisstrom in der TURBOTRONIK ist (1 mV=1 mA). Diesem Strom kann bei bestimmten Betriebszuständen ein Ansaugdruck zugeordnet werden; siehe dazu Fig.8. Spannung an den Meßbuchsen Spannung Die Zuordnung von Druck und Strom hängt vom Einsatzfall ab. Dazu erbitten wir bei Bedarf Ihre Anfrage. Ruhespannung im Gerät Ruhespannung wird abgebaut TURBOVAC läuft hoch mit maximalem Strom Strom und Spannung sinken mit sinkendem Ansaugdruck Zeit ca. 90 s Fig. 8 Spannung an den Meßbuchsen auf der Frontplatte in Abhängigkeit von der Zeit beim Einschalten der TURBOTRONIK (qualitativ) © LEYBOLD VAKUUM GMBH – 20 – GA 05.212/7 - 04/97 TURBOTRONIK NT13 ANSCHLUß UND BETRIEB 4 Vorsicht Die Meßspannung ist mit Netzpotential behaftet. Meßgerät mit isolierten Leitungen so anschließen, daß keine Berührung möglich ist. 4.4 Betriebsarten / Fernsteuerung Im Auslieferungszustand ist mit der TURBOTRONIK NT13 nur die Betriebsart „Automatisches Starten durch Netz einschalten“ möglich. Betriebsart ändern Die TURBOTRONIK NT 13 kann auch auf die Fernbedienung, wie in Abschnitt 3.4 für die TURBOTRONIK NT 12 beschrieben, umgestellt werden. Siehe dazu Kapitel 5. 4.5 Bedienung TURBOVAC einschalten Netzspannung für die TURBOTRONIK einschalten, die LED „POWER“ muß leuchten. Gleichzeitig startet die TURBOVAC. Die LED „ACCEL“ (Hochlauf) leuchtet. Nach Erreichen von ca. 90 % der Nenn- Drehzahl leuchtet die LED „NORMAL“, die LED „ACCEL“ verlöscht. Das Relais Druck Trigger (Pin 8 und 10) schließt, wenn der Zwischenkreisstrom in der TURBOTRONIK den vorgegebenen Grenzwert unterschreitet. TURBOVAC ausschalten TURBOVAC und TURBOTRONIK durch Ausschalten der Netzspannung abschalten. Nach dem Beheben einer Störung ebenfalls TURBOVAC und TURBOTRONIK abschalten und dann erst wieder einschalten. © LEYBOLD VAKUUM GMBH – 21 – GA 05.212/7 - 04/97 GERÄTEKONFIGURATION EINSTELLEN 5 5.1 Netzspannungsbereich umstellen TURBOTRONIK NT10 und NT13 Der Netzspannungs-Wahlschalter (9/3) befindet sich innen im Gerät nahe der Frontplatte. Die beiden Schrauben (9/1) an der rechten und linken Seite des Gerätes herausschrauben, dann die Frontplatte vorsichtig nach links schwenkend herausnehmen. Den Netzspannungswahlschalter (9/3) umschalten. Frontplatte wieder anbauen. Eine Sicherung muß beim Umstellen des Netzspannung-Bereiches nicht gewechselt werden. 1 Schrauben 2 Rasthaken 3 Netzspannungswahlschalter 4 Stecker für Flachkabel Abb 9. Netzspannungsbereich einstellen; Frontplatte NT 10 abbauen (NT 13 sinngemäß) TURBOTRONIK NT12 Der Netzspannungswahlschalter der TURBOTRONIK NT12 ist an der Frontseite durch einen Lüftungsschlitz zugänglich. Er kann von außen mit einem kleinen Schraubendreher umgeschaltet werden; siehe dazu die Beschriftung auf dem Gehäuse. Eine Sicherung muß beim Umstellen des Netzspannung-Bereiches nicht gewechselt werden. Netzspannungsbereich einstellen NT12 NetzspannungsWahlschalter Fig.10 Netzspannungs-Wahlschalter TURBOTRONIK NT12 © LEYBOLD VAKUUM GMBH – 22 – GA 05.212/7 - 04/97 GERÄTEKONFIGURATION EINSTELLEN 5 5.2 Platinen ausbauen Damit die Jumper und Drahtbrücken zum Ändern der Gerätekonfiguration zugänglich sind, müssen die Platinen aus dem Gehäuse ausgebaut werden. Die beiden aufgeklappten Platinen sehen Sie in Fig. 11. 5.2.1 NT10 Die beiden Schrauben (9/1) an der rechten und linken Seite des Gerätes herausschrauben, dann die Frontplatte vorsichtig nach links schwenkend herausnehmen. Die Rasthaken (9/2) zusammendrücken und das Innenteil des Steckers (9/4) einige Millimeter herausziehen. Das Flachkabel aus dem Stecker herausziehen. Die Rückwand abschrauben und die Platinen nach hinten aus dem Gehäuse herausziehen, auseinanderschrauben und aufklappen. Zum Ändern der Gerätekonfiguration siehe Abschnitt 5.4 bis 5.7. Die Platinen wieder zusammenklappen, verschrauben und einbauen. Flachbandkabel wieder einstecken. Front- und Rückplatte wieder anbauen. 5.2.2 NT12 Die vier Schrauben der Abdeckhaube herausschrauben, die Abdeckhaube vorsichtig anheben und das Erdungskabel abziehen. Die Platinen auseinanderschrauben und aufklappen. Zum Ändern der Gerätekonfiguration siehe Abschnitt 5.4 bis 5.7. Die Platinen wieder zusammenklappen, verschrauben, das Erdungskabel wieder einstecken und die Abdeckhaube montieren. 5.2.3 NT13 Die beiden Schrauben (9/1) an der rechten und linken Seite des Gerätes herausschrauben, dann die Frontplatte herausnehmen. Die Verbindungskabel zu den Meßbuchsen in der Frontoplatte abziehen Tip Wir empfehlen Ihnen, jede Änderung der Relaisbelegung oder das Ausschalten der Resonanzüberwachung am Gerät oder in der zum Gerät gehörenden Gebrauchsanleitung zu notieren. © LEYBOLD VAKUUM GMBH Die Rückwand abschrauben und die Platinen nach hinten aus dem Gehäuse herausziehen, auseinanderschrauben und aufklappen. Zum Ändern der Gerätekonfiguration siehe Abschnitt 5.4 bis 5.7. Die Platinen wieder zusammenklappen, verschrauben und einbauen. Die Meßbuchsen in der Frontplatte wieder polrichtig anschließen. Front- und Rückplatte wieder anbauen. – 23 – GA 05.212/7 - 04/97 GERÄTEKONFIGURATION EINSTELLEN 5 5.3 Lage der Steckkontakte und Jumper S2 K2 X16 X11 X15 X14 X13 X12 X12 X14 X16 X17 X18 X18 X13 X15 X17 Sicherung F1 T 1A/ 250V X21 X19 X20 115V 230V NetzspannungsWahlschalter K1 S11 S12 S17 S18 S13 S14 S6 X10 S5 Fig. 11 Layout Platinen 5.4 Relaiszustände 5HODLVIXQNWLRQ %HWULHEV]XVWDQG Netz EIN ACCEL. NORMAL FAIL STOP Normal Aus Aus Ein Aus Aus Druck Trigger Aus Aus Ein *) Aus Aus Fail (Störung) Aus Aus Aus Ein Aus Steuerung Vorvakuumpump Aus Ein Ein Ein Aus 5HODLV. 5HODLV. *) IZK (Zwischenkreisstrom) < IGR (Stromgrenzwert) vorgegeben durch das Potentiometer des Druck Triggers. Aus = nicht aktiv; Ein = aktiv © LEYBOLD VAKUUM GMBH – 24 – GA 05.212/7 - 04/97 GERÄTEKONFIGURATION EINSTELLEN 5 5.5 Konfiguration Relais K1 einstellen Funktion „NORMAL“ S11 S12 S13 S14 Das Relais wird geschaltet, beim Erreichen der Betriebszustandes „NORMAL“. Auslieferungszustand NT 10, NT 12 Fig. 12 Funktion „Druck Trigger“ Version 1 S11 S12 S13 S14 Das Relais wird geschaltet, wenn der, durch das Potentiometer des Druck Triggers vorgegeben Zwischenkreisstrom in der TURBOTRONIK unterschritten wird. Gleichzeitig leuchtet die LED „NORMAL“ auf. Fig. 13 Funktion „Druck Trigger“ Version 2 S11 S12 S13 S14 Fig. 14 Auslieferungszustand NT 13 X21 Kontaktbelegung K1 Auslieferungszustand Das Relais wird geschaltet, wenn der, durch das Potentiometer des Druck Triggers vorgegeben Zwischenkreisstrom in der TURBOTRONIK unterschritten wird. Die LED „NORMAL“ leuchtet auf beim Erreichen des Normalbetriebs. Arbeitskontakt bei NT 12 und NT 13 (normaly open) X19 X20 Fig. 15 Kontaktbelegung K1 umstellen X21 Auslieferungszustand NT 13 Ruhekontakt bei NT 12 und NT 13 (normaly closed) X19 X20 Fig. 16 5.6 Konfiguration Relais K2 einstellen Funktion „FAIL“ S17 Das Relais hat die Funktion „FAIL“ (Störung). Im Störfall ist das Ralais aktiv. S18 Auslieferungszustand NT10, NT12 Fig. 17 Funktion „Steuerung Vorvakuumpumpe“ S17 S18 Über das Relais wird gleichzeitig mit „START“ der TURBOVAC die Vorvakuumpumpe eingeschaltet und mit „STOP“ ausgeschaltet (siehe auch Abschnitt 5.4, Relaiszustände). Fig. 18 © LEYBOLD VAKUUM GMBH – 25 – GA 05.212/7 - 04/97 GERÄTEKONFIGURATION EINSTELLEN K2 außer Betrieb X12 X14 X18 X16 X13 X15 X17 Fig. 19 Kontaktbelegung K2 umstellen X12 X14 X16 5 Relais K2 ist außer Betrieb! Bei NT 12 und NT13: An X11.12 liegt Netz N (Nulleiter) An X11.14 liegt Netz L (Phase) Bei NT 10: An X10.9 liegt Netz N (Nulleiter) An X10.10 liegt Netz L (Phase) Auslieferungszustand NT 13 Arbeitskontakt bei NT 10, NT 12 und NT13 (normaly open) X18 X13 X15 X17 Auslieferungszustand NT 10, NT 12 Fig. 20 X12 X14 X16 Ruhekontakt bei NT 10, NT 12 und NT13 (normaly closed) X18 X13 X15 X17 Fig. 21 5.7 Resonanzüberwachung einstellen Resonanzüberwachung EIN S6 S5 Resonanzüberwachung ist eingeschaltet für den Betrieb der TURBOVAC 50D. Auslieferungszustand NT 10, NT 12, NT 13 AUS S6 S5 Resonanzüberwachung ist ausgeschaltet für den Betrieb der TURBOVAC 50. Fig. 22 5.8 Jumperfeld S2 START / STOP bei NT 10 Die Pins 1, 2 und 3 des Phönix-Steckers X10 dienen als Steuereingänge zum Einund Ausschalten der TURBOVAC. Fig. 23 START / STOP bei NT 12 und NT 13 Auslieferungszustand NT 10 Die Pins 4, 6 und 16 der Messerkontaktleiste X11 dienen bei der NT12 als Steuereingänge zum Ein- und Ausschalten der TURBOVAC. Die NT13 kann auf diese Konfiguration umgestellt werden. Auslieferungszustand NT 12 Fig. 24 © LEYBOLD VAKUUM GMBH – 26 – GA 05.212/7 - 04/97 GERÄTEKONFIGURATION EINSTELLEN Automatischer Hochlauf 5 Die TURBOVAC startet automatisch beim Einschalten der Netzspannung. Diese Konfiguration kann bei allen drei Modellen angewählt werden. Auslieferungszustand NT 13 Fig. 25 Motorfrequenz messen NT12 und NT13 Nur möglich bei NT12 und NT13! An den Pins 4, 6, und 16 der Messerkontaktleiste kann die Motorfrequenz gemessen werden; siehe dazu auch Schaltungsbeispiel im folgenden Abschnitt 5.8. Die TURBOVAC startet dann automatisch beim Einschalten der Netzspannung. Fig. 26 5.9 Motorfrequenz messen Zum Messen der Motorfrequnz muß das Jumperfeld S2 nach Fig. 26 gesteckt sein! Siehe vorhergehende Abbildung! Gemessen wird die Motorfrequenz zwischen Pin 16 (0V) und Pin 6 (Q1). Das Frequenzsignal liegt ca. jede Sekunde für ca. 0,1 Sekunden an. Gleichzeitig wird zwischen Pin 4 (Q5) und Pin 16 ein Torsignal ausgegeben. Es kann zur Triggerung eines Frequenzzählers benutzt werden. Diagramm Motorfrequenz messen Impulspakete Motorfrequenz Torsignal Fig. 27 Schaltungsbeispiel Motorfrequenz messen +5 V Messerkontaktleiste 2,2 KΩ 4 Tor (Q5) 6 Frequenz (Q1). 8 10 Torzeit Motorfrequenz 12 14 16 18 0 V *) *) Bezugspotential für +5 V und Signale Fig. 28 Motorfrequenz messen © LEYBOLD VAKUUM GMBH – 27 – GA 05.212/7 - 04/97 GERÄTEKONFIGURATION EINSTELLEN 5 5.10 Anschlußbeispiele für Fernbedienung Standardbrücke NT 10 Tastaturbetrieb START STOP 1 Werkseitig montiert (nur bei NT 10) STOP 2 Fig. 29 Notwendige Brücke für Tastaturbetrieb (nur bei NT 10) Automatischer START START STOP 1 STOP 2 Fig. 30 Automatischer Hochlauf mit Netz EIN Fernbedienung mit Schalter START Schalter geschlossen = START STOP 1 Schalter offen = Stop STOP 2 Fig. 31 Fernbedienung mit einem Schalter Fernbedienung mit 2 Tastern Taster START (min. 3 s gedrückt halten) START STOP 1 Taster STOP STOP 2 Fig. 32 Fernbedienung mit 2 Tastern Fernbedienung mit Optokopplern START Optokoppler Daten: STOP 1 >15 V / 10 V UCEsat < 1 V STOP 2 Strom fließt = START Kein Strom = STOP. Fig. 33 Fernbedienung mit Optokopplern Fernbedienung mit Open Collector START >15 V / 10 V STOP 1 STOP 2 Fig. 34 Fernbedienung mit Open Collector Zuordung Funktion - Klemme © LEYBOLD VAKUUM GMBH START = STOP 1 = STOP 2 = X10, X11, X10, X11, X10, X11, PIN 1 Pin 16 Pin 2 Pin 4 Pin 3 Pin 6 (NT (NT (NT (NT (NT (NT 10) 12, NT 13) 10) 12, NT 13) 10) 12, NT 13) – 28 – GA 05.212/7 - 04/97 FEHLERSUCHE 6 Störung Mögliche Ursache / LED “Power” leuchtet nicht. • TURBOTRONIK ist nicht ans Netz angeschlossen. Beseitigung • Netzschalter nicht eingeschaltet (nur NT 10). • Sicherung defekt. Verbindung zum Netz herstellen Netzschalter an der Rückseite TURBOTRONIK NT 10 einschalten Sicherung (siehe Fig. 11) prüfen und ggf. auswechseln. Öffnen der TURBOTRONIK unter Abschnitt 5.1 und 5.2. LED “ACCEL” leuchtet, LED “NORMAL” leuchtet auch nach angemessener Hochlaufzeit nicht! • Leck im Vakuumsystem, so daß die Nenndrehzahl nicht erreicht wird. • Gaseinbruch ins Vakuumsystem, so daß nach dem Erreichen der Enddrehzahl diese durch zu hohe Gasreibung abnimmt. Vakuumsystem abdichten! Hinweis Gaseinbrüche bewirken eine Drehzahlreduzierung. Wenn die Drehzahl unter ca. 40% der Nenndrehzahl sinkt, schaltet die TURBOTRONIK wieder auf “ACCEL”. Wenn kein zu großes Leck vorliegt, läuft die TURBOTRONIK selbstätig wieder hoch. LED “FAIL” leuchtet (Relais FAIL ist aktiv, bei entsprechender Schaltung) und die Drehzahl der TURBOVAC fällt ab. • Die Motorwicklung der TURBOVAC hat die zulässige Grenztemperatur überschritten, z.B. wegen unzulässig hoher Umgebungstemperatur oder nicht ausreichender Kühlung. • Die Resonanzüberwachung hat den Antrieb abgeschaltet, weil die Pumpe länger als ca. eine Minute im Drehzahlbereich zwischen 45000 und 55000 min-1 war. TURBOVAC abkühlen lassen. Kühlung verbessern! Fehler durch Betätigung von “STOP” zurücksetzen. Mit Taste oder Fernbedienung ausschalten und anschließend die TURBOVAC neu starten. Betriebsbedingungen so ändern, daß die Pumpe über 55000 min-1 drehen kann. Bei der TURBOVAC 50 kann die Resonanzüberwachung ausgeschaltet werden (siehe Abschnitt 5.5). © LEYBOLD VAKUUM GMBH – 29 – GA 05.212/7 - 04/97 FEHLERSUCHE 6 Störung Mögliche Ursache / LED “FAIL” leuchtet (Relais FAIL ist aktiv, bei entsprechender Schaltung) und die TURBOVAC läuft nicht an. • Verbindungsleitung zur TURBOVAC oder Stecker sind defekt oder falsch angeschlossen. Beseitigung • Motorwicklung der TURBOVAC ist unzulässig warm. Verbindungsleitung und Stecker prüfen, ggf. auswechseln. Fehler durch Betätigung von “STOP” zurücksetzen. Mit Taste oder Fernbedienung ausschalten und anschließend die TURBOVAC neu starten. TURBOVAC abkühlen lassen. Fehler durch Betätigung von “STOP” zurücksetzen. Mit Taste oder Fernbedienung ausschalten und anschließend die TURBOVAC neu starten. Pumpe dreht normal, LED “NORMAL” leuchtet, aber es wird kein ausreichender Enddruck erreicht © LEYBOLD VAKUUM GMBH • Leck im Vakuumsystem. • Pumpe dreht falsch herum. Leck suchen und beseitigen! Die 3 Phasen des Motoranschlusses prüfen; bei Fehler 2 Phasen tauschen. – 30 – GA 05.212/7 - 04/97 EG HERSTELLERERKLÄRUNG EG - Herstellererklärung (nach Art. 4 Abs.2 der EG-Richtlinie 89/329/EWG) Dokumenten-Nr.: MSR0196 / NT10, NT12, NT13 Hersteller: REFU elektronik GmbH Produktbezeichnung: Typ: NT10, NT12, NT13 Katalog-Nr.: 859 00 859 01 859 04 859 05 859 06 859 07 Das bezeichnete Produkt ist ausschließlich zum Einbau in eine Maschine bestimmt. Die Inbetriebnahme ist solange untersagt, bis die Konformität des Endproduktes mit der Richtlinie 89/329/ EWG festgestellt ist. Angewandte Normen: EN 60204-1 (DIN VDE 0113 Teil 1) EN 61010-1 (DIN VDE 0411 Teil 1) Metzingen, den 02.01.1996 REFU elektronik GmbH ................................................... H. Baumann Geschäftsleitung Die Sicherheitshinweise der mitgelieferten Produktdokumentation sind zu beachten. © LEYBOLD VAKUUM GMBH – 31 – GA 05.212/7 - 04/97 EG KONFORMITÄTSERKLÄRUNG EG - Konformitätserklärung Dokumenten-Nr.: NSR0196 / NT10, NT12, NT13 Hersteller: REFU elektronik GmbH Produktbezeichnung: Typ: NT10, NT12, NT13 Katalog-Nr.: 859 00 859 01 859 04 859 05 859 06 859 07 Hiermit wird erklärt. daß das bezeichnete Produkt aufgrund seiner Konzipierung und Bauart sowie in der von uns in Verkehr gebrachten Ausführung den einschlägigen, grundlegenden Sicherheitsund Gesundheitsanforderungen der EG-Richtlinien entsprechen. Bei einer nicht mit uns abgestimmten Änderung eines Produktes verliert diese Erklärung ihre Gültigkeit. Das Produkt entspricht der EG-Niederspannungsrichtlinie (73/23/ EWG). Angewandte Normen: EN 61010-1 (DIN VDE 411 Teil 1) Ausgabe 1994-03 Anbringung der CE-Kennzeichnung: 1996 Metzingen, den 02.01.1996 REFU elektronik GmbH ................................................... H. Baumann Geschäftsleitung Die Sicherheitshinweise der mitgelieferten Produktdokumentation sind zu beachten. © LEYBOLD VAKUUM GMBH – 32 – GA 05.212/7 - 04/97 WERKSBESCHEINIGUNG Werksbescheinigung Dokumenten-Nr.: EMV0196 / NT10, NT12, NT13 Hersteller: REFU elektronik GmbH Produktbezeichnung: Typ: NT10, NT12, NT13 Katalog-Nr.: 859 00 859 01 859 04 859 05 859 06 859 07 Das bezeichnete Produkt erfüllt bei bestimmungsgemäßer Anwendung die Anforderungen der EMV-Richtlinie 89/336/EWG. Die Bemessung erfolgte unter Berücksichtigung folgender Normen: EN 500 82-2 EN 55011 (DIN VDE0875 Teil 1) EN 61000-3-2 EN 61000-3-3 Hinweis Angaben zur EMV-gerechten Installation für den bestimmungsmäßigen Betrieb und weitere zutreffende Hinweise in der mitgelieferten Produktdokumentation sowie die jeweils zutreffenden Anschlußbedingungen müssen beachtet werden. Metzingen, den 02.01.1996 REFU elektronik GmbH ................................................... H. Baumann Geschäftsleitung © LEYBOLD VAKUUM GMBH – 33 – GA 05.212/7 - 04/97 TABLE OF CONTENTS SAFETY-WARNING INFORMATION .................................. 4 1 DESCRIPTION ........................................................... 5 1.1 Function and design ...............................................................5 1.1.1 TURBOTRONIK NT 10 .................................................... 6 1.1.2 TURBOTRONIK NT 12 .................................................... 6 1.1.3 TURBOTRONIK NT 13 with pressure trigger ................... 6 1.2 Technical data ........................................................................7 1.3 Scope of supply ...................................................................... 7 1.4 Accessories ............................................................................ 9 2 TURBOTRONIK NT10 CONNECTION AND OPERATION 2.1 Equipment configuration ....................................................... 10 2.1.1 Supply voltage range ...................................................... 10 2.1.2 Relay assignment ........................................................... 10 2.1.3 Resonance monitoring ................................................... 10 2.2 Installing TURBOTRONIK .................................................... 11 2.3 Electrical connection ............................................................ 11 2.3.1 Connecting the relay contacts ........................................ 11 2.4 Operating modes/remote control .......................................... 12 1. Operation via the “START” and “STOP” buttons .................. 12 2. Remote control via 2 external pushbuttons .......................... 12 3. Remote control via an external switch ................................. 13 4. Automatic start when the power is switched-on ................... 13 2.5 Operator control ..................................................................... 13 3 TURBOTRONIK NT12 CONNECTION AND OPERATION 3.1 Equipment configuration ....................................................... 14 3.1.1 Supply voltage range ...................................................... 14 3.1.2 Relay assignment ........................................................... 14 3.1.3 Resonance monitoring function ...................................... 14 3.2 Installing TURBOTRONIK .................................................... 15 3.3 Electrical connection ............................................................ 15 3.3.1 Connecting the relay contacts ........................................ 15 3.4 Operating modes/remote control .......................................... 16 1. Remote control via 2 external pushbuttons .......................... 16 2. Remote control via an external switch ................................. 17 3. Automatic start when the power is switched-on ................... 17 3.5 Operator control ................................................................... 17 4 TURBOTRONIK NT13 CONNECTION AND OPERATION 4.1 Equipment configuration ....................................................... 18 4.1.1 Supply voltage range ...................................................... 18 4.1.2 Relay assignment ........................................................... 18 4.1.3 Resonance monitoring function ...................................... 18 4.2 Installing TURBOTRONIK .................................................... 19 © LEYBOLD VAKUUM GMBH –2– GA 05.212/7 - 04/97 TABLE OF CONTENTS 4.3 Electrical connection ............................................................ 19 4.3.1 Connecting the relay contacts ........................................ 19 4.3.2 Connecting the test sockets ........................................... 20 4.4 Operating modes/remote control .......................................... 21 4.5 Operator control ................................................................... 21 5 SETTING THE EQUIPMENT CONFIGURATION 5.1 Selecting the supply voltage range ....................................... 22 5.2 Withdrawing the PC boards .................................................. 23 5.3 Locations of the plug-in and jumpers .................................... 24 5.4 Relay statuses ...................................................................... 24 5.5 Setting the configuration of relay K1 ..................................... 25 5.6 Setting the configuration of relay K2 ..................................... 25 5.7 Setting the resonance monitoring funct. ................................. 26 5.8 Jumper field S2 .................................................................... 26 5.9 Measuring the motor frequency ............................................ 27 5.10 Connecting examples for remote control ............................. 28 6 TROUBLESHOOTING EC DECLARATION OF MANUFACTURE .......................... 31 EC DECLARATION OF CONFORMITY ............................. 32 FACTORY CERTIFICATE ................................................ 33 Fig. 1 TURBOTRONIK NT10 ...........................................................6 Fig. 2 TURBOTRONIK NT12 ...........................................................6 Fig. 3 TURBOTRONIK NT13 ...........................................................6 Fig. 4 Dimension drawings of the Turbotronik NT10, NT12, NT13 ...8 Fig. 5 Rear panel of the TURBOTRONIK NT10 ............................. 12 Fig. 6 TURBOTRONIK NT 12, pin assignment .............................. 16 Fig. 7 TURBOTRONIK NT 13, pin assignment .............................. 20 Fig. 8 Voltage at the front panel test sockets ................................. 20 Fig. 9 Setting the supply voltage range .......................................... 22 Fig.10 Supply voltage selector switch TURBOTRONIK NT12 ....... 22 Fig. 11 PC board layouts ............................................................... 24 Fig. 12 - 16 Setting the configuration of relay K1 ............................ 25 Fig. 17 - 21 Setting the configuration of relay K2 ....................... 25/26 Fig. 22 Setting the resonance monitoring function .......................... 26 Fig. 23 - 26 Jumper field S2 ............................................................ 27 Fig. 27 Diagram, measuring the motor frequency ........................... 27 Fig. 28 Measuring the motor frequency ......................................... 27 Fig. 29 - 34 Connecting examples for remote control ..................... 28 Note (5/3) = refers to figure. The first digit refers to the number of the figure, the second digit to the position. © LEYBOLD VAKUUM GMBH –3– GA 05.212/7 - 04/97 SAFETY-WARNING INFORMATION 1 Warning about the potential hazards of this equipment This unit has voltages at hazarous potentials! Death, severe bodily injury or significant material damage can occur if the instructions in this Instruction Manual are not observed. Only appropriately qualified personnel may work with this equipment. This personnel must be knowledgeable about all of the warning information and measures which are specified in this Instruction Manual for the transport, installation, operator control and troubleshooting of the equipment. The successful and safe handling of this equipment requires that it is professionally transported, installed and handled. Caution Disconnect the equipment from the supply and lock-out against accidental reclosure before opening-up the equipment. When connecting an external voltage of > 42 V to the terminals of the unit, the VDE safety regulations must be observed! Caution This device contains devices which can be destroyed by electrostatic discharge (ESD)! Qualified personnel Qualified personnel are personnel who are either suitably qualified electricians or have had some form of electrical training in the sense of EN 60204 Part 1, 3.55 and 3.30. Proper use and operation The electronic frequency converters NT10, NT12 and NT13 are exclusively used for feeding turbo-molecular pumps ♦ TURBOVAC 50 (Cat. No. 854 00, 854 01, 854 02 and 853 99) ♦ TURBOVAC 50D (Cat. No. 856 60, 856 61, 856 62 and 856 63) The connecting cables, specified under Section 1.4 must be used to connect-up the above mentioned turbo-molecular pumps. The EC manufacturer’s declaration becomes null and void if the unit is changed without consulting us beforehand, or if it is used for another purpose than it was originally designed for! It is not permissible to make changes or modifications on the equipment for safety reasons. We retain the right to change the mechanical design and revise the technical data. Definition of caution Caution: Is specified for working- and operating procedures which must be precisely maintained in order to avoid personnel being subject to hazards. Definition of warning Warning: Refers to working- and operating procedures which must be precisely maintained in order to prevent the equipment being damaged or destroyed. Keep the Instruction Manual in a safe place for future use! © LEYBOLD VAKUUM GMBH –4– GA 05.212/7 - 04/97 DESCRIPTION 1 1.1 Function and design Application and function The electronic TURBOTRONIC NT 10, NT 12 and NT 13 frequency converters are used to drive TURBOVAC 50 and 50 D. They differ as follows: n the housing n the connectors, n operator control possibilities n scope of supply, and n in the configuration in which they are supplied. The electronic frequency converters convert the single-phase supply voltage into a three-phase AC voltage to control the TURBOVAC induction motor. The frequency converters operate according to a specific cycle: The motor is driven for approximately 1 second and the monitoring measurements are executed in the following 0.1 seconds. Operating statuses The following operating statuses are displayed using LEDs: n supply voltage present n run-up n standard and n fault Optionally Various signals are available via 2 relay outputs. Run-up and operation After the start, the pump continuously accelerates with the maximum current. This is identified by the yellow LED „ACCEL“ (acceleration) which is lit. The green „NORMAL“ LED is lit and the „ACCEL“ LED goes dark when approximately 90% of the rated speed is reached. The speed is continuously monitored and controlled. When the speed cannot be maintained, even at the maximum current, as a result of external influences, e.g. excessive gas feed, the speed decreases and the pump continues to operate. When a rotational frequency of approximately 500 Hz is fallen below, the „ACCEL“ LED lights-up on the frequency converter. The TURBOTRONIK now attempts to accelerate the pump up to its reference frequency. Outputs The frequency converter outputs are no-load- and short-circuit proof. The electronic TURBOTRONIK frequency converters can be connected to external open-loop control- and monitoring devices with electrical isolation. The cable connections between TURBOTRONIK - TURBOVAC can be a maximum of 100 m. © LEYBOLD VAKUUM GMBH –5– GA 05.212/7 - 04/97 DESCRIPTION 1 1.1.1 TURBOTRONIK NT 10 Desktop unit or for mounting in a rack 1/4 19”, 3 HE Front panel: Membrane keypad, 4 LEDs, “START” and “STOP” keys Housing: Extruded aluminum housing. Rear panel: 10-pin Phönix connector for remote monitoring and control, 5-pin connector to connect the TURBOVAC, 3 m long power cable with protective contact connector and þ power switch Fig.1 TURBOTRONIK NT10 1.1.2 TURBOTRONIK NT 12 Chassis unit Front panel: 4 LEDs. Housing: Sheet-steel housing with screen plate Rear panel: Plug connector strip in accordance with DIN 41 612 with 15 contacts to connect the TURBOVAC, the power and the remote control and monitoring. þ Note A switch must be installed on the system side to allow the equipment to be isolated from the supply! Fig.2 TURBOTRONIK NT12 1.1.3 TURBOTRONIK NT 13 with pressure trigger For mounting in rack ¼ 19“ rack, 3 HE Front panel: Membrane-coated front panel with 4 LEDs and 2 test sockets Housing: Extruded-aluminum housing. Rear panel: Sheet steel, plug connector strip in accordance with DIN 41 612 with 15 contacts to connect the TURBOVAC, the power and the remote control and monitoring. þ Note Fig.3 TURBOTRONIK NT13 © LEYBOLD VAKUUM GMBH A switch must be installed on the system side to permit the equipment to be isolated from the line supply! –6– GA 05.212/7 - 04/97 DESCRIPTION 1 1.2 Technical data Supply Supply voltage ranges ........................... 100-140 V AC, -10%/+16% Can be switched-over to ................................. 200-240 V AC, ±10% Supply frequency ................................................................ 50/60 Hz Line fuse (F1 internal) .................................................. T 1A / 250 V Rated speed of the TURBOVAC ................ 72,000 RPM = 1200 Hz Power consumption Briefly when accelerating ................................... up to 64 VA (45 W) Continuously in operation (rated speed) ..................... 35 VA (18 W) Idle operation (no-load) ................................................... 6 VA (3 W) Outputs Voltage ............................................................................... 3 x 150 V Supply frequency ................................................................. 1200 Hz Frequency range of the output voltage ........................ 220-1250 Hz Ambient temperature in operation ...................................................................... 0°C - 40°C storage ...................................................................... -40°C to +85°C Max. load capability of the relay contacts Switching voltage ......................................... ≤ 250 V AC, ≤ 30 V DC Switching current ............................................... ≤ 6 A AC, ≤ 5 V DC Switching power for DC ....................................................... ≤ 150 W Switching power for AC .................................................... ≤ 1500 VA Degree of protection The units have degree of protection IP20 in accordance with EN 60 529. An increased degree of protection, e.g. IP54 can only be realized by mounting the units in other housings. Weigt TURBOTRONIK NT 10 ............................................................ 1.5 kg TURBOTRONIK NT 12 ............................................................ 1.5 kg TURBOTRONIK NT 13 ............................................................ 1.5 kg Dimensions and housing dimensions TURBOTRONIK NT 10 ................................................ 1/4 19”, 3 HE TURBOTRONIK NT 13 ................................................ 1/4 19”, 3 HE (refer to Fig. 4) 1.3 Scope of supply The connecting cable to the TURBOVAC is not included in the scope of supply! 1.3.1 TURBOTRONIK NT 10 TURBOTRONIK NT 10, miniature fuses, mating connector for the Phönix connector (control terminal strip X10), attachable feet for desktop operation, 4 adhesive feet, four M 3x8 screws, the power cable is permanently attached. 1.3.2 TURBOTRONIK NT 12 TURBOTRONIK NT 12, miniature fuses 1.3.3 TURBOTRONIK NT 13 TURBOTRONIK NT 13, miniature fuses, 4 screws for rack installation © LEYBOLD VAKUUM GMBH –7– GA 05.212/7 - 04/97 DESCRIPTION 1 TURBOTRONIK NT10 TURBOTRONIK NT12 TURBOTRONIK NT13 Panel cut-out for TURBOTRONIK NT10 and N13 Fig. 4 Dimension drawings of the TURBOTRONIK NT10, NT12, NT13 © LEYBOLD VAKUUM GMBH –8– GA 05.212/7 - 04/97 DESCRIPTION 1 1.4 Accessories Ordering information Cat. No. Electronic frequency converter TURBOTRONIK NT 10 200 V - 240 V ................................................................... 859 00 100 V - 120 V ................................................................... 859 01 TURBOTRONIK NT 12 200 V - 240 V ................................................................... 859 04 100 V - 120 V ................................................................... 859 05 TURBOTRONIK NT 13 200 V - 240 V ................................................................... 859 06 100 V - 120 V ................................................................... 859 07 Connecting cable Connecting cable from the TURBOVAC to TURBOTRONIK NT10 3 m long ........................................................................... 5 m long ........................................................................... 10 m long ......................................................................... 20 m long ......................................................................... 857 50 857 51 857 52 857 53 TURBOTRONIK NT12 3 m long ........................................................................... 857 54 TURBOTRONIK NT13 1 m long ........................................................................... 857 56 A mating connector for the plug connector strips X11 including 15 contact pins are supplied with the connecting cable (only NT12, NT13). Accessories to mount NT 12 in a rack on request. © LEYBOLD VAKUUM GMBH –9– GA 05.212/7 - 04/97 TURBOTRONIK NT10 CONNECTION AND OPERATION 2 The equipment may only be connected-up by a suitably trained electrician or under his supervision in accordance with the valid IEC (international), EN (European) and/or domestic guidelines. Caution The TURBOTRONIK NT10 has parts and components at hazardous voltage levels. Before carrying out any work with the equipment open, it must be isolated from the line supply and locked-out against accidental re-closure. 2.1 Equipment configuration 2.1.1 Supply voltage range TURBOTRONIK NT10 can be operated with two supply voltages; between 200-240 V or between 100-120 V. It is set in the factory for a specific supply voltage range which can be identified by the Order No., refer to the Catalog No. under Section 1.4. Caution TURBOTRONIK will be damaged if it is connected to the wrong line supply voltage. Refer to Section 5.1 when changing-over the supply voltage range. 2.1.2 Relay assignment Status when shipped TURBOTRONIK NT10 has 2 relays; the “NORMAL” (K1) and “FAIL”/ fault (K2) signals are available at its outputs. Changing-over the relay assignment Relay K1 is available as changeover contact. The relay function of K2 can be changed using a jumper. Further, relay K2 can be changed over from an NO contact to an NC contact. K2: Contrlling the prevacuum pump Relay K2 can be used to control the “pre-vacuum pump”. In this case, it is active after the start, and inactive after the TURBOVAC has been brought to a standstill, also refer to Section 5. 2.1.3 Resonance monitoring Tip We recommend that if you change the relay assignment or if the resonance monitoring is disabled, then this should either be noted on the equipment itself, or documented in the associated Instruction Manual. © LEYBOLD VAKUUM GMBH TURBOTRONIK NT 10 has a resonance monitoring function for the TURBOVAC 50D. The resonance monitoring function shuts down the drive and displays a fault if the pump remains in the speed range between 45,000 and 55,000 RPM for longer than approximately 1 minute. When shipped, the resonance monitoring function is active, and can be disabled when operating the TURBOVAC 50; also refer to Section 5.6. Caution If TURBOVAC 50D is used without the resonance monitoring function, this can lead to bearing damage. – 10 – GA 05.212/7 - 04/97 TURBOTRONIK NT10 CONNECTION AND OPERATION 2 2.2 Installing TURBOTRONIK Operating as desktop unit TURBOTRONIK NT 10 is supplied in a housing as desktop unit. When required, feet can be attached to the lower side. The feet can be attached by inserting them into the lowest groove of the corner strip from the back and pushing them towards the front until they lock-in. Attach the four adhesive feet to the lower side of the equipment feet and in the rear area of the unit. Rack insatllation TURBOLINK NT 10 can be installed in a rack. Ensure that it is adequately ventilated. In operation, it is not permissible that the ambient temperature exceeds 40°C. If the rear panel of the TURBOTRONIK is no longer accessible after it has been installed, switch-on the power switch (5/2) beforehand. Four holes in the front panel are used to install it in 19” racks. 2.3 Electrical connection Insert the connecting cable to the TURBOVAC at the socket (5/4) and at the TURBOVAC motor. The connector is secured using the screw provided. Note It is impossible to incorrectly insert the pump connector as a result of the different pins. When correctly assembled, this plug connection has degree of protection IP65. If you assembly your own connecting cable, observe that it can be a maximum of 100 m long. Only use double-screened cables with the appropriate insulation. If you require any further information, please inquire. Caution Protective conductor connection High discharge currents! If the connecting cable between the TURBOVAC and TURBOTRONIK is longer than 10 m, protective ground must be connected to both units. Connect the grounding cable (5/3) to the central grounding rail. Connect the supply using the power cable (5/1). 2.3.1 Connecting the relay contacts The “NORMAL” and “ACCEL” (acceleration) operating statuses can be interrogated at pins 5,6,7. • Pins 6-7 closed: “NORMAL” • Pins 5-6 closed: “ACCEL”, standstill or fault When a fault occurs, pins 9 and 10 are jumpered (NO contact). þ The relays can be assigned differently, also refer to Section 2.3.2 and Chapter 5. The supply voltage or functional low voltage can be connected to the relay contacts. Observe the appropriate safety regulations. © LEYBOLD VAKUUM GMBH – 11 – GA 05.212/7 - 04/97 TURBOTRONIK NT10 CONNECTION AND OPERATION 2 5 Control inputs and relay outputs (Phönix connector, X10) 1 2 3 4 5 6 7 8 9 10 4 TURBOVAC power supply 3 Ground cable connection (M4 stud with nut and serated washer) TURBOVAC 1 2 3 START STOP 4 5 6 NORMAL OPERATION 7 8 9 10 FAILURE/ FOREPUMP MAIN 2 Power switch HV PE FUSE: 100..120V/T1A 200..240V/T1A 1 Power cable Fig.5 Rear panel of the TURBOTRONIK NT10 2.4 Operating modes/remote control When TURBOTRONIK NT 10 is shipped, 4 operating modes are possible by appropriately connecting inputs 1, 2 and 3 of control connector X10 at the rear panel of the TURBOTRONIK. The equipment configuration can also be changed-over to other functions using plug-in jumpers and other jumpers; also refer to Section 5. Refer to Section 5.9 for circuit examples for remote control. Operating mode 1 1. Operation via the “START” and “STOP” buttons Jumper between pins 2 and 3 (status when shipped). The TURBOVAC is started and stopped using the “START” and “STOP” buttons on the membrane keypad. Operating mode 2 © LEYBOLD VAKUUM GMBH 2. Remote control via 2 external pushbuttons The TURBOVAC starts if “START” (pin 1) is connected to pin 2 for a minimum of 3 seconds using an NO contact. The TURBOVAC stops if the connection between the two inputs, pin 2 and 3 “STOP” is disconnected using an NC contact. – 12 – GA 05.212/7 - 04/97 TURBOTRONIK NT10 CONNECTION AND OPERATION Operating mode 3 2 3. Remote control via an external switch Connect pins 1 and 2 (jumper). The TURBOVAC starts if “STOP2” (pin 3) is connected to the jumper, pin 1-2. The TURBOVAC stops if this connection is interrupted. Operating mode 4 4. Automatic start when the power is switched-on Connect the three pins 1, 2 and 3 with one another. TURBOVAC starts automatically when the supply voltage is connected. TURBOTRONIK can also be controlled via relays, optocouplers or open-collector circuits. 2.5 Operator control Starting TURBOVAC Switch-on TURBOTRONIK, the “POWER” LED must light-up. Depress the “START” button, or start TURBOVAC via remote control, refer to Section 2.4. The pump runs-up. The “ACCEL” LED (acceleration) lights-up. The “NORMAL” LED lights-up and the “ACCEL” LED goes dark when approximately 90% of the rated speed is reached. Switching-off TURBOVAC Depress the “STOP” button, or shutdown TURBOVAC via remote control, refer to Section 2.4. Only the “POWER” LED is lit. After a fault has been removed, also depress the “STOP” button, or shutdown TURBOVAC via remote control and then restart it. © LEYBOLD VAKUUM GMBH – 13 – GA 05.212/7 - 04/97 TURBOTRONIK NT12 CONNECTION AND OPERATION 3 The equipment may only be connected-up by a suitably trained electrician or under his supervision in accordance with the valid IEC (international), EN (European) and/or domestic guidelines. Caution The plug connector strip of TURBOTRONIK NT12 is not shockproof. Thus, the equipment must be installed in a housing which is shockproof. The TURBOTRONIK NT 12 has components and parts at hazardous voltage levels. Before carrying out any work with the equipment open, it must be isolated from the line supply and locked-out against accidental re-closure. 3.1 Equipment configuration 3.1.1 Supply voltage range TURBOTRONIK NT 12 can be operated with two supply voltages; between 200-240 V or between 100-120 V. It is set in the factory for a specific supply voltage range which can be identified by the Order No., refer to Catalog No. under Section 1.4. Caution TURBOTRONIK will be damaged if it is connected to the wrong line supply voltage. Refer to Section 5.1 when changing-over the supply voltage range. 3.1.2 Relay assignment Status when shipped TURBOTRONIK NT 12 has 2 relays; the “NORMAL” (K1) and “FAIL”/ fault (K2) signals are available at its outputs when the equipment is shipped. Changing-over the relay assignment These relay functions can be changed using a jumper. Further, both relays can be changed over from an NO contact to an NC contact. Also refer to Section 5 K2: Controlling the pre-vacuum pump Relay K2 can be used to control the “pre-vacuum pump”. In this case, it is active after the start, and inactive after the TURBOVAC has been shutdown. 3.1.3 Resonance monitoring function TURBOTRONIK NT 12 has a resonance monitoring function for the TURBOVAC 50D. The resonance monitoring function shuts down the drive and displays a fault if the pump remains in the speed range between 45,000 and 55,000 RPM for longer than approximately 1 minute. When shipped, the resonance monitoring function is active, and can be disabled when operating the TURBOVAC 50; also refer to Section 5.6. © LEYBOLD VAKUUM GMBH – 14 – GA 05.212/7 - 04/97 TURBOTRONIK NT12 CONNECTION AND OPERATION 3 Caution If TURBOVAC 50D is used without the resonance monitoring function, this can lead to bearing damage. Tip We recommend that if you change the relay assignment or if the resonance monitoring function is disabled, then this should either be noted on the equipment itself, or documented in the associated Instruction Manual. Further, the assignment of the control inputs can be changed so that the motor frequency of the TURBOVAC can be measured, also refer to Section 5.8. 3.2 Installing TURBOTRONIK Mount the TURBOTRONIK using M3 bolts. The cover has 4 holes for this purpose, refer to Fig. 4, Dimension drawings Ensure that the equipment is adequately ventilated! In operation, it is not permissible that the ambient temperature exceeds 40°C. 3.3 Electrical connection The supply, the TURBOVAC, relays and control inputs are connected via the plug connector strip at the rear of the unit; refer to Fig. 6 for the pin assignment. Caution The line supply voltage can be present at various locations of the connector strip. Only touch the connector connections when the TURBOTRONIK is isolated from the line supply. A mating connector to the plug connector strip is supplied with the connecting cable to TURBOVAC. Connect the connecting cable in accordance with the attached drawing “installation information, pump cable”. If you assemble you own connecting cable, observe that it can be a maximum of 100 m long. Only use double screened cables with the appropriate insulation. If you require any further information please inquire. Caution Protective conductor connection High discharge currents! If the connecting cable between the TURBOVAC and TURBOTRONIK is longer than 10 m, protective ground must be connected to both units. 3.3.1 Connecting the relay contacts The “NORMAL” and “ACCEL” (acceleration) operating statuses can be interrogated at pins 8 and 10. • Pins 8-10 closed: “NORMAL” • Pins 8-10 open: “ACCEL”, standstill or fault When a fault occurs, relay 2 pulls-in and pins 12 and 14 are jumpered (NO contact). © LEYBOLD VAKUUM GMBH – 15 – GA 05.212/7 - 04/97 TURBOTRONIK NT12 CONNECTION AND OPERATION 3 The relays can be assigned differently, also refer to Section 5.4. The supply voltage or functional extra low voltage can be connected to the relay contacts. Observe the appropriate safety regulations. Messerkontaktleiste X11 Input 3: "STOP 2" 4 Input 2: "STOP 1" 8 8/10 relay contact "NORMAL" closed "ACCEL" open 6 10 12/14 relay contact "Fail" "Fail" = closed TURBOVAC L1 L3 PE (protective condu.) 2nd cable screen 12 14 Input 1: "START" 20 L2 24 Ground 1st protective conductor 28 N (neutral conductor) 32 PE (protective conductor) 22 26 SUPPLY L (phase) 16 18 30 Fig. 6 TURBOTRONIK NT 12 Pin assignment of the plug connector strip when shipped 3.4 Operating modes/remote control When TURBOTRONIK NT 12 is shipped, 3 operating modes are possible by appropriately connecting inputs, pins 4, 6 and 16 of the plug connector strip. The equipment configuration can also be changed-over to other functions using plug-in jumpers and other jumpers; also refer to Section 5. Refer to Section 5.9 for circuit examples for remote control. Operating modet 1 1. Remote control via 2 external pushbuttons TURBOVAC starts if “START” (pin 16) is connected for at least 3 seconds with pin 4 via an NO pushbutton. TURBOVAC stops if the connection to the “STOP” inputs (pins 4 and 6) is interrupted using an NC contact. © LEYBOLD VAKUUM GMBH – 16 – GA 05.212/7 - 04/97 TURBOTRONIK NT12 CONNECTION AND OPERATION Operating mode 2 3 2. Remote control via an external switch Establish a conection between pins 4 and 16. TURBOVAC starts if “STOP2” (pin 6) is connected to pin 4 via a switch. TURBOVAC stops if the connection is re-interrupted. Operating mode 3 3. Automatic start when the power is switched-on Connect all of the three pins (4, 6, 16) with one another. TURBOVAC starts automatically when the supply voltage is connected. TURBOTRONIK can also be controlled via relays, optocouplers or open-collector circuits. 3.5 Operator control Strating TURBOVAC Switch-on the TURBOTRONIK power supply, the “POWER” LED must light-up. Start TURBOVAC via remote control, refer to Section 3.4. TURBOVAC accelerates. The “ACCEL” (acceleration) LED lightsup. The “NORMAL” LED lights-up and the “ACCEL” LED goes dark when approximately 90% of the rated speed is reached. Switching-off TURBOVAC Switch-off TURBOVAC via the remote control; refer to Section 3.4. Only the “POWER” LED is lit. After a fault has been removed, also shutdown the TURBOVAC via the remote control and then restart it. © LEYBOLD VAKUUM GMBH – 17 – GA 05.212/7 - 04/97 TURBOTRONIK NT13 CONNECTION AND OPERATION 4 The equipment may only be connected-up by a suitably trained electrician or under his supervision in accordance with the valid IEC (international), EN (European) and/or domestic guidelines. Caution The plug connector strip of TURBOTRONIK NT13 is not shockproof. Thus, the equipment must be installed in a housing which is shockproof. The TURBOTRONIK NT13 has components and parts at hazardous voltages. Before carrying out any work with the equipment open, it must be isolated from the line supply and locked-out against accidental re-closure. 4.1 Equipment configuration 4.1.1 Supply voltage range TURBOTRONIK NT 13 can be operated with two supply voltages; between 180-260 V or between 90-140 V. It is set in the factory for a specific supply voltage range which can be identified from the Order No., refer to Catalog No. under Section 1.4. Caution TURBOTRONIK will be damaged if it is connected to the wrong line supply voltage. Refer to Section 5.1 when changing-over the supply voltage range. 4.1.2 Status when shippel Relay assignment TURBOTRONIK NT13 has 2 relays; Relay K 1 is used as pressure trigger. It is switched, if a specified DC link current in the TURBOTRONIK is fallen below. This DC link current corresponds to a specific pressure under defined conditions. When shipped, relay K 2 is not used. When it is connected, the supply voltage outputs at pins 12 and 14 are no longer available. Changing-over the relay assignment The relays, when required, can be assigned, so that K1 indicates the “NORMAL” operating status, and relay K2 can be used to indicate faults or to control the pre-vacuum pump. Further, it is possible to changeover from NC contact to NO contact. Also refer to Section 5. Tip 4.1.3 We recommend that if you change the relay assignment or if the resonance monitoring function is disabled, then this should either be noted on the equipment itself, or documented in the associated Instruction Manual. TURBOTRONIK NT 13 has a resonance monitoring function for the TURBOVAC 50D. The resonance monitoring function shuts down the drive and displays a fault if the pump remains in the speed range between 45,000 and 55,000 RPM for longer than approximately 1 minute. When shipped, the resonance monitoring function is active, and can be disabled when operating the TURBOVAC 50; also refer to Section 5.6. © LEYBOLD VAKUUM GMBH Resonance monitoring function – 18 – GA 05.212/7 - 04/97 TURBOTRONIK NT13 CONNECTION AND OPERATION 4 Caution If TURBOVAC 50D is used without the resonance monitoring function, this can lead to bearing damage. 4.2 Installing TURBOTRONIK Rack mounting TURBOTRONIK NT13 is designed for mounting in 19” racks. Four holes are provided in the front panel for mounting. Ensure that the equipment is adequately ventilated and, in operation, it is not permissible that the ambient temperature exceeds 40°C. 4.3 Electrical connection The supply, the TURBOVAC, relays and control inputs are connected via the plug connector strip at the rear of the unit; refer to Fig. 7 for the pin assignment. Caution The line supply voltage can be present at various locations on the connector strip. Only touch the connector connections when the TURBOTRONIK is isolated from the line supply. A mating connector to the plug connector strip is supplied with the connecting cable to TURBOVAC. Connect-up the connecting cable in accordance with the attached drawing “installation information, pump cable”. If you assemble you own connecting cable, observe that it can be a maximum of 100 m long. Only use double screened cables with the appropriate insulation. If you require any further information please inquire. Caution Protective conductor connection High discharge currents! If the connecting cable between the TURBOVAC and TURBOTRONIK is longer than 10 m, protective ground must be connected to both units. 4.3.1 Connecting the relay contacts (also refer to Fig. 8) A pressure trigger can be interrogated at pins 8 and 10 n Pins 8-10 closed: The DC link current in the TURBOTRONIK is lower than a specified limit value n Pins 8-10 open: The DC link current in the TURBOTRONIK is greater than a specified limit value. The limit value setting is very dependent on the particular application. When required, please contact us. The supply voltage or functional extra low voltage can be connected to the relay contacts. Observe the appropriate safety regulations. © LEYBOLD VAKUUM GMBH – 19 – GA 05.212/7 - 04/97 TURBOTRONIK NT13 CONNECTION AND OPERATION 4 Plug connector strip X11 NT13 Not assigned/connected when the equipment is shipped 4 Not assigned/connected when the equipment is shipped 8 8/10 relay contact "pressure trigger" 12 Supply N (neutral conductor) e.g. for the fan 6 10 Supply L (phase) e.g. for the fan TURBOVAC 14 L1 18 L3 22 PE (protective conduct.) 2nd cable screen Not assigned/connected when the equipment is shipped 20 L2 24 Ground 1st cable screen 28 N (neutral conductor) 32 PE (protective conductor) 26 SUPPLY L (phase) 16 30 Fig. 7 TURBOTRONIK NT 13; Pin assignment of the plug connector strip when shipped 4.3.2 Connecting the test sockets A voltage is available at the front panel test sockets, which is proportional to the DC link current in the TURBOTRONIK ( 1 mV = 1 mA). For specific operating statuses, this current can be assigned a particular inlet pressure; also refer to Fig. 8. Voltage at the test sockets Voltage The relationship between the pressure and current depends on the particular application. Please contact us if you have any questions. Quiescent voltage in the unit Quiescent voltage is reduced TURBOVAC accelerates with maximum current Current and voltage decrease with decreasing inlet pressure time approx. 90 s Fig. 8 Voltage at the front panel test sockets as a function of time when TURBOTRONIK is switch-on (qualitative) © LEYBOLD VAKUUM GMBH – 20 – GA 05.212/7 - 04/97 TURBOTRONIK NT13 CONNECTION AND OPERATION 4 Caution The measuring voltage is at line supply potential. Use insulated cables to connect-up a measuring unit so that it is not possible to come into contact with this voltage. 4.4 Operating modes/remote control When shipped, the only mode which can be used with the TURBOTRONIK NT 13 is “automatic start after the supply is switched-on”. Changing the operating mode TURBOTRONIK NT 13 can also be changed-over to remote control, as is described in Section 3.4 for TURBOTRONIK NT 12. Also refer to Section 5. 4.5 Operator control Starting TURBOVAC Switch-on the power for the TURBOTRONIK, the “POWER” LED must light-up. TURBOVAC simultaneously starts. The “ACCEL” (acceleration) LED lights-up. The “NORMAL” LED lights-up and the “ACCEL” LED goes dark when approximately 90% of the rated speed is reached. The pressure trigger relay (pins 8 and 10) closes when the DC link current in the TURBOTRONIK falls below the specified limit value. Switching-off TURBOVAC Shutdown TURBOVAC and TURBOTRONIK by switching-off the supply voltage. After a fault has been removed, also shutdown TURBOVAC and TURBOTRONIK, and then switch-on again. © LEYBOLD VAKUUM GMBH – 21 – GA 05.212/7 - 04/97 SETTING THE EQUIPMENT CONFIGURATION 5 5.1 Selecting the supply voltage range TURBOTRONIK NT10 and NT13 The supply voltage selector switch (9/3) is located inside the unit close to the front panel. n Remove the two screws (9/1) on the righthand and lefthand sides of the unit, and carefully remove the front panel by swinging it out towards the lefthand side. n Changeover the supply voltage selector switch (9/3). Re-install the front panel. When changing-over the supply voltage range, the fuse does not have to be changed 1 Screws 2 Catches 3 Supply voltage selector switch 4 Ribbon cable connector Fig. 9. Setting the supply voltage range; remove front panel NT10 (NT 13 essentially the same) TURBOTRONIK NT12 The supply voltage selector switch of the TURBOTRONIK NT12 is accessible from the front through an air ventilation slot. It can be changed-over from the outside using a small screwdriver; also refer to the labelling on the housing. When changing-over the supply voltage range, the fuse does not have to be changed. Setting the supply voltage range for NT12 Supply voltage selector switch Fig.10 Supply voltage selector switch TURBOTRONIK NT12 © LEYBOLD VAKUUM GMBH – 22 – GA 05.212/7 - 04/97 SETTING THE EQUIPMENT CONFIGURATION 5 5.2 Withdrawing the PC boards The PC boards must be removed from the housing so that the jumpers and wire jumpers are accessible to change the equipment configuration. Refer to Fig. 11 where the two unfolded PC boards are illustrated 5.2.1 NT10 n Remove the two screws (9/1) located on the righthand and lefthand sides of the unit and then carefully remove the front panel by swinging it out to the left. n Press the catches (9/2) together and withdraw the inner part of the connector (9/4) several millimeters. n Remove the ribbon cable from the connector. n Unscrew the rear panel, and withdraw the PC boards towards the rear our of the housing, unscrew and fold-out Refer to Sections 5.4 to 5.7 when changing the unit configuration n Place the two PC boards over one another again, screw together and insert. n Re-insert the ribbon cable n Re-install the front- and rear panels. 5.2.2 NT12 n Remove the four screws on the cover, carefully withdraw the cover and remove the grounding cable. n Remove the screws holding the PC boards together and foldout. Refer to Sections 5.4 to 5.7 when changing-over the unit configuration n Place the PC boards on top of one another again, screw together, re-insert the grounding cable and re-install the cover 5.2.3 NT13 n Remove the two screws (9/1) at the righthand and lefthand sides of the unit and then remove the front panel. n Remove the connecting cable to the test sockets in the front panel Tip We recommend that if you change the relay assignment of if the resonance monitoring function is disabled, then this should either be noted on the equipment itself, or documented in the associated Instruction Manual. n Unscrew the rear panel and remove the PC boards towards the back out of the housing, remove the screws holding them together and lay out. Refer to Sections 5.4 to 5.7 when changing-over the unit configuration n Place the PC boards one on top othe other again together again, screw and re-install n Connect-up the test sockets again in the front panel ensuring that the polarity is correct. n Re-install the front- and rear panels. © LEYBOLD VAKUUM GMBH – 23 – GA 05.212/7 - 04/97 SETTING THE EQUIPMENT CONFIGURATION 5 5.3 Locations of the plug-in and jumpers S2 K2 X16 X11 X15 X14 X13 X12 X12 X14 X16 X17 X18 X18 X13 X15 X17 Fuse F1 T 1A/ 250V X21 X19 X20 115V 230V Supply voltage selector switch K1 S11 S12 S17 S18 S13 S14 S6 X10 S5 Fig. 11 PC board layouts 5.4 Relay statuses Relay function Operating status Supply ON ACCEL. NORMAL FAIL STOP Normal Off Off On Off Off Pressure trigger Off Off Off Off Fail (fault) Off Off Off On Off Control, pre-vacuum pump Off On On On Off Relay K1 On *) Relay K2 *) IDC link (DC link current) < Ilimit (current limit) specified by the pressure trigger potentiometer Off = not active; On = active © LEYBOLD VAKUUM GMBH – 24 – GA 05.212/7 - 04/97 SETTING THE EQUIPMENT CONFIGURATION 5 5.5 Setting the configuration of relay K1 „NORMAL“ function S11 S12 S13 S14 The relay is switched when the “NORMAL” operating status is reached. Status when shipped NT 10, NT 12 Fig. 12 „Pressure trigger“ function, version 1 S11 S12 S13 S14 The relay is switched if the DC link current in the TURBOTRONIK, specified by the pressure trigger potentiometer, is fallen below. The “NORMAL” LED is simultaneously lit. Fig. 13 „Pressure trigger“ function, version 2 S11 S12 S13 S14 Status when shipped NT 13 Fig. 14 X21 Contact assignment K1 when shipped The relay is switched if the DC link current in the TURBOTRONIK, specified by the pressure trigger potentiometer, is fallen below. The “NORMAL” LED is lit when the normal operating mode is reached. NO contact for NT 12 and NT 13 (normaly open) X19 X20 Fig. 15 Changing-over the contact assignment of K1 X21 Status when shipped NT 13 NC contact for NT 12 and NT 13 (normaly closed) X19 X20 Fig. 16 5.6 Setting the configuration of relay K2 „FAIL“ function S17 S18 The relay has the “FAIL” function (fault). The relay is active when a fault condition develops Status when shipped NT10, NT12 Fig. 17 „Control, pre-vacuum pump“ function S17 S18 The pre-vacuum pump is powered-up via the relay at the same time as the TURBOVAC is started with “START”, and is powered-down with “STOP” (also refer to Section 5.4, relay statuses). Fig. 18 © LEYBOLD VAKUUM GMBH – 25 – GA 05.212/7 - 04/97 SETTING THE EQUIPMENT CONFIGURATION K2 not operational X12 X14 X18 X16 X13 X15 X17 Fig. 19 Changing-over the contact assignment of K2 X12 X14 X16 5 Relay K2 is disabled (not opertional)! For NT 12 and NT13: Supply N (neutral contactor) is connected to X11.12 Supply L (phase) is connected X11.14 Bei NT 10:Supply N (neutral contactor) is connected to X10.9 Supply L (phase) is connected X10.10 Status when shipped NT 13 NO contact for NT 10, NT 12 and NT13 (normaly open) Status when shipped NT 10, NT 12 X18 X13 X15 X17 Fig. 20 X12 X14 X16 NC contact for NT 10, NT 12 and NT13 (normaly closed) X18 X13 X15 X17 Fig. 21 5.7 Setting the resonance monitoring funct. Resonance monitoring function ON S6 S5 Resonance monitoring is switched-on for operation of TURBOVAC 50D Status when shipped NT 10, NT 12, NT 13 OFF S6 S5 Resonance monitoring is switched-off for operation of the TURBOVAC 50 Fig. 22 5.8 Jumper field S2 START / STOP for NT 10 Pins 1, 2 and 3 of the Phönix connector X10 are used as control inputs to power the TURBOVAC on and off. Fig. 23 START / STOP for NT 12 and NT 13 Status when shipped NT 10 Pins 4, 6 and 16 of the plug connector strip X11 are used for the NT12 as control inputs to power the TURBOVAC on and off. NT13 can also be changed-over to this particular configuration. Status when shipped NT 12 Fig. 24 © LEYBOLD VAKUUM GMBH – 26 – GA 05.212/7 - 04/97 SETTING THE EQUIPMENT CONFIGURATION Automatic acceleration 5 The TURBOVAC automatically starts-up when the supply voltage is connected. This configuration can be selected for all three models. Status when shipped NT 13 Fig. 25 Measuring the motor frequency NT12 and NT13 Only possible for NT 12 and NT 13! The motor frequency can be measured at pins 4, 6 and 16 of the plug connector strip; also refer to the circuit example in the following Section 5.8. In this case, TURBOVAC automatically starts when the supply voltage is switched-on. Fig. 26 5.9 Measuring the motor frequency The jumper field S2 must be inserted as shown in Fig. 26 to measure the motor frequency! Refer to the previous diagram! The motor frequency is measured between pin 16 (0 V) and pin 6 (Q1). The frequency signal is present for approximately 0.1 seconds in each second. A gating signal is simultaneously output between 4 (Q5) and pin 16. This can be used to trigger a frequency count. Diagram, measuring the motor frequency Pulse package Motor frequency Gating signal Fig. 27 Ciruit example, measuring the motor frequency +5 V Plug connector strip 2,2 KΩ 4 Gating signal (Q5) 6 Frequency (Q1). 8 10 12 Gating time Motor frequency 14 16 18 0 V *) *) Refernece potential for +5 V and signals Fig. 28 Measuring the motor frequency © LEYBOLD VAKUUM GMBH – 27 – GA 05.212/7 - 04/97 SETTING THE EQUIPMENT CONFIGURATION 5 5.10 Connecting examples for remote control Standard jumper NT 10, keypad operation START STOP 1 Mounted in the factory(only for NT 10) STOP 2 Fig. 29 Jumper required for keypad operation (only for NT 10) Automatic start START STOP 1 STOP 2 Fig. 30 Automatic start with power ON Remote control with switch START Switch closed = START STOP 1 Switch open = Stop STOP 2 Fig. 31 Remote control using one switch Remote control with 2 pushbuttons START pushbutton (keep depressed for min. 3 s) START STOP 1 STOP pushbutton STOP 2 Fig. 32 Remote control with 2 pushbuttons Remote control with optocouplers START Optocoupler data: STOP 1 >15 V / 10 V UCEsat < 1 V STOP 2 Current flows = START No current = STOP Fig. 33 Remote control using optocouplers Remote control with open collector START >15 V / 10 V STOP 1 STOP 2 Fig. 34 Remote control with open collector Assignment, function-terminal © LEYBOLD VAKUUM GMBH START = STOP 1 = STOP 2 = X10, X11, X10, X11, X10, X11, PIN 1 Pin 16 Pin 2 Pin 4 Pin 3 Pin 6 (NT (NT (NT (NT (NT (NT 10) 12, NT 13) 10) 12, NT 13) 10) 12, NT 13) – 28 – GA 05.212/7 - 04/97 TROUBLESHOOTING 6 þ Fault • Posible cause / „Power“ LED not lit • TURBOTRONIK is not connected to the supply • Supply switch not switched-on (only NT 10). • Fuse blown þ Establish the connection to the supply þ Switch-on the power switch at the rear panel of the TURBOTRONIK NT 10 þ Check the fuse (refer to Fig. 11) and if required, replace. Openup the TURBOTRONIK as explained under Sections 5.1 and 5.2. • Leak in the vacuum system so that the rated speed is not reached. • Gas has leaked into the vacuum system, so that when the final speed is reached, it decreases as a result of the excessive gas friction þ Seal the vacuum system “ACCEL” LED, “NORMAL” LED do not light up even after an adequate acceleration time Counter-measure Note Gas leaks cause the speed to be reduced. If the speed falls below approximately 40% of the rated speed, TURBOTRONIK switches again to “ACCEL”. TURBOTRONIK automatically runs-up again if the leak is not excessive. “FAIL” LED is lit (FAIL relay is active, when the appropriate circuitry is available), and the TURBOVAC speed drops. • The TURBOVAC motor winding has exceed the permissible limit temperature, e.g. due to an inadmissibly high ambient temperature, or inadequate cooling. • The resonance monitoring has shutdown the drive, because the pump speed was within the speed range between 45,000 and 55,000 RPM for longer than one minute. þ Let the TURBOVAC cool down. Improve the cooling! Reset the fault by actuating “STOP”. Power-down the TURBOVAC using the appropriate pushbutton or remote control and then restart it. þ © LEYBOLD VAKUUM GMBH Change the operating conditions so that the pump can rotate above 55,000 RPM. For TURBOVAC 50, the resonance monitoring function can be disabled (refer to Section 5.5). – 29 – GA 05.212/7 - 04/97 TROUBLESHOOTING 6 Fault • Posible cause / “FAIL” LED is lit (the FAIL relay is active if the appropriate circuitry is available) and TURBOVAC does not run-up • The connecting cable to the TURBOVAC or connector is defective or incorrectly connected. • The TURBOVAC motor winding is inadmissibly hot. þ Check the connecting cable and connector and if required, replace. Reset the fault by depressing “STOP”. Power-off the TURBOVAC either using the appropriate pushbutton or remote control and then restart it. þ Let theTURBOVAC cool down. Reset the fault by depressing “STOP”. Power-down using the appropriate pushbutton or remote control and then re-start the TURBOVAC • Leak in the vacuum system. • Pump rotates in the incorrect direction þ Remove the leak! þ Check the three motor connection phases; if applicable, interchange 2 phases The pump rotates normally, “NORMAL” LED is lit, but an adequate final pressure is not achieved © LEYBOLD VAKUUM GMBH Counter-measure – 30 – GA 05.212/7 - 04/97 EC DECLARATION OF MANUFACTURE EC declaration of manufacture (in accordance with Art. 4 paragraph 2 of EC directive 89/329/ EEC) Document No.: MSR0196 / NT10, NT12, NT13 Manufacteurer: REFU elektronik GmbH Product Identification: Typ: NT10, NT12, NT13 Catalog No.: 859 00 859 01 859 04 859 05 859 06 859 07 The product indicated solely for fitting in anorther machine. Commissioning is prohibited until the conformity of the end product with EC directive 89/392/EEC has been established. Standards applied: EN 60204-1 (DIN VDE 0113 part 1) EN 61010-1 (DIN VDE 0411 part 1) 1996-01-02 REFU elektronik GmbH ................................................... H. Baumann President The savety notes given in the product documentation must be observed. © LEYBOLD VAKUUM GMBH – 31 – GA 05.212/7 - 04/97 EC DECLARATION OF CONFORMITY EC declaration of conformity Document No.: NSR0196 / NT10, NT12, NT13 Manufacteurer: REFU elektronik GmbH Product Identification: Typ: NT10, NT12, NT13 Catalog No.: 859 00 859 01 859 04 859 05 859 06 859 07 Herewith, we declare that this product, as a result of its design and type of construction, and the version marketed by us, correspond to the basic health and safety regulations specified in the EEC Directives. This declaration is no longer valid if the product is modified without us being in full agreement. The product conforms to the EEC Low-Voltage Directive (73/23/EEC). Standards applied: EN 61010-1 (DIN VDE 411 part 1) Edition 1994-03 Display the CE-mark: 1997 1996-01-02 REFU elektronik GmbH ................................................... H. Baumann President The savety notes given in the product documentation must be observed. © LEYBOLD VAKUUM GMBH – 32 – GA 05.212/7 - 04/97 FACTORY CERTIFICATE Factory certificate Document No.: EMV0196 / NT10, NT12, NT13 Manufacteurer: REFU elektronik GmbH Product Identification: Typ: NT10, NT12, NT13 Catalog No.: 859 00 859 01 859 04 859 05 859 06 859 07 The named product, when put to its intended use, satisfies the requirements of Directive 89/336/EEC concerning electromagnetic compatibility. The applicable measurements were made taking into account the following standards: EN 500 82-2 EN 55011 (DIN VDE0875 Teil 1) EN 61000-3-2 EN 61000-3-3 Note Attention must be paid to the information provided on provided on proper installation with respect to elektromagnetic compatibility and to other pertinent notes in the documentation supplied with the product, as well as to the relevant information concernning electrical connection. 1996-01-02 REFU elektronik GmbH ................................................... H. Baumann President © LEYBOLD VAKUUM GMBH – 33 – GA 05.212/7 - 04/97 Bonner Straße 498 (Bayenthal) D-50968 Köln Telefon: (0221) 347-0 Telefax: (0221) 347-1250 http://www.leyboldvac.de e-mail:[email protected] Gedruckt auf chlorfrei gebleichtem Umweltschutzpapier Technikredakteur, Design und Layout: Dagmar Bertram REFUelektronik GmbH / Ausgabe 2 CE / 04.97 LEYBOLD VAKUUM GMBH