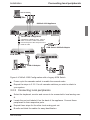
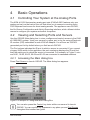
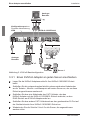
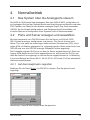
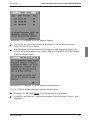
1
control
User Guide / Bedienungsanleitung
KVM series2-1602/0801
Keyboard/Video/Mouse Switch
English / Deutsch
2
KVM series2-1602/0801
Installer/User Guide
Edition October 2005
Comments... Suggestions... Corrections
The User Documentation Department would like to know your
opinion of this manual. Your feedback helps us optimize our
documentation to suit your individual needs.
Fax forms for sending us your comments are included in the
back of the manual.
There you will also find the addresses of the relevant User
Documentation Department.
Certified documentation
according to DIN EN ISO 9001:2000
To ensure a consistently high quality standard and user-friendliness, this documentation was created to meet the regulations of
a quality management system which complies with the requirements of the standard DIN EN ISO 9001:2000.
Copyright and Trademarks
Copyright © Fujitsu Technology Solutions GmbH 2009.
All rights reserved.
Delivery subject to availability; right of technical modifications reserved.
All hardware and software names used are trademarks of their respective manufacturers.
This manual is printed on
paper treated with
chlorine-free bleach.
Contents
1
Preface . . . . . . . . . . . . . . . . . . . . . . . . . . . . . . . . . . . . . . . . . . . . . . . . . 1
1.1
Features and Benefits . . . . . . . . . . . . . . . . . . . . . . . . . . . . . . . . . . . . . . 1
1.1.1
KVM s2-Adapter . . . . . . . . . . . . . . . . . . . . . . . . . . . . . . . . . . . . . . . . . . 1
1.1.2
Multiplatform support . . . . . . . . . . . . . . . . . . . . . . . . . . . . . . . . . . . . . . . 2
1.1.3
OSCAR graphical user interface . . . . . . . . . . . . . . . . . . . . . . . . . . . . . . 2
1.1.4
Security . . . . . . . . . . . . . . . . . . . . . . . . . . . . . . . . . . . . . . . . . . . . . . . . . 2
1.1.5
Operation modes . . . . . . . . . . . . . . . . . . . . . . . . . . . . . . . . . . . . . . . . . . 2
1.1.6
Video . . . . . . . . . . . . . . . . . . . . . . . . . . . . . . . . . . . . . . . . . . . . . . . . . . . 2
1.1.7
Plug and Play . . . . . . . . . . . . . . . . . . . . . . . . . . . . . . . . . . . . . . . . . . . . 2
1.1.8
FLASH upgradable . . . . . . . . . . . . . . . . . . . . . . . . . . . . . . . . . . . . . . . . 3
1.1.9
Cascading expansion . . . . . . . . . . . . . . . . . . . . . . . . . . . . . . . . . . . . . . 3
1.2
Summary of contents . . . . . . . . . . . . . . . . . . . . . . . . . . . . . . . . . . . . . . 4
1.3
Notational Conventions . . . . . . . . . . . . . . . . . . . . . . . . . . . . . . . . . . . . . 4
2
Safety notes . . . . . . . . . . . . . . . . . . . . . . . . . . . . . . . . . . . . . . . . . . . . . 5
2.1
Radio frequency information . . . . . . . . . . . . . . . . . . . . . . . . . . . . . . . . 5
2.2
Precautions and rack mount safety . . . . . . . . . . . . . . . . . . . . . . . . . . . . 6
3
Installation . . . . . . . . . . . . . . . . . . . . . . . . . . . . . . . . . . . . . . . . . . . . . . . 7
3.1
Getting started . . . . . . . . . . . . . . . . . . . . . . . . . . . . . . . . . . . . . . . . . . . . 7
3.1.1
Supplied with the KVM s2-1602/0801 . . . . . . . . . . . . . . . . . . . . . . . . . 7
3.1.2
Additional items needed . . . . . . . . . . . . . . . . . . . . . . . . . . . . . . . . . . . . 7
3.2
Rack Mounting Your KVM s2-1602/0801 . . . . . . . . . . . . . . . . . . . . . . . 7
3.2.1
Installing the 1U switch mounting bracket . . . . . . . . . . . . . . . . . . . . . . . 8
3.3
Installing the KVM s2-1602/0801 . . . . . . . . . . . . . . . . . . . . . . . . . . . . . 9
3.3.1
Connecting a KVM s2-Adapter to each server . . . . . . . . . . . . . . . . . . 10
3.3.2
Adding legacy switches . . . . . . . . . . . . . . . . . . . . . . . . . . . . . . . . . . . . 10
3.3.2.1
Adding a legacy KVM switch . . . . . . . . . . . . . . . . . . . . . . . . . . . . . . . . 10
3.3.3
Connecting local peripherals . . . . . . . . . . . . . . . . . . . . . . . . . . . . . . . . 11
3.4
Setting Up Your KVM s2-1602/0801 System . . . . . . . . . . . . . . . . . . . 12
590-334-609F
Contents
4
Basic Operations . . . . . . . . . . . . . . . . . . . . . . . . . . . . . . . . . . . . . . . . . 13
4.1
Controlling Your System at the Analog Ports . . . . . . . . . . . . . . . . . . . 13
4.2
Viewing and Selecting Ports and Servers . . . . . . . . . . . . . . . . . . . . . . 13
4.2.1
Accessing the Main dialog box . . . . . . . . . . . . . . . . . . . . . . . . . . . . . . 13
4.2.2
Viewing the status of your appliance . . . . . . . . . . . . . . . . . . . . . . . . . 14
4.2.3
Selecting servers . . . . . . . . . . . . . . . . . . . . . . . . . . . . . . . . . . . . . . . . . 14
4.2.3.1
Selecting the previous server . . . . . . . . . . . . . . . . . . . . . . . . . . . . . . . 14
4.2.3.2
Disconnect the user from a server . . . . . . . . . . . . . . . . . . . . . . . . . . . 14
4.2.4
Soft switching . . . . . . . . . . . . . . . . . . . . . . . . . . . . . . . . . . . . . . . . . . . 14
4.2.4.1
Configuring servers for soft switching . . . . . . . . . . . . . . . . . . . . . . . . . 15
4.2.4.2
Soft switching to a server . . . . . . . . . . . . . . . . . . . . . . . . . . . . . . . . . . 15
4.3
Navigating OSCAR . . . . . . . . . . . . . . . . . . . . . . . . . . . . . . . . . . . . . . . 15
4.4
Configuring OSCAR . . . . . . . . . . . . . . . . . . . . . . . . . . . . . . . . . . . . . . 16
4.4.1
Accessing the Setup menu . . . . . . . . . . . . . . . . . . . . . . . . . . . . . . . . . 17
4.4.2
Assigning server names . . . . . . . . . . . . . . . . . . . . . . . . . . . . . . . . . . . 18
4.4.2.1
Accessing the Names dialog box . . . . . . . . . . . . . . . . . . . . . . . . . . . . 18
4.4.2.2
Assigning names to servers . . . . . . . . . . . . . . . . . . . . . . . . . . . . . . . . 18
4.4.3
Assigning device types . . . . . . . . . . . . . . . . . . . . . . . . . . . . . . . . . . . . 19
4.4.3.1
Accessing the Devices dialog box . . . . . . . . . . . . . . . . . . . . . . . . . . . . 19
4.4.3.2
Assigning a device type . . . . . . . . . . . . . . . . . . . . . . . . . . . . . . . . . . . . 20
4.4.4
Changing the display behavior . . . . . . . . . . . . . . . . . . . . . . . . . . . . . . 21
4.4.4.1
Accessing the Menu dialog box . . . . . . . . . . . . . . . . . . . . . . . . . . . . . . 21
4.4.4.2
Choosing the default display order of servers . . . . . . . . . . . . . . . . . . . 21
4.4.4.3
Setting a Screen Delay Time for OSCAR . . . . . . . . . . . . . . . . . . . . . . 21
4.4.5
Controlling the status flag . . . . . . . . . . . . . . . . . . . . . . . . . . . . . . . . . . 22
4.4.5.1
Accessing the Flag dialog box . . . . . . . . . . . . . . . . . . . . . . . . . . . . . . . 22
4.4.5.2
Determining how the status flag is displayed . . . . . . . . . . . . . . . . . . . 23
4.4.6
Setting console security . . . . . . . . . . . . . . . . . . . . . . . . . . . . . . . . . . . 23
4.4.6.1
Accessing the Security dialog box . . . . . . . . . . . . . . . . . . . . . . . . . . . . 23
4.4.6.2
Setting or changing the password . . . . . . . . . . . . . . . . . . . . . . . . . . . . 24
4.4.6.3
Password protecting your console . . . . . . . . . . . . . . . . . . . . . . . . . . . 24
590-334-609F
Contents
4.4.6.4
Logging in to your console . . . . . . . . . . . . . . . . . . . . . . . . . . . . . . . . . 25
4.4.6.5
Removing password protection from your console . . . . . . . . . . . . . . . 25
4.4.6.6
Enabling the screen saver mode with no password protection . . . . . . 25
4.4.6.7
Exiting the screen saver mode . . . . . . . . . . . . . . . . . . . . . . . . . . . . . . 25
4.4.6.8
Turning off the screen saver . . . . . . . . . . . . . . . . . . . . . . . . . . . . . . . . 26
4.4.6.9
Immediately turning on the screen saver . . . . . . . . . . . . . . . . . . . . . . 26
4.5
Displaying Version Information . . . . . . . . . . . . . . . . . . . . . . . . . . . . . . 26
4.6
Scanning Your System . . . . . . . . . . . . . . . . . . . . . . . . . . . . . . . . . . . . 27
4.6.1
Adding servers to the scan list . . . . . . . . . . . . . . . . . . . . . . . . . . . . . . 28
4.6.2
Removing a server from the scan list . . . . . . . . . . . . . . . . . . . . . . . . . 28
4.6.3
Starting the scan mode . . . . . . . . . . . . . . . . . . . . . . . . . . . . . . . . . . . . 28
4.6.4
Cancelling scan mode . . . . . . . . . . . . . . . . . . . . . . . . . . . . . . . . . . . . . 29
4.7
Broadcasting to Servers . . . . . . . . . . . . . . . . . . . . . . . . . . . . . . . . . . . 29
4.7.1
Accessing the Broadcast dialog box . . . . . . . . . . . . . . . . . . . . . . . . . . 30
4.7.1.1
Broadcasting to selected servers . . . . . . . . . . . . . . . . . . . . . . . . . . . . 30
4.7.1.2
Turning broadcasting off . . . . . . . . . . . . . . . . . . . . . . . . . . . . . . . . . . . 31
4.8
Changing Your Switch Mode . . . . . . . . . . . . . . . . . . . . . . . . . . . . . . . . 31
4.8.1
Accessing the Switch dialog box . . . . . . . . . . . . . . . . . . . . . . . . . . . . . 32
4.9
Setting the Keyboard Country Code . . . . . . . . . . . . . . . . . . . . . . . . . . 32
4.9.1
Changing the keyboard country code . . . . . . . . . . . . . . . . . . . . . . . . . 33
5
Appendices . . . . . . . . . . . . . . . . . . . . . . . . . . . . . . . . . . . . . . . . . . . . . 35
5.1
FLASH Upgrades . . . . . . . . . . . . . . . . . . . . . . . . . . . . . . . . . . . . . . . . 35
5.1.1
Upgrading the KVM s2-1602/0801 . . . . . . . . . . . . . . . . . . . . . . . . . . . 35
5.1.1.1
Items needed for the upgrade . . . . . . . . . . . . . . . . . . . . . . . . . . . . . . . 35
5.1.1.2
Upgrading firmware . . . . . . . . . . . . . . . . . . . . . . . . . . . . . . . . . . . . . . . 35
5.1.1.3
Possible error conditions . . . . . . . . . . . . . . . . . . . . . . . . . . . . . . . . . . . 35
5.1.2
Upgrading the KVM s2-Adapter firmware . . . . . . . . . . . . . . . . . . . . . . 36
5.1.2.1
Simultaneously upgrading multiple KVM s2-Adapters . . . . . . . . . . . . 36
5.1.2.2
Upgrading KVM s2-Adapter firmware individually . . . . . . . . . . . . . . . . 37
5.2
KVM s2-1602/0801 Technical Specifications . . . . . . . . . . . . . . . . . . . 39
5.3
Sun Advanced Key Emulation . . . . . . . . . . . . . . . . . . . . . . . . . . . . . . . 40
590-334-609F
5.4
Technical Support . . . . . . . . . . . . . . . . . . . . . . . . . . . . . . . . . . . . . . . . 42
590-334-609F
1
Preface
1.1 Features and Benefits
The multiuser 16 port KVM series2-1602 (KVM s2-1602) and the single user 8
port KVM series2-0801 (KVM s2-0801) switches integrate Fujitsu Technology
Solutions’ field-proven analog keyboard, video and mouse (KVM) switching
technology with advanced cable management, flexible user access and a
patented, next-generation user interface. The KVM series2-1602 and KVM
series2-0801 switches (KVM s2-1602/0801) conveniently support all major
server platforms and feature powerful on-screen management for easy system
configuration and server selection.
A unique benefit of the KVM s2-1602/0801 is the KVM series2-Adapter (KVM
s2-Adapter) module. The KVM s2-Adapter module with CAT 5 design dramatically
reduces cable clutter, while providing optimal resolution and video settings. The
built-in memory of the KVM s2-Adapter simplifies configuration by assigning and
retaining unique server names and Electronic ID (EID) numbers for each attached
server. The KVM s2-Adapter is powered directly from the server and provides
Keep Alive functionality even if the KVM s2-1602/0801 is not powered.
For optimal screen resolution of 1280x1024, limit the cable length between the
switch and the attached server to 15 meters (49 feet). Cable lengths greater than
15 meters will limit the screen resolution.
Maximum Cable Length
1280x1024 @ 85 Hz
1024x768 @85 Hz
800x600 @85Hz
3 Meters (9.8 Feet)
Supported
Supported
Supported
15 Meters (49 Feet)
Supported
Supported
Supported
30 Meters (98.5 Feet)
Supported
Throughout the documentation you will see the word “appliance” used
generically to describe the KVM s2-1602/0801 switch.
1.1.1 KVM s2-Adapter
KVM s2-Adapter modules allow direct KVM connectivity to servers in your KVM
s2-1602/0801 system. The KVM s2-1602 appliance has 16 Fujitsu Technology Solutions Rack Interface (RI) ports for connecting KVM s2-Adapters, while the KVM
s2-0801 has eight RI ports.
Utilizing a KVM s2-Adapter, you can attach additional switches to expand your
KVM s2-1602/0801 system. This flexibility allows you to add capacity as your data
center grows.
590-334-609F
1
OSCAR graphical user interface
Preface
1.1.2 Multiplatform support
The KVM s2-Adapter modules available with the KVM s2-1602/0801 support PS/2,
Sun and USB server environments. Using the On-Screen Configuration and Activity Reporting interface (OSCAR®) in conjunction with these modules allows you to
switch easily across platforms.
1.1.3 OSCAR graphical user interface
A KVM s2-1602/0801 switch uses OSCAR, which features intuitive menus to
configure your switch system and select computers. Computers can be identified
by unique name, EID or port number, allowing you to assign unique server names.
You can choose the display language for OSCAR (English, German, French, etc.)
by downloading updates for OSCAR. For more information, see “Flash Upgrades”
in Chapter 5.
1.1.4 Security
OSCAR allows you to protect your system with a screen saver password. After a
user-defined time, the screen saver mode engages and access is prohibited until the
appropriate password is entered to reactivate the system.
1.1.5 Operation modes
The OSCAR user interface provides convenient operation modes for easy KVM
s2-1602/0801 system administration. These modes (Broadcast, Scan and Switch)
allow you to manage your switching activities. Chapter 4 explains these modes in
detail.
1.1.6 Video
KVM s2-1602/0801 provides optimal resolution for analog VGA, SVGA and XGA
video. Achieve resolutions of up to 1280 x 1024 (at 75 Hz) with a 15 meter (49
foot) cable and up to 800 x 600 (at 60 Hz) with a 30 meter (98.5 foot) cable. Resolutions will vary depending upon the length of cable separating your switch and
servers.
1.1.7 Plug and Play
The KVM s2-1602/0801 also supports Display Data Channel Plug and Play, which
automates configuration of the monitor and is compliant with the VESA DDC2B
standard.
2
590-334-609F
Preface
Summary of contents
1.1.8 FLASH upgradable
Upgrade your firmware at any time through a simple update utility to ensure
that your KVM s2-1602/0801 system is always running the most current version
available. Both the KVM s2-1602/0801 switch and the KVM s2-Adapter modules
are FLASH upgradable. See Chapter 5 for more information.
When upgrading your switch firmware, ensure that the keyboard country codes with your system correspond with the firmware loaded in your
switch. Contact Fujitsu Technology Solutions Technical Support for more
information. Technical Support contact information is available in Chapter
5.
1.1.9 Cascading expansion
Each KVM s2-1602 switch supports up to 16 directly attached servers, while the
KVM s2-0801 supports up to eight attached servers. Both the KVM s2-1602 and
the KVM s2-0801 can conveniently scale to support more. You can expand your
system using cascadable Fujitsu Technology Solutions products. This extra “cascade” of units allows you to attach up to 256 servers in one system.
KVM s2-Adapter
Switch
KVM s2-Adapter
Rack of Servers
Switch
Critical Server
Rack of Servers
KVM s2-1602 Appliance
Analog Connection
Figure 1: Example KVM s2-1602 Configuration
590-334-609F
3
Notational Conventions
Preface
1.2 Summary of contents
Safety notes
It is essential to read the following Safety notes chapter before starting
to work with the KVM s2-1602/0801. That chapter contains essential information for proper installation and handling of the KVM s2-1602/0801
device.
This manual describes how to install the KVM s2-1602/0801 and explains how to
configure and operate the appliance.
1.3 Notational Conventions
The following notational conventions are used in this manual:
Bold
This indicates emphasis in the text.
Key
This indicates keys or key combinations in continuous text.
Italics
This indicates commands, file names, menu names and inputs in continuous text.
- and •
4
This indicates additional information and tips.
This indicates information, which if not heeded, may jeopardize your
health, the functioning of your system or the security of your data.
This indicates a step that you have to perform.
These characters symbolize itemized lists.
590-334-609F
2
Safety notes
This chapter provides radio frequency and safety information for the KVM s21602/0801 appliance.
2.1 Radio frequency information
United States radio frequency information
Warning: Changes or modifications to this unit not expressly approved
by the party responsible for compliance could void the user's authority
to operate the equipment.
This equipment has been tested and found to comply with the limits for a
Class A digital device, pursuant to Part 15 of the FCC Rules. These limits
are designed to provide reasonable protection against harmful interference
when the equipment is operated in a commercial environment. This
equipment generates, uses and can radiate radio frequency energy and,
if not installed and used in accordance with the instruction manual, may
cause harmful interference to radio communications. Operation of this
equipment in a residential area is likely to cause harmful interference in
which case the user will be required to correct the interference at his own
expense.
Canadian radio frequency information
This digital apparatus does not exceed the Class A limits for radio
noise emissions from digital apparatus set out in the Radio Interference
Regulations of the Canadian Department
of Communications.
Le présent appareil numérique n’émet pas de bruits radioélectriques
dépassant les limites applicables aux appareils numériques de la
classe A prescrites dans le Règlement sur le brouillage radioélectrique
édicté par le Ministère des Communications du Canada.
VCCI approval
590-334-609F
5
Precautions and rack mount safety
Safety notes
2.2 Precautions and rack mount safety
Avoiding potential video and/or keyboard problems when using
the KVM s2-1602/0801
•
If the building has 3-phase AC power, ensure that the computer
and monitor are on the same phase. For best results, they should
be on the same circuit.
•
Use only Fujitsu Technology Solutions-supplied cable to connect
computers and KVM switches. Fujitsu Technology Solutions
warranties do not apply to damage resulting from user-supplied
cable.
Avoiding potentially fatal shock hazard and possible damage
to equipment
•
Do not use a 2-wire extension cord in any of the Fujitsu Technology
Solutions product configurations.
•
Test AC outlets at the computer and monitor for proper polarity and
grounding.
•
Use only with grounded outlets at both the computer and monitor.
When using a backup Uninterruptible Power Supply (UPS), power the
computer, the monitor and the appliance off the supply.
The AC inlet is the main disconnect.
Rack mount safety considerations
6
•
Elevated Ambient Temperature: If installed in a closed rack assembly, the operation temperature of the rack environment may
be greater than room ambient. Use care not to exceed the rated
maximum ambient temperature of the unit.
•
Reduced Air Flow: Installation of the equipment in a rack should be
such that the amount of airflow required for safe operation of the
equipment is not compromised.
•
Mechanical Loading: Mounting of the equipment in the rack should
be such that a hazardous condition is not achieved due to uneven
mechanical loading.
•
Circuit Overloading: Consideration should be given to the
connection of the equipment to the supply circuit and the effect that
overloading of circuits might have on overcurrent protection and
supply wiring. Consider equipment nameplate ratings for maximum
current.
•
Reliable Earthing: Reliable earthing of rack mounted equipment
should be maintained. Pay particular attention to supply
connections other than direct connections to the branch circuit (for
example, use of power strips).
590-334-609F
3
Installation
3.1 Getting started
Before installing your KVM s2-1602/0801 appliance, refer to the following list to
ensure you have all items that shipped with the appliance as well as other items
necessary for proper installation.
3.1.1 Supplied with the KVM s2-1602/0801
•
KVM s2-1602 or KVM s2-0801 unit
•
Power cord
•
One straight-through null modem serial cable
•
KVM series2-1602/0801 CD with electronic Installer/User Guide
•
KVM series2-1602/0801 Quick Installation Guide
•
Rack mounting kit
3.1.2 Additional items needed
•
One KVM s2-Adapter module and UTP cabling per attached server
or switch
3.2 Rack Mounting Your KVM s2-1602/0801
Your KVM s2-1602/0801 appliance may be rack mounted using brackets available through Fujitsu Technology Solutions. Before installing the appliance and
other components in the rack cabinet (if not already installed), stabilize the rack
in a permanent location. Install your equipment starting at the bottom of the
rack cabinet, then work to the top. Avoid uneven loading or overloading of rack
cabinets.
590-334-609F
7
Installing the mounting bracket
Installation
Figure 2: KVM s2-1602 Horizontal Installation
Rack Loading
Overloading or uneven loading of racks may result in shelf or rack
failure, causing damage to equipment and possible personal injury.
Stabilize racks in a permanent location before loading begins. Mount
components beginning at the bottom of the rack, then work to the top.
Do not exceed your rack load rating.
3.2.1 Installing the 1U switch mounting bracket
Remove the first two screws on each side.
Line up the holes in the “long side” of the kit’s side brackets with the screw
holes in the switch.
With a Phillips screwdriver, fasten the mounting brackets to the switch using
two screws on each side.
Attach four cage nuts or clip nuts to the rack mounting flange of the rack cabinet so that the nut is positioned on the inside of the rack.
Nuts are not included with the rack mount kit.
Mount the switch assembly to the rack cabinet by matching the holes in the
“short side” of each bracket to an appropriate set of matching holes on your
rack cabinet. Next, insert the combination hex head screws through the slots
in the bracket and the holes in the mounting rail, then into the cage nuts or clip
nuts.
8
590-334-609F
Installation
Installing the KVM s2-1602/0801
3.3 Installing the KVM s2-1602/0801
Plug the supplied power cord into the back of the appliance and then into an appropriate power source. Figure 3 illustrates one possible configuration for your
KVM s2-1602 or KVM s2-0801 appliance. See the following detailed set of procedures to successfully install your appliance.
Reducing the risk of electric shock or damage to your equipment
• Do not disable the power cord grounding plug. The grounding plug is
an important safety feature.
• Plug the power cord into a grounded (earthed) outlet that is easily
accessible at all times.
• Disconnect the power from the unit by unplugging the power cord
from either the electrical outlet or the unit.
Analog User
Configuration Port
for updating firmware KVM
KVM s2-1602 Appliance
1
2
Analog User
3
4
5
6
7
8
9
10
11
12
13
14
15
16
16 Server 1
s2-Adapter Servers 2-
Figure 3: Basic KVM s2 Configuration
590-334-609F
9
Connecting an Adapter
Installation
3.3.1 Connecting a KVM s2-Adapter to each server
Locate the KVM s2-Adapter modules for your KVM s2-1602/0801 unit.
Attach the appropriately color-coded cable ends to the keyboard, monitor and
mouse ports on the first server you will be connecting to the unit.
Attach one end of the CAT 5 cabling that will run between your KVM s2-Adapter and KVM s2-1602/0801 unit to the RJ45 connector on the KVM s2-Adapter
module.
Connect the other end of the CAT 5 cable to the desired RI port on the back of
your KVM s2-1602/0801 unit.
Repeat steps 2 to 4 for all servers you wish to attach.
When connecting a Sun KVM s2-Adapter module, you must use a multisync monitor to accommodate Sun computers that support both VGA and
sync-on-green or composite sync.
3.3.2 Adding legacy switches
You can add cascade switches to the KVM s2-1602/0801 system for easy integration into your existing configuration. In a cascaded system, each RI port will accommodate up to 16 servers (depending on the KVM s2 model you are using).
3.3.2.1 Adding a legacy KVM switch
Mount the KVM switch into your rack cabinet. Locate a length of CAT 5
cabling to connect between your KVM s2-1602/0801 appliance and the KVM
s2-Adapter for your switch.
Attach the keyboard, monitor and mouse connectors of the KVM s2-Adapter
to a user port on your cascade switch.
Attach one end of the CAT 5 cabling to the RJ45 connector on the KVM s2Adapter.
Connect the other end of the CAT 5 cable to an available port on the back of
your KVM s2-1602/0801.
Connect the servers to your Fujitsu Technology Solutions cascade switch according to the instructions included with the device.
To cascade other KVM s2 appliances to the KVM s2-1602/0801, attach
one end of a CAT 5 cable to the ACI port on the main KVM s2-1602/0801.
Attach the other end of the CAT 5 cable to an RI port on the cascaded
appliance. Note that only one level of tiering is supported in this type of
configuration and the local port OSCAR is disabled when the main KVM
s2-1602/0801 is cascaded below another appliance.
10
590-334-609F
Installation
Connecting local peripherals
Analog User
KVM s2-1602 Appliance
Tiered KVM s2 Appliance
Cascade to a KVM s2-1611, 1602 or
0801 via a CAT 5 cable connected
from an RI port to the ACI port on the
KVM s2-1602
KVM Switch KVM s2-Adapter
KVM Switch
KVM s2-Adapter
Server 1
Server 2
Figure 4: KVM s2-1602 Configuration with a Legacy KVM Switch
Power cycle the cascade switch to enable the cascade code.
Repeat the steps in 3.3.2.1 for all cascade switches you wish to attach to
your system.
3.3.3 Connecting local peripherals
Select the keyboard, monitor and mouse to be connected to local analog user
A.
Locate the port set labeled A on the back of the appliance. Connect these
peripherals to their respective ports.
Repeat these steps for the other local analog port set.
Bundle and label the cables for easy identification.
590-334-609F
11
Setting Up Your System
Installation
3.4 Setting Up Your KVM s2-1602/0801 System
With the KVM s2-1602/0801 system, you can auto detect and configure each port
on your appliance. Chapter 4 provides detailed instructions on naming, customization and OSCAR setup and configuration.
12
590-334-609F
4
Basic Operations
4.1 Controlling Your System at the Analog Ports
The KVM s2-1602 features two analog port sets (KVM s2-0801 features only one
analog port set) on the back of the unit that allow you to connect a monitor and a
PS/2 keyboard and mouse for direct analog access. The appliance uses OSCAR,
the On-Screen Configuration and Activity Reporting interface, which utilizes intuitive
menus to configure your system and select computers.
4.2 Viewing and Selecting Ports and Servers
Use the OSCAR Main dialog box to view, configure and control servers in the KVM
s2-1602/0801 system. View your servers by name, port or by the unique Electronic
ID number (EID) embedded in each KVM s2-Adapter. You will see an OSCARgenerated port list by default when you first launch OSCAR.
The Port column indicates the RI port to which a server is connected. If you connect
a legacy KVM switch to the appliance, the port numbering displays the RI port first,
then the switch port to which the server is connected. For example, in Figure 5, servers 06-01, 06-02, 06-03, 06-04 and 01-02 are connected to cascaded switches.
4.2.1 Accessing the Main dialog box
Press Print Screen to launch OSCAR. The Main dialog box appears.
Figure 5: Example of Configured Main Dialog Box
You can also press the Control key twice within one second to launch
OSCAR. You can use this key sequence in any place you see Print Screen
throughout this installer/user guide.
590-334-609F
13
Viewing the status of your appliance
Basic Operations
4.2.2 Viewing the status of your appliance
The status of the servers in your system is indicated in the right columns of the
Main dialog box. The following table describes the status symbols.
OSCAR Symbol Description
KVM s2-Adapter and/or connected switch is online (green circle).
KVM s2-Adapter and/or connected switch is offline or is not
operating properly.
KVM s2-Adapter is being accessed by the indicated user channel.
KVM s2-Adapter is blocked by the indicated user channel. For
instance, in Figure 5, user B is viewing Forester, but is blocking access
to Acton, Barrett and Edie which are connected to the same KVM s2Adapter chain.
Table 1: OSCAR Status Symbols
4.2.3 Selecting servers
Use the Main dialog box to select servers. When you select a server, the appliance
reconfigures the keyboard and mouse to the proper settings for that server.
Double-click the server name, EID or port number.
-orIf the display order of your server list is by port (Port button is depressed),
type the port number and press Enter .
-orIf the display order of your server list is by name or EID number (Name or EID
button is depressed), type the first few characters of the name of the server or
the EID number to establish it as unique and press Enter .
4.2.3.1 Selecting the previous server
Press Print Screen and then Backspace . This key combination between the
previous and current connections.
4.2.3.2 Disconnect the user from a server
Press Print Screen and then Alt+Ø. This leaves the user in a free state, with
no server selected. The status flag on your desktop displays Free.
4.2.4 Soft switching
Soft switching is the ability to switch servers using a hotkey sequence. You can
soft switch to a server by pressing Print Screen and then typing the first few characters of its name or number. If you have set a Screen Delay Time and you press
the key sequences before that time has elapsed, OSCAR will not display.
14
590-334-609F
Basic Operations
Navigating OSCAR
4.2.4.1 Configuring servers for soft switching
Press Print Screen to launch OSCAR. The Main dialog box appears.
Click Setup - Menu. The Menu dialog box appears.
For Screen Delay Time, type the number of seconds of delay desired before
the Main dialog box is displayed after Print Screen is pressed.
Click OK.
4.2.4.2 Soft switching to a server
To select a server, press Print Screen. If the display order of your server list is by
port (Port button is depressed), type the port number and press Enter .
-orIf the display order of your server list is by name or EID number (Name or EID
button is depressed), type the first few characters of the name of the server or
the EID number to establish it as unique and press Enter .
To switch back to the previous server, press Print Screen then Backspace.
4.3 Navigating OSCAR
This table describes how to navigate OSCAR using the keyboard and mouse.
This Keystroke
Does This
Print Screen
Opens OSCAR. Press Print Screen twice
to send the Print Screen keystroke to the
currently selected device.
F1
Opens the Help screen for the current
dialog box.
Escape
Closes the current dialog box without saving
changes and returns to the previous one.
In the Main dialog box, it closes OSCAR
and returns to the flag. In a message box,
it closes the pop-up box and returns to the
current dialog box.
Alt
Opens dialog boxes, selects or checks
options and executes actions when used with
underlined or other designated letters.
Alt+X
Closes the current dialog box and returns to
the previous one.
Alt+O
Selects the OK button, then returns to the
previous dialog box.
590-334-609F
15
Navigating OSCAR
Basic Operations
This Keystroke
Does This
Single-click, Enter
In a text box, it selects the text for editing
and enables the Left and Right Arrow keys
to move the cursor. Press Enter again to quit
the edit mode.
Enter
Completes a switch in the Main dialog box
and exits OSCAR.
Print Screen, Backspace
Toggles back to previous selection.
Print Screen, Alt+ Ø
Immediately disengages user from a server;
no server is selected. Status flag displays
Free. (This only applies to the Ø on the
keyboard and not the keypad.)
Print Screen, Pause
Immediately turns on screen saver mode and
prevents access to that particular console, if
it is password protected.
Up/Down Arrows
Moves the cursor from line to line in lists.
Right/Left Arrows
Moves the cursor between columns. When
editing a text box, these keys move the
cursor within the column.
Page Up/Page Down
Pages up and down through Name and Port
lists and Help pages.
Home/End
Moves the cursor to the top or bottom of
a list.
Backspace
Erases characters in a text box.
Delete
Deletes current selection in the scan list or
characters in a text box.
Shift-Del
Deletes from the current selection to the end
of the list when editing a scan list.
Numbers
Type from the keyboard or keypad.
Table 2: OSCAR Navigation Basics
4.4 Configuring OSCAR
You can configure your KVM s2-1602/0801 from the Setup menu within OSCAR.
Select the Names button when initially setting up your appliance to identify servers
by unique names. Select the other setup features to manage routine tasks for your
servers from the OSCAR menu.
16
590-334-609F
Basic Operations
Configuring OSCAR
Setup Feature
Purpose
Menu
Change the server listing between
numerically by port or EID number and
alphabetically by name. Change the Screen
Delay Time before OSCAR displays after
pressing Print Screen.
Flag
Change display, timing, color or location of
the status flag.
Broadcast
Set up to simultaneously control
multiple servers through keyboard and
mouse actions.
Scan
Set up a custom scan pattern for up to
16 servers.
Security
Set passwords to restrict server access.
Enable the screen saver.
Devices
Identify the appropriate number of ports on
an attached cascade switch
Names
Identify servers by unique names.
Table 3: Setup Features to Manage Routine Tasks for your Servers
4.4.1 Accessing the Setup menu
Press Print Screen to launch OSCAR. The Main dialog box appears.
Click Setup. The Setup dialog box appears.
Figure 6: Setup Dialog Box
590-334-609F
17
Accessing the Setup menu
Basic Operations
4.4.2 Assigning server names
Use the Names dialog box to identify individual servers by name rather than by port
number. The Names list is always sorted by port order. Names are stored in the
KVM s2-Adapter, so even if you move the cable/server to another RI port, the name
and configuration will be recognized by the appliance.
If a server is turned off, its respective KVM s2-Adapter will not appear in
the Names list.
4.4.2.1 Accessing the Names dialog box
Press Print Screen. The Main dialog box will appear.
Click Setup - Names. The Names dialog box appears.
Figure 7: Names Dialog Box
If the server list changes, the mouse cursor will turn into an hourglass as
the list is automatically updated. No mouse or keyboard input will be accepted until the list update is complete.
4.4.2.2 Assigning names to servers
In the Names dialog box, select a server name or port number and click
Modify. The Name Modify dialog box appears.
18
590-334-609F
Basic Operations
Assigning names to servers
Figure 8: Name Modify Dialog Box
Type a name in the New Name box. Names of servers may be up to 15 characters long. Legal characters include: A-Z, a-z, Ø-9, space and hyphen.
Click OK to transfer the new name to the Names dialog box. Your selection is
not saved until you click OK in the Names dialog box.
Repeat steps 1 to 3 for each server in the system.
Click OK in the Names dialog box to save your changes.
-orClick X or press Escape to exit the dialog box without saving changes.
If a KVM s2-Adapter has not been assigned a name, the EID is used as
the default name.
4.4.3 Assigning device types
While the appliance automatically discovers cascade KVM switches attached
to your unit, you will need to specify the number of ports on the cascade switch
through the Devices dialog box. Select the switch from the list and the Modify
button appears, allowing you to assign it the appropriate number of ports.
The Modify button will only be available if a configurable switch
is selected.
4.4.3.1 Accessing the Devices dialog box
Press Print Screen. The Main dialog box will appear.
Click Setup - Devices. The Devices dialog box appears.
590-334-609F
19
Assigning device types
Basic Operations
Figure 9: Devices Dialog Box
When the KVM s2-1602 appliance discovers a cascade switch, you will notice the
port numbering change to accommodate each server under that switch. For example, if the switch is connected to RI port 6, the switch port would be listed as 06
and each server under it would be numbered sequentially 06-01, 06-02 and so on.
4.4.3.2 Assigning a device type
In the Devices dialog box, select the desired port number.
Click Modify. The Device Modify dialog box appears.
Figure 10: Device Modify Dialog Box
Choose the number of ports supported by your cascade switch and click OK.
Repeat steps 1–3 for each port requiring a device type to be assigned.
Click OK in the Devices dialog box to save settings.
20
590-334-609F
Basic Operations
Changing the display behavior
Changes made in the Device Modify dialog box are not saved until you
click OK in the Devices dialog box.
4.4.4 Changing the display behavior
Use the Menu dialog box to change the display order of servers and set a Screen
Delay Time for OSCAR. The display order setting alters how servers will display in
several screens including the Main, Devices and Broadcast dialog boxes.
4.4.4.1 Accessing the Menu dialog box
Press Print Screen to launch OSCAR. The Main dialog box appears.
Click Setup - Menu in the Main dialog box. The Menu dialog box appears.
Figure 11: Menu Dialog Box
4.4.4.2 Choosing the default display order of servers
Select Name to display servers alphabetically by name.
-orSelect EID to display servers numerically by EID number.
-orSelect Port to display servers numerically by port number.
Click OK.
4.4.4.3 Setting a Screen Delay Time for OSCAR
Type in the number of seconds (Ø to 9) to delay OSCAR display after you
press Print Screen. Entering Ø will instantly launch OSCAR with no delay.
Click OK.
Setting a Screen Delay Time allows you to complete a soft switch without OSCAR
displaying. To perform a soft switch, see Soft switching in this chapter.
590-334-609F
21
Controlling the status flag
Basic Operations
4.4.5 Controlling the status flag
The status flag displays on your desktop and shows the name or EID number of
the selected server or the status of the selected port. Use the Flag dialog box to
configure the flag to display by server name or EID number, or to change the flag
color, opacity, display time and location on the desktop.
OSCAR Flag
Description
Flag type by name
Flag type by EID number
Flag indicating that the user has
been disconnected from
all systems
Flag indicating that Broadcast mode
is enabled
Table 4: OSCAR Status Flags
4.4.5.1 Accessing the Flag dialog box
Press Print Screen. The Main dialog box will appear.
Click Setup - Flag. The Flag dialog box appears.
Figure 12: Flag Dialog Box
22
590-334-609F
Basic Operations
Determining how the status flag is displayed
4.4.5.2 Determining how the status flag is displayed
Select Name or EID to determine what information will be displayed.
Select Displayed to show the flag all the time or select Timed to display the
flag for only five seconds after switching.
Select a flag color in Display Color.
In Display mode, select Opaque for a solid color flag or select Transparent to
see the desktop through the flag.
To position the status flag on the desktop:
a. Click Set Position to gain access to the Set Position Flag screen.
b. Left-click on the title bar and drag to the desired location.
c.
Right-click to return to the Flag dialog box.
Figure 13: Set Position Flag
Changes made to the flag position are not saved until you click OK in the
Flag dialog box.
Click OK to save settings.
-orClick X to exit without saving changes.
4.4.6 Setting console security
OSCAR enables you to set security on your analog port console. You can establish a screen saver mode that engages after your console remains unused for a
specified Inactivity Time. Once engaged, your console will remain locked until you
press any key or move the mouse. You will then need to type in your password to
continue.
Use the Security dialog box to lock your console with password protection, set or
change your password and enable the screen saver.
If a password has been previously set, you will have to enter the password
before you can access the Security dialog box.
4.4.6.1 Accessing the Security dialog box
Press Print Screen. The Main dialog box will appear.
Click Setup - Security. The Security dialog box appears.
590-334-609F
23
Setting or changing the password
Basic Operations
Figure 14: Security Dialog Box
4.4.6.2 Setting or changing the password
Single-click and press Enter or double-click in the New text box.
Type the new password in the New text box and press Enter .
Passwords must contain both alpha and numeric characters, are case sensitive and may be up to 12 characters long. Legal characters are: A-Z,
a-z, Ø-9, space and hyphen.
In the Repeat box, type the password again and press Enter .
Click OK to change only your password, and then close the dialog box.
If you should lose or forget your password, you must return your switch for
service or technical support. See the Technical Support section for contact
information.
4.4.6.3 Password protecting your console
Set your password as described in the previous procedure.
Select Enable Screen Saver.
Type the number of minutes for Inactivity Time (from 1 to 99) to delay activation of password protection and the screen saver feature.
For Mode, select Energy if your monitor is Energy Star®compliant; otherwise
select Screen.
Monitor Damage
Monitor damage can result from the use of Energy mode with monitors
not compliant with Energy Star®.
(Optional) Click Test to activate the screen saver test which lasts 10 seconds
then returns you to the Security dialog box.
Click OK.
24
590-334-609F
Basic Operations
Removing password protection
4.4.6.4 Logging in to your console
Press any key or move the mouse.
The Password dialog box appears. Type your password, then click OK.
The Main dialog box appears if the password was entered properly.
4.4.6.5 Removing password protection from your console
From the Main dialog box, click Setup - Security; the Password dialog box appears. Type your password, then click OK.
In the Security dialog box, single-click and press Enter or double-click in the
New box. Leave the box blank. Press Enter .
Single-click and press Enter or double-click in the Repeat box. Leave the box
blank. Press Enter .
Click OK to eliminate your password.
4.4.6.6 Enabling the screen saver mode with no password protection
If your console does not require a password to gain access to the Security
dialog box, proceed to step 2.
-orIf your console is password protected, see the previous procedure, then go to
step 2.
Select Enable Screen Saver.
Type the number of minutes for Inactivity Time (from 1 to 99) to delay activation of the screen saver.
Choose Energy if your monitor is Energy Star®compliant; otherwise select
Screen.
Monitor Damage
Monitor damage can result from the use of Energy mode with monitors
not compliant with Energy Star®.
(Optional) Click Test to activate the screen saver test which lasts 10 seconds
then returns you to the Security dialog box.
Click OK.
Activation of the screen saver mode disconnects the user from a server; no
server is selected. The status flag displays Free.
4.4.6.7 Exiting the screen saver mode
Press any key or move your mouse. The Main dialog box appears and any previous server connection will be restored.
590-334-609F
25
Displaying Version Information
Basic Operations
4.4.6.8 Turning off the screen saver
In the Security dialog box, clear Enable Screen Saver.
Click OK.
4.4.6.9 Immediately turning on the screen saver
Press Print Screen, then press Pause .
4.5 Displaying Version Information
OSCAR enables you to display the KVM s2-1602/0801 and KVM s2-Adapter firmware versions. For optimum performance, keep your firmware current. For more
information, see FLASH Upgrades in Chapter 5.
Press Print Screen. The Main dialog box will appear.
Click Commands - Display Versions. The Version dialog box appears. The top
half of the box lists the subsystem versions in the appliance.
Figure 15: Version Dialog Box
Click KVMS2 to view individual KVM s2-Adapter version information. The
KVM s2-Adapter Selection dialog box appears.
26
590-334-609F
Basic Operations
Displaying Version Information
Figure 16: KVM s2-Adapter Selection Dialog Box
Select a KVM s2-Adapter to view and click the Version button. The KVM s2Adapter Version dialog box appears. For more information on loading firmware, see Chapter 5.
Figure 17: KVM s2-Adapter Version Dialog Box
Click X to close the KVM s2-Adapter Version dialog box.
4.6 Scanning Your System
In scan mode, the appliance automatically scans from port to port (server to
server). You can scan up to 16 servers (depending on the KVM series2 model
that you are using), specifying which servers to scan and the number of seconds
that each server will display. The list is always shown in scanning order. You can,
however, choose to display the server’s name or EID number by pressing the appropriate button.
590-334-609F
27
Scanning Your System
Basic Operations
4.6.1 Adding servers to the scan list
Press Print Screen. The Main dialog box will appear.
Click Setup - Scan. The Scan dialog box appears.
Figure 18: Scan Dialog Box
In the Scan dialog box, click the checkbox next to each server that you would
like to add to the scan list.
-orDouble-click a server name or port.
-orPress the Alt key and the number of the server you want to scan. You can
select up to 16 servers.
In the Scan Time box, type the number of seconds (from 3 to 99) of desired
time before the scan moves to the next server in the sequence.
Click OK.
4.6.2 Removing a server from the scan list
In the Scan dialog box, click the server to be removed.
Press Delete.
-orClick Clear to remove all servers from the scan list.
Click OK.
4.6.3 Starting the scan mode
Press Print Screen. The Main dialog box will appear.
Click Commands. The Commands dialog box appears.
28
590-334-609F
Basic Operations
Broadcasting to Servers
Figure 19: Commands Dialog Box
Select Scan Enable in the Commands dialog box.
Click X to close the Commands dialog box.
Scanning will begin when the Main dialog box or flag is displayed. Scanning is inhibited in any other OSCAR dialog box.
4.6.4 Cancelling scan mode
Select a server if OSCAR is open.
-orMove the mouse or press any key on the keyboard if OSCAR is not open.
Scanning will stop at the currently selected server.
-orPress Print Screen. The Main dialog box will appear.
Click Commands. The Commands dialog box appears.
Clear Scan Enable.
4.7 Broadcasting to Servers
The analog user can simultaneously control more than one server in a system, to
ensure that all selected servers receive identical input. You can choose to broadcast keystrokes and/or mouse movements independently.
You can broadcast one server per RI port. This means you can broadcast
up to 16 (with the KVM s2-1602) or eight (with the KVM s2-0801) servers
at one time.
590-334-609F
29
Broadcasting to selected servers
Basic Operations
4.7.1 Accessing the Broadcast dialog box
Press Print Screen. The Main dialog box will appear.
Click Setup - Broadcast. The Broadcast dialog box appears.
Figure 20: Broadcast Dialog Box
When Broadcasting keystrokes, the keyboard state must be identical for all
servers receiving a broadcast to interpret keystrokes identically. Specifically, the Caps Lock and Num Lock modes must be the same on all keyboards. While the appliance attempts to send keystrokes to the selected
servers simultaneously, some servers may inhibit and thereby delay the
transmission.
For the mouse to work accurately when broadcasting mouse movements,
all systems must have identical mouse drivers, desktops (such as identically
placed icons) and video resolutions. In addition, the mouse must be in exactly the same place on all screens. Because these conditions are extremely
difficult to achieve, broadcasting mouse movements to multiple systems may
have unpredictable results.
4.7.1.1 Broadcasting to selected servers
From the Broadcast dialog box, select the mouse and/or keyboard checkboxes for the servers that are to receive the broadcast commands.
-orPress the Up or Down Arrow keys to move the cursor to the target server.
Then press Alt+K to select the keyboard checkbox and/or Alt+M to select the
mouse checkbox. Repeat for additional servers.
Click OK to save the settings and return to the Setup dialog box. Click X or
press Escape to return to the Main dialog box.
30
590-334-609F
Basic Operations
Turning broadcasting off
Click Commands. The Commands dialog box appears.
Click the Broadcast Enable checkbox to activate broadcasting. The Broadcast
Enable Confirm/Deny dialog box appears.
Figure 21: Broadcast Enable Confirm/Deny Dialog Box
Click OK to enable the broadcast. Click X or press Escape to cancel and
return to the Commands dialog box.
If broadcasting is enabled, type the information and/or perform the mouse
movements you want to broadcast from the user station. Only servers in the
list are accessible.
The other user is disabled when broadcast mode is enabled.
4.7.1.2 Turning broadcasting off
From the Commands dialog box, clear the Broadcast Enable checkbox.
4.8 Changing Your Switch Mode
Your KVM s2-1602/0801 allows you to connect to attached servers using two
methods: Preemptive and Cooperative.
Select Preemptive (default setting) to allow any user to select any server at any time; a
request from another user disconnects the current user without warning.
-orSelect Cooperative to maintain the current user connection; the current user won’t
be disconnected if another user requests connection.
590-334-609F
31
Setting the Keyboard Country Code
Basic Operations
4.8.1 Accessing the Switch dialog box
Press Print Screen. The Main dialog box will appear.
Click Setup - Switch. The Switch dialog box appears.
Select either Preemptive or Cooperative as your switch mode.
Figure 22: Switch Dialog Box
4.9 Setting the Keyboard Country Code
Using the keyboard code that supports a language different than that of your KVM
s2-1602/0801 firmware will cause incorrect keyboard mapping.
By defualt, KVM s2-1602/0801 appliances send the US keyboard country code to
the USB modules attached to servers, and the code is applied to the servers when
they are powered up or rebooted. Codes are then stored in the KVM s2-Adapter
Issues may arise when you use the US keyboard country code with a keyboard of
another country. For example, the Z key on a US keyboard is the in the same location as the Y key on a German keyboard.
The Keyboard command enables you to send a different keyboard country code
than the default US setting. The specified country code is sent to the all servers attached to the KVM s2-1602/0801 when they are powered up or rebooted, and the
new code is stored in the KVM s2-Adapter.
If the KVM s2-Adapter is moved to a different server, the keyboard country code
will need to be reset.
Only local users can view or change keyboard country code settings.
32
590-334-609F
Basic Operations
Changing the keyboard country code
4.9.1 Changing the keyboard country code
If OSCAR is not activated, press Print Screen. The main dialog box will appear.
Click Setup - Keyboard. The keyboard dialog box appears.
Select a country code and click OK.
Reboot the servers. After rebooting, each server will request the country code
setting stored in the KVM s2-Adapter.
If you wish to rebott the servers by power-cyvling them, you must wait 90 seconds
before rebooting. A soft reboot may be performed without waiting 90 seconds.
590-334-609F
33
34
590-334-609F
Appendices
5
FLASH Upgrades
Appendices
5.1 FLASH Upgrades
5.1.1 Upgrading the KVM s2-1602/0801
You can upgrade the firmware of your KVM s2-1602/0801 switch by using a special update utility provided by Fujitsu Technology Solutions. This utility automatically configures the port communications settings to allow direct downloading from
the connected server.
If you upgrade the appliance firmware, please verify the individual firmware of
the KVM s2-Adaptors. The upgrade of the adapters requires a separate upgrade
procedure which is found in Chapter 4.
5.1.1.1 Items needed for the upgrade
•
Server running Windows NT®, Windows 95, Windows 98, Windows 2000, or
Win XP
•
Available serial port (COM port) on the server
•
Straight-through null modem serial cable (female) that connects the switch and
the server
•
Firmware update
5.1.1.2 Upgrading firmware
Connect the standard serial cable to a COM port on the server and to the serial connector on the back panel of the switch. Make a note of which COM port
you have chosen, then turn on the switch.
Go to the Fujitsu Technology Solutions web site to access the firmware
upgrade file. Once the download is complete, navigate to the drive where you
have saved the firmware update and unzip the file.
Double-click to run the file.
In the dialog box that displays, select the desired language and COM port.
Click Load.
Once the firmware is updated, the appliance symbol is checked green..
The switch automatically reboots after the upgrade is completed.
5.1.1.3 Possible error conditions
If the download does not execute properly, verify the following:
•
Verify that the COM port is correct.
590-334-609F
35
Upgrading the Firmware
Appendices
•
Verify that no other program is currently using the COM port, or that a previous DOS window/shell is open that had used the desired COM port.
•
Verify that no other copies of the upgrade utility are currently running.
•
Verify that a straight-through null modem serial cable is used.
•
Verify in the selected COM port’s Advanced Port settings that the FIFO buffers
are selected and that the receive buffer is set to High.
While upgrading, do not use your computer for anything else or switch between windows. Close all other windows if necessary. If the upgrade was
unsuccessful (such as during a power outage), repeat the procedure.
5.1.2 Upgrading the KVM s2-Adapter firmware
The KVM s2-Adapters can be upgraded individually or simultaneously.
Do not cycle power to the server or disconnect the KVM s2-Adapter during
this process. A loss of power will render the KVM s2-Adapter inoperable
and require the switch to be returned to the factory for repair.
5.1.2.1 Simultaneously upgrading multiple KVM s2-Adapters
Press Print Screen. The Main dialog box will appear.
Click Commands - KVM series2-Adapter Status. The KVM s2-Adapter Status
dialog box appears.
Figure 23: KVM s2-Adapter Status Dialog Box
Click one or more types of modules to upgrade. Click Upgrade.
The KVM s2-Adapter Upgrade dialog box appears. Click OK to initiate the upgrade and return to the KVM s2-Adapter Status dialog box.
36
590-334-609F
Appendices
Upgrading firmware individually
Figure 24: KVM s2-Adapter Upgrade Dialog Box
5.1.2.2 Upgrading KVM s2-Adapter firmware individually
Press Print Screen. The Main dialog box will appear.
Click Commands - Display Versions. The Version dialog box appears.
Figure 25: Version Dialog Box
Click KVMS2 to view individual cable version information. The KVM s2-Adapter Selection dialog box appears.
590-334-609F
37
Upgrading firmware individually
Appendices
Figure 26: KVM s2-Adapter Selection Dialog Box
Select a KVM s2-Adapter to upgrade and click the Version button. The KVM
s2-Adapter Version dialog box appears.
Figure 27: KVM s2-Adapter Version Dialog Box
Click the Load Firmware button. The KVM s2-Adapter Load dialog
box appears.
38
590-334-609F
Appendices
KVM s2 Technical Specifications
Figure 28: KVM s2-Adapter Load Dialog Box
Click OK to initiate the upgrade and return to the Status dialog box.
During an upgrade, the KVM s2-Adapter status indicator in the Main dialog
box will be yellow. The KVM s2-Adapter is unavailable while an upgrade
is in progress. When an upgrade is initiated, any current connection to the
server via the KVM s2-Adapter will be terminated.
5.2 KVM s2-1602/0801 Technical Specifications
Server Ports
Number
16 (KVM s2-1602) or 8 (KVM s2-0801)
Types
PS/2, Sun and USB KVM s2-Adapters
Connectors
RJ45
Sync Types
Separate horizontal and vertical
Plug and Play
DDC2B
Video Resolution
Analog Port Maximum: 1280 x 1024 @ 75 Hz
Update Port
Number
1
Type
Serial RS232
Connector
DB9 Male
Analog Port Sets
Number
2 (KVM s2-1602) or 1 (KVM s2-0801)
Type
PS/2 and VGA
590-334-609F
39
Sun Advanced Key Emulation
Connectors
Appendices
PS/2 MiniDIN and 15-pin D
Dimensions
(H x W x D)
4.32 x 43.18 x 16.51 cm 1U form factor
(1.70 x 17.00 x 6.50 in)
Weight
3.6 kg (8 lb) without cables
Heat Dissipation
92 BTU/Hr
Airflow
8 cfm
Power Consumption
12.5 W
AC-input power
40 W maximum
AC-input voltage rating
100 to 240 VAC Autosensing
Dimensions (continued)
AC-input current rating
0.5 A
AC-input cable
18 AWG three-wire cable, with a three-lead
IEC-320 receptacle on the power supply end
and a country or region dependent plug on the
power resource end
AC-frequency
50/60 Hz
Temperature
10º to 50º Celsius( 50º to 122º Fahrenheit)
operating
-20º to 60º Celsius (-4º to 140º Fahrenheit)
nonoperating
Humidity
20 to 80% noncondensing operating
5 to 95% noncondensing nonoperating
Agency Approvals
EN55022 Class A, EN55024, EN61000-3-3,
FCC15 Class A, VCCI Class A,
IEC950, EN60950, UL 1950/60950 third edition,
CSA C22.2 No. 60950
Table 5: KVM s2-1602/0801 Product Specifications
5.3 Sun Advanced Key Emulation
Certain keys on a standard Type 5 (US) Sun keyboard may be emulated by key
press sequences on a PS/2 keyboard. To enable Advanced Sun Key Emulation
mode and use they keys, press and hold Ctrl+Shift+Alt and then press the Scroll
Lock key. The Scroll Lock LED blinks. Use the indicated key in the following table
as you would use the advanced keys on a Sun keyboard.
40
590-334-609F
Sun Advanced Key Emulation
Appendices
Sun Key (US)
PS/2 Key Combination
Compose
Application
Compose
keypad *
Power
F11
Open
F7
Help
Num Lock
Props
F3
Front
F5
Stop
F1
Again
F2
Undo
F4
Cut
F10
Copy
F6
Paste
F8
Find
F9
Mute
keypad /
Vol. +
keypad +
Vol. -
keypad -
Command (left)
(2)
F12
Command (left)
(2)
Win (GUI) left (1)
Command (right) (2)
Win (GUI) right (1)
(1) Windows 95 104-key keyboard
(2) The Command key is the Sun Meta (diamond) key
For example: For Stop + A, press and hold Ctrl+Shift+Alt and press Scroll Lock,
then F1 + A.
These key combinations will work with the USB KVM series2-Adapters (if your
Sun system comes with a USB port) as well as the Sun KVM series2- Adapters.
With the exception of Scroll Lock+F12, these key combinations are not recognized
by Microsoft Windows. The Scroll Lock+F12 combination performs a Windows key
press.
590-334-609F
41
Technical Support
Appendices
5.4 Technical Support
Our Technical Support staff is ready to assist you with any installation or operating
issues you encounter with your Fujitsu Technology Solutions product. If an issue
should develop, follow the steps below for the fastest possible service:
Check the pertinent section of this manual to see if the issue can be resolved
by following the procedures outlined.
Check our web site at http://ts.fujitsu.com/support and click on Services &
Support. Click helpdesk on the left side of the page for a listing of technical
support phone numbers in your area.
42
590-334-609F
Appendices
590-334-609F
43
44
590-334-609F
Fujitsu Technology Solutions GmbH
User Documentation
33094 Paderborn
Germany
Comments
Suggestions
Corrections
email: [email protected]
http://ts.fujitsu.com/support
Submitted by
Comments on KVM s2-1602/0801
590-334-609F
45
46
590-334-609F
Fujitsu Technology Solutions GmbH
User Documentation
33094 Paderborn
Germany
Comments
Suggestions
Corrections
email: [email protected]
http://ts.fujitsu.com/support
Submitted by
Comments on KVM s2-1602/0801
590-334-609F
47
KVM series2-1602/0801
Installations- und Bedienungsanleitung
Auflage Oktober 2005
Kommentare… Vorschläge… Verbesserungen
Unsere Abteilung für technische Dokumentation würde gerne Ihre
Meinung zu diesem Handbuch wissen. Ihr Feedback hilft uns, unsere
Dokumentation zu optimieren und Ihre individuellen Anforderungen zu
erfüllen.
Sie finden hinten im Handbuch Fax-Formulare, mit denen Sie uns Ihre
Kommentare zuschicken können.
Dort befindet sich auch die Adresse der entsprechenden Abteilung für
technische Dokumentation.
Zertifizierte Dokumentation
nach DIN EN ISO 9001:2000
Zur Sicherstellung von konsistent hohen Qualitätsstandards und
Benutzerfreundlichkeit wurde diese Dokumentation in Übereinstimmung
mit den Vorschriften eines Qualitätssicherungssystems erstellt, das den
Anforderungen der Norm DIN EN ISO 9001:2000 entspricht.
Copyright und Markenzeichen
Copyright © Fujitsu Technology Solutions 2009.
Alle Rechte vorbehalten.
Liefermöglichkeiten und technische Änderungen vorbehalten.
Alle verwendeten Hardware- und Softwarebezeichnungen sind Eigentum ihrer entsprechenden
Hersteller.
Dieses Handbuch ist auf
chlorfrei gebleichtem
Papier gedruckt.
Inhalt
1
Vorwort . . . . . . . . . . . . . . . . . . . . . . . . . . . . . . . . . . . . . . . . . . . . . . . . . 1
1.1
Merkmale und Vorteile . . . . . . . . . . . . . . . . . . . . . . . . . . . . . . . . . . . . . . . . . . 1
1.1.1
KVM s2-Adapter . . . . . . . . . . . . . . . . . . . . . . . . . . . . . . . . . . . . . . . . . . 1
1.1.2
Multi-Plattform-Support . . . . . . . . . . . . . . . . . . . . . . . . . . . . . . . . . . . . . 2
1.1.3
Grafische Benutzeroberfläche OSCAR . . . . . . . . . . . . . . . . . . . . . . . . . 2
1.1.4
Sicherheit . . . . . . . . . . . . . . . . . . . . . . . . . . . . . . . . . . . . . . . . . . . . . . . 2
1.1.5
Betriebsmodi . . . . . . . . . . . . . . . . . . . . . . . . . . . . . . . . . . . . . . . . . . . . . 2
1.1.6
Video . . . . . . . . . . . . . . . . . . . . . . . . . . . . . . . . . . . . . . . . . . . . . . . . . . . 2
1.1.7
Plug and Play . . . . . . . . . . . . . . . . . . . . . . . . . . . . . . . . . . . . . . . . . . . . 3
1.1.8
Geeignet für FLASH-Upgrades . . . . . . . . . . . . . . . . . . . . . . . . . . . . . . . 3
1.1.9
Kaskadierung . . . . . . . . . . . . . . . . . . . . . . . . . . . . . . . . . . . . . . . . . . . . 3
1.2
Inhaltsübersicht . . . . . . . . . . . . . . . . . . . . . . . . . . . . . . . . . . . . . . . . . . . 4
1.3
Darstellungskonventionen . . . . . . . . . . . . . . . . . . . . . . . . . . . . . . . . . . . 5
2
Sicherheitshinweise . . . . . . . . . . . . . . . . . . . . . . . . . . . . . . . . . . . . . . . . 7
2.1
Hinweise zu Hochfrequenzstörungen . . . . . . . . . . . . . . . . . . . . . . . . . . 7
2.2
Sicherheitsvorkehrungen und Rackbefestigung . . . . . . . . . . . . . . . . . . 8
3
Installation . . . . . . . . . . . . . . . . . . . . . . . . . . . . . . . . . . . . . . . . . . . . . . 11
3.1
Vor der Installation . . . . . . . . . . . . . . . . . . . . . . . . . . . . . . . . . . . . . . . 11
3.1.1
Lieferumfang des KVM s2-1602/0801 . . . . . . . . . . . . . . . . . . . . . . . . . 11
3.1.2
Zusätzlich benötigte Teile . . . . . . . . . . . . . . . . . . . . . . . . . . . . . . . . . . 11
3.2
Rackbefestigung des KVM s2-1602/0801 . . . . . . . . . . . . . . . . . . . . . . 11
3.2.1
Die 1HE-Switch-Befestigungshalterung anbringen . . . . . . . . . . . . . . . 12
3.3
Installation des KVM s2-1602/0801 . . . . . . . . . . . . . . . . . . . . . . . . . . . 13
3.3.1
Einen KVM s2-Adapter an jeden Server anschließen . . . . . . . . . . . . . 14
3.3.2
Legacy-Switches hinzufügen . . . . . . . . . . . . . . . . . . . . . . . . . . . . . . . . 15
3.3.2.1
Einen Legacy-KVM-Switch hinzufügen . . . . . . . . . . . . . . . . . . . . . . . . 15
3.3.3
Lokale Peripheriegeräte anschließen . . . . . . . . . . . . . . . . . . . . . . . . . 17
3.4
Das KVM s2-1602/0801‑System einrichten . . . . . . . . . . . . . . . . . . . . 17
590-334-609F
Inhalt
4
Normalbetrieb . . . . . . . . . . . . . . . . . . . . . . . . . . . . . . . . . . . . . . . . . . . 19
4.1
Das System über die Analogports steuern . . . . . . . . . . . . . . . . . . . . . 19
4.2
Ports und Server anzeigen und auswählen . . . . . . . . . . . . . . . . . . . . . 19
4.2.1
Auf das Hauptmenü zugreifen . . . . . . . . . . . . . . . . . . . . . . . . . . . . . . . 19
4.2.2
Die Statusanzeige der Einheit anzeigen . . . . . . . . . . . . . . . . . . . . . . . 20
4.2.3
Server auswählen . . . . . . . . . . . . . . . . . . . . . . . . . . . . . . . . . . . . . . . . 20
4.2.3.1
Den vorherigen Server auswählen . . . . . . . . . . . . . . . . . . . . . . . . . . . 20
4.2.3.2
Die Verbindung zwischen Benutzer und Server trennen . . . . . . . . . . . 21
4.2.4
Soft Switching . . . . . . . . . . . . . . . . . . . . . . . . . . . . . . . . . . . . . . . . . . . 21
4.2.4.1
Server für Soft Switching konfigurieren . . . . . . . . . . . . . . . . . . . . . . . . 21
4.2.4.2
Soft Switching zu einem Server . . . . . . . . . . . . . . . . . . . . . . . . . . . . . 21
4.3
Navigation in OSCAR . . . . . . . . . . . . . . . . . . . . . . . . . . . . . . . . . . . . . 22
4.4
OSCAR konfigurieren . . . . . . . . . . . . . . . . . . . . . . . . . . . . . . . . . . . . . 24
4.4.1
Auf das Setup-Menü zugreifen . . . . . . . . . . . . . . . . . . . . . . . . . . . . . . 24
4.4.2
Servernamen zuweisen . . . . . . . . . . . . . . . . . . . . . . . . . . . . . . . . . . . . 25
4.4.2.1
Auf das Dialogfeld „Namen“ zugreifen . . . . . . . . . . . . . . . . . . . . . . . . 25
4.4.2.2
Servern Namen zuordnen . . . . . . . . . . . . . . . . . . . . . . . . . . . . . . . . . . 26
4.4.3
Gerätetypen zuordnen . . . . . . . . . . . . . . . . . . . . . . . . . . . . . . . . . . . . . 27
4.4.3.1
Auf das Dialogfeld „Geräte“ zugreifen . . . . . . . . . . . . . . . . . . . . . . . . . 27
4.4.3.2
Einen Gerätetyp zuweisen . . . . . . . . . . . . . . . . . . . . . . . . . . . . . . . . . 27
4.4.4
Das Anzeigeverhalten ändern . . . . . . . . . . . . . . . . . . . . . . . . . . . . . . . 28
4.4.4.1
Auf das Hauptmenü zugreifen . . . . . . . . . . . . . . . . . . . . . . . . . . . . . . . 28
4.4.4.2
Die Standard-Anzeigereihenfolge der Server auswählen . . . . . . . . . . 29
4.4.4.3
Die Zeitverzögerung für OSCAR einstellen . . . . . . . . . . . . . . . . . . . . . 29
4.4.5
Steuerung des Status-Flags . . . . . . . . . . . . . . . . . . . . . . . . . . . . . . . . 30
4.4.5.1
Auf das Dialogfeld „Flag“ zugreifen . . . . . . . . . . . . . . . . . . . . . . . . . . . 30
4.4.5.2
Die Anzeige des Status-Flags festlegen . . . . . . . . . . . . . . . . . . . . . . . 30
4.4.6
Die Konsolensicherheit einstellen . . . . . . . . . . . . . . . . . . . . . . . . . . . . 31
4.4.6.1
Auf das Dialogfeld „Sicherheit“ zugreifen . . . . . . . . . . . . . . . . . . . . . . 31
4.4.6.2
Das Kennwort festlegen oder ändern . . . . . . . . . . . . . . . . . . . . . . . . . 32
4.4.6.3
Die Konsole mit einem Kennwort schützen . . . . . . . . . . . . . . . . . . . . . 32
590-334-609F
Inhalt
4.4.6.4
An der Konsole anmelden . . . . . . . . . . . . . . . . . . . . . . . . . . . . . . . . . . 33
4.4.6.5
Den Kennwortschutz der Konsole entfernen . . . . . . . . . . . . . . . . . . . . 33
4.4.6.6
Den Bildschirmschonermodus ohne Kennwortschutz aktivieren . . . . . 33
4.4.6.7
Den Bildschirmschonermodus verlassen . . . . . . . . . . . . . . . . . . . . . . 34
4.4.6.8
Den Bildschirmschoner deaktivieren . . . . . . . . . . . . . . . . . . . . . . . . . . 34
4.4.6.9
Den Bildschirmschoner sofort aktivieren . . . . . . . . . . . . . . . . . . . . . . . 34
4.5
Versionsinformationen anzeigen . . . . . . . . . . . . . . . . . . . . . . . . . . . . . 34
4.6
Das System scannen . . . . . . . . . . . . . . . . . . . . . . . . . . . . . . . . . . . . . 36
4.6.1
Server zur Scan-Liste hinzufügen . . . . . . . . . . . . . . . . . . . . . . . . . . . . 36
4.6.2
Einen Server aus der Scan-Liste entfernen . . . . . . . . . . . . . . . . . . . . 37
4.6.3
Den Scan-Modus starten . . . . . . . . . . . . . . . . . . . . . . . . . . . . . . . . . . . 37
4.6.4
Den Scan-Modus abbrechen . . . . . . . . . . . . . . . . . . . . . . . . . . . . . . . . 37
4.7
An Server senden . . . . . . . . . . . . . . . . . . . . . . . . . . . . . . . . . . . . . . . . 38
4.7.1
Auf das Dialogfeld „Senden“ zugreifen . . . . . . . . . . . . . . . . . . . . . . . . 38
4.7.1.1
An ausgewählte Server senden . . . . . . . . . . . . . . . . . . . . . . . . . . . . . 39
4.7.1.2
Senden deaktivieren . . . . . . . . . . . . . . . . . . . . . . . . . . . . . . . . . . . . . . 40
4.8
Den Switch-Modus ändern . . . . . . . . . . . . . . . . . . . . . . . . . . . . . . . . . 40
4.8.1
Auf das Dialogfeld „Switch“ zugreifen . . . . . . . . . . . . . . . . . . . . . . . . . 40
4.9
Länderspezifische Tastaturlayouts einstellen . . . . . . . . . . . . . . . . . . . 41
4.9.1
Das länderspezifische Tastaturlayout ändern . . . . . . . . . . . . . . . . . . . 41
5
Anhänge . . . . . . . . . . . . . . . . . . . . . . . . . . . . . . . . . . . . . . . . . . . . . . . 43
5.1
FLASH-Upgrades . . . . . . . . . . . . . . . . . . . . . . . . . . . . . . . . . . . . . . . . 43
5.1.1
Den KVM s2-1602/0801 aktualisieren . . . . . . . . . . . . . . . . . . . . . . . . . 43
5.1.1.1
Für die Aktualisierung benötigte Teile . . . . . . . . . . . . . . . . . . . . . . . . . 43
5.1.1.2
Firmware aktualisieren . . . . . . . . . . . . . . . . . . . . . . . . . . . . . . . . . . . . 43
5.1.1.3
Mögliche Fehlerquellen . . . . . . . . . . . . . . . . . . . . . . . . . . . . . . . . . . . . 44
5.1.2
KVM s2-Adapterfirmware aktualisieren . . . . . . . . . . . . . . . . . . . . . . . . 44
5.1.2.1
Mehrere KVM s2-Adapter gleichzeitig aktualisieren . . . . . . . . . . . . . . 44
5.1.2.2
KVM s2-Adapterfirmware einzeln aktualisieren . . . . . . . . . . . . . . . . . . 45
5.2
Technische Daten des KVM s2-1602/0801 . . . . . . . . . . . . . . . . . . . . . 48
5.3
Tastenemulation für Sun-Zusatztasten . . . . . . . . . . . . . . . . . . . . . . . . 50
590-334-609F
5.4
Technischer Kundendienst . . . . . . . . . . . . . . . . . . . . . . . . . . . . . . . . . 51
590-334-609F
1
Vorwort
1.1 Merkmale und Vorteile
Der KVM series2-1602 (KVM s2-1602)-Multi-user-Switch mit 16 Ports und der
KVM series2-0801 (KVM s2-0801)-Einzelplatz-Switch mit 8 Ports integrieren
die bewährte analoge KVM (Keyboard, Video, Maus)-Switching-Technologie
von Fujitsu Technology Solutions mit modernstem Kabelmanagement, flexiblem
Benutzerzugriff und einer patentierten Benutzeroberfläche der nächsten
Generation. Die Switches der KVM series2-1602 und KVM series2-0801 (KVM
s2-1602/0801) unterstützen alle gängigen Serverplattformen, verfügen über
leistungsstarke On-Screen-Managementfunktionen und ermöglichen die einfache
Systemkonfiguration und Serverauswahl.
Ein entscheidender Vorteil des KVM s2-1602/0801 ist das KVM series2Adaptermodul (KVM s2-Adaptermodul). Das KVM s2-Adaptermodul mit CAT
5-Design reduziert das Kabelaufkommen entscheidend und bietet gleichzeitig
optimale digitale Bildschirmauflösungen und Monitoreinstellungen. Der interne
Speicher des KVM s2-Adapters vereinfacht die Konfiguration durch die
Zuweisung und das Speichern eindeutiger Servernamen bzw. elektronischer
Kennnummern (EID) für jeden angeschlossenen Server. Der KVM s2-Adapter
wird direkt vom Server mit Strom versorgt und verfügt selbst bei ausgeschaltetem
KVM s2‑1602/0801 über eine „Keep Alive“-Funktionalität.
Für eine optimale Bildschirmauflösung von 1280x1024 sollten Sie die Kabellänge
zwischen dem Switch und dem angeschlossenen Server auf 15 Meter
beschränken. Kabel mit einer Länge von über 15 Metern beeinträchtigen die
Bildschirmauflösung.
Max. Kabellänge
1280x1024 bei 85 Hz
1024x768 bei 85 Hz
800x600 bei 85 Hz
3 Meter
Unterstützt
Unterstützt
Unterstützt
15 Meter
Unterstützt
Unterstützt
Unterstützt
30 Meter
Unterstützt
In der Dokumentation wird das Wort „Einheit“ als Bezeichnung für den
KVM s2-1602/0801-Switch verwendet.
1.1.1 KVM s2-Adapter
KVM s2-Adaptermodule ermöglichen direkte KVM-Konnektivität zu Servern in
einem KVM s2-1602/0801-System. Die KVM s2-1602-Einheit verfügt über 16
Fujitsu Technology Solutions Rack Interface (RI)-Ports zum Anschluss von KVM
s2-Adaptern, und der KVM s2-0801 verfügt über acht RI-Ports.
590-334-609F
1
Grafische Benutzeroberfläche OSCAR
Vorwort
Mit dem KVM s2-Adapter können Sie zusätzliche Switches anschließen, um
Ihr KVM s2-1602/0801-System zu erweitern. Mit dieser Flexibilität kann die
Leistungsfähigkeit Ihres Systems an das Wachstum Ihres Datencenters angepasst
werden.
1.1.2 Multi-Plattform-Support
Die für den KVM s2-1602/0801 verfügbaren KVM s2-Adaptermodule unterstützen
PS/2-, Sun- und USB-Serverumgebungen. Über die On-Screen-Konfigurationsund Ereignisprotokoll-Schnittstelle (OSCAR®) können Sie in Verbindung mit
diesen Modulen bequem zwischen Plattformen umschalten.
1.1.3 Grafische Benutzeroberfläche OSCAR
Der KVM s2-1602/0801-Switch verwendet OSCAR. Mit dieser grafischen
Benutzeroberfläche können Sie Ihr Switchsystem über intuitive Menüs
konfigurieren und Rechner auswählen. Rechner können über individuelle Namen,
EIDs oder Portnummern identifiziert werden, wodurch eine spezifische Zuweisung
von Servernamen ermöglicht wird. Sie können Updates für OSCAR herunterladen,
die es Ihnen ermöglichen, die Sprache der OSCAR-Benutzeroberfläche (Englisch,
Deutsch, Französisch etc.) auszuwählen. Weitere Informationen finden Sie unter
„FLASH-Upgrades“ in Kapitel 5.
1.1.4 Sicherheit
Mit OSCAR können Sie Ihr System durch ein Bildschirmschoner-Kennwort schützen.
Nach einem benutzerdefinierten Zeitintervall wird der Bildschirmschonermodus
aktiviert und es ist kein Zugriff möglich, bis das entsprechende Kennwort zur
Reaktivierung des Systems eingegeben wird.
1.1.5 Betriebsmodi
Die Benutzeroberfläche OSCAR stellt komfortable Betriebsmodi zur einfachen
Verwaltung von KVM s2-1602/0801-Systemen zur Verfügung. Mit diesen Modi
(Senden, Scan und Switching) können Sie Ihre Switching-Aktivitäten steuern. In
Kapitel 4 werden diese Modi genauer erklärt.
1.1.6 Video
Der KVM s2-1602/0801 bietet optimale Bildschirmauflösungen für AnalogVGA, -SVGA und -XGA-Video. Es können Auflösungen von bis zu 1280 x 1024
(bei 75 Hz) mit einer Kabellänge von 15 Metern und Auflösungen von bis zu
800 x 600 (bei 60 Hz) mit Kabellängen von 30 Metern erreicht werden. Die
Bildschirmauflösungen sind von der Kabellänge zwischen Ihrem Switch und den
Servern abhängig.
2
590-334-609F
Vorwort
Inhaltsübersicht
1.1.7 Plug and Play
Der KVM s2-1602/0801 unterstützt Display Data Channel (DDC) Plug and Play
zur automatischen Monitorkonfiguration gemäß der VESA DDC2B-Norm.
1.1.8 Geeignet für FLASH-Upgrades
Sie können Ihre Firmware jederzeit mit einem einfachen
Aktualisierungsprogramm aktualisieren. Hierdurch stellen Sie sicher, dass Ihr
KVM s2‑1602/0801‑System sich stets auf dem neuesten Stand befindet. Sowohl
der KVM s2-1602/0801‑Switch als auch die KVM s2-Adaptermodule sind für
FLASH‑Aktualisierungen geeignet. Weitere Informationen finden Sie in Kapitel 5.
Wenn Sie die Switch-Firmware aktualisieren, stellen Sie sicher, dass
die länderspezifischen Tastaturen Ihres Systems mit der Firmware
übereinstimmen, die Sie in den Switch laden. Nehmen Sie bezüglich
weiterer Informationen Kontakt mit dem technischen Kundendienst von
Fujitsu Technology Solutions auf. Informationen über den technischen
Kundendienst finden Sie in Kapitel 5.
1.1.9 Kaskadierung
Jeder KVM s2-1602‑Switch unterstützt bis zu 16 direkt angeschlossene Server
und jeder KVM s2-0801 bis zu acht direkt angeschlossene Server. Sowohl
der KVM s2‑1602 als auch der KVM s2-0801 können zur Unterstützung von
zusätzlichen Servern bequem angepasst werden. Sie können Ihr System mit
kaskadierfähigen Produkten von Fujitsu Technology Solutions einfach erweitern.
Mit diesen zusätzlichen Kaskadeneinheiten können Sie bis zu 256 Server in einem
System anschließen.
590-334-609F
3
Kaskadierung
Vorwort
KVM s2-Adapter
Switch
KVM s2-Adapter
Rack mit Servern
Switch
Kritischer Server
Rack mit
Servern
KVM s2 -1602-Einheit
Analogverbindung
Abbildung 1: Beispielkonfiguration eines KVM s2-1602
1.2 Inhaltsübersicht
Sicherheitshinweise
Lesen Sie vor der Inbetriebnahme des KVM s2-1602/0801 das
Kapitel Sicherheitshinweise. Dieses Kapitel enthält wichtige
Informationen für die ordnungsgemäße Installation und Bedienung des
KVM s2‑1602/0801.
In diesem Handbuch wird beschrieben, wie der KVM s2-1602/0801 installiert,
konfiguriert und betrieben wird.
4
590-334-609F
Vorwort
Darstellungskonventionen
1.3 Darstellungskonventionen
In diesem Handbuch werden die folgenden Darstellungskonventionen verwendet:
Fett
Hebt wichtigen Text hervor.
Taste
Hebt Tasten oder Tastenkombination im laufenden Text hervor.
Kursiv
Hebt Befehle, Dateinamen, Menübezeichnungen und Eingaben im
laufenden Text hervor.
Gibt zusätzliche Informationen und Tipps an.
Hebt Informationen hervor, die bei Nichtbeachtung Ihre Gesundheit,
die Funktionsfähigkeit Ihres Systems oder die Datensicherheit
beeinträchtigen können.
Hebt einen Schritt hervor, den Sie ausführen müssen.
590-334-609F
5
Vorwort
6
590-334-609F
- und • Diese Zeichen bezeichnen Gliederungen.
2
Sicherheitshinweise
Dieses Kapitel erhält Hinweise zu Hochfrequenzstörungen und zur Sicherheit Ihrer
KVM s2-1602/0801-Einheit.
2.1 Hinweise zu Hochfrequenzstörungen
Hinweise zu Hochfrequenzstörungen (USA)
Warnung: Änderungen an diesem Gerät, die nicht ausdrücklich von der
für die Einhaltung der Vorschriften beauftragten Stelle genehmigt sind,
können die Berechtigung des Benutzers zum Betrieb dieses Geräts
außer Kraft setzen.
Dieses Gerät wurde getestet und liegt innerhalb der Grenzwerte für
digitale Geräte der Klasse A gemäß Teil 15 der FCC-Vorschriften.
Diese Grenzwerte wurden festgelegt, um beim Betrieb des Geräts in
Gewerbegebieten angemessenen Schutz vor schädlichen Störungen
zu bieten. Dieses Gerät erzeugt und nutzt Hochfrequenzenergie
und kann Hochfrequenzenergie ausstrahlen. Falls das Gerät nicht in
Übereinstimmung mit der Betriebsanleitung installiert und betrieben wird,
kann es den Funkverkehr stören. Bei Betrieb dieses Geräts in einem
Wohngebiet werden wahrscheinlich schädliche Störungen verursacht, die
in einem solchen Fall vom Benutzer auf eigene Kosten beseitigt werden
müssen.
Hinweise zu Hochfrequenzstörungen (Kanada)
Dieses digitale Gerät liegt innerhalb der Grenzwerte der Klasse A für
Hochfrequenzgeräusch-Emissionen von digitalen Geräten, die in den
„Radio Interference Regulations“ des kanadischen Department of
Communications festgelegt sind.
Le présent appareil numérique n’émet pas de bruits radioélectriques
dépassant les limites applicables aux appareils numériques de la
classe A prescrites dans le Règlement sur le brouillage radioélectrique
édicté par le Ministère des Communications du Canada.
VCCI-Zulassung
590-334-609F
7
Sicherheitsvorkehrungen und Rackbefestigung
Sicherheitshinweise
2.2 Sicherheitsvorkehrungen und Rackbefestigung
Zur Vermeidung von potenziellen Problemen hinsichtlich Monitor
und/oder Tastatur bei der Verwendung des KVM s2-1602/0801
• Wenn im Gebäude dreiphasiger Wechselstrom verwendet wird,
stellen Sie sicher, dass Rechner und Monitor phasengleich sind.
Die besten Ergebnisse werden erzielt, wenn die Geräte am selben
Stromkreis angeschlossen sind.
• Verwenden Sie ausschließlich von Fujitsu Technology Solutions
gelieferte Kabel zum Anschließen von Rechnern und KVMSwitches. Fujitsu Technology Solutions übernimmt keine Garantie
für Schäden, die durch nicht von Fujitsu Technology Solutions
gelieferte Kabel hervorgerufen werden.
Zur Vermeidung von möglichen tödlichen Verletzungen durch
Stromschlag und Schäden an der Ausrüstung
• Verwenden Sie kein zweiadriges Verlängerungskabel in Fujitsu
Technology Solutions-Produktkonfigurationen.
• Prüfen Sie die Stromausgänge an Rechner und Monitor auf
ordnungsgemäße Polarität und Erdung.
• Verwenden Sie die Einheit nur mit geerdeten Ausgängen an Rechner
und Monitor. Bei der Verwendung einer unterbrechungsfreien
Stromversorgung (USV) müssen Rechner, Monitor und Einheit mit
Strom über die Stromversorgung versorgt werden.
Der Wechselstromeingang ist die Haupt-Stromtrennung.
Sicherheitsvorkehrungen bei Rackbefestigung
• Erhöhte Umgebungstemperaturen: Beim Einbau in geschlossenen
Rack-Gruppen kann es vorkommen, dass die Betriebstemperatur
in der Rack-Umgebung höher als die Raumtemperatur ist. Achten
Sie darauf, dass die auf dem Gerät angegebene maximale
Umgebungstemperatur nicht überschritten wird.
• Unzureichende Belüftung: Der Einbau von Geräten im Rack muss
so vorgenommen werden, dass die für den sicheren Betrieb der
Geräte benötigte Luftzufuhr sichergestellt ist.
• Mechanische Belastung: Der Einbau von Geräten im Rack muss
unter Berücksichtigung einer gleichmäßigen mechanischen
Belastung erfolgen, damit Gefahrensituationen aufgrund von
ungleichmäßiger Belastung vermieden werden.
• Stromkreisüberlastung: Es muss darauf geachtet werden,
8
590-334-609F
Sicherheitshinweise
Sicherheitsvorkehrungen und Rackbefestigung
welche Auswirkungen der Anschluss der Geräte an den
Versorgungsstromkreis und eine Überlastung des Stromkreises
auf den Überlastungsschutz und die Verkabelung haben können.
Die maximalen Spannungswerte sind auf den Typenschildern der
Geräte angegeben.
• Zuverlässige Geräteerdung: Achten Sie darauf, dass der
Erdungsanschluss für Rack-montierte Geräte dauerhaft zuverlässig
ist. Achten Sie vor allem auf Versorgungsanschlüsse, die nicht
direkt an den Verzweigungsschaltkreis angeschlossen sind
(z. B. Verwendung von Mehrfachsteckdosen).
590-334-609F
9
Sicherheitshinweise
10
590-334-609F
3
Installation
3.1 Vor der Installation
Überprüfen Sie vor der Installation der KVM s2-1602/0801‑Einheit anhand der
folgenden Liste, ob sowohl alle Teile, die mit der Einheit versandt wurden, als auch
etwaige Zusatzteile, die für die Installation benötigt werden, vorhanden sind.
3.1.1 Lieferumfang des KVM s2-1602/0801
•
KVM s2-1602‑ oder KVM s2-0801‑Einheit
•
Netzkabel
•
Ein serielles Nullmodem-Durchgangskabel
•
KVM series2-1602/0801-CD mit Installations- und Bedienungsanleitung
•
KVM series2-1602/0801-Schnellinstallationsanleitung
•
Rackmontagekit
3.1.2 Zusätzlich benötigte Teile
•
Ein KVM s2-Adaptermodul und UTP-Kabel für jeden angeschlossenen
Server oder Switch
3.2 Rackbefestigung des KVM s2-1602/0801
Sie können Ihre KVM s2-1602/0801‑Einheit in ein Rack einbauen. Die
benötigten Halterungen sind über Fujitsu Technology Solutions erhältlich.
Stabilisieren Sie das Rack vor der Befestigung der Einheit und anderer
Komponenten im Rack an seinem vorgesehenen Standort (wenn es nicht schon
aufgebaut ist). Bestücken Sie das Rack von unten nach oben mit Komponenten.
Vermeiden Sie ungleichmäßige Belastung und achten Sie darauf, dass das Rack
nicht überladen wird.
590-334-609F
11
Die Befestigungshalterung anbringen
Installation
Abbildung 2: Horizontale Installation des KVM s2-1602
Rackbelastung
Überladung oder ungleichmäßige Rackbestückung kann zur
Beschädigung von Regalen oder Racks führen und mögliche
Personenschäden nach sich ziehen. Vor dem Bestücken die
Racks an ihren vorgesehenen Standorten stabilisieren. Das Rack
mit Komponenten von unten nach oben bestücken. Die RackBelastungswerte nicht überschreiten.
3.2.1 Die 1HE-Switch-Befestigungshalterung anbringen
Entfernen Sie die ersten zwei Schrauben auf beiden Seiten.
Richten Sie die Bohrungen auf der „langen“ Seite der Seitenhalterungen des
Kits auf die Bohrungen im Switch aus.
Schrauben Sie die Befestigungshalterungen am Switch mit je zwei
Schrauben auf beiden Seiten an. Verwenden Sie hierzu einen
Kreuzschlitzschraubendreher.
Befestigen Sie vier Käfigmuttern oder Schnappmuttern so am
Rackbefestigungsflansch des Racks, dass die Mutter auf der Rackinnenseite
positioniert ist.
Die Muttern sind nicht im Lieferumfang des Kits enthalten.
12
590-334-609F
Installation
Installation des KVM s2-1602/0801
Bauen Sie den Switch in das Rack ein, indem die Bohrungen in der „kurzen“
Seite jeder Halterung auf einen entsprechenden Satz der passenden
Bohrungen des Geräteracks ausgerichtet werden. Führen Sie als nächstes
die Kombinationssechskant-Kopfschrauben durch die Schlitze in der
Halterung und durch die Bohrungen der Befestigungsstrebe und danach in die
Käfig- oder Schnappmuttern ein.
3.3 Installation des KVM s2-1602/0801
Schließen Sie das mitgelieferte Stromkabel hinten an die Einheit und dann an
eine geeignete Stromquelle an. Abbildung 3 zeigt eine mögliche Konfiguration
für Ihre KVM s2-1602‑ oder KVM s2-0801‑Einheit. Mithilfe der folgenden
Vorgehensweisen können Sie Ihre Einheit erfolgreich installieren.
So vermeiden Sie einen Elektroschock oder Schäden an Ihrem Gerät
• Das Netzkabel muss immer ordnungsgemäß geerdet sein. Der
Masseanschluss ist ein wichtiges Sicherheitsmerkmal.
• Das Netzkabel in eine geerdete Schukosteckdose stecken, die
jederzeit leicht zugänglich ist.
• Das Netzkabel entweder aus der Netzsteckdose oder aus dem
Gerät ziehen, um die Stromversorgung zu unterbrechen.
590-334-609F
13
Einen Adapter anschließen
Installation
Analoger
Benutzer
Konfigurationsport zur
Firmware-Aktualisierung
KVM
KVM s2-1602-Einheit
1
2
Analoger
Benutzer
3
4
5
6
7
8
9
10
11
12
13
14
15
16
Server 2-16
s2-Adapter
Server 1
Abbildung 3: KVM s2‑Basiskonfiguration
3.3.1 Einen KVM s2-Adapter an jeden Server anschließen
Legen Sie die KVM s2-Adaptermodule für Ihre KVM s2-1602/0801‑Einheit
bereit.
Schließen Sie die entsprechenden farblich gekennzeichneten Kabelenden
an die Tastatur-, Monitor- und Mausports am ersten Server an, der an diese
Einheit angeschlossen werden soll.
Schließen Sie das eine Kabelende des CAT 5-Kabels, das den
KVM s2‑Adapter mit der KVM s2-1602/0801‑Einheit verbindet, an den
RJ45‑Stecker am KVM s2-Adaptermodul an.
Schließen Sie das andere CAT 5-Kabelende an den gewünschten RI-Port auf
der Geräterückseite Ihrer KVM s2-1602/0801‑Einheit an.
Wiederholen Sie die Schritte 2 bis 4 für alle Server, die angeschlossen
werden sollen.
14
590-334-609F
Installation
Legacy-Switches hinzufügen
Beim Anschluss eines Sun KVM s2-Adaptermoduls muss ein MultisyncMonitor verwendet werden, der Sun Rechner mit sowohl VGA als auch
Sync-on-Green oder Composite-Sync unterstützt.
3.3.2 Legacy-Switches hinzufügen
Sie können kaskadierte Switches zu dem KVM s2-1602/0801‑System zur
einfachen Integration mit Ihrer bestehenden Konfiguration hinzufügen. Bei einem
kaskadierten System nimmt jeder RI-Port bis zu 16 Server auf (in Abhängigkeit
vom verwendeten KVM s2-Modell).
3.3.2.1 Einen Legacy-KVM-Switch hinzufügen
Installieren Sie den KVM-Switch im Rack. Legen Sie ein CAT 5-Kabel zur
Verbindung Ihrer KVM s2-1602/0801‑Einheit mit dem KVM s2-Adapter für
Ihren Switch bereit.
Schließen Sie die Tastatur-, Monitor- und Mausstecker des KVM s2-Adapters
an einen Benutzerport am kaskadierten Switch an.
Schließen das eine CAT 5-Kabelende an den RJ45-Stecker des
KVM s2‑Adapters an.
Schließen Sie das andere Ende des CAT 5-Kabels an einen verfügbaren Port
auf der Geräterückseite Ihres KVM s2-1602/0801 an.
Schließen Sie die Server gemäß den Anweisungen (im Lieferumfang
enthalten) an Ihren kaskadierten Fujitsu Technology Solutions‑Switch an.
Schließen Sie zum Kaskadieren von anderen KVM s2-Einheiten mit dem
KVM s2-1602/0801 ein Ende eines CAT 5-Kabels an den ACI-Port des
Haupt-KVM s2-1602/0801-Switches an. Schließen Sie das andere
CAT 5 ‑Kabelende an einen RI-Port der kaskadierten Einheit an.
Bitte beachten Sie, dass nur eine kaskadierte Ebene bei dieser
Konfigurationsart unterstützt wird. Außerdem wird OSCAR am lokalen
Port deaktiviert, wenn der Haupt-KVM s2-1602/0801 unter einer anderen
Einheit gestuft ist.
590-334-609F
15
Installation
Legacy-Switches hinzufügen
Analoger
Benutzer
KVM s2-1602 Einheit
Gestufte KVM s2-Einheit
Kaskadieren Sie mit einem
KVM s2‑1611, 1602 oder 0801 über
ein CAT 5-Kabel, das einen RI-Port
mit dem ACI-Port am KVM s2-1602
verbindet
KVM-Switch KVM s2-Adapter
KVM-Switch
KVM s2-Adapter
Server 1
Server 2
Abbildung 4: KVM s2-1602‑Konfiguration mit einem Legacy KVM-Switch
Schalten Sie den kaskadierten Switch aus und wieder ein, um den
Kaskadencode zu aktivieren.
Wiederholen Sie die in 3.3.2.1 beschriebenen Schritte für alle kaskadierten
Switches, die Sie an Ihr System anschließen möchten.
16
590-334-609F
Installation
Lokale Peripheriegeräte anschließen
3.3.3 Lokale Peripheriegeräte anschließen
Wählen Sie die Tastatur, den Monitor und die Maus zum Anschluss an den
lokalen analogen Benutzer A.
Das Portset mit der Bezeichnung A befindet sich auf der Rückseite der Einheit.
Schließen Sie diese Peripheriegeräte an ihre entsprechenden Ports an.
Wiederholen Sie diese Schritte für das andere Analogport-Sets.
Bündeln Sie die Kabel zu einem Kabelstrang und kennzeichnen Sie sie zur
einfacheren Identifikation.
3.4 Das KVM s2-1602/0801‑System einrichten
Mit dem KVM s2-1602/0801‑System können Sie automatisch jeden Port Ihrer
Einheit suchen und konfigurieren. In Kapitel 4 finden Sie detaillierte Anweisungen
zur Benennung und Anpassung sowie der Einrichtung und Konfiguration von
OSCAR.
590-334-609F
17
Installation
18
590-334-609F
4
Normalbetrieb
4.1 Das System über die Analogports steuern
Der KVM s2-1602 besitzt zwei Analogport-Sets (der KVM s2-0801 verfügt über nur
ein Analogport-Set) auf der Geräterückseite zum Anschluss eines Monitors und einer
PS/2-Tastatur und -Maus für den direkten analogen Zugriff. Das Gerät verwendet
OSCAR, die On-Screen-Konfigurations- und Ereignisprotokoll-Schnittstelle, mit
intuitiven Menüs zur Konfiguration Ihres Systems und zur Rechnerauswahl.
4.2 Ports und Server anzeigen und auswählen
Mit dem Hauptmenü von OSCAR können Sie die Server im KVM s2‑1602/
0801‑System anzeigen, konfigurieren und steuern. Die Server können nach
Name, Port oder nach der eindeutigen elektronischen Kennnummer (EID), die in
jedem KVM s2-Adapter gespeichert ist, angezeigt werden. Beim ersten Aufruf von
OSCAR wird eine von OSCAR erzeugte Standard-Portliste angezeigt.
Die Portspalte zeigt den RI-Port an, an den ein Server angeschlossen ist. Wenn ein
Legacy-KVM-Switch an der Einheit angeschlossen ist, wird zuerst der RI-Port und
dann der Switch-Port angezeigt, an den der Server angeschlossen ist. In Abbildung
5 sind zum Beispiel die Server 06-01, 06-02, 06-03, 06-04 und 01-02 an kaskadierte
Switches angeschlossen.
4.2.1 Auf das Hauptmenü zugreifen
Betätigen Sie die Taste Druck, um OSCAR zu starten. Das Hauptmenü wird
angezeigt.
Abbildung 5: Beispiel des konfigurierten Hauptmenüs
590-334-609F
19
Die Statusanzeige der Einheit anzeigen
Normalbetrieb
Sie können OSCAR auch aufrufen, indem Sie die Taste Strg zweimal
innerhalb einer Sekunde betätigen. Diese Tastenfolge kann immer
dann verwendet werden, wenn die Taste Druck in der Installations- und
Bedienungsanleitung abgebildet ist.
4.2.2 Die Statusanzeige der Einheit anzeigen
Der Serverstatus Ihres Systems wird in den rechten Spalten im Hauptmenü
angezeigt. Die folgende Tabelle beschreibt die Statussymbole.
OSCAR Symbol-Beschreibung
Der KVM s2-Adapter und/oder der angeschlossene Switch sind online
(grüner Kreis).
Der KVM s2-Adapter und/oder der angeschlossene Switch sind offline
oder funktionieren nicht einwandfrei.
Auf den KVM s2-Adapter wird vom angezeigten Benutzerkanal
zugegriffen.
Der KVM s2-Adapter wird vom angezeigten Benutzerkanal blockiert.
In Abbildung 5 zeigt Benutzer B zum Beispiel Förster an, blockiert
jedoch den Zugriff von Anders, Borrell und Enderle, die an die gleiche
KVM s2-Adapterkette angeschlossen sind.
Tabelle 1: OSCAR Statussymbole
4.2.3 Server auswählen
Verwenden Sie das Hauptmenü, um Server auszuwählen. Wenn Sie einen
Server auswählen, konfiguriert die Einheit Tastatur und Maus auf die korrekten
Einstellungen für diesen Server.
Doppelklicken Sie auf den Servernamen, die EID oder die Portnummer.
- oder Wenn die Anzeigereihenfolge Ihrer Serverliste nach Port geordnet ist
(Schaltfläche Port ist gedrückt), geben Sie die Portnummer ein und betätigen
Sie die Eingabetaste.
- oder Wenn die Anzeigereihenfolge Ihrer Serverliste nach Name oder EID-Nummer
geordnet ist (Schaltfläche EID oder Name ist gedrückt), geben Sie die ersten
Zeichen des Servernamens oder der EID-Nummer ein, um diese als eindeutig
auszuweisen, und betätigen Sie die Eingabetaste.
4.2.3.1 Den vorherigen Server auswählen
Betätigen Sie die Taste Druck und danach die Rücktaste. Diese
Tastenkombination wird zum Umschalten zwischen den vorherigen und den
aktuellen Verbindungen verwendet.
20
590-334-609F
Normalbetrieb
Soft Switching
4.2.3.2 Die Verbindung zwischen Benutzer und Server trennen
Drücken Sie die Taste Druck und danach Alt+Ø. Durch diese
Tastenkombination bleibt der Benutzer im Freizustand, es wird kein Server
ausgewählt. Das Status-Flag auf Ihrem Desktop zeigt Frei an.
4.2.4 Soft Switching
Mit einem Soft Switching können Server über eine Tastenfolge umgeschaltet
werden. Soft Switching zu einem Server kann durch das Betätigen der Taste
Druck und der nachfolgenden Eingabe der ersten Buchstaben des Servernamens
oder seiner Nummer erfolgen. Ist die Zeitverzögerung eingestellt und wird diese
Tastenfolge vor dem Ablauf dieser Zeit betätigt, wird OSCAR nicht angezeigt.
4.2.4.1 Server für Soft Switching konfigurieren
Betätigen Sie die Taste Druck, um OSCAR zu starten. Das Hauptmenü wird
angezeigt.
Klicken Sie auf Setup - Menü. Das Dialogfeld „Menü“ wird angezeigt.
Legen Sie über „Zeitverzögerung Sekunden“ die Zeitdauer fest, die zwischen
dem Drücken der Taste Druck und der Anzeige des Hauptmenüs vergehen
soll.
Klicken Sie auf OK.
4.2.4.2 Soft Switching zu einem Server
Betätigen Sie die Taste Druck, um einen Server auszuwählen. Wenn die
Anzeigereihenfolge Ihrer Serverliste nach Port geordnet ist (Schaltfläche Port ist
gedrückt), geben Sie die Portnummer ein und betätigen Sie die Eingabetaste.
- oder Wenn die Anzeigereihenfolge Ihrer Serverliste nach Name oder EID-Nummer
geordnet ist (Schaltfläche EID oder Name ist gedrückt), geben Sie die ersten
Zeichen des Servernamens oder der EID-Nummer ein, um diese als eindeutig
auszuweisen, und betätigen Sie die Eingabetaste.
Betätigen Sie die Taste Druck und danach die Rücktaste, um zum vorherigen
Server zurückzuschalten.
590-334-609F
21
Navigation in OSCAR
Normalbetrieb
4.3 Navigation in OSCAR
Diese Tabelle beschreibt die Navigation in OSCAR mit Hilfe von Tastatur und
Maus.
Tastenanschlag
Wirkung
Druck
OSCAR wird geöffnet. Betätigen Sie
die Taste Druck zweimal, um den
Tastenanschlag Druck an das momentan
ausgewählte Gerät zu übertragen.
F1
Öffnet den Hilfebildschirm für das aktuelle
Dialogfeld.
Esc
Schließt das aktuelle Dialogfeld, ohne die
Änderungen zu speichern, und kehrt zum
vorherigen Dialogfeld zurück. Im Hauptmenü
schließt diese Taste OSCAR und kehrt zum
Flag zurück. In einem Meldungsfeld schließt
diese Taste das Popup-Feld und kehrt zum
aktuellen Dialogfeld zurück.
Alt
Öffnet Dialogfelder, wählt oder aktiviert
Optionen und führt Aktionen aus, wenn
die Taste in Verbindung mit einem
unterstrichenen Buchstaben oder anderen
entsprechenden Zeichen verwendet wird.
Alt+X
Schließt das aktuelle Dialogfeld und kehrt
zum vorherigen Dialogfeld zurück.
Alt+O
Wählt die Schaltfläche OK aus und kehrt
zum vorherigen Dialogfeld zurück.
Einfaches Klicken,
Eingabetaste
In einem Textfeld wird Text zum Bearbeiten
ausgewählt und die Nach-Links- und NachRechts-Taste aktiviert, um den Cursor in
die entsprechende Richtung zu bewegen.
Erneutes Drücken der Eingabetaste beendet
den Bearbeitungsmodus.
Eingabetaste
Schließt den Switchbetrieb im Hauptmenü
ab und verlässt OSCAR.
Druck, Rücktaste
Schaltet auf die vorherige Auswahl zurück.
22
590-334-609F
Normalbetrieb
Navigation in OSCAR
Tastenanschlag
Wirkung
Druck, Alt+Ø
Trennt den Benutzer sofort vom Server. Es
wird kein Server ausgewählt. Status-Flag
zeigt „Frei“ an. (Das trifft nur auf die Null
Ø auf der Tastatur zu und nicht auf die der
Zehnertastatur.)
Druck, Pause
Aktiviert sofort den Bildschirmschonermodus
und verhindert bei Kennwortschutz den
Zugriff auf die entsprechende Konsole.
Auf-/Abwärtspfeiltasten
Bewegen den Cursor zeilenweise in Listen.
Nach-Rechts/-Links-Tasten
Bewegen den Cursor spaltenweise. Bei der
Bearbeitung eines Textfelds bewegen diese
Tasten den Cursor innerhalb einer Spalte.
Tasten Bild auf/Bild ab
Blättern in Namens- und Portlisten sowie
Hilfeseiten seitenweise nach oben oder
unten.
Pos1/Ende
Bewegen den Cursor an den Anfang oder
das Ende einer Liste.
Rücktaste
Löscht Zeichen in einem Textfeld.
Löschen
Löscht die aktuelle Auswahl in der ScanListe oder Zeichen in einem Textfeld.
Umschalttaste-Entf
Löscht von der aktuellen Auswahl bis zum
Ende der Liste, wenn eine Scan-Liste
bearbeitet wird.
Zifferntasten
Eingabe über Tastatur oder Ziffernblock.
Tabelle 2: OSCAR Navigationsgrundlagen
590-334-609F
23
OSCAR konfigurieren
Normalbetrieb
4.4 OSCAR konfigurieren
Sie können Ihren KVM s2-1602/0801 über das Installationsmenü von OSCAR
konfigurieren. Wählen Sie beim erstmaligen Einrichten der Einheit die
Schaltfläche Namen aus, um Server durch eindeutige Namen zu identifizieren.
Durch die Auswahl anderer Installationsmerkmale können Sie routinemäßige
Serveraufgaben über das OSCAR-Menü verwalten.
Installationsmerkmal
Zweck
Menü
Ändert die Anzeigereihenfolge der
Serverliste von numerisch nach Port
oder EID-Nummer und alphabetisch
nach Namen. Ändert die Zeitverzögerung
bevor OSCAR nach Betätigung von Druck
angezeigt wird.
Flag
Ändert die Anzeige, das Timing, die Farbe
oder die Position des Status-Flags.
Senden
Richtet Tastatur und Maus zur gleichzeitigen
Steuerung mehrerer Server ein.
Scan
Richtet ein benutzerdefiniertes ScanSchema für bis zu 16 Server ein.
Sicherheit
Legt Kennwörter für den Serverzugriff fest.
Aktiviert den Bildschirmschoner.
Geräte
Identifiziert die Anzahl der Ports an einem
angeschlossenen kaskadierten Switch.
Namen
Identifiziert Server durch eindeutige Namen.
Tabelle 3: Installationsmerkmale zum Verwalten von routinemäßigen
Serveraufgaben
4.4.1 Auf das Setup-Menü zugreifen
Betätigen Sie Druck, um OSCAR zu starten. Das Hauptmenü wird angezeigt.
Klicken Sie auf Setup. Das Dialogfeld „Setup“ wird angezeigt.
24
590-334-609F
Normalbetrieb
Auf das Setup-Menü zugreifen
Abbildung 6: Dialogfeld „Setup“
4.4.2 Servernamen zuweisen
Verwenden Sie das Dialogfeld „Namen“, um individuelle Server nach Namen
und nicht nach Portnummern zu identifizieren. Die Namensliste wird immer nach
Portnummer sortiert. Namen werden im KVM s2-Adapter gespeichert. Selbst wenn
Sie das Kabel/den Server an einen anderen RI-Port anschließen, erkennt die Einheit
den Namen und die Konfiguration.
Wenn ein Server ausgeschaltet ist, wird der zugehörige KVM s2-Adapter
nicht mehr in der Namensliste angezeigt.
4.4.2.1 Auf das Dialogfeld „Namen“ zugreifen
Betätigen Sie die Taste Druck. Das Hauptmenü wird angezeigt.
Klicken Sie auf Setup - Namen. Das Dialogfeld „Namen“ wird angezeigt.
Abbildung 7: Dialogfeld „Namen“
590-334-609F
25
Servernamen zuweisen
Normalbetrieb
Der Mauszeiger wird während der automatischen Aktualisierung der
Serverliste zu einem Sanduhrsymbol. Erst nach Aktualisierung der
Serverliste werden wieder Tastatur- und Mauseingaben akzeptiert.
4.4.2.2 Servern Namen zuordnen
Wählen Sie den gewünschten Servernamen oder die gewünschte
Portnummer im Dialogfeld „Namen“ aus und klicken Sie die Schaltfläche
Ändern an. Das Dialogfeld „Namen ändern“ wird angezeigt.
Abbildung 8: Dialogfeld „Namen ändern“
Geben Sie in das Feld „Name neu“ einen Namen ein. Servernamen können bis
zu 15 Zeichen lang sein. Gültige Zeichen sind: A-Z, a-z, Ø-9, Leerzeichen und
Bindestrich.
Klicken Sie auf OK, um den neuen Namen in das Dialogfeld „Namen“ zu
übernehmen. Die Auswahl wird erst dann gespeichert, wenn im Dialogfeld
„Namen“ auf OK geklickt wird.
Wiederholen Sie die Schritte 1 bis 3 für jeden Server im System.
Klicken Sie auf OK im Dialogfeld „Namen“, um die Einstellungen zu speichern.
- oder Klicken Sie auf X oder betätigen Sie Esc, um die Änderungen nicht zu
speichern und das Dialogfeld zu verlassen.
Die EID wird als Standardname verwendet, wenn dem KVM s2-Adapter
kein Name zugewiesen wurde.
26
590-334-609F
Normalbetrieb
Gerätetypen zuordnen
4.4.3 Gerätetypen zuordnen
Die Einheit erkennt automatisch angeschlossene kaskadierte KVM-Switches.
Es muss jedoch die Anzahl der Ports an der kaskadierten Einheit über das
Dialogfeld „Geräte“ angegeben werden. Wenn dieser Switch aus der Liste
ausgewählt wird, erscheint die Schaltfläche „Ändern“, mit der dem Switch die
entsprechende Anzahl von Ports zugewiesen werden kann.
Die Schaltfläche „Ändern“ erscheint nur, wenn ein konfigurierbarer Switch
ausgewählt wird.
4.4.3.1 Auf das Dialogfeld „Geräte“ zugreifen
Betätigen Sie die Taste Druck. Das Hauptmenü wird angezeigt.
Klicken Sie auf Setup - Geräte. Das Dialogfeld „Geräte“ wird angezeigt.
Abbildung 9: Dialogfeld „Geräte“
Wenn die KVM s2-1602‑Einheit einen kaskadierten Switch erkennt, ändert
sich die Portnummerierung, damit jeder Server unter diesem Switch dargestellt
werden kann. Beispiel: Wenn der Switch an RI-Port 6 angeschlossen ist, wird der
Switchport mit „06“ aufgeführt und jeder untergeordnete Server wird sequenziell
mit „06-01“, „06-02“ usw. bezeichnet.
4.4.3.2 Einen Gerätetyp zuweisen
Wählen Sie die gewünschte Portnummer im Dialogfeld „Geräte“ aus.
Klicken Sie auf Ändern. Das Dialogfeld „Gerät ändern“ wird angezeigt.
590-334-609F
27
Das Anzeigeverhalten ändern
Normalbetrieb
Abbildung 10: Dialogfeld „Gerät ändern“
Geben Sie die von Ihrem kaskadierten Switch unterstützte Portanzahl an und
klicken Sie auf OK.
Führen Sie die Schritte 1-3 für jeden Port aus, der einem Gerätetyp
zugewiesen werden soll.
Klicken Sie im Dialogfeld „Geräte“ auf OK, um die Einstellungen zu speichern.
Die Änderungen im Dialogfeld „Gerät ändern“ werden erst dann
gespeichert, wenn Sie im Dialogfeld „Geräte“ auf OK geklickt haben.
4.4.4 Das Anzeigeverhalten ändern
Mit dem Dialogfeld „Menü“ können Sie die Anzeigereihenfolge der Server
ändern und eine Zeitverzögerung für OSCAR einstellen. Eine Änderung
der Anzeigereihenfolge betrifft die Anzeige der Server auf verschiedenen
Bildschirmen, einschließlich Hauptmenü und der Dialogfelder „Geräte“ und
„Senden“.
4.4.4.1 Auf das Hauptmenü zugreifen
Betätigen Sie Druck, um OSCAR zu starten. Das Hauptmenü wird angezeigt.
Klicken Sie im Hauptmenü auf Setup - Menü. Das Dialogfeld „Menü“ wird
angezeigt.
28
590-334-609F
Normalbetrieb
Das Anzeigeverhalten ändern
Abbildung 11: Dialogfeld „Menü“
4.4.4.2 Die Standard-Anzeigereihenfolge der Server auswählen
Wählen Sie Name aus, um die Server alphabetisch nach Namen anzuzeigen.
- oder Wählen Sie EID aus, um die Server numerisch nach EID-Nummern
anzuzeigen.
- oder Wählen Sie Port aus, um die Server numerisch nach Portnummern
anzuzeigen.
Klicken Sie auf OK.
4.4.4.3 Die Zeitverzögerung für OSCAR einstellen
Geben Sie die Anzahl der Sekunden (Ø bis 9) ein, mit der die Anzeige von
OSCAR nach dem Betätigen der Taste Druck verzögert werden soll. Die
Eingabe von Ø bewirkt eine sofortige Anzeige von OSCAR ohne Verzögerung.
Klicken Sie auf OK.
Durch das Einstellen der Zeitverzögerung kann ein Soft Switching ausgeführt
werden, ohne dass OSCAR angezeigt wird. Weitere Informationen zur
Durchführung eines Soft Switchings finden Sie unter Soft Switching in diesem
Kapitel.
590-334-609F
29
Steuerung des Status-Flags
Normalbetrieb
4.4.5 Steuerung des Status-Flags
Das Status-Flag wird auf Ihrem Desktop angezeigt. Es gibt den Namen oder
die EID-Nummer des ausgewählten Servers oder den Status des ausgewählten
Ports an. Verwenden Sie das Dialogfeld „Flag“, um das Flag nach Namen oder
EID-Nummer anzuzeigen, die Farbe des Flags zu ändern, das Flag deckend zu
gestalten und die Anzeigezeit und Position auf dem Desktop zu bestimmen.
OSCAR Flag
Beschreibung
Anzeige des Flag-Typs nach Namen
Anzeige des Flag-Typs nach
EID‑Nummer
Anzeige, dass der Benutzer von
allen Systemen getrennt wurde
Anzeige, dass der Senden-Modus
aktiviert ist
Tabelle 4: OSCAR Statusflags
4.4.5.1 Auf das Dialogfeld „Flag“ zugreifen
Betätigen Sie die Taste Druck. Das Hauptmenü wird angezeigt.
Klicken Sie auf Setup - Flag. Das Dialogfeld „Flag“ wird angezeigt.
Abbildung 12: Dialogfeld „Flag“
4.4.5.2 Die Anzeige des Status-Flags festlegen
Wählen Sie Name oder EID aus, um zu bestimmen, welche Informationen
angezeigt werden.
Wählen Sie Anzeigen aus, um das Flag permanent anzuzeigen oder Zeit, um
das Flag für jeweils 5 Sekunden nach dem Switching anzuzeigen.
30
590-334-609F
Normalbetrieb
Die Anzeige des Status-Flags festlegen
Wählen Sie unter „Anzeigefarbe“ eine Farbe für das Flag aus.
Im Anzeigemodus Deckend für ein Flag mit deckender Farbe oder
Transparent auswählen, damit das Desktop durch das Flag hindurch sichtbar
bleibt.
So positionieren Sie ein Status-Flag auf dem Desktop:
a. Klicken Sie auf Positionieren, um das Flag zur Positionierung
anzuzeigen.
b. Klicken Sie mit der linken Maustaste auf die Titelleiste und verschieben
Sie das Flag in die gewünschte Position.
c. Klicken Sie auf die rechte Maustaste, um zum Dialogfeld „Flag“
zurückzukehren.
Abbildung 13: Flag-Positionierung
Änderungen an der Flag-Position werden erst dann gespeichert, wenn Sie
im Dialogfeld „Flag“ auf OK klicken.
Klicken Sie auf OK, um die Änderungen zu speichern.
- oder Klicken Sie auf X, um die Änderungen nicht zu speichern und das Dialogfeld
zu verlassen.
4.4.6 Die Konsolensicherheit einstellen
Über OSCAR können Sie die Sicherheit Ihrer analogen Portkonsole einstellen.
Sie können einen Bildschirmschonermodus einrichten, der aktiviert wird, sobald
Ihre Konsole während einer bestimmten Zeitspanne nicht verwendet wird. Sobald
dieser Modus aktiviert ist, bleibt die Konsole gesperrt, bis Sie eine beliebige Taste
betätigen oder die Maus bewegen. Die Eingabe des Kennworts ist erforderlich,
damit Sie fortfahren können.
Über das Dialogfeld „Sicherheit“ können Sie Ihre Konsole durch ein Kennwort
sperren, das Kennwort einstellen oder ändern und den Bildschirmschoner
aktivieren.
Es muss ein Kennwort eingegeben werden, um das Dialogfeld „Sicherheit“
anzuzeigen, wenn zuvor ein Kennwort eingerichtet wurde.
4.4.6.1 Auf das Dialogfeld „Sicherheit“ zugreifen
Betätigen Sie die Taste Druck. Das Hauptmenü wird angezeigt.
Klicken Sie auf Setup - Sicherheit. Das Dialogfeld „Sicherheit“ wird angezeigt.
590-334-609F
31
Das Kennwort festlegen oder ändern
Normalbetrieb
Abbildung 14: Dialogfeld „Sicherheit“
4.4.6.2 Das Kennwort festlegen oder ändern
Durch einmaliges Klicken und anschließender Betätigung der Eingabetaste
bzw. durch Doppelklick in das Textfeld „Neu“ wird der Cursor in das Textfeld
bewegt.
Geben Sie das neue Kennwort in das Textfeld „Neu“ ein und betätigen Sie die
Eingabetaste.
Kennwörter müssen Ziffern und Buchstaben enthalten und eine maximale
Länge von 12 Zeichen haben. Außerdem wird zwischen Groß- und
Kleinschreibung unterschieden. A-Z, a-z, Ø-9, Leerzeichen und Bindestrich.
Geben Sie das Kennwort erneut in das Textfeld „Bestätigen“ ein und betätigen
Sie die Eingabetaste.
Klicken Sie auf OK, wenn nur das Kennwort geändert werden soll, und
schließen Sie danach das Dialogfeld.
Wenn Sie Ihr Kennwort verlieren oder vergessen, muss der Switch
zur Wartung oder für technischen Kundendienst eingesandt werden.
Kontaktinformationen finden Sie im Kapitel Technischer Kundendienst.
4.4.6.3 Die Konsole mit einem Kennwort schützen
Richten Sie das Kennwort ein (siehe oben).
Wählen Sie Bildschirmschoner aktivieren aus.
Geben Sie die Anzahl der Minuten für „Wartezeit“ (von 1 bis 99) ein, um
die Zeitverzögerung für die Aktivierung des Kennwortschutzes und der
Bildschirmschonerfunktion einzustellen.
Wählen Sie im Feld „Modus“ den Punkt Energie aus, wenn Ihr Monitor den
Energy Star® Richtlinien entspricht, andernfalls wählen Sie Bildsch.
32
590-334-609F
Normalbetrieb
Den Kennwortschutz der Konsole entfernen
Monitorschäden
Bei Monitoren, die nicht den EnergyStar® Richtlinien entsprechen,
kann die Auswahl des Energie-Modus zu Schäden am Monitor führen.
(Optional) Klicken Sie auf Test, um den Bildschirmschonertest auszuführen,
der 10 Sekunden dauert und Sie danach wieder zum Dialogfeld „Sicherheit“
zurückführt.
Klicken Sie auf OK.
4.4.6.4 An der Konsole anmelden
Drücken Sie eine beliebige Taste, oder bewegen Sie die Maus.
Das Dialogfeld „Kennwort” wird angezeigt. Geben Sie Ihr Kennwort ein, und
klicken Sie auf OK.
Das Hauptmenü wird angezeigt, wenn das richtige Kennwort eingegeben
wurde.
4.4.6.5 Den Kennwortschutz der Konsole entfernen
Klicken Sie im Hauptmenü auf Setup - Sicherheit. Es erscheint das Dialogfeld
„Kennwort“. Geben Sie Ihr Kennwort ein und klicken Sie auf OK.
Klicken Sie im Dialogfeld „Sicherheit“ einmal mit der Maustaste und betätigen
Sie danach die Eingabetaste, oder doppelklicken Sie im Feld „Neu“. Lassen
Sie das Feld leer. Drücken Sie die Eingabetaste.
Klicken Sie einmal mit der Maustaste bzw. betätigen Sie die Eingabetaste,
oder doppelklicken Sie im Textfeld „Bestätigen“. Lassen Sie das Feld leer.
Drücken Sie die Eingabetaste.
Klicken Sie auf OK, um das Kennwort zu löschen.
4.4.6.6 Den Bildschirmschonermodus ohne Kennwortschutz aktivieren
Wird bei Ihrer Konsole kein Kennwort benötigt, um auf das Dialogfeld
„Sicherheit“ zugreifen zu können, fahren Sie mit Schritt 2 fort.
- oder Ist Ihre Konsole kennwortgeschützt, beachten Sie das vorherige Verfahren
und fahren Sie mit Schritt 2 fort.
Wählen Sie Bildschirmschoner aktivieren aus.
Geben Sie die Anzahl der Minuten (von 1 bis 99) ein, um die Wartezeit für die
Aktivierung der Bildschirmschonerfunktion einzustellen.
Wählen Sie Energie aus, wenn Ihr Monitor den Energy Star® Richtlinien
entspricht, andernfalls wählen Sie Bildsch.
Monitorschäden
Bei Monitoren, die nicht den EnergyStar® Richtlinien entsprechen,
kann die Auswahl des Energie-Modus zu Schäden am Monitor führen.
590-334-609F
33
Versionsinformationen anzeigen
Normalbetrieb
(Optional) Klicken Sie auf Test, um den Bildschirmschonertest auszuführen,
der 10 Sekunden dauert und Sie danach wieder zum Dialogfeld „Sicherheit“
zurückführt.
Klicken Sie auf OK.
Wenn der Bildschirmschonermodus aktiviert wird, wird die Verbindung
zwischen Benutzer und Server unterbrochen. Es wird kein Server
ausgewählt. Das Status-Flag zeigt „Frei“ an.
4.4.6.7 Den Bildschirmschonermodus verlassen
Drücken Sie eine beliebige Taste, oder bewegen Sie die Maus. Das Hauptmenü
wird angezeigt, und alle vorherigen Serververbindungen werden wiederhergestellt.
4.4.6.8 Den Bildschirmschoner deaktivieren
Deaktivieren Sie im Dialogfeld „Sicherheit“ das Kontrollkästchen
Bildschirmschoner aktivieren.
Klicken Sie auf OK.
4.4.6.9 Den Bildschirmschoner sofort aktivieren
Betätigen Sie die Taste Druck und danach Pause.
4.5 Versionsinformationen anzeigen
Mit OSCAR können Sie die Firmware-Versionen der KVM s2-1602/0801 und der
KVM s2-Adapter anzeigen. Halten Sie die Firmware für eine optimale Leistung des
Systems immer auf dem neuesten Stand. Weitere Informationen finden Sie unter
„FLASH‑Upgrades“ in Kapitel 5.
Betätigen Sie die Taste Druck. Das Hauptmenü wird angezeigt.
Klicken Sie auf Befehle - Versionen anzeigen. Das Dialogfeld „Version“ wird
angezeigt. Die Subsystemversionen der Einheit werden in der oberen Hälfte
des Dialogfelds aufgeführt.
Abbildung 15: Dialogfeld „Version“
34
590-334-609F
Normalbetrieb
Versionsinformationen anzeigen
Klicken Sie auf KVMS2, um die jeweiligen Versionen für die KVM s2-Adapter
anzuzeigen. Das Dialogfeld „KVM s2-Adapter-Auswahl“ wird angezeigt.
Abbildung 16: Dialogfeld „KVM s2-Adapter‑Auswahl“
Wählen Sie einen KVM s2-Adapter zur Anzeige aus, und klicken Sie auf
die Schaltfläche Version. Das Dialogfeld „KVM s2-Adapter-Version“ wird
angezeigt. Weitere Informationen zum Laden der Firmware finden Sie in
Kapitel 5.
Abbildung 17: Dialogfeld „KVM s2-Adapter‑Version“
Klicken Sie auf X, um das Dialogfeld „KVM s2-Adapter‑Version“ zu schließen.
590-334-609F
35
Das System scannen
Normalbetrieb
4.6 Das System scannen
Im Scan-Modus scannt die Einheit die Ports (Server) automatisch nacheinander
ab. Sie können bis zu 16 Server scannen (in Abhängigkeit vom verwendeten
KVM series2-Modell), indem Sie angeben, welche Server gescannt werden sollen
und wie lange jeder Server angezeigt werden soll. Die Liste zeigt immer die ScanReihenfolge an. Es besteht jedoch die Möglichkeit, den Servernamen oder die
EID-Nummer durch das Betätigen der entsprechenden Schaltfläche anzuzeigen.
4.6.1 Server zur Scan-Liste hinzufügen
Betätigen Sie die Taste Druck. Das Hauptmenü wird angezeigt.
Klicken Sie auf Setup - Scan. Das Dialogfeld „Scan“ wird angezeigt.
Abbildung 18: Dialogfeld „Scan“
Klicken Sie im Dialogfeld „Scan“ in das Kontrollkästchen neben dem Server,
den Sie der Scan-Liste hinzufügen möchten.
- oder Doppelklicken Sie auf einen Servernamen oder -port.
- oder Betätigen Sie die Taste Alt und die Nummer des Servers, der gescannt
werden soll. Sie können bis zu 16 Server auswählen.
Geben Sie die Anzahl der Sekunden (von 3 bis 99) für die gewünschte
Zeitverzögerung im Feld „Scan-Dauer“ ein, nach deren Ablauf der nächste
Server gescannt wird.
Klicken Sie auf OK.
36
590-334-609F
Normalbetrieb
Das System scannen
4.6.2 Einen Server aus der Scan-Liste entfernen
Klicken Sie im Dialogfeld „Scan“ auf den Server, der entfernt werden soll.
Betätigen Sie die Taste Entf.
- oder Klicken Sie auf Löschen, um alle Server aus der Scan-Liste zu entfernen.
Klicken Sie auf OK.
4.6.3 Den Scan-Modus starten
Betätigen Sie die Taste Druck. Das Hauptmenü wird angezeigt.
Klicken Sie auf Befehle. Das Dialogfeld „Befehle“ wird angezeigt.
Abbildung 19: Dialogfeld „Befehle“
Wählen Sie im Dialogfeld „Befehle“ Scan aktiv aus.
Klicken Sie auf X, um das Dialogfeld „Befehle“ zu schließen.
Der Scan-Vorgang beginnt, sobald das Hauptmenü bzw. das Flag
angezeigt werden. Der Scan-Vorgang wird in jedem anderen Dialogfeld
von OSCAR unterdrückt.
4.6.4 Den Scan-Modus abbrechen
Wählen Sie einen Server aus, wenn OSCAR geöffnet ist.
- oder Bewegen Sie die Maus oder drücken Sie eine beliebige Taste, wenn OSCAR
nicht geöffnet ist. Das Scannen wird an dem aktuell ausgewählten Server
angehalten.
- oder Betätigen Sie die Taste Druck. Das Hauptmenü wird angezeigt.
590-334-609F
37
An Server senden
Normalbetrieb
Klicken Sie auf Befehle. Das Dialogfeld „Befehle“ wird angezeigt.
Deaktivieren Sie Scan aktiv.
4.7 An Server senden
Der analoge Benutzer kann gleichzeitig mehr als einen Server in einem
System steuern, wodurch sichergestellt werden kann, dass alle ausgewählten
Server identische Eingaben erhalten. Sie können Tastenanschläge und/oder
Mausbewegungen unabhängig voneinander senden.
Sie können an einen Server pro RI-Port senden. Dies bedeutet, dass Sie
jeweils an bis zu 16 (beim KVM s2-1602) oder acht (beim KVM s2-0801)
Server gleichzeitig senden können.
4.7.1 Auf das Dialogfeld „Senden“ zugreifen
Betätigen Sie die Taste Druck. Das Hauptmenü wird angezeigt.
Klicken Sie auf Setup - Senden. Das Dialogfeld „Senden“ wird angezeigt.
Abbildung 20: Dialogfeld „Senden”
Bei der Übertragung von Tastenanschlägen muss der Tastaturstatus
für alle Server, an die gesendet wird, identisch sein, damit die
Tastenanschläge auch identisch interpretiert werden können. Besonders
ist darauf zu achten, dass die Feststell- und Num-Taste sich bei allen
Tastaturen im gleichen Modus befinden. Obwohl die Einheit versucht,
Tastenanschläge simultan an ausgewählte Server zu übertragen, können
einige Server u. U. die Übertragung blockieren und somit verzögern.
38
590-334-609F
Normalbetrieb
An ausgewählte Server senden
Bei der Übertragung von Mausbewegungen müssen für das
ordnungsgemäße Arbeiten der Maus auf allen Systemen die
gleichen Maustreiber, Desktops (identisch platzierte Symbole) und
Bildschirmauflösungen installiert sein. Außerdem muss sich die Maus in
genau der gleichen Position auf allen Bildschirmen befinden. Da diese
Voraussetzungen nur sehr schwer zu erfüllen sind, kann das Senden von
Mausbewegungen an mehrere Systeme zu unvorhersehbaren Ergebnissen
führen.
4.7.1.1 An ausgewählte Server senden
Markieren Sie die Maus- und/oder Tastaturkontrollkästchen im Dialogfeld
„Senden” für die Server, welche die Sendebefehle empfangen sollen.
- oder Betätigen Sie die Auf- oder Abwärtspfeiltaste, um den Cursor zum Zielserver
zu bewegen. Betätigen Sie danach Alt+K, um das Kontrollkästchen für die
Tastatur zu markieren und/oder Alt+M, um das Kontrollkästchen für die Maus
zu markieren. Wiederholen Sie diesen Schritt für zusätzliche Server.
Klicken Sie auf OK, um die Einstellungen zu speichern und zum Dialogfeld
„Setup“ zurückzukehren. Klicken Sie auf X oder betätigen Sie Esc, um zum
Hauptmenü zurückzukehren.
Klicken Sie auf Befehle. Das Dialogfeld „Befehle“ wird angezeigt.
Markieren Sie das Kontrollkästchen Senden aktiv, um das Senden zu
aktivieren. Das Dialogfeld „Senden aktiviert“ wird angezeigt und kann bestätigt
oder abgelehnt werden.
Abbildung 21: Dialogfeld zum Bestätigen/Ablehnen von „Senden aktiviert“
Klicken Sie auf OK, um das Senden zu aktivieren. Klicken Sie auf X klicken
oder betätigen Sie Esc, um zum Hauptmenü zurückzukehren.
590-334-609F
39
Senden deaktivieren
Normalbetrieb
Wenn „Senden“ aktiviert ist, geben Sie die Informationen an der
Benutzerkonsole ein und/oder führen Sie die zu übertragenden
Mausbewegungen an der Benutzerkonsole aus. Es kann nur auf Server
zugegriffen werden, die sich auf der Liste befinden.
Der andere Benutzer wird getrennt, wenn der Modus „Senden“ aktiviert ist.
4.7.1.2 Senden deaktivieren
Deaktivieren Sie das Kontrollkästchen Senden aktiv im Menü „Befehle“.
4.8 Den Switch-Modus ändern
Sie können mit dem KVM s2-1602/0801 auf zwei verschiedene Arten Verbindung
zu angeschlossenen Servern aufnehmen: Präventiv und Kooperativ.
Wählen Sie „Präventiv“ (Standardeinstellung), damit jeder Benutzer zu jeder Zeit einen
beliebigen Server auswählen kann. Fordert ein anderer Benutzer eine Verbindung an,
wird die Verbindung des aktuellen Benutzers ohne Warnmeldung unterbrochen.
- oder Wählen Sie Kooperativ, um die aktuelle Benutzerverbindung aufrecht zu erhalten.
Der momentan aktive Benutzer wird nicht getrennt, wenn ein anderer Benutzer
eine Verbindung anfordert.
4.8.1 Auf das Dialogfeld „Switch“ zugreifen
Betätigen Sie die Taste Druck. Das Hauptmenü wird angezeigt.
Klicken Sie auf Setup - Switch. Das Dialogfeld „Switch“ wird angezeigt.
Wählen Sie entweder Präventiv oder Kooperativ als Switch-Modus aus.
Abbildung 22: Dialogfeld „Switch“
40
590-334-609F
Normalbetrieb
Länderspezifische Tastaturlayouts einstellen
4.9 Länderspezifische Tastaturlayouts einstellen
Wird eine Tastatur mit einer anderen Sprachunterstützung verwendet
als in der KVM s2-1602/0801-Firmware festgelegt, führt dies zu falschen
Tastaturzuordnungen.
Standardmäßig versendet die KVM s2-1602/0801-Einheit die US-Tastaturcodes
an die USB-Module, die mit Servern verbunden sind. Die Server übernehmen den
Code, wenn sie hochgefahren oder neu gestartet werden. Die Codes werden dann
im KVM s2-Adapter gespeichert.
Es können Probleme auftreten, wenn eine US-Tastatureinstellung unter
Verwendung einer anderen länderspezifischen Tastatur verwendet wird. Die Taste
Z auf einer US-Tastatur ist zum Beispiel am selben Platz wie die Taste Y auf einer
deutschen Tastatur.
Durch den Tastatur-Befehl können Sie andere länderspezifische Tastaturlayouts
als die US-Standardeinstellung auswählen. Die angegebene Tastatureinstellung
wird beim Hochfahren oder Neustart an alle Server versendet, die mit der
KVM s2‑1602/0801-Einheit verbunden sind. Der neue Code wird im
KVM s2‑Adapter gespeichert.
Wird ein KVM s2-Adapter an einen anderen Server angeschlossen, muss die
Tastatureinstellung erneut vorgenommen werden.
Nur lokale Benutzer können die länderspezifischen Tastatureinstellungen anzeigen
oder verändern.
4.9.1 Das länderspezifische Tastaturlayout ändern
Betätigen Sie die Taste Druck, wenn OSCAR nicht geöffnet ist. Das
Hauptmenü wird angezeigt.
Klicken Sie auf Setup - Tastatur. Das Dialogfeld „Tastatur“ wird angezeigt.
Wählen Sie eine länderspezifische Tastatureinstellung aus, und klicken Sie
auf OK.
Starten Sie die Server neu. Nach dem Neustart wird für jeden Server die
länderspezifische Tastatureinstellung aus den KVM s2-Adaptern abgerufen.
Wenn Sie die Server durch Ein- und Ausschalten neu starten möchten, müssen
Sie vor dem Wiederhochfahren 90 Sekunden warten. Ein Warmstart kann ohne
Wartezeit von 90 Sekunden ausgeführt werden.
590-334-609F
41
Normalbetrieb
42
590-334-609F
5
Anhänge
5.1 FLASH-Upgrades
5.1.1 Den KVM s2-1602/0801 aktualisieren
Sie können die Firmware Ihres KVM s2-1602/0801‑Switches aktualisieren,
indem Sie ein speziell von Fujitsu Technology Solutions zur Verfügung gestelltes
Aktualisierungsprogramm verwenden. Dieses Programm konfiguriert automatisch
die Portkommunikationseinstellungen, wodurch ein direkter Download vom
angeschlossenen Server ermöglicht wird.
Überprüfen Sie beim Aktualisieren der Einheiten-Firmware auch die Firmware
der einzelnen KVM s2-Adapter. Die Adapter müssen separat aktualisiert werden.
Dieser Aktualisierungsvorgang wird in Kapitel 4 beschrieben.
5.1.1.1 Für die Aktualisierung benötigte Teile
•
Server unter Windows NT®, Windows 95, Windows 98, Windows 2000 oder
Win XP
•
Freier serieller Port (COM-Port) am Server
•
Ein serielles Nullmodem-Durchgangskabel (Buchse) zur Verbindung von
Switch und Server
•
Firmware-Update
5.1.1.2 Firmware aktualisieren
Schließen Sie das serielle Standardkabel an den COM‑Port am Server und
an den seriellen Anschluss auf der Geräterückseite des Switches an. Notieren
Sie den ausgewählten COM-Port, und schalten Sie den Switch ein.
Besuchen Sie die Webseite von Fujitsu Technology Solutions, um auf die
Aktualisierungsdatei der Firmware zuzugreifen. Sobald der Download beendet
ist, gehen Sie durch die Verzeichnisstruktur zu dem Laufwerk, auf dem das
Firmware-Update gespeichert ist, und entpacken die Datei.
Doppelklicken Sie auf die Datei um diese auszuführen.
Wählen Sie in dem angezeigten Dialogfeld die gewünschte Sprache und den
COM-Port aus.
Klicken Sie auf Laden.
Das Einheiten-Symbol wird wieder grün, sobald die Firmware aktualisiert
wurde.
Der Switch wird automatisch neu gestartet, wenn die Aktualisierung beendet ist.
590-334-609F
43
Firmware aktualisieren
Anhänge
5.1.1.3 Mögliche Fehlerquellen
Wenn der Download nicht ordnungsgemäß durchgeführt wird, überprüfen Sie
Folgendes:
•
Stellen Sie sicher, dass der richtige COM-Port ausgewählt wurde.
•
Stellen Sie sicher, dass zur Zeit kein anderes Programm den COM-Anschluss
benutzt bzw. vorherige DOS-Fenster/Shells geöffnet sind, die diesen COMPort benutzt haben.
•
Stellen Sie sicher, dass zur Zeit keine anderen Kopien des
Aktualisierungsprogramms ausgeführt werden.
•
Überprüfen Sie, ob ein serielles Nullmodem-Durchgangskabel verwendet wird.
•
Überprüfen Sie, dass in den erweiterten Porteinstellungen des ausgewählten
COM‑Ports die FIFO-Puffer markiert und die Empfangspuffer auf „High /Hoch“
eingestellt sind.
Verwenden Sie während der Aktualisierung den Rechner nicht für
andere Arbeiten, und wechseln Sie nicht zwischen Fenstern hin und
her. Schließen Sie ggf. alle anderen Fenster. Wiederholen Sie den
Vorgang, wenn die Aktualisierung nicht erfolgreich durchgeführt wurde
(z. B. während eines Stromausfalls).
5.1.2 KVM s2-Adapterfirmware aktualisieren
Die KVM s2-Adapter können einzeln oder gleichzeitig aktualisiert werden.
Schalten Sie den Server während des Vorgangs nicht ab, und trennen Sie
die Verbindung zum KVM s2-Adapter nicht. Stromverlust führt dazu, dass
der KVM s2-Adapter funktionsuntüchtig wird und der Switch zur Reparatur
ins Werk zurückgeschickt werden muss.
5.1.2.1 Mehrere KVM s2-Adapter gleichzeitig aktualisieren
Betätigen Sie die Taste Druck. Das Hauptmenü wird angezeigt.
Klicken Sie auf Befehle - KVM series2‑Adapter-Status. Das Dialogfeld
„KVM s2‑Adapter‑Status“ wird angezeigt.
44
590-334-609F
Anhänge
KVM s2-Adapterfirmware einzeln aktualisieren
Abbildung 23: Dialogfeld „KVM s2-Adapter‑Status“
Klicken Sie auf einen oder mehrere Modultypen, die aktualisiert werden
sollen. Klicken Sie auf Aktual.
Das Dialogfeld „KVM s2-Adapter-Aktualisierung“ wird angezeigt. Klicken Sie
auf OK, um die Aktualisierung zu starten und zum Dialogfeld „KVM s2-AdapterStatus“ zurückzukehren.
Abbildung 24: Dialogfeld „KVM s2-Adapter‑Aktualisierung “
5.1.2.2 KVM s2-Adapterfirmware einzeln aktualisieren
Betätigen Sie die Taste Druck. Das Hauptmenü wird angezeigt.
Klicken Sie auf Befehle - Versionen anzeigen. Das Dialogfeld „Version“ wird
angezeigt.
590-334-609F
45
KVM s2-Adapterfirmware einzeln aktualisieren
Anhänge
Abbildung 25: Dialogfeld „Version“
Klicken Sie auf KVMS2, um individuelle Kabelversionsinformationen zu
erhalten. Das Dialogfeld „KVM s2-Adapter-Auswahl“ wird angezeigt.
Abbildung 26: Dialogfeld „KVM s2-Adapter‑Auswahl“
Wählen Sie einen KVM s2-Adapter zur Aktualisierung aus, und klicken Sie
auf die Schaltfläche Version. Das Dialogfeld „KVM s2-Adapter-Version“ wird
angezeigt.
46
590-334-609F
Anhänge
KVM s2-Adapterfirmware einzeln aktualisieren
Abbildung 27: Dialogfeld „KVM s2-Adapter‑Version“
Klicken Sie auf die Schaltfläche Firmware laden. Das Dialogfeld
„KVM s2‑Adapter laden“ wird angezeigt.
Abbildung 28: Dialogfeld „KVM s2-Adapter laden“
Klicken Sie auf OK, um die Aktualisierung zu starten und zum Dialogfeld
„Status“ zurückzukehren.
Die KVM s2-Adapter-Statusanzeige im Hauptmenü wechselt während
der Aktualisierung zu gelb. Der KVM s2-Adapter ist während einer
Aktualisierung nicht verfügbar. Aktuelle Verbindungen zum Server über
den KVM s2-Adapter werden während einer Aktualisierung abgebrochen.
590-334-609F
47
Technische Daten des KVM s2
Anhänge
5.2 Technische Daten des KVM s2-1602/0801
Serverports
Anzahl
16 (KVM s2-1602) oder 8 (KVM s2-0801)
Typen
PS/2-, Sun- und USB-KVM s2-Adapter
Stecker
RJ45
Sync-Arten
Unabhängig horizontal und vertikal
Plug and Play
DDC2B
Bildschirmauflösung
Maximum des Analogports: 1280 x 1024 bei
75 Hz
Aktualisierungsport
Anzahl
1
Typ
Seriell RS232
Stecker
DB9-Stecker
Analogport-Sets
Anzahl
2 (KVM s2-1602) oder 1 (KVM s2-0801)
Typ
PS/2 und VGA
Stecker
PS/2 Mini-DIN und 15-polig D
Spezifikationen
(H x B x T)
4,32 x 43,18 x 16,51 cm, Formfaktor 1 HE
Gewicht
3,6 kg ohne Kabel
Wärmeabstrahlung
92 BTU/Std.
Luftstrom
8 Kubikfuß pro Minute (cfm)
Stromverbrauch
12,5 W
Wechselstrom-Eingangsleistung
max. 40 W
WechselstromEingangsspannung
100 bis 240 V AC, automatische Umschaltung
48
590-334-609F
Anhänge
Technische Daten des KVM s2
Spezifikationen (Fortsetzung)
WechselstromEingangsspannungswert
0,5 A
WechselstromStromversorgungskabel
Dreiadriges 18 AWG-Kabel mit dreipoliger
IEC‑320-Buchse am Stromversorgungsende
und länder- oder gebietsabhängigem Stecker
am Stromquellenende
Wechselstromfrequenz
50/60 Hz
Temperatur
10 bis 50 ºC, in Betrieb
-20 bis 60 ºC, nicht in Betrieb
Luftfeuchtigkeit
20 bis 80 % nicht-kondensierend (Betrieb)
5 bis 95 % nicht-kondensierend (nicht in
Betrieb)
Behördliche Zulassungen
EN55022 Class A, EN55024, EN61000-3-3,
FCC15 Class A, VCCI Class A,
IEC950, EN60950, UL 1950/60950 third edition,
CSA C22.2 No. 60950
Tabelle 5: Produktspezifikationen des KVM s2-1602/0801
590-334-609F
49
Tastenemulation für Sun-Zusatztasten
Anhänge
5.3 Tastenemulation für Sun-Zusatztasten
Bestimmte Tasten einer Standard-Sun-Tastatur vom Typ 5 (US) können durch
die folgenden Tastenfolgen auf einer PS/2-Tastatur emuliert werden. Um
die Tastenemulation für Sun-Zusatztasten zu aktivieren und diese Tasten zu
verwenden, halten Sie Strg+Umschalt+Alt gedrückt und drücken Sie die Taste
Rollen. Die LED der Taste Rollen blinkt. Verwenden Sie die entsprechenden
Tasten in der folgenden Tabelle so, als würden Sie die Zusatztasten einer
Sun‑Tastatur bedienen.
Sun-Taste (US)
PS/2-Tastenkombination
Compose
Anwendung
Compose
Zehnertastatur *
Power
F11
Open
F7
Help
Num-Taste
Props
F3
Front
F5
Stop
F1
Again
F2
Undo
F4
Cut
F10
Copy
F6
Paste
F8
Find
F9
Mute
Zehnertastatur /
Vol.+
Zehnertastatur +
Vol.-
Zehnertastatur -
Command (left)
(2)
F12
Command (left)
(2)
Win (GUI) links (1)
Command (right) (2)
Win (GUI) rechts (1)
(1) Windows 95‑Tastatur mit 104 Tasten
(2) Die Command-Taste ist die Sun Meta (Diamond)-Taste
Beispiel: Für Stop + A, halten Sie die Tasten Strg+Umschalt+Alt gedrückt und
drücken Sie die Rollen-Taste. Drücken Sie danach F1 + A.
50
590-334-609F
Anhänge
Technischer Kundendienst
Diese Tastenkombinationen funktionieren mit USB KVM series2-Adaptern (wenn
Ihr Sun System mit einem USB-Port ausgerüstet ist) sowie mit Sun KVM series2Adaptern. Diese Tastenkombinationen werden mit Ausnahme von Rollen + F12
von Microsoft Windows nicht erkannt. Die Tastenkombination Rollen +F12 führt
eine Windows‑Tastenfolge aus.
5.4 Technischer Kundendienst
Unser technischer Kundendienst steht Ihnen jederzeit bei Fragen hinsichtlich
Installations- bzw. Betriebsproblemen mit Ihrem Produkt von Fujitsu Technology
Solutions zur Verfügung. Verfahren Sie wie folgt zur schnellstmöglichen
Problemlösung:
Sehen Sie im entsprechenden Kapitel der Bedienungsanleitung nach, ob das
Problem mit den vorgeschlagenen Abhilfemaßnahmen gelöst werden kann.
Besuchen Sie unsere Webseite unter http://ts.fujitsu.com/support und klicken
Sie auf Services & Support. Klicken Sie auf der linken Seite der Webseite auf
Helpdesk, um die Telefonnummer des technischen Kundendienstes in Ihrer
Nähe zu finden.
590-334-609F
51
Anhänge
52
590-334-609F
Fujitsu Technology Solutions GmbH
Benutzerdokumentation
33094 Paderborn
Deutschland
Kommentare
Vorschläge
Verbesserungen
E-Mail: [email protected]
http://ts.fujitsu.com/support
Eingereicht von
Anmerkungen zum KVM s2-1602/0801
590-334-609F
53
Fujitsu Technology Solutions GmbH
Benutzerdokumentation
33094 Paderborn
Deutschland
Kommentare
Vorschläge
Verbesserungen
E-Mail: [email protected]
http://ts.fujitsu.com/support
Eingereicht von
Anmerkungen zum KVM s2-1602/0801
54
590-334-609F
Fujitsu Technology Solutions GmbH
Benutzerdokumentation
33094 Paderborn
Deutschland
Kommentare
Vorschläge
Verbesserungen
E-Mail: [email protected]
http://ts.fujitsu.com/support
Eingereicht von
Anmerkungen zum KVM s2-1602/0801
590-334-609F
55
590-334-609F