1
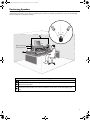
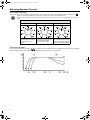
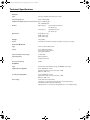
DON Analog Localized.book Page i Monday, September 5, 2005 11:48 AM
SAFETY & REGULATORY INFORMATION
The following sections contain notices for various countries:
Notice for the USA
FCC Part 15: This equipment has been tested
and found to comply with the limits for a Class
B digital device, pursuant to Part 15 of the FCC
Rules. These limits are designed to provide
reasonable protection against harmful
interference in a residential installation. This
equipment generates, uses, and can radiate
radio frequency energy and, if not installed and
used in accordance with the instructions, may
cause harmful interference to radio
communications. However, this notice is not a
guarantee that interference will not occur in a
particular installation. If this equipment does
cause harmful interference to radio or
television reception, which can be determined
by turning the equipment off and on, the user
is encouraged to try one or more of the
following measures:
❒ Reorient or relocate the receiving antenna.
❒ Increase the distance between the
equipment and receiver.
❒ Connect the equipment to an outlet on a
circuit different from that to which the
receiver is connected.
❒ Consult the dealer or an experienced radio/
TV technician.
CAUTION: To comply with the limits for the
Class B digital device, pursuant to Part 15 of
the FCC Rules, this device must be installed
with computer equipment certified to comply
with the Class B limits.
All cables used to connect the computer and
peripherals must be shielded and grounded.
Operation with non-certified computers or
non-shielded cables may result in interference
to radio or television reception.
Modifications
Any changes or modifications not expressly
approved by the guarantee of this device could
void the user’s authority to operate the device.
Notice for Canada
This apparatus complies with the Class B limits for
radio interference as specified in the Canadian
Department of Communications Radio
Interference Regulations.
Cet appareil est conforme aux normes de CLASSE
“B” d’interference radio tel que spe’cifie’ par le
Ministère Canadien des Communications dans les
règlements d’interfèrence radio.
Important Notice
Your product has a serial number. Write this serial
number down and keep it in a secure area.
CAUTION
Take care to prevent the accidental operation of
your new speakers at excessive sound pressure
levels!
If you do not hear sound from your new speakers,
keep the volume controls at a low levels while
trying to restore sound. This will prevent
accidental operation at uncomfortably loud levels.
DECLARATION OF CONFORMITY
Manufacturer/Importer's Name:
Creative Labs, Inc.
Manufacturer/Importer's Address:
1901 McCarthy Boulevard
Milpitas, CA. 95035
United States
Tel: (408) 428-6600
declares under its sole responsibility that the product
Trade Name::
Creative Labs
Model Numbers:
MF1510/MF1515
has been tested according to the CISPR13 requirement and
found compliant with the following standards:
EMI/EMC: CISPR 13 : 2003, FCC Part 15 Subpart B
Complies with Canadian ICES-003 Class B
European Compliance
This product conforms to the following:
EMC Directive 89/336/EEC as amended by 92/31/
EEC and 93/68/EEC.
Mains operated products for the European market
comply with LVD Directive 73/23/EEC as amended
by 93/68/EEC.
Communication / RF wireless products for the
European market comply with Directive R&TTE
1999/5/EC.
This device complies with part 15 of the FCC Rules.
Operation is subject to the following two conditions:
(1) This device may not cause harmful interference, and
(2) This device must accept any interference received, including
interference that may cause undesirable operation.
Ce matériel est conforme à la section 15 des régles FCC.
Son Fonctionnement est soumis aux deux conditions suivantes:
(1) Le matériel ne peut étre source D'interférences et
(2) Doit accepter toutes les interférences reques, Y compris celles pouvant
provoquer un fonctionnement indésirable.
Compliance Manager
Creative Labs, Inc.
June 1, 2005
IMPORTANT SAFETY INSTRUCTIONS
READ INSTRUCTIONS - Read all safety and
operating instructions before operating the
product.
RETAIN INSTRUCTIONS - Keep all safety
and operating instructions for future reference.
HEED WARNINGS - Take note of all
warnings on the product and in the operating
instructions.
FOLLOW INSTRUCTIONS - All operating
and usage instructions should be followed.
CLEANING - Unplug this product from the
power source before cleaning. Do not use liquid or
aerosol cleaners. Use a dry cloth for cleaning.
ATTACHMENTS - Do not use attachments or
accessories not recommended by Creative as
they may cause hazards.
WATER AND MOISTURE - Do not use this
product near any water source or water hazard
- for example, near a bath tub, wash bowl,
kitchen sink, or laundry tub; in a wet basement;
or near a swimming pool; and the like.
PLACEMENT - Place the product on a stable
surface or recommended stand, or sold with the
product. Otherwise, the product may fall and
cause injury to a person, and damage to the
product. Follow the manufacturer’s instructions
for mounting the product.
VENTILATION - To ensure reliable operation
and to prevent overheating, do not block or
cover ventilation openings and slots with fabrics
or impermeable material. Do not place in a
built-in installation such as a bookcase or a rack
unless there is proper ventilation, or Creative’s
instructions have been adhered to. “The speaker
shall be positioned 5-cm (maximum) behind the
front edge, 15-cm (minimum) free space along
the sides and 30-cm (minimum) free space from
top and depth behind.
HEAT - Do not place this product anywhere near heat
sources such as radiators, stoves, and other products
(including amplifiers) that produce heat.
POWER SOURCES - This product is specifically
designed for operation within the electrical range(s)
specified on the provided power adapter and use
outside of this range shall be at your own risk. Please
contact your local electric utility company if you have
any questions about the electrical voltage at your
intended location of use.
POWER CORD - Grounding-type Plug - Do not
defeat the Safety purpose of grounding-type plug. A
grounding-type plug has two blades and a third
grounding prong. The third prong is provided for your
safety. If the provided plug does not fit into your
socket, consult an electrician for replacement of the
obsolete outlet.
POWER-CORD PROTECTION - Arrange the
power-cords to minimize the risk of damage from
being walked on or pinched. Pay particular attention to
the area near the plug head, the power source outlet
and the connection from the product.
LIGHTNING - Unplug the product from the power
source during lightning storms or if unused for long
periods of time. This will prevent lightning and
power-line surge damage to the product.
OVERLOADING - Do not overload wall outlets,
extension cords, or integral power circuits as this can
result in a risk of fire or electric shock.
OBJECT AND LIQUID ENTRY - Never push any
object through the product’s openings, as they can
result in a fire, electric shock or damage. Do not spill
liquids on the product.
SERVICING - Do not attempt to service the product
yourself. Refer all servicing to qualified service
personnel.
DAMAGE REQUIRING SERVICE - Unplug the product
from the power source. Call for servicing when:
c)the power-supply cord or plug is damaged.
d)objects have fallen through or liquids have been spilled
into the product’s openings.
e)the product has been exposed to rain or water.
f)the product does not operate normally when following
g)the operating instructions.
h)the product behaves differently.
i)the product has been dropped or damaged in any way.
REPLACEMENT PARTS - When replacing parts, check
that the service technician has used replacement parts
specified by Creative, or have the same characteristics as the
original parts. Unauthorized substitutions may result in fire,
electric shock, or other hazards.
SAFETY CHECK - After servicing or repairing the
product, get the service technician to perform safety checks
to be sure that the product is working properly.
WARNING:
TO REDUCE THE RISK OF FIRE OR ELECTRIC SHOCK
❒ DO NOT EXPOSE THIS APPARATUS TO RAIN OR
MOISTURE
❒ DO NOT EXPOSE THIS APPARATUS TO DRIPPING OR
SPLASHING FLUIDS, AND ENSURE THAT NO
OBJECTS FILLED WITH LIQUIDS — SUCH AS VASES
— ARE PLACED ON THE APPARATUS.
❒ THE SPEAKER SHALL BE CONNECTED TO A MAINS
SOCKET OUTLET WITH PROTECTIVE EARTHING
CONNECTION
The mains plug and appliance couple are used as the
disconnecting devices. The speaker shall be placed near a
socket outlet which is easily accessible and readily operable.
i
DON Analog Localized.book Page ii Monday, September 5, 2005 11:48 AM
SAFETY WARNINGS
The lightning flash arrowhead within an equilateral triangle is intended
to alert the user to the presence of uninsulated, “dangerous voltage”
within the product’s enclosure, that may be of sufficient magnitude to
constitute risk of electric shock to persons.
The exclamation point within an equilateral triangle is intended to
alert the user to the presence of important operating and maintenance
(servicing) instructions in the literature accompanying this product.
CAUTION:
This symbol indicates that the marked item may be Hot and should not
be touched without proper care.
❒To minimize the risk of burns and other injuries to children, position
the device such that hot surfaces are out of their reach.
❒To minimize the risk of fire, keep flammable materials like paper and
cloth (for example, curtains) away from the hot surface.
WARNING
DO NOT OPEN
TO PREVENT THE RISK OF ELECTRIC SHOCK, DO NOT REMOVE SPEAKER
COVERS (OR BACKS). NO USER-SERVICEABLE PARTS INSIDE. REFER
SERVICING TO QUALIFIED SERVICE PERSONNEL.
AVISQUE
POUR EVITER TOUT RISQUE DE CHOC ELECTRIQUE, NE PAS DEMONTER LE
COUVERCLE DU HAUT PARLEUR. AUCUN ENTRETIEN DES PIECES
INTERIEURES N EST REQUIS. TOUT SERVICE D ENTRETIEN NE DOIT ETRE
EFFECTUE QUE PAR DU PERSONNEL D ENTRETIEN QUALIFIE.
CAUTION:
TO PREVENT THE RISK OF ELECTRIC SHOCK, MATCH WIDE BLADE OF PLUG
TO WIDE SLOT. INSERT CAREFULLY.
ATTENTION:
POUR EVITER LES CHOCS ELECTRIQUES, INTRODUIRE LA LAME LA PLUS
LARGE DE LA FICHE DANS LA BORNE CORRESPONDANTE DE LA PRISE ET
POUSSER JUSQU AU FOND.
IMPORTANT NOTICE:
Your product has a serial number. Write this serial number down and keep it in a
secure area.
READ AND HEED IMPORTANT SAFETY WARNING ON REAR OF
SPEAKER ENCLOSURE
WARNING: The cord(s) included with this product may contain chemicals known to the
State of California to cause cancer and birth defects or other reproductive harm. Wash
hands after handling.
The use of the WEEE Symbol indicates that this product may not be treated as
household waste. By ensuring this product is disposed of correctly, you will help
protect the environment. For more detailed information about the recycling of
this product, please contact your local authority, your household waste disposal
service provider or the shop where you purchased the product.
ii
DON Analog Localized.book Page 1 Monday, September 5, 2005 11:48 AM
E-MU PM5 Precision Monitor
Thank you for purchasing the E-MU® PM5 Precision Monitor. This extremely compact two-way, bi-amplified
near-field reference monitor features custom audiophile amplifiers, world-class drivers, and innovative
cabinet design to deliver hyper-accurate audio reproduction for all your critical monitoring needs.
This package includes:
• 1 x E-MU PM5 Precision Monitor
• 1 x Power Cord
• 1 x Owner's Manual
• 1 x Warranty and Support Information
Notes and tips
Items of special interest are presented in this document as notes and tips:
• Note. This highlights additional or important information about a feature.
• Tip. This tells you about shortcuts or hints relating to a feature.
Contents
Overview ........................................... 2
Connecting Your Speaker ................ 2
Positioning Your Speaker ................. 3
Adjusting Speaker Controls ............. 4
To set input sensitivity ................. 4
To set tone controls .................... 4
Technical Specifications ................... 5
Information in this document is subject to change without notice and does not represent a commitment on the part of E-MU
Systems, Inc. No part of this manual may be reproduced or transmitted in any form or by any means, electronic or mechanical,
including photocopying and recording, for any purpose without the written permission of E-MU Systems, Inc.
Version 1.0
September 2005
© 2005. E-MU Systems, Inc. All rights reserved. E-MU is a registered trademark of E-MU Systems, Inc. in the United States and in
other countries. The Creative logo is a registered trademark of Creative Technology Ltd. in the United States and in other countries.
All other logos, brand or product names are trademarks or registered trademarks of their respective holders and are hereby
recognized as such. All specifications are subject to change without notice. Use of this product is subject to a limited warranty. Actual
contents may differ slightly from those pictured.
1
DON Analog Localized.book Page 2 Monday, September 5, 2005 11:48 AM
Overview
The following section introduces you to the different components on your speaker.
Speaker Components
1
Combination XLR/TRS balanced analog input connector
2
Balance (BAL)/Unbalance (UNBAL) switch
Select either balanced (XLR or TRS) or unbalanced (RCA) analog
inputs with this switch.
3
RCA unbalanced analog input connector
4
Input sensitivity control knob
Adjusts the input sensitivity of your speaker.
5
Attenuation switches
• Adjust the bass roll off with the LF (Low Frequency) switch
• Adjust the treble tilt with the HF (High Frequency) switch
• By default, both switches are set to zero.
6
Power socket
• Disconnect the power adapter cable from the power socket if you
do not intend to use your speaker for several days
• Make sure that the voltage rating of your speaker matches the
voltage standard of your country.
7
ON/OFF switch
8
Power LED
• Lights up in blue when your speaker is turned on
• Lights up in red when the overload protection circuitry engages.
1 2 3 4 5
6
7
8
Connecting Speakers
Your speaker features a combination XLR/TRS balanced analog input connector and an RCA unbalanced analog input connector
for connecting a wide variety of analog audio input devices.
• Before connecting your speaker, make sure that the Input sensitivity control knob
is turned fully counterclockwise.
• Do not connect more than one audio input device to your speakers at any one time as this will cause the mixing of input signals
and result in unwanted noise.
You may hear a thump from your speaker when you turn it on and off. Make sure that your speaker is the last device to be turned
on and the first device to be turned off in your audio set up to prevent this from occuring.
1 = Ground/Shield
2 = Hot (+)
3 = Cold (-)
2
3
Tip = Hot (+)
2
Ring = Cold (-)
1
3
Sleeve = Ground/Shield
1
Connector
Connection
1
Balanced ¼-inch TRS
2
Balanced XLR male
Connect either to the combination XLR/TRS balanced
analog input connector
3
Unbalanced RCA
Connects to the RCA unbalanced analog input connector
After you have connected your audio device to your speaker, make sure that you select the appropriate input connection type
using the Balanced (BAL)/Unbalanced (UNBAL) switch
.
2
DON Analog Localized.book Page 3 Monday, September 5, 2005 11:48 AM
Positioning Speakers
How you position your speaker can greatly affect your speaker’s performance. While many factors such as room shape and wall
material affect performance, there are general tips that you can follow to maximize performance in any room. The following
section provides tips on speaker positioning.
L
R
30°
30°
2
High frequency driver
Low frequency driver
3
1
Speaker positioning tips
1
Place your speakers on a flat, stable surface to minimize vibration.
2
Position your speakers at the same height, and maintain the same speaker-to-wall and speaker-to-listener
distance for both speakers.
3
The acoustic axis of each speaker falls on the mid-point between the speaker’s high frequency driver and
low frequency driver. Position your speakers such that the acoustic axes are at the same height as your
ears.
3
DON Analog Localized.book Page 4 Monday, September 5, 2005 11:48 AM
Adjusting Speaker Controls
To set input sensitivity
You can match the input sensitivity of your speakers to your output source device by adjusting the Input sensitivity knob
.
• Make sure that the Power LED does not light up in red when you adjust the Input sensitivity knob.
• Adjust the input sensitivity to your speaker to match the source signal in order to avoid unnecessary clipping of the output
signal.
Scales for input sensitivity control
dB
dBu
This is the input sensitivity
For balanced professional use,
scale in decibels as shown on
the recommended input
the back panel of your
sensitivity level is +4dBu.
speaker.
V
An input sensitivity of 0.66V
will result in maximum output
only when the Input sensitivity
knob is turned fully clockwise.
To set tone controls
You can use the Attenuation switches
to adjust the bass roll off (LF) and treble tilt (HF) of your speaker. The following
graph illustrates how bass roll off and treble tilt affect the free field response of your speaker.
4
DON Analog Localized.book Page 5 Monday, September 5, 2005 11:48 AM
Technical Specifications
General
Type
Two-way, bi-amplified near-field reference monitor
Frequency Response
67Hz - 20kHz (±2.5dB)
Maximum Sound Pressure Level, short term Single: ≥100dB SPL @1m
Pair: ≥103dB SPL @1m
Drivers
High Frequency:
Type: Neodymium Soft Dome
Size: 25.4mm (1")
Low-Frequency:
Type: Glass Fiber Cone
Size: 127mm (5")
Dimensions
Height: 290mm (11.5")
Width: 175mm (6.9")
Depth: 245mm (9.7")
Weight
6.5kg (14.3lbs)
Power
120V, 60Hz or 220 V-240 Vca 50/60 Hz, depending on the region of purchase
Crossover Network
Type
Active second-order Butterworth
Inputs
Input 1: XLR female balanced
Input 2: ¼" Jack socket balanced
Input 3: RCA unbalanced
Input sensitivity control range
-21 dB to 0dB
Input impedance
Balanced: 47K ohms
Unbalanced: 47K ohms
Crossover frequency
2.5kHz
Amplifiers
Type
Custom discrete with Class-A input stage and MOSFET output stages
High Frequency Amplifier
Power: 40W RMS into 4 ohms
Signal-to-Noise Ratio, referred to full output: > 98dB
Distortion: THD < 0.2%
Low Frequency Amplifier
Power: 40W RMS into 4 ohms
Signal-to-Noise Ratio, referred to full output: > 98dB
Distortion: THD < 0.2%
Fuse ratings
120Vac 60Hz model: T1AL. 250Vac.
T1AL (where T = Time lag, Fuse rating 1A and L = low breaking capacity.)
220V-240Vac 50/60Hz model: T500mAL. 250Vac.
T500mAL (where T = Time lag, Fuse rating 500mA and L = low breaking capacity.)
5
DON Analog Localized.book Page i Monday, September 5, 2005 11:48 AM
INFORMATIONS DE SÉCURITÉ — NORMES
Les chapitres qui suivent contiennent des informations qui s’appliquent à divers pays :
Remarques pour les USA
Réglementation fédérale FCC, alinéa 15 : Ce
produit a été testé et répond aux normes sur
les équipements numériques de Classe B, selon
l’alinéa 15 des régulations fédérales FCC. Ces
normes offrent une protection raisonnable
contre les interférences en environnement
résidentiel. Cet appareil génère, utilise et peut
émettre des fréquences radio, et; s’il n’est pas
installé et utilisé selon les instructions, peut
causer des interférences nuisibles aux
communications radio. Cela dit, ces remarques
ne constituent pas une garantie contre toute
apparition d’interférences en fonction de
l’installation. Si cet appareil cause des
interférences aux réceptions radio ou
télévision, ce que vous pouvez déterminer en
plaçant l’appareil sous/hors tension, essayez les
solutions suivantes :
❒ Réorientez ou déplacez l’antenne de
réception.
❒ Éloignez l’appareil du récepteur.
❒ Connectez l’appareil sur une ligne secteur
différente de celle du récepteur.
❒ Consultez le revendeur ou un technicien
radio/ TV.
ATTENTION : Pour répondre aux normes
sur les équipements numériques de Classe B,
alinéa 15 de la réglementation fédérale FCC,
cet appareil doit être installé avec des
équipements informatiques certifiés et
répondant aux normes de la Classe B.
Tous les câbles utilisés pour connecter
l’ordinateur et les périphériques doivent être
blindés et mis à la masse. L’utilisation
d’équipements informatiques qui ne répondent
pas à ces normes ou l’utilisation de câbles non
blindés peut générer des interférences radio
ou télévision.
Modifications
Les changements ou modifications non
expressément approuvés par la garantie de ce
produit peuvent annuler vos droits à utiliser
cet appareil.
Remarques pour Canada
This apparatus complies with the Class B limits for
radio interference as specified in the Canadian
Department of Communications Radio
Interference Regulations.
Cet appareil est conforme aux normes de Classe
“B” sur les interférences radio, telles que spécifiées
par le Ministère Canadien des Communications
dans les réglementations sur les interférences
radio.
DÉCLARATION DE CONFORMITÉ
Nom du fabriquant/Importateur :
Creative Labs, Inc.
Adresse du fabriquant/
Importateur :
1901 McCarthy Boulevard
Milpitas, CA. 95035
USA
Tél. : (408) 428-6600
déclare sous sa propre responsabilité que le produit
Remarque importante
Ce produit possède un numéro de série. Notez-le
et conservez-le pour toute consultation ultérieure.
MISE EN GARDE
Évitez toute utilisation de ces enceintes à des
niveaux sonores élevés !
Si les enceintes ne produisent aucun son, laissez le
niveau sur un réglage très faible lorsque vous
essayez de rétablir le son. Ceci évite toute
utilisation accidentelle à des niveaux sonores
dangereux.
Nom commercial :
Creative Labs
Références du modèle :
MF1510/MF1515
a été testé selon les alinéas de la norme CISPR13 et répond aux
normes suivantes :
EMI/EMC : CISPR 13 : 2003, FCC alinéa 15 sous-alinéa B
Compatible avec la norme canadienne ICES-003 sur les
équipements de Classe B
Normes européennes
Ce produit est conforme aux normes suivantes :
Directive EMC 89/336/EEC, amendements 92/31/
EEC et 93/68/EEC.
Les produits alimentés par secteur pour le marché
européen répondent aux directives LVD 73/23/
EEC, amendement 93/68/EEC.
Les produits de communication/HF sans fil pour le
marché européen répondent aux directives R&TTE
1999/5/EC.
Cet appareil est compatible avec l’alinéa 15 des réglementatioss
fédérales.
L’utilisation est sujette aux deux conditions suivantes :
(1) Cet appareil ne doit pas générer d’interférence
(2) Cet appareil doit accepter toutes les interférences reçues, dont les
interférences pouvant causer un fonctionnement instable.
Responsable de la normalisation
Creative Labs, Inc.
1 juin, 2005
MISES EN GARDE IMPORTANTES SUR LA SÉCURITÉ
LISEZ LES INSTRUCTIONS - Lisez toutes
les instructions de sécurité et d’utilisation avant
d’utiliser le produit.
CONSERVEZ LES INSTRUCTIONS Conservez toutes les instructions de sécurité
pour consultation future.
RESPECTEZ LES MISES EN GARDE Lisez toutes les mises en garde sur le produit et
dans le mode d’emploi.
SUIVEZ LES INSTRUCTIONS - Vous devez
suivre toutes les instructions d’utilisation.
NETTOYAGE - Déconnectez le produit du
secteur avant de le nettoyer. Ne pas utiliser de
nettoyants liquides ou en aérosol. Utilisez
uniquement un tissu sec.
FIXATIONS - Ne pas utiliser de fixations ou
accessoires non recommandés par Creative, car
ils peuvent être source d’accident.
EAU ET HUMIDITÉ - Ne pas utiliser ce
produit près d’une source liquide - par exemple,
à côté d’une baignoire, d’un lavabo, d’un évier,
d’une machine à laver, dans un lieu humide, près
d’une piscine, etc.
PLACEMENT - Placez le produit sur une
surface stable ou un support recommandé, ou
vendu avec le produit. Dans le cas contraire, le
produit peut chuter et blesser quelqu’un, ou
s’endommager. Suivez les instructions du
fabriquant pour le montage du produit.
VENTILATION - Pour garantir une utilisation
fiable et pour éviter toute surchauffe, veillez à ne
pas boucher ou obstruer les ouïes de ventilation
avec un tissu ou un matériau imperméable. Ne
pas renfermer en installant, par exemple, dans un
meuble ou un Rack, sauf si la ventilation correcte
du produit est assurée. Suivez toujours les
instructions de Creative. “L’enceinte doit être
placée 5 cm maximum en arrière, avec un espace
vide d’au moins 15 cm sur les côtés et d’au moins
30 cm sur le dessus et à l’arrière”.
CHALEUR - Ne pas placer ce produit près d’une
source de chaleur telle qu’un radiateur, poêle, et autres
produits (dont les amplificateurs de puissance)
générant de la chaleur.
ALIMENTATION - Ce produit a été conçu pour
être alimenté par une tension et une fréquence secteur
spécifiées sur l’adaptateur secteur. L’utilisation d’une
tension et/ou d’une fréquence secteur autre que celle
indiquée entraîne des risques dont vous seul êtes
responsable. Contactez votre fournisseur d’électricité
si vous avez des questions sur la tension et la fréquence
électrique de votre zone géographique.
CORDON SECTEUR - Fiche avec terre - Ne jamais
déconnecter la terre de la fiche. Les fiches avec secteur
comportent trois bornes. La borne centrale
correspond à la terre et garantit la sécurité de
l’utilisateur. Si la fiche fournie ne correspond pas au
format de votre prise secteur murale, consultez un
électricien et faites remplacer la prise murale.
PROTECTION DU CORDON SECTEUR Placez le cordon secteur de façon à éviter tout
dommage (notamment en évitant que les personnes ne
marchent dessus, ou en évitant tout pincement du
cordon). Protégez le cordon près de sa sortie de
l’appareil et près de la fiche.
ORAGE - Déconnectez l’appareil du secteur en
présence d’orage ou si vous ne l’utilisez pas pendant
longtemps. Vous éviterez ainsi tout risque de dommage
au produit par surtension.
SURCHARGE - Veillez à ne pas surcharger les prises
secteur, les rallonges, les prises multiples ou les circuits
d’alimentation internes, car ceci constitue un risque
d’incendie ou d’électrocution.
INFILTRATION D’OBJET ET DE LIQUIDE - Ne
jamais insérer d’objet dans les ouvertures du produit
— ceci constitue un risque d’incendie, d’électrocution
ou de dommage. Ne jamais renverser un liquide sur le
produit.
RÉPARATIONS - N’essayez pas de réparer
vous-même le produit. Confiez toutes les réparations
à un personnel compétent et qualifié.
DOMMAGES NÉCESSITANT UNE RÉPARATION Déconnectez le produit de sa source d’alimentation. Faites
réparer lorsque :
a)Le cordon ou la fiche secteur est endommagé.
b)Un objet ou un liquide s’est infiltré dans le produit.
c)Le produit a été exposé à la pluie ou à un liquide.
d)Le produit ne fonctionne pas normalement lorsque vous
suivez les instructions d’utilisation.
e)Le produit fonctionne anormalement.
f) Le produit est tombé ou est endommagé.
PIÈCES DE RECHANGE - Lorsque vous faites remplacer
des pièces, assurez-vous que le technicien utilise les pièces
de rechange spécifiées par Creative, ou par des pièces dont
les caractéristiques sont identiques à celles des pièces
d’origine. Les substitutions non agréées peuvent être source
d’incendie, d’électrocution, ou autre.
CONTRÔLE DE SÉCURITÉ - Après avoir fait réparer le
produit, demandez au réparateur de vérifier la sécurité de
l’appareil et que celui-ci fonctionne correctement.
MISES EN GARDE :
POUR RÉDUIRE LES RISQUES D’ÉLECTROCUTION OU
D’INCENDIE :
❒ NE PAS EXPOSER CET APPAREIL À LA PLUIE OU À
L’HUMIDITÉ.
❒ NE PAS EXPOSER CET APPAREIL À DES SOURCES
LIQUIDES ET NE PAS POSER UN OBJET CONTENANT
UN LIQUIDE — VASE, PAR EXEMPLE — SUR
L’APPAREIL.
❒ LES ENCEINTES DOIVENT ÊTRE CONNECTÉES AU
SECTEUR PAR UNE PRISE ÉQUIPÉE D’UNE PRISE DE
TERRE POUR GARANTIR LA SÉCURITÉ DE
L’UTILISATEUR.
La fiche secteur et l’interrupteur secteur permettent de
déconnecter l’appareil du secteur. L’enceinte doit être placée
près d’une prise secteur facilement accessible et en bon état
de fonctionnement.
i
DON Analog Localized.book Page ii Monday, September 5, 2005 11:48 AM
CONSIGNES DE SÉCURITÉ
L’éclair dans le triangle équilatéral prévient l’utilisateur que l’appareil
contient des tensions électriques dangereuses, d’amplitude suffisante
à constituer des risques d’électrocution aux personnes.
WARNING
DO NOT OPEN
TO PREVENT THE RISK OF ELECTRIC SHOCK, DO NOT REMOVE SPEAKER
COVERS (OR BACKS). NO USER-SERVICEABLE PARTS INSIDE. REFER
SERVICING TO QUALIFIED SERVICE PERSONNEL.
Le point d’exclamation dans le triangle équilatéral prévient l’utilisateur
de la présence d’instructions d’utilisation et de maintenance
importantes dans le manuel qui accompagne ce produit.
MISE EN GARDE
NE PAS OUVRIR
POUR EVITER TOUT RISQUE D’ÉLECTROCUTION, NE PAS RETIRER LE
COUVERCLE DE L’ENCEINTE. AUCUN ENTRETIEN DES PIÈCES INTERNES
N’EST REQUIS. TOUTES LES RÉPARATIONS DOIVENT ÊTRE ÉFFECTUÉES
UNIQUEMENT PAR UN PERSONNEL QUALIFIÉ.
ATTENTION :
Ce symbole indique que l’élément repéré peut être chaud et que vous
ne devez pas le toucher sans avoir pris les précautions nécessaires.
❒Pour réduire les risques de brûlure et autre blessures aux enfants,
placez l’appareil de sorte que les surfaces chaudes restent hors de
leur portée.
❒Pour réduire les risques d’incendie, veillez à ne pas placer d’objets
en papier, en tissu (rideaux, par exemple), etc., près de la surface
chaude.
CAUTION:
TO PREVENT THE RISK OF ELECTRIC SHOCK, MATCH WIDE BLADE OF PLUG
TO WIDE SLOT. INSERT CAREFULLY.
ATTENTION :
POUR ÉVITER TOUT RISQUE D’ÉLECTROCUTION, INTRODUIRE LA LAME LA
PLUS LARGE DE LA FICHE SECTEUR DANS LA BORNE CORRESPONDANTE DE
LA PRISE ET POUSSER JUSQU’AU FOND.
REMARQUE IMPORTANTE :
Ce produit possède un numéro de série. Notez ce numéro de série et conservez-le
dans un lieu sûr pour toute référence ultérieure.
LISEZ ET RESPECTEZ LES CONSIGNES DE SÉCURITÉ SÉRIGRAPHIÉES À L’ARRIÈRE DE L’ENCEINTE
Ce symbole indique que ce produit ne peut pas être recyclé comme déchet
ménager. En veillant à vous débarrasser correctement de ce produit, vous
aiderez à protéger l’environnement. Pour obtenir de plus amples renseignements
sur le recyclage de ce produit, contactez les autorités locales, votre centre de
recyclage ou votre revendeur.
ii
DON Analog Localized.book Page 1 Monday, September 5, 2005 11:48 AM
Moniteur E-MU PM5
Merci d’avoir choisi le moniteur E-MU® PM5 Precision. Ce moniteur de référence bi-amplifié à deux voies
est extrêmement compact. Il est équipé d’amplificateurs spéciaux d’une extrême fidélité, de haut-parleurs
haute qualité et d’une conception de baffle novatrice pour délivrer un signal audio d’une très haute fidélité
et vous offrir un outil de Monitoring ultra précis.
Les éléments fournis sont :
• 1 moniteur E-MU PM5 Precision
• 1 cordon secteur
• 1 mode d’emploi
• 1 carte de garantie et d’informations sur l’assistance
Remarques et astuces
Les éléments à prendre en considération sont présentés sous la forme de remarques et d’astuces :
• Remarque. Souligne des informations supplémentaires ou importantes sur un
point spécifique.
• Astuce. Vous donne des astuces sur un point spécifique.
Table des matières
Généralités ........................................ 2
Connexion des enceintes ................. 2
Positionnement des enceintes ......... 3
Réglages sur les enceintes ................ 4
Réglage de la sensibilité d’entrée 4
Réglages de réponse ..................... 4
Caractéristiques techniques ............. 5
Les informations de ce document sont sujettes à modifications sans préavis et ne représentent aucun engagement ou responsabilité
de la part d’E-MU Systems, Inc. Interdiction de reproduire ou de transmettre ce manuel en tout ou partie, quel que soit le moyen
utilisé à cette fin (mécanique, ce qui comprend par photocopie, par enregistrement, etc.), sans la permission écrite
d’E-MU Systems, Inc.
Version 1.0
Septembre 2005
© 2005. E-MU Systems, Inc. Tous droits réservés. E-MU est une marque déposée de E-MU Systems, Inc. aux USA et dans d’autres
pays. Le logo Creative est déposé par Creative Technology Ltd. aux USA et dans d’autres pays. Tous les autres logos, marques ou
noms de produits sont déposés. Toutes caractéristiques sujettes à modification sans préavis. L’utilisation de ce produit est sujette à
une garantie limitée. L’aspect du produit peut différer des photos fournies.
1
DON Analog Localized.book Page 2 Monday, September 5, 2005 11:48 AM
Généralités
La section suivante vous présente les différents éléments et fonctions du moniteur.
Éléments du moniteur
1
Connecteur combiné d’entrée symétrique analogique
XLR/Jack stéréo 6,35 mm
2
Sélecteur symétrique (BAL)/Asymétrique (UNBAL)
Sélectionnez la position symétrique BAL (entrée XLR ou Jack stéréo)
ou UNBAL (connecteur d’entrée RCA).
3
Entrée analogique asymétrique RCA
4
Potentiomètre de sensibilité d’entrée
Règle la sensibilité d’entrée du moniteur.
5
Atténuateurs
• Règle l’atténuation des basses fréquences par le sélecteur LF (Low
Frequency).
• Règle l’atténuation des hautes fréquences par le sélecteur HF (High
Frequency).
• Par défaut les deux sélecteurs sont réglés sur zéro.
6
Embase secteur
• Déconnectez le cordon secteur de cette embase en cas
d’inutilisation prolongée du moniteur (plusieurs jours).
• Assurez-vous que la tension de fonctionnement du moniteur
corresponde à celle de la tension secteur de votre pays.
7
Interrupteur de mise sous/hors tension ON/OFF
8
Led Power
• S’allume en bleu lorsque le moniteur est sous tension.
• S’allume lorsque le circuit de protection contre les surcharges
s’active.
1 2 3 4 5
6
7
8
Connexion des moniteurs
Ce moniteur est équipé d’un connecteur d’entrée combiné symétrique XLR/Jack stéréo 6,35 mm et d’un connecteur RCA
asymétrique pour la connexion de la sortie de vos équipements audio analogiques.
• Avant de connecter le moniteur, placez le réglage de sensibilité
au minimum.
• Veillez à ne connecter qu’une seule source à la fois, car le mélange de plusieurs signaux génère du bruit de fond indésirable.
Il se peut que vous entendiez un bruit de “pop” lors de la mise sous ou hors tension du moniteur. Veillez à toujours placer le
moniteur sous tension en dernier et hors tension en premier pour éviter ce problème.
1 = Masse/blindage
2 = Point chaud (+)
3 = Point froid (-)
2
3
Pointe = Point chaud (+)
2
Bague = Point froid (-)
1
3
Corps = Masse/blindage
1
Connecteur
1
Jack stéréo 6,35 mm symétrique
2
XLR symétrique mâle
3
RCA asymétrique
Connexion
Connectez votre signal d’entrée symétrique analogique à
l’embase combine XLR/Jack stéréo 6,35 mm
Connectez votre signal d’entrée asymétrique analogique à
l’embase RCA
Après avoir connecté votre équipement audio au moniteur, sélectionnez l’entrée utilisée avec le sélecteur BAL (symétrique)/
UNBAL (asymétrique)
.
2
DON Analog Localized.book Page 3 Monday, September 5, 2005 11:48 AM
Positionnement des enceintes
La façon dont vous positionnez votre moniteur affecte sensiblement ses performances. Bien que certains facteurs restent
difficilement modifiables (forme de la pièce, matériaux utilisés pour les murs, etc.) et affectent le son, voici quelques conseils que
vous pouvez suivre pour optimiser les performances globales, quelle que soit la pièce utilisée. La section qui suit vous donne
quelques conseils sur le placement des enceintes.
L
R
30°
30°
2
Tweeter
3
Woofer
1
Astuce de placement des moniteurs
1
Placez les enceintes sur une surface plate, stable pour minimiser les vibrations.
2
Placez les enceintes à la même hauteur, et respectez la même distance entre les enceintes et le mur et la
même distance entre les enceintes et la position d’écoute pour les deux enceintes.
3
La hauteur du point d’écoute doit également être située horizontalement entre le Tweeter et le Woofer.
3
DON Analog Localized.book Page 4 Monday, September 5, 2005 11:48 AM
Réglages du moniteur
Pour régler la sensibilité d’entrée
Vous pouvez adapter la sensibilité d’entrée au niveau de sortie de l’appareil audio connecté avec le bouton Input Sensitivity
.
• Assurez-vous que la Led Power ne s’allume jamais en rouge lors du réglage de sensibilité d’entrée.
• Réglez la sensibilité d’entrée en fonction du niveau de sortie de l’appareil connecté tout en évitant tout écrêtage du signal de
sortie.
• Si vous utilisez deux moniteurs pour l’écoute en stéréo, assurez-vous que tous les réglages des deux moniteurs soient
parfaitement identiques.
Équivalences de réglages de sensibilité d’entrée
dB
Échelle de sensibilité
d’entrée en Décibels telle
que sérigraphiée au dos de
l’enceinte.
dBu
V
Une sensibilité d’entrée de
Pour une utilisation avec des
0,66 V offre le niveau de sortie
niveaux professionnels
maximum, uniquement lorsque
symétriques, utilisez une valeur
le bouton Input sensitivity est
de +4 dBu.
réglé au maximum.
Réglage de la réponse
Vous pouvez utiliser les deux atténuateurs
pour modeler l’atténuation dans les basses fréquences (LF) et dans les hautes
fréquences (HF) du moniteur. Les courbes ci-dessous illustrent de quelle façon ces deux atténuateurs affectent la réponse en
fréquence du moniteur.
4
DON Analog Localized.book Page 5 Monday, September 5, 2005 11:48 AM
Caractéristiques techniques
Généralités
Type
Moniteur de référence de proximité à deux voies, bi-amplifié
Réponse en fréquence
67 Hz - 20 kHz (±2,5 dB)
Niveau sonore maximum, réponse rapide
Simple : ≥100 dB SPL à 1 m
Paire : ≥103 dB SPL à 1 m
Haut-parleurs
Tweeter :
Type : Néodymium, à dôme doux
Taille : 25,4 mm (1 pouce)
Woofer :
Type : Membrane en fibre de verre
Taille : 127 mm (5 pouces)
Dimensions
Hauteur : 290 mm (11,5 pouces)
Largeur : 175 mm (6,9 pouces)
Profondeur : 245 mm (9,7 pouces)
Poids
6,5 kg
Alimentation secteur
120 V, 60 Hz ou 220 V-240 Vca 50/60 Hz, selon le pays de distribution
Filtrage
Type
Filtre actif Butterworth de deuxième ordre
Entrées
Entrée 1 : XLR femelle symétrique
Entrée 2 : Jack stéréo 6,35 mm symétrique
Entrée 3 : RCA asymétrique
Plage de sensibilité d’entrée
-21 dB à 0 dB
Impédance d’entrée
Symétrique : 47 kOhms
Asymétrique : 47 kOhms
Fréquence de coupure
2,5 kHz
Amplificateurs
Type
Amplificateurs spéciaux à semi-conducteurs avec étage d’entrée à topologie de
Classe-A et étages de sortie MOSFET
Amplificateur du Tweeter
Puissance : 40 W eff. dans 4 Ohms
Rapport signal/bruit référencé au niveau maximum en sortie : > 98 dB
Distorsion Harmonique Totale : < 0,2 %
Amplificateur du Woofer
Puissance : 40 W eff. dans 4 Ohms
Rapport signal/bruit référencé au niveau maximum en sortie : > 98 dB
Distorsion Harmonique Totale : < 0,2 %
Fusibles
Modèle 120 Vca 60 Hz : T1AL. 250 Vca.
T1AL (T = Temporisation, Débit de fusion 1 A et L = faible résistance à la fusion).
Modèle 220 V-240 Vca 50/60 Hz : T500mAL. 250 Vca.
T500mAL (T = Temporisation, Débit de fusion 500 mA et L = faible résistance à la
fusion).
5
DON Analog Localized.book Page i Monday, September 5, 2005 11:48 AM
WICHTIGE SICHERHEITSVORKEHRUNGEN
ANLEITUNGEN LESEN - Lesen Sie alle
Sicherheits- und Bedienungsanleitungen, bevor
Sie das Gerät in Betrieb nehmen.
ANLEITUNGEN AUFBEWAHREN Heben Sie alle Sicherheits- und Bedienungsanleitungen für den zukünftigen Gebrauch auf.
WARNUNGEN BEACHTEN - Beachten
Sie alle Warnungen auf dem Produkt und in den
Betriebsanleitungen.
ANLEITUNGEN BEFOLGEN - Befolgen
Sie alle Betriebs- und Nutzungsanleitungen.
REINIGUNG - Ziehen Sie vor der Reinigung des
Geräts den Netzstecker. Verwenden Sie keine Flüssig- oder Aerosolreiniger, sondern ein trockenes
Tuch.
BEFESTIGUNGEN - Verwenden Sie keine
Befestigungen oder Zubehörteile, die nicht von
Creative empfohlen wurden, da sie gefährlich
sein könnten.
WASSER UND FEUCHTIGKEIT - Benutzen Sie Geräte nicht in der Nähe von Wasser
oder eines Wasserrisikos (z. B. Badewanne,
Waschschüssel, Spülbecken, Wäschezuber, nasser Keller, Schwimmbecken usw.).
PLATZIERUNG - Stellen Sie das Produkt auf
eine stabile Oberfläche oder einen Ständer, der
für das Produkt empfohlen oder mit ihm verkauft
wurde. Andernfalls könnte das Produkt umfallen
und Personen verletzen oder selbst beschädigt
werden. Befolgen Sie die Anleitungen des Herstellers zur Montage des Produkts.
BELÜFTUNG - Um einen zuverlässigen Betrieb sicherzustellen und Überhitzung zu verhindern, sollten Sie die Belüftungsöffnungen und
-schlitze nicht mit Stoff oder undurchlässigem
Material blockieren oder bedecken. Bauen Sie
das Produkt nur dann ein, z. B. in ein Bücherregal
oder Rack, wenn eine ausreichende Belüftung
gewährleistet ist und Creatives Anleitungen befolgt wurden. “Die Box darf (höchstens) 5 cm
hinter dem vorderen Rand stehen und muss
(mindestens) 15 cm Freiraum an den Seiten und
(mindestens) 30 cm Freiraum auf der gesamten
Rückseite besitzen.
HITZE - Stellen Sie das Gerät nicht in der Nähe von
Heizkörpern, Heizungsklappen oder anderen Wärmequellen (inklusive Verstärker) auf.
SPANNUNGSQUELLEN - Dieses Produkt ist
speziell für den Betrieb innerhalb des elektrischen Bereichs konzipiert, der auf dem mitgelieferten Netzadapter angegeben ist. Die Verwendung außerhalb
dieses Bereichs erfolgt auf eigenes Risiko. Setzen Sie
sich bitte mit den zuständigen Stadtwerken in Verbindung, wenn Sie die elektrische Spannung an dem geplanten Betriebsort nicht kennen.
NETZKABEL - Stecker mit Erdungsstift - Setzen Sie
die Sicherheitsfunktion des Netzsteckers mit Erdungsstift nicht außer Kraft. Ein geerdeter Stecker besitzt
zwei Klingen und einen dritten Erdungsstift. Der dritte
Stift dient Ihrer Sicherheit. Falls der mitgelieferte Stift
nicht in Ihre Netzsteckdose passt, lassen Sie die veraltete Steckdose von einem Elektriker ersetzen.
SCHUTZ DES NETZKABELS - Verlegen Sie das
Netzkabel so, dass niemand darüber laufen und es
nicht geknickt und beschädigt werden kann. Achten Sie
besonders auf den Bereich am Netzstecker, die Netzsteckdose und den Kabelanschluss am Gerät.
GEWITTER - Bei Gewittern oder längerer Nichtbenutzung des Produkts sollten Sie dessen Netzstecker aus der Steckdose ziehen. Dadurch verhindern
Sie, dass das Gerät durch Blitzschlag oder Spannungsspitzen beschädigt wird.
ÜBERLASTUNG - Netzsteckdosen, Verlängerungskabel oder interne Stromkreise dürfen nicht überlastet werden, um die Gefahr eines Brandes oder
Stromschlags auszuschließen.
OBJEKTE ODER FLÜSSIGKEITEN - Schieben
Sie keine Objekte in die Öffnungen des Produkts, da
dies zu Bränden, Stromschlägen oder Beschädigungen
führen könnte. Verschütten Sie keine Flüssigkeiten auf
dem Produkt.
WARTUNG - Versuchen Sie nicht, das Produkt zu
warten. Überlassen Sie die Wartung qualifiziertem
Fachpersonal.
REPARATURBEDÜRFTIGE SCHÄDEN - Trennen
Sie das Produkt vom Netz und rufen Sie den Kundendienst
an, wenn:
a)Stromkabel oder Netzstecker beschädigt wurden.
b)Gegenstände oder Flüssigkeit in das Produkt gelangt sind.
c)das Produkt Regen oder Feuchtigkeit ausgesetzt war.
d)das Produkt sich nach der Betriebsanleitung nicht mehr
normal bedienen lässt.
e)das Produkt sich anders wie gewohnt verhält.
f)das Produkt fallen gelassen oder beschädigt wurde.
ERSTATZTEILE - Achten Sie beim Ersetzen von Bauteilen darauf, dass der Wartungstechniker die von Creative
empfohlenen Ersatzteile benutzt oder diese die gleichen
Eigenschaften wie die Originalteile besitzen. Unautorisierte
Ersatzteile können zu Bränden, Stromschlägen und anderen
Gefahren führen.
SICHERHEITSPRÜFUNG - Nach der Wartung oder
Reparatur des Produkts muss der Wartungstechniker
Sicherheitsprüfungen durchführen, um sicherzustellen, dass
das Produkt korrekt funktioniert.
WARNUNG:
UM DIE GEFAHR EINES BRANDES ODER STROMSCHLAGS ZU VERMEIDEN
❒ SOLLTEN SIE DIESES GERÄT WEDER REGEN NOCH
FEUCHTIGKEIT AUSSETZEN
❒ SOLLTEN SIE DAS GERÄT KEINEN TROPFENDEN
ODER SPRITZENDEN FLÜSSIGKEITEN AUSSETZEN
UND SICHERSTELLEN, DASS KEINE MIT FLÜSSIGKEIT
GEFÜLLTEN OBJEKTE - WIE VASEN USW. - AUF DEM
GERÄT ABGESTELLT WERDEN.
❒ MÜSSEN SIE DIE BOX AN EINE NETZSTECKDOSE MIT
SCHUTZERDE ANSCHLIESSEN.
Der Netzstecker und die Gerätesteckvorrichtung dienen als
Trennschalter. Die Box sollte in der Nähe einer Netzsteckdose aufgestellt werden, die leicht erreichbar und sofort
betriebsbereit ist.
SICHERHEITSWARNUNGEN
Der Blitz mit Pfeilspitze im gleichseitigen Dreieck soll den Anwender
vor nichtisolierter "gefährlicher Spannung" im Geräteinnern warnen.
Diese Spannung kann so hoch sein, daß die Gefahr eines Stromschlags
besteht.
Das Ausrufezeichen im gleichseitigen Dreieck soll den Anwender auf
wichtige Bedienungs- und Wartungsanleitungen aufmerksam machen,
die im mitgelieferten Informationsmaterial näher beschrieben werden.
WARNING
DO NOT OPEN
TO PREVENT THE RISK OF ELECTRIC SHOCK, DO NOT REMOVE SPEAKER
COVERS (OR BACKS). NO USER-SERVICEABLE PARTS INSIDE. REFER
SERVICING TO QUALIFIED SERVICE PERSONNEL.
MISE EN GARDE
NE PAS OUVRIR
POUR EVITER TOUT RISQUE D’ÉLECTROCUTION, NE PAS RETIRER LE
COUVERCLE DE L’ENCEINTE. AUCUN ENTRETIEN DES PIÈCES INTERNES
N’EST REQUIS. TOUTES LES RÉPARATIONS DOIVENT ÊTRE ÉFFECTUÉES
UNIQUEMENT PAR UN PERSONNEL QUALIFIÉ.
VORSICHT:
Dieses Symbol zeigt an, dass das markierte Objekt heiß sein könnte
und nur mit den entsprechenden Vorkehrungen berührt werden sollte.
❒Um das Risiko von Verbrennungen und anderen Verletzungen bei
Kindern zu verringern, platzieren Sie das Gerät so, dass heiße
Oberflächen von Kindern nicht erreicht werden können.
❒Um das Risiko von Bränden zu verringern, halten Sie brennbare
Materialien, wie Papier oder Stoff (z. B. Vorhänge), von heißen
Oberflächen entfernt.
VORSICHT:
UM STROMSCHLÄGE ZU VERHINDERN, STECKEN SIE DIE BREITE KLINGE DES
STECKERS IN DEN BREITEN SCHLITZ DER STECKDOSE. GEHEN SIE VORSICHTIG VOR.
ATTENTION:
POUR EVITER LES CHOCS ELECTRIQUES, INTRODUIRE LA LAME LA PLUS
LARGE DE LA FICHE DANS LA BORNE CORRESPONDANTE DE LA PRISE ET
POUSSER JUSQU AU FOND.
WICHTIGER HINWEIS
Ihr Produkt besitzt eine Seriennummer. Notieren Sie diese und heben Sie sie gut auf.
BITTE LESEN UND BEACHTEN SIE DIE WICHTIGEN
SICHERHEITSWARNUNGEN AUF DER BOXENRÜCKSEITE
Die Verwendung des WEEE-Symbols zeigt an, dass dieses Produkt nicht als
Haushaltsabfall behandelt werden darf. Durch eine sachgerechte Entsorgung
tragen Sie zum Umweltschutz bei. Detailliertere Informationen über das
Recycling dieses Produkts erhalten Sie bei Ihrer zuständigen Behörde, Ihrer
Müllabfuhr oder dem Laden, in dem Sie das Produkt gekauft haben.
i
DON Analog Localized.book Page 1 Monday, September 5, 2005 11:48 AM
E-MU PM5 Precision Monitor
Herzlichen Dank für den Kauf des E-MU® PM5 Precision Monitors. Dieser extrem kompakte, Bi-Amp,
2-Weg, Nahfeld-Referenzmonitor zeichnet sich aus durch spezielle audiophile Verstärker, Weltklasse-Treiber
und ein innovatives Gehäusedesign, das eine hyper-präzise Audio-Reproduktion für alle wichtigen Abhöranforderungen bietet.
Dieses Paket enthält:
• 1 x E-MU PM5 Precision Monitor
• 1 x Netzkabel
• 1 x Bedienungshandbuch
• 1 x Garantie- und Support-Informationen
Hinweise und Tipps
Themen von besonderem Interesse sind in dieser Anleitung als Hinweise und Tipps dargestellt:
• Hinweis. Markiert zusätzliche oder wichtige Informationen über eine Funktion.
• Tipp. Beschreibt Shortcuts oder Details zu einer Funktion.
Inhalt
Übersicht ........................................... 2
Box anschließen ................................ 2
Box platzieren ................................... 3
Boxen-Regler einstellen ................... 4
Eingangsempfindlichkeit einstellen 4
Klangregler einstellen ................... 4
Technische Daten ............................. 5
Die Informationen dieses Handbuchs können unangekündigt geändert werden und stellen keine Verpflichtung seitens E-MU Systems,
Inc. dar. Kein Teil dieses Handbuchs darf in irgendeiner Form und mit irgendwelchen Mitteln - ob elektronisch oder mechanisch,
inklusive Photokopie und Aufzeichnung - für irgendeinen Zweck ohne die schriftliche Erlaubnis von E-MU Systems, Inc. reproduziert
oder übertragen werden.
Version 1.0, September 2005
© 2005. E-MU Systems, Inc. Alle Rechte vorbehalten. E-MU ist in den USA und anderen Ländern ein eingetragenes Warenzeichen von
E-MU Systems, Inc. Das Creative Logo ist in den USA und anderen Ländern ein eingetragenes Warenzeichen von Creative Technology
Ltd. Alle anderen Logos, Marken oder Produktnamen sind Warenzeichen oder eingetragene Warenzeichen der jeweiligen Besitzer und
werden hiermit als solche anerkannt. Alle Technischen Daten können unangekündigt geändert werden. Der Einsatz dieses Produkts
unterliegt einer eingeschränkten Garantie. Der tatsächliche Inhalt kann geringfügig vom abgebildeten Inhalt abweichen.
E-MU Systems, Inc., Scotts Valley, CA 95066
1
DON Analog Localized.book Page 2 Monday, September 5, 2005 11:48 AM
Übersicht
Der folgende Abschnitt macht Sie mit den verschiedenen Komponenten Ihrer Box vertraut.
Boxen-Komponenten
1
Symmetrischer, analoger XLR/TRS Kombi-Eingang
2
Balance (BAL)/Unbalance (UNBAL) Schalter
Wählt entweder den symmetrischen (XLR oder TRS) oder
asymmetrischen (Cinch) Analog-Eingang.
3
Asymmetrischer, analoger Cinch-Eingang
4
Input Sensitivity-Regler
Regelt die Eingangsempfindlichkeit der Box.
5
Bedämpfungs-Schalter
• Regelt die Bass-Absenkung mit dem LF (Low Frequency) Schalter
• Regelt die Höhen-Dämpfung mit dem HF (High Frequency) Schalter
• Beide Schalter sind auf „0“ voreingestellt.
6
Netzanschluss
• Ziehen Sie das Netzadapterkabel aus dem Netzanschluss, wenn Sie
die Box mehrere Tage lang nicht benutzen.
• Stellen Sie sicher, dass der Spannungsnennwert Ihrer Box mit der in
Ihrem Land üblichen Spannung übereinstimmt.
7
ON/OFF-Schalter
8
Power LED
• Leuchtet blau, wenn die Box eingeschaltet ist.
• Leuchtet rot, wenn der Überlastungsschutz aktiviert ist.
1 2 3 4 5
6
7
8
Boxen anschließen
Ihre Box verfügt über einen symmetrischen, analogen XLR/TRS Kombi-Eingang und einen asymmetrischen, analogen
Cinch-Eingang, an die sich die verschiedensten analogen Audio-Eingabegeräte anschließen lassen.
• Beim Anschließen der Box muss der Input Sensitivity-Regler
ganz nach links gedreht sein.
• Schließen Sie immer nur ein Audio-Eingabegerät an Ihre Boxen an, da andernfalls die Eingangssignale gemischt werden und
unerwünschte Störgeräusche entstehen.
Beim Ein-/Ausschalten der Box hören Sie vielleicht ein Knackgeräusch. Um dies zu vermeiden, sollten Sie in Ihrem Audio-System
die Boxen zuletzt einschalten und zuerst ausschalten.
1 = Erde/Abschirmung
2 = Heiß (+)
3 = Kalt (-)
2
3
Spitze = Heiß (+)
2
Ring = Kalt (-)
1
3
Schirm = Erde/Abschirmung
1
Anschluss
Verbindung
1
Symm. ¼ “ TRS-Stecker
2
Symm. XLR-Stecker
Anschluss an symmetrischen, analogen XLR/TRS
Kombi-Eingang
3
Asymm. Cinch-Stecker
Anschluss an asymmetrischen, analogen Cinch-Eingang
Nachdem Sie Ihr Audiogerät an die Box angeschlossen haben, müssen Sie mit dem Balanced (BAL)/Unbalanced (UNBAL)
Schalter
den geeigneten Eingangsanschlusstyp wählen.
2
DON Analog Localized.book Page 3 Monday, September 5, 2005 11:48 AM
Boxen platzieren
Die Platzierung der Boxen kann deren Leistung stark beeinflussen. Obwohl viele Faktoren, wie Form des Raumes und Material
der Wände, die Leistung beeinflussen, gibt es einige allgemeine Tipps, die bei der Maximierung der Boxenleistung in jedem Raum
helfen. Der folgende Abschnitt gibt Ihnen Tipps zur Boxenplatzierung.
L
R
30°
30°
2
Hochfrequenz-Treiber
Tieffrequenz-Treiber
3
1
Boxenplatzierungs-Tipps
1
Platzieren Sie Ihre Boxen auf einer ebenen, stabilen Oberfläche, um Vibrationen zu verringern.
2
Platzieren Sie die Boxen auf gleicher Höhe und halten Sie bei den Boxen die gleiche Entfernung zur Wand
und zum Hörer ein.
3
Die akustische Achse der Box liegt in der Mitte zwischen Hochfrequenz- und Tieffrequenztreiber.
Positionieren Sie die Boxen so, dass die akustischen Achsen auf der Höhe Ihrer Ohren liegen.
3
DON Analog Localized.book Page 4 Monday, September 5, 2005 11:48 AM
Boxenregler einstellen
Eingangsempfindlichkeit einstellen
Mit dem Input Sensitivity-Regler
.können Sie die Eingangsempfindlichkeit Ihrer Boxen an Ihr Ausgabegerät anpassen.
• Beim Einstellen des Input Sensitivity-Reglers darf die Power LED nicht rot aufleuchten.
• Stimmen Sie die Eingangsempfindlichkeit Ihrer Box auf das Quellensignal ab, um unnötiges Übersteuern des Ausgangssignals zu
vermeiden.
Skalen für den Input Sensitivity-Regler
dB
Dies ist die Input Sensitivity-Skala in Dezibel, wie sie
auf der Boxen-Rückseite
abgebildet ist.
dBu
Für den professionellen symmetrischen Einsatz wird ein
Input Sensitivity-Pegel von
+4dBu empfohlen.
V
Ein Input Sensitivity-Wert von
0,66V erzeugt nur dann maximale Ausgangsleistung, wenn
der Input Sensitivity-Regler
ganz nach rechts gedreht ist.
Klangregler einstellen
Mit den Attenuation-Schaltern
können Sie die Bassabsenkung (LF) und Höhenbedämpfung (HF) Ihrer Box einstellen. Das
folgende Schaubild zeigt, wie Bass Roll Off und Treble Tilt den Freifeld-Frequenzgang Ihrer Box beeinflussen.
4
DON Analog Localized.book Page 5 Monday, September 5, 2005 11:48 AM
Technische Daten
Allgemein
Typ
2-Weg, Bi-Amp, Nahfeld-Referenzmonitor
Frequenzgang
67 Hz - 20 kHz (±2,5 dB)
Max. Schalldruckpegel, kurzzeitig
Einzeln: ≥100 dB SPL @1m
Paar: ≥103 dB SPL @1m
Treiber
Höhen:
Typ: Neodym Soft Dome
Größe: 25,4 mm (1")
Bässe:
Typ: Glasfaser-Konus
Größe: 127 mm (5")
Abmessungen
Höhe: 290 mm (11,5")
Breite: 175 mm (6,9")
Tiefe: 245 mm (9,7")
Gewicht
6,5 kg (14,3 lbs.)
Leistungsaufnahme
120 V, 60 Hz oder 220 V-240 Vca 50/60 Hz
Crossover-Netzwerk
Typ
Butterworth zweiter Ordnung, aktiv
Eingänge
Input 1: symmetrische XLR-Buchse
Input 2: symmetrische ¼" Buchse
Input 3: asymmetrische Cinch-Buchse
Input Sensitivity-Regelbereich
-21 dB bis 0dB
Eingangsimpedanz
symmetrisch: 47 kOhm
asymmetrisch: 47 kOhm
Crossover-Frequenz
2,5 kHz
Verstärker
Typ
spezielle, getrennte Amps mit Class-A Eingangsstufe und MOSFET-Ausgangsstufen
Höhen-Verstärker
Leistung: 40 W RMS an 4 Ohm
Geräuschspannungsabstand, bei voller Ausgangsleistung: > 98 dB
Verzerrung: Klirrfaktor < 0,2 %
Bass-Verstärker
Leistung: 40 W RMS an 4 Ohm
Geräuschspannungsabstand, bei voller Ausgangsleistung: > 98dB
Verzerrung: Klirrfaktor < 0,2 %
Sicherungs-Nennwerte
120 VAC 60 Hz Modell: T1AL. 250 VAC
T1AL (wobei T = Verzögerungszeit, Sicherungsnennwert 1A und L = niedrige
Abschaltleistung.)
220 V - 240 VAC 50/60 Hz Modell: T500 mAL. 250 VAC.
T500 mAL (wobei T = Verzögerungszeit, Sicherungsnennwert 500mA und L =
niedrige Abschaltleistung.)
5