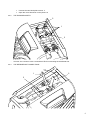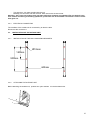
1
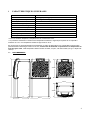
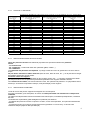
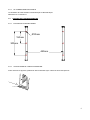
19/11/2008
WINEMASTER
SP 100
Mode d’emploi
Gebrauchsanweisung
Instruction for use
Numéro de série
Seriennummer
Serial number
SOMMAIRE
1
CARACTERISTIQUES GENERALES ........................................................................ 4
1.1
ENCOMBREMENT : ...................................................................................................... 4
2 AMENAGEMENT DES LOCAUX ............................................................................... 5
2.1
UNITE INTERIEURE ...................................................................................................... 5
2.2
UNITE EXTERIEURE ..................................................................................................... 5
2.3
LA CAVE ........................................................................................................................ 5
2.3.1 L’ ISOLATION ................................................................................................................ 5
2.3.2 CHOIX DE L’ ISOLATION ................................................................................................. 6
2.3.3 ISOLATION DES MURS ET DU PLAFOND .......................................................................... 6
2.3.4 ISOLATION DU PLANCHER ............................................................................................. 6
2.3.5 LA PORTE ..................................................................................................................... 7
2.3.6 ISOLATION DES AUTRES ELEMENTS............................................................................... 7
3 INSTALLATION DE L’UNITE EXTERIEURE DU CLIMATISEUR ............................. 7
3.1
PERCEMENT DU MUR .................................................................................................. 7
3.2
DEMONTAGE DU FLEXIBLE ........................................................................................ 7
3.2.1 LE CAPOT ..................................................................................................................... 7
3.2.2 LES BRIDES DE MAINTIEN .............................................................................................. 8
3.2.3 LES RACCORDS FRIGORIFIQUES .................................................................................... 8
3.2.4 LE CONNECTEUR ELECTRIQUE ...................................................................................... 9
1.2
FIXATION DE L’UNITE EXTERIEURE ........................................................................... 9
3.2.5 FIXATION DU SUPPORT MURAL ...................................................................................... 9
3.2.6 ACCROCHAGE DE L’UNITE EXTERIEURE ......................................................................... 9
4 INSTALLATION DE L’ UNITE INTERIEURE ........................................................... 11
4.1
RECONNECTION DU FLEXIBLE ................................................................................ 11
4.2
MISE EN PLACE DE L’ECOULEMENT D’EAU ........................................................... 11
5 MISE EN SERVICE DU CLIMATISEUR WINESP100 .............................................. 12
5.1
BRANCHEMENT DU CLIMATISEUR .......................................................................... 12
5.2
TABLEAU DE CONTROLE .......................................................................................... 12
5.3
DEGIVRAGE AUTOMATIQUE..................................................................................... 12
6 ENTRETIEN DU CLIMATISEUR .............................................................................. 12
6.1
CHANGEMENT DU FILTRE......................................................................................... 13
7 LA GARANTIE ......................................................................................................... 14
7.1
LA GARANTIE LEGALE .............................................................................................. 14
7.2
GARANTIE CONTRACTUELLE DE 2 ANS ................................................................. 14
7.3
CONDITIONS D’ APPLICATION DE LA GARANTIE ................................................... 14
7.4
EXCLUSIONS ET LIMITES DE LA GARANTIE ........................................................... 14
2
De la vigne au vin
Autrefois, on prévoyait au moment de la construction une cave qui, à elle seule,
était capable de maintenir en toute saison une température n’excédant pas 14 à 16 °c.
De nos jours, rares sont celles qui peuvent y prétendre.
Pourtant une cave digne de ce nom doit être à l’abri des grandes variations de
température, être humide à souhait mais ventilée, être obscure et ne souffrir
d’aucune vibration.
C’est pourquoi, depuis plus de quinze ans, entourés de spécialistes, d’amateurs
passionnés et exigeants nous avons conçu, développé, éprouvé et fabriqué des milliers
de climatiseurs destinés à la conservation et au vieillissement du vin.
Si vous suivez nos conseils et respectez nos préconisations, vos crus pourront
s’épanouir pleinement.
Il est impératif de lire la notice ci-après avant d’installer et d’utiliser votre
climatiseur de cave WINEMASTER FONDIS.
Contactez-nous si vous avez des interrogations !
Alors... même si quelques longues années peuvent être nécessaires au vin pour
atteindre sa plénitude... viendra le grand jour et pourtant toujours délicat du
débouchage.
Saisir délicatement le flacon... ne pas décapiter la capsule au ras de l’embouchure...
s’emparer d’un bel outil à levier... arracher le bouchon sans secousse... examiner le
«miroir»...
Mais ceci est une autre histoire...
SERVICE CLIENTS FONDIS
Tél. 03.89.37.75.15/Fax 03.89.37.75.89
E-MAIL : [email protected]
ª Attendre 24 heures avant de brancher le climatiseur.
3
1
CARACTERISTIQUES GENERALES
Dimensions
Poids
Réglage de la température
Température extérieure maxi
Puissance frigorifique
Puissance de chauffage
Alimentation électrique
Puissance électrique
Gaz
Charge de gaz
Longueur du flexible utile
1005 mm x 395 mm
45 kg (int) – 15 kg(ext)
Prérégler à 12°C ajustable entre 4 et 25°C*
35°C**
2500W à 12°C**
1000W
230-240V 50Hz avec prise de terre ( livré avec câble de 3
1250W
R407C sans CFC
1000g
4.50 m
* Avec une isolation adaptée à la température et au volume de la cave.
** La puissance diminuant en fonction de la température extérieure, l’appareil peut perdre de sa capacité à
maintenir les 12°C si la température extérieure approche les 35°C.
En cas de mise en sécurité thermique trop fréquente, le relais de démarrage ou le condensateur peuvent être
prématurément endommagé. Dans tous les cas, il faut éviter de maintenir en permanence la température du
local de rejet à 35°C, cette température élevée devant se limiter, au plus, à la saison d’été (voir §1.1 “Rejet d’air
chaud”).
1.1
ENCOMBREMENT :
465mm
1005mm
435mm
360mm
395mm
480mm
4
2
AMENAGEMENT DES LOCAUX
Le climatiseur est composé de deux unités séparées et relié par une liaison frigorifique et électrique souple de 5
mètres. La distance entre les deux unités ne peut donc pas dépasser 5 mètres.
2.1
UNITE INTERIEURE
L’unité intérieure s’installe entièrement dans la cave à vin : posé sur le sol ou sur un support horizontal adapté
au poids de l’appareil (voir § 2 “Installation du climatiseur”).
2.2
UNITE EXTERIEURE
Elle doit être placée sur un mur de telle sorte que l’éjection de l’air à l’arrière de l’appareil ne soit pas perturbée
par un obstacle.
2.3
2.3.1
LA CAVE
L’ ISOLATION
Elle est déterminante pour un bon fonctionnement du WINEMASTER.
Une isolation adéquate contribuera à assurer une meilleure stabilité de la température et de l'hygrométrie.
Le tableau de la page ci-après (choix de l'isolation) permet de déterminer le type et l'épaisseur d'isolant
nécessaires, en fonction du volume extérieur de la cave et du modèle de WINEMASTER, pour une température
intérieure de 12°C.
Continuité de l'isolation :
L'assemblage des éléments d'isolants doit être réalisé, de préférence par emboîtement des feuillures des
panneaux ou par collage des panneaux entre eux, de façon à assurer une parfaite continuité de l'isolation.
Celle-ci est très importante : elle évite les entrées parasites de chaleur et d'humidité qui nuiraient à leur
régulation.
IMPORTANT
La validité de la garantie du WINEMASTER est liée au strict respect des valeurs du tableau de "Choix de
l'isolation" pour toutes les parois de la cave y compris sol et plafond + porte ainsi qu'à la parfaite continuité de
l'isolation et à une installation conforme à la notice.
5
2.3.2
CHOIX DE L’ ISOLATION
E P A IS S E U R M IN IM A L E D 'IS O L A N T E N m m P O U R 1 2 ° C IN T E R IE U R E T 3 5 ° C E X T E R IE U R
M OUSSE DE
P O L Y U R E T H A N E λ = 0 ,0 2 5
VOLUM E DE LA
PO LYSTYRENE EXPANSE
PO LYSTYRENE EXTRUDE
C A V E (m 3 )
λ = 0 ,0 4 4 W /m ° C
λ = 0 ,0 3 0 W /m ° C
W /m ° C
14
16
18
20
22
24
26
28
30
32
34
36
38
40
42
44
46
48
50
60
70
80
90
100
2.3.3
60
60
70
70
70
80
80
90
90
100
100
100
110
110
120
120
120
130
130
150
170
190
200
220
40
40
50
50
50
60
60
60
60
70
70
70
80
80
80
80
90
90
90
100
120
130
140
150
30
40
40
40
40
50
50
50
50
60
60
60
60
70
70
70
70
70
80
90
100
110
120
130
ISOLATION DES MURS ET DU PLAFOND
Choix des panneaux isolants Les fabricants proposent leurs panneaux isolants sous plusieurs
formes:
- les isolants seuls
- les "complexes" : l'isolant est revêtu d'un parement (plâtre, minéral...),
- les sandwiches :
Le revêtement des panneaux est important : il protège l'isolant des chocs et garantit donc sa tenue dans le
temps.
Ne pas utiliser d'isolants en fibres minérales (laine de verre, laine de roche, etc...), car ils peuvent se charger
d’humidité et perdre leur pouvoir isolant.
Protection contre les rongeurs
Certains matériaux isolants sont détériorés par les rongeurs (souris, rats, ...). Il est donc nécessaire de vérifier
que les parois de la cave ne présentent pas d'orifices permettant aux rongeurs d'atteindre l'isolant.
Ces isolants seront revêtus, sur la face interne à la cave, d'un parement de protection. Le polyuréthane est un
isolant qui, du fait de sa composition chimique, n'est pas attaqué par les rongeurs.
2.3.4
ISOLATION DU PLANCHER
Le sol de la cave doit pouvoir supporter les étagères et le vin entreposé.
Il est donc nécessaire, pour cette partie, de choisir un isolant présentant une résistance à la compression
suffisante.
Les fabricants indiquent dans leurs documentations les isolants aptes, ou destinés spécifiquement, à l'isolation
des sols.
La résistance à la perforation (pieds d'étagères en particulier) est obtenue :
- en utilisant des panneaux isolants "complexes" revêtus, sur leur face supérieure, d'un panneau suffisamment
résistant.
- en doublant l'isolant d'un panneau d'aggloméré de bois (épaisseur 15 mm environ), ou de tout autre
revêtement adapté (chape et dalle par exemple).
6
2.3.5
LA PORTE
Elle participe à la continuité de l'isolation.
Deux solutions sont possibles :
- Isoler la porte existante avec un isolant du même type que pour les parois de la cave.
Intercaler un joint d'étanchéité (en mousse par exemple) entre le battant et le dormant de la porte, sur toute sa
périphérie.
- Utiliser une PORTE ISOTHERME FONDIS, garnie de mousse polyuréthane. Elle comporte, sur toute sa
périphérie, un joint d'étanchéité qui intègre une fermeture magnétique.
2.3.6
ISOLATION DES AUTRES ELEMENTS
Ne pas mettre une armoire à vin ou un congélateur, qui produisent de la chaleur, dans la cave.
Il faut isoler toute source de production de chaleur dans la cave, telle que les tuyaux de chauffage central.
3
INSTALLATION DE L’UNITE EXTERIEURE DU CLIMATISEUR
Avant toute intervention à l’intérieure de l’unité, le câble d’alimentation doit être débranché.
Assurez-vous de choisir le bon emplacement :
3.1
choisir l’endroit idéal pour que la longueur du flexible soit la plus courte possible,
PERCEMENT DU MUR
Le diamètre de perçage pour le passage des raccords et du flexible est de 70mm
3.2
3.2.1
DEMONTAGE DU FLEXIBLE
LE CAPOT
2
1
•
•
Dévisser les deux vis plastique noir 1.
Soulever le capot 2 en le faisant pivoter comme sur le dessin.
7
3.2.2
LES BRIDES DE MAINTIEN
2
1
3
3.2.3
Dévisser les 5 vis 1 à l’aide d’un tournevis cruciforme PZ2 pour dégager les brides de maintien 2 et 3.
LES RACCORDS FRIGORIFIQUES
1
2
3
- Deux clefs 1 et 2 sont livrées avec l’appareil.
- Il faut maintenir le raccord avec la clef 1 et dévisser celui-ci à l’aide de la clef 2.
Attention, ne par interrompre le dévissage pendant la manipulation :du gaz peut s’échapper !
8
3.2.4
LE CONNECTEUR ELECTRIQUE
Le ventilateur de l’unité extérieur est alimenté par le câble électrique.
Débrancher le connecteur 3.
1.2
FIXATION DE L’UNITE EXTERIEURE
3.2.5
FIXATION DU SUPPORT MURAL
Ø10mm
150mm
300mm
443mm
3.2.6
ACCROCHAGE DE L’UNITE EXTERIEURE
Avant d’accrocher l’appareil, positionner deux entretoises nylon 1 dans les trous des équerres
1
9
1
2
•
Placer l’unité de condensation de façon à ce que les vis et rondelles 1 se logent dans l’ouverture 2
1
•
Pour terminer, visser les ensembles vis rondelles sous l’appareil.
10
4
INSTALLATION DE L’ UNITE INTERIEURE
-
4.1
poser l’appareil au sol ou sur son support horizontal,
il ne doit y avoir aucun obstacle en face de la ventilation pour faciliter la circulation du flux d’air
froid,
le support ou le sol doit être de niveau et ne pas transmettre de vibrations.
RECONNECTION DU FLEXIBLE
Vous pouvez maintenant passer le flexible a travers le mur et reconnecter les raccords et le connecteur
électrique en reprenant les opérations inverse des § 3.2.1. à 3.2.4.
L’ordre de branchement des raccords n’a pas d’importance.
Attention : les raccords doivent rester propres. Il est fortement conseillé de les recouvrir lors du
passage dans la cloison.
4.2
MISE EN PLACE DE L’ECOULEMENT D’EAU
1
2
3
•
•
•
•
Visser le coude en plastique 1
En cas de nécessité étanchéifier le filetage avec du téflon
Emmancher le tuyau cristal 2
Fixer le tuyau avec le collier de serrage 3
Accorder l’extrémité libre du tuyau sur un écoulement d’eau usée ou vers un bac de rétention (mini 25
litres). Eviter les « contre-pentes » ou les « siphons »
11
5
MISE EN SERVICE DU CLIMATISEUR WINESP100
L’appareil doit être installé en respectant les règles nationales d’installation électrique.
Si le câble d’alimentation est endommagé, il ne doit être remplacé que par le fabricant,
son SAV ou une personne de qualification similaire.
5.1
BRANCHEMENT DU CLIMATISEUR
Branchez la prise mâle sur un socle de prise de courant 230V / 16 A.
Mettez le climatiseur en route en appuyant sur le bouton VERT à l’arrière du climatiseur.
Le ventilateur coté cave fonctionne immédiatement.
Le compresseur ne peut se mettre en route qu’après 2 minutes, si la température de la cave est supérieure à la
température de consigne. Si la température de la cave est inférieure ou égale au réglage du thermostat, le
compresseur ne se met pas en route.
5.2
TABLEAU DE CONTROLE
Le réglage de la température de consigne se fait sur le thermostat.
Procédez de la manière suivante:
Appuyez sur le bouton 1 une seconde jusqu’à ce que le message o1
apparaisse. En appuyant sur le bouton 3, la température de consigne
clignote. Utilisez le bouton 1 pour augmenter, et le bouton 2 pour diminuer la
température de consigne. Lorsque le réglage vous convient, appuyez sur le
bouton 3 pour valider.
5.3
DEGIVRAGE AUTOMATIQUE
Le thermostat du modèle WINEMASTER SP100 est programmé pour effectuer, à intervalle régulier, un
dégivrage automatique. Cela se traduit par l’arrêt du compresseur, le ventilateur côté cave continuant à
fonctionner.
Les condensats éventuels, résultant du dégivrage, seront évacués par le tuyau prévu à cet effet.
6
ENTRETIEN DU CLIMATISEUR
LE FILTRE A POUSSIERE
Il est indispensable de remplacer le filtre à poussière qui se trouve dans la partie extérieure dès que nécessaire
et au moins une fois par an. Si ce dernier est encrassé, le climatiseur risque d’être sérieusement endommagé.
12
6.1
CHANGEMENT DU FILTRE
2
1
•
•
•
3
Dévisser les deux vis 1.
Enlever le cache en tôle 2.
Tirer le filtre à l’aide de la languette 3.
Remplacez-le par un filtre FONDIS exclusivement !
Vous pouvez remonter le cache en tôle.
13
7
7.1
LA GARANTIE
LA GARANTIE LEGALE
La garantie contractuelle n'est pas exclusive, du bénéfice au profit de l'acheteur, de la garantie légale pour
défauts et vices cachés qui s'applique dans les conditions des articles 1641 et suivants du code civil.
7.2
GARANTIE CONTRACTUELLE DE 2 ANS
Le climatiseur est garanti 2 ans contre tout défaut de fabrication.
Durant la période de garantie contractuelle, FONDIS remplacera toute pièce reconnue défectueuse.
En cas de panne électrique, FONDIS remplacera toute pièce reconnue défectueuse suite à l’intervention du
revendeur qualifié ou de son intervenant.
En cas de panne frigorifique, FONDIS pourra demander le retour en atelier pour réparation, suite au diagnostic
effectué par le revendeur qualifié ou son intervenant. Le matériel sera tenu emballé à disposition du transporteur
de FONDIS pour enlèvement.
Les interventions et retours devront être réalisés après accord écrit du service après-vente FONDIS.
7.3
CONDITIONS D’ APPLICATION DE LA GARANTIE
La garantie contractuelle s'applique à tous les appareils installés et utilisés conformément au "Guide
d'installation et d'utilisation". Son application est conditionnée par la présentation de la facture d’achat ou à
défaut de sa copie.
7.4
EXCLUSIONS ET LIMITES DE LA GARANTIE
La garantie est refusée dans les cas suivants :
- L'isolation de la cave et l’installation n'ont pas été effectuées conformément au présent guide.
- Les avaries sont dues à une négligence, un mauvais entretien, une utilisation défectueuse ou mal adaptée du
WINEMASTER.
- Les échanges de pièces ou leur remise en état au titre de la garantie ne peuvent avoir pour effet de prolonger
celle-ci.
La Communauté Européenne accordant une grande importance à l’environnement et
au traitement des déchets, a mis en place la Directive 2002/96/CE relative aux
Déchets d’Equipements Electriques et Electroniques (DEEE).
Conformément à cette norme, la présence du logo ″ poubelle barrée ″ est obligatoire.
Ce logo signifie que ce produit ne peut être en aucun cas jeté dans les ordures
ménagères.
Il doit être remis à un point de collecte approprié pour le traitement, la valorisation, le
recyclage des déchets d’Equipements Electriques et Electroniques.
Par cette action vous faites un geste pour l’environnement et vous contribuez à la
préservation des ressources naturelles ainsi qu’à la protection de la santé humaine.
14
19/11/2008
WINEMASTER
SP 100
Mode d’emploi
Gebrauchsanweisung
Instruction for use
Numéro de série
Seriennummer
Serial number
CONTENTS
1
CHARACTERISTICS ...........................................................................................................4
DIMENSIONS : .........................................................................................................................4
2 LAYOUT OF PREMISES .....................................................................................................6
2.1
INDOOR UNIT ..........................................................................................................................6
2.2
OUTSIDE UNIT ........................................................................................................................6
2.3
THE CELLAR ...........................................................................................................................6
2.3.1
INSULATION .............................................................................................................................6
2.3.2
CHOICE OF INSULATION ..........................................................................................................7
2.3.3
WALL AND CEILING INSULATION ..............................................................................................7
2.3.4
FLOOR INSULATION .................................................................................................................7
2.3.5
THE DOOR ...............................................................................................................................8
2.3.6
INSULATION OF OTHER ITEMS..................................................................................................8
3 INSTALLING THE OUTSIDE UNIT ..................................................................................8
Make sure you have chosen the best place for fitting the outside unit : ........................................8
3.1
DRILLING THE WALL ............................................................................................................8
3.2
FLEXIBLE DISMOUNTING ...................................................................................................8
3.2.1
THE COVER ..............................................................................................................................8
3.2.2
THE FIXING BRACKETS.............................................................................................................9
3.2.3
THE REFRIGERANT CONNECTIONS ...........................................................................................9
3.2.4
ELECTRICAL CONNECTOR ......................................................................................................10
3.3
INSTALLATION OF THE OUTSIDE UNIT ..........................................................................10
3.3.1
INSTALLATION OF THE WALL MOUNTING BRACKETS ..............................................................10
3.3.2
ATTACHING THE OUTSIDE UNIT .............................................................................................10
4 INSTALLATION OF THE INSIDE UNIT .........................................................................12
4.1
RE-CONNECTION OF THE FLEXIBLE ...............................................................................12
4.2
INSTALLING THE CONDENSING WATER FLUE.............................................................12
5 USING THE WINEMASTER SP100 .................................................................................13
5.1
CONNECTING THE AIR-CONDITIONER ...........................................................................13
5.2
CONTROL PANEL .................................................................................................................13
AUTOMATIC DEFROST ...................................................................................................................13
6 SERVICING THE WINEMASTER AIR-CONDITIONER ...............................................13
6.1
CHANGING THE FILTER .....................................................................................................14
7 WARRANTY ......................................................................................................................15
7.1
YEARS CONTRACTUAL WARRANTY ..............................................................................15
7.2
TERMS OF APPLICATION OF THE GUARANTEE............................................................15
7.3
EXCLUSIONS AND LIMITS OF GUARANTEE ..................................................................15
1.1
2
FROM VINEYARD TO WINE
In former times, good french cellars were built to maintain a temperature not exceeding
14 to 16°C in all seasons.
Today, this is rarely the case.
Nevertheless, a cellar worthy of the name must be protected against wide variations in
temperature, be as damp as necessary and ventilated, dark and free of vibration.
This is why, for more than fifteen years, we have used the expertise of specialists and
enthusiastic amateurs to design, develop, test and produce thousands of air-conditioners
destined to help in the storage and ageing of wine.
If you follow our advice and respect our recommendations Winemaster will provide the
optimal ageing conditions for your treasured wine collection.
You have to read the installation and operating guide for your FONDIS WINEMASTER cellar
air-conditioner.
Contact us if you have any questions :
So....even if there ay be long years to wait before the wine reaches perfection, the great day
will come when you face the delicate job of uncorking.
Hold the bottle carefully – do not remove the capsule on a level with the mouth – use a good
quality tool or lever – remove the cork without shaking the bottle and examine the “ mirror “..
But that’s another story......
SERVICE CLIENTS FONDIS
Phone 33 3 89 37 75 15/Fax 33 3 89 37 75 89
E-MAIL : [email protected]
ATTENTION : Wait for 24 hours before switching on the air-conditioner.
3
1
CHARACTERISTICS
Weight
Dimensions
Setting the temperature
Electrical power
Gas
45 kg (interior) – 15 kg (outside)
1005 mm x 395 mm
Preset to 12°C, adjustable between 12 and 25°C*
35°C**
2500W at 12°C**
1000W
230-240V 50Hz with earth connection ( supplied
with 3m cable )
1250W
R407C without CFC
Refrigerant gas
1000g
Length of refrigerant flexible
connection
4.50 m
Maximum outdoor temperature
Cooling power
Heating power
Electricity supply
The circuit breaker must be at least 16 Amps.
* The insulation quality and thickness has to be in accordance with the volume of the cellar and the set
temperature.
** The cooling performance is dependant from the outside temperature. Therefore, the set temperature of 12°C for
the cellar cannot be maintained if the outside temperature of the cellar is maintained at 35°C.
If the thermal safety functions to often, there is a risk for the condensator and starter to be damaged. In
all the cases, it must be avoided that the outside temperature remains at 35°C, this high temperature
should be limited to the summer period.
1.1
DIMENSIONS :
4
465mm
1005mm
435mm
360mm
395mm
480mm
5
2
LAYOUT OF PREMISES
The air-conditioner is composed by two separate units which are connected by an electric and refrigerant flexible
cable of 5 mts. The distance between the two units cannot be more than 5 mts.
2.1
INDOOR UNIT
The indoor unit is entirely installad inside the cellar directly on the floor or fixed on the wall with adapted special
brackets.
2.2
OUTSIDE UNIT
The outside unit must be fixed on an outside wall in an area free from obstruction which may cause irregular air
distribution and/or return in front and back of the unit.
2.3
2.3.1
THE CELLAR
INSULATION
Insulation of the 4 walls, the door, the ceiling and the floor is essential for the Winemaster to work properly.
Adequate insulation helps to obtain the stability of the temperature and the humidity.
The board on the next page ( choice of insulation ) can be used to determine the type and the thickness of
insulation needed according to the internal volume of the cellar and a cellar temperature of 12°C.
Insulation continuity :
Insulation components must be assembled preferably by interlocking panels or glueing the panels together, to
ensure perfect continuity of insulation.
This is very important : it prevents heat and humidity entering from the outside which would counter the effects of
regulation.
IMPORTANT
The validity of the WINEMASTER guarantee depends on the values in the "Choice of insulation"
table being strictly respected, for all the cellar walls, including floor and ceiling + door, as well as
perfect continuity of insulation and installation in accordance to the user guide.
6
2.3.2
CHOICE OF INSULATION
C ELLAR
V O L U M E (m 3 )
14
16
18
20
22
24
26
28
30
32
34
36
38
40
42
44
46
48
50
60
70
80
90
100
2.3.3
M IN IM U M T H IC K N E S S O F IN S U L A T IO N (m m )fo r 1 2 ° C c e lla r te m p e r a tu r e
PO LYU R ETH AN E
EXPAN D ED PO LYSTYR EN E
EXTR U D ED PO LYSTYR EN E
λ = 0 ,0 4 4 W /m ° C
λ = 0 ,0 3 0 W /m ° C
F O A M λ = 0 ,0 2 5 W /m ° C
60
40
30
60
40
40
70
50
40
70
50
40
70
50
40
80
60
50
80
60
50
90
60
50
90
60
50
100
70
60
100
70
60
100
70
60
110
80
60
110
80
70
120
80
70
120
80
70
120
90
70
130
90
70
130
90
80
150
100
90
170
120
100
190
130
110
200
140
120
220
150
130
WALL AND CEILING INSULATION
The manufacturers propose their insulation panels in several forms :
- insulation alone
- "complexes" : the insulation is lined with a facing ( plaster, mineral ….)
- “ sandwiches “ : the insulation is lined on each side with a wooden or plaster panel
The panel facing is important : it protects the insulation from shocks and guarantees long life.
Do not use mineral fibre insulation ( glasswool, stonewool…) because it stores humidity and loose its insulation
capacity.
Protection against rodents
Some insulating materials are damaged by rodents ( mice, rats…). It is therefore essential to make sure that the
walls of the cellar do not contain holes whichf would allow rodents access to the insulation.
This insulation must be lined, on the inner surface of the cellar, with a protective facing.
Polyurethane insulation, because of its chemical composition, is not attacked by rodents.
2.3.4
FLOOR INSULATION
The cellar floor must be able to support shelves and the wine stored on them.
You should therefore choose an insulating material with adequate compression resistance for this part.
Manufacturers recommend appropriate insulation or materials designed specifically for floor insulation, in their
documentation.
Puncture resistance ( feet of shelves in particular ) is provided :
- in using "complex" insulation panels lined, on the upper surface, with a strong panel .
- by facing the insulation with a panel of chipboard ( approx. 15 mm thick), or any other suitable covering
plaster and slab, for example
7
2.3.5
THE DOOR
It is part of the continuity of insulation.
There are two possible solutions :
- to insulate the existing door using the same type as insulation as was used for the cellar walls. Insert a seal
such a foam, between the door panel and the frame all around the edge.
- Use a FONDIS isothermal door, lined with polyurethane foam. It includes a seal around its periphery, with
a magnetic closure..
2.3.6
INSULATION OF OTHER ITEMS
A fridge or another appliance producing heat must not be placed inside the cellar. For example, any hot water pipe
going through the cellar must also be insulated.
3
INSTALLING THE OUTSIDE UNIT
Before any intervention with interior of the unit, the electric cable must be disconnected.
Make sure you have chosen the best place for fitting the outside unit :
-
Chose the best place in order that the length of the flexible connection will be shorter as possible.
There should not be any obstacle in front of the ventilation grid and the back of the unit, to
facilitate air flow
The wall structure should be strong enough to carry the unit weight and avoid deformations
rupture, or vibration during operation
3.1 DRILLING THE WALL
Drill one hole of diametre 70mm to allow the connection of the flexible refrigerant tube to the unit.
3.2
3.2.1
FLEXIBLE DISMOUNTING
THE COVER
2
1
8
•
•
3.2.2
Unscrew the two black platic screws 1.
Open the cover like shown on the picture 2.
THE FIXING BRACKETS
2
1
3
3.2.3
Unscrew the 5 screws 1 with a screwdriver PZ2 for unmounting the brackets 2 et 3.
THE REFRIGERANT CONNECTIONS
1
2
3
9
- Two wrenches 1 & 2 are supplied with the unit.
- Maintain the connection with the wrenche 1and unscre with the wrenche 2.
Attention : don’t stop unscrewing while gas leaks until the 2 elements are separated.The gas leak will stop
then ! Before and during remounting operations, protect the end of the flexible connection in order to avoid
dust goes out.
3.2.4
ELECTRICAL CONNECTOR
The ventilator of the outside unit is connected by an electric cable.
Disconnect the connector 3.
3.3
INSTALLATION OF THE OUTSIDE UNIT
3.3.1
INSTALLATION OF THE WALL MOUNTING BRACKETS
Ø10mm
150mm
300mm
443mm
3.3.2
ATTACHING THE OUTSIDE UNIT
Before attaching the outside unit, position two nylon washers 1 in the brackets holes.
1
10
1
2
•
Position the outside unit so that the screws and washers 1 are engaged in the slot 2
1
•
To finish, screw the kit screws and washer 1 under the unit.
11
4
INSTALLATION OF THE INSIDE UNIT
-
4.1
Put the unit on the floor or on his horizontal support,
It shouldn’t be any obstacle in front of the ventilation grid to facilitate the air flow
The support or floor must be level and not transmit vibrations.
RE-CONNECTION OF THE FLEXIBLE
Pass the connecting flexible through the hole in the wall and re-connect the refrigerant fittings with the wrenches
and the electrical connecting wires to the outside unit. The reconnection can be done to any pipe.
Attention : open the ends of the flexible connection when you pass them through the wall in order to keep
the end clean for screwing again.
4.2
INSTALLING THE CONDENSING WATER FLUE
1
2
3
•
•
•
•
Screw the plastic bend 1 supplied with the unit
If necessary seal the threads with Teflon
Slide the PVC tubing 2
Screw up the ring clamp 3
Connect the free end of the PVC tubing to a wastewater point or a retention tank ( mini content 25 litres).
Avoid “counter slopes “ or « siphons »
12
5
USING THE WINEMASTER SP100
The Winemaster SP100 must be installed by complying with the national rules of electric
installation
5.1
CONNECTING THE AIR-CONDITIONER
Connect the male plug to a 230/16A power socket. Switch on the air-conditioner by pressing the green button on
the back of the inside unit..
The fan on the cellar side comes on immediately.
The compressor may not come on until 2 minutes later if the temperature in the cellar is higher than the set
temperature. If the cellar temperature matches the thermostat setting, the compressor will not come on.
5.2
CONTROL PANEL
The setting of the targeted temperature of the cellar is made on the thermostat .
Use the following process :
Press the button 1 one seconde until the message o1 appears. Press then the
button 3, the set temperature of the cellar will appear. Use again the button 1 to
increase the temperature or the button 2 to lower the temperature. When the
right temperature is set, press the button 3 to confirm it.
AUTOMATIC DEFROST
The program of the thermostat from model WINEMASTER SP100 will run an automatic defrost time several times a
day. During this position, the compressor stops and only the fan in the cellar is functionning.
The condensate water produced during this period will b evacuated through the tube.
6
SERVICING THE WINEMASTER AIR-CONDITIONER
THE DUST FILTER
It is essential to replace the dust filter in the air-conditioner as soon as necessary and at least once a year. If it is
clogged, the air-conditioner could be seriously damaged.
13
6.1
CHANGING THE FILTER
2
1
•
•
•
3
Unscrew the two plastic screws 1
Remove the cover 2.
Pull the tab 3 to release the filter
Replace it with a FONDIS filter only !
You can then replace the cover.
14
7
7.1
WARRANTY
YEARS CONTRACTUAL WARRANTY
The air-conditioner is guaranteed for two years against manufacturing defects.
During the contractual guarantee period, FONDIS will replace any part recognized as defective, following the
intervention of a qualified representative.
In the event of an electrical breakdown, FONDIS will replace any part recognized as defective following the
intervention of a qualified stockist or his representative.
In the event of cooling system breackdown, FONDIS can ask for the part to be returned for repair following the
intervention of a qualified representative. The equipment will be packed and held available for the FONDIS carrier
to collect it.
Operations and returns must be made with the written agreement of FONDIS after sales service.
7.2
TERMS OF APPLICATION OF THE GUARANTEE
The contractual guarantee applies to all devices installed and used in accordance with the « installation and
operating guide ". His application is conditionned by the presentation of the invoice of purshace or for lack of its
copy.
7.3
EXCLUSIONS AND LIMITS OF GUARANTEE
The guarantee is refused in the following cases :
- The cellar and installation have not been insulated in accordance with this guide.
- The damage is due to negligence, poor maintance, defective or inappropriate use of the Winemaster
- Part exchanges or remplacements under guarantee will not have the effect of extending it.
The European Community attaching a great importance to the environment and the
waste processing, set up Directive 2002/96/CE relating to the Electric and Electronic
Component Waste.
In accordance with this standard, the presence of the logo "barred dustbin" is
obligatory.
This logo means that this product cannot be to in no case thrown in the household
refuse.
It must be given to a suitable collection point for the treatment, valorization, recycling of
Electric and Electronic Components.
Acting like that you make a gesture for the environment and you contribute to the
safeguarding of the natural resources as well as to the protection of human health.
15
19/11/2008
WINEMASTER
SP 100
Mode d’emploi
Gebrauchsanweisung
Instruction for use
INHALTSVERZEICHNIS
1 TECHNISCHE DATEN
1.1 MASSE
2 EINRICHTUNG DES WEINKELLERS
2.1 Innen-Gerät
2.2 Aussen-Gerät
2.3 Ausstattung des Weinkellers
2.3.1 Wärmedämmung
2.3.2 Wahl der Wärmedämmung
2.3.3 Wärmedämmung des Bodens
2.3.4 Die Tür
3 ANBAU DES AUSSENTEILS
3.1 Wanddurchbruch
3.2 ABBAUEN DES SCHLAUCHES
3.2.1 ABDECKUNG
3.2.2 HALTEFLANSCHE
3.2.3 KÜHLANSCHLÜSSE
3.2.4 ELEKTRISCHER STECKVERBINDER
3.2.5 BEFESTIGUNG DER WANDHALTERUNG
3.2.6 EINHÄNGEN DES AUSSENTEILS
4 EINBAU DES INNENTEILS
4.1 WIEDERANSCHLIESSEN DES SCHLAUCHES
4.2 ANBRINGEN DER KONDENSWASSERABLEITUNG
5 INBETRIEBNAHME DES WINEMASTER SP 100
5.1 ANSCHLIESSEN DES KLIMAGERÄTES
5.2 BEDIENUNGSFELD
5.3 AUTOMATISCHES ENTEISEN
6 WARTUNG DES KLIMAGERÄTES
6.1 AUSWECHSELN DES FILTERS
7 GARANTIE
7.1 ZWEIJÄHRIGE VERTRAGSGARANTIE
7.2 VORAUSSETZUNGEN FÜR DIE GÜLTIGKEIT DER
GARANTIE
7.3 AUSSCHLÜSSE UND BEGRENZUG DER GARANTIE
GARANTIESCHEIN
Seite 4
Seite 4
Seite 5
Seite 5
Seite 5
Seite 5
Seite 5
Seite 5
Seite 6
Seite 6
Seite 7
Seite 7
Seite 7
Seite 7
Seite 7
Seite 8
Seite 9
Seite 10
Seite 11
Seite 11
Seite 11
Seite 11
Seite 12
Seite 12
Seite 12
Seite 12
Seite 12
Seite 13
Seite 14
Seite 14
Seite 14
Seite 14
Seite 15
2
VOM REBSTOCK ZUM WEIN
Früher baute man Häuser, in denen auch ein Keller vorgesehen war, in dem die
Temperatur das ganze Jahr über relativ konstant blieb – im Durchschnitt zwischen 14 und
16°C.
Heute stellt dieser Fall eher eine Ausnahme dar.
Wenn man sich jedoch einen richtigen Weinkeller einrichten will, so darf dieser keine
starken Temperaturschwankungen, jedoch eine leichte Luftfeuchtigkeit aufweisen, soll
gut durchlüftet, möglichst dunkel und keinerlei Vibrationen ausgesetzt sein.
Daher wurden bei der Fa. FONDIS seit über 15 Jahren in Zusammenarbeit mit Fachleuten
auf dem Gebiet und anspruchsvollen Weinliebhabern tausende von Klimageräten geplant,
entwickelt, erprobt und gebaut, die ein einwandfreies Lagern und Reifen der Weine
gewährleisten.
Wenn Sie unsere Ratschläge befolgen und unsere Vorschriften beachten, können Sie Ihre
edlen Tropfen in aller Ruhe lagern und reifen lassen.
Lesen Sie die Einbau- und Betriebsanleitung Ihres Klimagerätes für Weinkeller
WINEMASTER der Fa. FONDIS sorgfältig durch.
Wenden Sie sich an uns, wenn Sie Fragen haben!
Auch wenn es mehrere Jahre erfordert, um manchen Wein zur vollen Reife zu bringen,
können Sie mit dem WINEMASTER in aller Ruhe auf den großen Tag warten, an dem Sie
eine besonders gute Flasche aus Ihrem Weinkeller holen können.
Nehmen Sie die Flasche behutsam vom Regal, ohne sie zu schütteln, entfernen Sie die
Kapsel am Flaschenrand, greifen Sie zum Korkenzieher und ziehen Sie den Korken
langsam und ohne Rucken heraus, prüfen Sie den „Spiegel“ daran und …
Aber das ist eine andere Geschichte …
FONDIS KUNDENDIENST
Tel. (0)389 377 500 - Fax (0)389 377 589
E-Mail : [email protected]
Wichtig : Vor der Inbetriebnahme des Klimagerätes 24 Stunden warten.
3
1
TECHNISCHE DATEN
Abmessungen
1005 mm x 395 mm
Weight
45 kg (int) – 15 kg(ext)
Temperatureinstellung
Werkseitig auf 12° eingestellt, regelbar zwischen
4°C&25°C
Maxi Aussentemperatur
Kühlleistung
Kälteleistung
Stromversorgung
Leistungsaufnahme
Gas
Gasfühlung
Schlauchlänge
35°C **
12°C**
2500W
230-240 V - 50 Hz - mit Erdung (mit 3m Kabel geliefert)
1250W
R407C ohne CFC
1000g
4.5 m
Der Schaltautomat muss mindestens für 16 Ampere ausgelegt sein.
* Die Isolation soll im Verhältniss mit Raumvolumen und der gewählten Innentemperatur sein.
** Die Leistung ist von der Aussentemperatur abhängig. Das Gerät kann deswegen nicht unbedingt die Innentemperatur von
12°C einhalten wenn die Aussentemperatur 35°C erreicht.
Wenn die thermische Sicherung zu oft ausfällt können die Kondensatoren und der Starter beschädigt werden. In jedem Fall,
muss man vermeiden, dass die Tempartur im Aussenraum ständig bei 35°C bleibt. Diese hohen Temparaturen sollten sich in
den Sommerzeiten begrenzen.
1.1 MASSE :
465mm
1005mm
435mm
360mm
395mm
480mm
4
2
EINRICHTUNG DES WEINKELLERS
Die Klimaanlage besteht aus 2 separaten Geräten welche mit einem 5 m Kühlungsschlauch verbunden sind. Die
2 Geräte dürfen nicht mehr als 5 m von einander entfernt stehen.
2.1
INNEN-GERÄT
Das Innengerät wird im Inneren des Weinkellers eingerichtet : Auf dem Boden oder auf einem waagerechten
Ständer.
2.2
AUSSEN-GERÄT
Wird auf einer Aussenmauer eingerichtet frei von alle An - oder Zuluftstörungen .
.2.3 AUSSTATTUNG DES WEINKELLERS
2.3.1 WÄRMEDÄMMUNG
Sie muss eingebaut sein auf allen Seiten, Wände, Decke und Boden für den einwandfreien Betrieb des
Winemasters. Bei richtiger Wärmedämmung ergibt sich eine bessere Stabilität der Temperatur und der
Luftfeuchtigkeit.
Anhand der nachfolgenden Tabelle, “Wahl der Wärmedämmung“ können Art und Stärke der Dämmschicht
nach Aussenabmessungen des Raumes für eine Kellertemperatur von 12°C bestimmt werden..
Durchgehende Wärmedämmung:
Die einzelnen Elemente der Wärmedämmung müssen durch Ineinanderschieben von Nut und Feder bzw.
Verkleben der Dämmplatten zusammengefügt werden, so dass eine durchgehende Wärmedämmung
gewährleistet ist.
Dieser Punkt ist sehr wichtig, da das Eindringen von Wärme oder Feuchtigkeit den einwandfreien Betrieb
des Klimagerätes beeinträchtigen kann.
2.3.2.WAHL DES WINEMASTERS UND DER WÄRMEDÄMMUNG
WICHTIG
Die Garantie für den WINEMASTER hat nur dann Gültigkeit, wenn die in der Tabelle „Wahl der
Wärmedämmung“ angegebenen Werte an allen Wandflächen des Raumes – einschließlich Decke, Boden
und Tür - eingehalten werden und eine durchgehende Wärmedämmung gewährleistet ist.
WAHL DER WÄRMEDÄMMUNG
5
VOLUM EN DES
R A U M S (m 3 )
14
16
18
20
22
24
26
28
30
32
34
36
38
40
42
44
46
48
50
60
70
80
90
100
M IN D E S T S T Ä R K E D E R D Ä M M S C H IC H T in m m fo r 1 2 ° C K e lle r te m p e r a tu r
G ESCHÄUM TES STYO PO R
E X T R U D IE R T E S S T Y R O P O R
λ = 0 ,0 4 4 W /m ° C
λ = 0 ,0 3 0 W /m ° C
P U -S C H A U M λ = 0 ,0 2 5 W /m ° C
60
60
70
70
70
80
80
90
90
100
100
100
110
110
120
120
120
130
130
150
170
190
200
220
40
40
50
50
50
60
60
60
60
70
70
70
80
80
80
80
90
90
90
100
120
130
140
150
30
40
40
40
40
50
50
50
50
60
60
60
60
70
70
70
70
70
80
90
100
110
120
130
.
2.3.3 WÄRMEDÄMMUNG DES BODENS
Der Boden des Weinkellers muss die Weinregale usw.tragen können.
Daher ist für diesen Teil des Weinkellers ein Dämmmaterial zu wählen, das ausreichend fest gegen die auftretende
Druckbelastung ist.
Die Hersteller von Dämmstoffen geben in Ihrer Dokumention an, welche Produkte speziell für solche
Beanspruchungen geeignet sind.
Der Schutz der Bodenverkleidung vor dem Durchstossen ( insbesondere durch die Füsse der Regale ) kann
folgendermassen werden :
- Durch komplexe Dämmplatten die auf der Oberseite mit einer ausreiched festen Platte verkleidet sind.
- Durch Abdecken der Dämmschicht mit einer Spanplatte ( mit ca.15 mm Stärke ).
2.3.4 DIE TÜR
Sie muss fester Bestandteil der durchgehenden Wärmedämmung sein.
Dabei sind zwei Lösungen möglich :
- Wärmedämmung der vorhanden Tür mit einem Dämmstoff derselben Art wie bei den Wänden und der
Decke
- Dabei auch eine umlaufende Dichtung ( z.B.aus Schaumstoff ) zwischen Türblatt und Türrahmen einsetzen
- Einbau einer wärmedämmenden Tür von FONDIS die mit einer Schicht PU-Schaum versehen ist und eine
umlaufende Dichtung sowie einen magnetischen Türverschluss besitzt.
6
3. ANBAU DES AUSSENTEILS
Vor jedem Eingriff in das Innere des Geräts, das Netzkabel muss getrennt werden.
Auf günstigen Einbauort achten:
- Technisch am idealsten ist der Einbau, bei dem die Schlauchlänge am kürzesten ist.
3.1 WANDDURCHBRUCH
Der Durchmesser der Öffnung zum Durchführen der Anschlüsse und des Schlauchs beträgt 70 mm.
3.2 ABBAUEN DES SCHLAUCHES
3.2.1 ABDECKUNG
• Die 2 schwarzen Plastikschrauben 1 abschrauben.
• Die Abdeckung 2, wie auf der Zeichnung dargestellt, abnehmen.
2
1
3.2.2 HALTEFLANSCHE
- Die 5 Schrauben 1 mit einem Kreuzschraubendreher PZ2 lösen um die beiden
Halteflansche 2 und 3 abzunehmen.
7
2
1
3
3.2.3 KÜHLANSCHLÜSSE
- Die zwei Maulschlüssel 1 und 2 sind mitgeliefert.
- Den Anschluss mit dem Schlüssel 1 festhalten und mit dem Schlüssel 2 abschrauben.
1
2
3
Achtung: Die Arbeit während des Abschraubens nicht unterbrechen, da Gas entweichen kann!
8
3.2.4 ELEKTRISCHER STECKVERBINDER
Der Ventilator des Außenteils wird mit Strom versorgt.
Den Steckverbinder abklemmen.
3.2.5 BEFESTIGUNG DER WANDHALTERUNG
Ø10mm
150mm
300mm
443mm
3.2.6 EINHÄNGEN DES AUSSENTEILS
Vor dem Einhängen des Gerätes, die beiden Abstandhalter aus Nylon 1 in die Bohrungen in den
Winkeleisen einsetzen.
1
9
1
2
•
Das Kondensationsgerät so anbringen, dass die Schrauben und U’Scheiben 1 in der Aussparung 2
einhaken 2
1
•
Abschließend die Schrauben mit den U’Scheiben auf der Unterseite des Gerätes anschrauben.
10
4. EINBAU DES INNENTEILS
-
Das Gerät auf dem Boden oder einer waagrechten Fläche abstellen.
Es darf sich kein Hindernis vor der Luftaustrittsöffnung befinden, um das ungehinderte
Ausströmen der Kaltluft zu gewährleisten.
Die Auflage bzw. der Boden muss waagrecht sein und darf keine Schwingungen
übertragen.
4.1 WIEDERANSCHLIESSEN DES SCHLAUCHES
Anschließend kann der Schlauch durch den Wanddurchbruch gezogen und die Anschlüsse sowie der
Steckverbinder angeschlossen werden. Dazu die Arbeitsschritte nach 3.2.1 bis 3.2.4 in umgekehrter
Reihenfolge durchführen.
Die Anschlüsse können in beliebiger Reihenfolge vorgenommen werden.
Achtung: Die Medienanschlüsse müssen stets sauber bleiben. Es empfiehl sich, sie vor dem
Durchführen durch die Wand abzudecken.
4.2 ANBRINGEN DER KONDENSWASSERABLEITUNG
1
2
3
•
•
•
•
Den Krümmer aus Kunststoff 1 einschrauben
Wenn notwendig, das Gewinde mit
Teflon verdichten
Das Kristallrohr 2 aufsetzen
Den Schlauch mit den Schlauchklemmen 3 befestigen.
Das freie Ende des Schlauches in eine Ableitung oder einen Auffangbehälter (min. 25 Liter) legen.
Dabei auf möglichst gerades Verlegen (keine Siphon- und Schleifenbildung) achten.
11
5. INBETRIEBNAHME DES WINEMASTER SP100
Das Gerät sollte eingerichtet werden, die den nationalen Vorschriften des elektrischen
Anlage.
Wenn das Netzkabel beschädigt ist, darf er ersetzt werden, die vom Hersteller, seinem
Kundendienst oder eine Person, die Qualifikation ähnlich.
5.1 ANSCHLIESSEN DES KLIMAGERÄTES
Den Gerätestecker an einer Wandsteckdose (230 V – 16 A) anschließen.
Das Klimagerät durch Drücken der GRÜNEN Taste auf der Rückseite des Geräts in Betrieb setzen.
Der Ventilator auf der Innenseite beginnt sich sofort zu drehen.
Wenn die Temperatur im Weinkeller höher als die Vorgabetemperatur ist, wird der Kompressor nach einer
Verzögerung von 2 Minuten eingeschaltet. Ist die Innentemperatur kleiner oder gleich der
Vorgabetemperatur, so bleibt er abgeschaltet.
5.2 BEDIENNUNGSFELD
Das Einstellen der Vorgabetemperatur erfolgt am Thermostat
.
Dazu wie folgt vorgehen:
Taste 1 eine Sekunde lang gedrückt halten, bis „01“ angezeigt wird.
Danach die Taste 3 drücken, worauf die Temperaturanzeige blinkt. Nun
kann die Vorgabetemperatur mit den Tasten 1 (höher) und 2 (niedriger)
eingestellt werden. Zum Bestätigen des eingestellten Wertes erneut die
Taste 3 drücken.
5.3 AUTOMATISCHES ENTEISEN
Der Thermostat des Modells WINEMASTER SP100 ist so programmiert, dass in regelmäßigen
Intervallen ein automatisches Enteisen durchgeführt wird. Dazu wird der Kompressor abgeschaltet,
während der Ventilator auf der Innenseite weiter läuft.
Wenn beim Enteisen Kondenswasser anfällt, wird dieses über den angebauten Schlauch abgeleitet.
6. WARTUNG DES KLIMAGERÄTES
STAUBFILTER
Der Staubfilter im Außenteil muss ausgewechselt werden, sobald dies notwendig ist, mindestens jedoch
einmal pro Jahr. Bei zu starker Verschmutzung des Filters kann das Gerät ernsthaft beschädigt werden.
12
6.1 AUSWECHSELN DES FILTERS
2
1
•
•
•
3
Die beiden Schrauben 1 abschrauben.
Die Blechabdeckung 2 entfernen.
Den Filter an der Lasche 3 herausziehen.
Zum Auswechseln ausschließlich Original FONDIS-Filter verwenden!
Anschließend die Abdeckung wieder anschrauben.
13
7 GARANTIE
7.1 ZWEIJÄHRIGE VERTRAGSGARANTIE
Auf das Klimagerät wird eine zweijährige Garantie für Fertigungsfehler erteilt.
In der Garantiezeit werden alle als fehlerhaft anerkannten Teile von der Fa.Fondis ersetzt.
Bei Mängeln an elektrischen Komponenten werden alle als fehlerhaft anerkannten Teile nach den entsprechenden
Reparaturarbeiten des qualifizierten Händlers oder dessen Beauftragten von der Fa.FONDIS ersetzt.
Bei Mängeln am Kühlaggregat kann die Firma FONDIS die Rücksendung des Gerätes zu Reparaturzwechen nach
der Diagnose des qualifizierten Händlers oder dessen Beauftragten verlangen. Dazu ist das Gerät dem
Transportunternehmen der Fa.Fondis ordnungsgemäss verpackt zum Abholen bereit zu stellen.
Vor Reparaturarbeiten bzw. Rücksendungen ist die schriftliche Zustimmung des FONDIS –Kundendienstes
einzuholen.
7.2 VORAUSSETZUNGEN FÜR DIE GÜLTIGKEIT DER GARANTIE
Die Vertragsgarantie gilt für alle Klimageräte, die sachgerecht, d.h. nach den Vorgaben in der „Einbau-und
Betriebsanleitung“ installiert und betrieben werden. Damit die Garantie in Kraft tritt, muss der Garantieschein am
Ende der Anleitungsbroschüre innerhalb von 3 Wochen nach dem Kaufdatum an Fondis zurückgeschickt werden.
7.3.AUSSCHLÜSSE UND BEGRENZUG DER GARANTIE
In folgenden Fälle ist die Garantie ausgeschlossen :
Unsachgemässe bzw.fehlende Wärmedämmung des Weinkellers nach den Vorgaben in dieser Anleitung
Mängel, die durch Nachlässigkeit, unzureichende Wartung, unsachgemässen Betrieb oder Benutzung
des Winemasters zu anderen Zwecken als den vorgesehenen verursacht wurden.
Bei Austausch oder Reparatur von Geräteteilen im Rahmen der Garantie wird die Garantiezeit insgesamt
nicht verlängert.
Die Fa.Fondis kann nicht durch Betriebsausfälle des Klimagerätes verursachte direkte und indirekte Schänden
haftbar gemacht werden. Die Garantie ist aussschliesslich auf das von der Fa.FONDIS gelieferte Produkt begrenzt.
14
GARANTIESCHEIN FÜR WINEMASTER FONDIS
Damit Ihre vertragliche 2-Jahres-Garantie wirksam werden kann, müssen Sie gemäß den
in der Gebrauchsanleitung beschriebenen Bedingungen diesen Garantieschein ausfüllen
und innerhalb von 2 Wochen nach dem Kaufdatum an FONDIS einsenden.
Sie können den Garantieschein in einem frankierten Umschlag an folgende Adresse
schicken :
FONDIS S.A.
F - 68801 THANN CEDEX
STEMPFEL DES FACHGESCHÄFTES
MODELL
SERIENNUMMER
KAUFDATUM
NAME ........................................................... VORNAME ...............................................
ADRESSE.......................................................................................................................
.....................................................................................................................................
PLZ ........................ ORT ..................................................LAND .................................
Bitte, geben Sie hier an, wie Ihre Weinklimaanlage installiert wurde.
Beschaffenheit der Dämmung
Klimatisierter Rauminhalt: . . . . . . . m3
Materialbeschreibung und Dicke
Art des Dämmstoffs und Dicke
Wände
Boden
Decke
Tür
Wie sind Sie auf WINEMASTER von FONDIS aufmerksam geworden ?
Durch meinen Fachhändler
Auf einer Verbrauchermesse
Durch einen Zeitungsartikel
Durch Werbung
Sonstiges (bitte erläutern) :
15