1
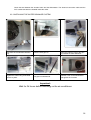
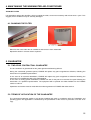
USER GUIDE
WINE C25
C
D E F Y I N G
O N V E N T I O
N
GB
INSTRUCTIONS FOR USE
TABLE OF CONTENTS
Introduction: “From Vineyard to wine” ............................................................... Page
27
1. INSTALLATION OF THE WINEMASTER ......................................................... Page
1.1. EVACUATION ROOM.............................................................................................. Page
1.2 THE CELLAR EQUIPMENT.................................................................................... Page
1.2.1. INSULATION ...............................................................................................................Page
1.2.2. INSULATION WALLS AND CELLING .........................................................................Page
1.2.3. FLOOR INSULATION ..................................................................................................Page
1.2.4. THE DOOR..................................................................................................................Page
1.2.5. INSULATION OF OTHER ITEMS................................................................................Page
28
28
28
28
29
30
30
30
2. INSTALLING THE WINEMASTER AIR-CONDITIONER ................................... Page
2.1. PIERCING THE WALL ............................................................................................ Page
2.2 SEALING AND LEVELLING THE WOODEN FRAME ............................................ Page
2.3. INSTALLING THE AIR-CONDITIONER ................................................................. Page
2.3.1. REMOVE THE PLASTIC COVER .............................................................................Page
2.3.2. FITTING THE DEVICE INTO THE FRAME ...............................................................Page
2.3.3. INTALLING THE WATER DRAINAGE SYSTEM ......................................................Page
30
31
31
31
31
32
32
3. USING THE WINEMASTER AIR-CONDITIONER ............................................. Page
3.1. STARTING UP MODEL WINE C25 ........................................................................ Page
3.1.1. CONNECTING THE AIR-CONDITIONER .................................................................Page
3.1.2. SETTING THE TEMPERATURE...............................................................................Page
3.2 STARTING UP MODEL WINE C25S(R) (With heater) ........................................... Page
3.2.1. CONNECTING THE AIR-CONDITIONER .................................................................Page
3.2.2. SETTING THE TEMPERATURE...............................................................................Page
3.3 AUTOMATIC DEFROST ......................................................................................... Page
33
33
33
33
34
34
34
34
4. MAINTAINING THE WINEMASTER AIR-CONDITIONER ................................ Page 35
4.1. CHANGING THE FILTER ........................................................................................ Page 35
5. GUARANTEE ..................................................................................................... Page
5.1. TWO-YEAR CONTRACTUAL GUARANTEE ......................................................... Page
5.2. TERMS OF APPLICATION OF THE GUARANTEE ............................................... Page
5.3. EXCLUSIONS AND LIMITS OF GUARANTEE ...................................................... Page
35
35
35
36
26
FROM VINEYARD TO WINE
In former times, good french cellars were built to maintain a temperature not exceeding 14
to 16°C in all seasons.
Today, this is rarely the case.
Nevertheless, a cellar worthy of the name must be protected against wide variations in
temperature, be as damp as necessary and ventilated, dark and free of vibration.
This is why, for more than fifteen years, we have used the expertise of specialists and
enthusiastic amateurs to design, develop, test and produce thousands of air-conditioners
destined to help in the storage and ageing of wine.
If you follow our advice and respect our recommendations Winemaster will provide the
optimal ageing conditions for your treasured wine collection.
Don't hesitate to read the installation and operating guide for your FONDIS
WINEMASTER cellar air-conditioner.
Contact us if you have any questions!
So… even if there may be long years to wait before the wine reaches perfection, the great day
will come when you face the delicate job of uncorking.
Hold the bottle carefully – do not remove the capsule on a level with the mouth – use a good
quality tool or lever – remove the cork without shaking the bottle and examine the "mirror"..
But that's another story…
SERVICE CLIENTS FONDIS
Tel. (0)389 377 500 / Fax (0)389 377 589
E-mail: [email protected]
Warning: Wait for 24 hours before switching on the air-conditioner.
27
CHARACTERISTICS
Setting the temperature
Maximum outdoor temperature
Cooling power
Electricity supply
Electrical power
Heating power
WINE C25/C25S(R)
Preset to 12°C, adjustable between 4 and
15°C*
35°C**
550 W at 15°C **
235 V – 50 Hz
400 W
250 w ( only for C25S(R))
The circuit breaker must be at least 16 Amps.
* The insulation quality and thickness has to be in accordance with the volume of the cellar and the set temperature.
** The cooling performance is dependant from the outside temperature. Therefore, the set temperature of 12°C for the cellar cannot
be maintained if the outside temperature of the cellar is maintained at 35°C.
If the thermal safety functions to often, there is a risk for the compressor to be damaged. In all the cases, it must be avoided that
the outside temperature remains at 35°C.
This high temperature should be limited to the summer period.
1. INSTALLATION OF THE WINEMASTER
The WINEMASTER is to be built in a wall of the cellar.
If the compressor runs the unit expels air at the outside air outlet at 20°C
above the temperature of the air inlet.
This hot air must be cooled in a well aerated room or be expelled outside.
1.1 EVACUATION ROOM
The “ hot “ side of the WINEMASTER must be inside a room.
Exceptionally, an outdoor installation is possible if the outside part is
sheltered and protected from the weather (direct rain, snow, etc... ).
WARNING
Starting the compressor at a negative temperature will destroy it. To avoid this problem, you must not change
the setting of thermostat if the outside temperature is under zero. This specification doesn’t concern the model
WINE C25SR equipped with an heating belt on the compressor.
This model should be preferred for outside installation.
The room into which the wine evacuates the hot air must be well ventilated so that the temperature does not
exceed 35°C.
A space of at least 10 cm must remain all around the WINEMASTER so that the cover can be removed and that
hot air expelled is not aspired again in the air inlet.
The outside of the WINEMASTER must not be integrated in an underground cellar window or in too small a
space.
The wall where the device is to built-in must not be more than 22 cm thick. Otherwise, the wall must be cut in a
wedgeshape.
1.2 THE CELLAR EQUIPMENT
1.2.1 INSULATION
Insulation of the 4 walls, the door, the ceiling and the floor is essential for the Winemaster to work
properly. Adequate insulation helps to obtain the stability of the temperature and the humidity.
The table below (choice of insulation) can be used to determine the type and the thickness of insulation
needed according to the internal volume of the cellar and a cellar temperature of 12°C.
28
Insulation continuity :
Insulating components must be assembled preferably by interlocking panels or glueing the panels
together, to ensure perfect continuity of insulation.
This is very important: it prevents heat and humidity entering from the outside which would counter the
effects of regulation.
IMPORTANT
The validity of the WINEMASTER guarantee depends on the values in the "Choice of insulation" table
being strictly respected, for all the cellar walls, including floor and ceiling + door, as well as perfect
continuity of insulation.
CHOICE OF INSULATION
MINIMUM THICKNESS OF INSULATION (mm)
for 12°C cellar temperature
WINE C25 / C25 S(R)
CELLAR
VOLUME
(m3)
EXPANDED
POLYSTYRENE
EXTRUDED
POLYSTYRENE
POLYURETHANE
FOAM
O = 0.044W/m°C
O = 0.030W/m°C
O = 0.025W/m°C
6
8
10
12
14
16
18
20
22
24
25
40
50
60
70
70
80
90
90
100
110
110
30
40
40
50
50
60
60
70
70
70
80
30
30
40
40
40
50
50
60
60
60
60
1.2.2 INSULATING WALLS AND CEILING
The manufacturers propose their insulating panels in several forms:
- insulation alone
- complexes: the insulation is lined with a facing (plaster, mineral…)
- sandwiches: the insulation is lined on each side with a wooden or plaster panel.
The panel facing is important: it protects the insulation from shocks and guarantees long life.
Do not use mineral fibre insulation (Glasswool, stonewool) because it stores humidity!
Protection against rodents
Some insulating materials are damaged by rodents (mice, rats…). It is therefore essential to make sure
that the walls of the cellar do not contain holes which would allow rodents access to the insulation.
This insulation must be lined, on the inner surface of the cellar, with a protective facing.
Polyurethane insulation, because of its chemical composition, is not attacked by rodents.
29
1.2.3 FLOOR INSULATION
The cellar floor must be able to support shelves and the wine stored on them.
You should therefore choose an insulating material with adequate compression resistance for this part.
Manufacturers recommend appropriate insulation or materials designed specifically for floor insulation, in
their documentation.
Puncture resistance (feet of shelves in particular) is provided:
- by using "complex" insulation panels lined, on the upper surface, with a strong panel.
- by facing the insulation with a panel of chipboard (approx. 15 mm thick), or any other suitable covering
(plaster and slab, for example).
1.2.4 THE DOOR
It is part of the continuity of insulation.
There are two possible solutions:
- to insulate the existing door using the same type as insulation as was used for the cellar walls.
Insert a seal such as foam, between the door panel and the frame, all around the edge.
- use a FONDIS ISOTHERMAL DOOR, lined with polyurethane foam. It includes a seal around its
periphery, with a magnetic closure.
1.2.5 INSULATION OF OTHER ITEMS
A fridge or another appliance producing heat must not be placed inside the cellar. For example, any hot
water pipe going through the cellar must also be insulated.
2. INSTALLING THE WINEMASTER AIR-CONDITIONER
Tools
2
1
1. PHILIPS SCREWDRIVER PZ 2
2. WATER LEVEL
3. UNIVERSAL WRENCH
3
4. METER TAPE
4
2.1 PIERCING THE WALL
Cut the wall as necessary to fit the wooden frame. The outer dimension of the wooden frame is 514 mm long by
374 mm high. Be careful to leave at least 10 cm room below the ceiling, both in the cellar and outside.
30
2.2 SEALING AND LEVELLING THE WOODEN FRAME
Seal the wooden frame so that it is flush with the inside of the cellar wall. If the wall is thicker than the wooden frame,
cut a wedge-shape in the wall, as shown in the diagram above.
The joint between the wooden frame and the insulation must be filled
(with polyurethane foam, for example), to ensure continuity of insulation.
WARNING, DO NOT PUT POLYURETHANE FOAM BETWEEN THE
WINEMASTER AND THE WOODEN FRAME, THE WINEMASTER
MUST BE REMOVABLE.
The wooden frame must be level :
the widest side should be horizontal
CORRECT
INCORRECT
2.3 INSTALLING THE AIR-CONDITIONER
2.3.1 REMOVE THE PLASTIC COVER
Unscrew the 2 screws on each side of the
Winemaster
Remove the cover
2.3.2 FITTING THE DEVICE INTO THE FRAME
Position the air-conditioner in the
frame from inside the cellar
Tighten the two screw/washer units at
the top
Tighten the two screw/washer units
on the side
31
Check the seal between the wooden frame and the Winemaster. The electrical connection cable and the
PVC condensate tube are situated inside the cellar.
2.3.3 INSTALLING THE WATER DRAINAGE SYSTEM
Flow from the condensate collection
tray.
Push the PVC pipe on.
Place the collar as close to the pipe
as possible for better adhesion.
Tighten the collar using a universal
wrench or pliers.
The pipe is well attached.
Refit the cover on the Winemaster
and tighten the 4 screws
Important :
Wait for 24 hours before switching on the air-conditioner.
32
3. USING THE WINEMASTER AIR-CONDITIONER
The thermostat indicates the temperature in the wine cellar with a precision of 2°C.
A temperature change of the air does not mean the same change of temperature of the liquid due to the thermal
capacity of the liquid.
The temperature is set at 12° C in the factory. During installation the set temperature must be controlled and adjusted
as shown in next paragraph if necessary (paragraph 3.1.2 & 3.2.2 ).
BEFORE MODIFIYING THE TEMPERATURE OF ADJUSTEMENT, TO CHECK IS IT A WINE
C25 (3.1) OR A C25S (SR) (3.2).
3.1 STARTING UP MODEL WINE C25
3.1.1. CONNECTING THE AIR-CONDITIONER
When you plug it into the electrical socket, the air conditioner starts up immediately.
If the temperature in the cellar is higher than the thermostat setting, the compressor starts up immediately.
If the temperature in the cellar corresponds to the setting, only the cellar fan which functions permanently
will start.
3.1.2 SETTING THE TEMPERATURE
The temperature is set on the thermostat as follows:
Press button
one second until the set temperature is flashing. Use button
to increase
and button
to decrease the set temperature. When the setting is right, press button
again to validate it.
-
INDICATOR
flickering = cold mode on standby
-
INDICATOR
lit fixed = engaged cold mode (compressor)
-
INDICATOR
lit fixed = defrost
33
3.2 STARTING UP MODEL WINE C18S(R) (WITH HEATER)
3.2.1. CONNECTING THE AIR-CONDITIONER
When you plug it into the electrical socket. The fan in the cellar starts up immediately. The compressor
may not come on until 2 minutes later if the temperature of the cellar is higher than the set temperature. If
the temperature of the cellar is the same as the setting on the thermostat, the compressor will not come
on.
3.2.2 SETTING THE TEMPERATURE
The setting of the targeted temperature of the cellar is made on the thermostat .
Use the following process :
Press the button
Use again the button
one second. Press then the button
, the set temperature of the cellar will appear.
to increase the temperature or the button
temperature is set, press the button
to lower the temperature. When the right
to confirm it.
-
INDICATOR
flickering = cold mode on standby
-
INDICATOR
lit fixed = engaged cold mode (compressor)
-
INDICATOR
-
INDICATOR
-
INDICATOR
lit fixed = defrost
lit fixed = heat (resistance)
lit fixed = fan
On all the guides except C25.
3.3 AUTOMATIC DEFROST
The program of the thermostat will run an automatic defrost time several times a day.
During this position, the compressor cannot start. Only the fan in the cellar can function.
The condensate water produced during this period will be evacuated through the tube
34
4. MAINTAINING THE WINEMASTER AIR-CONDITIONER
THE DUST FILTER
It is essential to replace the dust filter, which is outside the cellar, as soon as necessary and at least once a year. If it is
clogged, the air-conditioner may be seriously damaged.
4.1 CHANGING THE FILTER.
Raise it at the notch under the air-conditioner and remove it from underneath.
Repeat this action in reverse order to replace it.
5. GUARANTEE
5.1. TWO-YEAR CONTRACTUAL GUARANTEE
The air-conditioner is guaranteed for two years against manufacturing defects.
During the contractual guarantee period, FONDIS will replace any part recognized as defective, following the
intervention of a qualified representative.
In the event of an electrical breakdown, FONDIS will replace any part recognized as defective following the
intervention of a qualified stockist or his representative.
In the event of cooling system breakdown, FONDIS can ask for the part to be returned for repair following the
intervention of a qualified representative. The equipment will be packed and held available for the FONDIS
carrier to collect it.
Operations and returns must be made with the written agreement of FONDIS after sales service.
5.2. TERMS OF APPLICATION OF THE GUARANTEE
The contractual guarantee applies to all devices installed and used in accordance with the "Installation and
operating guide". His application is conditioned by the presentation of the invoice of purchase or for lack of its
copy.
35
5.3 EXCLUSIONS AND LIMITS OF GUARANTEE
The guarantee is refused in the following cases:
- The cellar and installation have not been insulated in accordance with this guide.
- The damage is due to negligence, poor maintenance, defective or inappropriate use of the WINEMASTER.
- Part exchanges or replacements under guarantee will not have the effect of extending it.
FONDIS SA cannot be held responsible, under any circumstances, for the direct or indirect consequences of the
air-conditioner's failure to function. The guarantee is limited only to the product supplied by FONDIS SA.
The European Community attaching a great importance to the environment and the
waste processing, set up Directive 2002/96/CE relating to the Electric and Electronic
Component Waste.
In accordance with this standard, the presence of the logo "barred dustbin" is
obligatory.
This logo means that this product cannot be to in no case thrown in the household
refuse.
It must be given to a suitable collection point for the treatment, valorisation, recycling of
Electric and Electronic Components.
Acting like that you make a gesture for the environment and you contribute to the
safeguarding of the natural resources as well as to the protection of human health.
36
Unit 4 Brunel Close,
Harworth, Doncaster DN11 8QA
Tel: 01302 744916 Fax: 01302 751233
E-mail: [email protected]
www.winecorner.co.uk
© Wine Corner Limited 2012. We reserve the right to change product specifications and prices without prior notice.
Wine Corner Limited does not accept any responsibility for any loss, which may arise as a consequence of reliance on information contained in this price list.