1
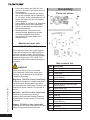
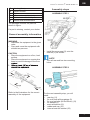
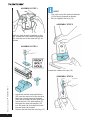
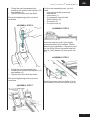
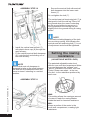
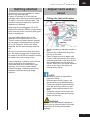
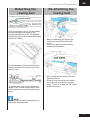
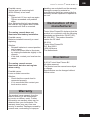
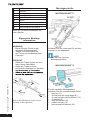
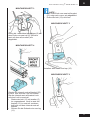
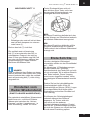
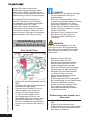
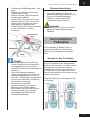
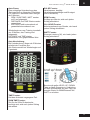
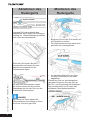
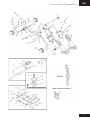
ROWER
www.tunturi.com
User manual................................... 04-17
Bedienungsanleitung...................... 18-32
Owner ’s manual
•
PURE ROW 8.1
GB
Contents
Introduction.......................................... 4
Safety warnings................................... 4
Workouts.............................................. 5
Heart rate measurement ...................... 5
Maximum heart rate.............................. 6
Assembly............................................. 6
Parts out of box..................................... 6
Box content list...................................... 6
General assembly information............... 7
Assembly steps..................................... 7
Setting the rowing............................. 10
resistance ......................................... 10
Getting started....................................11
Adjust tank water level......................11
Filling the tank with water.....................11
removing water from the tank.............. 12
Water treatment................................... 12
Slider footplate.................................. 12
Adjusting the footplate......................... 12
How to row......................................... 13
How often............................................ 13
Rowing console................................. 13
Detaching the rowing belt................. 15
Re-attaching the rowing belt............ 15
Troubleshooting................................ 16
Warranty............................................. 17
Declaration of the manufacturer...... 17
Disclaimer.......................................... 17
Specifications.................................... 33
Product................................................ 33
Spare parts.......................................... 34
Exploded view..................................... 36
3
Introduction
Welcome to the world of Tunturi New
Fitness!
Thank you for purchasing this piece
of Tunturi equipment. Tunturi offers
a wide range of professional fitness
equipment, including crosstrainers,
treadmills, exercise bikes, rowers and
vibration plates. The Tunturi equipment
is suitable for the entire family, no matter
what fitness level. For more information,
please visit our website www.tunturi.com
•
•
•
•
Safety warnings
WARNING
Read the safety warnings and the
instructions. Failure to follow the safety
warnings and the instructions can
cause personal injury or damage to the
equipment. Keep the safety warnings
and the instructions for future reference.
WARNING
Heart rate monitoring systems may be
inaccurate. Over exercise may result in
serious injury or death. If you feel faint
stop exercising immediately.
•
Owner ’s manual
•
PURE ROW 8.1
•
4
•
•
The equipment is suitable for
domestic and professional use only
(e.g. hospitals, fire stations, hotels,
schools etc.). Max. usage is limited
to 6 hrs a day. The equipment is not
suitable for full commercial use (e.g.
large gyms).
The use of this equipment by children
or persons with a physical, sensory,
mental or motorial disability, or lack
of experience and knowledge can
give cause to hazards. Persons
responsible for their safety must give
explicit instructions or supervise the
use of the equipment.
Before starting your workout, consult
a physician to check your health.
If you experience nausea, dizziness
or other abnormal symptoms,
immediately stop your workout and
•
•
•
•
•
•
•
•
•
•
consult a physician.
To avoid muscular pain and strain,
start each workout by warming up
and finish each workout by cooling
down. Remember to stretch at the
end of the workout.
The equipment is suitable for indoor
use only. The equipment is not
suitable for outdoor use.
Only use the equipment in
environments with adequate
ventilation. Do not use the equipment
in draughty environments in order not
to catch a cold.
Only use the equipment in
environments with ambient
temperatures between 10 °C and
35 °C. Only store the equipment
in environments with ambient
temperatures between 5 °C and
45 °C.
Do not use or store the equipment in
humid surroundings. The air humidity
must never be more than 80%.
Only use the equipment for its
intended purpose. Do not use the
equipment for other purposes than
described in the manual.
Do not use the equipment if any part
is damaged or defective. If a part is
damaged or defective, contact your
dealer.
Keep your hands, feet and other
body parts away from the moving
parts.
Keep your hair away from the moving
parts.
Wear appropriate clothing and shoes.
Keep clothing, jewellery and other
objects away from the moving parts.
Make sure that only one person
uses the equipment at a time. The
equipment must not be used by
persons weighing more than 150kg
(330lbs).
Do not open equipment without
consulting your dealer.
Follow instructions provided in this
manual for correct foot position and
basic rowing techniques.
Owner ’s manual
•
PURE ROW 8.1
GB
Heart rate measurement
•
•
•
•
WARNING
The equipment can stand vertically
for storage. Make sure a secure
location is chosen, such as in the
corner of a room.
Place the equipment on a firm, level
surface.
Place the equipment on a protective
base to prevent damage to the floor
surface.
Allow at least 100 cm of clearance
around the equipment.
Workouts
The workout must be suitably light, but
of long duration. Aerobic exercise is
based on improving the body’s maximum
oxygen uptake, which in turn improves
endurance and fitness. You should
perspire, but you should not get out of
breath during the workout.
To reach and maintain a basic fitness
level, exercise at least three times a
week, 30 minutes at a time. Increase the
number of exercise sessions to improve
your fitness level.
It is worthwhile to combine regular
exercise with a healthy diet. A person
committed to dieting should exercise
daily, at first 30 minutes or less at a time,
gradually increasing the daily workout
time to one hour. Start your workout at
low speed and low resistance to prevent
the cardiovascular system from being
subjected to excessive strain.
As the fitness level improves, speed and
resistance can be increased gradually.
The efficiency of your exercise can be
measured by monitoring your heart rate
and your pulse rate.
(HEART RATE CHEST BELT)
NOTE
The product does not come standard
with a build in heart rate receiver.
To prepare the equipment for a heart
rate chest belt you need to install the
additional Heart rate receiver, available
as a kit. Contact your local distributor for
details.
The most accurate heart rate
measurement is achieved with a
heart rate chest belt. The heart rate is
measured by a heart rate receiver in
combination with a heart rate transmitter
belt. Accurate heart measurement
requires that the electrodes on the
transmitter belt are slight moist and
constantly touching the skin. If the
electrodes are too dry or too moist, the
heart rate measurement might become
less accurate.
•
•
•
•
WARNING
If you have a pacemaker, consult a
physician before using a heart rate
chest belt.
CAUTION
If there are several heart rate
measurement devices next to each
other, make sure that the distance
between them is at least 2 meter.
If there is only one heart rate receiver
and several heart rate transmitters,
make sure that only one person with
a transmitter is within transmission
range.
NOTE
Always wear the heart rate chest belt
under your clothes directly in contact
with your skin. Do not wear the heart
rate chest belt above your clothes.
If you wear the heart rate chest belt
above your clothes, there will be no
signal.
5
•
•
•
•
If you set a heart rate limit for your
workout, an alarm will sound when it
is exceeded.
The transmitter transmits the heart
rate to the console up to a distance
of 1,5 meter. If the electrodes are not
moist, the heart rate will not appear
on the display.
Some fibers in clothes (e.g. polyester,
polyamide) create static electricity
which can prevent accurate heart
rate measurement.
Mobile phones, televisions and
other electrical appliances create
an electromagnetic field which
can prevent accurate heart rate
measurement.
Assembly
Parts out of box
Maximum heart rate
(DURING TRAINING)
The maximum heart rate is the highest
heart rate a person can safely achieve
through exercise stress. The following
formula is used to calculate the average
maximum heart rate: 220 - AGE. The
maximum heart rate varies from person
to person.
WARNING
Owner ’s manual
•
PURE ROW 8.1
Make sure that you do not exceed
your maximum heart rate during your
workout. If you belong to a risk group,
consult a physician.
6
Beginner: (50-60% of max. heart rate)
Suitable for beginners, weight-watchers,
convalescents and persons who have
not exercised for a long time. Exercise at
least three times a week, 30 minutes at
a time.
Box content list
Item
1
2
3
4
5
6
7
Advance: (60-70% or max. heart rate)
Suitable for persons who want to
improve and maintain fitness. Exercise
at least three times a week, 30 minutes
at a time.
8
9
10
11
12
13
Expert: (70-80% or max. heart rate)
Suitable for the fittest of persons who are
used to long-endurance workouts.
14
15
16
Description
Main frame
Seat rail (boxed seperately)
Rower seat
Horizontal seat rail bolt
(M10x120mm)
Washer (M10)
Nylock nut (M10)
Vertical seat rail tensioning bolt
(M10x150mm)
Plastic dome cap
Rear seat rail bumpstop
Seat rail end cap
Rear leg
Seat rail bracket
Rear leg bolts - dome
(M10x120mm)
AA Batteries (x2)
Multi tool
Hex key (8mm)
Owner ’s manual
17
18
19
20
21
22
Hex key (6mm)
Owners manual
Siphon
Water treatment tablets (x4)
Vertical seat rail bolt dampener
Internal seat rail bolt bracket
•
PURE ROW 8.1
GB
Assembly steps
ASSEMBLY STEP 1
The package contains the parts as
shown in figure.
If a part is missing, contact your dealer.
General assembly information
WARNING
• Assemble the equipment in the given
order.
• Carry and move the equipment with
at least two persons.
•
CAUTION
• Place the equipment on a firm, level
surface.
• Place the equipment on a protective
base to prevent damage to the floor
surface.
• Allow at least 100 cm of clearance
around the equipment.
Refer to the illustrations for the correct
assembly of the equipment.
•
Install the rower seat (3) onto the
seat rail (2) as shown.
NOTE
The rail rear end has two mounting
holes.
ASSEMBLY STEP 2
For the next assembly step, you will
need:
• ·rear leg (11)
• ·2x rear seat rail bumpstops (9)
• ·2x rear leg bolts (M10x120mm) (13)
• ·2x washer (5)
• ·seat rail bracket (12)
• ·rubber end cap (10)
• ·internal seat rail bracket (22)
7
ASSEMBLY STEP 3
NOTE
•
•
The oval end of the seat rail bracket
(12) is facing forward as shown.
Do not thighten the bolt (13).
ASSEMBLY STEP 5
With the seat already installed on the
rail, thread the rear rubber bumpstops
(9) onto the end of the seat rail (2) as
shown.
ASSEMBLY STEP 4
Install the rubber end cap (10)
•
Owner ’s manual
•
PURE ROW 8.1
ASSEMBLY STEP 6
8
•
•
Insert the internal seat rail backet
(22) into the rear end of the rail and
align the internal seat rail bracket
hole with the seat rail front bolt hole.
Insert the bolt (13) with washer (5)
throught the seat rail bracket (12)
into the seat rail front bolt hole and
internal seat rail bracket.
Secure the bolt into the rear leg (11)
Owner ’s manual
•
•
Finish the rear leg assembly by
installing the second rear leg bolt (13)
and washer (5).
Tighten both front and rear bolts.
Be careful tightening bolts to prevent
scratches
ASSEMBLY STEP 6
•
PURE ROW 8.1
GB
For the next assembly step, you will
need:
• seat rail assembly (previously
assembled)
• main frame (1)
• 2x horizontal seat rail bolts
(M10x120mm) (4)
• 2x washer (5)
• 2x nylock nuts (6)
ASSEMBLY STEP 8
Insert the seat rail until it just slightly
protrudes behind the footplate. Shown
above is the installation / alignment point
for the M10x120mm horizontal seat rail
bolt (4), M10 washer (5) and nylock nut
(6)
ASSEMBLY STEP 9
•
•
Finish the rear leg assembly by
installing the second rear leg bolt (13)
and washer (5).
Tighten both front and rear bolts.
Be careful tightening bolts to prevent
scratches
Install and secure the two bolts (4) and
two washers (5) with the nylock nuts (6).
ASSEMBLY STEP 7
9
ASSEMBLY STEP 10
•
Secure the seat rail bolt with seat rail
bolt dampener into the lower main
frame (1).
Do not tighten the bolt (7).
The vertical seat rail tensioning bolt (7) is
designed to hold the mid leg 3-5mm off
the ground when the rower is standing
on the ground without a person on it.
During operation the mid leg will just
slightly touch the ground during a rowing
stroke.
•
•
Install the vertical seat rail bolt (7)
with plastic dome cap (8) through the
seat rail assy.
Fit the vertical seat rail bolt dampener
(21) onto the bolt end sticking out of
the seat rail assy.
NOTE
If excessive shaking/hopping of the tank
occurs during rowing, this indicates the
vertical seat rail tensioning bolt (7) is out
of adjustment and should be tightened.
Setting the rowing
resistance
(ADJUSTABLE WATER LEVEL)
NOTE
The vertical seat rail dampener is
designed to take up the slack between
the seat rail and mainframe when the
rower is stored / standing in a vertical
position.
The patented adjustable water level
offers a true multi-level experience.Water
is moved between the “storage” and
“active” chambers of the tank. Your new
Tunturi Rower can adapt - at the turn
of a dial - to the resistance preferred by
each user.
Owner ’s manual
•
PURE ROW 8.1
ASSEMBLY STEP 11
10
MAX:
This setting allows the maximum amount
of water to reach the rowing Blades
inside the tank for heaviest resistance
MIN:
Keeps a portion of the water in the
inner tank compartment, creating light
resistance.
Owner ’s manual
•
PURE ROW 8.1
GB
Adjust tank water
level
Getting started
To achieve minimum resistance, select
MIN on the tank adjuster.
It takes 10 strokes to fill the central
(storage) tank, leaving a minimal amount
of water in the outer (active) tank. This
process is always required if minimum
resistance is desired.
Filling the tank with water
Row hard at a steady pace (20 to 25
Strokes Per Minute [SPM]) and put some
effort into the stroke, ensuring that good
form is maintained.
You can make adjustments to the
resistance level while you row. Your
Tunturi rower will adapt almost instantly
to increases in resistance but will take
up to 10 strokes to reduce the effort
required, as the inner storage tank fills
up.
Once you have found a level that gives
you the exercise required, changes can
be made to the SPM and stroke intensity
to further vary your energy input.
•
•
•
Interval training is used by most rowers,
where a period of low intensity is
combined with short intervals of high
intensity. Your Tunturi rower allows
instant changes, achieving multi-level
resistance profiles during a single
workout.
•
•
•
•
Set the resistance adjuster handle to
MAX
Remove the rubber tank plug from
the top of the tank.
Place a large bucket of water next
to the rower and position the siphon
with the rigid hose in the bucket and
the flexible hose into the tank as
shown. Make sure the small breather
valve on the top of the siphon is
closed before filling.
NOTE
17 liters of water is required for
maximum filling.
Where water quality is poor, we
recommend using distilled water.
Putting the bucket higher than the
tank will allow the siphon to “selfpump” when adding water to the
tank.
Consider using a towel under the
bucket and water tank preventing
stains on the floor.
WARNING
Failure to set the adjuster handle to
MAX prior to filling the tank will cause
inaccurate fill levels and possible
leakage.
11
•
•
•
Begin filling the tank by squeezing
the siphon. Use the level gauge decal
on the side of the tank to measure
volume of water in the tank.
After filling the tank to the desired
water level, open the valve on the top
of the siphon to allow excess water to
escape.
Ensure that the tank plug is replaced
once filling and water treatment
procedures are complete.
•
Exposure to sunlight affects the
water. Moving the rower away from
direct sunlight will extend time
between water treatments
Water treatment
•
•
Add one water treatment tablet (20)
Add a water treatment tablet
whenever the water appears dirty or
cloudy over time.
removing water from the tank
•
•
•
•
•
•
•
Set the resistance adjuster handle to
MIN.
Row at least ten strokes to fill the
inner storage reservoir as much as
possible with water.
Remove the tank plug.
Insert the siphon rigid hose end into
the tank
Insert the siphon flexible hose end
into a large bucket.
Drain the tank (approx. 40% of
water will remain in the tank. It is not
possbile to drain the tank completely
without disassembling the tank)
Refill the tank following the directions
as described under the section
“Filling the tank” of this manual.
•
WARNING
Only use the Tunturi supplied water
treatment tablets.
Slider footplate
The slider footplate is designed to fit a
wide range of foot sizes.
Adjusting the footplate
Lift the top of the sliding portion of the
footplate and slide up or down. The
numbers 1-6 represent a guideline
from which the proper length can be
determined. Secure the plate onto the
mounting pegs and push down firmly to
lock into position.
Owner ’s manual
•
PURE ROW 8.1
Tighten the foot straps securely and
begin your workout.
12
•
•
NOTE
The valve on top of the siphon must
be closed to allow proper drainage.
If the water treatment schedule is
maintained, it will not be necessary
to change the water inside the tank.
An additional water treatment tablet
is only required when discoloration of
the water appears.
Owner ’s manual
WARNING
Never operate this rower without feet
properly secured in Foot straps, or
without the sliding portion of the Slider
Footplate locked into position!
How to row
Catch
Comfortably forward
with straight back and
arms.
Drive
Push with the legs
while arms remain
straight.
Finish
Pull through with
arms and legs
rocking slightly back
on your pelvis.
Recovery
Upper body tips
forward over your
pelvis and move
forward.
Catch
Back to the starting
positon and begin
again.
Catch - Drive
Begin the stroke comfortably in forward
position and push strongly back with
your legs while keeping your arms and
back straight.
•
PURE ROW 8.1
GB
Finish
Begin to pull your arms back as they
pass over your knees and continue the
stroke through to completion rocking
slightly back over your pelvis.
Recovery - Catch
Return to the starting position and
repeat.
How often
Begin with 5 minute training sessions
once a day and aim for a time around
2:30 to 2:45 for 500m distance. Row at
a pace that keeps the water circulating
continuously between strokes.
Progress a few minutes more each
day until you are comfortable with 3045 minutes training time 3 or 4 times a
week.
This will provide aerobic endurance
benefits, muscle toning and sufficient
calorie burning to form part of a weight
loss program.
•
•
WARNING
Always consult a doctor before
beginning an exercise program.
Stop immediately if you feel faint or
dizzy.
Rowing console
Auto Start:
Commence rowing to activate.
Reset all values:
Hold DISTANCE button down for 3
second to RESET.
Distance:
Add 1000m distance each button push to
accumulate required distance then begin
rowing to initiate count-back.
13
Auto-Pause:
A temporary halt in exercise will result in
the following:
For over 5 seconds and under 5
minutes:
• SPM / 500M TIME / WATT return to
zero.
• DISTANCE and TIME are put on
hold, values are saved.
• CAL HOUR defaults to total calories
used in this session.
A Resumption in exercise in less than 5
minutes will resume
DISTANCE and TIME from saved values
automatically.
PULSE Window:
Heart Rate pulse. Requires chast strap
and receiver kit (sold seperately)
SPM Window:
Stroke Per Minute, updated each stroke.
CAL HOUR Window:
Calories per hour, updated each stroke.
WATT Window:
Unit of power (W), updated each stroke.
Auto Power Down:
After 5 minutes the console will shut
down.
All values revert to zero after restart.
Owner ’s manual
•
PURE ROW 8.1
Use the yellow LEVEL UP / DOWN
buttons on the console in conjunction
with the tank resistance adjuster handle
for accurate 500M TIME / DISTANCE /
CAL HOUR / WATT.
14
TIME Window:
Auto start elapsed time.
500M TIME Window:
Time to row 500m, updated at the
completion of each stroke
Owner ’s manual
PURE ROW 8.1
GB
Re-attaching the
rowing belt
Detaching the
rowing belt
Untie the bungee cord or cut the plastic
tiewrap holding the bungee at the
bungee attachment point. The bungee
attachment point is located at the bottom
of the main frame.
•
•
•
Begin re-attaching by guiding the
rower belt around the rower belt
pulley.
The velcro side should be facing
upward as illustrated.
Pull the bungee cord through all three
pulleys and leave excess on top of the
tank for now.
•
•
To detach belt, simply pull beyond the
range of the normal rowing stroke until
the belt detaches from the belt bungee
pulley.
Next, guide the belt around the idle
wheel as shown.
Once around the idle wheel, attach
the rower belt to the belt / bungee
pulley. There is an obvious “lip” at the
attachment point.
NOTE
You will hear the velcro separating just
before the belt detaches.
15
•
•
•
Wind the rower belt onto the belt /
bungee pulley until the rower handle
is at its furthest forward position.
•
NOTE
If bungee cord previous tension
seemed correct (a good way to judge
is if the rower handle can make it
to the furthest point forward on the
top of the mainframe under bungee
tension alone) then simply tie off at
previous position.
If the return is too slack, experiment
by tightening the tension in small
increments and testing until the
correct tension is achieved.
If the rower handle cannot reach the
end of the seat rail during a rowing
stroke, then the bungee cord is overtensioned.
Troubleshooting
Water changes color or becomes
cloudy
•
6. Re thread the bungee cord
(on opposite side of the idle wheel)
back through the bungee pulleys and
tie off at the attachment point.
Owner ’s manual
•
PURE ROW 8.1
BUNGEE CORD ROUTE (RED LINE)
16
Possible cause:
Rower is in direct sunlight or has not had
water treatment.
Solution:
• Change rower location to reduce
direct exposure to sunlight.
• Add water treatment or change
tank water as directed in the water
treatment section of this manual.
•
•
Rower belt slipping off belt / bungee
pulley
Possible cause:
Bungee cord not under enough tension.
Solution:
• Tighten bungee cord following the
instructions in “Re-attaching the
rowing belt” - step 8 of this manual.
Front of rower lifts slightly during
vigorous rowing.
Owner ’s manual
Possible cause:
Vertical seat rail tensioning bolt
(M10x150mm) is too loose.
Solution:
• Tighten bolt 1/2 turn and row again.
Tighten as needed until problem
stops.
Over tightening this bolt can damage
the seat rail. Only tighten bolt in small
increments until fault is corrected.
The rowing console does not
illuminate after battery installation.
Possible cause:
Batteries installed incorrectly or need
replacing.
Solution:
• Reinstall batteries in correct position
and try again.
• If the LCD screen fails to illuminate,
try rotating the batteries slightly in the
console.
• If this fails, contact your local service
centre.
The rowing console screen
illuminates, but does not register
when rowing.
Possible cause:
Loose or failed connection
•
PURE ROW 8.1
GB
handling are excluded from the warranty.
Damages caused by material or
manufacturing faults are covered by the
warranty and will repaired or replaced at
no cost.
Declaration of the
manufacturer
Tunturi New Fitness BV declares that the
product is in conformity with the following
standards and directives: EN 957 (SC),
89/ 336/ EEC. The product therefore
carries the CE label.
09-2014
Tunturi New Fitness BV
P.O. Box 60001
1320 AA Almere
The Netherlands
Disclaimer
© 2014 Tunturi New Fitness BV
All rights reserved.
The product and the manual are subject
to change.
Specifications can be changed without
further notice.
Solution:
• Check that the console lead is
connected properly.
• If it is connected then contact your
local service centre.
Warranty
The product has a warranty from the
date of delivery (to be documented
by invoice or delivery note). Further
information on warranty terms can be
obtained from your local dealer. The
warranty terms may vary from one
country to another. Damages caused by
normal wear, overloading or improper
17
GERMAN
Einführung
Diese deutsche Bedienungsanleitung ist
eine Übersetzung des englischen Textes.
Es können keine Rechte auf diese
Übersetzung abgeleitet werden.
Die ursprüngliche englische Text
Vorrang.
INHALT
betriebsanleitung
•
PURE ROW 8.1
INHALT................................................ 18
Einführung......................................... 18
Sicherheitshinweise.......................... 18
Training............................................... 19
Herzfrequenz messung....................... 20
Maximale herzfrequenz....................... 20
18
Montage.............................................. 21
Auspacken der Teile............................ 21
Inhalt der verpackung.......................... 21
Algemeine Montage information.......... 22
Montageschritte................................... 22
Einstellen vom Ruder-Wiederstand.25
Erste Schritte..................................... 25
Tankfüllung undWasserbehandlung........................... 26
Den Tank füllen.................................... 26
Entfernung vom wasser aus dem tank.26
Wasserbehandlung.............................. 27
Verschiebbare Fußrasten................. 27
Anpassen der Fußrasten..................... 27
Richtig Rudern................................... 28
Wie oft................................................. 28
Ruder Computer................................ 28
Abnehmen des Rudergurts.............. 30
Montieren des Rudergurts................ 30
Fehlerbehebung................................. 31
Garantie.............................................. 32
Erklärung des ................................... 32
Herstellers.......................................... 32
Haftungsausschluss......................... 32
Willkommen in der Welt von Tunturi New
Fitness!
Herzlichen Dank, dass Sie einen Tunturi
Trainer erworben haben. Tunturi bietet
eine Vielzahl von professionellen
Fitnessgeräte; Crosstrainer,
Laufbänder, Heimtrainer, Ruderer und
Vibrationsplatten.
Die Tunturi Trainer sind für die ganze
Familie geeignet, egal welches FitnessLevel. Für mehr Information, besuchen
Sie bitte unsere Webseite www.tunturi.
com.
Sicherheitshinweise
WARNUNG
Lesen Sie die Sicherheitshinweise
und Anweisungen bitte vor
gebrauch des Trainers. Werden die
Sicherheitshinweise und Anweisungen
nicht befolgt, dann kann dies zu
Personenverletzungen und Schäden
am Trainer führen. Bewahren Sie die
Sicherheitshinweise und Anweisungen
bitte.
WARNUNG
Herzfrequenz Messgeräte können
ungenau sein. Überbelastung kann zu
schweren Verletzungen oder zum Tod
führen. Wenn Sie sich unwohl fühlen
sollten Sie das Training sofort stoppen.
• Der Trainer eignet sich für heimund semi-gewerblichen Gebrauch
(z.B. Krankenhäuser, Feuerwachen,
Hotels, Schulen usw.). Mit einer
maximalen Belastung von 6 stunden
am Tag. Der Trainer ist nicht geeignet
für einen vollständig gewerblichen
Gebrauch wie Sportschulen usw.
• Wenn dieser Trainer von Kinder
oder Personen mit körperliche,
sensorische, geistige oder
motorischer Behinderung, ohne
betriebsanleitung
•
•
•
•
•
•
•
•
•
•
•
Begleitung, benutzt wird, kann
dies zu Gefahrensituationen
führen. Personen, die für deren
Sicherheit verantwortlich sind,
müssen klare Anweisungen geben
oder den Gebrauch des Trainers
beaufsichtigen.
Bevor Sie ihr Training starten,
nehmen Sie bitte Kontakt mit
einem Arzt auf um ihre Gesundheit
kontrollieren zu lassen.
Falls Sie Übelkeit, ein
Schwindelgefühl oder andere
anormale Symptome verspüren,
hören Sie bitte unverzüglich mit dem
Training auf und wenden Sie sich an
einen Arzt.
Um einen Muskelkater zu vermeiden,
starten Sie jedes Training mit dem
Aufwärmen und beenden Sie es mit
Abkühlung der Muskulatur. Denken
Sie daran, ihre Muskulatur am Ende
des Trainings zu dehnen.
Der Trainer ist nur für den Gebrauch
in geschlossenen Räumen geeignet,
nicht für den Gebrauch im Freien.
Benutzen Sie den Trainer nur in
Umgebungen mit ausreichender
Belüftung.
Benutzen Sie den Trainer nicht in
zugigen Umgebung damit Sie sich
nicht erkälten.
Benutzen Sie den Trainer
nur in Umgebungen mit
Umgebungstemperaturen zwischen
10 °C und 35 °C. Lagern Sie den
Trainer nur in Umgebungen mit einer
Umgebungstemperatur zwischen 5
°C und 45 °C.
Der Trainer sollte nicht in
Umgebungen mit einer
Luftfeuchtigkeit über 80% benutzt
oder gelagert werden.
Benutzen Sie den Trainer nur
bestimmungsgemäß, benutze den
Trainer nicht für andere Zwecke als in
der Anleitung beschrieben.
Benutzen Sie den Trainer nicht wenn
Teile defekt oder beschädigt sind.
Wenn ein Teil beschädigt oder defekt
ist, wenden Sie sich bitte an ihrem
Händler
Halten Sie ihre Hände, Füße
und andere Körperteile von den
beweglichen Teilen fern.
•
PURE ROW 8.1
D
• Halten Sie ihr Haar von den
beweglichen Teilen fern.
• Tragen Sie geeignete Kleidung und
Schuhe.
• Halten Sie Kleidung, Schmuck
und andere Gegenstände von den
beweglichen Teilen fern.
• Vergewissern Sie sich, dass der
Trainer nur von einer Person auf
einmal benutzt wird. Der Trainer darf
nicht von Personen benutzt werden
deren Gewicht 150 Kg überschreitet.
• Öffnen Sie den Trainer nicht
ohne vorher mit ihrem Händler zu
sprechen.
• Folgen Sie die Anweisungen in dieser
Anleitung für die richtige Fuß-Position
und Ruder Grundtechniken.
WARNUNG
• Der Trainer kann vertikal stehen zum
Lagern. Stellen Sie sicher dass der
Trainer an einem sicheren Ort wie in
einer Ecke eines Raumes abgestellt
wird.
• Stellen Sie den Trainer auf einen
festen, ebenen Untergrund.
• Stellen Sie den Trainer auf eine
schützenden Unterlage um Schäden
am Bodenbelag zu vermeiden.
• Sorgen Sie für einen Freiraum von
mindestens 100 cm rundum den
Trainer.
Training
Das Training sollte leicht, geeignet aber
von langer Dauer sein. Aerobic-übungen
sind basiert auf die Verbesserung der
maximalen Sauerstoff-Aufnahme des
Körpers. Diese verbessert wiederum
die Kondition und Ausdauer. Sie sollten
Schwitzen aber nicht außer Atem
geraten während dem Training.
Um eine basis-Kondition zu bekommen
sollten Sie mindestens drei mal pro
Woche, 30 Minuten Trainieren. Erhöhen
Sie die Anzahl der Übungen um ihre
Kondition zu verbessern.
19
Es lohnt sich, die regelmäßigen
Übungen mit einer gesunden Diät
zu Kombinieren. Personen die eine
Diät machen sollten anfangs, täglich,
maximal 30 Minuten Trainieren und
diese zeit allmählich auf einer Stunde
verlängern. Starten Sie ihr Training
mit einer niedrigen Geschwindigkeit
und Widerstand damit der
Herzkreislaufsystem keine übermäßigen
Belastung ausgesetzt wird.
•
•
Wenn das Konditions-Level verbessert
können die Geschwindigkeit und der
Widerstand schrittweise erhöht werden.
Die Effizienz des Trainings kann durch
Überwachung der Herzfrequenz/Puls
gemessen werden..
Herzfrequenz messung
•
(HERZFREQUENZ BRUSTGURT)
Die genaueste Herzfrequenzmessung
wird mit einem Brustgurt erzielt. Die
Herzfrequenz wird mittels einen
Herzfrequenz-Empfänger und einen
Brustgurt gemessen. Für eine akkurate
Herzfrequenzmessung ist es erforderlich,
dass die Elektroden am Sender etwas
angefeuchtet sind und die Haut konstant
berühren. Sind die Elektroden zu trocken
oder feucht, wird die Herzfrequenz
weniger akkurat.
betriebsanleitung
20
•
•
•
•
•
HINWEIS
Tragen Sie den Brustgurt immer
unter ihre Kleidung, in direktem
Kontakt mit der Haut. Tragen Sie den
Brustgurt nicht über ihre Kleidung.
Wenn Sie den Brustgurt über ihre
Kleidung tragen wird kein Signal
übertragen.
Wenn Sie sich einen HerzfrequenzGrenzwert für ihr Training setzen,
ertönt beim überschreiten dieser
Herzfrequenz ein Signal.
Der Sender überträgt die
Herzfrequenz über einen Abstand bis
zu 1.5 Meter.
Wenn die Elektroden nicht
angefeuchtet sind wird die
Herzfrequenz nicht auf dem Display
übertragen.
Einige Kleidungsfasern (z.B.
Polyester, Polyamid) erzeugen
statische Elektrizität, diese kann
eine genaue Herzfrequenzmessung
verhindern.
Mobiltelefone, Fernsehgeräte und
andere Elektrogeräte erzeugen ein
Elektromagnetisches Feld das eine
Genaue Herzfrequenz verhindern
kann.
Maximale herzfrequenz
•
PURE ROW 8.1
HINWEIS
Das Produkt wird nicht Standard
mit einem Herzfrequenz-Empfänger
ausgerüstet.
Um den Trainer mit einem HerzfrequenzBrustgurt zu benutzen muss ein
Empfänger eingebaut werden. Dieser ist
als Kit erhältlich, Für weitere Information
zu diesem Umbau nehmen Sie bitte
Kontakt mit ihrem Händler auf.
VORSICHT
Falls sich mehrere HerzfrequenzMessgeräte in gegenseitiger Nähe
befinden, vergewissern Sie sich,
dass der Abstand zwischen diese
Messgeräte mindestens 2 Meter
beträgt.
Falls nur einen
Herzfrequenzempfänger aber
mehrere Herzfrequenz Sensoren
vorhanden sind, vergewissern Sie
sich dass sich nur eine Person mit
dem Sender Im Senderbereich
befindet.
•
WARNUNG
Falls Sie einen Herzschrittmacher
haben, wenden Sie sich an einem
Arzt, bevor Sie einen HerzfrequenzBrustgurt benutzen.
(WÄHREND DEM TRAINING)
Die Maximale Herzfrequenz ist
die höchste Herzfrequenz die eine
Person sicher erzielen kann. Die
folgende Formel wird zur Berechnung
•
Montage
betriebsanleitung
der durchschnittlichen maximale
Herzfrequenz benutzt; 220 – ALTER.
Die maximale Herzfrequenz variiert von
Person zu Person.
PURE ROW 8.1
D
Auspacken der Teile
WARNUNG
Stellen Sie sicher, dass Sie währen des
Trainings ihre maximale Herzfrequenz
nicht überschreiten. Falls Sie einer
Risikogruppe angehören, wenden Sie
sich an einem Arzt.
Anfänger: (50-60% der maximalen
Herzfrequenz)
Geeignet für Anfänger, GewichtBeobachter, Genesende und Personen
die schon lange nicht mehr trainiert
haben. Trainieren Sie mindestens
dreimal pro Woche 30 Minuten an einem
Stück.
Fortgeschrittene: (60-70% der
maximalen Herzfrequenz)
Geeignet für Personen die ihre Kondition
verbessern und halten wollen. Trainieren
Sie mindestens dreimal pro Woche 30
Minuten an einem Stück.
Experte: (70-80% der maximalen
Herzfrequenz)
Geeignet für die fittesten Personen,
die sich an langes Ausdauertraining
gewöhnt haben.
Das Paket enthält die Teile, wie in der Abbildung gezeigt.
Inhalt der verpackung
Stück
1
2
3
4
5
6
7
l8
9
10
11
12
13
Bezeichnung
Main frame
Seat rail (separate verpackt)
Rower seat
Horizontal seat rail bolt
(M10x120mm)
Washer (M10)
Nylock nut (M10)
Vertical seat rail tensioning bolt
(M10x150mm)
Plastic dome cap
Rear seat rail bump stop
Seat rail end cap
Rear leg
Seat rail bracket
Rear leg bolts-dome
(M10x120mm)
21
14
15
16
17
18
19
20
21
22
Montageschritte
AA Batteries (x2)
Multi tool
Hex key (8mm)
Hex key (6mm)
Owners manual
Siphon
Water treatment tablets (x4)
Vertical seat rail bolt dampener
Internal seat rail bolt bracket
MONTAGESCHRITT 1
Wenn ein Teil fehlt, kontaktieren Sie
ihren Händler.
Algemeine Montage
information
WARNUNG
• Bauen Sie den Trainer in der
gezeigten Reihenfolge auf.
• Tragen und verschieben Sie
den Trainer mit mindestens zwei
Personen.
Schieben Sie den rower seat (3) auf dem
seat rail (2, wie abgebildet.
•
betriebsanleitung
•
PURE ROW 8.1
VORSICHT
• Stelle den Trainer immer auf eine
feste, ebene Oberfläche.
• Stelle den Trainer auf eine
schützende Unterlage um Schäden
am Bodenbelag zu vermeiden.
• Allow at least 100 cm of clearance
around the equipment.
22
Refer to the illustrations for the correct
assembly of the equipment.
NOTE
Der rear end hat zwei
Befestigungslöcher.
MONTAGESCHRITT 2
Für den nächsten Montageschritt
brauchen Sie die untenstehenden Teilen:
• ·rear leg (11)
• ·2x rear seat rail bump stops (9))
• ·2x rear leg bolts (M10x120mm) (13)
• ·2x washer (5)
• ·seat rail bracket (12)
• ·rubber end cap (10)
• ·internal seat rail bracket (22)
betriebsanleitung
•
PURE ROW 8.1
D
MONTAGESCHRITT 3
•
•
NOTE
Das ovale Ende vom seat rail bracket
(12) zeigt nach vorne, wie abgebildet.
Drehe den bolt (13) nicht fest.
MONTAGESCHRITT 5
Drehe die rear rubber bumpstops (9) auf
dem Ende vom seat rail (2) (MIt dem
seat auf dem rail,montiert) wie
abgebildet.
MONTAGESCHRITT 4
Installere den rubber end cap (10).
MONTAGESCHRITT 6
Stecke den internal seat rail backet (22)
in dem rear end vom rail und richten
Sie das internal seat rail bracket Loch
mit dem Loch im seat rail.
• Stecke den bolt (13) mit washer (5)
im vorgesehenen Loch im seat rail
bracket (12) im seat rail vorderem
bolt hole und dem internal seat rail
bracket.
• Sichern Sie die Schraube im rear leg
(11).
23
MONTAGESCHRITT 9
Beende die rear leg Montage durch den
zweiten rear leg bolt (13) und washer (5)
zu montieren.
• Ziehen Sie beide Schrauben fest.
Seien Sie vorsichtig beim festziehen der
Schrauben um Kratzer zu vermeiden
MONTAGESCHRITT 7
Installiere und sichere die zwei bolts (4)
und washers (5) mit den nylock nuts (6).
MONTAGESCHRITT 10
Für den nächsten Montageschritt
brauchen Sie die untenstehenden Teilen:
• seat rail assembly (vormontiert)
• main frame (1)
• 2x horizontal seat rail bolts
(M10x120mm) (4)
• 2x washer (5)
• 2x nylock nuts (6)
MONTAGESCHRITT 8
betriebsanleitung
•
PURE ROW 8.1
•
24
Schieben Sie den seat rail bis, gerade
hinter, den footplate. Oben werden
die Installations- und Ausrichtepunkte
für den horizontalen seat rail bolt (4),
M10 washer (5) und nylock nut (6),
abgebildet.
•
Installiere den vertical seat rail bolt
(7) mit dem Plastik dome cap (8)
durch dem seat rail assy.
Montiere den vertical seat rail
bolt dampener (21) auf dem
aussteckendem Bolzen vom seat rail
assy.
HINWEIS
Der vertical seat rail dampener ist
entworfen um die Lücke zwischen dem
seat rail und das mainframe zu dichten
wenn der Trainer in Aufrechter Position
weggestellt wird.
betriebsanleitung
MONTAGESCHRITT 11
•
Befestigen den seat rail bolt mit dem
seat rail bolt dampener im unterem
main frame (1).
Drehen den bolt (7) nicht fest.
Die vertikale seat rail tensioning
bolt (7) ist so entworfen das Sie, im
unbelastetem Zustand, den mid leg
etwa 3-5mm vom Boden weg hält und
nur unter der Belastung, während der
Ruderbewegung zu einem leichten
Berühren des Bodens führt.
HINWEIS
Falls es während dem Rudern zu einem
starken schütteln oder hüpfen des Tanks
kommt bedeutet dies, dass die vertikale
seat rail tensioning bolt (7) nicht richtig
eingestellt ist.
Einstellen vom
Ruder-Wiederstand
(EINSTELLBARER WASSERSTAND)
Der patentierte einstellbare Wasserstand
bietet ihnen ein multi-level Erlebnis.
Wasser wird zwischen der “aktiven
Kammer” und der „Lagerkammer“, je
nach Einstellung, verteilt. Ihr neuer
•
PURE ROW 8.1
D
Tunturi Rudergerät kann sich mit
dem drücken einer Taste, sofort am
bevorzugten Widerstandswert vom
jeweiligem Benutzer anpassen.
MAX:
Bei dieser Einstellung befindet sich das
meiste Wasser am Schaufelrad wodurch
der stärkste Widerstand erzeugt wird.
MIN:
Bei dieser Einstellung bleibt die größte
mögliche Wassermenge im ReserveTank wodurch der leichteste Widerstand
erzeugt wird.
Erste Schritte
Um den niedrigsten Widerstand
einzustellen stellen sie den Einstellhebel
auf : „MIN“.
Es dauert etwa 10 Ruderbewegungen
bis das Wasser den Zentralen
Speicherbereich des Tanks füllt und sich
nur ein minimaler Teil im aktiven Bereich
des Tanks befindet. Dieser Vorgang
muss immer durgeführt werden, bevor
der niedrigste Widerstandsstufe erreicht
wird.
Rudern Sie hart bei gleichbleibender
Geschwindigkeit (etwa 20 bis 25
Ruderschläge pro Minute (SPM)). Legen
Sie entsprechend Kraft hinter jeden
Ruderschlag und achten Sie dabei auf
ihrer Haltung.
Sie können den Schwierigkeitsgrad
jederzeit während des Ruderns
anpassen. Ihr Trainer wird sich
fast sofort auf den anderen
Schwierigkeitsgrad einstellen. Es wird
aber bis zu 10 Ruderschläge benötigen
bis sich das Wasser neu verteilt hat und
Sie die neue Einstellung spüren.
25
Sobald Sie ihren erwünschten
Schwierigkeitsgrad gefunden haben
können Sie, mittels Veränderung des
SPM-ubd die Ruderintensität noch mehr
Abwechslung in ihrem Training bringen.
Die meiste Ruderer benutzen ein
Intervall Training bei dem Perioden
mit niedrigem und Hohen Widerstand
kombiniert werden. Ihr Tunturi
Rudergerät erlaubt unmittelbare
Änderungen ohne das Sie ihr Training
unterbrechen müssen. Damit Sie mit
einem einzigen Training ein vielstufiges
Widerstandsprofil erreichen können.
Tankfüllung und
Wasserbehandlung
Den Tank füllen
•
•
•
•
WARNUNG
Falls der Widerstandknopf vor der
Füllung nicht auf MAX gestellt wird,
kann das zu fehlerhafte Füllung leiten
was austreten von Wasser zu Folge
haben kann.
•
•
betriebsanleitung
•
PURE ROW 8.1
•
26
•
•
Stellen Sie den Widerstandsknopf auf
MAX
Entfernen Sie den Gummistöpsel auf
der Oberseite des Tanks.
Platziere einen Großen Eimer mit
Wasser neben dem Gerät und
stecken Sie das flexible Ende
im Tank und das Starre Ende
der Handpumpe im Eimer, wie
abgebildet. Stellen Sie sicher, dass
das Entlüftungsventil am oberen
Ende der Handpumpe geschlossen
ist bevor sie anfangen den Tank zu
füllen.
HINNWEIS
Es werden 17 Liter Wasser benötigt
um eine Maximale Füllung zu
gewährleisten.
Sollte die Wasserqualität in ihrer
Umgebung bekanntermaßen schlecht
sein, dann empfehlen wir ihnen
destilliertes Wasser zu verwenden.
Stellen Sie den Wassereimer höher
als den Tank, so kommt es zu einem
„Selbs-Full“ Effekt.
Benutzen Sie ein Handtuch unter
dem Eimer und dem Tank um
Flecken auf dem Fußboden zu
vermeiden.
•
Beginnen Sie die Füllung
des Tanks indem Sie die
Handpumpe zusammendrücken.
Benutze den Aufkleber mit der
wasserstandanzeigen auf der
Seite des Tanks um den jeweiligen
Wasserstand im Tank abzulesen.
Nachdem Sie den Wasserstand
im Tank auf dem von ihnen
gewünschten Niveau gebracht
haben, öffnen Sie das
Entlüftungsventil auf der Oberseite
der Handpumpe um das überflüssige
Wasser ausfließen zu lassen.
Stellen Sie sicher, dass der Tank
Plug nach der Wasserfüllung
oder Wasserbehandlung wieder
eingeschraubt wird.
Entfernung vom wasser aus
dem tank
•
•
Stellen Sie den Widerstandsknopf auf
MIN.
Rudern Sie mindestens zehn
Ruderschläge um so viel wie möglich
Wasser im inneren Speicherbereich
des Tanks zu pumpen.
betriebsanleitung
•
•
•
•
•
Entferne des Entlüftungsventil ( tank
plug).
Stecken Sie das Starre Ende der
Handpumpe im Tank.
Stecken Sie das flexible Ende der
Handpumpe im Eimer.
Entleere den Tank (etwa 40% vom
Wasser bleibt im Tank, es ist nicht
möglich den Tank ganz zu leeren
ohne diesen zu demontieren).
Füllen Sie den Tank wie beschrieben
in “den Tank füllen” in dieser
Anleitung.
•
PURE ROW 8.1
D
Wasserbehandlung
•
•
•
Füge dem Wasser im Tank eine
wasserbehandlungs-Tablette zu (20).
Füge eine WasserbehandlungTablette zu wenn das Wasser
verschmutzt oder wolkig ist.
WARNUNG
Verwenden Sie nur die von Tunturi
gelieferten WasserbehandlungsTabletten.
Verschiebbare
Fußrasten
Die einstellbare Fußrasten sind so
entworfen das Sie für einen breiten
Bereich von Faustgroßen einstellbar
sind.
•
•
•
HINWEIS
Das Entlüftungsventil (Tank Plug)
auf der Oberseite der Handpumpe
muss geschlossen sein um eine
korrekte Funktion der Handpumpe zu
erreichen.
Wenn die Wasserbehandlung
korrekt durchgeführt wird ist es nicht
notwendig das Wasser im Tank zu
erneuern. Zusätzliche Chlortabletten
sind nur bei eventueller Verfärbung
vom Wasser notwendig.
Aussetzung an direktem
Sonnenlicht kann ein negatives
Effekt auf dem Wasser haben.
Eine Aufstellung außerhalb direkter
Sonneneinstrahlung verlängern
die Zeitspannen zwischen den
Wasserbehandlungen.
Anpassen der Fußrasten
Heben Sie die obere Seite und schieben
Sie die Fußrasten in der gewünschten
Position. Die nummern 1-6 stellen einen
Richtwert da von welchem man die
Fußrasten ausrichten kann. Richten Sie
die Fußraste, mit den Haltestiften aus
und drucke diese dann fest runter um die
Position zu fixieren.
Ziehe die Fußriemen und beginnen Sie
ihr Training.
27
WARNUNG
Benutzen Sie das Rudergerät nicht ohne
das Sie ihre Füße in den Fußrasten
festgezogen haben. Achten Sie auch
darauf, dass die Fußrasten richtig auf
den Haltestiften eingerastet sind!
Richtig Rudern
Vorlage
Angenehm nach vorne
mit gestreckte Arme
und Rücken.
Durchzug
Drücke mit den Beinen
nach hinten während
die Arme gestreckt
bleiben.
Rücklage
Ziehe mit den Armen
und Beinen durch bis
Sie leicht nach hinten
lehnen.
Vorziehen
Oberkörper nach
vorne lehnen und
Körper nach vorne
bewegen.
betriebsanleitung
•
PURE ROW 8.1
Vorlage
28
Gehen Sie zurück in
die Ausgansposition
und wiederholen Sie
den Vorga.
Vorlage - Durchzug
Beginnen Sie mit angenehm nach
vorne gestreckten Armen und Rücken.
Drücken Sie die beine nach hinten, die
Arme und der Rücken bleiben gestreckt.
Rücklage
Ziehe die Arme zurück sobald diese über
die Knie sind und ziehe diese durch bis
Sie leicht nach hinten lehnen.
Vorlage
Gehe zurück zur Ausgangsposition und
wiederholen Sie den Vorgang.
Wie oft
Beginnen Sie ihr Training mit
Trainingszeiten von 5 Minuten, einmal
Täglich und richten Sie sich auf einer
Ruderzeit von etwa 2:30 bis 2:45 je
500m. Rudere auf einer Geschwindigkeit
wobei das Wasser kontinuierlich
zirkuliert zwischen den Zügen.
Steigere das Training jeden Tag mit ein
par Minuten bis Sie Komfortabel 30-45
Minuten Trainieren. Trainiere 3 bis 4 mal
die Woche.
Dies ist ausreichend um ihre Ausdauer
zu steigern, Muskeltraining zu betreiben
und genügend Kalorien zu verbrennen
für eine Gewichtsabnahme.
•
•
WARNUNG
Kontaktiere immer ihren Arzt bevor
Sie ein Trainingsprogramm beginnen.
Stoppen Sie direkt wenn Sie sich
schwindlig oder unwohl fühlen.
Ruder Computer
Auto Start:
Beginnen Sie mit rudern um den
Computer zu aktivieren.
HOLD TO RESET:
Drücke die DISTANCE Taste 3
Sekunden um den Computer neu zu
starten.
Distance:
Mit jedem druck der distance Taste wird
1000m an der Ruderdistanz zugefügt.
Sobald die gewünschte Ruderdistanz
eingestellt ist können Sie anfangen zu
Rudern.
betriebsanleitung
Auto-Pause:
Eine zeitweilige Unterbrechung des
Trainings führt zu folgenden Resultaten:
Für mehr als 5 Sekunden aber weniger
als 5 Minuten.
• SPM / 500M TIME / WATT werden
auf 0 zurückgesetzt.
• DISTANCE und TIME Werte werden
gespeichert.
• CAL HOUR stellt automatisch auf
gesamtkalorienverbrauch um.
Wiederbeginnen vom Training innerhalb
von 5 Minuten, das Training wird
fortgesetzt.
DISTANCE und TIME starten
automatisch vom gespeicherten Wert.
•
PURE ROW 8.1
D
PULSE Fenster:
Herzfrequenz, benötigt
Herzfrequenzempfänger und Brustgurt
(als Kit erhältlich).
SPM Fenster:
Schläge pro Minute, wird nach jedem
Schlag aktualisiert.
CAL HOUR Fenster:
Kalorienverbrauch pro Stunde, wird nach
jedem Schlag aktualisiert.
WATT Fenster:
Erzeugte Leistung (W), wird nach jedem
Schlag aktualisiert.
Auto Abschaltung:
Bei Unterbrechung, länger als 5 Minuten
schaltet der Computer aus.
Alle Werte werden bei Wiederbeginn auf
0 gestartet.
Benutze die gelbe LEVEL UP / DOWN
Taste auf dem Computer in Verbindung
mit dem Einstellhebel auf dem Tank um
korrekte Werte für 500M/Distanz/CAL/
WATT zu erhalten.
TIME Fenster:
Seit dem Autostart vergangene Zeit.
500M TIME Fenster:
Zeit für die 500m Ruderstrecke
benötigt wird, wird nach jedem Schlag
aktualisiert.
29
Abnehmen des
Rudergurts
Löse das Seil oder schneide den
Kabelbinder durch womit der Rudergurt
befestigt ist. Diese Befestigung befindet
sich unten am Hauptrahmen.
Montieren des
Rudergurts
•
•
Beginnen Sie mit den Gurt wieder auf
die Gurtrolle zu ziehen.
Der Klettverschluss muss nach oben
gerichtet sein wie abgebildet.
Ziehe den Gurt durch alle drei
Umlenkrollen und lassen Sie den
Überschuss zunächst auf der
Tankoberseite liegen.
betriebsanleitung
•
PURE ROW 8.1
•
30
Um den Gurt abzunehmen ziehen
Sie einfach weiter als die normale
Ruderlänge bis sich der Gurt von der
Gurtrolle zu lösen beginnt.
HINWEIS
Sie können es hören sobald der
Klettverschluss sich anfängt zu lösen
bevor der Gurt sich ganz löst.
Als nächstes fädeln Sie den Gurt
um den Leerlaufrad so wie oben
abgebildet.
Sobald der Gurt um das Leerlaufrad
gewickelt ist können Sie den Gurt an
der Gur- und Gummizugrolle befestigen.
Die korrekte stelle ist mit einem klar
sichtbaren Rand gekennzeichnet.
betriebsanleitung
•
Rolle den Rudergurt solange auf die
Gurt- und Gummizugrolle bis sich
der Rudergriff auf seiner vordersten
Position befindet.
•
•
PURE ROW 8.1
D
Wenn der Rudergriff währen deines
Ruderschlages das Ende der
Sitzschiene nicht erreichen kann,
dann ist der Gummizug überspannt
und sollte etwas zurück gestellt
werden.
Fehlerbehebung
Wasser ändert die Farbe und zieht
flockig aus.
•
6. Führe den Gummizug durch
das obere Rahmenloch. (auf der
gegenüberliegende Seite des
Leerlaufrades) Dann durch den
mittlere Rahmen zur bungee pulley
GUMMIZUG ROUTE (ROTE LINIE)
Mögliche Ursache:
Rudergerät steht in direkter Sonnenbestrahlung oder die Wasserbehandlung ist
nicht durchgeführt.
Lösung:
• Ändere den Standort außerhalb
direkter Sonneneinstrahlung.
• Behandle das Wasser wie
beschrieben in “Tankfüllung und
Wasserbehandlung“.
Rudergurt rutsch vom Gummizug.
Mögliche Ursache.
Rudergurt hat eine zu niedrige
Spannung.
•
•
HINWEIS
Wenn die Spannung des
Gummizuges zuvor korrekt war
(einfach festzustellen - wenn sich
der Rudergriff nur mit der Spannung
des Gummizugs alleine bis zum
vordersten Punkt am Hauptrahmen
zurück zieht) dann befestigen
Sie diesen einfach wieder an der
gleichen Stelle wie zuvor.
Wenn der Rückzug zu schwach
ist, experimentieren Sie einfach in
dem Sie die Spannung in kleinen
Schritten erhöhen und diese dann
ausprobieren bis Sie die gewünschte
Spannung erreichen.
Lösung:
• Ziehen Sie den Gurt nach wie in
“Montieren des Rudergurts”, in dieser
Anleitung, beschrieben..
Front of rower lifts slightly during
vigorous rowing.
Mögliche Ursache:
Vertikale Schienen Bolzen
(M10x150mm) ist zu locker.
Lösung:
• Ziehe den Bolzen 1/2 Umdrehung
fest und rudere wieder. Ziehe den
Bolzen nach bis das Problem gelöst
ist.
Überspannung vom Bolzen kann die
Sitzschiene beschädigen. Ziehen
31
Sie den Bolzen jedes mal ein kleines
Stückchen nach.
Der Computer leuchtet nicht auf
nachdem die Batterien ausgetauscht
sind.
Mögliche Ursache:
Batterien sind falsch eingelegt oder
müssen ausgetauscht werden.
Lösung:
• Lege die Batterien in korrekter
Position ein und versuche es
nochmal.
• Wenn das LCD Fenster nicht
aufleuchtet, versuchen Sie die
Batterien leicht zu drehen.
• Sollte das den Fehler nicht beheben,
nehmen Sie bitte Kontakt auf mit
Ihrem Händler
•
Der Computer leuchtet auf, registriert
nicht während des Ruderns.
Mögliche Ursache:
Lockere oder Fehlgeschlagene
Verbindung.
betriebsanleitung
•
PURE ROW 8.1
Lösung:
• Überprüfe ob die Kabelverbindung
richtig angeschlossen und die Kabel
nicht beschädigt sind.
• Wenn die Kabel richtig
angeschlossen und unbeschädigt
sind, nehmen Sie bitte Kontakt auf
mit Ihrem Händler
32
Garantie
Das Ankaufdatum ist Garantie-Datum.
Das Produkt hat Garantie ab dem
Rechnungsdatum. Rechnungskopie ist
Garantie-Beleg.
Weitere Garantiebedingungen können
Sie bei ihrem Händler nachfragen.
Die Garantiebestimmungen können von
Land zu Land unterschiedlich sein.
Beschädigungen durch normalem
Gebrauch, Überbelastung oder
unsachmässiger Behandlung sowie
Transportschäden oder Teileverluste
sind von der Garantie ausgeschlossen.
Schäden die durch Material- oder
Herstellungsmängel entstehen sind von
der Garantie abgedeckt und werden
Kostenlost hergestellt.
Erklärung des
Herstellers
Tunturi New Fitness BV erklärt, dass
das Produkt die folgenden Normen und
Richtlinien EN 957 (SC), 89/ 336/ EEC.
The product therefore carries the CE
label.
09-2014
Tunturi New Fitness BV
P.O. Box 60001
1320 AA Almere
The Netherlands
Haftungsausschluss
© 2014 Tunturi New Fitness BV
All rights reserved.
Das Produkt und die Anleitung können
geändert werden.
Produktspezifikationen können, ohne
vorherigen Bericht, geändert werden.
Owner ’s manual
•
PURE ROW 8.1
GB
Specifications
Product
RESISTANCE SYSTEM
Adjustable water resistance, tank
volume up to 17 ltr (4,5 gal)
PRODUCT
Folding ............ NO (standing straigth up)
Power supply ............................... Battery
Heigth.............................................52 cm
Length. ........................................217 cm
Width..............................................51 cm
Weigth. ........................................26,2 kg
Max. userweigth ............. 150 kg /330 lbs
MONITOR
Display....................... LCD Monochrome
Programs................Manual + 500 m time
Ergometer.......................................... Yes
Control......................................... Buttons
QUALITY
EN-957 CLASS ..................................SA
NOTE
The Pure Rower 8.1 does not come with
a standard build in heart rate receiver.
A heart rate receiver kit is available and
can be purchased separately.
Tunturi New Fitness item number for the
Heart rate receiver kit is: 14TRW08011
• This kit does not come with the chest
strap
• The heart rate receiver kit is a 5,4
Khz receiver type of module.
33
Spare parts
#
1
2
3
4
5
6
7
8
9
10
11
12
13
14
15
Owner ’s manual
•
PURE ROW 8.1
16
17
18
19
20
21
22
23
24
25
26
34
27
28
29
30
31
32
33
34
35
36
37
38
Description
Counter sunk tapping screw
(M3x20 sus)
Nylock nut (M10)
Seat
Washer (M6x16x1)
Washer (M10x21x2)
Nylock nut (M6)
Foot strap & buckle
Handle grip
Handlebar O-ring
Handle bar & belt
End cap rear rail support
(50x100)
Bolt (M8x60)
Decal (how to row)
Handlebar rubber cover
Foot levelers (M8x30) hardened
rubber
Nylock nut (M5 -b)
Bungee pulley spacer (8mm)
Bungee pulley (50mm)
Belt pulley spacer (10mm)
Belt pulley 100mm & 2x bearing
Main shaft oil bushing - lower
Sensor disk (& 6x24)
Roll pin (6mm)
Magnet (5x4)
Dome head bolt (M8x65)
Round head phillips screw
(M3x20 sus)
Nylock nut (M3 sus)
Impeller end cap
Tank internal screw (M6x15 sus)
Computer mount plastic bushing
Speed sensor (300mm)
Frame plug (Ø 38.1)
O ring 9.5x6.5x1.5
Main shaft nylon bushing - upper
Round end cap (Ø 76.2 )
Transport wheel fastener
Transport wheel 76.2
Lower frame end cap (25x50)
Qty
12
1
1
2
4
2
2
2
2
1
2
3
1
1
2
8
4
1
2
1
1
1
2
6
1
24
24
1
3
2
1
1
2
1
4
4
2
2
39
40
41
42
43
44
45
46
47
48
49
50
51
52
53
54
55
56
57
58
59
60
61
62
63
64
65
66
67
68
69
70
71
72
73
74
75
76
Plastic spacer (15*6*2.5t)
Bungee cord (8mmx1950)
Washer (M8.5x19x1.6t)
Nylock nut (M8)
Plastic dome cap (10mm)
Belt/bungee compl. & bearings,
velcro
Tank bonding strip 3m-vhb
Dome head bolt (M5x15)
Internal seat rail supp. bracket
Curved washer (M10 )
Dome head bolt for seat rail
(M10x120)
Hex head bolt (M10x120)
Dome head bolt (M10x150)
Vertical seat rail bolt dampener
Tank plug for hs tank
Hex head bolt (M10x120)
Idle wheel compl. with bearing
& shaft
Rubber end cap - main frame
Seat wheel
Dome head bolt (M8x70 -b)
Dome head bolt (M10x60 -b)
Washer (8.5x19x1.6t - b)
Grub screw (M4x6 - b)
Nylock nut (M8 -b)
Decal (Tank water level)
Seat wheel short spacer
(12.7x8.1x13 - b)
Plastic spacer for ar tank
Impeller
Lower outter tank shell
Upper outter tank shell
Inner reserve tank shell
Decal (Resistance knob)
Pulley 50mm with bearing &
spacer
Grub screw (M3x12 sus)
Velcro for sliding footplate
Footrest plate slider
Footrest plate slider base
Tank upper/ lower shell seal
2
1
1
1
1
1
4
8
1
4
2
1
1
1
1
4
1
1
6
1
1
12
1
11
1
6
1
1
1
1
1
1
2
4
2
2
2
1
Owner ’s manual
77
78
79
80
81
82
83
84
85
86
87
88
89
90
91
92
93
94
95
96
User interface
Upper main frame
Lower main frame
Rear rail support
Seat rail rail end cap
Seat rail profile
Decal (How to adjust
resistance)
Tank adjuster outer cup
Tank adjuster inner cup
Adjuster knob
End cap-adjuster knob
Rail support assembly bracket
Rubber bumper
Spacer for seat
Seat frame bracket
Hex head bolt (M8x45)
Rubber hook cover
Bearing for bungee pulley
Velcro for bungee pulley
Belt bungee pulley complete kit
•
PURE ROW 8.1
GB
1
1
1
1
1
1
1
1
1
1
1
1
1
2
2
2
2
2
1
1
Complete pre assembled parts
Seat rail set (&82)
Seat frame and wheel assembly
Handlebar complete (&
8,9,10,14)
Tank assembly complete
Extra parts not shown in drawing
Siphon
Hardware kit
Water treatment tablets - 4 tabs
Owners manual
35
Owner ’s manual
•
PURE ROW 8.1
Exploded view
36
Owner ’s manual
•
PURE ROW 8.1
GB
Siphon
water treatment tablets
37
www.tu n tu r i.com
Tunturi New Fitness B.V.
P.O. Box 60001
1320 AA
The Netherlands
www.tunturi.com
20140918