1
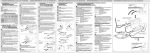
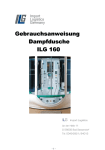
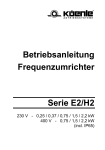
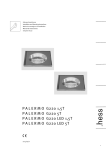
• Installation and Maintenance Instructions
• Instructions d’installation et d’entretien
• Installations- und Wartungsanleitungen
2
1
>50cm
>20cm
4
3
5
Installation Instructions
READ AND FOLLOW ALL
INSTALLATION INSTRUCTIONS
DANGER - To avoid possible electric shock,
special care should be taken since water is
employed in the use of aquarium equipment.
For each of the following situations, do not
attempt repairs by yourself; return the appliance
to an authorised service facility for service facility
for service or discard the appliance:
SAVE THESE INSTRUCTIONS!
This product is designed for indoor use and the
illumination of aquariums and terrariums only
and will provide a good and safe service life
provided that these instructions are followed.
Failure to do so may result in serious personal
injury or property damage.
If you are in any doubt about the installation or
operation of this product, please consult a
qualified and experienced electrician.
Check that the voltage and frequency rating on
the product label is the same as your electrical
supply before proceeding further.
WARNING - To guard against injury, basic
safety precautions should be observed,
including the following:
Maintenance
1. Caution! Disconnect all appliances in the
aquarium from the mains supply before
putting your hands in the water or
maintaining the pendant.
2. Always support the pendant when adjusting
its height and physically prevent it from
falling onto the aquarium or into the water.
3. Do not operate pendant less than 20cm
above the maximum possible water level in
the aquarium.
4. Do not operate pendant closer than 50cm
to the ceiling.
5. Do not operate pendant in an enclosed or
hooded aquarium.
6. Regularly check the security of all parts of
your hanging mechanism. See illustration 1.
7. The luminaire can get very HOT. Never
touch the pendant while it is operating and
allow adequate time for it to cool before
attempting any maintenance.
8. Harmful UV output! Never operate the
pendant without the protective shield.
Replace any cracked protective shield.
9. Do not operate the pendant with defective
or ‘end of life’ lamps - Circuit damage may
occur. Replace lamps promptly with a lamp
of the correct type and correct wattage. It is
advisable to keep spare lamps in readiness.
Physical Installation
Select a suitable site close to your electricity
supply. You should take into consideration the
electrical supply rating of your outlet and wall
and the strength of your ceiling or wall structure.
Do not connect you luminaire to a power
supply during installation. The Luminaire is
suitable for indoor use only, and must only be
placed above an Aquarium not less than 20cm
above the maximum possible water level.
See illustration 2.
This luminaire does not have special protection
against the ingress of water and should always
be kept dry, ventilated and away from other
heat sources.
It is preferable to install your pendant with a
clear and unobstructed space below. However,
if installing over an existing aquarium, take
adequate precautions to protect it from drilling
dust, tools, or any other falling objects.
Make sure that the light from the luminaire is
aimed solely at the water within the aquarium.
Do not allow the light to spill out, as looking
directly into some lamps for more than a few
minutes could be harmful to the human eye.
The pendants are heavy so ensure that your
fastenings, and the wall or ceiling position you
are fixing them to, are suitable.
Where ceilings are not suitable because of their
height or construction, the Arcadia ‘Wall Mount’
bracket allows pendants to be mounted on the wall.
Wire Suspension Kit:
Comprises of the following parts:
A. Ceiling attachment.
B. Screw cap.
C. Suspension wire with bead.
D. Quick-adjust holder.
2
Installation and Maintenance Instructions
Fixing centres for this method can vary, but we
would advise a distance between fixing centres of
approx 2/3 of the Pendant length. The bracket
supporting the Quick-adjust holder can be moved
and locked into the correct position easily.
The following MINIMUM screw sizes should be
used, when fixing the suspension system:
• M5 Machine screws. M5 screws will fix
directly into the suspension ceiling barrel.
• 50mm long x 4mm (shaft) wood screw.
Securely fix the ceiling attachments to your ceiling
using the most suitable method of fastening,
either screws or nuts and bolts. Pass the
suspension wire through the screw cap, so that
the bead sits inside. Tightly screw the screw cap
into the ceiling attachment. It is advisable to
tighten it with a spanner to ensure that it will not
come undone accidentally. You will need to hold
the ceiling attachment in a pair of pliers with a
soft cloth to avoid scratching it.
When both suspension wires are in place, feed
the wires down through the buttons on top of
the Quick-adjust holders which will automatically
hold the wires in position. To lower the height of
the pendant, support the pendant one end at a
time, and release the wire by depressing the
button at the top of the Quick-adjust. To raise
the pendant, support it and pull the wire through
the hole in the side of the Quick-adjust holders.
When adjusting the pendant always ensure that
there is sufficient wire to achieve your target height.
Always leave a minimum 10 mm of wire showing.
Excess wire can often be concealed in the channel
on the top. If cutting the wire, wrap the wire with
masking tape and cut with sharp, heavy duty side
cutters.
Electrical Installation
This appliance must be earthed and the circuit
must be protected by a suitable fuse!
This unit must be protected by a suitable fuse.
Before installing, ensure that the rated voltage
and frequency of the luminaire match that of
your supply, and that the mains lead plug is fully
compatible with your mains socket. If in doubt,
please return the unit to the point of purchase
to verify.
3
Important!: Fusing.
When discharge lamps are switched on, the
current drawn from the supply can be analysed as:
Inrush current - for a few milliseconds
Starting current - for a few minutes
Running current - after the lamp has stabilised.
The fuse that protects the circuit must withstand
all of the above currents with the inrush current
normally being the most onerous (up to 25 x
starting current). Ensure that a correctly rated
fuse is used. Nuisance tripping is possible on
some types of modern current limiting devices,
and they may not be suitable. Consult your fuse
or circuit breaker manufacturer for advice.
Increasing fuse ratings will also mean that the
supply cable size may need to be reviewed to
support the higher fuse rating.
The current ratings above will also apply to any
timer switch apparatus connected to the
circuit(s) or other switching apparatus
controlling the circuit(s).
Ensure your domestic wiring supply is rated
appropriately.
EARTHING (GROUNDING)
INSTRUCTIONS
This appliance should be earthed to minimise the
possibility of electric shock. This appliance is
equipped with an electric cord having an
equipment earth wire conductor and a grounding
type plug. The plug must be plugged into an
outlet that is installed and earthed in accordance
with all appropriate codes and ordinances.
Safety and Maintenance Instructions
IMPORTANT!
the cord and coming in contact with the
socket. See illustration 3
ALWAYS COMPLY WITH THESE
INSTRUCTIONS
Close supervision is necessary when any
appliance is used by or near children.
WARNING - To guard against injury, basic
safety precautions should be observed,
including the following:
To avoid injury, do not contact moving parts or
hot parts such as heaters, reflectors, lamp
bulbs, and the like.
READ AND FOLLOW ALL
SAFETY INSTRUCTIONS.
Always unplug an appliance from an outlet
when not in use, before putting on or taking
off parts, and before cleaning. Never pull on
the cord to remove the plug from the socket.
Instead, grasp the plug and pull to disconnect.
DANGER - To avoid possible electric shock,
special care should be taken since water is
employed in the use of aquarium equipment.
For each of the following situations, do not
attempt repairs by yourself; return the
appliance to an authorised service facility for
service facility for service or discard the
appliance:
Do not use this luminaire other than for the
intended use. The use of non- Arcadia
attachments or accessories is not recommended,
and may cause an unsafe condition.
1. If the appliance falls into the water, DON’T
reach for it! First unplug it and then retrieve
it. If electrical components of the appliance
get wet, unplug the appliance immediately.
Make sure the luminaire is mounted securely
over the tank before operating it.
2. If the appliance shows any sign of abnormal
water leakage, immediately unplug it from
the power source.
3. Carefully examine the appliance after
installation. It should not be plugged in if there
is water on parts not intended to get wet.
4. Do not operate any appliance if it has a damaged
cord or plug, or if is malfunctioning or has been
dropped or damaged in any manner.
If the cord or plug of this luminaire is
damaged, it shall be exclusively replaced by the
manufacturer or his service agent or a similar
qualified person in order to avoid a hazard.
5. To avoid the possibility of the appliance plug
or socket getting wet, position the aquarium
stand and tank to one side of a wall mounted
socket to prevent water from dripping onto
the receptacle or plug. The “drip loop”,
shown in the figure below, should be
arranged by the user for each cord connecting
an aquarium appliance to a socket. The “drip
loop” is that part of the cord below the level
of the socket, or the connector if an extension
cord is used, to prevent water travelling along
Do not install or store the appliance where it
will be exposed to the weather or temperatures
below freezing.
Read and observe all the important notices on
the appliance.
If an extension cord is necessary, a cord with a
proper rating should be used. A cord rated for
less amperes or watts than the appliance
rating may overheat. Care should be taken to
arrange the cord so that it will not be tripped
over or pulled.
This product is designed for indoor use only!
Lamp Installation
Normally, after factory testing, your pendant
lamp(s) and protective shield(s) are removed
and packed separately inside the box to avoid
damage in transit. Although normal
maintenance will later be carried out with the
pendant hanging, it is easier at this stage to reinstall the lamp(s) and protective shield(s)
before fixing the pendant.
Protective Shields: See illustration 4
To protect against water ingress, lamp explosion
and UV output:
Never operate the pendant without the
protective shield and replace any cracked
4
Safety and Maintenance Instructions
protective shield immediately. Metal halide
lamps use a special glass protective shield.
Check that the luminaire is rated for the same
supply voltage that you are using.
Only use the recommended lamp type for the
purchased unit.
For installation and removal of the following
lamp types:
Check that the Lamps are of the correct
wattage, type and length for the luminaire.
Metal Halide Lamps:
Try to keep fingers off the lamps and remove
any marks or fingerprints with alcohol or
methylated spirit and a clean rag. It may be
easier to hold the lamp in a clean rag or tissue
while installing it, ensuring that no loose
strands of fibre become trapped. Install all
metal halide lamps firmly, but without undue
force.
Metal halide with Rx7s lampcaps (150W)
Locate one end of the lamp on to one of the
sprung lampholder contacts, then push the
lamp against the lampholder contact until
sufficient space is available to locate the other
end of the lamp on to the corresponding
lampholder contact. See illustration 5
To remove a 150W lamp repeat the process in
the reverse order.
Troubleshooting
Metal Halide Lamps:
High intensity discharge lamps such as metal
halide take a few minutes (2-4 min) after
striking to reach their operating temperature
and full brightness (Run-up time). When
extinguished the lamp will then need to cool
down (5-10 min) before it will then re-light.
(Re-strike time).
LEDs:
These should be maintainence free for the life
of the product. If the LEDs do not light up,
please send back to Classica for a servicing.
If the luminaire does not light:
Check that the mains power is connected and
switched on both at the wall and at the switch
on the timer.
5
Maintenance
Caution! Disconnect all appliances in the
aquarium from the mains supply before putting
your hands in the water or maintaining the
pendant.
Always support the pendant when adjusting its
height and physically prevent it from falling
onto the aquarium or into the water.
Regularly check the security of all parts of your
hanging mechanism.
Cleaning: Always clean the pendant when it is
both disconnected from the supply and it is
cool, this not only avoids smears but also
reduces the likelihood of any harm from either
moisture entering the pendant or from skin
contacting the very hot underside.
Both the appearance and performance of your
pendant can benefit from regular cleaning. A
damp cloth is normally adequate to clean the
body. Excessive deposits of salt on the
underside can reduce light output and are a
sign that the pendant is too close to the
aquarium. These can be removed with the
careful use of a wet cloth ensuring that water
does not enter the pendant body.
Always remove lamps before cleaning the
special anodised reflector material. Dark ‘sootlike’ deposits can be easily removed and will
ensure optimum light output. Don’t forget to
remove all fingerprints from metal halide lamps
before re-installing them.
Replacement Parts
For a list of replacement parts available, please
refer to the Arcadia Products website for the
most up to date information.
Instructions d’installation
LISEZ ET SUIVEZ ATTENTIVEMENT
LES INSTRUCTIONS
D'INSTALLATION
DANGER - Pour éviter la possibilité de décharges
électriques, il est essentiel de faire attention à
cause de la présence de l’eau. Dans les
circonstances ci-dessous, ne tentez jamais de faire
des réparations vous-même. Retournez l’appareil à
un service de réparations autorisé, ou bien jeter-le.
CONSERVEZ CES INSTRUCTIONS
Ce produit est conçu pour un usage intérieur, pour
l’éclairage d’aquariums et de vivariums. Le respect
de ces instructions garantit un fonctionnement
durable et sans risque de l’appareil. Le non-respect
de ces instructions peut engendrer des blessures
graves ou des dysfonctionnements.
En cas de doute sur l'installation ou le
fonctionnement de ce produit, veuillez consulter
un électricien agréé compétent.
Vérifiez que la puissance et les caractéristiques
assignées de fréquence sur l’étiquette du
produit sont compatibles avant de continuer.
ATTENTION : - Pour éviter les blessures, il faut
respecter les précautions de sécurité
fondamentales, y compris les suivantes :
1. Attention ! Débranchez tous les appareils
dans l’aquarium avant de toucher l’eau ou
d’entretenir le luminaire.
2. Soutenez toujours le luminaire lors de régler
son hauteur et empêchez-le physiquement
de tomber dans le bac ou dans l’eau.
3. Faites fonctionner le luminaire uniquement
au moins 20 cm au-dessus du niveau le plus
haut possible de l’eau.
4. Ne faites pas fonctionner le luminaire à une
distance inférieure à 50 cm du plafond.
5. N'utilisez pas le luminaire dans un aquarium
fermé ou comportant un couvercle.
6. Vérifiez régulièrement la sécurité de tous les
composants de votre mécanisme de suspension.
Voir la figure 1
7. Le luminaire peut devenir très CHAUD. Ne
jamais touchez l’appareil lors d’opération et
attendez qu’il refroidisse avant de l’entretenir.
F
8. Émission nocive d’UV ! Ne jamais faire
fonctionner l’appareil sans l’écran protecteur.
Remplacez tout écran fêlé.
9. N’utilisez pas de lampes défectueuses ni à la
fin de leur durée de vie – cela peut
endommager le circuit. Remplacez chaque
lampes tout de suite d’une lampe du type et
puissance appropriés. Nous vous conseillons
de garder des lampes en réserve.
Installation physique
Sélectionnez un emplacement approprié près
d'une prise de courant. Vous devez tenir compte
de l'intensité du courant de la prise électrique et
de la solidité du plafond ou du mur sur lequel
doit être fixé le luminaire.
Ne pas mettre le luminaire sous tension
pendant l’installation. Le luminaire est conçu
pour un usage intérieur et doit être
uniquement placé au-dessus d’un aquarium, au
moins 20 cm au-dessus du niveau le plus haut
possible de l’eau.
Voir la figure 2
Ce luminaire n’a pas de moyen spécial de
protection contre l’humidification et doit donc
rester sec et être situé dans un endroit ventilé, à
l’écart d’autres sources de chaleur.
De préférence, installez votre luminaire
suspendu au-dessus d’une espace vide et libre.
Cependant, si vous l’installez au-dessus d’un
aquarium actuel, prenez bien garde de le
protéger de poussière, d’outils ou de la chute de
tout autre objet.
Assurez-vous que la lumière se dirige
uniquement vers l’eau dans l’aquarium. Évitez les
fuites de lumière à l’extérieur de l’aquarium :
l’exposition directe aux rayons peut causer de
graves dommages oculaires en quelques minutes.
Les luminaires suspendus sont lourds ; assurezvous de l’aptitude de vos attaches et la position
de fixation au mur ou au plafond.
Si le plafond n’est pas convenable, grâce à son
hauteur ou sa construction, vous pouvez utiliser
le support ‘Wall Mount’ d’Arcadia pour monter
votre luminaire au mur.
6
F
Instructions d’installation
Kit de suspension métallique :
L’appareil doit être équipé d’un fusible approprié.
Comprend les pièces suivantes :
Avant d’installer le luminaire, assurez-vous que
les caractéristiques assignées de la puissance et
des fréquences sont compatibles avec ceux de
votre réseau alimentation, et que la prise du
câble principal est tout à fait compatible avec vos
prises de courant. Au cas de doute, veuillez
retourner l’appareil au vendeur pour vérification.
A. Attache de plafond
B. Culot à vis
C. Suspension métallique avec perle isolante
D. Monture à réglage rapide
Les centres de fixation pour cette méthode
peuvent se varier, mais nous conseillons une
distance entre ces centres d’à peu près 2/3 de
la longueur du luminaire suspendu. Le support
de la monture à réglage rapide est facile à
déplacer et à glisser en place.
Important ! : Fusibles.
Lors d’allumer les lampes à décharge, le
courant tire de l’alimentation peut entre
analyse comme suite :
Courant d’appel – pendant quelques millisecondes
Les tailles de vis MINIMALES suivantes doivent
être utilisées pour fixer le luminaire :
Courant de démarrage – pendant quelques
minutes
• Vis usinées M5. Les vis M5 s'emboîtent
directement dans le barillet de tension.
Courant de fonctionnement – après la
stabilisation de la lampe
• Vis à bois (à queue) de 4 mm x 50 mm de long.
Le fusible qui protège le circuit doit être capable
de résister tous ces courants, dont celui d’appel
est normalement les plus onéreux (jusqu'à 25 fois
le courant de démarrage). Un déclenchement
intempestif est possible auprès de quelques
appareils modernes de dispositifs limiteurs, qui ne
sont donc pas convenables. Demandez des
conseils du fabricant de fusibles ou du
disjoncteur. Une augmentation du calibre de
fusible peut nécessiter un changement
correspondant des dimensions du câble.
Assurez une fixation sure à votre plafond par le
moyen approprié (à vis ou à boulon). Passez le
fils de suspension par le culot à vis afin que la
perle isolante reste à l’intérieur. Serrez le culot
dans l’attache du plafond, de préférence avec
une clé pour éviter des accidents. Vous devrez
tenir l’attache d’une pince avec un chiffon doux
pour éviter des rayures.
Ayant installé les fils de suspension, passez-les
par les boutons sur la partie supérieure des
montures à réglage rapide, ce qui tiendra les fils
en place. Pour baisser le luminaire, soutenez-le
d’un bout à la fois, et déclenchez le fils en
poussant le bouton sur la monture. Pour lever
le luminaire, soutenez-le et tirez le fils par le
trou dans le côté des montures.
Lors de régler la hauteur du luminaire, assurezvous toujours qu’il y a suffisamment de fils pour
atteindre la hauteur voulue. Toujours laissez
visible au moins 10 mm de fils. On peut souvent
cacher un excès de fils dans la rainure de la
surface supérieure. Enroulez du ruban cache
autour du fils avant de le couper avec une pince
coupante de côté renforcée et bien aiguisée.
Installation électrique
Reliez l’appareil à la terre et équipez le circuit
d’un fusible approprié.
7
Les calibres actuels ci-dessus s’appliquent
également à tout appareil de connexion au(x)
circuit(s) (ex minuteur) ou qui contrôle le(s) circuit(s).
Assurez-vous de la calibration appropriée de
votre alimentation domestique.
INSTRUCTIONS POUR MISE A TERRE
Il faut relier l’appareil à la terre pour minimiser
les décharges électriques. Cet appareil est
fourni d’un cordon électrique de type
conducteur de terre et une terre prise de
masse. Celle-ci doit être reliée à une prise de
courant installée et mise à terre conforme à
tous les codes et règlements appropriés.
Instructions de sécurité et d'entretien
IMPORTANT !
TOUJOURS SUIVEZ
SCRUPULEUSEMENT LES
INSTRUCTIONS.
ATTENTION : - Pour éviter les blessures, il faut
respecter les précautions de sécurité
fondamentales, y compris les suivantes :
LISEZ ET SUIVEZ ATTENTIVEMENT
TOUTES LES INSTRUCTIONS DE
SECURITE !
DANGER - Pour éviter la possibilité de
décharges électriques, il est essentiel de faire
attention à cause de la présence
de l’eau. Dans les circonstances ci-dessous, ne
tentez jamais de faire des réparations vousmême. Retournez l’appareil à un service de
réparations autorisé, ou bien jeter-le.
1. Si l’appareil tombe dans l’eau, NE PAS le
toucher ! Débrancher avant de l’enlever. Au
cas de contact avec de l’eau des composants
électriques, débrancher l’appareil tout de suite.
F
prolongateur) pour empêcher l’eau de
traverser le cordon et établir contact avec le
récipient. Voir la figure 3
Il faut bien surveiller l’emploi d’un appareil par
ou près des enfants.
Pour éviter des blessures, ne pas toucher les
pièces en mouvement ou les pièces chaudes,
telles que les appareils de chauffage, les
réflecteurs et les ampoules.
Toujours débrancher un appareil quand il est hors
de service, avant d’ajouter ou d’enlever des pièces,
et avant de le nettoyer. Ne jamais tirer sur le
cordon pour débrancher la fiche d’alimentation ; il
faut tenir et tirer la fiche elle-même.
N’utilisez ce réflecteur que pour l’intention
voulue. L’emploi d’accessoires non-Arcadia n’est
pas recommandé et peut engendrer une
condition dangereuse.
Ne pas installer ou garder l’appareil dans des
conditions d’exposition au temps ou aux
températures au-dessous de zéro.
Assurez-vous que le réflecteur est bien monté
sur le bac avant de l’opérer.
2. Au cas de toute fuite anormale d’eau,
débrancher l’appareil tout de suite.
Lisez et suivez scrupuleusement toutes les
affiches importantes sur l’appareil.
3. Inspecter soigneusement l’appareil après son
installation. Ne pas brancher si vous remarquez
de l’eau sur des parties qui doivent rester sèches.
S’il faut un cordon prolongateur, vérifiez ses
caractéristiques assignées. Un cordon assigné
pour moins d’ampères ou de watts que l’appareil
peut surchauffer. Il faut positionner le cordon
soigneusement pour éviter des accidents.
4. Ne pas opérer l’appareil au cas de
détérioration d’un cordon ou d’une prise, de
mauvais fonctionnement ou de toute chute
ou dommage. Au cas de détérioration du
câble ou cordon flexible, ce doit être
remplacé exclusivement par le fabricant ou
son agent de service, ou par un électricien
confirmé, afin d’éviter tout danger.
5. Positionnez le support du bac et le bac luimême au même côté d’un récipient monté
au mur afin de protéger le récipient ou la
prise contre les gouttes d’eau. Pour chaque
cordon liant un appareil de bac à un
récipient, il faut créer un anneau
d’écoulement ; c’est-à-dire la partie du
cordon en dessous du niveau du récipient
(ou le connecteur dans le cas d’un cordon
Ce produit est conçu uniquement pour
un usage intérieur
Installation des Lampes
Après une série de tests en laboratoire, les
lampes et écrans protecteurs sont normalement
enlevés et emballés séparément pour éviter toute
avarie en cours de route. L’entretien normal de
l’appareil pourra s’effectuer en laissant le
réflecteur au-dessus de l’aquarium mais il est
préférable, à ce stade, de réinstaller les lampes
et écrans avant de monter l’appareil.
Ecrans protecteurs : Voir la figure 4.
Pour protéger contre l’humidification,
l’explosion d’une lampe ou les UV :
8
F
Instructions de sécurité et d'entretien
Ne jamais faire fonctionner le luminaire
suspendu sans l’écran protecteur, et remplacer
immédiatement tout écran fêlé. Les lampes HQI
utilisent un écran spécial en verre.
Utilisez uniquement la lampe recommandée
pour l’appareil.
Pour l’installation et désinstallation des lampes
suivantes :
Lampes HQI :
Prenez garde de ne pas toucher les lampes et
enlever toute tache ou empreinte digitale avec de
l’alcool ou l’alcool dénaturé et un chiffon propre.
Lors d’installer une lampe, il peut être plus
facile de la tenir dans un chiffon propre ou un
kleenex, tout en évitant l’entrée de fibres isolés.
Serrez bien, mais sans force excessive.
Les HQIs avec douilles Rx7 (150 W)
Positionnez une extrémité de la lampe sur un
des contacts de douille, puis poussez la lampe
contre le contact pour créer suffisamment
d’espace pour positionner l’autre extrémité de
la lampe sur le contact correspondant.
Voir la figure 5
Pour enlever une lampe 150 W, répétez en
l’ordre inverse.
Diagnostique
Lampes HQI :
Il faut aux lampes à décharge d’intensité
exceptionnelle, telles que Ies HQIs, 2 à 4 minutes
après l’allumage pour atteindre leur température
d’exploitation et intensité maximale (temps de
démarrage). Une fois éteinte, la lampe devra se
refroidir (5 à 10 minutes) avant de pouvoir se
rallumer (temps de??)
LEDs:
Ces lampes ne requièrent aucune maintenance
au cours de leur durée de vie. Si elles ne
s'allument pas, merci de les retourner à Classica
pour réparation.
Si le luminaire ne s’allume pas :
Vérifiez que l’appareil est sous tension (vérifier
l’interrupteur au mur et celui sur le minuteur).
Vérifiez la compatibilité des lampes (puissance,
type et longueur) avec le luminaire.
9
Vérifiez la compatibilité des lampes (puissance,
type et longueur) avec le luminaire.
Entretien
Attention ! Débranchez tous les appareils dans
l’aquarium avant de toucher l’eau ou
d’entretenir le luminaire.
Soutenez toujours le luminaire lors de régler
son hauteur et empêchez-le physiquement de
tomber dans le bac ou dans l’eau.
Vérifiez régulièrement la sécurité de tous les
composants de votre mécanisme de suspension.
Nettoyage : Nettoyez le luminaire uniquement
lorsqu’il est hors de tension et froid, pour éviter
des taches ainsi que des dommages causés par
l’humidification de l’intérieur de l’appareil, ou
des brûlures de peau.
Un nettoyage régulier entretient l’aspect et les
performances de votre luminaire.
Normalement, il suffit de nettoyer la coque de
l’appareil à l’aide d’un chiffon humide. Des
dépôts excessifs de sel sur la partie inférieure
peuvent réduire l’intensité lumineuse. Éliminez
ces dépôts à l’aide d’un chiffon humide, en
prenant garde de ne pas humidifier l’intérieur
de l’appareil, et repositionnez le luminaire un
peu plus loin de l’eau.
Toujours enlevez les lampes avant de nettoyer le
matériel anodisé. Des dépôts ayant l’aspect de
la suie sont faciles à enlever pour assurer la
meilleure intensité lumineuse. N’oubliez pas
d’enlever toute empreinte digitale des lampes
HQI avant de les remettre en place.
Pièces de rechange
Pour une liste des pièces de rechange
disponibles et les toutes dernières informations,
consultez notre site de Web.
Installationsanleitung
ALLE INSTALLATIONSANLEITUNGEN
DURCHLESEN UND BEFOLGEN
GEFAHR - Zur Vermeidung von Stromschlägen
besondere Sorgfalt walten lassen, da beim Einsatz
von Aquariumsgeräten Wasser benutzt wird. In
folgenden Situationen keine eigenen Reparaturen
vornehmen, sondern das Gerät immer an eine
autorisierte Wartungsstelle schicken oder entsorgen:
DIESE ANLEITUNGEN AUFBEWAHREN.
Dieses Produkt ist nur für die Verwendung in
Innenräumen und die Beleuchtung von Aquarien
und Terrarien vorgesehen. Es bietet einen guten,
sicheren Betrieb und eine lange Lebensdauer,
sofern diese Anleitungen befolgt werden. Eine
Missachtung der Anleitungen kann schwere
Verletzungen oder Sachschäden zur Folge haben.
Im Falle von Fragen zur Installation oder
Verwendung dieses Produkts sollten Sie einen
qualifizierten und erfahrenen Elektriker zu Rate
ziehen.
Bevor Sie fortfahren, sollten Sie sicherstellen,
dass die Nennwerte für Spannung und Frequenz
auf dem Produktschild mit Ihrer
Stromversorgung übereinstimmen.
WARNUNG - Zum Schutz vor Verletzungen sind
prinzipielle Sicherheitsvorkehrungen zu
beachten, und zwar u.a.:
1. Vorsicht! Alle Geräte im Aquarium vom
Netzstrom trennen, bevor Sie Ihre Hände ins
Wasser tauchen oder die Hängeleuchte warten.
2. Die Hängeleuchte bei der Höhenverstellung
immer festhalten, um zu verhindern, dass sie
auf das Aquarium oder ins Wasser fällt.
3. Hängeleuchte nicht weniger als 20 cm über
dem höchstmöglichen Wasserstand des
Aquariums aufhängen.
4. Hängeleuchte mit einem Mindestabstand
von 50cm zur Decke verwenden.
5. Hängeleuchte nicht in einem geschlossenen
oder abgedeckten Aquarium verwenden.
6. Alle Teile der Aufhängvorrichtung regelmäßig
auf ihre Sicherheit überprüfen.
Siehe Abbildung 1
7. Die Leuchte kann sich stark ERHITZEN. Eine
Leuchte in Betrieb niemals berühren. Vor
D
Wartungsarbeiten genügend Zeit verstreichen
lassen, bis die Leuchte sich abgekühlt hat.
8. Schädliche UV-Strahlen! Hängeleuchte niemals
ohne Schutzabdeckung verwenden.
Beschädigte Abdeckungen umgehend ersetzen.
9. Hängeleuchte nicht mit defekten oder
überalterten Lampen verwenden - das könnte
die Elektrik beschädigen. Lampen umgehend
durch ein neues Modell der korrekten Art und
Wattzahl ersetzen. Es empfiehlt sich,
Ersatzlampen vorrätig zu haben.
Physische Installation
Einen geeigneten Standort in der Nähe Ihrer
Stromversorgung wählen. Stromleistung der
Steckdose und die Stärke der Zimmerdecke
oder -wand berücksichtigen.
Die Leuchte während der Installation nicht an
eine Stromquelle anschließen. Die Leuchte ist
nur für die Verwendung in Innenräumen
vorgesehen und muss mit mindestens 20 cm
Abstand zum höchstmöglichen Wasserstand
über dem Aquarium angebracht werden.
Siehe Abbildung 2
Diese Leuchte besitzt keine speziellen
Wasserschutzvorrichtungen und sollte stets
trocken, gut belüftet und entfernt von anderen
Wärmequellen gehalten werden.
Idealerweise sollte der Bereich unter der
Hängeleuchte bei der Installation völlig frei
liegen. Wenn Sie die Leuchte jedoch über
einem vorhandenen Aquarium installieren, ist
dieses vor Bohrstaub, Werkzeug oder anderen
fallenden Gegenständen zu schützen.
Sicherstellen, dass das Licht der Leuchte nur auf
das Wasser im Aquarium fällt. Das Licht nicht
nach außen dringen lassen, da die direkte
Lichteinstrahlung einiger Lampen nach mehr als
ein paar Minuten das Auge verletzen kann.
Die Hängeleuchten sind schwer, deshalb
sicherstellen, dass die Befestigungsteile sowie der
Befestigungspunkt an Wand oder Decke dafür
geeignet sind.
Wenn eine Deckenmontage aufgrund der Höhe
oder Bauweise der Decke nicht möglich ist,
können Hängeleuchten mit den Wandhalterungen
von Arcadia auch an der Wand montiert werden.
10
D
Installationsanleitung
Aufhänge-Set:
Das Set enthält folgende Teile:
A. Deckenbefestigung
B. Schraubkappe
C. Aufhängedraht mit Endwulst
D. Verstellbare Halterung
Der Abstand der Befestigungspunkte kann
variieren, aber wir empfehlen einen Abstand
von rund 2/3 der Länge der Hängeleuchte. Das
Befestigungsteil für die verstellbare Halterung
lässt sich leicht verschieben und in der
gewünschten Position arretieren.
Zur Befestigung des Aufhängesystems sollten
Schrauben mit folgenden MINDESTGRÖSSEN
verwendet werden:
• M5 Kopfschrauben. M5 Schrauben passen
direkt in den Decken-Hängezylinder.
• Holzschrauben, 50mm (L) x 4mm (Schaft).
Die Deckenbefestigungen mit der geeigneten
Methode (Schrauben oder Bolzen und Muttern)
sicher an der Decke anbringen. Den Hängedraht
durch die Schraubkappe führen, so dass der
Endwulst innen sitzt. Die Schraubkappe fest in die
Deckenbefestigung einschrauben. Es empfiehlt
sich, dafür einen Schraubenschlüssel zu
verwenden, damit sich die Kappe nicht
versehentlich lösen kann. Die Deckenbefestigung
dabei mit einer Zange festhalten (ein weiches Tuch
dazwischen legen, um Kratzer zu vermeiden).
Nach Installation der beiden Aufhängedrähte
diese durch die Knöpfe oben in den verstellbaren
Halterungen führen, so dass sie automatisch in
Position gehalten werden. Zum Herabsenken der
Hängeleuchte diese jeweils an einem Ende
festhalten, den Knopf am anderen Ende drücken
und dadurch den Draht freigeben. Zum
Höherstellen der Hängeleuchte diese festhalten
und den Draht durch das Loch seitlich in den
verstellbaren Halterungen ziehen.
Beim Verstellen der Hängeleuchte stets
sicherstellen, dass genügend Draht für die
beabsichtigte Höhe vorhanden ist. Immer
mindestens 10 mm Draht überstehen lassen.
Überschüssige Drahtlängen lassen sich oft im
Kanal auf der Oberseite verstecken. Beim
Kürzen des Drahts diesen mit Abdeckband
11
umwickeln und mit einem scharfen, starken
Seitenschneider durchtrennen.
Elektrische Installation
Dieses Gerät muss geerdet und durch eine
geeignete Sicherung geschützt sein.
Diese Einheit muss durch eine geeignete
Sicherung geschützt sein.
Vor der Installation sicherstellen, dass die Nennwerte
für Spannung und Frequenz der Leuchte mit denen
Ihrer Stromversorgung übereinstimmen und dass der
Netzstecker mit Ihrer Netzsteckdose kompatibel ist.
Im Zweifelsfall entsprechende Informationen von
Ihrem Händler einholen.
Wichtig: Sicherung.
Die Stromaufnahme beim Einschalten von
Entladungslampen lässt sich wie folgt unterteilen:
Einschaltstoßstrom - für wenige Millisekunden
Anlaufstrom - für einige Minuten
Betriebsstrom - nach Stabilisierung des
Lampenbetriebs.
Die verwendete Sicherung muss alle obigen Stromstärken bewältigen können, wobei der
Einschaltstoß-strom zumeist der stärkste ist (bis
zum 25-Fachen des Anlaufstroms). Deshalb
unbedingt eine Sicherung mit korrekter
Nennleistung verwenden. Einige moderne
Strombegrenzungssicherungen können
Störauslösungen verursachen und sind eventuell
ungeeignet. Im Zweifelsfall den Hersteller Ihrer
Sicherung bzw. Ihres Schutzschalters zu Rate
ziehen. Bei Verwendung stärkerer Sicherungen
muss auch die Leistungsauslegung des Netzkabels
überprüft und gegebenenfalls angepasst werden.
Die obigen Stromstärken gelten auch für
etwaige Zeitschalter in der Elektrik oder andere
Schalteinrichtungen zur Steuerung der Elektrik.
Unbedingt sicherstellen, dass Ihr Stromnetz die
korrekte Nennleistung aufweist.
ERDUNGSANLEITUNGEN
Dieses Gerät sollte geerdet werden, um das
Risiko von Stromschlägen zu minimieren. Das
Stromkabel des Geräts ist mit einem Erdleiter
und einem Erdungsstecker versehen. Der Stecker
ist an eine Steckdose anzuschließen, die
vorschriftsmäßig installiert und geerdet wurde.
Sicherheits- und Wartungsanleitungen
WICHTIG
BITTE DIESE ANLEITUNGEN
IMMER BEFOLGEN.
WARNUNG - Zum Schutz vor Verletzungen sind
prinzipielle Sicherheitsvorkehrungen zu
beachten, und zwar u.a.:
ALLE SICHERHEITSANLEITUNGEN
DURCHLESEN UND BEFOLGEN
GEFAHR - Zur Vermeidung von Stromschlägen
besondere Sorgfalt walten lassen, da beim
Einsatz von Aquariumsgeräten Wasser benutzt
wird. In folgenden Situationen keine eigenen
Reparaturen vornehmen, sondern das Gerät
immer an eine autorisierte Wartungsstelle
schicken oder entsorgen:
1. Sollte das Gerät ins Wasser fallen, NICHT
danach greifen! Erst den Stecker ziehen,
dann das Gerät herausnehmen. Wenn
elektrische Teile des Gerätes nass werden,
sofort den Stecker aus der Steckdose ziehen.
2. Sollte das Gerät Anzeichen ungewöhnlicher
Wasserundichte aufweisen, sofort den
Stecker aus der Steckdose ziehen.
D
„Tropfenschleife“ ist der Teil des Kabels
unterhalb der Höhe der Steckdose oder der
Anschlussdose eines Verlängerungskabels, der
verhindert, dass Wasser das Kabel entlang
kriechen und in Kontakt mit der Steckdose
kommen kann. Siehe Abbildung 3
Sorgfältige Aufsicht ist notwendig, wenn ein Gerät
von Kindern oder in deren Nähe benutzt wird.
Um Verletzungen zu vermeiden, sollten bewegliche
oder heiße Teile wie Heizer, Reflektoren,
Glühbirnen u.ä. nicht berührt werden.
Bei Nichtbenutzung des Geräts, vor An- oder
Abbau von Teilen und vor der Reinigung
grundsätzlich den Stecker aus der Steckdose
ziehen. Dabei niemals am Kabel ziehen, sondern
den Stecker anfassen und herausziehen.
Diese Leuchte nur für ihren vorgesehenen Zweck
benutzen. Die Verwendung von Zubehör oder
Anbaugeräten, die nicht von Arcadia verkauft
werden, ist nicht empfehlenswert und kann zu
einem unsicheren Betriebszustand führen.
Das Gerät nicht an Orten installieren oder
lagern, wo es Witterungs-einflüssen oder
Temperaturen unter dem Gefrierpunkt
ausgesetzt wird.
3. Das Gerät nach dem Einbau sorgfältig
untersuchen und nicht an die Stromversorgung
anschließen, wenn sich Wasser auf Teilen zeigt,
die nicht nass werden dürfen.
Vor Betrieb der Leuchte überprüfen, dass sie
sicher über dem Aquarium befestigt ist.
4. Gerät unter folgenden Umständen nicht
einschalten: bei beschädigtem Netzkabel oder
Stecker, im Falle von Funktionsstörungen oder
wenn es fallengelassen oder anderweitig
beschädigt wurde.
Ist das Netzkabel oder der Stecker dieser
Leuchte beschädigt, sollte das defekte Teil aus
Sicherheitsgründen nur von dem Hersteller,
seinem Kundendienstvertreter oder einem
ähnlich qualifizierten Fachmann ersetzt werden.
Bei Verwendung eines Verlängerungs-kabels stets
ein Kabel der richtigen Leistungsstufe wählen. Ein
Kabel mit geringerer Ampere- oder Wattzahl als
das Gerät kann sich überhitzen. Außerdem das
Kabel so verlegen, dass es keine Zug- oder
Stolpergefahr darstellt.
5. Um Gerätestecker und Steckdose vor Nässe zu
schützen, das Aquarium so neben einer
Wandsteckdose aufstellen, dass kein Wasser auf
Steckdose oder Stecker tropfen kann. Für jedes
Verbindungskabel zwischen Aquariumsgerät
und Steckdose sollte eine „Tropfenschleife“
(siehe Abbildung unten) gebildet werden. Die
Bitte alle wichtigen Hinweise auf dem Gerät
lesen und beachten.
Dieses Produkt ist nur für die Verwendung
in Innenräumen vorgesehen.
Installation der Leuchtstoffröhre
Normalerweise werden die Hängeleuchte(n)
und die Schutzabdeckung(en) nach den
Werktests zerlegt und im Karton getrennt
verpackt, um Transport-schäden zu vermeiden.
Obwohl die üblichen Wartungs-maßnahmen
später bei hängender Leuchte stattfinden, ist es
zu Beginn leichter, zunächst die Lampe(n) und
12
D
Sicherheits- und Wartungsanleitungen
die Schutzabdeckung(en) anzubringen und
dann die komplette Leuchte zu installieren.
Schutzabdeckungen: Siehe Abbildung 4
Zum Schutz gegen eindringendes Wasser,
Explosion der Lampe und UV-Strahlen:
Die Hängeleuchte niemals ohne die
Schutzabdeckung verwenden und beschädigte
Abdeckungen umgehend ersetzen. HalogenMetalldampflampen haben eine spezielle
Schutzabdeckung aus Glas.
Nur den empfohlenen Lampentyp für Ihre
Einheit benutzen.
Anleitungen zum Ein- und Ausbau der
folgenden Lampentypen:
Halogen-Metalldampflampen:
Die Lampe möglichst nicht mit den Fingern
berühren und etwaige Spuren oder
Fingerabdrücke mit Ethanol oder Spiritus und
einem sauberen Lappen entfernen. Es ist u.U.
leichter, die Lampe bei der Installation mit
einem sauberen Lappen oder Papiertuch
festzuhalten, wobei jedoch keine losen Fasern
eingeklemmt werden dürfen. Alle HalogenMetalldampfleuchten fest, aber ohne starken
Kraftaufwand einsetzen.
Halogen-Metalldampflampe mit Sockel Rx7s
(150 W)
Ein Ende der Lampe auf einen der gefederten
Fassungskontakte setzen und die Lampe
dagegen drücken, bis Sie genügend Spielraum
haben, um das andere Ende in die Fassung
gegenüber einzusetzen. Siehe Abbildung 5
Zum Entfernen einer 150-W-Lampe in
umgekehrter Reihenfolge vorgehen.
Fehlerbehebung
Halogen-Metalldampflampen:
Leistungsstarke Entladungslampen wie HalogenMetalldampflampen benötigen nach der Zündung 2
bis 4 Minuten, bis sie ihre volle Betriebstemperatur
und Lichtleistung erreichen (Anlaufzeit). Nach dem
Ausschalten müssen sich die Lampen 5 bis 10
Minuten abkühlen, bevor sie wieder gezündet
werden können (Wiederzündungszeit).
13
LEDs:
Benötigen keine Instandhaltung für das Leben des
Produktes. Wenn die LEDs kein Licht ausgeben,
bitte die zu Classica für Wartung zurückschicken.
Die Leuchte brennt nicht:
Überprüfen, dass die Stromversorgung über die
Wandsteckdose angeschlossen und am
Zeitschalter eingeschaltet ist.
Überprüfen, dass die Nennspannung Ihrer
Leuchte mit Ihrer Netzspannung übereinstimmt.
Überprüfen, dass Wattzahl, Typ und Länge der
Lampen für Ihre Leuchte geeignet sind.
Wartung
Vorsicht! Alle Geräte im Aquarium vom
Netzstrom trennen, bevor Sie Ihre Hände ins
Wasser tauchen oder die Hängeleuchte warten.
Die Hängeleuchte bei der Höhenverstellung
immer festhalten, um zu verhindern, dass sie
auf das Aquarium oder ins Wasser fällt.
Alle Teile der Aufhängvorrichtung regelmäßig
auf ihre Sicherheit überprüfen.
Reinigung: Die Hängeleuchte nur reinigen,
wenn sie vom Netzstrom getrennt und ganz
abgekühlt ist. Das verhindert nicht nur
Schlieren, sondern reduziert auch das Risiko von
Schäden durch eindringende Feuchtigkeit oder
Verletzung der Haut durch Berührung mit der
sehr heißen Unterseite.
Aussehen und Leistung Ihrer Hängeleuchte
bleiben durch regelmäßige Reinigung längerfristig
erhalten. Für die Reinigung des Gehäuses genügt
gewöhnlich ein feuchtes Tuch. Starke
Salzablagerungen an der Unterseite können die
Lichtleistung reduzieren und deuten darauf hin,
dass die Leuchte zu dicht über dem Aquarium
hängt. Ablagerungen lassen sich vorsichtig mit
einem feuchten Tuch entfernen (sicherstellen,
dass kein Wasser in das Gehäuse eindringt).
Vor Reinigung des speziellen eloxierten
Reflektormaterials stets die Lampen entfernen.
Dunkle „rußartige“ Ablagerungen lassen sich
leicht entfernen, was eine optimale
Lichtleistung sicherstellt. Bitte vor dem erneuten
Einsetzen von Halogen-Metalldampfleuchten
sämtliche Fingerabdrücke abwischen.
Ersatzteile
Eine Liste von Ersatzteilen und aktuelle
Informationen finden Sie auf der Arcadia-Website.
www.classica-aqua.com
Classica Division, Arcadia Products plc, 8, The I/O Centre, Salbrook Road, Salfords, Redhill, Surrey, RH1 5DY
JB52